#install mongodb docker image
Explore tagged Tumblr posts
Visit Tumblr Blog
Explore Tumblr blogs with no restrictions, modern design and the best experience.
Last Seen Tumblr Blogs


Fun Fact
Tumblr was named as a finalist in Lead411’s New York City Hot 125 in Aug 2010.
Text
Graylog Docker Compose Setup: An Open Source Syslog Server for Home Labs
Graylog Docker Compose Install: Open Source Syslog Server for Home #homelab GraylogInstallationGuide #DockerComposeOnUbuntu #GraylogRESTAPI #ElasticsearchAndGraylog #MongoDBWithGraylog #DockerComposeYmlConfiguration #GraylogDockerImage #Graylogdata
A really great open-source log management platform for both production and home lab environments is Graylog. Using Docker Compose, you can quickly launch and configure Graylog for a production or home lab Syslog. Using Docker Compose, you can create and configure all the containers needed, such as OpenSearch and MongoDB. Let’s look at this process. Table of contentsWhat is Graylog?Advantages of…

View On WordPress
#Docker Compose on Ubuntu#docker-compose.yml configuration#Elasticsearch and Graylog#Graylog data persistence#Graylog Docker image#Graylog installation guide#Graylog REST API#Graylog web interface setup#log management with Graylog#MongoDB with Graylog
0 notes
Text
#youtube#video#codeonedigest#microservices#microservice#docker#springboot#spring boot#mongodb configuration#mongodb docker install#spring boot mongodb#mongodb compass#mongodb java#mongodb#dockercontainers#docker image#docker container#docker tutorial#dockerfile#spring boot microservices#java microservice#microservice tutorial
0 notes
Text
Docker Tutorial for Beginners: Learn Docker Step by Step
What is Docker?
Docker is an open-source platform that enables developers to automate the deployment of applications inside lightweight, portable containers. These containers include everything the application needs to run—code, runtime, system tools, libraries, and settings—so that it can work reliably in any environment.
Before Docker, developers faced the age-old problem: “It works on my machine!” Docker solves this by providing a consistent runtime environment across development, testing, and production.
Why Learn Docker?
Docker is used by organizations of all sizes to simplify software delivery and improve scalability. As more companies shift to microservices, cloud computing, and DevOps practices, Docker has become a must-have skill. Learning Docker helps you:
Package applications quickly and consistently
Deploy apps across different environments with confidence
Reduce system conflicts and configuration issues
Improve collaboration between development and operations teams
Work more effectively with modern cloud platforms like AWS, Azure, and GCP
Who Is This Docker Tutorial For?
This Docker tutorial is designed for absolute beginners. Whether you're a developer, system administrator, QA engineer, or DevOps enthusiast, you’ll find step-by-step instructions to help you:
Understand the basics of Docker
Install Docker on your machine
Create and manage Docker containers
Build custom Docker images
Use Docker commands and best practices
No prior knowledge of containers is required, but basic familiarity with the command line and a programming language (like Python, Java, or Node.js) will be helpful.
What You Will Learn: Step-by-Step Breakdown
1. Introduction to Docker
We start with the fundamentals. You’ll learn:
What Docker is and why it’s useful
The difference between containers and virtual machines
Key Docker components: Docker Engine, Docker Hub, Dockerfile, Docker Compose
2. Installing Docker
Next, we guide you through installing Docker on:
Windows
macOS
Linux
You’ll set up Docker Desktop or Docker CLI and run your first container using the hello-world image.
3. Working with Docker Images and Containers
You’ll explore:
How to pull images from Docker Hub
How to run containers using docker run
Inspecting containers with docker ps, docker inspect, and docker logs
Stopping and removing containers
4. Building Custom Docker Images
You’ll learn how to:
Write a Dockerfile
Use docker build to create a custom image
Add dependencies and environment variables
Optimize Docker images for performance
5. Docker Volumes and Networking
Understand how to:
Use volumes to persist data outside containers
Create custom networks for container communication
Link multiple containers (e.g., a Node.js app with a MongoDB container)
6. Docker Compose (Bonus Section)
Docker Compose lets you define multi-container applications. You’ll learn how to:
Write a docker-compose.yml file
Start multiple services with a single command
Manage application stacks easily
Real-World Examples Included
Throughout the tutorial, we use real-world examples to reinforce each concept. You’ll deploy a simple web application using Docker, connect it to a database, and scale services with Docker Compose.
Example Projects:
Dockerizing a static HTML website
Creating a REST API with Node.js and Express inside a container
Running a MySQL or MongoDB database container
Building a full-stack web app with Docker Compose
Best Practices and Tips
As you progress, you’ll also learn:
Naming conventions for containers and images
How to clean up unused images and containers
Tagging and pushing images to Docker Hub
Security basics when using Docker in production
What’s Next After This Tutorial?
After completing this Docker tutorial, you’ll be well-equipped to:
Use Docker in personal or professional projects
Learn Kubernetes and container orchestration
Apply Docker in CI/CD pipelines
Deploy containers to cloud platforms
Conclusion
Docker is an essential tool in the modern developer's toolbox. By learning Docker step by step in this beginner-friendly tutorial, you’ll gain the skills and confidence to build, deploy, and manage applications efficiently and consistently across different environments.
Whether you’re building simple web apps or complex microservices, Docker provides the flexibility, speed, and scalability needed for success. So dive in, follow along with the hands-on examples, and start your journey to mastering containerization with Docker tpoint-tech!
0 notes
Text
Ansible and Docker: Automating Container Management
In today's fast-paced tech environment, containerization and automation are key to maintaining efficient, scalable, and reliable infrastructure. Two powerful tools that have become essential in this space are Ansible and Docker. While Docker enables you to create, deploy, and run applications in containers, Ansible provides a simple yet powerful automation engine to manage and orchestrate these containers. In this blog post, we'll explore how to use Ansible to automate Docker container management, including deployment and orchestration.
Why Combine Ansible and Docker?
Combining Ansible and Docker offers several benefits:
Consistency and Reliability: Automating Docker container management with Ansible ensures consistent and reliable deployments across different environments.
Simplified Management: Ansible’s easy-to-read YAML playbooks make it straightforward to manage Docker containers, even at scale.
Infrastructure as Code (IaC): By treating your infrastructure as code, you can version control, review, and track changes over time.
Scalability: Automation allows you to easily scale your containerized applications by managing multiple containers across multiple hosts seamlessly.
Getting Started with Ansible and Docker
To get started, ensure you have Ansible and Docker installed on your system. You can install Ansible using pip: pip install ansible
And Docker by following the official Docker installation guide for your operating system.
Next, you'll need to set up an Ansible playbook to manage Docker. Here’s a simple example:
Example Playbook: Deploying a Docker Container
Create a file named deploy_docker.yml:
---
- name: Deploy a Docker container
hosts: localhost
tasks:
- name: Ensure Docker is installed
apt:
name: docker.io
state: present
become: yes
- name: Start Docker service
service:
name: docker
state: started
enabled: yes
become: yes
- name: Pull the latest nginx image
docker_image:
name: nginx
tag: latest
source: pull
- name: Run a Docker container
docker_container:
name: nginx
image: nginx
state: started
ports:
- "80:80"
In this playbook:
We ensure Docker is installed and running.
We pull the latest nginx Docker image.
We start a Docker container with the nginx image, mapping port 80 on the host to port 80 on the container.
Automating Docker Orchestration
For more complex scenarios, such as orchestrating multiple containers, you can extend your playbook. Here’s an example of orchestrating a simple web application stack with Nginx, a Node.js application, and a MongoDB database:
---
- name: Orchestrate web application stack
hosts: localhost
tasks:
- name: Ensure Docker is installed
apt:
name: docker.io
state: present
become: yes
- name: Start Docker service
service:
name: docker
state: started
enabled: yes
become: yes
- name: Pull necessary Docker images
docker_image:
name: "{{ item }}"
tag: latest
source: pull
loop:
- nginx
- node
- mongo
- name: Run MongoDB container
docker_container:
name: mongo
image: mongo
state: started
ports:
- "27017:27017"
- name: Run Node.js application container
docker_container:
name: node_app
image: node
state: started
volumes:
- ./app:/usr/src/app
working_dir: /usr/src/app
command: "node app.js"
links:
- mongo
- name: Run Nginx container
docker_container:
name: nginx
image: nginx
state: started
ports:
- "80:80"
volumes:
- ./nginx.conf:/etc/nginx/nginx.conf
links:
- node_app
Conclusion
By integrating Ansible with Docker, you can streamline and automate your container management processes, making your infrastructure more consistent, scalable, and reliable. This combination allows you to focus more on developing and less on managing infrastructure. Whether you're managing a single container or orchestrating a complex multi-container environment, Ansible and Docker together provide a powerful toolkit for modern DevOps practices.
Give it a try and see how much time and effort you can save by automating your Docker container management with Ansible!
For more details click www.qcsdclabs.com
#redhatcourses#information technology#containerorchestration#container#linux#docker#kubernetes#containersecurity#dockerswarm#aws
0 notes
Text
How to Install MongoDB on Docker Container linux.
How to Install MongoDB on Docker Container linux.
Hi Guys! Hope you are doing well. Let’s Learn about “How to Install MongoDB on Docker Container Linux”. The Docker is an open source platform, where developers can package there application and run that application into the Docker Container. So It is PAAS (Platform as a Service), which uses a OS virtualisation to deliver software in packages called containers. The containers are the bundle of…

View On WordPress
#docker hub#install mongodb#install mongodb docker#install mongodb docker container#install mongodb docker image#install mongodb docker linux#install mongodb docker ubuntu#install mongodb on docker container#mongodb docker install#mongodb docker tutorial#run docker on mongodb container
0 notes
Photo

hydralisk98′s web projects tracker:
Core principles=
Fail faster
‘Learn, Tweak, Make’ loop
This is meant to be a quick reference for tracking progress made over my various projects, organized by their “ultimate target” goal:
(START)
(Website)=
Install Firefox
Install Chrome
Install Microsoft newest browser
Install Lynx
Learn about contemporary web browsers
Install a very basic text editor
Install Notepad++
Install Nano
Install Powershell
Install Bash
Install Git
Learn HTML
Elements and attributes
Commenting (single line comment, multi-line comment)
Head (title, meta, charset, language, link, style, description, keywords, author, viewport, script, base, url-encode, )
Hyperlinks (local, external, link titles, relative filepaths, absolute filepaths)
Headings (h1-h6, horizontal rules)
Paragraphs (pre, line breaks)
Text formatting (bold, italic, deleted, inserted, subscript, superscript, marked)
Quotations (quote, blockquote, abbreviations, address, cite, bidirectional override)
Entities & symbols (&entity_name, &entity_number,  , useful HTML character entities, diacritical marks, mathematical symbols, greek letters, currency symbols, )
Id (bookmarks)
Classes (select elements, multiple classes, different tags can share same class, )
Blocks & Inlines (div, span)
Computercode (kbd, samp, code, var)
Lists (ordered, unordered, description lists, control list counting, nesting)
Tables (colspan, rowspan, caption, colgroup, thead, tbody, tfoot, th)
Images (src, alt, width, height, animated, link, map, area, usenmap, , picture, picture for format support)
old fashioned audio
old fashioned video
Iframes (URL src, name, target)
Forms (input types, action, method, GET, POST, name, fieldset, accept-charset, autocomplete, enctype, novalidate, target, form elements, input attributes)
URL encode (scheme, prefix, domain, port, path, filename, ascii-encodings)
Learn about oldest web browsers onwards
Learn early HTML versions (doctypes & permitted elements for each version)
Make a 90s-like web page compatible with as much early web formats as possible, earliest web browsers’ compatibility is best here
Learn how to teach HTML5 features to most if not all older browsers
Install Adobe XD
Register a account at Figma
Learn Adobe XD basics
Learn Figma basics
Install Microsoft’s VS Code
Install my Microsoft’s VS Code favorite extensions
Learn HTML5
Semantic elements
Layouts
Graphics (SVG, canvas)
Track
Audio
Video
Embed
APIs (geolocation, drag and drop, local storage, application cache, web workers, server-sent events, )
HTMLShiv for teaching older browsers HTML5
HTML5 style guide and coding conventions (doctype, clean tidy well-formed code, lower case element names, close all html elements, close empty html elements, quote attribute values, image attributes, space and equal signs, avoid long code lines, blank lines, indentation, keep html, keep head, keep body, meta data, viewport, comments, stylesheets, loading JS into html, accessing HTML elements with JS, use lowercase file names, file extensions, index/default)
Learn CSS
Selections
Colors
Fonts
Positioning
Box model
Grid
Flexbox
Custom properties
Transitions
Animate
Make a simple modern static site
Learn responsive design
Viewport
Media queries
Fluid widths
rem units over px
Mobile first
Learn SASS
Variables
Nesting
Conditionals
Functions
Learn about CSS frameworks
Learn Bootstrap
Learn Tailwind CSS
Learn JS
Fundamentals
Document Object Model / DOM
JavaScript Object Notation / JSON
Fetch API
Modern JS (ES6+)
Learn Git
Learn Browser Dev Tools
Learn your VS Code extensions
Learn Emmet
Learn NPM
Learn Yarn
Learn Axios
Learn Webpack
Learn Parcel
Learn basic deployment
Domain registration (Namecheap)
Managed hosting (InMotion, Hostgator, Bluehost)
Static hosting (Nertlify, Github Pages)
SSL certificate
FTP
SFTP
SSH
CLI
Make a fancy front end website about
Make a few Tumblr themes
===You are now a basic front end developer!
Learn about XML dialects
Learn XML
Learn about JS frameworks
Learn jQuery
Learn React
Contex API with Hooks
NEXT
Learn Vue.js
Vuex
NUXT
Learn Svelte
NUXT (Vue)
Learn Gatsby
Learn Gridsome
Learn Typescript
Make a epic front end website about
===You are now a front-end wizard!
Learn Node.js
Express
Nest.js
Koa
Learn Python
Django
Flask
Learn GoLang
Revel
Learn PHP
Laravel
Slim
Symfony
Learn Ruby
Ruby on Rails
Sinatra
Learn SQL
PostgreSQL
MySQL
Learn ORM
Learn ODM
Learn NoSQL
MongoDB
RethinkDB
CouchDB
Learn a cloud database
Firebase, Azure Cloud DB, AWS
Learn a lightweight & cache variant
Redis
SQLlite
NeDB
Learn GraphQL
Learn about CMSes
Learn Wordpress
Learn Drupal
Learn Keystone
Learn Enduro
Learn Contentful
Learn Sanity
Learn Jekyll
Learn about DevOps
Learn NGINX
Learn Apache
Learn Linode
Learn Heroku
Learn Azure
Learn Docker
Learn testing
Learn load balancing
===You are now a good full stack developer
Learn about mobile development
Learn Dart
Learn Flutter
Learn React Native
Learn Nativescript
Learn Ionic
Learn progressive web apps
Learn Electron
Learn JAMstack
Learn serverless architecture
Learn API-first design
Learn data science
Learn machine learning
Learn deep learning
Learn speech recognition
Learn web assembly
===You are now a epic full stack developer
Make a web browser
Make a web server
===You are now a legendary full stack developer
[...]
(Computer system)=
Learn to execute and test your code in a command line interface
Learn to use breakpoints and debuggers
Learn Bash
Learn fish
Learn Zsh
Learn Vim
Learn nano
Learn Notepad++
Learn VS Code
Learn Brackets
Learn Atom
Learn Geany
Learn Neovim
Learn Python
Learn Java?
Learn R
Learn Swift?
Learn Go-lang?
Learn Common Lisp
Learn Clojure (& ClojureScript)
Learn Scheme
Learn C++
Learn C
Learn B
Learn Mesa
Learn Brainfuck
Learn Assembly
Learn Machine Code
Learn how to manage I/O
Make a keypad
Make a keyboard
Make a mouse
Make a light pen
Make a small LCD display
Make a small LED display
Make a teleprinter terminal
Make a medium raster CRT display
Make a small vector CRT display
Make larger LED displays
Make a few CRT displays
Learn how to manage computer memory
Make datasettes
Make a datasette deck
Make floppy disks
Make a floppy drive
Learn how to control data
Learn binary base
Learn hexadecimal base
Learn octal base
Learn registers
Learn timing information
Learn assembly common mnemonics
Learn arithmetic operations
Learn logic operations (AND, OR, XOR, NOT, NAND, NOR, NXOR, IMPLY)
Learn masking
Learn assembly language basics
Learn stack construct’s operations
Learn calling conventions
Learn to use Application Binary Interface or ABI
Learn to make your own ABIs
Learn to use memory maps
Learn to make memory maps
Make a clock
Make a front panel
Make a calculator
Learn about existing instruction sets (Intel, ARM, RISC-V, PIC, AVR, SPARC, MIPS, Intersil 6120, Z80...)
Design a instruction set
Compose a assembler
Compose a disassembler
Compose a emulator
Write a B-derivative programming language (somewhat similar to C)
Write a IPL-derivative programming language (somewhat similar to Lisp and Scheme)
Write a general markup language (like GML, SGML, HTML, XML...)
Write a Turing tarpit (like Brainfuck)
Write a scripting language (like Bash)
Write a database system (like VisiCalc or SQL)
Write a CLI shell (basic operating system like Unix or CP/M)
Write a single-user GUI operating system (like Xerox Star’s Pilot)
Write a multi-user GUI operating system (like Linux)
Write various software utilities for my various OSes
Write various games for my various OSes
Write various niche applications for my various OSes
Implement a awesome model in very large scale integration, like the Commodore CBM-II
Implement a epic model in integrated circuits, like the DEC PDP-15
Implement a modest model in transistor-transistor logic, similar to the DEC PDP-12
Implement a simple model in diode-transistor logic, like the original DEC PDP-8
Implement a simpler model in later vacuum tubes, like the IBM 700 series
Implement simplest model in early vacuum tubes, like the EDSAC
[...]
(Conlang)=
Choose sounds
Choose phonotactics
[...]
(Animation ‘movie’)=
[...]
(Exploration top-down ’racing game’)=
[...]
(Video dictionary)=
[...]
(Grand strategy game)=
[...]
(Telex system)=
[...]
(Pen&paper tabletop game)=
[...]
(Search engine)=
[...]
(Microlearning system)=
[...]
(Alternate planet)=
[...]
(END)
4 notes
·
View notes
Text
If this is not one of the most robust, free, rich and informative era ever then I cannot think of any other time in history adorned with the wealth of technology as this one. If you would wish to accomplish anything, this era wields the most virile grounds to nourish, nurture and aid the sprouting, the growth and the maturity of your dreams. You can literaly learn to be what you would wish to be in this age. That being said, this disquisition takes on a quest to get you into setting up something similar to Heroku on your own environment. We shall get to know what Heroku is then get off the dock and sail off towards our goal of having such an environment. The proliferation of cloud technologies brought with it many opportunities in terms of service offerings. First and foremost, users had the ability to get as much infrastructure as they could afford. Users can spawn servers, storage and network resources ad libitum which is popularly known as Infrastructure as a service. Then comes the second layer that sits on the infrastructure. It could be anything, cloud identity service, cloud monitoring server et cetera. This layer provides ready made solutions to people who might need them. This is known as software as a service. I hope we are flowing together this far. In addition to that there is another incredible layer that is the focus of this guide. It is a layer that targets developers majorly by making their lives easier on the cloud. In this layer , developers only concentrate on writing code and when they are ready to deploy, they only need to commit their ready project in a source control platform like GitHub/GitLab and the rest is done for them automatically. This layer provides a serverless layer to the developers since they do not have to touch the messy server side stuff. This layer as you might already have guessed is known as Platform as a Service (PaaS). Heroku is one of the solutions that sits on this layer. In this guide, are going to setup a platform that is similar to Heroku on your own infrastructure. As you know, you cannot download and install Heroku on your server. It is an online cloud service that you subscribe to. We will use Caprover to setup our own private Platform as a service (PaaS). CapRover is an extremely easy to use app/database deployment & web server manager for your NodeJS, Python, PHP, ASP.NET, Ruby, MySQL, MongoDB, Postgres, WordPress and even more applications. Features of Caprover CLI for automation and scripting Web GUI for ease of access and convenience No lock-in! Remove CapRover and your apps keep working! Docker Swarm under the hood for containerization and clustering Nginx (fully customizable template) under the hood for load-balancing Let’s Encrypt under the hood for free SSL (HTTPS) One-Click Apps: Deploying one-click apps is a matter of seconds! MongoDB, Parse, MySQL, WordPress, Postgres and many more. Fully Customizable: Optionally fully customizable nginx config allowing you to enable HTTP2, specific caching logic, custom SSL certs and etc Cluster Ready: Attach more nodes and create a cluster in seconds! CapRover automatically configures nginx to load balance. Increase Productivity: Focus on your apps! Not the bells and whistles just to run your apps! Easy Deploy: Many ways to deploy. You can upload your source from dashboard, use command line caprover deploy, use webhooks and build upon git push Caprover Pre-requisites Caprover runs as a container in your server which can be any that supports containerization. Depending on your preferences, you can use Podman or Docker to pull and run Caprover image. For this example, we are going to use Docker. In case you do not have Docker installed, the following guides listed below will be there to help you set it up as fast as possible. Install Docker and Docker Compose on Debian Setup Docker CE & Docker Compose on CentOS 8 | RHEL 8 How To Install Docker on RHEL 7 / CentOS 7
How To Install Docker CE on Ubuntu Once Docker Engine has been installed, add your user account to docker group: sudo usermod -aG docker $USER newgrp docker Another pre-requisite is a wildcard domain name pointed to the IP of your server where Caprover Server will be running. Setup your Heroku PaaS using CapRover Once the pre-requisites are out of the way, the only task remaining now is to set up our Caprover and poke around its rooms just to see what it has to offer. The following steps will be invaluable as you try to get it up and running. Step 1: Prepare your server Once Docker is installed, you can install all of the applications you need during your stay in the server. They include an editor and such kind of stuff. ##On CentOS sudo yum update sudo yum install vim git curl ##On Ubuntu sudo apt update sudo apt install vim git curl That was straingtforward. Next, let us pull Caprover image to set the stone rolling Step 2: Pull and execute Caprover Image We are going to cover the installation of Caprover depending on where your server sits. Scenario 1: Installation on a local server without Public IP Install dnsmasq After all, as mentioned in the pre-requisites section, we shall need a small DNS server to resolve domain names since Caprover is so particular with it. In case you have a local DNS server that supports wildcard domains, then you are good to go. You can skip the DNS setup part. In case you do not have it, install lightweight dnsmasq as follows: sudo yum -y install dnsmasq After dnsmasq is successfully installed, start and enable the service. sudo systemctl start dnsmasq sudo systemctl enable dnsmasq Add Wildcard DNS Recod Once dnsmasq is running as expected, we can go ahead and add the configs and wildcard domain name as shown below: $ sudo vim /etc/dnsmasq.conf listen-address=::1,127.0.0.1,172.20.192.38 domain=example.com server=8.8.8.8 address=/caprover.example.com/172.20.192.38 Replace the IPs therein with yours accordingly. Then restart dnsmasq sudo systemctl restart dnsmasq Test if it works We shall use the dig utility to test if our configuration works $ dig @127.0.0.1 test.caprover.example.com ; DiG 9.11.20-RedHat-9.11.20-5.el8 @127.0.0.1 test.caprover.example.com ; (1 server found) ;; global options: +cmd ;; Got answer: ;; ->>HEADER> Checking System Compatibility > Checking System Compatibility
0 notes
Text
Docker Commands Windows

Docker Commands Windows
Docker Commands Windows Server 2016
MongoDB document databases provide high availability and easy scalability. You do not need to push your certificates with git commands. When the Docker Desktop application starts, it copies the /.docker/certs.d folder on your Windows system to the /etc/docker/certs.d directory on Moby (the Docker Desktop virtual machine running on Hyper-V). Docker Desktop for Windows can’t route traffic to Linux containers. However, you can ping the Windows containers. Per-container IP addressing is not possible. The docker (Linux) bridge network is not reachable from the Windows host. However, it works with Windows containers. Use cases and workarounds.
Estimated reading time: 15 minutes
Welcome to Docker Desktop! The Docker Desktop for Windows user manual provides information on how to configure and manage your Docker Desktop settings.
For information about Docker Desktop download, system requirements, and installation instructions, see Install Docker Desktop.
Settings
The Docker Desktop menu allows you to configure your Docker settings such as installation, updates, version channels, Docker Hub login,and more.
This section explains the configuration options accessible from the Settings dialog.
Open the Docker Desktop menu by clicking the Docker icon in the Notifications area (or System tray):
Select Settings to open the Settings dialog:
General
On the General tab of the Settings dialog, you can configure when to start and update Docker.
Start Docker when you log in - Automatically start Docker Desktop upon Windows system login.
Expose daemon on tcp://localhost:2375 without TLS - Click this option to enable legacy clients to connect to the Docker daemon. You must use this option with caution as exposing the daemon without TLS can result in remote code execution attacks.
Send usage statistics - By default, Docker Desktop sends diagnostics,crash reports, and usage data. This information helps Docker improve andtroubleshoot the application. Clear the check box to opt out. Docker may periodically prompt you for more information.
Resources
The Resources tab allows you to configure CPU, memory, disk, proxies, network, and other resources. Different settings are available for configuration depending on whether you are using Linux containers in WSL 2 mode, Linux containers in Hyper-V mode, or Windows containers.
Advanced
Note
The Advanced tab is only available in Hyper-V mode, because in WSL 2 mode and Windows container mode these resources are managed by Windows. In WSL 2 mode, you can configure limits on the memory, CPU, and swap size allocatedto the WSL 2 utility VM.
Use the Advanced tab to limit resources available to Docker.
CPUs: By default, Docker Desktop is set to use half the number of processorsavailable on the host machine. To increase processing power, set this to ahigher number; to decrease, lower the number.
Memory: By default, Docker Desktop is set to use 2 GB runtime memory,allocated from the total available memory on your machine. To increase the RAM, set this to a higher number. To decrease it, lower the number.
Swap: Configure swap file size as needed. The default is 1 GB.
Disk image size: Specify the size of the disk image.
Disk image location: Specify the location of the Linux volume where containers and images are stored.
You can also move the disk image to a different location. If you attempt to move a disk image to a location that already has one, you get a prompt asking if you want to use the existing image or replace it.
Download Apple MacOS High Sierra for Mac to get a boost with new technologies in the latest Mac OS update coming fall 2017. Apple download sierra.
File sharing
Note
The File sharing tab is only available in Hyper-V mode, because in WSL 2 mode and Windows container mode all files are automatically shared by Windows.
Use File sharing to allow local directories on Windows to be shared with Linux containers.This is especially useful forediting source code in an IDE on the host while running and testing the code in a container.Note that configuring file sharing is not necessary for Windows containers, only Linux containers. If a directory is not shared with a Linux container you may get file not found or cannot start service errors at runtime. See Volume mounting requires shared folders for Linux containers.
File share settings are:
Add a Directory: Click + and navigate to the directory you want to add.
Apply & Restart makes the directory available to containers using Docker’sbind mount (-v) feature.
Tips on shared folders, permissions, and volume mounts
Share only the directories that you need with the container. File sharing introduces overhead as any changes to the files on the host need to be notified to the Linux VM. Sharing too many files can lead to high CPU load and slow filesystem performance.
Shared folders are designed to allow application code to be edited on the host while being executed in containers. For non-code items such as cache directories or databases, the performance will be much better if they are stored in the Linux VM, using a data volume (named volume) or data container.
Docker Desktop sets permissions to read/write/execute for users, groups and others 0777 or a+rwx.This is not configurable. See Permissions errors on data directories for shared volumes.
Windows presents a case-insensitive view of the filesystem to applications while Linux is case-sensitive. On Linux it is possible to create 2 separate files: test and Test, while on Windows these filenames would actually refer to the same underlying file. This can lead to problems where an app works correctly on a developer Windows machine (where the file contents are shared) but fails when run in Linux in production (where the file contents are distinct). To avoid this, Docker Desktop insists that all shared files are accessed as their original case. Therefore if a file is created called test, it must be opened as test. Attempts to open Test will fail with “No such file or directory”. Similarly once a file called test is created, attempts to create a second file called Test will fail.
Shared folders on demand

You can share a folder “on demand” the first time a particular folder is used by a container.
If you run a Docker command from a shell with a volume mount (as shown in theexample below) or kick off a Compose file that includes volume mounts, you get apopup asking if you want to share the specified folder.
You can select to Share it, in which case it is added your Docker Desktop Shared Folders list and available tocontainers. Alternatively, you can opt not to share it by selecting Cancel.
Proxies
Docker Desktop lets you configure HTTP/HTTPS Proxy Settings andautomatically propagates these to Docker. For example, if you set your proxysettings to http://proxy.example.com, Docker uses this proxy when pulling containers.
Your proxy settings, however, will not be propagated into the containers you start.If you wish to set the proxy settings for your containers, you need to defineenvironment variables for them, just like you would do on Linux, for example:
For more information on setting environment variables for running containers,see Set environment variables.
Network
Note
The Network tab is not available in Windows container mode because networking is managed by Windows.
You can configure Docker Desktop networking to work on a virtual private network (VPN). Specify a network address translation (NAT) prefix and subnet mask to enable Internet connectivity.
DNS Server: You can configure the DNS server to use dynamic or static IP addressing.
Note
Some users reported problems connecting to Docker Hub on Docker Desktop. This would manifest as an error when trying to rundocker commands that pull images from Docker Hub that are not alreadydownloaded, such as a first time run of docker run hello-world. If youencounter this, reset the DNS server to use the Google DNS fixed address:8.8.8.8. For more information, seeNetworking issues in Troubleshooting.
Updating these settings requires a reconfiguration and reboot of the Linux VM.
WSL Integration
In WSL 2 mode, you can configure which WSL 2 distributions will have the Docker WSL integration.
By default, the integration will be enabled on your default WSL distribution. To change your default WSL distro, run wsl --set-default <distro name>. (For example, to set Ubuntu as your default WSL distro, run wsl --set-default ubuntu).
You can also select any additional distributions you would like to enable the WSL 2 integration on.
For more details on configuring Docker Desktop to use WSL 2, see Docker Desktop WSL 2 backend.
Docker Engine
The Docker Engine page allows you to configure the Docker daemon to determine how your containers run.
Type a JSON configuration file in the box to configure the daemon settings. For a full list of options, see the Docker Enginedockerd commandline reference.
Click Apply & Restart to save your settings and restart Docker Desktop.
Command Line
On the Command Line page, you can specify whether or not to enable experimental features.
You can toggle the experimental features on and off in Docker Desktop. If you toggle the experimental features off, Docker Desktop uses the current generally available release of Docker Engine. Final cut pro mac app store.
Experimental features
Experimental features provide early access to future product functionality.These features are intended for testing and feedback only as they may changebetween releases without warning or can be removed entirely from a futurerelease. Experimental features must not be used in production environments.Docker does not offer support for experimental features.
For a list of current experimental features in the Docker CLI, see Docker CLI Experimental features.
Run docker version to verify whether you have enabled experimental features. Experimental modeis listed under Server Adobe photoshop 2020 patcher windows. data. Sonos controller mac 10.6.8 download. If Experimental is true, then Docker isrunning in experimental mode, as shown here:
Kubernetes
Note
The Kubernetes tab is not available in Windows container mode.
Docker Desktop includes a standalone Kubernetes server that runs on your Windows machince, sothat you can test deploying your Docker workloads on Kubernetes. To enable Kubernetes support and install a standalone instance of Kubernetes running as a Docker container, select Enable Kubernetes.
For more information about using the Kubernetes integration with Docker Desktop, see Deploy on Kubernetes.
Reset
The Restart Docker Desktop and Reset to factory defaults options are now available on the Troubleshoot menu. For information, see Logs and Troubleshooting.
Troubleshoot
Visit our Logs and Troubleshooting guide for more details.
Log on to our Docker Desktop for Windows forum to get help from the community, review current user topics, or join a discussion.
Log on to Docker Desktop for Windows issues on GitHub to report bugs or problems and review community reported issues.
For information about providing feedback on the documentation or update it yourself, see Contribute to documentation.
Switch between Windows and Linux containers

From the Docker Desktop menu, you can toggle which daemon (Linux or Windows)the Docker CLI talks to. Select Switch to Windows containers to use Windowscontainers, or select Switch to Linux containers to use Linux containers(the default).
For more information on Windows containers, refer to the following documentation:
Microsoft documentation on Windows containers.
Build and Run Your First Windows Server Container (Blog Post)gives a quick tour of how to build and run native Docker Windows containers on Windows 10 and Windows Server 2016 evaluation releases.
Getting Started with Windows Containers (Lab)shows you how to use the MusicStoreapplication with Windows containers. The MusicStore is a standard .NET application and,forked here to use containers, is a good example of a multi-container application.
To understand how to connect to Windows containers from the local host, seeLimitations of Windows containers for localhost and published ports
Settings dialog changes with Windows containers
When you switch to Windows containers, the Settings dialog only shows those tabs that are active and apply to your Windows containers:
If you set proxies or daemon configuration in Windows containers mode, theseapply only on Windows containers. If you switch back to Linux containers,proxies and daemon configurations return to what you had set for Linuxcontainers. Your Windows container settings are retained and become availableagain when you switch back.
Dashboard
The Docker Desktop Dashboard enables you to interact with containers and applications and manage the lifecycle of your applications directly from your machine. The Dashboard UI shows all running, stopped, and started containers with their state. It provides an intuitive interface to perform common actions to inspect and manage containers and Docker Compose applications. For more information, see Docker Desktop Dashboard.
Docker Hub
Docker Commands Windows
Select Sign in /Create Docker ID from the Docker Desktop menu to access your Docker Hub account. Once logged in, you can access your Docker Hub repositories directly from the Docker Desktop menu.
For more information, refer to the following Docker Hub topics:
Two-factor authentication
Docker Desktop enables you to sign into Docker Hub using two-factor authentication. Two-factor authentication provides an extra layer of security when accessing your Docker Hub account.
You must enable two-factor authentication in Docker Hub before signing into your Docker Hub account through Docker Desktop. For instructions, see Enable two-factor authentication for Docker Hub.
Docker Desktop for Windows user manual. Estimated reading time: 17 minutes. Welcome to Docker Desktop! The Docker Desktop for Windows user manual provides information on how to configure and manage your Docker Desktop settings. The fastest and easiest way to get started with Docker on Windows. Docker Desktop is an application for MacOS and Windows machines for the building and sharing of containerized applications and microservices. Docker Desktop delivers the speed, choice and security you need for designing and delivering containerized applications on your desktop. I have the same thing, but I also noticed that Hyper-V has to be enabled. As in, if your copy of Windows 10 has Hyper-V, you can install it by simply enabling it because it’s already there. On Windows 10 Home, though, there is no Hyper-V to enable. I also have Windows 10 Home. The only option for Home edition users is to use Docker. Docker supports Docker Desktop on Windows for those versions of Windows 10 that are still within Microsoft’s servicing timeline. What’s included in the installer The Docker Desktop installation includes Docker Engine, Docker CLI client, Docker Compose, Notary, Kubernetes, and Credential Helper. https://luckyloading560.tumblr.com/post/653769899713380352/docker-windows-home-edition.
After you have enabled two-factor authentication:
Docker Commands Windows Server 2016
Go to the Docker Desktop menu and then select Sign in / Create Docker ID.
Enter your Docker ID and password and click Sign in.
After you have successfully signed in, Docker Desktop prompts you to enter the authentication code. Enter the six-digit code from your phone and then click Verify.
After you have successfully authenticated, you can access your organizations and repositories directly from the Docker Desktop menu.
Adding TLS certificates
You can add trusted Certificate Authorities (CAs) to your Docker daemon to verify registry server certificates, and client certificates, to authenticate to registries.
How do I add custom CA certificates?
Docker Desktop supports all trusted Certificate Authorities (CAs) (root orintermediate). Docker recognizes certs stored under Trust RootCertification Authorities or Intermediate Certification Authorities.
Docker Desktop creates a certificate bundle of all user-trusted CAs based onthe Windows certificate store, and appends it to Moby trusted certificates. Therefore, if an enterprise SSL certificate is trusted by the user on the host, it is trusted by Docker Desktop.
To learn more about how to install a CA root certificate for the registry, seeVerify repository client with certificatesin the Docker Engine topics.
How do I add client certificates?
You can add your client certificatesin ~/.docker/certs.d/<MyRegistry>:<Port>/client.cert and~/.docker/certs.d/<MyRegistry>:<Port>/client.key. You do not need to push your certificates with git commands.
When the Docker Desktop application starts, it copies the~/.docker/certs.d folder on your Windows system to the /etc/docker/certs.ddirectory on Moby (the Docker Desktop virtual machine running on Hyper-V).
You need to restart Docker Desktop after making any changes to the keychainor to the ~/.docker/certs.d directory in order for the changes to take effect.
The registry cannot be listed as an insecure registry (seeDocker Daemon). Docker Desktop ignorescertificates listed under insecure registries, and does not send clientcertificates. Commands like docker run that attempt to pull from the registryproduce error messages on the command line, as well as on the registry.
To learn more about how to set the client TLS certificate for verification, seeVerify repository client with certificatesin the Docker Engine topics.
Where to go next
Try out the walkthrough at Get Started.
Dig in deeper with Docker Labs example walkthroughs and source code.
Refer to the Docker CLI Reference Guide.
windows, edge, tutorial, run, docker, local, machine
0 notes
Link

UTILITY STORES CORPORATION OF PAKISTAN (PRIVATE) LIMITED
HEAD OFFICE, ISLAMABAD
CAREER OPPORTUNITY
Utility Stores Corporation is looking for individuals for following positions who are innovative, productive and
enthusiastic with ability to deliver results: -
ProvinciaV
S.No Name of Post
Requisite Qualification
Regional Quota
and Experience
University Degree in Computer Science, Business
Administration or related field equals to 16 years of education
with minimum 10 years practical experience preferably in
Digital Transformation Project Management/Data Science/Big
Data/IT Systems and Architecture in an Industrial /
Project Manager
Merit: 01
Commercial/ FMCG organization.PMP, Agile, and/or other
1 (Market Based Salary)
Project Management-related certification(s).Must have
(01 Post)
experience of managing implementation projects in any Retail
Chain organization. Experience in developing detailed project
schedules and building effective Work Breakdown Structures
(WBS).Proficiency with MS Project, Excel, Visio, PowerPoint
and SharePoint with experience presenting to stakeholders and /
or Senior Leadership.
University Degree in Computer Science or related field equals
to 16 years of education. 7 years of experience with utilizing,
configuring, and installing software for connecting distributed
software and services across heterogeneous platforms.
Experience in securing production workloads in public/private
clouds, Private Cloud Deployment using Open Source
Technologies, like Linux, MaaS - Bare Metal Management
software, Open Stack software bundle and with Linux operating
Manager Systems/
Sindh: 01
systems. Strong understanding across cloud and infrastructure
Information Security
2 (Market Based Salary)
components (server, storage, data, and applications) to deliver
end to end cloud infrastructure architectures and designs. Clear
(01 Post)
understanding of the challenges of information security.
Excellent analytical and problem-solving abilities to identify
and fix security risks.
University Degree in Computer Science or related field equals
to 16 years of education.5 years of relevant work experience
particularly in Software Requirements, Software Architecture,
Software Development Fundamentals, Object-Oriented Design
(OOD), Multimedia Content Development and Software
Software Developer
Punjab: 01
ICT: 01
(Market Based Salary)
Debugging. Work experience as a Python Developer and
expertise in at least one popular Python framework (like
Django, Flask or Pyramid). Knowledge of object-relational
(02 Posts)
mapping (ORM), Odoo framework and front-end technologies
(like JavaScript and HTMLS).
University Degree in Computer Science or related field equals
to 16 years of education with3 years of relevant experience.
Demonstrable portfolio of released applications on the App
store or the Android market. Extensive knowledge of at least
Mobile App Developer
one programming language like Swift, Java etc. Experience
(Market Based Salary) Punjab
(Including ICT)
with third-party libraries and APIs. Superior analytical skills
(01 Post)
: : 01
with a good problem-solving attitude, ability to perform in a
team environment and ability to interpret and follow technical
plan.
University Degree in Computer Science or related field equals
to 16 years of education with 5 years of relevant database
administration experience. Hands-on experience in the
Database Administrator
definition, design, creation, and security of a database
5 (Market Based Salary) Punjab: 01
environment and database technologies (MySQL, MS SQL
(01 Post)
PostgreSQL Oracle, MongoDB). Experience with any cloud
services (OpenStack, AWS, and Microsoft Azure. Ability to
work independently with minimal supervision.
University Degree in Computer Science or related field equals
to 16 years of education with 5 years of relevant network
administration experience. Advanced knowledge of system
vulnerabilities and security issues and knowledge of best
practices around management, control, and monitoring of server
Network Administrator
infrastructure. Experience with firewalls, Internet VPN's
(Market Based Salary)
Punjab: 01
remote implementation, VMs, troubleshooting, and problem
(01 Post)
resolution. Ability to set up and configure server hardware.
University Degree in Computer Science or related field equals to
16 years of education with 5 years relevant hands on experience
with automation/DevOps activities. Extensive experience with
automation using scripting languages, such as Python as well as
configuration of infrastructure with code automation, version
control software and job execution tools, preferably Git.
Experience with Application Logging, Monitoring and
7 DevOps Engineers Punjab: 01
performance Management. Strong understanding of continuous
(Market Based Salary)
Sindh: 01 integration/delivery practices and other DevOps concepts.
(02 Posts)
Experience with cloud platforms, virtualization platforms and
containers, such as AWS, Azure, OpenStack, Docker,
VMWare/VSphere, etc. Experience with web application
environments, such as TCP/IP, SSL/TLS, HTTP, DNS, routing,
load balancing, CDNs, etc.
University Degree in Interaction Design, Architecture, or related
field equals to 16 years of education.3 years of relevant
experience with multiple visual design programs such as
Photoshop or Illustrator. Knowledgeable in wire-framing tools,
storyboards, user flows, and site mapping. In-depth
understanding of UI, latest design and technology trends and
UI Graphic Designer
their role in a commercial environment. Measure Human
8
Punjab (Including
(Market Based Salary)
ICT): 01 Computer interaction element of a design. Mathematical aptitude
(01 Posts)
and problem-solving skills to analyze problems and strategize
for better solutions. Able to multitask, prioritize, and manage
time efficiently, work independently and as an active member of
a team. Create visual elements such as logos, original images,
and illustrations to help deliver a message. Design layouts,
including selection of colors, images, and typefaces.
University Degree in Computer Science or related field equals to
16 years of education with minimum one year of relevant work
experience. Experience in Software Requirements, Software
Junior Software Baluchistan: 01
Architecture, Software Development Fundamentals, Object-
Developer
Oriented Design (OOD), Multimedia Content Development,
(Market Based Salary)
KPK: 01
Software Debugging. Work experience as a Python Developer
(02 Posts)
with expertise in at least one popular Python framework (like
Django, Flask or Pyramid). Knowledge of object-relational
mapping (ORM), Odoo framework and Familiarity with front-
end technologies (like JavaScript and HTML5).
1.
2.
3.
4.
5.
6.
Maximum age limit for positions at serial 1 & 2 is 45 years, for positions at serial 3to 8 is 40 years and
for position at serial 9 is 30 years.
• The appointment would be purely on a contract basis for a period of 2 years, extendable subject to
satisfactory performance.
Organization is committed to the principles of equal employment opportunity and to make employment
decision based on merit. Female Candidates are encouraged to apply.
Applicants working in Government, Semi-Government Autonomous Bodies should route their
applications through proper channel duly accompanied with NOC.
Advance copy of the application shall not be entertained.
Applicants sending applications through post courier must indicate the name of position on the top left
corner of the envelope.
Only shortlisted candidates would be called for interview.
Internal candidate meeting the above criteria can also apply.
Applications on the prescribed format (available on USC website www.usc.org.pk) along with CV
should reach through post on the following address within 15 days of the publication of this
advertisement. Applications received after due date will not be entertained.
Office of the General Manager (HR&A)
Utility Stores Corporation of Pakistan (Private) Limited
Head Office, Plot No. 2039, Sector F-7/G-7, Blue Area, Islamabad
Contact No. 051-9245039
7.
8.
9
PID(1) 6155/20
0 notes
Text
Spring Boot Microservices + MongoDB in Docker Containers | Step by step tutorial for Beginners
Full Video Link: https://youtu.be/qWzBUwKiCpM Hi, a new #video on step by step #tutorial for #springboot #microservices running in #docker #container with #mongodb also running in #docker #container is published on #codeonedigest #youtube channel. Easy
MongoDB is an open-source document database and leading NoSQL database. MongoDB is written in C++. This video will give you complete understanding of running the MongoDB in docker container. MongoDB works on concept of collection and document. MongoDB is a cross-platform, document-oriented database that provides, high performance, high availability, and easy scalability. Mongo Database –…

View On WordPress
#compass#container#docker#docker container#docker file#docker full course#docker image#docker tutorial#docker tutorial for beginners#microservices#microservices mongodb#mongo db#mongo dockerfile#mongodb#mongodb compass#mongodb configuration#mongodb configuration file#mongodb connection error#mongodb docker compose#mongodb docker install#mongodb docker setup#mongodb docker tutorial#mongodb docker volume#mongodb installation#Mongodb java#mongodb microservices example#mongodb tutorial#mongodb tutorial for beginners#monogodb tutorial#Spring boot
0 notes
Text
Continuous Integration at Coinbase: How we optimized CircleCI for speed & cut our build times by…
Continuous Integration at Coinbase: How we optimized CircleCI for speed and cut our build times by 75%
Tuning a continuous integration server presents an interesting challenge — infrastructure engineers need to balance build speed, cost, and queue times on a system that many developers do not have extensive experience managing at scale. The results, when done right, can be a major benefit to your company as illustrated by the recent journey we took to improve our CI setup.
Continuous Integration at Coinbase
As Coinbase has grown, keeping our developers happy with our internal tools has been a high priority. For most of Coinbase’s history we have used CircleCI server, which has been a performant and low-maintenance tool. As the company and our codebase have grown, however, the demands on our CI server have increased as well. Prior to the optimizations described here, builds for the monorail application that runs Coinbase.com had increased significantly in length (doubling or tripling the previous average build times) and developers commonly complained about lengthy or non-finishing builds.
Our CI builds were no longer meeting our expectations, and it was with the previous issues in mind that we decided to embark on a campaign to get our setup back into shape.
It’s worth sharing here that Coinbase specifically uses the on-premise server version of CircleCI rather than their cloud offering — hosting our own infrastructure is important to us for security reasons, and these concepts specifically apply to self-managed CI clusters.
The Four Golden Signals
We found the first key to optimizing any CI system to be observability, as without a way to measure the effects of your tweaks and changes it’s impossible to truly know whether or not you actually made an improvement. In our case, server-hosted CircleCI uses a nomad cluster for builds, and at the time did not provide any method of monitoring your cluster or the nodes within. We had to build systems of our own, and we decided a good approach would be using the framework of the four golden signals, Latency, Traffic, Errors, and Saturation.
Latency
Latency is the total amount of time it takes to service a request. In a CI system, this can be considered to be the total amount of time a build takes to run from start to finish. Latency is better measured on a per-repo or even per-build basis as build length can vary hugely based on the project.
To measure this, we built a small application that queried CircleCI’s API regularly for build lengths, and then shipped over that information to Datadog to allow us to build graphs and visualizations of average build times. This allowed us to chart the results of our improvement experiments empirically and automatically rather than relying on anecdotal or manually curated results as we had done previously.

CircleCI API results
Traffic
Traffic is the amount of demand being placed on your system at any one time. In a CI system, this can be represented by the total number of concurrently running builds.
We were able to measure this by using the same system we built to measure latency metrics. This came in handy when determining the upper and lower bounds for the use of our build resources as it allowed us to see exactly how many jobs were running at any one time.
Errors
Errors are the total amount of requests or calls that fail. In a CI system this can be represented by the total number of builds that fail due to infrastructural reasons. It’s important here to make a distinction between builds that fail correctly, due to tests, linting, code errors, etc. rather than builds that fail due to platform issues.
One issue we encountered was that occasionally AWS would give us “bad” instances when spinning up new builders that would run much slower than a normal “good” instance. Adding error detection into our builder startup scripts allowed us to terminate these and spin up new nodes before they could slow down our running builds.
Saturation
Saturation is how “full” your service is, or how much of your system resources are being used. In a CI system, this is fairly straightforward — how much I/O, CPU, and memory are the builders under load using.
To measure saturation for our setup we were able to tap into cluster metrics by installing a Datadog Agent on each of our builders, which allowed us to get a view into system stats across the cluster.
Datadog job statistics
Identifying the Root Cause
Once your monitoring setup is in place it becomes easier to dig into the root cause of build slowdowns. One of the difficulties in diagnosing CI problems without cluster-wide monitoring is that it can be hard to identify which builders are experiencing load at any one time or how that load affects your builds. Latency monitoring can allow you to figure out which builds are taking the longest, and saturation monitoring can allow you to identify the nodes running those builds for closer investigation.
For us, the new latency measuring we added allowed us to quickly confirm what we had previously guessed: not every build was equal. Some builds ran at the quick speeds we had previously been experiencing but other builds would drag on for far longer than we expected.
In our case this discovery was the big breakthrough — once we could quickly identify builds with increased latency and find the saturated nodes the problem quickly revealed itself: resource contention between starting builds! Due to the large number of tests for our larger builds we use CircleCI’s parallelization feature to split up our tests and run them across the fleet in separate docker containers. Each test container also requires another set of support containers (Redis, MongoDB, etc.) in order to replicate the production environment. Starting all of the necessary containers for each build is a resource-intensive operation, requiring significant amounts of I/O and CPU. Since Nomad uses bin-packing for job distributions our builders would sometimes launch up to 5 different sets of these containers at once, causing massive slow-downs before tests could even start running.
Build Experimentation
Setting up a development environment is key to debugging CI problems once found as it allows you to push your system to its limits while ensuring that none of your testing affects productivity in production. Coinbase maintains a development cluster for CircleCI that we use to test out new versions before pushing them out to production, but in order to investigate our options we turned the cluster into a smaller replica of our production instance, allowing us to effectively load test CircleCI builders. Keeping your development cluster as close as possible to production can help ensure any solutions you find are reflective of what can actually help in a real environment.
Once we had identified why our builds were encountering issues, and we’d set up an environment to run experiments in, we could start developing a solution. We repeatedly ran the same large builds that were causing the problems on our production cluster on different sizes and types of EC2 instances in order to figure out which was the most time and cost-effective options to use.

EC2 instance type comparison
While we previously had been using smaller numbers of large instances to run our builds it turns out the optimal setup for our cluster was actually a very large number of smaller instances (m5.larges in our case) — small enough that CircleCI would only ship one parallelized build container to each instance, preventing the build trampling issues that were the cause of the slow downs. A nice side effect of identifying the correct instance types was that it actually allowed us to reduce our server cost footprint significantly as we were able to size our cluster more closely to its usage.
Problem? Solved!
Applying your changes to a production environment is the final step. Determining whether the effects of the tuning worked can be done the same way the problems were identified — with the four golden signals.
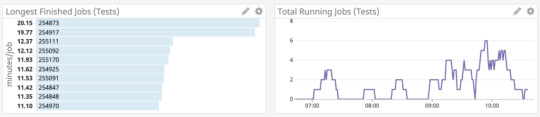
After we had identified what worked best on our development cluster we quickly implemented the new builder sizing in production. The results? A 75% decrease in build time for our largest builds, significant cost savings due to the right-sizing of our cluster, and most important of all: happy developers!

Builds, before and after
This website may contain links to third-party websites or other content for information purposes only (“Third-Party Sites”). The Third-Party Sites are not under the control of Coinbase, Inc., and its affiliates (“Coinbase”), and Coinbase is not responsible for the content of any Third-Party Site, including without limitation any link contained in a Third-Party Site, or any changes or updates to a Third-Party Site. Coinbase is not responsible for webcasting or any other form of transmission received from any Third-Party Site. Coinbase is providing these links to you only as a convenience, and the inclusion of any link does not imply endorsement, approval or recommendation by Coinbase of the site or any association with its operators.
Unless otherwise noted, all images provided herein are by Coinbase.
Continuous Integration at Coinbase: How we optimized CircleCI for speed & cut our build times by… was originally published in The Coinbase Blog on Medium, where people are continuing the conversation by highlighting and responding to this story.
from Money 101 https://blog.coinbase.com/continuous-integration-at-coinbase-how-we-optimized-circleci-for-speed-cut-our-build-times-by-378c8b1d7161?source=rss----c114225aeaf7---4 via http://www.rssmix.com/
0 notes
Text
Docker - Nginx
原本在Windows中,Nginx可以點兩下就啟動,只要資料夾內的東西有放好就可以快速連上,也不需要特別多做一些設定 Docker已經存在許久,但是主要的作業系統都是以Windows為主,所以在當時不支援的情況之下就沒特別玩弄(雖然現在已經開始支援Windows) 目前因為是用Mac 所以就可以很順利的快速使用
安裝
Mac的安裝說明在 https://docs.docker.com/docker-for-mac/ 下載的安裝檔則是在 https://docs.docker.com/docker-for-mac/install/#download-docker-for-mac 目前單純安裝Community Edition / Stable版本 解壓縮後直接丟到Application裡面就可以了
另外推薦安裝的是Kitematic, 打開功能介面就有這個選項 他可以幫你安裝其他人設定好的image 包括了官方的 比如: MongoDB / Python / Nginx 等
設定
實際上我是根據官網的說明來設定Nginx https://docs.docker.com/docker-for-mac/#explore-the-application-and-run-examples 好處是直接下指令之後,立刻幫你下載image並將80port建立好,讓你排便順暢沒煩惱,但是Nginx最大的好處是內部的設定檔以及Routing等功能。
但是等一下,這樣我怎麼知道我的Web應該放在哪邊? 因為沒有透過複雜的設定去建立設定檔,所以無法讓Docker內的image直接讀取本機的資料夾。其實只要把檔案丟進去就好了!! 開啟Docker之後,點選Kitematic,並對Nginx點選EXEC

在Command line中用CP的指令將我們的檔案複製到Nginx的路徑下就可以了,而hostname就是虛擬機的名稱
docker cp index.html b0ac4a31eb99:/usr/share/nginx/html
如此一來我們就可以將新的資料更新到Docker了!!
感謝鯨魚偉哉鯨魚
0 notes
Link
Have you ever built an application but it doesn't run on all platforms? Or been sick of installing different dependencies and libraries for each service/component in the application? Dodged the whole nine yards just to deploy, scale and manage a simple application??
Then DOCKER is waiting for you!!!
Docker:What the hell is it?
Docker is a set of platform as a service products that uses OS-level virtualization to deliver software in packages called containers. (Well. . .thats the GOOGLE definition for you! )
To wrap it up simply,it is just a BOX!
Imagine,
A printer box, we insert a paper and get printed text or colors on it. So how is it working ? Perhaps all the colors and required material is already present in the printer.

Consider a car wash, car is sent in, many process like washing, cleaning etc happen and at the end we get a shiny clean car (or a less rusty one).

So, docker is like a printer box or car wash setup in this instance, taking an input and giving an output basically.
It is basically a box with an application and its related dependencies, libraries etc inside it
But why docker?

Imagine we are building a zoo, we toss all animals like monkeys, Lion and Crocodiles in one big park with only one kind of food and only one kind of environment, lets say, land.
The bananas eaten by monkeys can’t be used by Lions and crocodiles, the meat for Lions can’t be eaten by monkeys. Monkeys want trees and crocodiles need a water space in the environment.
In similar way, if we are building an application that has services like a database and framework etc, The libraries and dependencies(food) used by databases (cassandra, postgresql, mongodb etc) may not be compatible/suitable for frameworks (strapi, nodejs express etc).
Eg: MongoDb version 4.26 might not be compatible/suitable for NodeJs version 4.16.4
To make it easy to develop, run and maintain an application and to operate on all the platforms we came up docker. The problem in zoo example can be solved by providing each animal, a separate boundary with the required food and environment.
Containers

In docker we have those separate boundaries called containers. We place each service in one container with all the libraries and dependencies required for it.
Container is a completely isolated environment with their own processes, network interfaces and their own mounts.
Wait, doesnt it look familiar? Yes,you are right if you guessed it, they remind us of Virtual machines. If its similar to VMs, Why on Earth do we need to use Containers??
Well, Each VM has a separate OS along with libraries, dependencies and application, which increases overload and utilization, making it difficult to operate it in small PCs(though we might not use it there).
Whereas Containers share the same OS, considerably less overload and utilization than VMs. Hence they are just the darlings preferred for application development, deployment and management.

Images
These are readymade templates of services like MongoDb, NodeJs etc, to run in containers. We can either use existing images from docker.io or create our own.
Creating an Image of the service helps in shipping it for deployments. Then it is just running a simple command to get the server up and running. We dont have to worry about creating environment, installing dependencies and what not.
Magic commands
Its time to blow some fairy pixel dust and do some magic!
Lets start with running an image in a container,using run command.
Run redis image in container
docker run redis

List the version details
docker version

List the Running containers
docker ps

List the Running & Not Running containers
docker ps -a

Remove a container
docker rm [container ID]

Note: To remove a container make sure it is stopped first using stop command.
List the images
docker images

Remove an image
docker rmi [image_name]

Just download the image but not run in the container
docker pull [image_name]

Thank you so much for reading my content. More of such content coming on this blog, so stay tuned.
0 notes
Link
Docker Mastery: with Kubernetes +Swarm from a Docker Captain
Docker Mastery: with Kubernetes +Swarm from a Docker Captain
Build, test, deploy containers with the best mega-course on Docker, Kubernetes, Compose, Swarm and Registry using DevOps
What you'll learn Docker Mastery: with Kubernetes +Swarm from a Docker Captain
How to use Docker, Compose and Kubernetes on your machine for better software building and testing.
Learn Docker and Kubernetes official tools from an award-winning Docker Captain!
Learn faster with included live chat group (21,000 members!) and weekly live Q&A.
Gain the skills to build development environments with your code running in containers.
Build Swam and Kubernetes clusters for server deployments!
Hands-on with best practices for making Dockerfiles and Compose files like a Pro!
Build and publish your own custom images.
Create your own custom image registry to store your apps and deploy them in corporate environments.
READ ALSO: 1. MongoDB - The Complete Developer's Guide 2020 2. Spring Framework 5: Beginner to Guru 3. Learn How To Code: Google's Go (golang) Programming Language 4. The Complete Oracle SQL Certification Course
Requirements
No paid software required - Just install your favorite text editor and browser!
Local admin access to install Docker for Mac/Windows/Linux.
Understand the terminal or command prompt basics.
Linux basics like shells, SSH, and package managers. (tips included to help newcomers!)
Know the basics of creating a server in the cloud (on any provider). (tips included to help newcomers!)
Understand the basics of web and database servers. (how they typically communicate, IP's, ports, etc.)
Have a GitHub and Docker Hub account.
Description
Updated Monthly in 2019! Be ready for the Dockerized future with the number ONE Docker + Kubernetes mega-course on Udemy. Welcome to the most complete and up-to-date course for learning and using containers end-to-end, from development and testing to server deployments and production. Taught by an award-winning Docker Captain and DevOps consultant.
Just starting out with Docker? Perfect. This course starts out assuming you're new to containers.
Or: Using Docker now and need to deal with real-world problems? I'm here for you! See my production topics around Swarm, Kubernetes, secrets, logging, rolling upgrades, and more.
BONUS: This course comes with Slack Chat and Live Weekly Q&A with me!
"I've followed another course on (Udemy). This one is a million times more in-depth." "...when it comes to all the docker stuff, this is the course you're gonna want to take" - 2019 Student Udemy Review
Just updated in November 2019 with sections on:
Docker Security top 10
Docker 19.03 release features
Why should you learn from me? Why trust me to teach you the best ways to use Docker? (Hi, I'm Bret, please allow me to talk about myself for a sec):
I'm A Practitioner. Welcome to the real world: I've got 20 years of sysadmin and developer experience, over 30 certifications, and have been using Docker and the container ecosystem for my consulting clients and my own companies since Docker's early days. Learn from someone who's run hundreds of containers across dozens of projects and organizations.
I'm An Educator. Learn from someone who knows how to make a syllabus: I want to help you. People say I'm good at it. For the last few years, I've trained thousands of people on using Docker in workshops, conferences, and meetups. See me teach at events like DockerCon, O'Reilly Velocity, GOTO Conf, and Linux Open Source Summit. I hope you'll decide to learn with me and join the fantastic online Docker community.
I Lead Communities. Also, I'm a Docker Captain, meaning that Docker Inc. thinks I know a thing or two about Docker and that I do well in sharing it with others. In the real-world: I help run two local meetups in our fabulous tech community in Norfolk/Virginia Beach USA. I help online: usually in Slack and Twitter, where I learn from and help others.
"Because of the Docker Mastery course, I landed my first DevOps job. Thank you, Captain!" - Student Ronald Alonzo
"There are a lot of Docker courses on Udemy -- but ignore those, Bret is the single most qualified person to teach you." - Kevin Griffin, Microsoft MVP
Giving Back: a portion of my profit on this course will be donated to supporting open source and protecting our freedoms online! This course is only made possible by the amazing people creating the open-source. I'm standing on the shoulders of (open source) giants! Donations will be split between my favorite charities including the Electronic Frontier Foundation and Free Software Foundation. Look them up. They're awesome!
This is a living course and will be updated as Docker and Kubernetes feature change.
This course is designed to be fast at getting you started but also get you deep into the "why" of things. Simply the fastest and best way to learn the latest container skills. Look at the scope of topics in the Session and see the breadth of skills you will learn.
Also included is a private Slack Chat group with 20k students for getting help with this course and continuing your Docker and DevOps learning with help from myself and other students.
"Bret's course is a level above all of those resources, and if you're struggling to get a handle on Docker, this is the resource you need to invest in." - Austin Tindle, Course Student
Some of the many cool things you'll do in this course:
Edit web code on your machine while it's served up in a container
Lockdown your apps in private networks that only expose necessary ports
Create a 3-node Swarm cluster in the cloud
Install Kubernetes and learn the leading server cluster tools
Use Virtual IP's for built-in load balancing in your cluster
Optimize your Dockerfiles for faster building and tiny deploys
Build/Publish your own custom application images
Learn the differences between Kubernetes and Swarm
Create your own image registry
Use Swarm Secrets to encrypt your environment configs, even on disk
Deploy container updates in a rolling always-up design
Create the config utopia of a single set of YAML files for local dev, CI testing, and prod cluster deploys
And so much more...
After taking this course, you'll be able to:
Use Docker in your daily developer and/or sysadmin roles
Deploy apps to Kubernetes
Make Dockerfiles and Compose files
Build multi-node Swarm clusters and deploying H/A containers
Make Kubernetes YAML manifests and deploy using infrastructure-as-code methods
Build a workflow of using Docker in dev, then test/CI, then production with YAML
Protect your keys, TLS certificates, and passwords with encrypted secrets
Keep your Dockerfiles and images small, efficient, and fast
Run apps in Docker, Swarm, and Kubernetes and understand the pros/cons of each
Develop locally while your code runs in a container
Protect important persistent data in volumes and bind mounts
Lead your team into the future with the latest Docker container skills!
Extra things that come with this course:
Access to the course Slack team, for getting help/advice from me and other students.
Bonus videos I put elsewhere like YouTube, linked to these courses resources.
Weekly Live Q&A on YouTube Live.
Tons of reference links to supplement this content.
Updates to content as Docker changes its features on these topics.
Who this course is for:
Software developers, sysadmins, IT pros, and operators at any skill level.
Anyone who makes deploys or operates software on servers.
Docker Mastery: with Kubernetes +Swarm from a Docker Captain
Created by Bret Fisher, Docker Captain Program
Last updated 3/2020
English
English, French [Auto-generated]
Size: 11.24 GB
DOWNLOAD COURSE
Content From: https://ift.tt/2CCIwDx
0 notes
Link
via thenewstack.io
Google Cloud Run is a serverless environment to run containers. For the background and context of this latest Google Cloud Platform (GCP) service, refer to my previous article.
In this tutorial, we will deploy a web application based on Node.js and MongoDB to the Cloud Run platform. Since Cloud Run is meant to host and scale stateless web applications, we will use mLab service to persist data. Since both mLab and Cloud Run are serverless, we just need to focus on the code and business logic instead of worrying about the infrastructure.
There are two steps involved in this workflow: provisioning an mLAB Mongo database instance, and deploying code to Cloud Run. This tutorial assumes you have an active account on Google Cloud Platform with the CLI and SDK installed on your development machine. You also need Docker Desktop to build images locally.
Step 1: Provisioning a mLab MongoDB Instance
mLab offers a managed MongoDB database as a service. It has a free plan called Sandbox that provides 500MB of storage to run a database instance for development and testing. It is a shared database server process running on a shared virtual machine, good enough for our prototype.
mLab instances can be deployed in multiple cloud platforms including GCP. Refer to the documentation on creating a database within GCP. Make sure that you launch the instance in us-central1 (lowa) region. This is the same region where our web app will be deployed. Since both the services are running in the same region, the latency is minimal.
Below is the screenshot of the mLab database service that I launched for this tutorial. Make sure your instance looks similar. Keep the connection string handy which is needed for the next step.
Step 2: Building and Deploying a Cloud Run Service
Start by cloning the Github repo that has the sample MEAN web application. We will then build a Docker image and push it to Google Container Registry (GCR).
Navigate to the root of the repo to find the Dockerfile. We will use this to build the image locally.
Run the below commands to set the environment. This initializes all the variables required to build and deploy the service. Ensure you are replacing the placeholders with appropriate values.
PROJECT_ID='GCP project id' REGION_ID='us-central1' IMAGE='todo:v1' CLOUD_RUN_SVC="todo" DB_HOST='mLAB connection string' gcloud components install beta gcloud components update gcloud config set run/region $REGION_ID gcloud auth configure-docker gcloud components install docker-credential-gcr
The above commands install the Cloud Run CLI followed by configuring the local Docker environment with Google Container Registry credentials.
It’s time for us to build the container and push it to GCR.
docker build . --tag gcr.io/$PROJECT_ID/$IMAGE docker push gcr.io/$PROJECT_ID/$IMAGE
Verify that the image is available in GCR by running the below command:
gcloud container images list
With the database and container image in place, let’s go ahead and deploy the web application.
gcloud beta run deploy $CLOUD_RUN_SVC \ --image gcr.io/$PROJECT_ID/$IMAGE \ --allow-unauthenticated \ --update-env-vars DBHOST=$DB_HOST
The switch, –allow-unauthenticated, will let the service accept the traffic from the public internet. Notice that we are passing the MongoDB connection string generated by mLab as an environment variable. The code expects the connection string from the DBHOST environment variable.
You can retrieve the running services with the below command:
gcloud beta run services list
You can also explore the service configuration from the GCP Console.
Clicking on the URL takes us to the web application.
Cloud Run services can also be deployed on existing GKE clusters. They act like typical Kubernetes Pods with access to resources available within the cluster. In the next part of this tutorial, I will demonstrate how to access stateful services running in a GKE cluster from a Cloud Run service. Stay tuned.
Feature image by Gerd Altmann from Pixabay.
The post Tutorial: Deploying a Web Application on Google Cloud Run appeared first on The New Stack.
0 notes
Text
[Udemy] Docker Containers For Beginners (Learn Container Secrets)
A Docker Container crash course for busy professionals and absolute beginners from any background Install Docker Engine on your Laptop and run Docker Containers Know Docker Container Secrets Build Docker Container Images for any applications Publish Docker Images to the online Docker Hub Repository Download Docker Images from Docker Hub Registry and run the application Docker Containers. Create Persistent Storage Volumes in the host machine, and mount it inside any “stateful” Docker Containers Perform Docker Container Life Cycle Management Retrieve Container Logs for debugging. Login to a Docker container to execute commands and debug applications, alive. Requirements Basic Understanding on Linux Description A simple and easy to understand Docker Container crash course for busy professionals and absolute beginners from any background. This course was designed with beginners in mind. This Docker course full of demos and lab exercises. Docker is the most popular container engine. Docker is also the most popular application packaging and runtime format. We have designed this course on Docker Containers for Beginners with simple and easy to understand examples. What you’ll learn from this course on Docker Containers: What is the need for Virtual Machines and Containers What is a Virtual Machine What is a Container Difference between Virtual Machines and Containers How Containers are better than Virtual Machines What is a Docker Container How to run a simple web server Docker Container How to build a Docker Container Image - 2 methods How to upload/download the Docker Container Images from the Docker Hub Repository How to run stateful applications How to configure persistent storage volumes How to use persistent storage volumes for a Backend DB application like MySQL or MongoDB How to run multi-container applications using Docker Compose How to simplify Develop and Test Engineer Workflow using Docker Compose Learn what happens under the hood in a Docker Container Learn some of the little known Docker Container Secrets Learn Linux Kernel Virtualization Primitives. Please Note: This course is not solidified yet. So, I will keep adding more content and lectures to the course on Docker Networking, Docker Compose etc, in the upcoming weeks. Who is the target audience? Software Developers, Application Developers, Software Test Engineers, Managers, DevOps Engineers, IT admins, Anyone who’s interested in learning Docker Containers source https://ttorial.com/docker-containers-beginners-learn-container-secrets
source https://ttorialcom.tumblr.com/post/179353968478
0 notes