#its not much but i hope it helps!
Text
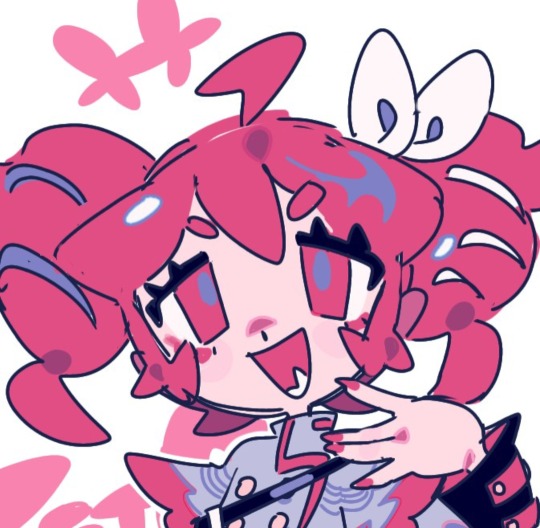
I think the downright most horrific and brutal detail in the show is that Kilgharrah actually used Merlin to make sure Arthur's death happened with the pretence of protecting him
#kilgharrah when i catch you#this is why merlins “ i failed? ” destroyed me to my core#you were never supposed to succeed love#I honestly believe Kilgharrah knew Arthur was supposed to die at Camlaan and just wanted to make sure he didn't die BEFORE that#thats why he was like ooh but Merlin you must protect him and make sure he survives ( until its the convenient time)#and merlin genuinely thought he could protect Arthur until the end#say what you want about Kilgharrah and what his intentions might be behind this but this is SO FOUL#and now Merlins waiting for Arthurs return for a thousand years on Kilgharrah's word alone because thats the only hope he has#what else can he do#lets just hope he's right this time#bummed my self out with this thought while doing my class work#merlin#bbc merlin#merthur#cannot take much more of this guys send help
385 notes
·
View notes
Text
the catholic rejection of it all
#one piece#op#trafalgar law#monkey d. luffy#gear 5 luffy#song is big god by florence and the machine#religious symbology? in my shounen anime protagonist? it's more likely than you think#im 24 years old it's the end of 2023 it's MY turn to finally make a cringe amv for christmas#to be clear. i dont think law sees luffy as his god. but i definitely think he's helped law regain some faith#i.e. catholicism (yeah hardy-hah one piece character is an ex-catholic its all very silly but let's take it unironically for a second)#it would've drilled into law as a child to believe in one true cause (that cause being god). and that will supposedly carry him through lif#give hope purpose etc. but a lot of former catholics choose instead to find that in something else. in law’s cause:#the freedom and hope corasan gave him#the freedom that luffy brings. the will of D. the goodness in the people around him#it's a transfer of faith that feels real and tangible#it's a neat concept and I don't see it talked about much#CJ's op watch-through#corasan#donquixote rosinante#sun god nika#CJ's edits#op analysis#amv
578 notes
·
View notes
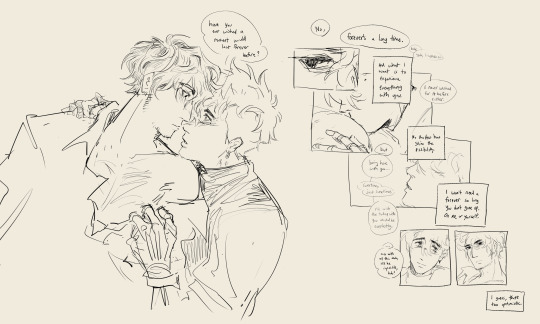
Text
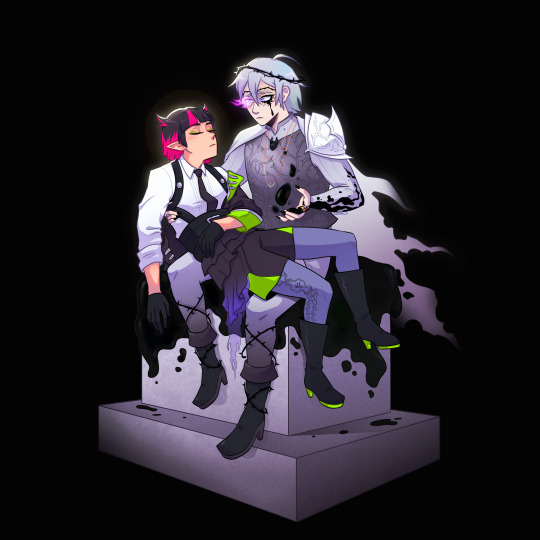
pietà
#TY LETTIE FOR THE COMM AND FOR THIS ABSOLUTE TREASURE OF A REQUEST. IM SO ILL ITS SO SICK AND TWISTED (POSITIVE)#silver in the depths of despair but still holding his father close. with love and compassion and mourning who he is and what has happened#surrounded by the nothingness. nothing but blot and misery. lilia still untouched and kept safe. the lil halo glow OUGUGHH#the RING being blotted. the blot winding up his arm like the pricked finger on the spindle iM GNAWINF THE BARS OF MY CAGE GRGAHGAHH#WHEN I TELL U THIS IS THE SINGLE BEST COMM REQUEST IN THE HISTORY OF EVER. WHEN I TELL U LETTIES MIND IS SO POWERFUL#im normal. ty b i love u so much <3#twst#twisted wonderland#twst silver#lilia vanrouge#suntails#i will never be normal again. hope this helps
502 notes
·
View notes
Photo

soft (and some bittersweet)
#trigun stampede#trigun#vashwood#vash the stampede#nicholas d wolfwood#i think they both spent majority of their lives in solitude and ofc vash went town to town and made friendships promises and etc along the w#way + he had his home and whatnot in the long years he's been alive but he still just seemed so lonely.#in prior versions of trimax he had friends at home at least and maybe he mightv made some but luida and brad are basically just his#guardians in this adaption. like brad used to be a homie.... vash watched that little dude grow up.... and jessica too.... but he doesn't#have that in this adaption. nor a town like july where he had grown close to the townspeople and shaped that tragedy to be closer to his#heart. and wolfwood spent years fighting under the eom and doing shit under their jurisdiction when we saw him so adamantly try to reject#and fight back against that fate. i dont think he had a second at all to get familiar with townspeople or even care to#so its just these two lonely ass souls and vash immediately seeing the good in ww and points it out#ww who is under orders again to be involved in vash's business but he's also SO touchy about it bc vash is so careless and lack that self#regard and also just is not seeing the world that ww is seeing. but then vash helps him and saves him by sharing a piece of what /he/ sees#and it fucking. rescrambled ww's brain for a sec. HE GAVE HIM HOPE!!! he gave him hope!!!! and in turn ww gave vash hope too and its#all done in like 3-4 eps. there's so much fervent attachment in what they managed to give each other in such a short time#but theyre limited to the contract to the inevitable confrontation with knives - so while theyd want to give into that chance to love this#person who managed to give them smth special they just can't at all#ruporas art
2K notes
·
View notes
Text
[ cw: violence mention / death mention / ]
Will never stop thinking about how Leo, all alone in an endless void and being beaten again and again and again by the only other living thing around, still finds comfort in that space. The situation he was in was completely hopeless, and in any other circumstances he would not have escaped, at least not fast enough to save him from permanent (or even fatal) damage, be it physical or mental.
And yet, despite the bleakness of his situation, despite the agony and helplessness, all he needs is one glance at a crumbled photograph, one glance to remember his family, and that’s enough of a reason for him to smile.
Maybe that’s why his powers center around manipulating space - because no matter how much space is between them, no matter how dire his own situation may be, just the thought of his family, alive and okay, is enough to give Leo hope.
#rottmnt#rise of the teenage mutant ninja turtles#rottmnt leo#rise leo#the prison dimension is horrifying on its own#add in a monstrous being that towers over you and has vowed to ensure your suffering?#god I can’t imagine how scary that is#Mikey opening the portal was a miracle because if he hadn’t managed it there#it’s really up in the air what could have become of Leo#personally I subscribe by the theory that you straight up can’t die in the prison dimension#so it’s a prison in all ways#but the thought of a Leo who manages anyway who adapts and continues to have hope despite it all…#Leo saying he’s nothing without his family is a double edged sword really#because the thought of his family alone is all he needs to live. to hope.#to smile#nothing without them…but they’re EVERYTHING to him#and maybe he doesn’t realize it but…the feeling is mutual#one thing too is that hope that comforts Leo so much is not just that#should he think his family needs help - that hope can turn into determination#I’m unwell about this family#actually on my point of their powers - I truly do think the abilities tie in not only to their personalities#but to their relationship to family and love in general#kinda like love languages in a way#Mikey with his chains and time abilities values being around his family the most - he wants them to experience living in the moment togethe#Donnie is someone who is 100% a gift giver to show his love - his constructs are exactly that aren’t they? gifts of his mind#Raph is someone who willingly bears the weight of the shield - he protects his family like the best big brother possible#and Leo - he goes off on his own a lot but his mind is constantly on his family anyway#like a sailor at sea no matter how far he travels the compass always point in one direction - and for him that compass points home#even if he can’t make it back - it’s still there#and that’s enough
241 notes
·
View notes
Note
SHAKES YOU how do you draw taurs. i need help i genuinley cant wrap my head around the anatomy of it. optionally i need help with fat taurs but any kind of taur is okay
Ooh, I love these sorta questions!!!
So there are two main things folks usually struggle with when it comes to drawing taurs as a whole. 1, they struggle with quadrupedal anatomy and 2. connecting the humanoid upper body to the quadrupedal lower body. Obviously there's no shame in either of these things, drawing four legged animals, especially if you're more used to the anatomical structure of something more humanoid is quite tough! And finding the sweet spot where humanoid and quadruped meet to make a taur is a bit of a struggle for folks who're still figuring it out.
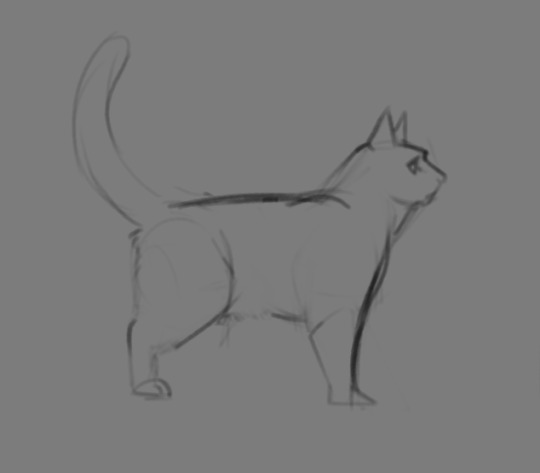
So! The first thing you wanna do really is just familiarize yourself with quadrupedal anatomy. Look at the skeleton of the creature you're trying to taur and see how things like their limbs bend differently or how they're just differently naturally posed as compared to someone who walks upright.
This is a very simplified skeleton of a cat, but you can pretty immediately see how differently everything bends. And I'm not saying it's something you have to perfectly master to know how to draw a taur (especially when you get to drawing fat taurs), but i highly recommend becoming familiar with how a quadrupedal body is structured, the silhouette of most animals is quite misleading! And absolutely use reference!
Heck, our first go at drawing taur Riley was super heavily referenced (I'll even share the ref image if anyone is interested!), and this still came out real jank. Practice makes perfect!
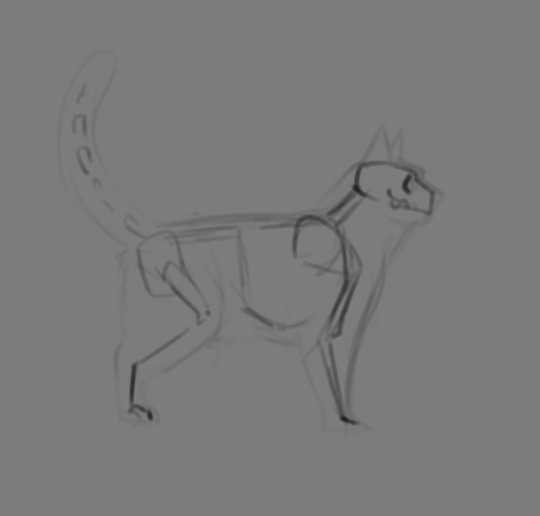
As for connecting the upper body to the lower body, this is a little more subjective and up to you, but I'll lay out some general guidelines.

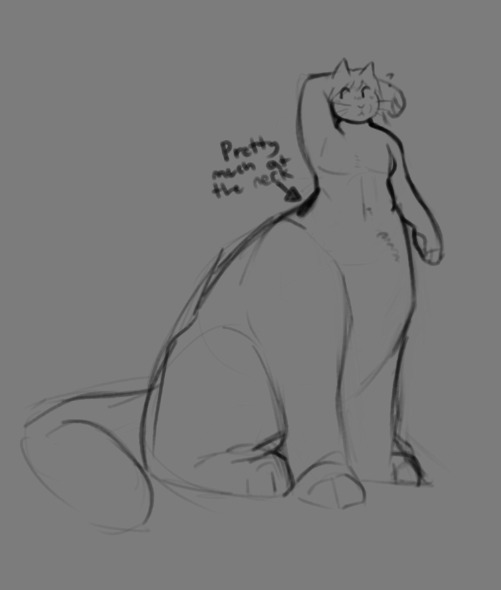
Generally speaking, you wanna put the humanoid torso where the base of the neck is, the front of the torso kinda merging with the rest of the taur body just after the tummy, basically just before the crotch starts.

As for the back, you're gonna want to shoot for just shy of where the butt starts, waist having curved back outwards. It gets a little awkward if you go higher or lower than that. And obviously, you wanna make sure the torso is firmly planted in the center of where the neck should be, ehehe.
That's pretty much the basics though! As always, i recommend looking at how your favorite taur artists draw the creatures and studying off of that! Familiarize yourself with quadrupedal anatomy, and use reference!! You will absolutely get it down with time. I will absolutely cover fat taurs if there's interest in it, and ofc, lemme know if there's anything I missed or need to go over! I hope this helps!
#hat answers#my art#my ocs#Riley Foxglove#design talk#tutorials#taurposting#i imagine this one'll find a much more niche audience but i really do hope its helpful!#these are the two things that definitely gave me grief when i was first figuring out how to Taur#but im sure theres plenty more i missed!#never be afraid to ask about stuff!!!!!!
149 notes
·
View notes
Text
@jaditestuff ty for your commission request, i swear to god i tried so many iterations of adding in yoru and i really couldn’t figure it out im super gomenasorry i hope shanks looking handsome and holding hawky is enough to distract you from this error of ways 🥺🙏🏽
#shanks x mihawk#mishanks#??? is that their ship name???#shanks turned out shockingly handsome so im pretty stoked about that#xam doodies#xam commissions#wahoo thank you so much!!!!#i did try my best with your provided pose reference which was helpful but bc these are half body shots jt was a little difficult#i had to take liberties… see lack pf sword#the sword wouldve made the whole thing super jank#ngl id totally draw thwm again but with my own composition with fhat sword if you want#my brain just didnt want to work with adding a sword to the mix i wanna do better 😔😭😭😭😭😭#but also i never draw these dudes so i hope its ok!!
252 notes
·
View notes
Text


[ X ] DON'T RUN AWAY THIS TIME
OUR DATING SIM (2023) for @soulmatelines [ happy birthday jo 💗 ]
#our dating sim#우리 연애 시뮬레이션#asianlgbtqdramas#lee seung gyu#lee jong hyuk#dawn.gif#*ff#idk how to tag sets anymore girl help#ANYWAYS ITS MY JESTIE'S BIRTHDAY EVERYBODY SHUT THE FUCK UP ITS JO'S DAY#HAPPIEST BIRTHDAY JOOOOO#i love u SO so much thank u for being by my side all this time and i hope u enjoy ur 21st birthday a whoooole lot#here's just a little smth bc i miss them and love them and love YOUUU!!!!#hope u like it 🫶#happy bdayyyyy <3333
262 notes
·
View notes
Photo


YANG JEONGIN
for @foxinys
#jeongin#yang jeongin#i.n#stray kids#skz#createskz#*gifs#*m#flashing tw#LATE....#im cursing everyone esp my isp because of how long my internet was out this morning#and i thought i loaded a reminder into my calendar a WEEK in adv but apparently nawt !!!! so thats me :sob:#ok ok i hope yew like this#i just picked blue bc i feel like i can colour blues well and I FELT LIKE ITS TOO OBV IF I ASK UR FAV COLOUR#but i see now per mary's set its probably PURPLE HELP FAONIWFOAWI#anyway its ok <3#hope u like this <3#my psd has drastically changed since i left tumblr so idk do with that what we will#anyway i love giffing him and im so happy u bias someone i bias bc OIFNOWAIF it makes this so much easier#this took like 2 hrs LOL#n e way sorry for it being late and i hope u like.. happ brith
586 notes
·
View notes
Text
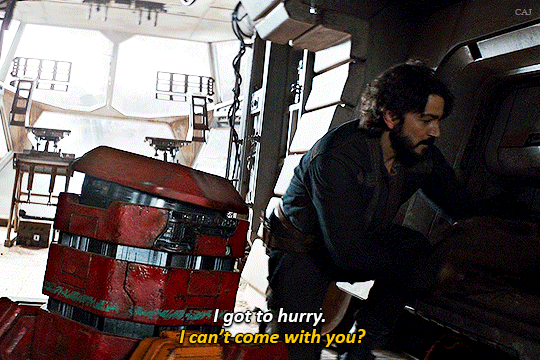
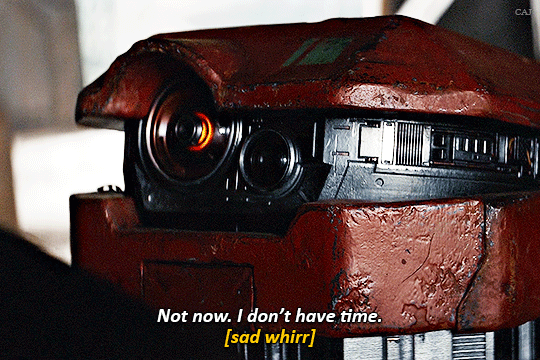
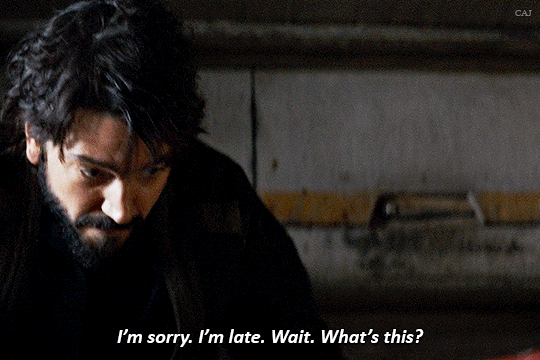
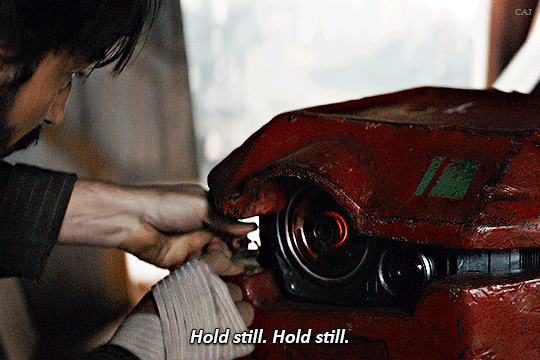

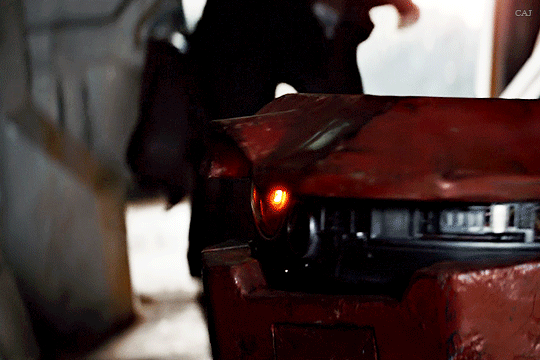
Take your time on the way back.
ANDOR
1.01 | Kassa
#andor#andoredit#swedit#starwarsedit#cassian andor#b2emo#starwarsblr#userjjessi#usernik#userkit#*cajedit#*gif#entering my andor giffing era....FINALLY!!!#almost a year late but hhh thats fine#its been a really long time since ive giffed star wars but ive wanted to make sets for andor for a while now#and im a much better gifmaker now than i was then#jessi this is for you as much as it's for me <3#kit idk if youve watched this but i know you like sw and i hope it's ok to tag you!#and nik...ik we're not mutuals but i hope tagging you in my upcoming andor sets is ok!#consider it a thank you for all the giffing help a while back 🥰#(and also if you know any other blogs that may rb non-moot star wars gifs and may want to see these would you let me know??)
500 notes
·
View notes
Text
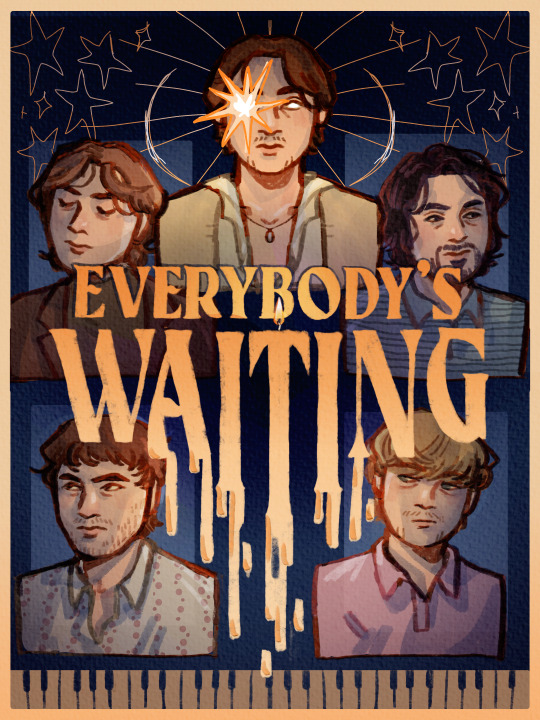
everybody's waiting at the ball 👁️🪩💡🌟🕯️

#FOR YOU TO SHINEEE LIKE A LIGHTHOUSE AFTER ALLLLLL~~~#joker out#bojan cvjetićanin#kris guštin#jan peteh#jure maček#nace jordan#thank you to eryka c28hunter for helping w my chronic inability to draw jan peteh !!!! 🥰🥰#sorry this design is so cliched and overdone#whatever#THE NEW SONG???? OH MY GOD? they weren't kidding about it being different and its grown on me so much#i've been looping it on and off over the past two days and OUGh the vocals at the end always hit i dunno#hope that guessing at their outfits paid off btw some (kris & nace) were easy some (jan and bojan) i had to spot in the background#AND JURE'S i had to base off a single dim bts photo WHERE HIS BACK IS FACING THE CAMERA 😭#anywayz ..... half term hw am i right ! have to get started on that#joker out fandom is sooo lucky i am in school otherwise it would be over for everyone 100%#my art
155 notes
·
View notes
Text

really wanted to draw some cats from other clans today so here we are! a couple of my favs
Boulderspeckle belongs to @bitterclan
Oakstorm belongs to @cricketclan
Belle and Moonspeckle belong to @almaraclan
#ty fallenclan discord for helping me narrow it down#these are some of my fav clans and some of my fav cats#so much whimsy in me#clangen#art#cricketclan#bitterclan#almaraclan#i think i spent about 20 minutes studying belle's design lol#its so complex. mwah#i hope i did her justice lol
282 notes
·
View notes
Text
OK heres zeno coloring tutorial 2.0 !!!! i'm gonna do it kind of in chapters i guess?
chapter 1: choosing base colors
when i'm choosing base colors i always pick everything based on a specific off-white! my 'default' off-white is this kind of very light cyan color but i change it regularly based on character designs/environment/lighting whatever,, examples here!
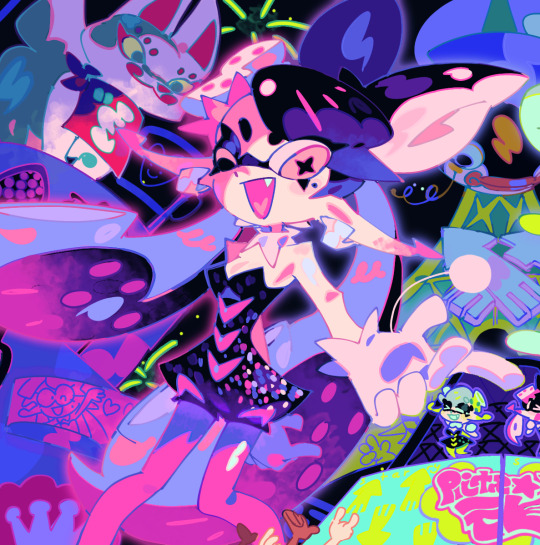
for callie in this piece, i based everything off of this pinkish color! her skin tone, tentacles, outfit etc are all chosen to harmonise/contrast with the pink color

and with this piece, i used a slightly darker blueish color as they're in space but there's still a lot of light... and the lighter colors in the background (the explosion) make a sense of depth i guess? i used that blue color and chose similar cool colors to harmonise with it!
so i more or less base the tone of the colors in the piece off the off-white! warm off-white = warmer colors (like the nova valentine's day art) and cold off white = cooler colors (like the explosion nova and paro art). but i switch up this formula often !!
chapter 2: coloring specific things
here i'll go over some specific textures and stuff like skin and hair ... skin first !!
for skin, i like to use a variety of tones! there are different ways to draw cooler and warmer skintones that other people have gone over way better than i have but basically for skin i use this part of the color wheel and pick the darker tones of oranges/reds/pinks etc. (for darker skintones, i go to the middle of the color square thingy, and for lighter tones, i usually slide down the upper-right side)

when it comes to shading skintones, it's pretty straightforward, just a darkish-purple and a pinkish color on 100% multiply, and i always add a little shadow on the nose and blush becuz i think it's cute
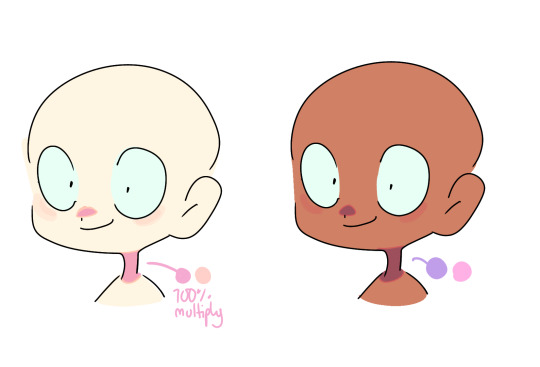
(also i like to add reflective spots on darker skin tones sometimes because 1. darker skin tones reflect in real life and 2. it's fun)

next up is hair... this is very specific to my artstyle but i like to add 3-6 long oval line thingies to the hair to mimic reflection ! it looks cool, it's a good way to show off different colors in the design and i like to switch it up sometimes based on a character's personality!! (like how the frye pic above has a lighting bolt shaped hair thing, or how my teto design has a wing shaped hair thing to mimic her wings in her chimera form!) (note: it doesn't always need to be lighter than the actually hair color and it usually isn't)

for other materials like metal, screens, etc etc... i just add random X marks lol... and reflections!!!

(also, just a general thing, but adding little saturated lines to shading really adds depth and color imo!!)
i would put more tips with refs but tumbles only allows 10 images per post ;w; so i will simply close off by saying don't be afraid to add overlays and filters to your art!! overlays can really help harmonise colors and filters like brightness and contrast can help colors pop... try not to completely rely on them for color choice tho!!
and that's basically it !!! this is not a definitive 'how to draw/color' post... i am not a color theorist... i just wanted to show people how i choose colors cuz a lot of people say they like my color choices! honestly i don't know much myself but i hope that this and the philosophy of 'do what looks good' will help you all o_ob thank you and goodbye
#long post#ah its so freeing to have zero character limit on this site#i did want to add more pics tho 😭#i would make a part two but i dont have much else to say#hope this helps people maybe#also idk how to add a cut/'continue reading' thingy on mobile so if someone could tell me how id appreciate it 😭😭😭
937 notes
·
View notes
Text
Horse Yaoi trotted so Horsegirl Yuri could fly.
#poorly drawn mdzs#mdzs#equineswap au#wei wuxian#lan wangji#little apple#xiao pingguo#lan wunian#This is the first and second kiss I've ever drawn. And its horse yaoi and horsegirl yuri. Wouldn't want it any other way tbh.#And with that...Horse week has come to a close#Not the end of this AU mind you; I'll still throw some doodles in here & there and reblog any fanart#The concept behind this was to make something with the vibes of that one picture with the guys holding girls up on their shoulders#so the girls can kiss. And the guys are kissing too. I hope someone knows what I'm talking about.#Maybe one day I'll draw the unswapped version. Ill flip a coin to decide whether or not wangxian are carrying their equines or riding them#Thank you all so much for the extremely enthusiastic reception to my equineswap AU#The love for both sides of the swap has blow me away. These designs have been sitting around for a while and I wasn't sure I'd post them.#In the end it became a way to celebrate a follower milestone *and* this blog's 3 month anniversary#also...It has been a hard few weeks and I needed something light and fun. I really mean it when I say “you guys helped me pull through”#Love you all B'*)
640 notes
·
View notes
Text
I hope Hawk and Tim kiss and dance and makeout and swim and be HAPPY in 7th episode


Lets be real, Hawk mightve not seen him in over 10 years (since ep.6) but he is still smitten look at his face
#fellow travelers#tim laughlin#hawk fuller#hawk x tim#jonathan bailey#matt bomer#hawkins fuller#its gonna have sad parts too im sure#like the description of the ep says#Hawk is on fire island bc hes destroyed and has gone down a bad hole#hope skippy can help him#i love them#i love them so much
180 notes
·
View notes
Text
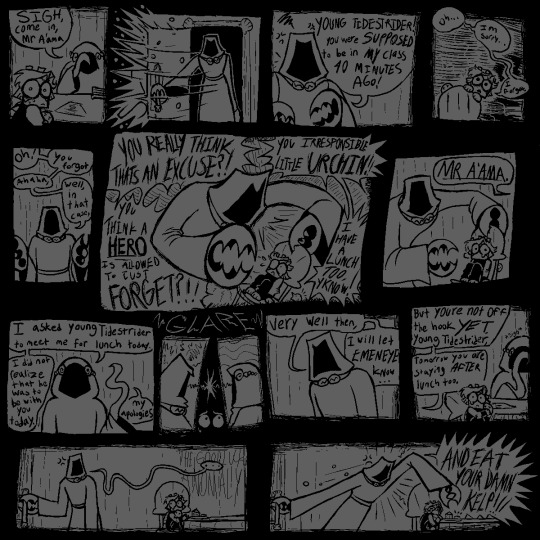
[<==PREV PAGES] [NEXT PAGE==>(not out yet.wait a year.or maybe more.imagine.]
saw alot of comments on prev pages; saying 'i HATE that mean teacher! im gonna FIGHT HIM!!' & i LOVE the energy!! it WOULD be nice. to have that catharsis. but the story of young tidestrider is Not one of catharsis. it is a story of being so small and so special and sucking so bad.
#jrwi fanart#jrwi show#jrwi riptide#gillion tidestrider#GONNA START FORMATTING MY COMICS BETTER. W THE PROPER 'PREV' 'NEXT' LINKS#REALLY DIDNT EXPECT TO CONTINUE THIS SERIES BUT AAAUUUHH MY BRRAAAIN MY BRAIN IS SO IDEASSS. I HAVE 3 OTHER PAGES SKETCHED OUT#NO PROMISES ILL FINISH EM ANY TIME SOON OR EVER. MY WHIMS ARE THEIR OWN BEAST AND I ONLY DRAW ON MY WHIMS#THAT BEING SAID IF U COMMISSIONED ME ILL GEEETT TO YOUUU IM SORRYYYY. ART IS AN EMOTIONAL RELEASE FOR ME N BABY I HAVE EMOTIONS.#ESPECIALLY ABOUT GILLION TIDESTRIDER CHAMPION OF THE UNDERSEA HERO OF THE DEEP.for the desc here i put smth that i typed up in the tags of#another thing i made. i gotta make a proper Baby Gillion tag or smth. eventually.. eventually...I LOVE DRAWIN THIS LIL BABY GUY..#i also LOVE depicting the teachers as just being so fuckin mean. ofc theres variation in that. just like in all things.like the teacher her#idk if itll be mentioned but the octo lady is named Ms Octburn.an octopus pun based off the name of an actual councilor i had#when i was in elementary school i got bullied alot but teachers never did anything. i hated adults and didnt trust them.#but this councilor o mine was so genuinely sweet. i remember spending alot of time w her. she doesnt work there anymore.#but that one school adult that actually earns ur trust and is there for you when they can be.its SO important for a child i think#i hope she knows how much she helped me.youll see in the next page that ms octburn isnt perfect either.but she tries. they all try.somehow.#ALL these comics are gonna be inspired by somesorta experience o mine in the school system. school is so fucked up u ever thing abt that#AND GILLIOOOOONNN IN THE MOST FUCKED UP LITTLE SCHOOL OF ALL. MAINTAINED BY A CULT. CENTERED AROUND HIM. OUR CHOSEN ONE#I IMAGINE ALOT BANKS ON HIS SUCCESS. THIS IS THE WORLD. THE WHOLE WORLD. THE PROPHECY IS GOING TO COME TRUE N UR TELLIN ME#THAT ITS THIS LITTLE IDIOT THATS GONNA BE SAVING US? WHAT IF HE FAILS. IF HE CANT GET THIS RIGHT THEN HE WILL FAIL AND WE WILL DIE#WE NEED TO TRAIN HIM. WE NEED HIM TO LEARN. AND TO SUCCEED. OR ELSE WE'RE DEAD. WE'RE ALL FUCKING DEAD. I IMAGINE THAT MUST BE STRESSFUL#in other news i hope ppl actually giggle when they read these. they ARE intended to be comical. dark humor or whatever. like its also sad#this is intended to be a sad comic series. but a funny one too. does that make sense? god i hope so.saw some1 say they had flashbacks-#-reading this. like YES!! THE INTENDED EFFECT!! YOU GET ME!! i love seeing ppl get upset on this lil baby boys behalf. i LOVE seeing ppl-#-wail n weep n cry in the comments. i LOOOVE seeing ppl RELATE to baby gillion. and i love letting u all know that this wont be a happycomi#gillion gets his happiness arc in the actual show. this series is one of unfortunate events. teehehehe. do u guys remember that show#i keep listening to the lil songs from A Series of Unfortunate Events for inspiration. GOOD STUFF!!#anyway uuhh uhh thats all i got in my brain. for now. feed me ur comments give me ur input i NNEEEEEDD THHEEEMMMM
114 notes
·
View notes
Last Seen Blogs
hey-op-just-kill-me
:) Hello :)

marysa-hdz
💬🏳️🌈It's mary

mytauexperience-blog
My Tel Aviv University Experience

princelancey-main
Hella bi and kinda sad

medpharfan
Tận tâm - Uy tín - Chất lượng