#javascript onclick
Explore tagged Tumblr posts
Visit Tumblr Blog
Explore Tumblr blogs with no restrictions, modern design and the best experience.
Last Seen Tumblr Blogs


Fun Fact
Tumblr.com is the 103rd most visited website in the world.
Text
[solved] onclick JavaScript button in image description not working in WordPress
[solved] onclick JavaScript button in image description not working in WordPress
When working with WordPress, there may be instances where the onclick JavaScript button in the image description is not working. This can be caused by a number of issues relating to how WordPress processes and serves content. In this article, we will explore the common reasons for this issue and provide solutions to fix WordPress. Possible Causes of onclick JavaScript Button Issues in Image…
View On WordPress
0 notes
Text
React on Event Types

React is a popular JavaScript library used for building user interfaces. One of its key features is the ability to handle events efficiently and effectively. In this article, we will explore different event types in React and how to handle them.

1. Introduction to React Events
In React, events are actions or occurrences that happen in the browser, such as a button click, input change, or form submission. React provides a synthetic event system that normalizes event handling across different browsers and provides additional functionality for managing UI updates and state.
2. Event Handling in React
Event handling in React can be done in two main ways: using class components and functional components. 2.1 Event Handling in Class Components In class components, event handling involves creating event handler methods. For example, to handle a button click event, you can define an onClick event handler method: class MyComponent extends React.Component { handleClick() { // Event handler logic } render() { return ( Click ); } } 2.2 Event Handling in Functional Components In functional components, event handling can be achieved using the useState hook along with event handler functions. For instance, to handle an input field change event, you can define an onChange event handler function: import React, { useState } from 'react'; function MyComponent() { const = useState(''); function handleChange(event) { setValue(event.target.value); } return ( ); }
3. Common Event Types
React provides support for various event types. Here are some of the commonly used event types: 3.1 onClick Event The onClick event occurs when an element is clicked, typically used with buttons or links. When a user clicks the element, the event handler is invoked, and the specified logic is executed. 3.2 onChange Event The onChange event occurs when the value of an input field changes, commonly used for handling text input. Whenever the input value changes, the event handler is called, and the UI can be updated based on the input value. 3.3 onSubmit Event The onSubmit event occurs when a form is submitted, usually used for form submission handling. When a user submits the form, the event handler is triggered, and the form data can be processed. 3.4 onMouseOver Event The onMouseOver event occurs when the mouse pointer is moved over an element, often used for tooltips or dropdown menus. When a user hovers over the element, the event handler is invoked, and the associated actions related to that element can be performed.
4. Writing Event Handler Functions
In React, event handler functions are typically written within the component where the event occurs. The event handler function is responsible for updating the state or executing other logic based on the user's action. class MyComponent extends React.Component { handleClick() { // Event handler logic } render() { return ( Click ); } } import React, { useState } from 'react'; function MyComponent() { const = useState(''); function handleChange(event) { setValue(event.target .value); } return ( ); }
5. Event Propagation and Default Behavior
React provides mechanisms to control event propagation and default behavior. Event propagation refers to the process of an event being passed to its parent components, while default behavior refers to the browser's default actions. To control event propagation, you can use the stopPropagation() method, which prevents the event from being propagated to the parent components. To prevent the default behavior, you can use the preventDefault() method, which stops the browser from performing its default action.
6. Event Delegation
Event delegation in React refers to handling events on parent elements instead of individual child elements. This approach simplifies event handling for dynamically generated elements. By using event delegation, there is no need to attach event handlers to each individual child element.
7. Passing Parameters to Event Handlers
There are scenarios where you need to pass parameters to event handlers in React. For example, if you want to obtain information about a specific item when clicking on a list item. In such cases, you can pass additional parameters to the event handler.
8. Event Handling with External Libraries in React
React provides integration support for various external libraries. When using external libraries, you need to follow their event handling approaches. Integrating events between React components and external libraries requires careful consideration and may require additional configuration or measures, if necessary.
9. Event Optimization in React
In React, event optimization can be crucial for performance improvement. Event optimization aims to prevent unnecessary re-renders and enhance the responsiveness of your application. Techniques such as function binding, memoization, and maintaining immutability can be applied for event optimization.
10. Conclusion
In this article, we explored event handling in React. React offers a wide range of event types that enable you to handle user interactions and implement dynamic UIs. We learned how to write event handler functions, control event propagation and default behavior, use event delegation, pass parameters to event handlers, integrate events with external libraries, and optimize events in React. Read the full article
0 notes
Text
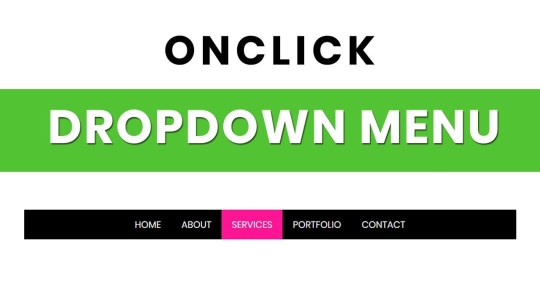
Dropdown Menu on Click
#dropdown menu on click#navbar#navigation menu#onclick dropdown menu#html css#code#frontenddevelopment#css#learn to code#css3#html#divinector#javascript
0 notes
Text
How do I fucking....... iterate through HTML selecting all the text that's rendered as italicized/bolded/etc via CSS rules and such so I can wrap it in 'i' 'b' tags so I can easily strip out all the span class='msword-keysmash12 calibre-keysmash21 googledocs-keysmash76' onclick='popupAd()' style='text-decoration: migraineaura; font-size: 1.0002em; color: #000001;'
Programmatically I mean I don't want a GUI tool. I would prefer Ruby but I imagine that Javascript is the Sane Person way to do this
#'where are you encountering this' IT'S EVERYWHERE#i'm getting rid of all the word processors we're going back to text editors. stop practicing law and writing books until i'm done.
10 notes
·
View notes
Text
#Playstation7 #framework #BasicArchitecture #RawCode #RawScript #Opensource #DigitalConsole
To build a new gaming console’s digital framework from the ground up, you would need to integrate several programming languages and technologies to manage different aspects of the system. Below is an outline of the code and language choices required for various parts of the framework, focusing on languages like C++, Python, JavaScript, CSS, MySQL, and Perl for different functionalities.
1. System Architecture Design (Low-level)
• Language: C/C++, Assembly
• Purpose: To program the low-level system components such as CPU, GPU, and memory management.
• Example Code (C++) – Low-Level Hardware Interaction:
#include <iostream>
int main() {
// Initialize hardware (simplified example)
std::cout << "Initializing CPU...\n";
// Set up memory management
std::cout << "Allocating memory for GPU...\n";
// Example: Allocating memory for gaming graphics
int* graphicsMemory = new int[1024]; // Allocate 1KB for demo purposes
std::cout << "Memory allocated for GPU graphics rendering.\n";
// Simulate starting the game engine
std::cout << "Starting game engine...\n";
delete[] graphicsMemory; // Clean up
return 0;
}
2. Operating System Development
• Languages: C, C++, Python (for utilities)
• Purpose: Developing the kernel and OS for hardware abstraction and user-space processes.
• Kernel Code Example (C) – Implementing a simple syscall:
#include <stdio.h>
#include <unistd.h>
int main() {
// Example of invoking a custom system call
syscall(0); // System call 0 - usually reserved for read in UNIX-like systems
printf("System call executed\n");
return 0;
}
3. Software Development Kit (SDK)
• Languages: C++, Python (for tooling), Vulkan or DirectX (for graphics APIs)
• Purpose: Provide libraries and tools for developers to create games.
• Example SDK Code (Vulkan API with C++):
#include <vulkan/vulkan.h>
VkInstance instance;
void initVulkan() {
VkApplicationInfo appInfo = {};
appInfo.sType = VK_STRUCTURE_TYPE_APPLICATION_INFO;
appInfo.pApplicationName = "GameApp";
appInfo.applicationVersion = VK_MAKE_VERSION(1, 0, 0);
appInfo.pEngineName = "GameEngine";
appInfo.engineVersion = VK_MAKE_VERSION(1, 0, 0);
appInfo.apiVersion = VK_API_VERSION_1_0;
VkInstanceCreateInfo createInfo = {};
createInfo.sType = VK_STRUCTURE_TYPE_INSTANCE_CREATE_INFO;
createInfo.pApplicationInfo = &appInfo;
vkCreateInstance(&createInfo, nullptr, &instance);
std::cout << "Vulkan SDK Initialized\n";
}
4. User Interface (UI) Development
• Languages: JavaScript, HTML, CSS (for UI), Python (backend)
• Purpose: Front-end interface design for the user experience and dashboard.
• Example UI Code (HTML/CSS/JavaScript):
<!DOCTYPE html>
<html>
<head>
<title>Console Dashboard</title>
<style>
body { font-family: Arial, sans-serif; background-color: #282c34; color: white; }
.menu { display: flex; justify-content: center; margin-top: 50px; }
.menu button { padding: 15px 30px; margin: 10px; background-color: #61dafb; border: none; cursor: pointer; }
</style>
</head>
<body>
<div class="menu">
<button onclick="startGame()">Start Game</button>
<button onclick="openStore()">Store</button>
</div>
<script>
function startGame() {
alert("Starting Game...");
}
function openStore() {
alert("Opening Store...");
}
</script>
</body>
</html>
5. Digital Store Integration
• Languages: Python (backend), MySQL (database), JavaScript (frontend)
• Purpose: A backend system for purchasing and managing digital game licenses.
• Example Backend Code (Python with MySQL):
import mysql.connector
def connect_db():
db = mysql.connector.connect(
host="localhost",
user="admin",
password="password",
database="game_store"
)
return db
def fetch_games():
db = connect_db()
cursor = db.cursor()
cursor.execute("SELECT * FROM games")
games = cursor.fetchall()
for game in games:
print(f"Game ID: {game[0]}, Name: {game[1]}, Price: {game[2]}")
db.close()
fetch_games()
6. Security Framework Implementation
• Languages: C++, Python, Perl (for system scripts)
• Purpose: Ensure data integrity, authentication, and encryption.
• Example Code (Python – Encrypting User Data):
from cryptography.fernet import Fernet
# Generate a key for encryption
key = Fernet.generate_key()
cipher_suite = Fernet(key)
# Encrypt sensitive user information (e.g., account password)
password = b"SuperSecretPassword"
encrypted_password = cipher_suite.encrypt(password)
print(f"Encrypted Password: {encrypted_password}")
# Decrypting the password
decrypted_password = cipher_suite.decrypt(encrypted_password)
print(f"Decrypted Password: {decrypted_password}")
7. Testing and Quality Assurance
• Languages: Python (for automated tests), Jest (for JavaScript testing)
• Purpose: Unit testing, integration testing, and debugging.
• Example Unit Test (Python using unittest):
import unittest
def add(a, b):
return a + b
class TestGameFramework(unittest.TestCase):
def test_add(self):
self.assertEqual(add(10, 20), 30)
if __name__ == '__main__':
unittest.main()
8. Order of Implementation
• Phase 1: Focus on core system architecture (low-level C/C++) and OS development.
• Phase 2: Develop SDK and start building the basic framework for UI and input management.
• Phase 3: Work on backend systems like the digital store and integrate with front-end UI.
• Phase 4: Begin rigorous testing and debugging using automated test suites.
This comprehensive approach gives you a detailed idea of how each component can be built using a combination of these languages and technologies. Each section is modular, allowing teams to work on different aspects of the console simultaneously.
[Pixel Art/Sprites/Buildinodels/VictoriaSecretPixelArtKit #Playstation7 #DearDearestBrands]


#victoriasecretrunway#runwaybattle#victoria secret fashion#victoria secert model#victoriasecret#victoria secret#VictoriaSecretRunwayBattle#capcom victoriasecret#capcom videogames#playstation7#ps7#deardearestbrands#capcom#digitalconsole#python#script#rawscript#raw code#framework#VictoriaSecretVideoGame#deardearestbrandswordpress
2 notes
·
View notes
Note
hi! i saw your ask to robin about making a website that involves a search/tag feature that works kind of like ao3's?
i was wondering if you'd mind explaining a little about how you're doing that, cause i've recently started trying to make a website that i want to have a similar function (but for photos of Queen because. autism) and i don't really know what i'm doing
no pressure obviously, i'll probably be able to figure it out on my own, but if you'd like to help that would be cool :)
Oh my god. You're asking for the autism to be unleashed
So! Basically, most of the magic is Javascript, and I know nearly nothing of Javascript -- I write, ask AI to help correct stuff, and rewrite lmfao (I personally use SheCodes AI but I'm sure any coding-oriented bot does the same thing. It was just the top result when I searched lmfao -- it also has classes embedded in the site and can recommend you classes based on what you're asking for help on)
Also, this is... not very good. But you have my complete and express permission to build on it lmfao (for example, you can't select more than one tag at once, which is... something that I've got to figure out how to do)
But! Here's the initial CSS (image-div being the class of all searchable images): .image-div { display: none; width: 100px; height: 100px; margin: 5px; border: 1px solid #ccc; background-size: cover; }
That's the easy part. It's just styling what you want to be shown -- but, if you do want the images to be visible before they've been searched, you can delete the display: none line (I THINK. I haven't messed around with this enough to be certain)
Aaaand the HTML:
<div id="tags"> <button onclick="showImages('silly')">Silly</button> <button onclick="showImages('city')">City</button> </div> <div id="image-gallery"> <div class="image-div silly" style="background-image: url('___');"></div> <div class="image-div silly" style="background-image: url('___');"></div> <div class="image-div city" style="background-image: url('___');"></div> </div>
I made the divs themselves be the images because I was trying to save on time lol. If you wanted to have more than just images inside each div, then just code as usual inside each div (you'll have to change the CSS a bit, too -- if you still want the CSS to apply to the images inside each div, then make the selector '.image-div > img' instead of just '.image-div'... I THINK. Either that or '.image-div 'img''. Maybe. I'll have to refresh my memory, sigh)
Now, Javascript:
function showImages(selectedTag) { const allDivs = document.querySelectorAll('.image-div'); allDivs.forEach(div => { if (div.classList.contains(selectedTag)) { div.style.display = 'block'; } else { div.style.display = 'none'; } }); }
Hopefully reading through that is... somewhat self-explanatory. All it does is change the display style of the selected tags to block instead of none.
If you're an actual beginner and this all sounds like gobbledegook to you, I will gladly teach you from the beginning if you'd like lmfao
2 notes
·
View notes
Text
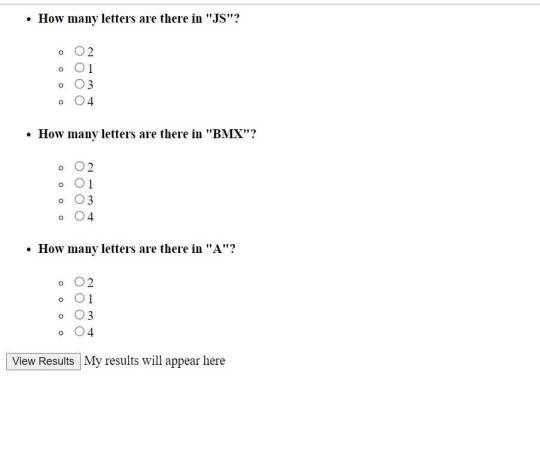
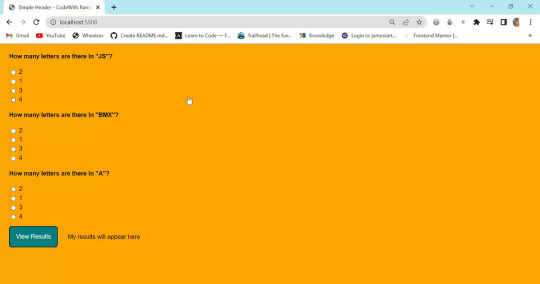
How To Make Multiple Choice Quiz In Html Code

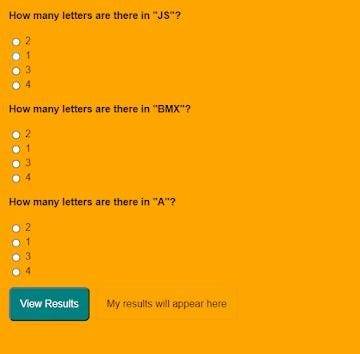
first, you play Multiple Choice Questions (MCQ) Quiz and then click on View results The results page will then be shown. This Multiple Choice Questions (MCQ) Quiz will be finished using JavaScript Code, a powerful language that allows for anything.
100+ JavaScript Projects For Beginners With Source Code
Live Preview Of Multiple Choice Questions Source Code and Preview:-
As you are looking in the project preview how the thing is organized.
Following is the feature of our project:-
We have arranged the Questions and options in the list format using the tag.
Then we set the option using span and defining the radio button and giving the appropriate value.
Multiple Choice Quiz Html Code:-
Now I’ll be telling you to define the structure using HTML. Not from scratch, just the code which is under the body tag.
We have the following part in the HTML section:
Portfolio Website Using HTML CSS And JavaScript ( Source Code)
First, we call the ul class which we have defined the class as a quiz.
Then using the tag we have set our question in the tag.
Then we used a label tag and called the radio button given the value and using span we have given the answer.
Similarly, we have done this for all the options and for all the questions.
Go through the code below and run it in our IDLE before CSS Styling.
<ul class="quiz"> <li> <h4>How many letters are there in "JS"?</h4> <ul class="choices"> <li> <label ><input type="radio" name="question0" value="A" /><span >2</span ></label > </li> <li> <label ><input type="radio" name="question0" value="B" /><span >1</span ></label > </li> <li> <label ><input type="radio" name="question0" value="C" /><span >3</span ></label > </li> <li> <label ><input type="radio" name="question0" value="D" /><span >4</span ></label > </li> </ul> </li> <li> <h4>How many letters are there in "BMX"?</h4> <ul class="choices"> <li> <label ><input type="radio" name="question1" value="A" /><span >2</span ></label > </li> <li> <label ><input type="radio" name="question1" value="B" /><span >1</span ></label > </li> <li> <label ><input type="radio" name="question1" value="C" /><span >3</span ></label > </li> <li> <label ><input type="radio" name="question1" value="D" /><span >4</span ></label > </li> </ul> </li> <li> <h4>How many letters are there in "A"?</h4> <ul class="choices"> <li> <label ><input type="radio" name="question2" value="A" /><span >2</span ></label > </li> <li> <label ><input type="radio" name="question2" value="B" /><span >1</span ></label > </li> <li> <label ><input type="radio" name="question2" value="C" /><span >3</span ></label > </li> <li> <label ><input type="radio" name="question2" value="D" /><span >4</span ></label > </li> </ul> </li> </ul> <button class="view-results" onclick="returnScore()">View Results</button> <span id="myresults" class="my-results">My results will appear here</span>
CSS Code For Styling Multiple Choice Quiz:-
By CSS design we will design our whole page here it is just a quiz so we’ll just add a background color, color to the button, and font family for the whole body.
And set the padding of the questions and options so that it doesn’t get messy and looks in a systematic order.
10+ Javascript Project Ideas For Beginners( Project Source Code)
The analysis will be aided by the CSS code below. After adding this file to your link rel-tag, wait for the results. We will add some of the basic styling to our quiz app using the default selector, and we will add styling to various quiz app elements using the class selector.
this is simple css code. we do not add any heavy css code because our main aim is to create Multiple Choice Questions (MCQ) functionality. if you need more Better Ui you can add more css code in this css section.

JavaScript Multiple Choice Quiz Code:-
In the JavaScript Code of Multiple Choice Quiz section, we will add logic for initializing our page. The logic must know what is correct and incorrect, So we’ll define there the correct option and then we’ll set that when the user clicks on the button the logic will generate and tell the user about his/her score.
Restaurant Website Using HTML and CSS
Through this blog, we have learned how to design Multiple Choice Quizzes using HTML, CSS & JavaScript.
Final Output Of Multiple Choice Quiz in HTML and JS Code:
Now I’m looking for some positive reviews from your side.
So, How was the blog Learners,
If you want a more interesting blog like this then please check our Blog sites. Stay tuned because every day you will learn something new here.
I hope that I’m able to make you understand this topic and that you have learned something new from this blog. If you faced any difficulty feel free to reach out to us with the help of the comment box and if you liked it, please show your love in the comment section. This fills bloggers’ hearts with enthusiasm for writing more new blogs.
Ecommerce Website Using Html Css And Javascript Source Code
Happy Coding
click and get full article and get complete source code
That’s it, folks. In this article, we shared 10+ Portfolio Website templates with cool and different designs.
Hope you liked this article. Share this with your fellow developers. Comment down below your thoughts and suggestions, we would love to hear from you.
See our other articles on codewithrandom and gain knowledge in Front-End Development.
Thank you and keep learning!!
follow us on Instagram: Ashutosh Mishra
2 notes
·
View notes
Text
Start Coding Today: Learn React JS for Beginners

Start Coding Today: Learn React JS for Beginners”—will give you a solid foundation and guide you step by step toward becoming a confident React developer.
React JS, developed by Facebook, is an open-source JavaScript library used to build user interfaces, especially for single-page applications (SPAs). Unlike traditional JavaScript or jQuery, React follows a component-based architecture, making the code easier to manage, scale, and debug. With React, you can break complex UIs into small, reusable pieces called components.
Why Learn React JS?
Before diving into the how-to, let’s understand why learning React JS is a smart choice for beginners:
High Demand: React developers are in high demand in tech companies worldwide.
Easy to Learn: If you know basic HTML, CSS, and JavaScript, you can quickly get started with React.
Reusable Components: Build and reuse UI blocks easily across your project.
Strong Community Support: Tons of tutorials, open-source tools, and documentation are available.
Backed by Facebook: React is regularly updated and widely used in real-world applications (Facebook, Instagram, Netflix, Airbnb).
Prerequisites Before You Start
React is based on JavaScript, so a beginner should have:
Basic knowledge of HTML and CSS
Familiarity with JavaScript fundamentals such as variables, functions, arrays, and objects
Understanding of ES6+ features like let, const, arrow functions, destructuring, and modules
Don’t worry if you’re not perfect at JavaScript yet. You can still start learning React and improve your skills as you go.
Setting Up the React Development Environment
There are a few ways to set up your React project, but the easiest way for beginners is using Create React App, a boilerplate provided by the React team.
Step 1: Install Node.js and npm
Download and install Node.js from https://nodejs.org. npm (Node Package Manager) comes bundled with it.
Step 2: Install Create React App
Open your terminal or command prompt and run:
create-react-app my-first-react-app
This command creates a new folder with all the necessary files and dependencies.
Step 3: Start the Development Server
Navigate to your app folder:
my-first-react-app
Then start the app:
Your first React application will launch in your browser at http://localhost:3000.
Understanding the Basics of React
Now that you have your environment set up, let’s understand key React concepts:
1. Components
React apps are made up of components. Each component is a JavaScript function or class that returns HTML (JSX).
function Welcome() { return <h1>Hello, React Beginner!</h1>; }
2. JSX (JavaScript XML)
JSX lets you write HTML inside JavaScript. It’s not mandatory, but it makes code easier to write and understand.
const element = <h1>Hello, World!</h1>;
3. Props
Props (short for properties) allow you to pass data from one component to another.
function Welcome(props) { return <h1>Hello, {props.name}</h1>; }
4. State
State lets you track and manage data within a component.
import React, { useState } from 'react'; function Counter() { const [count, setCount] = useState(0); return ( <div> <p>You clicked {count} times.</p> <button onClick={() => setCount(count + 1)}>Click me</button> </div> ); }
Building Your First React App
Let’s create a simple React app — a counter.
Open the App.js file.
Replace the existing code with the following:
import React, { useState } from 'react'; function App() { const [count, setCount] = useState(0); return ( <div style={{ textAlign: 'center', marginTop: '50px' }}> <h1>Simple Counter App</h1> <p>You clicked {count} times</p> <button onClick={() => setCount(count + 1)}>Click Me</button> </div> ); } export default App;
Save the file, and see your app live on the browser.
Congratulations—you’ve just built your first interactive React app!
Where to Go Next?
After mastering the basics, explore the following:
React Router: For navigation between pages
useEffect Hook: For side effects like API calls
Forms and Input Handling
API Integration using fetch or axios
Styling (CSS Modules, Styled Components, Tailwind CSS)
Context API or Redux for state management
Deploying your app on platforms like Netlify or Vercel
Practice Projects for Beginners
Here are some simple projects to strengthen your skills:
Todo App
Weather App using an API
Digital Clock
Calculator
Random Quote Generator
These will help you apply the concepts you've learned and build your portfolio.
Final Thoughts
This “Start Coding Today: Learn React JS for Beginners” guide is your entry point into the world of modern web development. React is beginner-friendly yet powerful enough to build complex applications. With practice, patience, and curiosity, you'll move from writing your first “Hello, World!” to deploying full-featured web apps.
Remember, the best way to learn is by doing. Start small, build projects, read documentation, and keep experimenting. The world of React is vast and exciting—start coding today, and you’ll be amazed by what you can create!
0 notes
Text
Master JavaScript: Step-by-Step Tutorial for Building Interactive Websites
JavaScript Tutorial

Master JavaScript: Step-by-Step Tutorial for Building Interactive Websites
In the evolving world of web development, JavaScript remains one of the most powerful and essential programming languages. Whether you're building simple webpages or full-fledged web applications, JavaScript gives life to your content by making it interactive and dynamic. This JavaScript Tutorial offers a beginner-friendly, step-by-step guide to help you understand core concepts and begin creating responsive and engaging websites.
What is JavaScript?
JavaScript is a lightweight, high-level scripting language primarily used to create dynamic and interactive content on the web. While HTML structures the webpage and CSS styles it, JavaScript adds interactivity—like handling clicks, updating content without refreshing, validating forms, or creating animations.
Initially developed for client-side scripting, JavaScript has evolved significantly. With the rise of environments like Node.js, it is now also used for server-side programming, making JavaScript a full-stack development language.
Why Learn JavaScript?
If you're looking to become a front-end developer or build web-based applications, JavaScript is a must-have skill. Here’s why:
It runs on all modern browsers without the need for plugins.
It’s easy to learn but incredibly powerful.
It works seamlessly with HTML and CSS.
It powers popular frameworks like React, Angular, and Vue.js.
It’s in high demand across the tech industry.
This JavaScript Tutorial is your gateway to understanding this versatile language and using it effectively in your web projects.
Getting Started: What You Need
To start coding in JavaScript, all you need is:
A modern browser (like Chrome or Firefox)
A text editor (such as Visual Studio Code or Sublime Text)
Basic knowledge of HTML and CSS
No complex setups—just open your browser and you're ready to go!
Step 1: Your First JavaScript Code
JavaScript code can be embedded directly into HTML using the <script> tag.
Example:<!DOCTYPE html> <html> <head> <title>JavaScript Demo</title> </head> <body> <h1 id="demo">Hello, World!</h1> <button onclick="changeText()">Click Me</button> <script> function changeText() { document.getElementById("demo").innerHTML = "You clicked the button!"; } </script> </body> </html>
Explanation:
The onclick event triggers the changeText() function.
document.getElementById() accesses the element with the ID demo.
.innerHTML changes the content of that element.
This simple example showcases how JavaScript can make a static HTML page interactive.
Step 2: Variables and Data Types
JavaScript uses let, const, and var to declare variables.
Example:let name = "Alice"; const age = 25; var isStudent = true;
Common data types include:
Strings
Numbers
Booleans
Arrays
Objects
Null and Undefined
Step 3: Conditional Statements
JavaScript allows decision-making using if, else, and switch.let age = 20; if (age >= 18) { console.log("You are an adult."); } else { console.log("You are a minor."); }
Step 4: Loops
Use loops to execute code repeatedly.for (let i = 0; i < 5; i++) { console.log("Iteration:", i); }
Other types include while and do...while.
Step 5: Functions
Functions are reusable blocks of code.function greet(name) { return "Hello, " + name + "!"; } console.log(greet("Alice")); // Output: Hello, Alice!
Functions can also be anonymous or arrow functions:const greet = (name) => "Hello, " + name;
Step 6: Working with the DOM
The Document Object Model (DOM) allows you to access and manipulate HTML elements using JavaScript.
Example: Change element style:document.getElementById("demo").style.color = "red";
You can add, remove, or change elements dynamically, enhancing user interaction.
Step 7: Event Handling
JavaScript can respond to user actions like clicks, keyboard input, or mouse movements.
Example:document.getElementById("myBtn").addEventListener("click", function() { alert("Button clicked!"); });
Step 8: Arrays and Objects
Arrays store multiple values:let fruits = ["Apple", "Banana", "Mango"];
Objects store key-value pairs:let person = { name: "Alice", age: 25, isStudent: true };
Real-World Applications of JavaScript
Now that you have a basic grasp, let’s explore how JavaScript is used in real-life projects. The applications of JavaScript are vast:
Interactive Websites: Menus, image sliders, form validation, and dynamic content updates.
Single-Page Applications (SPAs): Tools like React and Vue enable dynamic user experiences without page reloads.
Web Servers and APIs: Node.js allows JavaScript to run on servers and build backend services.
Game Development: Simple 2D/3D browser games using HTML5 Canvas and libraries like Phaser.js.
Mobile and Desktop Apps: Frameworks like React Native and Electron use JavaScript for cross-platform app development.
Conclusion
Through this JavaScript Tutorial, you’ve taken the first steps in learning a foundational web development language. From understanding what is javascript is now better.
As you continue, consider exploring advanced topics such as asynchronous programming (promises, async/await), APIs (AJAX, Fetch), and popular frameworks like React or Vue.
0 notes
Text
Как начать работу с фронтенд-разработкой: основы HTML, CSS и JavaScript?
В мире создания сайтов и мобильных приложений фронтенд-разработка — это то, что превращает идеи в реальные интерфейсы, с которыми пользователи взаимодействуют. Для начинающих разработчиков важно освоить базовые технологии, такие как HTML, CSS и JavaScript, которые являются основой любой веб-страницы. Если вы хотите погрузиться в мир создания сайтов или приложений, эти три технологии — первые шаги на вашем пути.

1. HTML — основа структуры веб-страницы
HTML (HyperText Markup Language) — это язык разметки, который используется для создания структуры веб-страниц. Он задаёт, что будет на странице: текст, изображения, кнопки и ссылки. Если сравнивать веб-страницу с домом, то HTML — это фундамент и стены. С помощью HTML вы определяете, какие элементы будут отображаться и как они будут связаны друг с другом.
Пример простого HTML-кода:
html
<!DOCTYPE html>
<html lang="en">
<head>
<meta charset="UTF-8">
<meta name="viewport" content="width=device-width, initial-scale=1.0">
<title>Моя первая страница</title>
</head>
<body>
<h1>Добро пожаловать на мой сайт!</h1>
<p>Это пример страницы на HTML.</p>
</body>
</html>
2. CSS — оформление и стиль
После того как у вас есть структура страницы, нужно придать ей стиль и оформление. Для этого используется CSS (Cascading Style Sheets). CSS позволяет задать цвета, шрифты, отступы и другие визуальные элементы. Если HTML — это скелет страницы, то CSS — это её одежда.
Пример простого CSS-кода для вышеуказанного HTML:
css
body {
font-family: Arial, sans-serif;
background-color: #f4f4f4;
}
h1 {
color: #333;
}
3. JavaScript — добавление интерактивности
Чтобы сделать вашу страницу динамичной и интерактивной, вам понадобится JavaScript. Этот язык программирования позволяет добавлять на страницы различные функции, такие как анимации, калькуляторы, формы обратной связи и многое другое. JavaScript делает сайт живым, реагируя на действия пользователя.
Пример простого кода на JavaScript, который изменяет текст при клике на кнопку:
html
<button onclick="changeText()">Нажми меня</button>
<p id="text">Этот текст изменится!</p>
<script>
function changeText() { document.getElementById("text").innerHTML = "Текст изменен!";
}
</script>
Как начать изучение?
Практикуйтесь каждый день. Начните с небольших проектов — создайте свою первую страницу, попробуйте изменить стиль или добавить простую интерактивность. Программирование — это практическое ремесло, и опыт приходит только с практикой.
Используйте онлайн-ресур��ы. Существует множество бесплатных курсов и платформ, которые помогут вам освоить HTML, CSS и JavaScript. Платформы вроде FreeCodeCamp, Codecademy и MDN Web Docs — отличные источники для новичков.
Смотрите на чужой код. Изучение чужих проектов помогает понять, как другие разработчики решают задачи. Это также отличный способ узнать о новых подходах и лучших практиках.
Начало работы с фронтенд-разработкой не требует огромных усилий, но требует терпения и настойчивости. Создание сайтов или мобильных приложений — это увлекательный процесс, который может стать основой для вашей карьеры в разработке. Главное — начать с основ: HTML, CSS и JavaScript. Эти инструменты откроют для вас двери в мир веб-разработки, где вы сможете создавать удобные и красивы интерфейсы для пользователей по всему миру.
0 notes
Text
Getting Started with Interactive Programming

Interactive programming brings your code to life by enabling users to engage with it in real-time. Whether it’s a game, a web app, or a visualization, interactive programs provide an engaging user experience. In this post, we’ll explore what interactive programming is, why it's useful, and how you can start building your own interactive applications.
What is Interactive Programming?
Interactive programming refers to writing software that reacts to user inputs or events while it's running. It can range from graphical applications and games to websites, simulations, or command-line tools that prompt user feedback.
Why Learn Interactive Programming?
Enhances User Experience: Real-time feedback makes applications dynamic and engaging.
Foundation for Games and UI: Essential for developing games, web UIs, and mobile apps.
Boosts Problem-Solving: Helps you think logically and event-driven.
Fun and Motivating: It’s exciting to see your code respond to your actions instantly.
Where to Start?
There are several beginner-friendly platforms and languages perfect for learning interactive programming:
JavaScript + HTML/CSS: Build interactive web pages with event listeners and animations.
Python with Turtle or Pygame: Great for visual learning and making simple games.
Scratch: Drag-and-drop interface for learning logic and interaction basics (perfect for kids and absolute beginners).
Processing (Java-based): A creative coding environment for art and interactive visualizations.
Example: JavaScript Button Interaction
<button onclick="sayHello()">Click Me!</button> <script> function sayHello() { alert('Hello there!'); } </script>
This simple code responds to a user clicking the button by showing a message. That’s interactivity in action!
Key Concepts to Learn
Event Handling: Responding to user actions like clicks, keypresses, and gestures.
DOM Manipulation (Web): Changing what users see on a webpage using code.
State Management: Tracking changes and conditions in your app.
Animation & Timing: Creating smooth transitions and effects over time.
Tools & Platforms
Replit – Online IDE to run interactive code instantly
CodePen – Great for experimenting with HTML/CSS/JS
p5.js – JavaScript framework for creative interactive coding
Scratch – A visual coding platform ideal for interactive storytelling
Project Ideas to Practice
Build a quiz app with score tracking
Make a to-do list with live updates
Create a drawing app with mouse input
Develop a simple game (e.g., pong, tic-tac-toe)
Design a responsive calculator
Conclusion
Interactive programming is one of the most rewarding ways to develop your coding skills. It not only improves your logic and design thinking but also brings your ideas to life in exciting ways. Start small, experiment freely, and have fun creating programs that respond to the world around them!
0 notes
Text
How is XHTML Different from HTML? Understanding the DOM (Document Object Model)
In the world of web development, HTML (HyperText Markup Language) is the foundation of almost every website. However, an advanced and stricter version called XHTML (Extensible HyperText Markup Language) also exists. While both are used to structure web pages, they have key differences in syntax and usage.
Another important concept in web development is the Document Object Model (DOM), which allows developers to interact with web pages dynamically. The DOM makes it possible to modify a webpage’s structure, style, and content using JavaScript.
If you’re looking to build websites and web applications, understanding these topics is crucial. By enrolling in web development courses, an app development course, or a website development course, you can gain the necessary skills to create interactive and professional websites.
This article will cover:
Differences between XHTML and HTML
Features and advantages of XHTML
What is the DOM and how it works
How the DOM is used in modern web development
By the end, you’ll understand why these technologies are important and how learning them can improve your career opportunities.
What is HTML?
HTML (HyperText Markup Language) is the standard language used for creating webpages. It provides a structure that web browsers read to display content.
Key Features of HTML
Uses simple and flexible syntax.
Defines elements such as headings, paragraphs, links, and images.
Works alongside CSS (for styling) and JavaScript (for interactivity).
Used to create static and dynamic webpages.
Example of HTML Code
html
Copy
Edit
<!DOCTYPE html>
<html>
<head>
<title>My First Web Page</title>
</head>
<body>
<h1>Welcome to My Website</h1>
<p>This is a simple HTML page.</p>
</body>
</html>
Why is HTML Important?
HTML is essential for web development because:
It forms the basic structure of all websites.
It is easy to learn and implement.
It supports multimedia elements like images, videos, and audio.
Many website development courses start with HTML before moving on to advanced topics.
What is XHTML?
XHTML (Extensible HyperText Markup Language) is a stricter version of HTML that follows the rules of XML (Extensible Markup Language).
Key Features of XHTML
Follows strict syntax rules.
Ensures well-structured code for better readability.
Requires all elements to be properly closed and nested.
More compatible with mobile devices and modern web applications.
Example of XHTML Code
html
Copy
Edit
<!DOCTYPE html>
<html xmlns="http://www.w3.org/1999/xhtml">
<head>
<title>My XHTML Page</title>
</head>
<body>
<h1>Welcome to XHTML</h1>
<p>This is a well-structured webpage.</p>
</body>
</html>
Advantages of XHTML Over HTML
More Consistent Code – XHTML enforces stricter coding practices.
Better Compatibility – Works well across multiple platforms and browsers.
Easier to Maintain – Fewer errors mean smoother updates.
Since XHTML focuses on well-structured code, it is often included in app development courses that teach best coding practices.
What is the Document Object Model (DOM)?
The Document Object Model (DOM) is a programming interface that represents an HTML or XML document as a structured tree. It allows developers to modify web pages dynamically using JavaScript.
How Does the DOM Work?
When a browser loads a webpage, it converts the HTML document into a DOM tree.
Each element (e.g., headings, paragraphs, buttons) becomes a node in the DOM.
JavaScript can access and modify these nodes to update content, style, and behavior.
Example of DOM Structure
html
Copy
Edit
<!DOCTYPE html>
<html>
<head>
<title>DOM Example</title>
</head>
<body>
<h1 id="heading">Hello, World!</h1>
<button onclick="changeText()">Click Me</button>
<script>
function changeText() {
document.getElementById("heading").innerHTML = "You clicked the button!";
}
</script>
</body>
</html>
Why is the DOM Important?
Makes websites interactive – Updates content without refreshing the page.
Used in modern web frameworks like React and Angular.
Essential for app development – Many mobile apps rely on DOM-based frameworks.
A website development course often includes DOM manipulation to teach dynamic web programming.
How the DOM is Used in Web Development
Real-Time Updates – Social media feeds update without reloading the page.
Form Validation – Checks user input before submitting a form.
Animations and Effects – Smooth transitions and interactive elements.
Single Page Applications (SPA) – Websites that load content dynamically.
By enrolling in a web development course or app development course, you can master the DOM and build interactive applications.
Why You Should Learn XHTML, HTML, and DOM
High Demand for Web Developers – Businesses need skilled developers to create dynamic websites.
Better Career Opportunities – Mastering these technologies makes you more employable.
Enhances Problem-Solving Skills – Understanding the DOM helps in building interactive applications.
Great for Freelancers – Web development is a popular field for remote work and freelancing.
Courses like web development courses, app development courses, and website development courses teach these skills, helping individuals gain industry-relevant expertise.
Both HTML and XHTML are important for web development, but XHTML enforces stricter rules for better structure. The Document Object Model (DOM) allows developers to interact with web pages dynamically, making websites more engaging.
HTML is great for beginners, while XHTML is preferred for professional development.
The DOM is essential for interactive websites and modern web applications.
Learning these technologies through web development courses can boost your career.
0 notes
Text
Menu Falso Iframe
O Falso Iframe é aquele código que simula uma página interna no seu tumblr, e que gera os já famosos "about me", "about tumblr" e outros.
Antes de começar, procure por {block:Posts} no seu html (para procurar dê Ctrl+F) e verá algo parecido com isso:
<div id="posts">
Pode ser que a id tenha um nome diferente (liuc, content, ...) mas isso não vai alterar nada o tutorial a seguir. Apenas guarde o nome da sua id para as próximas etapas.
1- Copie esse código antes de </head>
<script type="text/javascript"> function changeNavigation(id) {document.getElementById('nome da id').innerHTML=document.getElementById(id).innerHTML} </script>
Substitua a parte em negrito pelo nome da sua id, e não altere mais nada.
2- Coloque esse código onde quiser que fique seu menu:
<span onClick="changeNavigation('01')">Nome da aba</span> <span onClick="changeNavigation('02')">Nome da aba</span> <span onClick="changeNavigation('03')">Nome da aba</span>
Se o seu menu for personalizado, o código é esse:
<div class="class do seu menu"><span onClick="changeNavigation('01')">Nome da aba</span></div>
<div class="class do seu menu"><span onClick="changeNavigation('02')">Nome da aba</span></div>
<div class="class do seu menu"><span onClick="changeNavigation('03')">Nome da aba</span></div>
Substitua a parte em negrito pela class do seu menu. Se quiser adicionar mais itens, copie o código de novo e substitua o número (01, 02, 03) por outro.
3- Agora, lá no finalzinho do seu html, antes de </body>, copie o seguinte código:
<div id="01" style="display:none"> Conteúdo da aba 01 </div> <div id="02" style="display:none"> Conteúdo da aba 02 </div> <div id="03" style="display:none"> Conteúdo da aba 03 </div>
Se o seu menu tiver mais itens, copie o código e substitua o número que estiver nele pelo número que você usou na etapa anterior.
Substitua as aspas de todos os códigos, caso contrário, seu menu não funcionará.
0 notes
Text
For the PlayStation 7 UI (NexusOS 1.0), here’s a refined approach with an AI-driven, cloud-integrated interface.

Key UI Features & Functionality
AI-Powered Dashboard (NexusOS 1.0)
Personalized layout that adapts to player behavior and preferences.
Instant access to cloud-stored games, settings, and social features.
Dynamic Game Hub
AI-Suggested Game Queue based on user activity and trends.
Live Game Previews (AI-Generated Clips & Adaptive Recommendations).
Holographic & Gesture-Based Navigation
Supports hand-tracking for UI interactions (works with PlayStation VR).
Adaptive UI scales to different display modes (console, PC, mobile, holographic).

ZeroNexus AI Assistant
Voice & text-based AI assistant for navigating the system.
Real-time game strategy insights & latency optimization.
Instant Play & Multi-Device Sync
No downloads—games launch instantly from PlayStation ZeroCloud.
Seamless device switching (console, tablet, mobile, or PC).

Refined UI Code (Concept in JavaScript for Web-Based Console Interface)
class NexusOS { constructor(user) { this.user = user; this.aiAssistant = new ZeroNexusAI(); this.games = []; this.recommendations = []; } async loadUserDashboard() { console.log(`Loading NexusOS for ${this.user.name}...`); this.games = await this.fetchCloudGames(); this.recommendations = await this.aiAssistant.generateGameSuggestions(this.user); this.renderDashboard(); } async fetchCloudGames() { return fetch("https://ps7cloud.playstation.com/user-games") .then(response => response.json()) .catch(error => console.error("Error fetching games:", error)); } renderDashboard() { let dashboard = document.getElementById("dashboard"); dashboard.innerHTML = `<h1>Welcome, ${this.user.name}</h1>`; let gameList = document.createElement("div"); gameList.classList.add("game-list"); this.games.forEach(game => { let gameCard = document.createElement("div"); gameCard.classList.add("game-card"); gameCard.innerHTML = ` <h2>${game.title}</h2> <button onclick="launchGame('${game.id}')">Play Now</button> `; gameList.appendChild(gameCard); }); dashboard.appendChild(gameList); } launchGame(gameId) { console.log(`Launching game ID: ${gameId}...`); window.location.href = `https://ps7cloud.playstation.com/play/${gameId}`; } } class ZeroNexusAI { async generateGameSuggestions(user) { return fetch(`https://ps7cloud.playstation.com/recommendations?user=${user.id}`) .then(response => response.json()) .catch(error => console.error("Error generating recommendations:", error)); } } // Example Usage const currentUser = { id: 12345, name: "PlayerOne" }; const ps7UI = new NexusOS(currentUser); ps7UI.loadUserDashboard();
UI Enhancements & Features in Development

✅ AI-Generated Dynamic Game Previews
✅ Multi-Device Streaming UI (Console, PC, Tablet)
✅ Holographic UI (for Future PlayStation VR)
✅ Voice-Controlled Navigation via ZeroNexus

BerryBlast, Roses with Hints of Citris #Playstation7
#deardearestbrands#playstation7#chanel#bambiprescott#mousequteers#marvel#samuraiskirts#capcom#nikechanel#tokyopop#deardearestbrands x playstation7
0 notes
Text
JavaScript 2 🧬 How to add JavaScript
New Post has been published on https://tuts.kandz.me/javascript-2-%f0%9f%a7%ac-how-to-add-javascript/
JavaScript 2 🧬 How to add JavaScript

youtube
a - Add Javascript to HTML There are two ways to add JavaScript in an HTML file 1 → by embedding JavaScript in the HEAD or BODY section 2 → by linking to an external JavaScript file You may also find inline JavaScript handlers like onclick="showSomething()" in an HTML element But this way is not recommended. Instead it is better to addEventListener to HTML element in Javascript. Placing the JavaScript in the BODY section ensures that the code will be executed after all the HTML body is parsed
0 notes
Text
What is React.js? A Complete Guide for 2025

What is React.js?
What is React js? A Complete Guide for 2025 dives deep into React.js, the groundbreaking JavaScript library that has transformed the way developers build dynamic and interactive user interfaces. As one of the most powerful and widely adopted tools in modern web development, React, originally created by Facebook (now Meta), continues to dominate the industry with its efficient, component-based architecture and unparalleled flexibility. Whether you're a beginner or an experienced developer, this guide will equip you with everything you need to master React.js in 2025 and beyond.
Reasons for Popularity:
Fast and efficient: Utilizes Virtual DOM for performance and optimization
Component-based: Allows for code reusability and organization
Huge ecosystem: There are many libraries and tools out there that enhance the development experience
It is backed by Meta: All the time updates and new features are added
History and Evolution of React.js
React.js was originally launched in 2013 by Facebook. Over the years, it has passed through several major versions:
2015: React 0.14 was introduced with functional components.
2016: React 15 was designed to improve performance, and so was the implementation of the Fiber architecture.
2017: React 16 brought in Hooks and Error Boundaries.
2020: React 17 emphasized easier upgrades and gradual adoption.
2022+: React 18 introduced concurrent rendering with automatic batching.
Why to Learn React.js by 2025?
Performance and Speed
With fast UI updates made possible by the React Virtual DOM and concurrent rendering, React will be an indispensable framework for modern applications.
Large Community Support
React has a vast user base consisting of millions of developers, and thus, finding resources, tutorials, and support is easier than before.
Flexibility and Scalability
Applications of any size can be developed using React, whether they are small projects or enterprise-level applications.
Core Features of React.js
Virtual DOM
In React, unlike in the normal DOM, only those parts of the UI that were actually changed would be updated, thereby giving faster performance.
Component-Based Architecture
In React, an application is made up of building blocks called components, which are reusable, thereby minimizing redundancy.
JSX (JavaScript XML)
JSX enables developers to write markup directly inside the code.
One-Way Data Binding
This aids in keeping tighter control over the data flow, which is beneficial for easier debugging.
Setting Up React.js in 2025
Install Node.js and npm.
Create a React app using:
npx create-react-app my-app
cd my-app
npm start
Use Vite for faster builds:
npm create vite@latest my-app --template react
Building a Basic React.js Application
Creating Components
function Welcome(props) {
return <h1>Hello, {props.name}!</h1>;
}
Using State with Hooks
import { useState } from 'react';
function Counter() {
const [count, setCount] = useState(0);
return (
<button onClick={() => setCount(count + 1)}>
Count: {count}
</button>
);
}
React.js Best Practices for 2025
Functional components are preferred over class components.
Keep components small and reusable.
Render optimization through memoization (React.memo, useMemo).
Follow proper folder structures.
Error boundaries should be implemented.
Learning React.js at the TCCI Computer Coaching Institute
TCCI offers a comprehensive course on the training of React.js:
React from the beginning to advanced
Projects work from real life
Personal mentorship
Getting certified after completion
Conclusion
React.js will dominate frontend development in 2025. No matter whether you're a fresher or have many years of experience in programming, learning React opens doors to innumerable opportunities. Join TCCI Computer Coaching Institute to master React.js practicing real-time!
Location: Ahmedabad, Gujarat
Call now on +91 9825618292
Get information from https://tccicomputercoaching.wordpress.com/
FAQ
What is React.js mainly used for?
React.js is used for building fast, interactive user interfaces for web applications.
How long does it take to learn React.js?
Depending on prior experience, it can take 2-3 months to become proficient.
Is React.js still relevant in 2025?
Yes, React remains one of the most in-demand frontend technologies.
What are the prerequisites for learning React.js?
Basic knowledge of HTML, CSS, and JavaScript is recommended.
Can I use React.js for mobile development?
Yes! React Native allows you to build mobile apps using React.js.
#ReactJS#WebDevelopment#LearnReact#ReactTutorial#FrontendDevelopment#JavaScript#Coding#TechGuide#Programming#ReactJS2025
0 notes