#javascript react
Explore tagged Tumblr posts
Visit Tumblr Blog
Explore Tumblr blogs with no restrictions, modern design and the best experience.
Last Seen Tumblr Blogs


Fun Fact
Post activity is at the highest at 4:00 pm EDT; notes peak at 10:00 pm EDT.
Text

⚠ BEWARE OF THE DOG ⚠
Snoopy #23
24/10/2024
#peanuts#snoopy#art#23#been looking and feeling like this a bit too often these days#minus the horrifying leech teeth. i have human teeth!#me when the 40 hour work week is real :(#does anyone want to teach me javascript (typescript?) and react in the next like 10 hours before i have to go to work? HA HA HA :/
52 notes
·
View notes
Text
Mini React.js Tips #1 | Resources ✨

I thought why not share my React.js (JavaScript library) notes I made when I was studying! I will start from the very beginning with the basics and random notes I made along the way~!
Up first is what you'll need to know to start any basic simple React (+ Vite) project~! 💻
What you'll need:
node.js installed >> click
coding editor - I love Visual Studio Code >> click
basic knowledge of how to use the Terminal

What does the default React project look like?

Step-by-Step Guide
[ 1 ] Create a New Folder: The new folder on your computer e.g. in Desktop, Documents, wherever that will serve as the home for your entire React project.
[ 2 ] Open in your coding editor (will be using VSCode here): Launch Visual Studio Code and navigate to the newly created folder. I normally 'right-click > show more options > Open with Code' on the folder in the File Explorer (Windows).
[ 3 ] Access the Terminal: Open the integrated terminal in your coding editor. On VSCode, it's at the very top, and click 'New Terminal' and it should pop up at the bottom of the editor.


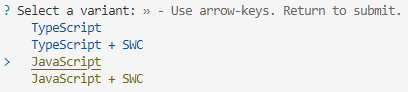
[ 4 ] Create the actual React project: Type the following command to initialize a new React project using Vite, a powerful build tool:
npm create vite@latest
[ 5 ] Name Your Project: Provide a name for your project when prompted.

[ 6 ] Select 'React' as the Framework: Navigate through the options using the arrow keys on your keyboard and choose 'React'.

[ 7 ] Choose JavaScript Variant: Opt for the 'JavaScript' variant when prompted. This is the programming language you'll be using for your React application.
[ 8 ] Navigate to Project Folder: Move into the newly created project folder using the following command:
cd [your project name]
[ 9 ] Install Dependencies: Execute the command below to install the necessary dependencies for your React project (it might take a while):
npm install

[ 10 ] Run the Development Server: Start your development server with the command (the 'Local' link):
npm run dev

[ 11 ] Preview Your Project: Open the link provided in your terminal in your web browser. You're now ready to witness your React project in action!
Congratulations! You've successfully created your first React default project! You can look around the project structure like the folders and files already created for you!
BroCode's 'React Full Course for Free' 2024 >> click
React Official Website >> click
Stay tuned for the other posts I will make on this series #mini react tips~!
#mini react tips#my resources#resources#codeblr#coding#progblr#programming#studyblr#studying#javascript#react.js#reactjs#coding tips#coding resources
116 notes
·
View notes
Text
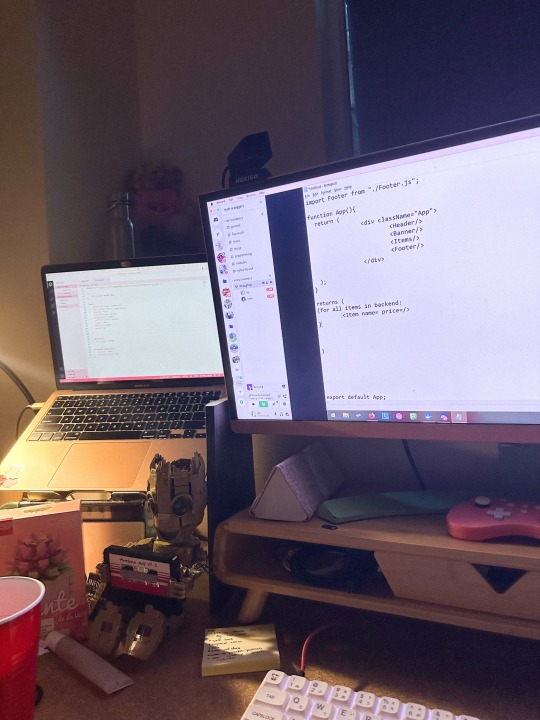
my summer vacation have been so busy…
some of the things i have been up to: i started a ux/ui bootcamp, moved to my first apartment, started driving lessons and i’m currently focusing on front-end development.
a gentle reminder:
it’s only delusional until it’s done.
#codeblr#studyblr#motivation#engineering#javascript#react#comp sci#coding#studying#study motivation#studyspo#desk#study desk#computer engineering#computer science
215 notes
·
View notes
Text

Posting for future reference for when I'm rich and can finally get a tech job in my country and retire to a lonely beach and have massive parties by myself and cook hearty meals and sleep naked on the roof-porch under the night sky by the ocean. And it only took me 3 days to build this fucking crap
6 notes
·
View notes
Text
let today = new Date("12 December 2023");
Hey coders!
The past couple of months I've been a frontend developer intern at an e-sports company and it's been so amazing! I am realizing that yeah, this is exactly what I want to do! I feel super lucky.
Anyway, today, and for the past like week, I have been struggling with implementing the multiselect from react-select in a form we are building in my team. It's a very complicated field, where you can choose from different lists, with values that need to be replaced and disabled depending on which list you are choosing from and what has already been chosen, so just getting the logic right was tough.
Today I got it working, only to realize I can't style it without all the functionality breaking. Feeling like I've tried everything, I was like: you know what? Fuck it, I'm just gonna make my own. Sooo here I am!
This is the inspo (from react-select):

And this is how far I've gotten(using our on-brand styles):

Anddd here's my (non funcitoning) code:
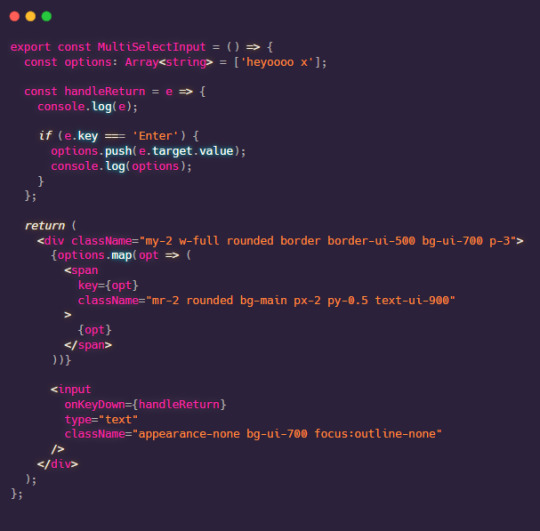
To break it down:
I have a div that contains a span (which will be rendered from an array of options, to be the yellow chip) and an invisible input field
The div is styled to look like an input field, but in reality it's just a div with spans and an invisible input field following the span (lol special thanks to this stack overflow thread)
When the user types, I am listening to what keys they are pressing with a function I am currently calling handleReturn
If the pressed key is "Enter", I will push the current value of the field to the options array
But! This does not do anything at the moment, since the options array does not tell the component to update itself in any way to display the newly added value! For that, I need to make the options array be a state using the useState() hook from React!
When a state is changed, react's useState can tell, and it will rerender (=update) the component, and then my new value will (...should) be shown as well, since it will be using the new array with new values!
Stay tuned for updates(:
#codeblr#react.js#react#reactjs#frontend#frontend developer#web development#compsci#stem#woman in stem#coding#programming#css#html#javascript#js#software engineering#typescript
17 notes
·
View notes
Text
Starting... 21.03.24
Estou aqui para separar os conhecimentos que adquiri por tags. Anotar data e se precisar colocar fotos. Cansei de anotar no papel e além do mais, aqui permite buscas, o que facilita muito. É apenas uma documentação dos >meus< estudos e o que aprendi no dia. Não to aqui pra ensinar nada a ninguém até porque o tumblr no Brasil caiu no ostracismo total, mas quem chegar por aqui (se chegar), pode mandar um oi!
meu twitter = https://twitter.com/sandevz
meu github = https://github.com/sandypiropo
meu linkedin = https://www.linkedin.com/in/sandypiropo/
e é isso ai :)
#Como usar#start#duvidas#programming#programação#Java#React#Javascript#Typescript#Dev#Devs#python#Girl programming#coding#daily
9 notes
·
View notes
Text
Simple react/next js todo list
Modeled after this tutorial by Web Dev Simplified, but using Next.js and Tailwind
I think following a plain react tutorial while using next js is what gave me some issues, especially being my first react project. I probably should have learned some basic react first before going into frameworks, but oh well.
Trying to line up the text with the CSS paper was a huge pain. I still don't like how it looks but at least it's not floating through the lines anymore lol.
The data persistence gave me the most trouble (took me like FIVE hours 😭). The way it was done in the video did not work for me at all, so I had to figure it out. Local storage can't be accessed during server-side rendering, so accessing localStorage has to be done during client-side rendering, using the useEffect hook. But, as I've learned, the useEffect hook doesn't have a return value, and hooks can only be called at the top level. Then I found out that React intentionally calls useEffect twice and that was resetting my local storage with the empty initialization value -_- But in the end i got it working :)
Now I wanna add some more features; a delete all, clear selected, maybe edit note.
6 notes
·
View notes
Text
What the fuck is a "class" bitch I'll kill you
#I HATE HTML AND CSS AND BOOTSTRAP AND TAILWIND AND REACT AND SO MANY MORE#javascript can stay they're like an estranged brother to me#I HATE FRONT END SHIT I JUST WANNA LEARN PHP#this would literally take me like 4 hours to finish but it's been an entire day bc I just don'tt wanna do it#let me do the thing where you put shit in the database and connect it to shit#let me do the fun actual programming shit pleasepleaseplease
2 notes
·
View notes
Text
React JS
Component-Based Architecture:
React applications are built using components, which are reusable, self-contained pieces of the UI. Components can be nested, managed, and handled independently, leading to better maintainability and scalability.
JSX (JavaScript XML):
React uses JSX, a syntax extension that allows HTML to be written within JavaScript. This makes the code more readable and easier to write.
Virtual DOM:
React maintains a virtual DOM, an in-memory representation of the actual DOM. When the state of an object changes, React updates the virtual DOM and efficiently determines the minimal set of changes needed to update the real DOM, leading to performance improvements.
One-Way Data Binding:
Data flows in one direction, from parent to child components, which makes the data flow and logic easier to understand and debug.
State Management:
React components can maintain internal state, making it easy to build dynamic and interactive UIs. For more complex state management, libraries like Redux or Context API can be used.
Advantages of Using React
Performance:
Due to the virtual DOM, React minimizes direct manipulation of the DOM, resulting in better performance for dynamic applications.
Reusable Components:
Components can be reused across different parts of an application, reducing the amount of code and enhancing consistency.
Strong Community and Ecosystem:
A large community and a rich ecosystem of tools and libraries support React, making it easier to find solutions, get support, and integrate with other technologies.
SEO Friendly:
React can be rendered on the server using Node.js, making web pages more SEO-friendly compared to traditional client-side rendering.
Getting Started with React
To start building applications with React, you need to have Node.js and npm (Node Package Manager) installed. Here’s a basic setup to create a new React application:
Install Node.js and npm:
Download and install from Node.js website.
Create a New React Application:
You can use Create React App, an officially supported way to create single-page React applications with no configuration required:
npx create-react-app my-app cd my-app npm start
import React from 'react';
function Welcome(props) { return
Hello, {props.name}
; }
export default Welcome;
#React JS#Front end Developer#Advanced JavaScript#coding#html css#htmlcoding#html#css#php#website#html5 css3#software#React Training
5 notes
·
View notes
Text
Mini React.js Tips #3 | Resources ✨

Continuing the #mini react tips series, its components making time~!
In React, a component is like a Lego brick for building websites or apps. It's a small, independent part of the user interface (UI) that you can reuse whenever you need it. These components can be combined to create bigger and more complex applications. Examples are the header, footer, cards, asides, etc!
What you'll need:
know how to create a React project >> click
know the default React project's file structure >> click
know basic HTML
know basic JavaScript
basic knowledge of using the Terminal

What We Are Creating:
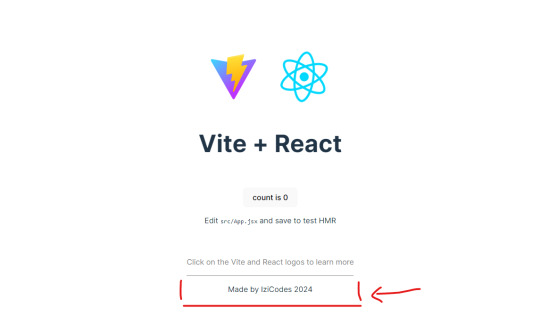
The footer at the bottom!
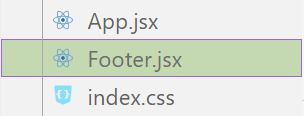
[ 1 ] Navigate to the 'src' Folder: Open your project in Visual Studio Code, locate the 'src' folder, and right-click on it.
[ 2 ] Create a New File: Click 'New File' to create the file within the 'src' folder. This file will house the code for your React component.
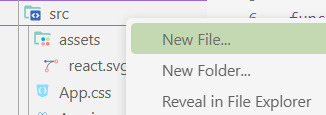
[ 3 ] Naming Conventions: Give your component a name, according to the convention of starting with a capital letter. This naming convention is essential for React to recognize your component~!!
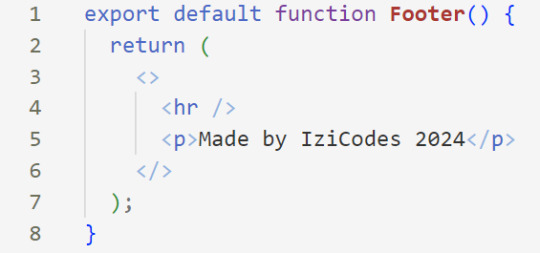
[ 4 ] Create The Initial Function: Open the file and type:
export default function [name of component]() {}

[ 5 ] Insert The return() Statement: The statement is used within a component to specify what content should be rendered when the component is invoked or used. Type:
return()

*the error is there because we haven't added anything inside yet, don't worry!
[ 6 ] Insert The Empty Tags: Inside of the return(), add empty tags (tags that don't have a specified element inside of them).

[ 7 ] Time For Some HTML: Inside the empty tags, enter the normal HTML elements that you want~!
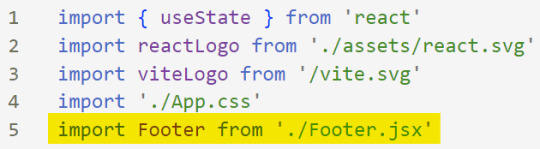
[ 8 ] Integration with App.jsx: Navigate to the 'App.jsx' file in the project, which is typically the entry point of your React application. At the top, import your newly created component. Type:
import [name of component] from './[location of the component]'
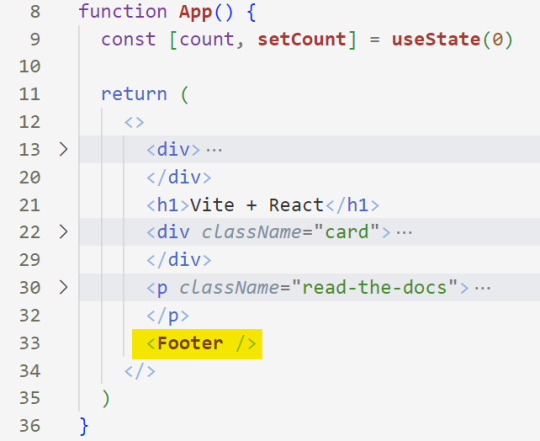
[ 9 ] Use Your Component: Inside the return() statement of the 'App()' function, include your component using the following syntax:
<[name of your component] />
[ 10 ] Run the Development Server: Start your development server with the command (the 'Local' link):
npm run dev
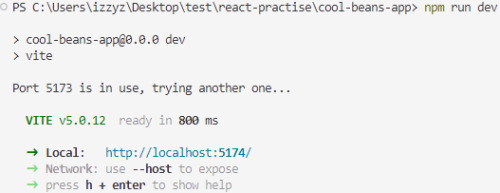
[ 11 ] Preview Your Project: Open the link provided in your terminal in your web browser. Witness your component in action!
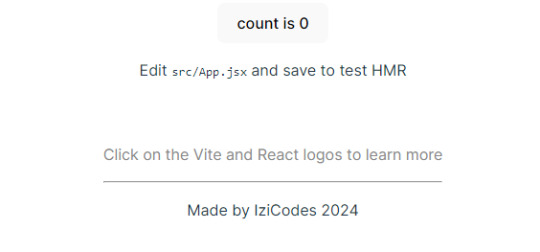
Congratulations! You made your first component! Try and create some new ones and place them around in the App()~!
BroCode’s 'React Full Course for Free’ 2024 >> click
React Official Website >> click
W3School's React Components >> click
Importing and Exporting Components >> click
🐬Previous Tip: Tip #2 The anatomy of the default React project >> click
Stay tuned for the other posts I will make on this series #mini react tips~!
#mini react tips#my resources#resources#codeblr#coding#progblr#programming#studyblr#studying#javascript#react.js#reactjs#coding tips#coding resources
33 notes
·
View notes
Text
react is very confusing to me, specially at how to.. render data..as content..
3 notes
·
View notes
Text
Hi, this is Creative School. Today we share with you how to generate PDF documents from any website. If you want to develop a website and want to provide PDF downloading features, you are exactly in the right place. This video will help you to insert a PDF generator feature in your website on any page of any specific size and shape. GitHub Link: https://github.com/BorhanHosen/How-to-add-pdf-file-download-option-in-your-website.git 0:00 Explanation 3:10 Intro 3:39 Explaining Puppeteer 7:12 Server Side Code Explanation 15:01 Client Side Code Explanation 26:21 Final Touch 28:18 Outro Here are some of our previous tutorial links. You can watch and learn new things and techniques. Enjoy them: How to Send Data from HTML Form Data to Google Sheets | Creative School https://youtu.be/A4TPkOw2Ess Mastering Full Invoice Inventory Management in Microsoft Excel | Creative School Tutorial https://youtu.be/f8BTxan1QTo Motion Graphics in PowerPoint Full Playlist: https://youtube.com/playlist?list=PLsWfHxHIjBT87YgBulwX6X-bnEk4TayQu How to Create the Best Animated Info-graphic in PowerPoint [Part-1] 2020 || Creative School || https://youtu.be/rV-mykyBQIM Awesome Flat Intro Animation In PowerPoint Part 2 || Creative School || https://youtu.be/TafoVSYadEg The Night Sky with a Mountain, fountain, a tree, Bird & Moon Creating in PowerPoint || Creative School || https://youtu.be/jyCTlxJrGyg SAMSUNG Galaxy Boot Animation in PowerPoint [Full Tutorial- 2020] https://youtu.be/pqh-P1mUNp8 How to make an intro video of 10-minute school in PowerPoint 2020. [Part 1] https://youtu.be/I1xObR_SVco Water Animation In PowerPoint Animation! || Creative School https://youtu.be/WfzKTzbGVRA How to add pdf file #download option in your #website https://youtu.be/cNhQ-0VBt5A ===HashTags=== #reactjs #creativeschool #pdfconversion #html #nodejs #vscode #website #javascript #convertpdf #generatepdf #pdfconverter #downloadpdf #puppeteers #mernstack #javascript ===Related Tags=== react pdf generator, generate pdf using react, generate pdfs from html & css with nodejs using puppeteer, certificate generator website, how to create a pdf file using reactjs, html to pdf using javascript, generate pdf from html, generate pdf using javascript, how to add pdf object on a website, how to convert html to pdf in react app using jspdf, easy way to embed pdfs on a website, how to convert html content to pdf in react app using jspdf, generate pdf with react, how to create a pdf with node and puppeteer, generate pdfs from html & css with nodejs using puppeteer, puppeteer, getting to know puppeteer with example, get started with headless chrome and puppeteer, headless chrome and puppeteer, how to generate pdf from html with node.js, how to create a pdf file using reactjs, generate pdf using javascript, how to create pdfs with node js and react, puppeteer examples, puppeteer tutorial, puppeteer html to pdf generation with node.js,
#react pdf generator#generate pdf using react#generate pdfs from html & css with nodejs using puppeteer#certificate generator website#how to create a pdf file using reactjs#html to pdf using javascript#generate pdf from html#generate pdf using javascript#how to add pdf object on a website#how to convert html to pdf in react app using jspdf#generate pdf with react#how to create a pdf with node and puppeteer#javascript#creativeschool#mernstack#puppeteer#website#download
3 notes
·
View notes
Text

New frameworks and tools are constantly being developed in the tech sector, which is a dynamic industry. By nature, Full Stack developers are used to lifelong learning. This flexibility is an essential quality in a field where keeping up with emerging technologies is critical. Taking a Full Stack course fosters an attitude of lifelong learning and development.
Web: https://trumpbookusa.com/blogs/36784/The-Strong-Arguments-for-Enrolling-in-a-Full-Stack-Course
#codingmemes#webdevelopers#nodejs#software#javascriptdeveloper#daysofcode#development#developers#web#bootstrap#o#computerscience#pythonprogramming#peoplewhocode#javascripts#javaprogramming#softwareengineer#technology#dev#react#developerlife#codingdays#softwaredevelopment#webapp#webdevelopmentcompany#programmerlife#tech#github#ui#programmers
4 notes
·
View notes
Text
Framework-heavy JS websites mistake substance for flashy lights. Meanwhile, static HTML just says what it wants to tell.
"web app" websites with a billion lines of react code and a 100 MB cache and enough tracking elements to find out what i had for breakfast, that take 20 seconds to load on my gaming laptop... they are like little inbred bulldogs to me. What are you puppy mill ass web devs doing!! your awful JS isn't making them "aesthetic," youre giving them serious breathing problems >:(
#not a haiku#javascript#html#react#this is targeted at you#gotta say i like having little js activities tho#like making animations of Creatures that for all intents and purposes seem like gifs#but instead are animated with js so they can blink at random intervals#but that's only with#vanilla js#anyway op you might wanna check out the small web#it's like. well. smaller websites that aren't tied to corporations#so people usually do it themselves and the websites tend to be more static
647 notes
·
View notes
Text
Anyone here a programmer? I have things I wanna ask.
2 notes
·
View notes
Text
🚀 2025 is here! Which JavaScript framework is dominating web dev? We break down React, Angular, Vue, Svelte, and more to help you choose the best for your next project.
#javascript#javascriptframework#web application development#web development#react js#mobile app development#app development#artificialintelligence#react native#web application services
0 notes