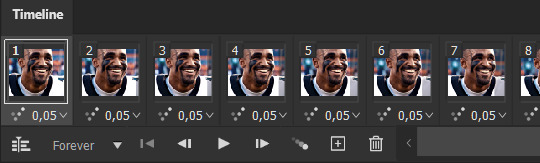
#keyframes walkthrough
Explore tagged Tumblr posts
Visit Tumblr Blog
Explore Tumblr blogs with no restrictions, modern design and the best experience.
Last Seen Tumblr Blogs


Fun Fact
Tumblr.com is the 103rd most visited website in the world.
Text
Keyframes Spring 01: CG Guide
For spring of the first year there is 8 CGs, with 2 CGs having variations which total up to bout 11 CGs that you can collect for this season (v1.11). All the CGs will be below the cut!
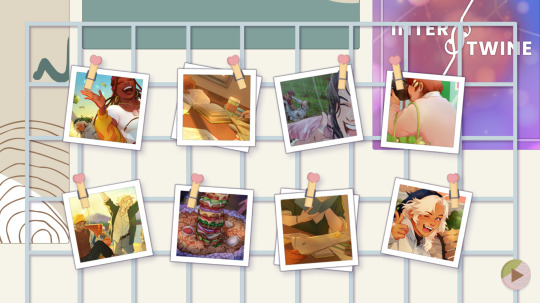
We'll go from up to down, left to right
1. Deja and Cam celebrating
When you're going against one of the boys during the scavenger hunt, you'll be prompted with 3 rounds Quick Time Events (QTE), the first two rounds honestly don't matter and is just fun dialogue of who is currently in the lead. The real deciding factor is the last round where you must succeed at least 3 keys
2. Percy, Elio, and Jamie celebrating
As long as you score less than 3 on round 3 of the QTE when you're up against the boys, whomever you're up against will get ya and they'll win
3. Percy and Elio studying
During the Studying Session event (you can check my other guide on how to get a specific event), choose "I'll actually tag along." when Elio asks if you want anything
The variations come from what you choose to do when yall detour, the options being the polo club, horticulture club and the coop, with each option getting you a variation of the CG -> - Why were there horses on the Green? - Those plants… were they having a sale? - The coop sounded… intriguing, to say the least.
4. Burger !
During the Late Night event, you'll automatically get this CG and it's unmissable!
5. Percy, Elio, and Jamie goofing in the rain
During the Rainy Day event, which you have to play as the first event, you're gonna have to reject Percy's invitation to go good off in the rain and not invite them up for soup </3. The reason why it has to be the first event chosen is because if its any subsequent event, Cam or even you are closer to the boys so you'll automatically invite them up for soup. It's okay, at least you get to have quality bestie time with Cam and Deja if you don't invite them up -> - Going out into the rain? No thanks. -- Whatever they were up to down there, you’d leave them to it.
6. Cam, Deja and Jamie studying
During the Studying Session event, choose "Can I text you if I think of anything?" when Elio asks if you want anything
The variations come from what you choose to do what yall choose to do in town either going to get ice cream or see Nena -> - Ice cream sounds really good right now… - Let’s go see if Nena’s at the thrift store?
7. Reynah taking a photo
During the Errands event, its another unmissable CG!
8. Cam posing like a cutie!
During the Spring Festival event, you have to choose to split up when prompted what the group should do, from there choose to hang out with whomever you want to but after choose to take a break with Cam - There was no harm in splitting up. You’d catch up with whoever you found along the way. -- (just choose any you wanna do!) --- You needed a break— to the benches with you.
hopefully this helps yall get all the CGs and their variations! especially since a few are hidden behind specific choices in the events
85 notes
·
View notes
Text
youtube
This one goes out to anyone who wants to learn to animate pixel art! There are a lot of great resources from great artists out there, I'm not one! But I show my entire process, and how someone who doesn't have a great understanding of perspective and anatomy, but needs to learn this stuff for gamedev can approach animation, and it doesn't have to be intimidating.
I personally find to useful to, along with expert tutorials, also watch less experienced creators doing full walkthroughs of their process of learning/creating, so that's what I'm offering too! It gives me confidence that I don't have to know everything to start.
So, I show everything from creating a silhouette to making an animatable rig, blocking out the animation, keyframes, interpolating frames, keeping shapes consistent, and I talk through all the choices I make until it's done. Right up until the colour side of things, which I will do in a follow-up.
Partly I realized some of my devlogs could be all art some weeks, and I could spend days making something I could show in a minute, so why not make the process into something I can use and share as well? I hope people find this helpful!

#gamedev#solodev#indiedev#game development#indiegamedev#indie games#pixel art#pixelart#pixel animation#animation tutorial#Youtube
26 notes
·
View notes
Text
3D animation research
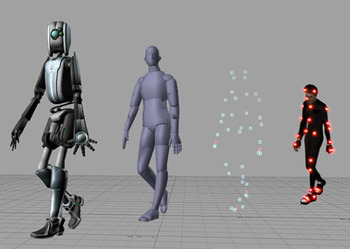
3D animation is the process of creating moving images in a three-dimensional environment and allows for depth and volume unlike 2D animation making it possible to create lifelike characters and realistic environments.
Spider-Man: Into the Spider-Verse


youtube
I love how the animation in spider-man into the spider-verse looks as it has a very unique style that makes it look like a 2D comic book despite being 3D and the movie is animated at 24 fps and sometimes 12 fps to give the movie its unique style of animation that works really well despite it not being as smooth as recent movies.
Arcane
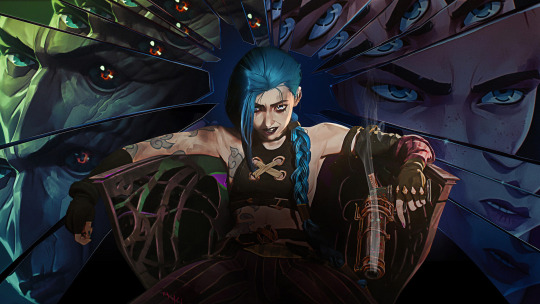


youtube
Arcane's animation looks so good because it uses a mix of 2D and 3D animation to give it its unique style by using layered 2D backgrounds digitally painted and 3D objects and characters in the foreground creating highly detailed scenes with a graphic novel like style.
Guilty Gear: Strive
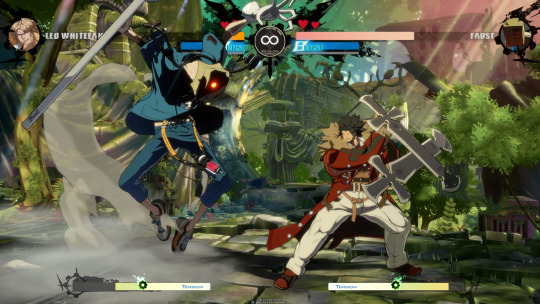

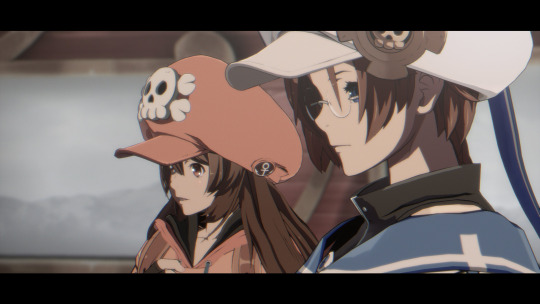
youtube
Guilty gear strives animation is kind of similar to into the spider-verse as it purposely leaves out some frames of the animation to be closer to 2D rendering giving it the unique style it has that makes it stand out.
Inside


youtube
Inside actually uses a mixture of keyframe and procedural animation. Procedural animation is a technique used in the gaming industry to generate realistic and dynamic animations in real-time. Unlike traditional animation, where each movement is manually created and stored as a sequence of frames, procedural animation uses algorithms and rules to generate animations.
Red Dead Redemption 2:


RDR2 used motion capture to record the actors performances and used a face camera to record facial reactions for later animation this is what gives the game its realistic animations that keep you immersed in its gameplay.
1 note
·
View note
Text
Understanding the Three Essential Stages of 3D Animation
1.Can you animate in 3D?
Yes, I can provide information and guidance on 3D animation techniques, tools, and workflows. However, I cannot create or manipulate 3D animations myself. Popular software for 3D animation includes Blender, Autodesk Maya, and Cinema 4D, among others. I can help you understand concepts like modeling, rigging, rendering, and animation principles. If you have specific questions or need advice on a project, feel free to ask!
2. What are the 3 stages in 3D animation?
The three stages in 3D animation are modeling, animation, and rendering.
1. **Modeling**: Creating the 3D characters, objects, and environments using software tools. This involves shaping and texturing the models.
2. **Animation**: Adding movement to the models by defining keyframes and creating motion sequences, allowing the characters and objects to come to life.
3. **Rendering**: The final process where the animated scenes are processed into 2D images or video, applying lighting, shading, and effects to produce the final output.
3. What are the types of 3D animation?
The main types of 3D animation include:
1. **Character Animation**: Focuses on animating characters, emphasizing movement and personality.
2. **Object Animation**: Involves animating inanimate objects, often for effects or storytelling.
3. **Motion Graphics**: Combines graphic design with animation, often used in advertising and presentations.
4. **Visual Effects (VFX)**: Integrates animated elements with live-action footage for enhanced realism.
5. **Simulation Animation**: Simulates real-world physics for natural movements, such as water or fire.
6. **Architectural Animation**: Visualizes architectural designs through animated walkthroughs and presentations.
4. What is an example of a 3D animation?
An example of a 3D animation is the animated film "Toy Story," produced by Pixar Animation Studios. Released in 1995, it was the first entirely computer-animated feature film and features characters like Woody and Buzz Lightyear, showcasing detailed 3D modeling, textures, and lifelike movements. Other notable examples include "Finding Nemo" and "Frozen," which also utilize 3D animation techniques to create immersive worlds and engaging storytelling.
5. What are the advantages of 3D animation?
3D animation offers several advantages, including enhanced realism and depth, which create immersive experiences for viewers. It allows for greater flexibility in design and manipulation of objects, making it easier to visualize complex concepts. 3D animation can be used across various industries, from entertainment to education, improving engagement and retention. Additionally, it supports the creation of dynamic characters and environments, enabling storytelling that captures audience attention. The technology also allows for efficient production processes, as assets can be reused and modified for different projects, ultimately saving time and resources.
Visit: VS Website See: VS Portfolio
0 notes
Text
3D Animation Course in Sonipat.
3D Animation Course Content at Pickles Animation
The 3D Animation course at Pickles Animation is structured to provide a thorough understanding of the principles and techniques involved in creating high-quality 3D animations. Here's an overview of the course content:
Course Structure and Duration
Duration: 12 months
Eligibility: Open to students with a 10+2 qualification from any stream.
Key Modules and Topics
Photoshop
Image editing and preparation for 3D modeling
Texturing and creating digital artwork
3D Modeling
Introduction to 3D modeling tools and software
Techniques for creating detailed 3D models of characters, environments, and objects
Texturing
Applying textures to 3D models
UV mapping and texturing techniques to create realistic surfaces
Lighting
Principles of lighting in 3D space
Techniques for setting up light sources to enhance the realism of scenes
Rendering
Basics of rendering images and animations
Advanced rendering techniques for photorealistic outputs
Rigging
Setting up skeletons and joints for character animation
Techniques for creating flexible and controllable character rigs
Animation
Principles of animation, including keyframing and motion paths
Creating character animations, including walking, running, and complex movements
Advanced Rendering
Techniques for optimizing renders
Use of advanced rendering tools and plugins for enhanced visual effects
Walkthrough
Creating walkthrough animations for architectural visualization
Techniques for smooth and realistic movement through 3D spaces
Practical Training
Live Projects: Students work on real-world projects to gain practical experience and build a professional portfolio.
Industry Exposure: Insights into industry workflows and standards, preparing students for professional environments.
Career Opportunities
Graduates of this course can pursue careers in various roles, including:
3D Animator
3D Modeler
Rigging Artist
Lighting Artist
Texturing Artist
Character Animator
Graphic Designer
Interior Designer
Pickles Animation provides job placement support upon course completion, leveraging industry connections to help students begin their careers in 3D animation (Pickles Animation) (Pickles Animation).

0 notes
Text
Step-by-Step Guide to Perfect Text and Graphics in Premiere Pro

Introduction:
In the ever-evolving realm of video editing, the magic lies in the fusion of compelling visuals and captivating text. Adobe Premiere Pro stands as a formidable tool for video editing, offering an array of features to elevate the visual allure of your projects. This step-by-step guide unveils the secrets to perfecting text and graphics within Premiere Pro, providing insights into the art of dynamic content creation.
Grasping the Fundamentals:
Premiere Pro Graphics Tutorial Before delving into the intricacies of dynamic text and graphics, it's imperative to grasp the basics. Premiere Pro acts as a canvas for your imagination, allowing you to seamlessly incorporate text and graphics into your videos. Familiarize yourself with essential tools like the Text tool and the Graphics workspace to set the stage for your creative exploration.
Harnessing the Power of Dynamic Text
Dynamic text is the key to holding your audience's attention. Premiere Pro offers a myriad of features to breathe life into your text. Dive into the world of text styles, fonts, and formatting options. Experiment with text animations to infuse that extra touch of flair into your content.
Keywords to Embrace: Achieve text dynamism by exploring Premiere Pro's diverse text features, experimenting with styles, fonts, and animations to captivate your audience.
Elevating Graphics for Maximum Impact
Graphics serve a pivotal role in conveying information and establishing the tone of your video. Premiere Pro provides a versatile toolkit for graphic design and animation. Master the manipulation of shapes, colors, and styles to craft visually stunning graphics seamlessly integrated into your video.
Keywords to Embrace:
Enhance your visuals by mastering Premiere Pro's graphic design tools, empowering you to create impactful and visually appealing elements for your videos.
Step-by-Step Walkthrough for Perfect Text and Graphics
Setting Up Your Project: Align your project settings with your creative vision. Establish the right resolution, frame rate, and aspect ratio for a seamless integration of text and graphics.
Text Placement and Precision Alignment: Precision is paramount. Learn the art of placing and aligning your text effectively within your video frames for a polished and professional appearance.
Text Animation Mastery: Unleash the potential of dynamic text by mastering animation techniques. Explore keyframing and easing options to craft smooth and eye-catching text movements.
Graphic Design Techniques: Immerse yourself in the world of graphic design within Premiere Pro. Grasp concepts like layering, blending modes, and effects to enhance the visual appeal of your graphics.
Seamless Integration with Video Footage: The seamless merging of text and graphics with your video footage is crucial. Learn to synchronize your visual elements with the overall flow of your video.
Conclusion:
Elevate Your Premiere Pro Craft with Dynamic Text and Graphics Embark on your quest to master text and graphics in Premiere Pro, remembering that practice is the key. Experiment with diverse styles, explore the extensive features, and push the boundaries of your creativity. By following this guide, unlock the full potential of Premiere Pro, transforming your videos into captivating visual masterpieces. Dive into the art of dynamic text and graphics today with our comprehensive Premiere Pro guide, and watch your creative vision spring to life on the screen.
#Dynamic Text and Graphics#attitude academy#enrollnow#learnwithattitudeacademy#bestcourse#attitude tally academy#video editing course in uttam nagar#Premiere Pro Graphics Tutorial
1 note
·
View note
Photo


Rotoscoping Tutorial by @antoniosvivaldi
Hi everyone! I’m excited to announce my long-delayed Rotoscoping Tutorial - requested by a number of people over the past calendar year.
In this tutorial, I will show you how to create the cutout gifs like this (and seen in most of my gifsets under this tag) with Rotoscoping on After Effects. I’ll also provide additional examples and a number of things that I do to optimise my giffing / Rotoscoping workflow (e.g. useful shortcuts & other things to be aware of).
This is the structure of the tutorial:
Why Rotoscoping? Photoshop video timeline’s limitations
Photoshop workflow pt 1: Preparing your gif
After Effects workflow: Interface, shortcuts, and Rotoscoping tools
Photoshop workflow pt 2: Assembling your gif; with multiple examples
Bonus content: Rotoscoping tips* & workarounds to common issues
For quick reference, here are example gifsets (and where Rotoscoping is used in the posts) that I will mention in the tutorial:
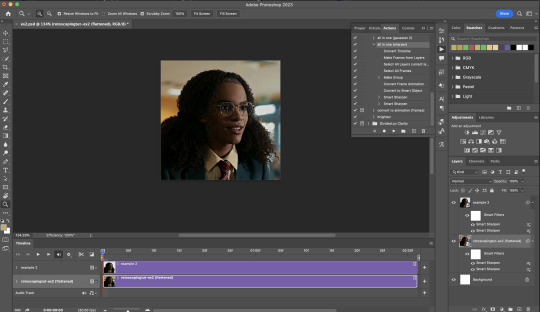
Example 1: Cutout gif effect | panels 2 + 4
Example 2: Changing a gif’s background colour | all panels
Example 3: Cutout gif effect in a shape | all panels
Example 4: Putting it all together | panels 1, 3, & 5
What you need & need to know:
Software: Photoshop & After Effects (After Effects 2021 or later for Rotobrush 2.0)*
Hardware: 16GB RAM required to run later versions of AE*
Difficulty: Advanced; Knowledge in making gifs, applying layer masks, and using video timeline interface assumed
Key concepts: Rotoscoping (AE) / Video Timeline (AE+ PS) / Layer Masks & Groups (PS)
Supplementary files: tutorial resources
*I’m currently running the latest version of PS & AE on an M2 Mac, but I’ve also used older versions (CC 2015 & 2020) on Intel-based Macs. I’ll outline some known compatibility & performance issues, and workarounds later in this tutorial that could help streamline your giffing workflow.
Tutorial under the cut. Like / Reblog this post if you find this tutorial helpful. Linking this post / the example gifsets in your post caption, will be greatly appreciated if you read this to create effects seen in Examples 3 + 4.
1) Why Rotoscoping?
My Rotoscoping journey is motivated by the shortcomings on Photoshop - namely the limited options to manipulate the Layer Mask keyframes in the video timeline interface, as well my need to gif more efficiently.
Suppose I want to cutout this subject or recolour the background of a gif on Photoshop: I personally classify the gifs that I prepare on PS into 3 types based on the motion of the subject
These are the common Photoshop-only approaches when attempting to mask the subject in the gif.
Case 1: minimal motion in the subject → a simple layer mask will do the trick
Case 2: some linear panning of the subject in the gif → using the Layer Mask Position keyframes in the video timeline interface will do the trick
Case 3: subject moves around a lot (e.g. zoom motion) → Unfortunately this is where a Photoshop-only workflow will require frame by frame masking. Layer Mask Position keyframes only apply positional translation (but not transformation / rotation) on the layer mask
Enter Rotoscoping on After Effects: Instead of resigning to frame by frame procedure on Photoshop, I opted to make my life easier by learning to Rotoscope on After Effects. This essentially provides me an opportunity to cutout / recolour a wider range of gifs with relative ease.
2) Photoshop pt. 1: Preparing your gif
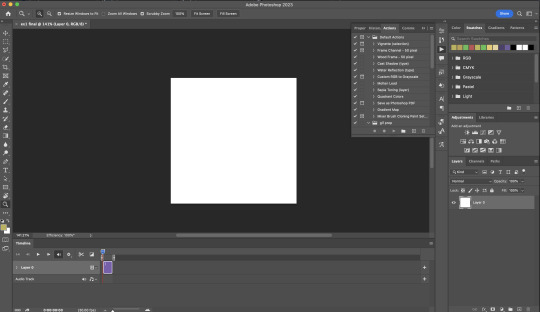
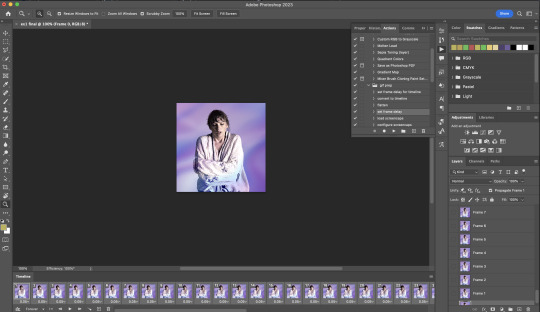
Prepare your gif the usual way - whether you screencap or import frames from video.
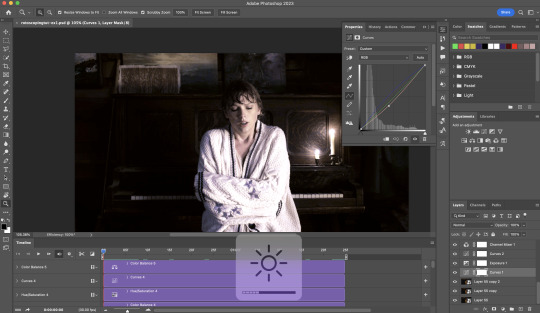
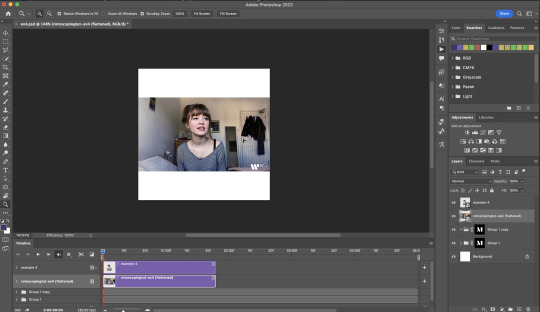
Then your Photoshop should look like this:
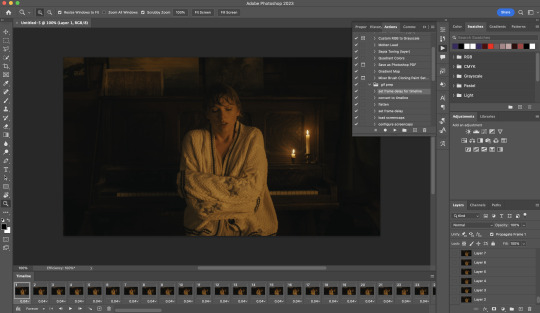
Now, I shall walkthrough & explain my personal giffing workflow (as of 2023) after loading the gif frames. To speed up the process, import my gif prep action file to Photoshop.
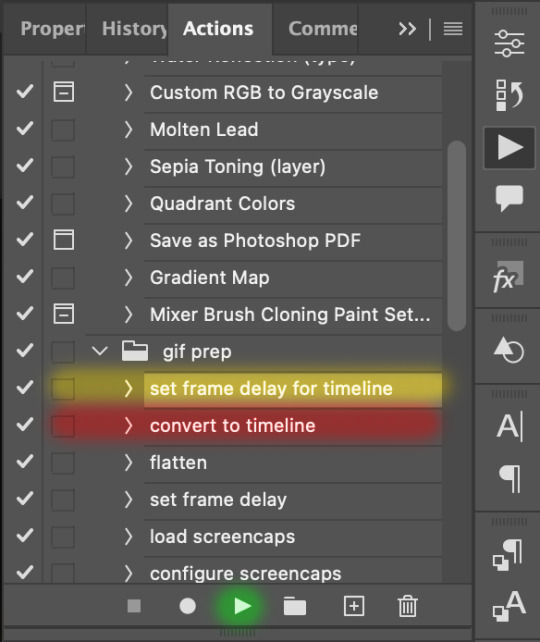
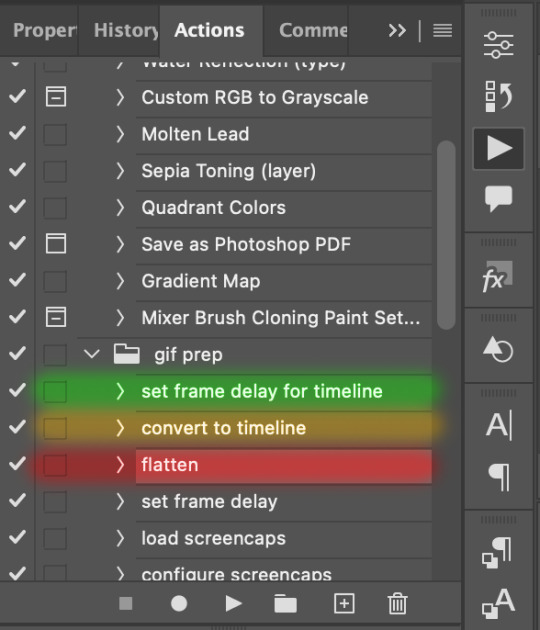
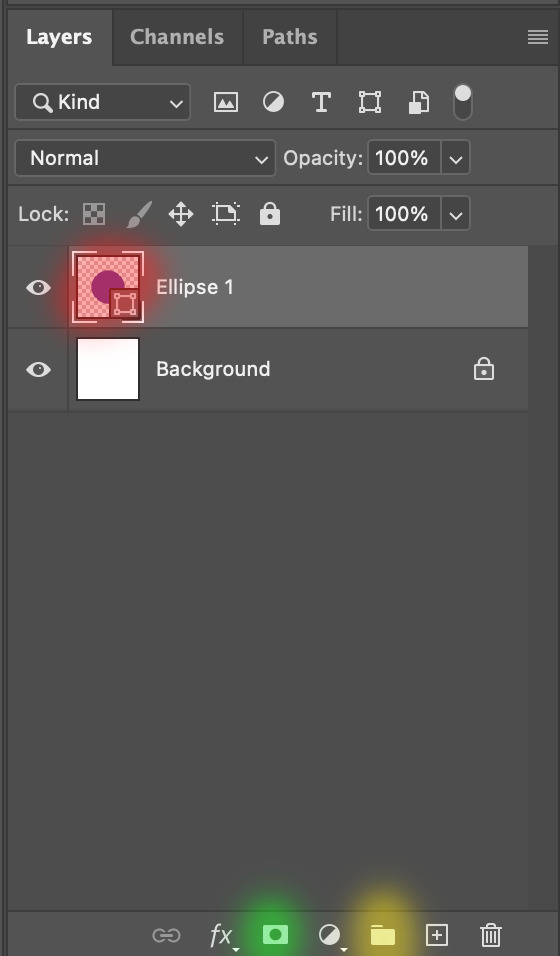
Going to Window > Action, you’ll see a set of actions under the “gif prep” folder.
"set frame delay for timeline” (highlighted in yellow) will set all of your entire gif’s frame delay to 0.03s
“convert to timeline“ (highlighted in red) will take you to the Video Timeline interface
To play an action, press on the Play button (highlighted in green)
i. Set the frame delay of the entire gif to 0.03s. (play “set frame delay for timeline” from my gif prep action pack)
I work with everything in 0.03s frame delay (or equivalently 30fps) at first. It’s always possible to change the frame delay of the final gif to 0.05s before uploading onto Tumblr.
ii) Convert this gif to a Smart Video Layer (play “convert to timeline” from my action pack)
Note: I personally don’t resize the gif just yet. That’s because Rotoscoping in full video resolution will render higher quality details around the edges as well as more flexibilities later on in the editing process.
Performance optimisation: If your computer has 8GB of RAM or less, you might find it helpful to crop / resize your gif to Tumblr dimensions now for a less sluggish performance in After Effects later on.
(I have giffed on a desktop with 8GB of RAM and it’s quite slow at rendering individual frames of a 1080p short clip on AE)
iii) Add colouring adjustments on the gif. This will save you A LOT of time when you Rotoscope gifs that are originally very dark / poorly lit (e.g. the uncoloured Taylor Swift gif shown just above).
If you usually colour your gifs at the very end of your giffing process (i.e. after sharpening), this will be a bit of a change.Nevertheless I still highly recommend adding some base colourings now to at least increase the contrast between the subject and the background.
iv) To minimise lagging on After Effects, simplify this gif file as follows:
Flatten / Unsmart this gif file back to frame animation mode: play “flatten” (highlighted in red) from my gif prep action pack
Set the frame delay to 0.03s: play “set frame delay for timeline” (highlighted in green)
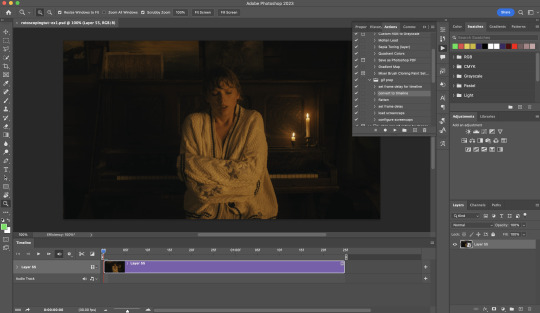
Convert the simplified gif file back to the video timeline interface: play “convert to timeline” (highlighted in yellow)
After “unsmarting” and converting back to the video timeline, your interface should look like this

And voila! This gif PSD is now ready to be imported to After Effects for Rotoscoping work!
3) After Effects: Interface and useful shortcuts
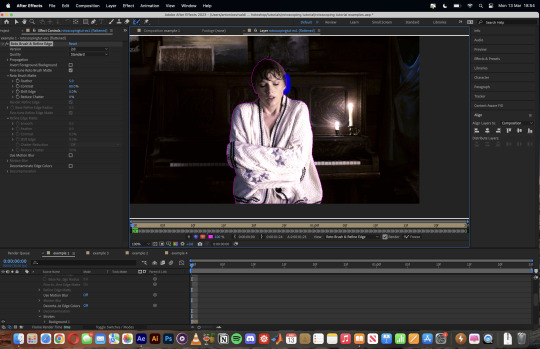
Open After Effects and Import (Cmmd / Ctrl + I) your gif PSD that you’ve just prepared.
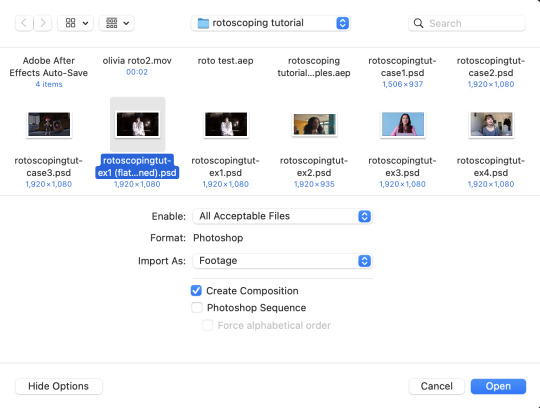
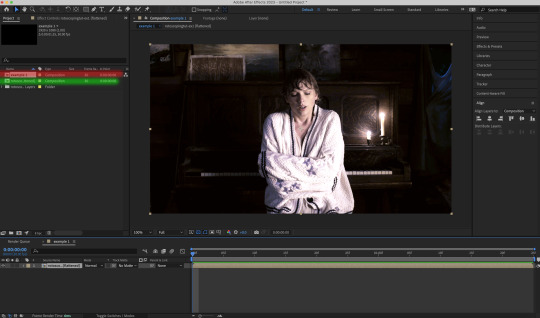
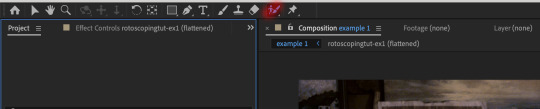
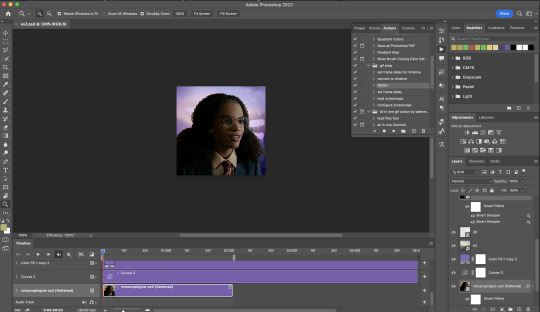
After importing your gif PSD to After Effects, the interface should look like this.
In the screenshot below, there are two compositions: the imported gif (highlighted in green) & another composition file made from selecting the imported gif (highlighted in red)
For the rest of the workflow, we will edit from the clone composition (the one highlighted in red), so select this one.
Before we take our plunge into the Rotoscoping, here are a few useful shortcuts to remember. I’ll explain the Roto Brush tool in the next section.
Preview the previous: fn + up arrow
Preview the next frame: fn + down arrow
Add to Roto Brush selection: holding Shift while you’re using the Roto Brush Tool
Subtract from Roto Brush selection: holding Alt while you’re using the Roto Brush Tool
Change Roto Brush size: while holding Cmmd / Ctrl, click + drag your mouse left / right
4) After Effects: The Rotoscoping Process
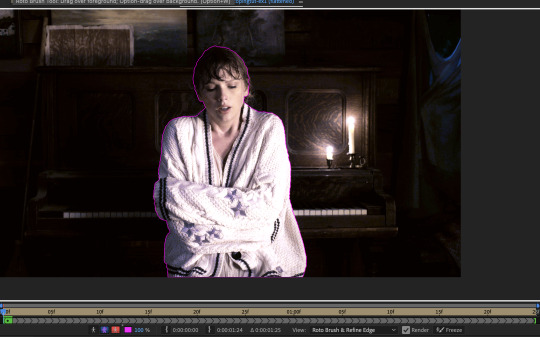
To access the Rotoscoping tools, click on the Roto Brush icon (highlighted in red in the screenshot below)
Then you’ll get the following dropdown options with two Rotoscoping Tools
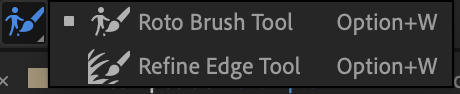
Roto Brush Tool: This is where you add / subtract your Rotoscoping selection in your composition
Refine Edge Tool: Paint around the edge of your selection for more refined edges. Very helpful for Rotoscoping fuzzy edges / hairs
To make some Rotoscoping selection, first grab the Roto Brush Tool and click on the subject you want to cut out from your composition.
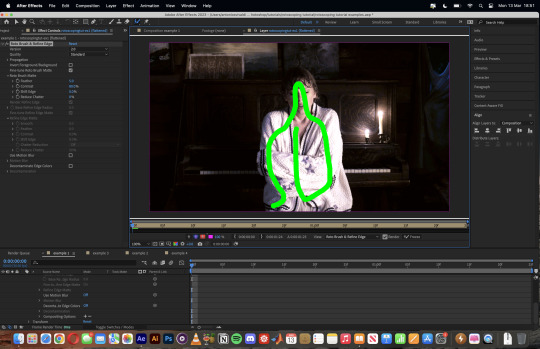
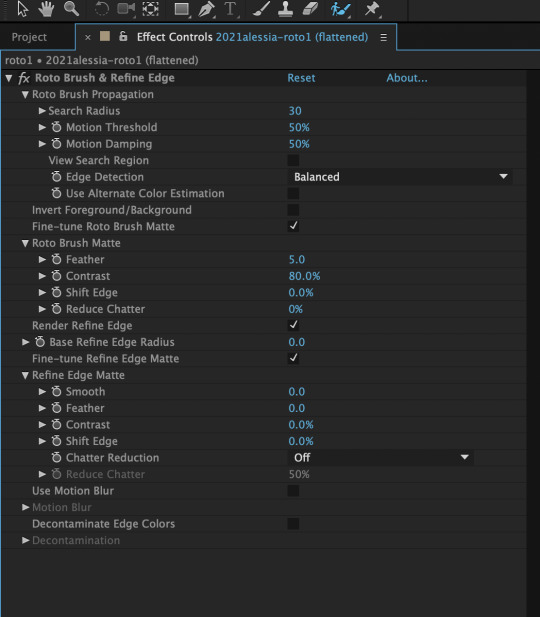
When you’re Rotoscoping you’ll see this in the Effect Controls panel.
There are two versions of Roto Brush:
Version 2.0: The Rotoscoping selection is powered by AI for higher accuracy when you propagate the frames.
Version 1.0 (Classic): This is the legacy Roto Brush Tool that uses a lesser algorithm. Recommended only if Roto Brush 2.0 is unstable on your machine due to RAM issues.
And two quality settings for Roto Brush 2.0:
Standard
Best
Note: I am currently unable to use Roto Brush 2.0 with Best quality model on my machine to compare the differences myself, so I’ll link this page that explains the two quality settings.

Note: if you’re using an older version of After Effects you’ll see this instead. This corresponds to Roto Brush 1.0 / Classic in the newer versions of AE.
When you’ve made a selection using the Roto Brush Tool, you’ll see the pink lines around the subject. This is the region that you’ve selected to Rotoscope!
To bring out some details around the edges, grab the Refine Edge Tool and paint around the edges
Then the interface will look like this

To view the Rotoscoping selection that you’ve made more intuitively, you could click on the following buttons.
Personally I like the viewing my selection using Toggle Alpha (the second box from the left) & Toggle Alpha Boundary (the 3rd box from the left)

Toggle Alpha
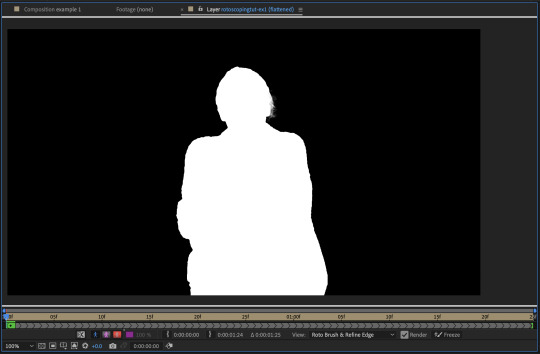
Toggle Alpha Boundary

Note: If you aren’t happy with the initial Roto Brush selection, you can always add (press Shift while using the Roto Brush Tool) / subtract (press Alt / Option using the Roto Brush Tool) your selection.
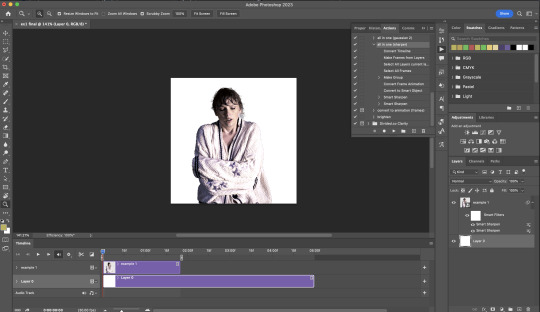
After you’re happy with your Rotoscoping selection in the first frame of your composition, press fn + down to view the next frame.
Repeat pressing fn + down and fix the selection along the way (e.g. I subtracted a small area from my Rotoscoping selection with the Roto Brush tool to make the edge look cleaner).

After fixing the selection along the way, go back to the composition file (select the clone composition again) and you will see that a cutout gif is made!
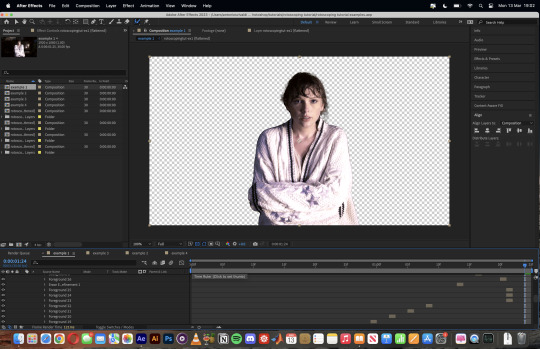
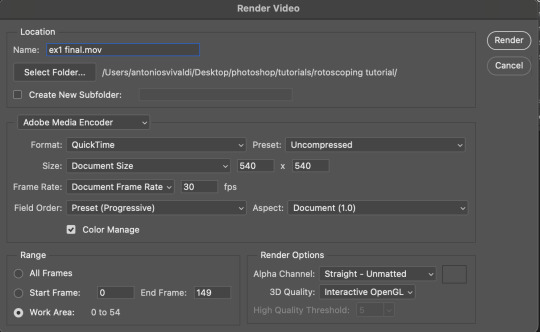
To export this, go to File > Export > Add to Render Queue. You’ll be redirected to the Render Queue panel at the bottom of After Effects.
Highlighted in red: click to change export setings
Highlighted in green: click to change save destination
Highlighted in yellow: click to render video

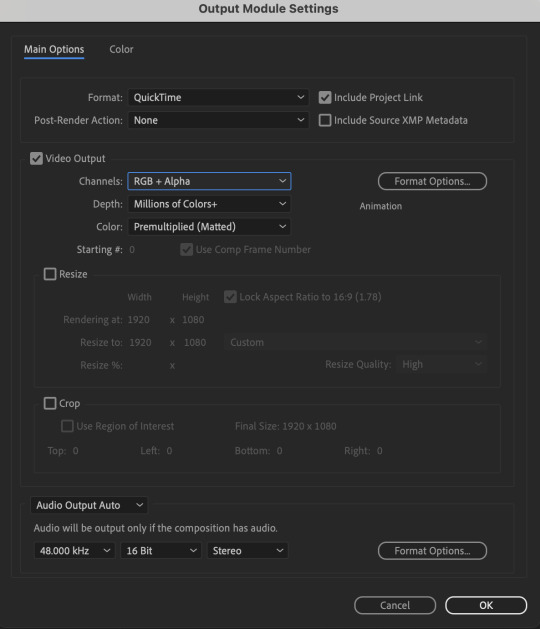
To preserve the transparency of your cutout gif, you need to change your export settings in the Output Module.
Under the Video Output section, change your Channels to RGB + Alpha. Press OK. Then Render the video.
5) Photoshop pt. 2: Assembling your final gif
The essence is to drag the cutout gif (aka the video file that you’ve just rendered on AE) into a new PSD composition file. This will be where you’ll do the rest of your giffing. Your workflow will contain the follow steps:
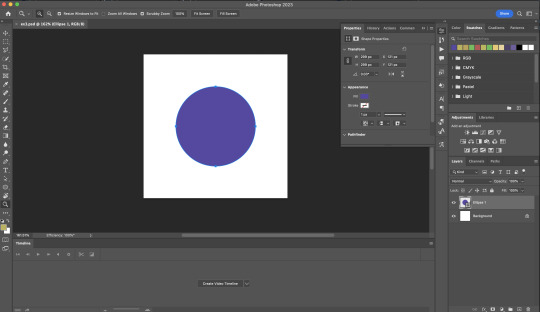
Make a new blank PSD composition file in Tumblr dimensions
Enable the Video Timeline
Follow the instructions detailed in the individual examples i.e. drag the cutout gif into the PSD & adjust the timeline start / end points
Exporting the final gif. If you’ve worked in 0.03s frame delay all the way up to here, just play the action that I’ve provided in the tutorial in the following order to set the frame delay to 0.05s.
EXAMPLE 1: finalising your cutout gif | sample gifset
After enabling the Video Timeline in your PSD composition file you’ll see something like this
Go to your folder, drag the cutout gif you’ve made on After Effects, resize / reposition, then press Enter.
And also make sure to adjust the Video Timeline’s start / end values.
Add some finishing touches. Because I did the Rotoscoping at full HD resolution, I’ll also need to sharpen my gif in this step.
After you’re happy, you can export this into a gif file and do what you usually do to change the frame delay to 0.05s.
Notes on my “Unsmarting” approach:
To prevent accidentally writing over a PSD composition file that I’ve spent time editing, I personally render this into a short video (File > Export > Render Video) and use the following export settings (to prevent quality loss)
Then I open the rendered clip and play the actions in my gif prep action pack as follows:
flatten: this “Unsmarts” the clip / video
set frame rate: this sets all frames to have 0.05s frame delay
This is the final interface that I get before I pull up the Save For Web window.
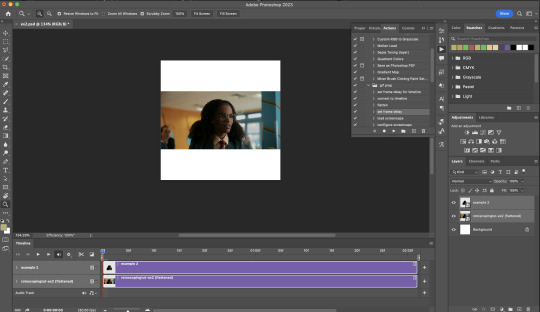
EXAMPLE 2: changing your gif’s background colour (for Case 3 gifs) | sample gifset
From your folder, drag BOTH the cutout gif (rendered on AE) and the original gif to your blank composition.
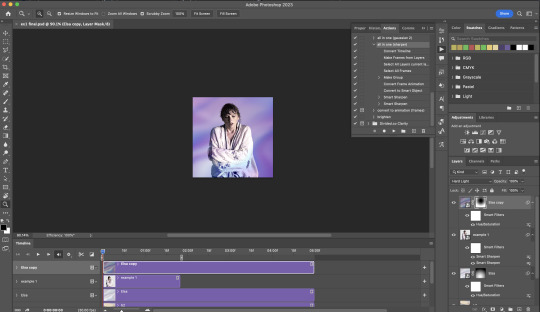
Important: you need to make sure that both layers are properly lined up in the composition file (i.e. selecting both layers when repositioning / resizing)
On Photoshop, press Enter twice and place the cutout gif on top of the original gif from the Layers panel. Then you should get something like this
Select both layers and resize / reposition them in your PSD composition until you’re satisfied with the placements.
The basic idea here is to add some adjustment layers / other things in between the cutout gif and the original gif. To do this, select the original gif layer in the Layers panel.
Then you can start adding.a bunch layers e.g. textures, onto the composition.
And then here’s the exported gif!

6) Fancier Rotoscoping examples
Note: knowledge in using layer masks / groups and making shape / text layers assumed
In the next two examples, I’ll show you how to combine the two previous examples with shape / text layers.
EXAMPLE 3: Placing your cutout gif into a shape / text layer | sample gifset
Add a text / shape layer to your blank PSD composition
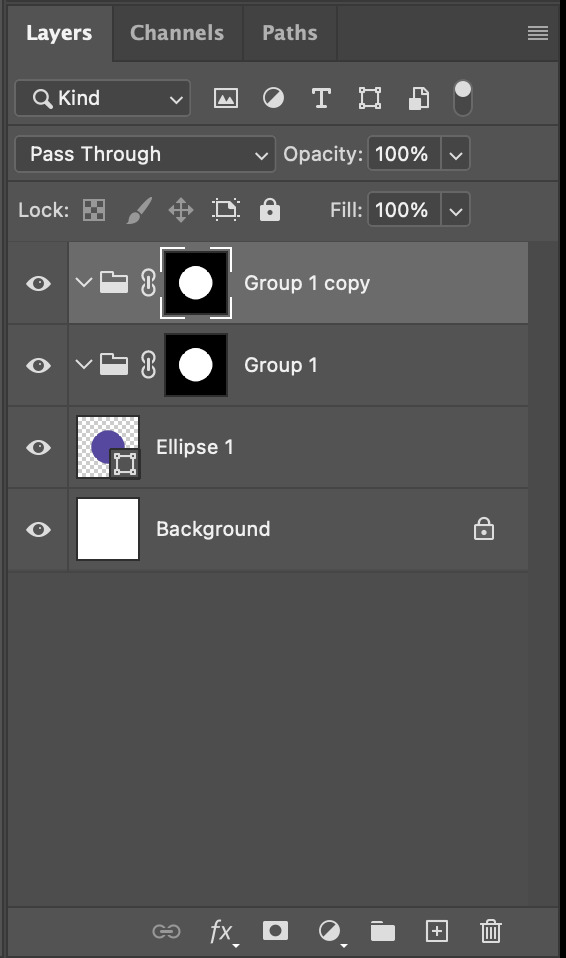
We want to prepare a masked group so in the Layers panel:
Make selection from layer: Cmmd / Ctrl + Click (highlighted in red)
Make a new group: click on the folder icon (in yellow)
Create layer mask: click on the icon (in green)
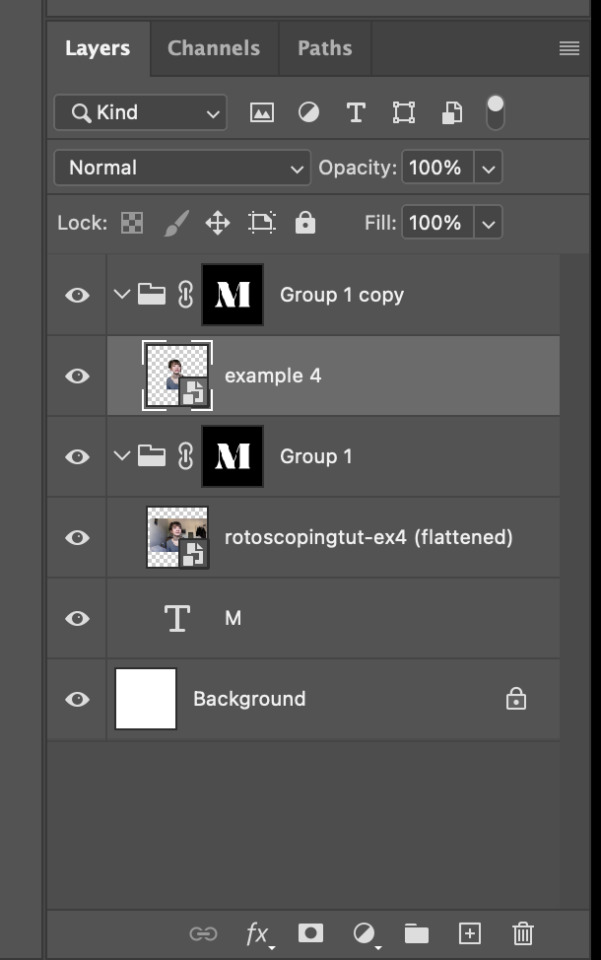
After duplicating the masked group you’ll get something like this in the Layers panel
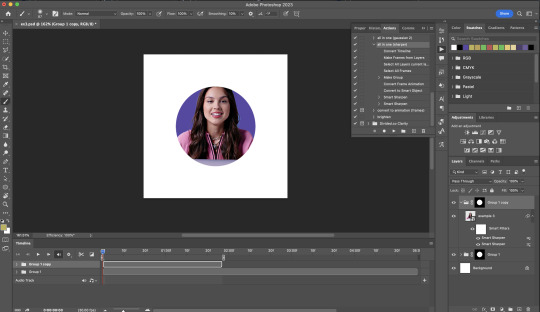
Drag your cutout gif into the PSD composition

Place the cutout gif into the masked group on top
Select the mask of the top group and paint (in white) over the region you want to reveal for the cutout gif
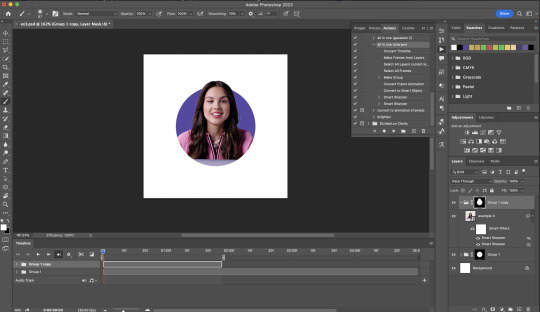
Add some finishing touches & export the gif!
EXAMPLE 4: Putting it all together | sample gifset
You follow the same approach as in Example 3 to prepare the masked groups, but you need to drag two gif layers in (and resize them using the approach outlined in Example 2)
Place the gif layers as follows
While selecting the mask of the group on top, paint (in white) over the region that you want to reveal in the cutout gif
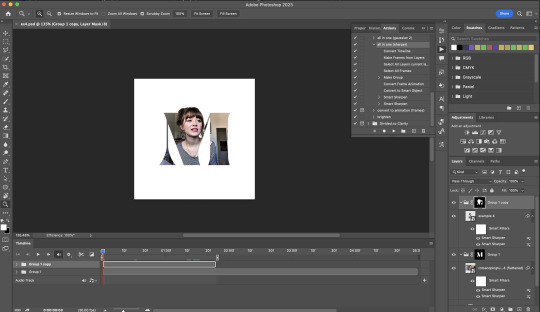
Now select the original gif (placed within the other group) and add some adjustment layers
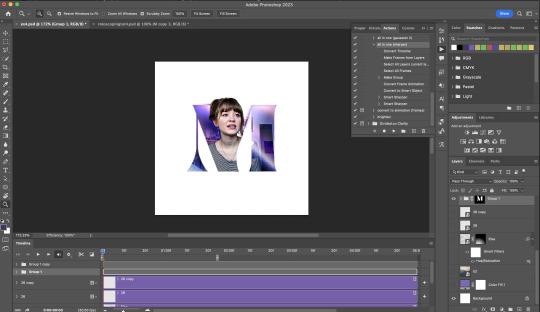
After adding some finishing touches & exporting the gif, I get this!
Note: you can do even more overlay effects in the background portion of example 4. There will just be more masked groups + adjustment layers
7) Bonus: Some useful Rotoscoping / giffing lifehacks
GIFFING LIFEHACKS:
— Use best quality footage that you could find & Rotoscope in full video resolution, for better details around the edges
— Poorly lit scenes & low contrast edges are harder to Rotoscope (e.g. Toy Story set / TS evermore set).
If you’re new to AE, I would recommend choosing videos with well-lit gifs with simpler backgrounds and high contrast edges (e.g. Maisie Peters Cate’s Brother set)
— Use Rotobrush 2.0 if you’re using After Effects 2021 or later. It’s more difficult to Rotoscope / change background colour for gifs with a lot of movements with the classic Rotobrush tool. If the scene is tricky, you might want to switch to the “Best” quality model.
HARDWARE-RELATED PERFORMANCE OPTIMISATION:
— The recent versions of Photoshop require at least 8GB of RAM. If you have less RAM, it will still work provided you have enough scratch disk space. For better performance, it’s best to close other applications when you’re using Photoshop.
— The recent versions of After Effects require at least 16GB of RAM. If your machine has less RAM than this, there are some workarounds to prevent your machine from hanging:
Essential: close other applications that you’re running on your computer
Resize your gif down to Tumblr dimensions & sharpen it before importing to After Effects.
Install an older version of AE
8) Bonus: Some known software + hardware issues, and workarounds
KNOWN ISSUES ON PHOTOSHOP:
I currently have minimal issues in my giffing workflow, but I’ll nevertheless outline a few common known Photoshop issues for anyone who needs some workarounds.
— Video Timeline interface missing: this affects Apple Silicon Macs (i.e. M1 / M1 Pro / M1 Max / M1 Ultra / M2 / M2 Pro / M2 Max)
Update to newer version of Photoshop (updated 2022 or 2023)
Open Photoshop with Rosetta
— Scratch disk full error: This is a common issue with machines that lack RAM & have nearly used up internal storage. Editing video layers in the timeline interface uses a lot of memory hence will require a lot of scratch disk space.
Make sure that you have enough free storage space while using Photoshop. Alternatively you can use an external hard drive as a scratch disk.
KNOWN ISSUES ON AFTER EFFECTS:
These are a few issues that I have personally ran into over the course of giffing on multiple devices & multiple versions of After Effects.
Note: Inputs from M1 / M2 Mac users with regards to experiences on using the After Effects Rotoscoping tools are welcome!
— Rotobrush 2.0 set to “Best” quality model causes AE to crash: this affects anyone who’s using MacOS Ventura
I’m currently experiencing this issue on my M2 Mac. The workaround right now is to change the Roto Brush 2.0 quality setting to Standard.
This is due to some software compatibility issues on Adobe’s side specifically with MacOS Ventura. Fingers crossed that they will properly fix this bug in the future updates!
— Cannot re-open project files with Rotoscoping: this affects anyone using the initial release of After Effects 2020 (I had installed this on an Intel-based machine and it sucked)
The only option here is to update to a later version of After Effects.
8) More useful Rotoscoping resources
Rotoscoping + Keyframes Tutorial by @jenna--ortega
Rotoscoping + Masking Tutorial by @usergif
Rotoscoping For Beginners in After Effects | Motion Graphics Tutorial
I hope you enjoy reading this! If you have any questions / need any help related to this tutorial, feel free to send me an ask!
#after effects#tutorial#gif tutorial#photoshop tutorial#dearindies#tusermelissa#usernik#useryoshi#usershreyu#usercim#userrobin#useralison#userannalise#userkosmos#userisaiah#usergiu#userives#*#my resources#my tutorials
2K notes
·
View notes
Note
How do you make your gifs?
Hello hello! I love talking about gifmaking, so thank you for giving me the chance to ramble.
Instead of a detailed step-by-step walkthrough, I will link tutorials and resources written by the wonderful Tumblr creators on here along the way. Everyone has their method and preferences, and there’s no right or wrong way to make gifs. I’m going to share techniques and resources I picked up along the way that work best for me—they may or may not be suited to your preferences, but I hope you’ll find some helpful things here.
(Warning: screenshot/image heavy)
USEFUL TUTORIALS AND RESOURCES
Here are some tutorials and resources that I found very useful when I got back into gifmaking:
Gifmaking tutorial using video timeline by @hope-mikaelson is identical to my own process
Gifmaking and coloring tutorial by @kitty-forman, whose process is very similar to my own
Giffing 101 by @cillianmurphy, an incredibly detailed tutorial that covers everything you need, including a step-by-step guide to using HandBrake
Gifmaking and coloring tutorial with 4K HDR footage by @sith-maul, another incredibly detailed tutorial with many useful tips
Gifmaking tutorial by @jeonwonwoo, incredibly comprehensive and covers so many aspects of gifmaking from basics, sharpening, captioning, and text effects
Gifmaking/PS tips and tricks by @payidaresque
Action pack by @anyataylorjoy, the Save action is especially a true life-saver
@usergif and @clubgif are amazing source blogs with many tutorials on gifmaking, color grading, and gif effects, can’t be thankful enough for the members for their work curating and creating for these blog!
TOOLS
Adobe Photoshop CS6 or higher, any version that supports video timeline. @completeresources has many links to download Photoshop, have a look!
Photopea is a free alternative to Photoshop, but it has a slightly different UI, check out these tutorials for gifmaking with Photopea
HandBrake or any other video encoder, especially if you’re working with .MKV formats
4Kvideodownloader for downloading from YouTube, Vimeo, Instagram, etc.
OBS Studio or any other similar screen capturing software. To prevent duplicate frames in gifs that prevents your gifs from looking smooth, try to match the recording frame rate (FPS) with the source.
IMPORTING FOOTAGE AND WORKING IN VIDEO TIMELINE
I work exclusively in video timeline instead of importing video frames to layers or loading files into stack. For videos that don’t require converting/encoding using HandBrake, especially ones that are already in .MP4 format, I tend to open the video directly on Photoshop, and trim the videos around directly.
As mentioned above, this gifmaking tutorial using video timeline is exactly how I make gifs. I find it more efficient, especially if you’re making multiple gifs from the same video/the same scene with little to no change in lighting conditions You can simply slide around sections of gifs you want to save, and they will all be the same length.
Another thing also covered in the tutorial linked is the ability to change video speed in video timeline mode. Right click on the video and set the speed before proceeding with cropping/resizing. This is also very useful when you’re making blended gifs where you need the footage to have the same length.
Slowing footage down.
As mentioned in this post, changing the FPS before slowing down the gif results in smoother gifs. Doubling the frame rate before slowing down your gifs usually yields the best result.
Speeding footage up.
I love using this to speed up slow motion B-rolls to make the speed slightly more natural. It will result in nice, smooth gifs:

(B-roll footage, normal broadcast speed)
(200% speed)
Subject won’t stay in frame?
Another feature of the video timeline mode. Keyframes are your best friend. This tutorial by @kangyeosaang covers everything you need to know about panning gifs. I use this technique regularly, it’s a life-saver.
COLORING
Here are some coloring tutorials I found very useful:
Coloring tutorial by @brawn-gp beloved, their coloring style is second to none
Mega coloring tutorial by @yenvengerberg, for stylized /vibrant coloring
Understanding Channel Mixer by @zoyanazyalensky
Coloring rainbow gifs by @steveroger, which delves deep into Channel Mixer
I tend to go for neutral-saturated coloring in general, especially for minimalist gifsets with no effects (blending/isolated coloring/overlays etc.), but the possibility is endless for stylized coloring. Here’s what my adjustment layers look like for the example gifs above.
The base footage for this Charles gifset is incredibly desaturated. I started with a Curves layer to bring contrast to the gif, as well as do some color-correcting to bring the base footage to a more neutral tone. To bump contrast, I also like to add a black and white Gradient Map layer with a Soft Light blending mode at 10%-30% opacity:
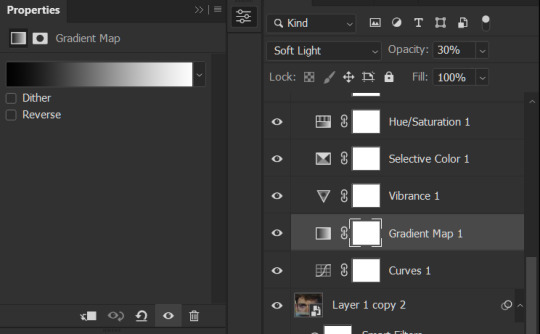
The Vibrance layer is then used to lift the saturation of the base footage, with the Selective Color, Hue/Saturation, and Channel Mixer layers to help remove the green/yellow tint to his skintone.
An underrated adjustment layer/preset in my opinion is the Color Lookup. You can layer in pre-loaded .LUT color grading presets to help speed up your process. For this gif, it’s simply a base preset Soft Warming Look to achieve a warm, pink-tinted tone.
In hindsight I feel like this gifset is too saturated, his skintone is skewing very red/pink, I could’ve bumped down the lightness of the reds with a Selective Color layer or a Hue/Saturation layer. Try to err on the side of neutral for skintones. Experiment with layer orders—there’s no right or wrong! Remember that each layer build up on the one before it.
The base footage of the Jalen gif is already quite nicely color-graded, but it’s still muddy and underexposed. As with the Charles gif, I started with a Curves layer to bring the gif to a better baseline contrast. Then I focus on brightening the gif with the Brightness/Contrast and Exposure layers.
The Hue/Saturation and Selective Color layers are to color-correct Jalen’s skin tone—it’s something I spend most of my time coloring gifs and focus a lot on, especially when color grading BIPOC skintones. Putting a Vibrance layer, upping the Vibrance and Saturation, and calling it a day would make his skintone skew very, very yellow/orange.
Focus on the reds and yellow for skintone, play around with the Saturation and Lightness sliders, use the Hue slider with caution.
It can be tricky to achieve the right skin tone when working with sports footage vs the higher quality, higher dynamic range footage of films or TV shows, but I try to keep it as close to the subject’s natural skintone as possible.
Here are some of tutorials with tips and tricks on coloring BIPOC:
How to fix orange-washed characters by @zoyanazyalensky
How to prevent pink-washing and yellow-washing by @jeonwonwoo
Coloring tutorial by @captain-hen
Changing lighting conditions?
Fret not—this is why I love working in video timeline. I’ll take this gifset as an example: it’s a deceptively difficult one to color. The footage is 720p and the sunlight shifts throughout the video, so matching across gifs was tricky.
My solution was to split the clips in sections with consistent lighting, and apply adjustment layers to the individual sections before applying general color grading layers on top of everything.
We can make use of the Fade Transition effect for sections where the lighting changes within the gif section we want to color.

(without vs with Fade on the Brightness/Contrast layer)
The difference is subtle in this example, but the brightness in the right gif is noticeably more consistent throughout. You can also add the Fade Transition effect to the beginning for a fade in, of course.
SHARPENING AND OPTIMIZING GIF QUALITY
This tutorial by @anya-chalotra covers everything you need to know about optimizing gifs for Tumblr.
Sharpening.
Sharpening is essential to making crisp gif images. Here’s another ask I answered re: my own sharpening settings and maximizing gif quality.
(base footage, unsharpened)

(color graded, unsharpened)
(color graded, sharpened)
The final gif is sharpened with Smart Sharpen, 500% at 0.3px and 10% at 10px (my standard sharpening settings).
Here are some tutorials and resources on sharpening:
Sharpening process by @anya-chalotra
Sharpening tutorial with added gaussian blur by @haleths
Sharpening action by @daenerys-stormborn
Size your gifs for Tumblr correctly.
This is essential: full width gifs are 540px wide.Two side-by-side gifs should be 268px wide. Here’s a handy post on gif size guide for Tumblr.
Incorrectly sizing your gifs will take away the quality of your gifs: undersizing your gifs will especially make them grainy, blurry, and /or pixelated, and won’t display correctly on many people’s desktop theme. Oversizing usually isn't as dramatic as undersizing, but it will make the gifset glitch when displayed, and the file size will be unnecessarily bloated.
Work with HD footage if possible.
Media fandoms (films/TV shows) are luckier than us in the sports trenches—we have to work with what we have. Broadcast footage is usually subpar: lacks contrast, pixelated, very desaturated, the list goes on. But it’s possible to still make high quality gifs from subpar footage. Here are a couple of tutorials to mask low source footage quality:
low quality video ➜ “HD” gifs tutorial by @nickoffermen
Sharpening low quality footage by @everglow-ing
(This gifset I made is from a 480p footage with horrendous lighting conditions and colors, and the end result is decent I’d say)
Save for Web (File > Export > Save for Web (Legacy) or Ctrl + Alt + Shift + S) settings.
I default to Adaptive + Diffusion but also use Adaptive + Pattern from time to time. Any combination of Adaptive or Selective + Diffusion or Pattern will give you a good result. In my experience some gifs will need the Selective color table for the colors to display correctly.
Here are my default settings:
SAVING AND EXPORTING FOR TUMBLR
Converting to frames and adjusting the gif speed.
If possible, avoid exporting your gif and reopening it to adjust the frame speed. I used to do this sometimes when I’m lazy, I have to admit, but this is where this Action as mentioned at the beginning comes in very handy. It converts all visible layer into smart object, then converts it back to frame animation.
Step-by-step:
1. Select all layers
2. Right click > Convert to Smart Object
3. Go to the Timeline menu (≡) > Convert Frames > Flatten Frames into Clips
4. Go to the Timeline menu again (≡) > Convert Frames > Convert to Frame Animation
5. In the same menu (≡), select Make Frames from Layers
6. Delete the first frame (it’s a duplicate) then set your frame speed

Now you can adjust the frame speed before exporting it (Save for Web).
Pay attention to the source framerate.
The frame delay of 0.05 s is usually the default to make gifs for TV shows and films, and it is preferred by most gifmakers. This stems from the fact that most movies and TV shows are 24 or 25 FPS. This may not be the case for all source videos: you might get 30 FPS footage, and sports or gaming footage can be 50 or 60 FPS. Gif speed also depends on the FPS of your original file. Play around with gif speed and see what feels most natural to you.
My rule of thumb is the frame delay Photoshop gives you + 0.01 s. For example, 50 FPS footage will give you 0.02 s frame delay (25 FPS gives you 0.04, 30 FPS gives you 0.03, etc.), so set it to 0.03 s. I usually err on the side of a faster frame delay for smoothness in in-game sports footage, anything else (interviews, press conferences, B-rolls) can get away with being slowed down. Again, experiment and see what you think looks best!
Keep gifs under the Tumblr file size limit (10 MB).
Cut down the number of frames. My gifs are usually around 60-70 frames for 540px full-width gifs, but depending on the coloring, sometimes you can get away with more. 268px gifs can go up to 200+ frames.
Crop your gifs. Remember to keep full-width gifs at 540px wide, but if necessary, you can crop the height. My go-to sizes are 540x540, 540x500, 540x450, and 540x400.
Amp up the contrast of your gifs. Flat colors like black cut down gif size.
The Grain filter or Noise filter, though beautiful for aesthetics or simply necessary sometimes to mask low source footage quality/pixelating, may bloat your gif size.
Play your gifs back before exporting.
Pay attention to duplicate frames or glitches, you might need to get rid of them!
Hope this is helpful! Don’t hesitate to send an Ask or DM if you need any help, I will happily answer all your questions and send over PSDs. (I’m also on Discord—just shoot me a message if you need my tag!) Happy creating :]
#tutorial#PS asks#gif tutorial#Photoshop tutorial#I guess this is more of a resource link dump than tutorial but. Hey. Why reinvent the wheel...#Sorry for the late answer I hope you see this Anon :]#completeresources#allresources#userxoames#userbarbi#usernrzr
1K notes
·
View notes
Text
REPORT: Celebrating Evangelion's Creator At The Hideaki Anno Exhibition

I feel like it’s truly rare to understand the mind of a creative genius, especially one so closed off as Hideaki Anno, the creator of the Evangelion franchise, as well as the writer/co-director of Shin Godzilla. This year, with the release of Evangelion 3.0+1.0: Thrice Upon a Time, as well as the numerous interviews and specials, has changed all that, capping off with the Hideaki Anno Exhibition that is currently being held at The National Art Center, Tokyo. We got to go and explore what makes Anno tick.
Exploring Hideaki Anno’s Youth


After coming from the Nogizaka underground station and wandering through a maze that felt like I was escaping the Geofence (sans car lift), the very familiar sight of The National Art Center, Tokyo opened up. For fans of Your Name., this is where Taki and Okudera had their date. But today, it was holding a very different type of otaku wonder.
Greeting those who enter the Hideaki Anno Exhibition are portraits of the man himself, as well as a cardboard cutout of a younger Anno in his Kamen Rider costume. The portraits on display were drawn by both him and his wife at different stages of his life, with the bottom-most a self-portrait from 1982.

But that’s where the portraits of Anno end and the inspiration of the man begins. The first major room is filled to the brim with stuff that shaped the creative Anno is today, with a Mecha Godzilla, a U.S.S Enterprise, multiple Ultras, original keyframes from Gundam, and so much more.


The sheer amount of memorabilia was overwhelming and at times felt like Anno needed somewhere to store his things before his wife got annoyed at him for not cleaning up again. Especially with the random assortment of manga hanging on the wall that looked like they came straight from Anno’s bookcase.

Following what felt like a fun cleanout of Anno’s garage was what felt like a nostalgic walkthrough of his parents' attic, with original oil paintings by Anno in junior high school and high school in the art club on display — making it very apparent he was destined for greatness from a young age. In a cabinet at the end of the wall were notebooks, doodles, photos he took, and an award Anno won from his youth. I was honestly surprised how well everything was kept.


Around the corner was his video work from his youth, including the first-ever film he made when he got an 8mm camera in high school, Nakamu Rider, some very early animations, and even the infamous Ultraman movie he made in university projected on the wall. Honestly, it was amazing to see it in full. The full storyboards for the sequel fan-film Daicon Film’s Return of Ultraman were on full display, though a little faded due to time.


Beyond that were DAICON III and DAICON IV materials — the short animation that got Anno and the old-Gainax team on the radar of every animator in Japan and beyond. Alongside the opening animations actually being projected onto the wall (in very good quality!), the original storyboards, key animation, fully painted cells, and more were presented for all to see.


After the pre-Gainax days was their early work as a studio, though not yet the powerhouse they became. While not all of the materials were on show — you’d need Tokyo Big Sight for that — some of the proposals Anno came up with were on display. This included early materials for works such as At the Bus Stop, TEA TIME, KEIKO in the kindergarten, and more. Both the early storyboards and animatics were on display — with the animatics looking more animated and detailed than some anime films released today.


Anno’s Early Professional Life
From then on was what seemed like a full collection of work from Anno’s early years, including original key animation from his work on Nausicaä of the Valley of the Wind and Grave of the Fireflies, all the Nadia - The Secret of Blue Water voice recording scripts, original key animation from Gunbuster, and more.


The most interesting part of this section was the notes and production sketches from Anno’s days working with Hayao Miyazaki at what is now known as Studio Ghibli. Aside from the key animation, there were production doodles of what else but Kamen Rider, notes from production, and even doodles from Miyazaki himself of Anno sleeping on the job.


One fact I learned about Hideaki Anno during the exhibition was that he drew Sailor Pluto’s transformation in Sailor Moon S — though I wasn’t allowed to photograph any of the key animations. Past that were Anno’s live-action works, including Cutie Honey production photos, props from Shinji Higuchi’s Sinking of Japan that Anno designed, and materials from his short films and music videos.


Getting Into Anno’s Classic Evangelion
For someone who is a massive fan of both the classic Neon Genesis Evangelion and the Rebuild films, the exhibition gave you both sides of the franchise, starting, of course, with Neon Genesis Evangelion. While the rest of the exhibition has mostly been key animation or painted cells, the classical Evangelion section was mostly original pre-production materials.

Laid out to read was the original pitch for the series, complete with some of the first images of the cast, their first bios, and proof of concepts. Those proof of concepts were then also shown off separately, including the first-ever cell drawn for Evangelion to aid investors in understanding the idea behind what Anno was trying to achieve — not that it would help in the long run. The spear looks pretty cool in my opinion.


Most of the other materials in this section were more pre-production sketches, prop designs, logo concepts, original Evangelion designs, and storyboards for what would become the classic we know today. One of the pre-production materials was Anno’s notes for what the structure of the opening of Evangelion might look like, written next to the lyrics of “A Cruel Angel's Thesis.”


Hideaki Anno’s Shin Universe
Nestled between the classic Evangelion and the new Evangelion areas was Anno’s work on Shin Godzilla, full of scripts, pre-production art, storyboards, and perfectly detailed scale replicas of Godzilla in its many forms seen in the popular flick.


Aside from the Shin Godzilla materials, there was barely anything for Anno’s upcoming Shin Ultraman and Shin Kamen Rider films — which, ya know, he’s currently in production for both and they’re probably top secret. For Shin Ultraman, the previously shown off teaser visuals and production materials were on display, and for Shin Kamen Rider, a mold of the mask, how it was made, and bike concepts were on display.


The Buildings Of Anno’s New Evangelion
It was surprising — in comparison with the original Evangelion series and other projects Anno had worked on in the past — the number of materials for the Rebuild of Evangelion films on display was interestingly light — but not without its quality. The main piece of the area was the scale model of Village 3 Anno used to base his storyboards on in production.


As you can see on the walls behind the village, some light production material was on display, with the most interesting being the original concepts of Mari, the imageboards of the Eva-hellscape by Mahiro Maeda, and the character designs of casual Asuka and the Suzuhara baby — which were originally designed by Anno’s wife Moyoco and then adapted by Atsushi Nishigori.


The village wasn’t the only scale model used for the storyboarding process, Kensuke’s hut and Shinji’s penguin lookout were also built for production and subsequently displayed at the exhibition. All three scale models have little people set up inside them!


Storyboards for Evangelion 3.0+1.0: Thrice Upon a Time also had their own cabinet, allowing fans to see just how much work Anno put into developing them.

One of the last pieces in the Rebuild area — as well as the exhibition as a whole — was Rei (Tentative Name)’s bittersweet note to the Suzuhara family before she turned into LCL.

We Can (Not) Conclude
This exhibition is by far the most comprehensive display of Hideaki Anno’s professional life, and while it doesn’t touch on his personal emotional state through life, it clearly shows the trajectory of an otaku who grew up watching television to one that creates it, living out his boyhood fantasies. For superfans of the director, it was dream come true to see how Hideaki Anno came to be.

All photos were taken by Daryl Harding

Daryl Harding is a Japan Correspondent for Crunchyroll News. He also runs a YouTube channel about Japan stuff called TheDoctorDazza, tweets at @DoctorDazza, and posts photos of his travels on Instagram.
Do you love writing? Do you love anime? If you have an idea for a features story, pitch it to Crunchyroll Features.
By: Daryl Harding
5 notes
·
View notes
Note
MEG, your gifs are gorgeous as always! Can you please share how you did the falling text shadow effect on your 'Leverage: Redemption' gifset? I've been staring at it for hours now and I still can't figure out how you did it, it looks amazing 😭 Thank you! <3
asdflkjas thank you friend!!! the falling shadow effect on the text is actually from the trailer itself, but! even though i can’t give you a step by step walkthrough, i think this is something you can accomplish without too much work in photoshop.
i would just create whatever initial shadow effect you want (via layer style) on a separate text layer with the fill (not opacity) set to 0%, and then manipulate it using however you want either frame by frame (probably a lot of work) or via the transform dropdown in the keyframes section of timeline (probably less work). text warp might work too!

i hope that helps!
1 note
·
View note
Text
Keyframes Spring 01: Event Guide
Overall there is a total of 6 events for this semester (v1.11) and you'll only get to play 4 of them, with the first scavenger hunt being compulsory. So this is a mini guide to help you get an event that you've not seen before etc etc, but before we go through what options leads to what let's run through the events first below the cut
1. Scavenger Hunt, where you help out Deja with the student government party and participate in a scavenger hunt at the end which you can either win or lose
2. Spring Festival, where you get to enjoy the fruits of Deja and Reynah's labour and have fun! You can either choose to spend the entire festival tgt with the boys or split up
3. Errands, where you're stuck doing chores and meet a few ppl along the way as you try and get your groceries done. this event is more linear and doesn't have many sub events like spring festival
4. Studying Session, you're studying with the group but nobody can escape boredom forever so eventually y'all go off on a mini adventure. there's two groups you can choose to go with, with each group having their own sub events.
5. Late Night, it's late and y'all are done studying so you head to the diner Extra Fries and well..... a lot of food is potentially consumed 🧍♂️ this is another more linear event where the sub events aren't as drastically different like studying session, but its a vv sweet and fun event where you get to know everyone better
6. Rainy Day, it's raining!!!!! You can either choose to stay in or join the boys in the rain or even invite the boys up. There's alot of variation and it's generally a really fun time
------
Event 1: Scavenger Hunt!
Event 2
After the scavenger hunt you'll get texts from the group and what you respond with will lead to your second event!
1. How's that going Deja??? -> Spring Festival 2. There there Cam exam seasons almost over 2.1. Would it be helpful if I got a study room??? -> Studying Session 2.2. How abt we meet up tn at the library?? -> Late Nights 3. Nothing much, u? -> Rainy Day
Event 3
You'll be getting a call from either one of the boys (if they consider you a friend and their affection points is high enough) or cam!
If your first event was either Studying Session or Late Night, your phone call will not be the deciding factor, instead it will jump to a group text
1. Omg we were literally talking about wanting something to do lol! -> Spring Festival 2. Uhhh I'll sign up after I finish chores???? -> Errands 3. I'll think about it..... I have to finish studying first -> either Studying Session or Late Night depending on what you haven't done yet 4. OK but it's still not for a while right??? -> Rainy Day
And here are the calls! They all either will lead to the group text choices (below after this call section) if you dismiss studying when the caller brings it up or will lead to either studying event
Percy
1. Yeaaah, same. Gotta study at some point right? 1.1. Yeah, I'll reserve a study room. -> Studying Session 1.2. Yeah, let's meet at the library? -> Late Night 2. Can't relate, sorry. But good luck? -> group text choices
Jamie
1. In that case, I'd better get back to it. -> group text choices 2. There's still some at least. Enough for a study group? 2.1 Then I'll reserve a study room -> Studying Session 2.2 Yeah, let's meet at the library? -> Late Night
Elio
1. We could group up and study together, then? 1.1 Sure, and I'll reserve a study room -> Studying Session 1.2 Want to meet up at the library -> Late Night 2. Good thing you have roommates, huh? -> group text choice
Cam
1. ...No, it's melting. Wanna study together? 1.1 Sure, I'll reserve a study room -> Studying Session 1.2 Want to meet up at the library later? -> Late Night 2. Yeah, I think I'm doing okay, actually? -> group text choice
Group Text Choices, which will depend on whether you've played Rainy Day or Spring Festival as your first event
1. Rainy Day played 1.1 IT'S PARTY TIME! -> Spring Festival 1.2 tbh I still have to do laundry after the last time we partied, soo.. -> Errands
2. Spring Festival played 2.1 Yeah get on board Deja!!! --> Rainy Day 2.2 I skipped chores to go to that festival....... -> Errands
Event 4
The dialogue options you get will differ based on what events you have done already etc etc
1. If you've played both Studying Session and Late Night 1.1 Study break! Let's find something else to do?? -> Spring Festival 1.2 My last days of freedom.... are for chores -> Errands 1.3 An off day sounds great... im ready to just lie around for awhile lol --> Rainy Day
2. If you've only played one out of Studying Session or Late Night 2.1 If you have played Spring Festival 2.1.1 ok but.... Jamie's right, we DO need to study more😬 -> Studying Session/Late Night 2.1.2 Before I can study anymore……i have to do chores 😔 -> Errands 2.1.3 Can we take oneee more day off? Before we lose the chance?? -> Rainy Day 2.2 If you have played Rainy Day 2.2.1 Actually Deja i have bad news… we’re SO out of food… -> Errands 2.2.2 uhh honestly? i dont rly need That much time to study -> Spring Festival 2.3 If you have played Errands 2.3.1 Idk about u all but for once i have no chores left, sooo i’m taking an off day! -> Rainy Day 2.3.2 All work and no play makes us… …idk. Deja is it RSVP time?? -> Spring Festival
3. If you have not played both Studying Session or Late Night 3.1 ok… i admit it, we should probably study for exams a little… 3.1.1 ok i’ll go reserve a study room then? -> Studying Session 3.1.2 wanna meet at the library? -> Late Night 3.2 i’ll study LATER!! u can’t make me do it rn!!! -> Spring Festival/Rainy Day/Errands (depending on what you haven't done)
------
and that's all the events! again I'd really recommend you try doing the events in different orders because basically every event has like hidden dialogue depending on whether the guys consider you a friend or based on prev events you've gone through. it's genuinely really cool to see how each character will react differently based on your past experiences / the bond yall have at that current point. dwdw I will eventually make a guide for how to get closer to everyone etc when I have the time lmao, because some of them (not naming any names smh) are harder to get close to and so you basically never see the 'friend' dialogue as I like to call it lmao. but I will probably do the CG guide first cos that's much shorter
#keyframes#keyframes vn#keyframes walkthrough#keyframes guide#idk how to tag i assume thats just what i do lmao#praying that this is legible because i have no idea how to format stuff on tumblr help im struggling
80 notes
·
View notes
Text
How to Create Realistic Animations with SketchUp: Bringing Your Designs to Life
Introduction:
In the world of architectural and product design, it’s not enough to have static 3D models. Clients and stakeholders often want to see how the final design will look and function in real life. That’s where animations come in, allowing you to bring your designs to life and showcase their potential. In this article, we will explore the process of creating realistic animations using SketchUp, a powerful 3D modeling software, and discuss techniques to make your animations truly impressive.
Understanding the Basics of SketchUp Animations:
SketchUp’s animation capabilities: SketchUp provides a range of tools and features that enable you to create animations, including scenes, keyframes, and the animation timeline.
The importance of planning: Before diving into the animation process, it’s crucial to plan your animation by defining the camera movements, object interactions, and desired visual effects.
2. Setting up Scenes and Camera Movements:
Utilizing scenes: Scenes in SketchUp allow you to save different camera views, object states, and styles. They form the building blocks for creating smooth animations.
Defining camera movements: Learn how to set up dynamic camera movements, such as panning, orbiting, zooming, and walkthroughs, to enhance the realism of your animations.
3. Adding Motion to Objects:
Utilizing keyframes: Keyframes serve as milestones in your animation timeline, allowing you to define the position, rotation, and scale of objects at specific points in time.
Animating object interactions: Explore techniques to animate objects interacting with each other, such as doors opening, components assembling, or lights turning on/off.
4. Enhancing Realism with Materials, Lighting, and Textures:
Applying materials and textures: Learn how to apply realistic materials and textures to objects, making them visually appealing and accurate representations of real-world materials.
Utilizing lighting techniques: Discover how to use SketchUp’s lighting features to create natural or artificial lighting effects, adding depth and ambiance to your animations.
5. Fine-tuning and Rendering:
Refining animation timing: Adjust the timing of your animation by editing keyframes and transitions to ensure smooth transitions between scenes and camera movements.
Rendering your animation: Explore options for rendering your animation within SketchUp or exporting it to external rendering software to achieve high-quality visual output.
6. Showcasing and Sharing Your Animations:
Exporting your animation: Learn how to export your animations in popular video formats, such as MP4 or MOV, for easy sharing and distribution.
Presenting your animations: Discover methods to present your animations effectively, whether it’s embedding them in presentations, sharing them on websites, or creating interactive experiences.
Conclusion: With SketchUp’s animation capabilities, you have the power to bring your designs to life in a realistic and engaging manner. By mastering the techniques outlined in this article, you can create captivating animations that will impress your clients, stakeholders, and colleagues. So, unleash your creativity, explore the world of animation with SketchUp, and elevate your design presentations to new heights.
0 notes
Text
BEST 3D ANIMATION IN DELHI

MEANING OF 3D ANIMATION
3D animation refers to the process of creating moving images or visual effects in a three-dimensional digital environment. It involves the use of computer-generated graphics to generate lifelike and realistic animations. In 3D animation, objects, characters, and environments are created and manipulated in a virtual space using specialized software.
3D animation is widely used in various industries, including film, television, video games, advertising, architecture, and product visualization. It allows for the creation of visually stunning and highly detailed animations that can convey complex ideas, entertain audiences, and bring imaginative worlds to life.
The term "3D" stands for three-dimensional, which means that the objects or characters created in the animation have depth, width, and height, giving them a more realistic and immersive appearance. By manipulating these 3D objects, animators can bring them to life, adding movement, textures, lighting, and other visual effects.
The process of creating a 3D animation typically involves several steps, including:
Modeling: Creating a 3D model of objects or characters using specialized software. This involves defining their shape, structure, and surface details.
Texturing: Applying colors, textures, and surface properties to the 3D models to make them appear more realistic.
Rigging: Setting up a virtual skeleton or rig for characters, allowing animators to control their movement and expressions.
Animation: Defining keyframes and creating movement for the 3D objects or characters over time. This can involve manipulating their position, rotation, and scale.
Lighting: Placing virtual light sources within the scene to illuminate the 3D objects and create shadows and highlights.
Rendering: The process of generating the final animation frames or sequences by calculating the interactions between light, materials, and objects in the scene.
TYPES OF 3D ANIMATION
There are several types of 3D animation techniques used in various industries. Here are some of the most common types:
Character Animation: This type of 3D animation focuses on bringing digital characters to life. It involves creating realistic movements, expressions, and behaviors for characters, whether they are humans, animals, or fantastical creatures. Character animation is extensively used in animated movies, video games, and advertisements.
Motion Graphics: Motion graphics combine 2D and 3D elements to create visually appealing animations that convey information or enhance the visual presentation of a product or concept. This type of animation is commonly used in title sequences, commercials, explainer videos, and user interfaces.
Visual Effects (VFX): VFX refers to the integration of computer-generated elements into live-action footage to create realistic or fantastical scenes. This can include adding explosions, creatures, environments, or altering and enhancing existing footage. VFX are extensively used in the film industry to create stunning and immersive visual experiences.
Architectural Visualization: 3D animation is also used in architectural visualization to create virtual walkthroughs, flyovers, or interactive presentations of architectural designs. It helps architects, designers, and real estate developers to showcase their projects before they are built, giving a realistic representation of the final product.
Product Visualization: 3D animation is employed to showcase products in a visually engaging and interactive manner. It allows for a detailed representation of products from various angles, highlighting features, functionality, and aesthetics. This is often used in marketing, advertising, and e-commerce to promote products effectively.
Simulation and Training: 3D animation is used for simulating real-world scenarios and training purposes. It allows for the creation of virtual environments where users can practice tasks or experience situations that may be dangerous, expensive, or impractical in real life. Examples include flight simulators, medical training, and military simulations.
ADVANTAGES OF 3D ANIMATION
3D animation offers several advantages over traditional 2D animation or other forms of visual media. Here are some key advantages of 3D animation:
Realism and Immersion: 3D animation allows for the creation of highly realistic and immersive visuals. The use of three-dimensional objects, textures, lighting, and shading techniques can result in lifelike characters, environments, and effects. This realism can captivate audiences and make the viewing experience more engaging and believable.
Flexibility and Control: With 3D animation, animators have greater control over every aspect of the scene. They can easily manipulate objects, camera angles, lighting, and other elements to achieve the desired effect. This flexibility allows for creative freedom and the ability to make changes or adjustments at any stage of the production process.
Versatility and Adaptability: 3D animation can be applied to various industries and mediums, including film, television, video games, advertising, architecture, and more. It offers versatility in terms of visual styles, from realistic to stylized or abstract, catering to different artistic visions and project requirements. Additionally, 3D animations can be rendered at different resolutions and formats, making them adaptable for different platforms and display devices.
Enhanced Visualization: 3D animation enables the visualization of complex ideas, concepts, and data in a more accessible and engaging manner. It can simplify and represent intricate information, making it easier to understand and absorb. This is particularly useful in fields like science, education, medicine, and engineering, where visualizing abstract or technical concepts is crucial.
Time and Cost Efficiency: While 3D animation may require significant upfront investment in terms of software, hardware, and training, it can be more time and cost-efficient in the long run. Once the initial assets and setups are created, animators can reuse and modify them for different projects, saving time on repetitive tasks. Additionally, 3D animation can simulate physical phenomena, eliminating the need for costly practical effects or on-location shoots.
Interactivity and Engagement: 3D animation can be combined with interactive elements to create engaging and immersive experiences. This is evident in video games, virtual reality (VR), augmented reality (AR), and interactive presentations, where users can interact with and explore 3D environments. This interactivity enhances user engagement and provides a more dynamic and memorable experience.
SPECIALITY OF 3D ANIMATION
The specialty of 3D animation lies in its ability to create highly realistic and immersive visual experiences. Here are some key aspects that highlight the specialty of 3D animation:
Lifelike Characters and Environments: 3D animation allows for the creation of characters, objects, and environments that closely resemble real-world counterparts. The use of advanced modeling techniques, realistic textures, lighting, and physics simulations can result in lifelike and highly detailed representations. This specialty makes 3D animation ideal for creating believable and immersive worlds in film, video games, and virtual reality.
Dynamic and Fluid Movement: 3D animation enables animators to create dynamic and fluid movement for characters and objects. With the ability to control every aspect of an animation, including timing, spacing, and physics, animators can achieve natural and realistic motion. This specialty is particularly valuable in character animation, where subtle movements, expressions, and interactions contribute to the overall believability and emotional impact.
Complex Visual Effects: 3D animation excels in generating complex and visually stunning effects. From realistic explosions and fire simulations to intricate particle systems and fluid dynamics, 3D animation software provides powerful tools to create a wide range of effects. This specialty is extensively used in the film industry for generating visual effects that would be challenging or impossible to achieve practically.
Versatility in Artistic Styles: 3D animation offers versatility in terms of artistic styles. It can be used to create realistic visuals that closely resemble the physical world, but it also allows for stylized and abstract representations. Artists can explore unique and imaginative styles, pushing the boundaries of creativity. This specialty makes 3D animation suitable for a wide range of projects, from photorealistic films to stylized animations and art installations.
Interactive and Immersive Experiences: 3D animation can be combined with interactive elements to create immersive experiences in virtual reality (VR), augmented reality (AR), and video games. By integrating real-time rendering and interactivity, users can interact with and explore 3D environments, enhancing immersion and engagement. This specialty opens up new possibilities for storytelling, education, training, and entertainment.
Technical Precision and Accuracy: 3D animation requires technical precision and attention to detail. From accurate modeling of objects and environments to precise lighting and physics simulations, every aspect must be carefully crafted to achieve the desired result. This specialty ensures that 3D animations meet the highest standards of quality and realism.
INFORMATION OF 3D ANIMATION
Certainly! Here are some additional related pieces of information about 3D animation:
Software and Tools: There are various software and tools available for creating 3D animations. Some popular 3D animation software include Autodesk Maya, 3ds Max, Cinema 4D, Blender, and Houdini. These software offer a wide range of features and capabilities for modeling, texturing, rigging, animation, rendering, and more.
Keyframes and Animation Curves: Keyframes are specific points in an animation timeline that define the position, rotation, and scale of objects or characters. Animation curves are used to interpolate the values between keyframes, creating smooth and fluid motion. Animators manipulate keyframes and adjust animation curves to achieve the desired movement and timing in their 3D animations.
Rendering Techniques: Rendering is the process of generating the final images or frames of a 3D animation. It involves calculating the interactions of light, materials, and objects in the scene to create realistic or stylized visuals. Rendering techniques can include ray tracing, global illumination, ambient occlusion, and various shading models to achieve different lighting and visual effects.
Rigging and Character Animation: Rigging is the process of creating a virtual skeleton or rig for characters. It involves setting up joints, controls, and constraints to enable animators to manipulate and pose characters realistically. Character animation involves creating movement, expressions, and behaviors for characters using rig controls, keyframes, and animation techniques.
Motion Capture: Motion capture, or mocap, is a technique used in 3D animation to capture the movements of real-life actors or objects and apply them to digital characters or objects. This involves recording the motion using specialized cameras or sensors and mapping the captured data onto 3D models. Motion capture can enhance the realism and naturalness of character animations.
Stereoscopic 3D: Stereoscopic 3D animation is a technique used to create a sense of depth and dimension in 3D animations. It involves rendering separate images for the left and right eye, which are then viewed with special glasses to create a perception of depth. Stereoscopic 3D is commonly used in films, theme park attractions, and virtual reality experiences.
3D Animation in Virtual Reality and Augmented Reality: 3D animation plays a significant role in virtual reality (VR) and augmented reality (AR) experiences. In VR, 3D animation is used to create immersive environments and interactive characters. In AR, 3D animation overlays digital elements onto the real-world view, enhancing the user's perception and interaction with the environment.
CONCLUSION
3D animation is that it has revolutionized the field of animation and entertainment. Over the years, advancements in technology have made it possible to create highly realistic and visually stunning 3D animations that captivate audiences and bring imaginary worlds to life.
One of the key benefits of 3D animation is its versatility. It can be used in various industries, including film, television, video games, advertising, architecture, and more. 3D animation allows for the creation of complex and intricate scenes, characters, and visual effects that were previously difficult or impossible to achieve with traditional 2D animation techniques.
The widespread use of 3D animation has also opened up new opportunities for storytelling. It enables filmmakers and animators to create immersive narratives, explore fantastical worlds, and visualize abstract concepts in ways that engage and captivate audiences. With 3D animation, the boundaries of imagination are expanded, and the possibilities for creative expression are limitless.
Moreover, 3D animation has become an integral part of the entertainment industry. It has contributed to the success of blockbuster movies, popular video games, and visually stunning advertisements. Audiences have come to expect high-quality and visually appealing content, and 3D animation has played a significant role in meeting those expectations.
CONTACT: 9910884607
WEBSITE: WWW.SKYDIGIWEB.COM
0 notes
Text
drag and drop videos review - drag and drop videos review | huge drag and drop videos bonus
Drag and drop videos review
FULL FREE DEMO HERE https://jvz1.com/c/390031/304643
– what precisely is drag and drop videos? The idea at the back of drag & drop videos is to allow everyone to create high-quality videos, through dragging and dropping some documents, and through copying and pasting their textual content into placeholders. With drag & drop films humans can create nearly any type of video, without an pricey software program like after effects, without previous video editing information, and literally inside only some mins. Drag and drop motion pictures
drag and drop videos review – the income funnel
fe: drag & drop motion pictures – 200 template scenes, 1,000+ video graphics belongings. Oto1: drag & drop motion pictures deluxe – 200 extra template scenes, 2,000+ video portraits assets. Oto2: massive assets vault with 1,000’s video and photographs property. Oto3: 250 editable area of interest templates for 50 pinnacle niches. Oto4: video and pics belongings with white label rights (observe: the wl isn't for drag & drop films, however for associated video photographs property). Drag and drop videos overview – what are the wonderful capabilities of drag and drop movies? Two hundred+ template scenes included
1,000+ video property blanketed
expert-grade video editor protected
full second and 3-d compositing
unlimited video & audio tracks
windows & mac well suited
use any fonts in your gadget
create films in any language
1 click inexperienced display elimination
mask editing and rendering
live video preview
keyframe animations
trim, reduce, enlarge, reverse, and transform films
undo & records equipment
coloration correction and coloration grading equipment
particle outcomes
export in a couple of formats (in hd 1080p)
export multiple films right now
drag and drop videos evaluation – how is it different from different video apps? Big form of diferent video types:
the sheer amount of different video kinds you could create is very fantastic. You may create everything from promo films, fancy slideshows, 3-d animations, explainer films, and lots greater… all from one interface. You’ll get editable templates for these kind of special video sorts. Very high exceptional:
drag & drop video templates are certainly excessive quality and polished, and the motion pictures you could render look sharp and expert. Much like something you’d create in a high-give up video editor inclusive of after results. Absolutely edit and customize everything:
a few other video apps include templates that lock you into precise coloration issues, with particular pics, fonts, song tracks, etc.. With drag & drop films you get complete control – upload your personal images, use any fonts you have on your device, trade the colours, add your own music tracks or voice overs (in any language), and lots greater. You’ll get a fully featured video compositor to edit the entirety. Integrate, re-arrange, blend & healthy:
that is the largest element that makes drag & drop videos specific… the capability to combine special templates collectively – integrate real video photos, with explainer scenes, with 3d animations, with kinetic textual content, with logo stingers, etc.. Plus the ability to combine & healthy one of a kind scenes, and even man or woman elements within every scene, to create actually particular videos. Then arrange these scenes in any order, to create long multi-scene films, with limitless video & audio tracks. All inside one interface
drag and drop motion pictures review – the entirety is completely editable & customizable
the cool element about drag & drop video templates is which you get pleasant of each worlds… in case you want to create a video as quickly as viable, sincerely drag and drop your content inner, and hit render. And you also have the potential to dig deeper and spend a few more mins customising matters on your liking. Absolutely control text
drag and drop video review
drag and drop video Bonus
drag and drop video Review & Bonus
drag and drop video Bonuses
drag and drop video Software Review
drag and drop video Demo
drag and drop video Scam
drag and drop video Software Scam
drag and drop video Software Preview
drag and drop video Walkthrough
drag and drop video Jvzoo
drag and drop video Download
drag and drop video Software
drag and drop video Review + Bonus
drag and drop video Best Bonus
drag and drop video Upsell
drag and drop video OTO
drag and drop video Best Bonuses
STORE BUILDR Review and Bonuses
Does drag and drop video Really Work
Does drag and drop video Work
Does drag and drop video Actually Work
drag and drop video Preview
drag and drop video Buy
Get drag and drop video
Don't Buy drag and drop video
Is drag and drop video A Scam
drag and drop video Discount
drag and drop video OTO1
drag and drop video Early Bird
kind to your own text, use any font established on your system, exchange hues, trade text length, letter spacing, move and function textual content where you want, and extra. Manipulate colorings
maximum of the templates will let you manipulate the colour of the history and factors like borders, shapes, textual content, and so forth.. So you can personalize the shade scheme to suit your brand. Insert your very own photos / motion pictures
a few different video apps lock you into a particular area of interest template. As an instance they've a fab looking template, however it’s for dentists only. Drag & drop video templates are fully customizable with any photos or films you want, for any niche you need. So that you can create unlimited motion pictures for limitless niches. Upload your personal song / audio
add what ever music, sound consequences or voice overs you want to the templates. Assume your video needs a hip hop song tune, no trouble. Rock is more your fashion? No trouble. With unlimited audio tracks, you may even add a voice over on top of a music song, with sound outcomes delivered on top. Flow matters round
most templates are bendy enough wherein you could move distinctive elements around. For instance in case you want to have your text in a nook in preference to the middle, you can circulate it. Or a decrease 0. 33 on proper facet in preference to left, you could do this too. Alpha transparency
maximum of the templates and animations include alpha transparency. Meaning you could placed them on pinnacle of any picture or video. You could even layer exclusive elements on top of each other. Complete manage
change opacity, function, length, rotation, add outcomes and behaviors, and lots greater. You've got a totally featured superior video editor at your fingertips. Word: in case you don’t need to play around with all of the settings, you don’t have too. The templates are drag & drop easy to use, and the superior settings are non-compulsory
drag and drop motion pictures assessment – how drag and drop motion pictures works
step 1: select template
pick out from a large kind of pre-formatted templates, for almost each video kind
https://www.youtube.com/watch?v=QjYJtfvPouM
step 2: drag & drop your media internal
take your “media” (snap shots or films) and drag them into actually marked placeholders. Those may be any photographs or films from your computer. Step 3: replica & paste your textual content
copy and paste (or type in) your own text into the textual content placeholders. And in case you need you may also alternate: text size, fonts, colorations, bold, italics, letter spacing, and many others.. Step 4: hit render
hit render and await your masterpiece to be created. Render in full hd (1080p). Extremely good rapid render (quicker than in-the-cloud apps). Actual time render development, realize exactly when your video is accomplished. Render more than one videos immediately, and as many videos as you need (no restriction on render amounts). Drag and drop motion pictures evaluate – why must you purchase it proper now?
– no longer handiest are you having access to drag and drop motion pictures for the first-class charge ever supplied, but additionally you’re making an investment absolutely with out risk. Drag and drop motion pictures consist of a 30-day money lower back assure coverage. While you pick out drag and drop videos, your pride is guaranteed.
– something you do, don’t wait. The rate on this is going up with each sale. Be fast, or you may pay a miles higher price! Purchase it as quickly as viable to get the bottom rate.
– do now not miss this possibility, you could by no means get another threat!! Doorways to tug and drop motion pictures are final soon. Get immediately get admission to to drag and drop movies now before the cart closes. Unique offer: you will get hold of a group of big bonus from us whilst you buy drag and drop motion pictures via this site. Please see the bonus programs details below. Drag and drop motion pictures bonus – get our unique bonuses! Drag and drop movies bonus
do these steps under to get our drag and drop motion pictures bonus if making a decision to buy drag and drop films. Don’t leave out it. Act now! Those bonus packages will expire quickly …
1st: press ctrl + shift + delete to clean all of the cookies and caches out of your net browser. 2nd: click the “purchase now!” button underneath to get drag and drop films at cut price (or get it through this discount hyperlink). Third: touch us to verify the purchase. 4th: wait for your bonus. Buy it through this website online & get all these bonuses free! A hundred% valid software program
drag and drop movies 2. 0 bonus
this all-in-one instagram advertising and marketing suite is a hundred% cloud instagram submit scheduler, photo and video editor, comments, likes, follow, comply with back, unfollow… and not using a 3rd party apps or browser extensions. That is a need to have for video marketers, ecom keep proprietors, and every body else seeking to get the most out of instagram with an ‘all-in-one’ solution. Audiencedrill
drag and drop videos bonus
audiencedrill is an high-quality focused on and facebook research software program. The most effective facebook targeting software of its kind that has the energy to right away increase your roi by way of 100% thru unique marketplace segmentation! Videodrill
drag and drop films bonus
videodrill is a powerful video focused on and studies software. The most effective video focused on software that can growth your roi by means of 100% thru laser targeting and segmentation that you could’t do with another app. Social optimizer
drag and drop films bonus
for the primary time ever, an all-in-one automatic system with direct fb ads integration in order to permit you to mechanically tune information and important metrics throughout each single campaign you run with facebook ads throughout any platform on line (all ecom shops, any sales funnels, affiliate promotions, web sites and so forth). All of this beneath one dashboard, to get a clear view of your commercial enterprise overall performance and your vital numbers and metrics. Xomator app
xomator app
use the xomator app to get instant get entry to to tens of millions of physical merchandise that you may dropship. Xomator is your #1 technique to run your dropshipping enterprise from aliexpress. Characteristic spotlight:
– instantly view supplier rating, shipping options and time whilst searching aliexpress
– 1-click product import from the aliepxress – including pictures, product options, and vendor specifics
– edit product info – title, description, price, pick out alternatives that you want with out navigating away from the aliexpress product web page
– download zip file with all the product records, such as images
– push products without delay in your on the spot ecom keep.
– fulfill orders in your instant ecom store and more. 5000+ stock photo collection
drag and drop movies overview 2017
animals inventory pix, architecture inventory pictures, commercial enterprise stock pix, fitness stock pix, foods and drinks inventory photos, fitness stock photos, miscellaneous gadgets inventory pictures and greater. Biggest series of digital photographs (whitelabel)
instamate 2. Zero bonus
instamate 2. Zero bonus
a massive % of high exceptional digital graphics that fits to multiple niches, use them to your landing pages, income pages, income motion pictures or even in social meida networks. Purchase drag and drop motion pictures now earlier than price increase! + get our drag and drop videos bonus [free!]. Don’t pass over out! 0
three
zero
three
2
1
01
9
zero
purchase drag and drop films
9. 1
overall rating
top! Add your evaluation
proportion this:
tweet
facebook
google
pinterest
linkedin
related articles
associate raid overview – launch bargain & huge bonus affiliate raid overview – release cut price & big bonus
vidagency ally overview – launch bargain & massive bonus vidagency ally review – launch discount & large bonus
million dollar shortcut overview – release discount & huge bonus million dollar shortcut review – launch discount & massive bonus
we are able to be happy to pay attention your thoughts
leave a reply
you ought to be logged in to put up a comment.
[https://www.youtube.com/watch?v=YrQbAQlpShE]
[https://www.youtube.com/watch?v=QjYJtfvPouM]
[https://www.youtube.com/watch?v=c2JYEOZit2E]
youtube
1 note
·
View note
Text
Second Life Bento Tail Rigging and Animation Walkthrough
Your mileage may vary. Anything important to note (or thing to do) will be marked in the images in red. Blender 2.78a, Avastar 2.0.41
Notice: this is a Release Candidate version of Avastar. Things might not work right or consistently (especially while transferring weights or creating automatic weights) and process might be subtly different in future versions.
Start with blank file, delete the starting cube, cursor to origin (shift-S) Shift-A -> Avastar -> Extended Rig
Armature layer visibility -> Tail The top one.
On the left, under Avastar tab -> Rig Display, Visibility, every bone has an "true" one thats used for rigging (Deform Bone Groups), and a 'display' bone (Control Bone Groups) usually laying over the exact same location for users to animate. This is to allow Avastar to set rotation limits on bones and use those circles to as 'handles'
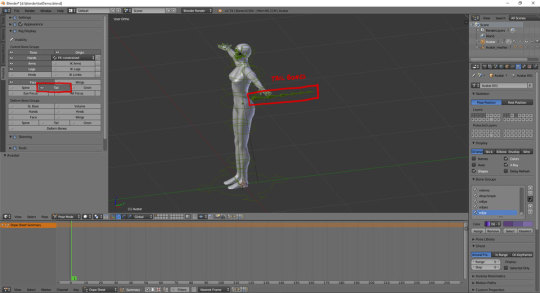
You should be in Pose Mode. While the armature is selected, use ctrl-tab to toggle between Pose mode and Object mode.
The deform bones are purple, control bones are green. You can toggle their visibility at Avastar tab -> Rig Display, Visibility.
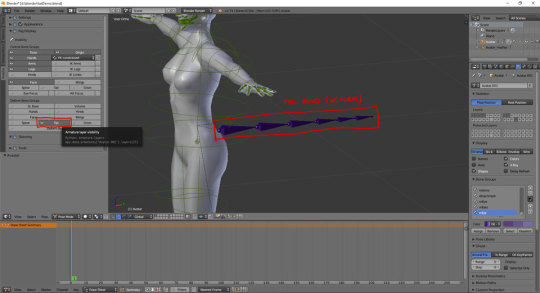
Select the base tail bone. Shift-S -> Cursor to Selected Shift-A -> Add Cylinder Give it 8 vertices to become an 8-sided cylinder then rotate and resize to fit over the tail.
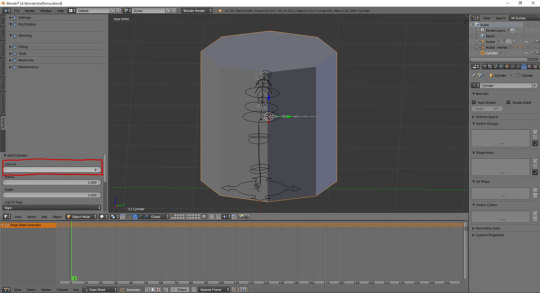
Select the cylinder, Edit mode, Ctrl-R, press '7' to give it 7 cuts.
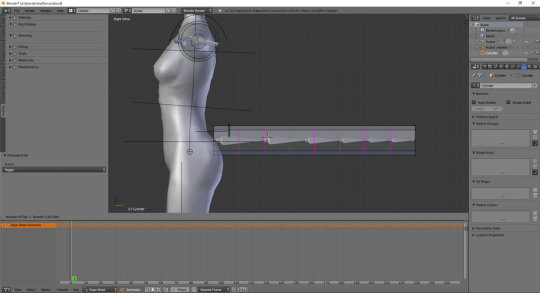
Press Tab for Object mode. Select Cylinder, hold-shift and select the Armature too.
At Avastar Tab, Skinning, Bind to Armature.
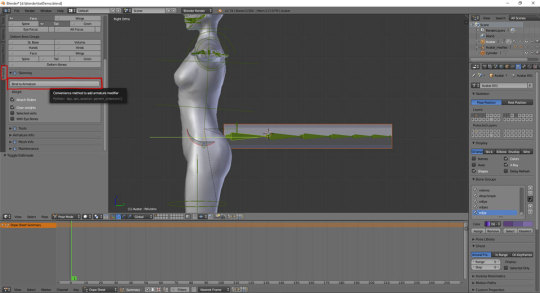
Now many things have happened. On the left, set turn off Control Bone Groups -> Tail (upper one) and turn on Deform Bone Groups -> Tail (lower one) Select Cylinder in Object mode, press ctrl-tab to enter Weight Paint mode. Now right click on each tail bone to see the weightings for them. On the far right, under Vertex Groups are the full list of bones influencing the object. This list can also be used instead of right-clicking on bones. Note that some undesired weights were acquired (i.e. mHindLimbsRoot)
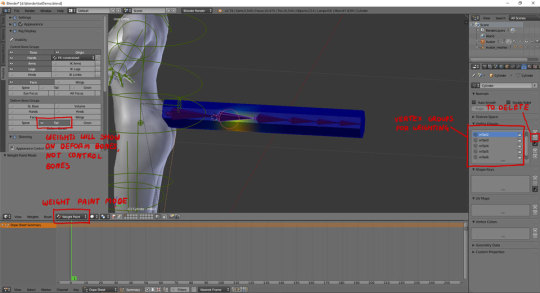
Avastar 2 Release Candidate 3 still has bugs needing to be ironed out. Errors might happen or all kinds of nearby bones might apply weights to the base of the tail, or the automatic weights just look off.
Select Vertex Groups -> mHindLimbsRoot and click on the - (minus) button.
All the weights are off. Select mTail2, click on Tools. For Brush, set weight 1.0 , Multi-Paint on. For each bone, repaint the weights to be in bands. Use weight 0.0 to erase weights.
[ Refer to Addemdum Post 1 until I figure out how to embed videos :( ]
Avastar Deform Bone Groups visibility -> SL Base Select the mPelvis bone. Paint all the base vertices with 1.0 weight. This is to ensure the base of the tail stays stuck to the butt. This is also why mTail1 has 0.0 weight on those vertices as well.
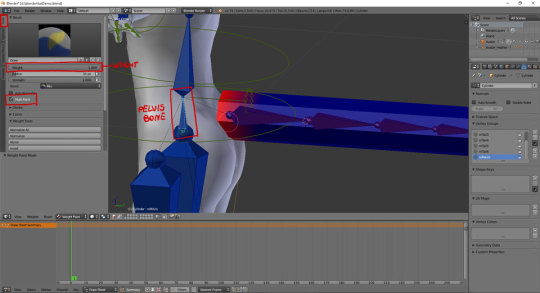
Now test the tail. Turn off Deform Bone Groups -> Tail visibility, turn on Control Bone Groups -> Tail. Select and rotate each tail bone.
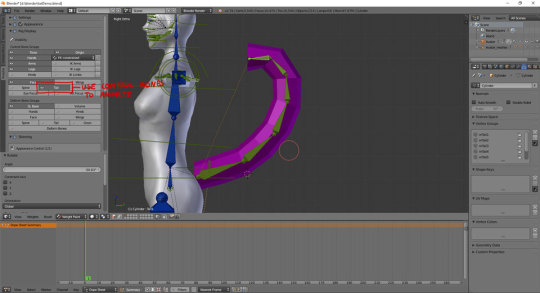
If nothing looks disastrously bad, select bones and press Alt-R to reset to Rest Pose.
Num Pad-7 for Top View. Change bottom pannel to Dope Sheet. Select Cylinder and Ctrl-Tab so it stops being pink, then select the first tail bone.
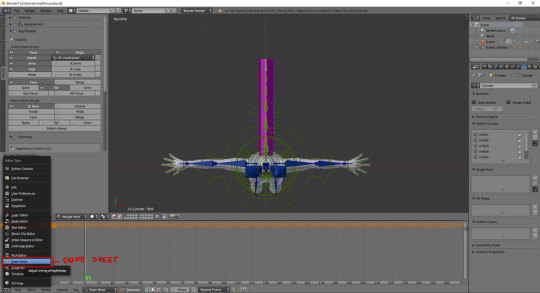
For each bone, rotate them 10 degrees on Z to curve the tail to the left. Select all tail bones, press I -> LocRot
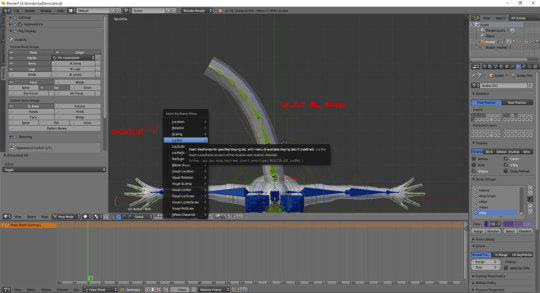
Keyframe created Selection tools are the same as 3dview. Press B and box-select the keyframe. Shift-D, type 30 (Creates a duplicate and places it 30 frames ahead) Repeat again to have another duplicate keyframe at frame 60
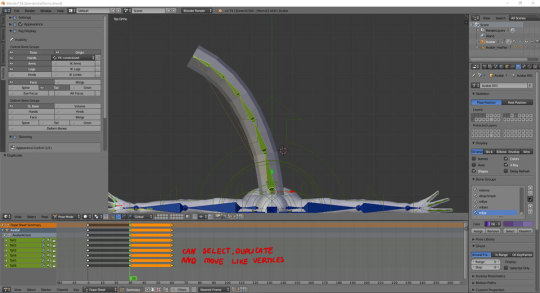
Select the keyframe at 30. Select all bones, Alt-R. Rotate each bone 10 degrees the other way to curve it to the right. Make sure all tail bones are selected, press I -> LocRot to save the keyframe.
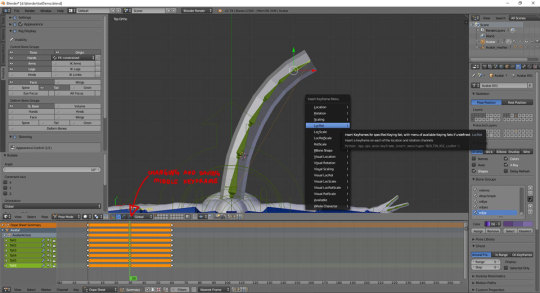
Slide the green line about to see how the animation goes
[ Addemdum post 2]
Select the Armature, then go to the Render -> Animation Export on the right. Loop animation -> on In: 1 Out: 60
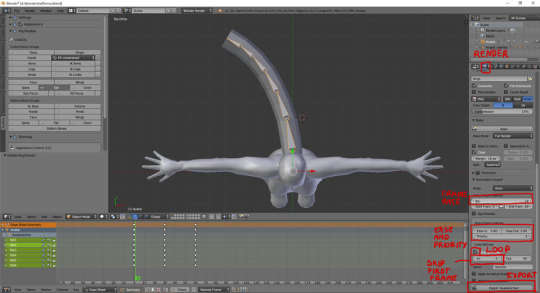
Export the animation. Select the tail mesh, Export -> Collada (Avastar) (.dae)
Upload the Animation. Upload the Mesh. Make sure Upload options -> 'Include skin weight' is turned on or it won't move.
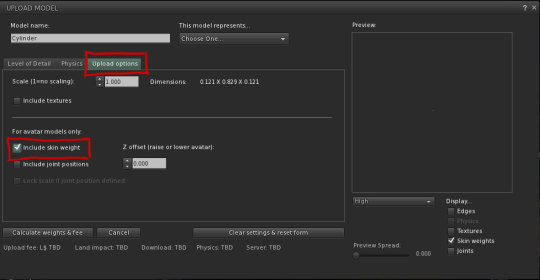
Wear the mesh. Play the animation.
9 notes
·
View notes
Text
atmos : Headspace from stills to 360
I love the Headspace’s 360 renders and when they came out I was left wondering if using a game engine could have helped us to achieve comparable and faster results.

Unity is the software of choice for many reasons but the most important was that at that time it seemed as if it could handle very complex PRODUCTION geometry without crashing, and in the end this choice paid off. Big thumbs up for Unity!
After sooo many days the first explorable scene (meaning that with mouse and keyboard it is possible to walk inside Headspace as it can be done in many videogames) was done! It was really basic, no materials, no textures, but it was really cool walking in this twilight world of pristine white. There was much room for improvement though and it was really fun discovering some of the possibility offered by Unity.

If by bad luck you missed the last explorable scene here is the link, please keep in mind that the loading times are a bit long. Please refer to this Facebook post to check how to walk around.
As weird as it sounds it was easier to make a game out of the 3d file rather than make a 360 image. To do that I required some help and I tried many additional App (all of those generously available for free at the Unity Store) until I found the best fit.
To capture a fully-fledged walkthrough I just needed to learn how to animate the camera using a bunch of keyframes and that’s it! That’s how the magic (and a lot of fun) happened.
-Lorenzo
5 notes
·
View notes