#keyframes guide
Explore tagged Tumblr posts
Visit Tumblr Blog
Explore Tumblr blogs with no restrictions, modern design and the best experience.
Last Seen Tumblr Blogs


Fun Fact
The total number of visits Tumblr.com received during January 2021 is 327 million.
Text
Keyframes Spring 01: CG Guide
For spring of the first year there is 8 CGs, with 2 CGs having variations which total up to bout 11 CGs that you can collect for this season (v1.11). All the CGs will be below the cut!
We'll go from up to down, left to right
1. Deja and Cam celebrating
When you're going against one of the boys during the scavenger hunt, you'll be prompted with 3 rounds Quick Time Events (QTE), the first two rounds honestly don't matter and is just fun dialogue of who is currently in the lead. The real deciding factor is the last round where you must succeed at least 3 keys
2. Percy, Elio, and Jamie celebrating
As long as you score less than 3 on round 3 of the QTE when you're up against the boys, whomever you're up against will get ya and they'll win
3. Percy and Elio studying
During the Studying Session event (you can check my other guide on how to get a specific event), choose "I'll actually tag along." when Elio asks if you want anything
The variations come from what you choose to do when yall detour, the options being the polo club, horticulture club and the coop, with each option getting you a variation of the CG -> - Why were there horses on the Green? - Those plants… were they having a sale? - The coop sounded… intriguing, to say the least.
4. Burger !
During the Late Night event, you'll automatically get this CG and it's unmissable!
5. Percy, Elio, and Jamie goofing in the rain
During the Rainy Day event, which you have to play as the first event, you're gonna have to reject Percy's invitation to go good off in the rain and not invite them up for soup </3. The reason why it has to be the first event chosen is because if its any subsequent event, Cam or even you are closer to the boys so you'll automatically invite them up for soup. It's okay, at least you get to have quality bestie time with Cam and Deja if you don't invite them up -> - Going out into the rain? No thanks. -- Whatever they were up to down there, you’d leave them to it.
6. Cam, Deja and Jamie studying
During the Studying Session event, choose "Can I text you if I think of anything?" when Elio asks if you want anything
The variations come from what you choose to do what yall choose to do in town either going to get ice cream or see Nena -> - Ice cream sounds really good right now… - Let’s go see if Nena’s at the thrift store?
7. Reynah taking a photo
During the Errands event, its another unmissable CG!
8. Cam posing like a cutie!
During the Spring Festival event, you have to choose to split up when prompted what the group should do, from there choose to hang out with whomever you want to but after choose to take a break with Cam - There was no harm in splitting up. You’d catch up with whoever you found along the way. -- (just choose any you wanna do!) --- You needed a break— to the benches with you.
hopefully this helps yall get all the CGs and their variations! especially since a few are hidden behind specific choices in the events
85 notes
·
View notes
Note
Congrats on launching the Kickstarter!! Quick question: Does the rainy day event have a CG?
it does! it's just tucked into one of the branches, haha.
#keyframes asks#we know that's a hard one to find HAHAHA#but the community's rallied and someone has a guide out there in the ether i think
62 notes
·
View notes
Text
George’s Guide to Surviving Lockwood and Co [Humor]
youtube
inspired by Oksana's break room video from Odd Squad
for @savelockwoodandco’s #LockwoodSurvivalGuide challenge :)
#always stay until the end of the credits#odd squad will always be a source of inspiration for me haha#I am so excited and proud to share this video!!!#george karim#lockwood and co#lockwood and co netflix#lockwood and co video#lockwood and co edit#lockwoodandcoedit#odd squad#odd squad pbs kids#oksana's breakroom video#lockwood survival guide#george's guide to surviving lockwood and co#and the spinning survival guide badge#save lockwood and co#videos in the palace#edits in the palace#lockwood and co humor#earlier this week I was pondering over if I should even do this challenge and if so what to make for it#I decided that I wanted to make it silly and then it struck me#I learned how to do those pop up things and I'm so proud of myself (finally learned keyframes haha)#it was originally going to be a stamp next to the l&co logo but then I realized that it would fit perfectly over the ghost lamp#was debating whether or not to do a post credits scene like in oksana's video and if so what#and then figured that george would know that lockwood would never stay until the end of the credits#Youtube
24 notes
·
View notes
Text
i might have to try and look at a different guide for pose modding because my success rate with the mod wiki one is like 0/5 attempts lmao
#there's just some things i think must be being glazed past and things that are maybe outdated?#like the guide saying there should be a popup menu for keyframing but when i use the option there's nothing#normally prefer not to use video guides as it takes me way longer lol as i'll scour through everything and have to rewatch/listen to things#like 10 times before it sinks in lol
4 notes
·
View notes
Text
WIP
#IM---#WHY IS HE GOING SIDE TO SIDE#BROTHER PLEASE WALK STRAIGHT#shouldve made this wwx or something#ok so i found an alternative route to get this shit in 10 minutes#whereas the other path took me a week and it still works less than this#so first take the vrm make a copy and turn the copy into a glb. just change the extension name. then import it to blender#then generate an fbx with or without textures nobody gives a shit just do it#get the animations on that and then import back the skeleton to blender#then on your static model you will want an animation track so literally go into pose mode pick a bone and then add a keyframe#then go ahead delete it. you just wanted a blank animation track#then rename the imported skellys and then push down the animations to make them actions#then add the actions to this model by going to the NLA and just. adding the actions.#thats how to get to this point. idk why hes swaying and how to fix that. im gonna go mess with that now#once this works i can fulfill my dream and i can start mocapping myself with a whip#ive been mocapped before ive never done it myself tho#ive always been a minor antagonist in every game ive been in#is there something about my face?#forgot to mention. this fixes the glb file geometry rendering export issue. now i can use glb again#which means i can put this shit on neocities#edit: I found the issue. DO NOT adjust the skeletons and absolutely do NOT EVER transform all while importing#this is my guide to myself because I will forget and then get screwed so bad#edit edit: do not import glb using the default setting on blender. use the middle setting. idk what it says but thats the one.#use the one with cones not balls
5 notes
·
View notes
Text
Step-by-Step Guide to Keyframing in After Effects for Stunning Animations

Introduction:
Welcome to the exciting world of keyframing in After Effects! If you're looking to elevate your animation game and create stunning visuals, mastering keyframing is a crucial skill. In this step-by-step guide, we'll walk you through the fundamentals of keyframing in After Effects, demystifying the process and empowering you to bring your creative visions to life. Let's dive into this comprehensive After Effects keyframing tutorial.
Understanding Keyframing:
Before we delve into the nitty-gritty details, let's establish a clear understanding of keyframing. In animation, keyframes serve as markers that define the starting and ending points of an animation sequence. By strategically placing keyframes, you can create smooth transitions and dynamic movements, adding a professional touch to your projects.
Getting Started with After Effects Keyframing:
Open After Effects: Launch After Effects and create a new composition to begin your animation journey.
Import Your Assets: Import the elements you want to animate into your composition. This could include images, text, or even video clips.
Select Your Layer: Choose the layer you want to animate and make sure it is selected in the timeline.
Access the Keyframe Assistant: Look for the stopwatch icon next to the property you want to animate. Clicking this icon activates keyframing for that property.
Set Your Initial Keyframe: Move the playhead to the starting point of your animation and set your initial keyframe by adjusting the property value.
Move to the End of the Animation: Advance the playhead to the desired endpoint of your animation.
Adjust the Property Value: Modify the property value to set the final state of your animation.
After Effects Handles: Explore the use of handles to control the speed and easing of your animation, creating a more polished look.
Repeat these steps for additional properties or layers to build a complex and visually appealing animation.
Enhancing Your Animation with Advanced Techniques: To take your animations to the next level, consider exploring these advanced keyframing techniques:
Easy Ease:
Apply the Easy Ease function to create smooth transitions between keyframes.
Graph Editor:
Dive into the Graph Editor to fine-tune the velocity and acceleration of your animation.
Parenting:
Utilize the Parenting feature to link layers and create intricate motion hierarchies.
Conclusion:
Congratulations! You've completed our step-by-step keyframing guide in After Effects. By mastering these techniques, you can breathe life into your creations, making them visually stunning and captivating. Whether you're a seasoned animator or a beginner, this After Effects keyframing tutorial serves as a valuable resource to elevate your animation skills. Embrace the power of keyframes and unleash your creativity in After Effects!
#step by step keyframing guide#After Effects keyframing tutorial.#attitude academy#enrollnow#learnwithattitudeacademy#bestcourse#attitude tally academy#video editing course in uttam nagar
0 notes
Text

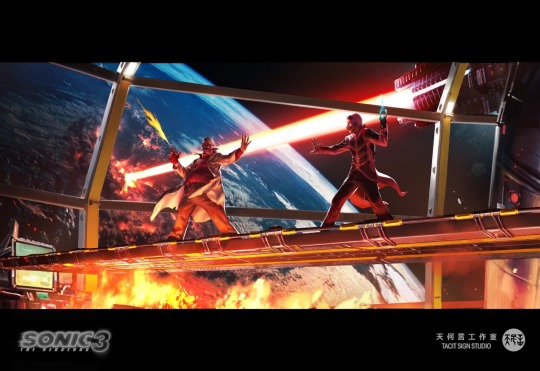


New concept art for Sonic the Hedgehog 3 (2024) has released. (More on their website since Tumblr only allows a certain about of photos on a post). Here’s an excerpt below translated in English:
Hello, everyone. We are Tianheyan Studio.
In 2022, we were invited by Jeff Fowler, director of the Sonic the Hedgehog series, to participate in the preliminary conceptual design of Sonic the Hedgehog 3. It's an honor to participate in this series of films again.
This time, we are mainly responsible for the drawing of some keyframes and some character modeling. The keyframe concept map plays a helpful role in the establishment of the film tone style, and can also assist in guiding the work of visual effects. Some keyframes also need to design specific scene details. The character modeling is mainly based on the performance photos of Dr. Egghead (Kim Kerry), exploring witty makeup and costume design suitable for matching with animated characters.
Here are some of the results of our team's keyframe concept maps. Thank you for your support.
SOURCE
#sonic movie#sonic the hedgehog#sonic movie 3#shadow the hedgehog#Sonic 3#sonic cinematic universe#sonicmovie3spoilers#sonic movie 3 spoilers#sonic spoilers#sonicspoilers#The concept of time travel was scrapped
2K notes
·
View notes
Text


I made a Really Basic CSP animation set-up guide for a friend, or at least how I personally set-up my animation workspace! I wanted to share this here because some of this might be insightful to someone else out there too :-)
It mostly covers really basic functions and dabbles a little bit into how to add keyframes and camera movements, but nothing too groundbreaking. BUT I figure it could be helpful for the unfamiliar!
682 notes
·
View notes
Text
I figure its been long enough now. Time to post Carmen I just did the rough animation, not the layout or compositing. Props to the amazing artists who came before and after me in the pipeline, this show was a dream to work on. I started on this show in season 3 doing Special Posing (drawing keyframes as guides for layout) and in season 4 started doing rough animation for the animators to use as guides. I cant post the actual roughs, but it was pretty exactly these shots but sketches
530 notes
·
View notes
Text

I got a couple of asks on how I did the text transition in this set. I'm going to explain as best as I can (with image references).
*Disclaimer: this assumes you have a basic understanding of giffing with video timeline, and keyframes. If you're new to keyframes, check out this tutorial by @userpeggycarter before proceeding.
Step 1: Go through, make your gif, color and all that jazz. if you're not familiar with giffing and need a guide, check this one out by @cal-kestis. Be mindful of the number of frames you have, as it is extremely important when keyframing begins. Make sure you have an even number of frames, or you will have an uneven transition. For this gif I'm at 60 frames total, and I'd be careful exceeding 70, as if you need to go back and delete... It just sucks, so be mindful! You'll see my gif and coloring under a group I titled "base" - and I highly recommend putting your gif/coloring/etc. into groups, as it will make the timeline a bit cleaner, and it's a little easier to find everything you need. But when you're done, you should be here:

*Quick note 1: Make sure your gif is in 8-bit mode. If you aren't familiar with bit modes, that is a tutorial for another time. For now, you can change it here:

Step 2.1: Pick your font/placement/etc. I really recommend being 100% on whatever you pick, along with the size. I've encountered problems when I move the font after the fact with alignment, so it's best to look your gif over to ensure you're satisfied. For this set, I went with Figtree, placed dead center.
I want to add to this by saying, thus far, I have found that white is the only color that works for this. I'm playing around with some other options, but black is 100% a no go. If you find a way to get that working, let me know. I'll amend this tutorial.
Photo of text settings, along with where you should be now.

Step 2.2: Since we're transitioning into a new set of words/text, you need to get that text ready as well. Shorten the length of time the first piece of text runs to halfway (I have 60 frames, so I cut it to 30).

Step 2.3: Duplicate your text layer, type your other text. The two texts should show for length of time, as you have an even number of frames, meaning you can divide by 2. Move it over to the end of where the previous text ends. If that makes no sense, it should look like the below: (again, folder for the typography to know where to reference. I have a small organization addiction so.. creator's choice)

*Quick note 2: I do not recommend changing to a new font or size with this, it won't look quite right. Of course, experiment away! This is just a small caution based on my own experimentation.
Now, to get to the actual fun part...
Step 3.1: Duplicate the first text layer. For this gif, it's the one that says "it didn't change anything". Once you duplicate it, you'll be turning it into a smart object. This is so the filter we apply works. Repeat for the second text layer. Lil gif below:

Quick note 3: I recommend going one text bit at a time, and also would tell you to put each typography layer into its own folder. This is really important for later, so doing it earlier is better.
Step 3.2: We will now apply the filter. To do this, you're going to click the smart object version of our text, then go to Filter → Stylize → Wind. For the gifset I made, I used Method → Blast and Direction → From the Right. Click "OK" and the filter will apply. Duplicate this for the other text layer.

Step 4: We now begin the keyframing. I highly recommend the rule of 0.3, which is when your transitions are over the span of multiples of 3 (i.e. if you start at frame 1 with 100% opacity, frame 3 will be at 0%). We'll be doing 6 frames from 100% to 0%, and vice versa, for this transition. This was the best time I found for this transition, but it's a matter of preference. Just follow that rule of 3.
Step 4.1: Click the smart layer of the text we made on the timeline, then click the little arrow on the left of the name of the layer. You'll see this:

See the little clock next to Opacity? Click it, and you get this lovely little yellow diamond. This is how we control the visibility of the Wind layer. It will start at 100%, keep it there.

Click the arrow on the right of the play button 6 times (aka get to the 6th frame), click the stopwatch again. While on this frame, and the yellow diamond clicked, change the opacity of the Wind layer to 0% It'll look like this:


You will repeat this, in reverse, at the end of the text layer.
Quick note 4: Sometimes, Photoshop is moody. To get the diamond on frame 30 (or whatever frame # the end of your text layer is), put it on the frame prior. You can then nudge that diamond over 1 frame. See below:


Repeat the process for the other text layer.
Step 5: We're basically done! Change your gif from video timeline to frames, maybe do a quick play through to make sure all is well.
Quick note 4 (it's the last one I promise): I have heard from many that when they work with keyframes, they end up with duplicate frames. I, personally, have not encountered this issue. I do not know if it is because of the version of Photoshop others are using, PC vs. Mac, or some other secret third thing. I recommend that, when you check your gif, verify if there are duplicate frames. The keyframe tutorial I linked earlier goes into further detail, and here is another lovely explanation from Nik, the master of all things keyframe transitions.
Step 5.1: Export, and give yourself a high five because you deserve it.
If you have any questions, don't hesitate to reach out! I'll try to clarify anything if needed. Happy giffing!
#*tutorial#c*#*ps#tutorial#userchibi#usertj#uservivaldi#userbuckleys#usertina#userroza#usershreyu#usersole#useralien#userabs#userrainbow#quicklings#userbambie#useraljoscha#userzal#userbess#userfern#tuserhol#usernolan#usermagic#userhallie#usershale#userholloway#tusermels#usergif#we will absolutely not be discussing that fact that i have been awake since 630 am
236 notes
·
View notes
Text

Someone asked me how I created the fade transition in this gifset which I’ll try to explain in the most comprehensive way that I can. If you've never done something like this before, I suggest reading through the full tutorial before attempting it so you know what you'll need to plan for.
To follow, you should have:
basic knowledge of how to make gifs in photoshop
some familiarity with the concept of how keyframes work
patience
Difficulty level: Moderate/advanced
Prep + overview
First and foremost, make the two gifs you'll be using. Both will need to have about the same amount of frames.
For ref the gif in my example is 540x540.
I recommend around 60-70 frames max total for a big gif, which can be pushing it if both are in color, then I would aim for 50-60. My gif has a total of 74 frames which I finessed using lossy and this will be explained in Part 4.
⚠️ IMPORTANT: when overlaying two or more gifs and when using key frames, you MUST set your frame delay to 0.03 fps for each gif, which can be changed to 0.05 fps or anything else that you want after converting the combined canvas back into frames. But both gifs have to be set to 0.03 before you convert them to timeline to avoid duplicated frames that don't match up, resulting in an unpleasantly choppy finish.
Part 1: Getting Started
Drag one of your gifs onto the other so they're both on the same canvas.
The gif that your canvas is fading FROM (Gif 1) should be on top of the gif it is fading INTO (Gif 2).

And here's a visual of the order in which your layers should appear by the end of this tutorial, so you know what you're working toward achieving:

Part 2: Creating the grid
Go to: View > Guides > New guide layout
I chose 5 columns and 5 rows to get the result of 25 squares.

The more rows and columns you choose, the more work you'll have to do, and the faster your squares will have to fade out so keep that in mind. I wouldn't recommend any more than 25 squares for this type of transition.

To save time, duplicate the line you've created 3 more times, or as many times as needed (key shortcut: CMD +J) and move each one to align with the guides both horizontally and vertically. You won't need to recreate the lines on the edges of the canvas, only the ones that will show.
After you complete this step, you will no longer need the guides so you can go back in and clear them.

Follow the same duplicating process for the squares with the rectangle tool using the lines you've created.
Align the squares inside the grid lines. The squares should not overlap the lines but fit precisely inside them.
This might take a few tries for each because although to the eye, the squares look all exactly the same size, you'll notice that if you try to use the same duplicated square for every single one without alterations, many of them will be a few pixels off and you'll have to transform the paths to fit.
To do this go to edit > transform path and hold down the command key with the control key as you move one edge to fill the space.
Once you're done, put all the squares in their separate group, which needs to be sandwiched between Gif 1 and Gif 2.

Right click Gif 1 and choose "create clipping mask" from the drop down to mask it to the squares group. This step is super important.
After this point, I also took the opacity of the line groups down to about 40% so the lines wouldn't be so bold. Doing this revealed some squares that needed fixing so even if you aren't going dim the lines, I recommend clicking off the visibility of the lines for a moment to make sure everything is covered properly.

Part 3A: Prep For Key framing
I wanted my squares to fade out in a random-like fashion and if you want the same effect, you will have to decide which squares you want to fade out first, or reversely, which parts of Gif 2 you want to be revealed first.
In order to see what's going on underneath, I made Gif 1 invisible and turned down the opacity of the squares group.

If you want text underneath to be revealed when the squares fade away, I would add that now, and place the text group above Gif 2, but under the squares group.

Make a mental note that where your text is placed and the order in which it will be revealed is also something you will have to plan for.
With the move tool, click on the first square you want to fade out. Every time you click on a square, it will reveal itself in your layers.
I chose A3 to be the first square to fade and I'm gonna move this one to the very top of all the other square layers.
So if I click on D2 next, that layer would need to be moved under the A3 layer and so on. You'll go back and forth between doing this and adding key frames to each one. As you go along, it's crucial that you put them in order from top to bottom and highly suggested that you rename the layers (numerically for example) which will make it easier to see where you've left off as your dragging the layers into place.

Part 3B: Adding the Keyframes
This is where we enter the gates of hell things become tedious.
Open up the squares group in the timeline panel so you can see all the clips.
Here is my example of the general pattern that's followed and its corresponding layers of what you want to achieve when you're finished:

So let’s try it!
Expand the control time magnification all the way to the right so you can see every frame per second.

As shown in Part 3A, select your first chosen square.
Where you place the time-indicator on the panel will indicate the placement of the keyframe. Click on the clock next to opacity to place your first keyframe.

Move the time-indicator over 3 frames and place the next key frame.

Things to consider before moving forward:
Where you place your very first keyframe will be detrimental. If you're using a lot of squares like I did, you may have to start the transition sooner than preferred.
If you're doing 25 squares, the key frames will have to be more condensed which means more overlapping because more frames are required to finish the transition, verses if you're only using a 9-squared grid. See Part 4 for more detailed examples of this.
The opacity will remain at 100% for every initial key frame, and the second one will be at 0%.

Instead of creating two keyframes like this and changing the opacities for every single clip, you can copy the keyframes and paste them onto the other clips by click-dragging your mouse over both of them and they'll both turn yellow. Then right click one of the keyframes and hit copy.
Now drop down to your next clip, move your time-indicator if necessary to the spot where the first keyframe will start and click the clock to create one. Then right click it and hit "paste".


Tip: When you have both keyframes selected, you can also move them side to side by click-dragging one of them while both are highlighted.
Your full repetitive process in steps will go as follows:
click on square of choice on the canvas
drag that square layer to the top under the last renamed
in timeline panel: drop down to next clip, move time-indicator tick to your chosen spot for the next keyframe
create new keyframe
right click new keyframe & paste copied keyframes
repeat until you've done this with every square in the group
Now you can change the opacity of your squares layer group back to 100% and turn on the visibility of Gif 1. Then hit play to see the magic happen.
PART 4: Finished examples
Example 1

the transition starts too soon Cause: initial keyframe was placed at frame 0
the squares fade away too quickly Cause: overlapping keyframes, seen below. (this may be the ideal way to go with more squares, but for only 9, it's too fast)

Example 2

more frame time for first gif
transition wraps up at a good point Cause: in this instance, the first keyframe was placed 9 frames in, and the keyframes are not overlapping. The sequential pair starts where the last pair ended, creating a slower fade of each square.


Part 5: Final Tips and Saving
You can dl my save action here which will convert everything back into frames, change the frame rate to 0.05 and open the export window so you can see the size of the gif immediately.
If it's over 10gb, one way to finesse this is by use of lossy. By definition, lossy “compresses by removing background data” and therefore quality can be lost when pushed too far. But for most gifs, I have not noticed a deterioration in quality at all when saving with lossy until you start getting into 15-20 or higher, then it will start eating away at your gif so keep it minimal.

If you've done this and your gif is losing a noticeable amount of quality and you still haven’t gotten it below 10mb, you will have no choice but to start deleting frames.
When it comes to transitions like this one, sometimes you can't spare a single frame and if this is the case, you will have to return to the timeline state in your history and condense the key frames to fade out quicker so you can shorten the gif. You should always save a history point before converting so you have a bookmark to go back to in case this happens.
That's pretty much it, free to shoot me an ask on here or on @jugheadjones with any questions.
#gif tutorial#photoshop tutorial#transition tutorial#grid tutorial#usergif#ps help#tutorials#tutorials*#resources*#requested
454 notes
·
View notes
Text
Keyframes Spring 01: Event Guide
Overall there is a total of 6 events for this semester (v1.11) and you'll only get to play 4 of them, with the first scavenger hunt being compulsory. So this is a mini guide to help you get an event that you've not seen before etc etc, but before we go through what options leads to what let's run through the events first below the cut
1. Scavenger Hunt, where you help out Deja with the student government party and participate in a scavenger hunt at the end which you can either win or lose
2. Spring Festival, where you get to enjoy the fruits of Deja and Reynah's labour and have fun! You can either choose to spend the entire festival tgt with the boys or split up
3. Errands, where you're stuck doing chores and meet a few ppl along the way as you try and get your groceries done. this event is more linear and doesn't have many sub events like spring festival
4. Studying Session, you're studying with the group but nobody can escape boredom forever so eventually y'all go off on a mini adventure. there's two groups you can choose to go with, with each group having their own sub events.
5. Late Night, it's late and y'all are done studying so you head to the diner Extra Fries and well..... a lot of food is potentially consumed 🧍♂️ this is another more linear event where the sub events aren't as drastically different like studying session, but its a vv sweet and fun event where you get to know everyone better
6. Rainy Day, it's raining!!!!! You can either choose to stay in or join the boys in the rain or even invite the boys up. There's alot of variation and it's generally a really fun time
------
Event 1: Scavenger Hunt!
Event 2
After the scavenger hunt you'll get texts from the group and what you respond with will lead to your second event!
1. How's that going Deja??? -> Spring Festival 2. There there Cam exam seasons almost over 2.1. Would it be helpful if I got a study room??? -> Studying Session 2.2. How abt we meet up tn at the library?? -> Late Nights 3. Nothing much, u? -> Rainy Day
Event 3
You'll be getting a call from either one of the boys (if they consider you a friend and their affection points is high enough) or cam!
If your first event was either Studying Session or Late Night, your phone call will not be the deciding factor, instead it will jump to a group text
1. Omg we were literally talking about wanting something to do lol! -> Spring Festival 2. Uhhh I'll sign up after I finish chores???? -> Errands 3. I'll think about it..... I have to finish studying first -> either Studying Session or Late Night depending on what you haven't done yet 4. OK but it's still not for a while right??? -> Rainy Day
And here are the calls! They all either will lead to the group text choices (below after this call section) if you dismiss studying when the caller brings it up or will lead to either studying event
Percy
1. Yeaaah, same. Gotta study at some point right? 1.1. Yeah, I'll reserve a study room. -> Studying Session 1.2. Yeah, let's meet at the library? -> Late Night 2. Can't relate, sorry. But good luck? -> group text choices
Jamie
1. In that case, I'd better get back to it. -> group text choices 2. There's still some at least. Enough for a study group? 2.1 Then I'll reserve a study room -> Studying Session 2.2 Yeah, let's meet at the library? -> Late Night
Elio
1. We could group up and study together, then? 1.1 Sure, and I'll reserve a study room -> Studying Session 1.2 Want to meet up at the library -> Late Night 2. Good thing you have roommates, huh? -> group text choice
Cam
1. ...No, it's melting. Wanna study together? 1.1 Sure, I'll reserve a study room -> Studying Session 1.2 Want to meet up at the library later? -> Late Night 2. Yeah, I think I'm doing okay, actually? -> group text choice
Group Text Choices, which will depend on whether you've played Rainy Day or Spring Festival as your first event
1. Rainy Day played 1.1 IT'S PARTY TIME! -> Spring Festival 1.2 tbh I still have to do laundry after the last time we partied, soo.. -> Errands
2. Spring Festival played 2.1 Yeah get on board Deja!!! --> Rainy Day 2.2 I skipped chores to go to that festival....... -> Errands
Event 4
The dialogue options you get will differ based on what events you have done already etc etc
1. If you've played both Studying Session and Late Night 1.1 Study break! Let's find something else to do?? -> Spring Festival 1.2 My last days of freedom.... are for chores -> Errands 1.3 An off day sounds great... im ready to just lie around for awhile lol --> Rainy Day
2. If you've only played one out of Studying Session or Late Night 2.1 If you have played Spring Festival 2.1.1 ok but.... Jamie's right, we DO need to study more😬 -> Studying Session/Late Night 2.1.2 Before I can study anymore……i have to do chores 😔 -> Errands 2.1.3 Can we take oneee more day off? Before we lose the chance?? -> Rainy Day 2.2 If you have played Rainy Day 2.2.1 Actually Deja i have bad news… we’re SO out of food… -> Errands 2.2.2 uhh honestly? i dont rly need That much time to study -> Spring Festival 2.3 If you have played Errands 2.3.1 Idk about u all but for once i have no chores left, sooo i’m taking an off day! -> Rainy Day 2.3.2 All work and no play makes us… …idk. Deja is it RSVP time?? -> Spring Festival
3. If you have not played both Studying Session or Late Night 3.1 ok… i admit it, we should probably study for exams a little… 3.1.1 ok i’ll go reserve a study room then? -> Studying Session 3.1.2 wanna meet at the library? -> Late Night 3.2 i’ll study LATER!! u can’t make me do it rn!!! -> Spring Festival/Rainy Day/Errands (depending on what you haven't done)
------
and that's all the events! again I'd really recommend you try doing the events in different orders because basically every event has like hidden dialogue depending on whether the guys consider you a friend or based on prev events you've gone through. it's genuinely really cool to see how each character will react differently based on your past experiences / the bond yall have at that current point. dwdw I will eventually make a guide for how to get closer to everyone etc when I have the time lmao, because some of them (not naming any names smh) are harder to get close to and so you basically never see the 'friend' dialogue as I like to call it lmao. but I will probably do the CG guide first cos that's much shorter
#keyframes#keyframes vn#keyframes walkthrough#keyframes guide#idk how to tag i assume thats just what i do lmao#praying that this is legible because i have no idea how to format stuff on tumblr help im struggling
80 notes
·
View notes
Note
I honestly wouldn't complain about a CG guide! I've been cracking my head over all the possible iterations of the events, and the order they're played in, but I still haven't hit that 100% :(
we'll think about it!
honestly, a big reason why we didn't release a walkthrough on launch (and likely won't for at least another week if we do at all) is because we just kind of want to see what you guys find on your own without us saying anything about our favorite moments, what certain flags are to trip to get specific outcomes, haha.
Adding on to this! It’s come to our attention that the library CG has a bug on it so if that’s the one you’re waiting on then don’t stress, we’ll patch that soon
#keyframes asks#as a completionist cg hunter though i understand fully ahaha#i used to live in the mines of searching fan blogs for guides..............
62 notes
·
View notes
Text
Wind Breaker Exhibition Kyoto - Full review with audio guides

I went for WinBre Ex two weeks ago! It was STUNNING and AMAZING 🤩 Here’s a rundown of what went down (with plenty of simping from yours truly)! I also bought the audio guide, so I’ll also be summarising the audio guide at the points where it’ll be played. The guide features the first year trio.
Disclaimer: Photos are allowed for most sections of the exhibition. As many of the exhibits are manga panels, I was more selective in the photos I've shown here, to focus more on interesting ways the panels were shown, or on exhIbition-exclusive displays. (moots, feel free to DM me if you want more photos!) Where there are no photos in my post, photography was not allowed. I did not take photos of every single exhibit on display, only the panels or art works that I found especially interesting (or those with Umemiya cos I'm his simp).
Entrance
You’ll be given a QR code to scan to get the audio guide when entering, if you bought it! There are 9 tracks in total.
The bonuses you’ll get when entering are a random sticker (I got the omurice one with Sakura and Umemiya!!!) and a physical ticket. You can also purchase the ticket with a pass case and photo card, but I didn’t find it very cost-effective so I bought just the ticket ^^;

At the entrance there’s a huge poster of the key visual of the exhibition art, as well as the noticeboard at the entrance to Makochi!

Section 1: Character intros
The first section has cutouts of the first years! Manga panels of the first chapter and a few other general key visuals, such as art by Nii-sensei for the anime airing, are here too.

They also have Sakura’s real uniform on display!! The detail on the embroidery is sooo intricate.

Audio guide 1: The scene starts with Nirei dropping his notebook. Suo (if i remember correctly)picks it up and returns it to him, and Sakura tells Nirei to take better care of it. Nirei tells Sakura about how he wants to use the notebook to help Sakura reach the top, since Nirei himself can’t fight, and he hopes to help using the information on people inside it. They go through Sakura’s profile (stuff like his height, weight, likes and dislikes etc.). Suo tells Sakura that he’s really loved, and Sakura gets all blushy and tsun (SO CUTE).
Section 2: Meeting Boufuurin
This section is in the same area as the first, and starts with a photo spot!

They have two uniform jackets for you to try on for photos (Sakura’s and Sugi’s) and the size difference is real lmao. The one in front is Sakura’s, and it’s considerably shorter than Sugi’s. I also took some dumb photos here www (available on request by DM, moots only)

The rest of Boufuurin is introduced here too!! But um. As you can see I kind of. Only had eyes for one person. Oop.

Audio guide 2: The trio are discussing how their class is full of interesting people, and they give a quick profile of Tsugeura, Kiryuu, and Sugi. When Nirei says that standing next to Sakura and Suo gets him all excited, Suo mentions that Sakura is all red, and Sakura gets really flustered. Sakura demands Nirei to hand him the notebook so he can search for Suo’s weak point, but the only information he found is whatever was in Suo’s character profile (specifically his love for Chinese-style fashion and tea). They also discuss the embroidery on their uniform, and how long Sugi’s uniform is because of his height.
Section 3: Shishitoren arc
This section summarises the Shishitoren arc, and includes panels from the manga, as well as keyframes from the anime!

Note: For the Tokyo exhibition, the Shishitoren tunnel was there, but from what I remember the Kyoto one didn’t have the tunnel (I might have missed it in my excitement to see Umemiya x_x)
Audio guide 3: The trio see a cat, and they discuss the Shishitoren members. According to Nirei’s notebook, Choji claims to understand cats, and there’s also some discussion about how Hiiragi and Sako had a past together, and they also talked about Togame and Sakura’s fight. Sakura comments that the fight he had this time felt different from those he had in the past, and Suo tells Sakura that he has climbed the staircase to adulthood while petting his head. Sakura gets all pissy (like a cat) and tells Suo to stop petting him like a cat. (LMAO)
Section 4: Pothos

There’s a recreation of the bar counter at Pothos here! (I also have a photo with myself here, request by DMs from moots only) You can sit here for photos, and they even recreated the omurice and coffee!!!


Audio guide 4: This takes place at Pothos. The trio have come to get some food, but Kotoha is out for now. Nirei quizzes the other two about what Kotoha likes, and the answer is that she likes taking care of plants. Kotoha returns, and the audio guide ends.
Section 5: Umemiya and the Shitenou
This section introduces you to the four kings! The scroll with the Boufuurin structure is super cool www.


It’s also super nice that they have the panel with Umemiya and the four kings in life-size!!! It’s almost like Umemiya is speaking straight to you ;-:

Audio guide 5: The trio discuss facts about Umemiya and Hiiragi. They warn you not to follow Hiiragi’s way of spamming Gascon 10, and discuss a bit about the role of grade captain. In a throwback to Sakura wanting to become the top (Teppen), they called the role of being the grad captain the Teppen of their class too. (SO CUTEEEE ;-; SAKURA IS SO LOVED)
Section 6: KEEL
This is the keel arc, and there’s this super cool wall with the Keel logo. The whole area was also decorated to look like the warehouse where the fight took place! You can see how the walls were made to look like the sheet metal in the warehouse.

They also have the panel of Kaji-paisen coming to the rescue in a life-sized board!!!

But I think the coolest panel is the first years in mid-fight!

Audio guide 6: Nirei is almost run over by a car!!! Nirei and Suo warn Sakura about watching out for Keel, and they discuss the traits of Keel. There’s also a bit of discussion about Kaji-paisen; the headphones seem to be a gift from someone important to him ^_^
Extra: Special video
No photos or recordings are allowed for this section, but it’s a video compilation voiced by Sakura about the growth he experienced up till the Keel arc ;-; it starts with how he was alone, and gains many dependable friends in Boufuurin, and how he’s no longer alone ;-; it is very beautifully thought out and created, and I really loved how poignant and moving the piano soundtrack was ;-;
Section 7: Roppo-Ichiza
This entire section looks like a night club, with all the blue lighting and use of metal grilles. There’s profiles of Tsubaki-chan, Kanji (forgot to take a pic of his oops) and Suzuri here (this one’s for you @/kafkaoftherubble!!!)


Audio guide 7: The trio start by talking about Gravel and the nature of the group. They also talk about Roppo-Ichiza, and mention that Umemiya and Nakamura (Kanji, not Yuuichiro www) know each other personally. When Nirei and Suo comment that Tsubaki-chan could be meeting someone she likes in the Roppo Ichiza area, Sakura starts stammering and blushing. (YOU CAN HEAR THE BLUSH SO MUCH)
Section 8: Umemiya’s past
THIS IS MY FAVE SECTION BTW I TOOK SO MANY PICS HERE.

A small note that the notebook with “8” on it marks the points where there is an audio guide track! The audio guide specifically describes this section with the two scrolls:

Audio guide 8: Nirei starts the ball rolling on the past of the current Boufuurin. For the first part, he reads the text in the two scrolls in a super exaggerated and old-fashioned (think Kabuki-style without the elongated syllables!) manner. Suo observes that Nirei really likes the town, and Sakura says that he will protect the town.
ALSO THIS IS HANDS DOWN ONE OF MY FAVOURITE ILLUSTRATION BOARDS THROUGHOUT THE WHOLE EXHIBITION

ALSO THIS. PLEASE LOOK AT THIS.

Section 9: FRANK
At the time of the exhibition, this arc was still ongoing! Only the first part where Boufuurin is prepping for the fight is featured.
I also LOVE this cover art, I’m so glad they have a big version of it here!!

They also reproduced the briefing by Mizuki about the plan to protect the town! The projector will also show a QR code that you can scan which takes you to a web page that replicates the LINE group chat created by Mizuki for Boufuurin. (Available by request by DMs, moots only)


(edit 22 October 2024) I tried scanning the QR code here^, it brings you to the first chapter of Wind Breaker on Magazine Pocket lmao.
Some of the manga panels and art featuring the start of the fights is also featured here!


Audio guide 9: Note that this is actually an epilogue to the exhibition that does not touch on this arc. The trio say the Boufuurin motto. The cat from audio guide 3 gets ahold of Nirei’s notebook, and Sakura chases after it!
Extra: Anime-related content
For this section, photos are not allowed. The OP and ED videos are showed, and there’s a wall of 16 shikishi (signature boards) from the voice actors, production staff, and even natori and Young Keel! The shikishi which really stood out to me was Suzuki Ryouta’s (Hiiragi’s seiyuu), he wrote “Gascon Ten?” (HELP I’M CRYING) (t/n: This is a very dumb pun. In Japanese, the Wind Breaker Exhibition is called “WinBreTen” for short, as 展=てん=pronounced as “ten” = exhibition.)
Merch haul

I bought an aggressive amount of merch from the exhibition, and surprisingly my favourite piece isn’t anything Umemiya related, but it’s Nirei’s notebook. It’s super cute that it’s marked as Nirei’s own notebook, and even includes all the character profiles until Tsubaki-chan!!!
Also the finger puppets were available starting from the Kyoto exhibition, I’m SO GLAD I managed to get one.
Other significant stuff I bought of note: Yakiniku Teishoku t-shirt (I am wearing it as I type this lmao), WinBre10 candies (IT’S THAT PUN AGAIN HELPPPP). There’s a couple other things I got but these are the more interesting ones www
And that’s it! Thank you for sticking through with my very long post with an aggressive amount of simping for Umemiya. I hope you’ve enjoyed it and managed to get a glimpse of what it was like! I rate it Gascon10/Winbre10, will go again (I’ve been infected by Suzuki Ryouta).
87 notes
·
View notes
Note
Hi! I was wondering if you’d be up to share how you made the before and after slider on this post:
https://www.tumblr.com/freckleslikestars/780305824654540800/before-after-gif-colouring-challenge
It’s really cool! Thank you!
Aww thank you so much! I literally had a dream about doing this two weeks ago, and when @sophsun1 tagged me I was like "oh my gosh lets try it!"

Now, before we start, I'm going to assume basic knowledge of gif making, colouring, etc. I'm using Adobe Photoshop 2025, but you should be able to adapt the steps for pretty much any software that has a timeline and allows for vector masks.
Once you understand key frames and vector masks, it's super easy to do!
First, we're going to open our gif in video timeline view, with our colouring already done. (My colouring is all in "Group 1")

Next, I converted the footage to a smart object, leaving the colouring as it's own independant group. This isn't technically necessary, but I do this to a) apply sharpening and b) so my layers tab is less cluttered. This is normally also where I'd make sure my image size is correct (I do 540X400 pixels) but I forgot so I did that later on this one.
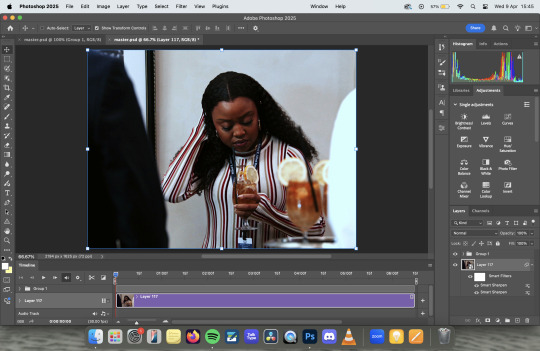
At this point, I turned some guides on and, using the rectangle tool, drew a rectangle that was around the size of the canvas, clicked to the last column on the right hand side.

The next step is to turn it into a vector mask. With command held down on a mac (I think it's alt on windows, but don't quote me on that) drag the rectangle layer onto the colouring group layer. It will fill in the whole canvas with colour.

Delete the rectangle layer, so that you're just left with the gif itself and the colouring layer with the rectangle vector mask over the top.

Next we're going to animate it, so you need to open the dropdown for the colouring layer on the timeline, and you'll want to scroll down to where it says Vector Mask Position

Making sure your playhead is at the very beginning of the gif, click on Vector Mask Position and drop a keyframe. Then, move your playhead to the very end of your gif and drop another keyframe - at this point you don't need to move the vector mask at all.


The next thing you need to do is find the middle of your gif - this doesn't need to be overly precise, particularly with longer gifs, but the precision means that the vector mask moves at the same spead both ways. Drop another keyframe there.
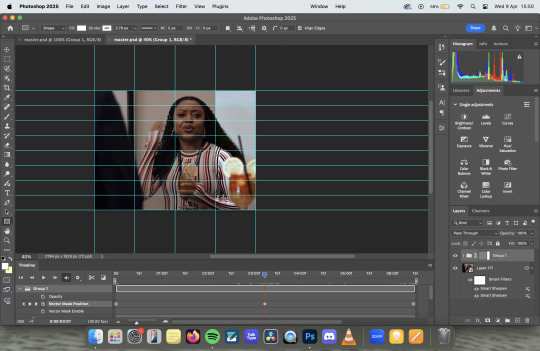
With the playhead over the keyframe, select the vector mask on the layers panel and using the move tool, move it across to the first column on the left. I personally prefer to use my arrow keys to just nudge it left, rather than faffing about with clicking and dragging.

If you were to export it at this point, it would be perfectly fine, you'd get the moving vector mask to show the before and after, which has a pretty cool aesthetic all of it's own. But lets add some details to make it look like a before and after sample image.

I started by adding the BEFORE and AFTER - I used Adobe Clean as my font, but font choice is really personal preference. I just centred them in the bottom left and right squares of my guidelines. I then drew a white line, using the line tool, down where the divide is, added a couple of rounded arrows (and lowered their opacity), and merged the three of them together (keeping the text separate).
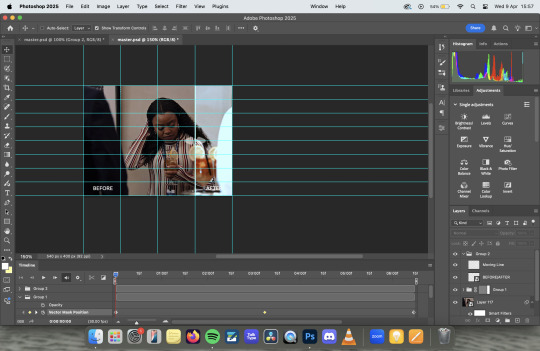
Then I simply followed the same steps to add key frames to the line in the same places as I did with the vector mask, making sure that the centre one was nudged to the location for the vector mask on the centre key frame.
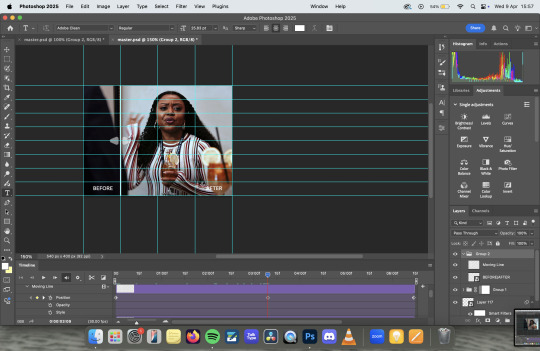
Export as usual and et voila!
Something to note is that this effect works better with longer gifs. As you'll see, this X Files gif was a touch too short, and so the slider feels a little too rushed:

Also, if you're wanting all of the sliders to move at the same time/speed, you're going to want to make sure all of your gifs are the same length, which I didn't do because I'd had a long day and I was procrastinating from postgrad work for an assessment I have tomorrow. Which is incidentally what I'm also doing right now.
Anyway, there you have it! Super simple when you know how! If you have any further questions, don't hesitate to ask! :)
#my gifs#gif tutorial#I genuinely love the colouring of that Abbott gif. The X Files one pisses me off because it started off so dark#that when you don't see the comparison it looks like i did absolutely nothing. but the comparison makes it slightly better
25 notes
·
View notes
Note
hi lovely!! do you have any tips on making cool fun and sexy typography?
hey joanna!! this made me giggle haha, i'm not quiiiite sure how to answer that, but here are some tips i keep in my when i do typography, and some examples:
FONTS
don't be afraid to "shop" for fonts and try funky fonts you've never used/seen. i often try so many before settling. i almost always use at least 2 different font for gifsets, even 3 sometimes. i think a good font pairing can do a lot for a gif. it's usually something like:
serif + cursive/funky fonts (example)
sans serif + cursive/funky fonts (example)
serif + sans serif fonts (example)
two different cursive/funky fonts (example)
or even simply the same font but all caps + all lowercase (example)
in case you're unsure where too start or want inspiration, here's a great resource: usergif's font pairing guide and its fonts page
BLEND MODES & LAYER STYLES
i think playing around with different blend modes and layer styles will always elevate your typography game, in my opinion. it's usually a bit more dynamic than just an opaque color. tho this minimalist typography can also be really good.
when you double click on a text layer, you get all the layer style options, as well as the blend modes. a very popular layer style is setting the layer's blending option to difference, paired with a color and/or gradient overlay (often set to multiply/color dodge). a drop shadow is also important so the text is more easily readable. we often see a black soft drop shadow, but don't hesitate to be creative with it, for example a thick, hard line, colorful drop shadow.
i feel like this step often takes the most time for me because the possibilities are endless. definitely play around with layer styles, especially drop shadow, color overlay, gradient overlay, stroke. and also try different blending modes for these settings.
as for the layer's blend mode, also definitely play around with them. and keep in mind that the text's color will also give a different result, it doesn't have to be white + blend mode set to difference, even tho this is a classic that works well.
TEXT WRAPING & POSITION
a great feature on photoshop is definitely the text warping tool. to access it, right click on a text layer and go "warp text". from there you'll get a few different styles and setting sliders. my favorites are flag and wave (example). you can always go back to edit these settings once they're done by right clicking again. and you can even keyframe/animate these settings!
typography doesn't always have to be centered and straight, i often prefer it on a side and rotated a little. you can easily rotate typography by selecting the layer(s) and hitting ctrl + T. you can also play with the skew and pespective after hitting ctrl + T by right clicking the canvas and clicking on either. these will give different ways to move your text.
SIZING
i love playing around with different font sizes, it makes the typography more interesting in my opinion, and it's a way to emphasize some words.
so for that reason i usually put each word on a different layer so i can edit each word separately. sometimes i will also put each letter on a different layer, because it can be interesting to offset/rotate some letters sometimes (example) (another example).
i often pair a quite small serif or sans serif font with a much bigger funky font (example). and often that bigger font will also have different sized words (example). i play around a lot with this!
ADDED EFFECTS
there are some things than can be done to enhance typography:
adding a colorful rectangle block behind the text (example)
using text symbols such as quotation marks or backets (example)
using lines around the text (example) (another example)
these can definitely bring typography to a different level
MORE RESOURCES
great font website
usergif's typography tag
my fonts tag
this is all i can think of right now, i hope it helps :D if you have any question on a specific text effect let me know, i can definitely make a tutorial!
#alie replies#silversmists#typography#photoshop#*ps help#resource#completeresources#allresources#resourcemarket#usercats#userabs#userpjo
220 notes
·
View notes