#laravel 5 crud step by step
Explore tagged Tumblr posts
Visit Tumblr Blog
Explore Tumblr blogs with no restrictions, modern design and the best experience.
Last Seen Tumblr Blogs


Fun Fact
Premium Tumblr themes are available from anywhere between $9 to $49.
Text
Complete PHP Tutorial: Learn PHP from Scratch in 7 Days
Are you looking to learn backend web development and build dynamic websites with real functionality? You’re in the right place. Welcome to the Complete PHP Tutorial: Learn PHP from Scratch in 7 Days — a practical, beginner-friendly guide designed to help you master the fundamentals of PHP in just one week.
PHP, or Hypertext Preprocessor, is one of the most widely used server-side scripting languages on the web. It powers everything from small blogs to large-scale websites like Facebook and WordPress. Learning PHP opens up the door to back-end development, content management systems, and full-stack programming. Whether you're a complete beginner or have some experience with HTML/CSS, this tutorial is structured to help you learn PHP step by step with real-world examples.
Why Learn PHP?
Before diving into the tutorial, let’s understand why PHP is still relevant and worth learning in 2025:
Beginner-friendly: Easy syntax and wide support.
Open-source: Free to use with strong community support.
Cross-platform: Runs on Windows, macOS, Linux, and integrates with most servers.
Database integration: Works seamlessly with MySQL and other databases.
In-demand: Still heavily used in CMS platforms like WordPress, Joomla, and Drupal.
If you want to build contact forms, login systems, e-commerce platforms, or data-driven applications, PHP is a great place to start.
Day-by-Day Breakdown: Learn PHP from Scratch in 7 Days
Day 1: Introduction to PHP & Setup
Start by setting up your environment:
Install XAMPP or MAMP to create a local server.
Create your first .php file.
Learn how to embed PHP inside HTML.
Example:
<?php echo "Hello, PHP!"; ?>
What you’ll learn:
How PHP works on the server
Running PHP in your browser
Basic syntax and echo statement
Day 2: Variables, Data Types & Constants
Dive into PHP variables and data types:
$name = "John"; $age = 25; $is_student = true;
Key concepts:
Variable declaration and naming
Data types: String, Integer, Float, Boolean, Array
Constants and predefined variables ($_SERVER, $_GET, $_POST)
Day 3: Operators, Conditions & Control Flow
Learn how to make decisions in PHP:
if ($age > 18) { echo "You are an adult."; } else { echo "You are underage."; }
Topics covered:
Arithmetic, comparison, and logical operators
If-else, switch-case
Nesting conditions and best practices
Day 4: Loops and Arrays
Understand loops to perform repetitive tasks:
$fruits = ["Apple", "Banana", "Cherry"]; foreach ($fruits as $fruit) { echo $fruit. "<br>"; }
Learn about:
for, while, do...while, and foreach loops
Arrays: indexed, associative, and multidimensional
Array functions (count(), array_push(), etc.)
Day 5: Functions & Form Handling
Start writing reusable code and learn how to process user input from forms:
function greet($name) { return "Hello, $name!"; }
Skills you gain:
Defining and calling functions
Passing parameters and returning values
Handling HTML form data with $_POST and $_GET
Form validation and basic security tips
Day 6: Working with Files & Sessions
Build applications that remember users and work with files:
session_start(); $_SESSION["username"] = "admin";
Topics included:
File handling (fopen, fwrite, fread, etc.)
Reading and writing text files
Sessions and cookies
Login system basics using session variables
Day 7: PHP & MySQL – Database Connectivity
On the final day, you’ll connect PHP to a database and build a mini CRUD app:
$conn = new mysqli("localhost", "root", "", "mydatabase");
Learn how to:
Connect PHP to a MySQL database
Create and execute SQL queries
Insert, read, update, and delete (CRUD operations)
Display database data in HTML tables
Bonus Tips for Mastering PHP
Practice by building mini-projects (login form, guest book, blog)
Read official documentation at php.net
Use tools like phpMyAdmin to manage databases visually
Try MVC frameworks like Laravel or CodeIgniter once you're confident with core PHP
What You’ll Be Able to Build After This PHP Tutorial
After following this 7-day PHP tutorial, you’ll be able to:
Create dynamic web pages
Handle form submissions
Work with databases
Manage sessions and users
Understand the logic behind content management systems (CMS)
This gives you the foundation to become a full-stack developer, or even specialize in backend development using PHP and MySQL.
Final Thoughts
Learning PHP doesn’t have to be difficult or time-consuming. With the Complete PHP Tutorial: Learn PHP from Scratch in 7 Days, you’re taking a focused, structured path toward web development success. You’ll learn all the core concepts through clear explanations and hands-on examples that prepare you for real-world projects.
Whether you’re a student, freelancer, or aspiring developer, PHP remains a powerful and valuable skill to add to your web development toolkit.
So open up your code editor, start typing your first <?php ... ?> block, and begin your journey to building dynamic, powerful web applications — one day at a time.

0 notes
Text
Beginner's Guide to Full-Stack Development: A Step-by-Step Path
In today’s digital age, full-stack developers are in high demand. They have the skills to build both the frontend and backend of web applications, making them valuable assets in the tech industry. Enrolling in a Full Stack Developer Course in Bangalore significantly enhances one’s ability to leverage Java’s capabilities effectively.
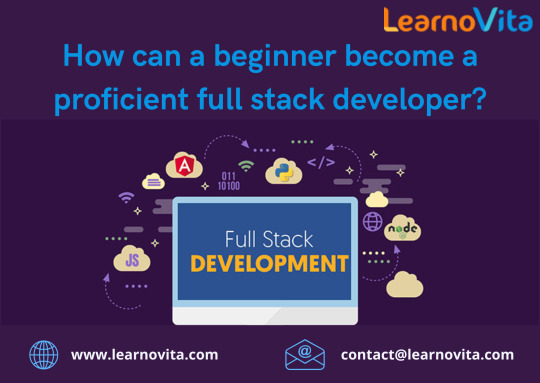
If you're a beginner looking to dive into full-stack development, this guide will take you through a structured step-by-step path to mastering the field.
Step 1: Understand the Basics of Web Development
Before jumping into coding, it's crucial to understand how the web works. Learn about the interaction between web browsers and servers, how HTTP requests function, and what APIs are. A strong foundation in these concepts will make learning full-stack development much easier.
Step 2: Learn Frontend Development
Frontend development focuses on what users see and interact with on a website. To start, learn:
HTML & CSS – The fundamental building blocks of web pages.
JavaScript – The programming language that makes web pages interactive.
Frontend Frameworks – Libraries like React.js, Angular, or Vue.js help streamline development and enhance performance.
Once you grasp these technologies, try building simple projects like a personal website or an interactive to-do list to apply your skills.
Step 3: Master Backend Development
Backend development is responsible for handling data, server logic, and database management. Learn:
Backend Programming Languages – Choose from JavaScript (Node.js), Python (Django/Flask), Java (Spring Boot), PHP (Laravel), or Ruby on Rails.
Databases – Understand SQL databases (MySQL, PostgreSQL) and NoSQL databases (MongoDB).
RESTful APIs & Authentication – Learn how to create APIs, manage user authentication, and implement security measures.
Backend development allows you to process data, create user accounts, and store information securely. It’s simpler to master this tool and progress your profession with the help of Best Online Training & Placement Programs, which provide thorough instruction and job placement support to anyone seeking to improve their talents.
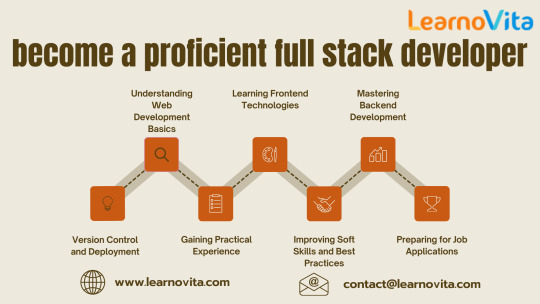
Step 4: Work with Version Control and Deployment
Version control helps in tracking code changes and collaborating with others. Learn Git and GitHub to manage your projects efficiently. Additionally, familiarize yourself with deployment platforms like AWS, Firebase, Heroku, and Netlify to host your applications online. Understanding containerization tools like Docker can also be beneficial.
Step 5: Gain Hands-On Experience with Real-World Projects
The best way to learn full-stack development is by building projects. Here are a few ideas:
Portfolio Website – Showcase your work and skills.
Task Manager App – A simple CRUD (Create, Read, Update, Delete) application.
E-Commerce Website – Implement user authentication, product management, and payment integration.
Blog Platform – A full-stack web application with a database and user authentication.
Contributing to open-source projects will also help you gain practical experience and collaborate with other developers.
Step 6: Learn Best Practices and Problem-Solving Skills
To become a proficient full-stack developer, focus on improving your problem-solving skills by learning data structures and algorithms. Following best coding practices such as clean code, maintainability, and security will also make your applications more robust.
Step 7: Prepare for Job Opportunities
Once you feel confident in your skills, start applying for internships and full-time jobs. Here’s how to improve your chances:
Build a strong resume and LinkedIn profile that highlights your projects and skills.
Network with professionals in the field through online communities and tech events.
Conclusion
Becoming a full-stack developer requires dedication, practice, and continuous learning. By following this structured path and gaining hands-on experience, you can develop the skills needed to build complete web applications and launch a successful career in tech. Stay updated with industry trends, explore new technologies, and keep coding!
Are you looking for the best full-stack development courses to accelerate your learning? Let us know, and we can guide you to the right training programs!
#full stack course#full stack developer#full stack software developer#full stack training#full stack web development
0 notes
Text
Laravel CRUD Generator (from scratch 5.8) - Laravel
Laravel CRUD Generator (from scratch 5.8) – Laravel
Laravel CRUD Generator (from scratch 5.8) – Laravel
[ad_1]
Do you want to hire me? Click here: https://renatohysa.me/ 🚀 https://devlob.com 🚀
Videos are uploaded first on https://devlob.com and then on YouTube (5-10 days later). Questions are answered only on https://devlob.com/forum. If you have questions, then post it there.
Courses https://devlob.com/courses *Unique features: you can take notes…
View On WordPress
#laravel#laravel 5 crud#laravel 5 crud generator#laravel 5 crud step by step#laravel 5 crud tutorial#laravel 5 package development#laravel 5.8#laravel 5.8 crud generator#laravel 5.8 features#laravel 5.8 package development#laravel 5.8 preview#laravel 5.8 tutorial#laravel 5.8 video tutorials#laravel 5.8 videos#laravel crud#laravel crud generator#laravel crud generator tutorial#laravel crud operation#laravel package development#laravel tutorials
0 notes
Text
When you start learning any programming, you start building basic application functionalities. CRUD is the basic things you build in any application. In this tutorial, I have created simple CRUD application for beginners from the scratch. So if you are new to Laravel, this tutorial will help you to understand the basic MVC structure of Laravel. We are going to build blog application which includes creating, editing showing and deleting post. We will go through step by step from the starting. You can also build the Laravel CRUD application using this tutorial. The tutorial will follows below steps: Step 1: Create new Laravel application Step 2: Configure database environment Step 3: Create and run database migration Step 4: Create Post model Step 5: Create application routes Step 6: Create PostController controller Step 7: Create blade view for payment button Step 8: Test CRUD application Prerequisite: We assume that you have already installed LAMP server into your Ubuntu system. We also assument that you have installed Composer which is used to create Laravel application and managing PHP packages. So, let's start from creating fresh Laravel application. Step 1: Create new Laravel application We are going to start tutorial from creating new Laravel 8 application. We will use Composer application command to create latest Laravel application. To start with tutorial, open the Terminal or CMD and run the below Composer command to create Laravel application. composer create-project laravel/laravel blog --prefer-dist After the project is created, change Terminal directory to project root. cd blog Step 2: Configure database environment In the second step, we will setup database and configure into our Laravel application. Laravel database configuration are stored at .env file of root directory. Open the .env file and change the database with your MySQL database and credentials. DB_CONNECTION=mysql DB_HOST=127.0.0.1 DB_PORT=3306 DB_DATABASE=blog DB_USERNAME=root DB_PASSWORD=root Step 3: Create and run database migration After we have setup database, we need to create tables into database. For that first create migration class for database table. Run the following command into Terminal to create migration file. php artisan make:migration create_posts_table This will create migration file at database/migrations directory. Open that file and add new fields into up() method.
0 notes
Text
Laravel 9 FullCalendar Ajax Tutorial with Example

Laravel fullcalendar crud events tutorial; In this tutorial, we'll show you how to use the FullCalendar JavaScript event calendar plugin to create and cancel events in your Laravel app. FullCalendar is a fantastic, robust, and lightweight JavaScript calendar plugin for creating dynamic, draggable event calendars in modern web applications. The FullCalendar package supports jQuery AJAX and efficiently organises your events, plus it's visually appealing thanks to its easy modification. This step-by-step tutorial shows you how to incorporate and integrate FullCalendar in Laravel, as well as how to use FullCalendar in the Laravel app.
How to Make Fullcalendar CRUD Events in Laravel 9
Table of Content
- Step 1: Create Laravel App - Step 2: Connect to Database - Step 3: Set Up Migration and Model - Step 4: Generate and Configure Controller - Step 5: Create and Add Routes - Step 6: Create Blade View - Step 7: Run Development Server
Step 1 - Create Laravel App
It's great if you have composer installed on your machine because it will allow you to install the new laravel application. If the app has already been created, you can skip this step. composer create-project --prefer-dist laravel/laravel full-calendar-demo Make that you're in the app folder: cd full-calendar-demo
Step 2 - Connect to Database
The first thing we do after entering the inside app is open the .env file and add the database details to the ENV configuration file in order to link the laravel project to the database. DB_CONNECTION=mysql DB_HOST=127.0.0.1 DB_PORT=3306 DB_DATABASE=db DB_USERNAME=root DB_PASSWORD=
Step 3 - Set Up Migration and Model
To build the migration and model file, run the following command to create the events table in the database and add some values related to events. php artisan make:model CrudEvents -m After that, enter the app/Models/CrudEvents.php file and declare the crud events values in a $fillable array. Read the full article
#laravel9fullcalendarajax#laravel9fullcalendarcrudexample#laravel9fullcalendareventclick#laravel9fullcalendarexample
0 notes
Text
Laravel crud
Laravel Archives - Readerstacks Blogs to Improve Your Coding Skills
In this section we cover a cool tutorial on Laravel crud ajax. Handling database interactions with Ajax has several advantages. We know this contributes to very fast page refreshes, reduces bandwidth usage, and provides a smooth user experience. We used Laravel on the backend and jQuery on the client side to set up a fully functional Laravel Ajax Crud training application.
So, let's start and follow below steps.
Step 1: Install Laravel
In the terminal, enter the following command.
Step 2: Database setup
In the second step we configure the database, eg database name, username, password etc for our raw Laravel AJAX example. So open the .env file and fill in all the details as shown below:
Step 3: Create a migration table
We will create an AJAX raw post example. So first we need to create a migration for the "posts" table using Laravel PHP Artisan command, so first type the following command:
Step 4: Add resource route
Now add the resource route in Routes/web.php
Step 5: Add controller and model
Create a PostAjaxController with the following command.
Step 6: Add Blade files
In this step we will only create one blade file for this example, so create postAjax.blade.php in this path resources/views/postAjax.blade.php
Laravel Example Laravel ajax upload Tutorial Here you will learn how to upload files using jQuery Ajax in a Laravel application
As well as uploading files to a MySQL database and a folder on the web server with validation. And also upload data and files in form with ajax in Laravel application.
When working with Laravel applications. And you want to upload file, invoice file, text file with ajax form to database and server folder in Laravel.
This tutorial will guide you step by step uploading files using Ajax forms submitted with validation in Laravel.
Note that this Laravel ajax file upload tutorial also works with Laravel versions 5, 5.5, 6, 7.x.
Laravel CRUD operating application; In this tutorial you will learn step by step how to create a Laravel crud in Laravel . And how to validate and update server-side form data in Laravel Crud application.
CRUD Meaning: CRUD is an acronym that comes from the world of computer programming and refers to the four functions deemed necessary to implement persistent storage applications: create, read, update, and delete.
This Laravel Crud Operations step by step tutorial implements a simple raw operations enterprise application in a Laravel application with validation. With this raw application you can learn how to insert, read, update, and delete data from a database in Laravel .
Visit for more Information:- https://readerstacks.com/how-to-create-rest-apis-in-laravel
0 notes
Text
#websolutionstuff#laravel#PHP#laravel6#laravel7#laravel8#crud#operation#example#tutorial#Jquery#bootstrap#CSS#html#website#Blog#blogger#web development
0 notes
Link
rest api in laravel 6 step by step, rest api in laravel 6 tutorial, laravel 6 restful api authentication,laravel rest api authentication,laravel 5 8 jwt auth,laravel 6 jwt auth,jwt auth laravel 6,jwt middleware laravel,laravel api authentication without passport
0 notes
Link
Laravel 5.6 Tutorial For Beginners is today’s leading topic. Laravel is a free, open-source PHP web framework. It follows MVC(Model View Controller) Architecture. In this example, we create a simple stock system that allows you to create, update and delete operation(CRUD). You have followed below step to create CRUD application in Laravel 5.6. I have listed some of features of Laravel 5.6
0 notes
Text
Laravel + Vue.js AdminPanel Generator
News / May 11, 2018
Laravel + Vue.js AdminPanel Generator
Laravel and Vue.js are often used together. With more tools on these technologies are released, here’s one of them – presenting to you Vue+Laravel Admin Panel Generator.
Disclaimer: I’m the founder and one of the developers of this tool, and also Laravel-only generator QuickAdminPanel, but the goal in this article is not only to present you the product, but explain what it generates, and how Vue + Laravel work together. Also, you will find an example project with source available on Github.
How does the generator work?
For those who prefer video, here’s a quick demo:
youtube
Now, let’s look at it with more details.
Step 1. You create your panel without coding, just adding menu items and fields.
Step 2. At any point, you can view the generated code, file by file.
Step 3. Then you download the code and install it – locally or on your remote server, with these commands:
composer install php artisan key:generate php artisan migrate --seed php artisan passport:install
Of course, your .env file should be configured at that point.
And then, on the front-end:
npm install npm run dev
Step 4. That’s it; you have your panel.
Step 5. The most important thing: you can change the code however you want, it’s pure Laravel+Vue, without our generator’s package as a dependency. That’s the main difference from packages like Voyager or Laravel Backpack (which are both excellent, by the way!).
What are we generating – structure of the project
After you download the project, you see something like this:
Generated Code: Back-end Laravel
Let’s first analyze the back-end Laravel part, which serves as API:
Here’s routes/api.php file:
Route::group(['prefix' => '/v1', 'middleware' => ['auth:api'], 'namespace' => 'Api\V1', 'as' => 'api.'], function () { Route::post('change-password', 'ChangePasswordController@changePassword')->name('auth.change_password'); Route::apiResource('roles', 'RolesController'); Route::apiResource('users', 'UsersController'); Route::apiResource('companies', 'CompaniesController'); Route::apiResource('employees', 'EmployeesController'); });
You can see apiResource for every CRUD, and also one separate POST for changing the password.
Controllers are namespaces under Api/V1, so here’s our app/Http/Controllers/Api/V1/CompaniesController.php:
namespace App\Http\Controllers\Api\V1; use App\Company; use App\Http\Controllers\Controller; use App\Http\Resources\Company as CompanyResource; use App\Http\Requests\Admin\StoreCompaniesRequest; use App\Http\Requests\Admin\UpdateCompaniesRequest; use Illuminate\Http\Request; class CompaniesController extends Controller { public function index() { return new CompanyResource(Company::with([])->get()); } public function show($id) { $company = Company::with([])->findOrFail($id); return new CompanyResource($company); } public function store(StoreCompaniesRequest $request) { $company = Company::create($request->all()); return (new CompanyResource($company)) ->response() ->setStatusCode(201); } public function update(UpdateCompaniesRequest $request, $id) { $company = Company::findOrFail($id); $company->update($request->all()); return (new CompanyResource($company)) ->response() ->setStatusCode(202); } public function destroy($id) { $company = Company::findOrFail($id); $company->delete(); return response(null, 204); } }
We have a typical resourceful Controller, with one exception – Resources classes, which have been available since Laravel 5.5.
In our case, every resource is a simple conversion to an array, here’s a file app/Http/Resources/Company.php
namespace App\Http\Resources; use Illuminate\Http\Resources\Json\JsonResource; class Company extends JsonResource { /** * Transform the resource into an array. * * @param \Illuminate\Http\Request $request * @return array */ public function toArray($request) { return parent::toArray($request); } }
But you can extend it, adding your logic on top – see more examples here and here.
Finally, Laravel Passport protects all the routes – when installing the project, you need to run this:
php artisan passport:install
As an overall back-end result, every Controller is responsible for that specific CRUD operations called to the API, from Vue.js front-end.
Generated Code: Front-end Vue.js
Now, let’s take a look at front-end part. The main file for this is resources/client/assets/js/app.js, where we initiate the Vue and some libraries:
// ... window.Vue = require('vue') Vue.prototype.$eventHub = new Vue() import router from './routes' import store from './store' import Datatable from 'vue2-datatable-component' import VueAWN from 'vue-awesome-notifications' import vSelect from 'vue-select' import datePicker from 'vue-bootstrap-datetimepicker' import VueSweetalert2 from 'vue-sweetalert2' import 'eonasdan-bootstrap-datetimepicker/build/css/bootstrap-datetimepicker.css' Vue.use(Datatable) Vue.use(VueAWN, { position: 'top-right' }) Vue.use(datePicker) Vue.use(VueSweetalert2) Vue.component('back-buttton', require('./components/BackButton.vue')) Vue.component('bootstrap-alert', require('./components/Alert.vue')) Vue.component('event-hub', require('./components/EventHub.vue')) Vue.component('vue-button-spinner', require('./components/VueButtonSpinner.vue')) Vue.component('v-select', vSelect) moment.updateLocale(window.app_locale, { week: { dow: 1 } }) const app = new Vue({ data: { relationships: {}, dpconfigDate: { format: window.date_format_moment }, dpconfigTime: { format: window.time_format_moment }, dpconfigDatetime: { format: window.datetime_format_moment, sideBySide: true } }, router, store }).$mount('#app')
Next, every CRUD has its own set of components:
For showing the data table, we’re using vue2-datatable-component – here’s full code of resources/clients/assets/components/cruds/Companies/Index.vue:
<template> <section class="content-wrapper" style="min-height: 960px;"> <section class="content-header"> <h1>Companies</h1> </section> <section class="content"> <div class="row"> <div class="col-xs-12"> <div class="box"> <div class="box-header with-border"> <h3 class="box-title">List</h3> </div> <div class="box-body"> <div class="btn-group"> <router-link :to="{ name: xprops.route + '.create' }" class="btn btn-success btn-sm"> <i class="fa fa-plus"></i> Add new </router-link> <button type="button" class="btn btn-default btn-sm" @click="fetchData"> <i class="fa fa-refresh" :class="{'fa-spin': loading}"></i> Refresh </button> </div> </div> <div class="box-body"> <div class="row" v-if="loading"> <div class="col-xs-4 col-xs-offset-4"> <div class="alert text-center"> <i class="fa fa-spin fa-refresh"></i> Loading </div> </div> </div> <datatable v-if="!loading" :columns="columns" :data="data" :total="total" :query="query" :xprops="xprops" /> </div> </div> </div> </div> </section> </section> </template> <script> import { mapGetters, mapActions } from 'vuex' import DatatableActions from '../../dtmodules/DatatableActions' import DatatableSingle from '../../dtmodules/DatatableSingle' import DatatableList from '../../dtmodules/DatatableList' import DatatableCheckbox from '../../dtmodules/DatatableCheckbox' export default { data() { return { columns: [ { title: '#', field: 'id', sortable: true, colStyle: 'width: 50px;' }, { title: 'Name', field: 'name', sortable: true }, { title: 'Description', field: 'description', sortable: true }, { title: 'Actions', tdComp: DatatableActions, visible: true, thClass: 'text-right', tdClass: 'text-right', colStyle: 'width: 130px;' } ], query: { sort: 'id', order: 'desc' }, xprops: { module: 'CompaniesIndex', route: 'companies' } } }, created() { this.$root.relationships = this.relationships this.fetchData() }, destroyed() { this.resetState() }, computed: { ...mapGetters('CompaniesIndex', ['data', 'total', 'loading', 'relationships']), }, watch: { query: { handler(query) { this.setQuery(query) }, deep: true } }, methods: { ...mapActions('CompaniesIndex', ['fetchData', 'setQuery', 'resetState']), } } </script> <style scoped> </style>
Quite a lot of code, isn’t it? Of course, it could be more straightforward, but we tried to follow the official documentation and best practices, generating code for the cases that could be extended for bigger projects.
Next, we can take a look at Create.vue:
<template> <section class="content-wrapper" style="min-height: 960px;"> <section class="content-header"> <h1>Companies</h1> </section> <section class="content"> <div class="row"> <div class="col-xs-12"> <form @submit.prevent="submitForm"> <div class="box"> <div class="box-header with-border"> <h3 class="box-title">Create</h3> </div> <div class="box-body"> <back-buttton></back-buttton> </div> <bootstrap-alert /> <div class="box-body"> <div class="form-group"> <label for="name">Name</label> <input type="text" class="form-control" name="name" placeholder="Enter Name" :value="item.name" @input="updateName" > </div> <div class="form-group"> <label for="description">Description</label> <textarea rows="3" class="form-control" name="description" placeholder="Enter Description" :value="item.description" @input="updateDescription" > </textarea> </div> </div> <div class="box-footer"> <vue-button-spinner class="btn btn-primary btn-sm" :isLoading="loading" :disabled="loading" > Save </vue-button-spinner> </div> </div> </form> </div> </div> </section> </section> </template> <script> import { mapGetters, mapActions } from 'vuex' export default { data() { return { // Code... } }, computed: { ...mapGetters('CompaniesSingle', ['item', 'loading']) }, created() { // Code ... }, destroyed() { this.resetState() }, methods: { ...mapActions('CompaniesSingle', ['storeData', 'resetState', 'setName', 'setDescription']), updateName(e) { this.setName(e.target.value) }, updateDescription(e) { this.setDescription(e.target.value) }, submitForm() { this.storeData() .then(() => { this.$router.push({ name: 'companies.index' }) this.$eventHub.$emit('create-success') }) .catch((error) => { console.error(error) }) } } } </script> <style scoped> </style>
Edit and Show components for the CRUD are pretty similar, so won’t discuss them here.
In addition to that Vue code, there are many small details and helpers like Sweet Alert, Notifications, Datepickers, and setting/getting relationships data for the forms. I guess I will leave it for you to analyze.
Notice: The choice of Vue.js libraries is pretty subjective, and it was the most challenging part of the project – to choose the Vue libraries to trust. Ecosystem still lacks standards, or 100% trusted open-source – a lot of movement in the market, some libraries are better supported than others. So it’s always hard to guess, and the best libraries will probably change with time, or new ones will appear.
That’s the end of a quick overview of Vue+Laravel QuickAdminPanel, try it out here: https://vue.quickadminpanel.com
Finally, here’s the source of a demo-project with two CRUDs: Companies and Customers.
I hope our generator will not only save you time on writing code but also show you how Vue can work with Laravel. Our way of structuring this code is not the only way, and you can structure your code differently, but we tried our best to stick to standards.
via Laravel News https://ift.tt/2wzPFV6
0 notes
Text
Raw SQL Queries - Become a Master in Laravel - 09 - Laravel
Raw SQL Queries – Become a Master in Laravel – 09 – Laravel
Raw SQL Queries – Become a Master in Laravel – 09 – Laravel
[ad_1]
When writing queries, protect your application from SQL injection attacks. Normally, the query builder does this for us. However, when we write our own SQL, we need to make sure we don’t inadvertently remove this protection.
Anybody can learn programming no matter who you are. You just need some time to study.
The most starred PHP…
View On WordPress
#laravel#laravel 5#laravel 5.7#laravel 5.7 sql server#laravel 5.8#laravel crud raw query#laravel database queries#laravel eloquent queries#laravel for intermediate#laravel master#laravel query#laravel tutorial#laravel tutorial for beginners step by step#laravel web application development#laravel wherein#query builder#raw sql queries#sql (programming language)#sql laravel
0 notes
Photo

New Post has been published on https://programmingbiters.com/crud-create-read-update-delete-example-in-laravel-5-2-from-scratch/
CRUD (Create Read Update Delete) Example in Laravel 5.2 from Scratch
In this post i going to give example how to create CRUD (Create Read Update Delete) application in laravel 5 from starting. In this step you have to just follow few step and you can create simple CRUD application. In this CRUD application after follow all output you can listing items, create new item, edit item and also delete item function. I used resource route, validation, listing etc for this crud application example.After finish all step successfully, you will find output like as bellow image output.
Preview:
Step 1: Laravel Installation
If you haven’t installed laravel in your system then you have to run bellow command and get new Laravel project.
composer create-project –prefer-dist laravel/laravel blog
After clone laravel application, we also require to install laravelcollective/html for Form class, you can install from here : HTML/FORM not found in Laravel 5?.
Step 2: Create items table and model
In this step we have to create migration for items table using Laravel 5 php artisan command, so first fire bellow command:
php artisan make:migration create_items_table
After this command you will find one file in following path database/migrations and you have to put bellow code in your migration file for create items table.
use IlluminateDatabaseSchemaBlueprint; use IlluminateDatabaseMigrationsMigration; class CreateItemsTable extends Migration public function up() Schema::create('items', function (Blueprint $table) $table->increments('id'); $table->string('title'); $table->text('description'); $table->timestamps(); ); public function down() Schema::drop("items");
After craete “items” table you should craete Item model for items, so first create file in this path app/Item.php and put bellow content in item.php file:
app/Item.php
namespace App; use IlluminateDatabaseEloquentModel; class Item extends Model public $fillable = ['title','description'];
Step 3: Add Route and Controller
Now we have to add route for items CRUD, in this example i added resource route for application, if we add resource route then it will add index, create, show, edit and delete route automatically. So add bellow line in your route file.
app/Http/routes.php
Route::resource('itemCRUD','ItemCRUDController');
Ok, now we should create new controller as ItemCRUDController in this path app/Http/Controllers/ItemCRUDController.php. this controller will manage all route method:
app/Http/Controllers/ItemCRUDController.php
namespace AppHttpControllers; use IlluminateHttpRequest; use AppHttpControllersController; use AppItem; class ItemCRUDController extends Controller /** * Display a listing of the resource. * * @return IlluminateHttpResponse */ public function index(Request $request) $items = Item::orderBy('id','DESC')->paginate(5); return view('ItemCRUD.index',compact('items')) ->with('i', ($request->input('page', 1) - 1) * 5); /** * Show the form for creating a new resource. * * @return IlluminateHttpResponse */ public function create() return view('ItemCRUD.create'); /** * Store a newly created resource in storage. * * @param IlluminateHttpRequest $request * @return IlluminateHttpResponse */ public function store(Request $request) $this->validate($request, [ 'title' => 'required', 'description' => 'required', ]); Item::create($request->all()); return redirect()->route('itemCRUD.index') ->with('success','Item created successfully'); /** * Display the specified resource. * * @param int $id * @return IlluminateHttpResponse */ public function show($id) $item = Item::find($id); return view('ItemCRUD.show',compact('item')); /** * Show the form for editing the specified resource. * * @param int $id * @return IlluminateHttpResponse */ public function edit($id) $item = Item::find($id); return view('ItemCRUD.edit',compact('item')); /** * Update the specified resource in storage. * * @param IlluminateHttpRequest $request * @param int $id * @return IlluminateHttpResponse */ public function update(Request $request, $id) $this->validate($request, [ 'title' => 'required', 'description' => 'required', ]); Item::find($id)->update($request->all()); return redirect()->route('itemCRUD.index') ->with('success','Item updated successfully'); /** * Remove the specified resource from storage. * * @param int $id * @return IlluminateHttpResponse */ public function destroy($id) Item::find($id)->delete(); return redirect()->route('itemCRUD.index') ->with('success','Item deleted successfully');
Step 4: Create Blade File
In this step we will create blade file for listing, craete, edit and show item and also create default blade file for theme setting. So first we create new layouts directory and create default.blade.php file inside that folder.
resources/views/layouts/default.blade.php
<!DOCTYPE html> <html lang="en"> <head> <meta charset="utf-8"> <meta http-equiv="X-UA-Compatible" content="IE=edge"> <meta name="viewport" content="width=device-width, initial-scale=1"> <title>Laravel CRUD</title> <link href="https://cdnjs.cloudflare.com/ajax/libs/twitter-bootstrap/4.0.0-alpha/css/bootstrap.css" rel="stylesheet"> </head> <body> <div class="container"> @yield('content') </div> </body> </html>
Ok, now we will creae layout for items listing, So first we create new ItemCRUD directory and create index.blade.php file inside that folder.
resources/views/ItemCRUD/index.blade.php
@extends('layouts.default') @section('content') <div class="row"> <div class="col-lg-12 margin-tb"> <div class="pull-left"> <h2>Items CRUD</h2> </div> <div class="pull-right"> <a class="btn btn-success" href=" route('itemCRUD.create') "> Create New Item</a> </div> </div> </div> @if ($message = Session::get('success')) <div class="alert alert-success"> <p> $message </p> </div> @endif <table class="table table-bordered"> <tr> <th>No</th> <th>Title</th> <th>Description</th> <th width="280px">Action</th> </tr> @foreach ($items as $key => $item) <tr> <td> ++$i </td> <td> $item->title </td> <td> $item->description </td> <td> <a class="btn btn-info" href=" route('itemCRUD.show',$item->id) ">Show</a> <a class="btn btn-primary" href=" route('itemCRUD.edit',$item->id) ">Edit</a> !! Form::open(['method' => 'DELETE','route' => ['itemCRUD.destroy', $item->id],'style'=>'display:inline']) !! !! Form::submit('Delete', ['class' => 'btn btn-danger']) !! !! Form::close() !! </td> </tr> @endforeach </table> !! $items->render() !! @endsection
Now we create new blade file for create new item, it’s call create.blade.php file inside “ItemCRUD”.
resources/views/ItemCRUD/create.blade.php
@extends('layouts.default') @section('content') <div class="row"> <div class="col-lg-12 margin-tb"> <div class="pull-left"> <h2>Create New Item</h2> </div> <div class="pull-right"> <a class="btn btn-primary" href=" route('itemCRUD.index') "> Back</a> </div> </div> </div> @if (count($errors) > 0) <div class="alert alert-danger"> <strong>Whoops!</strong> There were some problems with your input.<br><br> <ul> @foreach ($errors->all() as $error) <li> $error </li> @endforeach </ul> </div> @endif !! Form::open(array('route' => 'itemCRUD.store','method'=>'POST')) !! <div class="row"> <div class="col-xs-12 col-sm-12 col-md-12"> <div class="form-group"> <strong>Title:</strong> !! Form::text('title', null, array('placeholder' => 'Title','class' => 'form-control')) !! </div> </div> <div class="col-xs-12 col-sm-12 col-md-12"> <div class="form-group"> <strong>Description:</strong> !! Form::textarea('description', null, array('placeholder' => 'Description','class' => 'form-control','style'=>'height:100px')) !! </div> </div> <div class="col-xs-12 col-sm-12 col-md-12 text-center"> <button type="submit" class="btn btn-primary">Submit</button> </div> </div> !! Form::close() !! @endsection
Next, we have to create show.blade.php file for item details page, so again create this file in ItemCRUD folder.
resources/views/ItemCRUD/show.blade.php
@extends('layouts.default') @section('content') <div class="row"> <div class="col-lg-12 margin-tb"> <div class="pull-left"> <h2> Show Item</h2> </div> <div class="pull-right"> <a class="btn btn-primary" href=" route('itemCRUD.index') "> Back</a> </div> </div> </div> <div class="row"> <div class="col-xs-12 col-sm-12 col-md-12"> <div class="form-group"> <strong>Title:</strong> $item->title </div> </div> <div class="col-xs-12 col-sm-12 col-md-12"> <div class="form-group"> <strong>Description:</strong> $item->description </div> </div> </div> @endsection
At last, we need to create edit.blade.php file for update item, so again create this file in ItemCRUD folder.
resources/views/ItemCRUD/edit.blade.php
@extends('layouts.default') @section('content') <div class="row"> <div class="col-lg-12 margin-tb"> <div class="pull-left"> <h2>Edit New Item</h2> </div> <div class="pull-right"> <a class="btn btn-primary" href=" route('itemCRUD.index') "> Back</a> </div> </div> </div> @if (count($errors) > 0) <div class="alert alert-danger"> <strong>Whoops!</strong> There were some problems with your input.<br><br> <ul> @foreach ($errors->all() as $error) <li> $error </li> @endforeach </ul> </div> @endif !! Form::model($item, ['method' => 'PATCH','route' => ['itemCRUD.update', $item->id]]) !! <div class="row"> <div class="col-xs-12 col-sm-12 col-md-12"> <div class="form-group"> <strong>Title:</strong> !! Form::text('title', null, array('placeholder' => 'Title','class' => 'form-control')) !! </div> </div> <div class="col-xs-12 col-sm-12 col-md-12"> <div class="form-group"> <strong>Description:</strong> !! Form::textarea('description', null, array('placeholder' => 'Description','class' => 'form-control','style'=>'height:100px')) !! </div> </div> <div class="col-xs-12 col-sm-12 col-md-12 text-center"> <button type="submit" class="btn btn-primary">Submit</button> </div> </div> !! Form::close() !! @endsection
قالب وردپرس
0 notes
Text
Laravel Tutorial - CRUD (Create Read Update Delete) Operations in Laravel
Laravel Tutorial – CRUD (Create Read Update Delete) Operations in Laravel
In our previous Laravel 5 tutorial, we have learned how to install and configure Laravel application on Windows or Ubuntu. Now you’ll learn the most used functionality in this third part of the Laravel tutorial. In this tutorial, we’ll create a simple CRUD application with Laravel 5. Our step-by-step guide for beginners helps you to implement CRUD (Create, Read, Update, and Delete) Operations in…
View On WordPress
0 notes
Text
How to Create REST API in Laravel7 using Passport

I hope everything is going well for you. I'm going to show you how to create a rest API in Laravel today. We'll build a restful API with Laravel 6 from the ground up. Rest APIs are increasingly widely used in web development. Here, I'll show you how to use a passport to authenticate a rest API in a Laravel 7 application. In this tutorial, I'll teach you how to create restful api authentication in Laravel 7 using eloquent api resources. In Laravel 7, you can easily learn rest api for crud module with authentication. When working with mobile applications, you must use the Rest API. If your programme is intended for both web and mobile platforms, you'll need to create an API for mobile development. Laravel, on the other hand, makes it simple to create APIs. You can easily accomplish it with a passport if you have authentication in your mobile app. Passport in Laravel 7 provides a means to generate auth tokens for verifying users. If you also want to create a rest API for your mobile app, you may follow this guide for step-by-step instructions on how to create a rest API with Laravel 7. If you're a beginner, don't worry; I'll walk you through this guide step by step. This tutorial will teach you how to use the Laravel passport. That is, how to make use of the Laravel passport. I'll use Laravel passport for api authentication in this tutorial, and a simple e-commerce project to generate restful api crud. So, let's get started on our laravel rest api tutorial with a passport example.
Step 1: Install Laravel
I'll walk you through everything step by step. First, we'll create a new Laravel 6 application with the commands below. So, open a terminal OR a command prompt and type the following command: composer create-project --prefer-dist laravel/laravel api
Step 2: Setup Passport
In this stage, we'll use the Composer package management to install passport, so open a terminal and type the following command: composer require laravel/passport Following the successful installation of the package, we must obtain default migration in order to create new passport tables in our database. So, let's run the command below. php artisan migrate The next step is to use the command to install passport. It will generate token keys for security using the passport:install command. So, let's run the command below: php artisan passport:install
Step 3: Passport Configuration
We must configure three things in this step: the model, the service provider, and the auth config file. So all you have to do now is keep track of the changes in that file. The HasApiTokens class of Passport was added to the model. Passport::routes() was added to AuthServiceProvider. We added api auth configuration to auth.php app/User.php namespace App; use IlluminateNotificationsNotifiable; use IlluminateContractsAuthMustVerifyEmail; use LaravelPassportHasApiTokens; use IlluminateFoundationAuthUser as Authenticatable; class User extends Authenticatable implements MustVerifyEmail { use HasApiTokens, Notifiable; protected $fillable = ; protected $hidden = ; } app/Providers/AuthServiceProvider.php namespace AppProviders; use LaravelPassportPassport; use IlluminateSupportFacadesGate; use IlluminateFoundationSupportProvidersAuthServiceProvider as ServiceProvider; class AuthServiceProvider extends ServiceProvider { protected $policies = ; public function boot() { $this->registerPolicies(); } } config/auth.php return , 'api' => , ], ..... ]
Step 4: Create API Routes
Route::post('register', 'APIRegisterController@register'); Route::post('login', 'APIRegisterController@login'); Route::apiResource('/products','ProductController'); Route::group(,function() { Route::apiResource('/{product}/reviews','ReviewController'); });
Step 5: Create Model Migration and Controller and Factory
php artisan make:model Product -fmr php artisan make:model Review -fmr app/Http/Controllers/API/BaseController.php namespace AppHttpControllersAPI; use IlluminateHttpRequest; use AppHttpControllersController as Controller; class BaseController extends Controller { public function sendResponse($result, $message) { $response = ; return response()->json($response, 200); } public function sendError($error, $errorMessages = , $code = 404) { $response = ; if(!empty($errorMessages)){ $response = $errorMessages; } return response()->json($response, $code); } } app/Http/Controllers/API/RegisterController.php namespace AppHttpControllersAPI; use IlluminateHttpRequest; use AppHttpControllersAPIBaseController as BaseController; use AppUser; use IlluminateSupportFacadesAuth; use Validator; class RegisterController extends BaseController { public function register(Request $request) { $validator = Validator::make($request->all(), ); if($validator->fails()){ return $this->sendError('Validation Error.', $validator->errors()); } $input = $request->all(); $input = bcrypt($input); $user = User::create($input); $success = $user->createToken('MyApp')->accessToken; $success = $user->name; return $this->sendResponse($success, 'User register successfully.'); } public function login(Request $request) { if(Auth::attempt()){ $user = Auth::user(); $success = $user->createToken('MyApp')-> accessToken; $success = $user->name; return $this->sendResponse($success, 'User login successfully.'); } else{ return $this->sendError('Unauthorised.', ); } } }
Step 6: Setup database table
Open your migration table and put the code below into it. database/migrations/products.php Schema::create('products', function (Blueprint $table) { $table->bigIncrements('id'); $table->string('name'); $table->text('detail'); $table->double('price'); $table->string('stock'); $table->double('discount'); $table->integer('user_id')->unsigned(); $table->timestamps(); }); database/migrations/reviews.php Schema::create('reviews', function (Blueprint $table) { $table->bigIncrements('id'); $table->integer('product_id'); $table->string('customer'); $table->text('review'); $table->double('star'); $table->timestamps(); });
Step 7: Make relationship between product and review
We must now establish a link between the Product model and the Review model. To make it work, copy and paste the code into your product and review model. app/Product.php namespace App; use AppReview; use IlluminateDatabaseEloquentModel; class Product extends Model { protected $fillable = ; public function reviews() { return $this->hasMany(Review::class); } } app/Review.php namespace App; use AppProduct; use IlluminateDatabaseEloquentModel; class Review extends Model { protected $fillable = ; public function product() { return $this->belongsTo(Product::class); } }
Step 8: Setup factory
Our database table and relationship are now complete. We can now run our migrate command to save that table in our database. So, after you've set up your database, run php artisan migrate and open it up. database/factory/ProductFactory.php use FakerGenerator as Faker; $factory->define(Product::class, function (Faker $faker) { return ; }); database/factory/ReviewFactory.php use FakerGenerator as Faker; $factory->define(Review::class, function (Faker $faker) { return ; }); Our factory setup is now complete. It's now time to add some dummy data. So, open your command prompt and paste the following command lines one after the other. php artisan tinker factory(AppProduct::class,50)->create() factory(AppReview::class,50)->create() exit We now have 50 products and 50 reviews for our products after running this command.
Step 9: Setup Product Controller
Now it's time to get the data for our API from the database. So Open appHttpControllersProductController.php namespace AppHttpControllers; use AppHttpRequestsProductRequest; use AppHttpResourcesProductCollection; use AppHttpResourcesProductResource; use AppProduct; use IlluminateHttpRequest; use IlluminateSupportFacadesAuth; use SymfonyComponentHttpFoundationResponse; class ProductController extends Controller { public function __construct() { $this->middleware('auth:api')->except('index','show'); } public function index() { return ProductCollection::collection(Product::paginate(5)); } public function store(ProductRequest $request) { $product = new Product; $product->name = $request->name; $product->detail = $request->description; $product->price = $request->price; $product->stock = $request->stock; $product->discount = $request->discount; $product->save(); return response(,Response::HTTP_CREATED); } public function show(Product $product) { return new ProductResource($product); } public function update(Request $request, Product $product) { $this->userAuthorize($product); $request = $request->description; unset($request); $product->update($request->all()); return response(,Response::HTTP_CREATED); } public function destroy(Product $product) { $product->delete(); return response(null,Response::HTTP_NO_CONTENT); } public function userAuthorize($product) { if(Auth::user()->id != $product->user_id){ //throw your exception text here; } } }
Step 10: Create Resource Collection
Simply type the following commands to create a product resource and a review resource. php artisan make:resource ProductCollection php artisan make:resource ProductResouce php artisan make:resource ReviewResource Following this command, three files will be added to the app/Http/Resources slug. Why did we build this resource or collection, for example? We can return our api data without this, but if you use Collection or Resource, you can adjust your return data. How did you do it? Look app/Http/Resources/ProductCollection.php namespace AppHttpResources; use IlluminateHttpResourcesJsonResource; class ProductCollection extends Resource { public function toArray($request) { return ]; } } As you can see, the name of our return data field contains information such as name, totalPrice, discount, and so on. You are free to use whatever name you choose. However, if you don't use it, you won't be able to update your outcome data. We may also add other field names to offer more information for a certain data. I hope you can see why we require a resource or collection. app/Http/Resources/ProductResource.php namespace AppHttpResources; use IlluminateHttpResourcesJsonResource; class ProductResource extends Resource { public function toArray($request) { return ]; } } app/Http/Resources/ReviewResource.php namespace AppHttpResources; use IlluminateHttpResourcesJsonJsonResource; class ReviewResource extends JsonResource { public function toArray($request) { return ; } }
Step 11: Create Custom Request
For handling form data, Laravel provides a default Request. However, for a given model, we can utilise a custom request. To make a request, copy and paste the code below. php artisan make:request Product php artisan make:request Review Now go to app/Http/Requests and you'll see two new files. namespace AppHttpRequests; use IlluminateFoundationHttpFormRequest; class ProductRequest extends FormRequest { public function authorize() { return true; //Only authorize user can do this operation if false then unauthorize user can do } public function rules() { return ; } } True or false is returned by the authorize() method. If true, it will only work for authenticated users; if false, it will work for all users. HTML form data was validated using the rules() method. app/Http/Requests/ReviewRequest.php namespace AppHttpRequests; use IlluminateFoundationHttpFormRequest; class ReviewRequest extends FormRequest { public function authorize() { return true; } public function rules() { return ; } }
Step 12: Setup review controller
app/Http/Controllers/ReviewController.php namespace AppHttpControllers; use AppHttpResourcesReviewResource; use AppProduct; use AppReview; use IlluminateHttpRequest; class ReviewController extends Controller { public function index(Product $product) { return ReviewResource::collection($product->reviews); } public function store(ReviewRequest $request , Product $product) { $review = new Review($request->all()); $product->reviews()->save($review); return response(,Response::HTTP_CREATED); } public function update(Request $request, Product $procduct, Review $review) { $review->update($request->all()); } public function destroy(Product $product, Review $review) { $review->delete(); return response(null,Response::HTTP_NO_CONTENT); } } Everything for our rest api development project is now complete. So now you're ready to use Postman to run our Rest Api data. In Laravel, we are now able to operate a full restful api as well as a passport api. So, let's execute our example, so use the command below to run it quickly: php artisan serve Ensure that the following headers are used in the details api: 'headers' => I hope you will like the content and it will help you to learn How to Create REST API in Laravel7 using Passport If you like this content, do share. Read the full article
#laravel7/6passportrestapitutorial#laravel7/6restfulapiauthentication#restapiinlaravel7/6stepbystep#restapiinlaravel7/6tutorial
0 notes
Text
50% off #Laravel(5.2) PHP Framework Jump Start for beginners – $10
Master code patterns of Laravel and the Object-Oriented PHP concepts behind it.Learn modern agile PHP Web Development.
Beginner Level, – 3 hours, 32 lectures
Average rating 3.7/5 (3.7 (83 ratings) Instead of using a simple lifetime average, Udemy calculates a course’s star rating by considering a number of different factors such as the number of ratings, the age of ratings, and the likelihood of fraudulent ratings.)
Course requirements:
You should already be little bit familiar with HTML,CSS and PHP. Download and install a text editor like Sublime Text(which we use here) or Dreamviewer.
Course description:
Learn the basic concepts and tools that you will need to build fully functional Object Oriented PHP web applications using Laravel framework.(Over 3000 students have already enrolled to this course,the most popular Laravel course at Udemy).
Build a strong foundation in modern agile Object-Oriented PHP programming.
Set up and configure your local development environment. Generate code files effectively and efficiently using Laravel artisan tool. Object-Oriented PHP programming with MVC architecture. Eloquent ORM. Laravel routing. Migrations and seedings. Laravel Sessions and Requests. Blade templating
A powerful ,highly demanded,highly paid,highly marketable skill at your fingertips.
As you might already know, Laravel is the most popular PHP framework today.
It is free and open source,,very easy to learn,has excellent documentations,has a very friendly community support and most importantly it is fun to code.
Laravel developers get higher salaries than other PHP developers.
If you like freelancing, this skill will give you a strong background to get large projects worth over 2000 US dollars as a freelancer web developer.
Content and Overview
This course is for beginner level web developers and students.
You will learn all essential Laravel code patterns and establish a strong understanding of the Laravel web application architecture.
Each chapter closes with exercises and links for further readings,putting your new learned skills into practical use immediately.
Starting with the setting up and configuration of local development environment,this course will take you through artisan,migrations,seeders,routes,controllers,sessions,requests,blade templates and eloquent models.
Students completing the course will have the knowledge to create functional and useful dynamic web applications using Laravel PHP framework.
This course comes with downloadable code samples,you will be able to work alongside the instructor as you work through each concept, and will receive a verifiable certificate of completion upon finishing the course.
Full details Start work with Laravel PHP framework. Apply all CRUD(Create,Read,Update and Delete)functionalities effectively for the web applications. Build dynamic web sites(applications) in relatively less time and effort. Use object oriented techniques for their web projects following MVC architecture. Apply login and registration features to web sites in a shorter period of time using build in laravel authentication system.
Full details Students who want to develop PHP dynamic applications and websites faster,more secure and more maintainable way. Developers who quickly want to pick up skills of Laravel PHP framework Developers who want to improve their career or get a better one. Freelancers who want to get larger projects and earn more money Any one who has a love and passion to learn web development Students who are looking for their first job(Laravel skill will be a big plus for you)
Full details
Reviews:
“I got this course for free. Ok course, but accent is sometimes making it hard to understand what they are saying. If you can get past this, I think all the information is provided to be able to start using the technology be taught!” (Paul Kruger)
“Hi, Thank you for this Course. It’s easy & simple for Real Beginner. Cheers :)” (Mr. Suchan Kooprasit)
“So far this has been the clearest, most up to date, step by step, tutorial I have seen. One thing I like is that he is using a windows based operating system that matches my own. Other tutorials used Mac Pro which led to discrepancies in the installation with my own system” (Lbjoiner)
About Instructor:
Anushka Madusanka
Hi! I’m Anushka. I am a Information Technology graduate from Colombo University, and I am also an Oracle certified Java programmer. I have been doing two jobs since 2008 as a software engineer from Monday to Friday and as a part time teacher on Saturdays. I am currently working as a Software Engineer. In our company we are mainly producing PHP and JAVA based software solutions for medium level business owners. I love teaching .Teaching is my passion and hobby .Thanks to Udemy, I am willing to do a lot of teaching here.
Instructor Other Courses:
…………………………………………………………… Anushka Madusanka coupons Development course coupon Udemy Development course coupon Web Development course coupon Udemy Web Development course coupon Laravel(5.2) PHP Framework Jump Start for beginners Laravel(5.2) PHP Framework Jump Start for beginners course coupon Laravel(5.2) PHP Framework Jump Start for beginners coupon coupons
The post 50% off #Laravel(5.2) PHP Framework Jump Start for beginners – $10 appeared first on Course Tag.
from Course Tag http://coursetag.com/udemy/coupon/50-off-laravel5-2-php-framework-jump-start-for-beginners-10/ from Course Tag https://coursetagcom.tumblr.com/post/157368971133
0 notes
Link
Laravel 5.6 Tutorial For Beginners is today’s leading topic. Laravel is a free, open-source PHP web framework. It follows MVC(Model View Controller) Architecture. In this example, we create a simple stock system that allows you to create, update and delete operation(CRUD). You have followed below step to create CRUD application in Laravel 5.6. I have listed some of features of Laravel 5.6
0 notes