#layer cake block tutorial
Explore tagged Tumblr posts
Visit Tumblr Blog
Explore Tumblr blogs with no restrictions, modern design and the best experience.
Last Seen Tumblr Blogs


Fun Fact
If you dial 1-866-584-6757, you can leave an audio post for your followers.
Text
youtube
This Layer Cake no-waste version of quick cutting a Hunter's Star has my mind properly blown.
#quilt block tutorial#quilt block#tutorial#quilt tutorial#hunter's square block#hunter's square block tutorial#video#hunter's square layer cake block tutorial#layer cake#layer cake block tutorial#layer cake hunter's star block tutorial#quilt#quilting#modern quilt#sewing#fabric#Youtube
17 notes
·
View notes
Text
Progress Pride Flag Quilt Block Pattern & Tutorial
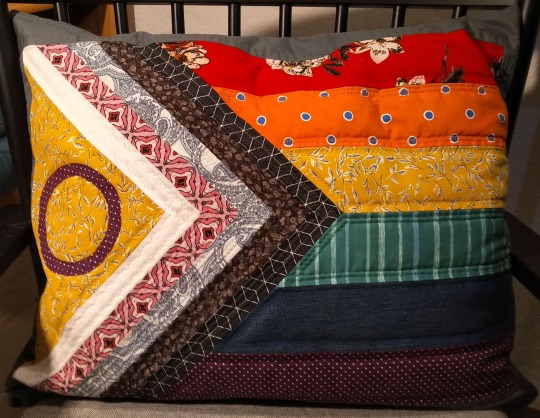
Don't you just love the flag of our people? Do you have an inner grandma that years to make stuff? Do you want to combine these two things and make a queer quilt?
Well, I've got you.
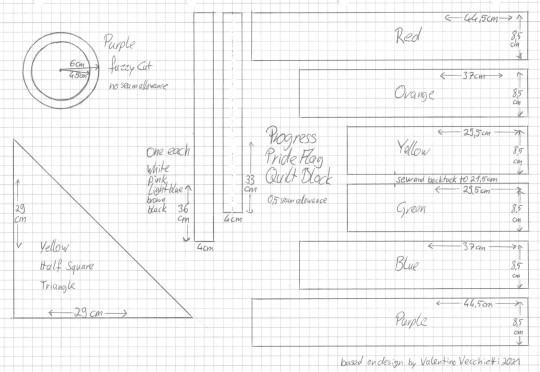
Behold the pattern! And my lack of graphic skills, so I drew it on paper!
Basically it's a bunch of rectangles, one half square triangle and a fuzzy cut circle. I don't know shit about quilting and I was able to come up with it. Why centimeter, you ask? Because I'm German and that's what I'm familiar with. Why weird measurements and not jelly rolls and layer cakes and stuff? Because I'm German and quilting is not really a thing here.
Onto the tutorial!
You'll need:
A scrap of fabric of red, orange, yellow, green, blue, purple, black, brown, light blue, pink, white each
additional fabric for the border
Cutting mat, quilting ruler, roll cutter
sewing machine
thread
pins
double sided interfacing
iron and ironing board
fabric sheers
compasses
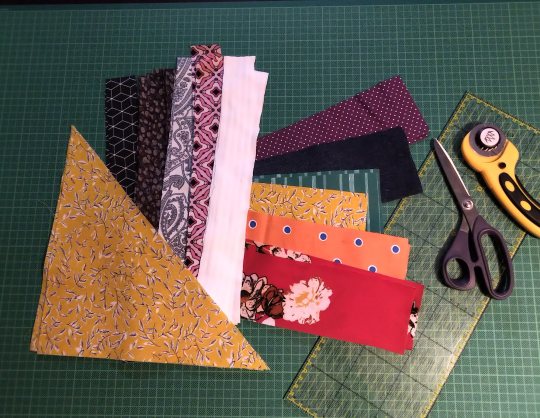
Step 1: Cut everything. Duh. We'll take care of the circle later, don't worry about that now. The half square triangle is exactly what it sounds like. A square and then you cut it diagonally. That's why I didn't give the length of the hypotenuse.
(Note: I'm making two blocks at the same time, that's why there's so much fabric. Also this is a middle of the night project, hence the lighting.)
I'm using all kinds of different fabrics, different weights and drapes, some stretchy, some transparent, so I needed to interface some of them.
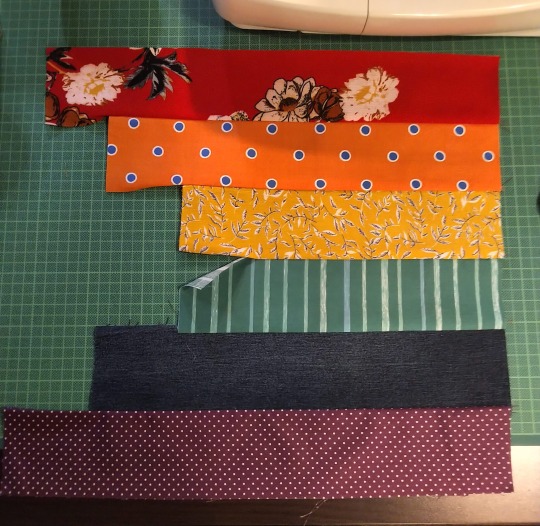
Step 2: Sew the rainbow together. 0,5cm seam allowance on everything, that's exactly the edge of the foot on your machine. Double and triple check that everything is facing the right direction before sewing. The seam of yellow and green does not get sewn fully, only 21,5 cm! That's important later! Also backtack there. Don't forget to iron.
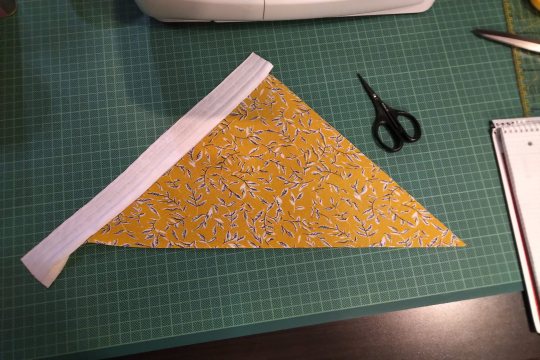
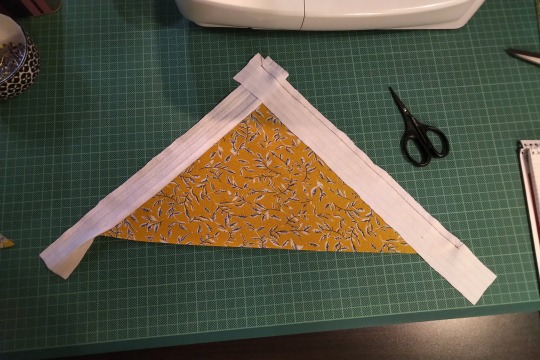
Step 3: Sew the strips to the half square triangle. For this you have to switch between the sewing machine and the ironing board constantly. Attach the shorter strip diretly to one side of the HST, iron it open. The second strip of the same colour gets attatched to the other side of the HST and the first strip. Look at the pictures closely if you're unsure how that works. Also the strips are longer than the triangle. We'll square that up later.
All strips attatched will look like this. See how the two strips meet at the tip!
Step 4: Cut the rainbow part to size. The length between yellow and green is 22cm long. The shorter seam from before plus some seam allowance. The outsides of red and purple are 44,5cm long. These two points are the beginning and end of your cutting line. You will cut a little triangle from every single colour. Do this slowly and carefully. Maybe your fabrics have stretched a bit (mine did). Don't worry, it will be ok.

Step 5: The Y seam, part one. Y seams are tricky, but there's only one for this block. So put your strips part on your rainbow part and line them up so that the tip of the strip part overhangs the seam between yellow and green by about half a centimeter. Remember that it's not about the edges of the fabric, but where the seam will be. But don't sew all the way! Leave 0,5cm at the tip!
You can also mark on your strip piece two lines 0,5cm from the edges of the black. They should form a little square at the tip. There they meet is where the actual tip on the finished block will be. So place this spot directly on the seem between yellow and green and only sew right up to it. Not beyond.
Step 6: The Y seam, part two. Now, fold both the rainbow part and the strips part in half and if you've done the last step correctly, the remaining two edges will allign. Pin and sew.
I can't explain it better than I've done here, I'm sure there are tutorias out there. Good luck!
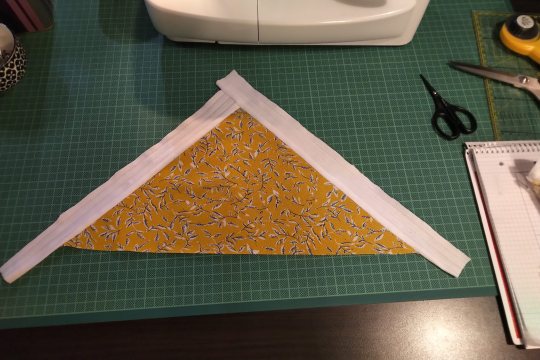
Step 7: Square up. Iron your block to that everything is nice and straight and flat. Then use the fabric edges of the red and purple to cut the remaining ends of the strips. Use the HST to cut the white. Be careful, the long side of the triangle is on the bias and likely stretched a bit.
I already added borders here. I'm making a pillow case.
Step 8: Fuzzy cut and raw edge applique. Double sided iron on interfacing is essentially double sided tape. It has two types of glue, one gets activated by 2 seconds of heat, the other by 5 or so (depends on the product). The second side is also covered with a paper that needs to be removed before the second gluing. Read the instructions of the product you are using!
Use your compasses to draw a circle on the protective paper side of the interfacing. It's actually two circles from the same middle point, see pattern. Cut it out roughly. Then place it with the rougher side on the backside of your purple fabric and iron for 2 seconds on middle heat. If you've just ironed your fabric before and the ironing board is still hot, wait for it to cool down. Also let the fabric cool down after applying. Then cut out your circle. The interfacing will have stiffened the fabric, so that shouldn't be a problem. Then remove the protective paper, place the circle on the yellow triangle where you want it and iron for 5 seconds. Let cool.
And you're done! The applique at this point is only secured with the interfacing, but it should hold fairly well. The quilting will secure it further.
And that's it. BTW, did you know that this design was made by Valentino Vecchietti for Intersex Equality Rights UK in 2021? Now you do. Happy quilting!
#lgbt+#lgbtq+#lgbtq community#pride flag#progress pride flag#valentino vecchietti#quilting#quilt#quilt block#quilt pattern#quilt tutorial#sewing#sewing machine#sewing tutorial#sewing pattern
251 notes
·
View notes
Text
And a free pattern to use with this block:
12 notes
·
View notes
Text
How to make a cut and swap Magic star block
This block has been circulating on the internet for some time. I’m not sure who created it initially, but I believe it’s a block worth picking up. It works particularly well with layer cakes (squares measuring 10″ x 10″), and it achieves its best look when used as a scrappy block in a quilt. Block companion This is an exclusive Patreon video. Watch the full tutorial on my Patreon page. If…

View On WordPress
18 notes
·
View notes
Text
The Modern Identity of Quilting: A Fusion of Tradition and Online Quilt Store

The versatility of quilting as a craft lies in its cutting-edge modern identity, coexisting in harmony with enduring traditions spanning generations. From classic patchwork built upon sentimental fabric scraps to bold graphic designs with unexpected color pops, quilts narrate stories of evolving times.
For contemporary quilters, fabric stores on line quilting promise a mind-boggling selection and irresistible convenience to fuel us through many more creative chapters – anytime, anywhere! Read on to discover insider tips for finding your perfect fabric haven.
Fabric Haven Checklist – What to Look For
With thousands of virtual stores vying for business, finding your quilting happy place takes effort. Look beyond pretty websites to ascertain shop credentials using this checklist before hitting checkout:
Sell Quality Fabrics
A great fabric selection distinguishes the best online quilt store catering specifically to quilters versus crafters. They stock superior quality cotton, including rare finds like artisan indigos, along with quilt-worthy blends known for characteristics like durability, vibrancy, and easy care.
Batiks for All Budgets
Good online fabric stores understand batiks are a quilter’s delight with their vibrant patterns and supple drapes. They offer the coveted Robert Kaufman Mali collection along with affordable options for frugal buyers to enjoy batik magic.
Precuts Galore
Every quilter loves a good fabric bundle! The best online fabric store quilting offer tons of handy precuts like jelly rolls, charm packs and layer cakes allowing us to conveniently try new color schemes. Subscription services for monthly fabric infusions also score big.
Notions and Tools
One stop online shops stock essential notion like threads, templates, specialty rulers and sewing machine accessories quilters need alongside fabric. Sales on notions help maximize project budgets.
Responsiveness and Reviews
Customer service responsiveness reveals how shops value us. Check response times and depth of interactions. Past buyer reviews on product quality, shipping, returns etc provide transparency.
Best Price Guarantees
Savvy stores allow stacking coupons with existing discounts resulting in unbeatable deals. Price match guarantees against local or online competitors also keep our craft affordable.
Best Online Fabric Store Quilting – Where to Buy Quilting Fabric
While newcomers give veterans healthy competition daily, these fabric stores on line quilting beloved by quilters worldwide for their quality and service stand the test of time:
Missouri Star Quilt Company
With a whopping selection of over 7000 bolts, MSQC sets the gold standard for fabric choices spanning types, brands, colors, motifs and scales. Their high-definition site images minimize returns. Sign up for their inspiring YouTube tutorials!
Pink Castle Fabrics
Boasting meticulous customer service and gorgeously curated fabric lines in cotton, fleece, and flannels, Pink Castle Fabrics pampers loyal quilters with exclusive deals and early access to new releases.
Fat Quarter Shop
True to their name, these experts offer stackable coupon codes on precut fabric bundles and notions that traditional shops can’t match. Subscribe for exciting monthly deliveries to try new designers.
Connecting Over Quilting – Online Communities and Resources
Our passion for quilting transcends just snagging discount fabrics as self-expression interweaves with community bonds. The best online fabric stores help facilitate this engagement through:
Quilt Along and Challenges
Virtual quilt along build motivation levels to finish projects watching creative peers. Block contests, theme challenges, and bee groups make quilting enjoyable with collective encouragement. So, join the worldwide quilting party happening 24/7 online! With exceptional service, fabric choices galore and camaraderie in crafting, these online havens help quilters enjoy purposeful me-time without isolation or intimidation. Happy quilting!
0 notes
Text
Last day for the May 2024 Paper Pumpkin Kit - The Best There Is

LAST DAY MAY 2024 PAPER PUMPKIN KIT The Best There Is KitSubscribe today! Create Father's Day cards and more with the "The Best There Is" May Paper Pumpkin Kit. This kit allows you to craft heartfelt messages of thanks and admiration, offering: - Components to create 9 cards, featuring 3 unique designs, accompanied by 9 matching envelopes - A variety of precut paper accents and labels for easy customization - Rich woodgrain textures and robust, masculine colors for a natural feel - A complementary color palette that includes Wild Wheat, Pool Party, Misty Moonlight (Classic Stampin’ Spot), Early Espresso, Crumb Cake, and Basic Beige - Perfect compatibility with the Country Woods Designer Series Paper, a highlight of the upcoming Annual Catalog. Special Feature: 🎉 Exclusive Add-On Die: Don't miss the opportunity to enhance your crafting experience with a special add-on die that coordinates seamlessly with projects from all three months! WHAT ARE PAPER PUMPKIN KITS? Paper Pumpkin Subscription: Monthly Creative Surprises For those craving a regular injection of creative inspiration, the Paper Pumpkin Subscription is a monthly adventure that arrives at your doorstep. Key features include: SUBSCRIBE - Monthly Mail Delight: Subscribers receive a specially curated kit by mail every month. Each package includes designed projects, precut pieces, a stamp set, and ink. It’s like receiving a surprise creative adventure in your mailbox each month. - Exclusive Subscriber Benefits: Subscribers to Paper Pumpkin enjoy special perks, including access to exclusive products and offers. It’s a fantastic way to stay connected with the crafting community and unlock additional creative opportunities. - Endless Possibilities: Where will Paper Pumpkin take you this month? With a subscription, you’ll discover new techniques, themes, and crafting styles. It’s a journey of endless possibilities that keeps your creativity flowing. - Acrylic Block: Your first Paper Pumpkin kit will arrive with a reusable acrylic block for your stamps. - Refills: Depending on availability refills for each month’s kit are often available in my online store while they last. - Control: You have full control over your Paper Pumpkin subscriptions and can take a break / pause, cancel and rejoin at anytime. - Alternate Ideas: Go outside the box each month with me as I share alternate ideas for each Paper Pumpkin kit absolutely free on my blog. See my tutorial gallery here. - PPX Bonus Videos: When you subscribe to Paper Pumpkin kits through me, you’ll receive 6 additional videos for alternate projects to the kit. These PPX videos are exclusive and not available anywhere else. Paper Pumpkin kits have a deadline to subscribe each month by the 10th of the month in order to get that month’s kit. That month’s kit isn’t available after the deadline but depending on availability refills will be available in my online store. PPX VIDEOS: YOUR EXCLUSIVE EXPERIENCE PPX: YOUR EXCLUSIVE PAPER PUMPKIN EXPERIENCE Are you new to paper-crafting, or maybe you’re a dedicated DIY enthusiast with a passion for crafting? If so, you’re in for a treat! Introducing PPX – an exclusive video tutorial program specially curated for our beloved Paper Pumpkin subscribers. For those unfamiliar, Paper Pumpkin is a crafting kit subscription service by Stampin’ Up, delivering a delightful box of creative goodies to your doorstep each month. Now, let’s dive into the exciting world of PPX and discover how it adds an extra layer of joy to your crafting experience. The Magic of Paper Pumpkin:Before we delve into the exclusive video tutorials, let’s take a moment to appreciate the magic of Paper Pumpkin craft kits. As a subscriber, each month brings a new and beautifully curated kit filled with all the materials you need for a creative project. From cards and scrapbooking to home décor and more, Paper Pumpkin provides endless crafting possibilities for both beginners and seasoned crafters. Your Personal Crafting Companion:For those who have fallen in love with the artistry of Paper Pumpkin, PPX is here to elevate your crafting adventure. As an active Paper Pumpkin subscriber, you gain access to six exclusive video tutorials every month, crafted with care and creativity by our team. These tutorials go beyond the instructions in the kit, offering alternate ideas to spark your imagination. Stretching Your Creativity:What sets PPX apart is its commitment to helping you stretch the value of your Paper Pumpkin kit. Each video tutorial takes you on a journey, exploring different ways to use the kit contents and create alternate projects. Whether you’re a beginner looking to expand your crafting skills or a seasoned pro seeking fresh inspiration, PPX is designed to cater to all levels of expertise. Exclusive Access for Subscribers:The exclusivity of PPX isn’t just limited to Paper Pumpkin subscribers; it extends to those who join through a Paper Pumpkin crew member and to my Stamp It Demonstrator Group. This means that when you become part of our crafting community, you’re not only getting the amazing Paper Pumpkin kits but also unlocking the door to a treasure trove of additional creative insights. A Glimpse Into My Crafty World:As a fervent Paper Pumpkin enthusiast, I’ve dedicated an entire gallery of videos to showcase the monthly kits. From unboxing the surprises to guiding you through the crafting process, my goal is to share the joy and excitement that comes with each Paper Pumpkin delivery. Join me on this crafting journey, and let’s explore the endless possibilities together. PPX is more than just a video tutorial program – it’s a community-driven initiative that celebrates the art of crafting. If you’re ready to take your Paper Pumpkin experience to new heights, become an active subscriber today and unlock the exclusive world of PPX. Let the crafting adventures begin! SUBSCRIBE SUBSCRIPTION VS PREPAID CODESWHICH SHOULD I CHOOSE? There are two ways to subscribe to Paper Pumpkin.1. First, we offer a monthly subscription where you pay as you go which is automatic each month. SUBSCRIBE TO PAPER PUMPKIN 2. Secondly, we offer prepaid subscriptions which allow you to pay ahead or give as a gift. Prepaids can be purchased in my online store. After you purchase a subscription, we’ll email you a prepaid code to redeem here at www.paperpumpkin.com to set up your subscription to start receiving your kits. Read the full article
0 notes
Text
baking in paris | sm

warnings: mentions of smut etc etc possibly swearing?? I also have NOT proof read don't come for me. should probably mention this is an au lol
word count: 2k ish
Summer in Paris was dreamy. The balance of the bright sun beaming down onto vibrant bodies mixed with the soft breeze that forced leaves to scatter down the street was the perfect setting and it was everything you dreamed of and more. Your thin, flimsy blinds were the only thing blocking the heated rays from filtering into your room, mostly because you didn’t want Gabriel across the road seeing your ta-ta’s in process of getting dressed.
Your apartment was simple, a beige and white colour pallet flowing throughout with a touch of fresh flowers ever so often from the local florist down the road from your café. The acoustic playlist was the soundtrack to your early morning, the smell of lemon drizzle cake filling your senses as you washed the dishes, the baking area currently looking like a flour explosion had gone off. The one thing that immediately sold this apartment to you was the double oven and large kitchen island that was more than ample for your baking experiments.
Today was your day off, which was very much needed because running a café in the height of tourist season was extremely tiring, but you wouldn’t change it for the world. As much as you needed the day off, waking up and baking a fresh batch of cakes for the café was your number one priority, because your shop didn’t get its reputation for nothing. It was almost mid-morning by the time you’d finish decorating both cakes, much precision and care going into each. Who said days off were for relaxing, right?
A knock on the door sounded, and you assumed it would just be the little old lady, Camille, across the hallway, who always moaned you played music too loud in a morning. You wiped your hands on the apron that covered your high waisted denim shorts as you padded over to the door, shouting at your device for the music to go down to volume two.
The other side of the door, Shawn stood with a loaf of baking parchment in one hand, his other shoved into his pocket after knocking on the door to number 10. When you swung the door open and stared into his chest, because you expected it to be Camille who was dramatically shorter than Shawn, he laughed and tucked his fingers under your chin, dragging your face upwards.
“Shawn…” You breathed, more than shocked at his presence. “Hi. What… How… Why aren’t you at the bakery?” You asked, because more often than not he did the morning shift in the bakery next to your café, setting up for his boss and making sure the savoury breakfasts were ready to fill tourists’ belly’s.
“My boss came in and it was ridiculously quiet, so I worked on some new stuff and he said I can take a break for a few hours.” He wafted the item he was holding, the smell of fresh, doughy bread overpowering the lemon drizzle coming from your kitchen. “And I would like a professional opinion.”
You offered him to come him, suddenly feeling nervous that he’d only been here twice before and both time you had drunkenly hooked up. He didn’t realise how authentic your small apartment was, but he remembered the balcony in your bedroom and how he’d fucked you over it late one night. You and Shawn were friends, you think, maybe something slightly more but nothing dramatic. Friends with benefits is what you would use to suit your relationship best, although you could count the amount of times you’ve been physically together on one hand. He was a real sweetheart, who moved over here for a breath of fresh air, just like you and that’s how the friendship started. It blossomed furthermore when he got job at the bakery next to your café, which was a bonus for him because it meant he didn’t have to fly straight back home after running out of money, and more so, it was a bonus for you because you got to see him almost every day and you’ve seen a lot worse views in your time.
He complimented the smell of your baking and you suddenly felt bad that he was bringing you goods and you had nothing to offer, so you gave him the bowl of left excess cake sponge to which he happily picked at. He sat down his parcel, perching himself on the bar stool at the kitchen island as you hoped up onto the island itself, your legs swinging over the edge.
“This looks insane!” You exclaimed, pulling open the baking paper to reveal a twisted bread dough, still warm and golden from a fresh bake. “Caramelised onion?”
“And brie.” He smiled, popping a chunk of lemon drizzle sponge in his mouth, enjoying every mouthful. Shawn loved how much you loved food and he’d be lying if he said it didn’t make him want to be better baker. He pestered you non-stop for a tutorial on your secret cakes and sweets, but if you told him that you’d have to kill him, obviously.
“My favourite.” You smiled, grabbing the two plates and knife you pulled out the cupboard.
“I know,” he took the knife from you, cutting into the bread softly, the outer layer cracking with a crunch but inside softly slicing perfectly. Your mouth juiced as your stomach growled and you became suddenly aware that you were too busy in the thought of feeding everyone else that you had not fed yourself this morning.
“Someone’s hungry” He laughed, standing up from the bar stool and walking in front of you, tapping your knee to usher you to open your legs wider. Once open, he slotted snuggly in between them and your breath hitched at the new contact of your thighs hugging someones hips - not just any hips either, Shawn’s hips. He picked up a slice of bread, which was light work for his massive hands, and brought it up to your lips. You wondered if he noticed your breathing was deeper since he’d moved in between you or if he noticed that you were biting your lip as you adored every small feature on his face.
Truth be told, he didn’t notice; only because he was too busy trying not to act like a complete loser in front of you, even though you’d seen him be a complete dork on many occasions. That’s what made him more endearing, you thought. The simple fact that someone can be so completely nerdy but so incredibly attractive at the same time and you had to remind yourself that he was just here for the summer. Attachment was not an option.
When you bit into the pillowy bread, your eyes closed shut, noting all the small little flavours that he’d added to the loaf, making the experience much more enjoyable than your normal breakfast routine. “Oh my god, Shawn. It’s amazing!”
“You think?”
“Uh, yeah!” you slapped his arm with the back of your hand, opening your mouth again to which he happily obliged, and fed you another bite. “Seriously, I don’t know why you don’t come work for me and we can take over the world.”
Shawn had to bite his tongue; they couldn’t take over the world, he was going home in less that 2 months and as much as he wanted to stay, he needed his home too. He innocently smiled, placing the bread back down on the plate which you stuck your bottom lip out at, feeling hungrier now you’d had a couple of bites. You leant back on your hands, forgetting about the covering of flour on the island behind you, instantly feeling the powdery ingredient under your touch. Your breasts stuck out as you leant backwards, Shawn using every inch of his willpower to not bring his lips down to them, your white bardot shirt revealing the upper half of your chest and contrasting against your tanned, summer skin. Underneath your apron lower down, he could see a slither of denim, and he knew how well you pulled of those exact shorts, even if he hadn’t seen you in them fully today. “Ooo, the thought of me working for you....” he laughed, arms reaching around and resting on the lower of your back in a bid to feel closer to you again. “Telling me what to doooooo...” He sang, pulling his mouth into a suggestive smirk.
“You’re such a sub, Shawn Mendes.” You laughed, throwing your head back, making a brief statement to your sex life and of course, he knew that. He wasn’t submissive, per se. In fact, there’d been a couple of time’s where he’d roughed you around that much you didn’t know if you were sleeping with the same guy. But truthfully, he’d be on his knees for you before you even had to ask and he’d never met anyone who had this effect on him.
He threw his hands up in defensive, only briefly removing them from your body before they returned to behind you. This time, you felt his hands put more pressure onto your body, your denim shorts sliding along the smooth island surface as he pulled you a touch closer. “Can you blame me? Have you seen yourself?”
“Pfft, have you seen yourself?!” You raised your eyebrows, instantly biting your lip to stop yourself from spilling anymore affection.
He stared into your eyes, trying to hold back a smile, “did you just compliment me?” he brought his palm to your forehead, switching in between the palm and back of his hand, “are you feeling okay? what did I put in that bread?!”
You used your body to help you lean your weight foreword, bringing one of your arms around and smacking him in the chest, a smoke of flour filling the air in between you. You had forgotten (kinda), and tried your best to act apologetic, gritting your teeth together as he switched his eyes in between the hand shaped, flour print on his black t-shirt and your -now- barely flour covered palm. Having no time to react at all, he reached behind you and scooped up and left over flour he could see before bringing his hand up to your face, cupping which despite the fact he was messing you up, you leaned into, squirming as he tickled the side of your neck. “You’re an ass, mine was an accident!” you squealed, trying your best to move away from him but his grasp too tight.
“Oh yeah?” he smirked, too concentrated on staring into your eyes to realise you were reaching back round for more flour. With a swift movement you brought your hands in front of you, blowing quickly at the ingredient in your palm. His eyes squinted closed and he screwed up and blew his lips, trying to get any taste out of his mouth.
“Yeah” You innocently shrugged, wiping your hands down your apron for probably the 60th time of today.
Moving closer to you, you laughed at his powdery face, although admired how pretty he still looked. You knew you’d get hell later when he tried to shower the flour out of his perfectly spiralled curls, but it was worth it. His lips hovered over yours, waiting to gauge a reaction from you and although you didn’t give him one, he pressed down onto you, letting out a breath of relief as your features locked. Your bodies were a mess of tangled, floury limbs and whimpering noises as you worked on each other, grabbing at whatever piece of each other you could. You pulled at his black t-shirt, aware you’d already messed it up and he tugged at the string of your apron, letting it fall loose besides your hips. You couldn’t help but think that Camille would soon be banging on your door, complaining of the noise that wasn’t from the music.
—
taglist: @imaginashawnns @fallinallincurls @mendesficsxbombay
#Shawn mendes#Shawn mendes smut#Shawn mendes blurb#Shawn mendes imagine#Shawn mendes fluff#shawn mendes au
95 notes
·
View notes
Text
How To Minimize Concrete Paver Molds On A Winding Path
This could be an important factor to assume about since you're considering of doing the project slightly bit at a time. I even have that very same mould and used it for a sidewalk years in the past. I have a 16x16 foot deck at our present house and used the mould for a sidewalk on two sides. It has held up good aside from the filler between the stones concrete paver molds.
Use a leftover scrap to make a single mold, or buy a benderboard roll and make a quantity of molds at once. Benderboard is often overlapped and secured with screws, however this will depart an impression within the paver, so you'll find a way to simply tape the ends collectively. First brush inner mildew surface with mould launch, making use of with a cheap paintbrush. Remove excess oil with a paper towel or dry paintbrush. Next, measure out dry concrete or mortar mix in a wheelbarrow or utility tub.

While you'll have the ability to definitely choose interesting and beautiful ready-made concrete pavers, making your personal provides a inventive dimension that appeals to many gardeners. Install a paver patio or walkway to add both visual attraction and performance to your landscaping. Pavers assist define a garden’s type while also bettering entry to it and including outdoor dwelling area. Ready-made pavers, although, may be cost-prohibitive for many concrete paver molds homeowners.
Many people are turning to paver molds to create floors for patio areas. Rather than fussing with laying large blocks of stone, they're using the molds to make beautiful patterned areas for out of doors entertaining. In at present's world of big box home and garden stores and smaller specialty backyard centers, you might surprise why utilizing a mold to make concrete pavers is better than buying ready-made pavers. Find a flat, level place on the bottom or a piece of plywood the place you'll find a way to lay your type once it is able to obtain the moist concrete. Pour 2-3 inches of sand on the flat spot, and degree the sand.
If you employ the best concrete paver molds recipe, it can be as sturdy as cement, and quite a bit cheaper; in my case, I basically mixed cement with the clay I dug out of my yard. Bend the benderboard items to form a circle with the two ends butted towards each other. Follow the pure curve because of the board being in a roll.
youtube
You additionally could have plenty of time to regulate the color as you're working on them. You don’t need to end up having to buy expensive stains or dyes, together with etching products and sealants, to appropriate the colour if the color isn’t what you have been going for. Let these take a look at items remedy a minimum of three days -a week is better. You don’t need to use your vinyl straps, just plop your wet combination onto the ground where your stones will go and make them into any shape. Just bear in mind that when the cement is wet, it appears quite darkish, however will cure to quite a light-weight shade of gray that nearly appears white. With my vinyl straps, I was limited to creating solely three molds at a time.
Return tackle isn't the company address on Jaxpety web site. Our customer service will provide you a return handle after return approved. All NON-seller mistake returns for refund are subject to 10% re-stocking payment and purchaser will be liable for the return shipping charge. We need you to be utterly satisfied together with your buy on Wish. Return all products inside 30 days of delivery if they don't seem to be as a lot as your satisfaction. According to the structural design of the concrete ditch, there are notches on the 2 ends of the facet to facilitate the inspection of the ditch blockage.
Concrete Success options all kinds of mould shapes to create interlocking patio stones as well as stones for backyard paths. With so many molds to choose from, you're certain to search out one that matches your backyard. Since including stones and pavers takes time and effort, and the results aren't easily moved once they're put in, take your time to select the right look and feel on your backyard. Be positive the concrete is filled to the top of the shape and is leveled and smoothed.
Mainly prefabricated concrete edge blocks for urban roads. If you do find yourself with leaf stains, a stress washer and some OxiClean, or maybe tsp will help remove them. You need a mix that permits for the biggest dimension stone you propose to make and can meet the thickness you need. Otherwise, good ole fashioned hand mixing with a hoe and extensive bin will work. Here are two different fun tutorials where I used concrete to make a stone formed planter and in addition to make a rock shaped planter. I had my concrete covered because it was the height of pollen season and I didn’t need the yellow pollen staining the stones.
I think you'd be better off with sand or screenings between them rather than mortar unless you'll have the ability to put a concrete base underneath the pavers, you then could be OK with mortar between them. A couple of things I wish to point out earlier than I get onto my question. The first is that the mildew creates particular person stones, this isn't a stamp. Once the mold is removed, they are utterly separated pieces. The mortar is swept in dry, then sprayed with water to create a bond between all the blocks / stones. The second thing is that the finished cement is 2 inches thick.
At my customer's insistance, I did a flagstone patio dry laid on a tamped mattress of stone over fabric & upper layer of screenings. We did everything we may to roll water off the patio. We used mortar joints between the flagstones and so they popped some joints. The key's to make sure you begin with good, quality molds and that you combine constant batches of concrete.
I truly have 225sqft I'm going to be putting in pavers on so roughly $500 or so for normal formed pavers. My spouse is wanting different designs so if this methodology is cheaper it might be a good route. In common, customers are extremely glad with the functionality and usefulness of the Pathmate random stone mould.
The very first thing you have to determine is whether the "completely different designs" your wife needs may be satisfied through the use of molds, or by alternating the design of pavers . Also understand that the finished molded concrete pavers will crack (ideally alongside their "grout" traces, which isn't an issue), and can respond to frost heave less properly than pavers. Spray the inside of the paver mould with nonstick cooking spray to make it easy to release the concrete.
Concrete Countertop Molds And Edge Molds
As well, you should spray down the stroll maker form after each couple of uses- this helps it launch easier. Wash the Poly PVA Solution off the unique stepping stone mannequin with water after which place the original stepping stone and reproduced stepping stones into the walkway. Apply Pol-Ease® 2300 Release Agent to the stepping stone, mold box walls and mildew box bottom board after which brush it out with a dry brush to encourage even coverage. We left zero.75″ of house between the stepping stone and mold field walls to create 0.75″ thick mildew walls. Some gardeners may be intimidated on the thought of making their own concrete pavers. If you might make a cake, you can even make concrete pavers and stepping stones.
If you have a very porous mannequin, like the one on this tutorial, you might have to use more than one coat of Poly PVA Solution. We applied two coats of this sealer, waiting for it to dry (~ 1 hour) in between coats and earlier than moving on to the following steps. Select essentially the most intact stepping stone from the walkway.
There are extra choices than you assume in relation to the molds needed to type stepping stones.
The best part is that once the pavers are laid and vibrated in, the project is done and usable IMMEDIATELY.
This helps to take away any air bubbles that could show up within the stone.
Since I'm in no rush and have loads of time I want to hear from someone who has really tried this technique earlier than.
Dampen the Sand Mix with a nice mist of water (do not over-wet).
If you have the actual DIY spirit, or are simply looking to save money in your next hardscaping project, contemplate making your own concrete pavers. A reference value is offered by the vendor of the merchandise . Percentage off and savings quantities are based on the vendor's reference worth. The reference value can give you a sign of the value of the product butsome shops may sell the merchandise for lower than the reference worth. If you feel a reference price is inaccurate or deceptive please report it with the URL for the itemizing to report-
My concern with massive concrete slabs is the 10x10 that is already there has cracked in several locations and just does not look good. The identical settling in a paver setup could make them slightly off degree in a certain spot, but that is much easier to treatment and look good than a cracked slab. Home made high quality control might attain the extent of crappy 2x2 slabs however not of commercially produced patio/driveway pavers. An interesting aspect observe, was talking to my brother yesterday and talked about I was thinking of getting slightly concrete mixer. He bought a garage and it has a industrial concrete mixer in it with a new electric motor.
Our concrete molds are designed to final, and you must use one p ath maker many occasions. The only cause why one could contemplate shopping for another concrete p ath mould is to make the process even quicker. You could fill in the second brick paver mildew while the primary one is getting dry. But for some purpose, when I made these concrete stepping stones, I didn’t suppose the colour of the pavers would turn out gentle -like the bowl in my exams did. Make natural looking DIY concrete stepping stones or pavers. Color the concrete and mould it into the form of real fieldstones or flagstones.
We actually have 1000's of great products in all product categories. Whether you’re in search of high-end labels or low-cost, economic system bulk purchases, we assure that it’s here on AliExpress. Each order comes with easy to use mold instructions to create ornamental wanting ornamental pieces for your house or garden. • Avoid vigorous tapping when eradicating air bubbles; this can trigger cracks within the plastic. Should a crack develop in the mildew, fill it with epoxy or Bondo, found at any ironmongery store. Apply these adhesives to the outer surface of the mildew.
How To Minimize Pavers On A Winding Path
The Pathmate Paving Stone Mold offers an ideal method to mildew a walkway in a yard with pace and effectivity. It's constructed of a plastic materials that is out there in black shade. This paving stone mildew features varied shapes and sizes so you could get creative along with your pavers. It may additionally be reused after cleansing so you can make as many as you need. This concrete paver mold allows you to design your own path with numerous colors and designs.
Add any desired imprints or elaborations, corresponding to mosaic tile, immediately before the floor begins to set. Using a hose and spray nozzle, clean the concrete residue off the mould earlier than it dries if you finish up finished using it. Gradually add water to the concrete mix based on the directions on the package deal. Stir the water into the concrete with the hoe as you go.
All of the center sections can be accomplished as fast as you can drop them into place. You can estimate approx $2.50/sq ft for the finishing supplies and somewhat bit extra for the gravel/base mix and a few sand to prime it off. The best part is that once the pavers are laid and vibrated in, the project is finished and usable IMMEDIATELY. It is easily repairable and may easily assist automobile and truck traffic. Again, the price just isn't as much as you would suppose becase the pavers are fashioned from very high energy concrete and colored through. To duplicate this, you would wish to buy the most costly type of bagged mix and if you have not priced the dye/coloring combine, you might be in for a suprise.
I can color the concrete to my likening and I get to work at my own tempo and budget. A couple pics of another person's work may be discovered right here and here. Since I did most of this project by myself, I discovered it was best to go combine one other batch and arrange the following mold, pour it and frivolously stage it. This technique made it straightforward to see that I would have a mixture of 5 giant stones and a number of other small stones – again, which if combined, would make 9 giant stepping stones. Also, many people wish to make ornamental stepping stones like garden mosaic stepping stones. They are usually made by including mosaic glass or different embeddable materials into the concrete.
I'm seeking to put a garden shed on some this summer time. Seem like most the stuff I discover on there is leftovers. 225sqft doesn't sound like a lot but if you break it down by pieces I would wish over x8 pavers or x12 pavers.
1 note
·
View note
Text
A Soothing Stop-Motion Animation Bakes a Rich Chocolate Layer Cake Entirely from LEGO | Colossal
A Soothing Stop-Motion Animation Bakes a Rich Chocolate Layer Cake Entirely from LEGO | Colossal
GRACE EBERT When your next ambitious baking project doesn’t pan out, try your hand at a simpler recipe with just one ingredient. Follow Japan-based animator tomosteen through a stop-motion tutorial for a decadent cake layered with chocolate frosting that’s made entirely with LEGO. The ASMR-inducing animation chronicles the baking process from cracking an egg into a yolky block to watching the…

View On WordPress
1 note
·
View note
Note
hello !!! omg yalls admin names are so CUTE it makes me hungry it’s currently 1am where im at 🤤 anyways if the boys at karasuno were youtubers instead, what kind of videos do u think theyd post? discussion is OPEN
Hi anon!! We’re glad you like our admin names !! We were pretty hungry when we made them hehe. Also thank you for this ask and for being our first anon!! We had a lot of fun doing this!! We were laughing so much while we were facetiming as we did it!! So thank you again and much love! Hope you enjoy!! ❤️ - Noodle ✨, BananaMilk 🐯, and Frice 🌊

Karasuno as YouTubers AU
School: Karasuno
Genre: Headcanons, fluff, crack
Warnings: one mention of alcohol
HINATA SHOYO & KAGEYAMA TOBIO
Hinata definitely dragged Kageyama to make this channel
He only agreed if they did things they both could do
So, they have a whole Volleyball 101 series like how to receive, block, set, etc. They also help teach like volleyball fundamentals and strategies!
They also do exercise and stretch tutorials
Kags would have a series of good and healthy food while Hinata would vlog about his days which mostly are about playing volleyball and biking lol PLUS interview his friends especially during training camps like Kenma and Bokuto.
They do lives sometimes but they always end up fighting/bickering somehow and it becomes popular content
SUGAWARA KOUSHI
Actual DIY king!!
He has a DIY channel for pen pals, bookmarks, socks, candles, slime, etc.
He will even do the really weird life hacks to see if they work or not
Very soft and pastel with a sprinkle of chaos because it is Sugawara
Vibes of those angry home cafe videos like one minute he’s making really cute cakes but another minute he’s punching the air and pouring chocolate all over his hand
His videos are popular not only because he’s so sweet and friendly (and chaotic) but also because he’s so pretty (has many girls and guys in the comments like “are you single uwu”)
SAWAMURA DAICHI
You know that dad on YouTube with the “how to…”? That’s Daichi
Examples of the videos are like “How to fix your tire” or “How to manage your finances”
He also loves to tell about his life and just gives advice like “What it means to be responsible” or “Tips for proper and open communication”
Also has “funnier” bits like “How I managed 11 demons (10 children + 1 vice-captain)”
(it’s 30 mins and most of the time it’s actually just chaotic bits of volleyball practice from their school and even when they are at the Japan camp)
(also the boys from the schools (read: Bokuto and Kuroo) take the camera at one point and just bombards the video)
NISHINOYA YUU & TANAKA RYUUNOSUKE
We all know they have a joint acct!! Their channel is like Korean Englishmen/Jolly
They love to vlog whether it's about school, their trips, volleyball practice, just anything!!
They also love to do all the challenges and trends
Their most viewed video is of them trying do the fire noodle challenge bc they almost DIED eating it
(they chugged a whole bottle of milk between themselves and even went to the store to buy more and bathed themselves in it)
TSUKISHIMA KEI & YAMAGUCHI TADASHI
Their channel is like Buzzfeed Unsolved/The Watchers !!
Yama is Ryan and Tsukki is Shane. Chaos and debates obviously happen.
Would collaborate with Tanka and Noya or the other first years to go to a local haunted house place together and record their reactions/experiences. Buzzfeed unsolved way.
Separate sections: tsukki makes a playlist of music and yamaguchi local food restaurant reviews(think Worth It).
Reaction videos to music videos (it’s fun to watch them because tsukki usually maintains his cool stance and yamaguchi is completely honest with his feelings. Tsukki mostly criticises and analyzes musical technicalities, but sometimes when he’s amazed you can see his eyes widen.
YACHI HITOKA
Her channel is mostly drawing tutorials + speed painting!!
Also does Adobe product tutorials, very technical but also cutesy aesthetic like she has a her own character (that’s a baby chick) at the corner of her videos
Vlogs where she live records her drawing + sometimes rants about the torture of rendering 3D animation
She actually vlogged the one time she spent 28 hours at the library trying to render a video that was 1 minute and 30 seconds long...
She does some baking videos and sometimes does collab with Asahi’s channel!! Because of their height differences, the top of Asahi’s head is often cut off from the screen
Kiyoko makes frequent appearances at Yachi’s channel and everyone loves when she comes on
SHIMIZU KIYOKO
She would have an ASMR channel that mostly focuses on her hands and the objects she’s using
She doesn’t like showing her face or having anything attached to her so no one ever knows it’s her (she’s uncomfy with all the attention vs. when she’s on Yachi’s channel where the attention is shared)
But she becomes like one of the top ASMR channels bc her vibes are really soft and also super aesthetic
Also, SOUND QUALITY !!! exquisite !!! best crunches, taps, scratches, etc.
Her most popular ASMR video is the one where she roleplays as a witch
NARITA KAZUHITO & KINOSHITA HISAHI
They have an anime/Marvel channel together!
Top 10 Anime Betrayals, Top 10 Anime Deaths, Best 2020 Anime Shows, Could this character beat Goku discussion/debate, etc. You name it. They have it.
They do reaction videos to anime shows/movies/marvel trailers.
Civil War Debate: Who Was Right (a lot of differing opinions so its LONG), All Marvel movies Ranked, Funniest moments in Marvel compilations, etc.
Their most popular video is when they made a funny video pretending to be BNHA heroes and have quirks. They invited the other 2nd years as well and it was a MESS but they had fun making it and editing it with bad effects and all.
ENNOSHITA CHIKARA
Of course our choir boy has a singing channel (covers, original songs, collaborations, etc.)
Plays guitar and sometimes posts acapella videos
He does youtube live with his fans and talks about his day, what he is working on, his favorite songs/musicals, etc. He answers their questions too!!
Ennoshita does a collaboration series with Takeda sensei (our musical lover) reacting and discussing music videos/songs. Very knowledgeable and calming vibes
He does it with the Karasuno team too and those become his most popular videos because they are SOOO chaotic and funny. Complete opposite of when he does a collab with Takeda sensei
AZUMANE ASAHI
Mainly a cooking channel that specializes in easy recipes!!
He also does a miniature food series.You would think he would have a hard time but he is very adept with small instruments.
Bakes sometimes due to Yachi’s influence, loves to bake bread from scratch.
Fashion tips : “How to layer clothes,” “How to find your aesthetic”, “How to do monochrome looks right”, etc.
He did a makeover series on the Karasuno team where he diagnoses and dresses them up from head to toe
One of his popular series is “How to cook/bake without a recipe” and the Karasuno group are invited to do it in teams! It is pure entertainment lol.
BONUS~
Coach Ukai and Takeda sensei make frequent appearances in Daichi’s channel / Hinata & Kageyama’s channel
Takeda sensei also goes food hunting with Yamaguchi sometimes and will leave reviews for the restaurant drinks (alcohol
#haikyuu!!#haikyuu#haikyuu headcanons#Karasuno#hinata#kageyama#tsukishima#yamaguchi#yach#nishinoya#tanaka#ennoshita#kinoshita#narita#daichi#sugawara#asahi#kiyoko#takeda#ukai
15 notes
·
View notes
Link
I *love* the look of this pink cross quilt - there isn’t a tutorial for the block on that website, so I kind of constructed one of my own in order to make my own block.

Michelle refers to this one as “server fire” due to the lower left hand block (IKEA Nummer fabric). Here’s my made up version of this using mostly 5″ blocks.

And yes, I did refer to it as the “Thicc Cross Block.” Please note that the B block is a bit fudged and will probably need to be trimmed down to 5x5 once it’s connected to the D block. Good luck!
#thicc cross block#quilt block#quilt block tutorial#quiltblock#quiltblocktutorial#cross block#scrap block#scrap quilt#quilt#quilting#modern quilt#layer cake#charm pack#measurements#modern quilting#modernquilt#sewing#fabric#cottagecore#grandmacore#tutorial tuesday
9 notes
·
View notes
Text
Present Mic’s speaker: a shitty tutorial
So this bitch finally finished her Present Mic cosplay for London ComicCon next weekend!! I thought I’d make a tutorial post for the speaker system- it’s a rough guide, and includes the mistakes I made so you don’t make the same!

Read below for the full tutorial!
STAGE ONE: Plan
So the first thing i did was that i purchased all the required components. I used foam for this- I couldn’t find any craft foam near me so i bought a foam/roll up camping matt for like £3.99 which was a massive bargain and seriously did the job. Here’s a list of what I used.
Foam
Silver spray paint
Glue/lacquer for making it shine/metallic (I used Mod Podge)
a neck rest- the type you’d have on a plane. I got mine for £1 at Poundland. (Dollar store for my American friends!)
Super glue (the kind that works with fabric!)
Paper and pencil
Ruler
Scissors. A good ol’ big pair, not nail scissors.
gold and silver marker pens
A mask, or just something to cover your mouth when you’re spray painting
Optional (It does make life easier to use):
Cutting knife
Cutting mat
Screws- if you have any hanging around the house in a random drawer. In my case i had lots left over from the studs I used on the jacket. It just makes it look more real!

Once purchased, I started out by taking some A3 paper and doing a rough outline of the neck rest. See the end of this tutorial to see the mistakes I made and how I could have improved this part. I made the width of the top section slightly slimmer than the actual neck rest, because I didn’t want foam to be stabbing me chin. That defeats the point of the neck rest, which is to help with the comfort of this bastard as well as being able to clip it on at the back.
I ended up with three pieces of paper. The top, the little square at the front, and the side panel (which is the same for both sides, so I just cut one template.)
I didn’t make a bottom to the speaker, ‘cause no one’s going to see that bit anyway. No point.
Stage 2: Cut the foam using the paper templates

In case you’re wondering why I’ve blocked out bits, it’s because I put down paper underneath to stop it from gluing to the table- the paper came from an underwear brochure and I didn’t want tumblr nuking me for the half naked ladies sajkdlajgkd
ANYWAY So I used the templates to draw an outline and cut the foam. It’s... not actually easy to cut this foam with scissors OR a proper craft cutting knife. It leaves little messy bits. But it turned out alright I think. You guys might be tidier than me.
I then superglued the shit out of it, sticking the panels together as you can see. I glued the side panel to the bottom of the top one, rather than the side. (If that makes sense). It ended up so that the edge of the foam shows on the side rather than the top. Choice is yours. But if you do it that way, remember that you’re adding about an inch to the height of the speaker. If you stick it the other way, you add to the width on the front.
Shit it’s hard to explain this lmao
So with this supergluing, the glue dries QUICKLY so try and be sharpish. Hold it in place for about 30 seconds and you have yourself a winner.
Step 3: add the details

Check out my cupcake slippers in the background
So i added the details here, trying to emulate the speaker bits on the side- they’re actually concave in Mic’s costume in the show, rather than poking out- but i wouldn’t even attempt to scoop out foam. It would be so messy. So I improvised.
The reason the front looks messy is because I accidentally glued the square and the circle on the front the wrong way around. i could have left it, I’m sure, but I’m a fussy bitch so i tore them off and swapped them, gluing them down again. To be fair, if you make mistakes like that, you can fill in the tears/holes with the lacquer glue at the end to smooth out.
Step 4: spray that shit

IMPORTANT- DO THIS OUTSIDE. You want ventilation so you don’t nuke your apartment with fumes, your flatmates and landlord won’t like you if you do. I did this in a carpark with people staring at my nerdy ass
I used silver spray paint from Poundland- actually, car spray paint. I thought, hey, I’m making a metal speaker- sounds ideal.
I didn’t use a mask here, but i covered my nose and mouth with a scarf and I’m not dead. Definitely cover your face with something when doing this, though. This stuff is really horrible.
Leave it to dry for as long as you can- It was windy outside which made this whole process HILARIOUS I was chasing after it now and then as it flew away, determined to find freedom. But I let it dry in my basement because I’m lucky enough to have one. I’d recommend your bathroom, otherwise.
I then finished off by adding little gold bits- just to make some of it stand out. Do what you like with this, but I just added it round the edge of the side speakers, drew some of the mesh on the front speaker- a cross-hatch effect- and whatever I thought needed it, really. You can tell I’m not a perfectionist
I also added some of the screws at this point- just. stuck ‘em right in here and there.
Step 5: Glaze it like a cake baby

If you wanna make that shit shiny like metal- and importantly NOT SMELL LIKE SHIT, because spray paint smells so bad holy fuck- you need to seal it in.
Everyone online recommended Mod Podge Gloss-lustre-lustre and it was amazing. I got the pot of it which required a paintbrush. You can get a spray version too, which I think I should have done to be honest. It would have left a much more even finish without streak marks.
It takes a while to dry, so wait a few hours at least before doing the next layer. Keep on layering that shit till it shines, I did 4 I think.
Step uhhhhh 6: stick on the neck rest

YOU’RE SO CLOSE MATE! All you need to do is add the neck rest. I superglued which works a treat. As you can see, I’ve got a safety pin there, so i can pin it at the back and it’ll stay around my neck, all comfy like.

Problem is, as you’ll see below, this is when i realised that it’s TOO BIG to fit under my jacket and it poked out all unattractively.

Final step 7: trim and amend
I amended by cutting off the pokey-out bits at the back, and just. made it fit better and tuck in more. Essentially, I should have drawn my paper plan to the shape of the neck rest when it was pinned, like below. I used the trimmings to cut down, amend and stick to the speaker system.
Then I tried it on again, and it fit like a glove!
Below is the finished product- i hope you guys think it looks as good as I think it does, I’m SUPER PROUD of myself. I also hope you manage to learn something from this, including my mistakes!

Thanks everyone! <3
83 notes
·
View notes
Text

After I'm done with the current quilt, I'm gonna start on a one-block-wonder.

My mom surprised me with a box of goodies today! Seven identical panics, sic of which will be cut up for the block, fabric for binding and backing, a ruler specifically for OBW quilts, a pattern, and batting. This is a peacock print on black with metallic gold, which means I'm keeping it unless someone is willing to pay me at least $2k for it. These are a lot more work than a typical type of quilt. Look up tutorials for these, then you'll understand why. Plus, it's gonna be handquilted.
She also sent a reproduction jelly roll and a layer cake. A jelly roll is 42 strips cut 2.5 inches x width of fabric (wof). So 2.5 × 42 inches. A layer cake is 42 10x10 pieces, typically two of each print or color in a collection. The reproduction print is a bright rainbow of colors in a 50s style of prints. I loooooove how happy this looks.


The jelly roll is from Boundless (it's the equivalent of Gucci for quilters) and designed by Riley Blake. The collection is called Prim, so look it up to see all the prints. If you wanna commission me for a quilt using this, you have until August 1st, which is I close commissions.


The layer cake is also another Boundless collection, but I can't see anything mentioning the designer or collection name. I may keep what I make with it, but I'm undecided.
9 notes
·
View notes
Text
How to make an improv quarter circle quilt block
This block is a lot of fun. It’s not only liberating but the end result is a beautiful modern block. I used layer cakes for this tutorial which makes the quilt a breeze and the layouts are many. Block companion Get a block companion to make a quilt with this block on my Patreon page. Learn how to sew sew improv circles Did it work for you? Fabrics on the video I used Michael Miller’s…

View On WordPress
5 notes
·
View notes
Note
so i'm trying to draw a picture of a dude in a bathing suit... i was wondering if you could give me some pointers? especially in the anatomy lol
Sure! Excuse me if I go into too much detail. Or not enough! Feel free to message me again if you still have questions after this.
Short version:
1. Find a reference picture or two
2. Copy or analyze/reconstruct the image(s) to the best of your ability. (If you’re going to share your art publicly, you should use a license-free image, or credit/ask the owner – assuming that your art and the reference are clearly similar.)
3. ???
4. Profit
Long version:
1. Gather good reference
Tumblr, Pinterest, Instagram, Youtube, Google… the internet is full of attractive people. Find some pictures that look close to the result you want. I like workout videos or TV/movie scenes because it’s always useful to see your subject from multiple angles, and I can select the exact frames that look best to me.
Sometimes I use little action figures, or 3D models in apps like Skelly or Handy, when I’m trying to figure out a pose. You can also use pics of yourself or friends. A big mirror or a smartphone is all you need to be your own model.
Don’t hesitate to take inspiration from art you really like. Instead of copying it, analyze why it appeals to you, and see how you can apply that in your own work.
2. Draw the pose first!
One of my favorite general principles in art is to work from big to small, or general to specific.
Try to capture the basic shape and position of the pose before you consider individual muscles. Place the head, torso, and limbs as flat boxy shapes using straight lines or simple curves.
At this stage it’s still easy to make changes and correct things. Don’t rush ahead to the muscles before you’re satisfied with the pose.
This is more or less how I start a figure:

(Both of these dudes are missing a cranium, and there are other proportion issues, so don’t mistake this as reference for anything but the overall drawing approach.)
3. Think of muscles as flat shapes
Muscles are complex interlocking 3D forms, but you don’t have to think of them that way in the beginning, especially if you’re sticking close to your reference. It’s easier to map the positions of the muscles onto your blocked-in pose with straight lines and basic curves, just like you did for the head, torso, and limbs. (See the chest of the second figure I posted above.)
This step is all about creating a clear guide for your final lines.
4. Final lines (or) additional steps
At this point you can make the contour more realistic, get the muscles just right, and add in more details from your reference, because you’ve got the pose established and you’ve figured out where all the major shapes are placed. If you tried to do this all at once, without blocking in the pose, you’d probably end up with a figure that’s way out of proportion.
For the final lines, work on top of your sketch. If it’s a traditional drawing, erase the sketch with a kneaded eraser until you can barely see it. If it’s a digital drawing, just lower the opacity of your sketch layer and make a new layer for your final lines on top.
If you’re familiar with constructive drawing (using perspective knowledge to translate your 2D drawing into basic 3D shapes, like wireframes), now is a good time to take your sketch further, using cross-contour lines and more accurate forms to define the figure in 3D space. Then you can do the final line work, or move on to the lighting or coloring phase.
Art is hard, so try to keep things simple and focus on one thing at a time. I try to think in a step-by-step way even when I ignore my own advice and rush to finish a drawing.
Generally speaking, the pose and overall proportions are much more important than detailed anatomy. Anatomy is the icing on the cake.
Resources for learning!
I should say that the main thing I covered in this post is an approach to blocking in a figure from reference. I left out a lot of the form building stuff that I rely on for most of my work, because it’s a huge subject, and you can get great results without all the complications if you use good reference.
To get the most out of your reference, it helps to learn observational drawing. Dorian Iten’s accuracy guide has some very useful tips.
In addition to observational drawing from reference, I use a constructive drawing approach, which I learned from resources like this:
Draw a Box - A great intro to constructive drawing. Highly recommended.
Figure Drawing: Design and Invention by Michael Hampton - Great to study after you know basic form construction, and before you dig too deep into anatomy.
My all time favorite figure drawing teacher is Steve Huston. Brilliant teacher and equally good artist. His book, Figure Drawing for Artists: Making Every Mark Count, is the single best guide to figure drawing that I’ve found. Also check out his lessons on New Masters if you want to get really serious.
Bryan Lee has posted a lot of great figure drawing tutorials and notes on his DeviantArt page. You can dig up most of the good stuff in his Tutorials section, and by searching his gallery for notes.
—
My ego is forcing me to add a disclaimer: More experienced artists will see that the work I post here doesn’t really do justice to the principles I mentioned. Trust me, I know my doodles are a horror show of errors. This is my fanart blog for chillaxing and trying very hard not to be the perfectionist who hates everything that’s not fit for a professional portfolio.
16 notes
·
View notes
Text
May 2024 Paper Pumpkin Kit - The Best There Is

MAY 2024 PAPER PUMPKIN KIT The Best There Is KitSubscribe April 11 - May 10 | May 2024 Paper Pumpkin Kit Create Father's Day cards and more with the "The Best There Is" May Paper Pumpkin Kit. This kit allows you to craft heartfelt messages of thanks and admiration, offering: - Components to create 9 cards, featuring 3 unique designs, accompanied by 9 matching envelopes - A variety of precut paper accents and labels for easy customization - Rich woodgrain textures and robust, masculine colors for a natural feel - A complementary color palette that includes Wild Wheat, Pool Party, Misty Moonlight (Classic Stampin’ Spot), Early Espresso, Crumb Cake, and Basic Beige - Perfect compatibility with the Country Woods Designer Series Paper, a highlight of the upcoming Annual Catalog. Special Feature: 🎉 Exclusive Add-On Die: Don't miss the opportunity to enhance your crafting experience with a special add-on die that coordinates seamlessly with projects from all three months! WHAT ARE PAPER PUMPKIN KITS? Paper Pumpkin Subscription: Monthly Creative Surprises For those craving a regular injection of creative inspiration, the Paper Pumpkin Subscription is a monthly adventure that arrives at your doorstep. Key features include: SUBSCRIBE - Monthly Mail Delight: Subscribers receive a specially curated kit by mail every month. Each package includes designed projects, precut pieces, a stamp set, and ink. It’s like receiving a surprise creative adventure in your mailbox each month. - Exclusive Subscriber Benefits: Subscribers to Paper Pumpkin enjoy special perks, including access to exclusive products and offers. It’s a fantastic way to stay connected with the crafting community and unlock additional creative opportunities. - Endless Possibilities: Where will Paper Pumpkin take you this month? With a subscription, you’ll discover new techniques, themes, and crafting styles. It’s a journey of endless possibilities that keeps your creativity flowing. - Acrylic Block: Your first Paper Pumpkin kit will arrive with a reusable acrylic block for your stamps. - Refills: Depending on availability refills for each month’s kit are often available in my online store while they last. - Control: You have full control over your Paper Pumpkin subscriptions and can take a break / pause, cancel and rejoin at anytime. - Alternate Ideas: Go outside the box each month with me as I share alternate ideas for each Paper Pumpkin kit absolutely free on my blog. See my tutorial gallery here. - PPX Bonus Videos: When you subscribe to Paper Pumpkin kits through me, you’ll receive 6 additional videos for alternate projects to the kit. These PPX videos are exclusive and not available anywhere else. Paper Pumpkin kits have a deadline to subscribe each month by the 10th of the month in order to get that month’s kit. That month’s kit isn’t available after the deadline but depending on availability refills will be available in my online store. PPX VIDEOS: YOUR EXCLUSIVE EXPERIENCE PPX: YOUR EXCLUSIVE PAPER PUMPKIN EXPERIENCE Are you new to paper-crafting, or maybe you’re a dedicated DIY enthusiast with a passion for crafting? If so, you’re in for a treat! Introducing PPX – an exclusive video tutorial program specially curated for our beloved Paper Pumpkin subscribers. For those unfamiliar, Paper Pumpkin is a crafting kit subscription service by Stampin’ Up, delivering a delightful box of creative goodies to your doorstep each month. Now, let’s dive into the exciting world of PPX and discover how it adds an extra layer of joy to your crafting experience. The Magic of Paper Pumpkin:Before we delve into the exclusive video tutorials, let’s take a moment to appreciate the magic of Paper Pumpkin craft kits. As a subscriber, each month brings a new and beautifully curated kit filled with all the materials you need for a creative project. From cards and scrapbooking to home décor and more, Paper Pumpkin provides endless crafting possibilities for both beginners and seasoned crafters. Your Personal Crafting Companion:For those who have fallen in love with the artistry of Paper Pumpkin, PPX is here to elevate your crafting adventure. As an active Paper Pumpkin subscriber, you gain access to six exclusive video tutorials every month, crafted with care and creativity by our team. These tutorials go beyond the instructions in the kit, offering alternate ideas to spark your imagination. Stretching Your Creativity:What sets PPX apart is its commitment to helping you stretch the value of your Paper Pumpkin kit. Each video tutorial takes you on a journey, exploring different ways to use the kit contents and create alternate projects. Whether you’re a beginner looking to expand your crafting skills or a seasoned pro seeking fresh inspiration, PPX is designed to cater to all levels of expertise. Exclusive Access for Subscribers:The exclusivity of PPX isn’t just limited to Paper Pumpkin subscribers; it extends to those who join through a Paper Pumpkin crew member and to my Stamp It Demonstrator Group. This means that when you become part of our crafting community, you’re not only getting the amazing Paper Pumpkin kits but also unlocking the door to a treasure trove of additional creative insights. A Glimpse Into My Crafty World:As a fervent Paper Pumpkin enthusiast, I’ve dedicated an entire gallery of videos to showcase the monthly kits. From unboxing the surprises to guiding you through the crafting process, my goal is to share the joy and excitement that comes with each Paper Pumpkin delivery. Join me on this crafting journey, and let’s explore the endless possibilities together. PPX is more than just a video tutorial program – it’s a community-driven initiative that celebrates the art of crafting. If you’re ready to take your Paper Pumpkin experience to new heights, become an active subscriber today and unlock the exclusive world of PPX. Let the crafting adventures begin! SUBSCRIBE SUBSCRIPTION VS PREPAID CODESWHICH SHOULD I CHOOSE? There are two ways to subscribe to Paper Pumpkin.1. First, we offer a monthly subscription where you pay as you go which is automatic each month. SUBSCRIBE TO PAPER PUMPKIN 2. Secondly, we offer prepaid subscriptions which allow you to pay ahead or give as a gift. Prepaids can be purchased in my online store. After you purchase a subscription, we’ll email you a prepaid code to redeem here at www.paperpumpkin.com to set up your subscription to start receiving your kits. Read the full article
0 notes