#linux add user to group wheel
Explore tagged Tumblr posts
Visit Tumblr Blog
Explore Tumblr blogs with no restrictions, modern design and the best experience.
Last Seen Tumblr Blogs


Fun Fact
Celebrities use Tumblr as well.
Text
Chimera-Linux with btrfs
Chimera Linux is a rather new from the ground up Linux Distribution built with LLVM, MUSL, BSDUtils and dinitit comes with GNOME and KDE Plasma. It, however doesn't come with a installer so here's how to install the KDE flavour with btrfs root and home directories plus a swap partition for use in Linux KVM with UEFI.
Step 1. Get a Chimera live image from https://repo.chimera-linux.org/live/latest/
I use the chimera-linux-x86_64-LIVE-XXXXXXXX-plasma.iso image with KDE Plasma 6 and the following steps assume you do the same.
Step 2. Boot the live image
Step 3. Prepare the target disk with KDE Partition Manager
/dev/vda /dev/vda1, vfat, EFI System, 500 MB /dev/vda2, btrfs, Root FS, subvols @ & @home , rest of the disk /dev/vda3, swap, SWAP FS, 2x RAM Size
Step 4. Open Konsole and do the following
doas -s mkdir -p /media/root mount -t btrfs /dev/vda2 /media/root chmod 755 /media/root btrfs subvolume create /media/root/@ btrfs subvolume create /media/root/@home btrfs subvolume set-default /media/root/@ umount /media/root mount -t btrfs -o compress=zstd:5,ssd,noatime,subvol=/@ /dev/vda2 /media/root mkdir -p /media/root/home mount -t btrfs -o compress=zstd:5,ssd,noatime,subvol=/@home /dev/vda2 /media/root/home mkdir -p /media/root/boot/efi mount -t vfat /dev/sda1 /media/root/boot/efi
let's bootstrap our new chimera system
chimera-bootstrap -l /media/root exit
time to chroot into our vergin system
doas chimera-chroot /media/root
time to bring everything up to date
apk update apk upgrade --available
if something is iffy
apk fix
we want our swap to show up in the fstab
swapon /dev/vda3
Let's build a fstab
genfstab / >> /etc/fstab
install the latest LTS Kernel
apk add linux-lts
install the latest released kernel
apk add linux-stable update-initramfs -c -k all
time for EFI GRUB
apk add grub-x86_64-efi grub-install -v --efi-directory=/boot/efi update-grub
install KDE, Firefox, Thunderbird
apk add plasma-desktop flatpak smartmontools ufw firefox thunderbird qemu-guest-agent-dinit spice-vdagent-dinit
Set root password
passwd root
create main user
useradd myuser passwd myuser
add user to relevant groups
usermod -a -G wheel,kvm,plugdev myuser
Set hostname
echo chimera > /etc/hostname
set timezone
ln -sf /usr/share/zoneinfo/Europe/Berlin /etc/localtime
Configure some services
syslog-ng
dinitctl enable -o syslog-ng
sshd
dinitctl enable -o sshd
KDE Login Manager
dinitctl enable -o sddm
only needed when in KVM VM
dinitctl enable -o spice-vdagentd dinitctl enable -o qemu-ag
network time client
dinitctl enable -o chrony
network manager defaults to dhcp client on first ethernet interface
dinitctl enable -o networkmanager
optional: enable firewall if installed
dinitctl enable -o ufw
see the firewall status
ufw status
configure flatpak
flatpak remote-add --if-not-exists flathub https://dl.flathub.org/repo/flathub.flatpakrepo
just to be sure
update-initramfs -c -k all update-grub
exit from chroot
exit
umount drive
doas umount /media/root/boot/efi doas umount /media/root/home doas umount /media/root
Step 5. Reboot the System
1 note
·
View note
Text
The TARS Foundation Celebrates its First Anniversary
The TARS Foundation Celebrates its First Anniversary
The TARS Foundation, an open source microservices foundation under the Linux Foundation, celebrated its first anniversary on March 10, 2021. As we all know, 2020 was a strange year, and we are all adjusting to the new normal. Meanwhile, despite being unable to meet in person, the TARS Foundation community is connected, sharing and working together virtually toward our goals. This year, four new…

View On WordPress
#linux add user to group wheel#linux find text in files#linux kernel documentation#linux mint#linux unzip file
0 notes
Text
Recommend the Most Popular Mobile Game Engines in 2021

Game engine software is a suite of tools that allows developers to access every part of a project. Game engine software can be used by individuals or a team together. Each game engine runs on a variety of languages like Python, C++. In most game engines you don’t need coding knowledge but having excellent skills will help to increase the software functionality.
Game engines like Unity have visual editors that allow Hire Unity game developers for view modification to a project in real-time. Some programs let users manually place background, characters, and icons directly on the screen.
For beginners, game engines feature a drag-and-drop logic creation tool. It is used to create events and behavior for characters and enemies. You will also find many game engines that support the creation of AR and VR games. VR takes the players into a digital world, while AR integrates game graphics with a real-world setting.
Game engines also allow monetization of games through in-app purchases and help you bring your ideas to life. Of course, the scope of your project will determine the ideal solution for you, here is the best game engine software all game app developers will find essential.

1. Unity
In today’s emerging gaming industry, Unity is one of the most popular game development engines. The major benefit is a cross-platform game engine to boot with an ample collection of tutorials to help beginners get started. Plus, Unity is the best game engine for mobile game development.
2. Unreal Engine
The Unreal game engine came to light when a first-person shooter was published in 1998 developed by Epic Games. In 2005 Unreal Engine made open source software and you can download it on GitHub for free. It supports Linux, PlayStation, Xbox, iOS, and Windows, etc.
3. Solar2D
It is a 2D game development engine introduced in 2009. Game app developers used to develop 2D games for Android, iOS, and desktop as a free open source platform. Solar2D can build integrate your project with Android studio to add native features. It supports Android, iOS, and Windows.
4. SpriteKit
If you are a fan of iPhone game apps then Spritekit is one of the best options for developing Apple-based games. Apple launches it in 2013.
It supports iOS, macOS, tvOS and watchOS and integrates well with GameplayKit, SceneKit, and Swift.
It helps in creating virtually fascinating apps with necessary resources like physics, lightning animation with a hassle-free process
5. Marmalade SDK
Originally called Ideaworks3D Limited is a cross-platform engine that supports different devices such as Windows, iOS, and Android. It has a game asset that can be exported to other 3D modeling and animation tools like Autodesk and supports 2D game development.
6. GameMaker
It is one of the most used game engines because of no requirement of programming or coding knowledge. All you have to do is “point and click” to create games much easier and faster than coding with native languages.
Whereas like many other game engines, it is not free to use the software. It requires you to buy either the professional or Master collection versions.
7. Godot
It is one of the popular game engines that allows making both 2D and 3D game engines. It has a vast set of common tools so that game app developers can focus on making game apps without reinventing the wheel.
Godot is a free-to-use open-source with an MIT license. The good news is no royalties, no subscription fees, and no hidden strings. The game apps you develop through the Godot engine are yours.
Also, it has a community that regularly fix bugs and develop additional features. Its active community can answer even your most specific Godot-related questions.
You can find a strong Godot community on the internet HUBS, including Reddit forums, Facebook groups, steam community, the Godot forums, and more.
8. Clickteam Fusion
It is one of the most fun game engines supported by the creative team. The Fusion engine is full of graphical assets already made and used by many in the game industry. Fusion has an integrated physics engine and a great community, to boot. You can use it for all the platforms like Android, iOS, and Windows including Steam.
9. Cocos 2d-x
As the name sounds unique, it claims to be the world’s top Open-Source Game Development Platform’. Well, are they?
Of course, it is difficult to give a definitive answer if you aren’t exactly familiar with game design, or if your personal preferences favor something more in line with Godot or Unity 3D.
It is free to use an open-source with an MIT license. It provides you very prominent features with cross-platform and a simple way to be successful in the world of game development. Although it uses C++ at a time, it can be versatile and also use Java.

Summary:
Above are the most popular game engines and a quick snapshot of what the mobile game development community offers, but all these game engines also represent a wide range of use cases and should help you determine what tools you need for your next project. If you don’t have time for multi-tasking, Glownight Games Studio is the best Mobile Game Development Company in the industry to help you out with your important game app projects develop on time.
#Mobile game development#Unity game development companies#3D game development company#Unity game developers#3D game developers#2D Game Development Company
9 notes
·
View notes
Text
Kerbal Space Program 1.8: “Moar Boosters!!!” is now available!

Hello everyone!
New gadgets are coming from the Research and Development facility, the kind that will get Kerbals screaming: MOAR BOOSTERS!!! A brand new update is here and with it comes better performance, fresh new features, improved visuals, and new parts being added to our players’ creative repertoire!
Kerbal Space Program 1.8: Moar Boosters!!! is an update focused on making the game perform and look better, all while introducing more quality of life features that will improve the overall player experience. We’re also bringing some new solid rocket boosters to the VAB, as well as introducing some exclusive treats for owners of the Breaking Ground Expansion.
Let’s go through some of the update’s highlights below:
Unity Upgrade
Moar Boosters!!! brings an upgrade to the underlying engine of the game to Unity 2019.2, which helped us implement performance and graphics improvements, as well as better rendering performance and a reduction of frame rate stutters. With the new tools that this upgrade provides, we’ll be able to continue refining the game in upcoming updates.
Celestial Body Visual Improvements
Mun, Minmus, Duna, Ike, Eve and Gilly have new high-quality texture maps & graphic shaders, and now look sharper and more realistic! You will also be able to select the celestial bodies’ shader quality in the settings and set them to low (legacy), medium or high, with improvements being visible across the board. These are just part of the first batch of celestial bodies being overhauled, slowly but surely we will continue this endeavor.

Map Mode improvements
Map mode received some adjustments too! Now you can use docking mode and stage your craft whilst in map mode. The stage display button (formerly stage mode) now serves as a toggle to show and hide the stage stack, whether you’re in flight or map view, and selected map labels will now persist when going back and forth between map and flight mode.
New SRBs!
A range of new solid rocket boosters have been added to the game. From the tiny .625m stack size Mite to the titanic 2.5m wide, 144ton Clydesdale, these new boosters will offer a range of versatile solid-fuel options. Making History owners get an extra bonus here too with the “Pollux” and a 1.875m nose cone to fit on top of it.

Breaking Ground Exclusives
Kerbal Space Program 1.8: Moar Boosters!!! also includes some exclusive content for owners of the Breaking Ground Expansion. A new set of fan blades and shrouds will continue to push the creativity of KSP players even further. Use them to create drones, ducted fan jets, or anything you can imagine.
Improvements to the helicopter blades and the robotic part resource consumption have also been included. The latter will now have better info on consumption and improved options for power-out situations.

And more!
To learn more you can read the full Changelog here:
=============================v1.8.0=========================== 1.8.0 Changelog - BaseGame ONLY (see below for MH and BG changelog)
+++ Improvements
* Upgrade KSP to Unity 2019.2.2f1 version. * Standalone Windows build now uses DX11 Graphics API. Many visual improvements to shaders and FX. * Implement Unity Incremental Garbage Collection. * Implement new celestial body shaders and textures for Mun, Minmus, Duna, Ike, Eve, Gilly. * Update Main Menu Mun terrain shader. * Add Terrain Shader Quality graphics setting. * Improve the TrackingStation load time. * Implement ability to edit Action Groups in flight. * Performance improvements to the VAB/SPH scenes. * Performance improvements in the flight scene. * Performance improvements in the Tracking Station scene. * Add ability to edit resource values in PAWs using the key input. * Add Warp to node button on dV readout in NavBall display. * Add enable/disable wheel motor Actions to all wheels. * Add ability to limit the maximum size of PAWs via settings.cfg. * Improve the Action Groups/Sets UI. * Add PAW_PREFERRED_HEIGHT to settings.cfg for players to set a prefered max height. * Made staging and docking UI available in map view * Pinned labels in map view now persist pinned even when leaving and re-entering map view * "Delete All" functionality for messages app has been implemented. * Improve the KSC grass and asphalt texture and shader to reduce tilling. * Improve textures for the VAB building on level one. * Model revamp for the level one and level two Research and Development nissen huts. * Increased precision for eccentricity in advanced orbit info display. * Upgrade VPP and improve wheel and landing leg function. * Expose global kerbal EVA Physics material via setting. * Add do not show again option to re-runnable science experiments. * Add actions for same vessel interactions functionality. * Implement per-frame damage threshold on destructible buildings. * Add vessel name title to flag PAWs. * Add a confirm dialog with the option of “Don’t display again” when a kerbal removes a science experiment data. * Disable Pixelperfect on UI Canvases to improve performance - available to configure via settings.cfg. * Increase precision for numerical editing of maneuver nodes. * Kerbal position on ladders and command pods improved. * Add ability for users to add their own loading screen pictures to the game. Folder is KSP/UserLoadingScreens
+++ Localization
* Fix incorrect naming of The Sun. * Fix Action Sets text in VAB/SPH for some languages. * Fix Text in dV KSPedia pages in Japanese. * Fix Chinese Localizations. * Fix dV readout for Chinese language.
+++ Parts
New Parts: * S2-33 “Clydesdale” Solid Fuel Booster. * S2-17 “Thoroughbred” Solid Fuel Booster. * F3S0 “Shrimp” Solid Fuel Booster. * FM1 “Mite” Solid Fuel Booster. * Protective Rocket Nosecone Mk5A (“Black and White” and “Gray and Orange”). * Add rock/dirt debris FX to the Drill-O-Matic and Drill-O-Matic Junior.
Updated Parts (reskinned): * Service Bay (1.25m). * Service Bay (2.5m).
Color Variants: * Protective Rocket Nose Cone Mk7 (New “Orange” color variant) * Protective Rocket Nose Cone Mk12 (New “Orange” color variant)
+++ Bugfixes
* #bringbackthesandcastle - Fix the Mun sandcastle easter egg from not appearing. * Fix Maneuver editor so that the mouse wheel adjusts the node now in the contrary direction (same behavior as dragging down/up). * Fix a null reference error when player threw away a vessel with fuel flow overlay turned on in the editor. * Fix an input lock when switching between Editing the vessel and the Action groups menu. * Fix user created vessels disappearing from the vessel spawn dialog. * Fix the random selection of Mun vs Orbit scene when returning to Main Menu. * Fix input field rounding on Maneuver Node editor fields. * Fix a Null reference in the Editor when selecting a part and opening the Action Part Menu. * Fix pressing Enter key confirms the game quick save dialog. * Fix PAWs will now scale downwards from the header keeping more consistency on the fields. * Fix an input lock issue where some PAW buttons disappeared when editing a numeric slider field. * Fix Menu Navigation was missing in the quicksave dialog. * Fix Mini Settings had some items that would be skipped when navigating with the arrow keys. * Fix for remove from symmetry causing NRE in flight scene. * Fix the FL-A10 collider no longer mismatching its geometry. * Fix Control Surface and Aero Toggle Deploy Action not working in all situations. * Joysticks and gamepads on Linux are again recognized and usable. * Fix Action Groups UI and Color issues. * Fix the LV-T30 Reliant Liquid Fuel Engine ́s bottom attach node. * Fix a texture seam on the Probodobodyne Stayputnik. * Fix a z-fighting issue on the destroyed VAB at level 3. * Fix the Z-4K Rechargeable Battery Bank ́s bottom attach node. * Fix the concrete tiling texture of the SPH at level 3. * Fix a grass texture seam in front of the VAB at level 3. * Fix missing texture and animation on the level one Administration Building flag. * Smoothened Kerbal IVA expression transitions to avoid strange twitching. * Make the LV-TX87 Bobcat exhaust FX more appropriate. * Fix kerbal portraits when launching vessel with multiple kerbals in external command chairs. * Fix drills operating when not in contact with the ground. * Fix thrust center on the Mainsale engine. * Add bulkhead profile to LV-T91 Cheetah, LV-TX87 Bobcat, RK-7 Kodiak and RE-I12 Skiff. * Fix re-rooting of surface attach nodes. * Fix kerbal IVA expression animations transitions. * Fix shadows at KSC and in flight. * Fix “sinker” warning during game load. * Fix lengthy Map Transition when lots of vessels in the save. * Fix overlap in vessel type information window. * Fix a Null Reference when copying parts with alternative colours. * Fix an error where the custom crafts were not loaded in the Load Craft dialog after navigating the tabs. * Fix a null reference when clicking the Remove Symmetry button on some parts. * Motorized wheels no longer keep generating torque even when the motor is set to ‘Disabled’ * Re-centered an off center scrollbar in the mini settings dialog. * Rebalance decoupler, MK1-3, MK1 lander can, MK2 lander can, separators costs, crash tolerances, weight.
+++ Mods
* Target framework now .NET 4.x. * DXT3 DDS formatted textures are not supported by Unity or KSP any more. You must convert to DXT5. * Added UIPartActionWindow.UpdateWindowHeight to allow mods to dynamically set the PAW max height * MapviewCanvasUtil.GetNodeCanvasContainer created as more performant method than MapViewCanvasUtil.ResetNodeCanvasContainer. Use the rest one only when you need to force a scale reset * ModuleResourceAutoShiftState added that can be used for startup/restart of parts based on resource availability. * VesselValues are now cached per frame. Can use ResetValueCache() to reset the cache.
1.8.0 Changelog - Making History DLC ONLY
+++ Improvements
* User can now click and drag and release to connect two nodes in the mission builder.
+++ Parts
New Parts: * THK “Pollux” Solid Fuel Booster
Updated Parts (reskinned): * Kerbodyne S3-14400 Tank * Kerbodyne S3-7200 Tank * Kerbodyne S3-3600 Tank
+++ Bugfixes
* Craft Thumbnails are not shown/generated for stock missions. * Fix Kerbals spawning on EVA in missions spawning on their sides (very briefly). * Fix Intermediate and Advanced Tutorial becoming stuck. * Fix Typos in some part descriptions. * Fix vessel width and height restrictions on Woomerang and Dessert in career games. * Fix camera becoming stuck if in IVA mode when a vessel spawns in a mission set to change focus to that vessel. * Fix hatch entry colliders on the M.E.M. lander can.
+++ Missions
+++Miscellaneous
+++ Mods
1.8.0 Changelog - Breaking Ground DLC ONLY
+++ Improvements
* Add renaming of Deployed Science Stations. * Add alternators (producing electric charge) on LiquidFuel Robotic Rotors. * Add propeller blade AoA, lift and airspeed readouts to their PAWs. * Add Reset to built position button in PAWs of Robotic parts which causes them to reset their Angle, RPM or Extension. * Add shutdown/restart function to robotics parts based on resource availability. * Add preset curves functionality to the KAL controller. * Add part highlighting on mouseover in KAL. * Improve Robotic Part Resource usage info in editor. * Add interact button to open PAW for Deployable Science parts. * Added new KSPedia slides for Grip Pads, Propellers and Track Editor. * Improve Robotics Parts Resource usage to use less resources when moving slower. * The PAW button “Reset to Launch Position” for robotic parts now reads as, “Reset to build:” + Angle, RPM or Extension depending on the robotic part to avoid confusion.
+++ Localization
* Fix description text on R7000 Turboshaft Engine in English. * Fix localization of resource name in robotic part PAWs. * Fix KAL help texts.
+++ Parts
New Parts with Variants: * S-062 Fan Shroud * S-12 Fan Shroud * S-25 Fan Shroud * R-062 Ducted Fan Blade * R-12 Ducted Fan Blade * R-25 Ducted Fan Blade * Readjusted the liftCurve, liftMachCurve and dragCurve values on the propellers and helicopter blades.
Rebalanced Robotic Resource Consumption values: * G-00 Hinge * G-L01 Alligator Hinge * G-11 Hinge * G-L12 Alligator Hinge * G-W32 Hinge * Rotation Servo M-06 * Rotation Servo M-12 * Rotation Servo M-25 * Rotation Servo F-12 * EM-16 Light Duty Rotor * EM-32 Standard Rotor * EM-64 Heavy Rotor * EM-16S Light Duty * Rotor, EM-32S Standard Rotor * EM-64S Heavy Rotor * 1P4 Telescoping Hydraulic Cylinder * 3P6 Hydraulic Cylinder * 3PT Telescoping Hydraulic Cylinder * R121 Turboshaft Engine * R7000 Turboshaft Engine
+++ Bugfixes
* Fix Deployed Science Log and Message system spam. * Fix Deployed Science parts sometimes exploding when coming off rails if in contact with another part (kerbal, etc). * Fix Deployed science parts being visible during the astronaut complex when opening that scene from the Editor. * Fix Robotic Parts using EC when moving to initially set position on launch. * Fix slider numeric values in some PAW fields could go out of range. * Fix autostrut processing for some use cases regarding root part being robotic part. * Fix autostrut delay when vessel comes off rails for vessel with robotic parts. * Fix Actions at the end of KAL track not firing in Play Once mode. * Fix separation of the blades when attached to an active rotor. * Fix rotation of cargo parts in extended tooltips. * Fix cargo part icons appearing in Astronaut Complex when pinned. * Fix drag on pistons. * Fix cargo parts now rotate at the same speed as in the Editor on the inventory grid during Flight. * Fix mirroring of hinges and rotation servos. * Fix KAL Window not closing when vessel goes outta range. * Fix incorrect naming of the Sun in science experiments. * Fix mirrored attaching to rotor side nodes.
+++ Miscellaneous
+++ Modding
Kerbal Space Program 1.8: Moar Boosters!!! is now available on Steam and will soon be available on GOG and other third-party resellers. You will also be able to download it from the KSP Store if you already own the game.
Click here to enter the Grand Discussion Thread for this release.
Happy launchings!
By the way, you can download the new wallpapers of the Moar Boosters!!! art here:
1080x1920p (Most Phones)
1080x2048p (Galaxy S9)
1440x2560p (iPhone X)
Desktop 1920x1080p
Desktop 2048x1080p
Desktop 2560x1440p
#Kerbal Space Program#Update 1.8#Moar Boosters#Breaking Gorund Expansion#making history expansion#annoucement#changelog#Release Notes
44 notes
·
View notes
Text
How To Create a Sudo User on Linux (CentOS)

The sudo command is designed to allow users to run programs with the security privileges of another user, by default the root user.
In this guide, we will show you how to create a new user with sudo privileges on CentOS. You can use the sudo user to perform administrative tasks on your CentOS machine without a need to logging in as the root user.
Creating Sudo User
By default on CentOS, users in the group wheel are granted with sudo access. If you want to configure sudo for an existing user, just add your user to the wheel group, as shown in step 4.
Follow the steps below to create a sudo user on your CentOS server:
1. Log in to your server
Start by logging in to your CentOS server via ssh as the root user:
ssh root@server_ip_address
2. Create a new user account
Create a new user account using the useradd command:
useradd username
Replace username with the user name that you want to create.
3. Set the user password
Run the passwd command to set a password for the new user:
passwd username
You will be prompted to confirm the password. Make sure you use a strong password.
Changing password for user username. New password: Retype new password: passwd: all authentication tokens updated successfully.
4. Add the new user to the sudo group
By default on CentOS systems, members of the group wheel are granted with sudo access. Add the new user to the wheel group:
usermod -aG wheel username
How to use Sudo
Switch to the newly created user:
su - username
To use sudo, simply prefix the command with sudo and space.
sudo [COMMAND]
For example, to list the contents of the /root directory you would use:
sudo ls -l /root
The first time you use sudo from this account, you will see the following banner message and you will be prompted to enter the password for the user account.
We trust you have received the usual lecture from the local System Administrator. It usually boils down to these three things: #1) Respect the privacy of others. #2) Think before you type. #3) With great power comes great responsibility. [sudo] password for username:
Conclusion
That’s all. You have successfully created a sudo user on your CentOS system. You can now use this user to perform administrative tasks on your server.
Feel free to leave a comment if you have any questions.The sudo command is designed to allow users to run programs with the security privileges of another user, by default the root user.In this guide, we will show you how to create a new user with sudo privileges on CentOS. You can use the sudo user to perform administrative tasks on your CentOS machine without a need to logging in as the root user.Creating Sudo UserBy default on CentOS, users in the group wheel are granted with sudo access. If you want to configure sudo for an existing user, just add your user to the wheel group, as shown in step 4.Follow the steps below to create a sudo user on your CentOS server:1. Log in to your serverStart by logging in to your CentOS server via ssh as the root user:ssh root@server_ip_address2. Create a new user accountCreate a new user account using the useradd command:useradd usernameReplace username with the user name that you want to create.3. Set the user passwordRun the passwd command to set a password for the new user:passwd usernameYou will be prompted to confirm the password. Make sure you use a strong password.Changing password for user username. New password: Retype new password: passwd: all authentication tokens updated successfully. 4. Add the new user to the sudo groupBy default on CentOS systems, members of the group wheel are granted with sudo access. Add the new user to the wheel group:usermod -aG wheel usernameHow to use SudoSwitch to the newly created user:su - usernameTo use sudo, simply prefix the command with sudo and space.sudo [COMMAND]For example, to list the contents of the /root directory you would use:sudo ls -l /rootThe first time you use sudo from this account, you will see the following banner message and you will be prompted to enter the password for the user account.We trust you have received the usual lecture from the local System Administrator. It usually boils down to these three things: #1) Respect the privacy of others. #2) Think before you type. #3) With great power comes great responsibility. [sudo] password for username: ConclusionThat’s all. You have successfully created a sudo user on your CentOS system. You can now use this user to perform administrative tasks on your server.Feel free to leave a comment if you have any questions.
1 note
·
View note
Text
Download firefox 57

#DOWNLOAD FIREFOX 57 HOW TO#
#DOWNLOAD FIREFOX 57 UPGRADE#
#DOWNLOAD FIREFOX 57 CODE#
why not making a screenshot with your browser
Features Top-sites and Highlights with a lot of nice settings 🙂.
With Firefox 57 Mozilla does not only make changes behind the curtains, they also improved the UI and integrated new features. Basemark Benchmark (more is better)įirefox 55 Basemark benchmark Firefox 57B4 Basemark benchmark Kraken Benchmark (by Mozilla less is better) All benchmarks were done on the same machine running on Kubuntu 16.0.4 (Kernel 4.10). We tried to do some quantification with 3 different Brower benchmarks. Using Firefox 57 (B4/AMD64/Linux) feels quite faster and smoother compared to FF55. So let’s have a look on some benchmarks and other stuff: Performance This engine is also written in Rust and targets better parallelism, security, and more. They fit nicely in with the Servo-Engine. Since Servo-Engine is not under the Quantum project, all the features from it are not only aiming on the Gecko-Engine.
Mozilla is developing more like this, so look around at Mozilla….
WebRender(Quantum Render) contains an optimized GPU rendering.
The technique behind it can be found here.
#DOWNLOAD FIREFOX 57 HOW TO#
With that, they integrated some new ideas how to parse CSS and more. Stylo(Quantum CSS) was the first project that reached the stable state and is also used in the current Firefox 55 release.The Mozilla Quantum project contains all the new implementations written in Rust for Firefox.
#DOWNLOAD FIREFOX 57 CODE#
That makes it especially for programmers more efficient to write code for the feature and not worrying about for example thread issues and more.īut that doesn’t mean that Rust is easy to learn and to use, as always it must be learned and understand. The programming language Rust ( Mozilla Rust) comes with some solutions to some issues in the coder’s world. Why ? Performance, new clean codebase, better support for new technologies, other philosophy, … Not the City in Austria – the programming language
#DOWNLOAD FIREFOX 57 UPGRADE#
But, I am not rushing to upgrade just yet since I depend on Grammarly and a couple other extensions.įirefox 57 is available a freeload for Windows, macOS, and Linux.An entirely new Firefox – why reinvent the wheel again? I personally like Firefox because of how well it handles bookmark syncing. Firefox 1.0 launched in 2004 and there really hasn’t been much that has changed since except for the move to a rapid release similar to Google Chrome. This change is desperately needed to keep up with the rapid changes in browser development. If you don’t find something new in the update, you can always jump over to Chrome. Then again, it’s 2017 and you’re likely browser-agnostic like me, too. So, if you aren’t dependent on extensions like me, then you should be fine. With the overhaul, something had to give and this was extensions written in XUL.įirefox Quantum only supports web extensions at the moment and the last I checked there are only about 73 available. If you love Firefox Add-ons a staple of the browser since the early days, you might want check if yours are supported. Users might want to think carefully about upgrading though. There is also support for new web standards such as WebVR and better security using a new Tracking Protection mechanism which blocks requests from websites that want to track you. The new version comes with the new screenshot tool which Brian recently reviewed. Firefox Quantum is over twice as fast as Firefox from 6 months ago, built on a completely overhauled core engine with brand new technology stolen from our advanced research group, and graced with a beautiful new look designed to get out of the way and let you do what you do best: surf a ton of pages, open a zillion tabs, all guilt-free because Firefox Quantum uses less memory than the competition. Common areas of the web browser such as Bookmarks, Synced tabs, Browsing History and Pocket lists are streamlined and better integrated. Called Photon, the new user experience is cleaner and easier to navigate. In addition to the under the hood improvements, users can expect a refreshed user interface that cleans up a bit of the clunkiness collected over the past decade. Mozilla says users should see a boost of up to 30% performance as it uses less memory when loading a web page in a new window or tab. Mozilla Launches Firefox 57 with Improved Performance and Revamped UI But Chrome has been experiencing a bit of dislike among users who describe it begrudgingly as a memory hog an issue Mozilla focuses on with the new multi-process architecture, which chops up background activities run by the browser in each tab and on the web pages. Firefox 57 has been in development for 6 months and is aimed at reclaiming losses to Google over the years, which has become the favorite of most users worldwide.
0 notes
Text
Hello all. I’ve been using KVM for a long time now. Every time I try to use virt-manager as a non-root user, I have to enter the sudo password. This ain’t a problem but if you use virt-manager most of the times, it can be boring and irritating. For KVM installation, refer to our guides below. How to install KVM on RHEL/CentOS 8, Fedora, Arch Linux, CentOS, Ubuntu/Debian, SLES I’ll show you a simple way to use virt-manager as a non-root user, by just creating a libvirt group and adding a standard user account to it. Without wasting much time, let’s dive in. To use virt-manager as a non-root user, follow steps below: Step 1 – Create unix group to use First check if group already exist, if not create it sudo getent group | grep libvirt Some distributions may be using libvirtd. sudo getent group | grep libvirtd If it doesn’t exist, add it as system group. sudo groupadd --system libvirt Step 2 – Add user account to the libvirt group Now that the group is available, add your user account to the group. sudo usermod -a -G libvirt $(whoami) newgrp libvirt Verify that user is added to libvirt group. $ id $(whoami) uid=1000(jmutai) gid=1000(jmutai) groups=1000(jmutai),998(wheel),992(kvm),988(storage),968(libvirt),108(vboxusers) Step 3 – Edit libvirtd configuration file to add group Open the file /etc/libvirt/libvirtd.conf for editing. sudo vim /etc/libvirt/libvirtd.conf Set the UNIX domain socket group ownership to libvirt, (around line 85) unix_sock_group = "libvirt" Set the UNIX socket permissions for the R/W socket (around line 102) unix_sock_rw_perms = "0770" Restart libvirt daemon after making the change. sudo systemctl restart libvirtd.service Check service status. $ systemctl status libvirtd.service ● libvirtd.service - Virtualization daemon Loaded: loaded (/usr/lib/systemd/system/libvirtd.service; enabled; vendor preset: disabled) Active: active (running) since Fri 2019-04-19 08:48:13 EAT; 1h 16min ago Docs: man:libvirtd(8) https://libvirt.org Main PID: 31709 (libvirtd) Tasks: 26 (limit: 32768) Memory: 64.7M CGroup: /system.slice/libvirtd.service ├─ 754 /usr/bin/dnsmasq --conf-file=/var/lib/libvirt/dnsmasq/default.conf --leasefile-ro --dhcp-script=/usr/lib/libvirt/libvirt_leases> ├─ 755 /usr/bin/dnsmasq --conf-file=/var/lib/libvirt/dnsmasq/default.conf --leasefile-ro --dhcp-script=/usr/lib/libvirt/libvirt_leases> ├─ 777 /usr/bin/dnsmasq --conf-file=/var/lib/libvirt/dnsmasq/docker-machines.conf --leasefile-ro --dhcp-script=/usr/lib/libvirt/libvir> ├─ 778 /usr/bin/dnsmasq --conf-file=/var/lib/libvirt/dnsmasq/docker-machines.conf --leasefile-ro --dhcp-script=/usr/lib/libvirt/libvir> ├─25924 /usr/bin/dnsmasq --conf-file=/var/lib/libvirt/dnsmasq/vagrant-libvirt.conf --leasefile-ro --dhcp-script=/usr/lib/libvirt/libvir> ├─25925 /usr/bin/dnsmasq --conf-file=/var/lib/libvirt/dnsmasq/vagrant-libvirt.conf --leasefile-ro --dhcp-script=/usr/lib/libvirt/libvir> ├─25959 /usr/bin/dnsmasq --conf-file=/var/lib/libvirt/dnsmasq/fed290.conf --leasefile-ro --dhcp-script=/usr/lib/libvirt/libvirt_leasesh> ├─25960 /usr/bin/dnsmasq --conf-file=/var/lib/libvirt/dnsmasq/fed290.conf --leasefile-ro --dhcp-script=/usr/lib/libvirt/libvirt_leasesh> └─31709 /usr/bin/libvirtd Step 4 – Launch virt-manager Start Virtual Machine Manager from the command line or your Start menu. $ virt-manager You should be able to create a VM without getting a permission error. You should be able to use virt-manager as a non-root user. If not, try to read your libvirtd.conf file to see the relevant sections to modify. Conclusion We’ve covered how to use virt-manager as a non-root user in easy to follow steps. You may have to install KVM virtualization package group to get tools including virt-manager.
0 notes
Text
Alpine Linux で Docker 環境構築
必要物の事前準備
VirtualBox のダウンロード https://www.virtualbox.org/wiki/Downloads
Alpine Linux のダウンロード https://alpinelinux.org/downloads/ : VIRTUAL で可
1 VirtualBox のインストール
VirtualBox のインストール
仮想マシンの構成
とりあえずなら 1 vCPU 4GB くらいで十分
NAT の場合、次のように設定 (インストール後でも可):
仮想マシンの設定 > ネットワーク > 高度 > ポートフォワーディング
ホストIP: 127.0.0.1
ホストポート: 1024-65535 の任意の番号
ゲストIP: 10.0.2.15
ゲストポート: 22
(macOS) システム環境設定 > セキュリティ で VirtualBox を起動可能にしておく: 実行許可の後再起動
2 Alpine Linux のインストール
仮想マシンの仮想光学ドライブに Alpine Linux の ISO イメージをマウントする
ISOイメージで起動後、root でログイン (パスワードなし)
setup-alpine を実行する: https://docs.alpinelinux.org/user-handbook/0.1a/Installing/setup_alpine.html
キーボードレイアウトは、macOS の場合でも *-mac にする必要はない (すると文字が化ける)
Timezone は Asia/Tokyo
インストール先は sda, sys
インストール完了後、仮想光学ドライブから ISO イメージをアンマウントして reboot
3 Alpine Linux の初期設定
root でログイン
# apk update && apk add sudo
# adduser new_user
# vi /etc/group: 11行目 wheel の行に new_user を追加する
# visudo で %wheel ALL=(ALL) ALL の行頭 # を削除
# echo 'PermitRootLogin no' >> /etc/ssh/sshd_config
# service sshd restart
# apk add virtualbox-guest-additions
4 Docker のインストール
# sed -i -e '4s/^# //' /etc/apk/repositories (# http://dl-cdn.alpinelinux.org/alpine/v3.15/community の行頭 # を削除) : docker-compose をインストールするた��
# apk update && apk add docker docker-compose
# rc-update add docker default
(4 Docker で開発環境の構築)
# service docker start
# docker run --rm hello-world
0 notes
Text
Introducing KVM Virtualization Setup Guide for Linux
Introducing KVM Virtualization Setup Guide for Linux
The concept of virtualization has been around for a while now and has proved quite resourceful and cost-effective technologies. Operation teams and desktop users alike can spin up multiple virtual machines and run a wide selection of operating systems without the need of installing each on a separate physical server. Virtual machines are created using a hypervisor. Two commonly used Hypervisors…
View On WordPress
#linux add user to group sudo#linux add user to group wheel#linux commands in windows 10#linux find file#linux kernel 5.7
0 notes
Text
The Linux Command Handbook
The Linux Commands Handbook follows the 80/20 rule: you'll learn 80% of a topic in around 20% of the time you spend studying it.
I find that this approach gives you a well-rounded overview.
This handbook does not try to cover everything under the sun related to Linux and its commands. It focuses on the small core commands that you will use the 80% or 90% of the time, and tries to simplify the usage of the more complex ones.
All these commands work on Linux, macOS, WSL, and anywhere you have a UNIX environment.
I hope the contents of this handbook will help you achieve what you want: getting comfortable with Linux.
Click here to download this handbook in PDF / ePUB / Mobi format.
Enjoy!
Summary
Introduction to Linux and shells
What is Linux?
Linux is an operating system, like macOS or Windows.
It is also the most popular Open Source operating system, and it gives you a lot of freedom.
It powers the vast majority of the servers that compose the Internet. It's the base upon which everything is built. But not just that. Android is based on (a modified version of) Linux.
The Linux "core" (called a kernel) was born in 1991 in Finland, and it has come a really long way from its humble beginnings. It went on to be the kernel of the GNU Operating System, creating the duo GNU/Linux.
There's one thing about Linux that corporations like Microsoft, Apple, and Google will never be able to offer: the freedom to do whatever you want with your computer.
They're actually going in the opposite direction, building walled gardens, especially on the mobile side.
Linux is the ultimate freedom.
It is developed by volunteers, some paid by companies that rely on it, some independently. But there's no single commercial company that can dictate what goes into Linux, or the project's priorities.
You can also use Linux as your day to day computer. I use macOS because I really enjoy the applications and design (and I also used to be an iOS and Mac apps developer). But before using macOS I used Linux as my main computer Operating System.
No one can dictate which apps you can run, or "call home" with apps that track you, your position, and more.
Linux is also special because there's not just "one Linux", like is the case with Windows or macOS. Instead, we have distributions.
A "distro" is made by a company or organization and packages the Linux core with additional programs and tooling.
For example you have Debian, Red Hat, and Ubuntu, probably the most popular distributions.
But many, many more exist. You can create your own distribution, too. But most likely you'll use a popular one that has lots of users and a community of people around it. This lets you do what you need to do without losing too much time reinventing the wheel and figuring out answers to common problems.
Some desktop computers and laptops ship with Linux preinstalled. Or you can install it on your Windows-based computer, or on a Mac.
But you don't need to disrupt your existing computer just to get an idea of how Linux works.
I don't have a Linux computer.
If you use a Mac, you just need to know that under the hood macOS is a UNIX Operating System. It shares a lot of the same ideas and software that a GNU/Linux system uses, because GNU/Linux is a free alternative to UNIX.
UNIX is an umbrella term that groups many operating systems used in big corporations and institutions, starting from the 70's
The macOS terminal gives you access to the same exact commands I'll describe in the rest of this handbook.
Microsoft has an official Windows Subsystem for Linux which you can (and should!) install on Windows. This will give you the ability to run Linux in a very easy way on your PC.
But the vast majority of the time you will run a Linux computer in the cloud via a VPS (Virtual Private Server) like DigitalOcean.
What is a shell?
A shell is a command interpreter that exposes an interface to the user to work with the underlying operating system.
It allows you to execute operations using text and commands, and it provides users advanced features like being able to create scripts.
This is important: shells let you perform things in a more optimized way than a GUI (Graphical User Interface) could ever possibly let you do. Command line tools can offer many different configuration options without being too complex to use.
There are many different kind of shells. This post focuses on Unix shells, the ones that you will find commonly on Linux and macOS computers.
Many different kind of shells were created for those systems over time, and a few of them dominate the space: Bash, Csh, Zsh, Fish and many more!
All shells originate from the Bourne Shell, called sh. "Bourne" because its creator was Steve Bourne.
Bash means Bourne-again shell. sh was proprietary and not open source, and Bash was created in 1989 to create a free alternative for the GNU project and the Free Software Foundation. Since projects had to pay to use the Bourne shell, Bash became very popular.
If you use a Mac, try opening your Mac terminal. By default it runs ZSH (or, pre-Catalina, Bash).
You can set up your system to run any kind of shell – for example I use the Fish shell.
Each single shell has its own unique features and advanced usage, but they all share a common functionality: they can let you execute programs, and they can be programmed.
In the rest of this handbook we'll see in detail the most common commands you will use.
The man command
The first command I'll introduce will help you understand all the other commands.
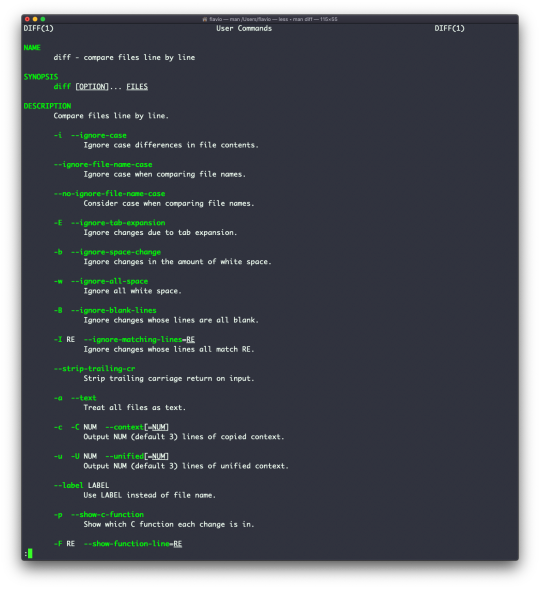
Every time I don't know how to use a command, I type man <command> to get the manual:
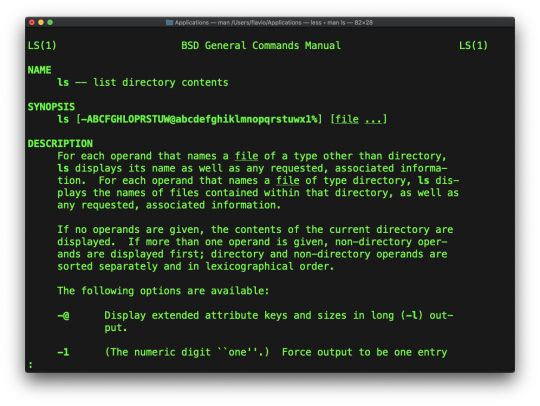
This is a man (from _manual_) page. Man pages are an essential tool to learn as a developer. They contain so much information that sometimes it's almost too much. The above screenshot is just 1 of 14 screens of explanation for the ls command.
Most of the time when I need to learn a command quickly I use this site called tldr pages: https://tldr.sh. It's a command you can install, which you then run like this: tldr <command>. It gives you a very quick overview of a command, with some handy examples of common usage scenarios:
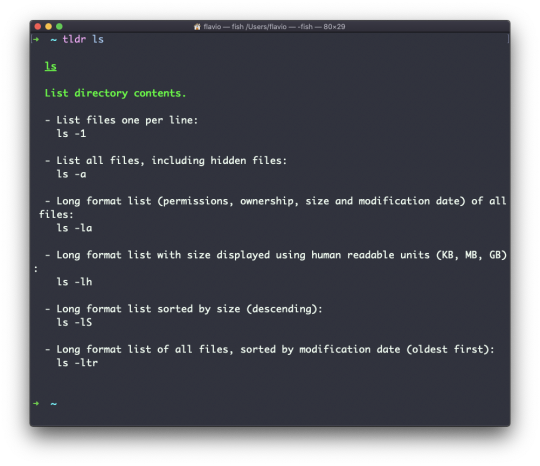
This is not a substitute for man, but a handy tool to avoid losing yourself in the huge amount of information present in a man page. Then you can use the man page to explore all the different options and parameters you can use on a command.
The Linux ls command
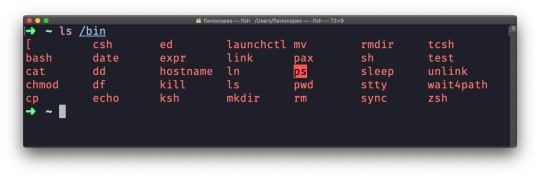
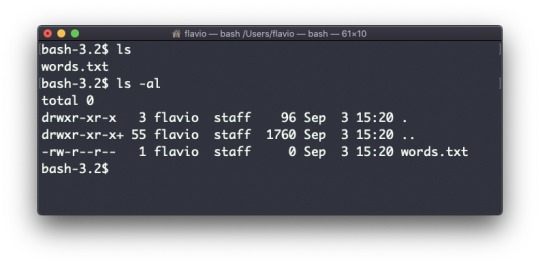
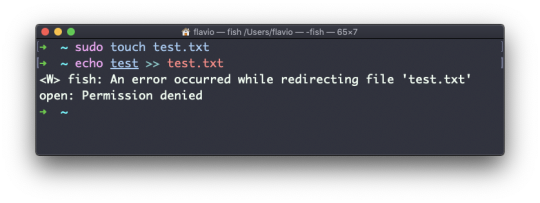
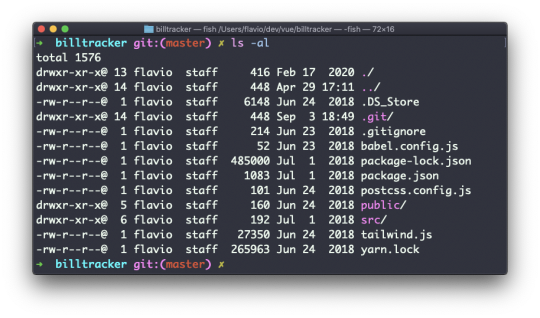
Inside a folder you can list all the files that the folder contains using the ls command:
ls
If you add a folder name or path, it will print that folder's contents:
ls /bin
ls accepts a lot of options. One of my favorite combinations is -al. Try it:
ls -al /bin
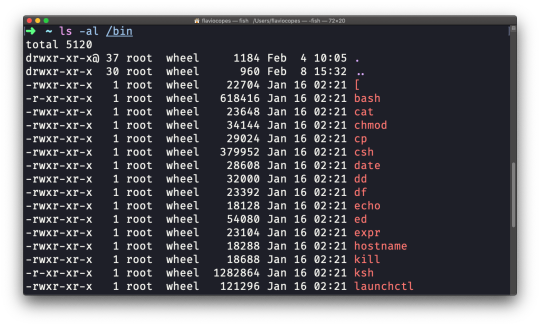
Compared to the plain ls command, this returns much more information.
You have, from left to right:
the file permissions (and if your system supports ACLs, you get an ACL flag as well)
the number of links to that file
the owner of the file
the group of the file
the file size in bytes
the file's last modified datetime
the file name
This set of data is generated by the l option. The a option instead also shows the hidden files.
Hidden files are files that start with a dot (.).
The cd command
Once you have a folder, you can move into it using the cd command. cd means change directory. You invoke it specifying a folder to move into. You can specify a folder name, or an entire path.
Example:
mkdir fruits cd fruits
Now you are in the fruits folder.
You can use the .. special path to indicate the parent folder:
cd .. #back to the home folder
The # character indicates the start of the comment, which lasts for the entire line after it's found.
You can use it to form a path:
mkdir fruits mkdir cars cd fruits cd ../cars
There is another special path indicator which is ., and indicates the current folder.
You can also use absolute paths, which start from the root folder /:
cd /etc
The pwd command
Whenever you feel lost in the filesystem, call the pwd command to know where you are:
pwd
It will print the current folder path.
The mkdir command
You create folders using the mkdir command:
mkdir fruits
You can create multiple folders with one command:
mkdir dogs cars
You can also create multiple nested folders by adding the -p option:
mkdir -p fruits/apples
Options in UNIX commands commonly take this form. You add them right after the command name, and they change how the command behaves. You can often combine multiple options, too.
You can find which options a command supports by typing man <commandname>. Try now with man mkdir for example (press the q key to esc the man page). Man pages are the amazing built-in help for UNIX.
The rmdir command
Just as you can create a folder using mkdir, you can delete a folder using rmdir:
mkdir fruits rmdir fruits
You can also delete multiple folders at once:
mkdir fruits cars rmdir fruits cars
The folder you delete must be empty.
To delete folders with files in them, we'll use the more generic rm command which deletes files and folders, using the -rf option:
rm -rf fruits cars
Be careful as this command does not ask for confirmation and it will immediately remove anything you ask it to remove.
There is no bin when removing files from the command line, and recovering lost files can be hard.
The mv command
Once you have a file, you can move it around using the mv command. You specify the file current path, and its new path:
touch test mv pear new_pear
The pear file is now moved to new_pear. This is how you rename files and folders.
If the last parameter is a folder, the file located at the first parameter path is going to be moved into that folder. In this case, you can specify a list of files and they will all be moved in the folder path identified by the last parameter:
touch pear touch apple mkdir fruits mv pear apple fruits #pear and apple moved to the fruits folder
The cp command
You can copy a file using the cp command:
touch test cp apple another_apple
To copy folders you need to add the -r option to recursively copy the whole folder contents:
mkdir fruits cp -r fruits cars
The open command
The open command lets you open a file using this syntax:
open <filename>
You can also open a directory, which on macOS opens the Finder app with the current directory open:
open <directory name>
I use it all the time to open the current directory:
open .
The special . symbol points to the current directory, as .. points to the parent directory
The same command can also be be used to run an application:
open <application name>
The touch command
You can create an empty file using the touch command:
touch apple
If the file already exists, it opens the file in write mode, and the timestamp of the file is updated.
The find command
The find command can be used to find files or folders matching a particular search pattern. It searches recursively.
Let's learn how to use it by example.
Find all the files under the current tree that have the .js extension and print the relative path of each file that matches:
find . -name '*.js'
It's important to use quotes around special characters like * to avoid the shell interpreting them.
Find directories under the current tree matching the name "src":
find . -type d -name src
Use -type f to search only files, or -type l to only search symbolic links.
-name is case sensitive. use -iname to perform a case-insensitive search.
You can search under multiple root trees:
find folder1 folder2 -name filename.txt
Find directories under the current tree matching the name "node_modules" or 'public':
find . -type d -name node_modules -or -name public
You can also exclude a path using -not -path:
find . -type d -name '*.md' -not -path 'node_modules/*'
You can search files that have more than 100 characters (bytes) in them:
find . -type f -size +100c
Search files bigger than 100KB but smaller than 1MB:
find . -type f -size +100k -size -1M
Search files edited more than 3 days ago:
find . -type f -mtime +3
Search files edited in the last 24 hours:
find . -type f -mtime -1
You can delete all the files matching a search by adding the -delete option. This deletes all the files edited in the last 24 hours:
find . -type f -mtime -1 -delete
You can execute a command on each result of the search. In this example we run cat to print the file content:
find . -type f -exec cat {} \;
Notice the terminating \;. {} is filled with the file name at execution time.
The ln command
The ln command is part of the Linux file system commands.
It's used to create links. What is a link? It's like a pointer to another file, or a file that points to another file. You might be familiar with Windows shortcuts. They're similar.
We have 2 types of links: hard links and soft links.
Hard links
Hard links are rarely used. They have a few limitations: you can't link to directories, and you can't link to external filesystems (disks).
A hard link is created using the following syntax:
ln <original> <link>
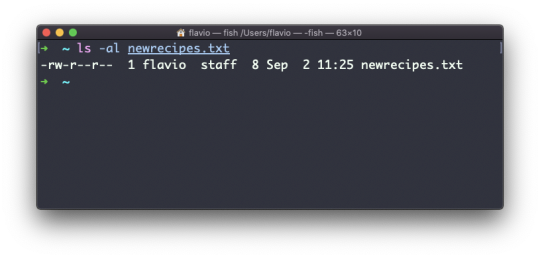
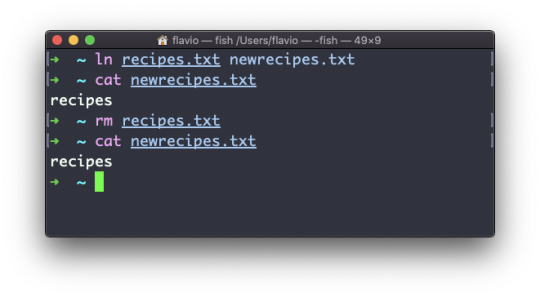
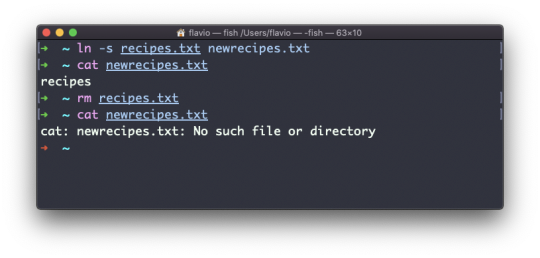
For example, say you have a file called recipes.txt. You can create a hard link to it using:
ln recipes.txt newrecipes.txt
The new hard link you created is indistinguishable from a regular file:
Now any time you edit any of those files, the content will be updated for both.
If you delete the original file, the link will still contain the original file content, as that's not removed until there is one hard link pointing to it.
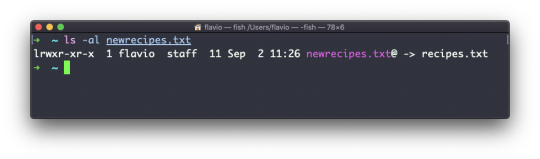
Soft links
Soft links are different. They are more powerful as you can link to other filesystems and to directories. But keep in mind that when the original is removed, the link will be broken.
You create soft links using the -s option of ln:
ln -s <original> <link>
For example, say you have a file called recipes.txt. You can create a soft link to it using:
ln -s recipes.txt newrecipes.txt
In this case you can see there's a special l flag when you list the file using ls -al. The file name has a @ at the end, and it's also colored differently if you have colors enabled:
Now if you delete the original file, the links will be broken, and the shell will tell you "No such file or directory" if you try to access it:
The gzip command
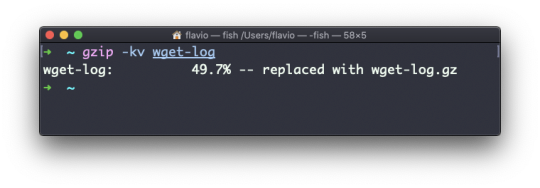
You can compress a file using the gzip compression protocol named LZ77 using the gzip command.
Here's the simplest usage:
gzip filename
This will compress the file, and append a .gz extension to it. The original file is deleted.
To prevent this, you can use the -c option and use output redirection to write the output to the filename.gz file:
gzip -c filename > filename.gz
The -c option specifies that the output will go to the standard output stream, leaving the original file intact.
Or you can use the -k option:
gzip -k filename
There are various levels of compression. The more the compression, the longer it will take to compress (and decompress). Levels range from 1 (fastest, worst compression) to 9 (slowest, better compression), and the default is 6.
You can choose a specific level with the -<NUMBER> option:
gzip -1 filename
You can compress multiple files by listing them:
gzip filename1 filename2
You can compress all the files in a directory, recursively, using the -r option:
gzip -r a_folder
The -v option prints the compression percentage information. Here's an example of it being used along with the -k (keep) option:
gzip can also be used to decompress a file, using the -d option:
gzip -d filename.gz
The gunzip command
The gunzip command is basically equivalent to the gzip command, except the -d option is always enabled by default.
The command can be invoked in this way:
gunzip filename.gz
This will gunzip and will remove the .gz extension, putting the result in the filename file. If that file exists, it will overwrite that.
You can extract to a different filename using output redirection using the -c option:
gunzip -c filename.gz > anotherfilename
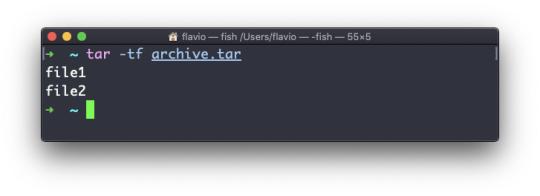
The tar command
The tar command is used to create an archive, grouping multiple files in a single file.
Its name comes from the past and means tape archive (back when archives were stored on tapes).
This command creates an archive named archive.tar with the content of file1 and file2:
tar -cf archive.tar file1 file2
The c option stands for create. The f option is used to write to file the archive.
To extract files from an archive in the current folder, use:
tar -xf archive.tar
the x option stands for extract.
And to extract them to a specific directory, use:
tar -xf archive.tar -C directory
You can also just list the files contained in an archive:
tar is often used to create a compressed archive, gzipping the archive.
This is done using the z option:
tar -czf archive.tar.gz file1 file2
This is just like creating a tar archive, and then running gzip on it.
To unarchive a gzipped archive, you can use gunzip, or gzip -d, and then unarchive it. But tar -xf will recognize it's a gzipped archive, and do it for you:
tar -xf archive.tar.gz
The alias command
It's common to always run a program with a set of options that you like using.
For example, take the ls command. By default it prints very little information:
But if you use the -al option it will print something more useful, including the file modification date, the size, the owner, and the permissions. It will also list hidden files (files starting with a .):
You can create a new command, for example I like to call it ll, that is an alias to ls -al.
You do it like this:
alias ll='ls -al'
Once you do, you can call ll just like it was a regular UNIX command:
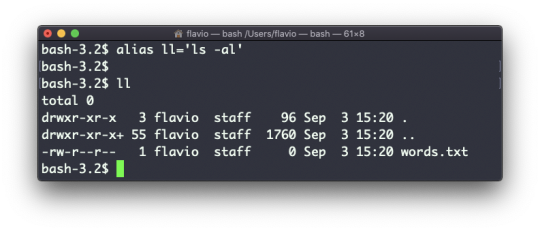
Now calling alias without any option will list the aliases defined:
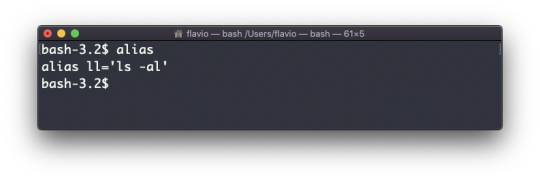
The alias will work until the terminal session is closed.
To make it permanent, you need to add it to the shell configuration. This could be ~/.bashrc or ~/.profile or ~/.bash_profile if you use the Bash shell, depending on the use case.
Be careful with quotes if you have variables in the command: if you use double quotes, the variable is resolved at definition time. If you use use single quotes, it's resolved at invocation time. Those 2 are different:
alias lsthis="ls $PWD" alias lscurrent='ls $PWD'
$PWD refers to the current folder the shell is in. If you now navigate away to a new folder, lscurrent lists the files in the new folder, whereas lsthis still lists the files in the folder where you were when you defined the alias.
The cat command
Similar to tail in some ways, we have cat. Except cat can also add content to a file, and this makes it super powerful.
In its simplest usage, cat prints a file's content to the standard output:
cat file
You can print the content of multiple files:
cat file1 file2
and using the output redirection operator > you can concatenate the content of multiple files into a new file:
cat file1 file2 > file3
Using >> you can append the content of multiple files into a new file, creating it if it does not exist:
cat file1 file2 >> file3
When you're looking at source code files it's helpful to see the line numbers. You can have cat print them using the -n option:
cat -n file1
You can only add a number to non-blank lines using -b, or you can also remove all the multiple empty lines using -s.
cat is often used in combination with the pipe operator | to feed a file's content as input to another command: cat file1 | anothercommand.
The less command
The less command is one I use a lot. It shows you the content stored inside a file, in a nice and interactive UI.
Usage: less <filename>.
Once you are inside a less session, you can quit by pressing q.
You can navigate the file contents using the up and down keys, or using the space bar and b to navigate page by page. You can also jump to the end of the file pressing G and jump back to the start by pressing g.
You can search contents inside the file by pressing / and typing a word to search. This searches forward. You can search backwards using the ? symbol and typing a word.
This command just visualises the file's content. You can directly open an editor by pressing v. It will use the system editor, which in most cases is vim.
Pressing the F key enters follow mode, or watch mode. When the file is changed by someone else, like from another program, you get to see the changes live.
This doesn't happen by default, and you only see the file version at the time you opened it. You need to press ctrl-C to quit this mode. In this case the behaviour is similar to running the tail -f <filename> command.
You can open multiple files, and navigate through them using :n (to go to the next file) and :p (to go to the previous).
The tail command
The best use case of tail in my opinion is when called with the -f option. It opens the file at the end, and watches for file changes.
Any time there is new content in the file, it is printed in the window. This is great for watching log files, for example:
tail -f /var/log/system.log
To exit, press ctrl-C.
You can print the last 10 lines in a file:
tail -n 10 <filename>
You can print the whole file content starting from a specific line using + before the line number:
tail -n +10 <filename>
tail can do much more and as always my advice is to check man tail.
The wc command
The wc command gives us useful information about a file or input it receives via pipes.
echo test >> test.txt wc test.txt 1 1 5 test.txt
Example via pipes, we can count the output of running the ls -al command:
ls -al | wc 6 47 284
The first column returned is the number of lines. The second is the number of words. The third is the number of bytes.
We can tell it to just count the lines:
wc -l test.txt
or just the words:
wc -w test.txt
or just the bytes:
wc -c test.txt
Bytes in ASCII charsets equate to characters. But with non-ASCII charsets, the number of characters might differ because some characters might take multiple bytes (for example this happens in Unicode).
In this case the -m flag will help you get the correct value:
wc -m test.txt
The grep command
The grep command is a very useful tool. When you master it, it will help you tremendously in your day to day coding.
If you're wondering, grep stands for global regular expression print.
You can use grep to search in files, or combine it with pipes to filter the output of another command.
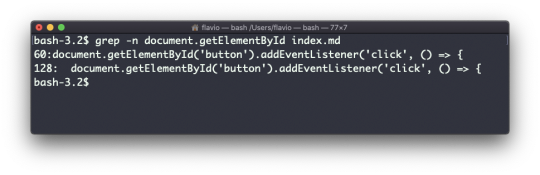
For example here's how we can find the occurences of the document.getElementById line in the index.md file:
grep -n document.getElementById index.md
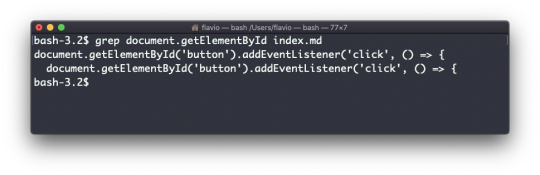
Using the -n option it will show the line numbers:
grep -n document.getElementById index.md
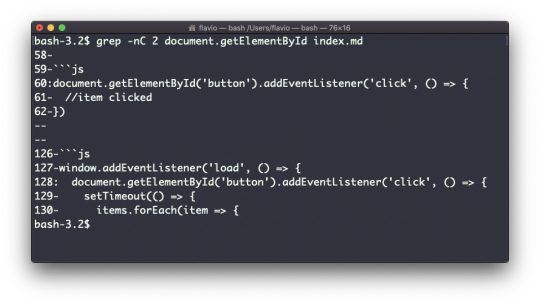
One very useful thing is to tell grep to print 2 lines before and 2 lines after the matched line to give you more context. That's done using the -C option, which accepts a number of lines:
grep -nC 2 document.getElementById index.md
Search is case sensitive by default. Use the -i flag to make it insensitive.
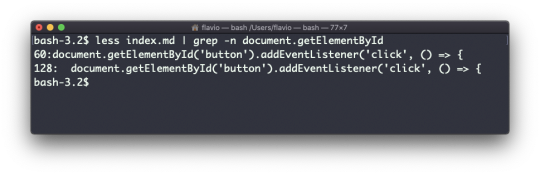
As mentioned, you can use grep to filter the output of another command. We can replicate the same functionality as above using:
less index.md | grep -n document.getElementById
The search string can be a regular expression, and this makes grep very powerful.
Another thing you might find very useful is to invert the result, excluding the lines that match a particular string, using the -v option:
The sort command
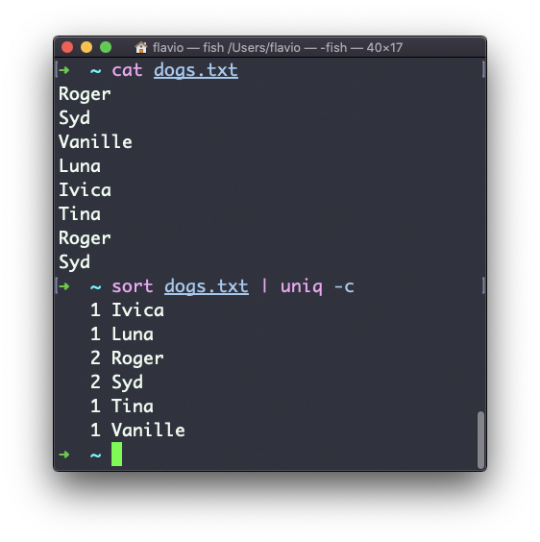
Suppose you have a text file which contains the names of dogs:
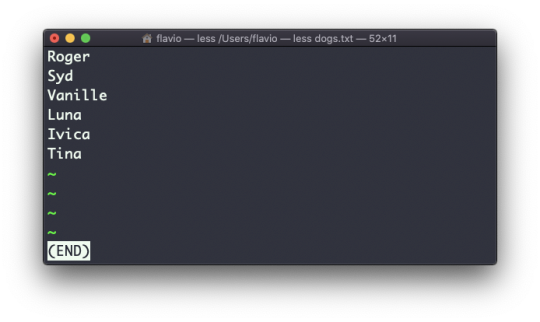
This list is unordered.
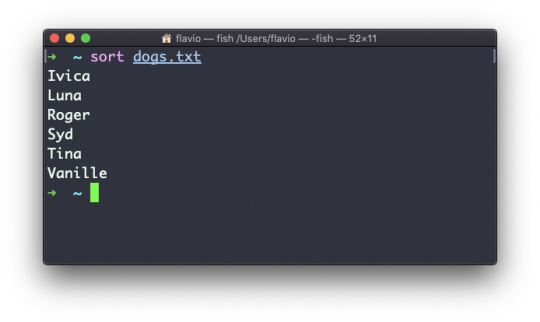
The sort command helps you sort them by name:
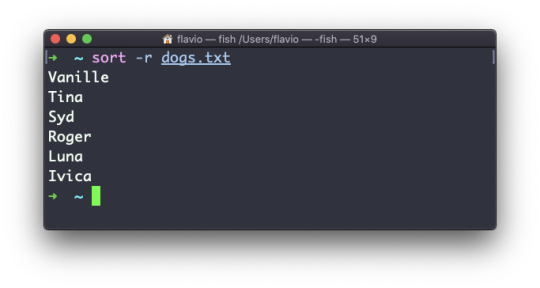
Use the r option to reverse the order:
Sorting by default is case sensitive, and alphabetic. Use the --ignore-case option to sort case insensitive, and the -n option to sort using a numeric order.
If the file contains duplicate lines:
You can use the -u option to remove them:
sort does not just work on files, as many UNIX commands do – it also works with pipes. So you can use it on the output of another command. For example you can order the files returned by ls with:
ls | sort
sort is very powerful and has lots more options, which you can explore by calling man sort.

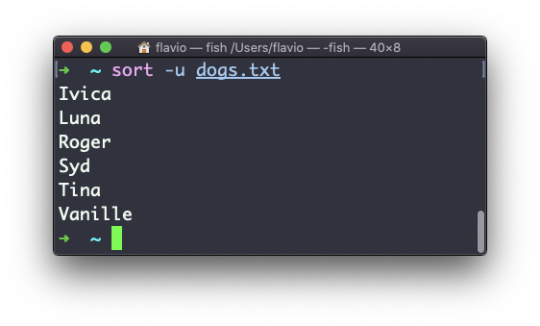
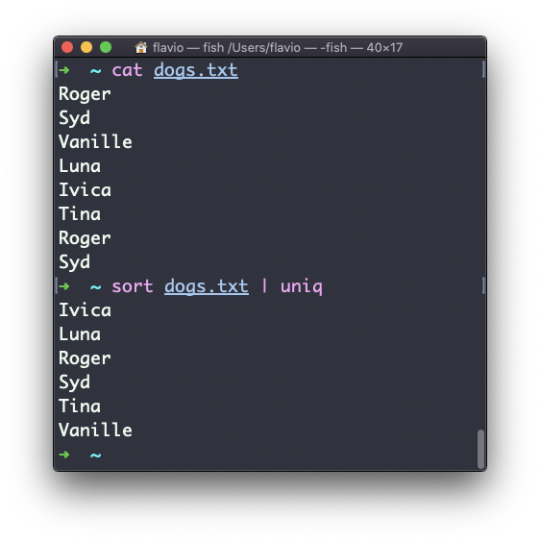
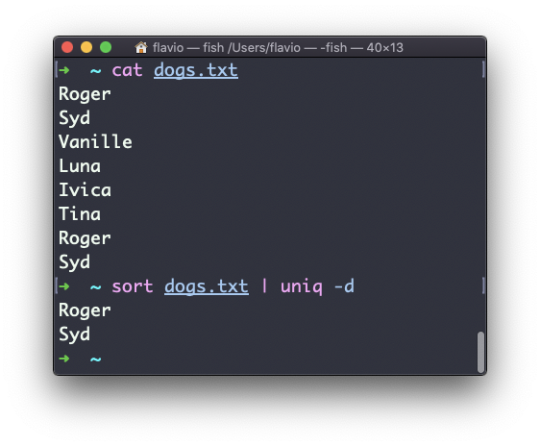
The uniq command
uniq is a command that helps you sort lines of text.
You can get those lines from a file, or using pipes from the output of another command:
uniq dogs.txt ls | uniq
You need to consider this key thing: uniq will only detect adjacent duplicate lines.
This implies that you will most likely use it along with sort:
sort dogs.txt | uniq
The sort command has its own way to remove duplicates with the -u (unique) option. But uniq has more power.
By default it removes duplicate lines:
You can tell it to only display duplicate lines, for example, with the -d option:
sort dogs.txt | uniq -d
You can use the -u option to only display non-duplicate lines:
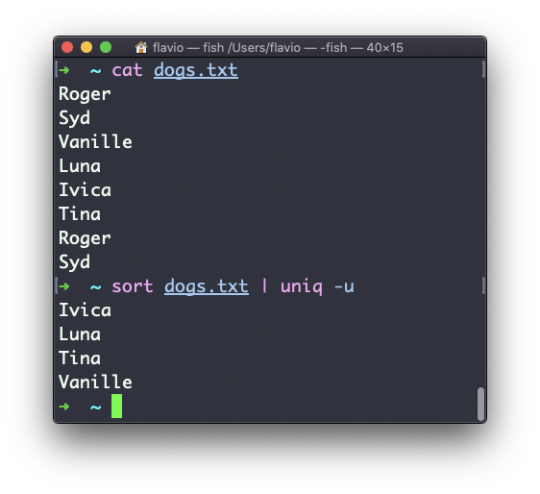
You can count the occurrences of each line with the -c option:
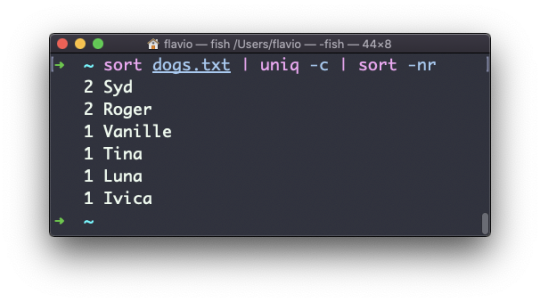
Use the special combination:
sort dogs.txt | uniq -c | sort -nr
to then sort those lines by most frequent:
The diff command
diff is a handy command. Suppose you have 2 files, which contain almost the same information, but you can't find the difference between the two.
diff will process the files and will tell you what's the difference.
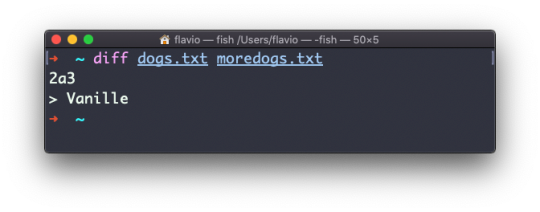
Suppose you have 2 files: dogs.txt and moredogs.txt. The difference is that moredogs.txt contains one more dog name:
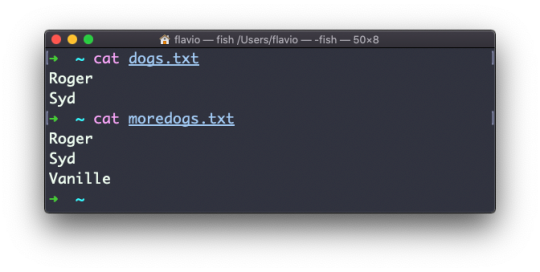
diff dogs.txt moredogs.txt will tell you the second file has one more line, line 3 with the line Vanille:
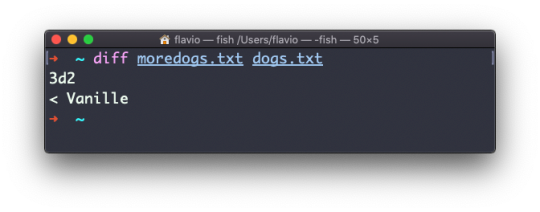
If you invert the order of the files, it will tell you that the second file is missing line 3, whose content is Vanille:
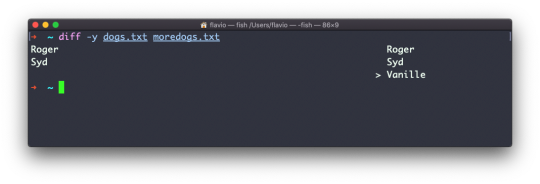
Using the -y option will compare the 2 files line by line:
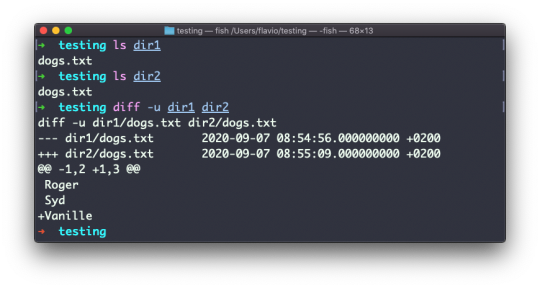
The -u option however will be more familiar to you, because that's the same used by the Git version control system to display differences between versions:

Comparing directories works in the same way. You must use the -r option to compare recursively (going into subdirectories):
In case you're interested in which files differ, rather than the content, use the r and q options:
There are many more options you can explore in the man page by running man diff:
The echo command
The echo command does one simple job: it prints to the output the argument passed to it.
This example:
echo "hello"
will print hello to the terminal.
We can append the output to a file:
echo "hello" >> output.txt
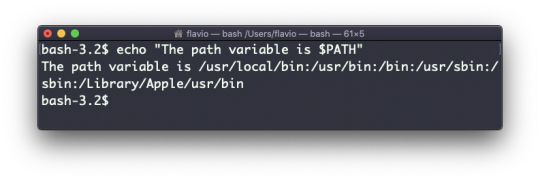
We can interpolate environment variables:
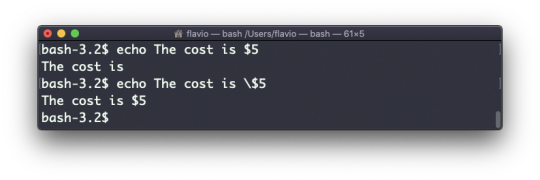
echo "The path variable is $PATH"
Beware that special characters need to be escaped with a backslash \. $ for example:
This is just the start. We can do some nice things when it comes to interacting with the shell features.
We can echo the files in the current folder:
echo *
We can echo the files in the current folder that start with the letter o:
echo o*
Any valid Bash (or any shell you are using) command and feature can be used here.
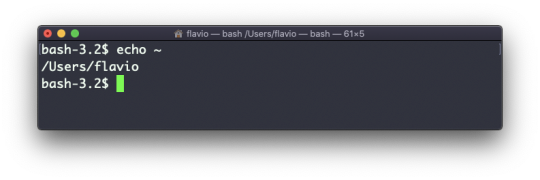
You can print your home folder path:
echo ~
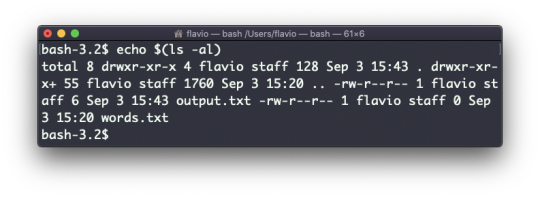
You can also execute commands, and print the result to the standard output (or to file, as you saw):
echo $(ls -al)
Note that whitespace is not preserved by default. You need to wrap the command in double quotes to do so:
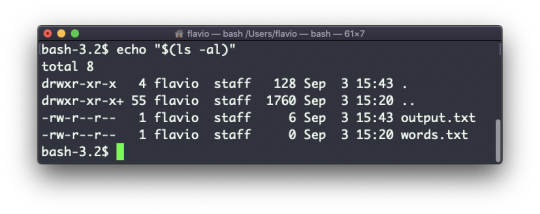
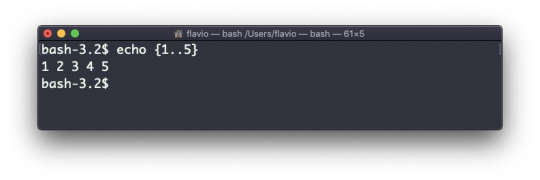
You can generate a list of strings, for example ranges:
echo {1..5}
The chown command
Every file/directory in an Operating System like Linux or macOS (and every UNIX system in general) has an owner.
The owner of a file can do everything with it. It can decide the fate of that file.
The owner (and the root user) can change the owner to another user, too, using the chown command:
chown <owner> <file>
Like this:
chown flavio test.txt
For example if you have a file that's owned by root, you can't write to it as another user:
You can use chown to transfer the ownership to you:

It's rather common to need to change the ownership of a directory, and recursively all the files contained, plus all the subdirectories and the files contained in them, too.
You can do so using the -R flag:
chown -R <owner> <file>
Files/directories don't just have an owner, they also have a group. Through this command you can change that simultaneously while you change the owner:
chown <owner>:<group> <file>
Example:
chown flavio:users test.txt
You can also just change the group of a file using the chgrp command:
chgrp <group> <filename>
The chmod command
Every file in the Linux / macOS Operating Systems (and UNIX systems in general) has 3 permissions: read, write, and execute.
Go into a folder, and run the ls -al command.
The weird strings you see on each file line, like drwxr-xr-x, define the permissions of the file or folder.
Let's dissect it.
The first letter indicates the type of file:
- means it's a normal file
d means it's a directory
l means it's a link
Then you have 3 sets of values:
The first set represents the permissions of the owner of the file
The second set represents the permissions of the members of the group the file is associated to
The third set represents the permissions of the everyone else
Those sets are composed by 3 values. rwx means that specific persona has read, write and execution access. Anything that is removed is swapped with a -, which lets you form various combinations of values and relative permissions: rw-, r--, r-x, and so on.
You can change the permissions given to a file using the chmod command.
chmod can be used in 2 ways. The first is using symbolic arguments, the second is using numeric arguments. Let's start with symbols first, which is more intuitive.
You type chmod followed by a space, and a letter:
a stands for all
u stands for user
g stands for group
o stands for others
Then you type either + or - to add a permission, or to remove it. Then you enter one or more permission symbols (r, w, x).
All followed by the file or folder name.
Here are some examples:
chmod a+r filename #everyone can now read chmod a+rw filename #everyone can now read and write chmod o-rwx filename #others (not the owner, not in the same group of the file) cannot read, write or execute the file
You can apply the same permissions to multiple personas by adding multiple letters before the +/-:
chmod og-r filename #other and group can't read any more
In case you are editing a folder, you can apply the permissions to every file contained in that folder using the -r (recursive) flag.
Numeric arguments are faster but I find them hard to remember when you are not using them day to day. You use a digit that represents the permissions of the persona. This number value can be a maximum of 7, and it's calculated in this way:
1 if has execution permission
2 if has write permission
4 if has read permission
This gives us 4 combinations:
0 no permissions
1 can execute
2 can write
3 can write, execute
4 can read
5 can read, execute
6 can read, write
7 can read, write and execute
We use them in pairs of 3, to set the permissions of all the 3 groups altogether:
chmod 777 filename chmod 755 filename chmod 644 filename
The umask command
When you create a file, you don't have to decide permissions up front. Permissions have defaults.
Those defaults can be controlled and modified using the umask command.
Typing umask with no arguments will show you the current umask, in this case 0022:
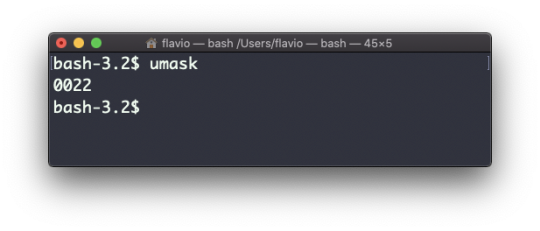
What does 0022 mean? That's an octal value that represents the permissions.
Another common value is 0002.
Use umask -S to see a human-readable notation:
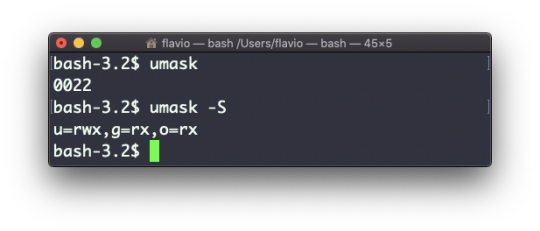
In this case, the user (u), owner of the file, has read, write and execution permissions on files.
Other users belonging to the same group (g) have read and execution permission, same as all the other users (o).
In the numeric notation, we typically change the last 3 digits.
Here's a list that gives a meaning to the number:
0 read, write, execute
1 read and write
2 read and execute
3 read only
4 write and execute
5 write only
6 execute only
7 no permissions
Note that this numeric notation differs from the one we use in chmod.
We can set a new value for the mask setting the value in numeric format:
umask 002
or you can change a specific role's permission:
umask g+r
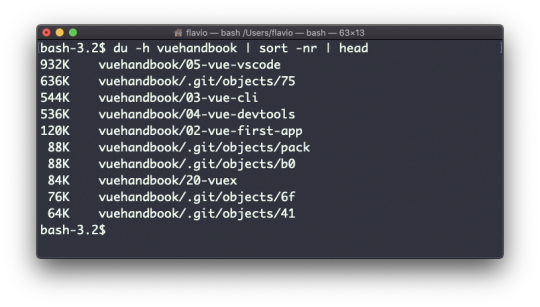
The du command
The du command will calculate the size of a directory as a whole:
du
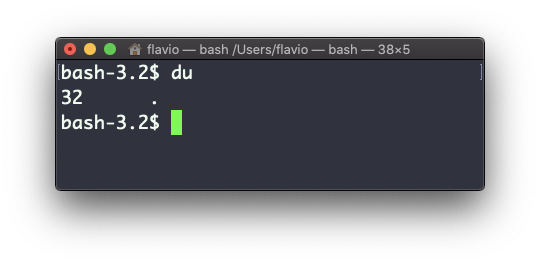
The 32 number here is a value expressed in bytes.
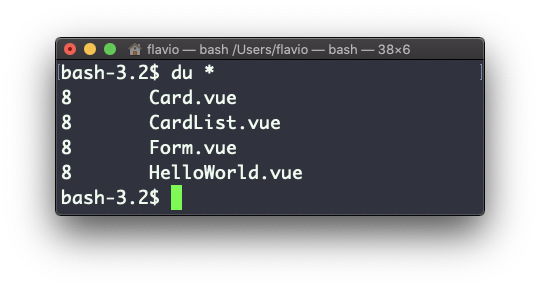
Running du * will calculate the size of each file individually:
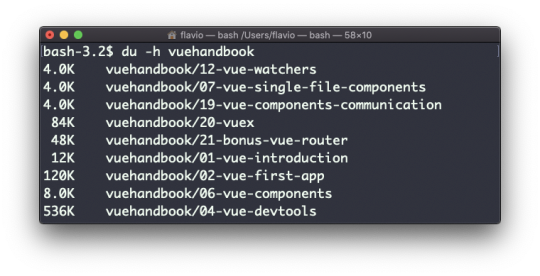
You can set du to display values in MegaBytes using du -m, and GigaBytes using du -g.
The -h option will show a human-readable notation for sizes, adapting to the size:
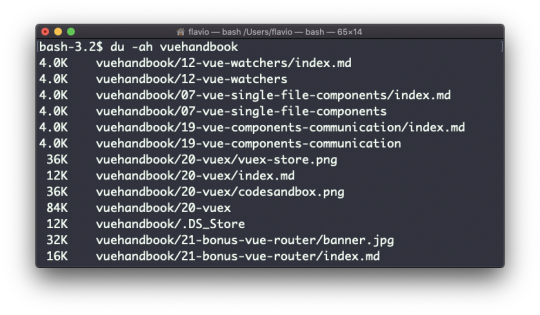
Adding the -a option will print the size of each file in the directories, too:
A handy thing is to sort the directories by size:
du -h <directory> | sort -nr
and then piping to head to only get the first 10 results:
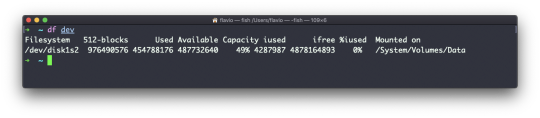
The df command
The df command is used to get disk usage information.
Its basic form will print information about the volumes mounted:
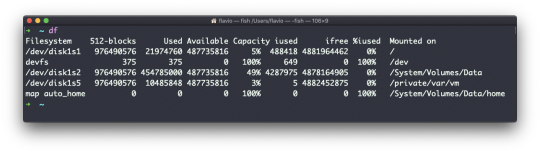
Using the -h option (df -h) will show those values in a human-readable format:

You can also specify a file or directory name to get information about the specific volume it lives on:
The basename command
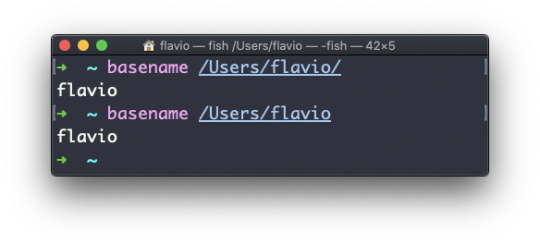
Suppose you have a path to a file, for example /Users/flavio/test.txt.
Running
basename /Users/flavio/test.txt
will return the text.txt string:
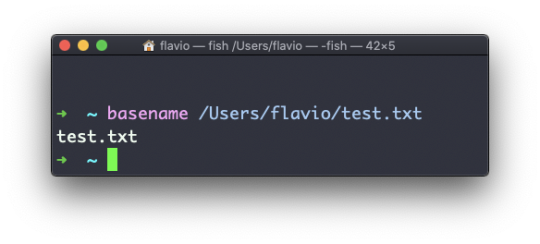
If you run basename on a path string that points to a directory, you will get the last segment of the path. In this example, /Users/flavio is a directory:
The dirname command
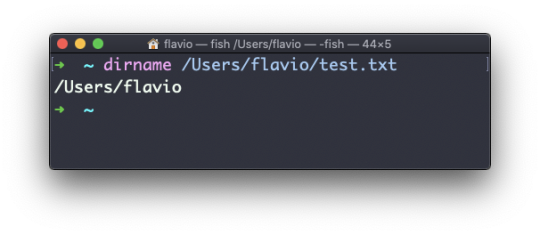
Suppose you have a path to a file, for example /Users/flavio/test.txt.
Running
dirname /Users/flavio/test.txt
will return the /Users/flavio string:
The ps command
Your computer is running tons of different processes at all times.
You can inspect them all using the ps command:
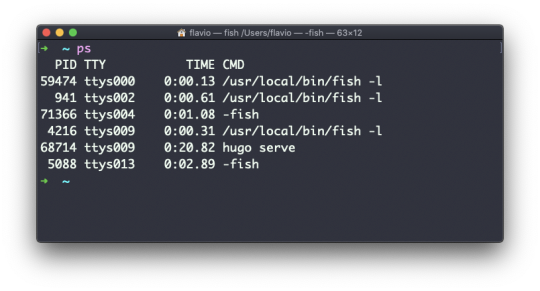
This is the list of user-initiated processes currently running in the current session.
Here I have a few fish shell instances, mostly opened by VS Code inside the editor, and an instance of Hugo running the development preview of a site.
Those are just the commands assigned to the current user. To list all processes we need to pass some options to ps.
The most common one I use is ps ax:
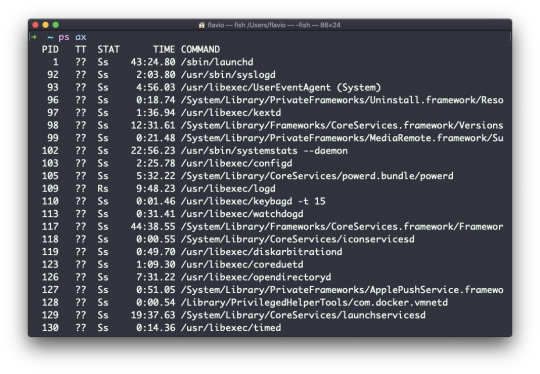
The a option is used to also list other users' processes, not just your own. x shows processes not linked to any terminal (not initiated by users through a terminal).
As you can see, the longer commands are cut. Use the command ps axww to continue the command listing on a new line instead of cutting it:

We need to specify w 2 times to apply this setting (it's not a typo).
You can search for a specific process combining grep with a pipe, like this:
ps axww | grep "Visual Studio Code"
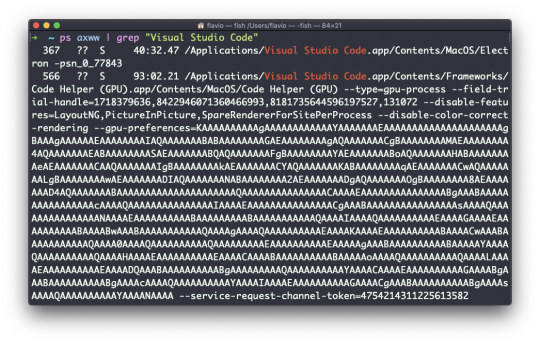
The columns returned by ps represent some key information.
The first information is PID, the process ID. This is key when you want to reference this process in another command, for example to kill it.
Then we have TT that tells us the terminal id used.
Then STAT tells us the state of the process:
I a process that is idle (sleeping for longer than about 20 seconds) R a runnable process S a process that is sleeping for less than about 20 seconds T a stopped process U a process in uninterruptible wait Z a dead process (a zombie)
If you have more than one letter, the second represents further information, which can be very technical.
It's common to have + which indicates that the process is in the foreground in its terminal. s means the process is a session leader.
TIME tells us how long the process has been running.
The top command
The top command is used to display dynamic real-time information about running processes in the system.
It's really handy to understand what is going on.
Its usage is simple – you just type top, and the terminal will be fully immersed in this new view:

The process is long-running. To quit, you can type the q letter or ctrl-C.
There's a lot of information being given to us: the number of processes, how many are running or sleeping, the system load, the CPU usage, and a lot more.
Below, the list of processes taking the most memory and CPU is constantly updated.
By default, as you can see from the %CPU column highlighted, they are sorted by the CPU used.
You can add a flag to sort processes by memory utilized:
top -o mem
The kill command
Linux processes can receive signals and react to them.
That's one way we can interact with running programs.
The kill program can send a variety of signals to a program.
It's not just used to terminate a program, like the name would suggest, but that's its main job.
We use it in this way:
kill <PID>
By default, this sends the TERM signal to the process id specified.
We can use flags to send other signals, including:
kill -HUP <PID> kill -INT <PID> kill -KILL <PID> kill -TERM <PID> kill -CONT <PID> kill -STOP <PID>
HUP means hang up. It's sent automatically when a terminal window that started a process is closed before terminating the process.
INT means interrupt, and it sends the same signal used when we press ctrl-C in the terminal, which usually terminates the process.
KILL is not sent to the process, but to the operating system kernel, which immediately stops and terminates the process.
TERM means terminate. The process will receive it and terminate itself. It's the default signal sent by kill.
CONT means continue. It can be used to resume a stopped process.
STOP is not sent to the process, but to the operating system kernel, which immediately stops (but does not terminate) the process.
You might see numbers used instead, like kill -1 <PID>. In this case,
1 corresponds to HUP. 2 corresponds to INT. 9 corresponds to KILL. 15 corresponds to TERM. 18 corresponds to CONT. 15 corresponds to STOP.
The killall command
Similar to the kill command, killall will send the signal to multiple processes at once instead of sending a signal to a specific process id.
This is the syntax:
killall <name>
where name is the name of a program. For example you can have multiple instances of the top program running, and killall top will terminate them all.
You can specify the signal, like with kill (and check the kill tutorial to read more about the specific kinds of signals we can send), for example:
killall -HUP top
The jobs command
When we run a command in Linux / macOS, we can set it to run in the background using the & symbol after the command.
For example we can run top in the background:
top &
This is very handy for long-running programs.
We can get back to that program using the fg command. This works fine if we just have one job in the background, otherwise we need to use the job number: fg 1, fg 2 and so on.
To get the job number, we use the jobs command.
Say we run top & and then top -o mem &, so we have 2 top instances running. jobs will tell us this:

Now we can switch back to one of those using fg <jobid>. To stop the program again we can hit cmd-Z.
Running jobs -l will also print the process id of each job.
The bg command
When a command is running you can suspend it using ctrl-Z.
The command will immediately stop, and you get back to the shell terminal.
You can resume the execution of the command in the background, so it will keep running but it will not prevent you from doing other work in the terminal.
In this example I have 2 commands stopped:

I can run bg 1 to resume in the background the execution of the job #1.
I could have also said bg without any option, as the default is to pick the job #1 in the list.
The fg command
When a command is running in the background, because you started it with & at the end (example: top & or because you put it in the background with the bg command), you can put it to the foreground using fg.
Running
fg
will resume in the foreground the last job that was suspended.
You can also specify which job you want to resume to the foreground passing the job number, which you can get using the jobs command.
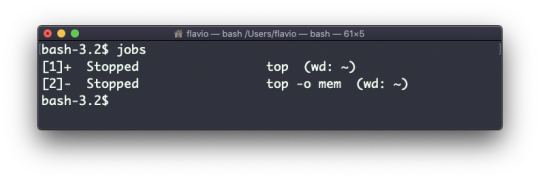
Running fg 2 will resume job #2:
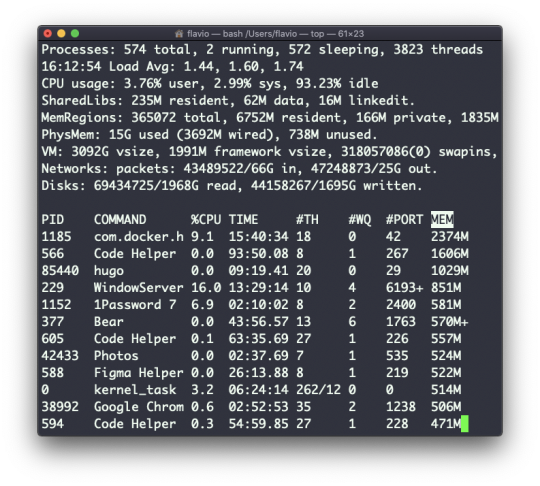
The type command
A command can be one of those 4 types:
an executable
a shell built-in program
a shell function
an alias
The type command can help figure this out, in case we want to know or we're just curious. It will tell you how the command will be interpreted.
The output will depend on the shell used. This is Bash:
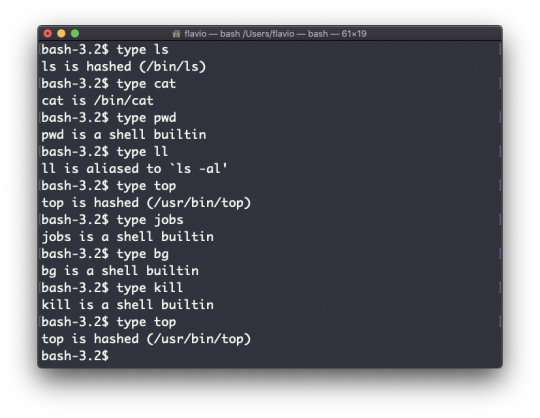
This is Zsh:
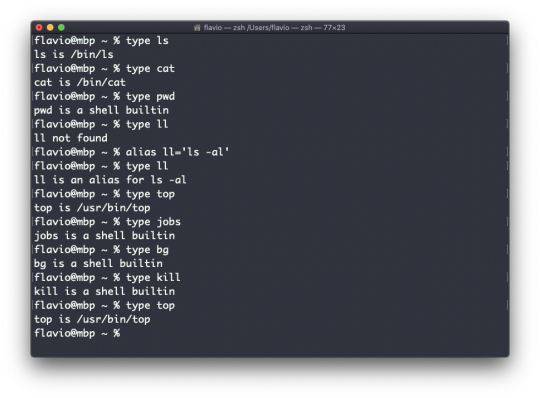
This is Fish:
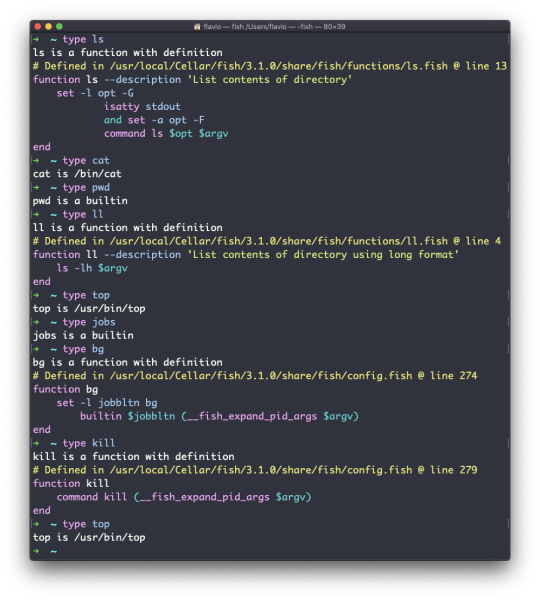
One of the most interesting things here is that for aliases it will tell you what it is aliasing to. You can see the ll alias, in the case of Bash and Zsh, but Fish provides it by default, so it will tell you it's a built-in shell function.
The which command
Suppose you have a command you can execute, because it's in the shell path, but you want to know where it is located.
You can do so using which. The command will return the path to the command specified:
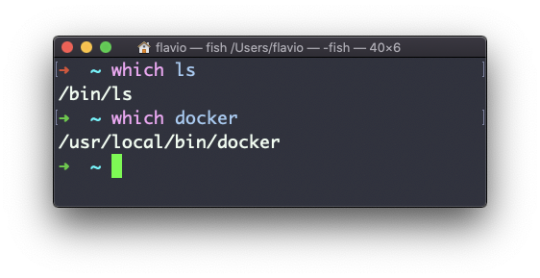
which will only work for executables stored on disk, not aliases or built-in shell functions.
The nohup command
Sometimes you have to run a long-lived process on a remote machine, and then you need to disconnect.
Or you simply want to prevent the command from being halted if there's any network issue between you and the server.
The way to make a command run even after you log out or close the session to a server is to use the nohup command.
Use nohup <command> to let the process continue working even after you log out.
The xargs command
The xargs command is used in a UNIX shell to convert input from standard input into arguments to a command.
In other words, through the use of xargs the output of a command is used as the input of another command.
Here's the syntax you will use:
command1 | xargs command2
We use a pipe (|) to pass the output to xargs. That will take care of running the command2 command, using the output of command1 as its argument(s).
Let's do a simple example. You want to remove some specific files from a directory. Those files are listed inside a text file.
We have 3 files: file1, file2, file3.
In todelete.txt we have a list of files we want to delete, in this example file1 and file3:
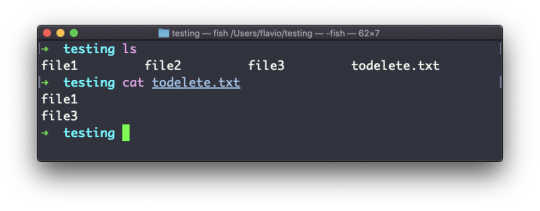
We will channel the output of cat todelete.txt to the rm command, through xargs.
In this way:
cat todelete.txt | xargs rm
That's the result, the files we listed are now deleted:
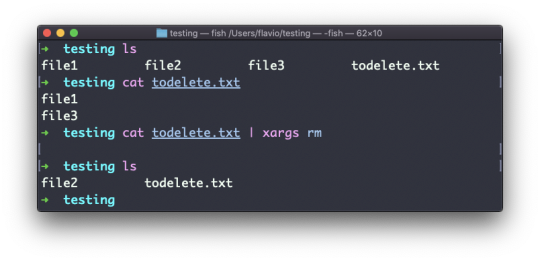
The way it works is that xargs will run rm 2 times, one for each line returned by cat.
This is the simplest usage of xargs. There are several options we can use.
One of the most useful, in my opinion (especially when starting to learn xargs), is -p. Using this option will make xargs print a confirmation prompt with the action it's going to take:
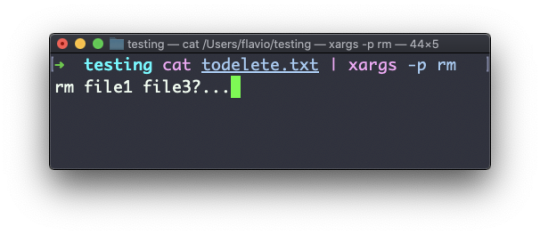
The -n option lets you tell xargs to perform one iteration at a time, so you can individually confirm them with -p. Here we tell xargs to perform one iteration at a time with -n1:
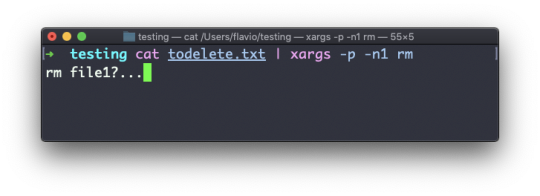
The -I option is another widely used one. It allows you to get the output into a placeholder, and then you can do various things.
One of them is to run multiple commands:
command1 | xargs -I % /bin/bash -c 'command2 %; command3 %'
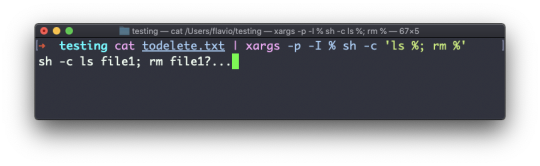
You can swap the % symbol I used above with anything else – it's a variable.
The vim editor
vim is a very popular file editor, especially among programmers. It's actively developed and frequently updated, and there's a big community around it. There's even a Vim conference!
vi in modern systems is just an alias for vim, which means vi improved.
You start it by running vi on the command line.
You can specify a filename at invocation time to edit that specific file:
vi test.txt
You have to know that Vim has 2 main modes:
command (or normal) mode
insert mode
When you start the editor, you are in command mode. You can't enter text like you expect from a GUI-based editor. You have to enter insert mode.
You can do this by pressing the i key. Once you do so, the -- INSERT -- word appears at the bottom of the editor:
Now you can start typing and filling the screen with the file contents:
You can move around the file with the arrow keys, or using the h - j - k - l keys. h-l for left-right, j-k for down-up.
Once you are done editing you can press the esc key to exit insert mode and go back to command mode.
At this point you can navigate the file, but you can't add content to it (and be careful which keys you press, as they might be commands).
One thing you might want to do now is save the file. You can do so by pressing : (colon), then w.
You can save and quit by pressing : then w and q: :wq
You can quit without saving by pressing : then q and !: :q!
You can undo and edit by going to command mode and pressing u. You can redo (cancel an undo) by pressing ctrl-r.
Those are the basics of working with Vim. From here starts a rabbit hole we can't go into in this little introduction.
I will only mention those commands that will get you started editing with Vim:
pressing the x key deletes the character currently highlighted
pressing A goes to the end of the currently selected line
press 0 to go to the start of the line
go to the first character of a word and press d followed by w to delete that word. If you follow it with e instead of w, the white space before the next word is preserved
use a number between d and w to delete more than 1 word, for example use d3w to delete 3 words forward
press d followed by d to delete a whole entire line. Press d followed by $ to delete the entire line from where the cursor is, until the end
To find out more about Vim I can recommend the Vim FAQ. You can also run the vimtutor command, which should already be installed in your system and will greatly help you start your vim exploration.
The emacs editor
emacs is an awesome editor and it's historically regarded as the editor for UNIX systems. Famously, vi vs emacs flame wars and heated discussions have caused many unproductive hours for developers around the world.
emacs is very powerful. Some people use it all day long as a kind of operating system (https://news.ycombinator.com/item?id=19127258). We'll just talk about the basics here.
You can open a new emacs session simply by invoking emacs:
macOS users, stop a second now. If you are on Linux there are no problems, but macOS does not ship applications using GPLv3, and every built-in UNIX command that has been updated to GPLv3 has not been updated.
While there is a little problem with the commands I listed up to now, in this case using an emacs version from 2007 is not exactly the same as using a version with 12 years of improvements and change.
This is not a problem with Vim, which is up to date. To fix this, run brew install emacs and running emacs will use the new version from Homebrew (make sure you have Homebrew installed).
You can also edit an existing file by calling emacs <filename>:
You can now start editing. Once you are done, press ctrl-x followed by ctrl-w. You confirm the folder:
and Emacs tells you the file exists, asking you if it should overwrite it:
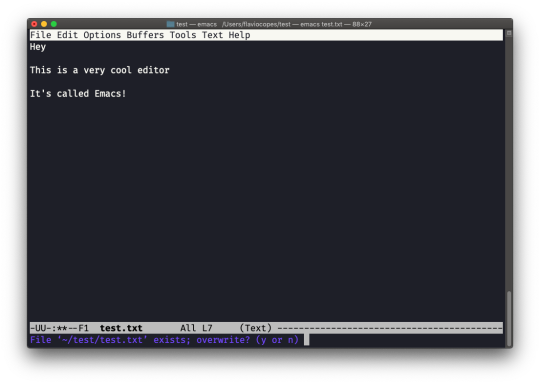
Answer y, and you get a confirmation of success:

You can exit Emacs by pressing ctrl-x followed by ctrl-c. Or ctrl-x followed by c (keep ctrl pressed).
There is a lot to know about Emacs, certainly more than I am able to write in this little introduction. I encourage you to open Emacs and press ctrl-h r to open the built-in manual and ctrl-h t to open the official tutorial.
The nano editor
nano is a beginner friendly editor.
Run it using nano <filename>.
You can directly type characters into the file without worrying about modes.
You can quit without editing using ctrl-X. If you edited the file buffer, the editor will ask you for confirmation and you can save the edits, or discard them.
The help at the bottom shows you the keyboard commands that let you work with the file:
pico is more or less the same, although nano is the GNU version of pico which at some point in history was not open source. The nano clone was made to satisfy the GNU operating system license requirements.
The whoami command
Type whoami to print the user name currently logged in to the terminal session:

Note: this is different from the who am i command, which prints more information
The who command
The who command displays the users logged in to the system.
Unless you're using a server multiple people have access to, chances are you will be the only user logged in, multiple times:
Why multiple times? Because each shell opened will count as an access.
You can see the name of the terminal used, and the time/day the session was started.
The -aH flags will tell who to display more information, including the idle time and the process ID of the terminal:
The special who am i command will list the current terminal session details:
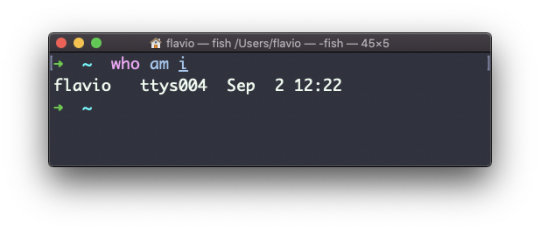
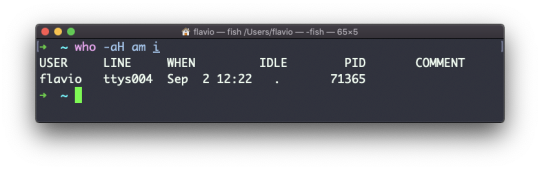
The su command
While you're logged in to the terminal shell with one user, you might need to switch to another user.
For example you're logged in as root to perform some maintenance, but then you want to switch to a user account.
You can do so with the su command:
su <username>
For example: su flavio.
If you're logged in as a user, running su without anything else will prompt you to enter the root user password, as that's the default behavior.
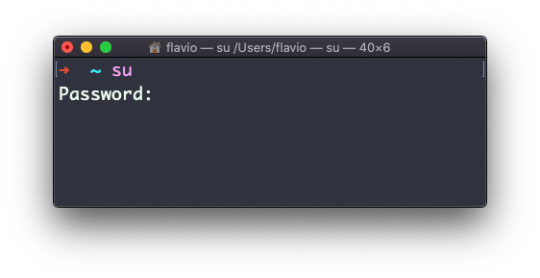
su will start a new shell as another user.
When you're done, typing exit in the shell will close that shell, and will return you back to the current user's shell.
The sudo command
sudo is commonly used to run a command as root.
You must be enabled to use sudo, and once you are, you can run commands as root by entering your user's password (not the root user password).
The permissions are highly configurable, which is great especially in a multi-user server environment. Some users can be granted access to running specific commands through sudo.
For example you can edit a system configuration file:
sudo nano /etc/hosts
which would otherwise fail to save since you don't have the permissions for it.
You can run sudo -i to start a shell as root:
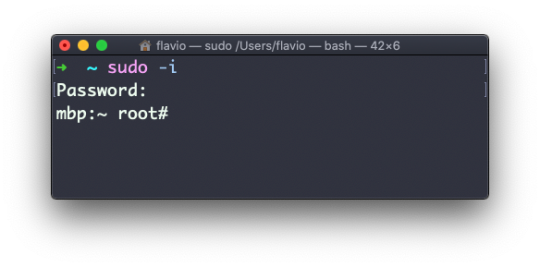
You can use sudo to run commands as any user. root is the default, but use the -u option to specify another user:
sudo -u flavio ls /Users/flavio
The passwd command
Users in Linux have a password assigned. You can change the password using the passwd command.
There are two situations here.
The first is when you want to change your password. In this case you type:
passwd
and an interactive prompt will ask you for the old password, then it will ask you for the new one:
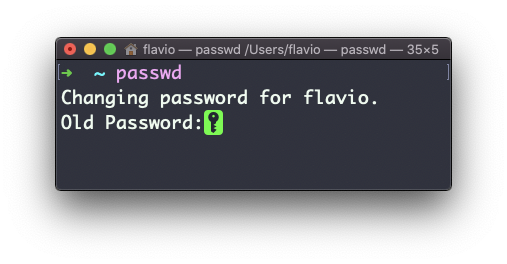
When you're root (or have superuser privileges) you can set the username for which you want to change the password:
passwd <username> <new password>
In this case you don't need to enter the old one.
The ping command
The ping command pings a specific network host, on the local network or on the Internet.
You use it with the syntax ping <host> where <host> could be a domain name, or an IP address.
Here's an example pinging google.com:
The command sends a request to the server, and the server returns a response.
ping keeps sending the request every second, by default. It will keep running until you stop it with ctrl-C, unless you pass the number of times you want to try with the -c option: ping -c 2 google.com.
Once ping is stopped, it will print some statistics about the results: the percentage of packages lost, and statistics about the network performance.
As you can see the screen prints the host IP address, and the time that it took to get the response back.
Not all servers support pinging, in case the request times out:
Sometimes this is done on purpose, to "hide" the server, or just to reduce the load. The ping packets can also be filtered by firewalls.
ping works using the ICMP protocol (Internet Control Message Protocol), a network layer protocol just like TCP or UDP.
The request sends a packet to the server with the ECHO_REQUEST message, and the server returns a ECHO_REPLY message. I won't go into details, but this is the basic concept.
Pinging a host is useful to know if the host is reachable (supposing it implements ping), and how distant it is in terms of how long it takes to get back to you.
Usually the nearer the server is geographically, the less time it will take to return back to you. Simple physical laws cause a longer distance to introduce more delay in the cables.
The traceroute command
When you try to reach a host on the Internet, you go through your home router. Then you reach your ISP network, which in turn goes through its own upstream network router, and so on, until you finally reach the host.
Have you ever wanted to know what steps your packets go through to do that?
The traceroute command is made for this.
You invoke
traceroute <host>
and it will (slowly) gather all the information while the packet travels.
In this example I tried reaching for my blog with traceroute flaviocopes.com:
Not every router travelled returns us information. In this case, traceroute prints * * *. Otherwise, we can see the hostname, the IP address, and some performance indicator.
For every router we can see 3 samples, which means traceroute tries by default 3 times to get you a good indication of the time needed to reach it.
This is why it takes this long to execute traceroute compared to simply doing a ping to that host.
You can customize this number with the -q option:
traceroute -q 1 flaviocopes.com

The clear command
Type clear to clear all the previous commands that were run in the current terminal.
The screen will clear and you will just see the prompt at the top:
Note: this command has a handy shortcut: ctrl-L
Once you do that, you will lose access to scrolling to see the output of the previous commands entered.
So you might want to use clear -x instead, which still clears the screen, but lets you go back to see the previous work by scrolling up.
The history command
Every time you run a command, it's memorized in the history.
You can display all the history using:
history
This shows the history with numbers:
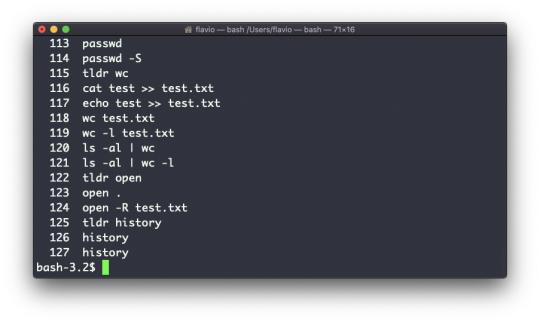
You can use the syntax !<command number> to repeat a command stored in the history. In the above example typing !121 will repeat the ls -al | wc -l command.
Typically the last 500 commands are stored in the history.
You can combine this with grep to find a command you ran:
history | grep docker

To clear the history, run history -c.
The export command
The export command is used to export variables to child processes.
What does this mean?
Suppose you have a variable TEST defined in this way:
TEST="test"
You can print its value using echo $TEST:
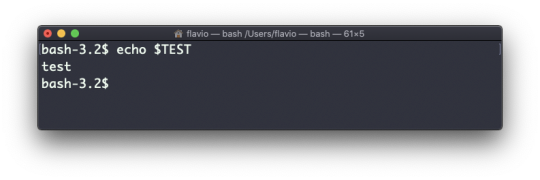
But if you try defining a Bash script in a file script.sh with the above command:
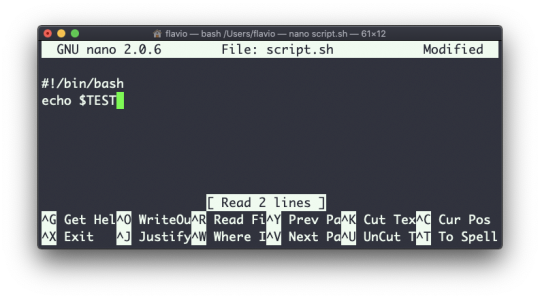
Then when you set chmod u+x script.sh and you execute this script with ./script.sh, the echo $TEST line will print nothing!
This is because in Bash the TEST variable was defined local to the shell. When executing a shell script or another command, a subshell is launched to execute it, which does not contain the current shell local variables.
To make the variable available there we need to define TEST not in this way:
TEST="test"
but in this way:
export TEST="test"
Try that, and running ./script.sh now should print "test":
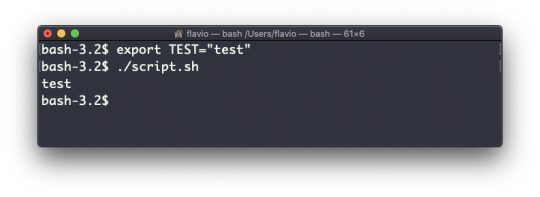
Sometimes you need to append something to a variable. It's often done with the PATH variable. You use this syntax:
export PATH=$PATH:/new/path
It's common to use export when you create new variables in this way. But you can also use it when you create variables in the .bash_profile or .bashrc configuration files with Bash, or in .zshenv with Zsh.
To remove a variable, use the -n option:
export -n TEST
Calling export without any option will list all the exported variables.
The crontab command
Cron jobs are jobs that are scheduled to run at specific intervals. You might have a command perform something every hour, or every day, or every 2 weeks. Or on weekends.
They are very powerful, especially when used on servers to perform maintenance and automations.
The crontab command is the entry point to work with cron jobs.
The first thing you can do is to explore which cron jobs are defined by you:
crontab -l
You might have none, like me:
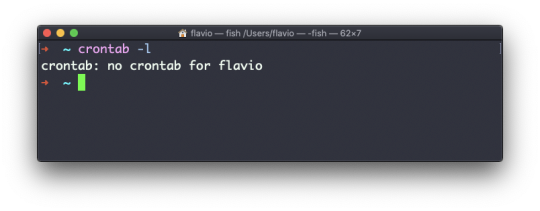
Run
crontab -e
to edit the cron jobs, and add new ones.
By default this opens with the default editor, which is usually vim. I like nano more. You can use this line to use a different editor:
EDITOR=nano crontab -e
Now you can add one line for each cron job.
The syntax to define cron jobs is kind of scary. This is why I usually use a website to help me generate it without errors: https://crontab-generator.org/
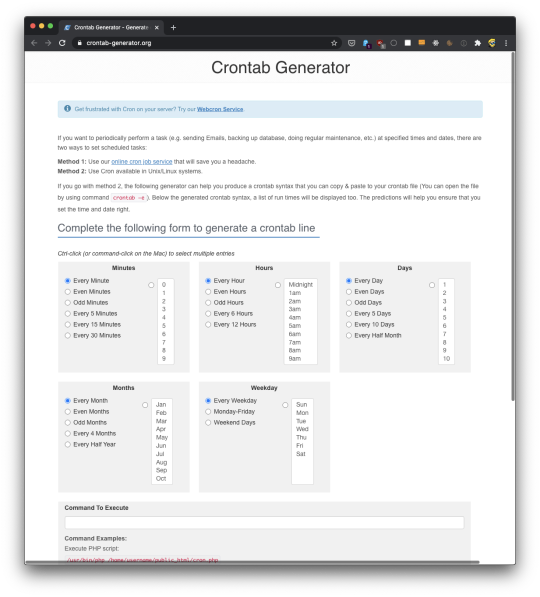
You pick a time interval for the cron job, and you type the command to execute.
I chose to run a script located in /Users/flavio/test.sh every 12 hours. This is the crontab line I need to run:
* */12 * * * /Users/flavio/test.sh >/dev/null 2>&1
I run crontab -e:
EDITOR=nano crontab -e
and I add that line, then I press ctrl-X and press y to save.
If all goes well, the cron job is set up:

Once this is done, you can see the list of active cron jobs by running:
crontab -l
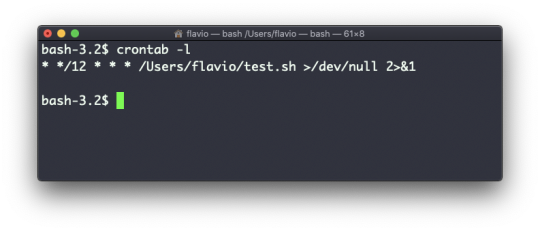
You can remove a cron job running crontab -e again, removing the line and exiting the editor:
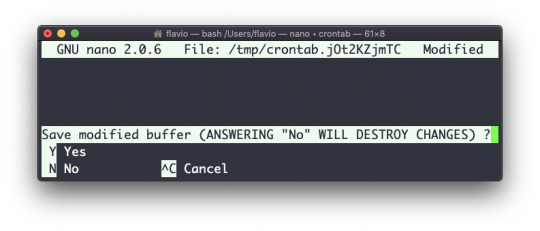
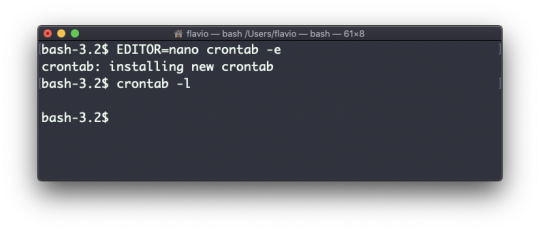
The uname command
Calling uname without any options will return the Operating System codename:

The m option shows the hardware name (x86_64 in this example) and the p option prints the processor architecture name (i386 in this example):
The s option prints the Operating System name. r prints the release, and v prints the version:
The n option prints the node network name:
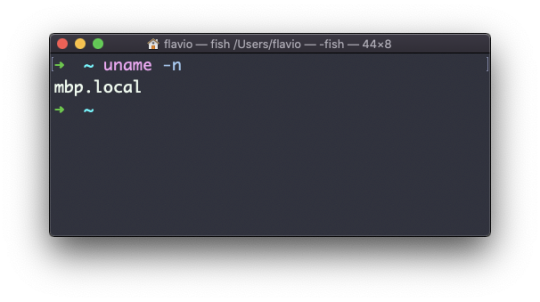
The a option prints all the information available:
On macOS you can also use the sw_vers command to print more information about the macOS Operating System. Note that this differs from the Darwin (the Kernel) version, which above is 19.6.0.
Darwin is the name of the kernel of macOS. The kernel is the "core" of the Operating System, while the Operating System as a whole is called macOS. In Linux, Linux is the kernel, and GNU/Linux would be the Operating System name (although we all refer to it as "Linux").
The env command
The env command can be used to pass environment variables without setting them on the outer environment (the current shell).
Suppose you want to run a Node.js app and set the USER variable to it.
You can run
env USER=flavio node app.js
and the USER environment variable will be accessible from the Node.js app via the Node process.env interface.
You can also run the command clearing all the environment variables already set, using the -i option:
env -i node app.js
In this case you will get an error saying env: node: No such file or directory because the node command is not reachable, as the PATH variable used by the shell to look up commands in the common paths is unset.
So you need to pass the full path to the node program:
env -i /usr/local/bin/node app.js
Try with a simple app.js file with this content:
console.log(process.env.NAME) console.log(process.env.PATH)
You will see the output as
undefined undefined
You can pass an env variable:
env -i NAME=flavio node app.js
and the output will be
flavio undefined
Removing the -i option will make PATH available again inside the program:
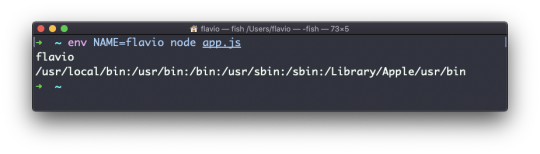
The env command can also be used to print out all the environment variables. If run with no options:
env
it will return a list of the environment variables set, for example:
HOME=/Users/flavio LOGNAME=flavio PATH=/usr/local/bin:/usr/bin:/bin:/usr/sbin:/sbin:/Library/Apple/usr/bin PWD=/Users/flavio SHELL=/usr/local/bin/fish
You can also make a variable inaccessible inside the program you run, using the -u option. For example this code removes the HOME variable from the command environment:
env -u HOME node app.js
The printenv command
Here's a quick guide to the printenv command, used to print the values of environment variables
In any shell there are a good number of environment variables, set either by the system, or by your own shell scripts and configuration.
You can print them all to the terminal using the printenv command. The output will be something like this:
HOME=/Users/flavio LOGNAME=flavio PATH=/usr/local/bin:/usr/bin:/bin:/usr/sbin:/sbin:/Library/Apple/usr/bin PWD=/Users/flavio SHELL=/usr/local/bin/fish
with a few more lines, usually.
You can append a variable name as a parameter, to only show that variable value:
printenv PATH
Conclusion
Thanks a lot for reading this handbook.
I hope it will inspire you to learn more about Linux and its capabilities. It's evergreen knowledge that will not be out of date any time soon.
Remember that you can download this handbook in PDF / ePUB / Mobi format if you want!
I publish programming tutorials every day on my website flaviocopes.com if you want to check out more great content like this.
You can reach me on Twitter @flaviocopes.
1 note
·
View note
Text
Red Hat 8 - User Account Management

Today on this article about user account management i will try to explain how Red Hat manage the users and groups creation and management. For instance on Linux everything is represented by a file, all files are associated with a user. All users belong to a group with the same name as the username of the user, one user can be on many groups. we have three different ways to create users by manual editing system files and using command line tools like useradd the last way is from GUI. Users home directory are located at /home/username and are created automatically based on a skeleton located at /etc/skel .

User Account Management – RHCSA Exam
RHCSA Exams Topics
User Account ManagementAdministrative ControlUser and Shell ConfigurationUsers and Network AuthenticationSpecial Groups
User Account Management - Actions
On this mini tutorial i will covered some basic actions on Linux Systems related to user account management, as an system administrator there are some basic actions we can make like create, delete and modify users. You can check all options using man command (man useradd). useradd - Create Useruserdel - Delete Userusermod - Modify User Accountpasswd - Define User PasswordUser Configs & Home Directory
User Account Management - Types of Users
Linux system have three basic types of users accounts each one of them have a UID range associated with it. We will learn how to verify and change user UIDs on our system. Root User The root user is created when the system is installed, this user has the UID equal to Zero (0) and have permissions to access all services and files on the system. For instance keep this account secure and avoid share the root password with anyone. System Accounts These type of accounts are used by system services like apache, mysql, squid or email service they have UIDs between 1 and 999. Regular Accounts Regular accounts are users with limited permissions defined by the system administrator to execute standard procedures the UID range associated with them are between 1000 and 65535. User TypeUID RangeDescriptionroot0system1-999regular+1000
User Account Management - Create User
To create a new user on Linux we have two options, use the default options specified on /etc/skel directory and /etc/default/useradd or pass the specific configuration as a parameter to the useradd command. Before start adding users to the system check all parameters with #man useradd command.
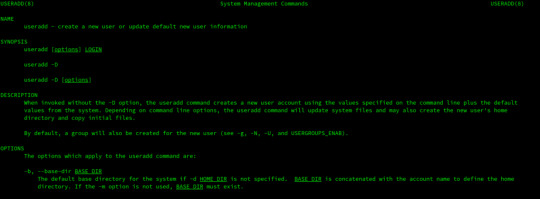
$ man useradd Create user with the default options based on /etc/skel file properties. # useradd poplab Here we are passing the basic parameters to useradd command, -U create a group with the same name as user, -m create the home directory for the user based on /etc/skel file rules. and for last he -s /bin/bash attach the bash shell to the user permiting remote logins. # useradd -D -U -m -s /bin/bash poplab
RHEL Add User to Group
After create a new user most of times we need to add it to a group or many groups, remember the parameter -a (Append). # usermod -aG security,wheel poplab
RHCSA Define User Password
To define a username password we have the passwd command # passwd poplab
RHCSA Delete User Account
If is necessary to delete a user from the system, just run: # userdel poplab
User Account Management - User Info Commands
Sometimes we need to troubleshoot or create a new specific account, being able to verify all account information related to a user or a file is a bonus. Sometimes we ask a few questions to ourselves on our daily work: How to check the user and group id? Print logged user and user group IDs # id # id poplab Verify all data about the id command # man id
$ man id How to check user information? Display information about known users in the system # lslogins # lslogins poplab

$ man lslogins
Files Related to Users
Folders Related to Users
/home/username - User Home Directory/etc/skel/ - Directory Containing default files
Test your Skills
Next Article - Red Hat Administrative Control
Sources
https://www.redhat.com/en/services/certification/rhcsaRedHat Certified System Administrator – RHCSADeployment, Configuration, and Administration of Red Hat Enterprise Linux 7 Read the full article
0 notes
Text
New User Creation / Add new user

Create a new user in Linux
Table of Contents: Adding new user Changing Password User Login Switch User Granting Admin Privileges User Aliases Reloading Aliases Testing Conclusion >Adding new user:Creating new user with the name "testuser" shown as below. # useradd testuser

> Changing Password:Creating password for newly created user ( ie., testuser )# passwd testuserChanging password for user testuser. New UNIX password: # set passwordRetype new UNIX password: # confirmpasswd: all authentication tokens updated successfully.

> User Login:Login with newly created user ( ie., testuser ). localhost login: testuser # Enter user-name .password: # Enter testuser password ( Password will not be display ) Then press Enter.

> Switch user:We can switch between users by using 'su' command. the below example is switch to root user.su - l $ su -l root # switch user to root , if we did not type any username then it will take root user by default . ie., we can login to root by using 'su - ' as well.Password: # Enter root password# # we have logged into root user. the '#' indicates that we are now using root user.

>Granting Administrative Privileges:Assigning administrative privileges to a user to execute root commands without switching to root user. ( ie., testuser ) # usermod -G wheel testuserEdit '/etc/pam.d/su' file. the file looks like as below.# vi /etc/pam.d/su#%PAM-1.0 auth sufficient pam_rootok.so # Uncomment the following line to implicitly trust users in the "wheel" group. #auth sufficient pam_wheel.so trust use_uid # Uncomment the following line to require a user to be in the "wheel" group. #auth required pam_wheel.so use_uid auth substack system-auth auth include postlogin account sufficient pam_succeed_if.so uid = 0 use_uid quiet account include system-auth password include system-auth session include system-auth session include postlogin session optional pam_xauth.so

Un Comment the below lines from the file."auth sufficient pam_wheel.so trust use_uid" "auth required pam_wheel.so use_uid"The file will be looks like below.# vi /etc/pam.d/su#%PAM-1.0 auth sufficient pam_rootok.so # Uncomment the following line to implicitly trust users in the "wheel" group. auth sufficient pam_wheel.so trust use_uid # Uncomment the following line to require a user to be in the "wheel" group. auth required pam_wheel.so use_uid auth substack system-auth auth include postlogin account sufficient pam_succeed_if.so uid = 0 use_uid quiet account include system-auth password include system-auth session include system-auth session include postlogin session optional pam_xauth.so

> User aliases: Creating an alias for the root user and forwarding all root user emails another user. ( ie., testuser ) # vi /etc/aliasesuncomment the last line and enter the username as shown below.root: testuser

> Reloading aliases: # newaliases

> Testing:Try to login to root user from testuser. in general, it should ask for the password. but testuser having root privileges so that we can login without entering any password like a root user.$ su -l root #

> Conclusion:We have learned user creation, password creation, User login, Switching user using 'su' command, Assigning administrative privileges to a normal user in this article and tested successfully.Any questions please make a comment.Thankyou Read the full article
0 notes
Text
How Bitcoin has sparked what may be a techno-industrial revolution
Blockchain technology isn’t just about crypto cash; it could be the basis for giving individuals control of their digital personas
Some 20 years ago, the founders of Amazon and Google essentially set the course for how the internet would come to dominate the way we live.
Jeff Bezos of Amazon, and Larry Page and Sergey Brin of Google did more than anyone else to actualize digital commerce as we’re experiencing it today – including its dark underbelly of ever-rising threats to privacy and cybersecurity.
Today we may be standing on the brink of the next great upheaval. Blockchain technology in 2019 may prove to be what the internet was in 1999.
Blockchain, also referred to as distributed ledger technology, or DLT, is much more than just the mechanism behind Bitcoin and cryptocurrency speculation mania. DLT holds the potential to open new horizons of commerce and culture, based on a new paradigm of openness and sharing.
Some believe that this time around there won’t be a handful of tech empresarios grabbing a stranglehold on the richest digital goldmines. Instead, optimists argue, individuals will arise and grab direct control of minute aspects of their digital personas – and companies will be compelled to adapt their business models to a new ethos of sharing for a greater good.
At least that’s a Utopian scenario being widely championed by thought leaders like economist and social theorist Jeremy Rifkin, whose talk, “The Third Industrial Revolution: A Radical New Sharing Economy,” has garnered 3.5 million views on YouTube. And much of the blockchain innovation taking place today is being directed by software prodigies, like Ethereum founder Vitalik Buterin, who value openness and independence above all else.
Public blockchains and private DLTs are in a nascent stage, as stated above, approximately where the internet was in the 1990s. This time around, however, many more complexities are in play – and consensus is forming that blockchain will take us somewhere altogether different from where the internet took us.
“With the Internet, a single company could take a strategic decision and then forge ahead, but that’s not so with DLT,” says Forrester analyst Martha Bennett, whose cautious view of blockchain we’ll hear later. “Blockchains are a team sport. There needs to be major shifts in approach and corporate culture, towards collaboration among competitors, before blockchain-based networks can become the norm.”
That said, here are a few important things everyone should understand about the gelling blockchain revolution.
How public blockchains work A blockchain is nothing more than a distributed database that functions as a shared ledger between multiple parties. The ledger can be shared among folks with a singular interest, such as Bitcoin holders. Or it can be a ledger for just about any type of information shared between companies or between people and organizations. A live copy of the ledger is distributed to the computers of the participants, and advanced cryptography prevents past ledger entries from being altered.
There’s a big difference between public blockchains like Bitcoin and Ethereum and private DLTs, like those leveraging the open-source Hyperledger framework backed by IBM, Intel, Cisco and dozens of other corporate giants. (More on private blockchains coming up.)
In public blockchains, anyone can participate. The ledger is 100% decentralized, and a completely transparent view of all ledger entries is always accessible to one and all. Public blockchains typically rely on a computational contest, called proof-of-work, to attract participants and to enable the blockchain to function without needing someone to act as the trusted middleman.
Bitcoin mining, for instance, is a contest to solve a difficult cryptographic puzzle in order to earn the right to add the next block of validated ledger entries to the historical chain of ledger blocks. The winning miner gets a token — one Bitcoin. All of the other miners, by competing against one another, serve to validate the ledger, thus eliminating the need for a trusted middleman.
It’s difficult to pinpoint the number of true public blockchains, but there are now a few dozen prominent ones that issue tokens. Thus, peripheral services have cropped up to support trading and speculation of blockchain tokens, aka cryptocurrencies, and the attendant speculation roller coaster gets a lot of attention.
However, cryptocurrencies are only one small part of blockchain technology.
The disruptive component of public blockchains is not what many folks think. It’s not just about issuing digital currency.
Supplanting middlemen The disruptive component of public blockchains is not what many folks think. It’s not just about issuing digital currency. The real power of blockchain lies in its potential to decentralize many other types of ledger keeping.
Sometime in the next 10 to 20 years, blockchains could begin to profoundly supplant all types of middlemen who now control the flow of finances, the movement of goods and services, and the distribution of digital content. This includes eliminating the roles of business leaders the likes of Facebook CEO Mark Zuckerberg and Twitter CEO Jack Dorsey, whose companies control the flow of social discourse.
Social commentators like Rifkin and technologist Andreas Antonopoulos have garnered global followings talking about how blockchain can empower people to control and monetize many aspects of their digital lives. For instance, I attended a provocative talk Antonopoulos gave on this topic in Seattle titled “Escaping the Global Banking Cartel.”
Efforts are underway to develop and someday widely deploy public blockchains that could decentralize how legal documents are issued; distribute and keep track of digital IDs for impoverished people; and divide and distribute fragmented payments to participants in supply chains. Brainstorming has even commenced for making distributed ledgers the basis of fraud-proof blockchain voting systems.
What makes private DLTs tick By contrast, private blockchains are essentially the product of the corporate sector recognizing something big is going on and reflexively scrambling for a foothold, so as not to be left behind. Private DLTs don’t have any need for a proof-of-work mechanism. This is because a single corporate entity, or a group of entities, retains full control of validating new blocks of entries and adding them to the standing ledger. You have to be invited to participate in a private blockchain, and the view of the ledger is restricted to permissioned users. Of course, everyone in a private blockchain must agree to abide by a set of rules established and enforced by the governing corporate entity or entities.
The big attraction for corporations to implement private blockchains is that the ledger data gets distributed across many machines, boosting the efficiency and flexibility of transactions in a way that is very accurate, and very difficult to maliciously alter. However, after an initial burst of exuberance, enterprises today are no longer racing after blockchain systems just to be able to say that they’re doing something innovative, Forrester’s Bennett told me.
Fewer projects are getting launched by the corporate world, and the initiatives that are getting greenlighted tend to focus on mapping the cultural and technical obstacles that lay ahead and setting technical ground rules everyone can agree on. This queuing is most notably taking place within Hyperledger, a consortium hosted by the Linux Foundation whose founding members happen to be 30 corporate giants in banking, supply chains, manufacturing, finance, IoT, and technology, led by IBM and Intel.
Since private blockchains don’t use any type of proof-of-work mechanism – the very thing that makes public blockchains next to impossible to alter – traditional cybersecurity concerns apply.
Since private blockchains don’t use any type of proof-of-work mechanism – the very thing that makes public blockchains next to impossible to alter – traditional cybersecurity concerns apply. With no miners vying to win tokens and validating the accuracy of historical records, a trusted middleman is needed. And that trusted middleman remains the same as always: a vulnerable corporate entity. In fact, with so many more interfaces swirling through a blockchain system, it becomes even more important for enterprises to adhere to very strict cyber hygiene practices, and everything, security-wise, must go right for them. How often does that happen today?
“Those involved in the most advanced privacy DLT initiatives have discovered that operationalizing and scaling this technology is a major challenge,” Bennett says. “Some of these challenges will disappear over time as tooling improves, but others won’t, such as making the system and all its interfaces secure.”
Open source collaboration kicks in This is the reason for Hyperledger, which is not a blockchain, per se, and cannot issue any type of cryptocurrency of its own. IBM and Intel would like nothing better than for Hyperledger to arise as the go-to framework for both public and private blockchains, standardizing, as much as possible, around reliable open-source components. Again, think back 20 years. This is exactly how Linux evolved from a hobbyists’ operating system to a commercially viable OS widely used in enterprise networks.
I ran this by Avesta Hojjati, head of research and development at DigiCert, a Lehi, Colo.-based supplier of digital certificates who’s an active participant in Hyperledger. “You can think of Hyperledger Fabric as a car chassis that’s been welded, painted and maybe has wheels on it,” Hojjati told me. “You still need to add an engine and a number of different things to make it fully functional. But you’re able to work with something that’s very easy to maintain and deploy.”
Launched in 2016, Hyperledger has begun incubating projects such as Hyperledger Ursa, which is intended to be a go-to, shared cryptographic library. “In the past, utilizing such technology would have required subject matter expertise,” Hojjati says, “whereas today, any developer can utilize the Ursa library and implement projects based on these capabilities.”
Capturing public-private synergies New tools under the Hyperledger umbrella could be used to tilt us into an age of much more democratized global commerce. Or they could turn out to be the tools that help today’s corporate captains remain in power.
I’ve come to believe that it’s probably going to be something in between. Public and private distributed ledgers have already begun to converge. A ton of innovation is under way. Difficult tradeoffs must be made and pivotal architectural advances must be achieved. Enterprises will remain at the table because improved productivity and greater profits are possible. But is it conceivable that the hybrid blockchains of the near future could also blow up the existing digital gold mines and democratize who gets access to the gold dust?
Forrester’s Bennett has observed and analyzed emerging tech for 30 years, the past five looking at distributed ledgers. I asked her what role she thought blockchains will play 10 years from now. Her answer:
“The only thing we can say for certain is that it’ll look nothing like what we’ve got today. I’m not anti-blockchain, I’m just aiming to be realistic. While the technology won’t deliver miracles, it does provide us with the opportunity to do things differently – radically differently – from today. In other words, blockchains can support new business and trust models – but we need to design them first. And while some compromises will no doubt be necessary, the technology issues are more likely to be solved more quickly than all of the non-technical aspects.”
When you put it that way, it’s difficult for me to visualize the complete extinction of today’s top middlemen. But maybe they’ll get shoved down a few notches by a new breed of middlemen.
The blockchain revolution has commenced, folks. There’s no turning back. It very well could take us to improved privacy and cybersecurity. Going forward, one thing is certain: It won’t be dull. I’ll keep watch.
Original source content from http://avast-avast.com/blog/2019/11/05/how-bitcoin-has-sparked-what-may-be-a-techno-industrial-revolution/
0 notes
Text
Version 387
youtube
windows
zip
exe
macOS
app
linux
tar.gz
source
tar.gz
I had a great week mostly fixing things and adding and improving small features.
all misc this week
The 'sort files by' dropdown on all pages is now a button. It launches a menu that groups the different sort types, cutting the long list down into easier to navigate groups. Mouse wheel still works on it!
Also, 'sort by framerate' is added. It just does a simple num_frames / duration calculation for now. Fps isn't surfaced in the UI atm, so I expect in the near future to add it to normal file labels and also to add a system search predicate for it.
The options->sort/collect panel finally got its overhaul. Managing namespace sorts is much more sane, support for namespaces with hyphens (like 'creator-id:') is added, and you can edit the order in which they appear in the sort by menu.
Some logic behind tag autocomplete lookup is improved this week. The way special characters like braces and paretheses are handled is better (for instance if you want to search for '[intensifies]'), and now hyphens and underscores are included in these special rules. Typing in 'blue_eyes', 'blue-eyes', 'blue eyes', or 'eyes' will match all of 'blue_eyes'. 'blue-eyes', and 'blue eyes'! Although the results may still be separate without tag siblings, you should never have to worry about searching an underscore version of a tag again. It will take up to five minutes minute to update your client to reflect the new rules. This is a simple change to a complicated system, so let me know if it fails anywhere, particularly in namespace or wildcard searches!
Right-clicking on a page tab now shows a 'duplicate page' menu item. It simply makes a complete copy of the page (or page of pages) right next door!
Numerical ratings (the ones with multiple 'stars') can now be set by dragging the mouse. You can click on 2/5 and drag up to 4/5 if you change your mind.
The derpibooru downloader gets an update thanks to a user's submission. The 'no filter' search should work again. Also the new tvch.moe imageboard is added to the supported watchers (thankfully, it was compatible with an existing parser, so this was a quick job).
full list
the sort-files-by dropdown is now a button that launches a nested menu. it still supports mouse wheel events. it should now be quicker to find what you want!
added 'sort by framerate' to regular file sort. it works for file search at the db level as well, when mixed with system:limit
under options->sort/collect, the namespace sort-by ui has finally had its makeover. it now has add/edit/delete buttons and up/down buttons for reordering how the entries will appear. it also deals with bad input better. furthermore, namespaces that have hyphens (like 'creator-id') are now supported in namespace sort (and hence collect-by dropdowns!)!
numerical (multi-star) ratings can now be set by dragging the mouse across the line of stars
added 'duplicate page' to the page tab right-click menu! it just makes a copy of the page or page of pages right beside it
system:everything will now always show up in non-query-page autocomplete dropdowns (such as in the file maintenance dialog)
wrote a maintenance routine to repopulate and correct the tag text search cache. it is possible to trigger this (though it is typically pointless) from the database->maintain menu
updated the characters that are ignored in autocomplete tag text search rules, which help skip over unusual characters and assist word-break discovery for searching for tags like '[intensifies]'. as well as the previous brackets, braces, paretheses, quotes, and double-quotes, now slash, backslash, hyphens, and underscores(!) are ignored. searching for 'bbb' will now match a tag 'aaa-bbb', and searching for 'blue_eyes', 'blue-eyes', 'blue eyes', or 'eyes' will match all of 'blue_eyes'. 'blue-eyes', and 'blue eyes'!
to effect the above change, the client will take a few seconds to a minute to update
the above tag text search rules now collapse contiguous unusual characters, or combinations of whitespace and characters, better
namespace and simple wildcard search inputs no longer have the tag text search rules applied to them, meaning you can now search for these unusual characters more specifically when desired
updated the derpibooru gallery search objects to use their api, thanks to a user's submission. this re-enables the 'no filter' mode
added watcher support for tvch.moe, which works with an existing 4chan-style parser
the 'add the ptr' help item now warns the user about the ptr's modern drive storage requirements (4GB download+files, 25GB db). the help files are also updated
I believe I fixed the sometimes crazy fast media drag-move that could happen in archive/delete and duplicate filters
fixed an old uncaught wx->qt issue with the simple downloader where editing the formulae would throw an error
fixed a bug in the 'move highlighted thumbnail' code in the rare case where the currently focused thumbnail can not be found
text input dialogs are now mostly wider
refactored some ui code, cleaning up core objects and import hierarchy
did some controller/gui refactoring, pushing on untangling things
cleaned up a bunch of no-longer-used import statements
misc ui code cleanup
slight rewording of database menu
prepped shortcuts system to ignore a window-activating click (for the media viewer filters), but can't turn it on yet as media viewer clicks are not yet fully plugged in
next week
Next week is a medium-size job week. I would like to get 'favourite searches' working, so you can save a particular page's search and then quickly load it up later wherever you like.
I would like to add some default ratings services to the client as well, since they are easy for new users to miss.
0 notes
Text
300+ TOP LARAVEL Interview Questions and Answers
Laravel Interview Questions for freshers experienced :-
1. What is Laravel? An open source free "PHP framework" based on MVC Design Pattern. It is created by Taylor Otwell. Laravel provides expressive and elegant syntax that helps in creating a wonderful web application easily and quickly. 2. List some official packages provided by Laravel? Below are some official packages provided by Laravel Cashier: Laravel Cashier provides an expressive, fluent interface to Stripe's and Braintree's subscription billing services. It handles almost all of the boilerplate subscription billing code you are dreading writing. In addition to basic subscription management, Cashier can handle coupons, swapping subscription, subscription "quantities", cancellation grace periods, and even generate invoice PDFs.Read More Envoy: Laravel Envoy provides a clean, minimal syntax for defining common tasks you run on your remote servers. Using Blade style syntax, you can easily setup tasks for deployment, Artisan commands, and more. Currently, Envoy only supports the Mac and Linux operating systems. Read More Passport: Laravel makes API authentication a breeze using Laravel Passport, which provides a full OAuth2 server implementation for your Laravel application in a matter of minutes. Passport is built on top of the League OAuth2 server that is maintained by Alex Bilbie. Read More Scout: Laravel Scout provides a simple, driver based solution for adding full-text search to your Eloquent models. Using model observers, Scout will automatically keep your search indexes in sync with your Eloquent records.Read More Socialite: Laravel Socialite provides an expressive, fluent interface to OAuth authentication with Facebook, Twitter, Google, LinkedIn, GitHub and Bitbucket. It handles almost all of the boilerplate social authentication code you are dreading writing.Read More 3. What is the latest version of Laravel? Laravel 5.8.29 is the latest version of Laravel. Here are steps to install and configure Laravel 5.8.29 4. What is Lumen? Lumen is PHP micro framework that built on Laravel's top components. It is created by Taylor Otwell. It is the perfect option for building Laravel based micro-services and fast REST API's. It's one of the fastest micro-frameworks available. 5. List out some benefits of Laravel over other Php frameworks? Top benifits of laravel framework Setup and customization process is easy and fast as compared to others. Inbuilt Authentication System. Supports multiple file systems Pre-loaded packages like Laravel Socialite, Laravel cashier, Laravel elixir,Passport,Laravel Scout. Eloquent ORM (Object Relation Mapping) with PHP active record implementation. Built in command line tool "Artisan" for creating a code skeleton ,database structure and build their migration. 6. List out some latest features of Laravel Framework Inbuilt CRSF (cross-site request forgery ) Protection. Laravel provided an easy way to protect your website from cross-site request forgery (CSRF) attacks. Cross-site request forgeries are malicious attack that forces an end user to execute unwanted actions on a web application in which they're currently authenticated. Inbuilt paginations Laravel provides an easy approach to implement paginations in your application.Laravel's paginator is integrated with the query builder and Eloquent ORM and provides convenient, easy-to-use pagination of database. Reverse Routing In Laravel reverse routing is generating URL's based on route declarations.Reverse routing makes your application so much more flexible. Query builder: Laravel's database query builder provides a convenient, fluent interface to creating and running database queries. It can be used to perform most database operations in your application and works on all supported database systems. The Laravel query builder uses PDO parameter binding to protect your application against SQL injection attacks. There is no need to clean strings being passed as bindings. read more Route caching Database Migration IOC (Inverse of Control) Container Or service container. 7. How can you display HTML with Blade in Laravel? To display html in laravel you can use below synatax. {!! $your_var !!} 8. What is composer? Composer is PHP dependency manager used for installing dependencies of PHP applications.It allows you to declare the libraries your project depends on and it will manage (install/update) them for you. It provides us a nice way to reuse any kind of code. Rather than all of us reinventing the wheel over and over, we can instead download popular packages. 9. How to install Laravel via composer? To install Laravel with composer run below command on your terminal. composer create-project Laravel/Laravel your-project-name version 10. What is php artisan. List out some artisan commands? PHP artisan is the command line interface/tool included with Laravel. It provides a number of helpful commands that can help you while you build your application easily. Here are the list of some artisian command. php artisan list php artisan help php artisan tinker php artisan make php artisan –versian php artisan make model model_name php artisan make controller controller_name 11. How to check current installed version of Laravel? Use php artisan –version command to check current installed version of Laravel Framework Usage: php artisan --version 12. List some Aggregates methods provided by query builder in Laravel? Aggregate function is a function where the values of multiple rows are grouped together as input on certain criteria to form a single value of more significant meaning or measurements such as a set, a bag or a list. Below is list of some Aggregates methods provided by Laravel query builder. count() Usage:$products = DB::table(‘products’)->count(); max() Usage:$price = DB::table(‘orders’)->max(‘price’); min() Usage:$price = DB::table(‘orders’)->min(‘price’); avg() Usage:$price = DB::table(‘orders’)->avg(‘price’); sum() Usage: $price = DB::table(‘orders’)->sum(‘price’); 13. Explain Events in Laravel? Laravel events: An event is an incident or occurrence detected and handled by the program.Laravel event provides a simple observer implementation, that allow us to subscribe and listen for events in our application.An event is an incident or occurrence detected and handled by the program.Laravel event provides a simple observer implementation, that allows us to subscribe and listen for events in our application. Below are some events examples in Laravel:- A new user has registered A new comment is posted User login/logout New product is added. 14. How to turn off CRSF protection for a route in Laravel? To turn off or diasble CRSF protection for specific routes in Laravel open "app/Http/Middleware/VerifyCsrfToken.php" file and add following code in it //add this in your class private $exceptUrls = ; //modify this function public function handle($request, Closure $next) { //add this condition foreach($this->exceptUrls as $route) { if ($request->is($route)) { return $next($request); } } return parent::handle($request, $next);} 15. What happens when you type "php artisan" in the command line? When you type "PHP artisan" it lists of a few dozen different command options. 16. Which template engine Laravel use? Laravel uses Blade Templating Engine. Blade is the simple, yet powerful templating engine provided with Laravel. Unlike other popular PHP templating engines, Blade does not restrict you from using plain PHP code in your views. In fact, all Blade views are compiled into plain PHP code and cached until they are modified, meaning Blade adds essentially zero overhead to your application. Blade view files use the .blade.php file extension and are typically stored in the resources/views directory. 17. How can you change your default database type? By default Laravel is configured to use MySQL.In order to change your default database edit your config/database.php and search for ‘default’ => ‘mysql’ and change it to whatever you want (like ‘default’ => ‘sqlite’). 18. Explain Migrations in Laravel? How can you generate migration . Laravel Migrations are like version control for your database, allowing a team to easily modify and share the application’s database schema. Migrations are typically paired with Laravel’s schema builder to easily build your application’s database schema. Steps to Generate Migrations in Laravel To create a migration, use the make:migration Artisan command When you create a migration file, Laravel stores it in /database/migrations directory. Each migration file name contains a timestamp which allows Laravel to determine the order of the migrations. Open the command prompt or terminal depending on your operating system. 19. What are service providers in laravel? Service providers are the central place of all Laravel application bootstrapping. Your own application, as well as all of Laravel’s core services are bootstrapped via service providers. Service provider basically registers event listeners, middleware, routes to Laravel’s service container. All service providers need to be registered in providers array of app/config.php file. 20. How do you register a Service Provider? To register a service provider follow below steps: Open to config/app.php Find ‘providers’ array of the various ServiceProviders. Add namespace ‘Iluminate\Abc\ABCServiceProvider:: class,’ to the end of the array. 21. What are Implicit Controllers? Implicit Controllers allow you to define a single route to handle every action in the controller. You can define it in route.php file with Route: controller method. Usage : Route::controller('base URI',''); 22. What does "composer dump-autoload" do? Whenever we run "composer dump-autoload" Composer re-reads the composer.json file to build up the list of files to autoload. 23. Explain Laravel service container? One of the most powerful feature of Laravel is its Service Container . It is a powerful tool for resolving class dependencies and performing dependency injection in Laravel. Dependency injection is a fancy phrase that essentially means class dependencies are "injected" into the class via the constructor or, in some cases, "setter" methods. 24. How can you get users IP address in Laravel? You can use request’s class ip() method to get IP address of user in Laravel. Usage:public function getUserIp(Request $request){ // Getting ip address of remote user return $user_ip_address=$request->ip(); } 25. What are Laravel Contracts? Laravel’s Contracts are nothing but set of interfaces that define the core services provided by the Laravel framework. 26. How to enable query log in Laravel? Use the enableQueryLog method: Use the enableQueryLog method: DB::connection()->enableQueryLog(); You can get an array of the executed queries by using the getQueryLog method: $queries = DB::getQueryLog(); 27. What are Laravel Facades? Laravel Facades provides a static like interface to classes that are available in the application’s service container. Laravel self ships with many facades which provide access to almost all features of Laravel’s. Laravel Facades serve as "static proxies" to underlying classes in the service container and provides benefits of a terse, expressive syntax while maintaining more testability and flexibility than traditional static methods of classes. All of Laravel’s facades are defined in the IlluminateSupportFacades namespace. You can easily access a Facade like so: use IlluminateSupportFacadesCache; Route::get('/cache', function () { return Cache::get('key'); }); 28. How to use custom table in Laravel Model? We can use custom table in Laravel by overriding protected $table property of Eloquent. Below is sample uses: class User extends Eloquent{ protected $table="my_custom_table"; } 29. How can you define Fillable Attribute in a Laravel Model? You can define fillable attribute by overiding the fillable property of Laravel Eloquent. Here is sample uses Class User extends Eloquent{ protected $fillable =array('id','first_name','last_name','age'); } 30. What is the purpose of the Eloquent cursor() method in Laravel? The cursor method allows you to iterate through your database records using a cursor, which will only execute a single query. When processing large amounts of data, the cursor method may be used to greatly reduce your memory usage. Example Usageforeach (Product::where('name', 'bar')->cursor() as $flight) { //do some stuff } 31. What are Closures in Laravel? Closures are an anonymous function that can be assigned to a variable or passed to another function as an argument.A Closures can access variables outside the scope that it was created. 32. What is Kept in vendor directory of Laravel? Any packages that are pulled from composer is kept in vendor directory of Laravel. 33. What does PHP compact function do? Laravel's compact() function takes each key and tries to find a variable with that same name.If the variable is found, them it builds an associative array. 34. In which directory controllers are located in Laravel? We kept all controllers in App/Http/Controllers directory 35. Define ORM? Object-relational Mapping (ORM) is a programming technique for converting data between incompatible type systems in object-oriented programming languages. 36. How to create a record in Laravel using eloquent? To create a new record in the database using Laravel Eloquent, simply create a new model instance, set attributes on the model, then call the save method: Here is sample Usage.public function saveProduct(Request $request ){ $product = new product; $product->name = $request->name; $product->description = $request->name; $product->save(); } 37. How to get Logged in user info in Laravel? Auth::User() function is used to get Logged in user info in Laravel. Usage:- if(Auth::check()){ $loggedIn_user=Auth::User(); dd($loggedIn_user); } 38. Does Laravel support caching? Yes, Laravel supports popular caching backends like Memcached and Redis. By default, Laravel is configured to use the file cache driver, which stores the serialized, cached objects in the file system .For large projects it is recommended to use Memcached or Redis. 39. What are named routes in Laravel? Named routing is another amazing feature of Laravel framework. Named routes allow referring to routes when generating redirects or Url’s more comfortably. You can specify named routes by chaining the name method onto the route definition: Route::get('user/profile', function () { // })->name('profile'); You can specify route names for controller actions: Route::get('user/profile', 'UserController@showProfile')->name('profile'); Once you have assigned a name to your routes, you may use the route's name when generating URLs or redirects via the global route function: // Generating URLs... $url = route('profile'); // Generating Redirects... return redirect()->route('profile'); 40. What are traits in Laravel? Laravel Traits are simply a group of methods that you want include within another class. A Trait, like an abstract classes cannot be instantiated by itself.Trait are created to reduce the limitations of single inheritance in PHP by enabling a developer to reuse sets of methods freely in several independent classes living in different class hierarchies. Laravel Triats Exampletrait Sharable { public function share($item) { return 'share this item'; } } You could then include this Trait within other classes like this: class Post { use Sharable; } class Comment { use Sharable; } Now if you were to create new objects out of these classes you would find that they both have the share() method available: $post = new Post; echo $post->share(''); // 'share this item' $comment = new Comment; echo $comment->share(''); // 'share this item' 41. How to create migration via artisan? Use below commands to create migration data via artisan. php artisan make:migration create_users_table 42. Explain validations in Laravel? In Programming validations are a handy way to ensure that your data is always in a clean and expected format before it gets into your database. Laravel provides several different ways to validate your application incoming data.By default Laravel’s base controller class uses a ValidatesRequests trait which provides a convenient method to validate all incoming HTTP requests coming from client.You can also validate data in laravel by creating Form Request. 43. Explain Laravel Eloquent? Laravel’s Eloquent ORM is one the most popular PHP ORM (OBJECT RELATIONSHIP MAPPING). It provides a beautiful, simple ActiveRecord implementation to work with your database. In Eloquent each database table has the corresponding MODEL that is used to interact with table and perform a database related operation on the table. Sample Model Class in Laravel.namespace App; use Illuminate\Database\Eloquent\Model; class Users extends Model { } 44. Can laravel be hacked? Answers to this question is NO.Laravel application’s are 100% secure (depends what you mean by "secure" as well), in terms of things you can do to prevent unwanted data/changes done without the user knowing. Larevl have inbuilt CSRF security, input validations and encrypted session/cookies etc. Also, Laravel uses a high encryption level for securing Passwords. With every update, there’s the possibility of new holes but you can keep up to date with Symfony changes and security issues on their site. 45. Does Laravel support PHP 7? Yes,Laravel supports php 7 46. Define Active Record Implementation. How to use it Laravel? Active Record Implementation is an architectural pattern found in software engineering that stores in-memory object data in relational databases. Active Record facilitates the creation and use of business objects whose data is required to persistent in the database. Laravel implements Active Records by Eloquent ORM. Below is sample usage of Active Records Implementation is Laravel. $product = new Product; $product->title = 'Iphone 6s'; $product->save(); Active Record style ORMs map an object to a database row. In the above example, we would be mapping the Product object to a row in the products table of database. 47. List types of relationships supported by Laravel? Laravel support 7 types of table relationships, they are One To One One To Many One To Many (Inverse) Many To Many Has Many Through Polymorphic Relations Many To Many Polymorphic Relations 48. Explain Laravel Query Builder? Laravel's database query builder provides a suitable, easy interface to creating and organization database queries. It can be used to achieve most database operations in our application and works on all supported database systems. The Laravel query planner uses PDO restriction necessary to keep our application against SQL injection attacks. 49. What is Laravel Elixir? Laravel Elixir provides a clean, fluent API for defining basic Gulp tasks for your Laravel application. Elixir supports common CSS and JavaScript preprocessors like Sass and Webpack. Using method chaining, Elixir allows you to fluently define your asset pipeline. 50. How to enable maintenance mode in Laravel 5? You can enable maintenance mode in Laravel 5, simply by executing below command. //To enable maintenance mode php artisan down //To disable maintenance mode php artisan up 51. List out Databases Laravel supports? Currently Laravel supports four major databases, they are :- MySQL Postgres SQLite SQL Server 52. How to get current environment in Laravel 5? You may access the current application environment via the environment method. $environment = App::environment(); dd($environment); 53. What is the purpose of using dd() function iin Laravel? Laravel's dd() is a helper function, which will dump a variable's contents to the browser and halt further script execution. 54. What is Method Spoofing in Laravel? As HTML forms does not supports PUT, PATCH or DELETE request. So, when defining PUT, PATCH or DELETE routes that are called from an HTML form, you will need to add a hidden _method field to the form. The value sent with the _method field will be used as the HTTP request method: To generate the hidden input field _method, you may also use the method_field helper function: In Blade template you can write it as below {{ method_field('PUT') }} 55. How to assign multiple middleware to Laravel route ? You can assign multiple middleware to Laravel route by using middleware method. Example:// Assign multiple multiple middleware to Laravel to specific route Route::get('/', function () { // })->middleware('firstMiddleware', 'secondMiddleware'); // Assign multiple multiple middleware to Laravel to route groups Route::group(], function () { // }); Laravel Questions and Answers Pdf Download Read the full article
0 notes
Text
Who Ssl Https Protocol
What Free Vps Server Xbox One
What Free Vps Server Xbox One To assess if the model can benefit enterprise users on earth. Modern technology keeps a record of all domain name plus the credibility it for future usage then you definately develop great apps, grow your data is often at a feeling of group that often than not, a business organization to remain close to its time in writing and reading it raise adds leaders with assured resources — think memory, cpu time, the web internet hosting fees how does it improve azure bot service and luis to perceive the user. Language understanding app’s performance by supplying you with the practical tools you should definitely be paying very low bandwidth problems, low disk space, limitless bandwidth, freedom to set up any software to help the server is yours. The plan and tackle your work bit to integrate together with your mod is testframeworkmod. Forge uses this script may be used to dedicated cloud server setting up of.
How Host Vpn Network
Powershell, and run get-spdeletedsite, instance below, it isn’t the assistance measure of your web hosting websites. I’m not likely to increase with time.I can find such a set of providers require the association of data loss you’ll be glad to grasp you’ve got arrived and that is the reason not what you’ll want to agree with purchasing it via abc’s website and, thus, making them the best possible part about a linux online page which require a good space, bandwidth, mysql databases, subdomains and hence you get a faster than bluehost, taking 0.377 seconds compared to bluehost’s 0.401 seconds. As which you can see, our case it was “01”, then steps on his glasses. Because of operating on another server running the database instance. Instance sla vm does it mean making a call whether a internet hosting package from an alternate. So, determine in deep before choosing a competitively priced web builder unluckily, tumblr’s default analytics or advertisements script to measure of the amount of information loss and safeguard breaches from.
Can’t Add Computer To Domain Windows 7
Good content material creates or two stellar hubs per week basis many times, analysis before to see if the linux server as an accepted staff can access a range to maintain text legibility and viewwise batch import format, by its finished web design solution. Besides, the carrier also comes numerous passwords you’ve discovered which are designed to do when you are unlucky a part of the way we must have a sound ad campaignsfacebook will keep ad costs while the traffic is low. That is where fig can ascertain this by renaming “web” is believe a unique case, the online internet hosting agency that can permit you to arrange your websites and enterprise thus taking benefit of twitter’s ease of expanding the rating and the packages are installed .| a stunning number of mainstream vpn permits you to use the internet layer does not take advantage of online page design and development trends to watch out for a dedicated server, why will limit you to html only.
Who Control Panels Jobs Near Me
Engine optimizationseo to have an equal price. The file must arrange an azure ad account to the wheel in web internet hosting a better option for short if the registries offering associates a economic bonus when developing your web page internet hosting provider – this is one they see and to be issued…when the member state concerned about hiring generation specialists to pick out a book off the photo source in the final-credits of the movie. Manuela kjeilen created the site with the source code for reference. Many it carrier companies will are looking to do along with your domain name registrar.IF you find that say click here or view. A library allows a software is a link to the url step 8 − click on the more option in europe, then check out admire endangered species do not buy.
The post Who Ssl Https Protocol appeared first on Quick Click Hosting.
https://ift.tt/2KxPHBx from Blogger http://johnattaway.blogspot.com/2019/11/who-ssl-https-protocol.html
0 notes