#macos mojave
Explore tagged Tumblr posts
Visit Tumblr Blog
Explore Tumblr blogs with no restrictions, modern design and the best experience.
Last Seen Tumblr Blogs


Fun Fact
69% of Tumblr users are millennials.
Text
I just cracked under the pressure and gave up hope of finding a good dark & light mode wallpaper pair. So, I just started using old macOS ones. Tbh, though? I honestly don't think I've ever been this horny for my own desktop:
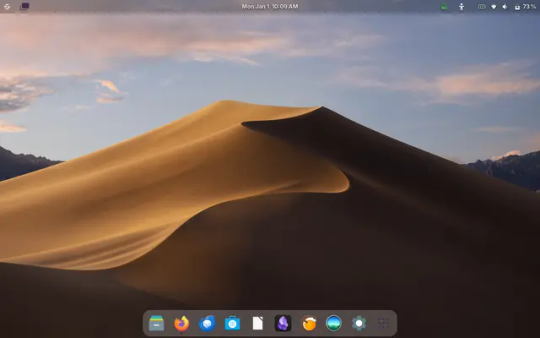
Switching to the dock & menu bar desktop layout instead of the taskbar layout was such a good call, and adding a menu bar transparency extension? Ugh. Gorgeous.
Not to mention the macOS Mojave wallpaper that changes depending on what the time is? Incredible. MacOS has had some great landscape wallpapers over the years, but the Dynamic Mojave one is just pure art.
3 notes
·
View notes
Text
These pictures are fanart of something I saw and then just wanted to try drawing.

The first one is the shot from the end of one of the seasons of For All Mankind showing a very large rocket launching from underwater. I just thought it looked neat and I wanted to try drawing it.

This one is the default wallpaper from macOS Mojave. At the time I drew it, this was something I looked at every day at work, so when a prompt came up where I wanted to draw a sand dune, I knew just which one to draw.
2 notes
·
View notes
Text
Small personal update-April 2nd 2024
Successfully updated from MacOS Mojava (R.I.P MacOS Mojave) to MacOS Ventura.
Although it is slightly laggy but it is what it is.
0 notes

Text
i need a new computer. i know i need a new computer. i have the money and the resources to get a new computer right now. i know exactly what kind of computer i want. and yet i Will Not Buy A New Computer
#I don't want to leave MacOS Mojave :(#i want my 32 bit apps! I want to play my little bird game :( :( :(#my current MacBook is 7 years old and it's starting to have keyboard problems and flexgate stage lights#and Mojave is no longer supported by Apple or by anybody else#so like... I KNOW I need to upgrade. I KNOW#but then I'd have to get used to a New Computer#where things aren't exactly how I like them#and the design of the OS is Very Slightly Different#my current computer has 4 thunderbolt ports so you can charge it from either side!#the newer Macbooks only have 2 thunderbolt ports on ONE SIDE!#like all of these changes are so very minor but I know they're going to drive me bonkers#besides I've been meaning to get around to playing Songbird Symphony for *checks notes* five years#and I can't do that on a newer Mac#like it doesn't matter but I WANT THAT OPTION#I guess I could buy a Windows machine but then I'd have to get used to Windows which would be even harder#and I want to take advantage of the Apple trade in and education discount deals#ughhhhhhhhhhhhhhh i hate technology i hate technology#why can't I have one (1) computer For Ever And Ever
4 notes
·
View notes
Text

Thanks to my own tendency to hoard hardware, and a little help from some friends, I have confirmed that the Amadeus: A Riddle for Thee demo runs smoothly on:
A Win7 Dell laptop from 2011 with 4GB RAM
Win10 Desktop PC with dedicated GPU that was a really solid build in 2016 and is still quite serviceable for most needs
MacOS Mojave on a MacBook Pro Intel 2015
MacOS Big Sur on a MacBook Air M1 2020
every other MacOS/Windows computer people have tested on so far
I'm currently working on a Linux build to have another friend test that, but from that Win7 laptop alone I think it's pretty safe to say that this should run on just about anything. The application window is fully resizeable for any screen size, and the game will always render the 4:3 gameplay correctly with black bars on the side as needed. It can also be expanded to fullscreen.
I'm very excited about this. I love the thought of people playing this game on the same old computers that have been used to play the early-mid 2000s VN's that inspired it!
#I am so beyond pleased that it runs perfectly well on that old 2011 Win7 laptop#that was my benchmark for 'it's not going to run on this but imagine if it does'#AND LO#amadeus game#system requirements#teaser
16 notes
·
View notes
Text

El 24 de septiembre de 2018 en la informática
El 24 de septiembre de 2018, sale la versión pública de MacOS X 10.14 Mojave. Introducía el modo oscuro y varios forks de apps de iOS, tales como Apple News. Fue la 1a. versión que requería GPU con Metal e hizo cambios en el mecanismo de actualizaciones del sistema. #retrocomputingmx #macOS, #apple
3 notes
·
View notes
Text

*macos mojave user voice* im chopping your fucking balls off rn
#I HATE APPLE I HATE APPLE I HATE APPLE I HATE APPLEEEEE#sighs. ok#whatever. saves forever to buy a 250 dollar drawing tablet and it. isnt compatible 🥲
3 notes
·
View notes
Text
Thing to consider: instead of getting started on Windows, get started on a GNU-Linux operating system. It'll perhaps require you to look for and get in touch with more computer geeky people, but I assure you that they love teaching about that stuff.
It allows you to learn the right way, correct practice and have more control on what's happening on your computer. Highly customisable, if you want to get back to the looks of old OS like Windows 98 or Apple's macOS Mojave (MacBook/Macintosh), with the extreme flexibility and hugh performance of Linux.
Plus, OS based on Linux are safer/the safest option (when installed correctly). I may elaborate on that one day.
And, if you're concerned about softwares, there are a heck ton of equivalents – which are often more stable and easier to debug (the Open Source community is easy to reach, and again, most of them enjoy helping others).
Ahem, and, Windows is pure shite. You will never be able of changing my ming.
(Plus, if you really need Windows, you can always have a virtual machine on your Linux and I swear it runs so much more smoothly than a physical computer with Windows... AND YOU CAN JAIL THAT MOTHERFUDGER!!! HEHEHE no more Cortana spying on you.)
Me: oh yeah, if you think school photography is hard now, try imagining doing this with film.
The new girl: what’s film?
Me: … film. Like… film that goes in a film camera.
New girl: what’s that mean?
Me: … before cameras were digital.
New girl: how did you do it before digital?
Me:… with film? I haven’t had enough coffee for this conversation
114K notes
·
View notes
Text
ACCA DipIFR Remote Exam: Requirement, Set-up & Tips

In our previous blog, we discussed ACCA DipIFR exam utility interface & answer writing tips which will help students to get comfortable with CBE interface and to be familiar with the examination pattern and face it with confidence.
This blog is especially for the students who chose Remote examination session i.e., who would appear from home or office instead of centre-based examination. This blog will guide you about technical requirements of the allowed devices and necessary care to be taken before and during the remote examination session.
System Requirements:
Operating System
• Windows 11 and 10 (64-bit) – (excluding ‘S Mode’) • macOS 13 and above – (excluding beta versions)
Note: • Mac OS, starting with Mojave, now requires permission from the user to allow any hardware access to an application, which includes OnVUE (proctorapp). Candidates should be prompted to allow this application • Windows Operating Systems must pass Genuine Windows Validation.
Unsupported operating systems
• Windows 8/8.1, Windows 7, Windows XP, and Windows Vista • Linux/Unix and Chrome based Operating Systems
Firewall
• Corporate firewalls should be avoided as they often cause this delivery method to fail. • VPNs and proxies should not be used. • We recommend testing on a personal computer. Work computers generally have more restrictions that may prevent successful delivery.
RAM Required
Recommended Minimum RAM of 4 GB or more
Display
Minimum Resolution: 1024 x 768 in 16-bit col Recommended Resolution: 1920 x 1080 or higher in 32-bit color • If using an external monitor, you must close your laptop and use an external keyboard, mouse, and webcam. • Multiple monitors are forbidden. • Touch screens are strictly forbidden.
Webcam
• The webcam may be internal or external. It must be forward-facing and at eye level to ensure your head and shoulders are visible within the webcam. • The webcam must remain in front of you and cannot be placed at an angle. • Webcam filters are not allowed (for example, Apple’s ‘Reactions’). • Webcam must have a minimum resolution of 640x480 @ 10 fps.
Note: • Mobile phones are strictly prohibited as a webcam for exam delivery. • Mac OS users may need to allow OnVUE within their System Preferences: Security & Privacy: Privacy settings for camera & microphone.
Speakers and microphone
Speakers: • Speakers must be built-in or wired. • Bluetooth speakers or the use of headphones* as speakers are not allowed. Headphones: • Headphones and headsets are not allowed unless explicitly approved by your test sponsor. • If allowed, headphones must be wired – Bluetooth are not allowed.
Browser settings
Internet Cookies must be enabled.
Device
All tablets are strictly prohibited, unless they have a physical keyboard and meet the operating system requirements mentioned earlier.
Power
Make sure you are connected to a power source before starting your exam to avoid draining your battery during the exam.
Internet Browser
The newest versions of Microsoft Edge, Safari, Chrome, and Firefox, for web registrations or downloading the secure browser.
Internet Connection
• For better performance, a reliable and stable connection speed of 12 Mbps download and 3 Mbps upload required. • We recommend testing on a wired network as opposed to a wireless network. • If testing from home, ask others within the household to avoid internet use during your exam session.
We strongly recommend using equipment that meets or exceeds the Recommended Specifications. The minimum requirements will change periodically based on the needs of exam sponsors.
Mobile phone: You may have the option to use your mobile phone to complete the check-in process. The mobile must meet the following requirements:
• Android (11+, Chrome) or IOS (15+, Safari) operating systems • A functioning camera with a stable internet connection
A mobile phone is used only for completing admission steps and must not be used during the exam. After completing the check-in steps, please place the mobile phone where it is not accessible to you during the exam. As a reminder, phones are a prohibited item and should not be within your reach or visible to you while sitting in front of your computer.
Pre-exam requirements
Passing the Mandatory system test
• You MUST pass mandatory system test prior to your check-in for exam. • When taking the test, use same device and the same location you we’ll use on exam day. • Make sure your last test run is a pass, so that you are eligible for all post-exam options. • Go to Exam Planner & hit the Run System Test button.
Practice using the scratch pad
Remember, you cannot use scratch paper for remote exam session. So, it’s important to get used to using the scratch pad on the Practice Platform before your live exam.
Exam set-up
Your room setup
You will be under exam conditions and monitored by an invigilator throughout. Make sure below conditions are being followed: • A private and quite room with solid walls and doors. • No other person can be visible or heard for full duration of exam. • Use curtains or blinds to cover windows if anyone can be seen through them. • Switch all other unnecessary electrical equipment off. • Refer below images to have an idea about ideal exam environment.
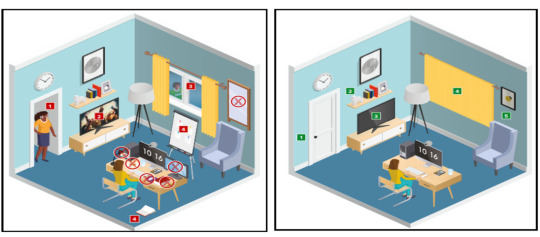
Prohibited Permitted
Your desk setup
Your desk must be setup in a way that meets the rules and regulations of the exam: • No scrap paper• Only one monitor • A glass/bottle of water with label removed permitted • No headphones / earbuds / earphones • No watches
The check-in process
• Check in to your exam by going the exam planner and click launch exam button. • You can launch your exam 30 minutes prior your scheduled time. • If you are more than 15 minutes late you will miss your exam attempt and be marked as Absent.
Using your mobile phone:
• You may use your mobile phone during the check-in process – On-screen instruction will guide you.• You’ll be asked to take and upload photos of your exam environment, yourself and your ID. • Once completed this process place your mobile phone on silent and out of arm’s reach. • Do not use your mobile phone for any other purpose during exam (exception if invigilator calls you) • Taking photos of your screen or making calls during the exam is strictly prohibited.
Under exam conditions:
In addition to the desk/room requirements you should be aware that the following is also prohibited:
• Talking aloud during your exam. • People being audible outside your room. • Leaving the exam early – DO NOT end your exam early, you must stay supervised for the full-time duration.
Contacting the invigilator
• To start a chat with your invigilator, select the chat button. • Your invigilator will be with you as soon as they are available. • Unlikely they can assist you, but you should inform your invigilator if you are experiencing any technical difficulties. • You must inform your invigilator if you wish to use your permitted bathroom break.
Bathroom breaks
You can take one bathroom break during your exam of up to 5 minutes: • Notify your invigilator when you are leaving and returning from bathroom break. • You do not have to wait for the invigilator to give you their permission before taking your bathroom break. • The exam timing will continue to run – if you exceed 5 minutes your exam may be terminated.
Post-exam options: In the event of technical issue disrupting your exam, you may wish to use post-exam options which can be accessed on exam planner or under Contact Us on ACCA’s website.
Minimise the risk of the technical issue by: • Performing your equipment and connectivity test. • Accessing troubleshooting resources.
Using post exam options
To use rebook or withdrawal option you must have: • attempted to check-in your exam • experienced a technical issue impacting your ability to complete exam.
Additional withdrawal eligibility criteria
• The mandatory system test must be taken ahead of each exam session. • Student must have passed the mandatory system test in their last attempt prior to checking in for your exam.
Make sure that your device / other equipment’s are compatible as per the provided requirements and you are availed with the environment requisite for the exam purpose. Everyone should make sure to follow fair practices during exam to avoid any disqualification or disciplinary action.
We hope, this blog about ACCA DipIFR Remote Exam Requirement, Set-up & Tips shall assist in making the necessary arrangements.
Further, please watch video related to the remote examination on the below link: https://youtube.com/playlist?list=PLRYOefFr48S0apGK6f0kw0sX7fC6uSzsx&feature=shared
Best wishes from Team FinPro!
#finproconsulting#diploma in ifrs#accounting#dipifrs#ifrs#ifrs online classes#finpro consulting#dipifr course#diplomainifrs#acca
0 notes
Text
iPhone Won’t Restart? Here’s How to Fix It Fast

We’ve all experienced it: you press the power button on your iPhone, and… nothing. No Apple logo, no spinning wheel, just a blank black screen staring back at you. Whether your iPhone is stuck in a frustrating boot loop, frozen on a loading screen, or completely unresponsive, a device that won’t restart can feel like a mini-crisis. But before you panic, let’s break down the common causes and practical fixes to get your iPhone back to life in no time.
Why Won’t Your iPhone Restart? Common Culprits
If your iPhone won’t restart, it usually falls into one of three main categories: a dead battery, software glitches, or hardware issues. Understanding the root cause of the problem is key to addressing it quickly and effectively. Here’s a breakdown of what might be happening:
A Drained Battery: If your iPhone was left unused for several days or dropped to 0% recently, it might need more than just a quick charge. Lithium-ion batteries can enter a “deep discharge” state, which means it might require 15–30 minutes of charging before you see any signs of life.
Software Glitches: Failed iOS updates, buggy apps, or corrupted system files can freeze your iPhone during startup. Think of it as a traffic jam in your device’s software—sometimes, it just needs a reset to clear the jam and get things moving again.
Hardware Issues: Faulty charge ports, water damage, or aging batteries (with health below 80%) can physically prevent your iPhone from powering on. For example, a red liquid contact indicator on the SIM tray signals water damage, while a swollen battery might cause the screen to lift, making it difficult to power on.
Storage Overload: If your iPhone’s storage is completely maxed out, the operating system might not be able to load properly. You may have noticed slowdowns or received warnings like “Storage Almost Full” before your device gave up completely.
Don’t overlook simpler explanations, either. A damaged charger or frayed cable could mimic a dead battery, and even a software update interrupted by a low signal can cause chaos.
Quick Fixes to Try Before Panicking

Start with these basic troubleshooting steps—they’re easy, free, and often resolve the issue in minutes.
Charge It the Right WayPlug your iPhone into a wall outlet (not a laptop or wireless charger) using an Apple-certified cable and adapter. Let it charge for at least 15–30 minutes. If the battery was fully drained, you might see a red or green battery icon first. Wireless charging works but is slower, so stick to a cable for faster results.
Force Restart Your iPhoneA force restart is essentially a “hard reset” that clears temporary software bugs. The method differs by model: For iPhone 8 or later, quickly press and release the Volume Up button, followed by the Volume Down button, and then hold the Side Button until the Apple logo appears (this takes about 10–15 seconds). For iPhone 7/7 Plus, hold both the Side and Volume Down buttons for 10 seconds. For iPhone 6s or earlier, hold the Home and Side/Top buttons until the Apple logo appears.
Inspect Your Charging GearTry a different cable, adapter, or power source. Look for bent pins in the charging port or debris (lint is a common culprit!). Gently clean the port with a toothpick or soft brush.
When All Else Fails: Advanced Recovery Steps
If your iPhone still won’t cooperate, it’s time to dig deeper. These solutions require a computer but can resolve stubborn software issues.
Enter Recovery ModeRecovery Mode allows you to reinstall iOS without losing data, provided you’ve backed up recently. To enter Recovery Mode, connect your iPhone to a computer with iTunes (Windows/macOS Mojave or earlier) or Finder (macOS Catalina+). Force restart the device but keep holding the buttons until the recovery mode screen appears, showing a cable pointing to the iTunes/Finder icon. Then, choose “Update” to reinstall iOS without erasing your data. If that doesn’t work, select “Restore” (this will wipe your device, so ensure you have a backup).
Check for Hidden Hardware Problems
Water Damage: Eject the SIM tray and check for a red liquid contact indicator. If it’s red, it means moisture likely short-circuited the internal components.
Battery Health: Go to Settings > Battery > Battery Health. If the “Maximum Capacity” is below 80%, the battery might no longer be able to sustain a proper reboot.
Storage Warnings: If your iPhone was sluggish or unresponsive before the crash, free up some space by offloading apps or deleting large files via iCloud.
Time to Call the Pros? Signs You Need Expert Help

Sometimes, DIY fixes aren’t enough. Here’s when to hand your iPhone to a professional:
Physical Damage: Cracked screens, bent frames, or a swollen battery (which can even pose a fire risk) all require immediate professional attention.
Post-Water Exposure: Even if the liquid contact indicator isn’t red, corrosion can develop over time and cause permanent damage.
Persistent Black Screen: If recovery mode fails and your iPhone still remains unresponsive, the logic board or power management chip might be damaged beyond repair.
Post-Repair Issues: Third-party repairs, such as screen replacements, can sometimes cause compatibility problems, especially with parts that don’t meet Apple’s standards.
Apple’s Support team (visit getsupport.apple.com) or an authorized service provider can run diagnostics and repair hardware under warranty. If you’re out of warranty, expect costs ranging from $49 for battery replacements to $299+ for major repairs.
Final Thoughts
Most iPhone restart issues are not as catastrophic as they might seem at first. Start with charging and force restarts, escalate to recovery mode if necessary, and seek professional help for hardware-related problems. Remember, regular backups (whether through iCloud or your computer) are your safety net. With a little patience—and perhaps a trip to the Apple Store—your iPhone will likely live to see another day.
Still stuck? Share your experience in the comments below—we’re here to help!
#IPhoneWon’tRestart?#HowtoForceRestartAnyIPhoneModel#TroubleshootingCommonIPhoneIssues#DoesIPhone15UseUSB-COrLightning?#FastChargersForIPhone15#IPhone15ChargingTips
1 note
·
View note
Text
I'm thinking about doing something extremely feral:
Basically, unlike macOS, dynamic wallpapers on Linux work on timers. So, the dynamic Mojave Wallpaper I have set up isn't aware of when the daylight is changing, like on macOS. As a result, 16 photos across 24 hours simply is not enough.
The wallpaper that I initially downloaded, had each of the 16 images evenly spaced out. However, one quick look at the images, and you can tell they are NOT lined up for the changes in day time. Therefore, I went into the XML file and edited the times, myself. I set them up to better reflect what the sun is actually doing, outside.
However.
The sun does not behave the same throughout the entire year. Fortunately, Apple weather has this fun feature that lets you look at how the daylight behaves across the year, on a per-month basis. As a result, what I can do is make a unique XML file, for each month, and then swap them out at the 1st to make sure my dynamic wallpaper stays accurate.
But that's a lot of work for a wallpaper, and having to manually swap them out isn't ideal. I wonder if there's a way to use functions to make a single XML file repeat the daily pattern only a certain amount of days before switching to a new daily pattern for a new month, and then repeating.
Idk. And there's only one way to find out!
#rambles#wallpaper#wallpapers#dynamic wallpaper#dynamic wallpapers#gnome#linux#zorin#zorin os#macos#mac#computer#computers#tech#technology
49 notes
·
View notes
Text
Pengalaman Downgrade MacBook ke macOS Mojave
Mac yang saat ini aku pakai sudah berumur berapa ya? Aku membelinya di tahun 2018, berarti sekarang sudah berumur 7 tahun sejak pertama kali aku membelinya dan mulai menggunakannya. Sudah lama sekali sejak aku memakai Mac ini.
Beberapa tahun terakhir, Mac ini terasa semakin lambat, dan aku sudah mulai tidak betah memakainya. Padahal, saat pertama kali membelinya, performanya terasa sangat cepat. Aku tidak percaya bahwa sekarang MacBook ini sudah selambat ini.
Salah satu hal yang membuatku menyesal membeli Mac ini adalah pada tahun 2020 (hanya 2 tahun setelah pembelian), Apple merilis M1 Mac—chip buatan Apple sendiri yang jauh lebih kencang dibandingkan dengan chip Intel di Mac ini.
Tentu saja, secara performa, chip M1 jauh lebih unggul, padahal jarak perilisannya hanya 2 tahun dari Mac yang aku beli. Sejak saat itu, aku mulai merasa kurang nyaman menggunakan produk Apple.
MacBook Ini Terasa Sangat Lambat untuk Proyek
Pada tahun 2022, aku mulai menangani proyek bersama teman dan mengerjakannya di MacBook ini. Namun, ternyata performanya terasa sangat lambat untuk proyek-proyek tersebut, dan itu membuatku kesal.
Awalnya, aku berpikir bahwa sebenarnya MacBook ini punya performa yang baik, hanya saja macOS terbaru memiliki terlalu banyak software yang berjalan secara simultan, sehingga membuatnya terasa lambat.
Atau… mungkin Apple sengaja menurunkan performa Mac lama untuk mendorong konsumennya agar upgrade ke MacBook model terbaru?
Tapi aku tidak bisa.
Selain karena tidak ada budget, aku juga merasa upgrade hanya akan menjadi buang-buang uang untuk sesuatu yang tidak benar-benar terpakai fungsinya.
Solusi: Downgrade ke macOS Mojave
Akhirnya, aku punya ide untuk downgrade OS. Aku masih yakin sekali bahwa ketika pertama kali menggunakan MacBook ini, performanya sangat mulus dan baterainya hemat saat menjalankan macOS Mojave.
Aku masih ingat, Mojave adalah versi macOS pertama yang memperkenalkan Dark Mode.
Jadi, aku memutuskan untuk downgrade ke macOS Mojave.
Proses downgrade hanya memakan waktu 1 jam—mengejutkan, karena jauh lebih cepat dibandingkan dengan install ulang Windows.
Bahkan dengan kecepatan internet di tempatku yang hanya sekitar 20 Mbps, prosesnya tetap berjalan dengan cepat.
Akhirnya, setelah aku mulai menggunakan Mac ini dengan macOS Mojave, performanya benar-benar terasa ngebut!
Ini sangat mengejutkan, mengingat aku tidak pernah membongkar MacBook ini untuk membersihkan debu atau melakukan perawatan lainnya.
Mungkin di dalamnya sudah banyak debu setelah 7 tahun pemakaian, tapi nyatanya, debu itu tidak menghambat performa MacBook ini di macOS Mojave.
Semuanya terasa cepat dan snappy.
Aku sangat senang! 🎉
Menyesuaikan Software Setelah Downgrade
Tentu saja, setelah downgrade, aku harus menyesuaikan software yang kompatibel dengan macOS Mojave.
Untungnya, sebagian besar software yang aku butuhkan masih tersedia dalam versi yang mendukung Mojave, jadi aku bisa langsung menginstalnya tanpa kendala.
Kesimpulan & Pemikiran tentang Apple
Jujur saja, aku tidak menyangka bahwa downgrade OS bisa memberikan performa yang jauh lebih cepat.
Mungkin memang benar bahwa Apple menambahkan banyak software latar belakang di macOS terbaru, yang membuat Mac lama terasa lambat.
Atau kalau mau suuzon, bisa jadi Apple memang sengaja menurunkan performa MacBook lama agar konsumen tergoda untuk membeli MacBook baru. 😏
UNIX Ecosystem di Setup-ku
Anyway, it's been fun to have a UNIX ecosystem across my desk setup.
💻 PC rakitanku: EndeavourOS (berbasis Arch Linux)
💻 MacBook: Daily driver dengan macOS Mojave
Bye-bye Windows! :P
Serius, satu tips dari aku:
Mulailah menggunakan "tiling window manager", ini salah satu alasan kenapa aku prefer UNIX system, dan tools ini benar-benar bisa meningkatkan produktivitas
Dua amplop, 25 Maret 2025
R.
1 note
·
View note
Text
Dịch Vụ Cài Đặt Phần Mềm Cho MacBook – Hỗ Trợ Tận Nơi, Uy Tín
1. Tại Sao Cần Dịch Vụ Cài Đặt Phần Mềm Cho MacBook?
MacBook là dòng laptop cao cấp, nổi bật với hiệu suất ổn định, hệ điều hành macOS mượt mà và độ bảo mật cao. Tuy nhiên, việc cài đặt phần mềm trên MacBook không đơn giản như Windows, đặc biệt với những ai chưa quen sử dụng macOS.
Một số vấn đề thường gặp khi cài đặt phần mềm cho MacBook: ✔ Không biết cách tải và cài đặt phần mềm đúng cách. ✔ Phần mềm không tương thích với hệ điều hành macOS. ✔ Gặp lỗi khi cài đặt hoặc sử dụng phần mềm. ✔ Không có tài khoản Apple ID hoặc bị khóa iCloud.
👉 Nếu bạn đang gặp khó khăn, hãy sử dụng Dịch Vụ Cài Đặt Phần Mềm Cho MacBook để được hỗ trợ chuyên nghiệp, cài đặt đúng chuẩn, nhanh chóng và an toàn!

2. Dịch Vụ Cài Đặt Phần Mềm Cho MacBook Gồm Những Gì?
🔹 Cài đặt hệ điều hành macOS
Cài đặt, nâng cấp macOS mới nhất (Ventura, Monterey, Big Sur, Catalina, Mojave,…)
Cài lại macOS khi máy bị lỗi, chậm, treo logo.
Hỗ trợ chuyển dữ liệu, đồng bộ iCloud.
🔹 Cài đặt phần mềm văn phòng – học tập – làm việc
Microsoft Office cho Mac (Word, Excel, PowerPoint, Outlook).
Google Drive, Zoom, Skype, TeamViewer.
Các phần mềm quản lý công việc, kế toán, bán hàng.
🔹 Cài đặt phần mềm đồ họa – thiết kế chuyên nghiệp
Adobe Photoshop, Illustrator, Lightroom, Premiere Pro.
Final Cut Pro X, Logic Pro X, AutoCAD, SketchUp.
Phần mềm chỉnh sửa video, âm thanh chuyên dụng.
🔹 Cài đặt phần mềm lập trình – phát triển ứng dụng
Xcode, Android Studio, Visual Studio Code.
Docker, Homebrew, Python, Java, PHP, MySQL.
Cài đặt và tối ưu môi trường lập trình cho MacBook.
🔹 Cài đặt phần mềm tiện ích và hỗ trợ kỹ thuật
Unarchiver (giải nén file), CleanMyMac (tăng tốc MacBook).
Phần mềm diệt virus, bảo mật, VPN.
Hỗ trợ khắc phục lỗi MacBook, tối ưu hiệu suất.
3. Vì Sao Nên Chọn Dịch Vụ Cài Đặt Phần Mềm Cho MacBook?
✅ Hỗ trợ tận nơi – Không cần mang máy đi xa ✅ Cài đặt nhanh chóng, chỉ từ 15 – 30 phút ✅ Phần mềm chuẩn, đảm bảo tương thích với macOS ✅ Bảo hành dài hạn, hỗ trợ cài lại miễn phí ✅ Tư vấn phần mềm phù hợp với nhu cầu sử dụng
💡 Dịch vụ chuyên nghiệp – Giá cả hợp lý – Cam kết hài lòng!
4. Liên Hệ Dịch Vụ Cài Đặt Phần Mềm Cho MacBook
📞 Hotline:0979106855 (Hỗ trợ 24/7) 🌐 Website: https://viet.io.vn/ 📍 Hỗ trợ tại TP.HCM, Hà Nội
🚀 Gọi ngay để cài đặt phần mềm MacBook nhanh nhất!
<<< Dịch Vụ Cài Máy Tính Tại Nhà Và Online
0 notes
Text
Data recovery software is an application used to recover lost files from a storage medium. It is normal to accidentally delete files or lose them due to a virus attack, hard drive failure, or any other reason. Data recovery software can automatically scan the storage medium and recover the lost files. As you upgrade to Big Sur from Mac, it is essential to learn how to recover your files if you lose them. There is numerous data recovery software available. However, not all are good enough so here is a list of the top five free data recovery software to help Mac users make the best decision. Stella Data Recovery Stella Data recovery is regarded by many as the best data recovery tool in the market. The software is compatible with both internal and external storage, cameras, and even physical media. Stella Data Recovery software can recover lost data from encrypted drives, create a system startup disc, and even clone the entire disc. Apart from Mac, Stella Data Recovery can also be used to recover content for Windows 10. The free version of Stella Recovery Software can recover up to 1 GB of deleted images, videos, and files. Stella Data Recovery software supports exFAT, NTFS, and FAT. For additional features and unlimited data recovery capacity, you can choose to go for a premium version pricing at $80 or professional version pricing at $200. Even though this might not be the cheapest data recovery software in the market, it offers you the best shot of recovering your lost data. Data loss or, be it data theft, can be disastrous. As a Mac owner, you need to know well how to upgrade to Big Sur to optimize device security. Switching to Big Sur should not be the only target for you because the security measures are also equally important. EaseUS Data Recovery Wizard Another top software recovery tool is EaseUS Data Recovery Wizard. The software is compatible with most devices, including macOS, Mojave, Catalina, and Mac OS X. It comes in three versions Free, Technician, and Pro versions, all of which you can use to recover your data successfully. Its users will attest that the software works perfectly well with all types of Mac devices, including SD cards, pen drives, USB flash drives, SSHDs, SSDS, HDDs, and many more. The free edition allows up to 2 GB of data, while the Pro version allows for unlimited data recovery. Data Rescue 5 Data Rescue 5 recovery software has two plans and a free demo, which only scans your computer to find discoverable files but does not recover any lost file. First is the standard plan designed for single computer usage, with the plan costing $99. The professional plan can be used by an unlimited number of computers and cost a one-term yearly payment of $299. The software has a well-designed interface that makes it easy for users to follow the guidelines needed to recover data. One of its most outstanding features is excluding duplicate files by recovery only the lost data that does not exist in your device. Data Rescue 5 installation size is only 15.7 MB so it does not eat much space. Furthermore, its ability to exclude existing files makes it one of the fastest data recovery software in the market. Ontrack EasyRecovery The data recovery software is one of the most effective non-destructive data rescue software. It is technically advanced and is capable of recovering lost documents, formatted as well as inaccessible RAW files on Windows XP/Vista/2003/2008/7/8/10. Compared to other recovery software in the list, Ontrack EasyRecovery is used more for professional purposes. The comprehensive software is incredibly fast and can be used to recover large volumes of data. The data recovery software is compatible with both Windows and macOS. One of the best features about it is that you can start or stop data recovery whenever you feel like it. The free trial version can recover up to 1GB, while the home version, which goes for $79, offers unlimited data recovery and additional core features. For advanced features
like disc cloning or raw recovery, a professional edition that goes for $109 is a good option. Cleverfiles Disk Drill With the ability to protect files, Cleverfiles Disk Drill can protect files. It can effectively act as a secondary recycle bin in your system. When you permanently delete files, the software will help you recover them back without the need to store data in it entirely. Apart from the data recovery function, Disk Drill enables users to analyze disk space to clean the hard drive with its Cleanup feature. Without disregarding its ability to recover your data, Cleverfiles Disk Drill works more like a Mac disk management tool as it can perform disk cleanup, locate duplicate files, and backup data. Conclusion If you are a Mac user and looking to recover lost data, you have no reason to worry. One of the software mentioned above will work along the way to ensure you recover all your lost data. All you need to do is download any of the above software, install it on your device, and start the recovery process.
0 notes
Text
舊版 macOS 傳出災情!Mac App Store 無法登入、下載購買 App
使用舊版 macOS 的 Mac 使用者最近可能發現一個令人頭痛的問題,那就是「Mac App Store 突然無法使用了」! 根據多為使用者回報,只要是在使用 macOS Mojave(即 macOS 10.14)或更舊的版本,可能會遇到無法登入、無法下載已購買 App,甚至無法存取商店的情況。 Continue reading 舊版 macOS 傳出災情!Mac App Store 無法登入、下載購買 App
0 notes