#magicmirror2
Explore tagged Tumblr posts
Visit Tumblr Blog
Explore Tumblr blogs with no restrictions, modern design and the best experience.
Last Seen Tumblr Blogs


Fun Fact
Kazakhstan’s Minister of Communications and Informatics has blocked the Tumblr site because it contained 60 sites of terrorism, extremism, and pornography in 2015.
Photo
Apptober ‘19, Day 28
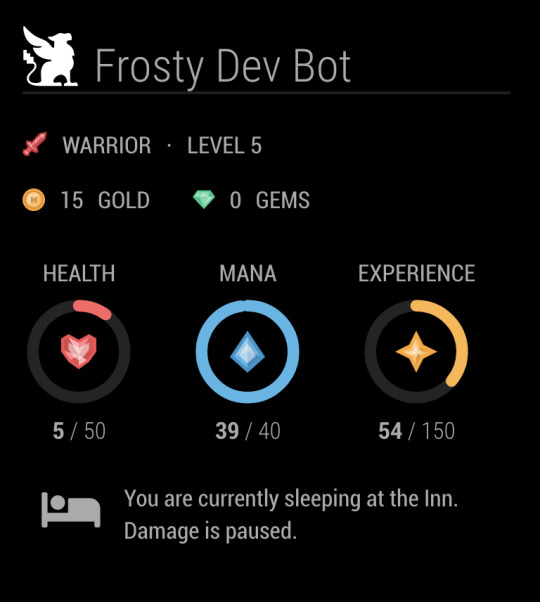
One of the cool features in Habitica is the Inn. When you go on vacation, or are just burnt out, you can have your little habit hero rest at the Inn to avoid taking any damage from missed dailies or boss fights.
Today we updated our design to check for sleeping heroes, and added a cute message to indicate when they are checked into the Inn. Since you can’t take damage in the inn, we also hid the “Due Today” and “Estimated Damage” sections so you don’t stress about them.
#habitica#magicmirror#magicmirror2#javascript#css#ui design#nodejs#programming#open source#open source software#apptober#apptober 2019
13 notes
·
View notes
Text
Apptober Day 17

Wohoo the Wallberry clock submodule is finished! The time zone stuff wasn’t actually terrible to write. Probably because I wasn’t doing anything super complicated, but I feel lucky all the same!
A Wild Design Pattern Appears!
If you’ve ever worked with a project using the MVC (Model View Controller) design pattern you’ll feel right at home writing a MagicMirror2 module. If you haven’t played with MVC before have no worries because the idea is gloriously simple, it just means our code is organized into three neat components:
The Model (AKA Data Model)
The Data Model contains the code that describes the data our module will be using.
For a more complex module you might have entire data object classes that live in their own files (like the authors of this weather module did). However, my clock module here is so simple that it’s not even worth separating my little time and city data objects from the Controller code.
The Controller
The Controller is what implements the lion’s share of our app logic. It takes the Data Model objects, does whatever calculations need to be done on them, then hands the results off to the View to be displayed.
In our case the main module file (“WB-clock.js”, also displayed in the first screenshot up above) is our Controller. You can see how it’s responsible for assembling the city and timezone data objects and returning them for our View’s template:

The View
The View is the code is responsible for constructing and displaying what the user sees.
MM2 includes the Nunjucks templating engine, so my View code is going to take the form of .njk template file. You’ll recognize the syntax immediately if you’ve ever written templates for a Django web server or used Jinja templates, but for the most part it just looks like fancy HTML:

Those {{ variable }} things are where the templating engine will put the data from the Controller, then the whole thing will be displayed to the user like you saw in the first screen shot!
Why Bother With MVC?
MVC is such a popular design pattern (seriously, once you learn it you’ll see it EVERYWHERE in web development) because it helps us write much, MUCH more maintainable code.
Having our Controller separate from our View means that we can change our app’s logic WITHOUT having to touch the code that’s responsible for displaying it. This becomes especially useful when you’re working with a team of people; now your interface designer can write the CSS and template code at the same time another dev writes the logic code that will provide the data.
Also, just to give you nightmares, imagine being the person who comes in to re-theme or maintain a project where all of your View and Controller code is mixed together and all of the app’s HTML is constructed through a spaghetti bowl of various javascript if-statements and functions:

Yeah that’s not fun. MVC FTW.
Also I want to say I’m not dunking on the person who had to write the code above (for MM2′s default clock.js), it was written before MM2 had Nunjucks support and you gotta do what you gotta do wildwildwest.mp3.
Up Next
I can’t decide if I’m going to work on the weather module next or clean things up a bit and port my CSS and font assets into my theme module. We’ll see :D
#apptober#javascript#programming#nodejs#magicmirror2#wallberry#long post#geez sorry guys i guess i'm really passionate about MVC
8 notes
·
View notes
Video
instagram
It a little #smudged, a little #wonkie and a little #awesome. #raspberrypi #magicmirror2 is up in the spare room and connected to the wifi. Instead of pining away at a nature loving girl in the #forest. im putting to #magic mirror to good use. #SnowWhite you can have the trees and bugs on the floor. I'm sticking to my own world of #gadgets, #widgets, #iot and #arduinoproject #coded #microcontrollers. You and me would have never worked. I'm in love with someone already. her name is #siliconvalley. She is #rewarding, #respectful and more like of someone who likes me for who I am. Stick to your rose peddle doorways and remember everything withers sooner or later. Sincerely, the #witch.. . . #disney #fairtales #viral #reels #reel #story #instagram #inspire #motivate #instadaily #technology #diy #raspberrypi.org #magicmirror2 #twowaymirror #ideasthatrock https://www.instagram.com/p/CErKYrSAnre/?igshid=dnrrjxs71pbi
#smudged#wonkie#awesome#raspberrypi#magicmirror2#forest#magic#snowwhite#gadgets#widgets#iot#arduinoproject#coded#microcontrollers#siliconvalley#rewarding#respectful#witch#disney#fairtales#viral#reels#reel#story#instagram#inspire#motivate#instadaily#technology#diy
0 notes
Photo


Latest project, in progress, a voice controlled Magic Mirror. 5/4/2018 worked on this instead of going out for Gringo de Mayo. (#NotAMexicanHoliday).
As I got planning, research turned up someone who had already built something just like this: https://medium.com/@aallan/a-magic-mirror-powered-by-aiy-projects-and-the-raspberry-pi-e6a0fea3b4d6
But unlike that solution, I’d like to keep the button and probably recognize the hotword with some basic machine learning on the RPi itself.
Supplies:
Raspberry Pi 3B ($35) Microcenter
10x20 Shadow box from JoAnn Fabrics. ($21)
Old Screen recovered from 17″ Laptop (free) I preserved the back panel and cut it to fit with a jigsaw
Controller board and power for Screen ($36)
Sugru ($10)
18″ HDMI cable ($5) Amazon
12″ x 24″ Acryllic Two Way Mirror ($37) Amazon
Google AIY Voice Kit ($10) Old version on Blowout Microcenter
Hot glue gun, double sided tape
Electrical tape (screen edges, random black out.)
32 GB MicroSDHC card (free) Microcenter
3D printed pieces:
Custom base for Raspberry PI (didn’t want to glue board to the screen)
Custom base for the LCD controller
Likely still needed
A replacement button if I want to turn off voice activation unless a button is pressed (the Google AIY Button is too big and too bright. I’d like something subtle.)
An acrylic backing if I want to create a clear back to show off the internals.
Software:
MagicMirror2 (Node JS) https://github.com/MichMich/MagicMirror
Google AIY included Examples
Notes so far:
An OLED screen would be a massive improvement over this cheap laptop tft, mostly because the backlight is the part that breaks the “magic” if the screen is on.
The mirror coating is easily damaged, next time I might keep the original glass behind the mirror. It now has several scratches :-(
Get an aryllic scoring tool. I used a cutting knife but a tool would have led to less chipping.
Give up
Tried to save the nice back of the shadow box, and keep the lid opening, but in the end decided spacing was better without either.
Display Rotate: https://www.raspberrypi-spy.co.uk/2017/11/how-to-rotate-the-raspberry-pi-display-output/
New Google AIY Voice kit is $50 with a Pi Zero W, it’s significantly slower than getting the older kit and a Pi3 at $35. But is also significantly smaller. So it’s price vs. size really.
Really want to fit a battery pack inside so I can run it at least for a few minutes without power! (Imagine, removing the cable and scaring kids at a Halloween party!)
0 notes
Photo
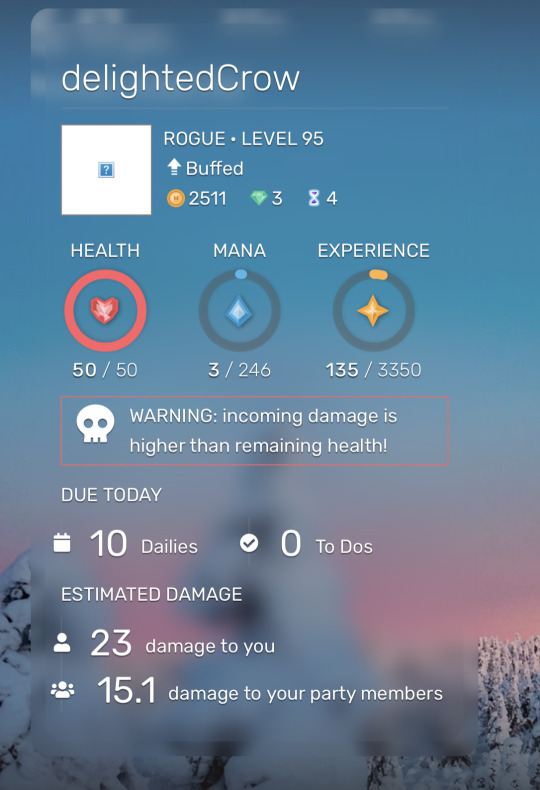
Damage calculation is working! We also are correctly listing the number of Daily tasks left to do today. We still need to figure out when ToDos are due, and calculate whether to show or hide the contextual elements like the "Warning" and "Buffed" messages. Then the last piece should be to stitch together the avatar from the various equipment images, and whatever finishing touches we can think of!
#apptober#habitica#magicmirror#magicmirror2#open source#open source software#javascript#nodejs#ui design
12 notes
·
View notes
Text
Apptober Day 1
Now that I’ve got my Rasberry Pi Wall Display built and up on the wall, I figure Apptober is the perfect time to commit to finishing the software side of the project! This month I’m going to be hacking around with MagicMirror2 (a wonderful open source NodeJS app built for the RasberryPi) to make my little Wallberry the fairest wall display of them all.
Magic Mirror, On The Wall
The design aesthetic of MM2 is originally intended to turn a raspberryPi and a two-way mirror into a sleek, space-ship-worthy HUD. While I do love the minimalist mirror look, I’d prefer to give Wallberry a more classic, picture frame display look. Basically I want to go from the image on the left (Wallberry with a vanilla install of MM2) to something like the design to the right:
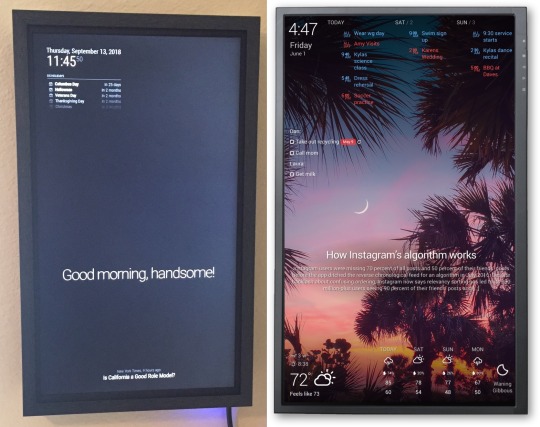
I’ve got a lot of tweaking ahead of me 😊
BTW - the image on the right there is from a company called Dakboard and they make GORGEOUS wall displays and I’d almost consider using their wall display software but alas I’m a fool for open source and MM2 has stolen my heart.
Project Requirements
Too many of my projects get abandoned unfinished due to feature creep so I’ve challenged myself to start REALLY small this time. To begin with I want my display to have the following features:
Current local time + date
Current time for at least two other cities in different timezones (I can’t do timezone math help me Wallberry)
Current local weather + temperature
Local weekly weather forecast
A gorgeous, high-resolution background photo that periodically changes
Exciting New Tech
I’m anticipating learning a ton of new stuff for this project, including:
NodeJS - finally, an excuse to learn Node 😄
SASS - cool cool, if I can’t avoid writing CSS forever then at least I can put variables in it
How to extend and theme MagicMirror - yay MM2 Modules!
The Unsplash photo API - because this seems like a really fun way to get great background photos
A ton of stuff that seems obvious but somehow isn’t when it comes to the UX design of wall display web apps
Some RaspberryPi-specific development things that’ll definitely pop up to bite me when I least expect it because nothing ever works in production like it does on your development machine
Tomorrow
Gonna get my dev environment all set up wish me luck 🙃
8 notes
·
View notes
Text
RaspberryPi Wall Display: Buildup
LONG post incoming!
It took me forever, BUT I FINISHED PUTTING WALLBERRY TOGETHER!

Aww, thanks Wallberry, you look nice too!
Putting Things Together
I’m not really experienced at anything hardware related so this part of the project was a particular challenge. Since I don’t have access to a lot of tools or a workshop space I tried as much as possible to use out-of-the-box solutions or hack stuff together from odds and ends around the house.
The easiest solution for the frame was to order a custom frame (I went with a simple wooden one from American Frame), which was surprisingly cheap since I didn’t need the acrylic glass or the mounting board:

American Frame didn’t have an option for cutting matboard as small as I needed (I only needed enough to cover up the screen’s ugly silver bezel where it peaked out from under the frame), so I thought “Michaels is having a 50% sale, why not get some matboard and cut it myself, how hard could that be?”
Oh my god what a pain in the ass, I DO NOT recommend doing this if you huge amount of area to cut out (I have 21x12 inches here) unless you have one of those big professional mat cutters with a backstop. Eventually I got something I could live with:

Aaaand this is the point where I realized that getting matboard with white backing would give me an ugly white boarder around my screen... ugh. But hey, that’s what Sharpies are made for, right? Right.
In retrospect, I should have ditched the matboard idea altogether, covered the half-inch of silver bezel with black electrical tape and called it a day. Live and learn, lol.
Cable Management Is The Worst
Now everything gets to go in the frame, and wow am I reminded that I hate cable management!
I put an extra layer of matboard against the back of the monitor screen as a buffer between it and the other components and used a bunch of (appropriately Halloween-themed!) electrical tape to fasten everything to the back of the screen and frame. Once I know for sure where I want everything to go I’ll find more permanent methods to secure everything, but the tape works great for now and makes it easy to change things if I realize something needs to move.

The raspberry pi is secured to another piece of matboard with plastic zip-ties, which at least makes it really easy to get it out again if I need access to it later.
Ideally I would have found much shorter cables and cut back on some of the mess, but in the spirit of using things around the house I just did my best to keep the ones I had from exploding all over the place.
Probably the most annoying thing is how much extra space is needed by the the monitor’s outward-pointing power and HDMI cable outlets. If you have extra time and money to spend on monitors I’d definitely suggest getting one with outlets oriented parallel to the screen.
I also should have gone with a much deeper frame, at least 2 or 2.5 inches instead of the 1.5 I thought I could get away with. For now I’ve solved the problem of needing some extra depth by sticking some styrofoam blocks on the back as spacers:

I’ll have to invent something classier later. At least there’s a ton of space for air flow and heat dissipation :)
All in all, it looks pretty awesome from the usual vantage point of standing at the whiteboard, so I’m happy with it.

Up Next: Software, Finally!
Wallberry is currently running a vanilla install of MagicMirror2 (which is what you see displayed in the photos above). I really love MM2 so far (super modable and has a GREAT community), but I’ll probably change the look and feel significantly from the intended mirror theme to something more like a traditional wall display. I’m really looking forward to this part!
Thanks for reading! If you’re interested in the post where I tear apart the monitor I used, check it out here.
9 notes
·
View notes
Text
Apptober Day 16
Today I started work on the clock submodule! I have mixed feelings about this one because on the one hand, yay I finally get to write some javascript! On the other, I’m quite sure everything to do with timezones and time math were created to persecute me, personally, so there’s that.
I have decided to write my clock module from scratch though, since my design is different enough from MM2′s default clock module to make it worth it. A quick refresh of my requirements for this module:
A large digital clock featuring my local time
The current date
The current time in a couple of other featured cities (that have different time zones than mine)
And here’s what that will look like visually:

I can trivially figure out the local date/time in code (MM2 already uses moment.js), but the easiest way to get the rest of the info will be to have the user supply it in MM2′s main config.js file.
The config section for my module currently looks like this, with the other cities and their timezones configurable as a simple list:

I could probably also guess the user’s local city name without having them supply it in the config, but that’s kind of a PITA currently and I have a strong feeling a better solution will pop up later after I implement the weather module.
Up Next
Figuring out how to get and configure the data was the boring part, tomorrow we’ll move on to some general MM2 module basics and Nunjucks templating :D
4 notes
·
View notes
Text
Apptober Day 15
After reviewing a bunch of MagicMirror2 code, I’m pretty satisfied that my theme will work well enough as a MM2 module and I won’t have to modify any of the core MM2 code. Hooray!
I’m basically gonna organize my code like this: a main module with all the general theming code, and several submodules that each handle a small chunk of functionality. My folder structure will look a lot like this:
WallberryTheme
theme fonts, general styles, default config files for submodules
Clock submodule
Weather submodule
Background Image Fetch submodule
In previous posts I've gone through a bunch of other 3rd party MM2 modules that handle clock, weather, and the background fetching, but the only one I won't have to modify to suit my needs is the background fetching one (thanks parnic!).
For the Clock and Weather submodules I've got some great starting points, but I'll need to modify them a decent amount to fit my needs. Time to get forking :D

Completely relatedly Github's repo forking animation is too cute:
4 notes
·
View notes
Text
Apptober Day 2
Setting up my development environment to work on my MagicMirror2 theme (one of these days I’ll actually name it) and I gotta say for all my love of beautiful GUIs I’ve missed working more with CLI tools. I am really enjoying Node + npm so far (brings back some warm fuzzies of developing with Django and pip) and everything installed cleanly without issue.

Basic Game Plan
I’m so impressed with the MM2 developer community, people have already created so many great modules. From what I’ve gathered looking through the MM2 code I’ve now got a rough idea of how I’ll start building out the different parts of my theme:
I think I’ll easily be able to build off the default clock module for my clock features
The default weather module is pretty great but I’d love to be able to use the DarkSky API for weather so I think I’m going to tweak this wonderful forecast-io module from dmcinnes.
I think I’ll probably build my own module (yay) to grab images from Unsplash and use as backgrounds. I found this wonderful module from parnic that does something quite similar to what I want for pulling images from collections, so that will probably be a great help.
Next Up
Tomorrow I’m gonna play with developing my own MM2 module, wish me luck!
BONUS - I love coming across code like this, it’s like playing a new dungeon area in a video game and coming across the bones of another adventurer:

4 notes
·
View notes
Text
Apptober Day 12
I have finally finished implementing my design in HTML and CSS! It’s been a long time since I’ve written CSS and I’m pretty pleased with how it went. Here’s a screenshot of my static code running from Wallberry (not in fullscreen mode obvs):

And here’s a fun IRL photo of Wallberry that’s kinda crap because my phone is very cranky about lighting:

I’m digging it so far.
Done Being Basic
Now that I’ve finished teaching myself CSS+SASS basics with a static prototype I’m ready to start integrating it into MagicMirror2. I’ve been thinking for a while about how I want to do this because my designs are going to require some pretty extensive code changes and I want to be careful how I go about it.
Here are the three main constraints I’m setting for myself:
Make it Easy to Update MM2 - I want it to be really easy to update MagicMirror from the original master branch anytime they publish fixes, so ideally most (if not all) of my theming will happen as an MM2 module that can be dropped in without modifying core MM2 code.
Easy to install theme from scratch - I also want it to be trivial to get a fresh install of MM2 + Wallberry Theme running in case anyone besides me (or let’s face it me three days from now) decides to download my theme and try it out. Gotta be careful not to code something irritatingly fiddly 😔
Still Plays nice with other MM2 Modules - Obviously I can’t guarantee this one with so many style changes, but I’m going to try and respect MM2 conventions as much as possible so that hypothetically other MM2 modules will still work and look good with my Wallberry theme.
Ok that sums up this post, join me next time and we’ll finally dive into some NodeJS goodness!
2 notes
·
View notes
Text
Apptober Day 3
I’ve pulled together all the MM2 modules I thought would work and I’m really impressed at how configurable they are. It looks like the clock and MMM-forecast-io modules will have the functionality I’m looking for, and after a little tweaking it turns out parnic’s MMM-Unsplash will do exactly what I want in fetching a rotating background image from a specific collection on Unsplash. I’m actually a bit sad about that last part, I was hoping I’d have to write that module myself 🙃
Here’s what it looks like right now with the new modules and some minimal config file changes (and no other real tweaking):

(You can just barely see the background image because MM2′s default theme dims everything, but the dog is very cute haha).
Up Next
I’ve had a good time tinkering with MagicMirror modules and I’m starting to get some good ideas of how I want things to look. Next I’m going to throw some of these ideas in Sketch and start working on a design mockup, and maybe start tinkering with SASS.
2 notes
·
View notes
Text
Apptober Day 21
Whew, I missed posting for a few days here and I wish I had a great excuse but the truth is the Space Industry Upgrade for Oxygen Not Included just came out and I've been ruthlessly hyperfocused on getting my poor cursed duplicants off their asteroid and into space.*** Oh well, back on track!
Web Development: Easier Than Rocket Science
When I last left off I was trying to decide how I wanted to implement my MagicMirror2 weather module. Like my clock module, the requirements for my weather module are just slightly different enough from the default module that I decided to write this one from scratch, too. The Weather module is slightly more complicated though; unlike the clock module it needs to make a request to another server to get its weather data.
Writing JavaScript For the Server
DarkSky.net, the service I’m going to be getting my weather data from, really doesn’t like when people send API requests using client side javascript. Since MM2 modules are run client side (in the browser) I’ll get errors if I try to send API requests directly from my main module code.
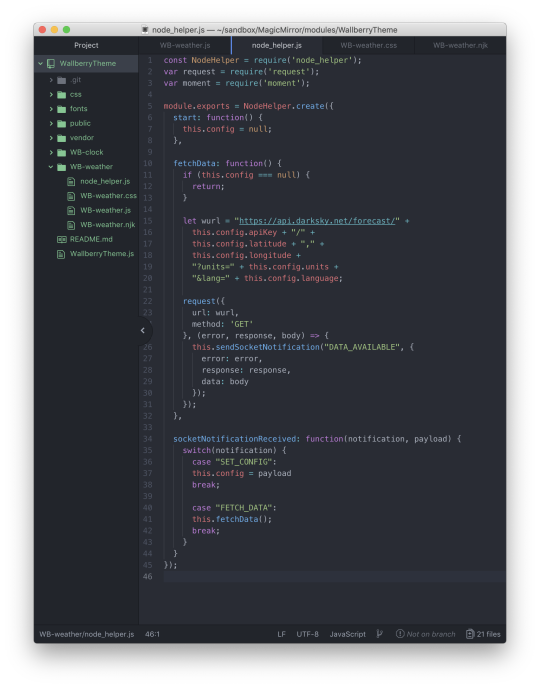
Instead, I’m going to use MM2′s Node Helper component to handle the communication from my module and the DarkSky API. Every MM2 module is allowed to implement one Node Helper for performing extra background tasks. Most importantly, this helper gets run by the NodeJS server (and NOT in the client’s browser) so it won’t run afoul of DarkSky’s Cross-Origin Resource Sharing rules.
In practice this means I’ll have two .js files with the following responsibilities:
The main MM2 module (WB-weather.js). This handles most of the app logic and is run client side (in the browser). When it needs weather data it sends a request to the Node Helper.
The Node Helper (node_helper.js). When it gets a data request from its module it in turn sends a request to the DarkSky API and waits for a callback. When it gets a response from Dark Sky it forwards that data back to the main module.
Easy As RaspberryPi?
The code for this is actually waay simpler than it sounds. All the weather module has to do is set a timer for how often it wants to fetch new weather data, tell the node helper to go get that data, then update the browser when it gets the data back from the helper. The relevant WB-weather.js functions look like this:

And the Node Helper is even simpler - it just waits for the module’s signal, sends a request to DarkSky for the data, then passes it back to the module again:
Up Next
Now that I’ve sorted the problem of getting the data I need I’ll have to display it somewhere other than the Developer console, so tomorrow I’ll work on finishing the View side of my weather module :D
*** j/k I'll probably never make it to space my crappy resource management always screws me over waaaay before I manage a sustainable space program and honestly I can't figure out why I even like this video game because it's basically Don't Starve In Space.... Klei you evil geniuses you've conned me into doing math in a video game just so I can farm your cute space geckos someone plz send help
10 notes
·
View notes
Text
Apptober Day 10
It’s taking me a bit of time to dredge through my memory of how CSS works and implement my design, but I have to admit I’m enjoying writing it a lot more than past attempts. I think we can blame the SASS; there’s something about being able to nest CSS rules that makes it so much more accessible to my brain.
It just looks SO MUCH cleaner to me to be able to group the styles for elements and their children like this:

So much better. Truly, if you have to spend any time writing CSS at all get thee a SASS compiler now because Syntactically Awesome Stylesheets live up to their name.
NPM I ❤️You Too
Besides being a super easy way to download and manage a TON of JavaScript libraries, NPM also makes it trivially easy to write and run simple developer scripts. I talked a bit in a previous post about using one to automatically compile my SASS files and set up live-reload, but it’s worth mentioning again because if you haven’t yet used live reload in some form in web development you’re in for a treat.
You can see the SASS compiler and live-reload scripts running in the terminal (little black window with green text in the lower right) in the screenshot below:

Every time I save a project file that program will detect the change and reload the appropriate files so that I always see my latest code in my browser (currently Safari on the left up there). BUT THAT’S NOT THE BEST PART.
Because live-reload is basically a tiny web server continually reloading my code, any machine on my network can load that web address and see those changes, too. This means I can just plug that URL into Wallberry’s browser and BAM, I’m seeing my web app live on my raspberryPi wall display while I work on it from my development machine:

Pretty nifty, eh? I love web servers.
Also do me the favor of ignoring the incorrect date/times in the junk data above, we’ll get to the correct stuff once I start integrating the HTML/CSS into MagicMirror2 😄
7 notes
·
View notes
Text
Apptober Day 6

Oh CSS I Haven’t Missed You
Since it’s time to start translating my design into code I thought I’d start by playing around npm to run a SASS compiler. Do I really need to do this? LMAO no honestly this whole endeavor will probably be waaay more trouble than it’s worth but if I have to write CSS then I’m going to take the opportunity to mess with SASS.
SASS (aka “Syntactically Awesome StyleSheets”) is basically CSS, but with fun extras like variables, basic functions, and some other programmatic goodies that make writing maintainable CSS code much easier. Browsers don’t natively understand SASS though, so you need a compiler to turn your .scss files back into .css files that your browser can use. Luckily the Node Package Manager has my back here and installing one is easy. Literally as easy as typing npm install node-sass --save-dev into my project directory. NPM I love you.
Thanks to this marvelous guide, How To Get Better At Writing CSS (HIGHLY recommend if you want a step-by-step guid to walk you through this), I also set up a npm script to automatically compile my .scss code and live-reload my browser window every time I save a file which is SO. CONVENIENT.
Hooray For Prototypes
It’s been a loooong time since I’ve had to write CSS so I’m going to start by coding a static CSS/HTML prototype of my design from yesterday before I start trying to theme my MagicMirror2 install. It’s not very efficient, but this way I’ll be able to focus exclusively on getting the design into CSS and HTML before I have to worry about the best way to apply my theme across MagicMirror’s codebase.
Up Next
This will probably take me a few days, wish me luck battling the CSS demons!
4 notes
·
View notes
Text
Apptober Day 18
Decided to spend today getting my main theme assets together and give my mirror module a more polished feel. There wasn’t much to this part, I just needed to port over the CSS from my previous static project to override some of the MM2 defaults and include my font files since I’m using a different custom font.
I had a devil of a time figuring out how to get the right font files to include until I came across this lovely google-webfonts-helper project. If you ever want to use a google font and need to host it yourself I high recommend checking that out it, it would have saved me soo much time.
Now everything is starting to look like my original design, which is exciting!
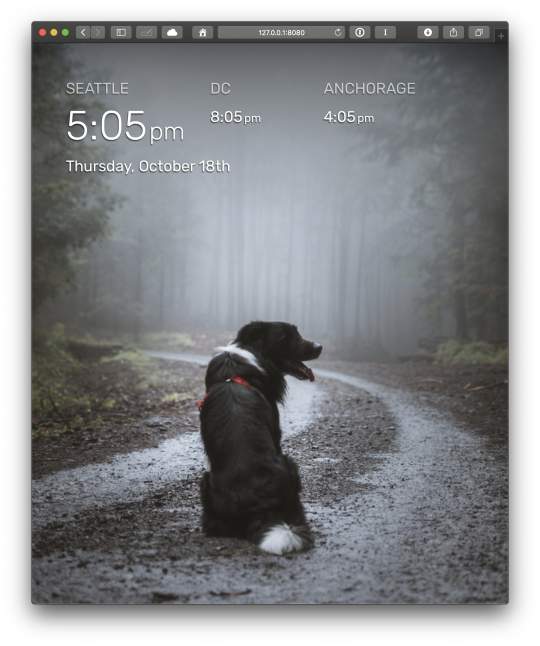
As you can see from the screen shot I also included the background image fetching module which is currently pulling a random image from one of my own curated Unsplash collections. I’ll probably be editing that module later, too, as I just realized I want it to include photographer/photo attribution near the bottom of the screen (because crediting artists for their work is cool).
Looks like I spoke too soon about not getting to write that module, lol.
Up Next
Next it’s back into the javascript as I start writing the weather module. Wish me luck! 🙂
5 notes
·
View notes