#marlequinncos
Explore tagged Tumblr posts
Visit Tumblr Blog
Explore Tumblr blogs with no restrictions, modern design and the best experience.
Last Seen Tumblr Blogs


Fun Fact
Tumblr Inc. is using 66 technologies for its website.
Text
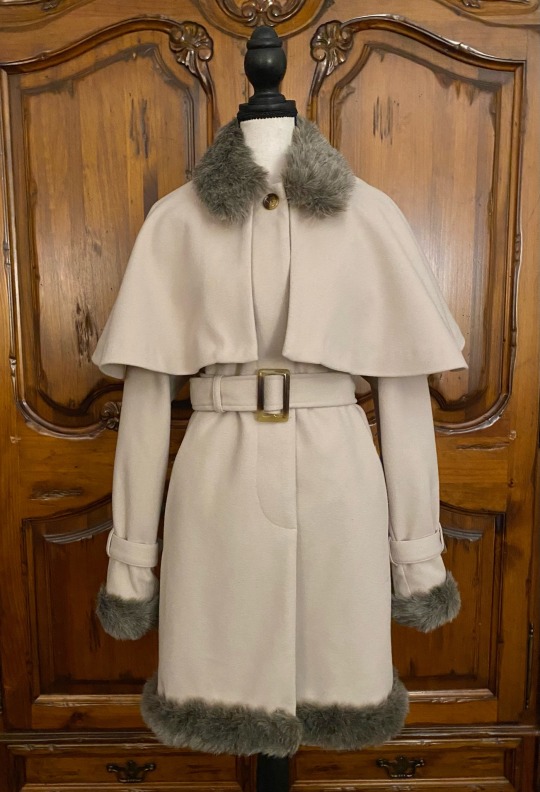
I couldn't get Fitzjames' cunty little fur-lined coat out of my head after finishing "The Terror", so I decided I needed my own version. I found the base coat secondhand, modified and tailored it, and hand sewed on the faux fur trim. Maybe one day I'll make the screen accurate version, but I'm very happy with this for now.
#coat fitzcoat#gonna wear this when I go ice skating with friends next week#I must be the hottest bitch at the rink at all times thank you very much#as for why I thrifted this build instead of making a screen accurate one from scratch:#I simply cannot justify the material costs for the screen accurate version considering I live in a place where it rarely gets below 70F/21C#also the fur trim made me want to scream#because the lighting varies wildly it looks different in every scene#so I was going frame by frame in various scenes to see if it was brown or grey#and my conclusion is that it is a brownish grey#the terror#the terror amc#james fitzjames#marlequinncos
649 notes
·
View notes
Text
Adding these incredible tags from @marlequinncos @ladythornwood and @urrone
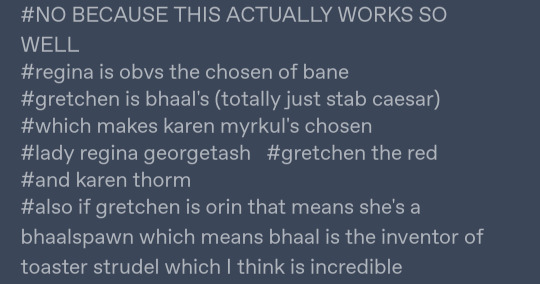


Bane, Myrkul, and Bhaal might've succeeded if they'd picked these three instead.
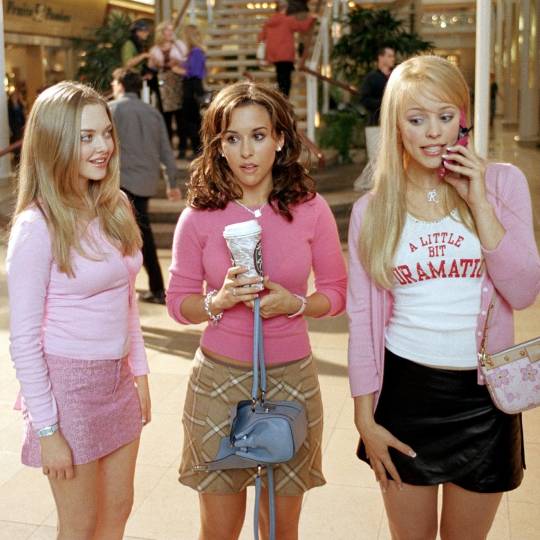
#bg3#mean girls#we could probably crack gretchen wieners tho#tho i heard karlach and regina used to be friends in middle school and then regina told her she couldn't come to her pool party#bc karlach was literally on fire and might burn girls there in their bikinis and omg it was so messed up
3K notes
·
View notes
Note
can we see what the coat fitzcoat looks like on?
Sure! It's slightly long in the sleeves as per the show, and while my version is not entirely screen-accurate, it's still quite warm.

#my version of the coat is made of fleece#the capelet is also attached with buttons so its removable#letters to the editor#chatterbox#the terror#the terror amc#james fitzjames#coat fitzcoat#marlequinncos
233 notes
·
View notes
Text

the inherent irony of a vampire mirror selfie
I've got to hem the chaps, paint the boots, and actually cut + style the wig into a mullet, but here's a Marko costest!
95% of what you see here was thrifted and I made the jacket from scratch myself!
#I do have the earring I just forgot to put it in for this whoops#the lost boys#marko the lost boys#marko tlb#marlequinncos#horror#horror cosplay#cosplay#my cosplay
465 notes
·
View notes
Text
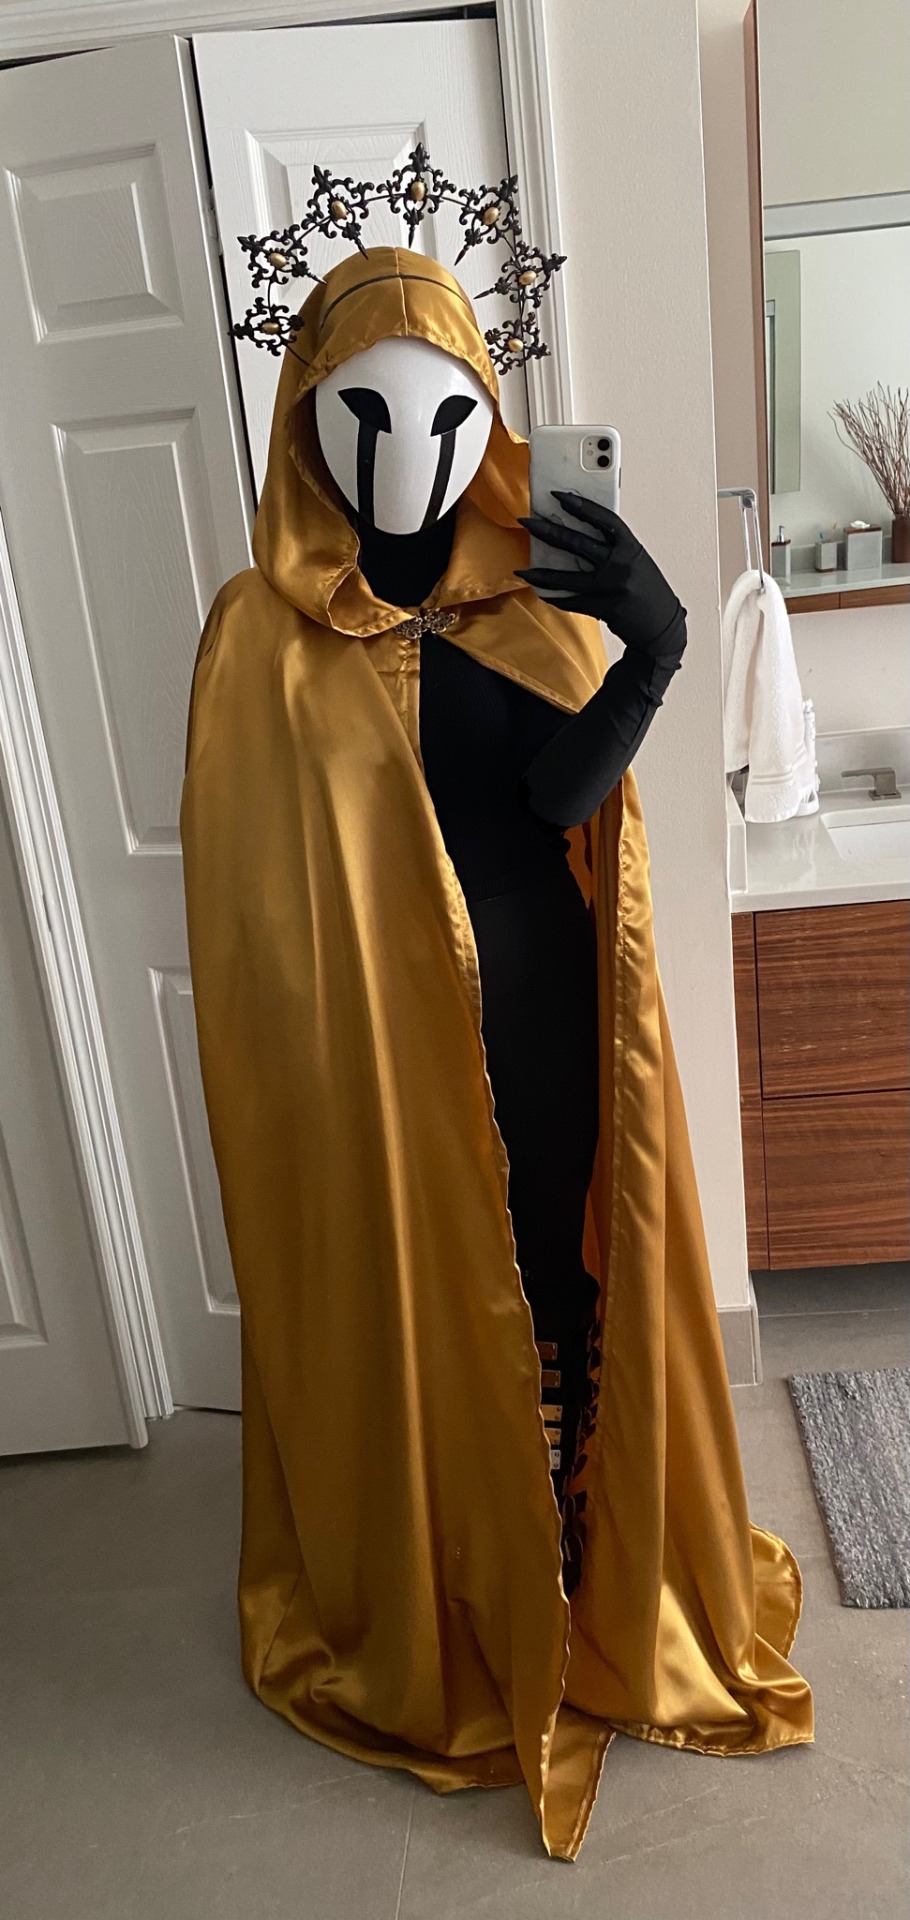
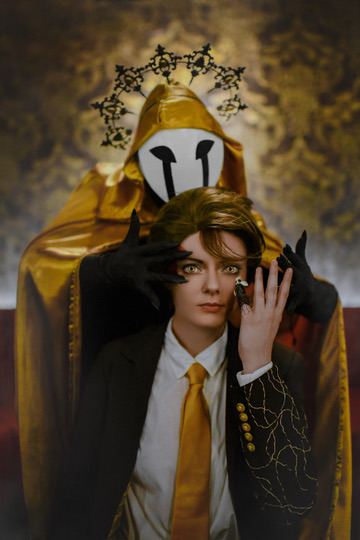
Happy Halloween! Spooky day seems like the best time to post my costest of John Doe from the horror podcast Malevolent!
This was a super fun cosplay to make, especially since this is a character from an audio-based medium who has no corporeal form in the story to begin with. Design-wise, I took inspiration from both the cover of the 1865 edition of Robert W. Chambers’ novel “The King in Yellow”, as well as various fandom interpretations of the character.
I can't wait to debut him at Anime Frontier alongside a friend of mine who will be cosplaying Arthur!
#malevolent#john doe malevolent#cosplay#marlequinncos#malevolent podcast#my cosplay#a friend of mine referred to him as a haunted banana#and that will forever be my nickname for John
982 notes
·
View notes
Text

incredibly important tags that extremely pass peer review from @marlequinncos
you can extremely screw up your eyes if you haven’t gotten an optometrist to check if you even can wear contacts!!!!! don’t just shove lenses from the dealer hall in your eyes or whatever!!!!!!
the original post didn’t state this clearly enough which is on me, but I was 100% meaning that if you’re an occasional wearer just for costumes, you might mistake what daily wearers sometimes mean by “hurt” (as in “slight discomfort from fucking up and wearing the lens half an hour too long”) for “it is fine to continue wearing lenses that are actively causing an eye injury”, which is a thing I’ve seen happen irl to occasional wearers more than once, one time of which involved skipping out on the con to go to the hospital.
since it’s getting to be big time con season, here’s a friendly reminder!
Cosplay Contact Lens PSA:
if your lens causes actual pain, CHUCK THAT LENS IMMEDIATELY!
Sometimes you’ll hear someone who wears contact lenses on the regular complain about how their lenses hurt, when what they actually mean is “whoops! I exceeded my comfortable wear time for the day, and now my eyes are aching in a non painful but still uncomfortable way! I need to get home and switch to glasses!” instead of that their lenses are causing actual pain. (That still isn’t a great situation btw! Keep glasses on hand in case of this!)
The way that there are two vastly different yet equally common meanings of “my contacts are hurting” has been behind literally every nightmarish cosplay lens horror story I’ve ever seen irl. Someone was used to hearing “my lens hurt” from a friend who meant the not great but not particularly likely to cause injury way, had cosmetic lenses that ACTUALLY hurt, and refused to take out the lens before there was significant damage.
DO NOT MAKE THIS MISTAKE.
if it’s uncomfortable, take it out! If it’s ACTUALLY PAINFUL, take it out as soon as possible, no exceptions! I don’t CARE if you have a photoshoot! It’s not worth it! You can photoshop your eyes later!
Just. My dudes. My fellow cosplayers. Please always remember.
CONTACT LENSES SHOULD NEVER CAUSE ACTUAL PAIN. IT IS ALWAYS BETTER TO GO WITHOUT LENSES THAN HURT YOUR EYES.
66 notes
·
View notes
Text

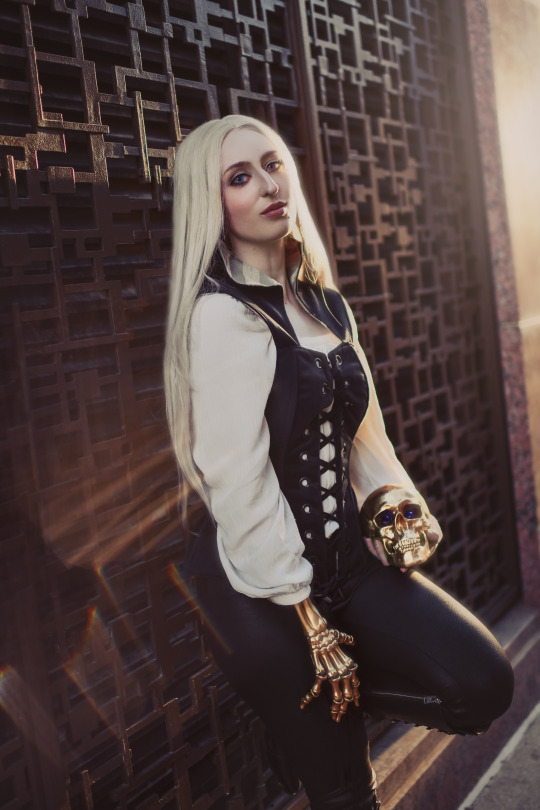
Ianthe Tridentarius, Princess of Ida, daughter of the Third House, the Pale Twin, and the Saint of Awe, eighth Lyctor to serve the King Undying.
This profile shot might be my favorite one from the whole photoshoot!
Photo by Allison the Photographer
Cosplay by me
Wig from sylvia_wigs on alieexpress
523 notes
·
View notes
Text


“Everything I am, I learned from you.”
More Malevolent! The first shot was inspired by the famous bar scene in Stanley Kubrick's "The Shining".
Photo by Allison the Photographer
Arthur Lester cosplay by Maeviary
John Doe cosplay by me
#malevolent#malevolent podcast#arthur lester#john doe#marlequinncos#john doe malevolent#the king in yellow#cosplay#my cosplay#friend cosplay
482 notes
·
View notes
Text

My Winged Lion cosplay is done, so have a cosplay and makeup test! From my sketch to reality, it was a whirlwind two months. This was a super fun build that allowed me to learn several new skills and flex my design muscles. I can’t wait to wear this to a con, get photos of it, and hang out with other Dungeon Meshi cosplayers. 🦁
If you want to see how I made this or see some of the small details up close, check out my build thread on Bluesky!
Cosplay designed + made by me
Base bodysuit: Pingping Clothing (Etsy)
Horns STL + headband: Shadowfall Workshop (Etsy)
Wings: Macwings (Etsy)
#makeup needs a few tweaks but I've got the general design for that mapped out#marlequinncos#cosplay#my cosplay#winged lion#dungeon meshi#dungeon meshi spoilers#delicious in dungeon spoilers#delicious in dungeon#dungeon meshi cosplay
81 notes
·
View notes
Text

"There are worse things than myself in this building."
Raise your hand if you’re hoping for a crumb of news about Alecto the Ninth 🙋♀️ I can’t wait for the last Locked Tomb book to come out; I’m so curious to see the way this story will end!
Photo by Allison the Photographer
Cosplay by me
Wig from sylvia_wigs on alieexpress
149 notes
·
View notes
Text
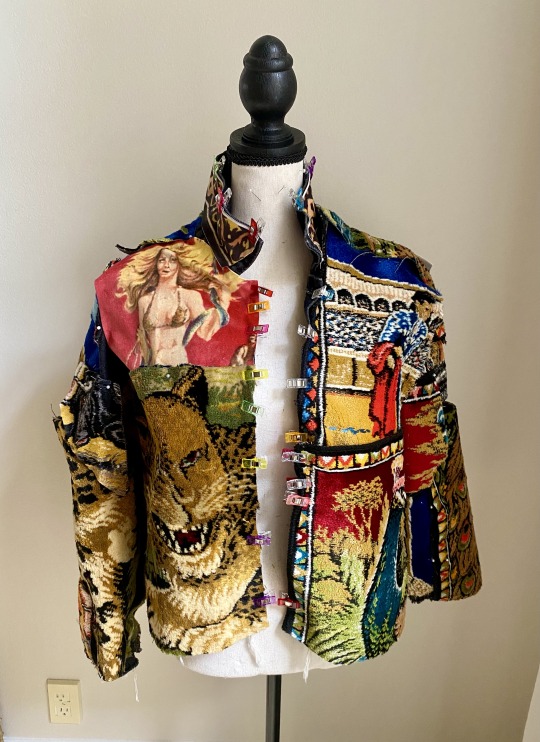
Cosplay Build Guide: Marko's Jacket from The Lost Boys (1987)
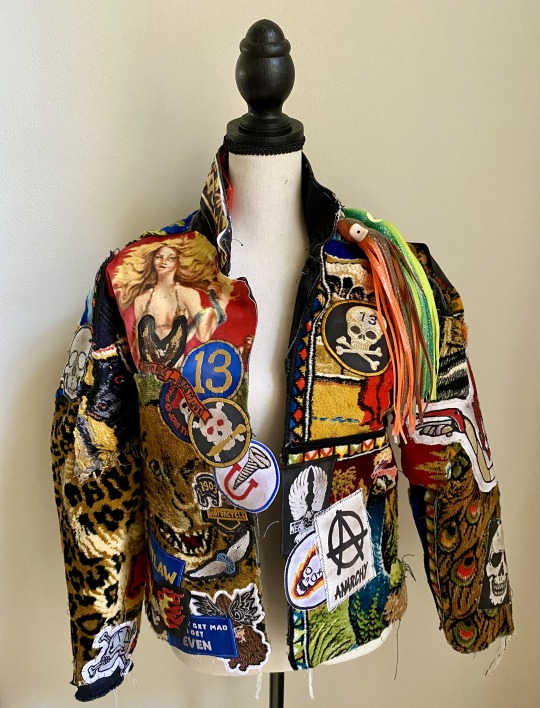
I am a lover of the horror genre; horror movies, books, games, you name it! And one of my favorite horror movies is the 1987 classic “The Lost Boys”, which focuses on a gang of motorcycle-riding vampires in the fictional California town of Santa Carla. I'm also a big fan of thrifting and modifying items for cosplay. I decided to combine those two things and make a garment that has lived rent-free in my head since I first saw the film: the colorful patchwork jacket worn by the vampire Marko.
I'm going to walk you through how I made Marko's jacket, breaking down the different parts that comprise the garment.
Marko’s outfit is made up of several components: a white cropped tank top, light wash denim jeans, leather chaps, custom painted leather moto boots, fingerless motorcycle gloves, a black skull earring, and of course, that iconic and extremely loud jacket.
All four titular vampires have a signature jacket they wear in the movie, and Marko’s is by far the most elaborate and distinctive. It consists of three main parts: the base jacket, the Italian tapestries, and the patches. Because of the nature of this build, I had to do a ton of intensive research to determine the individual and highly specific parts of the jacket. My main references were photos from movie memorabilia auction sites whenever one of the original jackets went up for sale, since they photograph the jacket from all angles.
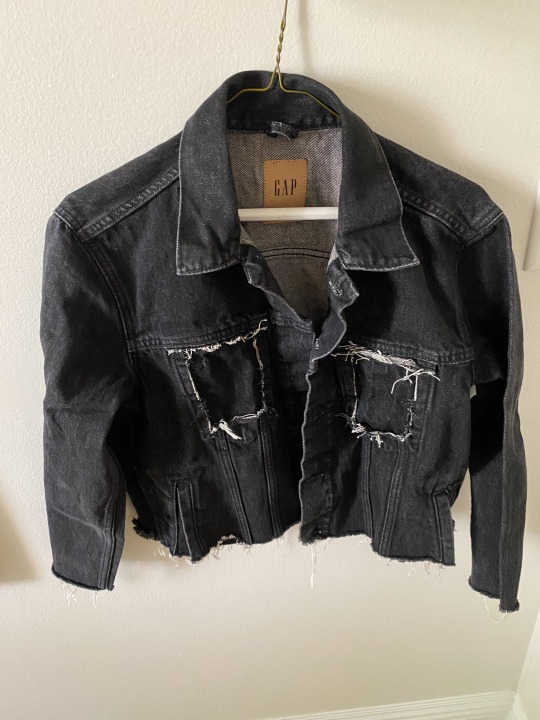
Part 1: The Base Jacket
Marko’s base jacket is, according to my research, a men’s black Levi’s denim jacket in a size 40, which I believe translates to a medium. Now, I’m a petite woman (5’3”, athletic but slim), so I knew that the exact jacket would be too big for my frame. Instead, I found a men’s black denim jacket in an extra small; it's very similar in style to the original, but a little better proportioned for me. It's still very much oversized though. The first things I did were remove the buttons and pockets, and I cut off the hem of the jacket and the sleeve cuffs. Then I tossed the jacket in the washing machine to fray the edges.
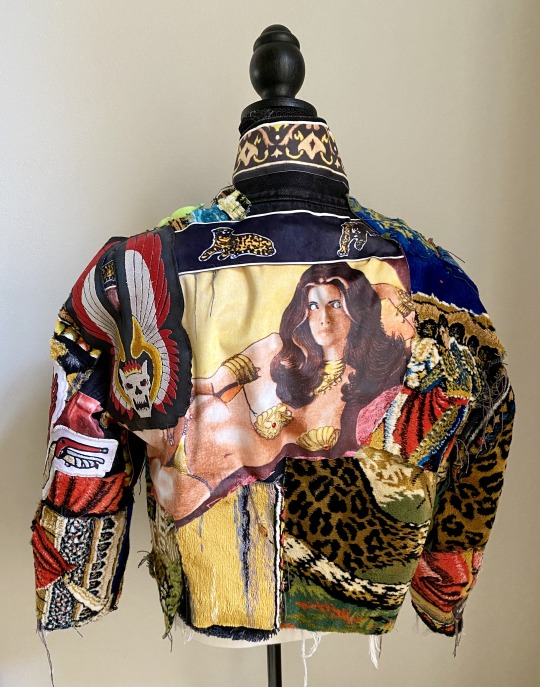
Part 2: The Tapestries
The hardest part of the jacket by far was finding the tapestries, for two reasons. The first is that the tapestries were all from the 1960’s and 1970’s, meaning I had to scour vintage stores and websites to find the right ones. The second is the variation. Six jackets were made for each Lost Boy in the movie; this is standard for a film, since some jackets would be used for closeups (the”hero” jackets) while others were used for stunts, and a few even have intentional holes in them for harness rigging. Because of that and the thrifted nature of the jacket, the Marko jackets for the film all differ slightly in the placement of the tapestries and patches.
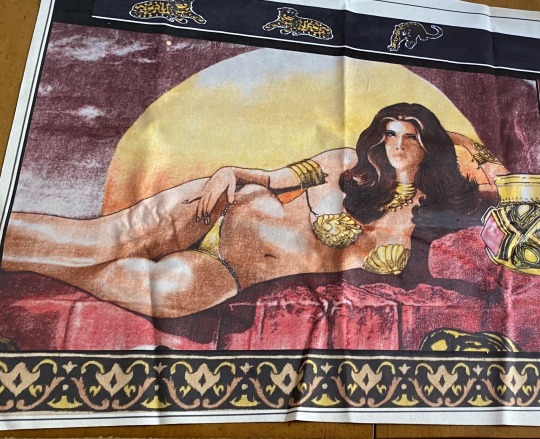
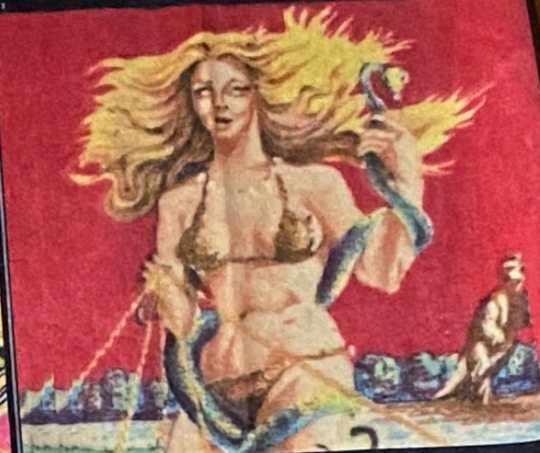
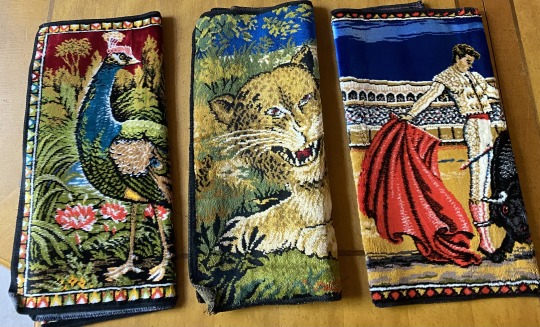
There are five tapestries in total. Three are velvet: the matador, the peacock, and the leopard with the messed up face. These are impossible to dupe via Spoonflower or Contrado (custom fabric printing websites) due to the fact that these three are essentially small rugs. The other two, chariot lady and cat lady, are dupable via Spoonflower or Contrado printing since they aren’t the same fabric as the others.
The two pin-up tapestries are nearly impossible to find, more so than the velvet ones. In my months of searching, I never found either pin-up tapestry, so I had them printed by Contrado, along with the collar trim.
If you go searching for the velvet tapestries, you'll notice that there are several different versions of each one, with slight changes in color and placement of things in the art. How accurate you want to be is up to you. My peacock and matador are accurate to the tapestries on one of the stunt jackets, whereas my leopard is the correct color but wrong direction. That's doesn't bother me much, personally, especially since the leopard is the hardest of the velvet tapestries to find by far.
Once the tapestries were acquired, I measured different sections based on the dimensions of the jacket, mapped it out using washi tape on the tapestries, and then cut them all out. There was a decent amount of math involved here, specifically regarding scaling the sections of tapestry down by a few inches since my jacket is smaller than the original. I then arranged them all onto the denim jacket and pinned them in place before hand sewing them (yes, you read that right; I hand sewed this whole thing) on in the correct overlap. I also added the rhinestones to the cat lady.
I recommend using embroidery needles and upholstery thread to attach the tapestries to the jacket, due to the thickness and the weight. I also sewed along the designs in the tapestries themselves to better hide the stitching within the image.
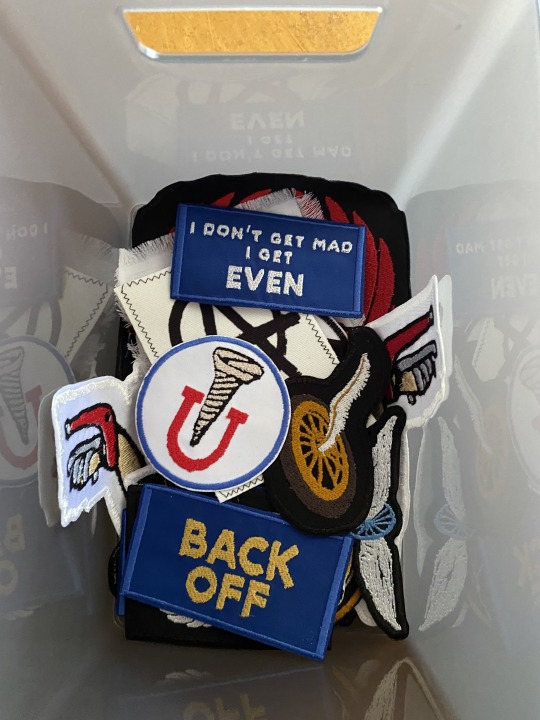
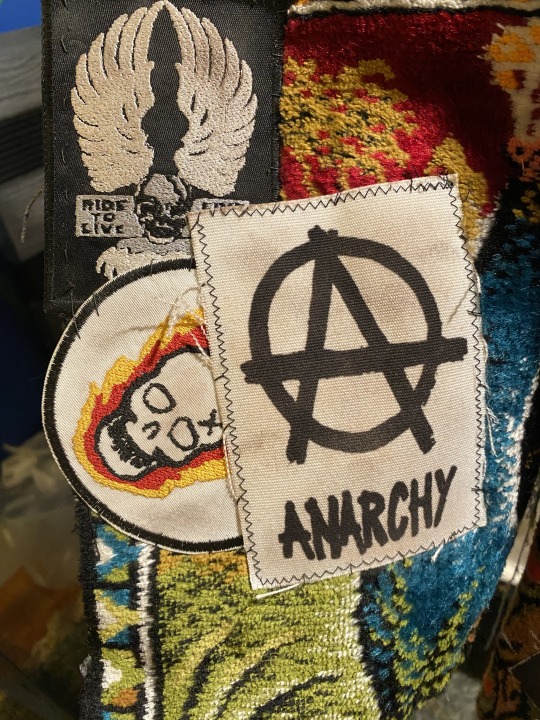
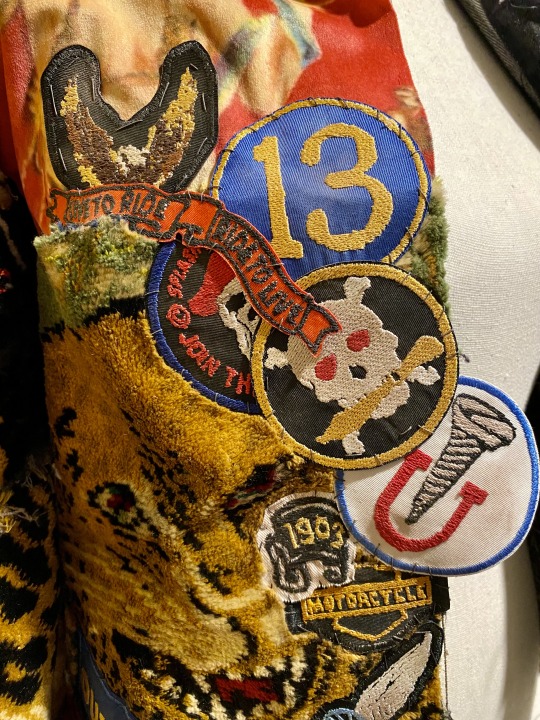
Part 3: The Patches
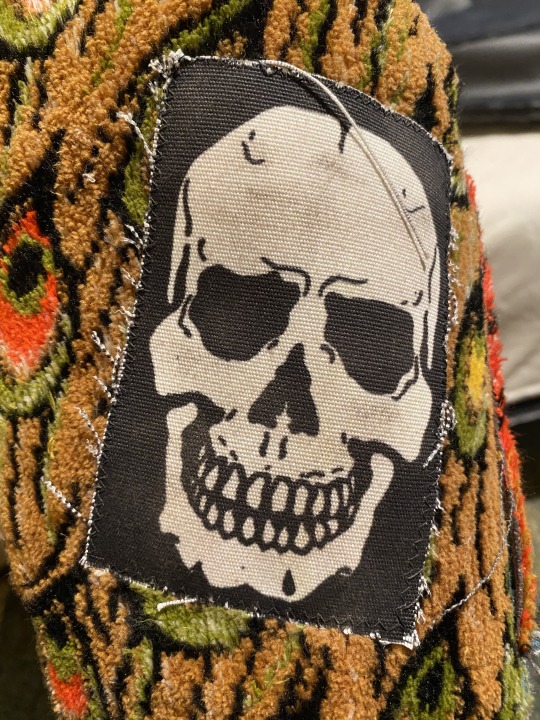
Marko’s jacket has a total of 26 different patches on it, most of which are motorcycle or punk themed. For these, I found a seller on Etsy who makes 24 of them, and I used Contrado to print the remaining two (the anarchy symbol and the large skull) on canvas and added the stitching. You could thrift and find the patches as well, but here's the thing: while some of these patches are pretty easy to find, others seem to be nonexistent, to the point that I wonder if some were made exclusively for the movie. That's why I went and purchased my patches instead of hunting them down. My personal favorite is the “Screw U” one. One fun fact about the patches is that the large winged skull on the back is a leftover from the movie “The Warriors”.
I once again hand sewed these all on as per the references from the movie. You might think that ironing the patches on is an easier method, but there's a few reasons why that won't work: 1) the patches in the movie are sewn on; if you zoom in, you can see the stitching 2) I'm not sure the patches would even adhere to the velvet and velour of the tapestries and 3) if you decide you don't like the placement of a patch that you sewed on, you can just seam rip the stitching and adjust it, which you can't really do as cleanly with an ironed-on patch.
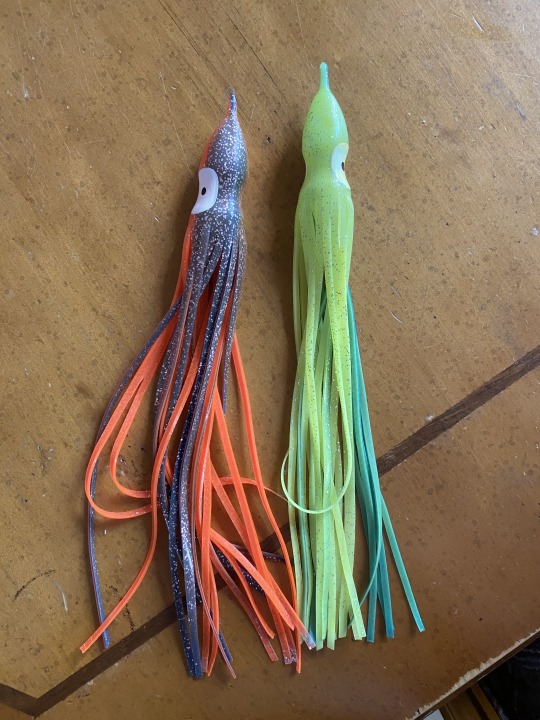
Part 4: The Tassels
The tassels on the jacket’s shoulder are not tassels at all; they’re squid skirts (a type of fishing lure), which is something I never knew existed until I started researching for this build. For these, I found a fishing tackle website that had the closest match to the colors I needed, a blue-grey/orange and a yellow/green. Both squids also have glitter and little eyes painted on.
Part 5: Weathering and Finishing Touches
Lastly, I weathered the jacket to give it that lived-in look. For the dirt/dust on the patches, I used powder eyeshadow. I also picked at the edges of the tapestries to fray them a bit. And to make the patches less stiff, I just broke the jacket in by wearing it around my house. The great thing about this jacket is that the more I wear it and the more it weathers, the better it'll look.
FAQ
How heavy and warm is the jacket?
The jacket is made of denim and rugs, so its pretty warm and heavy. It honestly feels like wearing a weighted blanket, which is a nice bonus if you're anxiety made flesh like I am. It makes a lot of sense for the jacket to be on the heavier side, because if you’ve been to Northern California, you know how cold it can get on the coast, especially at night (not sure if vampires can feel cold, but ¯\_(ツ)_/¯)
How long did it take you to make the jacket?
I don’t time my cosplay builds, but I can guess based on the amount of TV/movies/podcasts/playlists consumed as I was working on it. I'm also pretty fast when it comes to hand sewing. By my estimation, the jacket took me about 45-50 hours of work, and that’s not counting the time I spent searching for the tapestries.
Can you make me one?
Sorry friend, I don't take commissions. Even if I did, there's no guarantee I could find the exact tapestries again. I appreciate the interest though!
One of the most useful resources for making this jacket is the Replica Prop Forum! There's a ton of information there, as well as discussions and troubleshooting about the construction of the jacket.
I hope you enjoyed this walkthrough of Marko's jacket! This was a fun build and I'm really proud of the finished product. I'm going to make the rest of Marko's outfit + wig to complete the cosplay, so stay tuned for that!
If you have any other questions, feel free to plop them in my inbox! In addition to tumblr, you can also find my cosplay work on instagram and bluesky @/marlequinncos
#this might be my favorite thing I've ever made#the lost boys#marlequinncos#marko tlb#cosplay#my cosplay#marko the lost boys#horror#horror movies#80s movies#long post#build post
244 notes
·
View notes
Text

“You lived what anybody gets. You got a lifetime.”
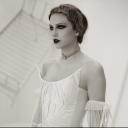
Finally debuting my cosplay of Death of the Endless from "The Sandman" comics by one of my favorite authors, Neil Gaiman!
Death is one of my favorite characters in Sandman, and I had a ton of fun bringing her to life.
(Also, on the off-chance that Neil sees this since he is, in fact, a tumblr user: hi Neil! I love your work!)
801 notes
·
View notes
Text
EVERYBODY LOOK AT MY SON
I'm steadily working on Lilia's book 7 outfit (so far, I've done his belt, wig, gloves, pants, and scalemail half-skirt), and I decided to make a quick egg prop to carry around!
The lil plushie was a custom from Etsy that I had made before I even decided to cosplay General Lilia because I simply wanted a baby Malleus plushie.
The egg was a gold plastic easter egg that I spray painted purple, covered in different kinds of glitter and iridescent powder, and then added the tendrils using a black hot glue.
Here's the scalemail skirt! The scales and rings are all anodized aluminum and the gems are resin from Etsy. I wove everything myself and its very lightweight, especially for being made of real metal.

277 notes
·
View notes
Text


On September 25, 1890 in the second Jojo continuity, the Steel Ball Run race began. To mark the anniversary, I thought I'd reveal my newly finished Diego Brando cosplay! Specifically, I want to show off the pièce de résistance of the whole outfit: the animatronic dinosaur tail! I commissioned this incredible tail from the lovely people at The Tail Company; it attaches to a specially made belt, and I can control and program a wide range of movements using an app on my phone.
Cosplay worn by me
Helmet, jumper, and jodhpurs from Amazon and eBay, tailored and modified by me
Wig from Arda Wigs, styled by me
Animatronic tail commissioned from The Tail Company
Belt buckle and spurs 3D print files from hexerik on Cults3D, printed and finished by me
#lads can I get a “wryyy” in the chat#fun fact: the word “dio” appears on the tail 12 times#and on the entire cosplay 14 times thanks to the belt buckle and helmet#fun fact 2: my riding boots are from the company frye which was founded in 1863#so the characters could canonically be wearing them at the time of the steel ball run#jojo's bizarre adventure#jjba#steel ball run#diego brando#marlequinncos#cosplay#my cosplay
119 notes
·
View notes
Text
“How many times can you fracture a soul until it's only a shell of its former?”
Its Malevolent Monday! Super excited to show off the first photo from the Malevolent photoshoot I did at Anime Frontier! We were lucky enough to find a wonderful bar/book store/speakeasy/cigar lounge to shoot these at and the shots came out wonderful! Stay tuned for more!
Photo by Allison the Photographer
Arthur Lester cosplay by Maeviary
John Doe cosplay by me
#malevolent#malevolent podcast#arthur lester#john doe#marlequinncos#cosplay#my cosplay#john doe malevolent#the king in yellow
209 notes
·
View notes
Text
"Alas. I have a bad personality and a stupefying deficit of attention."
So excited to share my Ianthe photoshoot with everyone! This was my first big cosplay shoot with a photographer and I'm so pleased with how everything came out!
The bone arm for this cosplay remains one of my favorite things I've ever made, and I'm so glad it photographed well! You can see the arm in motion here.
Photo by Allison the Photographer
Cosplay by me
Wig from sylvia_wigs on aliexpress
211 notes
·
View notes