#mine: ps help
Text


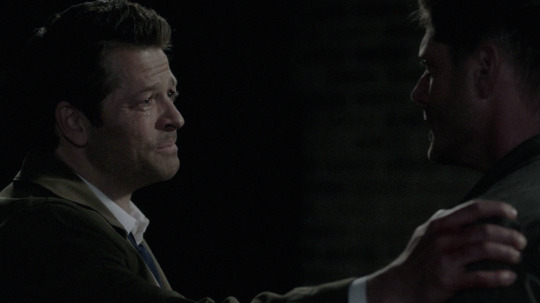
how to use/twist a quote to your advantage ft. Lucemond
#lucemond#otp: don't cry mercy#character interpretation: elliot grihault#character interpretation: Ewan Mitchell#type: edit#type: mine#okay so like....PS crashed on me before I can save my edit#so I tried my best to remember the steps I took for the rest#it's 3am help
445 notes
·
View notes
Text
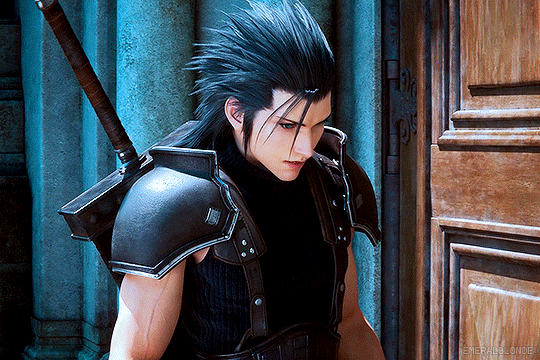
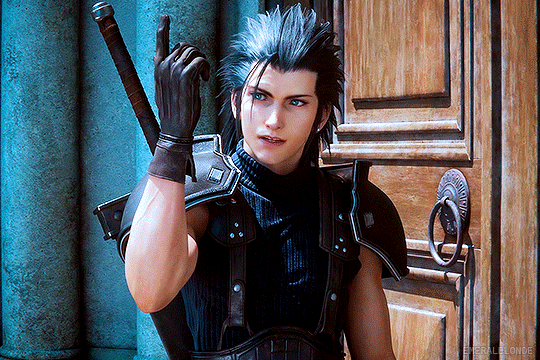

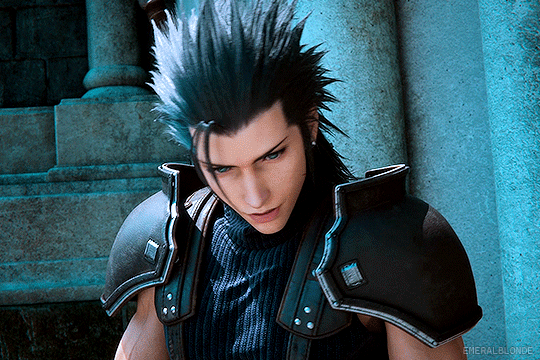
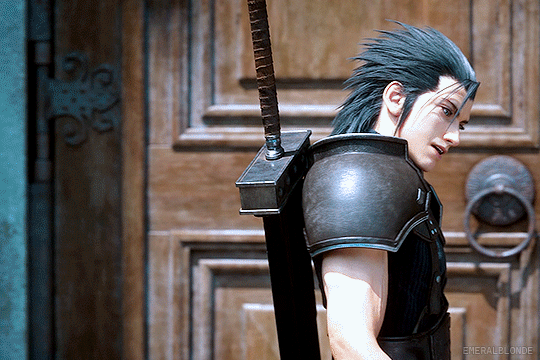
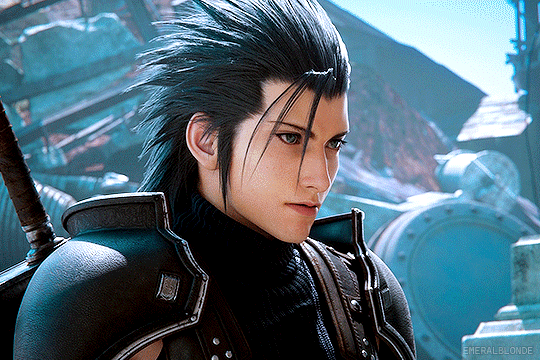
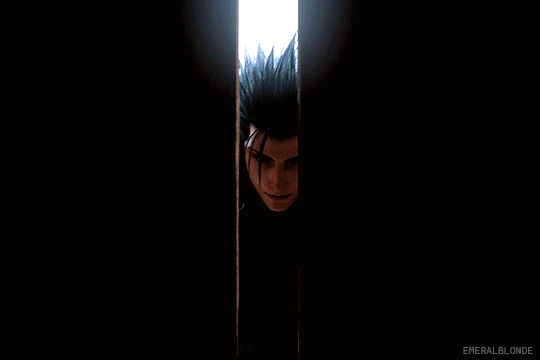
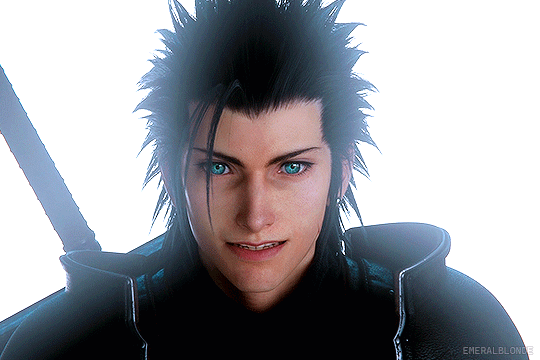
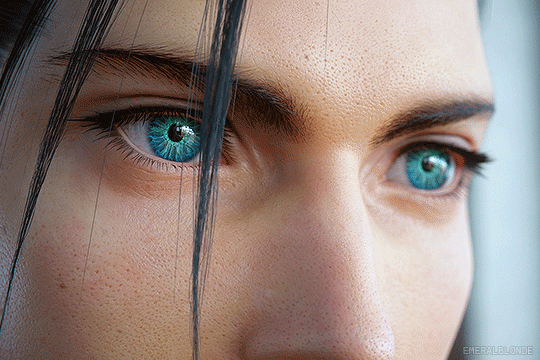
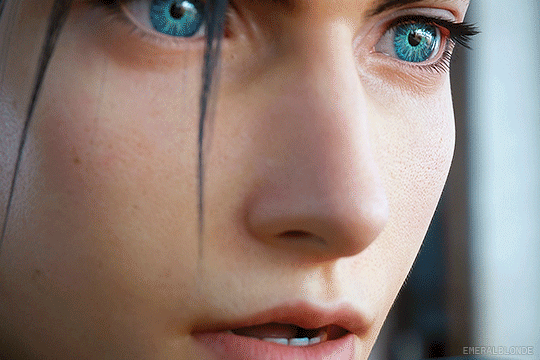
Zack Fair in Final Fantasy VII Remake: Episode INTERmission
#gamingedit#ffgraphics#dailygaming#videogameedit#ffedit#ffgifs#ffvii intermission#final fantasy vii intergrade#zack fair#ffviir#ffvii#ff7#ffvii remake#gamingmen#videogamemen#*#gifs: mine#finally got to make this set#kinda mad that i had to re-record this scene on pc because on ps it was a 'blocked scene'#*growls* anyway#he looks so pretty here i just couldn't help myself
618 notes
·
View notes
Text

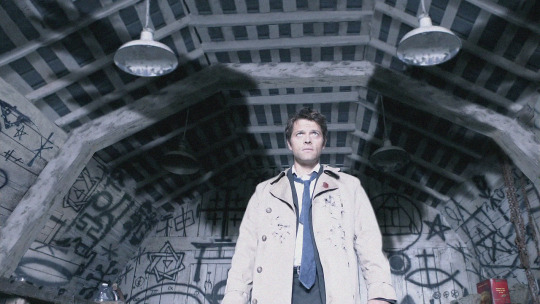

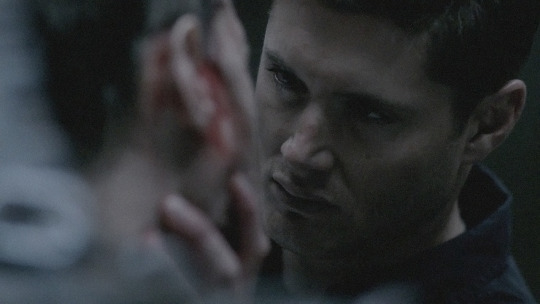

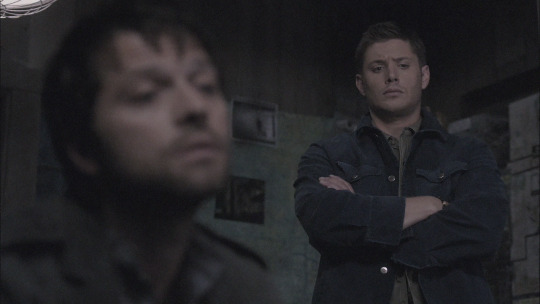


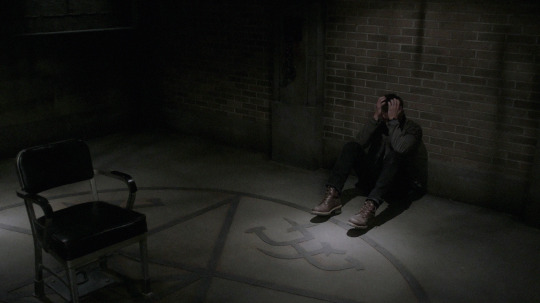
i deserve it, don't i? | mitski - i'm your man (part 1 of 2)
#spnedit#destiel#mine#girl help i was scrambling for screen caps. this song............#i have completely forgotten how to do anything in ps so this is not that great BUT#going wild in my room by myself over this#hello.....
1K notes
·
View notes
Text
#bg3edit#gamingedit#dailygaming#vgedit#astarion#astarion ancunin#gandrel#bg3#baldur's gate 3#bgiii#baldur's gate iii#mine#i love when it does that lack of contrast thing when the base text color is white that's definitely helpful ps#anyways. couldn't get this out of my head & i finally figured out how to execute it (kind of)
692 notes
·
View notes
Text


help him
#svtsource#hourlywonwoo#wonwoo#jeon wonwoo#svt#seventeen#*mine#my ps makes everything looks so pink i'm not even sure how it actually looks now help#but this whole segment had me near tears#they were soooo bad i love them so much
377 notes
·
View notes
Text

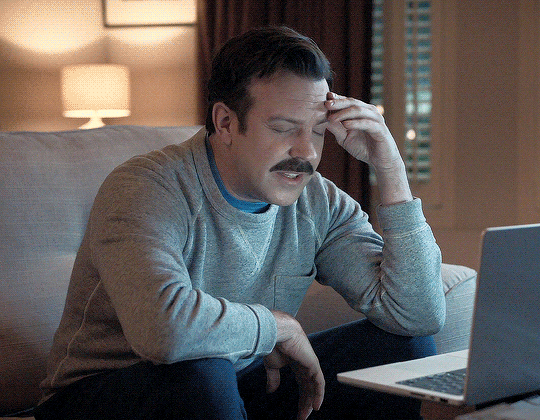

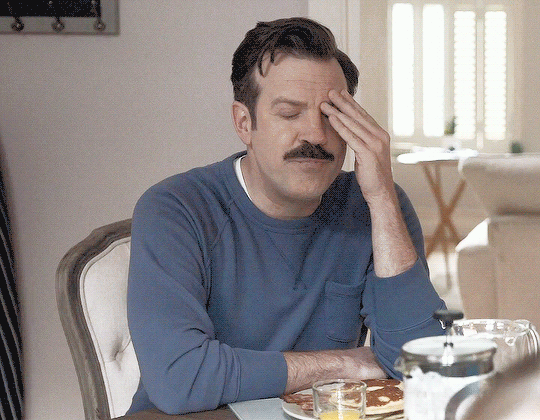
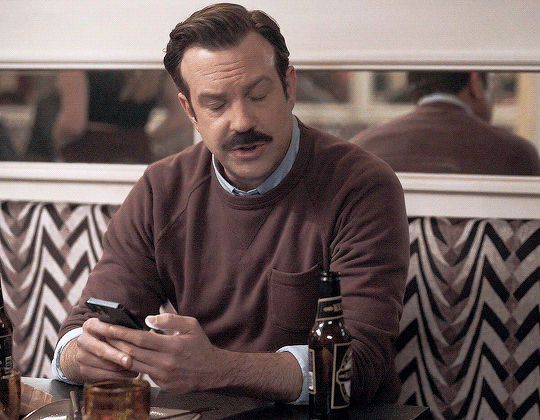
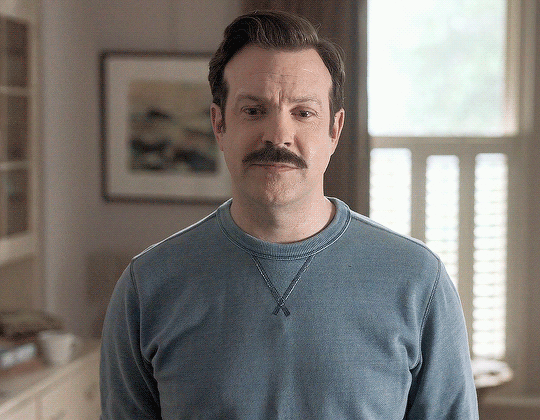
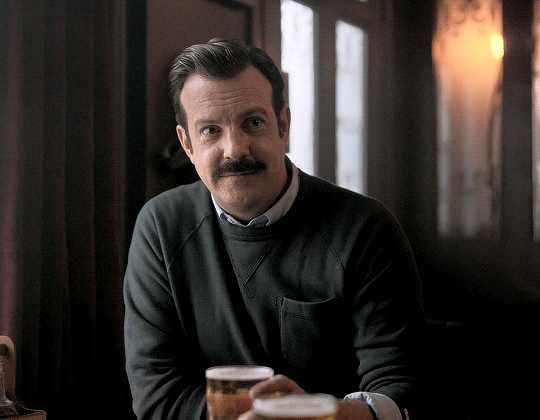
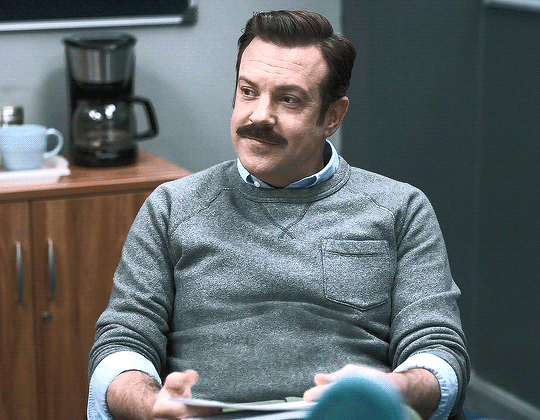

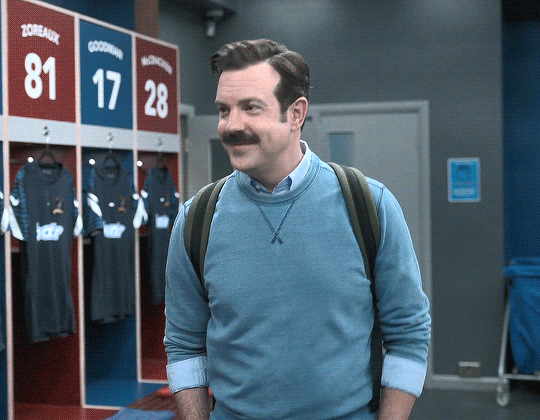

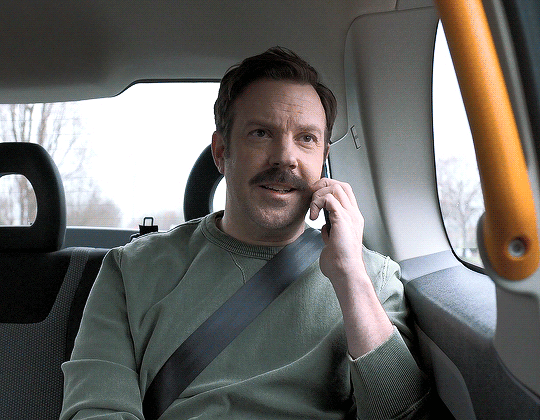

Jason Sudeikis as Ted Lasso Season 3 » Casual Sweaters/Jumpers
#Ted Lasso#Jason Sudeikis#Theodore Lasso#*mine: gif#tedlassoedit#sweater/jumper game#ugh you idiot with that face#stop staring at me swan#here's a gifset for the sweater/jumper lovers out there and sorry this is a long post. I just couldn't make up my mind on some of these#I spent way too much time overanalyzing the casual sweaters/jumpers. I was trying to only show each one once but then just gave up#deep dived research on the Todd Snyder site that's the kind of overanalyzing that happened#there is a lot of lighting messing with colors and for sure there are some repeats in this but whatever#I had this idea way back when we saw the variety of color sweaters/jumpers for S3#but after the end of S3 I lost a lot of feelings for this show#my motivation for giffing this show is not so strong anymore but there is a part of me that still wants to maybe try a layout set#I'm thinking of doing all 3 seasons and just an overall sweater/jumper encompassing gifset. both the work and casual together#kind of meh on how some of these turned out ¯\_(ツ)_/¯#it might be the added switch to the new editor and that all of these have been turned into gifv nonsense#also couldn't get the caption font to do what I wanted in html or at least it looked alright in drafts but not in preview#PS: thank you talldecafcappuccino for reading/helping with my color debate/same vs not same sweater/jumper nonsense
408 notes
·
View notes
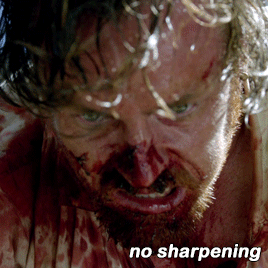
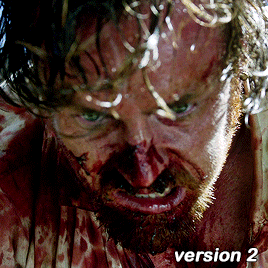
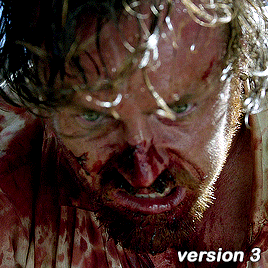
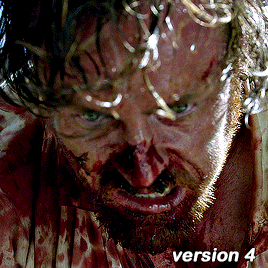
Photo


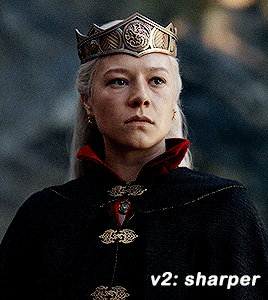
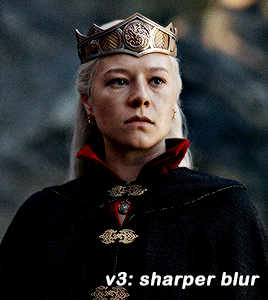
GIF SHARPENING ACTION 2.0 by @daenerys-stormborn
This is an updated version of my “all in one” gif action I made 5 years ago. It very similar but I added a new sharpening that I now use, v3: sharper blur.
‼️ UPDATED APRIL 2024 ‼️
I used a new sharpening now. I updated the action and it should be in the link. It’s under ‘sharper v2′.
Please read this for a more detailed breakdown of how these actions work and how I make my gifs.
v1: normal - smart sharpen (amount 500%, .3px)
v2: sharper - first smart sharpen (amount 500%, .3px) -> second smart sharpen (amount 10%, 10px)
v3: sharper blur - first smart sharpen (amount 500%, .3px) -> second smart sharpen (amount 20%, 10px) -> gaussian blur (radius 1px; opacity 52%) -> third smart sharpen (amount 500%, 0.2px) -> fourth smart object (amount 5%, 5 pixels) -> second gaussian blur (radius 1, opacity 10%)
sharper v2 (not shown on the gifset) - first smart sharpen (amount 150%, radius 0.4px) -> second sharpen (amount 10% radius 64px)
**v2 looks better in 540 gifs than smaller gifs, its a bit over sharpened here for my taste**
Actions also included:
Load Files Fast - for people using PS CS6 or older, uses “Load Multiple DICOM Files” for faster screencap loading.
Brighten - duplicates the smart object then changes blending mode to screen and converts it back into one single smart object to brighten dark scenes.
Convert to Frame Timeline - converts smart object back into frames, sets frame delay, and changes canvas sizes to -2px (width & height) to take away transparent border around gifs (you can always delete this part if it doesn’t apply, please read detailed breakdown for more info).
Convert to Video Timeline - converts frames in frame timeline into a smart object in video timeline.
DL: action
These actions were inspired by hoechlin's sharpening and trentcrimms' sharpening.
#itsphotoshop#allresources#completeresources#chaoticresources#resources#ps help#ps actions#mine#t*#r*
813 notes
·
View notes
Text
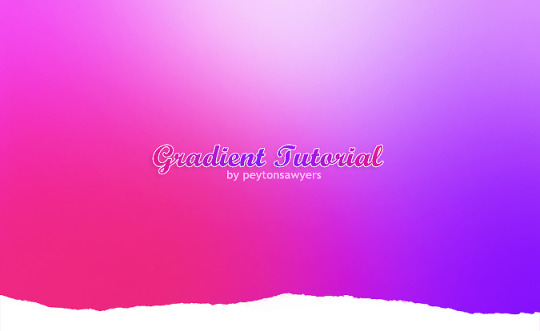
This quick tutorial will go over how to make gradients, from simple gradients to multicolor ones.
give this tutorial a like/reblog if it helped you out
end result & tutorial under the cut
if questions should arise, feel free to send a message!
Chapters:
how to make a basic gradient
adding colors with brushes
softening & adjustments
What you´ll need:
any version of photoshop (I use CS6, mine is in german because I bought it years ago in germany)
very basic photoshop knowledge
i. how to make a basic gradient
Open a new document in your desired size.
There are several ways to make gradients. I always use the new fill layer option, right next to the new layer or new group buttons on the right side.
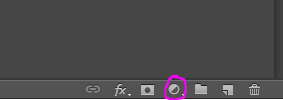
Click on it and select the second option.

Adjust the angle however you wish, and then click on the gradient to bring up the next window
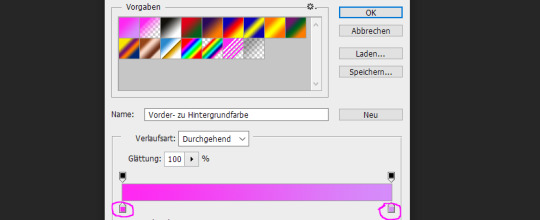
Select any colors you want by clicking on the little droppers highlighted above. I used #ff27f2 on the left and #d58dfa on the right. Once you´re done click OK until your new gradient is on your document.
ii. add colors with brushes
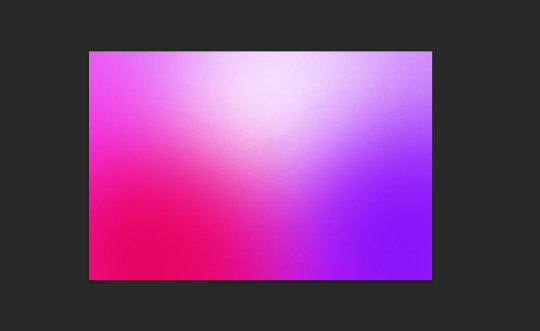
add a new layer & select a big brush with no hardness and low opacity.
select any color to paint with, I´ll be using #e50051 & #770dfa & plain white. Start painting on that new layer in slow strokes. You can add as many colors as you want. Mine now looks like this:
Now we merge our layers by selecting them, then righ click and selecting merge

iii. softening & adjustments
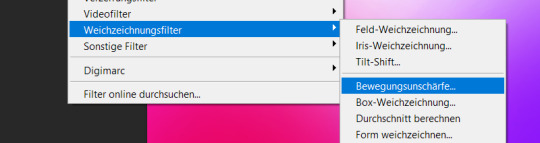
Go to filters -> blur > motion blur
Depending on the gradient you´ll have to select different variables, but for this one I used the numbers below:
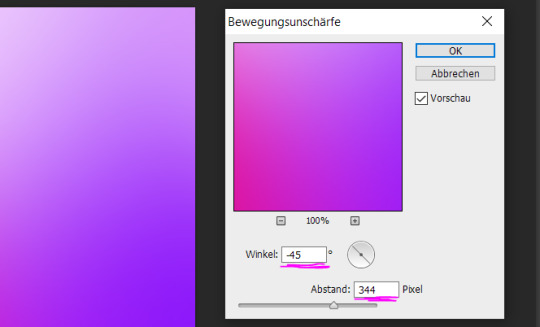
Sometimes I add Gaussian Blur too to blend it even more, but didn´t do that for this gradient.
Now for the adjustments I only added a brightness and vibrance layer. This is the finished gradient:

#completeresources#dailyresources#photoshop tutorial#gradient tutorial#photoshop help#usernelly#userireland#ps asks#mine: tutorial#my tutorials#my resources
161 notes
·
View notes
Text


lildohnut sharpen action set 1
LIKE/REBLOG IF YOU DOWNLOAD
Do not modify and/or reupload as your own.
Created using Photoshop CC 2023
Follow @lildohnut for more resources
This is my first sharpen set - it's 5 different actions with some subtle differences, but just try them out on whatever you are working with and pick which works best for you.
All of the actions are frame to timeline frame - meaning you don't need to save and reopen your gifs to save them as 0.05 speed as that is already done for you. It's my ✨lazy girl action✨ for photoshop.
DOWNLOAD HERE
#photoshop resources#completeresources#ps help#allresources#photoshop cc#mine#action#i hope this helps some people out
340 notes
·
View notes
Note
hi Pat, can I ask if you could share your colouring settings for your Blond Jk set? I was mesmerized by your style 🤩
hi anon! first, thank you so much! it means a lot. and i can share the psd if you want, if there is anything else you need to know, please just ask me ♥

original post | link to download
this file contains my "base" psd + the coloring i did exclusively for that video. hope it helps and that you like it 🤗
#ask#psds#psd coloring#ps stuff#ps help#userkelli#usersky#userdimple#raplineuser#annietrack#psd mine#resources#pls don't mind the before/after thing i just misspelled lmao
36 notes
·
View notes
Text
having a vague "why am i writing this horrible story?" crisis about the anglo-saxon au fic that has taken over my mind since *checks* about two days ago. i have approx 2000 words of it written so it is going fairly well in that sense but i have gone a bit niche with my fics recently and am starting to think "nobody wants to read this, people will be annoyed at you if you post this" a bit more often, even though they probably won't because it's a free cake and it's rude to complain about free cake.
#HOWEVER while hits are low the comments are about the same so that's actually my fics doing better really isn't it?#i keep stats hidden on ao3 usually but i occasionally put them back on and look at my stats page#part of switching off stats wasn't MY stats so much as other people's. i do think losing that context makes me feel better about mine.#for all i know 120 hits for a month-old sifki fic is Incredible Amounts of Number Go Up so i may as well just assume it is right?#just as i have MANY silent fans who are too shy to comment or kudos or rec my fic but they LOVE me and i am their FAVE#okay this little pep-talk in the tags has helped somewhat: i NEED to finish this horrible fic for the lurkers who love me! they'll LOVE it!#ps: the missy & jamie moriarty fic has had 24 hits which considering the crossover i am actually very pleased with :D#\o/#fic related#btw if i start tagging my fic-related posts with the working-titles so i can later track my own thought processes would that be weird?#is that too “anne rice if she had a yahoo mailing list”?
20 notes
·
View notes
Text
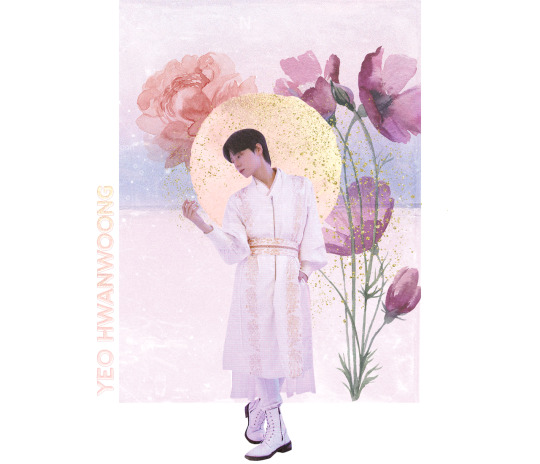

Happy birthday, Yeo Hwanwoong!
#hwanwoong#yeo hwanwoong#oneus#foroneus#mine#m:edit#*hw#*gh#i'm late but i'm here#i mistook his bday for the 28th#but i'm glad i managed to edit this in my old notebook whose screen is hanging by a thread#my new one arrived today <3 but i'm gonna ask for someone i know to get me ps#bc my current one is broken (doesn't let me save quality gifs) and i don't wanna mess up my chances now that i got a new pc#also want a newer ps#but i'm scared to pirate and do a mistake so i'll get help ashcdf#anyway#happy birthday to the boy who loves me#i love him too very dearly
47 notes
·
View notes
Text
family blow up. long story but went to my parents' for dinner with my sister and we literally got kicked out, which has never happened before (we are 34 and 36), and over non-personal/idealistic shit at that. my dad said he didn't want to have us over anymore. i feel like i got fucking disowned. i just keep sobbing and can't seem to stop and i keep almost panicking/hyperventilating.
for i think the 3rd time in my life, i'm very glad i have ativan.
update about 2 hours later: i took a day off work tomorrow. my sick time is maxed out anyway, fuck it. i almost didn't cuz i was thinking it would actually be good to be distracted by work tomorrow, but tbh i don't think it'd actually work out like that and i'd just be shitty at my job while still being just as sad and preoccupied.
#i've hardly ever wanted to stop feeling as much as i do right now#and i shouldnt think of it as my fault but i can't help but be reminded rn that almost every big bad thing that's happened in my life is bc#i can't keep my fucking mouth shut#tonight is totally my dad's fault... but it's still my fault somehow... good luck with that one#oh ps i've already committed to seeing my mom on saturday so. it's just a fucking great family week innit.#🍸🍸🍸#btw if you're confused “my parents” means my dad and step mom#mine
13 notes
·
View notes
Note
Hi!! I have a question about gifs. I’ve noticed some users (yourself included) have something on their gifs that I could only describe as sort of a net on top of their gifs. I noticed it, for example, on your Barbie/suicide squad parallels post. It almost seems like some sort of tool like noise where it helps to make a gif appear more hq. I’m wondering what that might be, or if I’m totally off base!
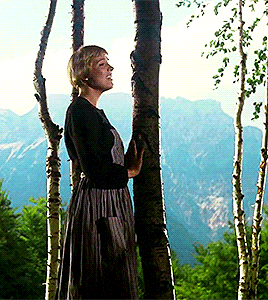
Hey! Unfortunately, I didn't save the PSD for that particular set - the closest one I still have was for this Sound of Music one, but the settings were fairly similar from what I remember.

There isn't really much to it, and the easiest way I can explain what the "net" is, is that it's basically the combo of your resize settings, sharpening/noise you've added to your gif, and finally your export settings. At least that's how it is for me - keeping in mind I usually try to work with the most HD cuts available so the quality is already there. Anything less than 1080p will always require more adjustment.
When figuring out your image size early on, ensure the resample size is set to Bicubic Sharper (reduction) as that'll give your gif a cleaner, more sharpened look to start with and it should make things easier moving forward.
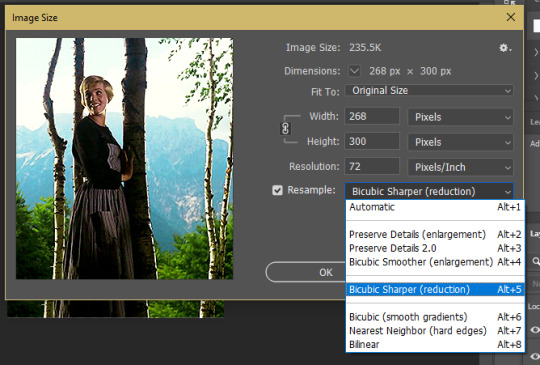
Proceed to make your gif as usual.
I add Smart Filters last, and these gifs didn't require anything more than the simple Sharpen tool applied to the gif once the layer had been converted.
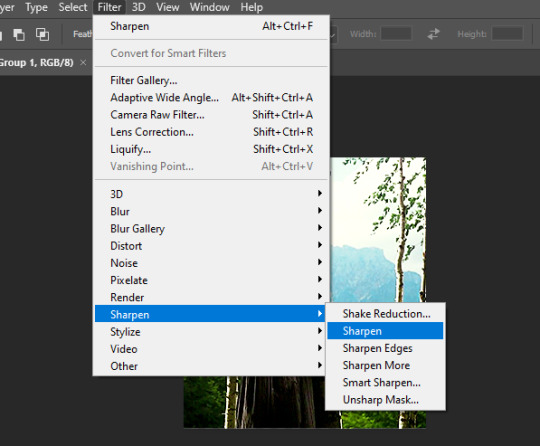
You can mess around with noise or blurring etc. if your gif doesn't quite look the way you want. Before sharpening, I sometimes use Stylize > Diffuse > Anisotropic > ~20% opacity (under blending options) to give the gif a softer look first and remove any graininess. It can look a little funky sometimes.
Lastly, when exporting your image, select Adaptive and Pattern as your save settings these can significantly change the final appearance of your gif - especially Pattern. The two in combination are what create the "net" and will retain the quality of your gif in export.
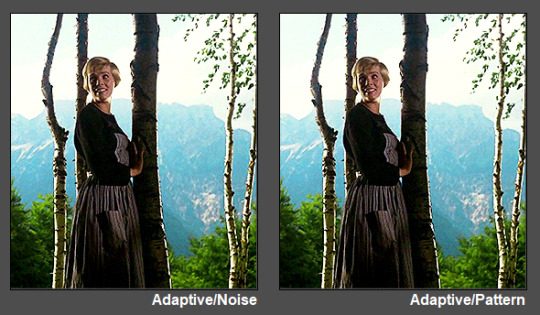

You should be all set with your quality-control "net"! 💜
#tutorial#ps tutorial#gif tutorial#mine*#gif making#I kinda suck at tutorials so let me know if this did/n't help anon and I can maybe offer some more suggestions if necessary :)
44 notes
·
View notes
Photo

Loki 1.03
b&w
#mine#sylki#faceless sylki is kinda my aesthetic now#lovie#dailysylki#can anybody help me with the proper setting in saving a png file? cos I swear this looks good on my PS but when I uploaded it here at tumblr#resolution went meh :(#dailyloki#stcbwseries
81 notes
·
View notes
Note
Jess are you going to play gaiden soon? I want to hear your thoughts on a few things 👀
I'm too poor :[ also unrelated

why tumblr showin the asks like this
#hard for me to read#since its only digital here i cant even hope to grab a copy secondhand off someone like i did with lost judgment for 30 bucks#really and truly i prefer to own a physical copy (not that the games even on the disc anymore)#like its what i prefer but people do sell a physical game for fair pretty soon after its release secondhand#so grrrrrr i hate capitalism grrrrrr let me buy an actual physical copy grrrrr#unless my brother buys me it for me bday or somn i prob wont be gettin it till ps store has a sale tbh#ausralia esspensive 😮💨#no but legit i spent pretty much the last of my money on my psychology appointment and it was so expensive#like yes i got diagnosed so thats good but also its so bummer to spend 700 bucks on that shit#government if u care anout the mental health crisis HELP ME PAY bitch asses#ohhhhhh welllllllll#thats how things are#ask#lmao#sorry for the tangent its my dads death anniversary and burning hot and all these things make little jessie girls want to mine yoshitaka#🌃
8 notes
·
View notes
Last Seen Blogs

triomaxwell
Free! Thinking
avadam
ALTITUDE

perna-store
Untitled

mikuroko
(っ˘ڡ˘ς)

sarilmaahissim
SarılıncaGüzel♥️🌙