#model resources
Photo


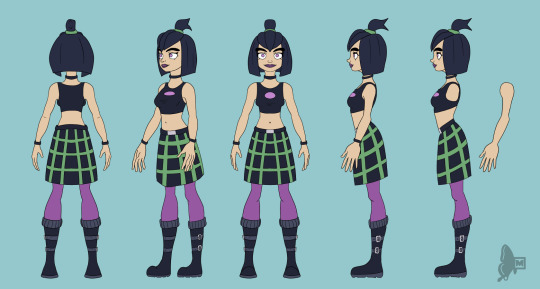
CARLA GUETTA COHEN AVATARS
4 notes
·
View notes
Text
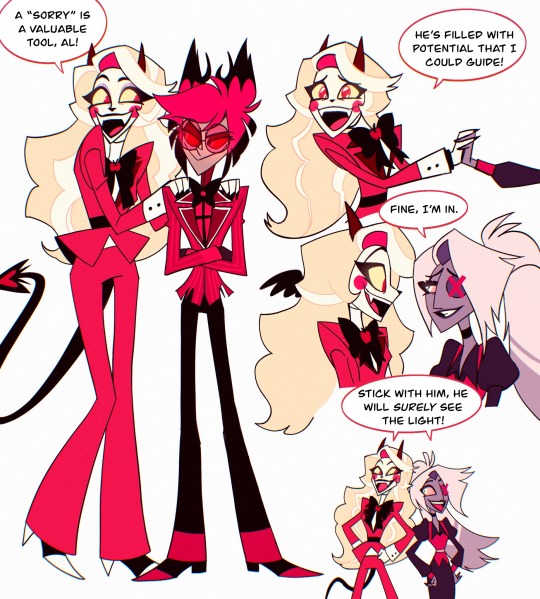
Role reversal AU
#pov: the most devious up-and-coming gangster checks into you and your wife’s redemption hotel#Charlie being alastor’s role model would be so funny#and he would be such a little punk as he tries to use the her resources and power to build his own and become an overlord#hazbin hotel#hazbin hotel fanart#charlie morningstar#vaggie#alastor#my doods#role reversal AU
28K notes
·
View notes
Text
Free Manual Wheelchair Reference Models

ID: A banner with grey 3D models of 5 kinds of manual wheelchairs in a line in front of the disability pride flag and text that reads "Manual Wheelchair References" /End ID
For disability pride month, I decided to release a pack of 3D manual wheelchair models.
The pack includes 5 wheelchairs:
2 Active urban-style chairs (one of which includes a smart drive)
1 off-road active chair
1 children's wheelchair
and 1 standard "hospital" wheelchair).
All the wheelchairs are based off either wheelchairs I or friends of mine have used
Downloadable here!
or on the Clip Studio Paint Asset Store (ID 2097442) (there's been an issue with the CSP version, but the models in the download folder can be imported into clip studio paint until I can fix it)
More info about the download contents below:
The first download link includes the original .Blend file with all 5 chairs, as well as individual .obj or .fbx files the chairs (All but 1 have an .obj file, as they're only meshes. The chair with the smart drive is rigged, which is why it has an .Fbx file instead so it will retain that information) as well as a "read me" file that explains in more depth what kind of disability/character/lifestyle each chair is made for (These are just what I had in mind when I designed them, they are usable by other characters who don't fit the suggestions for the most part!) I wanted to include the Read Me contents in the CSP Asset Store listing, but CS said it was too long lol.
Also, as the title says, these files are free to use! While it's not mandatory, I would appreciate credit if you use them (or even just a tag so I can see the cool art you make with them!!)
I actually made these ages ago, the original plan was to use them in a series of posts then release the pack, but I never got around to making the series and so they've just been sitting here. I took a day off from art fight attacks to clean them all up and get them ready to post. If you experience any issues, let me know and I'll try to fix it up.
I had a couple more that were supposed to be in the pack including a sports (basketball/Tennis) wheelchair and some different styles of wheelchair, but I think the files corrupted so once I fix (or remake) them, I'll probably make a second pack.
If you have any issues, please let me know!
#Writing Disability With Cy Cyborg#Disability in art#wheelchair#wheelchair user#disability#disabled#disability representation#mobility aids#drawing disability#drawing wheelchairs#art reference#art resources#Resources#manual wheelchair#art stuff#disabled artist#3d#3d model#blender#disability awareness#disabilities#disability in media
6K notes
·
View notes
Text


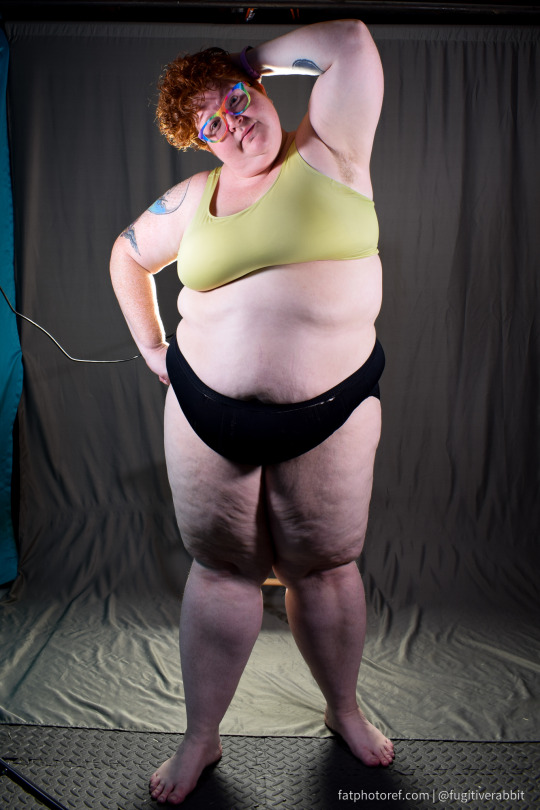


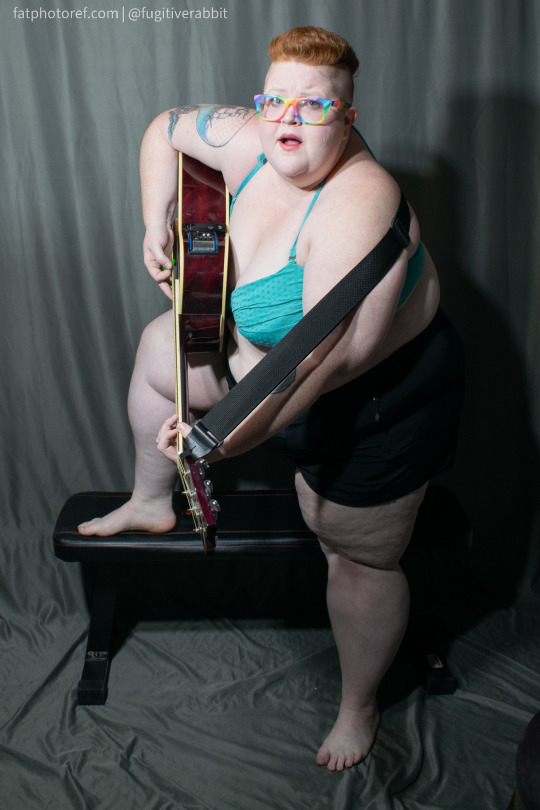
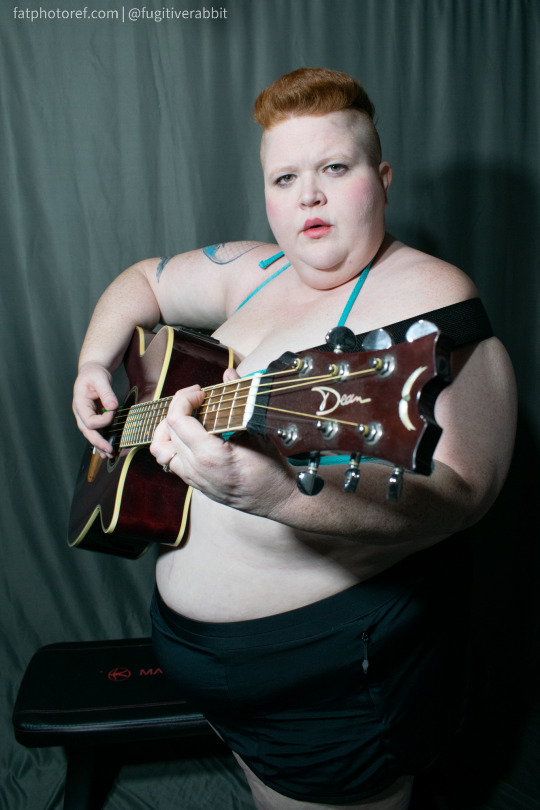
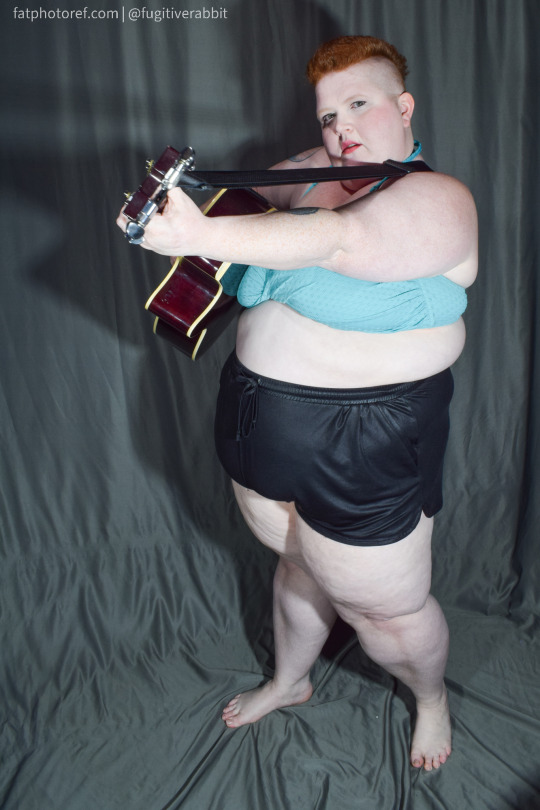
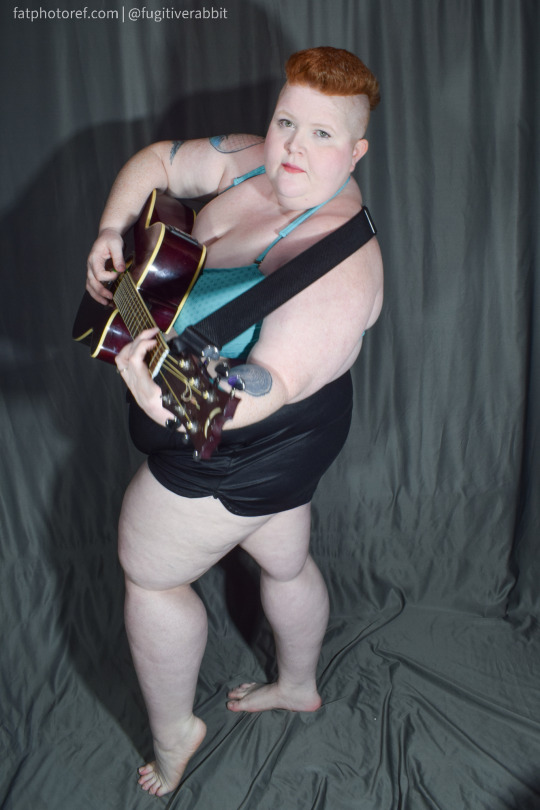
Thanks to some incredible supporters I was able to purchase new lighting for fatphotoref!
That means that there are new photos going up on the site every Monday from now through September. If you don’t want to wait that long to see them all, I’ve added an option to buy the full set from my last shoot on my ko-fi page.
Here’s a direct link to purchase the mega-pack, but no pressure whatsoever. https://ko-fi.com/s/7d8ba786c4
#fat acceptance#fat reference#plus size ref#plus size art#fat art#fat art model#fat artist#artists on tumblr#fat positive#art reference#fat liberation#fat model#refs#art tips#art resources#reference#fatphotoref
7K notes
·
View notes
Text
i was extremely sleep deprived yesterday when i discovered the dragon survival mod which was LIFE CHANGING when you're on three hours of sleep so of course i made a whole custom forest dragon texture in one day about it.
and. just for fun, some concept art i made for it:
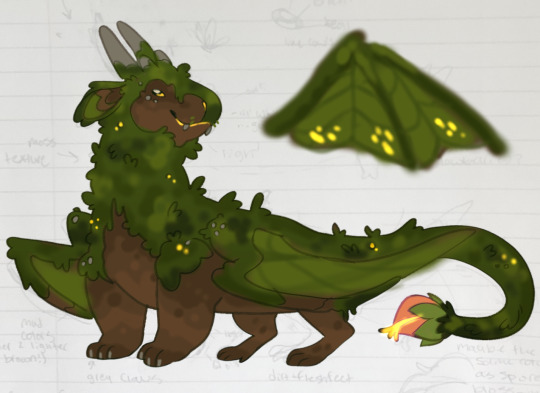
#aka i was too tired to trust myself to speak coherently with clients or make commission work up to my standards. but i need to be productive#or ill die#my art#minecraft#mineblr#dragon#dragonsona#of sorts#forest dragon#earth dragon#lush cave#mods in the video tht are noticable btw: complimentary reimagined shaders. alex's mobs. ambient sounds 5. mizuno 16 craft resource pack.#and a really cool seed i found online :]#video#NOT my model but im going to tag it as#my model#since it's 3D work!! actual model made by blackaures who made the mod and also some SICK ass dragon art#also. patreon gets to see the other 3 pages of concept art i made for this later today! :] wink wink nudge. coughs#sorry i need to shill#um. anyways#no name for this dragon yet. i do know it steals livestock from too-small village/illager pens#to give them enriched lives in its expansive cave farm#i'd like to come back to this eventually and touch up the wing design since the glowing spots didnt really shake out
3K notes
·
View notes
Text

i would like to share this VERY handy tutorial on drawing cars by the ever-immaculate EtheringtonBrothers (twitter, instagram)
#tutorial#cars#etheringtonbrothers#knight rider#transformers#resources#tagging the two fandoms i can think of who might need this the most lmfao#thank you EB i would never be able to draw kitt without you o7 coupled with my gmod references of a kitt car model too of course#please check out their accounts they have so so so many good tutorials. absolutely phenomenal tutorials. on like Everything ever#i know cars are THE biggest pain in the ass to draw ever so here's where i learned it 👉👉#you still gotta do a bit of thinking but its amazing how much even just this one trick can do for you. it carries HARD
684 notes
·
View notes
Text


i tore open time for you.
#destiny#d2#o14#saint-14#destiny osiris#yeah ive been feeling really normal. what about it#pose reference from themalenudestock on deviantart#and i painted over an angle of the corridors of time that i could only get thanks to the destiny 3d models resource folder !
915 notes
·
View notes
Text
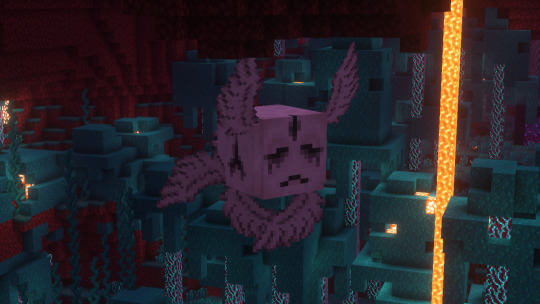
return of one of my favorite designs
#minecraft#mineblr#minecraft art#minecraft ghast#minecraft texture packs#minecraft resource pack#minecraft cottagecore#minecraft mobs#minecraft texture pack#3d models#3d modeling
5K notes
·
View notes
Text

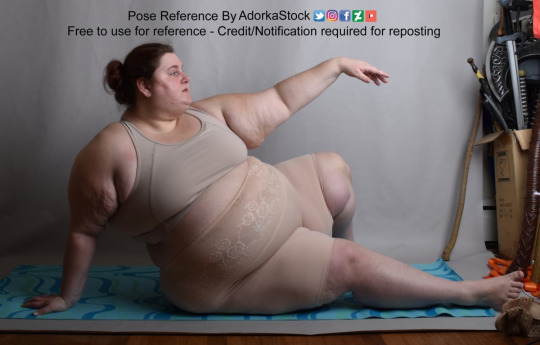
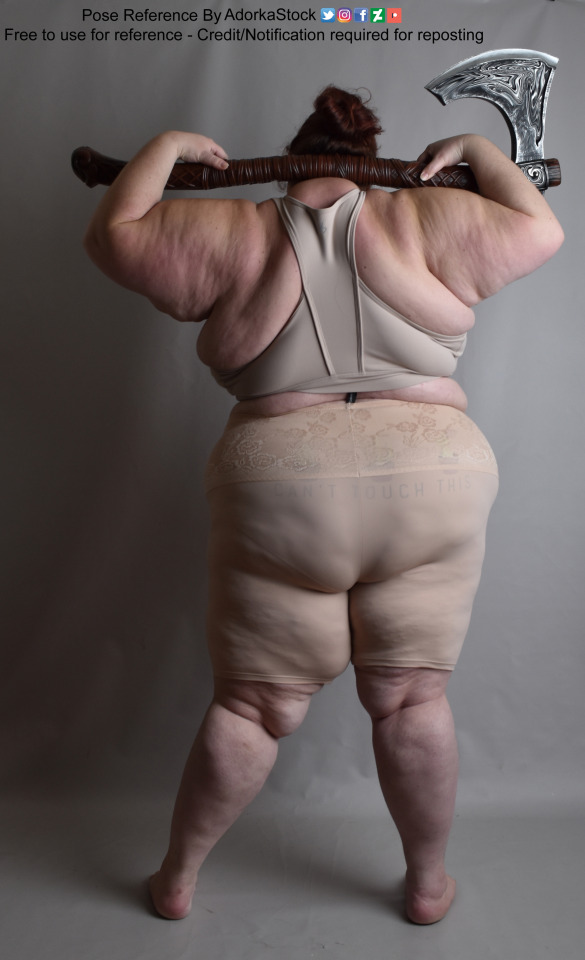
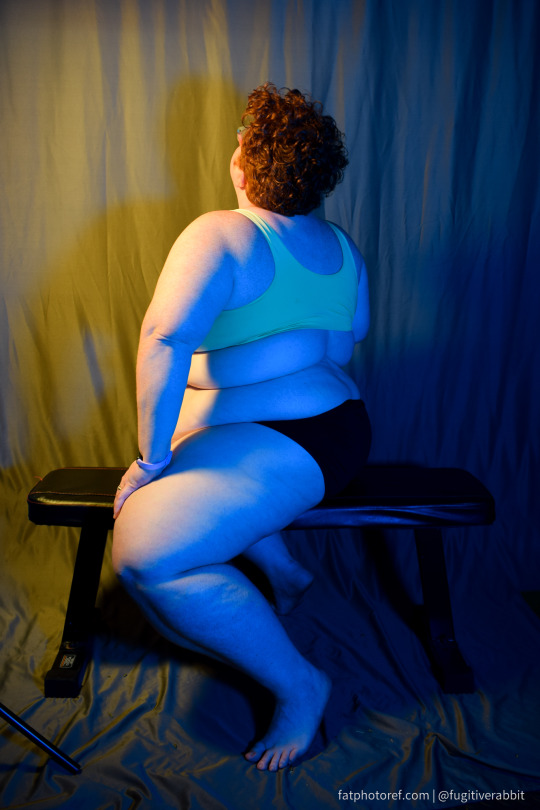
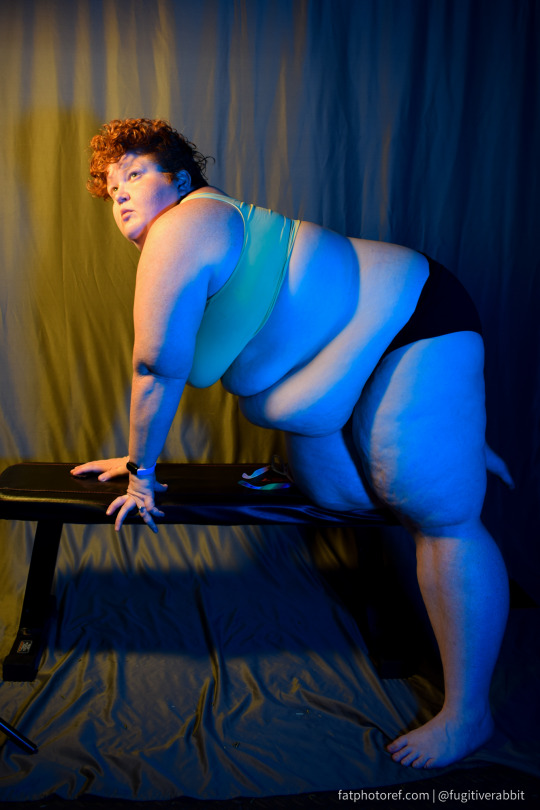
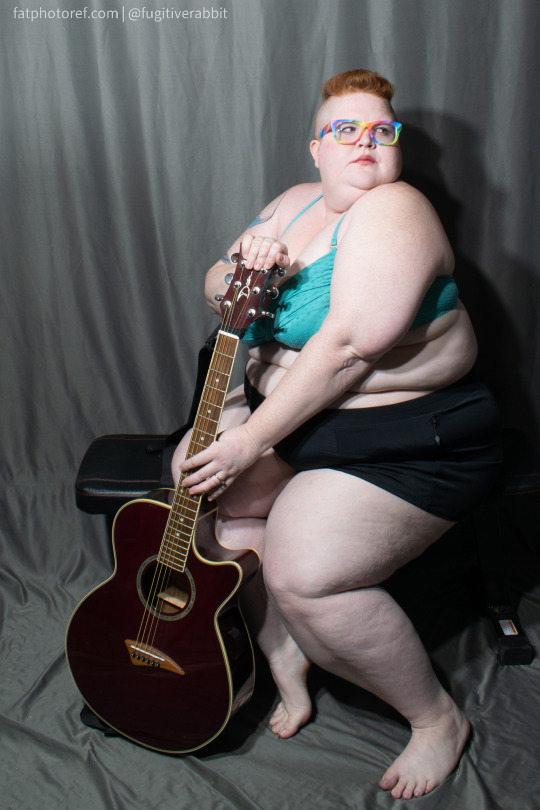
Here's my new model, Lauren Ashley! 😍 We took over 700 photos in our two hour shoot and there's JUST SO MUCH GREAT STUFF Ahhhhhh! I can't wait to show you more! She's fantastic. 🥰
Want three more images from this shoot? My Patrons have a few extras in the intro post there!
#pose reference#drawing reference#pose ideas#art reference#art resource#fat model#fatphotoref#adorkastock#figure model
15K notes
·
View notes
Text
I recently had to do a project in one of my psych classes, and man, I knew that CBT was used for every little thing, but seeing over and over, "do CBT! CBT is the best for every mental illness!" was so jarring. I'm absolutely biased because of my own experiences, but I just don't think it's as universal a treatment model as it's touted.
If you didn't benefit from CBT, it's not because you're lazy or didn't try hard enough or lacked intelligence or foresight into your own needs. Frankly, it's a therapy model that (I think) shouldn't be the only readily-accessible model and among the only therapy models covered by insurance. Some of us should not be treated in a CBT model and that's okay. It's not a sign of poor character or unreasonable demands, and if you don't think it's a model that works for you, then it's your right to express that!
#mental health#mental health advocacy#it was just so annoying because every resource i could access for this project often ONLY recommended cbt and#that just doesn't seem helpful for a good chunk of people#because i know i never benefitted from that model of therapy#obligatory: i am not against this therapy. me having a negative experience with it is not indicative that i believe it should be abolished'#if it works for you: KEEP DOING IT. cbt is not inherently harmful for MANY people and it's a good and valuable tool for many#but the overemphasis of cbt as the Only Therapy Model You Need sends this message that YOU failed...#...if you don't miraculously recover with that therapy model. it often feels like you'll Fail Recovery/Therapy and you're now a Bad Person#i've tried for over a decade to stick out cbt with a dozen therapists to boot. so i think i know a thing or two about my experiences with it#and overall its an unimpressive model (for me) as someone whos had a history with abuse and miscellaneous mental knickknacks rattling around#it's also frustrating because i genuinely like psych and i love learning about people#it's just. i'm tired of only being exposed to cbt (because i hate it honestly)#i feel similarly about cbt as i do with sigmund fucking frued#anyway i just want other insane people (affectionate) to remember that they deserve to not beat themselves up over this#if you're an insane person reading this: i love you i love you i love you i love you#i will share a slice of cake and homemade bread with you <3
1K notes
·
View notes
Text

acorn weevil
513 notes
·
View notes
Text

MOSS SMOOTHIE BAR GOES BRRRRRR
#plume games#i did good today#practiced blockbench modeling#learned how to put a resource pack on the server#learning armor stand mod#i did good
148 notes
·
View notes
Text
Road to 3D- Sam Manson (Part 2):
Character Modeling


Part 1: Model Sheet
Welcome to the second and final part of this project. Since people have asked how I do my models, I decided to make a write-up on how I approach these things using the example of a model of Sam Manson. The first part focused on how I make a model sheet fo a 3d model the second part focus just on the modeling. There are many more things about how to create a fully realized 3d character that I could make whole other chapters for, like UV unwrapping, texturing, shading and rigging, but I don't have enough knowledge past the fundamentals on these topics that could warrant their own seperate posts.
Additional stuff before I continue:
I use Blender for all my model
This not a beginners guide or something similar, it would be helpful to already know the general workflow of a modeling, how to use Blender and know different terminology like edgeflow, retopology etc.
If you are a beginner and want to learn more about character modeling I recommend the videoseries "Modeling for Animation" by Dikko on Youtube
Maybe I make some reference some tricks from this videoseries
That's it, let's go!


My first step is always the block-out phase. The block-out phase is what the construction lines and the first sketch in a drawing are. I align the frontview and sideview from the model sheet I made in part 1 with the z-axis (the blue line in the images above) and roughly shape out the forms with primitive forms. For this I mostly use a cube with a subdivide modifier.
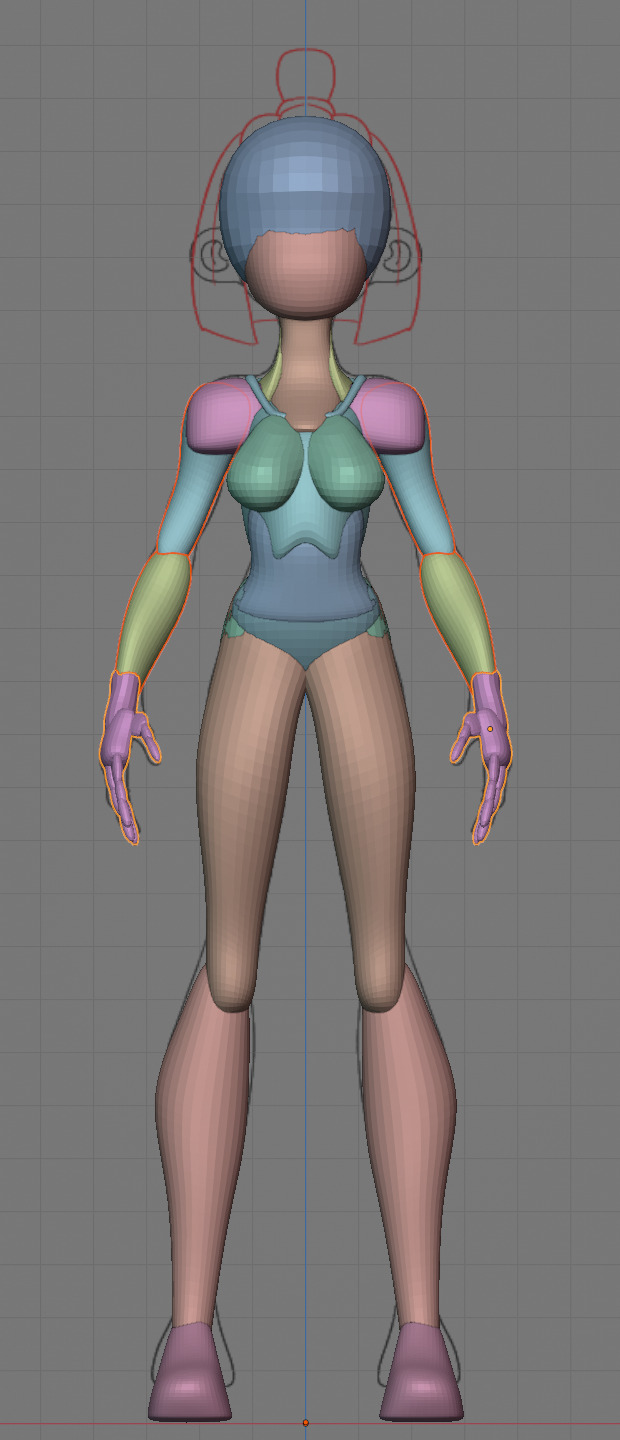


Having a modelsheet without the clothes obscuring the body makes it much easier the get the form right. The block-out phase is one of the most important steps, if it looks good than I have practically half the work done. This is also a good opportunity to practice anatomy.
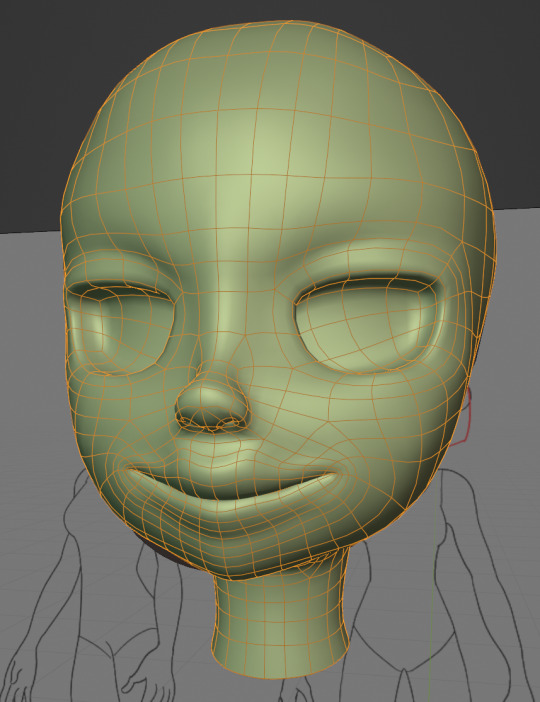

After this stage I continue with the head. First of all, don't forget to add the mirror modifier so I just need to model half of the model. There are different methods to approach modeling the head, like sculpt the head first, retopologize and than bake all the deatails onto the retopologized head. I actually prefer to polymodel the head especially when I have a good model sheet. I practially trace the lineart from the model sheet by extruding vertices, once from the frontview and once from the sideview. The most important points are the form of the eyes, the mouth, the form of the face and the jawline. The head block-out is used as an anchor point for the shrinkwrap modifier so that the traced forms actually look like they belong to a 3d form and not 2d lines floating space. From this point on it's just connecting everything, pull and push vertices so it looks like a 3d head and make sure the edgeflow is good. (It's also helpful to know how the planes of the head look like) After that I add the eyelashes, eyebrow, eyes and the ears, now it looks like something!
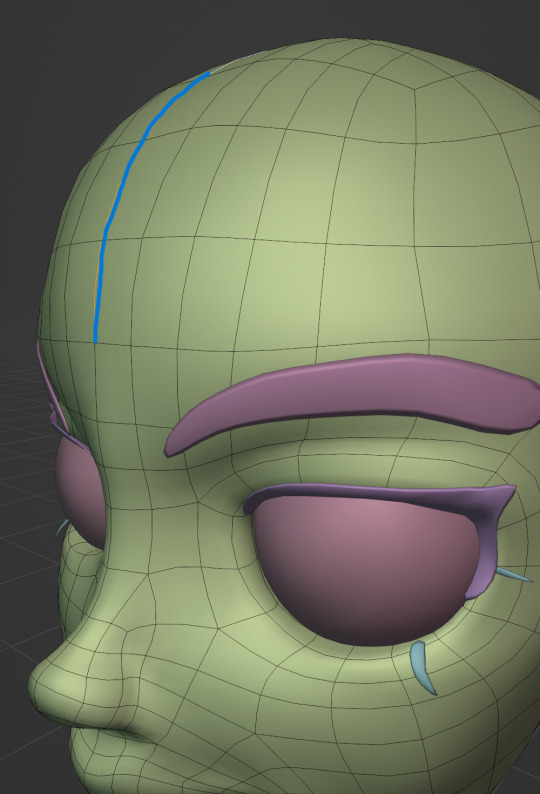
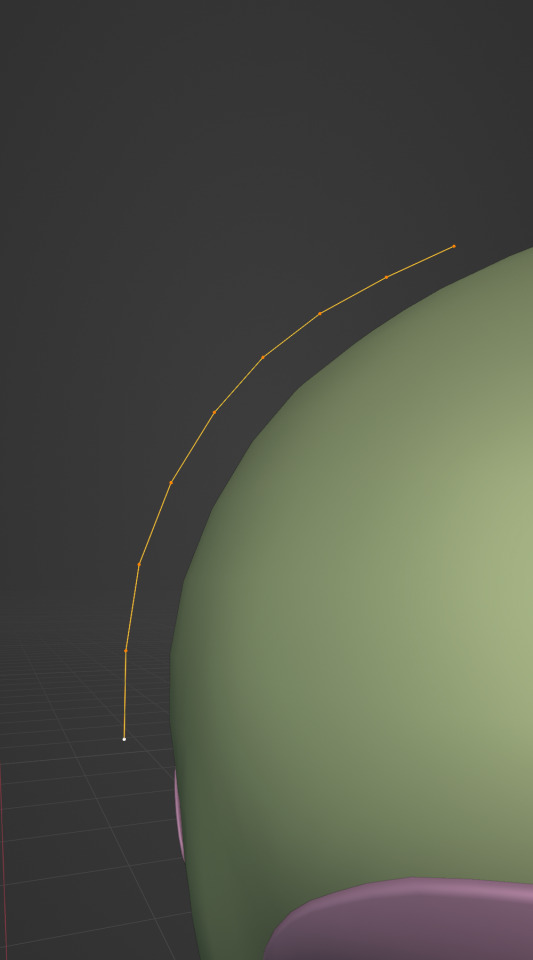
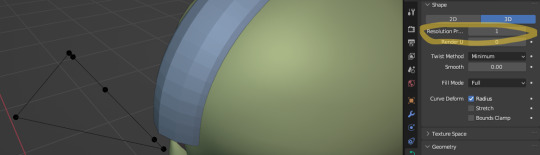
Now comes the hair. For the hair I used the "curve trick" like mentioned in the video series I recommended. Here is a tip to save time: I choose some edges from the head, duplicate and seperate it from the mesh. I convert this seperated line into a curve and choose a beziercircle as a bevel geometry. This is now the perfect foundation to model the hair further. One thing I needed a long time to notice: To get the beziercircle to a perfect square or in this case a triangle lower the Resolution U to 1 in the shape options. Now I just convert the curves into a mesh and add details and the head is done!
With the head finished I continue with the body. Remember how I wrote with a good block-out half of the work ist finished? Well, for this step I practically just use the smooth brush in sculpt mode and smooth everything out so everything looks connected. Then I retopologize the body and that's it. Well, ok there is a little bit more to it: Before smoothing things out I join the block-out part to a single mesh and remesh it with the remash modifier expept for the hands. I prefer to polymodel the hands seperatly without worrying about the rest of the body because they are difficult to model. I reattach them later. Speaking of reattaching, I make sure that the connection points have the same number of vertices while I retopologize/polymodel. To ensure that, I often use the following trick visualized with a simple example ( which is also described in the video series):
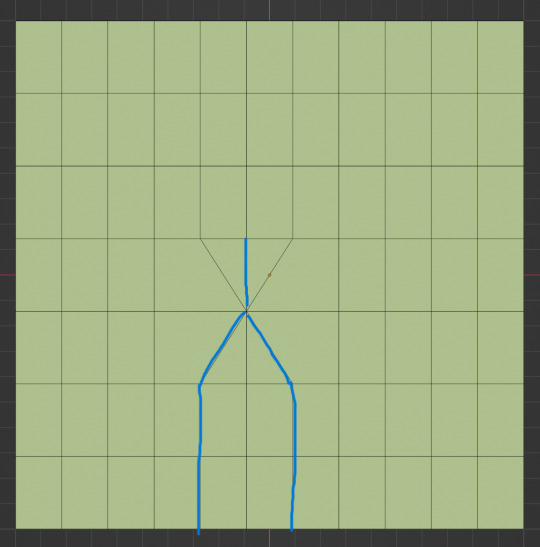

I want to reduce the amount of edges at the bottom of this plane, for this I merge 3 vertices from the middle into 1 vertice seen in the left image. After that I can select the blue marked edges from the center image and dissolve them. The result, which you can see on the right, is a nice clean edgeflow with a reduction in the number of edges.

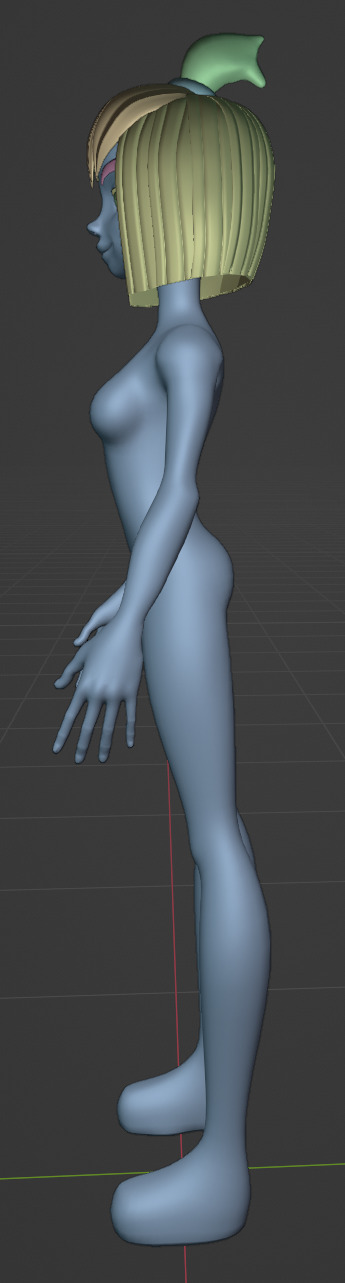
After modeling every part I attach them together and I have a finished bodymesh the work with.

Now onto the clothes, for this I use the model sheet with clothes as reference. Having a retopologized body makes it easier to model simple stuff like e.g. Sam's shirt. On the left image the marked faces of the the bodymesh already looks like a shirt. I just need to duplicate and seperate this area, clean it up a little and the shirt is basically finished. The more complex stuff like the boots I need to polymodel around the bodymesh.

With that the modeling part is done! Now comes the things I said above: uv unwrapping, texture painting, rigging and shading. These are whole other topics I cannot go deeper because I'm still learning how to do these things but I hope my little write-up about how I appoach character modeling was enough to learn one thing or two.
Thank you for your time and thank for reading!
#3d modeling process#3d model#blender#danny phantom#sam manson#long post#my animation#my art#art resources
236 notes
·
View notes
Photo

I know its been a long time, but fat photo ref just updated! Check it out or request access to the site at fatphotoref.com
I’ll be approving folks later today! There’s also a substack now if you want a newsletter when I update the site.
3K notes
·
View notes
Text

i cannot draw psychelocks to save my life so i modeled one as a drawing ref
#(ik theres an actual psychelock model but i couldnt find it on model resource oops) //#“why did you model the black lock instead of the red one” Well //#ace attorney#i should make a sideblog for this but for now they can go here //#gif#blender#wip#psychelock#fast gif
666 notes
·
View notes
Text
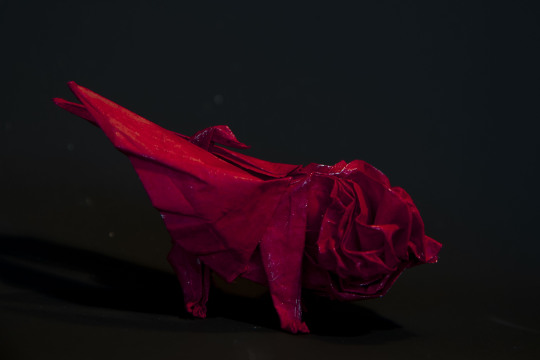
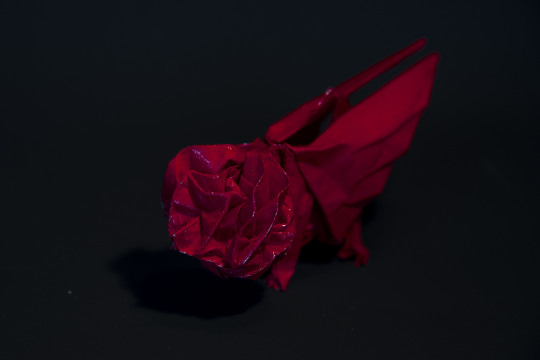
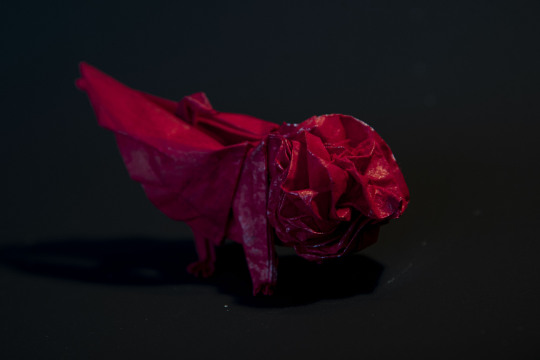

The manticore, origami, one square sheet of paper
#mine#origami#manticore#RED#what a lovely sendoff to this red wax pastel.... completely different feeling depending on your screen I'm afraid.#for me it's sharingan levels of hurt on mobile and almost disappointingly orange on desktop.#do switch around your devices for the complete manticore experience.#this is adapted from a winged lion model by Mauricio Flórez Pinzón#I'll make a post with a link and some photo resources#basically the only changes needed was a modification of the tail and a bit of unfriendlyness added to the mane#his was more inspired by st marc's lion i imagine#too much of a cherub vibe for my purpose#otherwise absolutely excellent model#very easy collapsing#GREAT weight distribution: despite my moving the tail to the center and the head being pretty voluminous is still stands on its 4 legs#i had no problem of the model opening up and flattening itself or anything#and there are plenty of sculpting possibility#all the while the shape is pretty understandable already from the collapsed model
123 notes
·
View notes
Last Seen Blogs

ennedixon
We ain’t The Walking Dead

diavolosbaby
Hail Cthulhu

aknifespoint
NOW @THEY-REAP-WHAT-WE-SOW
cbacci
Captured

enjoy-crl-blog
クラロワリーグを愉しむ