#my first work experience and i feel like i skipped tutorial
Text
Mutuals, my autism is autusming, do I need to have friends at the workplace or is it fine that I am just friendly, polite and engaging in small talk on the regular when I see people I know?
#im so tired besties my dramatic ass wanted to quit today because i thought i was a massive screw up as a co-worker and a teacher in general#my first work experience and i feel like i skipped tutorial#lena exposed
10 notes
·
View notes
Text

It's the tutorial that no one asked for! And I blew my entire day on it, so you better appreciate it! :) No, seriously, this is as much for me as for anyone else. I don't do this process often, and when I do, I have to re-remember the steps, and sometimes I forget some of them and have to figure it out again. This will save future me from having to do that.
Even if you aren't me, if you're interested in being able to place diving lots in most any world you like and that has ocean, this will be relevant to your interests. Unfortunately, it is a sometimes fiddly process to get a working lot at the end, and I went into a lot of detail, so the tutorial is long, but please do follow it closely because if you skip a step or mess anything up, your lot will be wonky or it might not work at all, and I don't want to hear your whining. :)
Note that this is a tutorial for placing a new, empty diving lot, which is the first step in placing a downloaded diving lot or one that you yoinked from another world, but this tutorial doesn't cover how to get such lots working. This just shows you how to place an empty lot, which I'm assuming for this tutorial's purpose that you will then build/decorate yourself. Frankly, I've discovered that building your own is much easier than trying to ram square pegs into round holes, which is what placing downloaded dive lots often feels like, even if you know what you're doing. It can be as time-consuming, if not more time-consuming, to get a pre-made lot placed and working than it does to just build your own.
So, here we go.
Step 1: Pick Your Poison.
Choose the world/save you'd like to plop a dive lot into, open it, and go into Edit Town. You can use any world you want, EA or custom, so long as it has accessible ocean in it. (More on that in Step 3.) I'm going to use Sunlit Tides, just because many people want to put dive lots in it yet can't always get them working.
Step 2: Cheats!
You need some cheats, so open the cheat box by pressing Control+Shift+C and then enter these three:
testingcheatsenabled true
buydebug on
enablelotlocking on
Note that you need to enable testing cheats first because the other two aren't available otherwise.
Step 3: Placing the Lot.
Go into World Editor and in the Lots submenu of it choose the lot size you want:

As far as I know, a dive lot can be any size you want from the minumum 10x10 to the maximum 64x64, any of the EA standard sizes or any custom size you might add using this mod. If you are bound and determined to try and place a downloaded/yoinked lot, then in my experience, it's best to make the new lot a little bigger than the lot you want to place, if possible, so that you have some wiggle room to get it to fit better. But, I'm assuming you're going to build your own here.
If you plan to do lots of terrain sculpting on your dive lot, bigger is better. That said, unless you're going to do something really elaborate, it doesn't have to be 64x64, the largest possible size, either. Smaller will mean that your prospective lot will fit in more places on the map. So, it's up to you. For this, I'm just going to place a 30x30 lot, because I'm not going to build/decorate it or anything.
Now, it needs to be said that not every world will be able to have diving lots. The world must have ocean, obviously, and that ocean must be routable or else sims won't be able to get to it. The ocean also has to be deep enough. Generally speaking, "deep enough" is if the water is dark blue. (Or green, or whatever color the lighting mod you use might make it.)
For instance, in Sunlit Tides here, it's pretty obvious where the deeper water is:
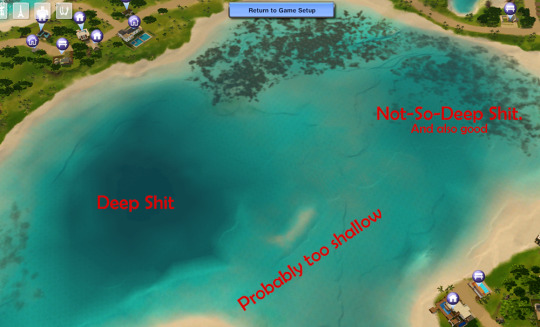
But you know what? I'm going to place a dive lot in some of the shallower water, anyway, because I/you actually can, within reason. And if you're interested in doing this in Sunlit Tides, I'll warn you that the deep spot in the pic above has a very uneven bottom. It's really not a good place to put a dive lot. And I'm not sure what the deep water on the outskirts of the map is like, but the good news is that much of the deeper and flat-bottomed shallows, as I've noted, work well.
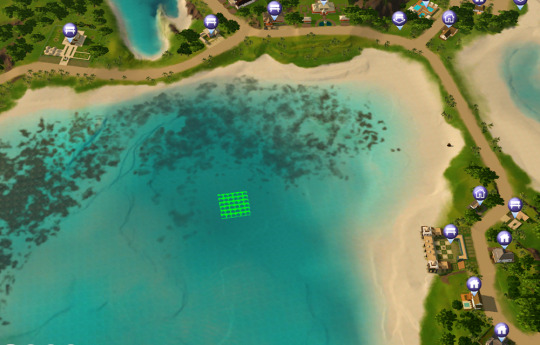
So: With your chosen lot size selected, move your cursor around in the ocean where it seems to you that the water is "deep enough" until you come to a spot you like and where the lot grid is green. If the grid is never green, then the ocean likely isn't routable at all and you won't be able to place diving lots in that world. I have never run into that, myself, but I also haven't done this all that often, so it's certainly possible. Anyway, I'm picking here:
My advice would be to not make your lot too far off-shore even if you can do so, or else it will take sims a long time to get to it. Especially merfolk, because they always swim out to dive lots rather than take a water taxi, and they swim much more slowly than a water taxi moves. Once you find your spot, go ahead and place the lot. Doing so will create a square island, not a sunken lot. That's fine. We'll fix it in a moment.
Step 4: Change the Lot Type.
Click the lot's icon and change the lot type to community and then choose "Diving Area" as the subtype:
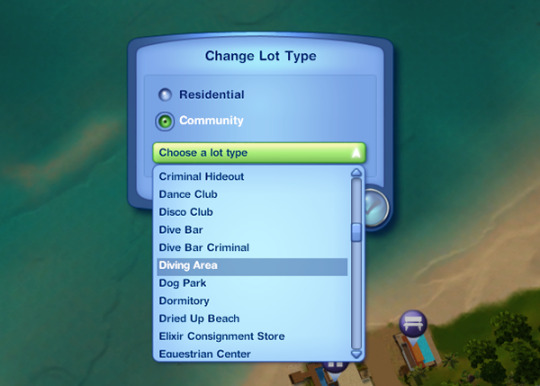
Note that this option will only show if you've enabled lot locking. So if you didn't enter that cheat up in Step 2 or if you entered it incorrectly, rectify that situation now so that you can set the lot type.
Step 5: Sinking the Lot
Enter the lot and flatten it with this tool in build mode:


This will submerge the lot so that it's level with the sea floor rather than being an island. You can now move the camera down under the water and have a look at your potential diving area, like so:

In particular, check the edges of the lot to see if there are any huge drop-offs or other great differences between the level of your lot and the surrounding terrain. Whether or not this will happen is world-dependent. Some worlds have very uneven/jagged underwater areas, which is what will make you end up with drop-offs, while others, like Sunlit Tides here, are (mostly) pretty flat.
You can see in the above pic that this lot is a little sunken along two of its sides. That's fine; that small amount of difference can easily be smoothed out with the terrain sculpting tools. If there are steep drop-offs or upward slopes, you can sculpt the lot to try to blend it with its surroundings, but be advised that 1) Interactable objects like dive caves can't be placed on uneven terrain and still be usable and 2) If you end up really deep down, the camera goes wonky and it's frustrating-to-impossible to build or play the lot. So, if you've got a huge drop-off and/or a steep upward slope on one or more of the edges of your lot, I'd recommend just trying a different spot. But, it's up to you. If you feel you can work with the uneven edges in some way, have at it. You are braver than me.
Step 6: Save that MFer.
Once you have a lot you're satisfied with, this is a good time to save. So, go back to Edit Town and do that.
I recommend saving often during this entire process because, I don't know about your game, but sometimes mine will "hang" or even crash when moving between Edit Town and Build/Buy, especially if I do it a lot. And with this process, you will be doing it a lot, not to mention exiting out to the main menu and then going back into the save a few times. Since getting a dive lot placed can be a fiddly business, it sucks to lose a lot of progress to a hang/crash. So, in my opinion, you can't save too often, but in this tute I'll only prompt you to do it when you must.
Step 7: Exit Stage Right
Remember long ago in the last step how I said you'll be exiting to the main menu a few times? Yeah, the first time is now. You do this because, for whatever reason, the game doesn't register changes made to the "structure" of dive lots without exiting and re-entering the save. So do that. Once it's reloaded go back into Edit Town and then back into the new diving lot. Because now it's time to place a dive buoy.
Step 8: Deploy Buoy
The dive buoy is located in the debug items, so if you haven't turned on access to that yet, do so now. Then, go into the buy menu, sort it "by function," not the default "by room," and you should see this question mark here:

Click that, and then I recommend that you go to the filters on the right-hand side of the menu and choose just Island Paradise objects. Because you'll be going into the "Misc. Objects" tab and, especially if you have all EPs/SPs, there's a crap-ton of objects in there to sort through. So, filter, then choose the "Misc. Objects" tab, and you'll see this much-more-manageable selection:

Choose the dive buoy, as indicated, and place it anywhere on your dive lot. It doesn't matter where because (spoiler alert) this one's going to be deleted, anyway.
Step 9: Ogle That Shapely Buoy
Once your buoy is placed, move your camera down to the ocean surface and have a closer look at it. Like so:
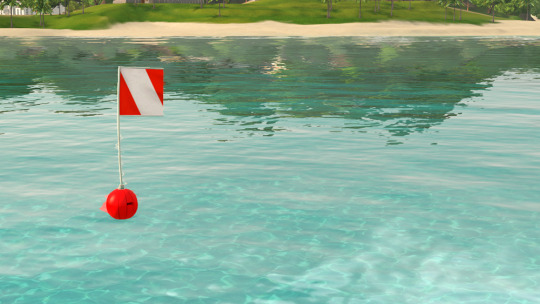
See how the ball part of it is just sitting on the surface of the ocean? That's bad. If you were to leave it like that, you'd have sims (and sharks, if you place a surface shark spawner) swimming/snorkeling in the air, if the lot would work at all. But don't panic! We can fix it. We just need to shift the entire lot down a l'il bit, so let's do it!
Step 10: Copy the Lot to the Library
Go back out to Edit Town. Check to make sure that your lot designation is still "Diving Area." (Because during this process, it will sometimes change.) Then, save the lot to your library. The game will give you a warning about cancelling all sim interactions or something. That's fine. Just put a copy of the lot in the library. The thumbnail in the community lot catalog will look like a blue square.
Why are you doing this, you ask? Because now you're going to bulldoze the original. Why? Because we need to move the entire lot down a little bit, and you can only do that by placing a fresh copy of the lot. And you may need to do this several times until you get it at the right depth, so having a copy of the lot in your library is necessary. You can delete it out of the library once you've got your dive lot in the right place, if you want.
Step 11: I'm a Steamroller, Baby
Once you've got a copy of the lot safely in your library, bulldoze the original lot you placed. Once bulldozed, the game will change the lot designation back to "No Visitors Allowed," so you'll need to change it back to "Diving Area."
Step 12: Go Down on That Lot
To move the lot down when it's placed, you need this cheat activated:
setimportedterrainoffset -0.1
The value at the end can be whatever you want, as many decimal places as you want. A positive number will move the lot up, and a negative number will move it down. (You can use a larger negative number to make deeper a lot that's too shallow, and it can also be helpful if you're intending to try to place a downloaded diving lot on this lot so that it might better match the depth of the water in whatever world it came out of, but this won't always have the effect you want. For one, your lot will be down in a hole.) For the purposes of this tute, all I need to do is move the lot down a teeny bit so that the dive buoy on the lot is sitting IN and not ON the surface of the water. Hence, the -0.1 value.
(Now, I should mention that other tutes I've seen will have you just lower the terrain right under the buoy to sink it a little bit rather than doing this bulldoze-and-replace-with-a-whole-lowered-lot thing I do. This method can work, but I don't like it for various reasons that I won't go into for brevity's sake. I'm just telling you what I do, which has worked every time I've placed a dive lot, including shallow-water ones like this one.)
Step 13: Re-Placing the Lot
Go into your library and place your saved lot back where it was. DO NOT ROTATE IT or else things will get screwed up. (Namely, your lot will become an island again and resinking it won't really work.) Just click "Accept." And then check its lot designation and change it to "Diving Area" again, if necessary, which it probably will be because stupid game.
Step 14: Ogle that Shapely Buoy 2, Electric Boogaloo
Now, enter build mode and move the camera down to the ocean surface again to check the dive buoy. Ideally, it will now be sitting IN, not ON, the water, like so:

If it's still sitting on the surface, the lot needs to be deeper and therefore moved down farther, so go back to Edit Town, bulldoze the lot again, change the value of the imported terrain offset cheat to a larger negative number (Perhaps -0.5) and try again. Be aware that, as I said, once you get to larger numbers (as in greater than -5 or so) you start ending up with your diving lot down in a hole, which may or may not be workable.
Now, there is a marker on the buoy, the little black rectangle I outlined in the pic above. If the ball part of the buoy is at least partly in the water but that marker is still above the water, as in the above pic, the lot will still work, but there will be a "hop" (and sometimes a pause) when a water taxi or a swimming merperson crosses the boundary of the lot. The higher the marker is above the water line, the larger that "hop" will be. (Because, if you haven't figured it out yet, the dive buoy is what tells the game where sims can swim, vertically, on a dive lot.)
If such a hop doesn't bother you, you can leave the buoy as-is. If you're a perfectionist like me, you go back to Edit Town, bulldoze the lot, and change the value of the terrain offset cheat to try again. Do this as often and with as many decimal places as your level of perfectionism demands. :) I'm not that fussy, so I usually just move the lot down in increments of 0.1 until the marker is at or below the water line but the ball of the buoy is not completely underwater because you don't want the ball completely underwater, either. At least some of it needs to be above water. So, fiddle as much or as little as you feel you need to.
(For reference/scale, the gap between the marker and the water line in the above pic would probably be fixed by an offset of about -0.15 instead of -0.1. But it would also be fine as-is unless a little hop at the lot boundary will bother you.)
Step 15: Bye-Bye Buoy!
Once you have the lot so that the buoy is where you want it, DELETE THE BUOY. I repeat: DELETE THE BUOY. Yes, DELETE THE BUOY. For whatever reason, dive lots drawn from your library that contain buoys won't work. I don't know why. They just don't. You need to place a fresh buoy. (I'm pretty sure this is why lots of people can't get downloaded dive lots or lots that they pulled from other worlds to work. Sometimes the answer is simply to delete the buoy, if the lot came with one, and place a fresh one.)
Step 16: Exit Stage Left
Once you have DELETED THE BUOY and only once you have DELETED THE BUOY, go back to Edit Town, check to make sure the lot is still designated as a diving area (and change it back if necessary) and save. Why? Because now you need to exit to the main menu and reload the save again. So do that.
Step 17: Fresh Meat Buoy!
Once the save is reloaded, go back into Edit Town, and check to make sure the dive lot is still designated as one. Redesignate, if necessary. Then, go into build/buy and place a fresh buoy, just as you did before. This one will be staying permanently, so place it where you actually want it to be. (Which really doesn't matter; aside from defining the vertical space of the diving lot, it just designates where your sim "enters" the lot.) If you want the lot to generate sharks on the surface, you can also place surface shark spawners now, too, as few or as many as you want, and because you have properly adjusted the height of the lot, the spawned sharks will not be swimming in the air. The spawners are also in debug mode, under the fish spawners. (There is also a spawner for underwater sharks. Do not put that one on the surface. Make sure you only put surface shark spawners on the surface.)
Step 18: Set the Lot's Skill Level
You set the required skill level for the diving lot by going to buy mode (if you left it), making sure the hand tool is active, and then holding down control and shift while clicking on the dive buoy. Choose the option "Set Required Diving Level…" from the menu that comes up:
…and then from the resulting options under that choose a NON-ZERO number. For some bizarro reason, buoys default to level zero when placed, and a diving lot set to skill level zero is inaccessible even if a sim has level 10 scuba skill. (Good move, EA! Why is zero even an option if it doesn't work??) So, pick whatever skill level you'd like, so long as it ISN'T ZERO. (I suspect that this is another reason why people can't get downloaded dive lots that they place in a world to work.) Once you have the skill level set, go back to Edit Town and save.
Step 19: Test
And now you're pretty much done. All that's left is to test the thing to make sure the lot works before you bother with building/decorating it. So, return to the game and send a victim to your new, empty lot and see if they successfully arrive (with or without a "hop" at the lot boundary) and successfully get themselves underwater. (My advice, for testing purposes, is to just give the sim you pick enough diving skill to use the lot. This can be done with NRAAS Master Controller.) Don't bother with doing anything further with the lot until you make sure it works.
Here is evidence that my lot, though shallow, works:
If your lot doesn't work, then something went wrong somewhere. Most likely, you missed a step or did a step wrong. I know there are a lot of words here, but they're all necessary to (more or less) guarantee a working lot in the end. So, try again. It's possible that you will have to pick a different location and start over, but I've been able to get a lot working wherever I've placed one, so long as it was in deep-enough routable ocean.
Step 20: PROFIT!
Assuming that your lot works, "all" that's left is to build it! :D I'm not going to go into detail about that. It's all up to you. You can sculpt the terrain, paint it with whatever terrain paints you want, place objects, whatever. If you're in shallower water, any objects you place that are tall enough to stick out of the water will just be chopped off at the water line; you won't be able to see the rest above water. The corals and stuff are in debug mode under "Underwater Objects," but if you don't want the tropical look, so long as you have moveobjects turned on, you can place (almost) any object you want down there, aside from things like walls and fences and other build items that can't be drawn underwater. Rocks, plants, trees, columns, and anything from the buy and debug catalogs are all good. If such an object has a function, sims won't be able to use them, though. They'll just become deco. (So, no underwater basketweaving sculpting. Sorry.) So, go to town. Have fun. For this tute, I'll just mention a couple objects and their settings and we'll finally be done.
Miscellaneous Objects:
First, treasure chests. Like the dive buoy, they're located in the "Misc. Objects" of debug mode. There are two versions, one for land and one for water. Obviously, on a diving lot, you want the water one if you want any at all. If you do want to use them on your lot, place down as many as you want, and then set the diving skill level necessary to open each one and designate the treasure each one will hold. You do both by holding down control and shift while in buy mode with the hand tool active and clicking on a chest, just like setting the skill level of the lot on the buoy. This brings up this menu:
The "Assign Treasure" option gives you eight different treasures for the chest. You simply pick the one you want. The "Set Required Skill Level" option allows you to assign the diving skill necessary to open the selected chest. You can choose any number you like from 0 to 10. (Yes, zero is OK for this purpose, even though no one with zero skill can scuba dive, so…Yay EA.)
Then there's the dive caves. I think they are in the "Underwater Objects" section of the debug catalog; I'm not sure because a mod I use moves them to the regular rock section. Anyway, there are two styles, which you're probably familiar with, but they both function the same way. If you have more than one of them in the world, even if they're all on the same lot, your sims can travel between them, much like a subway. Unfortunately, I can't show you how to set this up because that mod I use to move the caves to the rock section also makes them recolorable, but it breaks setting up this functionality and I don't feel like hunting the mod down and taking it out. But it's pretty easy. You Control-Shift-Click on each one, give them a name, and then you can connect them by using the names you give them. Again, it works much like subways. It's pretty self-explanatory.
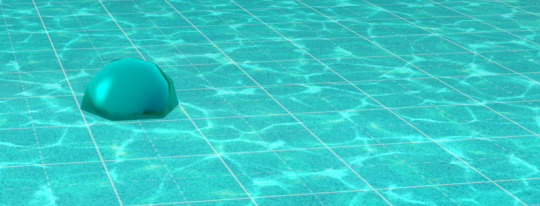
Finally, there's the fog emitter. If you're unfamiliar with this object, it's a base game object located in the "Misc. Objects" section of the debug catalog. The thumbnail in the catalog looks like this:
And it looks like this when it's placed:
They can be used on any lot, they disappear in live mode, and they can generate not just fog but many, many different effects. Literally thousands of different effects. You place the emitter where you want, and then control-shift-click on it and choose "Set Visual Effect" from the resulting menu:
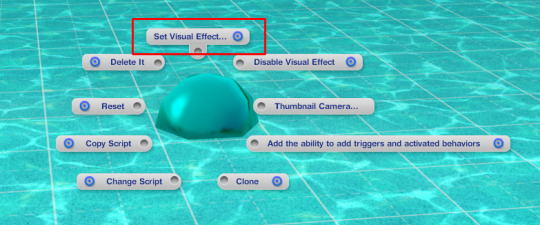
When you click on it, you get this:
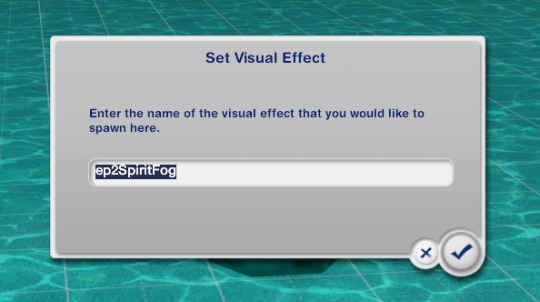
In that window, you type/paste the code for the effect you want. Of course, you will need to know the code for the effect you want. For your convenience, I've uploaded my list of effect codes, which is complete and includes the codes from all EPs, here. It's just a text file, and the codes are in alphabetical order. Since the list is all-EPs, some of them may not work if you don't have the EP the effect comes from, but if that's the case, then any such code you enter simply won't do anything.
The most relevant effects for a diving lot all start with "ep10," but there are others you could possibly use, too. Some of the names of the codes are more helpful than others in terms of knowing what it will do. Generally, you need to experiment. But, you can add schools of fish, single (but non-catchable) fish of all kinds (if you want catchable fish to spawn, you need to use the spawners, not the fog emitter), sharks (non-interactable), light rays, bubbles, glows, fog, all sorts of things, if you're patient enough to go through the list, look for interesting possibilities, and try them out to see if they will work for you. There are whole tutorials dedicated to the object, if you look for them. There's also a mod that makes them shiftable, which can be very useful, here.
One final suggestion:
If you go through this process in a world that you know or even just suspect that you'll want to use again and you'll want the dive lot(s) you made in that future save, for the love of pie keep a copy of this save file somewhere. That way you won't have to go through all this crap again. Because even if you save a copy of your finished lot, unless you manage to place the empty initial lot in the new save in the exact spot you placed it when you built the lot, it's not likely to be quite right. So beware.
And with that, I think we're done here. If anyone has any questions, or if you decide to try to make your own diving lot and have questions along the way, feel free to hit me up and I'll do my best to help. Just keep in mind that I'm not an expert by any means.
312 notes
·
View notes
Note
Do u have any tips/tutorial how to make gifs so smooth if there's movement? Mine are always choppy and weird :(
Hi anon, ty for sending this ask. I'm sooo honored!! (and plz don't call your gifs choppy or weird i have a feeling they're very lovely 😌)
✨ Gif Tutorial: making movements in ur gifs as smooth as possible✨ (updated)
↳ aka: speed management in gif making

Remember to always source your content responsibly!!
Process in this tutorial is simply what works best for me. Every creator has their own preferences and imo there is no right or wrong. We should always make content in the way we enjoy 🤍
Outline:
1. Remove duplicate frames
2. Repair missing frames
3. Speed management in Photoshop
4. Smoother slomo using Video Frame Interpolation
1. Remove duplicate frames
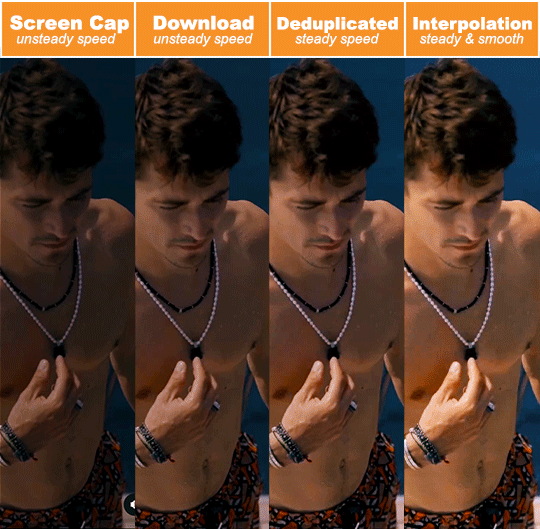
Obviously, if there're duplicate frames in a video, our gifs will end up with lil lags here and there (since some frames get more screen time than others). Although the dup frames are likely barely observable once compiled into gifs, imo this is what makes the difference between smooth and butter smooth. the two daniel gifs above (guy with big brown eyes, if ur not from our fandom 🤍) can hopefully showcase this difference**.
**technical explanation for this that you can totally skip: the persistence of human vision is approx. 0.1s, ie everything we see stay on our retina for this amount of time. since gifs refresh faster than this (eg. 0.04s on every frame for a 25 fps gif), we usually can't pinpoint exactly which frame is a duplicate just by looking at a gif. however. by definition, a duplicate frame will slow down a gif, by making it pause longer than it should. as a result, a movement during this lil chunk of time will move less pixels than your brain would've expected. and this is where we perceive the not-so-smoothness.
ok, now that we've established that we don't like duplicate frames -- I know it's common practice to handle this by looking for an optimal output frame rate to offset the dupes. to me this feels chancy. bc it's a process where you don't have control over exactly which frames to keep or discard. Personally, I prefer making sure my videos are dupe free before everything else. (Again, this is just what works for me. Everybody has their own process and imo there is no right or wrong :)
To remove duplicate frames, the first thing I do with a clip is to play the first few seconds frame by frame to see which one of the following scenarios it falls into:
a. no duplicate frames
↳ best case scenario! congrats!! plz proceed directly to step 2
b. there is a duplicated frame once in a while
↳ This happens most often with (but not limited to) videos from social medias
↳ Reason behind this is frame rate conversion. For instance, instagram/tiktok has a default frame rate of 30 fps. However, many media sources (eg. no brakes, sharl's vlogs) produce at 25 fps. When these videos are uploaded, instagram/tiktok convert them from 25 to 30 fps by duplicating 1 frame every 5 frames, hence twitchiness in gifs when slowed down.
↳ Solution: in photoshop, go through the clip frame by frame, delete dupes manually (recommended)
↳ Alternative solution: use duplicate frames remover softwares (see next bullet point)
c. almost every frame has duplicates
↳ This will almost always** be the case with screen record.
↳ What not to do: When there are many duplicates, we may be tempted to use photoshop's 'import 1 out of every n frames' function. this is not ideal bc, the dupes are rarely uniformly distributed. you could end up losing frames you don't want to lose (resulting in choppy gifs) or end up with dup frames still in the mix (resulting in laggy gifs) or, most likely: both.
↳ A better way: is to import all frames into photoshop, adjust the output frame rate to offset the dupes (here is a good tutorial on this)
Pros: efficiency; yields decent results in most cases.
Cons: again, in my experience this is a process where you don't have precise control over the frames. Therefore runs the same (albeit smaller) risks as the method above. It can also limit how much you can slow down a gif, and generally doesn't work well if the target frame rate (of the clip you're trying to gif) exceeds your computer's recording rate**.
**More on this statement: when target rate is comfortably lower than recording rate (~ 55 fps for many), chances are most to all frames will be captured. It is therefore more tolerating towards skipping a unique frame from time to time. However, when target rate (i.e. anything 60 fps) nears or exceeds recording rate, you will be dealing with dup frames as well as missing ones. Using the method above can therefore subject you to the possibility of losing two unique frames in a row, making the gifs noticeably choppy.
↳ Solution: we always have the option to trim dupes by hand in photoshop. But in this case, it can be time consuming, even with keyboard shortcuts. as a result, here is where we can really use a:
↳ Dup remover software: google search 'dup frame remover software' will give you several options and tutorials (here a plug-in for after effects). i've heard good things about some of these but unfortunately can't give recommendations (they do cost money sooo i wrote my own)
Demonstration:
This is a frame-by-frame animation of an ad Charles did for apm. It was produced at 25 fps & uploaded to socmed where the default is 30 fps. You can see that:
i. With screen recording, every frame has an unpredictable amount of duplicates.
ii. Original clip from instagram has 1 dup frame every 5 frames.
iii. After deduplication, the movement becomes lag free and continuous.

2. Repair missing frames
At this point, our video clip is (hopefully) free of duplicate frames, which makes our gifs lag-free (yayy!!). At the same time, we don't want choppiness in our gifs either. Choppiness in a gif is usually caused by missing key (unique) frames. To check if there is any, replay the clip, look out for the sudden jumps/fast forwards in movements. Three possible scenarios:
a. no missing frames
↳ best case scenario! congrats!! plz proceed directly to step 3
b. a lot of missing frames
↳ This is usually the case if the target frame rate (of the clip you want to gif) exceeds the screen recording frame rate.
↳ Solution, imo: (surprise!) is to leave things be. Reason is that something like this would be quite tedious to fix, but not that noticeable if made into a gif that's fast enough
↳ Alternative solution: Record at 120 fps
c. occasional missing frames
If a video clip misses frames, but not a lot, chances are it's only gonna happen very occasionally, i.e. 1 or 2 occurrences in total. A frame-miss in this case is usually due to either the screen recording skipping a frame by mistake, or that the original video misses frames/contains bad frames to begin with.
↳ Solution (for screen recordings): record again, find missing frame (chances are it will be captured on a second try), insert frame back into original timeline in PS
↳ Solution (if video misses frames or contains bad frames to begin with): Let's talk about ✨ VFI ✨. VFI (Video Frame Interpolation) is the process of synthesizing in-between images from a given set of images. It can increase videos' frame rates (i.e. 30 fps to 60 fps), achieve smoother slomos, and by definition, also help with missing/bad frames. There are many software products that let you use VFI by simply dragging videos into the app and clicking 'export'. Afterwards, all we need to do is to find the missing frame generated by the app & insert it back into the original timeline in PS (ahh technology). For more info on VFI, see "4. Smoother slomo".
↳ Note that VFI processed footages will likely differ slightly from the originals in terms of colors & lightings. This may be tuned out using clipping masks (allow a group of adjustment layers to only apply to one frame/layer, keyboard shortcut: Command+Opt+G)
3. Speed Management in Photoshop (✨ updated ✨)
At this point, our clip is without dupe or missing frames (or at least as close as can be). Whether you dodged the first 2 steps like a breeze or freshly emerged victorious from photoshop covered in blood to get here, good news is, things will be very straightforward for this point on. congrats!!!
🎉🎊🎉
As mentioned before, in terms of smoothness, our clip is now in ideal shape. The important thing is to keep it this way throughout the rest of the process. My workflow looks something like this:
Open file, crop, resize, sharpen, color, export gif, reopen gif in photoshop (which won't compromise quality), assign frame delay, export finalized gif
If you're used to finding a comfortable frame delay or speed/duration combo at the beginning, this process might feel unnatural. But it's so so so so important to leave the speed related settings alone until right before exporting. Here's why:
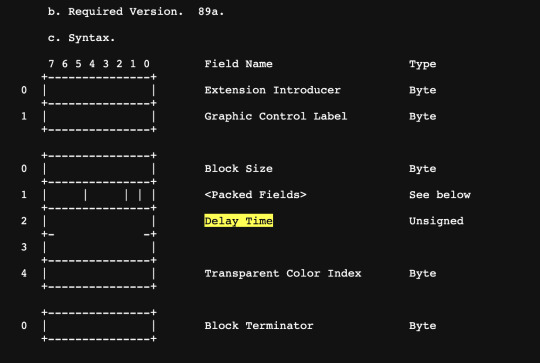
By not converting frames with modified delays into timelines with fps, we avoid having to give our finished product a frame rate (which photoshop timelines have to specify). This is crucial bc, there is no such a thing as frame rates in gifs. According to the syntax of GIF89a (the current '.gif' format, screenshot below), gifs control their speeds through (and only through) how much time to wait in between frames, aka delay time. Our process above does exactly that. It compiles frames directly into gifs, and avoids expressing frame delays (a gif concept) through frame rates (a photoshop concept), a conversion where dupe frames and missing frames come from**.
In other words, using frame delays to control speed is simply more natural to a gif's syntax.
**Why would this conversion cause dupe frames?
↳ On paper, frame delays should translate into frame rates seamlessly (i.e. 1 second ÷ 0.06s per frame = 16.67 fps). In reality, photoshop does not support direct translations like this. When converting frame animations into timelines, PS defaults outputs to 30 fps, regardless of frame delays. This disagreement between frame rates is where dupe frames come from.
↳ Some examples:
i. Consider a frame animation where frame delay = 0.04s (25 fps), to convert it into a timeline defaulted at 30 fps, 5 out of every 25 frames will be 'duplicated' by photoshop (30-25=5)
ii. Now, consider a frame delay = 0.06s (16.67 fps roughly 17 fps), to convert it into a timeline defaulted at 30 fps, 13 out of every 17 frames will be 'duplicated' by photoshop (30-17=13)
↳ (the 'duplicated' was in quotes bc photoshop achieves this thru assigning a frame roughly twice it's original screen time instead of actually adding another)
↳ (afaik, currently there's no way of changing the default 30 fps as long as u start with frame animations. If anyone does know how please let me know 😳)
**Why would this conversion cause missing frames?
↳ This happens when one tries to reverse the harm done by photoshop in prev step by changing the 30 fps frame rate back to what it's supposed to be (using function 'Set Timeline Frame Rate')
↳ Let's use the last example again. As mentioned, to go from 16.67 fps to 30 fps, 13 out of every 17 frames will receive roughly twice its original screen time (0.033s * 2 ≈ 0.07s). On the other hand, 4 out of every 17 frames' screen time will remain the same (0.03s). to go from 30 fps back to 16.67 fps, photoshop resamples frames from its 30 fps timeline in 0.06s intervals. As a result, any frame with screen time less than 0.06s runs the risk of 'slipping through the cracks', namely ones whose screen time remained 0.03s
↳ (gifs require frame delays to be rounded to the nearest hundredth of a second)
** What if I open the file as video object, instead of importing as frames?
↳ Indeed, when opening as video object (i.e. command+o instead of command+i), photoshop inherits its frame rate as is. We would then have the option to manipulate it's speed by right-click ➡️ adjusting the percentage (of how much to speed up or slow down).
↳ Here, if we slow down a gif without changing its frame rate, we risk introducing duplicate frames into the result (since frame rate is now higher than needed). If we slow down a gif and lowered the frame rate, but the math didn't check out, we also risk losing unique frames (frame rate not high enough). The same (opposite) goes for speeding things up. Therefore the best and easiest approach is, again, leaving speed related settings alone until right before exporting.
(the block of GIF89a syntax responsible for graphic control:)
Ok in hindsight this probably isn't exactly like. the most straightforward thing ever but the execution part is very much so 😳 here goes:
1. Open file in PS via Command + O
note the (25 fps) on bottom left
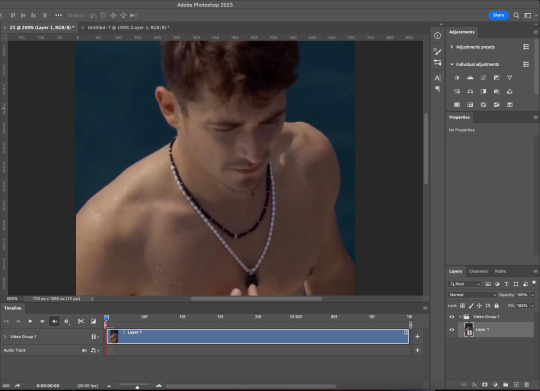
without changing speed, duration, or frame rate:
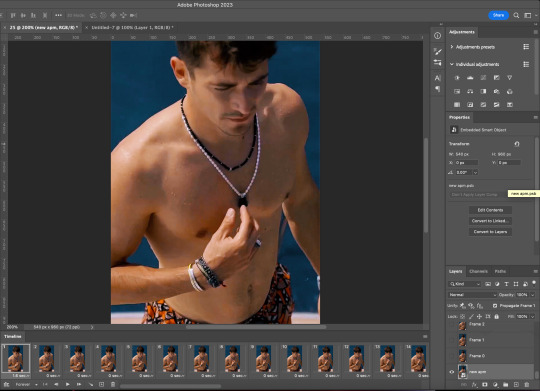
2. Trim ✂️
3. Crop
4. Resize
5. Sharpen
6. Color

(Updated!!!)
6. Export gif, and then reopen it in Photoshop
**Compare to the original method (timeline into smart object, smart object back into frames), the updated method has the following benefits:
i. Avoid lowering gif quality by converting into smart objects
ii. Reopening gif into frames and reassign frame delay saves time (bc less steps) and won't hurt the quality at all (bc no image processing required)
7. Assign Frame Delay (i usually go with original frame delay + 0.01s)
8. Export ✨

Tada!! Speed = managed!!
This ad actually came out last December where I was aware of like, maybe 5% of what's in this post. Here is what my original gif looks like. I'd say what we have rn is a big improvement :)
Now, imo there are situations where it simply makes more sense to start with frame animations (imported using command + i). For instance: when we need to remove duplicate frames by hand, when there is a missing frame/bad frame that needs to be repaired, etc. My workflow would then look like this:
1. Command + i
2. (do things to frames)
3. Set frame delay to 0.03s
4. Convert to video timeline
5. (the rest will look exactly like the workflow above)
This works bc when frame delay is set to 0.03s, photoshop will treat your video timeline as a "natural" 30 fps timeline and leave your frames alone. Therefore maintains its uniform speed.
4. Smoother Slomo using Video Frame Interpolation
As mentioned above, VFI (Video Frame Interpolation) is the process of synthesizing in-between images from a given set of images. It can increase videos' frame rates (i.e. 30 fps to 60 fps), hence smoother slomos. There are many software products that let you use interpolation by simply dragging videos into the app and clicking 'export'. I've had very good experiences with Topaz and After Effects.
Let's talk about After Effects first. If you have Photoshop, chances are you have AE as well. To use AE's Keyframe Interpolation:
i. Import
ii. Set speed to half
iii. Click square twice until you see lil arrow
iv. Export

Topaz is a production grade video enhancing software. It's capable of enhancing frame rates (i.e. 30 fps to 60 fps), increasing resolutions (i.e. 540p to 4K/2160p) and more. Unlike AE who uses only the two neighboring key frames to generate an in-between frame, Topaz takes the whole sequence into account, hence better reliability. It's also more user friendly than AE imo.
Here is a before-and-after interpolation using Topaz.


That's all 🎉🎉🎉
To sum up: remove dupe frames (if any), repair missing frames (if any), use and only use frame delay to control speed, and software enhance frame rate if needed.
This post got way longer and more technical than I had planned and I honestly have no idea where all this stuff came from lol. But it was really fun and I hope you'll find it helpful. Feel free to message me if you have any questions. Have fun moving-picture making!!
#f1edit#gif tutorial#asks#*#my gif tutorials#photoshop#dailyresources#allresources#completeresources#this was. 3k words?????? what?????
216 notes
·
View notes
Text
dividers in fanfiction: experimenting with screen readers
So I wrote up this tutorial on pretty AND accessible dividers for fanfiction (focusing on AO3, but this goes for every piece of text on the internet that has a divider somewhere). I confidently proclaimed that using an hr element instead of some random characters is the better way to do it, to accommodate screen reader users – but I had never actually tried it for myself.
I wanted to remedy that and took some time to experiment with a screen reader (Orca, because that was easiest for me to get my hands on). Setting that up was actually a bit of a hassle, so I captured the audio output to post it here, and you can hear for yourself what I'm talking about without having to bother with technology and then you can make up your mind about how you want to handle dividers in your own works.
I picked three pieces of fanfiction on AO3 that I knew off the top of my head had characters as dividers in them (because I love them! so much!!), selected a bit of text with the divider in the middle, and had Orca read it out to me. Here are the results:
Example #1: simple dreams of comfort by softestpunk
I tried this one first, and it confirmed my guess: the screen reader simply reads out the characters as it can't tell what they're supposed to mean.
Example #2: Pretending! Unless… by Aria_Lerendeair
This was up next, same thing in principle. Here I also found out that empty paragraphs are a little bit unwieldy if I wanted Orca to read the selected text. And also I was starting to get used to the voice by now.
Example #3: Tower and Rose by Moorishflower
Same thing, Orca reads "plusplusplus". As a bonus I discovered what happens when there is a full stop missing (did you catch it?). And this was also when I realised that I really could get used to that objectively awful reading voice. Like, if my other options were more tiring, or I had none? I'd probably try different readers, and I'd spend a lot of time tweaking the settings (there are SO MANY SETTINGS), and then I'd enjoy my favourite fics anyway.
And how does an actual hr divider get read?
Orca by default reads it as "separator". Which is not all that great either in my opinion, BUT I could teach it to just read it as a three second pause. Or make it say "skip" or whatever I like. That would be fairly easy to do, but teaching it how to read every random string of characters – not so much.
So, bottom line? It's less problematic than I thought. Sure, "asteriskasteriskasterisk" in the middle of a story doesn't sound nice. But I could get used to that meaning "separator". Brains are flexible like that. It does increase cognitive load a little, but not that badly I think. (Cognitive load is useful a concept, I'll write more about that soon.)
If you have published on AO3 and you'd like to convert to hr elements in your works (those can also be styled to look very nice!), I wrote a step by step tutorial on how to safely and easily replace the random characters with hr elements. If you use it, let me know how it worked for you! Constructive criticism very welcome 🙃
Oh and: I actually made a cool tool that lets you push sliders around instead of fiddling with code! Go ahead and design some lovely dividers for yourself. No CSS skills required, just copypaste the resulting code into your work skin!
@softest-punk, @aria-lerendeair, @moorishflower:
I hope this does not make you feel put on the spot (not at all my intention), but maybe rather a little flattered as I really did know those three fics sufficiently well to remember they had different strings of text as dividers. It's not quite the same as someone making fanart but… right now I'm just loads better at coding than at drawing. So, do with this possibly newfound knowledge as you will! And also whenever you will, I imagine you've all JUST come out the other end of Dreamling Week, phew… I am writing this with much love for you and your fics 🥰🥰🥰
#fanfiction meta#accessibility#screen readers#how to ao3#uuuhh also#reading recommendations#these three dreamling fics are all fabulous!#for writers#AO3 formatting manual#ao3 formatting#witch moon ramblings#reblogs appreciated#I'm just trying to raise some awareness here#I would LOVE to hear from actual screen reader users on this!
34 notes
·
View notes
Text

hello everyone (੭*ˊᵕˋ)੭* ̀ˋ i’m back with another coloring tutorial to share some tips on how i personally color mangas! you can check out my first tutorial here where i go over the basics of coloring. in here i’ll go a little more in depth about shading and lighting, and the areas that i like to focus!
so without further ado here we go !! ♡
before we start
all of my colorings are done in photoshop
i have a psd that i personally made for my colorings, so the tutorial will already have the psd on top. i personally like to color with a psd on and then make adjustments as i go along.
these are tips on how i personally like to color. the process is different for everyone, so take it with a grain of salt ^^
#1 - Base Colors
self explanatory, just fill in the base color of your character

ooo la la
#2 - Tips for Shading
my shading is broken up into two major parts
1. soft shading
2. hard shading
Soft shading
i like to do soft shading whenever i want my coloring to look slightly more realistic and for the base color to look less flat. other times i skip it altogether if i’m coloring something cute or chibi-like. If you’re like me who has difficulty sometimes imagining where the shadows/light should be, i highly suggest looking at references to get a general idea! here is just one example.

❗reminder that each step requires new layers! color everything on different layers so you can make changes in the future if you need to!! ❗
Hard shading
next, I like to add hard shadows to my colorings for more details. these are the shadows where i don’t blend into the skin. the areas where i almost always focus are
Under the hair
Neck
Ears
Under the eyebrows
but again, the hard shadows can also heavily depend on the angle that the character is in. like always, if you struggle with that, references will be your best friend!! i’ll show you a reference that i used for this coloring! :)

Tip: set your shading layer to multiply and then adjust the opacity to your liking. mine is set to 80% here
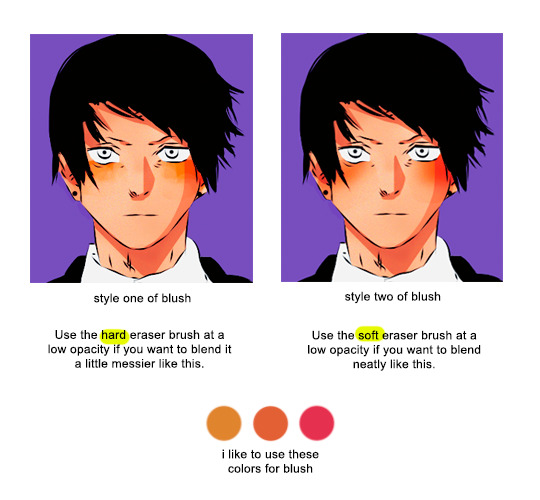
#3 - Tips for Blush
not everyone includes blushes in their colorings, but i personally like to add it because i feel like it adds a lot of life to the characters (and i find it cute 🥰)
#4 - Lighting/Color Details
another tip to make your coloring stand out is to add lighting! this is one of my favorite process as i really enjoy experimenting with different colors and seeing which one works best. you can use as much layers as you want until you get a result that you’re satisfied with.
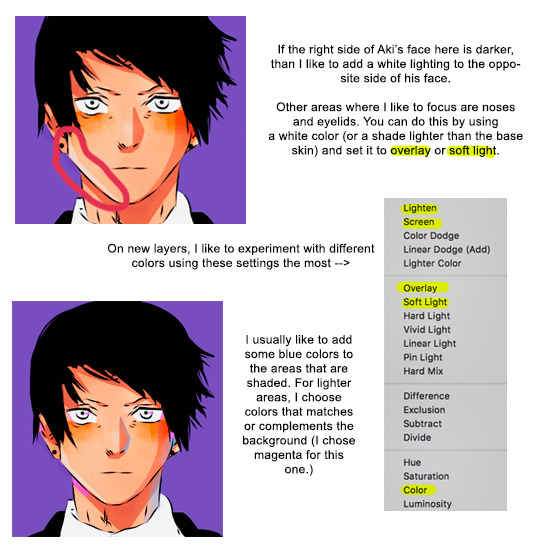
here is my result after i add more colors to the shadows and Aki’s face. i also colored in the eyes and added some pale colors to his lips because i know aki uses his chapstick 👑💅💁♀️

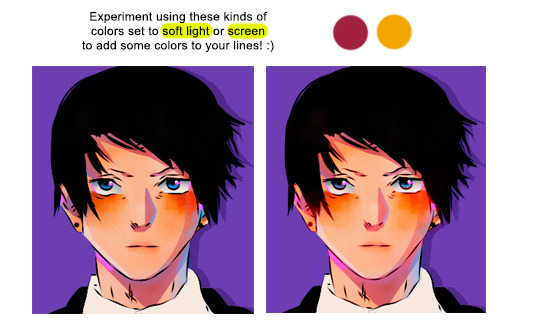
#5 - Brightening the Line Art
right now, the lines that we have are black, but i would prefer to brighten it up a little more. here, i will set a new layer above my manga cap, and choose a red or orange shade to add some colors to it
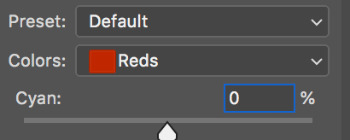
if you want a more vibrant effect, use a more vibrant version of those colors, or vice versa. you can also adjust the colors using your selective coloring tool
#6 - Finishing Touches
now that i’m nearing the finished product, i will begin to add some final details to it. are there areas that should be brighter or colors that should be less saturated? are there any areas where i should add highlights to? here is where i fix minor things until i’m satisfied with the outcome. i will also adjust my psd as well if i need to!
and finally, here is my result! :)

#mine#tutorial#tutorials#manga coloring tutorial#usergojoana#userokkotsus#usertorichi#usergokalp#usermica#hope it’s okay to tag some friends in this 🥹
213 notes
·
View notes
Text
ZINE CONTEST (with prize)(≧▽≦)
I have a Zine contest from NOW until Feb 24th (autism holiday). Pls read more about how to submit, the prizes and why I'm so hyped.
This is for BOTH people who consider themselves artists and those who don't. It doesn't have to be a comic. A ZINE CAN BE ANYTHING :D It can be a tech tutorial, it can be a comic, it can be flash fiction, it can be a local history guide, it can be Street Fighter II Turbo strategies printed out to be left in arcades, it can be anything!
The video below explains the process better than I could probably in text (I suck at conveying thing through text). My video also has a tl;dr that I would appreciate everyone read before submitting.
There's some other stuff below, but if you're more visual, like not the reading type (like me) then feel free to skip and just head to the video description to jump in.
Also, you may know me for my "Raspberry Pis are for paypigs" video where I try to advocate for the upcycling for ewasted Chromebooks.
I've been into the idea of leaving around Zines for a while. Every time I walk into a coffee shop or local business, I think "wow, I really would wish there was something cool to read." So I started making things to put there: 8 small 2.5 inch panels, folded into one 2.5 inch square for those interested to unravel. I put them inside of these origami boxes that a learned how to make, ones with a logo printed on them.
So far I've made: a zine template (I call it a dog ear zine for some reason), a template for the box to put them in, a zine about using yt-dlp, a zine about a reindeer working IT (along with a collaborator) and (coming soon) a zine about a monster in a cave doing stuff. All of the odg LibreOffice Draw template files to make your own zines or print out mine are on my archive.org page (linked at top of my Tumblr).
I'd really like other people to try this 8 panel 2.5 inch zine format, and I'm willing to bribe people with sweet, sweet Gabe Newell bucks to do it. You can submit as many zines in this format as you want. Just make sure they're printed out and have pictures of both the front and back (plus other pictures if you want) . In the video I mentioned you can use my submit page, which is probably the easiest for me to keep track of. You can also use the #dogearzine hashtag to enter. Please read the video description before entering, though (which includes Youtube's and Tumblr's terms of service, though this is more of a youtube thing).
youtube
Also, and this is completely unrelated, there's a lot more to me than just the faux-clickbait Wojak thumbnails. I like doing tech, wrestling, japanese, vidya and other videos, but I love to throw art in whenever I can shoehorn it in. Like, the video where I go over inchworm, butterfly, colors 3D and flipnote sudomemo - colors 3D on a hacked 3DS was my sister's first experience with digital at (she's moved up to an iPad and Procreate). So, it hold a special place in might heart, as a lot of the things I talk about do. I made a Whomp video because I miss Ronnie. I made a Rockbox video because I wished more people used dedicated MP3 players and knew where and how to download music. I want to help people do interesting things. And I also want to thank anyone who read all of this. You are cool. I hope everyone who's able to can compete in this contest and challenge themselves to get out of their comfort zone, to try something new! Also, also, thanks for liking these posts, people on Tumblr. You all have cool blogs. (^o^)丿
#zine#contest#zine contest#youtube#zine template#archive.org#comic#challenge#fun#chromebook#raspberry pi#wojak#zine ideas#fun ideas#steam#Youtube
22 notes
·
View notes
Text
For as interesting and rewarding as learning and mastering a speedrun can be initially it doesn't change the fact that you are engaging with a game in contexts where no design work was put in, sometimes actively avoiding the actually designed contexts and modes of engagement and running the game to its limit and its breaking point.
What happens to Celeste's story when you avoid any and all of it's manifestations? To the ludonarrative sense of overcoming when you already start winning? What happens to the stamina puzzles when you just use neutral jumps? To the level design when you can hyperdash the length of a screen?
What exactly are you engaging with?
Forsaken city is a tutorial for the basic mechanics I already know, an introduction to the characters I already know, it sets up a tone that I'm gonna ignore and mechanics I'm gonna bypass, its so input dense it make my hands hurt.
Old site, has an open section that I would have explored and wandered around in casually, a chase section that would have pressured me to constantly move (lol) and relaxed wind-down section at the end (TASawake here I come!!).
Celestial resort has you timing your inputs to avoid the dustbunnies (here's a setup to not have to worry), was there some story at some point? Remember the first time I passed though here it was so slow and frustrating, things are better now. Damn that last room is annoying, if I could skip it I would.
Thank god this game has no autoscrollers, no good speedgame game has autoscrollers, wind is a mechanic that pretends to impede the player.
So you know how the point of temple is that you have to wander and get lost, yeah fuck that. Anyway isn't it fucked up that seekers aren't meaningfully deterministic that's bad game design!!! Do you remember how the walk with Theo was slow and tedious, how carrying him was supposed to be a burden, remember how you had to improvise because the seekers would throw everything off, do you remember how to do a gultra?
So like the whole thing with reflection is that after a slow reflective section were you are given the option to go through the fast path and the slower path a few times (it's meandering, or was rather). You confront yourself in an explosive battle were all the hampering elements of the previous levels are not there and the screens get easier so you feel like you are constantly making headway (as opposed to the previous sections) and it feels awesome, this is likewise significant for story reasons. What actually happens now is you progress through a slog of unengaging screens that is way longer than it has to be and it's the most dogshit experience of the entire speedrun.
Chapter 7 exists, I guess, the previous one was so utter garbage that I never decided to route from 6 onward, I would practice 1-5 then kinda hope for good results on 6-7 whenever I decided to do actual runs, did not give a shit. Also shoutout to all the strawberries I didn't get.
At some point you can't say you are playing Celeste anymore, not to any practical degree, not from a game design or player experience perspective.
4 notes
·
View notes
Note
hey!! you follow my plantblr (unexpectedplantblr) and i’ve learned so much just off your tags dude. wdym pruning omg i’m so wildly unprepared how and when should i be doing that! i can’t imagine they have yt videos on shit THAT basic do they!?.
and my apples are dwarfs?? i’ve been stressing abt them so close to the house and was trying to find an arborist to help me move them but do you think they’ll be ok with just some root guard? omg i’m so sorry to bug you feel free to ignore!
There’s no issues and I welcome the asks! This enthusiasm gives me old tumblr days vibes that I think many miss these days lol.
Inevitably most domestic fruiting woody plants need a trim up of pruning for maintenance. Some types don’t need it overall or don’t need it at certain life stages, but those are the lucky cases.
While I’m currently still in the midst of pruning season as of writing this, your photos imply it’s a smidgen late for you to be doing any at all unless it’s either for major issues or dead/diseased wood; it’s generally best to get the pruning before said woody plants leaf out but while they are still dormant to reduce shock, to avoid damaging freshly sprouted growth (since if you’re early enough there’s no leaves to worry about), and keep them wasting energy on wood that’ll be cut off in the process. I recall I got my info on pruning mostly by book literature but I wouldn’t be surprised if there’s some niche videos on the topic online- there are yt video journals and tutorials for niche fruits like Asimina triloba cultivation/maintenance so surely less exotic stuff would have online tutorials on it. Do try to find more than one source to try to average out the answers they give lest they give different answers or overlook different details (gardening can get subjective sometimes after all). If I recall the rule for Grape vines you try to keep one “lead vine” intact to be the one to produce new yearly branches/shoots that will then produce the grapes.
Fortunately I think you don’t have to worry about any issues with skipping the livewood pruning this year; let this year just help you get more familiar with what you’re dealing with.
For next year I can at least say from my own experience a few points; universally you want to prune to remove dead, damaged, and diseased wood, as well as any branches that crisscross with each other (since those will just make damaged wood from rubbing if allowed to stay), and generally you try to not cut more than a 3rd of the live growth (even if it means you gotta wait next year to fully shape a tree if the pruning work for some reason is major- which is my case with my older unkempt trees) to avoid having the pruning reach deadly amounts (there are exceptions- most Clematis are pruned to extreme amounts most of the time, well established Grapes and Kiwis can have a lot taken off too in certain cases). Oh and big one that newbies can miss; if you're getting tools, try to get bypass type pruning tools, anvil type pruning tools do damage to live wood (since they crush moreso to cut unlike bypass) and are better for exclusively dead/removed wood.
Observe what others do to their trees of similar kind to your own; I learned a little bit on what to do with my own apple trees from seeing what other people have done to their apple trees of similar size in my region.
It’s not easy at first but set goals for what you’re pruning. In my case a good chunk of my apple trees are quite old (we’re talking hollowed-out old for many of these trees), so my goal is generally to help extend their lives as well as fruit production as a bonus, so I try to reduce the sources of major weight burden on the large crumbling branches. Another goal in my case is making it that the branches are not as high up so that they are easier to maintain and harvest from, since yet again, my trees are on the larger/older end of what to expect from an orchard.
While not an option for me consulting Arborists is definitely not a bad option if you’re free to throw the cash.
Pruning rules/goals for your dwarf apple trees will probably be slightly different from what I do for my own trees since you’re dealing with very different growth forms from my own.
I am not 100% certain your apple trees by the house are dwarves but their growth habit feels more like what I’d expect/imagine from dwarf/semidwarf trees; as to what fruit variety it could be a lot of possibilities; apple trees tend to be grafted onto rootstock that affects their hardiness/size, so you could have similar cultivars to what I have for the fruit/scionwood but would definitely have very different cultivars for the rootstock that they are attached to. If the previous owners knew what they were doing they would’ve chosen dwarf roostock cultivars to avoid them becoming troublesome so close to the house.
In my opinion dwarves or not they are a bit big already to risk moving/transplanting away from the house without a painful and risky amount of long (worst case possibly years worth) of aftercare; if that is or was truly an issue you’d be better off getting new rootstock to plant in the new locations and grafting onto them from the house specimens onto those new rootstocks (you can hire/ask experts if you can’t quite do it yourself, we had a family member of a family member help save a heritage cultivar in our orchard by getting some successful grafts from the dying tree. I plan to do some grafting myself down the road I just dk what to graft rn). I am not familiar with root guard, from what I read it's a brand of fertilizer that claims to help stimulate root growth???
Also note with the Cherry/Plum trees mention before; one of the issues for ID sometimes for them is there’s just, a lot of species, a lot hybridize together, and that’s not even considering/factoring in domestic hybrids/cultivars where the diversity can be as wide as it is for apple cultivars. It can really muddy the waters for identification down to the exact kind unless you’re dealing with a very sharp specialist or a very distinct variety, and even then some may struggle with certain cases.
Lucky you to also have something as fancy as a finger lime! I already guessed so but that definitely solidified my guess that you are in a warmer growing zone from me lol.
#plantblr#ask#askbox#tried to break it apart to make it easier to read but dear lord that's a lotta text#wall of text
6 notes
·
View notes
Text
Miss Vamp’s Diary • Fetish Goths Explained
Introduction
This is my first tumblr post don’t judge me. I’ve been wanting to do this since purple galaxy pattern was trending. I’m also writing this on my phone atm. You can skip the introduction, just trying to show some credibility as a goth content creator (ʃᵕ̩̩ ᵕ̩̩⑅)
Hello, my name is Miss Vamp. You can also address me as “Vamp” or “V4mptiddy” if you’re not one of my simps online. I decided to open up a small blog to elaborate on some small things like my inspirations for my fashion/cosmetics, honest makeup reviews, commentary on gothic culture or just personal experiences as a financial dominatrix. I want to share more dimensional factors about my (attempted) online personality. This is my awkward way of actually conveying some information that I’ve planned on sharing with the public such as how I’ve grown into being “Miss Vamp”.
I’m a year and a half in the industry, I hope to have this as a long term investment in my future. I aspire to be a goth influencer like MamieHades with my own twist. I love her to bits, one of the first people to notice my posts when I started on Instagram around April 2023.
During my time, I’ve managed to have a sub-funded makeup series where subs buy my makeup for me, a collaboration photoshoots with my best friend of eight years (Mellowbatz on IG), and own a 18+ NSFW discord server, “SlutCult”. So that’s also pretty cool too. I feel almost indebted to the Findom, Goth and BDSM community for supporting my dreams. I’m still small, lots to improve on but optimistic on what my capabilities are in regards to my own contribution towards the locals.
(I’m open to mutuals, you don’t have to pay to chat with me. In spite of that, sub that are interested in serving me, my initial tribute is $20. I’m a busy woman so I expect something transactional to catch my attention.)
Anyways, since I’m juggling so many things so early, making so many securities, a lot of people acknowledge it but never really understand how much this occupation means to me. I’ve barely started recognizing the emotional attachment I’ve had with this occupation until six months into it. There’s more intricate details between the line of my presentation. They don’t know my storyline of how I swindled to becoming a sensual sadistic fetish goth vampire that glue down their eyebrows and give subs nightmare fuel with my uncanny goth makeup. Nor have I truly exposed this side of me. In an unfiltered and non restricted manner. This is my raw self and attitude through written work.
Findom, Makeup tutorials and Goth Modeling is honestly my biggest passion as I’m entering my twenties and one of the things that orbits around my individuality. Yes, I have other accomplishments like graduating with an English degree and other adult stuff but this is equally important to me.
I plan on possibly running a YouTube channel with my bestfriend in the future but for now, I wanted to dabble in blogs and possibly have this as an online diary. A media that my intended audience can enjoy and for subs to indulge in secrecy.
If you've followed me on my other platforms outside of tumblr, I identify as a Fetish Goth. At some point, I pathetically failed to articulate that I wanted to have more queer/alt mutuals on an Instagram reel which backfired because I realized my interest is NICHE. It’s not well defined and misconstrued to be something else. Therefore, I feel like I have a sense of responsibility to actually elaborate and educate people who actually have an interest in my vision. I see that there’s attentive people that would like to know what I’m deliberately posting about.
General Explanation About Fetish Goths:
Fetish goth is a style blending elements of gothic fashion with BDSM aesthetics, stands out as a striking and provocative form of self-expression within alternative communities. Sensuality can serve as an identity in an individual’s life by their practice, morality or occupation. Sex sells but committing to the bit is taboo. It’s distinct subculture style within the broader landscape of gothic fashion, drawing influences from BDSM culture, punk fashion, and alternative music scenes. It was formed in the progression of goth culture, embracing edgier and more provocative aesthetics, incorporating elements of fetish wear and erotic symbolism into their attire. Generally speaking, it’s the reason why we wear fishnets, chokers and corsets.
The origins of fetish goth can be traced back to the late 20th century, a period marked by profound social and cultural upheaval with pop culture. Pop Culture media loves incorporating it but the average citizen can sneak a few disapproving glances at you. This fashion statement is not only controversial but can be relevant in today’s societal pandemic of purity culture and norms about fashion. A more honorable mention is the arguments about goth only fans models and idiots arguing in my comment section about how i’m a “poser” yet they lip sync to London After Midnight’s “Bondage Song” as a thirst trap on TikTok. This evolution in thought is not merely academic but has had profound social and moral implications. The motives developed through the ongoing media interpretation of said fashion and formed into a more political statement. In recent years, it has continued to germinate and adapt, reflecting changing attitudes towards gender, sexuality, and identity. As society becomes increasingly diverse and inclusive, fetish goths have expanded their ranks to include individuals of all genders, sexual orientations, and cultural backgrounds, encompassing a more fluid and expansive understanding of alternative fashion and subcultural identity.
As punk and gothic subcultures gained momentum in the 1970s and 1980s, a wave of creative experimentation swept through alternative communities, challenging conventional notions of fashion and identity. Inspired by the DIY ethos of punk and the macabre elegance of gothic aesthetics, early fetish goths began to incorporate elements of fetish wear / symbolism into their attire. The 1990s had a rise in electronic music (synth waves) and Fetish style such as PVC, rubber, piercings, leather latex and BDSM bondaged wear in Goth Clubs. This was an imperative step in separating Goth as a distinct subculture that is dissimilar to the post-punk scene it spawned from. Punk fashion had also incorporated elements of bondage and BDSM-wear because it was popularized in the media (Vivienne Westwood and Malcolm McLaren’s legendary SEX store in London) but it wasn’t as evident. Most punks were wearing D rings rather than O rings. The difference is O-ring is solely meant for BDSM, it means ownership and customized for humans participating in it; Having a D ring on a collar was catered to dogs. This might be a culture shock to some but chokers are called chokers for a reason.
It was merely drawing inspiration from the dark romanticism of gothic literature, the raw energy of punk rock, and the provocative aesthetics of BDSM. Fetish goths crafted a distinct visual language that defied categorization and pushed the boundaries of traditional fashion. The rise of this look coincided with a broader cultural shift towards alternative lifestyles and underground subcultures. As mainstream media and popular culture began to co-opt elements of gothic and BDSM aesthetics, fetish goths carved out their own niche within the subcultural landscape, embracing DIY ethos and a spirit of creative rebellion. From underground clubs and music festivals to online forums and social media communities, fetish goths found camaraderie and solidarity with like-minded individuals who shared their passion for dark fashion and unconventional beauty.
This is the part that could be upsetting to some but I must admit that it’s necessary to emphasize on how insane some users sound when they blame me as “part of the problem”; that doesn’t make sense. Fetish goth is not porn material, I personally don’t pretend to be goth for money. Not every single fetish goth is meant to be a sex worker, some just like it for the sex appeal and nothing more. As for me? I incorporated it into my findom / online branding and it was my own personal choice. There’s something more important to be addressed about within this context, there was always a fetish component to the subculture. It’s inherited into our characteristics. It doesn’t mean that femme presenting people should be fetishized. No one deserves to be fetishized unless there’s consent. I just need to make it abundantly clear it has been adopted by the goth scene entirely and any article of these clothes can be obtained without going to a sex store. It’s the unspoken reason why goth clubs are 18+ and elder goths were so territorial around baby goths. We have adopted explicit fetish accessories and turned it into street wear, the beloved footwear of big stompy boots also deviated from early goth footwear. While Demonia makes many styles of gothic shoes, their most identifiable boots are characterized by their tall platforms and heavy silver hardware, which can take the form of spikes, O-rings, buckles or chains. Both of these that were originally worn by them are now integrated into casual fashion and have influenced gothic culture. So I’d hate to register people on my page complaining about my fashion niche as hypocritical. ESPECIALLY if they’re in possession of Demonia boots and lip service items, it’s like the call is coming from inside the house. It’s so similar to our modern appearance that people can’t differentiate the two or register that it was the blueprints.
One of the key influences on the development of fetish goth style was the BDSM subculture, which was also a distinct community in the latter half of the 20th century.
BDSM, an acronym for Bondage, Dominance, Sadism, and Masochism, encompasses a wide range of practices and identities centered around consensual power exchange and erotic role-playing, Outside of the biased interpretations it’s classified as "a multidimensional paraphilia of sexuality; (consensual) power interchange in sexual encounters." All of this is safe of course, unlike the stigma, there are plenty of rules and reinforcements because it’s disciplinary between two parties (or more).” Fetish attire actively include leather, latex, corsets, and other fetishistic attire serve as symbols of sexual empowerment and personal expression, challenging societal taboos surrounding sexuality and desire to the public interest. It could simply be served as a temptation and pinpoint what kind of individual a person is by their reaction; "A twofold evolution tended to make the flesh into the root of all evil, shifting the most important moment of transgression from the act itself to the stirrings - so difficult to perceive and formulate - of desire" (Foucault, p. 20), reflects the seductive nature of fetish goth attire.
The main introduction is mainly with O rings chokers, big boots (with O rings, chains or spikes), bondage pants, chains/mail materials, and PVC, a type of latex leather that has a glossy shine, and the alternative version faux leather. This style does more than simply shock or oppose societal norms; it questions the foundations upon which these norms are built. By bringing 'the stirrings of desire' into the open, It critiques the notion that internal desires should be repressed or hidden. Instead, it celebrates these as parts of human identity that should be acknowledged and expressed. The visibility of such attire in public spaces and subcultural gatherings underscores a rejection of the idea that the body and its desires are sources of evil or shame. Furthermore, the very act of displaying what is conventionally concealed operates as a form of resistance against societal controls over the body and sexuality. It embodies a challenge to the 'twofold evolution' where the personal, internal aspects of desire are not only made visible but are also celebrated rather than censured. In doing so, fetish goth fashion not only redefines the aesthetics of desire but also reclaims agency over how desire and the body are perceived and governed.
Philosophy In The Details:
In historical context, particularly within Christian doctrine, this transformation can be seen in the transition from a focus on overt acts of sin to a more introspective examination of one's inner life and temptations. This shift places a greater moral burden on individual thoughts and feelings, which are inherently more subjective and less observable than actions. This introspective turn is deeply aligned with the practice of confession, where the faithful are encouraged not only to repent for their sins but to verbalize their innermost temptations and desires, thus making what is internal and hidden into something spoken and external.
So yes, to an extent there is a transformation of desire when most people start experimenting with it. Western societies have conceptualized sin and morality. This statement reflects a significant shift from viewing sin as merely a matter of wrongful actions (the acts themselves) to a deeper concern with the internal desires and impulses that precede and instigate these actions (the stirrings of desire). Without a doubt, there’s a site of moral scrutiny and social control that resonates strikingly with the aesthetics and expressions within it. Fetish goth attire, with its explicit evocations of the forbidden and the transgressive, challenges this historical moral schema by externalizing and aestheticizing what mainstream culture might deem dark or deviant desires. The provocative nature of fetish goth attire is not just a fashion statement but a form of social commentary. It confronts the viewer with a visual dialogue about the nature of desire, transgression, and the body.
In essence, the provocative freedom of fetish goth attire is a powerful form of cultural critique and resistance, embodying Foucault's observations about the shifts in moral scrutiny from acts to desires. It is more avant garde promoting a more inclusive and accepting approach to the diverse expressions of human sexuality and identity.
Significance In MY Life
However, to me, It’s my lifestyle. Arguably, it's the origins of my alter ego. My wardrobe, which is slowly accumulating more BDSM fetish attire and undergarments. Subs tend to buy my accessories, leather goods, makeup, lingerie and underwear. The exhibitionist in me can’t help but to be promiscuous in material. I personally love receiving attention in tight fitted and licentious displays of my best physical assists. I love it when it’s acknowledged and obsessed when I get complimented by anyone really. There’s just something about it that makes me feel really good inside when I challenge the status quo of “modesty” and “purity”. Makes me perky when I get worshipped for these qualities. Truly and honestly, I write this with my full heavy heart that I feel absolutely empowered. I take pride in being a tease and being spoiled for it. I love taking money and turning people on for wearing sexy clothes. For offending conservatives and being labeled as a lecherous “Jezebel”. It's the sensational urge that dwells within my erotic chimera to make someone choke on their tears when they address me as their Mistress. It’s the shine in my leather boots and in my eyes when I fantasize about a pathetic infatuated slave worshiping me at my toe box. The pleasure within holding someone at the end of the leash and consensually treating the participant as a fetish fashion accessory. Excitement to have a drawer full of subfunded panty just to add on the extra flare of what the distance of a fetish goth can preform. The ability to be thankful everyday because it’s another day to spite someone or give someone a sexual awakening. It’s the principles of my morality and the influences in my judgment as a woman in control of a libido. The confidence I have at this very moment, took many years to build up enough to prevail and rip people limb from limb apart. The guideline of sexual ethics, the philosophy of BDSM. My highest pinnacle of self expression. My own form of sexual liberation and sensuality wrapped in black satin and leather. It’s my redemption for being shamed into conformity. I refuse to surrender something valuable like that again.
This seemingly benign practice of sensuality of discussing desires becomes a profound tool for societal control on my end, influencing not just my own actions but the very desires that motivate an individual. It compliments my personality and if you dare to be technical in astrology, it’s the product of having a scorpio venus. I love the intensity, undying admiration and stubborn loyalty that could be formed in a dynamic bond. Overall, I love garnering eccentric fashion and sexual appeal like Elvira, Mistress Of The Dark. I will say it’s not for everyone, including other goths in the community but this lifestyle was solely the reason as to why I was able to reclaim my power and gain an identity as a fashionista and a findom. I do not sexualize goths, I sexualize myself if that makes sense? The funny thing about the assumption from the public eye is that everyone thinks I'm experienced and “ran through” but I'm still a raging virgin with guilty pleasures and hyperfixation on the topic. Regardless, I hold intense sentimental value in my fashion statement overall.
Originally, I treated this like exposure therapy after my assault and learned all principles before applying it into my life. I hope this perspective offers a critical framework for understanding the acts of rebellion and identity expression in communities, which stand in stark contrast to these norms, showcasing their cultural significance and resistance (and look good doing it). I also wanted to share this to formally specify why I make this such a big deal in my brand. Western societies have historically managed individual desires, particularly through the mechanism of discourse. A form of societal command unique to the West — was established to regulate personal desires captures a pivotal shift in the relationship between individuals and societal norms. This injunction wasn't merely a directive to obey the law; it extended deeply into the private realm, dictating that individuals not only confess to transgressions but also constantly discuss and analyze their desires.
Conclusion
(Relatively speaking as a fetish goth/findom)
Western society compels individuals to transform "every desire into discourse." This requirement to vocalize and scrutinize personal desires allows society to exert control over individuals not just through suppression but through the shaping of thoughts and feelings. Desires, once private, become public and malleable under societal scrutiny. I just personally feel like I’ve always been observed under this pressure before I turned 18 because of the brash gooners that had their brain fried from porn. No matter what I wear, it will never be an invitation but that doesn’t mean people won’t stop eye fucking me. So I interpreted this as my own way of processing and making desires a topic of constant discourse but simultaneously serves as a subtle but powerful form of social control for me. Before I turned into a fleshed out goth girl, I was confronted by this behavior on multiple occasion. If people are going to be weirdos, they might as well pay for my bills.
It operates under the impression of transparency and self-awareness, yet it functions as a mechanism through which society can influence and often dictate acceptable desires and behaviors. In the context of the fetish goth subculture, this societal mandate becomes a site of resistance. By openly embracing and redefining what mainstream culture might consider deviant or taboo, members of this subculture challenge the traditional boundaries set by the historical injunction to regulate desires through discourse. So in conclusion, this is how I live in my truth. Either you hate it, love it or fund it.
#goth aesthetic#findom brat#alternative#goth fashion#findomm#80s#post punk#goth makeup#alternative goth#goth#blogging#fetishfashion#black and white#vampire goth#makeup#makeup tutorial#poc goth#dark aesthetic#dark femme#goth subculture
4 notes
·
View notes
Text
This post got a lot longer than intended (oops), so feel free to just skim the pretty pictures, or skip to the bits you find most interesting!
I got bored, and wanted to try something out, just to see how it looked. The goal was: Make a visually appealing pixel-object out of very limited colors, which is both clear in visual, and shaded to give a lil depth. While this isn't a tutorial on making old-school pixel art, I'd love to see if this inspires anybody else to give it a try!
Shrunk a public domain photo down for the silhouette of my base here (https://www.publicdomainpictures.net/en/view-image.php?image=173260&picture=tree) and just kinda riffed on it. Tried to "capture" the way it looked (to me) as best I could, while staying true to the original photo.
In order to tempt people into scrolling past the read-more, here is the final image I settled on after taking several passes at it. (Be warned, this is a VERY LONG post!)
(And what it looks like at normal size)

Normally, when I do pixel art, I prefer not to do the thing where you shrink a picture down, and make it more pixellated. But... I've realized there's a bunch of different ways to emphasize those same pixels. So I decided to experiment.
First-off, my initial goal: The background would be the lightest color, and I would then use a darkest color and two mid-tone colors to re-create the entire image. I couldn't work with any other shades, as it would help me simplify the shapes I'm looking at a little better. So I started by blocking in the deepest shadows I could find, and then sculpting them into more satisfying shapes.
While it "worked," I didn't like the end-result. It wasn't terrible, it just didn't look the way that I wanted it to.
The next attempt was to make all my existing shadows the darkest color in my palette, then "fill in" between them with a nice mid-tone. Something to soften the shadows up a bit, and make it look a little more cohesive.
This also didn't quite give the effect I wanted. The shadows are a lovely shape, but I probably added too many of them. I wanted the "focus" on the bits of the tree that were fully highlighted, but it still didn't look right.
While it broke my initial "rule," I tried combining the first picture and the last one, to see what a "happy medium" looked like. The end-result... looked almost identical to the photo that I started with. (Colors notwithstanding.) While the visual effect was a bit more pleasing to the eye, that definitely defeated the purpose of the exercise. So...I started over completely.
SKIP DOWN TO THE TL;DR TO AVOID THE VIDEO GAME HISTORY RANT.
(Certain things have been heavily oversimplified, to make for a shorter explanation!)
Fun lil video-game history fact: Early visuals in video games started with "off" and "on." A lot of the modern limited-palette pixel art you see is directly inspired by the fact that the earliest screens we had to work with could only show visuals in binary; Parts of the screen were "on" (the lighter color) or "off" (the darker color) and we hadn't gotten to the point we could display a crisp white or black, yet. This meant that you might have a green background with darker green artwork. Later on, they were able to add a mid-tone shade or two for sake of depth and detail.
After we went through our early MS Paint era of video game visuals (complete with blinding use of primary colors), people stretched what early processors (CPU/video card/RAM/low-res displays) could handle to the limits. That harsh limitation on what an early computer could display without frying itself, and what it could display at all, led to some extremely clever uses of color-choice, dithering, and cross-hatching, to trick the eye into filling in with colors and shapes where early video game artists couldn't add them.
See, when we talk about "8-bit" games, we're talking about (oversimplified, mind you) the amount of colors and pixels a computer is capable of displaying, both overall, and in a given section of the screen at a time. Individual tiles and character-sprites for old games had a set amount of pixels per "square," and within those "squares," you were only allowed to display a certain amount of colors. Each separate "square" then had to be designed individually.
Some while after we figured out how to display more than "off" and "on," we developed computers that could handle showing a lovely range of different colors. But then we had a new issue; Within a single "square" (8x8, 16x16, etc) of the screen, you could have white, black, and up to 1-2 other colors. The computer couldn't handle displaying anything else; No midtone shades inbetween, no nothing.
So early video game artists compensated for this by sticking to that old method of "chunking" out the visuals on the screen into tiles, which matched that resolution. You wouldn't notice that your computer could only show 2 gray tones in the same square, if that square happened to be a stone wall. The square next to it could then be two different shades of green, and it would make a lovely piece of grass, or a tree, with shading even!
There was a period inbetween where we had such limited colors to work with, people had purple trees, orange grass, and red skies. It created a wild visual effect, and had all the right contrast (see artwork term: "Value") to allow the eye to see the detail needed for games in which visuals were really important, like early point-and-click adventures.
Eventually, artists stretched the limits further. While that resolution was slow to evolve, people began to create complex backgrounds with visible perspective, that blurred the lines between each "square" on the screen. If you wanted to create a diagonal edge, or overlap two objects over eachother, you had to use a set of colors that could apply to both objects you wanted to create.
So!!! FOR THOSE WHO SCROLLED DOWN, tl;dr-
I wanted to see if I could re-create this tree with only 3-4 total colors (+background) in a way that an early computer could have rendered on-screen. That means white/black + 2 colors per "square." Since I didn't like how harsh a pure black looked while I worked on it, I skipped using it. We're going to pretend an old computer could handle these specific shades of pink and purple (spoiler; they absolutely could not)...but the visual effect being used is true to the idea.

A first-attempt was made. I allowed myself one extra mid-tone, just for the sake of smoothing things out. I then decided on 8x8 pixel squares. You can visually see where one stops and the next starts. It had a fun visual effect, and it was much closer to what I was originally going for...but the artists that came before me made nuch nicer artwork with much worse tech, and I could do better. So I took a second pass at it.

THIS was much closer to what I'd been going for. While you can still guess where each square begins/ends, all the extra dithering and more organically-shaped lines helps to blur the edges of each square, without straying outside of them.
If you got all the way down here, you're amazing. I hope this entertained somebody, and that others will like the end-result as much as I do. :)
2 notes
·
View notes
Note
Apologies if you already answered this somewhere but what software do you use to make changeling and/or gilded shadows? I was thinking about giving TyranoBuilder a go but I think I would rather use the same software as you unless its all custom built obviously? i know very little about coding but I'd really like to make a visual novel. Thanks xx
Hi!
I use Ren'py. I have heard pretty mixed things about TyranoBuilder but have never personally tried it. Here are some basic pros and cons of Ren'py.
(I'm a very staunch advocate of trying things and finding what works best for you personally).
Pros:
Ren'py is free so there's no investment to try it out.
Ren'py has been around for a decade and has a lot of resources and communities to provide information and tutorials. Compared to some newer or less-used engines where it can be difficult to find help, you can find Ren'py devs every five feet in the indie VN community.
Ren'py comes with a really solid set of built in features. It is one of the most common indie VN engines for a reason. It even comes with an entire game UI that you can customise. One of the biggest complaints I've seen about some other engines is that they're lacking when it comes to some of the features we're really used to having in Ren'py games (such as rollback or skip).
Ren'py is really flexible once you get the hang of using it. Way more than a lot of people realise. You can do a lot of cool things with it.
Cons:
Ren'py does require learning some code. The coding is on the simple side for the most part but can get complex in regards to screens and customising the default UI. That said, I had absolutely 0 coding experience when I started out. I've had to get help multiple times but I clearly managed. I built a lot of the stuff in Gilded Shadows (customisation, flowcharts) on my own.
Ren'py ports to limited platforms. It's PC/Mac/Linux and mobile. Most people find that adequate though.
Ren'py can be intimidating at first - especially compared to other game engines more focused around a drag and drop strategy. The documentation isn't always clear on things so at first it might feel like reading an alien language.
Ren'py communities can be a bit hit or miss sometimes. Some people have been doing this a long time and can be a little unconsciously overbearing and critical toward newcomers to the engine. They often mean well but can be discouraging.
There are pros and cons to every single engine out there. I know people who are using godot or nani novel or fungus. I know people who have tried visual novel maker as well.
There is really not a perfect engine. But I know, also, people who have used Ren'py, switched to other engines, then come back to Ren'py as well. And I know people who've used other engines and never looked back.
That's why I really believe that it's not just about finding a good game engine, it's about finding the one that is best for you and your needs.
The good news is that if you ever want to try Ren'py out, I will always be willing to answer questions (if I can) or point you to places I think you can find the answer.
Hope this helps!
~Esh
34 notes
·
View notes
Text
I’ve been tagged by @katastronoot and @sheirukitriesfandom
Feel free to take if you haven’t been tagged already.
1) Describe one creative WIP project you’re planning to work on over the summer.
Just a few days ago I decided to pull myself together and finish my drafts, debts and references queue. There’s a number of tabs with refs hanging in my browser... Need to get rid of them! Then I’ll also finish some tutorials from my previous lessons as well as rewatch the ones I already did, just to get back in shape. And will probably dive into some other courses - I have some good videos.
Was thinking about making some doll, clothes after a long break. My drunk shepherdess needs this, as I changed my mind to sell her away! (she’s another story). And a bag for my favorite tarot deck, now I use the the bag I made for another one, while that another one rests in a bag that once was part of friend’s Christmas present.
The rest is optional for now, but I hope to start drawing more portraits again. Maybe, by the end of the year I’ll be taking requests and trades for your OCs and favorite characters... That would be super cool.
I wanted to start attending my IRL art class again, but looks like I won’t be able to afford it 😢 Sadly I’m not making much money these days, and there are some unexpected expences.
2) Rec a book!
Tanith Lee, The Night’s Master. I think Elden Ring fans will appreciate 😉 Made a post about it a while ago.
I also liked The Winter Players - finally, a good and strong female protagonist! Not evil, unlike Zorayas - the one from the Night’s Master 😉
3) Rec a fic!
False Azure in the Windowpane by Tulak_Hord
If you don’t mind het Malenia ship. I don’t because it has a lot of fluff and an interesting Tarnished. I loved the first 55k words, excluding the chapter where they sparred (for me, that felt too long and boring). But I keep reading it.
Also Flamed Aeonia by BadMonsterFr
This one has fem shipping, also a lot of hurt/comfort and fluff - just the way I like it!
I love Malenia fluff. So more Malenia fluff pls! If you can rec me anything else like this, you're welcome! (yes I know and love Unalloyed, esp. the epilogue. It’s somewhat different, more on Millicent and Miquella, but just my vibes as well).
(also I’m really sorry for not reading some of fandom’s buddies works, I do - I’d like to support you more ... started some of them, but couldn’t keep up. I’m a bad and slow reader, and prefer smaller sizes to long ongoings. There are just two long ongoings I'm reading, False Azure and Rebecca's, because they are updated not really often).
4) Rec Music!
I’m on my Breton and Francophone folk kick again, so I recommend
- La Boutine Souriante, folk-rock from Quebec (so far I’m listyening to their earliest albums, but they’ve been around since 70s and have many albums)
- Tri Yann. Modern Breton classics, I’d say! Love those old men who are still fit and well.
5)Share one piece of advice!
I agree with @vidvana Take care of yourself! Also don’t skip meals, get enough sleep. And if you feel you’d use some support, seek it any ways. If you can’t afford therapy or anything, there’s plenty of books and resources. Sometimes it’s even easier to help yourself than to find help. I’m quite experienced in self-help, I know what I’m talking about.
For me, Julia Cameron’s “The Artists’s Way” has become that single straw I grasped in my darkest times, and it actually helped greatly! I also used her list of further reading and quotes, thus finding Shakti Gauvain, whose books are inspiring and supportive as well. Later I was a moderator for several groups for the Asrtists’Way. Not an easy experience, but it taught me something as well.
But if there’s a chance of any therapy, groups, any other support, don’t give it up as well.
5 notes
·
View notes
Note
Hi Soni. About what happens with you and food remind me something similar that happened to me. Please feel free to ignore me but just wanted to share my experience with you in case is useful in some way. There was a time that I didn't have a schedule for eating and I sometimes skip breakfast and a lot of hour pass for me to eat something decent like until 12pm or something like that sometimes i eat decent sometimes really few things. With this lack of schedule and consistancy with the food I eat I had gastric reflux that make me feel that I will throw up if I eat at certain hours and even when I felt okay and I eat well I sometimes throw up without any way to control it, I wasn't provoquing it my body because of the acid gastrics somehow did that and it was awful and I didn't want to eat a lot because of that.
After I went to a doctor told me that I have gastritis and that I have to not eat certain foods or spices that make more acid to your body and said to me how important is to not skip meals because it gets worst with time. A nutrionist help me with suggestion for food that I like and taking in consideration my normal schedule with the activities that you do. Is not an easy change, is little steps but the more I was consistent my body stop giving me those problems. I sometimes have those symptoms when I skip meals and I am very anxious, nervous, sad etc. For me at least sometimes the negative emotions affect how much I eat. Maybe you can consider asking a doctor or nutritionist? I hope you don't mind me sharing this with you, I find your ask that you did relatable. I get the sensation that we know how or body works and how much we can handle without food but for me personally the symptoms after were harder to control (I once even pass out for a few secods and was really scary). I also sometimes don't see food interesting but I found that looking for different recepies also helps and is fun cooking with a tutorial and some music. Sending love to you. You don't have to post this. Sorry for my english.
hi. first of all thank you so much for taking time out and sharing this with me, i really do appreciate it. i'm gonna put my reply under the cut because it might get a bit long
the thing with me though is that i've been like this since i was a kid. like my mum told me that for the first two years all i would eat was fruits and nothing else and then gradually i branched out into other foods. when i'm at home (basically under my mum's care) i would drink fresh fruit juice in the morning, then have a proper lunch in the afternoon and in the evening i'd have fruits or a milkshake if i felt like it and this was the diet i got used to. however, i got diagnosed with pcos later on and in the pandemic my mum got really concerned for my health and we spoke to a dietician who prescribed me a diet wherein i had to have "mini meals" every two hours and i did that for 6 months just to please my mum and i spent those 6 months throwing up. that time in my life was truly the worst thing ever regarding my health and after that happened and my mum saw how much i was struggling she finally understood that my body is the way it is. at this point, i've really tried everything and both my doctor and my family have understood that this is my body and that despite the fact that i can only stomach one meal a day it's not doing me any damage, as in i don't feel exhaustion or weakness or anything of the sort and i'm still fit as a fiddle. as long as i'm having a healthy diet, it'll be okay because i do need to eat to take my meds. but yeah i just will forever have this very weird relationship with food and it is what it is
2 notes
·
View notes
Text
> AND ANOTHER THING
Likely a recurring segment where I make a post, go to bed, and then wake up the next morning with at least a handful more opinions to get out of my head.
This time it’s not cute I’m just vomiting my thoughts.
I’d like to expand on the ‘skip to the trolls’ idea. First of all I don’t care how other people read the comic, this is just my retrospection on my own experience. Had to get that out of the way. Now:
The first 3 acts are a tutorial for the reader on how to interact with Homestuck, as well as how the world these kids live in works, and how it changes due to SBURB. It is also a tutorial for the kids themselves. I am getting ahead of myself a little bit here as I am about to reference events beyond what I’ve re-read so far; Four human kids (children. This is important I’ll talk about it in a future post) gain access to working versions of a game and begin playing, setting off the events that follow for the rest of Homestuck. When they begin playing they have to figure out the tools and materials at their disposal and to what ends do these means strive. Their tutorial culminates in a timed trial that can only end in two ways.
They complete the trial successfully and are catapulted into the game, SBURB.
They do not complete the trial successfully and stay in their original world. Their original world is being demolished by meteors.
So really the choices from the moment they receive these discs in the mail are: keep playing or die.
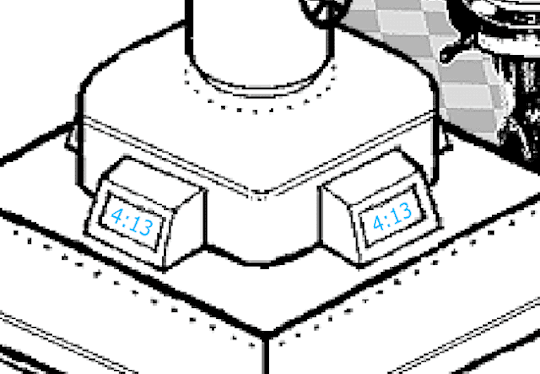
That’s all, I just really like the dynamic reader-pull that is being written into the same position the main characters are in. We’re both anxiously going through a confusing tutorial that ends up being the intro to something extremely difficult to define but undeniably impactful in every sense of the word.
Now let’s talk about SBURB.
S…BURB….suh…burb…Suburb.
Suburban.

I realize I’m the 612th person to point this out, so I’ll link to a video essay that words this better than I could here and then give my brief thoughts and summary.
https://www.youtube.com/watch?v=qVbPr04ugPc
[What the Hell is Homestuck? By Hawkwood on Youtube]
Now, brace yourself, I’m going to talk about generation traits on a public platform.
Homestuck was published on John Egbert’s 13th birthday 4/13/2009, making him born in 1996, the year widely believed to have been the last year someone could still be considered a millennial. Andrew Hussie was born in 1979, widely believed to be the last year someone could still be considered Gen-X.
I was born in 1996, and so were most of my friends. We all share the opinion that we don’t really identify as millennials or gen-Z, we’re ‘cuspers’. This gives us a unique view into both generational categories, for whatever they’re worth. I’d wager Hussie feels a similar way about millennials and gen-X, both based on his birth year and the echoes of such an opinion in the context surrounding the beta kids’ perspectives. Stay with me, I have a point I swear-
“[Hussie and Egbert] frame the entire millennial generation between them, cementing Homestuck as a purely millennial text.”
-Hawkwood, the video linked above.
What a statement to make. I don’t entirely disagree or agree, nuance is desperately needed and given in the full video. What I will say here is that this concept makes complete sense when specifically applied to the chat logs, forums, online interaction style, parent-child interaction style, and penchant for staying in their bedrooms.
Hear me out on that last note: if you’re younger than me you might not have the context for that.
Today it seems common, but good fucking lord the world is different now, especially post-global-quarantine. But in the 1990’s and early 2000’s, kids were becoming the very first human generation to ever grow up with the internet. To their parents, it was new and scary.
Did you get the ‘everyone on the internet is a dangerous, antagonistic liar and out to get you’ talk? I did, and I hid my information accordingly online, and what little I did share online I hid from my parents. A whole generation of children getting that talk plus stranger danger conditioning makes a whole generation of kids very cautious around strangers, very interested in staying inside where it’s safe, and socializing in a completely new and different way than recent generations before them.
One of the only ways to personalize the first social messenger accounts to exist, before social media as we know it, was to change the text you typed with. For example: Colors, grammar, using numbers, using emoticons,and whether people capitalized their sentences or not were all considered quirks inherent to an individual. Sound familiar?
ANYWAY, what else was huge in the late 80’s, 90’s and early 2000’s?
The Suburbs.

Is there something to be said about the isolation and sterile nature of suburbs being a catalyst that tipped our global society into something catastrophic? Maybe, but definitely not by me. Think about it on your own blog.
If you haven’t lived in or near a real suburb (not to gatekeep) you might not be aware of how uniform and barren it can be. The image of John’s neighborhood that I used above, that’s exactly what it’s like. Where would John have gone if he had walked outside? …for a walk? What else? Even if you did find a kid your age you could stand to be around, if you tried sports or anything loud or, gog forbid, skateboarding (a ne'er do wells pastime) you’d get hushed and ushered inside.
What about Dave, then? Near the top of a high rise in a major city? He’s not hanging out in the streets. Rose then. In a remote part of northern New York state? Yeah right. Jad-..nevermind.
It’s isolating.
They’re…stuck. At h-

These kids all fit in that time and online space, isolated and finding their only community in a new, exciting, high risk high reward online space where they could hang out with friends from far away places in the comfort of their own homes.
“Brief thoughts” I said.
Another commonly acknowledged but pertinent fact:
The alien species known as Trolls are a parody of internet trolls. I only bring this up to point out they were common in early internet messaging clients. Any old asshole could come chat at you, you’d have to block anyone who was bothering you. Almost like..nevermind.

Small tangent: I still haven’t seen all the movies that John has posters of! I went! To film school! For a little while, at least. -ahem-
Long enough to understand John fits (among many, many other things of course) an online forum young film buff archetype. Especially when it comes to Con Air. I was on set as an extra for a commercial once and mentioned Con Air being a sort of shitty movie to another extra and one of the film crew heard me and got genuinely livid. He had never heard of Homestuck. It was to my detriment, I couldn’t stop laughing and eventually got asked to sit outside for scenes I wasn’t in.
Added to my watch list: Deep Impact, FACE/OFF, Failure to Launch, A Time to Kill, and Ghost Dad. Wish I had seen that last one before the Bill Cosby allegations had come out but alas not all things can age well. Least of all things referenced in Homestuck.
I have so much more to say but it would be so disjointed and ahead of my own game. I’ll finish with this:
Can anyone explain the kernelsprite to me?

I understand it’s function on the surface- it’s a guide meant to help you through the tutorial.
But why does it exist? Where did it come from? Is this one of those topics you’re not supposed to think too hard about? Something that causes me trouble with Homestuck is how deliberate and on-purpose everything is. The kernelsprite has a deeper meaning and origin, it must, this is Hussie’s writing we’re talking about. But could anyone but them explain it to me? Unsure.
Maybe the term kernel. Is anyone out there familiar with computer processing/code/mechanical engineering/theoretical mathematics expertise able to explain the possible reference the word ‘kernel’ is making? It feels significant but I’m genuinely asking, I don’t know what it’s supposed to make me think of.
tl;dr
Homestuck’s hook is that the characters are struggling through a tutorial the same as we are. The context to the kids’ perspectives is inherently generational with real historic significance. Kells needs to watch more movies. Kells is confused about kernelsprites.
#homestuck#homestuck reread#post3#kernelsprite#sburb#con air#strife#aim#suburbs#imagine not knowing what homestuck is and searching the suburbs tag for some other reason and finding this#the lore goes deep
1 note
·
View note
Text
Onto Throné and Partitio now.
Throné
Love the aesthetic of Throné's home city, urbane and opulent and undeniably seedy in a way that reminds me of my own city. All that space isn't utilized much in gameplay (I want to see inside the theatre!)...but the first game was the same way with its large cities so I'm not surprised.
While sex work isn't a part of Throné's character like it was for Primrose, it does figure into her Chapter 1 when she has to dress like a brothel worker to sneak into a mark's house. I'm left wondering about the other two male assassins given the same job and how they snuck in, but I presume the answer isn't terribly relevant given they both die pretty quickly.
Said two assassins start with Throné as guest party members, but by the time she has to kill one of them after he's killed the third she's on her own. At least she's not so squishy (or the boss so strong) that that's too challenging of a fight.
Not sure how I feel about the early reveal that the "Mother" and "Father" Throné is setting out to kill are not her actual parents, but rather that's just the names they go by in the crime syndicate they lead. It makes the whole situation hover awkwardly between dysfunctional family drama and...something that isn't that.
I couldn't resist this time and did a little exploring after the chapter ended, making my way as far as the area where Temenos starts. After leaving the starting areas you can toggle between day and night with one button press, which is odd seeing NPCs pop in and out of position but still undeniably convenient. The tutorial says that there are stronger enemies that give better rewards at night, which would explain why there are more night-related than day-related buffs among the characters.
Partitio
Would appear to be this game's silly accent à la H'aanit, but here it's a broad western US accent which is at least one that actually exists.
This is another Chapter 1 that experiments with structure, with three time skips chronicling the boom and bust and second boom of the Wild West-esque silver-mining town where Partitio grows into adulthood. It's decently affecting (if you can overlook the ridiculous accents) although the turnaround after you fight the boss happens fairly quickly and there's still the lingering question of the devaluation of silver, but this series isn't really known for stretching out its localized plots that long anyway.
I did note the use of cigarettes in Osvald and Throné's stories, and now Partitio's introduces the steam engine which we saw in the trailers. The world of OT2 feels more 19th century as a result...although it still lacks firearms which really stands out in this particular story.
This is the first opening I've played with no guest characters, although Partitio gets to hire NPCs to be part of his posse (read: in-battle summons). Fortunately he's decently tanky, so he doesn't need the permanent help.
The main antagonist of this story - and by that I mean human antagonist, not Partitio's determination to fix poverty with capitalism - is fairly confusing, and I expect there's going to be a big motivation dump down the line.
There's a tutorial blurb at the end about Partitio's unique "Scent of Commerce" feature, which isn't available in the demo but appears to be leading him to any of three towns on the map. Supposedly this is totally separate from his regular chapters...I wonder how that's going to work.
1 note
·
View note
Text
god i really did play for 6 hours straight
usually my concentration level is too bad for that, i tried playing a game recently for the first time and i liked it, but i couldn’t play more than one hour without it feeling like a torture
and there i just. played. 6 hours.
crying once in a while because “ahah we’re so lucky Ignis has his four eyes to keep us on the road” or Noctis’s “i wish i could sit all day and nap” who wrote that i just wanna talk
but mostly being filled with this sort of bittersweet joy because man. I really like those characters. And those banters always make me so happy. A lot of them are so unconsequencial and everything but it’s just. so intimate in the sense it FEELS like it’s old friends joking around and caring for one another and it makes me soft. They’re all so sweet....
so at least it IS working on the plans of: wanting to make me feel something (sadness was expected, joy is a surprise), keeping me concentrated into something and distracted from my worries for a long time ect.
Meanwhile, it’s also just, the fact i’m way better at the game now. I didn’t pick New Game +, i went back from scratch to see how well i handled myself from the ground up. And i do so well. Despite being rusty from not having played in a year, i have a hand back on the control and remember the logics of the fights (basically wrap wrap wr-); I even remember some enemies weaknesses so it really help me with the flow of things. And, on newer levels, i’m understanding some old gameplay i didn’t get very much because they skipped my mind during the tutorial, or just, never got a hand on it. So now it’s going more smoothly. (i can pary now!!!!!! hourray!!!)
I’m still bad at driving the Regalia tho rip beautiful car i’m sorry i can’t fucking drive
so far i only did mostly exploration of the North East part of the map in general. I’m doing this thing i do with DA too where i just stubborningly refuse to use fast travel so i’m always a bit taking the long ways around for things (makes the night exciting!) so it took a while. I’ve left out two area i know will be explored with the main story anyway (near the first king tomb, and near Insomnia’s gates), and ofc i avoided every dungeon for now.
I’ve only reached legit the first station after Hammerhead DKLJFDKLF i didn’t even go to the beach yet nor taken the path to get down south.
But i’ve done the majority of the hunts from hunter level 1 and stopped before going south.
so it was really just, 6 hours, of me running around in the beginning area, fighting monsters, flexing my fightings, ignoring the main story, crying and laughing with the characters. And it was super fun. Loved it.
so yeah the experiment is working out well. Now onto hoping i keep surviving it once stuff becomes. Harder to swallow.
#ichablogging ffxvg#if you ignore the main story enough ff15 is just a camping simulator with friends!#who needs the main story anyway!#ahha... ahah.... ah......
5 notes
·
View notes
Last Seen Blogs

hereisyoursongoftheday
A Man Said to the Universe...

syvan
LAF

redhairedwolfwitch
the rainbow is strong here

batafterlife
This is the face of true despair.

laiavt-blog
DPA GITIC Laia Vilàs