#on the desktop theme editor and paste it
Explore tagged Tumblr posts
Visit Tumblr Blog
Explore Tumblr blogs with no restrictions, modern design and the best experience.
Last Seen Tumblr Blogs


Fun Fact
The most popular pages on Tumblr are about Minecraft, GIFs, and David J. Peterson.
Note
sorry to ask but i haven't been on tumblr for so long i almost forgot how to even put themes on, do you have any tutorial for it or some way to explain it simply?
omg don’t apologize!! ofc I can help u out!! im gonna include pictures and stuff so ill put it below the cut ;33
just as an fyi, my tumblr desktop theme looks like twitter so im sorry if that makes it confusing when u get to that part 😭
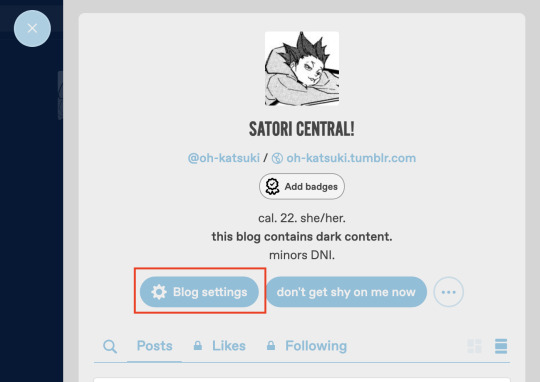
so if it’s the mobile theme /pop up theme you wanna edit and you’re on desktop, you’re just gonna click “blog settings” at the top of your blog by your ask button.
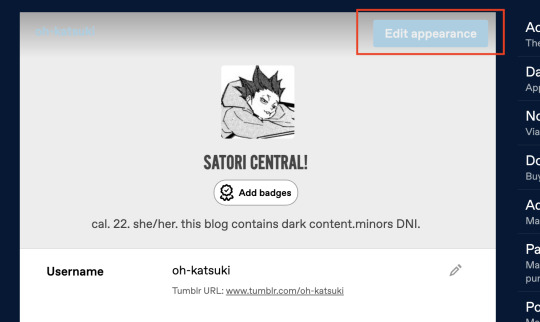
once you click that you’re gonna click “edit appearance” in the top right corner of the display box.
then just edit the theme, color, pfp, banner, and font however you want from there <333
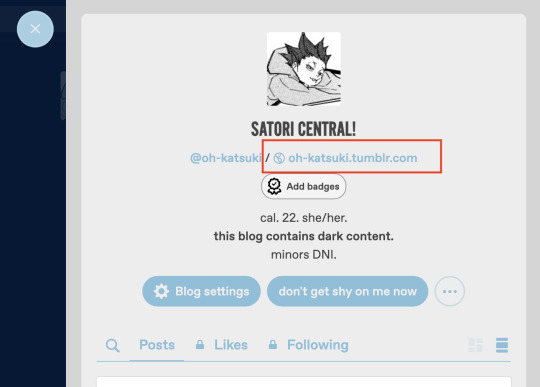
if u wanna edit your tumblr desktop theme, go on desktop and click on your blog, then click where it says (blog name).tumblr.com.
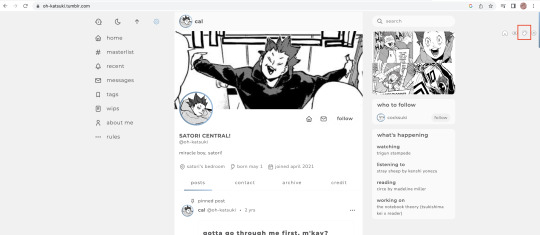
if your blog doesn’t have that, just type it into your computer and go directly to it. once you’re on your desktop blog, you’re gonna click the symbol in the top right corner that looks like a paint palette (like this 🎨 but no color).
once you’re there you’re gonna be able to edit the color background of your theme, font, font size, background color, accent color, title color, headers, links, and all that fun stuff from the editor sidebar.
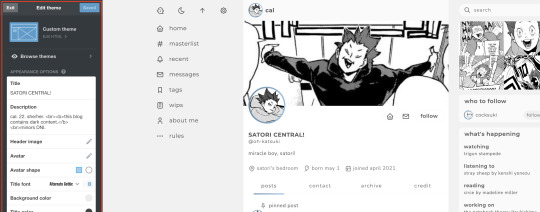
to browse other themes and post layouts, click “browse themes” at the top left of the edit bar and pick whichever one you like!!
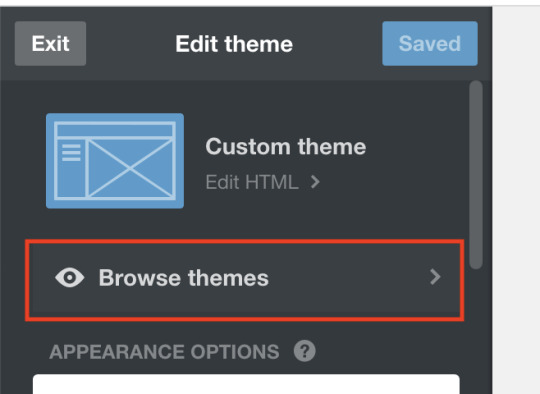
you can also customize the color and photos of those themes too!! I find that it’s just best to goof around on there to get a good feel for it!!
welcome back to tumblr and I hope that this helps <333
#[ 🏩 – chatting ]#sorry if this isn’t very coherent !!#I just have the basic rundown of buttons and stuff#lmk if u have any other questions bc I love doing theme related stuff#idk rly how to edit themes on my phone (since I usually use tumblr from my computer)#sorry!!!!#there are also account son tumblr that make rly cute desktop themes#and u just copy their written code and html and then put it into the html editor#on the desktop theme editor and paste it#then edit from ther
6 notes
·
View notes
Text
nah but it only gives you like ten or twenty posts, i'm so disappointed
(also it'll only show blogs that you follow that were posting at the time - if you don't see anything, you're not following anybody who was posting back in 2012 or whenever)
the resson i'm disappointed because before tumblr pulled their url fuckery a few years ago, you could click on an old original post and it would take you back to when that post was actually made on that blog - and you could just keep scrolling their blog? possibly years in the past?
if you clicked on one of your own posts, you could basically go back into the past of your own tumblr, and you could scroll and never run out of posts or get that "see other posts like this" dead end
i miss it so much
dash is dead im teleporting to the past
https://www.tumblr.com/dashboard?max_post_id=606474489540042752
#i've reblogged a lot of good shit in my years here#and every time i end up poking around in the 'past' on here i always find things i want to reblog again today#these days you gotta go in your tag search or your archive#SET UP YOUR BLOG ON A DESKTOP KIDS!#GET A CUSTOM THEME SO YOU HAVE ACCESS TO YOUR ARCHIVE AND MASS POST EDITOR#your tumblr ARCHIVE is the very best thing to have and they cruelly stopped making them automatic for mobile users#it's not the same as a time travel dash if you don't reblog or post much#but if you do/did it's hours of fun reminiscing
107K notes
·
View notes
Text
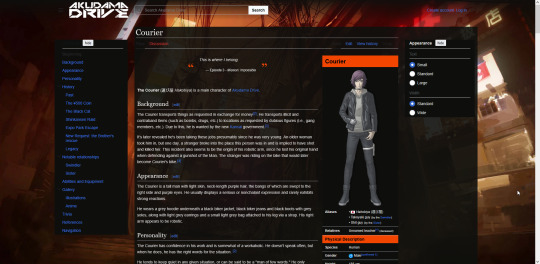
The Akudama Drive Wiki has a brand new desktop theme!
It was necessary for multiple reasons! (One of which is... SEO. Boring!) Visit the Wiki for yourself here ヽ(✿゚▽゚)ノ

This new theme is largely an improvement for its responsiveness to Akudama Drive's unavoidable dark mode:
It uses the Timeless skin, which is more responsive to dark mode than Vector-2022 and less likely to be deeply impacted by MediaWiki updates.
By "more responsive" I mean that it was easier to fix black-on-black elements, and those are less likely to be impacted by MediaWiki updates, so they should come up less!
Editor, which was barely legible as of the most recent update, is now back to normal.
Unrelated to dark mode - Junior is finally on the landing page! I finally found a way to make him fit.
Troubleshooting advice:
Note that Miraheze's cache can take a while to update. If after a long time, the theme still looks like the past theme or a mix of the two, try clearing your browser's cache, or potentially the site's cache and cookies.
If the theme doesn't look like Timeless and you have a Miraheze account, make sure that you haven't selected a different theme in your account's preferences. (Accessible in the top right of the page.)
If you find an issue with the theme that cannot be explained by either of these options, you can send me an ask or a message on my Talk page explaining the bug.
I will continue to improve the Wiki as time goes, but this is a huge change! See the previous appearance below:

9 notes
·
View notes
Text
PMT01: Scaffold nano & Trowel pico
Scaffold nano & Trowel pico v1.1.0 have been released tonight.
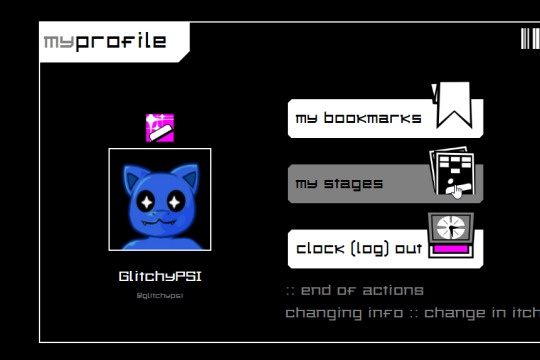
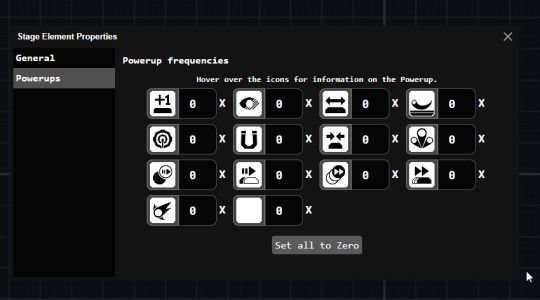
Updates add a myStages to Scaffold, and QoL improvements to the powerup editing experience in Trowel pico.
Now that it's out, I'd like to also take this moment to talk about the development and release of both.
One year minus one day ago I had announced in Twitter I would work on the level editor for the demo version of BRICKBREAKER SPRINT (nano) so fans could breathe in more life to the game even in its limited state and to also showcase how much it can do with its limited toolset at the current time.
The reasoning for a completely separate technology version was simple, WebGL. WebGL in Unity is so limited for even the most basic things (I had to install a package to support cross-app copy/paste before nano+'s release!) and I said "hey, might as well give the multiplatform users something to be able to edit with, doesn't need to be just windows which is what the currently unpolished-ish trowel desktop is!"
But then it hit me that the same limitations would likely make it hell for me to support just levels downloaded as files (internally stored with "bxtp" extension btw :) ) so then... I came at a crossroads
just say FKIT and not do it, make ppl wait for BB Lite
still say FKIT and kickstart the foundation of the online service that I had planned since the first design iteration of the game
guess what I took?
I don't regret it.
Currently, Scaffold's login system is attached to itch.io. In the future, this will use my own account system (called Luna, still in development)
Now then... developing Scaffold's frontend was a challenge in itself, because I'm a masochist. I chose yet another technology to make the frontend in, this time Svelte, Sveltekit as backend saying "okay, no more fear of ServerSideRendering now that I can afford a VPS for this"
but... Svelte has been an absolute joy to work with. Its learning curve even smoother than React's (my first frontend framework, which powers cometSpectrum!), and I got everything rolling very quickly

At first, I was going to use my regular website design language, but it's kinda jank, so I said NO and started from scratch with a simpler façade. For the style I wanted to pursue... it was perfect. Some people have complimented the graphic aspect of the site, and I'm happy I could deliver exactly what I wanted. (and yes the icons being in opposite directions compared to bbsprint's UI is entirely on purpose)
BTW, the site is made in such a way that a BB theme could be used as the site's theme and every color will change except for PNG icons, i love it (this functionality is used for people using their OS's Light theme)
This is actually the first made-by-me website project that has "public" facing write actions to a database and stores actual files. It works... very well, and I am very happy about it. It's like a combination of everything I've learnt up to this point, down to API design and interop between programs.
I did say this was the foundation for Scaffold, and I plan for this game to keep Scaffold as its prime way of getting stages, even when getting to storefronts like Steam or GOG. Kind of like an osu! situation.
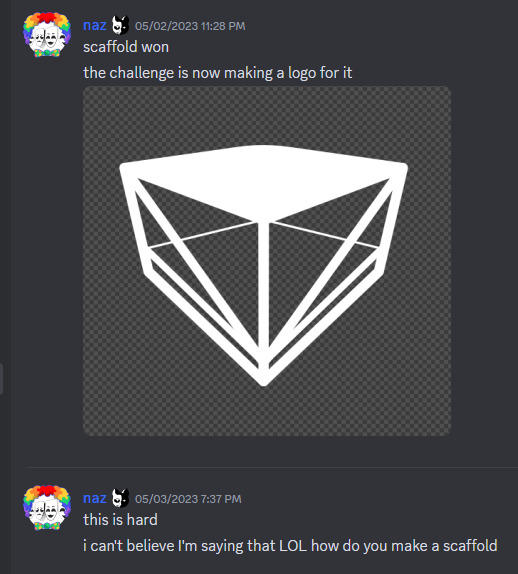
You're at this part of the message... wanna see how Scaffold's logo used to look like?
5 notes
·
View notes
Note
how do u edit ur font colours to those colours? Btw Love ur blog sm
hii baby!! sorry this is so late!! i'm assuming you mean in my intro post?
i used to use gradient text but that was too much effort for me lmao but here's a tutorial in case you wanna try that!!
psa: to do this you have to be on desktop!! for the solid colours, i always just use one of the colours i use in my theme, so text/bg/accent, and i go onto this website to turn it from a rgb to hex!! then i go onto this website to actually get the text that colour. write whatever you want to write and then click the little underlined A in the bar up the top to change the colour, enter the hex code there!! when you've got the text the colour you want, click get code and copy the code. go into your tumblr post and go into the settings and change the text editor from rich text to html then just paste the code in!! make sure you preview it before you post to ensure it's what you want, esp bc the html setting messes up image formatting so you'll have to move the images back to where you want them!!
5 notes
·
View notes
Text
I wrote a bunch of paragraphs about nothing in particular again so here it is under a readmore so it doesn't take up space.
like 8 years ago when people used tumblr more via desktop browser than its app, I put a 3rd party metric tracker in my desktop theme that logged how people were referred to my blog. it also captured what pages of my blog people viewed.
at one point during this time I reblogged a piece of pixel art from a japanese artist. they came to my blog through their activity page, and then searched my blog in a couple different ways for the terms "ドット" and "ドット絵" ("dot" and "dot art", as in pixel art). I checked those search urls myself to see if they found anything but there were no results because I never used those terms or specifically tagged pixel art in any other way.
ever since then I've made an effort to tag all pixel art I reblog with the term "pixel art". that artist was probably hoping to find more art to check out and it bums me out that my tagging system wasn't thorough enough to help.
this is why I have my current specific tag system lol. it keeps evolving but having the ability to find stuff you're into without jumping through hoops is really handy. (the site-wide post and tag searches return sooo much bullshit. it's a slog sifting through thr noise whenever I use those to fill my queue due to the sheer amount of manga caps, polls, liveblogs, personal posts, and fics posted without readmores...)
if only the way to view all tags you've ever used still worked. I think it caps at 500 or 1000 now and is also chronological so the first 500 or whatever tags you ever used show up in the list. then there's a hard stop and it does not update as you delete posts or use that mass tag editor to remove certain tags for your blog entirely.
I went through my used tag list earlier this year to unify certain tags and remove tags that I stopped using in favor for other ones, but I only got like 400 tagged terms down the list. maybe downloading my blog data would show more. the trick I mentioned uses your desktop blog's archive page. the tags are in its code so you can use "inspect element" to view it. I remember scrolling a lot to load a bunch of posts on the page but cant remember if this was required or I just did it to see if I could access more tags.
it's formatted all fucked and hard to manage but you can copy and paste the long chunk of tags into one cell of a spreadsheet and then use Data options to split them into columns by commas (or whatever punctuation separates them, I forget). a wide list is a huge pain to view so from there you can click on a cell containing data, click ctrl+a to highlight all data in thr row, copy, then paste special as "transposed" to turn the copied row 90° so it pastes as a column. the spreadsheet will wide as fuck from the hundreds of columns so honestly its easier to paste the transposed data into a new tab and delete the original vs clicking in the column to the left of your transposed data and then pressing ctrl+ shift+right arrow to select all rows to the right, then deleting the extra rows.
if you're in Excel you may have to use the "delete rows" option from the "home" tab and then save the sheet using "file > save" (do NOT save via the save button on the upper left corner or ctrl+s). this returns the sheet to a manageable size for scrolling (plus reduces its file size). this piece of shit software usually retains the sheet width/length even after you delete hundreds of columns/rows unless you use this trick of deleting specifically via home tab + saving specifically through the save menu.
I got a round number of tags when I did this which makes me think there's a cutoff.
9 notes
·
View notes
Note
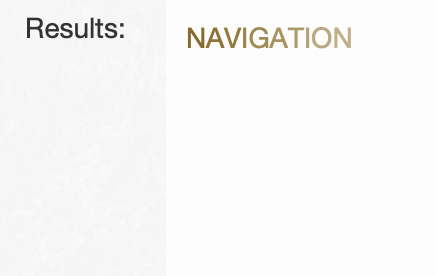
hii! very sorry if this question doesnt make any sense but how do u make ur texts multiple colors? like on ur posts
hi anonie! so I use this website. I'll add pictures below cut!
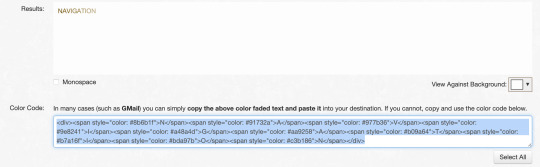
say you've chosen your colours for your gradients, I'll use my navigation theme as an example, you can always change and adjust how many colours you want in your gradient! then click on the 'generate' blue button and it'll give you results.

under the results is another box with the html code. you'll need to select all then copy it.
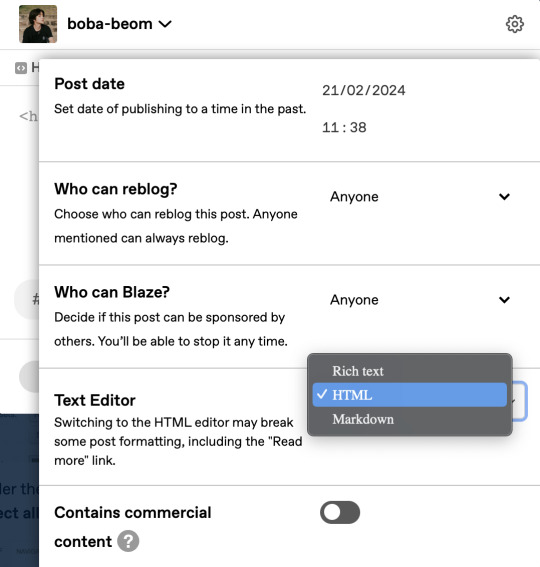
once you've copied all of that, go to edit your post and click on the small settings symbol at the top right of the post, then in the Text Editor box change Rich text to HTML.
paste the html code that you copied from the website and paste it. do this for all your colour gradients and you can adjust it after! when you're done you can change it back to Rich text.
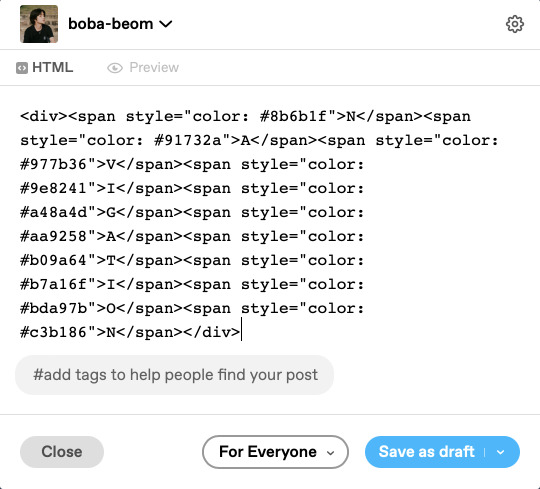

You can always cut+paste your text in rich text if you want to change your placement for it, the colours will still be there!
and then you have colour gradient text! I hope that helped!! and ofc, it's best to do it using a desktop!
5 notes
·
View notes
Note
Hello! How do you make gradient text in the new editor work properly? Because no matter what I do, it doesn't want to work on desktop theme. It's like new editor changes the code every time I enter the gradient text code.
hi anon! are you entering it via html? if you try and paste html code when you're in rich text then it will just 'wipe' the code and show it as blank text. for example i can do this: hello which is gradient, but you can't see it. you have to click on the cog at the top right of the post, change text editor (scroll down right to the bottom) and change this to html and paste it there instead, like so: hello! once you've done that you can return to rich text and it will preview it for you, but you have to have entered the code in html view as you would normally
3 notes
·
View notes
Text
You don't necessarily need a PC either. I hacked my 3DS a few years back using the SD card slot on my phone.
Advantages of jailbreaking your 3DS include:
Remove the region lock allowing you to play cartridges and eShop games from outside your region
Play games/ports/emulators and use applications the community has developed (there are really good native ports of Sonic Mania and Half-Life 1, assuming you can look past the loading times, and there's a port of Sonic Robo Blast 2 (3D sonic fangame that's low key better than all official 3D sonic games) that plays in 3D)
Install community-created home menu themes from https://themeplaza.art/ and create your own custom ones using Usagi Theme Editor
Copy your physical DS and 3DS games onto your SD card as digital copies and have them show up as regular icons on your homescreen so you can finally stop worrying about losing the cartridges
Create backups of your save games, and copy savegames from digital copies to physical cartridges, or vice versa, or from one cartridge to another
(Optional) Set a PIN lock on your 3DS that must be entered before it will turn on
(New 3DS only) Overclock the 3DS's processor to make demanding games less laggy
(New 3DS only) Send a screen capture stream via Wi-Fi to your PC where it can then be recorded or streamed to Discord/Twitch/etc., no need for an emulator
Install mods/romhacks (I've heard good things about Pokemon Shattered Sapphire and Ruined Ruby, and there's a really cool mod for MarioKart 7 called CTGP-7 that more than triples the number of tracks in the game. Some of the ones it adds are even good!)
Install save file editors for games like Pokemon and Animal Crossing that let you give yourself whatever items/stats you want
Use gameshark codes in your 3DS games, cartridge or digital (one of the homebrew apps the tutorial has you install comes with a list of every Gameshark code ever made for the 3DS, and all you have to do is turn them on)
and, of course, piracy (I'll have a whole section on that down below)
Disadvantages of jailbreaking your 3DS include
Nothing
Literally nothing at all
Jailbreaking is free and 99% of the software you will install is open source
You can still play games online download updates from the eShop, and even install new firmware versions after jailbreaking
All of your games, home menu themes, and save data will be exactly where you left them
Every single thing you could do on your 3DS before jailbreaking works exactly the same after
The main home menu/interface of the 3DS does not change at all -- all of the added functionality comes from the new apps it has you install and the Rosalina hacks menu you can open by pressing a key combo.
Sold yet? Great! Head on over to https://3ds.hacks.guide, follow all the instructions they give you, then come back here. I mentioned piracy earlier, and there are a few more apps you'll need to install if you want... the full experience.
there's a homebrew app you can install called hShop, which contains all content ever released on the eShop in every country the 3DS released in, AND every cartridge exclusive game AND every demo cartridge (the versions of games you'd have played if you walked up to a 3DS in a store) plus a few fan translations for the foreign-language-only titles and a few homebrew apps, all available for free. The 3DS's wifi chip is a little slow for downloading games, though, and there's a desktop app you can use to download games from your PC and then copy them onto the SD card that runs *way* faster than FBI does. I'll make a tutorial on using that if anyone's interested.
You can also install TWiLightMenu++ to play .nds ROMs straight from your SD card, no need for a flashcart, along with a cutesy little file browser styled after the DSi Menu (theme customizable). You can download a ROM file of every DS game ever released from archive.org, here. there's currently no way to browse that library from the 3DS itself, unfortunately, so you'll have to download them from your PC. it doesn't really matter where you put the files since TWiLightMenu will be able to find them regardless, but the default location is SD root/roms/nds/)
you can also install openAGBfirm to play GBA ROMs off your SD card using the 3DS's little-known GBA compatibility mode. Since they run natively rather than using software emulation, they run in full speed with perfect compatibility (assuming your GBA ROM is 32MB or smaller to fit within the 3DS's RAM and doesn't have any extra hardware like WarioWare's tilt sensor/rumble pack or or Boktai's light sensor). The downside is that since this isn't an emulator, you can't create savestates, and closing the clamshell doesn't pause the game. (This one comes as a FIRM file rather than a homebrew app, so you'll need to extract the .firm file into SD root/luma/payloads/, and you access it by holding the start button while turning the handheld on
NOTE: if you want to really take advantage of this wealth of content, you'll need a larger SD card than the 4GB one the 3DS comes with. The 3DS doesn't have a maximum SD card size, but it requires them to be formatted FAT32, and the built in Windows format tool will refuse to format any disk larger than 32GB with FAT32 even though FAT32 supports up to 2TB. Why? Because Microsoft would rather you use their newer filesystem, exFAT, which has worse compatibility, but more features, and, more importantly, which Microsoft collects royalties on. if you want to use a larger SD card than that, you'll need a separate tool to format them, such as guiformat. I have a 128GB SD card in my 3DS and it works great!
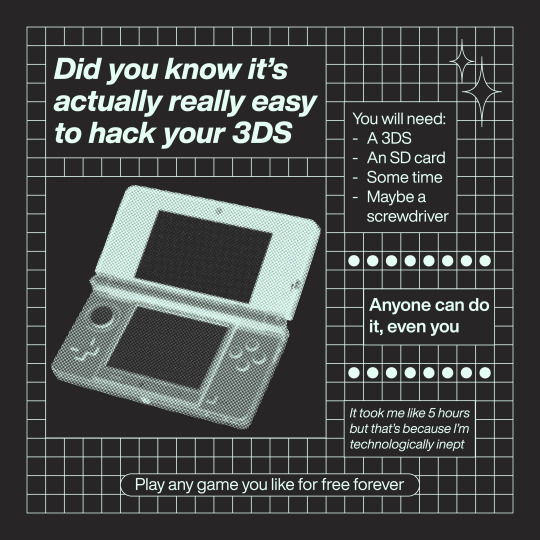
I made this a couple of months ago but. hack your 3ds. do it right now.
31K notes
·
View notes
Text
Why Tkinter is Still the Best Choice for Python GUI Development in 2025
When it comes to Python GUI development, developers often debate which framework is best suited for creating user-friendly applications. With various options available—such as PyQt, Kivy, and PySide—many might wonder whether Tkinter is still relevant in 2025. The answer is a resounding yes!
At LabDeck, we specialize in making modern GUI design accessible through our Custom Tkinter GUI Designer and other tools that enhance the power of Tkinter. Here’s why Tkinter remains the top choice for Python GUI development in 2025.
1. Simplicity and Ease of Use
One of the biggest advantages of Tkinter is its simplicity. Unlike other frameworks that require installing external dependencies, Tkinter is included by default in Python. This makes it an ideal choice for beginners and professionals looking for a hassle-free GUI development experience.
At LabDeck, we’ve taken this simplicity to the next level with our drag-and-drop Tkinter GUI Designer. It allows developers to create professional, responsive UIs without writing a single line of code.
2. Lightweight and Fast Performance
Tkinter is lightweight compared to other GUI frameworks like PyQt or Kivy, which can be resource-intensive. Applications built with Tkinter load quickly and consume minimal system resources, making it an excellent choice for desktop applications, Raspberry Pi projects, and lightweight business applications.
With LabDeck’s Custom Tkinter GUI Designer, users can build optimized Tkinter applications that are both memory-efficient and fast.
3. Cross-Platform Compatibility
Modern Tkinter applications run smoothly on Windows, macOS, Linux, and even Raspberry Pi. Unlike some frameworks that require separate adjustments for different platforms, Tkinter ensures that your app looks and functions the same across multiple operating systems.
LabDeck enhances this further by allowing you to design once and deploy anywhere, ensuring that businesses and developers save time and effort.
4. Dark Mode and Modern UI Customization
One of the criticisms Tkinter faced in the past was its outdated appearance. However, with LabDeck’s Custom Tkinter, this is no longer an issue. Developers can now create:
Dark mode applications
Custom-themed widgets
Advanced layouts with modern design principles
This means Tkinter applications no longer look old-fashioned but instead feel just as polished as Electron or Flutter-based apps.
5. No-Code and Low-Code Development with LabDeck
At LabDeck, we understand that not all businesses have dedicated developers, which is why our Tkinter GUI Designer is built for both programmers and non-programmers. Our drag-and-drop editor lets users design complex Tkinter applications effortlessly.
Additionally, our MatDeck Python IDE provides:
Code generation for Tkinter applications
Smart debugging tools
One-click module management
This ensures that developers of all skill levels can build professional GUI applications quickly and efficiently.
Conclusion: Tkinter’s Evolution with LabDeck
While many Python GUI frameworks exist, Tkinter remains the best choice for GUI development in 2025, thanks to its simplicity, performance, and cross-platform compatibility. With LabDeck’s modern Tkinter tools, businesses and developers can now build professional-grade applications faster and more efficiently than ever before.
If you’re looking to create powerful, beautiful, and lightweight Python GUI applications, explore LabDeck’s Custom Tkinter GUI Designer today! 🚀
0 notes
Text
Master Game Development with Godot: The Ultimate Beginner’s Guide
Game development has changed greatly over the past few decades. Choosing the correct engine is necessary for any developer. Among numerous options, Godot has emerged as a versatile free and open-source game engine. Whether you’re a first-time game developer or an experienced one looking for customization, Godot offers a richly featured, efficient, and cost-effective solution.
Well, in this blog we’ll be digging deeper into the capabilities of Godot, its unique features, advantages over other engines, and how you can use it for your projects.
What is Godot Engine?
Godot is a highly open-source and free cross-platform game engine where it supports all forms of developing both 2D and 3D games. Juan Linietsky developed this game first in 2014, after which it turned into a love for indie game development for studios as well as creators. Godot is licensed under the permissive MIT license. This means that developers can use it to create, modify, and distribute their games without paying royalties. It’s an advantage over proprietary engines like Unity or Unreal, whose licenses are often very complex.
Features that Make Godot Unique
1. Node-Based Architecture
The modular architecture of Godot organizes games into scenes composed of a hierarchy of nodes, each having a specific purpose-be it rendering graphics, handling physics, or processing logic. Such an approach can easily manage and reuse components with ease, and this makes the development of a game much easier.
2. GDScript and Multi-Language Support
Godot also features a very simple scripting language called GDScript, which, much like Python, is intuitive to use, but can do just about anything, from low-level C-like access to actual low-level details. For a bit more involved work, it’s possible to use C# and VisualScript for even more powerful and complex operations.
3. 2D Game Development Excellence
Its strong dedicated 2D engine makes it one of its highlights. This gives pixel-perfect precision, an animation editor in-built within the tool, and capabilities to create tilemaps, shaders, and particle effects. From making a platformer to designing a puzzle game or a visual novel, Godot’s 2D capability stands second to none.
4. Advanced 3D Rendering
Godot has the tools to use real-time global illumination, PBR materials, and a fully integrated visual shader editor for 3D projects. It is also capable of importing assets from popular 3D modeling software like Blender.
5. Multi-Platform Deploy
Godot allows deploying easily to all desired platforms. Deploy to:
Desktop: Windows, macOS, Linux
Mobile: Android, iOS
Web: HTML5 using WebAssembly
Consoles: With third party support for PlayStation, Xbox and Nintendo Switch
6. Customizable Editor
The editor itself is an open source which can be easily customized. As a result you can tailor your editor for work. Customize its themes, swap panels, script editor behavior – do anything according to your liking.
7. Lightweight and Efficient
Godot’s small footprint makes it run even on less powerful hardware, and it is the best for developers who do not have access to high-end machines.
Why Developers Love Godot
1.Free and Open-Source
Godot’s MIT license allows developers to use, modify, and distribute the engine without any legal or financial restrictions. This is particularly beneficial to indie developers and small studios who have a small budget.
2. Active Community and Resources
The Godot community is active and collaborative, providing access to many tutorials, forums, and resources. Developers can also participate in the development of the engine at GitHub, thereby ensuring that it is continuously improving.
3.Regular Updates and Roadmap
Godot is regularly updated, bringing about major changes in rendering, physics, and usability. Godot 4.0, the next version, promises to be cutting-edge with Vulkan support for advanced graphics.
4. Ease of Use
Godot’s intuitive design and comprehensive documentation make it accessible to beginners while still providing the depth needed for advanced projects.
Challenges and Limitations
Although powerful, Godot has some drawbacks as well.
Smaller Ecosystem: Compared to Unity or Unreal, Godot’s asset store and third-party plugin ecosystem are not as deep.
Learning Curve for Complex Projects: The advanced 3D development can be much deeper in understanding the engine and what it can actually do.
However, the challenges are mitigated by the active community and continuous development.
Conclusion
Godot stands to be one of the game-changers in the development world, offering a perfect balance of power, flexibility, and accessibility. For open-source nature and this extensive feature, it is an ideal choice for both indie developers and seasoned professionals. Godot builds on the potential of open-source innovation and represents a bright light in an open world. Whether your project is a pixel-art platformer or an expansive 3D adventure, Godot offers what you need to bring your dream to life.
0 notes
Text
Finally caving and no longer using Google docs (mostly, probably will still copy and paste the first drafts of chapters in there for my beta reader to go over since that’s what she has)
Gonna start writing via ellipsus now (@ellipsus-writes is their tumblr account, if you wanna check it out). The following is gonna basically just me squeeing and how amazing this thing is, as well as a few cons I’ve noticed, and it’s long. So I’m adding a cut for people who don’t care.
I’m so fucking excited to no longer have to manually add in all the html in the ao3 text editor, you have no fucking idea. That step alone takes hours, double that if something glitches. And I can still write on my phone!!!!!
First downside I’ve noticed so far is that it doesn’t include my preferred font for writing (trebuchet ms if anyone is curious). It DOES have a comic sans sibling tho, which I can use for now. If it annoys me over time then I guess I’ll put up with Inter, even tho I hate most mono fonts. And serif fonts. I’m really picky. Serif fonts me flashbacks to grade school 5 paragraph essays in mla style. And mono fonts just… idk they look weird. Not creative at all. Very corporate.
Another bonus I’ve noticed: it includes open dyslexic as a font!!! I don’t personally need it, but having that accessibility is amazing. HUGE props to the creators.
Also love the interface. Very nice, user friendly, intuitive, looks good, 10/10.
There’s a light and dark mode choice on install, and I chose dark of course.
The editor settings are cool, allowing you to turn on and off different features like seeing other editiors’ cursors when typing, avatars when they’re viewing the document (tho it says draft there, maybe it doesn’t work in the main doc and only in drafts? If so, that’s odd), certain formatting things like dashes combining into an emdash, Ellipses (idk what that’s supposed to mean since there’s no elaboration), quotes (again no elaboration), markdown shortcuts (idk what those are, maybe it’s about coding?), viewing the word count automatically in the top bar, the desktop formatting bar, and the theme (light vs dark).
AND STRIKETRHOUGH IS RIGHT THERE! Right next to bold italic and underline. I always forgot the key shortcut to it in Google docs (why is it three keys???? WHY???? It’s so inconvenient!) and you gotta navigate through like three drop downs to reach it in the menu bar. This is so SO much simpler. I use strike through all the time to denote thoughts the pov character is repressing, and considering Akechi is a pov character that’s pretty damn often.
Omg and having an easy button so see all the keyboard shortcuts???? I love the creators so much????? There’s so many I would never have known otherwise, and they’re all so useful!!!! Aaaaaaaaaa!!!!!!!
I love the drafts feature, it’s so nice having my notes and outlines and such all right there.
I do wish the spell check feature was better about recognising foreign names, but since I can just turn it on and off I don’t have to deal with constant red lines like with Google! I do wish there was a way to add words to the program’s dictionary, so that it doesn’t flag names, abbreviations, and slang. (For example, it doesn’t like fic, fanfic, lol, dashes like -- or - for some reason, or really any of the character names. the list goes on.) and I can’t just add in Japanese to the accepted languages, because I’d have to choose either that or English and then every single other word would be wrong. It does give options for which regional English variant you want, so I can choose British English! Which is nice. Google does it too, but you never know with beta versions of programs.
You can choose whether text is normal, a header (which subsets if headers), a caption, a quote, etc. I like that, since it’s directly tied to the outline and the different headers show up in there tree-style, but you can’t just have some text within a category be different. For example, say you want some of your paragraph text to be one font and then a different section of paragraph text to be another. You can’t do that.
I also haven’t been able to find a way to change text colour, or to highlight text. Which is annoying. I use highlighting text a lot when editing, so loosing that is a problem. Not the end of the world, but definitely one of my biggest gripes with Ellipsus so far.
There is a commenting system, but it ONLY works in drafts. I do not like that. In fact, I kinda hate it. A lot. And I definitely prefer the way comments work in Google docs, at least its desktop version, where they show up right next to the text instead of you having to click on the text with a comment to see that comment. At the very least, you can see all the comments in order of where the text is in the draft, with any replies, all in one place in the comments tab. However, you can’t just click away from the text to leave that tab. You gotta manually navigate back to where you were in the menu.
So yeah the comment feature kinda sucks.
There is also a chat feature? Idk how to properly review it, since rn I don’t have anyone else to chat with in ellipsus. You can use it in non-drafts, but I don’t think you can use it to point out specific text.
You can see word count!!!! And an estimate for how long it would take to read the whole thing! That’s so useful! And cool! You can also highlight (with a cursor, not actual highlight) sections of text and it will show that section’s word count, but NOT its reading time.
The version history feature is a bit slow, but it functions well. Not too worried about it. You can restore old versions as a new draft, though, which is pretty neat.
You can also download the document as a pdf, markdown, share it, and copy it as html, markdown, and rich text, but best of all, oooooo best of all, you can export DIRECTLY to ao3! And it includes all the html in the document!!!! I never have to manually code in html again!!!!! There are no words to encapsulate just how fucking excited about that I am. None. I am vibrating. I’m ahdnfbshsbdbfbcbhcbcnnsdbdbxnxbdmsnddbbdndbdbdbAAAAAAAAAAAAAAAA
best. Feature. Ever. More than makes up for all the things I don’t like. Amazing. Wonderful. 10/10. Would die for that.
As of right now, I think that’s everything. Overall, I’d rate ellipsus an 8.5/10, compared to Google docs’s 7/10. I really love what they’ve done so far, but there’s some things they could really improve on.
Overall cons:
I really wish you could comment in the main document, it’s a big deal to me. I wish you could see comments by the text at all times, instead of just in the comments tab. I wish there were more font choices, the current pickings are slim at best. I wish you could change the font of specific sections instead of everything under that text category. I wish you could highlight things (even better if you could have multiple highlight colours). I wish you could change font colour. I wish you could add words to a dictionary so they aren’t flagged by spell check.
However, the vast majority of things ellipsus is doing are great. There are a ton of pros to this program, and it’s still in beta. There’s room for improvement, but that’s the whole point of a beta release. Everything I don’t like are things I can live with and work around, too. That’s better than a lot of completely finished games and programs I’ve come across. And it’s free!!! I’m really excited to see how Ellipsus develops, and definitely recommend it to any writers out there - especially anyone who writes for ao3. Seriously, the export to ao3 feature practically sells this thing by itself.
0 notes
Text
GenerateBlocks Pro WordPress Plugin v1.7.1
https://themesfores.com/product/generateblocks-pro-wordpress-plugin-v1-7-1/ GenerateBlocks Pro WordPresss Plugin v1.7.1 GenerateBlocks works hand-in-hand with GeneratePress but is built to work with any theme. Pattern Library: Gain access to over 200 professional patterns directly inside the editor. Save hours of design time with a couple of clicks! Global Styles: Better workflow, better consistency, and better performance. Create global styles and use them throughout your website with ease. Effects: We bring the power of CSS effects directly into the editor with a powerful user interface that provides endless configuration. Accordions: Add a powerful Accordion block variation that uses our core set of blocks. Tabs: Like our Accordion block variation, you can build super flexible Tabs using our core blocks. Backgrounds: Add background gradients and images to your Containers and apply them to any device! Container Links: Turn your Container blocks into beautiful card-style links and design them with hover options. Asset Library: Add your icons and shapes to your library and gain access to them inside the editor. Copy+Paste Styles: Save time by copying and pasting your block styles throughout your page. Device Visibility: Easily hide or show our blocks on desktop, tablet, and mobile devices. Custom Attributes: Apply any custom data-* attributes to your blocks with a simple user interface. World-Class Support: We’ve been proud to help our customers with best-in-class support for over 10 years. Access Over 200 Professional Patterns With GenerateBlocks Pro, you gain immediate access to a vast Pattern Library featuring over 200 expertly crafted patterns. These patterns are integrated directly into the editor, allowing you to streamline your design process and save valuable hours. Whether you’re creating a landing page or a full website, these pre-designed patterns simplify the process and ensure a polished, professional finish with just a few clicks. https://themesfores.com/product/generateblocks-pro-wordpress-plugin-v1-7-1/ #Addon #WordpressPlugins
0 notes
Text
VeryUtils JavaScript Excel Editor Source Code License for Web Developers
VeryUtils JavaScript Excel Editor Source Code License for Web Developers.
✅ JavaScript Spreadsheet: A Comprehensive, Flexible Excel Editor The VeryUtils JavaScript Spreadsheet is a powerful and versatile JavaScript Excel Editor, designed to provide web developers with seamless data analysis and visualization capabilities, akin to those found in Microsoft Excel. This feature-rich tool ensures compatibility with Microsoft Excel file formats, delivering a highly intuitive user interface that simplifies complex data management tasks.
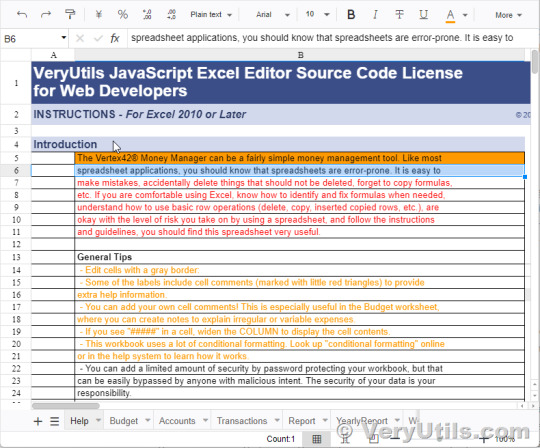
✅ Overview The VeryUtils JavaScript Spreadsheet is a robust control for organizing and analyzing data in a tabular format. It offers all the essential Excel features, including data binding, selection, editing, formatting, resizing, sorting, and both importing and exporting Excel documents. Whether you're building a simple data entry form or a complex data analysis tool, this JavaScript Spreadsheet makes it easy to deliver a high-performance, user-friendly experience.
✅ Why Choose the VeryUtils JavaScript Spreadsheet? High Performance: Optimized for handling large datasets, the JavaScript Spreadsheet is designed to load massive amounts of data efficiently. With row and column virtualization, users can view and interact with data on demand, ensuring smooth performance even with extensive datasets.
Seamless Data Binding: The JavaScript Spreadsheet supports seamless data binding with various local and remote data sources such as JSON, OData, WCF, and RESTful web services. This flexibility is made possible through the integrated data manager, allowing developers to connect and display data effortlessly.
Hassle-Free Formatting: Formatting cells and numbers in the JavaScript Spreadsheet is straightforward, with support for conditional formatting to highlight specific data ranges based on custom conditions. This feature enhances data readability and analysis, making it easier to identify trends and outliers.
Transform Data into Charts: The built-in chart feature allows users to convert spreadsheet data into visually appealing charts, providing an intuitive way to understand and present datasets.
Wide Range of Built-In Formulas: The JavaScript Spreadsheet comes with a comprehensive library of formulas, including cross-sheet references. The built-in calculation engine ensures accurate and efficient formula computations, making it easy to perform complex calculations within your application.
Customizable Themes: With a variety of built-in themes such as Fluent, Tailwind CSS, Material, and Fabric, the JavaScript Spreadsheet offers a modern and attractive design. Developers can further customize these themes using the online Theme Studio tool to match their application's look and feel.
Globalization and Localization: The JavaScript Spreadsheet supports globalization and localization, allowing users to format dates, currency, and numbers according to their locale. This feature ensures that your application can cater to a global audience.
✅ Interactive Features Clipboard Operations: Just like in Microsoft Excel, the JavaScript Spreadsheet supports cut, copy, and paste operations. Users can choose to paste values or formulas with or without formatting in a new range, enhancing the ease of data manipulation.
Undo and Redo: The undo and redo feature allows users to revert or reapply changes within the spreadsheet. Developers can customize the limit of these operations to suit the application's needs.
Context Menu: A context menu appears when a cell, row header, column header, or sheet tab is right-clicked, improving user interaction and making the JavaScript Spreadsheet more intuitive to use.
Cell Comments (Notes): The component provides options to add, edit, and delete cell comments, making it easier to annotate and collaborate on data within the spreadsheet.
Resize and Autofit: The resize and autofit features help users adjust row heights and column widths, ensuring that data is displayed neatly and efficiently.
Smooth Scrolling: Even with large datasets, the JavaScript Spreadsheet offers a smooth scrolling experience, enhancing usability and ensuring that users can navigate through their data effortlessly.
✅ Open and Save Capabilities Excel and CSV Import: The JavaScript Spreadsheet supports importing Excel documents (.xlsx, .xls) and CSV files, ensuring data accuracy, styles, and formats are preserved during the import process.
Excel and CSV Export: Users can easily export data from the JavaScript Spreadsheet to Excel or CSV formats, maintaining data accuracy, styles, and formats, making it easy to share and analyze data outside the application.
✅ Accessibility Keyboard Navigation: The JavaScript Spreadsheet ensures that every cell is accessible via keyboard commands, supporting major features like selection, clipboard, and editing. This keyboard accessibility is crucial for creating highly accessible applications.
Screen Reader Support: With complete WAI-ARIA accessibility support, the JavaScript Spreadsheet offers high-contrast visuals and valid UI descriptions, ensuring that visually impaired users can access the spreadsheet using assistive technologies like screen readers.
Right-to-Left (RTL) Support: The right-to-left rendering option enhances the user experience and accessibility for RTL languages, allowing developers to cater to a broader audience.
✅ Additional Features Touch-Friendly and Responsive: The JavaScript Spreadsheet is optimized for touch gestures, enabling users to swipe through sheets on mobile devices. Its responsive design ensures a consistent user experience across mobile phones, tablets, and desktop devices.
Developer-Friendly APIs: The Spreadsheet's rich set of client-side APIs allows developers to customize the UI and control its behavior according to user requirements, making it a highly adaptable component.
Print Functionality: The JavaScript Spreadsheet includes printing capabilities, allowing users to print single or multiple sheets directly from the application, providing a convenient way to produce hard copies of data.
The VeryUtils JavaScript Excel Editor is an all-in-one solution for web developers looking to implement comprehensive spreadsheet functionality in their applications. With its high performance, extensive feature set, and developer-friendly tools, it is the ideal choice for building powerful, data-driven web applications.
0 notes
Note
ok so this may be a weird, incoherent question but how did you make your tumblr bio like....have paragraph breaks, if that makes sense? like if i use the spacebar to create a new sentence, it doesn't show up that way???? if i'm not making sense please forgive me lol :'(
not to worry anon, you make perfect sense!
(OH EDIT IMPORTANT EDIT: i did all of this on desktop. i don't know what the process would look like on mobile, unfortunately! :( so if you only use mobile, we'll have to do a lil' bit of research to figure it out.)
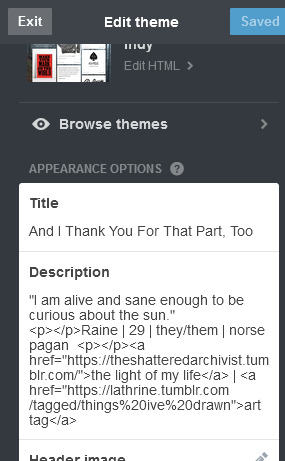
so i did the paragraphs by inputting html paragraph tags between each break. so, for example, if i go account > blogs > lathrine (my primary blog) > blog settings and then edit appearance, this is what it looks like!
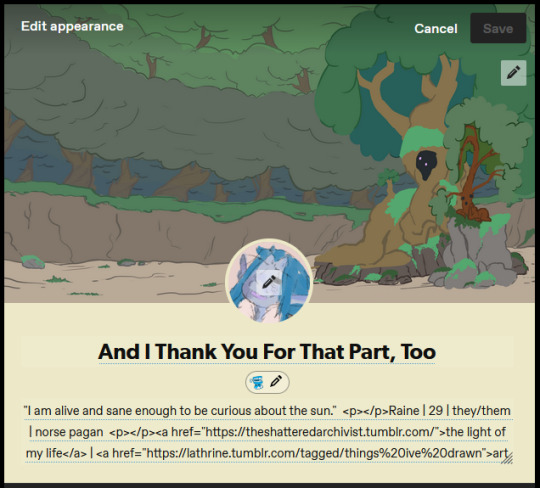
but i believe i had to actually hard code it in my theme settings. you only get access to theme settings by having a web address for your blog, instead of the default tumblr dot com/[your username]. if you have an ancient blog, like i do, you probably have an address by default! in which case you want to go to blog settings, turn on custom themes:

then either click "edit theme", or go to [your username] dot tumblr dot com and look for this icon:

from there you want to insert the paragraph tags (copy/paste this: <p> </p>) at the appropriate points in the description box, like so:
if you have a newer account, i believe by default you only have the @ blog. i don't remember how to set up the web address-- i think it's still free? gods only know-- but i know it should be in the same blog settings as edit appearance and custom themes.
actually, turning on custom themes itself might just generate the web address for you? i'm not sure!
anyways. definitely try the tags in your appearance editor! but it doesn't always accept html, so be prepared to go through the theme editor if that doesn't work. thankfully, there are tons of free themes available through tumblr itself and it's super easy to set them up! and if you have any more questions or need clarification, i'm happy to help!
#this is kind of a lot of Stuff i just threw at you anon so PLEASE do not be afraid to ask for further clarification! i am here to help!#also i just want to acknowledge that i was taught to bookend my text with the paragraph tags instead of having them float like this#but Unfortunately i have grown rude and undomesticated in my old age.#no one tell my father he's already sad enough i didnt follow his footsteps and become a programmer
0 notes
Note
for ur theme, you might be able to look at the HTML in the theme editor and type a shortened version of your description into that!
i had the same issue with my theme and was able to do this:


totally get it if you're not comfortable poking around in the code tho! whenever i make edits to mine, i always copy/paste the old code into a google doc before i start just so i can replace it if i mess something up.
Thank you so much! It took some digging through the theme code but I found the right spot and now the description on my desktop theme is shorter! Thank you again!
1 note
·
View note