#overview of openshift cluster
Explore tagged Tumblr posts
Visit Tumblr Blog
Explore Tumblr blogs with no restrictions, modern design and the best experience.
Last Seen Tumblr Blogs


Fun Fact
The most popular pages on Tumblr are about Minecraft, GIFs, and David J. Peterson.
Text
Mastering Multicluster Kubernetes with Red Hat OpenShift Platform Plus
As enterprises expand their containerized environments, managing and securing multiple Kubernetes clusters becomes both a necessity and a challenge. Red Hat OpenShift Platform Plus, combined with powerful tools like Red Hat Advanced Cluster Management (RHACM), Red Hat Quay, and Red Hat Advanced Cluster Security (RHACS), offers a comprehensive suite for multicluster management, governance, and security.
In this blog post, we'll explore the key components and capabilities that help organizations effectively manage, observe, secure, and scale their Kubernetes workloads across clusters.
Understanding Multicluster Kubernetes Architectures
Modern enterprise applications often span across multiple Kubernetes clusters—whether to support hybrid cloud strategies, improve high availability, or isolate workloads by region or team. Red Hat OpenShift Platform Plus is designed to simplify multicluster operations by offering an integrated, opinionated stack that includes:
Red Hat OpenShift for consistent application platform experience
RHACM for centralized multicluster management
Red Hat Quay for enterprise-grade image storage and security
RHACS for advanced cluster-level security and threat detection
Together, these components provide a unified approach to handle complex multicluster deployments.
Inspecting Resources Across Multiple Clusters with RHACM
Red Hat Advanced Cluster Management (RHACM) offers a user-friendly web console that allows administrators to view and interact with all their Kubernetes clusters from a single pane of glass. Key capabilities include:
Centralized Resource Search: Use the RHACM search engine to find workloads, nodes, and configurations across all managed clusters.
Role-Based Access Control (RBAC): Manage user permissions and ensure secure access to cluster resources based on roles and responsibilities.
Cluster Health Overview: Quickly identify issues and take action using visual dashboards.
Governance and Policy Management at Scale
With RHACM, you can implement and enforce consistent governance policies across your entire fleet of clusters. Whether you're ensuring compliance with security benchmarks (like CIS) or managing custom rules, RHACM makes it easy to:
Deploy policies as code
Monitor compliance status in real time
Automate remediation for non-compliant resources
This level of automation and visibility is critical for regulated industries and enterprises with strict security postures.
Observability Across the Cluster Fleet
Observability is essential for understanding the health, performance, and behavior of your Kubernetes workloads. RHACM’s built-in observability stack integrates with metrics and logging tools to give you:
Cross-cluster performance insights
Alerting and visualization dashboards
Data aggregation for proactive incident management
By centralizing observability, operations teams can streamline troubleshooting and capacity planning across environments.
GitOps-Based Application Deployment
One of the most powerful capabilities RHACM brings to the table is GitOps-driven application lifecycle management. This allows DevOps teams to:
Define application deployments in Git repositories
Automatically deploy to multiple clusters using GitOps pipelines
Ensure consistent configuration and versioning across environments
With built-in support for Argo CD, RHACM bridges the gap between development and operations by enabling continuous delivery at scale.
Red Hat Quay: Enterprise Image Management
Red Hat Quay provides a secure and scalable container image registry that’s deeply integrated with OpenShift. In a multicluster scenario, Quay helps by:
Enforcing image security scanning and vulnerability reporting
Managing image access policies
Supporting geo-replication for global deployments
Installing and customizing Quay within OpenShift gives enterprises control over the entire software supply chain—from development to production.
Integrating Quay with OpenShift & RHACM
Quay seamlessly integrates with OpenShift and RHACM to:
Serve as the source of trusted container images
Automate deployment pipelines via RHACM GitOps
Restrict unapproved images from being used across clusters
This tight integration ensures a secure and compliant image delivery workflow, especially useful in multicluster environments with differing security requirements.
Strengthening Multicluster Security with RHACS
Security must span the entire Kubernetes lifecycle. Red Hat Advanced Cluster Security (RHACS) helps secure containers and Kubernetes clusters by:
Identifying runtime threats and vulnerabilities
Enforcing Kubernetes best practices
Performing risk assessments on containerized workloads
Once installed and configured, RHACS provides a unified view of security risks across all your OpenShift clusters.
Multicluster Operational Security with RHACS
Using RHACS across multiple clusters allows security teams to:
Define and apply security policies consistently
Detect and respond to anomalies in real time
Integrate with CI/CD tools to shift security left
By integrating RHACS into your multicluster architecture, you create a proactive defense layer that protects your workloads without slowing down innovation.
Final Thoughts
Managing multicluster Kubernetes environments doesn't have to be a logistical nightmare. With Red Hat OpenShift Platform Plus, along with RHACM, Red Hat Quay, and RHACS, organizations can standardize, secure, and scale their Kubernetes operations across any infrastructure.
Whether you’re just starting to adopt multicluster strategies or looking to refine your existing approach, Red Hat’s ecosystem offers the tools and automation needed to succeed. For more details www.hawkstack.com
0 notes
Text
Mastering OpenShift Administration II: Advanced Techniques and Best Practices
Introduction
Briefly introduce OpenShift as a leading Kubernetes platform for managing containerized applications.
Mention the significance of advanced administration skills for managing and scaling enterprise-level environments.
Highlight that this blog post will cover key concepts and techniques from the OpenShift Administration II course.
Section 1: Understanding OpenShift Administration II
Explain what OpenShift Administration II covers.
Mention the prerequisites for this course (e.g., knowledge of OpenShift Administration I, basics of Kubernetes, containerization, and Linux system administration).
Describe the importance of this course for professionals looking to advance their OpenShift and Kubernetes skills.
Section 2: Key Concepts and Techniques
Advanced Cluster Management
Managing and scaling clusters efficiently.
Techniques for deploying multiple clusters in different environments (hybrid or multi-cloud).
Best practices for disaster recovery and fault tolerance.
Automating OpenShift Operations
Introduction to automation in OpenShift using Ansible and other automation tools.
Writing and executing playbooks to automate day-to-day administrative tasks.
Streamlining OpenShift updates and upgrades with automation scripts.
Optimizing Resource Usage
Best practices for resource optimization in OpenShift clusters.
Managing workloads with resource quotas and limits.
Performance tuning techniques for maximizing cluster efficiency.
Section 3: Security and Compliance
Overview of security considerations in OpenShift environments.
Role-based access control (RBAC) to manage user permissions.
Implementing network security policies to control traffic within the cluster.
Ensuring compliance with industry standards and best practices.
Section 4: Troubleshooting and Performance Tuning
Common issues encountered in OpenShift environments and how to resolve them.
Tools and techniques for monitoring cluster health and diagnosing problems.
Performance tuning strategies to ensure optimal OpenShift performance.
Section 5: Real-World Use Cases
Share some real-world scenarios where OpenShift Administration II skills are applied.
Discuss how advanced OpenShift administration techniques can help enterprises achieve their business goals.
Highlight the role of OpenShift in modern DevOps and CI/CD pipelines.
Conclusion
Summarize the key takeaways from the blog post.
Encourage readers to pursue the OpenShift Administration II course to elevate their skills.
Mention any upcoming training sessions or resources available on platforms like HawkStack for those interested in OpenShift.
For more details click www.hawkstack.com
#redhatcourses#information technology#containerorchestration#docker#kubernetes#container#linux#containersecurity#dockerswarm
1 note
·
View note
Text
IBM Cloud Mastery: Banking App Deployment Insights
Hybrid cloud banking application deployment best practices for IBM Cloud and Satellite security and compliance
Financial services clients want to update their apps. Modernizing code development and maintenance (helping with scarce skills and allowing innovation and new technologies required by end users) and improving deployment and operations with agile and DevSecOps are examples.
Clients want flexibility to choose the best “fit for purpose” deployment location for their applications during modernization. This can happen in any Hybrid Cloud environment (on premises, private cloud, public cloud, or edge). IBM Cloud Satellite meets this need by letting modern, cloud-native applications run anywhere the client wants while maintaining a consistent control plane for hybrid cloud application administration.
In addition, many financial services applications support regulated workloads that require strict security and compliance, including Zero Trust protection. IBM Cloud for Financial Services meets that need by providing an end-to-end security and compliance framework for hybrid cloud application implementation and modernization.
This paper shows how to deploy a banking application on IBM Cloud for Financial Services and Satellite using automated CI/CD/CC pipelines consistently. This requires strict security and compliance throughout build and deployment.
Introduction to ideas and products
Financial services companies use IBM Cloud for Financial Services for security and compliance. It uses industry standards like NIST 800-53 and the expertise of over 100 Financial Services Cloud Council clients. It provides a control framework that can be easily implemented using Reference Architectures, Validated Cloud Services, ISVs, and the highest encryption and CC across the hybrid cloud.
True hybrid cloud experience with IBM Cloud Satellite. Satellite lets workloads run anywhere securely. One pane of glass lets you see all resources on one dashboard. They have developed robust DevSecOps toolchains to build applications, deploy them to satellite locations securely and consistently, and monitor the environment using best practices.
This project used a Kubernetes– and microservices-modernized loan origination application. The bank application uses a BIAN-based ecosystem of partner applications to provide this service.
Application overview
The BIAN Coreless 2.0 loan origination application was used in this project. A customer gets a personalized loan through a secure bank online channel. A BIAN-based ecosystem of partner applications runs on IBM Cloud for Financial Services.
BIAN Coreless Initiative lets financial institutions choose the best partners to quickly launch new services using BIAN architectures. Each BIAN Service Domain component is a microservice deployed on an IBM Cloud OCP cluster.
BIAN Service Domain-based App Components
Product Directory: Complete list of bank products and services.
Consumer Loan: Fulfills consumer loans. This includes loan facility setup and scheduled and ad-hoc product processing.
Customer Offer Process/API: Manages new and existing customer product offers.
Party Routing Profile: This small profile of key indicators is used during customer interactions to help route, service, and fulfill products/services.
Process overview of deployment
An agile DevSecOps workflow completed hybrid cloud deployments. DevSecOps workflows emphasize frequent, reliable software delivery. DevOps teams can write code, integrate it, run tests, deliver releases, and deploy changes collaboratively and in real time while maintaining security and compliance using the iterative methodology.
A secure landing zone cluster deployed IBM Cloud for Financial Services, and policy as code automates infrastructure deployment. Applications have many parts. On a RedHat OpenShift Cluster, each component had its own CI, CD, and CC pipeline. Satellite deployment required reusing CI/CC pipelines and creating a CD pipeline.
Continuous integration
IBM Cloud components had separate CI pipelines. CI toolchains recommend procedures and approaches. A static code scanner checks the application repository for secrets in the source code and vulnerable packages used as dependencies. For each Git commit, a container image is created and tagged with the build number, timestamp, and commit ID. This system tags images for traceability. Before creating the image, Dockerfile is tested. A private image registry stores the created image.
The target cluster deployment’s access privileges are automatically configured using revokeable API tokens. The container image is scanned for vulnerabilities. A Docker signature is applied after completion. Adding an image tag updates the deployment record immediately. A cluster’s explicit namespace isolates deployments. Any code merged into the specified Git branch for Kubernetes deployment is automatically constructed, verified, and implemented.
An inventory repository stores docker image details, as explained in this blog’s Continuous Deployment section. Even during pipeline runs, evidence is collected. This evidence shows toolchain tasks like vulnerability scans and unit tests. This evidence is stored in a git repository and a cloud object storage bucket for auditing.
They reused the IBM Cloud CI toolchains for the Satellite deployment. Rebuilding CI pipelines for the new deployment was unnecessary because the application remained unchanged.
Continuous deployment
The inventory is the source of truth for what artifacts are deployed in what environment/region. Git branches represent environments, and a GitOps-based promotion pipeline updates environments. The inventory previously hosted deployment files, which are YAML Kubernetes resource files that describe each component. These deployment files would contain the correct namespace descriptors and the latest Docker image for each component.
This method was difficult for several reasons. For applications, changing so many image tag values and namespaces with YAML replacement tools like YQ was crude and complicated. Satellite uses direct upload, with each YAML file counted as a “version”. A version for the entire application, not just one component or microservice, is preferred.
Thet switched to a Helm chart deployment process because they wanted a change. Namespaces and image tags could be parametrized and injected at deployment time. Using these variables simplifies YAML file parsing for a given value. Helm charts were created separately and stored in the same container registry as BIAN images. They are creating a CI pipeline to lint, package, sign, and store helm charts for verification at deployment time. To create the chart, these steps are done manually.
Helm charts work best with a direct connection to a Kubernetes or OpenShift cluster, which Satellite cannot provide. To fix this, That use the “helm template” to format the chart and pass the YAML file to the Satellite upload function. This function creates an application YAML configuration version using the IBM Cloud Satellite CLI. They can’t use Helm’s helpful features like rolling back chart versions or testing the application’s functionality.
Constant Compliance
The CC pipeline helps scan deployed artifacts and repositories continuously. This is useful for finding newly reported vulnerabilities discovered after application deployment. Snyk and the CVE Program track new vulnerabilities using their latest definitions. To find secrets in application source code and vulnerabilities in application dependencies, the CC toolchain runs a static code scanner on application repositories at user-defined intervals.
The pipeline checks container images for vulnerabilities. Due dates are assigned to incident issues found during scans or updates. At the end of each run, IBM Cloud Object Storage stores scan summary evidence.
DevOps Insights helps track issues and application security. This tool includes metrics from previous toolchain runs for continuous integration, deployment, and compliance. Any scan or test result is uploaded to that system, so you can track your security progression.
For highly regulated industries like financial services that want to protect customer and application data, cloud CC is crucial. This process used to be difficult and manual, putting organizations at risk. However, IBM Cloud Security and Compliance Center can add daily, automatic compliance checks to your development lifecycle to reduce this risk. These checks include DevSecOps toolchain security and compliance assessments.
IBM developed best practices to help teams implement hybrid cloud solutions for IBM Cloud for Financial Services and IBM Cloud Satellite based on this project and others:
Continuous Integration
Share scripts for similar applications in different toolchains. These instructions determine your CI toolchain’s behavior. NodeJS applications have a similar build process, so keeping a scripting library in a separate repository that toolchains can use makes sense. This ensures CI consistency, reuse, and maintainability.
Using triggers, CI toolchains can be reused for similar applications by specifying the application to be built, where the code is, and other customizations.
Continuous deployment
Multi-component applications should use a single inventory and deployment toolchain to deploy all components. This reduces repetition. Kubernetes YAML deployment files use the same deployment mechanism, so it’s more logical to iterate over each rather than maintain multiple CD toolchains that do the same thing. Maintainability has improved, and application deployment is easier. You can still deploy microservices using triggers.
Use Helm charts for complex multi-component applications. The BIAN project used Helm to simplify deployment. Kubernetes files are written in YAML, making bash-based text parsers difficult if multiple values need to be customized at deployment. Helm simplifies this with variables, which improve value substitution. Helm also offers whole-application versioning, chart versioning, registry storage of deployment configuration, and failure rollback. Satellite configuration versioning handles rollback issues on Satellite-specific deployments.
Constant Compliance
IBM strongly recommend installing CC toolchains in your infrastructure to scan code and artifacts for newly exposed vulnerabilities. Nightly scans or other schedules depending on your application and security needs are typical. Use DevOps Insights to track issues and application security.
They also recommend automating security with the Security and Compliance Center (SCC). The pipelines’ evidence summary can be uploaded to the SCC, where each entry is treated as a “fact” about a toolchain task like a vulnerability scan, unit test, or others. To ensure toolchain best practices are followed, the SCC will validate the evidence.
Inventory
With continuous deployment, it’s best to store microservice details and Kubernetes deployment files in a single application inventory. This creates a single source of truth for deployment status; maintaining environments across multiple inventory repositories can quickly become cumbersome.
Evidence
Evidence repositories should be treated differently than inventories. One evidence repository per component is best because combining them can make managing the evidence overwhelming. Finding specific evidence in a component-specific repository is much easier. A single deployment toolchain-sourced evidence locker is acceptable for deployment.
Cloud object storage buckets and the default git repository are recommended for evidence storage. Because COS buckets can be configured to be immutable, They can securely store evidence without tampering, which is crucial for audit trails.
Read more on Govindhtech.com
#IBM#BankingApp#IBMCloud#Satellite#security#Financialservices#Kubernetes#BIANService#SecurityComplianceCenter#OpenShift#technews#technology#govindhtech
0 notes
Text
Introduction to Openshift - Introduction to Openshift online cluster
Introduction to Openshift – Introduction to Openshift online cluster OpenShift is a platform-as-a-service (PaaS) offering from Red Hat. It provides a cloud-like environment for deploying, managing, and scaling applications in a secure and efficient manner. OpenShift uses containers to package and deploy applications, and it provides built-in tools for continuous integration, continuous delivery,…
View On WordPress
#openshift openshift4 openshiftIntroduction openshifttutorial openshiftContainer introduction to openshift online cluster#introduction redhatopenshift containerization introduction to openshift#introduction to openshift#introduction to openshift container platform#introduction to openshift redhat#openshift 4#openshift 4 installation#openshift container platform#openshift online#Openshift overview#Overview of openshift#overview of openshift cluster#red hat introduction to openshift#red hat openshift#what is openshift#what is openshift online
0 notes
Text
In an OpenShift or OKD Kubernetes Cluster, the ClusterVersion custom resource holds important high-level information about your cluster. This information include cluster version, update channels and status of the cluster operators. In this article I’ll demonstrate how Cluster Administrator can check cluster version as well as the status of operators in OpenShift / OKD Cluster. Check Cluster Version in OpenShift / OKD You can easily retrieve the cluster version from the CLI using oc command to verify that it is running the desired version, and also to ensure that the cluster uses the right subscription channel. # Red Hat OpenShift $ oc get clusterversion NAME VERSION AVAILABLE PROGRESSING SINCE STATUS version 4.8.10 True False 10d Cluster version is 4.8.10 # OKD Cluster $ oc get clusterversion NAME VERSION AVAILABLE PROGRESSING SINCE STATUS version 4.7.0-0.okd-2021-05-22-050008 True False 66d Cluster version is 4.7.0-0.okd-2021-05-22-050008 To obtain more detailed information about the cluster status run the oc describe clusterversion command: $ oc describe clusterversion ...output omitted... Spec: Channel: fast-4.8 Cluster ID: f3dc42b3-aeec-4f4c-780f-8a04d6951595 Desired Update: Force: false Image: quay.io/openshift-release-dev/ocp-release@sha256:53576e4df71a5f00f77718f25aec6ac7946eaaab998d99d3e3f03fcb403364db Version: 4.8.10 Status: Available Updates: Channels: candidate-4.8 candidate-4.9 fast-4.8 Image: quay.io/openshift-release-dev/ocp-release@sha256:c3af995af7ee85e88c43c943e0a64c7066d90e77fafdabc7b22a095e4ea3c25a URL: https://access.redhat.com/errata/RHBA-2021:3511 Version: 4.8.12 Channels: candidate-4.8 candidate-4.9 fast-4.8 stable-4.8 Image: quay.io/openshift-release-dev/ocp-release@sha256:26f9da8c2567ddf15f917515008563db8b3c9e43120d3d22f9d00a16b0eb9b97 URL: https://access.redhat.com/errata/RHBA-2021:3429 Version: 4.8.11 ...output omitted... Where: Channel: fast-4.8 – Displays the version of the cluster the channel being used. Cluster ID: f3dc42b3-aeec-4f4c-780f-8a04d6951595 – Displays the unique identifier for the cluster Available Updates: Displays the updates available and channels Review OpenShift / OKD Cluster Operators OpenShift Container Platform / OKD cluster operators are top level operators that manage the cluster. Cluster operators are responsible for the main components, such as web console, storage, API server, SDN e.t.c. All the information relating to cluster operators is accessible through the ClusterOperator resource. It allows you to access the overview of all cluster operators, or detailed information on a given operator. To retrieve the list of all cluster operators, run the following command: $ oc get clusteroperators NAME VERSION AVAILABLE PROGRESSING DEGRADED SINCE authentication 4.8.10 True False False 2d14h baremetal 4.8.10 True False False 35d cloud-credential 4.8.10 True False False 35d cluster-autoscaler 4.8.10 True False False 35d config-operator 4.8.10 True False False 35d console 4.8.10 True False False 10d csi-snapshot-controller 4.8.10 True False False 35d dns 4.8.10 True False False 35d etcd 4.8.10 True False False 35d image-registry 4.8.10 True False False 35d
ingress 4.8.10 True False False 35d insights 4.8.10 True False False 35d kube-apiserver 4.8.10 True False False 35d kube-controller-manager 4.8.10 True False False 35d kube-scheduler 4.8.10 True False False 35d kube-storage-version-migrator 4.8.10 True False False 10d machine-api 4.8.10 True False False 35d machine-approver 4.8.10 True False False 35d machine-config 4.8.10 True False False 35d marketplace 4.8.10 True False False 35d monitoring 4.8.10 True False False 3d5h network 4.8.10 True False False 35d node-tuning 4.8.10 True False False 10d openshift-apiserver 4.8.10 True False False 12d openshift-controller-manager 4.8.10 True False False 34d openshift-samples 4.8.10 True False False 10d operator-lifecycle-manager 4.8.10 True False False 35d operator-lifecycle-manager-catalog 4.8.10 True False False 35d operator-lifecycle-manager-packageserver 4.8.10 True False False 18d service-ca 4.8.10 True False False 35d storage 4.8.10 True False False 35d Key Columns in the ouptut: NAME – Indicates the name of the operator. AVAILABLE – Indicates operator state if successfully deployed or has issues. TRUE means the operator is deployed successfully and is available for use in the cluster. The degraded state means the current state does not match its desired state over a period of time. PROGRESSING – Indicates whether an operator is being updated to a newer version by the cluster version operator. True means update in pending completion. DEGRADED – This entry returns the health of the operator. True means the operator encounters an error that prevents it from working properly. You can limit the output to a single operator: $ oc get co authentication NAME VERSION AVAILABLE PROGRESSING DEGRADED SINCE authentication 4.8.10 True False False 2d14h To get more information about an operator use: $ oc describe clusteroperators Example: $ oc describe co authentication If you’re in a process of upgrading your OpenShift / OKD cluster from one minor version to another, we have a guide dedicated to upgrade shared in the link below: How To Upgrade OpenShift / OKD Cluster Minor Version
0 notes
Text
IBM C1000-143 Practice Test Questions
Now you can pass C1000-143 IBM Cloud Pak for Watson AIOps v3.2 Administrator exam with ease. PassQuestion provides you a number of C1000-143 Practice Test Questions, exactly on the pattern of the actual exam. They are not only helpful for the exam candidates to evaluate their level of preparation but also provide them the opportunity to enhance their weaknesses well in time. The C1000-143 Practice Test Questions include the latest questions and answers which help you in clearing all of your doubts of the IBM C1000-143 exam. With the help of the C1000-143 practice test questions, you will be able to feel the real exam scenario and pass your exam successfully on your first attempt.
IBM Cloud Pak for Watson AIOps v3.2 Administrator
An IBM Certified Administrator on IBM Cloud Pak for Watson AIOps v3.2 is a system administrator who has extensive knowledge and experience on IBM Cloud Pak for Watson AIOps v3.2 including AI Manager, Event Manager and Metric Manager. This administrator can perform the intermediate tasks related to planning, sizing, installation, daily management and operation, security, performance, configuration of enhancements (including fix packs and patches), customization and/or problem determination.
Exam Information
Exam Code: C1000-143 Exam Name: IBM Cloud Pak for Watson AIOps v3.2 Administrator Number of questions: 65 Number of questions to pass: 46 Time allowed: 90 minutes Languages: English Price: $200 USD Certification: IBM Certified Administrator - Cloud Pak for Watson AIOps v3.2
Exam Sections
Section 1: IBM Cloud Pak for Watson AIOps Overview 11% Section 2: Install the IBM Cloud Pak for Watson AIOps 17% Section 3: Configuration 30% Section 4: Operate the Platform 22% Section 5: Manage User Access Control 8% Section 6: Troubleshoot 12%
View Online IBM Cloud Pak for Watson AIOps v3.2 Administrator C1000-143 Free Questions
Which collection of key features describes Al Manager? A.Al data tools and connections and Metric Manager B.Al data tools and connections and infrastructure automation C.Al models and Chat Ops D.Network management and service and topology management Answer: C
In Event Manager, which event groupings usually occur within a short time of each other? A.Scope-based B.Seasonal C.Temporal D.Topology Answer: C
When a user logs on to any of the components on a Cloud Pak for Watson AlOps deployed cluster and it is too slow or times out, what can be done to resolve the issue? A.Update the Idap-proxy-config ConfigMap and set the LDAP_RECURSIVE_SEARCH to "false". B.Update the platform-auth-idp ConfigMap and set the LDAP_TIMEOUT to a higher value. C.Update the Idap-proxy-config ConfigMap and set the LDAP_TiMEOUT to a higher value. D.Update the platform-auth-idp ConfigMap and set the LDAP_RECURSIVE_SEARCH to "false" Answer: A
When installing Al manager or Event Manager in an air-gapped environment, which registry must the OpenShift cluster be connected to in order to pull images? A.Docker V2 compatible registry running behind B.quay.io C.Red Hat OpenShift internal registry D.docker.io Answer: C
For Al Manager, which type of ChatOps channel surfaces stories? A.Reactive B.Proactive C.Public D.Private Answer: A
What are two valid Runbook types in Event Manager? A.Partial B.Semi-automated C.Initial D.Fully-automated E.Locked-partial Answer: C, D
0 notes
Link
Spinnaker is a Continuous Delivery (CD) platform that was developed at Netflix where they used it to perform a high number of deployments ( 8000+/day). Later they made it available as an open-source tool. Previously enterprise release cycles used to be stretched for 7/8 months. But with the availability of the Spinnaker CD tool, enterprises have been able to shorten the release cycles from months to weeks to days (even multiple releases a day).
There are several other CD tools available in the market but what made Spinnaker so special?
Spinnaker Features:
Multicloud Deployments
It includes support of deployment to multiple cloud environments like Kubernetes (K8s), OpenShift, AWS, Azure, GCP, and so on. It abstracts the cloud environment to be worked on and managed easily.
Automated releases
Spinnaker allows you to create and configure CD pipelines that can be triggered manually or by some events. Thus the entire release process is automated end-to-end,
Safe Deployments
With a high number of release deployments, it is hard to know if some unwanted or bad release has been deployed into production which otherwise should have been failed. The built-in rollback mechanisms with Spinnaker allow you to test and quickly rollback a deployment and lets the application go back to its earlier state.
Maintain Visibility & Control
This feature in Spinnaker allows you to monitor your application across different cloud providers without needing you to log in to multiple accounts.
So Spinnaker is a foundational platform for Continuous Delivery (CD) that can be quite easily extended to match your deployment requirements.
Overview of Spinnaker’s Application Management & Deployment Pipelines Functionality
Spinnaker supports application management. In the Spinnaker UI, an application is represented as an inventory of all the infrastructure resources – clusters/server-groups, load balancers, firewalls, functions (even serverless functions) that are part of your application.
You can manage the same application deployed to different environments like AWS, GCP, Kubernetes, and so on from the Spinnaker UI itself. Spinnaker supports access control for multiple accounts. For e.g. users like dev or testers with permission can deploy to Dev or Stage environments, where as only the Ops people get to deploy the application into production. You can view and manage the different aspects of the application – like scaling the application, view health of different Kubernetes pods that are running, and see the performance and output of those pods.
Spinnaker pipelines let you have all your application’s infrastructure up and running. You can define your deployment workflow and configure your pipeline-as-a-code (JSON). It enables github-style operations.
Spinnaker pipelines allow you to configure:
Execution options– flexibility to run fully automatically or have manual interventions
Automated triggers– the capability to trigger your workflows through Jenkins jobs, webhooks, etc
Parameters– ability to define parameter which can be also accessed dynamically during pipeline execution
Notifications– to notify stakeholders about the status of pipeline execution
As part of the pipeline, you can configure and create automated triggers. These triggers can be fired based on events like a code check-in to the github repository or a new image being published to a Docker repository. You can have them scheduled to run at frequent intervals. You can pass different parameters to your pipeline so that you can use the same pipeline to deploy to different stages just by varying the parameters. You can set up notifications for integrations with different channels like slack or email.
After configuring the setup you can add different stages each of which is responsible for doing a different set of actions like calling a Jenkins job, deploying to Kubernetes, and so on. All these stages are first-class objects or actions that are built-in and that allows you to build a pretty complex pipeline. Spinnaker allows you to extend these pipelines easily and also do release management.
Once you run the Spinnaker pipeline you can monitor the deployment progress. You can view and troubleshoot if somethings go wrong such as Jenkins build failure. After a successful build, the build number is passed and tagged to the build image which is then used in subsequent stages to deploy that image.
You can see the results of deployment like what yaml got deployed. Spinnaker adds a lot of extra annotations to the yaml code so that it can manage the resources. As mentioned earlier, you can check all aspects (status of the deployment, the health of infrastructure, traffic, etc) of the associated application resources from the UI.
So we can summarize that Spinnaker displays the inventory of your application i.e. it shows all the infrastructure behind that application and it has pipelines for you to deploy that application in a continuous fashion.
Problems with other CD tools
Each organization is at a different maturity level for their release cycles. Today’s fast-paced business environment may mandate some of them to push code checked-in by developers to be deployed to production in a matter of hours if not minutes. So the questions that developers or DevOps managers ask themselves are:
What if I want to choose what features to promote to the next stage?
What if I want to plan and schedule a release?
What if I want different stakeholders (product managers/QA leads) to sign off (approve) before I promote?
For all the above use cases, Spinnaker is an ideal CD tool of choice as it does not require lots of custom scripting to orchestrate all these tasks. Although, there are many solutions in the marketplace that can orchestrate the business processes associated with the software delivery they lack interoperability- the ability to integrate with existing tools in the ecosystem.
Can I include the steps to deploy the software also in the same tool?
Can the same tool be used by the developers, release managers, operations teams to promote the release?
The cost of delivery is pretty high when you have broken releases. Without end-to-end integration of delivery stages, the deployment process often results in broken releases. For e.g. raising a Jira ticket for one stage, letting custom scripting be done for that stage, and passing on to the next stage in a similar fashion.
Use BOM (bill-of-materials) to define what gets released
Integrate with your existing approval process in the delivery pipeline
Do the actual task of delivering the software
Say, your release manager decides that from ten releases, release A and B (i.e. components of software) will be released. Then it needs all the approvals ( from testers/DevOps/Project managers/release manager) to be integrated into the deployment process of these releases. And, all this can be achieved using a Spinnaker pipeline.
Example of a Spinnaker pipeline
The BOM application configuration ( example below) is managed in some source control repository. Once you make any change and commit, it triggers the pipeline that would deploy the version of the services. Under the hood, Spinnaker would read the file from a repository, and inject it into the pipeline, deploy the different versions of the services, validate the deployment and promote it to the next stage.
Example of a BOM
A BOM can have a list of services that have been installed. You may not install all services in the release or promote all the services. So you will declare if the service is being released or not, and the version of the release or image that is going to be published. Here in this example, we are doing it with a Kubernetes application. You can also input different parameters that are going to be part of the release e.g. release it in the US region only.
So the key features of this release process are:
Source Controlled
Versioned (Know what got released and when?)
Approved (Being gated makes the release items become the source of truth. Once it is merged with the main branch it’s ready to get deployed)
Auditable ( Being source-controlled, it will definitely have the audit history about who made the change, and what changes were made)
Some interesting ways to enforce approvals
Integrations with Jira, ServiceNow
Policy checks for release conformance
Manual Judgment
Approvals would include integrations with Jira, ServiceNow, policy checks for release conformance e.g. before you release any release items you need to have their SonarQube coverage for static analysis of code quality and security vulnerabilities at 80%. Finally, if you are not ready to automatically promoting the release to production you can make a manual judgment and promote the same
Spinnaker supports managing releases giving you control over what version of different services would get deployed and released. So all the versions need not have continuous delivery but planned release. It lets you plan releases, determine what releases would get promoted, and promote them through the whole process in an automated manner.
OpsMx is a leading provider of Continuous Delivery solutions that help enterprises safely deliver software at scale and without any human intervention. We help engineering teams take the risk and manual effort out of releasing innovations at the speed of modern business.
#Automated Pipelines#CD pipeline#CD pipelines#Continuous Delivery#Continuous Deployment#DevOps#Kubernetes#multicloud deployment#product release#release management
0 notes
Text
Kubernetes 1.16 released
Finally it’s the weekend. Peace and quiet to indulge yourself in a new Kubernetes release! Many others have beat me to it, great overviews are available from various sources.
The most exciting thing for me in Kubernetes 1.16 is the graduation of many alpha CSI features to beta. This is removes the friction of tinkering with the feature gates on either the kubelet or API server which is pet peeve of mine and makes me moan out loud when I found out something doesn't work because of it.
TL;DR
All these features have already been demonstrated with the HPE CSI Driver for Kubernetes, it starts about 7 minutes in, I’ve fast forwarded it for you.
At the Helm
Let’s showcase these graduated features with the newly released HPE CSI Driver for Kubernetes. Be warned, issues ahead. Helm is not quite there yet on Kubernetes 1.16, a fix to deploy Tiller on your cluster is available here. Next issue up is that the HPE CSI Driver Helm chart is not yet compatible with Kubernetes 1.16. I’m graciously and temporarily hosting a copy on my GitHub account.
Create a values.yaml file:
backend: 192.168.1.10 # This is your Nimble array username: admin password: admin servicePort: "8080" serviceName: nimble-csp-svc fsType: xfs accessProtocol: "iscsi" storageClass: create: false
Helm your way on your Kubernetes 1.16 cluster:
helm repo add hpe https://drajen.github.io/co-deployments-116 helm install --name hpe-csi hpe/hpe-csi-driver --namespace kube-system -f values.yaml
In my examples repo I’ve dumped a few declarations that I used to walk through these features. When I'm referencing a YAML file name, this is where to find it.
VolumePVCDataSource
This is a very useful capability when you’re interested in creating a clone of an existing PVC in the current state. I’m surprised to see this feature mature to beta before VolumeSnapshotDataSource which has been around for much longer.
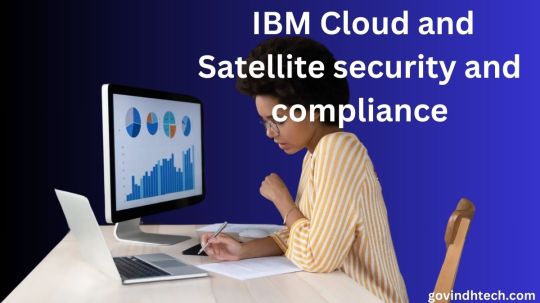
Assuming you have an existing PVC named “my-pvc”:
apiVersion: v1 kind: PersistentVolumeClaim metadata: name: my-pvc-clone spec: accessModes: - ReadWriteOnce resources: requests: storage: 32Gi dataSource: kind: PersistentVolumeClaim name: my-pvc storageClassName: my-storageclass
Let’s cuddle:
$ kubectl create -f pvc.yaml persistentvolumeclaim/my-pvc created $ kubectl create -f pvc-clone.yaml persistentvolumeclaim/my-pvc-clone created $ kubectl get pvc NAME STATUS VOLUME CAPACITY STORAGECLASS AGE my-pvc Bound pvc-ae0075... 10Gi my-storageclass 34s my-pvc-clone Bound pvc-d5eb6f... 10Gi my-storageclass 14s
On the Nimble array, we can indeed observe we have a clone of the dataSource.
ExpandCSIVolumes and ExpandInUsePersistentVolumes
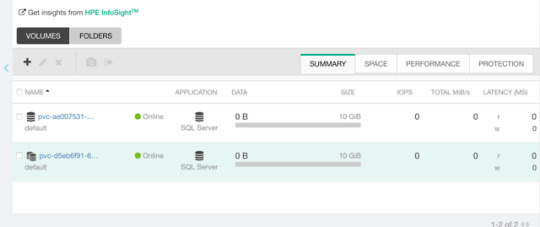
This is indeed a very welcome addition to be promoted. Among the top complaints from users. This is stupid easy to use. Simply edit or patch your existing PVC to expand your PV.
$ kubectl patch pvc/my-pvc-clone -p '{"spec": {"resources": {"requests": {"storage": "32Gi"}}}}' persistentvolumeclaim/my-pvc-clone patched $ kubectl get pv NAME CAPACITY CLAIM STORAGECLASS AGE pvc-d5eb6... 32Gi default/my-pvc-clone my-storageclass 9m25s
Yes, you can expand clones, no problem.
CSIInlineVolume
On of my favorite features of our legacy FlexVolume is the ability to create Inline Ephemeral Clones for CI/CD pipelines. Creating a point in time copy of a volume, do some work and/or tests on it and dispose of it. Leave no trace behind.
If this is something you’d like to walk through, there’s a few prerequisite steps here. The Helm chart does not create the CSIDriver custom resource definition (CRD). It need to be applied first:
apiVersion: storage.k8s.io/v1beta1 kind: CSIDriver metadata: name: csi.hpe.com spec: podInfoOnMount: true volumeLifecycleModes: - Persistent - Ephemeral
Next, the current behavior (subject to change) is that you need a secret for the CSI driver in the namespace you’re deploying to. This is a oneliner to copy from “kube-system” to your current namespace.
$ kubectl get -nkube-system secret/nimble-secret -o yaml | \ sed -e 's/namespace: kube-system//' | \ kubectl create -f-
Now, assuming we have deployed a MariaDB and have that running elsewhere. This example clones the actual Nimble volume. In essence, the volume may reside on a different Kubernetes cluster or hosted on a bare-metal server or virtual machine.
For clarity, the Deployment I’m cloning this volume from is using a secret, I’m using that same secret hosted in dep.yaml.
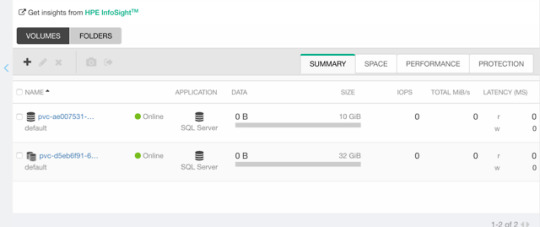
apiVersion: v1 kind: Pod metadata: name: mariadb-ephemeral spec: spec: containers: - image: mariadb:latest name: mariadb env: - name: MYSQL_ROOT_PASSWORD valueFrom: secretKeyRef: name: mariadb key: password ports: - containerPort: 3306 name: mariadb volumeMounts: - name: mariadb-persistent-storage mountPath: /var/lib/mysql volumes: - name: mariadb-persistent-storage csi: driver: csi.hpe.com nodePublishSecretRef: name: nimble-secret volumeAttributes: cloneOf: pvc-ae007531-e315-4b81-b708-99778fa1ba87
The magic sauce here is of course the .volumes.csi stanza where you specify the driver and your volumeAttributes. Any Nimble StorageClass parameter is supported in volumeAttributes.
Once, cuddled, you can observe the volume on the Nimble array.
CSIBlockVolume
I’ve visited this feature before in my Frankenstein post where I cobbled together a corosync and pacemaker cluster running as a workload on Kubernetes backed by a ReadWriteMany block device.
A tad bit more mellow example is the same example we used for the OpenShift demos in the CSI driver beta video (fast forwarded).
Creating a block volume is very simple (if the driver supports it). By default volumes are created with the attribue volumeMode: Filesystem. Simply switch this to Block:
apiVersion: v1 kind: PersistentVolumeClaim metadata: name: my-pvc-block spec: accessModes: - ReadWriteOnce resources: requests: storage: 32Gi volumeMode: Block storageClassName: my-storageclass
Once cuddled, you may reference the PVC as any other PVC, but pay attention to the .spec.containers stanza:
apiVersion: v1 kind: Pod metadata: name: my-pod spec: containers: - name: ioping image: hpestorage/ioping command: [ "ioping" ] args: [ "/dev/xvda" ] volumeDevices: - name: data devicePath: /dev/xvda volumes: - name: data persistentVolumeClaim: claimName: my-pvc-block
Normally you would specify volumeMounts and mountPath for a PVC created with volumeMode: Filesystem.
Running this particular Pod using ioping would indeed indicate that we connected a block device:
kubectl logs my-pod -f 4 KiB <<< /dev/xvda (block device 32 GiB): request=1 time=3.71 ms (warmup) 4 KiB <<< /dev/xvda (block device 32 GiB): request=2 time=1.73 ms 4 KiB <<< /dev/xvda (block device 32 GiB): request=3 time=1.32 ms 4 KiB <<< /dev/xvda (block device 32 GiB): request=4 time=1.06 ms ^C
For competitors who landed on this blog in awe looking for Nimble weaknesses, the response time you see above is a Nimble Virtual Array running on my five year old laptop.
So, that was “it” for our graduated storage features! I'm looking forward to Kubernetes 1.17 already.
Release mascot!
I’m a sucker for logos and mascots. Congrats to the Kubernetes 1.16 release team.
0 notes
Text
OpenShift for the Absolute Beginners - Hands-on

Description
Study the basics and primary ideas of OpenShift that you will want to construct a easy OpenShift cluster and get began with deploying and managing Utility. Deploy OpenShift with Minishift Perceive Tasks, Customers Perceive Builds, Construct Triggers, Picture streams, Deployments Perceive Community, Companies and Routes Configure integration between OpenShift and GitLab SCM Deploy a pattern Multi-services software on OpenShift A a lot required talent for anybody in DevOps and Cloud Studying the basics of OpenShift places data of a strong PaaS providing at your fingertips. OpenShift is the following era Utility Internet hosting platform by Crimson Hat. Content material and Overview This course introduces OpenShift to an Absolute Newbie utilizing actually easy and simple to grasp lectures. Lectures are adopted by demos exhibiting setup and get began with OpenShift. The coding workout routines that accompany this course will enable you observe OpenShift configuration records data in YAML. You'll be growing OpenShift Configuration Information for various use instances proper in your browser. The coding workout routines will validate your instructions and Configuration Information and guarantee you've written them accurately. And eventually we have now assignments to place your abilities to check. You'll be given a problem to unravel utilizing the talents you gained throughout this course. It is a nice strategy to acquire an actual life venture expertise and work with the opposite college students locally to develop an OpenShift deployment and get suggestions on your work. The task will push you to analysis and develop your personal OpenShift Clusters. Read the full article
0 notes
Link
Get started with OpenShift quickly with lectures, demos, quizzes and hands-on coding exercises right in your browser
What you’ll learn
Deploy an Openshift Cluster
Deploy application on Openshift Cluster
Setup integration between Openshift and SCM
Create custom templates and catalog items in Openshift
Deploy Multiservices applications on Openshift
Requirements
Basic System Administration
Introduction to Containers (Not Mandatory as we cover this in this course)
Basics of Kubernetes (Not Mandatory as we cover this in this course)
Basics of Web Development – Simple Python web application
Description
Learn the fundamentals and basic concepts of OpenShift that you will need to build a simple OpenShift cluster and get started with deploying and managing Application.
Build a strong foundation in OpenShift and container orchestration with this tutorial for beginners.
Deploy OpenShift with Minishift
Understand Projects, Users
Understand Builds, Build Triggers, Image streams, Deployments
Understand Network, Services and Routes
Configure integration between OpenShift and GitLab SCM
Deploy a sample Multi-services application on OpenShift
A much required skill for any one in DevOps and Cloud Learning the fundamentals of OpenShift puts knowledge of a powerful PaaS offering at your fingertips. OpenShift is the next generation Application Hosting platform by Red Hat.
Content and Overview
This course introduces OpenShift to an Absolute Beginner using really simple and easy to understand lectures. Lectures are followed by demos showing how to setup and get started with OpenShift. The coding exercises that accompany this course will help you practice OpenShift configuration files in YAML. You will be developing OpenShift Configuration Files for different use cases right in your browser. The coding exercises will validate your commands and Configuration Files and ensure you have written them correctly.
And finally we have assignments to put your skills to test. You will be given a challenge to solve using the skills you gained during this course. This is a great way to gain a real life project experience and work with the other students in the community to develop an OpenShift deployment and get feedback for your work. The assignment will push you to research and develop your own OpenShift Clusters.
Legal Notice:
Openshift and the OpenShift logo are trademarks or registered trademarks of Red Hat, Inc. in the United States and/or other countries. Re Hat, Inc. and other parties may also have trademark rights in other terms used herein. This course is not certified, accredited, affiliated with, nor endorsed by OpenShift or Red Hat, Inc.
Who this course is for:
System Administrators
Developers
Project Managers and Leadership
Cloud Administrators
Created by Mumshad Mannambeth Last updated 10/2018 English English
Size: 1.63 GB
Download Now
https://ift.tt/39fbqsd.
The post OpenShift for the Absolute Beginners – Hands-on appeared first on Free Course Lab.
0 notes
Text
🚀 Enterprise Kubernetes Storage with Red Hat OpenShift Data Foundation
As enterprises continue to adopt Kubernetes for container orchestration, the demand for scalable, resilient, and enterprise-grade storage solutions has never been higher. While Kubernetes excels in managing stateless applications, managing stateful workloads—such as databases, messaging queues, and AI/ML pipelines—poses unique challenges. This is where Red Hat OpenShift Data Foundation (ODF) steps in as a game-changer.
📦 What is Red Hat OpenShift Data Foundation?
Red Hat OpenShift Data Foundation (formerly OpenShift Container Storage) is a software-defined storage solution designed specifically for OpenShift environments. Built on Ceph and NooBaa, ODF provides a unified storage layer that seamlessly supports block, file, and object storage within your Kubernetes infrastructure.
ODF delivers highly available, scalable, and secure storage for cloud-native workloads, empowering DevOps teams to run stateful applications confidently across hybrid and multi-cloud environments.
🔧 Key Features of OpenShift Data Foundation
1. Unified Storage for Kubernetes
ODF supports:
Block Storage for databases and persistent workloads
File Storage for legacy applications and shared volumes
Object Storage for cloud-native applications, backup, and AI/ML data lakes
2. Multi-Cloud & Hybrid Cloud Ready
Deploy ODF on bare metal, private clouds, public clouds, or hybrid environments. With integrated NooBaa technology, it allows seamless object storage across AWS S3, Azure Blob, and on-premises storage.
3. Integrated with OpenShift
ODF is tightly integrated with Red Hat OpenShift, allowing:
Native support for Persistent Volume Claims (PVCs)
Automated provisioning and scaling
Built-in monitoring through OpenShift Console and Prometheus/Grafana
4. Data Resilience & High Availability
Through Ceph under the hood, ODF offers:
Data replication across nodes
Self-healing storage clusters
Built-in erasure coding for space-efficient redundancy
5. Security & Compliance
ODF supports:
Encryption at rest and in transit
Role-Based Access Control (RBAC)
Integration with enterprise security policies and key management services (KMS)
🧩 Common Use Cases
Database as a Service (DBaaS) on Kubernetes
CI/CD Pipelines with persistent cache
AI/ML Workloads requiring massive unstructured data
Kafka, Elasticsearch, and other stateful operators
Backup & Disaster Recovery for OpenShift clusters
🛠️ Architecture Overview
At a high level, ODF deploys the following components:
ODF Operator: Automates lifecycle and management
CephCluster: Manages block and file storage
NooBaa Operator: Manages object storage abstraction
Multicloud Object Gateway (MCG): Bridges cloud and on-prem storage
The ODF stack ensures zero downtime for workloads and automated healing in the event of hardware failure or node loss.
🚀 Getting Started
To deploy OpenShift Data Foundation:
Install OpenShift on your preferred infrastructure.
Enable the ODF Operator from OperatorHub.
Configure storage cluster using local devices, AWS EBS, or any supported backend.
Create storage classes for your apps to consume via PVCs.
Pro Tip: Use OpenShift’s integrated dashboard to visualize storage usage, health, and performance metrics out of the box.
🧠 Final Thoughts
Red Hat OpenShift Data Foundation is more than just a storage solution—it's a Kubernetes-native data platform that gives you flexibility, resilience, and performance at scale. Whether you're building mission-critical microservices or deploying petabyte-scale AI workloads, ODF is designed to handle your stateful needs in an enterprise-ready way.
Embrace the future of cloud-native storage with Red Hat OpenShift Data Foundation.For more details www.hawkstack.com
0 notes
Text
Getting Started with OpenShift: Environment Setup
OpenShift is a powerful Kubernetes-based platform that allows you to develop, deploy, and manage containerized applications. This guide will walk you through setting up an OpenShift environment on different platforms, including your local machine and various cloud services.
Table of Contents
1. [Prerequisites]
2. [Setting Up OpenShift on a Local Machine](#setting-up-openshift-on-a-local-machine)
- [Minishift]
- [CodeReady Containers]
3. [Setting Up OpenShift on the Cloud]
- [Red Hat OpenShift on AWS]
- [Red Hat OpenShift on Azure]
- [Red Hat OpenShift on Google Cloud Platform]
4. [Common Troubleshooting Tips]
5. [Conclusion]
Prerequisites
Before you begin, ensure you have the following prerequisites in place:
- A computer with a modern operating system (Windows, macOS, or Linux).
- Sufficient memory and CPU resources (at least 8GB RAM and 4 CPUs recommended).
- Admin/root access to your machine.
- Basic understanding of containerization and Kubernetes concepts.
Setting Up OpenShift on a Local Machine
Minishift
Minishift is a tool that helps you run OpenShift locally by launching a single-node OpenShift cluster inside a virtual machine.
Step-by-Step Guide
1. Install Dependencies
- VirtualBox: Download and install VirtualBox from [here](https://www.virtualbox.org/).
- Minishift: Download Minishift from the [official release page](https://github.com/minishift/minishift/releases) and add it to your PATH.
2. Start Minishift
Open a terminal and start Minishift:
```sh
minishift start
```
3. Access OpenShift Console
Once Minishift is running, you can access the OpenShift console at `https://192.168.99.100:8443/console` (the IP might vary, check your terminal output for the exact address).

CodeReady Containers
CodeReady Containers (CRC) provides a minimal, preconfigured OpenShift cluster on your local machine, optimized for testing and development.
Step-by-Step Guide
1. Install CRC
- Download CRC from the [Red Hat Developers website](https://developers.redhat.com/products/codeready-containers/overview).
- Install CRC and add it to your PATH.
2. Set Up CRC
- Run the setup command:
```sh
crc setup
```
3. Start CRC
- Start the CRC instance:
```sh
crc start
```
4. Access OpenShift Console
Access the OpenShift web console at the URL provided in the terminal output.

Setting Up OpenShift on the Cloud
Red Hat OpenShift on AWS
Red Hat OpenShift on AWS (ROSA) provides a fully-managed OpenShift service.
Step-by-Step Guide
1. Sign Up for ROSA
- Create a Red Hat account and AWS account if you don't have them.
- Log in to the [Red Hat OpenShift Console](https://cloud.redhat.com/openshift) and navigate to the AWS section.
2. Create a Cluster
- Follow the on-screen instructions to create a new OpenShift cluster on AWS.
3. Access the Cluster
- Once the cluster is up and running, access the OpenShift web console via the provided URL.

Red Hat OpenShift on Azure
Red Hat OpenShift on Azure (ARO) offers a managed OpenShift service integrated with Azure.
Step-by-Step Guide
1. Sign Up for ARO
- Ensure you have a Red Hat and Azure account.
- Navigate to the Azure portal and search for Red Hat OpenShift.
2. Create a Cluster
- Follow the wizard to set up a new OpenShift cluster.
3. Access the Cluster
- Use the URL provided to access the OpenShift web console.

Red Hat OpenShift on Google Cloud Platform
OpenShift on Google Cloud Platform (GCP) allows you to deploy OpenShift clusters managed by Red Hat on GCP infrastructure.
Step-by-Step Guide
1. Sign Up for OpenShift on GCP
- Set up a Red Hat and Google Cloud account.
- Go to the OpenShift on GCP section on the Red Hat OpenShift Console.
2. Create a Cluster
- Follow the instructions to deploy a new cluster on GCP.
3. Access the Cluster
- Access the OpenShift web console using the provided URL.

Common Troubleshooting Tips
- Networking Issues: Ensure that your firewall allows traffic on necessary ports (e.g., 8443 for the web console).
- Resource Limits: Check that your local machine or cloud instance has sufficient resources.
- Logs and Diagnostics: Use `oc logs` and `oc adm diagnostics` commands to troubleshoot issues.
Conclusion
Setting up an OpenShift environment can vary depending on your platform, but with the steps provided above, you should be able to get up and running smoothly. Whether you choose to run OpenShift locally or on the cloud, the flexibility and power of OpenShift will enhance your containerized application development and deployment process.
[OpenShift](https://example.com/openshift.png)
For further reading and more detailed instructions, refer to the www.qcsdclabs.com
#redhatcourses#information technology#linux#container#docker#kubernetes#containerorchestration#containersecurity#dockerswarm#aws
0 notes
Text
How to Deploy and Connect to a Solace PubSub+ Event Broker Using Minishift
The goal of this blog post is to give you a high-level overview of how to deploy Solace-powered event-driven applications using Minishift, a tool that lets you run an OpenShift 3.x cluster locally. By using Minishift, we’ll be able to develop OpenShift applications without spending the time required to set up a full-fledged development OpenShift cluster.
While the example architecture we’ll walk through is not production grade, it demonstrates how to configure both internal and external access to event broker services in OpenShift. Whether you’re trying to deploy and connect event-driven applications in an isolated on-premises environment, or you’re trying to deploy and connect event-driven applications across public and private clouds, the fundamentals covered in this blog post should prove useful to you.
If you follow along, you’ll learn how to:
Run an OpenShift cluster locally
Deploy a singleton Solace PubSub+ Event Broker into an OpenShift cluster
Establish connectivity between pods in an OpenShift cluster
Establish connectivity between a pod in an OpenShift cluster (in this case, a Solace PubSub+ Event Broker) and an external application
If you’re reasonably familiar with OpenShift, you could skip this tutorial and check out:
Solace’s OpenShift template samples found here
Solace’s AWS OpenShift Quickstart found here
The templates used in this blog post should not be used in a production-grade environment.
Overview
In this blog post, the first thing we’re going to do is get an OpenShift cluster running locally. Then, we’ll deploy both a singleton Solace PubSub+ Event Broker and a Node.js Express server that serves a basic web application to the client’s server. And lastly, we’ll show how both the Express server and the external web application can connect to the Solace PubSub+ Event Broker.
To get an OpenShift cluster running locally, we’ll be running Minishift with VirtualBox.
Here’s a visual of what the end product will look like:
You can find all the source code referenced in this blog post on this GitHub page.
Now, let’s start!
Run an OpenShift Cluster Locally
In this section, we’ll walk through how to install Minishift and VirtualBox, and then how to start an OpenShift cluster using them together.
OpenShift is a great technology, but unlike Docker it’s not something you can run natively on either a Mac or Windows computer. This is because OpenShift is a Kubernetes application platform that is built on top of Red Hat Enterprise Linux. If you want to test out OpenShift without paying for a dedicated test environment, you can use Minishift, “a tool that helps you run OpenShift locally by running a single-node OpenShift cluster inside a virtual machine (VM).” Note that Minishift runs OpenShift 3.x clusters. If you want to run OpenShift 4.x, there are other projects that you can use. You can run Minishift’s virtual machine using the hypervisor of your choice, but for the purposes of this blog post we’ll use VirtualBox, “a free and open-source hosted hypervisor for x86 virtualization, developed by Oracle.”
Install VirtualBox Follow the instructions on the Downloads – Oracle VM VirtualBox page to install VirtualBox.
Install Minishift Follow the instructions on the Installing Minishift page to install Minishift.If you’re using a Mac computer, I’d recommend installing Minishift using Homebrew Cask.
Start an OpenShift Cluster Once you have VirtualBox and Minishift installed, you can use this command to start a local OpenShift cluster: minishift start --vm-driver virtualbox --memory 9GB --cpus 5 Note that we set a couple flags in the command:
--vm-driver virtualbox tells Minishift how it can run the virtual machine
--memory 9GB tells Minishift how much memory to dedicate to the virtual machine
--cpus 5 tells Minishift how many CPU cores to dedicate to the virtual machine
Then it does some stuff…
And if Minishift starts successfully (it should), Control–click (Windows) or Command-click (Mac) the URL that the command spits out:
When you navigate to the link, you’ll see a screen that looks like this:
Once you get here, log in using “solace” for both the username and password. We’re not going to be covering how permissions work in OpenShift, so if you’d like to learn more about that, you can read more here.
You’ll see a screen that looks like this:
At this point, you’re ready to deploy some pods!
Deploy a PubSub+ Event Broker Using OpenShift
In this section, we’ll walk through how to deploy a Solace PubSub+ Event Broker as a pod into the OpenShift cluster we just started. The template we’ll be using is an ever-so-slightly modified version of what’s found on our sample templates repo. The modified version we’ll be using assigns a static NodePort to the NodePort service so that the port numbers in this blog post will match what you see locally. The blog post explains what that means in a bit.
If you haven’t already done so, download the source code.
Once you’ve downloaded the source code, navigate to templates/solace-singleton-ps+-broker.yml and take a minute to read over everything there. You’ll see that in the objects section of the template, three objects are being deployed: a pod, a cluster IP service, and a node port service.
Here are the descriptions of these three objects in the OpenShift documentation:
Pod: OpenShift Enterprise leverages the Kubernetes concept of a pod, which is one or more containers deployed together on one host, and the smallest compute unit that can be defined, deployed, and managed.
Cluster IP Service: A Kubernetes service serves as an internal load balancer. The default service clusterIP addresses are from the OpenShift Container Platform internal network and they are used to permit pods to access each other.
NodePort Service: Use NodePorts to expose the service nodePort on all nodes in the cluster. A node port exposes the service on a static port on the node IP address. NodePorts are in the 30000-32767 range by default, which means a NodePort is unlikely to match a service’s intended port (for example, 8080 may be exposed as 31020).
If the architecture diagram didn’t make sense at first, look at it again now that you have read each object’s description.
Hopefully by now you understand what this template is going to deploy, so let’s actually deploy it! OpenShift makes this step very easy.
First, create a project by clicking Create Project.
After you create your project, click Import YAML / JSON.
Then select the solace-singleton-ps+-broker.yml file found in the source code.
Click Create in the bottom right and then Continue in the nested popup. Don’t worry about saving the template, only Process the template has to be ticked for the purposes of this tutorial.
After you click Continue, you’ll see a screen like this:
This is where you can fill in the parameters that get interpolated into the template file. For example, the POD_NAME parameter gets interpolated anywhere the ${POD_NAME} variable is found. This can be useful for adding environment variables, connecting pods together, etc. Overall, it’s a handy tool for dynamically forming deployment templates.
The default parameter values are just fine for deploying the Solace PubSub+ Event Broker, so click Create and wait a couple seconds for the pod to deploy.
If you click into the project and look at the Overview tab, you should see a screen like this:
And if you click Applications > Services, you should see this:
If you see these objects in your console, congrats! You’ve successfully deployed a Solace PubSub+ Event Broker using OpenShift.
Now, let’s deploy the Node.js express server pod and services that will connect to our broker.
Deploy and Connect a Node.js Application Pod
In this section, we’ll walk through how to deploy a Node.js Express server as a pod into the OpenShift cluster, and then we’ll show how it can connect to the services we created for our Solace PubSub+ Event Broker.
Follow the same steps from the previous section except this time import the solace-simple-application.yml file found in the templates directory of the source code. This template will deploy both the Node.js application pod and a NodePort service that will allow us to reach the application externally. In the case of this example, we’ll be connecting to the Solace PubSub+ Event Broker from our web browser.
Pause after you click Process the template and look at the parameters that this template expects.
SOLACE_VMR_POD_NAME and SOLACE_SMFWEB_PORT are the variables that we’ll be using to connect the application pod to our Solace PubSub+ Event Broker pod. If you look inside the template under the pod object, you’ll find the following container environment variable:
containers: - env: - name: POD_NAMESPACE valueFrom: fieldRef: apiVersion: v1 fieldPath: metadata.namespace - name:"SOLACE_CLUSTERIP_SVC_HOSTNAME" value:${SOLACE_VMR_POD_NAME}-ci-svc.$(POD_NAMESPACE).svc
Here, we’re dynamically forming the host name that we’ll use to connect to the event broker. When the default parameters are substituted into the template, it forms vmr-ci-svc.testing.svc and will be accessible using the SOLACE_CLUSTERIP_SVC_HOSTNAME environment variable in our application.
In the SolaceClient.js file of our application code, you’ll see how this environment variable is used.
solaceclient.connectionParams = { url: `ws://${process.env.SOLACE_CLUSTERIP_SVC_HOSTNAME}:${process.env.SOLACE_SMFWEB_PORT}`, vpnName: process.env.SOLACE_VPN, userName: process.env.SOLACE_USERNAME, password: process.env.SOLACE_PASSWORD };
Here, we form the URL that the client will use to connect to the Solace PubSub+ Event Broker using both environment variables. This host URL resolves to our Solace PubSub+ Event Broker pod within our cluster.
When the application pod finishes deploying, you’ll see a message indicating whether it was able to connect to the Solace PubSub+ Event Broker. This is what it’ll look like if it successfully connects:
As the message indicates, the pod connects to the Solace router using the internally exposed ClusterIP service. Using this pattern, you can create an entirely self-contained, event-driven OpenShift cluster. This might be useful for on-premises deployments of OpenShift.
Along with the application, the template created another NodePort service that we can access from our web browsers. You’ll see it here named solace-simple-app-np-svc:
If you click on it for a detailed view of the NodePort service, you’ll see that the service is exposed on NodePort 30100, which we’ve defined statically in the template.
To access this service from our web browser, you’ll need to navigate to <Minishift IP>:<App Service NodePort>
A quick way to find your Minishift IP is to copy the IP address you’ve used to connect to the console.
In my case, I’d navigate to 192.168.99.110:30100
This is what our example Web page looks like:
This is an example app that demonstrates how a Web page might use Solace PubSub+ Event Broker to perform request and reply operations. The only information you’ll need to change on this page to get started is the Solace router host URL.
To access the Solace PubSub+ Event Broker externally, we’ll form and use a URL in a way similar to how we did to access our Web page’s landing page, but in this case, we’ll use the NodePort associated with the Solace router. Since this application is a Web page, we’ll be using the NodePort for Web messaging, which allows communication using the WebSocket protocol. For the purposes of this example, the template statically maps NodePort 30200 to the corresponding container port that handles WebSocket channels (port 60080).
Here’s how you’d find this information:
So, the full Solace router host URL will be ws://<Minishift IP>:30200
Note the ws:// prefix, which indicates the protocol that the client will be using to communicate.
After you plug in the Solace router host URL, click connect, subscribe, and send request:
If your screen looks like the screenshot, your Web browser was able to communicate with the Solace router that you’re running in an OpenShift cluster using Minishift, which demonstrates how you’re able to establish external connectivity to your router.
Conclusion
If you followed this tutorial from start to finish, you should have learned how to:
Run an OpenShift cluster locally
Deploy a singleton Solace PubSub+ Event Broker into an OpenShift cluster
Establish connectivity between pods in an OpenShift cluster
Establish connectivity between a pod in an OpenShift cluster and an external application
I hope you found this tutorial useful! If you have any questions, please post them to Solace Developer Community.
The post How to Deploy and Connect to a Solace PubSub+ Event Broker Using Minishift appeared first on Solace.
How to Deploy and Connect to a Solace PubSub+ Event Broker Using Minishift published first on https://jiohow.tumblr.com/
0 notes
Text
Overview of openshift online cluster in detail
OpenShift Online Cluster is a cloud-based platform for deploying and managing containerized applications. It is built on top of Kubernetes and provides a range of additional features and tools to help you develop, deploy, and manage your applications with ease. Here is a more detailed overview of the key features of OpenShift Online Cluster: Easy Deployment: OpenShift provides a web-based…
View On WordPress
#openshift openshift4 containerization redhatopenshift openshifttutorial openshiftonline Introduction to openshift online cluster#container platform#deploy openshift web application using openshift cli command line red hat openshift#Introduction to openshift online cluster#Login to openshift cluster in different ways openshift 4 red hat openshift#openshift#openshift 4#Openshift 4 container platform#Openshift architecture#openshift container platform#openshift docker#openshift enterprise#openshift for beginners#openshift online#openshift online account access openshift cluster openshift 4 red hat openshift#openshift online cluster#openshift online cluster admin#openshift online cluster overview of openshift cluster#openshift openshift 4 red hat openshift#Openshift overview#openshift tutorial#overview of openshift cluster#red container#red hat openshift#red hat openshift 4 container platform#red hat openshift clusters#red hat openshift container platform#redhat openshift online#web application openshift online#what is openshift online
0 notes
Text
10 Free Courses to Learn Docker for Programmers
Here is my list of some of the best, free courses to learn Docker in 2019. They are an excellent resource for both beginners and experienced developers.
1. Docker Essentials
If you have heard all the buzz around Docker and containers and are wondering what they are and how to get started using them, then this course is for you.
In this course, you will learn how to install Docker, configure it for use on your local system, clone and work with Docker images, instantiate containers, mount host volumes, redirect ports and understand how to manage images and containers.
After completing the course you should be able to implement containers in your projects/environment while having a firm understanding of their use cases, both for and against.
In short, one of the best course for developers and DevOps Engineers who want to learn basics, like what Docker containers are and how to use them in their environment.
2. Understanding Docker and using it for Selenium Automation
This is another good course to learn and understand the basics of Docker while automating Selenium test cases for your project.
The course is specially designed for DevOps engineers, automation guys, testers, and developers.
The course is divided into three main parts: Introduction of Docker, Docker Compose, and Selenium Grid with Docker.
The three sections are independent of each other and you can learn than in parallel or switch back and forth.
3. Docker for Beginners
This is one of the best sources to learn the big picture of Docker and containerization. If you know a little bit about virtualization, networking, and cloud computing, then you can join this course.
It provides a good introduction to current software development trend and what problems Docker solves.
In short, this is a good course for Software and IT architects, Programmers, IT administrator and anyone who want to understand the role of Docker in current world application development.
4. Containers 101
Docker and containers are a whole new way of developing and delivering applications and IT infrastructure.
This course will cover Docker and containers, container registries, container orchestration, understand if this will work for the enterprise, and how to prepare yourself for it.
In short, a good course for anyone who wants to get up to speed with containers and Docker.
5. Docker Swarm: Native Docker Clustering
Managing Docker at scale is the next challenge facing IT. This course, Docker Swarm: Native Docker Clustering will teach you everything you need to know about Docker Swarm, the native solution for managing Docker environments at scale.
It’s a good course for Developers, Networking Teams, DevOps Engineers, and Networking infrastructure teams.
This was a paid course earlier on Udemy, but it’s free for a limited time. Join this course before it becomes paid again.
6. Docker Course Made for Developers
Whether or not you’re a Developer, anyone who works with code or servers will boost their productivity with Docker’s open app-building platform.
In this course, you will learn how to use the Docker products, like Docker Toolbox, Docker Client, Docker Machine, Docker Compose, Kinematic, and Docker Cloud.
You will also learn how to work with images and containers, how to get your project running, and how to push it to the cloud, among other important lessons.
7. Docker on Windows 10 and Server 2016
If you are thinking to learn how to use Docker on Windows 10 and Windows Server 2016 then this is the right course for you.
In this course, you will understand what Docker On Windows is all about and how Docker on Windows is the same as Linux Containers.
You will also learn Hyper-V, namespace isolation and server containers in depth.
8. Deploying Containerized Applications Technical Overview
Docker has become the de facto standard for defining and running containers in the Linux operating system. Kubernetes is Red Hat’s choice for container orchestration.
OpenShift, built upon Docker, Kubernetes, and other open source software projects, provides Platform-as-a-Service (PaaS) for the ultimate in deploying applications within containers.
This is an Official Red Hat course about containers using Docker running on Red Hat Enterprise Linux.
In this course, Jim Rigsbee, a curriculum architect for Red Hat Training, will introduce you to container technology using Docker running on Red Hat Enterprise Linux
9. Docker Deep Dive
As the title suggests this is a great course to learn Docker in depth. It provides a good experience for core Docker technologies, including the Docker Engine, Images, Containers, Registries, Networking, Storage, and more.
You will also learn theory and all concepts are clearly demonstrated on the command line.
And the best part of this course is that no prior knowledge of Docker or Linux is required.
10. Docker and Containers
In this course, you’ll learn how this is going to impact you as an individual as well as the teams and organizations you work for.
This course will cover Docker and containers, container registries, container orchestration, whether this stuff is for the enterprise, and how to prepare yourself for it.
These two courses from Pluralsight are not really free; you need a Pluarlsight membership to get this course, and monthly membership costs around $29 and annual membership cost around $299.
I know, we all love free stuff, but you will not only get access to this course but over 5000 courses as well, so it’s definitely the money well spent.
I have an annual membership because I have to learn a lot of new stuff all the times. Even if you are not a member, you can get this course for free by signing a free trial. Pluralsight provides 10-day free trial with no obligation.
That’s all about some of the free Docker container courses for Java developers. It’s one of the essential skill if you are developing a mobile application or web application hence, I suggest every application developer learn Docker in 2019. You will not only learn an essential skill but also take your career to the next level, given the high demand for Docker specialist and developer who knows Docker.
[Source] https://hackernoon.com/10-free-courses-to-learn-docker-for-programmers-and-devops-engineers-7ff2781fd6e0
Beginners & Advanced level Docker Training Course in Mumbai. Asterix Solution's 25 Hour Docker Training gives broad hands-on practicals
#docker swarm training#docker certification#docker training#docker training course#docker container training
0 notes
Text
Up and Running with the OpenShift Ansible Broker
Openshift is integrated with Cloud Infrastructure Server Cluster. Contact us to find out our latest offers! [small_space]
Overview
In OpenShift 3.7, we introduced two new concepts: Service Catalog and Service Brokers. The Service Catalog is a self-service marketplace where service consumers can find and acquire services. It’s also a place for various service providers to list their services to…
View On WordPress
0 notes