#polycount discussion
Explore tagged Tumblr posts
Visit Tumblr Blog
Explore Tumblr blogs with no restrictions, modern design and the best experience.
Last Seen Tumblr Blogs


Fun Fact
The “We are the 99%” Tumblr blog became the slogan for the Occupy Wall Street movement.
Text
TS2 CC downloaders & creators discussion recap
Under the cut is a recap of the feedback gathered from the comments, community replies and reblogs on this thread. Thank you for taking the time to give your input! I tried to organize everything clearly in categories, with what was most often brought up at the top of each. I hope I didn’t forget anything. If I did, or you feel I didn't do your point justice, or you didn’t get a chance to say your piece, feel free to comment (I can always make edits). The text in brackets [] is my own remarks that I'm adding to the report.
About CC in general:
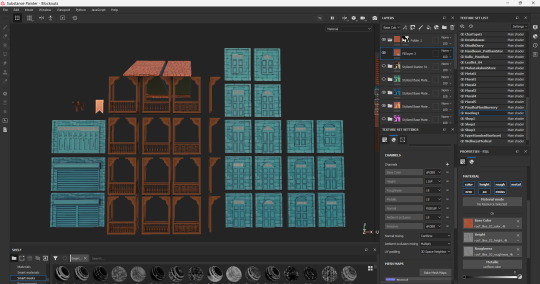
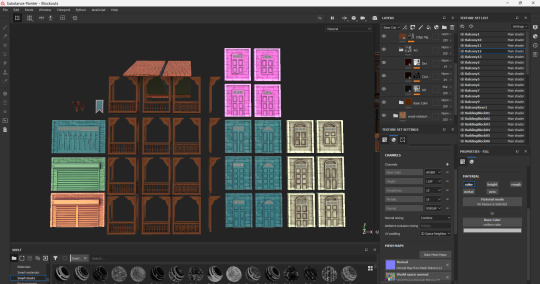
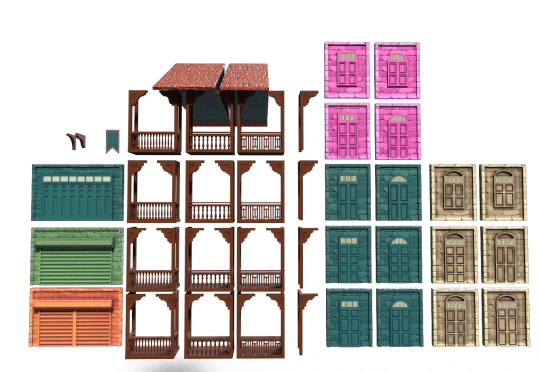
The people clamored for clear swatches/pictures that show which file corresponds to which recolor, so we can pick and choose what to keep.
Many people would like creators to put their usernames in their file names (or object descriptions) so they are easier to trace back to later. Two creators had counterpoints to this. One who has a long username said: “as a creator, I don't like to be told how I should name my files (besides identifying the thing clearly, which I think we really should do). If I've made the effort to make a thing, take previews, upload it, write the post etc. Just spend 5 seconds of your life renaming the file to whatever is convinient to you, I'm not going to add 16 characters to each of my files to include my username (I still think that longer names = longer loading time).” The other creator said: “As a creator, I don't want to put my full username in tooltips (just SB) because some hair names are quite long and I do not have the time to re tooltip the names.”
On the topic of file names, many people agreed that creators should not put special characters and spaces in their file names, to optimize loading times. One creator clarified: “the filenames should always have _ instead of spaces, as apparently this allows the game to load them easier/faster [...] underscores should be the only kind of special character in them” [use the Bulk Rename Utility - see tutorial by @ilovethesims2cc].
Still on file names, a Mac user said they dislike when file names are too long because apparently long file names are enough for Macs to shit themselves [sorry if I misunderstood, never had a Mac].
Several people mentioned disliking poorly optimized CC (one person listed: “bulky for no reason, unused bump maps, comically large or duplicated textures, things that could easily be repo'd but are not”), one person pointed out: “There is no reason a TS2 object needs a texture bigger than 1024x1024 unless it’s a special case like a skybox.”
One person said they dislike when a CC post lacks basic text info about what the download is. On this note, another person said they dislike when a creator isn’t clearly stating what mesh their recolors are for.
Two people asked that creators state their stuff’s polycounts.
Two people said they dislike when the recolors for a piece of CC are only available merged together, as they want to be able to easily choose which they want to keep. On the other hand, someone who “takes all recolors anyway” said they would like creators to offer a merged version of their recolors [you can merge CC to reduce loading times using LazyDuchess’s CC Merger].
One person recommended avoiding just using “here” as hyperlink text, but instead describing what you are linking to, so that if the link gets broken we still have a chance to find the thing. In the same vein, they and another person advised against reliance on an image alone to give info about the download. As we know, images can disappear, and a Google search won’t lead to the item if your post has no text that Google can detect.
About the images that creators do show, one person mentioned a download not having a proper preview as their pet peeve. On previews, two people recommended that the piece of CC be clearly visible and the main focus. Two people said they like when a preview of the item is included in the archive (“helpful when looking through old CC”).
One person said they appreciate when creators give two download links to two different hosting platforms, in case one of them ever breaks.
One person asked for creators to always test their stuff before uploading [it should go without saying but we do see egregious things to this day]. Their pet peeve is “CC with obvious issues that can’t have been tested properly in game! Don’t just look at it in build mode or bodyshop, actually use the item in live mode. Have a Sim wear the clothing or use the object!” They pointed out as an example that some CC lights don’t light up. Someone else said: “if there are minor imperfections, that's ok! But let your downloaders know what to expect.”
One person said that they enjoy reading detailed descriptions of CC: “Share your inspos, what went wrong, tag the pieces you used if you are Frankenmeshing because I might want those items too! Creating and sharing is deeply personal, don't be afraid to share a part of who you are in your downloads if you feel comfortable doing so.” [If I may offer a slight counterpoint, I think detailed technical info + proper crediting should always be frontloaded. And then, in a separate paragraph, you can write about how you made this because your grandma used to wear something similar on those cool autumn days back when you were 6. But please, don’t expect your audience to have to parse through your life story to get the basic info they need to even understand what the download is.]
On subfolders: one person mentioned that they dislike when individual files are placed in subfolders; someone else said they don’t like many subfolders within an archive; a third person said that when downloading a ‘bulk’ CC pack, they dislike when each item has its individual subfolder (unless the object has dozens of recolors).
One person said they dislike downloads that include a large number of things that aren’t all part of a single coherent set.
One person said they dislike gift/mega packages that don’t give the possibility to pick and choose what you’re downloading.
One person asked that creators compressorize their CC, unless there is a good reason for not doing so, reason that should be stated [yes please! Use jfade’s Compressorizer, found on this page].
One person said they like when creators who make recolors give a link to the mesh they are recoloring whenever possible, even if the mesh is included.
One person mentioned appreciating when creators include base PSDs in their downloads [they were talking about hair specifically but I suppose it can be done for other things too].
About Bodyshop CC specifically:
Many people mentioned disliking when a piece of clothing lacks a fat morph (as one person put it: ✨“its literally bigotry”✨ [iconic]), or has a fat morph that's blatantly a quickly WSO’d afterthought. Someone said: “Absurdly shaped/clipping fat morphs that were most probably never tested in game before uploading are pretty annoying”; someone else said: “I make male content and am constantly flabbergasted by some of the UM Top fat morphs that make no attempt to align with Bottom items, or look completely ridiculous. [...] WSOs are a great starting point, but that's just it: a starting point" [I couldn’t agree more]. One person added that clothes should also have preg morphs.
One person really wants tooltips. Someone else further asked that creators give actually helpful tooltips to their recolors to make it easier to identify which recolor corresponds to which file [you can use CatOfEvilGenius’s Tooltip utility to give your recolors tooltips that correspond to their file names].
One person mentioned gaps in meshes being their #1 pet peeve [putting this in this section because I’m assuming they’re referring to Bodyshop CC].
One person asks that creators give their accessories unique BIN numbers to make them layerable with other accessories.
The same person would like creators to remember to delete the inapplicable ages in their accessories [this also goes for hairs].
The same person also appreciates when creators make custom thumbnails for their accessories, “especially for accessories that are not on the face”.
The same person said: “Accessories that are 'part of the sim' (like ears, tails, etc.) should be showerproof”. Another person had the same request: “Body part accessories (such as animal ears, tails, horns, wings) should be available for all types of clothing.”
One person appreciates when hair meshers specify if their hair is animated or not.
One person would like to see more hairs for toddlers and children.
For geneticized skintones, one person said they find it helpful when the genetic number is indicated in the file name.
About Build & Buy CC specifically:
Several people said they dislike when CC objects are set to an absurd price (like a couch for 1 simoleon) [this can be fixed with Pick’N’Mix’s Object Relocator], and two people added that they dislike when an object’s price isn’t congruent with their stats (like when an expensive bed has a low energy score). A creator further said: “whats worse is sometimes items are cloned from a very expensive item, and then the creator has reduced the stats shown in the description, but the bhav still has very high ratings, or sometimes it can be the other way around, an item might have been cloned from a cheap one, then their displayed stats are set to 10 but the bhavs still have low ratings”.
Three people said that they really appreciate when creators state which category their object is in and what the price is. One person said they appreciate when creators give info about how their object functions (“Is it just deco? Does it have hobby enthusiasm?” etc.). For complex objects, they like when there’s a video to show how it works.
One person said they dislike when creators place objects in categories that don’t make sense. Someone said more specifically that they like when objects are put in categories other than deco/sculptures or deco/misc.
One person said they dislike blank object descriptions or object descriptions that were left the same as that of the Maxis object that the piece of CC was cloned from.
One person said they don’t like when objects aren’t enabled for quarter-tile placement [can be fixed in simPe or with the Object Relocator].
One person said they dislike non-functional objects (like a sofa that’s a sculpture).
One person brought up two experiences they and their friend had with CC beds that didn’t have unique GUIDs and therefore would override other beds. In the same vein, someone else said they dislike when a creator forgets to mention that their CC is not custom but default and will override something in the game.
One person encourages creators to learn about the TXMT settings of objects (e.g. should an object be reflective?) and praised @pforestsims and @shastakiss for their CC in that regard. Another person said they dislike when an object is too shiny, which is also a TXMT setting.
One person said they dislike “transparent cut out textures”. [I quote because I’m clueless about this:] “I’ve seen this a lot on TS3 or other game conversions, where the texture has been imported without enabling transparency, and you get ugly squares around draw handles and such. Import the texture as DXT 5 and enable AlphaTest in the TXMT.”
One person said they like when 4t2 conversions have several subsets.
The Mac user among us would like creators to resize their walls and floors for Macs, otherwise they show up grey in game.
About lots specifically:
Two people said they like when creators show the floor plans of their lots.
104 notes
·
View notes
Text
COMMISSIONS (STATUS: OPEN)
Due to substantial interest in my work (♥), I'm opening commissions for conversions.
I do:
CAS accessories, Teen-Elder
Almost all Buy Mode
Simpler Build Mode stuff (walls, floors, fireplaces, plants, MAYBE columns - never tried them!)
Patterns
I won't do it, please do not insist:
Fences, windows, doors, arches and all the other complex Build Mode stuff
Vehicles except for witch brooms
Functional mattresses, never got the hang of them
Clothing and shoes
Hair
Makeup
Pricing:
Up to 4 items: $7.50
5 to 7 items: $12
8 to 13 items: $22.50
14 to 18 items: $30
19 to 23 items: $37.50
24 to 33 items: $52.50
34 to 47 items: $75
For more than that, please tell me in private.
Yes, it's basically Suteflower's rate+50%, because I don't want to cut into her profits, I do have a regular job so I can't be as prolific, and I think it's fair to charge more because of my own experience in conversions :P That said, I am open to negotiations, especially from Global South simmers!
Also stuff like separating one painting with 30 presets into 3 paintings with 10 presets each do not count as extra items, that's just my way of optimizing items!
Extra notes:
No, sets don't count as a single item, don't even try :p
I'll try my absolute best to make all items recolorable, but for some items with complex textures it isn't always possible
For high poly alpha creators, please let me have a look at the items before I accept the commission or not - sometimes reducing the polycount for those items is just Not Worth It, but in my case it'll be kind of rare to refuse it
Kitchen counters, islands and cabinets are calculated by EVERY MODULAR PART instead of just a singular item because in practice they are multi-object conversions
Depending on the original creator, I'll share the conversion in private to avoid drama. You'll be free to share it with your friends and I'll be free to share with mine, though!
How to request:
Please send me a DM or reply to this post for the items you're interested, so I can check if the conversion is viable or not. If I accept it, please send me your Discord (if you have it; if not, we'll communicate by DMs anyway), so I can start sending you WIP pics and beta versions of the items, and also for discussion about edits, optimization, etc.
Pay me by Paypal or Ko-fi after I have a look at the TS4 items and we decided on a place to communicate. For Brazilian simmers, YES I DO ACCEPT PIX and we'll decide on the exchange rate in private!
I'll try to work on your request as soon as possible, and I'll inform you if anything happens or if I need to delay it a little.
My timezone is GMT-3, so please be patient!
I reserve the right to refuse a commission for any reason!
Also, my trades for clothing ARE STILL UP!
COMMISSION SPREADSHEET
SFS COMMISSION SUBFOLDER
UPDATE: Now I have a functional Ko-fi account!
25 notes
·
View notes
Text
Announcement
2024 brings some changes. I still plan to do hair and other Sims content conversions, but the order of posting will change slightly.
Firstly, from now on content will be published once per season in two parts. The first part is hair conversion (approximately 2-5 meshes, maybe more, but no promises). The second part is everything else - eyes, eyebrows, accessories, makeup, clothes. Perhaps someday there will be a third part, which will consist of buy&build mode objects.
To give my Patreon followers an advantage, I will be posting content there before posting on Tumblr. This doesn't mean there is a paid early release or anything like that, my conversions will always be free. Just if you check my patreon you will have a chance to see and download the release a little earlier.
Today, on the last day of winter, I am publishing the first part. This time there won't be a second part, but I'll try to make it for the next season.
There is also one more important thing I need to say. Updated TOU
Maybe some people won't like it, but c'est la vie. From today I ask to leave my conversions, published in 2024, unedited. I mean reducing polycount. I don’t want to start a discussion about this, the decision is final. If you need lowpoly mesh, please do conversion from scratch by yourself, guys. Retexturing, alpha-editing, f2m and age conversion is ok as before.
Lastly, on the updated previews you can see the VK link. It leads to a common group of several creators, which is not yet completely filled with content, because oh-la-la! there is not enough time for this yet. In the future, we plan to publish CC there, which will not be on Tumblr. When the group opens, I will let you know.
15 notes
·
View notes
Text
Blog Post #19- 03/04/2025
Today I pitched my idea to Eden and Neil, and I was honestly relieved because they both seemed to really like it.
Eden shared a few super helpful resources with us too, especially the FZD School YouTube channel, which has loads of tutorials on environment composition, cinematic lighting, storyboarding, and sci-fi world-building—all of which are totally relevant to what I’m trying to create.
He also introduced us to trim-sheets and advised us to use that in our project. One of the tutorials he recommended showed how you can use baked bevels in a trim sheet to fake geometry details like edges and corners, which is such a smart way to save on polycount.
We also talked about Unreal Engine techniques today, especially the limitations of Nanite when working with animated or deforming geometry due to how it handles topology, and how using Lumen for lighting adds realism but requires clean mesh and UV setups.
Eden also discussed second UV channels in Unreal, which can be used to add detail layers like decals or tiling textures without affecting the base UV layout—this could be really useful for adding extra details like cracks or dirt using vertex painting on my bunker walls.
During the session, we also looked at a game called Tiny Glade, and I absolutely loved it—it’s such a beautiful little diorama builder game with a cozy medieval vibe and this super clever real-time procedural geometry system. Even though it’s more stylized and relaxing in tone, the way it handles environment interaction and surface detail felt really inspiring for me, especially in terms of scene-building and flow. I might even research about it later and try to implement something similar in my project as well.
Sources:
Pounce Light. (2023) Tiny Glade [Steam game]. Available at: https://store.steampowered.com/app/2198150/Tiny_Glade/ (Accessed: 03 April 2025).
0 notes
Text
Pre-Production: 6
Blog#28
23/03/25
I came across this artwork by Paul Widelski on Polycount.
He shared his character creation process, from the 2D concept art to the final render. I was very impressed by the level of detail in this character.


The intricate details on his face, the textures of the fabric and accessories, and the careful attention to minute aspects like dirt under the nails, as well as cuts and bruises on the fingers, all contribute to telling the character's story.
I checked his ArtStation account, where I found other character art projects of equally high quality. I will be using this artwork as inspiration for my final major project.
References:
Widelski, P. (2024). [Finished] Saxon. [online] polycount. Available at: https://polycount.com/discussion/234966/finished-saxon#latest
Paul Widelski. (2025). Paul Widelski. [online] Available at: https://pav3d.artstation.com/
0 notes
Text
Researching Tri Limit for Guns
How many polys for guns? - Unity Engine - Unity Discussions
Recommended poly count for player models and weapons - Development / World Creation - Epic Developer Community Forums
Is 20K triangles for one gun model too much? - Help and Feedback / Building Support - Developer Forum | Roblox
Weapon Tri Count? — polycount
How many polygons do modern video game firearms tend to have? : r/gamedev
There are a lot of conflicting and different values for the tri limit to aim for. This is because each gun is different and the context its used in is different as well. With all this in mind I am going to aim for around 20-30k triangles. This is because I'm adding a lot of details since I want it to be realistic and it is also for a first person game. This means the gun will fill 25% of the screen so it needs to be high fidelity. This is also my first time trying to properly optimise such a high quality model.
If I can't manage to bake and retopologise to make it lower poly, as well as model and texture the three guns in the time, I will just leave it and use the high poly version. This is because I want to focus on texturing and modelling in particular for this project so I want to dedicate my time to that. My long term aspirations are also to model for VFX and film instead of games where I wouldn't be as constrained with the poly count and optimisation.
0 notes
Text
Average Polycount of EA Items in TS3: A Reference Sheet
I initially started this list as a personal “cheat sheet” that I could reference to ensure the custom content I'm downloading is appropriate for gameplay when it comes to polycount (and because I intend(ed) to learn how to make my own cc). I decided to share in case others find it useful.
I’m not a Maxis Match purist or anything like that, but purging high-poly CAS items from my cc folder eliminated in-game stuttering for me entirely. For some reason, this is rarely mentioned in discussions about gameplay optimization. Polycount does matter.
There’s a lot of absolutely gorgeous but incredibly high-poly cc out there that is simply not gameplay friendly for the average player. As we see an influx of first-time or rusty players migrating over from TS4, I think it’s important people are aware of this (both players and creators alike).
This might be a nonissue for those whose focus is on CAS and pretty screenshots, or maybe for those who have beastly gaming pcs/graphics cards etc.
But for players whose focus is on actual gameplay, high-poly cc can be detrimental.
With that said, below the cut you can find a list of average polycounts for some EA clothing/objects to use as a reference.
My method
I recorded the polycount of 10 items from each category below so that I could get a decent representation from each one to calculate the average. Since there is a wide range in some of the categories, I’ve opted to also include the minimum, median, and maximum for a clearer picture.
This list is not exhaustive; I feel like after a while, you kind of get the point. Also, this has been sitting on my computer for ages, and I don’t know if/when I will continue collecting data for it, so I figured I would just share what I have for now.
CAS
Tops:
Average polycount: 3538.4
Minimum polycount: 2868
Median polycount: 3443
Maximum polycount: 4872
Outfits:
Average polycount: 4281.8
Minimum polycount: 3865
Median polycount: 4205.5
Maximum polycount: 4932
Bottoms:
Average polycount: 1094.2
Minimum polycount: 770
Median polycount: 1016
Maximum polycount: 1768
Hair:
Average polycount: 4343.2
Minimum polycount: 2298
Median polycount: 4691
Maximum polycount: 6840
Shoes:
Average polycount: 621.6
Minimum polycount: 456
Median polycount: 594
Maximum polycount: 968
Accessories
Average polycount: 520.8
Minimum polycount: 118
Median polycount: 433
Maximum polycount: 1098
Objects
Dining Chairs
Average polycount: 806.3
Minimum polycount: 362
Median polycount: 799
Maximum polycount: 1054
Sofas and Loveseats
Average polycount: 1699.4
Minimum polycount: 958
Median polycount: 1414
Maximum polycount: 2920
Livingroom Chairs
Average polycount: 791.0
Minimum polycount: 290
Median polycount: 920
Maximum polycount: 1006
Beds
Average polycount: 3529.4
Minimum polycount: 1974
Median polycount: 3316
Maximum polycount: 5668
Plants
Average polycount: 746.3
Minimum polycount: 104
Median polycount: 801
Maximum polycount: 1998
Sculptures
Average polycount: 1659.3
Min polycount: 440
Median polycount: 1417.5
Max polycount: 5263
Misc
Average polycount: 914.4
Min polycount: 380
Median polycount: 988
Max polycount: 1926
Curtains
Average polycount: 762.4
Min polycount: 262
Median polycount: 802
Max polycount: 1438
Wall Art
Average polycount: 524.1
Min polycount: 62
Median polycount: 171
Max polycount: 2403
Dining Tables
Average polycount: 754.8
Min polycount: 468
Median polycount: 685
Max: 1262
For vehicles, check out this follow-up from @dhalsims
Further reading from people who are way smarter than me:
Polygon counts and Sims CC by @simlicious, plus their tutorial on how to check polycounts using TSRW. Edited to add: check out their newest essay about polycount vs vertices!
Let’s Talk Polygons by @mspoodle1 plus their tutorial on how to use S3pe to check polycounts.
A warning about high polycount custom content - for downloaders and creators by @tommeraas-cc (this post is for TS4 but still relevant for TS3 as well).
Maybe no one cares about cc polycounts anymore, but I sure do. 😅
Happy simming! I'm on a bit of a break from TS3 right now but I always come back. 🖤
#ts3#ts3 simblr#sims 3#ts3 simmer#the sims 3#simblr#ts3 cc#sims 3 cc#sims 3 simblr#ts3 info#ts3 tutorial#sims 3 tutorial
392 notes
·
View notes
Text
Community Forums and Online Workshops for 3D Visualization Enthusiasts

3D visualization has revolutionized multiple industries, from gaming and film to architecture and virtual reality. For those who are passionate about creating, learning, and evolving in the world of 3D visualisation, community forums and online workshops offer a treasure trove of resources. Whether you're a beginner starting out or an experienced professional seeking new challenges and inspiration, engaging with these platforms can significantly accelerate your learning curve and broaden your horizons. Here are some key points to consider.
Access to Expert Knowledge
Community Forums: One of the most significant advantages of participating in community forums is access to expert knowledge. Platforms like CGSociety, Polycount, and Blender Artists are frequented by experienced professionals who generously share their expertise. Whether you're troubleshooting a technical issue or seeking advice on your latest project, these forums are invaluable for anyone interested in 3D visualisation.
Online Workshops: Online workshops often feature lessons and tutorials from industry experts. Websites like Gnomon and School of Motion offer specialized courses that cover everything from the basics to advanced techniques in 3D modeling, texturing, lighting, and rendering. Engaging with these platforms can significantly enhance your skills in a 3D visualization studio setting.
Networking Opportunities
Community Forums: Community forums are not just about Q&A; they are also about building relationships. Engaging with other members by commenting on their work, participating in challenges, and sharing your own projects can lead to collaborative opportunities. These interactions can also provide insight into industry trends and job openings that you may otherwise miss in the architectural visualisation realm.
Online Workshops: Workshops often include group activities and forums where you can interact with your peers and instructors. This structured interaction simulates a classroom environment that can be highly beneficial for networking. You may even find your next project partner or employer through these connections.
Staying Updated with the Latest Trends and Tools
Community Forums: Forums are dynamic environments where members frequently discuss the latest trends, tools, and techniques. By regularly participating, you stay informed about new software updates, plugins, and workflow hacks that can enhance your work. Websites like Reddit’s 3D modeling community are particularly good for this and can help you stay ahead in the 3D visualization field.
Online Workshops: Workshops are often updated to reflect the latest industry standards and tools. For example, online learning platforms such as Udemy and Coursera regularly update their 3D visualization courses to include the latest software versions and trending techniques.
Receiving Constructive Feedback
Community Forums: Forums are great for receiving constructive feedback. By posting your work and asking for critiques, you get diverse perspectives that can help you improve. Constructive criticism from seasoned professionals and peers can be crucial for growth. Sites like ArtStation have dedicated sections for sharing and critiquing 3D visualisation work.
Online Workshops: Workshops generally include assignments and projects that are reviewed by instructors. This structured feedback is invaluable as it is directly tied to the course material and your individual progress. Instructors often provide detailed critiques and suggest areas for improvement, helping you refine your skills more effectively.
Cost-Effective Learning
Community Forums: Most community forums are free to join, making them a cost-effective way to learn and grow. You can access a plethora of user-generated content, tutorials, and advice without spending a dime. This is particularly beneficial for students or hobbyists who may have limited budgets.
Online Workshops: While some online workshops can be pricey, many platforms offer free or affordable options. Additionally, the structured curriculum and expert guidance often justify the cost, making it a worthwhile investment. Furthermore, websites like LinkedIn Learning offer subscription models that give you access to a wide range of courses for a single fee.
Conclusion
Community forums and online workshops are indispensable resources for anyone interested in 3D visualization. They offer access to expert knowledge, networking opportunities, updates on the latest trends, constructive feedback, and cost-effective learning solutions. By actively engaging with these platforms, you can accelerate your learning journey, enhance your skills, and foster meaningful connections within the 3D visualisation community.
So, whether you’re looking to solve a complex rendering issue or simply want to stay updated with industry trends, don’t overlook the value of community forums and online workshops. Dive in, share your passion, and watch your skills soar in the world of architectural visualisation!
#3darchitecturalrendering#interiorvisualization#3darchitecturalvisualization#3dvisualization in india#visualization3d
0 notes
Text
Feedback

Reflecting on this feedback on the website polycount, I'm really encouraged by the positive comments and helpful suggestions. The comparison to a Soul Calibur aesthetic is a huge compliment and reassures me that the character’s design is strong and visually appealing. I appreciate that the feedback comes from a place of admiration and aims to help me improve my work.
The suggestions on the pose and presentation are insightful. Raising the hand to improve the silhouette is a great idea. While the current pose captures a subtle, confident moment, adjusting it could make the character’s stance more dynamic. The idea of repositioning the feet to suggest movement and strength also adds value, making the pose feel more powerful and alive.
On the design side, the critique about the axe is very useful. Enhancing the corrupted glow to trace the decal work, as seen on the belt, could highlight the details better and add to the character’s story. Addressing the faint red on the axe will help keep the model’s intensity consistent.
The feedback on the blue eye accent is also valuable. I hadn’t fully considered how we perceive blue tones, and adjusting the shade slightly could improve contrast, making the eyes stand out more against the darker parts of the model.
Overall, this feedback is both helpful and motivating. It encourages me to rethink some of my design choices and reminds me of the importance of refining details to create a stronger, more cohesive character. I’m excited to implement these suggestions and improve my work further in the future.
Philippovits, N. (2024). Fantasy valkyrie project - looking for feedback. [online] polycount. Available at: https://polycount.com/discussion/235866/fantasy-valkyrie-project-looking-for-feedback#latest.
0 notes
Text
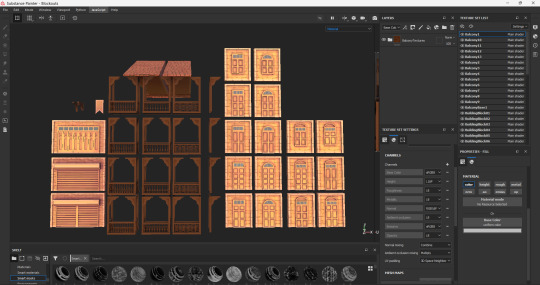
Texturing Modular Assets in Substance Painter
Welcome to this week's blog on creating semi-realistic stylized textures in Substance Painter for beginners! Today, we'll explore a simple 4-layer approach to achieve a handpainted, gradient-like look that's perfect for stylized environments like your Project Circuit Claw.
The 4-Layer Approach
Our texture will consist of four key layers:
Base Color
Ambient Occlusion
Edge Highlight
Gradient
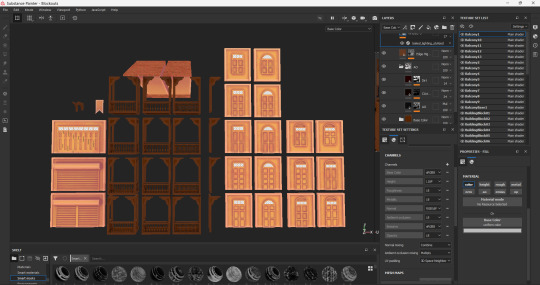
Base Color
Start with a solid base color that sets the tone for your asset. Choose a color that fits your overall environment theme. For Circuit Claw, you might opt for cool blues or warm oranges depending on the area.
To add depth, try using a Fill layer with a subtle noise pattern. This breaks up the uniformity and adds visual interest.
Ambient Occlusion
Add an Ambient Occlusion layer to enhance the depth and form of your model. Use a dark color with low opacity and set the blend mode to Multiply. This will darken the crevices and undersides of your asset, creating a sense of volume.
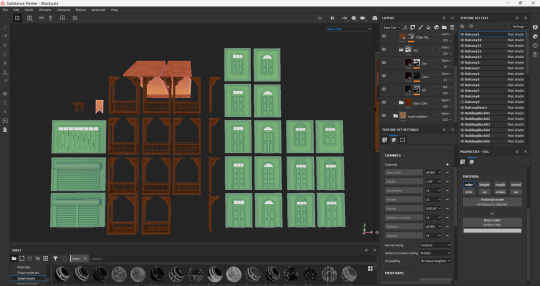
Edge Highlight
Create an Edge Highlight layer to make your asset pop. Use a lighter version of your base color or a complementary hue. Set the blend mode to Add or Overlay and mask it to affect only the edges. This will give your asset a subtle glow and enhance its silhouette.
Gradient
Finally, add a Gradient layer to tie everything together. This can be vertical, horizontal, or radial, depending on your asset's shape. Use colors that complement your base, perhaps transitioning from cool to warm tones. This layer adds depth and interest to large flat surfaces.


Tips for Variation
To avoid monotony in your modular assets:
Color Shifts: Subtly alter the hue of your base color for different modules.
Gradient Direction: Vary the angle or type of gradient across assets.
Wear and Tear: Add slight variations in edge wear or scratches to differentiate pieces.
Remember, the key to semi-realistic stylized textures is finding the balance between simplification and detail. Don't be afraid to exaggerate certain elements for visual appeal.
Happy texturing to me:) , and see you next week for more updates on the Project. Toodles!
References:
Gintsiak, E. (2020, December 14). Recreating Marceline in a Semi-Realistic style. https://80.lv/articles/recreating-marceline-in-a-semi-realistic-style/
Focus_Method. (2022, January 10). What is the secret behind these SP hyper realistic texturing? [Online forum post]. Polycount. https://polycount.com/discussion/229046/what-is-the-secret-behind-these-sp-hyper-realistic-texturing
Adobe Substance 3D. (2024, June 17). Tips & Tricks in Substance 3D Painter to Make Semi-REalistic Textures | Adobe Substance 3D [Video]. YouTube. https://www.youtube.com/watch?v=ng-Wb7RaYHU
Escape Studios. (2021, August 11). Substance Painter Tutorial: Photorealistic prop Texturing [Video]. YouTube. https://www.youtube.com/watch?v=dKjC75r1FWU
FastTrack Tutorials. (2024, July 2). Realistic texturing tips in substance painter [Video]. YouTube. https://www.youtube.com/watch?v=_qirDRMN1WI
0 notes
Text
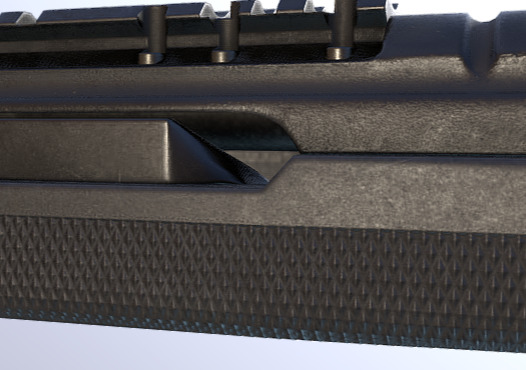
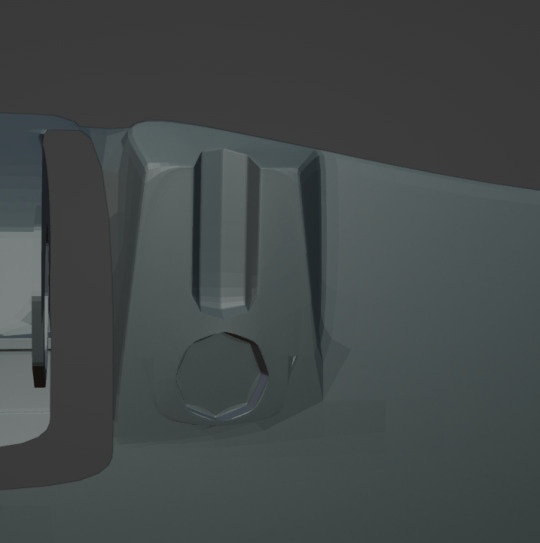
M1A Rifle. Progress. Part 3.

We are done with building the shapes and correcting the scales, and it is time now to focus on preparing the mesh for the high poly.
When I was working on the bolt of the Springfield, I noticed that each model (Jared Nelson (2016), Luchador (2019) had a different design of a rail: In a real-life example, the rail is supposed to slightly shrink and ramp down into the weapon, leaving some of the metal and polymer exposed. In the work of several artists, however - the rail looks different and either fully encloses the hole, or leaves some of the port hollow. I decided to leave some small cracks exposed in the port and cover behind of the port with a metal sheet, to avoid potential problems with the rendering of the weapon.


I had a chat with one of my classmates - we discussed each other's work, and I noticed that he used a different kind of workflow: He used ZBrush in order to do the beveling and to apply some details to his weapon. That got me a little excited and I figured that I would learn more about it later on.
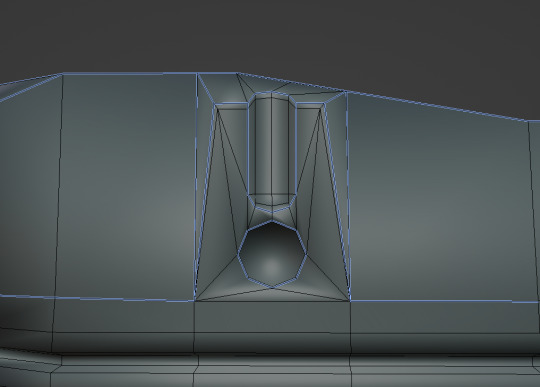
Most of the time I dedicated towards optimising the mesh that I had constructed from the beginning in order for the modifiers to work properly.
In my current Sub-D workflow, in order for the models to look highly detailed, I rely on two essential modifiers: Subdivision and Bevel. In combination they can do quite a good job of making many materials look round and smooth. However, there are negative trademarks for relying too much on these materials:
The topology has to be great. Because of that - you need to use quads, and know how to properly dissipate of too many or too less edges, or verts.
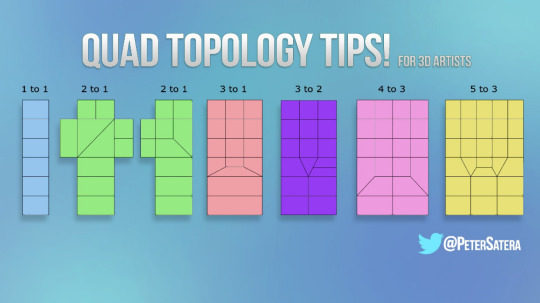
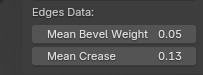
The user must know how Subdivisions and Bevels work. While they are perfect in simple meshes and such - they are an absolute pain to deal with in complicated and rough meshes: Subdivision does not like 90 degrees, and Bevel can ruin your model if not done properly. This is why in Blender you can control the strength of each tool through the Edges Data, but a user must still know where and how to place the control loops or even edges, and more.
One last thing - While it is important to maintain a quad topology during such a workflow, In reality, you don't always have to, if you understand what you are doing and what to avoid. For example, it can be fine if you do not follow a quad topology in the hidden or hard-to-see places, since most of the time they won't be seen, and it is fine to not maintain such a topology on flat surfaces, or far from edges, since the software would usually subdivide them smoothly anyway (But of course, before finishing or shipping the model, it is a must-have to fix N-gons).


A few blogs back I explained why I did not do a good-quality topology during the initial sculpting. Now I have a ready mesh, but then I realised that I missed an important detail of the weapon and now I had to create it while already having a topology prepared here.
In order to make this work - I would need to cut away the necessary space for the part, work on the missing detail and then optimise the new part in accordance with the reference. The additional difficulty of working like that is the fact that I would need to connect one topology to another one, which is not easy, because by removing some edges you risk destroying a good chunk of your existing topology, and by adding the new ones - you are creating unnecessary loops, that could add more faces later on, or create artefacts on your model.
Most of the work is done, and in the next part - I will be unwrapping the model.


References:
wiki.polycount.com. (n.d.). Subdivision Surface Modeling - polycount. [online] Available at: http://wiki.polycount.com/wiki/Subdivision_Surface_Modeling [Accessed 14 Jul. 2024].
Em14 (2024). Bought a Golden Era M1A today…. 51,xxx. [online] M14Forum. Available at: https://www.m14forum.com/threads/bought-a-golden-era-m1a-today%E2%80%A6-51-xxx.539388/ [Accessed 14 Jul. 2024].
Jared Nelson (2017). Springfield M1A Socom 16 - 3D model by Jared Nelson (@jjnelson). [online] Available at: https://sketchfab.com/3d-models/springfield-m1a-socom-16-d71ba145a3c14ee2a29fa04d49ffa4c7[Accessed 14 Jul. 2024].
Luchador. (2018). M1A Rifle - 3D model by Luchador (@Luchador90). [online] Available at: https://sketchfab.com/3d-models/m1a-rifle-2cbf09d6aa7d40a4b97a5a6dad0719a3[Accessed 14 Jul. 2024].
0 notes
Text
Create project phase
This last week or so I started modelling the head of the RIFA using the software Blender. I chose to work on the head for this prototype as it's shape and features will challenge my modelling skills, extend my learning and it includes a number of key identifying features for this species so could be useful if seeking feedback on the accuracy of the model and level of detail needed for it to be fit for purpose. Skills learnt modelling the head can then be applied to building the rest of the body at a later date. I started building the head and experimented with a few different ways of modelling using different shapes and tracked the time spent modelling. Progress on the modelling has been slower than I’d like due to my lack of knowledge of Blender and need for repetition to consolidate my skills. This past week time spent modelling has also been intermittent while I’ve been on the road travelling. Establishing a more regular modelling practice will help me retain knowledge between sessions. I also started a tip sheet to help me recall new commands and learnings faster.
Experimentation with modelling approaches
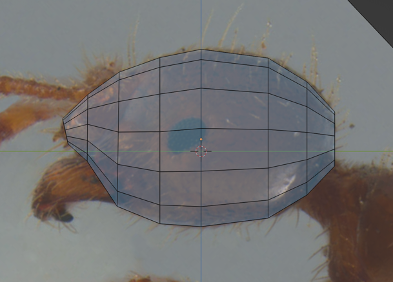
My first two experiments used a "hard modelling" process where you start with a certain shape and build onto it or you create the shape from scratch. I used scaled reference images of the RIFA as a visual guide to help get the shape and proportions accurate. I based my approaches on what I had observed in other digital models and a discussion with my client RK about how she would approach the modelling.
Model 1 - Initially I started by shaping a 10 sided cylinder mesh to the head shape, creating loop cuts around the cylinder and scaling the loops to the reference images which were scaled to match the size indicated in the image. One of my key aims in the modelling process is to keep the polycount (no. of polygons) low so the file size is kept as small as possible. From discussions with my client RK, the file size is a key factor in how easily the model can be accessed on mobile devices in the field. Too large a file and this will impact ease of use. By controlling the amount of faces created in the model I can work to keep them to a minimum. This approach was based on viewing the build of Massimo Righi’s Fire Ant where they have used two cylindrical shapes for the head to establish the crease down the forehead (see image below).

I experienced a few difficulties getting the shapes to overlap adequately and working out how to duplicate and invert one side to keep the head symmetrical- this was mainly due to my limited knowledge of some modelling tools and an issue with the view because I am modelling the RIFA at it’s actual scale which is smaller than typical modelling in Blender and does the odd weird thing with the view which threw me for a bit until I worked out what was happening. See images below of Model 1 in process:

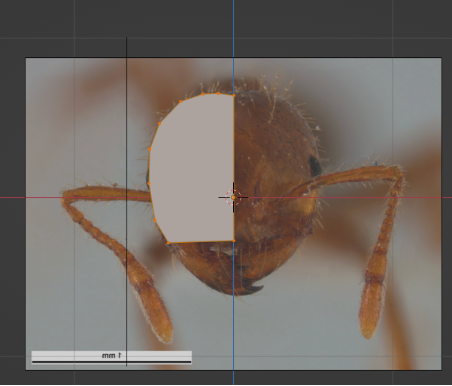
Model 2 – I wanted to see if I could control the modelling process and get a better head shape from the outset which would potentially save time later so also experimented with creating a flat plane of half of the head (front view). Using this approach I could build half and then mirror the other side, thus creating a symmetrical head shape and any changes applied to one half would automatically be made to the other half. This had an advantage over model 1 with the potential to reduce the polycount a little further. This method was based on examples I had seen of hard shape modelling on youtube previously. I had an issue with mirroring the design at one point however and had to set this model aside while I worked out how to resolve this issue while continuing to work on model 1. See images below:
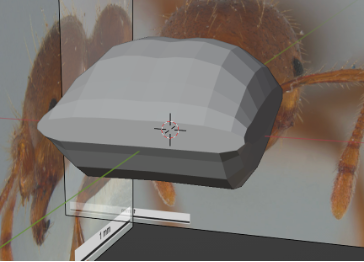
Another modelling approach I looked into more briefly but decided to discard was using a soft sculpting process. This tends to create a higher polycount and I felt the sculpting process in particular was not well suited to modelling of the RIFA where I want more control over the shape of each element (i.e. antennae) and polycount.
Additional research on RIFA
I have further questions about the RIFA and would like to test some assumptions about what value the model could provide to the market. I developed a list of these questions and put the questions into a short survey using Surveymonkey to make it easier to send the questions out to potential stakeholders and to collate the responses. I got my client RK to test and review the survey to help ensure it would be suitable and the link to the final version is here: https://www.surveymonkey.com/r/YXR8NZ7
I also reached out to a contact at the CSIRO insect collection who confirmed they have RIFA specimens, although these are not currently accessible by the public, and they may be able to assist if I need to clarify some features of the species.
What next? I plan to use one modelling approach going forward using the learning from the past week to draft the elements of the head i.e. head, eyes, antennae and mandibles before I start refining these elements. During this time I hope to receive some responses to my survey and gain further clarity around some of the features of the RIFA for when I begin to add more detail to the model.
0 notes
Text
Resources for Advancing Visual Effects Skills: Nurturing Creativity in the Digital Realm
Visual effects (VFX) have become a cornerstone of modern storytelling, shaping the way we experience narratives across various media platforms. From jaw-dropping cinematic spectacles to intricately detailed animations, VFX artists possess the power to transport audiences to worlds beyond imagination. As technology continues to evolve, the demand for skilled VFX professionals intensifies, making the pursuit of advancing VFX skills a compelling endeavor. In this article, we delve into a comprehensive array of resources that can propel aspiring artists and seasoned professionals alike towards mastering the art of visual effects.
The design industry in India is currently experiencing immense popularity, and the range of available options in the market speaks for itself, eliminating the need for further explanation regarding the hype. Individuals with an artistic perspective and creative abilities can undoubtedly delve into this field. Opting for a design career from MAAC institute ensures a path to success and reaching new heights.
1. Online Tutorials and Courses:
The digital age has ushered in a wealth of online tutorials and courses dedicated to advancing VFX skills. Platforms like Udemy, Coursera, and LinkedIn Learning offer a plethora of courses spanning diverse aspects of VFX, from 3D modeling to compositing and animation. These courses often feature step-by-step guides, video demonstrations, and hands-on projects that enable learners to grasp concepts and apply them in real-world scenarios.
2. Industry-Leading Software Documentation:
Mastery of VFX tools is essential for any aspiring artist. Industry-standard software like Autodesk Maya, SideFX Houdini, and Adobe After Effects come with comprehensive documentation and user guides. These resources provide insights into various features, functions, and workflows, allowing learners to navigate the software's intricacies with confidence.
3. VFX Communities and Forums:
Online communities and forums dedicated to VFX offer a platform for artists to connect, collaborate, and seek guidance. Websites like CGSociety, Polycount, and VFX Talk host discussions, share insights, and provide a space for artists to showcase their work and receive constructive feedback from peers.
4. Books and Publications:
Books remain a timeless resource for in-depth exploration of VFX theories and techniques. Titles like "The VES Handbook of Visual Effects" by Jeffrey A. Okun and Susan Zwerman provide a comprehensive overview of the VFX industry, while "Digital Compositing for Film and Video" by Steve Wright delves into the art of seamless integration of visual elements.
5. Software-Specific Forums and Channels:
Many VFX software providers host dedicated forums and YouTube channels featuring tutorials and tips directly from experts. These resources can help artists explore advanced techniques, troubleshoot issues, and stay up-to-date with the latest updates.
6. Art Schools and Institutes:
Formal education remains a robust path to advancing VFX skills. Enrolling in specialized VFX programs at art schools and institutes provides structured learning experiences, hands-on projects, and access to industry experts. Institutions like Gnomon School of Visual Effects, Vancouver Film School, and Escape Studios offer comprehensive VFX programs.
7. Conferences and Workshops:
Industry conferences and workshops offer invaluable opportunities to learn from professionals, witness live demonstrations, and network with fellow artists. Events like SIGGRAPH, FMX, and VIEW Conference bring together experts and enthusiasts from around the world to share insights and innovations in the realm of VFX.
8. Online Challenges and Competitions:
Participating in online VFX challenges and competitions can ignite creativity and push artists to explore new techniques. Platforms like The Rookies, CGTrader, and ArtStation regularly host contests that encourage artists to showcase their skills and receive recognition.
9. Professional Mentorship:
Mentorship from experienced VFX professionals can provide personalized guidance and insights. Seeking mentorship from established artists allows learners to receive tailored advice, industry insights, and constructive critique that accelerates their growth.
10. Personal Projects and Experimentation:
One of the most potent resources for advancing VFX skills lies within personal projects and experimentation. Creating passion projects allows artists to push boundaries, explore new techniques, and apply concepts learned from various resources.
In conclusion, the world of VFX is a dynamic and rapidly evolving realm, and the resources available for advancing VFX skills are equally diverse. From online tutorials and industry forums to formal education and professional mentorship, aspiring VFX artists have an array of tools at their disposal to master the craft. By leveraging these resources, artists can embark on a journey of continual growth, innovation, and mastery in the captivating world of visual effects.
0 notes
Text
So... how do we define MM anyways?
I'm putting this query out there, because ever since I created that list, I keep thinking of various people and going... are they Maxis Match? Or are they not?
I feel like MM is not as huge a thing in Sims 3 as it seems to be in TS2 and TS4, my personal CC collection is more maxis-mix and most of the creators I'm aware of don't actually list anywhere whether they're MM or Alpha, and a lot of them do both.
I have definitely a few criteria which disqualify from being MM:
1 - Photo-skinned items/clothing are not MM. Too different visually. 2 - Clothing made in MD (marvelous designer) is typically disqualified because it doesn't match the style OR the needed poly counts. 3 - I don't have a firm guide on what polycounts ought to be in order to be MM, but if they're high enough to cause gameplay issues, it's probably not MM. (I found a guide on Sims Wiki that gives some Polycount guidelines.) 4 - Anything overly realistic (like paintings for the wall that use RL photos and don't make them look like paintings) is not MM.
On the other hand, my criteria for saying something is MM:
1 - It was created by cloning an EA mesh and making small changes to that mesh or texture. 2 - Polycounts should be low enough to be comparable to or not much higher than EA items of similar complexity/size. However, I think hair, even from back in the day, breaks this rule. 3 - Style and visual look should be similar enough to official items that they blend well and it's hard or impossible to tell the difference.
Is this good enough for guidelines? Do the rest of you ever think about this? xD What guidelines do you use? Can lots and worlds that use CC be considered MM if the CC they use is MM?
Sidenote: That Wiki article basically says even complex hairs should be under 10k poly. And yet these days most conversions are 15k, 20k, or a lot of them are actually over 30k.
53 notes
·
View notes
Text
Personal opinion: Creators should notify about the texture sizes they have used too and not just the polycounts of their stuff, so people could better consider if their game can handle adding that CC. Anything with 2048x2048 textures especially put a huge strain on the texture memory and have a file size worth of multiple objects with smaller textures. This is equally true for textures built with raw formats (shadows and bump maps aside).
Those who have problems with the pink flashing might want to pay attention to CC with unusually large file sizes.
#text#text post#ts2 problems#this is not meant as an attack against anyone#i just feel that polycounts are discussed a lot these days#and texture sizes are often overlooked#while you can easily break the game with them too
116 notes
·
View notes
Text
Poll - Guide to Acceptable Polycounts for TS3
I'm not entirely sure how to broadcast this, but the polycount issue has blown up my feed spectacularly - and I've found the discussion interesting for a number of reasons.
Mainly that there has been no specific answer on what is expected to be a reasonable polycount and what's not outside of common sense. So I would like to take a poll of sorts to see where everyone's mind is at on the current issue.
So... who's up to take a vote? I think the easiest way would be to comment your answers below so they can be collected in one place. If you decide to reblog it to carry it to a bigger audience, tag me so I can see it and average/correct the numbers after a certain point of time.
------------------------------------------------------------------------------
I'm going to attempt to fill this in where I can... please feel free to tell me I'm nuts or way off track and reply your own thoughts. I put the not acceptable/photo-use as extreme cases so they're all higher than the high poly tier.
I am by no means an expert on this matter, I am just trying to collect data. So take that into consideration when you're reading through this.
------------------------------------------------------------------------------
CAS -
Low/Mid poly [# 0 - 10K ]
Mid/High Poly [# 10K - 20K ]
Photo-use Only / Not acceptable for gameplay [# 30K+ ]
BUILD OBJECTS -
Low/Mid poly [# 0 - 2K]
Mid/High Poly [# 2K - 4K]
Photo-use Only / Not acceptable for gameplay [# 6K+ ]
DECOR OBJECTS -
Low/Mid poly [# 0 - 2K ]
Mid/High Poly [# 2K - 4K]
Photo-use Only / Not acceptable for gameplay [# 6K+ ]
FUNCTIONAL OBJECTS -
Low/Mid poly [# 0 - 3K]
Mid/High Poly [# 3K - 6K ]
Photo-use Only / Not acceptable for gameplay [# 8K+ ]
Rabbitholes - Buildings - Major Landmarks (This may vary considering most major landmarks will only be used a limited number of times - if not once - in a world. In my very limited experience rabbit holes from EA can vary from 10k to 30k depending on how many details the building carries. This also applies to things such as distant terrains, etc).
Low/Mid poly [# 0 - 15K]
Mid/High Poly [# 15K - 30K ]
Photo-use Only / Not acceptable for gameplay [# 40K+ ]
Speedtree / Plants (This might be complicated, as SPT files aren't able to be decimated or lowered, as far as I've found it comes down to a ridiculous amount of tweaking and luck. Because a SPT plant can have 3000 leaves or 200 and have the same damn polycount. It makes no sense).
Low/Mid poly [# 0 - 2K]
Mid/High Poly [# 2K - 4K]
Photo-use Only / Not acceptable for gameplay [# 6K+ ]
WORLD OBJECTS / Minor Landmarks- (Rocks, Windmills, etc)
Low/Mid poly [# 0 - 3K ]
Mid/High Poly [# 3K - 6K ]
Photo-use Only / Not acceptable for gameplay [# 8K+ ]
-----------------------------------------------------------------------------
Please let me know your thoughts on this.
One other thing I would add to the creators/convertors to start adding to their creations is to add the polycount/Photo-use-only warning in the description of their packages so you can see it in game, as well as the download itself. Because most of us have so much crap we will never remember once it's in there.
144 notes
·
View notes