#pouring medium diy
Text
Fluffy Lesbian Pancakes
Easy and customizable recipe for fluffy pancakes to serve to your girlfriend or wife!
Ingredients:
1 1/2 cups all purpose flour
3 1/2 teaspoons baking powder
1 tablespoon white sugar
1/4 teaspoon salt (or to taste)
1 1/4 cups milk
3 tablespoons of melted butter
1 egg
1 teaspoon vanilla
How to make:
Mix flour, baking powder, sugar, and salt together in a bowl. for extra fluffiness, I like to sift it once or twice. If you don't have a sifter, you can use a fine sieve and a spoon over a bowl to DIY.
Add milk, vanilla, and egg. Mix together and once combined, stir in melted butter until smooth.
Heat a lightly greased pan on medium heat. Any neutral oil works, but I prefer butter. To test for heat, flick some cold water from the tap onto pan. If it sizzles, it is ready to be used to cook pancakes!
Pour about 1/4 cup of batter per pancake. You can eyeball it with a ladle or use measuring cup. Batter will be thick, but that's OK!
Cook until bubbles form and uncooked top of pancake looks 'shiny', about 2 minutes. You can always use a spatula to lift the edges to check for done-ness.
Flip and cook on remaining side. Repeat for remaining batter.
Serve with whatever toppings you prefer! Syrup, jam, boysenberry sauce...
This recipe makes about 8 pancakes. Personally, I like sprinkling blueberries or chocolate chips on them during the cooking process; but you can spice it up by adding pretty much anything! Some popular additions are:
chopped apple and cinnamon, nutmeg, and/or all spice
white chocolate chips and strawberries
chocolate chips
blueberries
walnuts and banana chunks
raisins
32 notes
·
View notes
Text

🥔Homemade Potato Soup 🍜
Ingredients
6 medium Russet potatoes, cut into bite size pieces
1 onion diced
3 carrots, peeled and sliced
3 stalks celery, diced
6 slices of bacon, cooked and crumbled
8 cups of vegetable broth or chicken broth
1 cup milk
½ cup heavy cream
1 tsp minced parsley
Salt and pepper to taste
3 tbsp flour (corn starch can be substituted)
1 cup finely grated cheese of your choice
How To Make Best Homemade Potato Soup
Add the bacon to a soup pot and cook until the fat is crispy. Remove from the pan and set aside. Pour off most of the bacon fat, but do not clean the pan. Return the pan to medium heat and add in the onion, celery and carrot
Stir and cook for two minutes, then add in the diced potatoes, salt and pepper and any other seasonings you like
Pour in the broth and bring to a low boil
Cook for 10 minutes or until the potatoes start to soften
Whisk the flour and the milk, add to the pot and stir continuously
Cook for another 5 minutes
Carefully scoop out ¼ to ½ of the soup and process it in a blender or food processor until it is smooth
Add this back into the pot slowly and carefully so it does not splash back on you and burn
Stir in the crumbled bacon, leaving some for a garnish
Serve in bowls with parsley, bacon and a little cheese for a garnish. #homesteading #cooking #recipes #diy
2 notes
·
View notes
Text
Akshay Mehndiratta: 6 Must-Try Mango Recipes for Summer Delights

When the summer sun shines brightly, it’s good to know that the most popular fruit at the moment is the mango! As bursting with flavor and versatility as mangoes certainly are, they make for a perfect culinary adventure. You can get not only refreshing drinks but also to indulge yourself in decadent desserts. In this blog post, Akshay Mehndiratta, the food enthusiast, unveils 6 mango recipes that are beyond resisting and will definitely allow you to enjoy your summer feasting.
6 Best Mango recipes for summer delights by Akshay Mehndiratta:
Mango Sticky Rice:
Ingredients:
1 cup glutinous rice (that is, sucked rice or sticky rice).
1 can (13.5 oz) coconut milk is as well.
1/2 cup granulated sugar
1/2 teaspoon salt
2 mangoes, fully ripped, peeled and chopped.
If you use toasted sesame seeds or toasted mung beans, this dish will have a better look (optional, for garnish).
Instructions:
Rinse the rice in cold water until it is clear. Allow the rice to soak in water for at least 30 minutes, or up to 4 hours.
Once soaked, drain the rice. Place it in a steamer covered with cheesecloth or a clean kitchen towel. Steam the rice for 25–30 minutes above boiling water, until it is tender. Alternatively, if you have a rice cooker, use it according to the directions.
While the rice is cooking, start making the coconut sauce. In a saucepan, combine coconut milk, sugar, and salt. Heat this mixture over medium heat, stirring regularly, until the sugar has dissolved and everything is well warmed. Be careful not to let it come to a boil.
After the rice is cooked, take it out in a bowl. Pour most of the coconut sauce over the rice. Mix it gently until all the rice is covered evenly. Leave for 10 minutes for the rice to absorb all the flavours. When ready to serve, transfer the rice to a serving plate or bowl.
Arrange the sliced mangoes alongside or on top of the rice. Drizzle the remaining coconut sauce over the mangoes and rice.
Optionally, garnish with toasted sesame seeds or mung beans for added texture and flavor.
Serve the mango sticky rice warm or at room temperature, and enjoy!
Akshay Mehndiratta’s recipe ensures a perfect balance of flavors, making it an ideal dessert to cool down on hot summer days.
Mango Lassi:
Quench your thirst with a glass of mango lassi, an Indian yogurt-based drink made with delicious mango puree. Akshay’s proprietary formula contains a dash of cardamom, elevating this drink to new heights of flavor and elegance.
Ingredients:
1 mango, peeled and diced (or 1 cup mango pulp).
1 cup plain yogurt.
1/2 cup of milk.
Adjust sugar to taste (2–3 teaspoons).
A sprinkle of ground cardamom (if preferred)
Ice cubes (if you prefer)
Optional garnish. Chopped pistachios or almonds
Instructions:
In a blender, blend together the chopped mango (or the mango pulp), the plain yogurt, milk, sugar, and cardamom,
Mix until the smoothness and the homogeneity are achieved. If you want, you can pour more milk and the texture will be thinner.
Feel the lassi’s freshness and fix the sweetness by adding more sugar.
If you like something cold, you can also add a few ice cubes in the blender and then mix until the lassi is well cooled with ice chunks blended finely.
Now that the lassi is prepared, add them to the glasses.
Finally sprinkle with finely chopped pistachios or almonds if you desire.
Have right away and taste the best Mango Lassi.
Mango Coconut Popsicles:
Mitigate the heat with Akshay Mehndiratta’s superbly crafted DIY mango coconut pops. The secret ingredients in these frozen treats are fresh mango puree and creamy coconut milk, making them a healthier option for both children and adults to enjoy.
Ingredients:
2 mangoes, peeled and chopped.
1 cup coconut milk
2–3 teaspoons honey or sugar (per taste)
1/2 teaspoon vanilla extract (optional).
Popsicle molds
Popsicle sticks
Instructions:
In a blender, blend the cut mangoes, coconut milk, honey or sugar, and vanilla extract (if using) together.
Process until the mixture is well mixed and smooth. Taste the mixture and adjust if too sweet.
When the mixture is smooth, pour it into the popsicle mold, leaving a small gap at the top for expansion.
Insert popsicle sticks into molds.
Place the popsicle molds in the freezer for at least 4–6 hours until completely frozen.
When the popsicles are ready and set, pour hot water over the molds for a few seconds and take them out. Remove the popsicles delicately.
Serve Mango Coconut Popsicles immediately, have a good time!
Mango Avocado Salad:
For a light and refreshing meal, try Akshay’s Mango Avocado Salad. Ripe mango, creamy avocado, mixed greens, and tangy lemon come together to create a colorful and nutritious dish that celebrates the best flavors of summer.
Ingredients:
2 ripe mangoes, peeled and chopped.
2 ripe avocados, peeled, pitted and cut into pieces.
1/4 cup red onion, finely chopped.
1/4 cup fresh coriander, chopped.
1 jalapeno, seeded and finely chopped (optional, for spicy kick).
Salt and pepper to taste
Instructions:
In a large bowl, combine diced mangoes, avocados, red onion, cilantro, and jalapeño (optional).
Pour the cool lime juice over the salad mixture. Lime juice is used not just for flavor, but also to keep avocados from browning.
Toss the salad slowly and carefully until all of the items are coated with lime juice.
Season your salad with salt and pepper to your liking. Adjust the seasoning to your liking.
After seasoning, gently toss the salad to ensure that the salt and pepper are evenly distributed.
Transfer the mango and avocado salad to a serving dish or individual plates.
Serve the salad immediately as a side dish or a light meal.
Mango Cheesecake:
Satisfy your craving with Akshay Mehndiratta Mango Cheesecake. Featuring a graham cracker base, a mango-flavored center, and a delightful mango glaze on top, this dish is sure to impress guests at any summer event.
Ingredients for Crust:
Mix in 1 1/2 cups graham cracker crumbs
1/4 cup granulated sugar
6 tablespoons melted butter.
Ingredients for Stuffing:
3 mangoes, diced and softened, mixed with 24 ounces cream cheese
Consider adding 1 cup granulated sugar and
1/4 cup mango juice or puree for mango kick.
Add 4 eggs, a teaspoon of vanilla extract and optionally the zest of a lemon for a tangy flavor
Ingredients for the topping:
Garnish with sliced mango and serve with whipped cream or whipped coconut cream if desired.
Instructions:
Prep your oven for baking at 325F (160C). Apply some butter/non-stick spray in a 9 inch springform pan. Provide your baking pans with parchment paper lining.
In a mixing bowl throw in the graham cracker crumbs together with the sugar and the melted butter for the crust till the ingredients are well intertwined. Fill the base of the pan with that mixture.
Make the crust in a preheated oven, baking for 10 minutes. It is now ready. Take it out from the stove. Let it is cool and things to make the filling.
In a blender or food processor, blend the cube cut mangoes until they become smooth. Keep it aside.
Directly in a mixing bowl, using a hand mixer, blend the cream cheese together with the sugar until the creamy mixture becomes smooth.
Mix together the egg, mango and mango puree ( if preferred) ,vanilla extract and lime zest, if preferred, and blend into the cream cheese mixture. Stir until the ingredients are good and smooth.
Pour the mixture onto the crust in the springform pan. Use a spatula to out the surface.
Put the cheesecake into the oven. Bake for 45–50 minutes or until the edges are firm but the center has a slight wobble.
Turn off the oven and let the cheesecake sit inside with the oven door cracked open for around 1 hour to cool gradually.
Once it’s cool, move the cheesecake to the fridge. Let it chill for at least 4 hours or better yet overnight to fully set.
Before serving, decorate your Mango Cheesecake, with sliced mangoes on top.
If you like you can accompany slices of Mango Cheesecake, with whipped cream or whipped coconut cream on the side.
Cut a slice, serve it up and savor every bite of your Mango Cheesecake!
Mango Chia Pudding:
Akshay’s recipe for mango chia pudding can be the perfect way to break the fast and to start your anywhere day. A healthy breakfast replacement that combines mango puree with chia seeds and coconut milk for the fiber, omega-three fatty acids, and antioxidants. it is a mix of fruit and dairy.
Ingredients:
1 ripe mango, peeled and diced
1 cup — coconut milk (or whatever milk you choose).
1/4 cup chia seeds
1–2 tbsp of honey or maple syrup (depending on taste, quantity can be altered)
1/2 teaspoon vanilla (typically optional)
Sliced mangoes, berries, or shredded coconut for topping (optional)
Instructions:
In a blender, pulverize the diced mango till it is smooth. Optionally, you can blend the mango with water or milk to give it a smooth consistency.
Whisk together the mango puree, coconut milk, chia seeds, and honey or maple syrup (if using) in a bowl or jar with vanilla extract (if apply). Stir well so that all ingredients form a homogeneous mixture.
Place the bowl or the jar in the fridge and let the mixture sit for 4 hours or best overnight to let the chia seeds do their magic and thicken the pudding.
By this time the pudding should have set, ensure you give the pudding another good stir to mix the chia seeds.
Take a bite of the pudding and finish up by adding more honey or maple syrup if desired.
Pour the Mango Chia Pudding into serving dishes or cups.
Finally, consider adding sliced mangoes, berries, or shredded coconut to the top of each serving for extra taste and texture.
Serve the Mango Chia Pudding chill and enjoy!
Conclusion:
Akshay Mehndiratta has curated a list of 10 amazing mango dishes for you to try out this summer. This will enable you to fully enjoy the summer season. Whether you want a thirst-quenching drink, a light salad, or a mouthwatering dessert, these recipes will definitely satisfy your thirst and enjoy the rich taste of ripe mangos. Gather up your resources, get in your apron, and be ready to discover the wonderful flavors of summer that can make you happy.
2 notes
·
View notes
Text
How to make candles

Making candles at home can be a fun and rewarding DIY project. Here's a basic guide to get you started:
1. Gather Your Supplies:
You'll need wax (such as soy wax, beeswax, or paraffin wax), candle wicks, containers (such as jars or tins), a double boiler or melting pot, a thermometer, fragrance oils or essential oils (optional), colorants (optional), and a stirring utensil.
2. Prepare Your Containers:
Clean and dry your containers thoroughly before you begin. If you're using jars or tins, make sure they are heat-resistant and can withstand the temperature of melted wax.
3. Melt the Wax:
Use a double boiler or melting pot to melt the wax over low to medium heat. If you're using soy wax or beeswax, heat the wax to around 160-180°F (71-82°C). If you're using paraffin wax, heat it to around 170-180°F (77-82°C). Use a thermometer to monitor the temperature and avoid overheating the wax.
4. Add Fragrance and Color (Optional):
Once the wax is fully melted, you can add fragrance oils or essential oils to scent your candles. Start with a small amount and adjust to your preference. You can also add colorants to tint the wax if desired. Stir the fragrance oils and colorants into the melted wax until well combined.
5. Attach the Wick:
While the wax is still liquid, dip the metal base of the candle wick into the melted wax and then press it firmly onto the bottom center of your container. Allow the wax to cool and harden, securing the wick in place.
6. Pour the Wax:
Carefully pour the melted wax into your prepared containers, leaving some space at the top. Make sure the wick stays centered as you pour. If necessary, use a wick holder or pencil to keep the wick upright.
7. Allow to Cool and Set:
Let the candles cool and harden completely at room temperature. This can take several hours, depending on the size of your candles and the type of wax used. Avoid moving or disturbing the candles while they're cooling to prevent uneven surfaces or air bubbles.
8. Trim the Wick:
Once the candles have cooled and hardened, trim the wick to about ¼ inch (0.6 cm) above the surface of the wax. This will help ensure a clean, even burn when you light the candle.
9. Enjoy Your Homemade Candle:
Your candles are now ready to use! Light them up and enjoy the warm glow and lovely scent of your handmade creations. Be sure to follow safety precautions when burning candles, such as keeping them away from flammable materials and never leaving them unattended.
Experiment with different wax types, fragrances, colors, and container styles to create unique candles that suit your preferences and style. With practice and creativity, you can make beautiful homemade candles to enjoy or give as gifts to friends and family.


#candles#in love#lovers#love#i love you#i love her#i love him#couple#couples#game#cute#diy projects#diy craft#diy#do it yourself#wax melts#wax#candle#self care#self love#self motivation
2 notes
·
View notes
Text
Pork Tamales with Jada Brands "Meat" (Vegan)
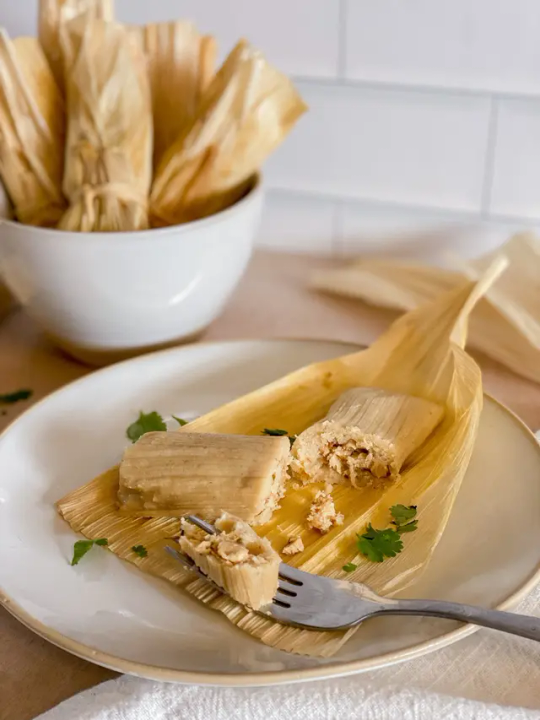
Yield: 12 servings | Prep time: 1 hour | Cook time: 1 hour 15 min | Total time: 3 hours
-----------------------------------------------------------------------
Let me start off my saying that I am from an Italian background and do not have much experience cooking Mexican food, though it's one of my favorite cuisines to eat! And when I stumbled upon dried corn husks and corn masa flour at Walmart, I was instantly inspired to tackle the task of making homemade tamales... from scratch.
I absolutely LOVE tamales but unfortunately vegan tamales are hard to come by, since typically they're filled with meat and the dough is made with lard. There are a few vegan frozen brands out there but they are way too expensive in my opinion (sorry but I'm not paying $3 for a tiny tamale). So I thought making my own would be a better alternative, and making a lot to keep in the freezer for when I get hit with a craving.
After a lot of research and some trial and error, I believe the recipe below is pretty solid. I chose to use the Jada Brands Plant-Based Porkless Lightly Seasoned Mix for the filling, but you can really use any filling you want. Try your favorite version of plant-based meat, rice & beans, jackfruit, zucchini and corn, or other veggies. Though keep in mind if your filling is too wet, the tamales will take longer to cook and might be more difficult to unwrap. Try this fun tamale recipe when you have a few free hours and want to make an impressive meal. Or make the masa and filling ahead of time and have a DIY tamale bar with your friends and family!
Cookware needed:
1 large baking dish
1 medium mixing bowl
1 large mixing bowl
Electric mixer (optional) or large spoon/spatula
Frying pan
Steamer basket
Tamale Ingredients:
24 large dried corn husks + 2 husks for using as ties
3 cups of instant corn masa flour (I used Maseca Nixtamasa Instant Corn Masa Flour)
2 1/2 cups of vegetable broth
1/2 cup + 1 tbsp vegetable oil
1 tsp salt
Filling Ingredients:
1 package of Jada Brands Plant-Based Porkless Lightly Seasoned Mix
1 small white onion
3 tbsp vegetable oil
1/2 cup of cantina style salsa (I used Fresh Cravings Restaurant Style)
2 tsp ground cumin
1/4 cup chopped cilantro

Directions:
For a video on how they're made, check out my Instagram reel here
Start by hydrating the corn husks.
Place all 26 of the husks in the large baking dish and cover with hot water. Set aside for 15-20 minutes to soften while you prepare the filling and dough.
Next, make the filling.
Pour the Jada Brands Porkless Mix into a medium size mixing bowl. Follow the instructions on the box to rehydrate the pork mix (add 1 cup of water & 1 tbsp of oil into the mix, stir, and let sit for 10 minutes).
Meanwhile, finely chop the onion and cilantro.
Heat a large frying pan over medium heat.
Add the onion and 2 tbsp of oil to the pan. Cook for about 2-3 minutes.
Add the pork mix, salsa, and cumin to the frying pan.
Cook, stirring occasionally, for 5-7 minutes or until the pork mix begins to look browned.
Remove from heat, mix in the cilantro, and set aside to cool.
Now that the filling is done, make the tamale dough (masa).
In a large bowl, combine the instant corn flour, vegetable broth, oil, and salt.
Use a large spoon/spatula or electric mixer to evenly mix the dough and make sure to work out any lumps. The consistency should be very thick but smooth and easy to stir. If it's dry and crumbly, mix in 1 tbsp of oil. If it's still dry, add 1 tbsp of water at a time until you get to the right consistency.
Continue mixing the dough for 5 minutes.
Now you are ready to assemble the tamales.
Take 2 of the smallest corn husks and dry them with a kitchen towel (keep the rest of the husks in the water so they don't dry out).
Rip the two husks into long shreds, about 1 cm wide, to use for tying the tamales. Set them aside.
Take 1 husk out of the water and dry it with a towel.
Using a small spatula, spread about 2-3 tbsp of the dough on the top half of the husk, leaving some space empty on the edges.
Spread 2 tbsp of the pork filling in the center of the dough in a vertical line.
Wrap the tamale by folding one side of the corn husk over the center almost to the other side, making sure the dough completely folds over the filling. Fold the other side of the corn husk over the center, then bring the bottom of the husk up and over the center of the tamale. The top will stay open.
Lay out one of the shreds from earlier and place the tamale on top. Tie the shred into a knot, securing the bottom of the tamale over the center. You can use two ties if needed.
Close the dough at the top of the tamale using your finger or a small spoon, spreading the dough over the filling to seal it shut.
Repeat with the rest of the corn husks (you will get faster with practice). If you have any leftover husks, remove them from the water and dry them to use in the future.
Once the tamales are all folded, it's time to steam the tamales.
Use a large steamer pot and fill the bottom with about 3-4 inches of water. Place the steamer basket inside.
Place 2-3 corn husks on the bottom of the steamer.
Then place the tamales in the steamer basket standing up (it's okay if they lean on each other). If not all of them fit, you can do them in separate batches.
Cover and steam them for 45-60 minutes over medium heat.
Check them at 45 minutes - remove one of the tamales to check if it's done. If it begins to unwrap easily from the corn husk, they are done. If the dough is still mushy, steam them for another 15 min or until the dough looks cooked through). You will most likely need to steam them closer to 60 minutes if there are a lot of tamales in the basket.
Once they are done steaming, remove them from the heat.
Let them cook for 5 minutes.
Serve, unwrapping the tamales from the corn husks and topping with your favorites (try salsa, avocado, guacamole, cilantro, or enchilada sauce).
Tips and Tricks:
There are many different types of corn flour masa you can buy, but I read from many articles and recipes that the Maseca brand is the best. I chose the Maseca Nixtamasa Instant Corn Masa Flour from Walmart. If you cannot find instant corn flour, you can still follow this recipe but may need to mix the dough for up to 10 minutes to get the right consistency.
If you can't find the Jada Brands Plant-Based Porkless Lightly Seasoned Mix, you can use any plant-based pork or meat mix your favorite veggies. Just follow the recipe as instructed above.
If your filling is too wet, the tamale dough may take longer to cook and they may be more difficult to unwrap.
You can make the filling and masa ahead of time to make this a faster recipe. Store the filling in the fridge, and keep the masa coverd at room temp.
Store the leftover tamales in their corn husks in an air-tight container in the fridge. Reheat them by unwrapping a tamale from the corn husk, microwaving it for 1 minute, and enjoy. You can also reheat them in the corn husk, they just might be a little difficult to unwrap.
These also freeze well. Store them in an air-tight bag or container in the fridge. Reheat them by microwaving the tamale for 30 seconds, then unwrapping it from the corn husk, then microwaving it for another 1 minute or until the center is warmed through.
3 notes
·
View notes
Text
DIY Homemade Lip Balm

Project by Ashley:
Brrr!!! I don’t know where you are, but here in the mountains of western North Carolina, it’s cold. Seriously cold. Dangerously cold. And while I can layer up in wool and flannel, bracing most of my body from the ravages of dry, frigid weather, I can’t hide my face. My face takes it straight on, turning tight, parched and achy, as do my lips. Cracked lips would be my wintertime lot were it not for some serious intervention in the form of lip balm (my face, meanwhile, is receiving a bit of TLC via creams, oils and moisturizing masks).
For today’s Small Measures, I’m offering up a do-it-yourself recipe for creating a healing lip salve to protect your own kisser. Perfect for locking in moisture and keeping lips smooth, this balm can be easily and affordably made.

All that’s needed to get started are a few ingredients and some very basic kitchen equipment. You will also need some sort of vessel for holding your finished balm; you can also easily repurpose previously used glass or metal lip balm containers. In the image above, I simply painted and then sanded the lids to achieve an “antiqued” finish.
I’ve always felt that the best part of making your own body-care products is the ability to customize them to your (or your recipient’s) fragrance preferences. Lip balm is no exception. In the recipe provided below, feel free to add any essential oil or combination of your choice. If minty freshness is your thing, go for peppermint or spearmint essential oil. If you prefer a floral fragrance, consider a few drops of lavender (which naturally contains antiviral, antiseptic and antibacterial properties, perfect for healing lip infections and keeping others at bay). Want a kiss of spice? Spring for cinnamon or clove oil. There really is no wrong way to go about scenting your balm.
Lips of Bliss Balm
The Goods
4 tbsp. natural beeswax, grated
2 tbsp. coconut oil
5–10 drops essential oil of choice
1/2 tsp. honey or glycerin-based food-grade flavor extracts, such as almond, orange, lemon, etc. (optional)
The Deal
1. Place grated beeswax into a heatproof glass dish (one with a spout and handle is ideal). Add coconut oil to the container (the oil will be solid at room temperature).
2. Add 1 1/2 cups water to a small/medium-sized pot. Bring to a boil and place glass dish with beeswax and coconut oil into the middle of the pot. The beeswax and coconut oil will begin to warm and melt; give the liquid a stir with a metal spoon to fully incorporate the two ingredients.
3. Once melted, remove the glass container from the pot and set on a kitchen cloth or trivet. Turn the heat off on your stove.
4. Add essential oil of choice and flavoring agent, if you’re using one. Stir with the metal spoon to distribute evenly.
5. Pour mixture into your container of choice; cover with a lid.
6. Allow to fully cool. Mixture will be solid at room temperature.
7. Makes enough for one 2-ounce container. For larger batches, simply multiply ingredients by the amount of 2-ounce jars you wish to make.
4 notes
·
View notes
Text
I just got an idea for a horror/thriller trilogy.
First movie is about a woman, who is kiddnaped by a psychopat who holds her in his basement for some time. He is trying to win her heart over the fact that he is desperatelly trying to find somebody who would apreciate his agressive way of love. How does she get out? She starts using arguments about the basement that the place isnt safe because there is mold, bugs etc. And she mentiones that with a few fixes she could at least make it look nicer since she has so much free time. They begin renovating the basement. He starts to trust her more and more until there is finally the moment. He is not paying attention when painting the ceilling and stabs him. Before she smashes his head with one of the items for diy and house renovation, he smiles a little and whispers his last words: "I finally find you, my love."
In the second part, we see the same woman visiting a psychologist. She has nightmares about him even after couple of years. That he survived and wants to not only kiddnap people but also torture and kill them. It is absolutelly imposible, since the police found his body. She also later identified him, as he was known to kiddnap and later kill both man and female. After visiting the house, where she killed him and doing a lot of research, it starts to seem like his ghost is following her, tempting her to do "bad things" and stepping into her dreams, too. She also finds a medium, person, who can communicate with the ghost, but doesnt want to try contacting Mr. psycho. So, opposite opinions from both the psychologist and the medium are making our main hero a big mess in her head. She finally decides to face her demon. She doesnt know if he is real or just hidden in her head. She is ready for any option. She uses a ritual to call upon and trap him in the basement. And it seems like a real ghost is caught there. She used old spell to banish him. He dissipates into a mist. Whe suddenly, the real Mr. Psycho shows up behind her in flesh. As mentioned before, she was ready for any posibility and manages to stab him. Again. Tired, she slides next to the wall. When she looks on the floor, there is no body, only a fresh puddle of blood. Her own blood. Which is pouring from the stabbing wound in her belly, where she was sure, she just hit the Psycho. What she just saw befor was just in her head....
The last part is about a young couple looking for a house to buy. In this economy, you dont choose. So when you find a cheap murser house, you buy a cheap murder house. After all, it has such a nice mancave in the basement. Anyway, they start to notice wierd stuff in the house. Things are falling, room is suddenly chilly, typical "ghost presence 101". Still better than a rent above a pizza place. The strangest thing is that most of the "wierd stuff", tend to fix itself. A book fell on the ground? Gues what, book is back usually in couple of minutes. Most of the wierd stuff is happening in the basement but with a busy life of the couple, the barely notice this. Until one night, they are both found dead. Their ghosts find out that there are other 2 ghosts. They are the original Mr. Psycho and girl from the first 2 thrillers. They find out that the ghosts repeat what they did, when they were alive. And it is only at midnight, when for a full hour, they realise they are dead. So most of their time was spent on him keeping the protagonist in the basement or she was killing him. When there was the midnight, the main protagonist from the last 2 stories was trying to warn them and make them run away. While Mr. Psycho was picking up every book and destroying every message she might get through. And he was also planning his next murder.
The end.
3 notes
·
View notes
Text
Different Materials Used for Formwork

Formworks are very essential when it comes to shaping concrete structures. Formwork temporarily supports wet concrete in shaping and setting until it dries. Formworks help set walls, columns, beams, slabs, and foundations of various shapes and sizes.
Various formworks are used in the construction sector. Different formwork offers different features. Formworks are selected based on the structure's strength, flexibility, weight, and durability. Formwork also helps get the seamless finish required for aesthetic appeal.
Different materials used for formwork
Plywood, Steel, Timber, and Aluminum are the most commonly used materials in formwork. Each material has advantages and is used depending
g on the specific projects and other factors like cost, reusability, and finish quality.
1. Timber Formwork
Because of its ease of use and versatility, one of the oldest and most commonly used formworks is Timber Formwork, mostly used in small- and medium-scale construction projects.
Advantages of Timber Formwork
Timber Formwork is relatively cheap and easily available. They are best for small projects with limited budgets. Because of easy accessibility, sourcing costs decrease greatly as you might get in at your locality.
They are easy to use and can be easily assembled and disassembled, which saves a lot of time if any quick adjustments need to be done on-site.
The best part of using Timber formwork is it can be worked on with basic carpentry tools. They also offer flexibility.
Timber formwork is lighter on the side than other formwork. Thus, they can be carried around easily without breaking a sweat.
Disadvantages of Timber Formwork
Compared to the lifespan of other formworks, Timber formwork has a shorter lifespan. After 5 to 10 use, you will start noticing a deterioration in Timber formwork.
Timber is also sensitive to moisture, leading to decay, warping, and swelling.
Timber formwork is less durable than steel, which can be used longer.
Timber formwork is more susceptible to fire.
Where Timber Formwork is used?
Mostly used in:
1) Residential buildings (Small and medium size projects)
2) In small DIY or minor home repair projects
2. Plywood Formwork
Plywood formwork is known for its strength and durability. It is mainly used in making panels. Plywood formwork also provides a smooth finish to concrete surfaces. They are easy to carry and assemble. They are mostly used to create columns, beams, and slabs.
Advantages of Plywood Formwork
Because of its design, Plywood formwork can bear significant loads and pressures when the wet concrete is poured and set.
Plywood offers longer longevity. It can last much longer if taken properly and treated with waterproof coatings.
Plywood formwork minimizes the need for additional finishing work, which usually happens.
It can easily be cut and molded to fit any design, making Plywood an all-rounder.
Plywood can be used in both simple and complex designs.
Though the initial cost of getting Plywood can be higher than Timber formwork, the maintenance and reusability make up the economical cost in the long run.
Disadvantages of Plywood Formwork
If the waterproofing is not applied, Plywood can absorb the moisture, resulting in swelling and warping. This would lessen the lifespan of plywood formwork.
Plywood formwork needs to be handled by professional and skilled labor to avoid damage like chipping or splintering.
To extend the lifespan of plywood formwork needs regular maintenance like cleaning, drying, etc.
Compared to other formworks, plywood formwork costs more, which is unsuitable for small projects.
If plywood formwork is not disposed of and discarded properly, it can lead to environmental waste.
Where Plywood Formwork is used?
Mostly used in:
1) Making walls, floors, and ceilings.
2) Large projects that require durable and reusable formwork.
3) Used in building strong structures. (Like High-rise buildings, bridges)
3. Steel Formwork
Steel formwork is mostly used in construction projects where reuse and longevity are critical factors. They provide a high-quality finish to concrete surfaces. They are mostly used during bridge or tunnel construction.
Advantages of Steel Formwork
Steel formwork is exceptionally strong and can withstand harsh wind and climate.
It can be reused numerous times, making it a cost-effective option.
Steel formwork reduces the need for additional plastering or finishing to get smooth finishes.
Steel formwork is fire-resistant as steel does not burn, unlike Timber and Plywood formwork.
Disadvantages of Steel Formwork
Steel formwork's initial cost is high compared to Timber and Plywood.
Because of the high cost, it is unsuitable for small projects with tight budgets.
Steel formwork is heavy and requires mechanical lifting equipment to handle and assemble.
The labor cost for setup, assembly, dismantling, and transportation of steel formwork is higher.
Steel is prone to rust, so it needs to be coated with anti-rust paint.
Where Steel Formwork is used?
Mostly used in:
1) Construction projects like Bridges, tunnels, dams, etc.
2) Used in Factories and warehouses.
4. Aluminium Formwork
Aluminum formwork is another popular choice in the construction industry. It is lightweight and has a high reusability rate. It is mostly used in large projects that require speed and efficiency.
Advantages of Aluminium Formwork
Unlike steel formwork, Aluminum formwork is much lighter. It can be manually transported.
Aluminum formwork can be reused multiple times without losing structural integrity.
Aluminum is resistant to rust and doesn't need much maintenance like steel or Plywood.
Disadvantages of Aluminium Formwork
It is costly as compared to timber and Plywood.
It is less suitable for complex shapes and designs.
If Aluminum is not handled properly, it can leave a dent.
Where Aluminum Formwork is used?
Mostly used in:
Suitable for large-scale housing projects where reusability is a key factor.
5. Plastic Formwork
Plastic formworks is durable, lightweight, cost-effective, and used in small- to large-scale projects. Plastic formwork is environmentally friendly as it can be recycled and reused.
Advantages of Plastic Formwork
It is easy to handle and lightweight, and it can be assembled without using heavy machinery.
They are highly durable and can resist wear and tear.
Plastic formwork is highly resistant to chemicals, rust, and water.
Disadvantages of Plastic Formwork
Plastic formwork is less durable compared to steel and wood.
They are less suitable for long-term projects.
If not managed properly, it can lead to structural issues.
Where Plastic Formwork is used?
Mostly used in:
1) Constructing walls, columns, slabs, and beams.
2) Used in residential, commercial, and infrastructure building.
Conclusion
If you want to find the best plastic formwork supplier in Bangalore, NovaFormworks stands out for various reasons. It offers cutting-edge solutions that are cost-effective and durable.
With years of experience in plastics manufacturing, it aims to find creative solutions that reduce labor costs and construction time and enhance construction quality. NovaFormworks is committed to eco-friendly practices and sustainable methods for the environment.
Regarding reliability, durability, and versatility, they offer the best solutions for constructing walls, columns, and slabs. With that, their proven years of track record and innovation make them pioneers in the plastic formwork industry.
0 notes
Text
Beyond Repairs: The Creative Potential of Glass Bond Epoxy
We’ve often praised glass bond epoxy for its incredible repair capabilities, but its potential extends far beyond fixing broken items. It's a versatile tool that can transform your crafting and DIY projects into extraordinary creations. Let's explore the limitless possibilities that epoxy offers. epoxy for floors tiles
Epoxy: A Canvas for Creativity
Liquid Art: Epoxy resin can be used to create stunning pieces of art. Experiment with colors, textures, and additives to achieve unique effects. Pour it into molds, layer it for depth, or even create three-dimensional sculptures.
Jewelry Making: Transform your love for crafting into a profitable venture. Create custom jewelry pieces by embedding flowers, shells, or other objects in epoxy resin.
Home Decor: Elevate your living space with epoxy-based creations. From coasters and wall art to decorative bowls and sculptures, the possibilities are endless.
Functional Art: Blending Beauty and Utility
Epoxy isn’t just about aesthetics; it can also enhance the functionality of your belongings:
Upcycled Treasures: Give new life to old objects by incorporating epoxy. Transform broken plates into unique clocks or repurpose glass bottles into stylish vases.
Kitchen and Bath Enhancements: Create custom cutting boards, shower shelves, or sink organizers using epoxy resin and your choice of materials.
Outdoor Decor: Weatherproof your outdoor spaces with epoxy-based projects like garden stepping stones, plant markers, or decorative planters.
Epoxy Techniques: Mastering the Craft
To unleash the full potential of epoxy, experiment with different techniques:
Layering: Create depth and dimension by layering different colors and textures of epoxy resin.
Inclusions: Incorporate various materials like dried flowers, glitter, or even small objects into your epoxy creations.
Molding: Use silicone molds to create unique shapes and forms.
Casting: Pour epoxy into a desired shape to create custom objects.
Safety First: Essential Tips
Ventilation: Always work in a well-ventilated area to avoid inhaling fumes.
Protective Gear: Wear gloves and eye protection to safeguard your skin and eyes.
Proper Mixing: Follow the manufacturer's instructions for mixing the resin and hardener.
Curing Time: Allow the epoxy to cure completely before handling or using the finished product.
Unleash Your Imagination
The beauty of epoxy lies in its versatility. It’s a medium that invites experimentation and rewards creativity. Don't be afraid to try new things, make mistakes, and learn from the process. With a little practice, you’ll be amazed at the stunning creations you can bring to life with epoxy. Epoxy tile joint filler
0 notes
Text
Trending Epoxy Art Resin Projects for Beginners
Epoxy art resin has revolutionized the world of DIY crafts and home decor, offering endless possibilities for creativity and customization. Whether you’re a novice or an experienced artist, epoxy art resin provides a versatile medium that can elevate your projects to a professional level. For beginners looking to dive into this exciting art form, here are some trending epoxy art resin projects that are easy to start with and deliver stunning results.
1. Resin Coasters

Creating resin coasters is an excellent introductory project for those new to epoxy art resin. Coasters are small, manageable, and offer a perfect canvas for experimenting with different colors and designs. To get started, you’ll need:
- Epoxy resin and hardener
- Silicone coaster molds
- Epoxy pigments or dyes
- Mixing tools and cups
Begin by mixing the epoxy resin and hardener according to the instructions provided by your epoxy resin suppliers. Once mixed, add your chosen pigments or dyes and pour the resin into the silicone molds. You can create swirls, layers, or add inclusions like glitter or dried flowers. Allow the resin to cure fully, typically 24-48 hours, and your custom coasters are ready to use or gift.
2. Jewelry Making

Epoxy art resin is ideal for creating unique and personalized jewelry pieces. From pendants to earrings, the possibilities are vast. For this project, you’ll need:
- Jewelry molds
- Epoxy resin
- Epoxy pigments
- Small inclusions (e.g., glitter, dried flowers, beads)
Mix the epoxy resin and hardener, then add pigments to achieve your desired color. Pour the resin into the molds and add small inclusions to enhance the design. Once cured, attach the necessary jewelry findings, such as earring hooks or necklace chains. The result is beautiful, handcrafted jewelry that makes a statement.
3. Resin Art Panels

Creating resin art panels allows you to produce larger, more expressive pieces. This project is great for those who enjoy abstract art. You’ll need:
- A wooden or canvas panel
- Epoxy resin
- Epoxy pigments
- Mixing tools
Prepare your panel by ensuring it’s clean and level. Mix the epoxy resin and hardener, then divide it into smaller cups to mix in different pigments. Pour the colored resin onto the panel and use tools like heat guns or brushes to manipulate the resin and create dynamic patterns. This project offers a fantastic way to explore your creativity with epoxy art resin.
4. Resin River Tables

While this project is more advanced, it’s become incredibly popular due to its stunning visual impact. A resin river table involves creating a “river” of resin between two pieces of wood. For this project, you’ll need:
- Two slabs of wood
- Epoxy resin
- Epoxy pigments
- Clamps and woodworking tools
Prepare your wood slabs by sanding and positioning them to leave a gap for the resin. Mix the epoxy resin and hardener, then add pigments to create a water-like effect. Pour the resin into the gap and use a heat gun to remove any bubbles. Once the resin cures, sand and finish the table to your desired look. The result is a breathtaking piece of furniture that showcases the beauty of epoxy art resin.
5. Decorative Trays

Creating decorative trays is another beginner-friendly project that combines functionality with artistry. You’ll need:
- A tray mold or a wooden tray base
- Epoxy resin
- Epoxy pigments
- Mixing tools
Mix the epoxy resin and pigments, then pour the mixture into the tray mold or onto the tray base. You can add inclusions like shells, stones, or metallic flakes to enhance the design. Allow the resin to cure, and you’ll have a unique, decorative tray perfect for displaying items or serving drinks.
Finding the Right Epoxy Resin Suppliers

When embarking on your resin art journey, sourcing high-quality materials is crucial. Reliable epoxy resin suppliers provide detailed product information, safety guidelines, and mixing instructions. Look for suppliers with positive reviews and a variety of resin options to suit different projects. For those ready to buy epoxy art resin, exploring reputable suppliers ensures you get the best results for your creations.

Getting started with epoxy art resin projects is an exciting and rewarding experience. From coasters and jewelry to art panels and river tables, there are numerous projects that cater to beginners and allow for creative expression. By using high-quality epoxy resin and pigments from trusted epoxy resin suppliers, you can achieve professional-looking results and enjoy the process of creating beautiful, customized pieces.
For top-quality epoxy art resin, trust MB Epoxy to provide the materials you need to bring your artistic visions to life.
#Epoxy Art Resin#Best Epoxy Art Resin#Epoxy Art Resin Piece#Epoxy resin suppliers#epoxy resin#epoxy resin products#buy epoxy resin online#best epoxy resin art#Buy epoxy art resin
1 note
·
View note
Text
How To Use A Chocolate Mold?
If you know how to use a chocolate mold, creating gorgeous molded chocolates is simple! Thanks to our extensive collection of plastic chocolate molds, You have countless alternatives for birthday gifts, party favors, and DIY wedding favors. With this instruction, you'll be well on making exquisite chocolates at home. To begin, you'll need a minimum of one chocolate mold. From chocolate bar molds to baby chocolate molds and all in between, a plastic injection mould manufacturer has every kind of chocolate mold you can imagine. Here, you may browse through all of our plastic chocolate molds.
How to Melt Chocolate Melts
Since chocolates melt quickly, it's simple to utilize these rich, creamy candy melts with chocolate molds. Melted chocolates don't need to be tempered before being placed in candy molds. There are three varieties of candy coatings: milk chocolate, white chocolate, and black chocolate. They taste like white chocolate and vanilla and are available in various hues.
Melt half a pound of candy coatings in a disposable pastry bag in the microwave (cover with a paper towel to prevent spills). One 20 to 30-second microwave burst is sufficient. Shuffle the candy coatings about in the pastry bag to spread any hot areas between intervals. Cut off the tip after the bag has melted, leaving a little hole.
How to Fill a chocolate mold?
Melted chocolate should be poured into each cavity of the candy mold; do not overfill; the chocolate should not overhang the sides. To release air bubbles and raise them to the top, fill every cavity and lightly tap the tray into your desk.
Put in the fridge; chocolate takes about ten to twenty minutes to solidify and set there. Larger chocolate molds may require 20 minutes to set, while smaller ones can require less time.
Release the Chocolates from the Mold
Look at the mold's underside; is it hazy and white? If so, it's time to release your chocolate candy as it has solidified and begun to come free from the mold! Does it still appear damp and squeezed against the mold? It can take longer for your chocolate to set. After solidifying the chocolate mold, carefully turn it onto a paper towel. If the mold doesn't release the chocolates immediately, tap it gently and keep it near the work surface (no soaring chocolates!). Chocolate can be frozen for up to five minutes if molds are difficult to remove from the chocolate. It must be extremely chilly sometimes!
Dull finish or White Streaking
Chocolates that have been molded should shine beautifully, but if they appear a touch flat, it may be because they require further chilling time. Sometimes they only need a little bit more time, even if they can appear hardened. Observing white lines? When candy melts are slightly overheated while melting, the fats split and a streaky finish is produced. This is known as white streaks. Consider melting the chocolate again and stirring it a little more.
How to keep molds for chocolate clean?
Before every usage, chocolate molds must be thoroughly cleaned, dried, and polished! It is suggested that you use a dry paper towel to clean the cavities of your chocolate molds in between usage. Your handcrafted chocolates will not shine if the mold's cavities are dull. Use a soft cloth and warm, but not hot, soapy water to clean plastic molds. Dry molds and polish immediately after. Dishwasher use should be avoided since the intense heat can distort plastic molds used for chocolate.
Do you spray molds for chocolate?
Chocolate molds don't need to be sprayed or covered with any kind of oil. Your chocolate will readily release on its own, provided that you used the appropriate molding chocolate and let it to set completely in the refrigerator.
How much time does chocolate take to solidify in molds?
The size of the plastic candy mold determines how long it takes for the chocolate to solidify in the molds. It might take five to ten minutes for smaller molds and fifteen to twenty minutes for medium-sized to big molds.
How should handmade chocolate be stored?
Chocolates can be prepared up to one month in advance. Completed pieces should be kept dry, cold, and dark—away from moisture and humidity—in a plastic container. Chocolate should not be kept in the refrigerator as it might sweat and become sticky. If you have no other choice but to store them in the refrigerator, feel free to do so, but make sure they get to room temperature before handling. Before handling the chocolates, open the container they are kept in and let any dampness or stickiness to go.
Conclusion
Using a chocolate mold can transform your homemade treats into professional-looking delights. Whether you're working with plastic moulding manufacturers or seeking chocolate packaging in Belgium, mastering the art of molding ensures your chocolates look as good as they taste. You can achieve flawless results every time by following simple steps like tempering the chocolate and tapping out air bubbles.
#plastic injection mold design#injection molding solutions#injection frisbee#plastic chocolate molds#plastic injection molding manufacturer#best injection molding company#plastic molds for chocolate making#plastic moulding manufacturers#injection molding maker#plastic injection mould manufacturer
0 notes
Text
5 Essential Tips for Finding the Best Concrete Mixer for Sale
It is crucial for both DIY enthusiasts and professional contractors to pick the right Best concrete mixer for sale. It is key to the success and efficiency of your work.
This blog will give you five key tips. They will help when you select a concrete mixer. They ensure you make an informed decision that fits your project needs.
Understand Your Project Needs
Before we discuss concrete mixers, you need to know your project's needs. Your project's scope and nature can greatly influence the mixer type you choose.
For instance, a small DIY project, such as building a patio or a small walkway, may only require a portable mixer with a smaller capacity.
Large construction sites, however, need continuous, large volumes of concrete. They might need a more robust, high-capacity mixer.
Choose the Right Type of Mixer
Concrete mixers come in various types, each designed to cater to different project needs. Understanding the differences between these types can help you make an informed choice:
Drum Mixers: Drum Mixers are the most common type of mixer. Ideal for small—to medium-sized projects, they rotate a drum to mix the concrete, making them suitable for jobs where consistency and ease of transport are important.
Pan Mixers: Pan mixers have a stationary pan in which the concrete is mixed by blades or paddles. They are great for making high-quality concrete. They are often used in the precast concrete industries.
Continuous Mixers: As the name suggests, continuous mixers are designed for large projects requiring a steady concrete supply. They continuously mix and pour concrete, making them ideal for big construction sites and infrastructure projects.
Consider Capacity and Size
Another crucial factor to consider is determining the appropriate capacity of the concrete mixer. The capacity you need depends on the volume of concrete your project requires.
Picking a mixer that's too small leads to inefficiencies and refilling, while choosing one that's too large is needlessly expensive and cumbersome.
Evaluate Power Source Options
Concrete mixers are powered by various sources, each with its own set of advantages and disadvantages. The three primary power sources for concrete mixers are:
Electric: Electric mixers are popular for their convenience and ease of use. They are typically quieter and more environmentally friendly compared to other power sources. However, they require access to an electrical outlet, which might be a limitation on certain job sites.
Gas: Gas-powered mixers are known for their portability and are often used in remote locations where electricity is not readily available. They tend to be more powerful than electric mixers but can be noisier and produce emissions.
Diesel: Diesel mixers are similar to gas mixers in portability and power. Due to their durability and ability to handle heavy loads, they are often used for large-scale projects. However, they can be more expensive to operate and maintain.

Check Durability and Build Quality
You must invest in a durable and high-quality concrete mixer for sale. It is essential for long-term performance and reliability. Here are some factors to consider when evaluating the durability and build quality of a mixer:
Material Quality: Look for mixers made from high-quality materials such as steel or heavy-duty plastic. These materials are more resistant to wear and tear and can withstand the rigours of construction work.
Brand Reputation: Opt for mixers from reputable brands known for their reliability and quality. Reading user reviews and testimonials can provide valuable insights. They show how well different brands perform.
User Reviews: Reading user reviews and feedback can help you gauge a mixer's real-world performance and durability. Look for reviews highlighting both positive and negative experiences to get a balanced perspective.
Conclusion
Choosing the right concrete mixer for your project involves understanding your needs. You must pick the right type, size, and power source and check durability.
By assessing these factors carefully, you can make an informed decision and choose the correct concrete mixer for sale. It will improve the efficiency and quality of your work.
0 notes
Text
How to Add SEO Keywords to Your Website?

Imagine this: you've poured your heart and soul into your website. It's beautiful, informative, and perfectly captures the essence of your brand. But there's a nagging problem - crickets. No visitors, no engagement, just the sound of tumbleweeds rolling through your virtual domain.
This scenario is all too common for new websites. In today's digital landscape, having a website isn't enough. You need to make sure people can find it, which is where SEO comes in. SEO, or Search Engine Optimization, is the art and science of increasing your website's visibility in search engine results pages (SERPs).
Think of it like this: SEO is like putting up a giant, neon sign outside your website that screams "Hey, I've got what you're looking for!" One of the most important tools in your SEO toolbox is using the right keywords. Keywords are the words and phrases people type into search engines to find information, products, or services.
For instance, if you run a website about gardening, some relevant keywords might be "how to grow tomatoes," "best vegetables for beginners," or "DIY raised garden beds." By strategically incorporating these keywords throughout your website, you're essentially telling search engines what your site is all about. This increases the chances that your website will show up on the first page of search results, which is prime real estate in the digital world. Studies by Backlinko [invalid URL removed] show that the top organic result on Google receives over 31% of all clicks for a given search query. That's a massive advantage!

Finding Your SEO Keyword Goldmine
The first step is to identify the keywords people are using to find businesses or information like yours. There are a number of free and paid keyword research tools available online. Here are a few popular options:
Google Keyword Planner: This free tool from Google provides insights into search volume and competition for different keywords.
Ahrefs and SEMrush: These are paid tools that offer more advanced keyword research features, such as competitor analysis and keyword difficulty.
Let's say you run a website dedicated to delicious, homemade baked goods. Here are some keywords you might uncover using a keyword research tool:
Easy bread recipes (High search volume, medium competition)
Gluten-free cookies (Medium search volume, low competition)
Online cake decorating classes (High search volume, high competition)
Choosing the Right Keywords for You
Once you have a treasure trove of potential keywords, it's important to choose the ones that are the perfect fit for your website. Here are a few key factors to consider:
Search Volume: How many people are searching for this keyword each month? Ideally, you want keywords with decent search volume, but not so much competition that it's impossible to rank for them.
Competition: How difficult is it to rank for this keyword? This depends on the number of other websites that are targeting the same keyword.
Relevance: How relevant is the keyword to your website and the content you create? Don't try to stuff your website with keywords that don't make sense for your audience.
Spicing Up Your Content with Targeted Keywords
Now that you've identified your golden keywords, it's time to sprinkle them throughout your website content. Here are the key areas to focus on:
Page Titles and Meta Descriptions: These are the snippets of text that appear in search engine results pages (SERPs). Your page title should be clear, concise, and include your target keyword. The meta description is a chance to further entice users to click on your website.
Headings: Use headings (H1, H2, H3) to break up your content and highlight important information. Include your target keywords in your headings naturally.
Body Content: Weave your target keywords throughout your website content in a natural way. Don't overdo it, though! Keyword stuffing (using keywords too frequently)
Body Content: Weave your target keywords throughout your website content in a natural way. Don't overdo it, though! Keyword stuffing (using keywords too frequently) can actually hurt your SEO ranking. Aim for a keyword density of around 1-2%.
Image Alt Text: Don't forget about the power of images! Add alt text to your images, which is a brief description that appears when someone hovers over the image. This is a great place to include relevant keywords.
Keeping Your Website Fresh and Appealing to Search Engines

SEO isn't a one-time thing. It's an ongoing process of creating high-quality content, optimizing your website, and staying up-to-date with the latest SEO trends. Here are some tips for keeping your website fresh and engaging in the eyes of search engines:
Publish New Content Regularly: This shows search engines that your website is active and relevant. Aim to publish at least one new blog post or article per month. The more content you have, the more opportunities you have to target relevant keywords and establish yourself as an authority in your niche.
Track Your Results: There are a number of SEO tools available that can help you track your website's traffic and keyword ranking. This data will help you see what's working and what's not, so you can adjust your SEO strategy accordingly. Google Search Console is a free tool that provides valuable insights into your website's SEO performance.
Build Backlinks: Backlinks are links from other websites to your website. Search engines see backlinks as a vote of confidence in your website's quality and relevance. There are a number of ways to build backlinks, such as guest blogging, creating infographics, and submitting your website to relevant directories.
Conclusion
By following these tips and consistently adding relevant keywords to your website, you can take control of your SEO destiny and unlock the door to increased website traffic. Remember, SEO is a marathon, not a sprint. It takes time and effort to see results, but the payoff can be huge. With a well-optimized website, you can attract more visitors, generate more leads, and ultimately grow your business.
If you're feeling overwhelmed or need help crafting a comprehensive SEO strategy, consider reaching out to digital marketing consultancy services. These professionals can provide invaluable guidance on keyword research, content creation, and backlink building to help you achieve your website's full potential.
1 note
·
View note
Text

Pickled Cucumber
#homemade #pickles #diy #cooking
Ingredients:
- 4 cups cucumbers, thinly sliced (about 2-3 medium cucumbers)
- 1 cup white vinegar
- 1 cup water
- 1/2 cup granulated sugar
- 1 tablespoon salt
- 1 teaspoon mustard seeds
- 1 teaspoon black peppercorns
- 1 teaspoon dill seeds (optional)
- 2 cloves garlic, thinly sliced
- 1 small onion, thinly sliced (optional)
- Fresh dill sprigs (optional)
Instructions:
1. Prepare the Cucumbers:
- Wash and thinly slice the cucumbers. You can use a mandoline slicer for even, thin slices.
- Thinly slice the onion, if using.
2. Pack the Jars:
- Place the sliced cucumbers, garlic, onion slices (if using), and fresh dill sprigs (if using) into clean, sterilized jars. Pack them tightly but without crushing.
3. Make the Brine:
- In a medium saucepan, combine the white vinegar, water, granulated sugar, salt, mustard seeds, black peppercorns, and dill seeds (if using).
- Bring the mixture to a boil over medium-high heat, stirring occasionally to dissolve the sugar and salt.
4. Pour the Brine:
- Once the brine is boiling and the sugar and salt are dissolved, carefully pour the hot brine over the cucumbers in the jars, ensuring all the cucumbers are submerged.
- Leave about 1/2 inch of headspace at the top of the jars.
5. Seal the Jars:
- Wipe the rims of the jars with a clean, damp cloth to remove any brine residue.
- Place sterilized lids on the jars and screw on the bands until fingertip-tight.
6. Cool and Refrigerate:
- Allow the jars to cool to room temperature.
- Once cool, refrigerate the pickles for at least 24 hours before serving to allow the flavors to develop. For best results, wait 3-5 days.
0 notes
Text


🌸 DIY Collagen Gummy Recipe 🌸
On my weight loss journey, reprogramming how I eat and think about food has been key to losing 70+ pounds while building muscle and keeping my skin’s elasticity.
I wanted to find ways to make my favorite snacks healthy and ended up making these gummies!
They’re packed with protein and collagen, helping rebuild muscle, hydrate the skin, strengthen the bones, help with signs of aging in the skin, and more. You can easily get 20-40g of protein with this alone!
Eat these whenever you have that “I need something sweet” thought 🤠
You’ll only need the following things and 20-30 minutes (15 of them spent waiting for the trays to cool down):
• 2 cups of your juice of choice (I used Lipton Citrus Green Tea + POM pomegranate juice together)
• Fruit Puree: 1 cup of frozen fruit + 1 tbsp of honey + a squeeze of lemon juice
• (optional) 1.25 scoop of Super Reds Powder (jam-packed with antioxidants and vitamins)
• 16-20 tbsps of Grass-Fed Gelatin (the kind I use is linked here!)
• Mini-Ice Cube Trays (the kind I have is linked. It includes the storage and scoop too!)
• Other tools: a large measuring cup, large pot, spoon, and whisk
Steps:
1. Put your fruit purée ingredients into a pot on medium heat (add a splash of water or leftover juice if you’d like!)
2. Once cooked down, mash with a spoon (or use an immersion blender if you have one)
3. Add your juice of choice to the pot and mix together
4. (Optional) Add the Super Reds powder and whisk together
5. Slowly whisk in the gelatin powder. Continue to whisk until fully dissolved.
*tip: the warmer the liquid is, the easier it is for the gelatin to dissolve!*
6. Once it’s hot enough to almost simmer, transfer everything back to the large measuring cup
7. Pour into your molds. Be careful to not use too much in each tray!!
8. Pop into the freezer for 15-20 minutes.
Done! 💘
#girlblogging#it girl#wellness journey#weight loss#healthy food#health & wellness#self love#anti aging#dream girl#self care#becoming that girl#healthy recipes
1 note
·
View note
Last Seen Blogs

katarinaishii
Katarina ishii 💕🌸

rsdollatelier
Adored by Rs Atelier

adrirodrsblog
dance to the music of your heart

lizziesjosie
Crackship Lover

aserendipitousdestiny
c h a m p a i n