#qemu/kvm
Explore tagged Tumblr posts
Visit Tumblr Blog
Explore Tumblr blogs with no restrictions, modern design and the best experience.
Last Seen Tumblr Blogs


Fun Fact
Total funding amounts to $125.3M.
Note

play of the Devil NOW
I'm fucking trying I prommy but Nvidia hates me because I use linux 💔
#morgan-of-the-devil#Yes I know virtual machines and GPU passthough exists#However setting up a windows VM is hell on earth with my libvirt + KVM + qemu setup
4 notes
·
View notes
Text
why hasnt anyone told me about virt-manager ive been fucking around with vmware for so long and for what. screw your vmmon and vmnet
#i would have gotten into virtualbox sooner if it weren't for having to work with vmware for school&work#but kali in qemu works so nicely#am accepting explanations on which part of the system is which idk why virt-manager says qemu/kvm
4 notes
·
View notes
Text
Sidetrack: ChromeOS Flex... on a Virtual Machine... with Single GPU Passthrough...
the prospect of running ChromeOS on anything more powerful than a microwave oven is unfathomably cursed - wheezus2000 on discord
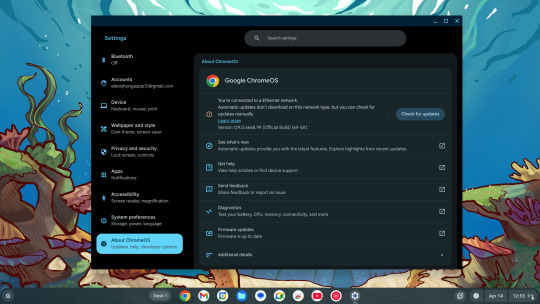
So... where do we start here... *checks notes* ah! So yeah, last Sunday I showcased a virtual machine running ChromeOS Flex (the most barebones GUI your grandma can only recognize) over to the aptly named r/ChromeOSFlex subreddit. It was a lot of work but it does work somehow.
Anyways, here's a tutorial to get this abomination up and running using virt-manager!
Prerequisites:
You will need:
ChromeOS Flex Recovery Image
A decent hard drive space (around 24GB is enough)
A nice dedicated GPU (because I'm not sure if it'll work with an iGPU)
more than 4GB of RAM (8GB or more is recommended)
IOMMU support
Lots of patience (you'll see why in a moment)
On the software side, you'll need:
KVM and QEMU
libvirtd and virt-manager
GRUB or any bootloader already set-up for GPU passthrough
On the skills necessary:
Having familiarized with the concept of Linux, and basic command line stuff
Having followed instructions precisely
Potentially, having skills in compiling software and/or fiddling with the operating system and the Linux kernel as well
and... not having an attention span of a script kiddie
Process
Visit this link to download the recovery image from Google.
Scroll down to this part of the page. Click on "ChromeOS Flex installer image".
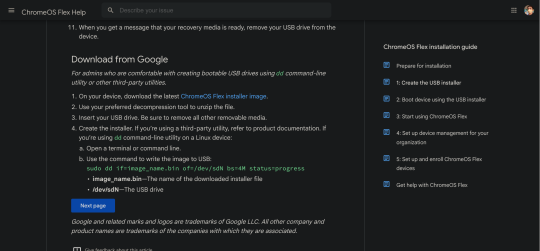
This would then be downloaded.

After that, unzip the file to a convenient place. This would take ~6GB of storage space.
Install the software prerequisites using your favorite package manager.
Once having virt-manager installed, click on the new button.
From there, select "Import existing disk image".

Click on Browse. Then select "Browse Local" to find the recovery image.
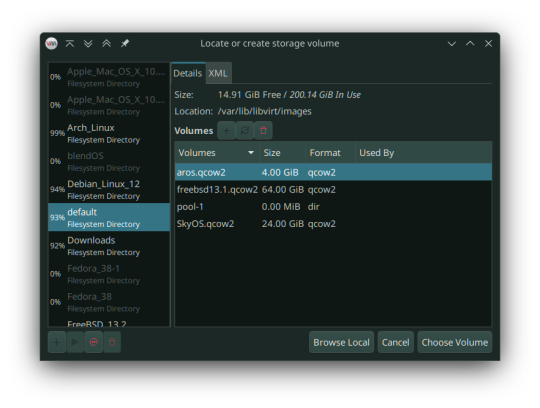
In my case, that'll be in the folder called vmdk, stored in my os folder on one of my hard drives. Select the "chromeos_*_reven_recovery..." file.

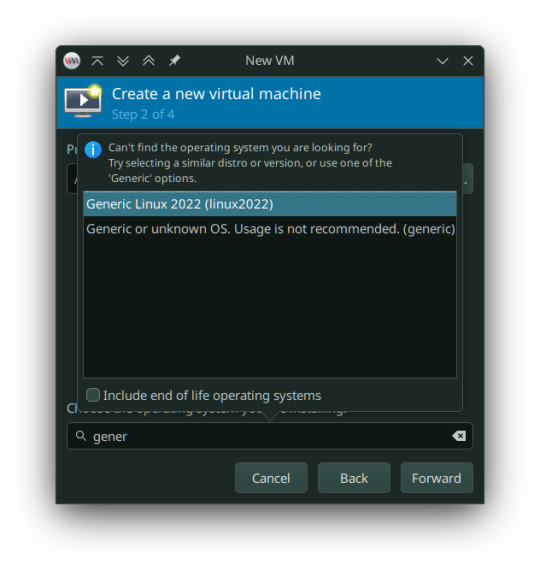
In the "Choose the operating system you are installing" prompt, select linux2022.
In the memory tab, pick 4096MiB and select how many cores you want to be assigned.

You must select "Customize configuration before install" as we tweak some things.

In the prompt that follows, here's what you need to change:
Firmware: BIOS -> UEFI
Disk: VirtIO -> USB
Video: Anything else -> VirtIO
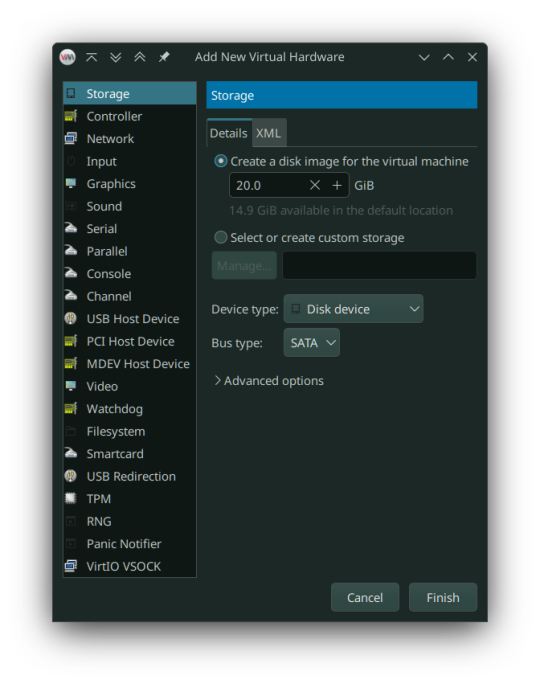
Now add a virtual hard drive by clicking the "Add Hardware" button. It should be 20GB or larger, SATA bus. VirtIO bus doesn't work as it wouldn't be recognized.
Remove any Consoles, RNG and start the install.
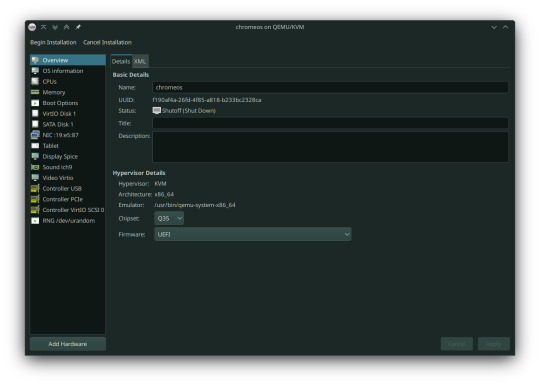
Here's the configuration if you follow these steps:
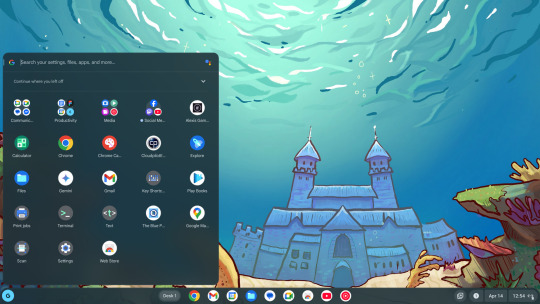
After starting, you can now follow the steps in installing ChromeOS Flex. It should be straightforward, however the graphics are still glitchy as it seems. It'll be fixed once we added our dGPU.
However, ChromeOS at boot will, and definitely (in my case) crash and bootloop a couple times, even when installed, before landing you to the desktop.
If for some reason, the USB tablet device doesn't work or if you prefer a cursor, switch the USB tablet for a PS/2 or USB mouse.
Once installed, you can see your desktop glitching. If you, somehow can navigate the system, you can now turn it off and set up Single GPU Passthrough. I used this one by risingprismtv. Follow the instructions provided in the wiki, and apply it to your VM. This can (and will) be complicated (especially when dealing with IOMMU groups), as it may break your setup, so please proceed with caution. Any issues with the script can be reported through their Discord server.
After setting the scripts, this is my current VM setup:

Now it's time to boot the VM, and voila! You can now use ChromeOS Flex while staying under Linux!
Predicaments, and possible issues
No, it does not work under Windows, well, without complications apparently.
Possible VM bootloops, just like I said. Seems related to the graphics, I presume. Though, this only happens multiple times, before working normally.
You can't update the VM, apparently.
Screenshots

And as always, see ya later!
0 notes
Text
QEMU: Potente Virtualización para la Ciberseguridad
La virtualización se ha convertido en una herramienta esencial en el mundo de la ciberseguridad. Permite a los profesionales probar entornos aislados, analizar malware y simular ataques sin comprometer sistemas reales. Entre las diversas soluciones disponibles, QEMU (Quick Emulator) se destaca como una de las opciones más versátiles y potentes. Pero, ¿qué es QEMU, cuáles son sus beneficios y cómo…
0 notes
Text
QEMU 9.0
Została wydana nowa wersja QEMU 9.0 https://linuxiarze.pl/qemu-9-0/

0 notes
Note
HI :3 wat VM software are you using to run your XP system? I found a cool emulator software which can do full system emulation for IBM PCs called 86Box, you might want to check it out if you’re into retro computing!
Hi, hiiii!! I'm using just plain old VirtualBox here. I had a KVM/QEMU setup before, but I switched back because of some unrelated issues...
Also, I don't know much about IBM PCs and that era of computing, but I'm always up to learn more about it, specially about the games!
9 notes
·
View notes
Text
I just spent 2 hours figuring this out, so here is how you forward a USB device directly to a QEMU VM on Linux:
Use lsusb to find the bus and device numbers (such as 001 and 008)
Make that device available to KVM: sudo chgrp kvm /dev/bus/usb/001/008 (source)
Start QEMU like so: qemu-system-x86_64 ... -usb -device usb-host,hostbus=1,hostaddr=8 (source)
Context: I was trying to use a USB gamepad within a Windows 2000 VM, but it didn't show up until I did the chgrp step.
6 notes
·
View notes
Text
New approach to working around that frustrating touchpad issue with trying to run FreeBSD and derivatives in KVM/QEMU: just giving a USB drive over to NomadBSD!
Had to get a little amused during the installation.

Yeah, you should indeed maybe skip the encryption for now if you have no clue wtf you are doing. I did not want to encrypt anyway, but also have never worked with geli.
And everything so far seems to be functioning after booting back into the new install, besides the Wifi card. Support is kinda spotty on the BSD side, which is one reason I was just trying to run shit in a VM.
But, some kind soul on the forum has us covered!
Vaguely impressed again at how friendly and helpful a lot of BSD communities do seem to be. Maybe especially in comparison to some gaggles of Linux enthusiasts. (And yes, I say this as someone with plenty of experience there. 😩 Approachability is not always great, maybe especially for new users.)
So yeah, I do now have working network through tethering to this phone. Which I tried to do with something else a while back (don't actually remember what tbh), but I was glad for the little walkthrough. Especially since I am a huge n00b when it comes to BSD. A lot of stuff is just different enough to trip you up pretty fast until you get used to it.
I did a little more configuration, and ran an update on the little that came installed by default. It's late enough that I don't even want to get into a browser sufficiently to even post to Tumblr from over there tonight, but hey. Certainly planning to jump back in tomorrow.
This is looking pretty fun for now, at least. Which is at least half the point.
7 notes
·
View notes
Text
Site Reliability Engineer (2-4yrs)
and script ( eg: Perl/Golang preferred ) ● Knowledge of automation/configuration management using either saltstack or equivalent… of cloud services on linux using kvm/qemu ● DCOS (mesos & mesos frameworks) ● aerospike ( nosql ) ● perl/golang ● galera… Apply Now
0 notes
Link
0 notes
Text
Migrating Virtual Machines to Red Hat OpenShift Virtualization with Ansible Automation Platform
As enterprises modernize their IT infrastructure, migrating legacy workloads from traditional hypervisors to cloud-native platforms becomes essential. Red Hat OpenShift Virtualization offers a powerful solution by allowing organizations to run and manage virtual machines (VMs) alongside containers on the same OpenShift cluster. To streamline and scale this migration process, Red Hat Ansible Automation Platform proves to be an invaluable tool.
In this post, we’ll explore how to leverage Ansible Automation Platform to automate the migration of VMs to OpenShift Virtualization, reducing manual effort, minimizing downtime, and increasing consistency across environments.
🧩 What is OpenShift Virtualization?
OpenShift Virtualization, built on KubeVirt, extends Red Hat OpenShift to run traditional VM workloads alongside containerized applications. This allows for:
Unified management of VMs and containers
Seamless integration with CI/CD pipelines
A single pane of glass for observability, networking, and security
🤖 Why Use Ansible for VM Migration?
Manually migrating virtual machines is not only tedious but also error-prone. Ansible Automation Platform enables:
Repeatable Playbooks for consistent VM conversion and deployment
Inventory management of existing VMs and target OpenShift clusters
Idempotent operations that reduce risk and human error
Event-driven automation with Red Hat Event-Driven Ansible (EDA)
🛠️ High-Level Workflow of VM Migration with Ansible
Discovery & Assessment
Identify source VMs using dynamic inventory (e.g., VMware, RHV, KVM)
Collect system configurations and workload details
Use Red Hat Migration Toolkit for Virtualization (MTV) if applicable
Pre-Migration Automation
Validate OpenShift Virtualization setup
Configure storage (e.g., Ceph, CSI volumes)
Prepare networking (e.g., Multus, bridges)
VM Export & Conversion
Use Ansible modules to:
Export VM disks (e.g., via ovftool, virt-v2v, or qemu-img)
Convert formats (e.g., VMDK to QCOW2)
VM Import into OpenShift
Create VM manifests in OpenShift (YAML/CRDs)
Automate virtctl commands or use MTV APIs
Attach appropriate storage and networks
Post-Migration Tasks
Run automated smoke tests
Update DNS or service endpoints
Decommission old VMs (if desired)
🧪 Sample Ansible Playbook Snippet
yaml
- name: Create OpenShift VirtualMachine from template hosts: localhost tasks: - name: Create VM from YAML definition k8s: state: present definition: "{{ lookup('file', 'vm-definition.yaml') }}"
You can integrate this into an Ansible Workflow Job Template in Red Hat Ansible Automation Controller, and trigger it via webhooks or Service Catalogs.
💡 Best Practices
Test in Staging: Simulate migrations in non-prod environments before rolling out to production.
Incremental Migration: Start with low-impact workloads to refine your process.
Logging and Auditing: Use Ansible Tower logs and OpenShift audit logs to monitor changes.
Rollback Plans: Always have a plan to revert if something fails.
🎯 Benefits of Using Ansible + OpenShift Virtualization
Centralized automation of hybrid workloads
Faster time-to-value with reusable playbooks
Simplified management for IT Ops and DevOps teams
Integration with existing CI/CD and ITSM platforms
🔚 Final Thoughts
Migrating VMs to OpenShift Virtualization doesn't have to be complex. By combining the power of Red Hat OpenShift with the flexibility of Ansible Automation Platform, organizations can modernize their workloads efficiently and with confidence.
At HawkStack Technologies, we help enterprises design, automate, and execute seamless VM migration strategies using Red Hat technologies. Contact us to learn how we can support your modernization journey.
📞 Need help with automation or OpenShift Virtualization? Let our certified experts at HawkStack guide your migration from legacy systems to a modern cloud-native environment.
For more details www.hawkstack.com
0 notes
Text
RHEL 8.8: A Powerful and Secure Enterprise Linux Solution
Red Hat Enterprise Linux (RHEL) 8.8 is an advanced and stable operating system designed for modern enterprise environments. It builds upon the strengths of its predecessors, offering improved security, performance, and flexibility for businesses that rely on Linux-based infrastructure. With seamless integration into cloud and hybrid computing environments, RHEL 8.8 provides enterprises with the reliability they need for mission-critical workloads.
One of the key enhancements in RHEL 8.8 is its optimized performance across different hardware architectures. The Linux kernel has been further refined to support the latest processors, storage technologies, and networking hardware. These RHEL 8.8 improvements result in reduced system latency, faster processing speeds, and better efficiency for demanding applications.
Security remains a top priority in RHEL 8.8. This release includes enhanced cryptographic policies and supports the latest security standards, including OpenSSL 3.0 and TLS 1.3. Additionally, SELinux (Security-Enhanced Linux) is further improved to enforce mandatory access controls, preventing unauthorized modifications and ensuring that system integrity is maintained. These security features make RHEL 8.8 a strong choice for organizations that prioritize data protection.
RHEL 8.8 continues to enhance package management with DNF (Dandified YUM), a more efficient and secure package manager that simplifies software installation, updates, and dependency management. Application Streams allow multiple versions of software packages to coexist on a single system, giving developers and administrators the flexibility to choose the best software versions for their needs.
The growing importance of containerization is reflected in RHEL 8.8’s strong support for containerized applications. Podman, Buildah, and Skopeo are included, allowing businesses to deploy and manage containers securely without requiring a traditional container runtime. Podman’s rootless container support further strengthens security by reducing the risks associated with privileged container execution.
Virtualization capabilities in RHEL 8.8 have also been refined. The integration of Kernel-based Virtual Machine (KVM) and QEMU ensures that enterprises can efficiently deploy and manage virtualized workloads. The Cockpit web interface provides an intuitive dashboard for administrators to monitor and control virtual machines, making virtualization management more accessible.
For businesses operating in cloud environments, RHEL 8.8 seamlessly integrates with leading cloud platforms, including AWS, Azure, and Google Cloud. Optimized RHEL images ensure smooth deployments, reducing compatibility issues and providing a consistent operating experience across hybrid and multi-cloud infrastructures.
Networking improvements in RHEL 8.8 further enhance system performance and reliability. The updated NetworkManager simplifies network configuration, while enhancements to IPv6 and high-speed networking interfaces ensure that businesses can handle increased data traffic with minimal latency.
Storage management in RHEL 8.8 is more robust, with support for Stratis, an advanced storage management solution that simplifies volume creation and maintenance. Enterprises can take advantage of XFS, EXT4, and LVM (Logical Volume Manager) for scalable and flexible storage solutions. Disk encryption and snapshot management improvements further protect sensitive business data.
Automation is a core focus of RHEL 8.8, with built-in support for Ansible, allowing IT teams to automate configurations, software deployments, and system updates. This reduces manual workload, minimizes errors, and improves system efficiency, making enterprise IT management more streamlined.
Monitoring and diagnostics tools in RHEL 8.8 are also improved. Performance Co-Pilot (PCP) and Tuned provide administrators with real-time insights into system performance, enabling them to identify bottlenecks and optimize configurations for maximum efficiency.
Developers benefit from RHEL 8.8’s comprehensive development environment, which includes programming languages such as Python 3, Node.js, Golang, and Ruby. The latest version of the GCC (GNU Compiler Collection) ensures compatibility with a wide range of applications and frameworks. Additionally, enhancements to the Web Console provide a more user-friendly administrative experience.
One of the standout features of RHEL 8.8 is its long-term support and enterprise-grade lifecycle management. Red Hat provides extended security updates, regular patches, and dedicated technical support, ensuring that businesses can maintain a stable and secure operating environment for years to come. Red Hat Insights, a predictive analytics tool, helps organizations proactively detect and resolve system issues before they cause disruptions.
In conclusion RHEL 8.8 is a powerful, secure, and reliable Linux distribution tailored for enterprise needs. Its improvements in security, containerization, cloud integration, automation, and performance monitoring make it a top choice for businesses that require a stable and efficient operating system. Whether deployed on physical servers, virtual machines, or cloud environments, RHEL 8.8 delivers the performance, security, and flexibility that modern enterprises demand.
0 notes
Text
Chimera-Linux with btrfs
Chimera Linux is a rather new from the ground up Linux Distribution built with LLVM, MUSL, BSDUtils and dinitit comes with GNOME and KDE Plasma. It, however doesn't come with a installer so here's how to install the KDE flavour with btrfs root and home directories plus a swap partition for use in Linux KVM with UEFI.
Step 1. Get a Chimera live image from https://repo.chimera-linux.org/live/latest/
I use the chimera-linux-x86_64-LIVE-XXXXXXXX-plasma.iso image with KDE Plasma 6 and the following steps assume you do the same.
Step 2. Boot the live image
Step 3. Prepare the target disk with KDE Partition Manager
/dev/vda /dev/vda1, vfat, EFI System, 500 MB /dev/vda2, btrfs, Root FS, subvols @ & @home , rest of the disk /dev/vda3, swap, SWAP FS, 2x RAM Size
Step 4. Open Konsole and do the following
doas -s mkdir -p /media/root mount -t btrfs /dev/vda2 /media/root chmod 755 /media/root btrfs subvolume create /media/root/@ btrfs subvolume create /media/root/@home btrfs subvolume set-default /media/root/@ umount /media/root mount -t btrfs -o compress=zstd:5,ssd,noatime,subvol=/@ /dev/vda2 /media/root mkdir -p /media/root/home mount -t btrfs -o compress=zstd:5,ssd,noatime,subvol=/@home /dev/vda2 /media/root/home mkdir -p /media/root/boot/efi mount -t vfat /dev/sda1 /media/root/boot/efi
let's bootstrap our new chimera system
chimera-bootstrap -l /media/root exit
time to chroot into our vergin system
doas chimera-chroot /media/root
time to bring everything up to date
apk update apk upgrade --available
if something is iffy
apk fix
we want our swap to show up in the fstab
swapon /dev/vda3
Let's build a fstab
genfstab / >> /etc/fstab
install the latest LTS Kernel
apk add linux-lts
install the latest released kernel
apk add linux-stable update-initramfs -c -k all
time for EFI GRUB
apk add grub-x86_64-efi grub-install -v --efi-directory=/boot/efi update-grub
install KDE, Firefox, Thunderbird
apk add plasma-desktop flatpak smartmontools ufw firefox thunderbird qemu-guest-agent-dinit spice-vdagent-dinit
Set root password
passwd root
create main user
useradd myuser passwd myuser
add user to relevant groups
usermod -a -G wheel,kvm,plugdev myuser
Set hostname
echo chimera > /etc/hostname
set timezone
ln -sf /usr/share/zoneinfo/Europe/Berlin /etc/localtime
Configure some services
syslog-ng
dinitctl enable -o syslog-ng
sshd
dinitctl enable -o sshd
KDE Login Manager
dinitctl enable -o sddm
only needed when in KVM VM
dinitctl enable -o spice-vdagentd dinitctl enable -o qemu-ag
network time client
dinitctl enable -o chrony
network manager defaults to dhcp client on first ethernet interface
dinitctl enable -o networkmanager
optional: enable firewall if installed
dinitctl enable -o ufw
see the firewall status
ufw status
configure flatpak
flatpak remote-add --if-not-exists flathub https://dl.flathub.org/repo/flathub.flatpakrepo
just to be sure
update-initramfs -c -k all update-grub
exit from chroot
exit
umount drive
doas umount /media/root/boot/efi doas umount /media/root/home doas umount /media/root
Step 5. Reboot the System
1 note
·
View note
Text
Site Reliability Engineer (4-8yrs)
and script ( eg: Perl/Golang preferred ) ● Knowledge of automation/configuration management using either saltstack or equivalent… of cloud services on linux using kvm/qemu ● DCOS (mesos & mesos frameworks) ● aerospike ( nosql ) ● perl/golang ● galera… Apply Now
0 notes
Text
OpenShift Virtualization Architecture: Inside KubeVirt and Beyond
OpenShift Virtualization, powered by KubeVirt, enables organizations to run virtual machines (VMs) alongside containerized workloads within the same Kubernetes platform. This unified infrastructure offers seamless integration, efficiency, and scalability. Let’s delve into the architecture that makes OpenShift Virtualization a robust solution for modern workloads.
The Core of OpenShift Virtualization: KubeVirt
What is KubeVirt?
KubeVirt is an open-source project that extends Kubernetes to manage and run VMs natively. By leveraging Kubernetes' orchestration capabilities, KubeVirt bridges the gap between traditional VM-based applications and modern containerized workloads.
Key Components of KubeVirt Architecture
Virtual Machine (VM) Custom Resource Definition (CRD):
Defines the specifications and lifecycle of VMs as Kubernetes-native resources.
Enables seamless VM creation, updates, and deletion using Kubernetes APIs.
Virt-Controller:
Ensures the desired state of VMs.
Manages operations like VM start, stop, and restart.
Virt-Launcher:
A pod that hosts the VM instance.
Ensures isolation and integration with Kubernetes networking and storage.
Virt-Handler:
Runs on each node to manage VM-related operations.
Communicates with the Virt-Controller to execute tasks such as attaching disks or configuring networking.
Libvirt and QEMU/KVM:
Underlying technologies that provide VM execution capabilities.
Offer high performance and compatibility with existing VM workloads.
Integration with Kubernetes Ecosystem
Networking
OpenShift Virtualization integrates with Kubernetes networking solutions, such as:
Multus: Enables multiple network interfaces for VMs and containers.
SR-IOV: Provides high-performance networking for VMs.
Storage
Persistent storage for VMs is achieved using Kubernetes StorageClasses, ensuring that VMs have access to reliable and scalable storage solutions, such as:
Ceph RBD
NFS
GlusterFS
Security
Security is built into OpenShift Virtualization with:
SELinux: Enforces fine-grained access control.
RBAC: Manages access to VM resources via Kubernetes roles and bindings.
Beyond KubeVirt: Expanding Capabilities
Hybrid Workloads
OpenShift Virtualization enables hybrid workloads by allowing applications to:
Combine VM-based legacy components with containerized microservices.
Transition legacy apps into cloud-native environments gradually.
Operator Framework
OpenShift Virtualization leverages Operators to automate lifecycle management tasks like deployment, scaling, and updates for VM workloads.
Performance Optimization
Supports GPU passthrough for high-performance workloads, such as AI/ML.
Leverages advanced networking and storage features for demanding applications.
Real-World Use Cases
Dev-Test Environments: Developers can run VMs alongside containers to test different environments and dependencies.
Data Center Consolidation: Consolidate traditional and modern workloads on a unified Kubernetes platform, reducing operational overhead.
Hybrid Cloud Strategy: Extend VMs from on-premises to cloud environments seamlessly with OpenShift.
Conclusion
OpenShift Virtualization, with its KubeVirt foundation, is a game-changer for organizations seeking to modernize their IT infrastructure. By enabling VMs and containers to coexist and collaborate, OpenShift bridges the past and future of application workloads, unlocking unparalleled efficiency and scalability.
Whether you're modernizing legacy systems or innovating with cutting-edge technologies, OpenShift Virtualization provides the tools to succeed in today’s dynamic IT landscape.
For more information visit: https://www.hawkstack.com/
0 notes