#qtcreator
Explore tagged Tumblr posts
Visit Tumblr Blog
Explore Tumblr blogs with no restrictions, modern design and the best experience.
Last Seen Tumblr Blogs


Fun Fact
1,644 Tumblr posts in 1 second.
Note
Is there a specific type or style of computer that you really like? And what kind of coding software are you proficient in?
My ideal dream computer setup would definitely be an old 2000's-esque computer running Windows XP, with an old CRT monitor and all. <333 However, that's unfortunately not very possible, due to Windows XP having had no security updates ever since 2014 or so. So it's not a very safe operating system to use anymore (unless it's fully offline and not connected to the internet without antivirus etc), which is depressing as it's my all-time favorite one </3 I really love the look of them old beige bulky computers from the 1990's and early 2000's, they're so nostalgic <333
And when it comes to coding, I can't say that I'm skilled or proficient in any program yet as coding generally is pretty new to me still. But I've lately been using CLion for C++ coding, WebStorm for HTML/CSS coding and Visual Studio Code for nearly everything else. In school, we use different programs, like for example; QtCreator, XAMPP (MySQL stuff in shell) and uhhhh, Visual Studio etc. I've gotten to use a lot of programs, lol.
If I had to recommend a good program for coding itself; Visual Studio Code, Notepad++ (for Windows only) and JetBrains programs are good solid ones imo.
5 notes
·
View notes
Text
RDS Data Extraction with RFtap and Wireshark
RDS (Radio Data System) is a communication protocol standard used for embedding small amounts of digital information in traditional FM radio broadcasts. It enables radio stations to transmit data such as station identification, program information, and traffic updates.
To capture and decode RDS data, one method involves using a Software Defined Radio (SDR) along with GNU Radio and RFtap. GNU Radio provides a framework for creating software radios, while RFtap acts as a bridge between GNU Radio and conventional network monitoring and packet analysis tools like Wireshark.

Unfortunately, as of the time of writing, RFtap is no longer being maintained and does not work with the latest version of GNU Radio (version 3.10.10). This post offers guidelines for rebuild and using RFtap with the new GNU Radio release.
This post assumes that the reader has access to DVB-T dongles based on the Realtek RTL2832U and a PC running Ubuntu or Debian Linux. For this, I used an RTL dongle with Rafael Micro R820T tuner and Ubuntu 24.04 LTS release.
As the first step install the following GNU Radio build dependencies into the OS:
sudo apt-get install cmake libboost-all-dev \ liblog4cpp5-dev qtcreator qtbase5-dev \ qt5-qmake python3-cheetah python3-numpy \ python3-pygtk python3-gi python3-gi-cairo \ gir1.2-gtk-4.0
sudo apt install git g++ libgmp-dev swig \ python3-mako python3-sphinx python3-lxml \ doxygen libfftw3-dev libsdl1.2-dev \ libgsl-dev libqwt-qt5-dev libqt5opengl5-dev \ python3-pyqt5 liblog4cpp5-dev libzmq3-dev \ python3-yaml python3-click \ python3-click-plugins python3-zmq python3-scipy \ libcodec2-dev libgsm1-dev libusb-1.0-0 \ libusb-1.0-0-dev libudev-dev \ python3-setuptools
sudo apt install pybind11-dev python3-matplotlib \ libsndfile1-dev libsoapysdr-dev soapysdr-tools \ python3-pygccxml python3-pyqtgraph
sudo apt install libiio-dev libad9361-dev \ libspdlog-dev python3-packaging python3-jsonschema \ python3-qtpy
sudo apt remove swig
Next, clone and build Volk (Vector-Optimized Library of Kernels)
mkdir ~/rf cd rf git clone --recursive https://github.com/gnuradio/volk.git cd volk mkdir build cd build cmake -DCMAKE_BUILD_TYPE=Release -DPYTHON_EXECUTABLE=/usr/bin/python3 ../ make sudo make install sudo ldconfig
After installing the Volk library, we can proceed to build GNU Radio.
cd ~/rf wget https://github.com/gnuradio/gnuradio/archive/refs/tags/v3.10.10.0.tar.gz tar -xvf ./v3.10.10.0.tar.gz cd gnuradio-3.10.10.0 mkdir build cd build cmake -DCMAKE_BUILD_TYPE=Release -DPYTHON_EXECUTABLE=/usr/bin/python3 ../ make -j8 make test sudo make install sudo ldconfig

Now GNU Radio is installed with all necessary components. To enable RTL SDR support, we must build and install Osmocom RTL SDR libraries and SDR components.
cd ~/rf git clone https://gitea.osmocom.org/sdr/rtl-sdr.git cd rtl-sdr mkdir build cd build cmake ../ -DINSTALL_UDEV_RULES=ON make sudo make install sudo ldconfig
cd ~/rf git clone https://gitea.osmocom.org/sdr/gr-osmosdr cd gr-osmosdr mkdir build cd build cmake ../ make sudo make install sudo ldconfig
Before plugging in the RTL-SDR dongle, we need to prevent the kernel modules for the RTL-SDR USB device from being loaded into the kernel and taking ownership of the device. To do this, simply navigate to the /etc/modprobe.d directory and create a file called rtl-sdr-blacklist.conf with the following content:
# This system has librtlsdr0 installed in order to # use digital video broadcast receivers as generic # software defined radios. blacklist dvb_usb_rtl28xxu blacklist e4000 blacklist rtl2832 blacklist rtl2830 blacklist rtl2838
Next, you should clone and build the FM RDS/TMC transceiver module for GNU Radio.
cd ~/rf wget https://github.com/bastibl/gr-rds/archive/refs/tags/v3.10.tar.gz tar -xvf ./gr-rds\ -v3.10.tar.gz cd gr-rds-3.10 mkdir build cd build cmake .. make sudo make install sudo ldconfig
For the next steps, we need to have Wireshark and RFTap. Wireshark can be installed using a package manager.
sudo apt-get install wireshark
To run Wireshark without requiring root user permissions, use the following set of commands:
sudo dpkg-reconfigure wireshark-common sudo usermod -a -G wireshark $USER newgrp wireshark
A message may be prompted in the first step above and proceed by selecting the "Yes" option.
Now restart the OS and continue with the RFTap installation.
The official RFTap repository is no longer being maintained and is not compatible with newer versions of GNU Radio. For this step, please use the RFTap fork available in my GitHub repository. This version has been successfully tested with GNU Radio 3.10.10 and Wireshark 4.2.2.
cd ~/rf git clone https://github.com/dilshan/gr-rftap.git cd gr-rftap mkdir build cd build cmake .. make sudo make install sudo ldconfig
Now get the modifier version of rds_rx_rftap.grc from the above repository.

The Wireshark Dissector file for RDS data is also available in the repository. Copy it to the ~/.config/wireshark/plugins directory. Create the directories if they do not exist.
Launch Wireshark and monitor the loopback (lo) adapter. Start GNU Radio and execute the rds_rx.grc file, which was downloaded in the above step.
youtube
If all the steps are performed correctly, the RDS data should appear in the packet list pane as UDP messages. The dissected messages can be observed through the packet bytes pane.
0 notes
Text
the fundamental basics of the offline sp/pk alt im making is done but i want a diary section and laying it out in qtcreator is making me feel homocidal
0 notes
Photo

The thing about #programming is that as you get more and more good at it, the less often you run the final result to see the errors because you know more and you put less errors in your code. But I't never gets to zero. . . #coding #coder #developer #dev #development #tech #techie #technology #debugging #webdev #assembly #cpp #cplusplus #qt #qtcreator #techworld #devops #sysadmin https://www.instagram.com/moisrex/p/BvjkBKoBxNV/?utm_source=ig_tumblr_share&igshid=aswaa7n3gu2c
#programming#coding#coder#developer#dev#development#tech#techie#technology#debugging#webdev#assembly#cpp#cplusplus#qt#qtcreator#techworld#devops#sysadmin
8 notes
·
View notes
Photo

Ma b9itch 3aref ach tandir #C++ #qtcreator #safiW3arit https://www.instagram.com/p/B6-z4X5DEyBGhHqUQU3Ny-gxZFtLqBqtInl8IY0/?igshid=kxhylrjaj0m3
0 notes
Photo

All backend stuff this week. I had a multi-threaded system set up for asset loading but I’ve set it up to be generic so I can get the landscape generation built into it.
I’ve also switched to debugging with GDB instead of using an IDE or another GUI debugger. They’ve each got a unique problem that inevitably makes them unusable over the long term: Eclipse screws up when Java changes versions, QtCreator doesn’t display the contents for pointers for more complex objects (it just gives up), while Nemiver (and KDevelop, from memory) doesn’t support setting breakpoints without manually breaking first and also doesn’t have a way to just evaluate typed expressions. And DDD just straight up doesn’t compile on Manjaro, if its benefit was supposed to technical simplicity then it just failed right out the gate.
So now I’m all-CLI, all the time. Frankly, just the ability script stuff is already proving useful. In time maybe I’ll just write my own damn GDB frontend if all the options are this unreliable.
5 notes
·
View notes
Text
Clion Vs Eclipse

Clion Vs Eclipse Cdt
Clion Vs Eclipse 2020

以前都是在 win 下写代码,用的是 vs,vs 作为宇宙第一IDE,绝对好用,所以在 win 下编程,推荐vs。 然后换到了mac,妈呀,xcode 写C太难受,完全不能忍,然后同事推荐用clion,用clion得学习下cmake,学会了就非常容易了。. R.I.P eclipse, netbeans, visual studio. By isls, 6 years ago, hopefully after a long wait jetbrains has announced new C/C IDE called Clion with all needed features needed from any programmer, every one should have a try. With various functions, pricing, terms, and more to compare, choosing the right IDE Software for your business is tricky. But making use of our system, it is simple to match the functions of CLion and Eclipse as well as their general score, respectively as: 8.9 and 8.5 for overall score and 88%. When comparing CLion vs Visual Studio Code, the Slant community recommends Visual Studio Code for most people. CLion is ranked 3rd while Visual Studio Code is ranked 8th. The most important reason people chose CLion is. But it's just over complex to add 3rd party libraries etc. Netbeans/Eclipse etc are much better integrated with the. CLion is a C and C development environment, while Visual Studio does everything in relation to MS Windows development (supports all the “official” MS languages, has database designers and UI designers and what not). So, for example as a C#/WPF/E.
For C and C++ applications, use the following options:
Left pane
ItemDescriptionC++ ExecutableSelect this option if you are going to use C++ as the project language and executable target.C++ LibrarySelect this option if you are going to use C++ as the project language and library target.C ExecutableSelect this option if you are going to use C as the project language and executable target.C LibrarySelect this option if you are going to use C as the project language and library target.
Right pane
Clion Vs Eclipse Cdt
LocationIn this text field, type the path to the project folder or click to select. Do nothing if you are going to use the default parameters.Language StandardClick here to select the desired language standard from the drop down list.Library type (visible when Library is selected as a target)Click here to select the library type: shared or static.
Apart from being a standalone tool, clang-tidy is integrated intovarious IDEs, code analyzers, and editors. We recommend using clangd whichintegrates clang-tidy and is available in most major editorsthrough plugins (Vim, Emacs, Visual Studio Code, Sublime Text and more).
The following table shows the most well-known clang-tidyintegrations in detail.
FeatureToolOn-the-fly inspectionCheck list configuration (GUI)Options to checks (GUI)Configuration via .clang-tidy filesCustom clang-tidy binaryA.L.E. for Vim+---+Clang Power Tools for Visual Studio-+-+-Clangd+--+-CLion IDE+++++CodeChecker----+CPPCheck-----CPPDepend-----Flycheck for Emacs+--++KDevelop IDE-++++Qt Creator IDE++-++ReSharper C++ for Visual Studio++-++Syntastic for Vim+---+Visual Assist for Visual Studio++---
Clion Vs Eclipse 2020
IDEs
CLion 2017.2 and later integrates clang-tidy as an extension to thebuilt-in code analyzer. Starting from 2018.2 EAP, CLion allows usingclang-tidy via Clangd. Inspections and applicable quick-fixes areperformed on the fly, and checks can be configured in standard command lineformat. In this integration, you can switch to the clang-tidybinary different from the bundled one, pass the configuration in.clang-tidy files instead of using the IDE settings, and configureoptions for particular checks.
KDevelop with the kdev-clang-tidy plugin, starting from version 5.1, performsstatic analysis using clang-tidy. The plugin launches theclang-tidy binary from the specified location and parses itsoutput to provide a list of issues.
QtCreator 4.6 integrates clang-tidy warnings into the editordiagnostics under the Clang Code Model. To employ clang-tidyinspection in QtCreator, you need to create a copy of one of the presets andchoose the checks to be performed. Since QtCreator 4.7 project-wide analysis ispossible with the Clang Tools analyzer.
MS Visual Studio has a native clang-tidy-vs plugin and also can integrateclang-tidy by means of three other tools. The ReSharper C++extension, version 2017.3 and later, provides seamless clang-tidyintegration: checks and quick-fixes run alongside native inspections. Apartfrom that, ReSharper C++ incorporates clang-tidy as a separatestep of its code clean-up process. Visual Assist build 2210 includes asubset of clang-tidy checklist to inspect the code as you edit.Another way to bring clang-tidy functionality to Visual Studio isthe Clang Power Tools plugin, which includes most of theclang-tidy checks and runs them during compilation or as a separatestep of code analysis.
Editors
Emacs24, when expanded with the Flycheck plugin, incorporates theclang-tidy inspection into the syntax analyzer. For Vim, you canuse Syntastic, which includes clang-tidy, or A.L.E.,a lint engine that applies clang-tidy along with other linters.
Analyzers
clang-tidy is integrated in CPPDepend starting from version 2018.1and CPPCheck 1.82. CPPCheck integration lets you import Visual Studiosolutions and run the clang-tidy inspection on them. TheCodeChecker application of version 5.3 or later, which also comes as a pluginfor Eclipse, supports clang-tidy as a static analysis instrument andallows to use a custom clang-tidy binary.
1 note
·
View note
Text
Гибридное приложение Qt + Javascript
Гибридное приложение Qt + Javascript
Данный эпос, как и было обещано в статье Гибридное приложение PyQt + React, будет посвящён разработке гибридного приложения на чистом Qt и чистом же (никаких React!) javascript. Используя эти две статьи вы сможете самостоятельно создавать любые приложения на Qt/PyQt и Js/React (да хоть на Angular!). В качестве бандлера также можно использовать что угодно. В статье про React я использовал parcel,…
View On WordPress
0 notes
Photo

Too many languages. #programming #programmer #programmierung #programmieren #прогаммист #算法 #程序员 #developer #projects #learningmandarin #cplusplus #qtcreator #mechatronics #mechatronik #мехатроника
#mechatronics#mechatronik#programmieren#算法#programmierung#мехатроника#learningmandarin#程序员#programmer#прогаммист#projects#programming#developer#qtcreator#cplusplus
0 notes
Text
Qt Creator 4.4 Beta disponible para quienes deseen probarla
Qt Creator 4.4 Beta disponible para quienes deseen probarla
El entorno integrado de desarrollo para aplicaciones de escritorio, móviles y embebidas basadas en las librerías QT acaba de liberar la beta de su versión 4.4 para Windows, Linux y Mac. Es necesario tener en cuenta que es una versión de prueba que puede tener errores. (more…)
View On WordPress
0 notes
Text
Qt dialog background color ui

QLinearGradient buttonGradient(0,0,0,ui->listWidget->height()) Put together we insert right after the line ui->setupUi(this) : end color the relative position and the end color.start color the relative position and the start color.the coordinates to tell the painter where to start drawing the gradient.In order to create a linear gradient we need at least three bits of information: Seems like we need some more actors on the stage.Įnter QBrush, QLinearGradient and QPalette The items are now painted using the default style (on my system the GTK-Qt-Style is used). Well, we have items, we have icons and we can select but we are still missing the promised fanciness. Running our sample application with these modifications results into this: set the icon from the resources we already added.create a new QListWidgetItem and pass the list widget from the ui object as the parameter so that it gets added automatically.Item3->setIcon( QIcon(":/network.png") ) QListWidgetItem *item3 = new QListWidgetItem(ui->listWidget) QListWidgetItem *item2 = new QListWidgetItem(ui->listWidget) QListWidgetItem *item1 = new QListWidgetItem(ui->listWidget) MainWindow::MainWindow(QWidget *parent) : In the constructor the method setupUi is called what initializes the from the included ui_mainwindow.h header file which is in turn created by the uic (User Interface Compiler).Īfter the initialization we can access the list widget and add some items: In the mainwindow.cpp we find a constructor that creates the user interface ( Ui::MainWindow) if you didn't change the default name. The project wizard created some cpp and header files we just need to modify. Now it's time to add some items to our tab bar. Since we don't need a tool bar, status bar and menu bar we get rid of them by right-click - 'Remove', either on the item directly or in the object inspector: The form designer opens the empty main window. Open the Forms folder and double click the. We start by modifying the mainwindow.ui form. Follow the Wizard steps and we should end up with a project skeleton containing a form, header and source for the main window. So lets create a new project by calling 'File' - 'New File or Project' and select 'Qt Widgets Application'. To make our life easy and get results fast we use QtCreator along this tutorial. QListWidget We make use of the flow property to make the items flow horizontally.So we need to make use of color roles and a customized QPalette QPalette Qt has no direct way for setting colors to particular widgets, except using stylesheets, but as far as I know there is no support for gradients yet.QBrush For creating the gradient we make use of QLinearGradient that is assigned to a QBrush.Resource System The icons you see in the screenshot are loaded via the Qt Resource System.QToolbox is just not conforming! Please let me know if I am doing things the wrong way.This tutorial makes use of different features and techniques provided by Qt: this->setStyleSheet("QToolBox ") Ĭorrectly applies a transparent background to just the QLineEdit element. Stylesheet settings I have tried that result in the first dialog image The dialog was done in Designer and contains one QTabWidget that contains one QToolbox, whose first page has a QLineEdit and a QPushButton. I have made a very simple dialog application to demonstrate the issue.
0 notes
Text
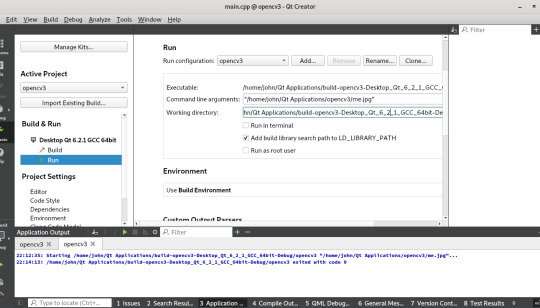
Qt, OpenCV with Debian
Qt, OpenCV with Debian
download and install OpenCV as per the following site instruction https://docs.opencv.org/2.4/doc/tutorials/introduction/linux_install/linux_install.html?highlight=installation Include following into the QtCreator .pro file INCLUDEPATH += /usr/local/include/opencv4 LIBS += -L/usr/local/lib -lopencv_core -lopencv_highgui -lopencv_imgproc -lopencv_objdetect -lopencv_imgcodecs -lopencv_videoio A…
View On WordPress
0 notes
Photo

I love it when I just leave every promise I ever made to myself and start something new to do and it turnes out to be something amazing. The best thing in the world for me is to lose track of time and spend hours doing what you love. I just realized that it's 3 in the morning and I've spent hours writing this code and I actually don't feel tired at all. Maybe it's because I loved working on this project of mine that I just started and I have absolutely no reason to start it. It's like something in my heart wanted me to start this working on this project that only I would use it. At least for now. Actually, I already know 1 application that does exactly what I'm doing, and I wrote a #bash #script months ago that did exactly this too. I don't know, it just feels right when I work on these kinda stuff. Do you do these kinda projects too? . . . #coding #programming #tech #techie #technology #programmer #cpp #boost #cplusplus #qt #qtcreator #vim #linux #math #mathematics #dev #developer #development https://www.instagram.com/p/BuH1ydjBQ8G/?utm_source=ig_tumblr_share&igshid=1o31qpgmmh6iy
#bash#script#coding#programming#tech#techie#technology#programmer#cpp#boost#cplusplus#qt#qtcreator#vim#linux#math#mathematics#dev#developer#development
8 notes
·
View notes
Photo

Sda3 errass #C++ #qtcreator #brainstopthinking https://www.instagram.com/p/B549kWglHRO08bRfnJW6q1VYld3tDKXYt6Ulow0/?igshid=1h42m6xxup2ce
0 notes
Text
"Error while parsing file *.pro. Giving up" © QtCreator
0 notes
Text
Investigating Intel’s Compiler
I don’t think there’s been a more controversial programming tool to ever be released than Intel’s own C++ compiler. The biggest controversy, for those who don’t know, basically involved Intel using their compiler to slow down their competitor’s chips. Whether that’s true or not, is what I’ll be going into in this post.
Why?
A lot of tech enthusiasts are, for good reason, very skeptical of Intel. Even a surface-level dive into the semiconductor industry reveals some troubling skeletons in Intel’s closet, including several anti-trust violations in both America and Europe.
But, times do change, and so, I’ve decided to investigate whether Intel’s compiler is still used as a weapon against their rivals, AMD in particular.
How?
Testing will actually be really simple: I just need to compile my test programs twice: Once with Intel’s compiler, and once with Visual Studio. I would use QTCreator given how lightweight it is, but my installation seems to be corrupted. That and Intel’s compiler has Visual Studio integration, so that will help keep things consistent. No need for me to write a batch file just to compile the tests.
By switching between two different compilers, one from Intel and the other vendor-agnostic, the various data points can be used to come to a conclusion. If Intel’s compiler is deliberately slowing down code that runs on my AMD hardware, then the difference will be very clear.
Once the tests have been compiled, I’ll run them, record the time, and then come to a conclusion. But note that I will not average the scores from different tests. This is because it’s simply unnecessary, and will make the data more murky. Especially given some programs will rely on certain algorithms more than others.
The Tests
In order to test this, I thought it too imprecise to find a program online, compile it, and run it. While that would provide a very realistic workload, I don’t think it would reveal too much about Intel’s slowdown methods, if they utilize any. In particular, 7-Zip, while free and open source, would be terrible for this because it’s mainly I/O bound. Any slowdown wouldn’t be noticed too well, and partially masked by either of my drives.
So instead, I decided to write my own suite of tests. Unfortunately these are all single-threaded tests, as multithreaded testing would be too difficult to do right. That’s not really the point anyway: If the compiler does indeed use tactics to slow down AMD chips, then even a single-threaded test will be able to reveal them.
These are the tests I wrote and why:
QuickSort. Reason being, it's a fairly simple algorithm with fairly predictable performance.
Counting Sort. Another sorting algorithm, but this one relies very little on branching. In fact, a proper implementation has no if statements at all. May not be a great indicator of real-world performance loss, but it’s a simple test, so I decided to throw it in.
Binary Tree. This one isn’t very indicative, but basically: It takes random data, builds a binary search tree with it, then locates a random element.
Note: In order to ensure that the testing is fair, the test will have to be rather large. This won’t be a 5-second thousand-element sort, no. Think 1 million elements. The exact testing parameters will be detailed below.
Test Machine
Of course, it’s important to contextualize the hardware on which these tests are done. This entire post would be a big waste of time if I was still rocking an i5-7600K. So below are all the relevant parts (and some irrelevant ones):
CPU: AMD Ryzen 5 1600 @ Stock
Cooler: AMD Wraith Spire (cu*)
RAM: 16 GB DDR4-3000 Team Vulkan-Z @ DDR4-2933**
Mobo: ASUS TUF GAMING B450M
* Has a copper slug. Just in case you were curious
** Otherwise stock. Also, F for my underutilized RAM :(
Testing Methodology
For each compiler, each test will be run 10 times, and the time taken averaged out. No major programs running in the background, not that it’ll impact anything. I/O, such as loading/generating data to be sorted, will not be counted towards any timed portions.
Every time the compiler is swapped, settings are checked to ensure fairness, and
There will be three tests: One with Visual Studio set to Debug mode, one with Release mode with standard O2 optimization, and one with Release mode and optimizations disabled.
The Results
Well, I wasn’t expecting what I found, in all honesty. First, Debug mode, as that’s what people will most likely test with at first.

Just as a reminder, this is running on AMD hardware. And I have triple-checked these numbers, and they’re accurate. No funny business. I even tested the Visual Studio compiler before installing the Intel compiler.
Maybe there’s shenanigans going on in Release mode + Od?
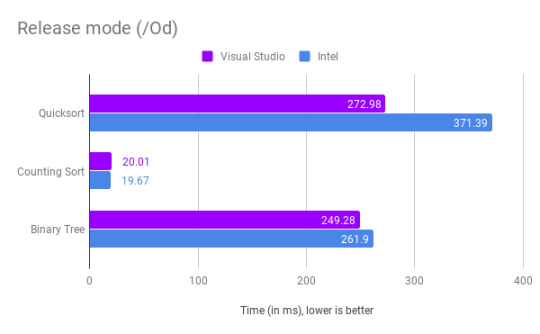
Well, quicksort is slower on Intel now. So it would seem that the Visual Studio compiler does more optimizations even when you tell it to not do anything special.
I do find it curious that Counting Sort takes longer with Release mode, but that could just be per-run variance. Overall, I’m not too concerned.
And finally, the most disappointing, Release mode + O2 optimization:
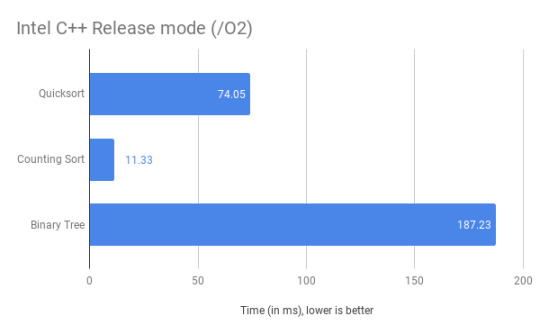
Unfortunately, I couldn’t get the Visual Studio compiler to produce anything useful despite being given more than enough time. It just sits around, twiddling its thumbs on a single thread. Eventually it complains about a lack of heap space, despite my system having 16 GBs of RAM. So the Intel compiler is the only one I was able to test.
But wait, there’s more!
So, being the super-paranoid programmer I am, I was thinking there had to be a catch. So I went ahead and threw the Intel-compiled code into HxD, a hex editor. It’ll let me see the individual instructions that make up the program, and tell me what an instruction means in x86.
Initially, I just looked for the instruction 0x0FA2, as that is the CPUID instruction in x86. CPUID lets programs see what hardware they’re running on, as it will return a string depending on which vendor made it. The string is vendor-dependent, so AMD could make a CPU that has an Intel vendor ID (though I doubt software would like that).
Intel has “GenuineIntel”, and AMD has “AuthenticAMD”, though at one point they had “AMDisbetter!”. There’s other x86 vendors that have their own respective vendor strings.
Anyway, I dug through an executable or two, didn’t find anything significant. Even dug through the Visual Studio compiled code. Weirdly, it does seem to call CPUID later on in the program, towards the end actually. I have no idea why it would do this.
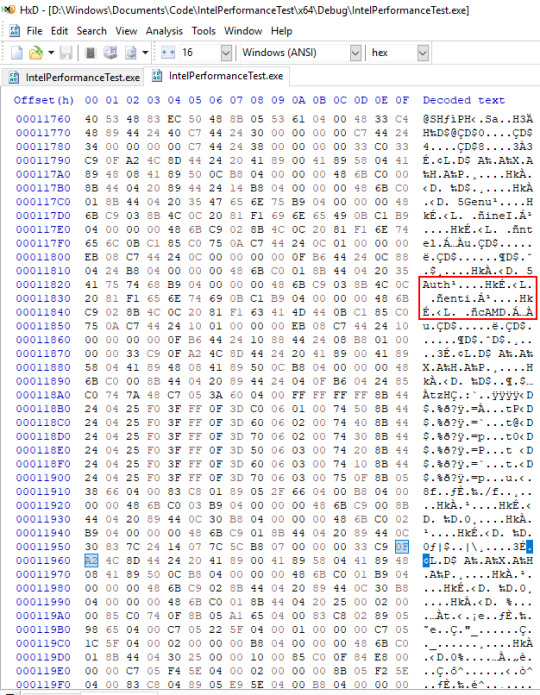
That is, until I was editing this blog post. I noticed that the gains going from Debug to Release Od were rather small, so I went ahead and threw that code in particular into HxD. Look at what I found:

There’s two things that stick out:
1. The mangled GenuineIntel vendor ID string.
2. The CPUID call that’s in the general area.
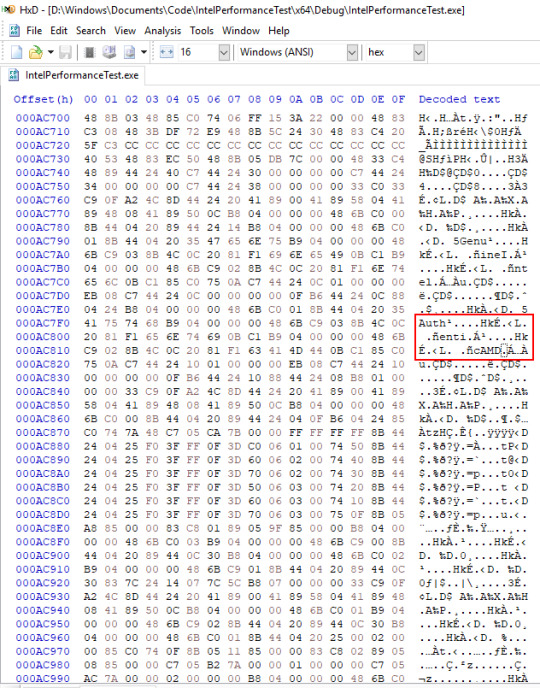
So at this point, I’m getting a little paranoid, so I go back and look at the other results. Turns out I did find more damning evidence and I was just being a tunnel-visioned idiot. This code is from the Debug compilation:
What the hell is that AuthenticAMD vendor string doing in Intel-compiled code? HMMM... Honestly I’m not sure. The code runs significantly faster than the Visual Studio code, so it doesn’t seem to be sabotage at first glance.
So I looked at the compiled executable sizes. And as compiling Visual Studio for Release is difficult, I just went ahead and only compiled for Debug.
Turns out the Visual Studio compiler is the bigger one, at 727 KBs versus Intel’s ~323 KBs (note: don’t have the exact number, forgot to jot it down).
So at this point I’m just... confused. What is going on? So I crack open the VS-compiled executable in HxD and... well...
I found the exact same string. Different place, but the same string nonetheless. Not only that, the same code surrounds it. So it’s not Intel-exclusive. None of what’s here is exclusive to Intel’s compiler, unless there’s some crazy conspiracy that both Intel and Microsoft are into. Which I highly doubt, given that would be a massive conflict of interest for Microsoft. Imagine, if Visual Studio’s C++ compiler was sabotaging AMD hardware. That would be a massive blow to their own consoles, given a lot of them may just be compiled with Visual Studio.
And for the record, there are no other instances of AMD’s vendor ID string anywhere in either compiled executables. I would mention it if there was.
Final Word
No, Intel’s compiler is not running deliberately slow code on AMD hardware. Or at least, as far as it seems. In fact, it seems to run faster code overall than Visual Studio’s own compiler.
Although I wouldn’t recommend using Intel’s software suite, given it has been found that their Math Kernel Library does indeed run intentionally worse on AMD hardware. I may do my own experimenting on it and see if I can replicate the results, but for now I’m just done with experimenting with Intel’s software. I’m going back to tinkering with Vulkan.
If you want to see the code I used to test this, here it is: https://github.com/Elusivehawk/IntelPerformanceTest
0 notes