#rasterisation
Explore tagged Tumblr posts
Visit Tumblr Blog
Explore Tumblr blogs with no restrictions, modern design and the best experience.
Last Seen Tumblr Blogs


Fun Fact
In February 2021, Tumblr had 518.6 million blog accounts.
Note
Hi, i used to follow you on here ages ago, then wandered off. If it's not too much bother, do you happen to remember the name of a very low-level graphics programming tutorial you did once? Someone i know wants to write their own rasterizer
hello! you are probably thinking of either Scratchapixel (the tutorial I was following), specifically their article on rasterisation, but maybe also my Building My Own Rasteriser series, which is the slightly more detailed notes I wrote while following along their guide some years back.
Scratchapixel is a fantastic resource, I highly recommend it. And a simple rasteriser is also a great way to learn what's going on under the hood in graphics programming, it's a great project to do, good luck to your friend!
Other useful articles and books you may find of interest:
Vulkan tutorial - in case you want to move beyond toy software rasterisers and use an actual hardware graphics API, but you don't want to just abstract it away using a library, this is where to learn how to drive Vulkan.
Physically Based Rendering: From Theory to Implementation - the definitive textbook on how to write a raytracer, available free online. A lot of the theory (microfacets etc.) will also be extremely relevant for surface shaders in a rasteriser.
Inigo Quilez's website: Inigo Quilez is the cofounder of Shadertoy, and probably the world expert on raymarching signed distance fields. There's a huge amount to explore in there if you're interested in that kind of technique and all sorts of other weird graphics tricks.
A list of frame breakdowns/graphics studies, another one - I remember finding another site with these but I can't find it right now. In any case, games usually use quite complex deferred rendering techniques, with multiple render passes combined in various ways. One of the best ways to learn about this is to use a tool like RenderDoc to break down all the draw calls in the frame, and see exactly what it does. So have a look through those pages to learn a bit how games are rendered!
game art tricks - I actually just found this one while writing this post but it's good! primarily visual effects focused, lots of very ingenious approaches to rendering things cheaply.
...I could def go on, at some point maybe I gotta just make a page on my website for 'useful graphics programming/tech art resources', but I'm probably getting a bit ahead here haha. Hope your friend has some fun drawing those triangles!
15 notes
·
View notes
Text

nefarious cube....
took much more work than it looks
1 note
·
View note
Text
Old man clove and baileys living spaces!!! I made a comparison
office


living room


bathroom


weird hall


bedroom


and cloves old room!! I made a night version:


#dol#dol pc#trash draws#pc clove#old man clove#i used the Sims thing and then rasterised and filtered them
14 notes
·
View notes
Note
For the comic, did you use the csp halftone layer function? how did you make it look non pixelated? sorry if this is a silly question!!! love your art
Yes I do (and thank you)!
But what exactly do you mean by pixelated? Halftones will always be displayed as more grainy if you zoom out of the canvas in the program, which is something you need to account for.
They can also just look weird if your frequency isn't set high enough. I prefer to keep the frequency at around 70 because it maintains that screentoney texture without making things look too crusty.

The level of grain will also depend on your export settings, so try to tinker with what works best (I export most of my pages with 100% quality and 50% scale in a jpeg format, with some exceptions).
Keep in mind that digital exports will always have more defined grain than things like actual manga scans. Screentones bleed together and blur a bit during printing, so they have a smoother look. You can try rasterising and then blurring the screentone layer just a little bit to achieve that, if that's what you're going for.
Also the little panel previews I post here are usually cropped from a very compressed version of the page, so they have that little blur to them that smoothens things out.
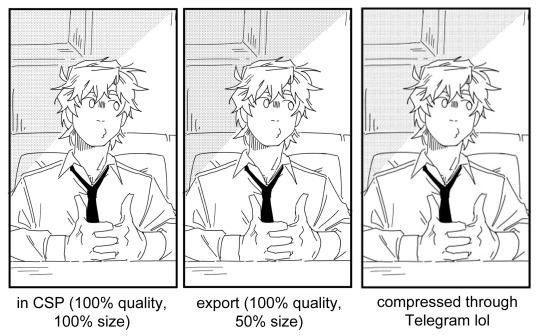
I'm not sure how well the difference will show on Tumblr, but essentially 100% quality and size will be very crisp, but will usually display kinda poorly on smaller screens, e.g. phones. It looks good only when zoomed in or in print.
The lower scale option won't look too different in terms of quality but will display much better on most screen sizes. It will change the tone slightly, though, like in this case it looks a bit darker.
Scaling the page to a lower size during export will not always come out perfectly, because it can make tones that are supposed to look smooth (on darker skin, for example) look too grainy. So just experiment and see which settings work best.
124 notes
·
View notes
Note
not to be annoying but if you don't like the halftone layers in ibis paint because you can't colour them, you actually can if you either rasterise the layer or do this trick! i understand you might just be used to how you typically do them and you dont want to change it, this is just a personal preference of mine and i wish i would have found out sooner

No, it’s fine! In fact, thanks for sharing! Didn’t know about this before 😊
Will see if I can somehow use it in future drawings! Answering this also in case anyone here can benefit from this information too!
46 notes
·
View notes
Text
ive been using csp for a while now but i keep running into this problem where it's absolutely smoother and more comfortable than ps when it comes to drawing but anything related to like, post-processing feels dogshit. like it becomes increasingly clear that clip studio is an image making program and photoshop is an image editing program so the former has way more advanced brushes and color blending options and so on but the latter has better filters and adjustment layers, a better text tool, a better crop tool. pisses me the hell off that csp text layers can't survive flipping the canvas horizontally, what the fuck do you mean you gotta rasterise first.
19 notes
·
View notes
Text
Rasterising is to pictures what vacbeds are to people.
#saphiposting#hypnodomme#hypnok1nk#hypnotic#trance#brainwash#brainwashing#hypnosis#mind control#erotichypnosis
13 notes
·
View notes
Text
TYPEFACES I THINK THE MOBSAI MAIN CAST WOULD USE
Decided to be insane and come up with some headcanons on the typefaces each character would use. Please shout at me about it on the psychohelmet forum if you get the chance. I've copied and pasted the headcanons under the read more for your viewing pleasure.
I wanted to share my headcanons for the different fonts (using this term very generally) each of the mobsai main cast would use (if we are imagining that they were given free rein to do so for some reason, and also that they wrote using a latin alphabet, obviously) which I just made up off the top of my head right now.
Anyway, here we go:
Mob - Calibri
I think this one makes a lot of sense, just off the bat. I really don't think Mob would be a serif sort of guy, he's too plain and unassuming for that. What better than to make him a very default font. I honestly don't think you can even get more default than calibri. It even sounds a little lame when you say it. Despite that, it's a pretty dependable font, it appears everywhere, and I would argue is very powerful due to its universality and legibility on any-sized devices. But don't just take my word for it, here's what Microsoft has to say about it: "Its proportions allow high impact in tightly set lines of big and small text alike. Calibri’s many curves and the new rasteriser team up in bigger sizes to reveal a warm and soft character." I would argue that this clearly reflects Mob's welcoming character and desire to understand and empathise with any number of characters within the show.
Reigen - Arial
Again, I do feel like this just makes sense to me. Reigen is also a real sans-serif sort of guy, he's the greatest psychic of the 21st century, he's spice city's bro! Arial I feel is also a little more professional than calibri, while still being quite similar in appearance, which I feel reflects the influence Reigen has over Mob's character and development within the story. Described by Microsoft as an "extremely versatile" typeface, especially "for display use in newspapers, advertising and promotions", I think this works well for Reigen's character. It's also a pretty dyslexia friendly font, which I think would be a fun fact he'd shoot at Mob.
Dimple - Papyrus
This one was a little tricky. I wanted it to look dated, considering Dimple's been dead for some time, while also being a little flashy to reflect his desires for godhood. I settled on papyrus because, well, look at it. It's definitely what I'd consider a meme typeface (which I think is fitting for a sentient fart, honestly), but it's also loud without being too out there, and a popular and fun font to use. It's unapologetic and real, which I think Dimple represents as a character, and the complete opposite of a font like calibri. It also looks good in green.
Ritsu - Times New Roman
Ritsu is absolutely a serif guy, through and through. He's always on that 12pt Times New Roman shit, even if he's just writing a casual email to someone. Ritsu is someone who takes things seriously, and has a reputation he wants/needs to uphold. I'm sure he read somewhere that TNR (I'm not writing that shit out again) was the professional font and just made it his whole personality or something. It looks good, so I'm not complaining. I've also heard that TNR is a good font to make study notes in, because you remember it better (I think this was a myth uni students used to tell each other though) but I'm sure he stands behind this fact wholeheartedly.
Teru - Blackadder ITC
Just listen to what Microsoft has to say here in its overview of this font: "Blackadder ITC font is an elegant, yet menacing display face is perfect for theatrical uses and scare tactics." Not only is it elegant and swirly, but works well with his flashy appearances and fashion choices throughout the show. It's impressive and makes a scene when it appears, and walks the line between impressive and gaudy very well for someone as in-TERU-sting as Hanazawa. I do think he'd switch around fonts a little, but this would be his favourite for sure.
Serizawa - Roboto
This one was also hard, and I'm not sure I did him justice. I think, given Serizawa's lack of real-life experience outside of a terrorist organisation as well as his time online, I wanted to go with a font that was professionally acceptable, but still a bit of an outlier. Roboto is also the default font on android devices, and all other google services, which I figured would reflect the 'shut in' phase of his life. It's sorta plain, but does the job and follows the rules without asking too many questions. I think if we were talking specifics, he'd be Roboto Mono.
Tome - Courier New
I need to preface this explanation by saying I love Tome. More than almost all of the characters in this show. She reminds me a lot of myself as a kid. This one's personal. Tome is obsessed with proving the existence of aliens, or any sort of extraterrestrial and paranormal activity. She starts the Telepathy club to research these phenomena, she's absolutely committed (apart from in that one episode) to show the world she's right, to have her friends take her interests seriously. I think she'd want to use a font that was interesting to look at, while still being serious-enough to reflect her passion for pursuing the truth. She probably watched the X-Files as a kid and really wanted to type up some legit-looking reports on the unexplained. No I'm not projecting.
Shou - Comic Sans MS
I mean, what did you expect. He uses Comic Sans for all his reports and thinks he's the funniest guy ever for doing so. He also just likes how it looks, I think he'd be into superhero comics and would love to make any work he does look similar. Not only is it a funny text face, Microsoft also calls it "useful" due to its readability. I think that definitely mirrors Shou's extraversion and his role as a helpful figure, both to Ritsu and to his father at the conclusion of his arc. I also bet he logs on to Toichiro's desktop sometimes and changes his default email font to comic sans too, probably makes the fantastic five or whatever they're called piss themselves with laughter. Also a frequent Wingdings user, for sure.
Toichiro - Futura
Guess I have to put him in here too, since I talked about Shou. I chose Futura here for what it stands for, a purely geometric and efficient typeface which I feel reflects Suzuki's ethos of wanting to be the best and creating a world where 'supreme beings' rule over normal humans. The progressive feel Futura has here becomes skewed, not towards a bright future but towards a descruction of the old order and a rebuilding of an ESPer-led world. An incredibly popular font, which I feel is all about appearances and precision, it wants its letters to stand in line, breaking away from the old 'grotesque' style of former sans-serif fonts. Do you see my vision?
Sample of their fonts below:

15 notes
·
View notes
Text

@lynxden assuming you meant cpu and not gpu then yes xD
it's basically some of the most memorable and fun moments I've had learning programming has been about doing things the Hard Way™ - doing things manually tends to require you to spend more time thinking about what the computer's actually doing to accomplish the things you ask it to do, which is inevitably a lot more work and often nowhere near as efficient or capable because it's pretty unlikely that you just happen to be smarter than the entire R&D teams they have at Nvidia or Unreal or wherever - but it does force you to learn stuff, at least on a temporary basis.
I mean look, when I first learned how to do proper programming that wasn't just faffing around in Qbasic or whatever, it was on Turbo Pascal in DOS some 25-odd years ago, and I'm kind of forever grateful that when it came to doing graphics, instead of just having us use the built in Borland Graphics API, the teacher taught us how to enter VGA mode 0x13 via direct DOS interrupts, and then how to draw graphics by writing directly to the part of memory that held the screen for that mode.
I still remember the address being 0xA000.
So when I decided I really should take another stab at trying to figure out how the hells matrices work for 2D and 3D transformations a few weeks back, I thought hey why not try doing all of this directly using the Win32 GDI API, BitBlt:ing a framebuffer into the graphics because then I'll also have to re-learn a bunch of stuff that I've more or less forgotten over the years. Plus, there's a part of me that kind of wants to try to take some time to learn at least a little more about software reverse engineering - see if I could ever get to a point where I might be able to look into whether some examples of old games or software that doesn't work so well anymore could be updated to work a bit better.
So, step by step I'm gradually working my way towards a software triangle rasteriser to see about poking around with all of that and I dunno maybe I'll make something small and simple out of it like maybe some vampire survivors-alike or something like the original after burner or maybe even descent or something, who knows.
For now it's mostly a whole lot of googling around, trying to wrap my brain around stuff that feels like I used to find it easier to understand than I do now, and basically just reminding myself why I liked doing some of this stuff, haha.
7 notes
·
View notes
Text
I wrote ~4.5k words about the operating of LLMs, as the theory preface to a new programming series. Here's a little preview of the contents:

As with many posts, it's written for someone like 'me a few months ago': curious about the field but not yet up to speed on all the bag of tricks. Here's what I needed to find out!
But the real meat of the series will be about getting hands dirty with writing code to interact with LLM output, finding out which of these techniques actually work and what it takes to make them work, that kind of thing. Similar to previous projects with writing a rasteriser/raytracer/etc.
I would be very interesting to hear how accessible that is to someone who hasn't been mainlining ML theory for the past few months - whether it can serve its purpose as a bridge into the more technical side of things! But I hope there's at least a little new here and there even if you're already an old hand.
293 notes
·
View notes
Text
cube spin available for windows and linux
0 notes
Text
The bisexual finger guns
Thanks to Cleo for the strange intro to the stream and giving me something to do instead of coursework :)

Sobbing I just noticed a typo on some of the rasterised text
#zombiecleo#zombiecleo fanart#inky art#This is the first time I’m trynna draw them so I’m pretty proud#Especially considering I had to draw HANDS for this
4 notes
·
View notes
Text
i have sexual feelings for the rasterise layer button
7 notes
·
View notes
Note
hi queen im in love with your theme pls teach us how u make your dividers 🙂↕️🤲
waaaaaa THANK YOU !! 🤩
there isn't anything all that special to it,, i use the procreate app on my ipad to make everything but i'm sure there are other free apps that you could use to do a lot of the basics,, i know ibis paint is a free app and is pretty great :3
i'm gonna add a cut because i'm not really sure which divider you're referring to in particular but i can show what i do for these ones below !! 🩷
obviously you don't have to do everything exactly,, you should do things differently to make it your own or to better fit what you like !! this is just how i do it and how i prefer to do things (❁´◡`❁)


⁂ for the first ones that are just plain strips of colour,, i crop a canvas to the size i want,, the thicker one is 879 × 8px and the thinner one is 879 × 4px. opening the actions tab and clicking crop and resize and then adding in the dimensions i want,,, you don't have to do the dimensions exactly, you can eyeball it ! this is just what i do :3


⁂ then i pick out my colours for my theme and place them all on the same layer like this

⁂ then i open up the adjustments tab on the canvas to find the gaussian blur option

⁂ lastly, i slide it until i am satisfied with the blend of the colours :>

⁂ and it ends up looking like this !!

=͟͟͞★
⁂ for the mdni divider,, i do the same thing for the background as i do for the slimmer divider but on a bigger scale,, the canvas size i use for it is 1350 × 80px i then go into the actions tab on the canvas and add the text

⁂ type in whatever text you want,, you can fiddle with the font,, the size of the text,, add emojis and symbols and such. place that where you want it on your canvas and then i rasterise the layer so it is no longer a text layer

⁂ after this i alpha lock the layer so i can add another colour to the text that i like,, totally optional, this is just what i do :3

⁂ after that, i gaussian blur the layer like i did earlier but on the layer with the text to blend the colours

⁂ this is what it ended up looking like :D you can add the lines above and below by using hyphens and another text layer and repeating the above process
=͟͟͞★
⁂ finally, for the headers in my posts i usually just find an image of some kind of smut manga online,, twt is a good place to find things like this. one acc i look to is @/lewdkittymia but they retweet others posts too so you can find some stuff from other accs that way too :> ⁂ the canvas size i use is 1488 × 326,, i add a layer and do the same as above with the smaller dividers but the size of this canvas,, you might not be able to see the image under it in the beginning but that's to be expected !

⁂ after this is when i lower the opacity of the layer by pressing on the 'N' on the layer with the colours,, i use the slider to adjust the layer until i can see the image underneath and am happy with it and then it's all done !!

finished product 🩷
=͟͟͞★
i'm not sure if this was at all comprehensive or helpful but this is my process !!
if you were curious about my animated ones that might need it's own post but i'm happy to make one if you want !! i use procreate for that too !! (i have procreate because i draw so you definitely don't need to pay for the app just to do this,, like i said,, ibis paint is free and you could probably use that !! 🩷)
thank you for your ask and for complimenting my blog hheehfgbe always makes me giddy 🥰 i hope you all are having a good day/night !!
4 notes
·
View notes
Text
Hello you outstanding orangutans!
I did the Adobe Photoshop workshop today finally!!
We started just looking at the basic tools of the program from the move tool to the lasso tool. We would’ve looked at them more but we started late.
I learned different tricks like pressing control + the image on layer will select all of that image. We rasterised a text vector layer into a normal photoshop layer. I also learned that I could use the single row/column tool to sample colours from an image which can be useful in fashion for patterns. This is an example of that from an image of colourful pigs


We also learned how to fill text with images. I typed out my word, rasterised the layer, pressed control + the image on layer to select the word and then pressed delete. This left me with the outline selection of my word. I then copied an image and then went to Edit - Paste Special - Paste Into.
This is the following result.

We also spent half an hour doing a quick rocket ship animation, of which I already had some experience doing animation on photoshop. I didn’t really learn anything new here but here is my lovely animation!
4 notes
·
View notes