#react map src
Explore tagged Tumblr posts
Visit Tumblr Blog
Explore Tumblr blogs with no restrictions, modern design and the best experience.
Last Seen Tumblr Blogs


Fun Fact
69% of Tumblr users are millennials.
Text
exapunks ditching MOV for COPY seems like a gesture to make the language more englishy and intuitive but it also introduced contradictions and redundancies that weren't present in either TIS-100 or Shenzhen I/O.
like, in those games, mov ALWAYS means "read here, write there" and any inconsistency is just from how different types of sources react to being read/written to. In TIS-100 reading from a port empties the port, but the accumulator stays the same. The reason the NIL register exists is so you can tell a port that its been read without actually doing anything with the value, which helps with syncing around those stack memory nodes.
the COPY command in exapunks, for all intents and purposes works almost exactly the same as MOV in tis/shenzhen, you read from a source and write to a destination. however, now its been given the baggage of the word "copy", which implies that the original should still exist in some form. and it (usually) does in this game, so it makes sense, right? well, synchronization is even more important in exapunks than it was in TIS-100, and the one tool you have for this is the shared M register. It works like a TIS-100 port, exas can write to it & they'll wait until another exa somewhere else on the map (or in the same host if set to local mode) reads from that register. so the "mov <src> nil" gambit is already a vital tool in the early game that I've played. HOWEVER, mov isn't mov anymore, it's copy, and "COPY M NIL" wouldn't make sense. Instead, they cooked up a whole new command, VOID M, that's just for reading the M register and emptying it. and then the inputs in the levels where you hack your own body advance permanently after being copied anyways so what the fuck
34 notes
·
View notes
Text
Threads Clone with React JS: Comprehensive Guide

Introduction
Welcome to this comprehensive guide on creating a Threads Clone using React JS. This project offers an opportunity to delve into modern web development while honing skills in crafting interactive user interfaces. With React's component-based architecture, we'll construct a responsive platform for threaded discussions, idea sharing, and real-time connections. Join us in exploring React's capabilities and emerge with a fully functional Threads Clone.
Setting Up Your Development Environment
To commence our journey, it's imperative to establish the appropriate tools. Begin by installing Node.js and npm, facilitating easy management of project dependencies and JavaScript runtime. Visit the official Node.js website, download the installer, and follow the provided instructions. Once installed, npm becomes available, simplifying the management of project dependencies.
With our development environment in place, we proceed to create a new React app using the Create React App command-line tool. Open your terminal and execute a simple command like npx create-react-app threads-clone to initiate a new React project named "threads-clone" with all requisite files and configurations.
Understanding the project's structure is akin to having a map for our journey. Within the "threads-clone" folder, several key directories include "public" for static assets, "src" housing React components and application logic, and "node_modules" where npm installs project dependencies. Additionally, files like package.json and package-lock.json list project details and dependencies, facilitating efficient management.
With our development environment established and project initiated, we are poised to bring our Threads Clone to fruition.
Designing the User Interface
Prior to delving into code, let's delineate the user interface. Define main sections such as header, thread display, and comment area, identifying necessary components like ThreadList, CommentForm, and UserProfile. This preparatory stage provides a clear roadmap for development.
React's component-based structure empowers us to create reusable building blocks for the UI. Components like Thread, Comment, and UserProfile encapsulate specific functionalities, enhancing modularity and maintainability. Styling can be achieved through traditional CSS or styling libraries like styled components, promoting modularization and manageable styling.
Subsequently, we'll transition to the coding phase, transforming UI plans into a fully functional Threads Clone using React JS.
Implementing User Authentication
To fortify our Threads Clone with security and personalization, we'll implement user authentication leveraging services like Firebase. Initiate a Firebase project and configure authentication settings, enabling user sign-up, login, and authentication token management.
Develop user-friendly authentication components such as registration and login forms, neatly structured within React's component architecture for modularity and maintenance ease. Secure routes to restrict access to authenticated users using tools like React Router and manage authentication state globally through React Context or state management libraries.
Building the Thread Creation Feature
With secure user authentication in place, empower users to create engaging threads. Design a ThreadCreationForm facilitating input of title, description, and relevant information, implementing form validation for data integrity. Utilize React hooks like useState and useEffect for state management and side effect handling, respectively.
Persistently store thread data by connecting our app to a backend server, designing API endpoints for thread creation and retrieval. Utilize asynchronous requests like Axios or Fetch API for seamless communication between front end and back end.
Displaying Threads and Comments
Connect the frontend to the backend to retrieve threads and comments, utilizing API calls to fetch data stored on the server. Utilize React's useEffect hook to manage asynchronous operations and dynamically display threads, fostering a seamless user experience.
Implement a dynamic comment system, designing a Comment component to represent individual comments and integrating them seamlessly with thread display. Enhance user experience with smooth navigation facilitated by React Router, defining routes for different sections of the app.
Real-Time Updates with WebSocket
Elevate our Threads Clone with real-time updates using WebSocket, enabling bidirectional communication between server and client for instant data updates. Implement a notification system to keep users informed about new content, enhancing user engagement and fostering a sense of community.
Adding Likes and Dislikes
Infuse interactivity into our Threads Clone by adding like and dislike functionality, designing intuitive buttons for user expression. Update the backend to support user preferences for threads and comments, displaying like counts to visualize user engagement.
Responsive Design
Ensure accessibility across different devices with responsive design principles, adapting layout and elements based on screen size using CSS media queries. Conduct thorough testing on various devices to identify and address layout or functionality issues, ensuring a consistent user experience.
Testing and Debugging
Ensure robustness through unit tests using Jest and React Testing Library, simulating user interactions to catch potential issues early. Master debugging tools and techniques to efficiently resolve bugs and enhance application stability.
Deployment
Prepare for deployment by configuring settings and choosing a hosting platform like Netlify or Vercel, simplifying the deployment process. Share the deployed link with users globally, marking the culmination of our journey. Why choose a ready-made thread clone by Oyelabs for launching in the USA?
Selecting Oyelabs' ready-made Threads Clone for launching in the USA provides a strategic advantage for your entry into the online discussion platform space. The following compelling reasons underscore the benefits of this choice:
Proven Expertise: Oyelabs demonstrates a robust track record in developing discussion platforms, supported by experience in similar projects. This expertise ensures the delivery of a meticulously crafted and feature-rich Threads Clone.
Time Efficiency: The utilization of ready-made solutions by Oyelabs significantly reduces development time. Instead of embarking on building a platform from the ground up, leveraging Oyelabs' pre-built solution enables a faster launch of your Threads Clone.
Cost-Effectiveness: Opting for a ready-made solution proves to be more cost-effective compared to custom development. This choice eliminates the expenses associated with extensive development hours and iterative processes.
Scalability: Oyelabs' solution is thoughtfully designed with scalability in mind. This ensures that the platform can seamlessly accommodate the growth of your user base, handling increased traffic and user interactions without compromising performance.
Feature-Rich: Oyelabs' ready-made Threads Clone comes equipped with a comprehensive set of features essential for a discussion platform. This includes robust functionalities such as user authentication, real-time updates, like/dislike capabilities, and more, providing a fully-rounded solution out of the box.
Technical Support: Oyelabs stands ready to offer technical support for their product, ensuring prompt assistance in the event of any issues or the need for guidance during the implementation and deployment process.
Customization Options: Despite being a ready-made solution, Oyelabs may provide customization options to tailor the Threads Clone according to your specific requirements. This flexibility allows for the addition of a personal touch or the integration of unique features aligned with your vision.
Market Readiness: Opting for a ready-made Threads Clone allows for a swift entry into the market, capitalizing on the growing demand for online discussion platforms. This agility is particularly crucial in a competitive landscape.
Regulatory Compliance: Oyelabs, as a reputable development company, is likely to build its solutions with a commitment to adherence to industry standards and regulations. This aspect is particularly vital when launching a platform in the USA, where stringent data protection and user privacy measures are paramount.
Conclusion
In conclusion, our endeavor to build a Threads Clone with React JS has equipped us with valuable skills in modern web development. By prioritizing security, interactivity, and responsiveness, our platform offers a seamless user experience. Whether embarking on discussions or simply browsing, users can engage effortlessly, fostering a vibrant and inclusive community. As we reflect on our journey, let's continue to innovate and tailor our platform to meet evolving needs.
1 note
·
View note
Text
Adding Markers and Custom Icons on Google Maps in React.js

Google Maps is a powerful tool for displaying and interacting with geographic information in web applications. In this blog post, we will explore how to add markers with custom icons to a Google Map using React.js. Custom markers can help you make your maps more visually appealing and informative.
Prerequisites: Before we begin, make sure you have the following prerequisites in place:
A basic understanding of React.js and JavaScript.
Node.js and npm (Node Package Manager) installed on your development machine.
A Google Cloud Platform (GCP) account with billing enabled and the Maps JavaScript API enabled.
Let’s get started!
Step 1: Set Up a React.js Project If you don’t already have a React.js project, you can create one using Create React App or your preferred React.js project setup.
npx create-react-app custom-marker-map
cd custom-marker-map
npm start
Step 2: Create a Google Maps Component Next, let’s create a React component that will display the Google Map.
// src/components/GoogleMap.js
import React, { Component } from 'react';
class GoogleMap extends Component {
componentDidMount() {
// Load the Google Maps JavaScript API
const script = document.createElement('script');
script.src = `https://maps.googleapis.com/maps/api/js?key=YOUR_API_KEY&libraries=places`;
script.async = true;
script.defer = true;
script.onload = this.initMap;
document.head.appendChild(script);
}
initMap() {
// Initialize the map
const map = new window.google.maps.Map(document.getElementById('map'), {
center: { lat: 37.7749, lng: -122.4194 }, // Set your initial map center coordinates
zoom: 12, // Set the initial zoom level
});
// Add markers to the map
const marker = new window.google.maps.Marker({
position: { lat: 37.7749, lng: -122.4194 }, // Set marker coordinates
map: map,
icon: 'path/to/custom-marker.png', // Path to your custom marker icon
title: 'Custom Marker',
});
}
render() {
return <div id="map" style={{ width: '100%', height: '400px' }}></div>;
}
}
export default GoogleMap;
In this component, we load the Google Maps JavaScript API using a script tag and initialize the map with a specified center and zoom level. We then add a custom marker to the map using the google.maps.Marker class and provide the path to the custom marker icon.
Step 3: Display the Map Component Now, import and render the GoogleMap component in your main App.js file or any other desired location within your React app.
// src/App.js
import React from 'react';
import './App.css';
import GoogleMap from './components/GoogleMap';
function App() {
return (
<div className="App">
<h1>Custom Marker Map</h1>
<GoogleMap />
</div>
);
}
export default App;
Step 4: Customize the Marker Icon To use a custom icon for your marker, replace 'path/to/custom-marker.png' with the path to your custom marker icon image. You can use a PNG or SVG file for your marker.
Step 5: Run Your React App Start your React app by running:
npm start
You should now see a Google Map with a custom marker icon at the specified coordinates.
Conclusion: In this blog post, we’ve learned how to add markers with custom icons to a Google Map in a React.js application. Custom markers can help you personalize your maps and provide valuable information to your users. You can further enhance your map by adding interactivity and additional features, such as info windows, by exploring the Google Maps JavaScript API documentation. Happy mapping!
React Company provides access to a team of experienced React developers who are ready to answer your questions and help you solve any problems you may encounter.
For any inquiries or further assistance, please don’t hesitate to contact us.
For more details you can connect with bosc tech labs.
0 notes
Text
react resimleri map içerisinde dinamik olarak göstermek
<script> import tr from '../../assets/icons/languages/Turkey_flat.png'; import en from '../../assets/icons/languages/United-Kingdom_flat.png';
let supportedLanguages = [”tr”,”en”]
{ (supportedLanguages || []).map((element, index) => { console.log("element",element, "index",index) return(
<MenuItem value={element} key = { index }> <ListItemIcon> <img className={styles['language-select-flag']} src={element} /> <ListItemText>{element}</ListItemText> </ListItemIcon> </MenuItem> ) }) </script>
yukarıdaki gibi yaptıgınızda resimleri çekemediğinizi göreceksiniz. Çünkü supportedLanguages dizisinde değerler string gözüküyor. Bunları çevirmek gerekiyor. Benzer bir örnek ile çözümü
import React from "react";import "./styles.css";import tr from "./tr.png";import en from "./en.png"; let supportedLanguages = ["tr", "en"];let images={ "tr": tr, "en":en}export default function App() { return ( <div className="App"> {(supportedLanguages || []).map((element, index) => { console.log("element", element, "index", index); return <img key={index} src={images[element]} />; })} <h1>Hello CodeSandbox</h1> <h2>Start editing to see some magic happen!</h2> </div> );}
#react map src#react local resimlerin dinamik olarak gösterilmesi#How do I reference a local image in React?#How to render images with React JS using map or loop?
0 notes
Text
Interview with Mark A. Vieira, author of Forbidden Hollywood: The Pre-Code Era (1930-1934)

Mark A. Vieira is an acclaimed film historian, writer and photographer. His most recent book, Forbidden Hollywood: The Pre-Code Era (1930-1934): When Sin Ruled the Movies is now available from TCM and Running Press.
Raquel Stecher: Twenty years ago you wrote Sin in Soft Focus: Pre-Code Hollywood for Harry N. Abrams. Why did you decide to revisit the pre-Code era with your new TCM-Running Press book Forbidden Hollywood?
Mark A. Vieira: That’s a good question, Raquel. There were three reasons. First, Sin in Soft Focus had gone out of print, and copies were fetching high prices on eBay and AbeBooks. Second, the book was being used in classes at the USC School of Cinematic Arts. Third, Jeff Mantor of Larry Edmunds Cinema Book Shop told me that his customers were asking if I could do a follow-up to the 1999 book, which had gotten a good New York Times review and gone into a second printing. So I wrote a book proposal, citing all the discoveries I’d made since the first book. This is what happens when you write a book; information keeps coming for years after you publish it, and you want to share that new information. Sin in Soft Focus: Pre-Code Hollywood told the story of the Code from an industry standpoint. Forbidden Hollywood has that, but it also has the audience’s point of view. After all, a grassroots movement forced Hollywood to reconstitute the Code.
Raquel Stecher: Forbidden Hollywood includes reproduced images from the pre-Code era and early film history. How did you curate these images and what were your criteria for including a particular photograph?

Mark A. Vieira: The text suggests what image should be placed on a page or on succeeding pages. Readers wonder what Jason Joy looked like or what was so scandalous about CALL HER SAVAGE (’32), so I have to show them. But I can’t put just any picture on the page, especially to illustrate a well-known film. My readers own film books and look at Hollywood photos on the Internet. I have to find a photo that they haven’t seen. It has to be in mint condition because Running Press’s reproduction quality is so good. The image has to be arresting, a photo that is worthy in its own right, powerfully composed and beautifully lit—not just a “representative” photo from a pre-Code film. It also has to work with the other photos on that page or on the next page, in terms of composition, tone and theme. That’s what people liked about Sin in Soft Focus. It had sections that were like rooms in a museum or gallery, where each grouping worked on several levels. In Forbidden Hollywood, I’m going for a different effect. The photo choices and groupings give a feeling of movement, a dynamic affect. In this one, the pictures jump off the page.
Raquel Stecher: Why did you decide on a coffee table art book style format?
Mark A. Vieira: Movies are made of images. Sexy images dominated pre-Code. To tell the story properly, you have to show those images. Movie stills in the pre-Code era were shot with 8x10 view cameras. The quality of those big negatives is ideal for a fine-art volume. And film fans know the artistry of the Hollywood photographers of that era: Fred Archer, Milton Brown, William Walling, Bert Longworth, Clarence Bull, Ernest Bachrach and George Hurrell. They’re all represented—and credited—in Forbidden Hollywood.

Raquel Stecher: What was the research process like for Forbidden Hollywood?
Mark A. Vieira: I started at the University of Southern California, where I studied film 40 years ago. I sat down with Ned Comstock, the Senior Library Assistant, and mapped out a plan. USC has scripts from MGM, Universal and the Fox Film Corporation. The Academy Library has files from the Production Code Administration. I viewed DVDs and 16mm prints from my collection. I reviewed books on the Code by Thomas Doherty and other scholars. I jumped into the trade magazines of the period using the Media History Digital Library online. I created a file folder for each film of the era. It’s like detective work. It’s tedious—until it gets exciting.
Raquel Stecher: How does pre-Code differ from other film genres?
Mark A. Vieira: Well, pre-Code is not a genre like Westerns or musicals. It’s a rediscovered element of film history. It was named in retrospect, like film noir, but unlike film noir, pre-Code has lines of demarcation—March 1930 through June 1934—the four-year period before the Production Code was strengthened and enforced. When Mae West made I’M NO ANGEL (’33), she had no idea she was making a pre-Code movie. The pre-Code tag came later, when scholars realized that these films shared a time, a place and an attitude. There was a Code from 1930 on, but the studios negotiated with it, bypassed it or just plain ignored it, making movies that were irreverent and sexy. Modern viewers say, “I’ve never seen that in an old Hollywood movie!” This spree came to an end in 1934, when a Catholic-led boycott forced Hollywood to reconstitute the Code. It was administered for 20 years by Joseph Breen, so pre-Code is really pre-Breen.

Raquel Stecher: What are a few pre-Code films that you believe defined the era?
Mark A. Vieira: That question has popped up repeatedly since I wrote Sin in Soft Focus, so I decided which films had led to the reconstituted Code, and I gave them their own chapters. To qualify for that status, a film had to meet these standards: (1) They were adapted from proscribed books or plays; (2) They were widely seen; (3) They were attacked in the press; (4) They were heavily cut by the state or local boards; (5) They were banned in states, territories or entire countries; and (6) They were condemned in the Catholic Press and by the Legion of Decency. To name the most controversial: THE COCK-EYED WORLD (’29) (off-color dialogue); THE DIVORCEE (’30) (the first film to challenge the Code); FRANKENSTEIN (’31) (horror); SCARFACE (’32) (gang violence); RED-HEADED WOMAN (’32) (an unrepentant homewrecker); and CALL HER SAVAGE (’32) (the pre-Code film that manages to violate every prohibition of the Code). My big discovery was THE SIGN OF THE CROSS (’32). This Cecil B. DeMille epic showed the excesses of ancient Rome in such lurid detail that it offended Catholic filmgoers, thus setting off the so-called “Catholic Crusade.”
Raquel Stecher: It’s fascinating to read correspondence, interviews and reviews that react to the perceived immorality of these movies. How does including these conversations give your readers context about the pre-Code era?
Mark A. Vieira: Like some film noir scholars, I could tell you how I feel about the film, what it means, the significance of its themes. So what? Those are opinions. My readers deserve facts. Those can only come from documents of the period: letters, memos, contracts, news articles. These are the voices of the era, the voices of history. A 100-year-old person might misremember what happened. A document doesn’t misremember. It tells the tale. My task is to present a balanced selection of these documents so as not to stack the deck in favor of one side or the other.

Raquel Stecher: In your book you discuss the attempts made to censor movies from state and federal government regulation to the creation of the MPPDA to the involvement of key figures like Joseph Breen and Will H. Hays. What is the biggest misconception about the Production Code?
Mark A. Vieira: There are a number of misconceptions. I label them and counter them: (1) “Silent films are not “pre-Code films.” (2) Not every pre-Code film was a low-budget shocker but made with integrity and artistry; most were big-budget star vehicles. (3) The pre-Code censorship agency was the SRC (Studio Relations Committee), part of the Motion Picture Producers and Distributors Association (MPPDA)—not the MPPA, which did not exist until the 1960s! (4) The Code did not mandate separate beds for married couples. (5) Joseph Breen was not a lifelong anti-Semite, second only to Hitler. He ended his long career with the respect and affection of his Jewish colleagues.
Raquel Stecher: How did the silent movie era and the Great Depression have an impact on the pre-Code era?
Mark A. Vieira: The silent era allowed the studios the freedom to show nudity and to write sexy intertitles, but the local censors cut those elements from release prints, costing the studios a lot of money, which in part led to the 1930 Code. The Great Depression emptied the theaters (or closed them), so producers used sexy films to lure filmgoers back to the theaters.
Raquel Stecher: TCM viewers love pre-Codes. What do you think it is about movies from several decades ago that still speak to contemporary audiences?

Mark A. Vieira: You’re right. Because we can see these films so readily, we forget that eight decades have passed since they premiered. We don’t listen to music of such a distant time, so how can we enjoy the art of a period in which community standards were so different from what they are now? After all, this was the tail end of the Victorian era, and the term “sex” was not used in polite society. How did it get into films like MIDNIGHT MARY (’33) and SEARCH FOR BEAUTY (’34)? There were protests against such films, and there were also millions of people enjoying them. What they enjoyed is what TCM viewers enjoy—frankness, honesty, risqué humor, beautiful bodies and adult-themed stories.
Raquel Stecher: What do you hope readers take away from your book?
Mark A. Vieira: One thing struck me as I wove the letters of just plain citizens into the tapestry of this story. Americans of the 1930s wrote articulate, heartfelt letters. One can only assume that these people were well educated and that they did a lot of reading—and letter writing. I want my readers to read the entire text of Forbidden Hollywood. I worked to make it accurate, suspenseful and funny. There are episodes in it that are hilarious. These people were witty! So I hope you’ll enjoy the pictures, but more so that you’ll dive into the story and let it carry you along. Here’s a quote about SO THIS IS AFRICA (‘33) from a theater owner: “I played it to adults only (over 15 years old). Kids who have been 12 for the last 10 years aged rapidly on their way to our box office.”
#pre-Code#TCM#Forbidden Hollywood#pre-code films#interview#jean harlow#mae west#ginger rogers#Depression era#1930s#Raquel Stecher
255 notes
·
View notes
Text
Clojure transducers from the ground-up: the essence.
This is the first part of an article dedicated to Clojure transducers. I initially wrote this article for uSwitch Labs (my former employer in 2017) but the articles were later removed. This first part illustrates the functional foundations of transducers. The second part contains practical examples of their use in real-life scenarios.
Introduction
Transducers have been introduced in Clojure 1.7 (at the end of 2014) and they never got the attention they deserved. The author of Clojure, Rich Hickey, recently stated in his A History of Clojure paper:
I think transducers are a fundamental primitive that decouples critical logic from list/sequence processing and construction, and if I had Clojure to do all over I would put them at the bottom.
Maybe because of some confusion with Reducers (a similar Clojure feature which focuses on parallelism), or because not all functions in the standard library are transducers-aware, many Clojure programmers are still reluctant to use them extensively. Transducers are still relegated to advanced scenarios, but there are compelling reasons to use them more often, for example to replace some common cases of sequential processing.
In this article I’m going to show you that transducers are essentially a functional abstraction (similar to combining object oriented patterns). They can be derived with a few refactoring moves on top of existing collection processing functions. The fact that Clojure offers them out of the box removes any excuse not to start using them today!
Same function, different implementations
map and filter are very common operation for stream oriented programming (there are many more in the Clojure standard library and the following examples apply to most of them as well). Here's a simplified version of how map and filter are implemented in Clojure:
(defn map [f coll] (when (not= '() coll) (conj (map f (rest coll)) (f (first coll))))) (defn filter [pred coll] (when (not= '() coll) (let [f (first coll) r (rest coll)] (if (pred f) (conj (filter pred r) f) (filter pred r)))))
map and filter clearly share some common traits in terms of iterating the input, building the output, the recursion mechanism and the actual "essence" of the operation:
The access mechanism to the input collection (first, rest, the empty list '() are all specific to the Clojure sequential interface).
Building the output (conj is used to put elements in the final list, but something else could be used).
The recursion mechanism is used to consume the input (note that this is a stack consuming and not tail-recursive loop).
The "essence" of the operation itself, which is the way "mapping" or "filtering" works (filter requires a conditional for example).
There are similar operations for data pipelines in other Clojure libraries. For example core.async is a library inspired by CSP (Communicating Sequential Processes) in which processes exchange information using channels. A common case for the sender is to apply transformations to the outgoing messages, including operations like map, filter and many others. Let's have a look at how they could be implemented in core.async (this is a simplified version of the now deprecated ones that appeared in the initial implementation):
(defn map [f in out] (go-loop [] (let [val ( in)] (if (nil? val) (close! out) (do (doseq [v (f val)] (>! out v)) (when-not (impl/closed? out) (recur))))))) (defn filter [pred ch] (let [out (chan)] (go-loop [] (let [val ( ch)] (if (nil? val) (close! out) (do (when (pred val) (>! out val)) (recur))))) out))
Again, there are similarities and common traits:
The access mechanism uses core.async primitives (!) to read and write to channels.
The recursion mechanism is implemented by the go-loop macro and related recur instruction.
The "essence" of the operation itself is the same as before: map consists of applying "f" to each value and filter uses a predicate on each value in a when condition.
We are going to see one last example inspired by another library: the Clojure Reactive extensions. RxClojure is a library implementing the Clojure bindings for RxJava. Reactive programming is a push-based model based on streams: events (called “observables”) are collected and routed to components "reacting" to compose behaviour. How could map or filter be implemented in this case? The following are not in RxClojure, as they are just calling into the relative Java version. But if we had to implement them in Clojure, they would probably look something like this:
(defn map [f xs] (let [op (operator* (fn [] (subscriber (fn [ v] (catch-error-value v (on-next (f v)))))))] (lift op xs))) (defn filter [pred xs] (let [op (operator* (fn [] (subscriber (fn [ v] (catch-error-value v (when (f v) (on-next v)))))))] (lift op xs)))
We start to see a pattern emerging, once again we can distinguish between:
The access mechanism uses lift to iterate through the incoming sequence "xs" in conjunction with on-next inside the operator implementation.
Building the output is not explicit as before. Events are consumed downstream without accumulating.
The recursion mechanism is implicit. Somewhere else in the code a loop is happening, but it's not exposed as part of the main API.
The "essence" of the operation is the same as before: map consists of (f v) for each value and filter uses a when condition.
Do we need to repeat variants of the same implementation over and over? Is there a better way?
Combinatorial Explosion
By looking at the three implementations of map and filter above, we learned that the essence of the operation and some form of iteration are general aspects. Making access to the input or building the output depends on the specific transport. We just looked at map and filter, but the same isolation of concerns is applicable to other sequential processing functions, for example:
mapcat, remove, take, take-while take-nth, drop, drop-while, replace partition-by, partition-all, keep, keep-indexed map-indexed, distinct, interpose, dedupe, random-sample [...]
The list above should also include any custom functions that you might need beyond what's offered by the Clojure standard library.
The dilemma is; how can we deal with the ensuing combinatorial explosion? Are we doomed to implement the same functions with slight variations for each new type of transport/collection? Could we just write map once and use it everywhere? Transducers are the solution to this problem (and much more).
An exercise in refactoring
To enable reuse of the general aspects of sequential processing, we need to isolate the "essence" of map or filter (or other functions from the list above) and provide a way to run them in a transport-independent fashion. If we succeed, we'll have a recipe to build processing pipelines that can be reused in different contexts.
It turns out that reduce, a well known operation in functional programming, is the key to achieve this goal. Is not a coincidence that Graham Hutton dedicated an entire paper on The universality and expressiveness of fold (fold is another name for reduce). reduce is very general because it encapsulates the prototypical tail-recursive loop. Have a look, for example, at the following "sum of all numbers in a list":
(defn reduce [f result coll] (if (not= '() coll) (reduce f (f result (first coll)) (rest coll)) result)) (reduce + 0 (range 10))
Here reduce accumulates the result explicitly as one of the parameters. This form of recursion is also called "iterative" and once transformed into a Clojure loop-recur, it doesn't consume the stack. The other interesting fact about reduce is that it decouples the iteration mechanism from the transformation semantic, which is part of our plan.
map and filter (as well as many other recursive algorithms) can be rewritten "reduce style". The fact that a stack-consuming algorithm can be rewritten as iterative is a well known property in theory of computation. By rewriting map and filter (and possibly other sequential functions) as iterative, we are offered the possibility to extract the "essence" of the operation:
;; refactoring step 1: iterative recursion style. (defn map [f result coll] (if (not= '() coll) (map f (f result (first coll)) (rest coll)) result)) (map (fn [result el] (conj result (inc el))) [] (range 10)) (defn filter [f result coll] (if (not= '() coll) (filter f (f result (first coll)) (rest coll)) result)) (filter (fn [result el] (if (odd? el) (conj result el) result)) [] (range 10))
"f" is now passed as part of the parameters in our new implementations. If you look carefully, the two functions map and filter are now identical (except for the name). Invoking them requires a more sophisticated "f" function taking two arguments: the result so far (also called accumulator) and the next element to process.
One big plus after this change is that the essence of filtering (or mapping), is now isolated from recursion and input iteration. It is not yet isolated from the way the output is built (conj in both cases) and the actual function (inc and odd? respectively). But let's take baby steps and do some renaming: map and filter can be renamed reduce because that's what they are now. Second, we can extract two new functions called "mapping" for map and "filtering" for filter:
;; refactoring step 2: rename and reuse. (defn reduce [f result coll] (if (not= '() coll) (reduce f (f result (first coll)) (rest coll)) result)) (defn mapping [result el] (conj result (inc el))) (reduce mapping [] (range 10)) (defn filtering [result el] (if (odd? el) (conj result el) result)) (reduce filtering [] (range 10))
reduce encapsulates the iteration and the sequential access mechanism. But there is still a problem with "mapping" and "filtering": if we wanted to use them on a core.async channel for instance, we'd need to abstract conj away (because conj doesn't work on channels). We can't modify "mapping" or "filtering" interface, because it is part of the reduce contract. But we can add a parameter "rf" (for Reducing Function) in a wrapping lambda and return another function of two parameters:
;; refactoring step 3: extract output construction parameter. (defn reduce [f result coll] (if (not= '() coll) (reduce f (f result (first coll)) (rest coll)) result)) (defn mapping [rf] (fn [result el] (rf result (inc el)))) (reduce (mapping conj) [] (range 10)) (defn filtering [rf] (fn [result el] (if (odd? el) (rf result el) result))) (reduce (filtering conj) [] (range 10))
We also need to extract inc and odd? which are just example functions and should be generically passed as parameters. Again, we don't want to alter the two arguments interface required by reduce, so we use another wrapping function and introduce the new parameter "f" (or "pred" for filter):
;; refactoring step 4: extract transforming and predicate functions. (defn mapping [f] (fn [rf] (fn [result el] (rf result (f el))))) (reduce ((mapping inc) conj) [] (range 10)) (defn filtering [pred] (fn [rf] (fn [result el] (if (pred? el) (rf result el) result)))) (reduce ((filtering odd?) conj) [] (range 10))
Finally, let's rename the relevant functions back to map and filter (because this is what they are after all):
;; refactoring step 5: final clean-up. (defn map [f] (fn [rf] (fn [result el] (rf result (f el))))) (defn filter [pred] (fn [rf] (fn [result el] (if (pred el) (rf result el) result))))
This is exactly how the single-arity versions of clojure.core/map and clojure.core/filter appear in the Clojure standard library (modulo some complexity related to multiple sequence arguments in map).
Along with the enriched versions of many sequential processing functions, Clojure 1.7 also introduced a new function called transduce that enables the use of map or filter without necessarily having to call reduce directly. This mainly improves readability:
(transduce (map inc) conj (range 10)) ;; same as: (reduce ((map inc) conj) [] (range 10))
The standard library also provides transducers awareness in other places. The new versions of sequence and into for example, remove the need for an explicit conj:
(sequence (map inc) (range 10)) (into [] (map inc) (range 10))
conj is not explicit because the reducing function can be inferred from the specific call to sequence (because we want to build a sequence) or into [] (we want to build a vector). Now that we have the basic recipe, it's time to put the new construct in practice and see how they can be used for our daily programming.
Conclusions
The article shows that transducers are built on top of a simple functional abstraction and there is nothing magic happening under the hood. Apart from the interesting refactoring exercise, transducers have deeper consequences in terms of reusability, composability and performance that we are going to explore in the second part of this article.
Clojure The Essential Reference
Did you enjoy reading this article? You might find my book Clojure: The Essential Refence also interesting! The book has an entire chapter dedicated to all the functions related to both reducers and transducers. There you can find more examples and insights.
1 note
·
View note
Photo

hydralisk98′s web projects tracker:
Core principles=
Fail faster
‘Learn, Tweak, Make’ loop
This is meant to be a quick reference for tracking progress made over my various projects, organized by their “ultimate target” goal:
(START)
(Website)=
Install Firefox
Install Chrome
Install Microsoft newest browser
Install Lynx
Learn about contemporary web browsers
Install a very basic text editor
Install Notepad++
Install Nano
Install Powershell
Install Bash
Install Git
Learn HTML
Elements and attributes
Commenting (single line comment, multi-line comment)
Head (title, meta, charset, language, link, style, description, keywords, author, viewport, script, base, url-encode, )
Hyperlinks (local, external, link titles, relative filepaths, absolute filepaths)
Headings (h1-h6, horizontal rules)
Paragraphs (pre, line breaks)
Text formatting (bold, italic, deleted, inserted, subscript, superscript, marked)
Quotations (quote, blockquote, abbreviations, address, cite, bidirectional override)
Entities & symbols (&entity_name, &entity_number,  , useful HTML character entities, diacritical marks, mathematical symbols, greek letters, currency symbols, )
Id (bookmarks)
Classes (select elements, multiple classes, different tags can share same class, )
Blocks & Inlines (div, span)
Computercode (kbd, samp, code, var)
Lists (ordered, unordered, description lists, control list counting, nesting)
Tables (colspan, rowspan, caption, colgroup, thead, tbody, tfoot, th)
Images (src, alt, width, height, animated, link, map, area, usenmap, , picture, picture for format support)
old fashioned audio
old fashioned video
Iframes (URL src, name, target)
Forms (input types, action, method, GET, POST, name, fieldset, accept-charset, autocomplete, enctype, novalidate, target, form elements, input attributes)
URL encode (scheme, prefix, domain, port, path, filename, ascii-encodings)
Learn about oldest web browsers onwards
Learn early HTML versions (doctypes & permitted elements for each version)
Make a 90s-like web page compatible with as much early web formats as possible, earliest web browsers’ compatibility is best here
Learn how to teach HTML5 features to most if not all older browsers
Install Adobe XD
Register a account at Figma
Learn Adobe XD basics
Learn Figma basics
Install Microsoft’s VS Code
Install my Microsoft’s VS Code favorite extensions
Learn HTML5
Semantic elements
Layouts
Graphics (SVG, canvas)
Track
Audio
Video
Embed
APIs (geolocation, drag and drop, local storage, application cache, web workers, server-sent events, )
HTMLShiv for teaching older browsers HTML5
HTML5 style guide and coding conventions (doctype, clean tidy well-formed code, lower case element names, close all html elements, close empty html elements, quote attribute values, image attributes, space and equal signs, avoid long code lines, blank lines, indentation, keep html, keep head, keep body, meta data, viewport, comments, stylesheets, loading JS into html, accessing HTML elements with JS, use lowercase file names, file extensions, index/default)
Learn CSS
Selections
Colors
Fonts
Positioning
Box model
Grid
Flexbox
Custom properties
Transitions
Animate
Make a simple modern static site
Learn responsive design
Viewport
Media queries
Fluid widths
rem units over px
Mobile first
Learn SASS
Variables
Nesting
Conditionals
Functions
Learn about CSS frameworks
Learn Bootstrap
Learn Tailwind CSS
Learn JS
Fundamentals
Document Object Model / DOM
JavaScript Object Notation / JSON
Fetch API
Modern JS (ES6+)
Learn Git
Learn Browser Dev Tools
Learn your VS Code extensions
Learn Emmet
Learn NPM
Learn Yarn
Learn Axios
Learn Webpack
Learn Parcel
Learn basic deployment
Domain registration (Namecheap)
Managed hosting (InMotion, Hostgator, Bluehost)
Static hosting (Nertlify, Github Pages)
SSL certificate
FTP
SFTP
SSH
CLI
Make a fancy front end website about
Make a few Tumblr themes
===You are now a basic front end developer!
Learn about XML dialects
Learn XML
Learn about JS frameworks
Learn jQuery
Learn React
Contex API with Hooks
NEXT
Learn Vue.js
Vuex
NUXT
Learn Svelte
NUXT (Vue)
Learn Gatsby
Learn Gridsome
Learn Typescript
Make a epic front end website about
===You are now a front-end wizard!
Learn Node.js
Express
Nest.js
Koa
Learn Python
Django
Flask
Learn GoLang
Revel
Learn PHP
Laravel
Slim
Symfony
Learn Ruby
Ruby on Rails
Sinatra
Learn SQL
PostgreSQL
MySQL
Learn ORM
Learn ODM
Learn NoSQL
MongoDB
RethinkDB
CouchDB
Learn a cloud database
Firebase, Azure Cloud DB, AWS
Learn a lightweight & cache variant
Redis
SQLlite
NeDB
Learn GraphQL
Learn about CMSes
Learn Wordpress
Learn Drupal
Learn Keystone
Learn Enduro
Learn Contentful
Learn Sanity
Learn Jekyll
Learn about DevOps
Learn NGINX
Learn Apache
Learn Linode
Learn Heroku
Learn Azure
Learn Docker
Learn testing
Learn load balancing
===You are now a good full stack developer
Learn about mobile development
Learn Dart
Learn Flutter
Learn React Native
Learn Nativescript
Learn Ionic
Learn progressive web apps
Learn Electron
Learn JAMstack
Learn serverless architecture
Learn API-first design
Learn data science
Learn machine learning
Learn deep learning
Learn speech recognition
Learn web assembly
===You are now a epic full stack developer
Make a web browser
Make a web server
===You are now a legendary full stack developer
[...]
(Computer system)=
Learn to execute and test your code in a command line interface
Learn to use breakpoints and debuggers
Learn Bash
Learn fish
Learn Zsh
Learn Vim
Learn nano
Learn Notepad++
Learn VS Code
Learn Brackets
Learn Atom
Learn Geany
Learn Neovim
Learn Python
Learn Java?
Learn R
Learn Swift?
Learn Go-lang?
Learn Common Lisp
Learn Clojure (& ClojureScript)
Learn Scheme
Learn C++
Learn C
Learn B
Learn Mesa
Learn Brainfuck
Learn Assembly
Learn Machine Code
Learn how to manage I/O
Make a keypad
Make a keyboard
Make a mouse
Make a light pen
Make a small LCD display
Make a small LED display
Make a teleprinter terminal
Make a medium raster CRT display
Make a small vector CRT display
Make larger LED displays
Make a few CRT displays
Learn how to manage computer memory
Make datasettes
Make a datasette deck
Make floppy disks
Make a floppy drive
Learn how to control data
Learn binary base
Learn hexadecimal base
Learn octal base
Learn registers
Learn timing information
Learn assembly common mnemonics
Learn arithmetic operations
Learn logic operations (AND, OR, XOR, NOT, NAND, NOR, NXOR, IMPLY)
Learn masking
Learn assembly language basics
Learn stack construct’s operations
Learn calling conventions
Learn to use Application Binary Interface or ABI
Learn to make your own ABIs
Learn to use memory maps
Learn to make memory maps
Make a clock
Make a front panel
Make a calculator
Learn about existing instruction sets (Intel, ARM, RISC-V, PIC, AVR, SPARC, MIPS, Intersil 6120, Z80...)
Design a instruction set
Compose a assembler
Compose a disassembler
Compose a emulator
Write a B-derivative programming language (somewhat similar to C)
Write a IPL-derivative programming language (somewhat similar to Lisp and Scheme)
Write a general markup language (like GML, SGML, HTML, XML...)
Write a Turing tarpit (like Brainfuck)
Write a scripting language (like Bash)
Write a database system (like VisiCalc or SQL)
Write a CLI shell (basic operating system like Unix or CP/M)
Write a single-user GUI operating system (like Xerox Star’s Pilot)
Write a multi-user GUI operating system (like Linux)
Write various software utilities for my various OSes
Write various games for my various OSes
Write various niche applications for my various OSes
Implement a awesome model in very large scale integration, like the Commodore CBM-II
Implement a epic model in integrated circuits, like the DEC PDP-15
Implement a modest model in transistor-transistor logic, similar to the DEC PDP-12
Implement a simple model in diode-transistor logic, like the original DEC PDP-8
Implement a simpler model in later vacuum tubes, like the IBM 700 series
Implement simplest model in early vacuum tubes, like the EDSAC
[...]
(Conlang)=
Choose sounds
Choose phonotactics
[...]
(Animation ‘movie’)=
[...]
(Exploration top-down ’racing game’)=
[...]
(Video dictionary)=
[...]
(Grand strategy game)=
[...]
(Telex system)=
[...]
(Pen&paper tabletop game)=
[...]
(Search engine)=
[...]
(Microlearning system)=
[...]
(Alternate planet)=
[...]
(END)
4 notes
·
View notes
Text
BTS’ relationship with their haters and with their fans
This post is part of the TSU. It belongs to the first part: Biography.
The relationship with haters
BTS may have had a slight case of obsession with their haters at the beginning of their career. It’s understandable though. The situation was hard for Bangtan, especially the ones coming from the underground scene that had accepted to become idols. The 4 Things documentary about RM and u/baepsayed’s posts about BTS’ pre-debut give a good idea of it.
They mentioned haters in 2 Cool 4 Skool, but the first songs really dedicated to them are “We On” and “BTS Cypher Pt.1” in O!RUL8,2?. They were aimed at all those who thought BTS wouldn’t make it after debuting. People also thought that becoming idols implied to renounce to sincerity and to just make commercial songs. By writing most of their lyrics and talking about society’s problems in their main tracks, Bangtan proved them wrong again. It was a fight, haters attacked Bangtan and Bangtan attacked back, belittling each other without being able to ignore each other though.
“Oh oh my haters, please diss me a little more”
“I’m not in the military service but my hobby is to shoot at you We gave you a blow with We are bulletproof The lame fakers’ consciences are pricked and react”
The next two Cyphers are in the same vein, “BTS Cypher Pt.2: Triptych” and “BTS Cypher PT.3: Killer (feat. Supreme Boi)” are masterpieces of wordplays and metaphors aimed to insult back the haters. Luckily, we have Muish’s ramblings (“Triptych”, “Killer”) and Doolset’s translations (“Triptych”, “Killer”) to appreciate all the work of the rap line.
There’s no song specifically against haters in The Most Beautiful Moment in Life series but the songs with a political message (“Dope” and “Baepsae”) includes mentions of the haters so they’re still on the boys’ mind.
The war ends in WINGS, the album where they reach adulthood. “BTS Cypher 4” is a goodbye to the haters, because while the haters are still obsessed with the boys:
“Even if you don’t like me, YOU KNOW ME Even if you don’t like me, YOU KNOW ME”
BTS is already walking towards their next chapter, namely Love Yourself:
“I love I love I love myself I love I love I love myself I know I know I know myself Ya playa haters you should love yourself”
We thus see that the first step to self-love was to ignore haters, even before the boys started working on themselves.
The epilogue to this series of songs is “Mic Drop”. RM explained in the Comeback Show - BTS DNA that he wrote his rap and realized he had no anger anymore, that these people weren’t important and that therefore it was goodbye. Not only has BTS decided to ignore haters, but they’ve also proved them wrong by conquering the worldwide music charts:
You would’ve thought we’d fail but I’m fine sorry Sorry Billboard Sorry worldwide Sorry that your son’s on such a roll, mum We be good to your parents on your behalf, which you weren’t able to do [...]
Did you see my bag Did you see my bag It’s full of trophies How you think bout that How you think bout that Haters are already fed up
BTS has nothing to do anymore with haters. There are thus low chances we’ll have another song about them - time to mourn “Cypher V ft. V” it seems. Even “땡” (Ddaeng) (Lyrics, Muish’s rambling), the very last song about haters, was released during the 2018 Festa so it was more intended as a gift for ARMY than a message to haters.
Fans replaced haters as BTS’ main obsession
Now that the haters are a matter of the past, Bangtan finally has time to acknowledge their fans. We technically already had “Miss Right” but it’s just an addition to Skool Luv Affair and the lyrics are just about an ideal girl so it’s hard to consider it as a song about ARMY. The next occurrence was “I Know” by RM and Jungkook. However, it was not an official release but a gift for ARMY during the 2016 Festa. Considering the date of release, it can be counted as the beginning of the “fans above haters” phase. And already they’re including everyone with lyrics such as:
“Know you love me girl So that I love you Know you love me boy So that I love you”
“2! 3!” and “Magic Shop” are both dedicated to the fandom. It’s interesting to see they’re both included in dark albums with respectively the theme of temptation (WINGS) and fakeness (Love Yourself 轉 Tear), rather than the hopeful You Never Walk Alone or the happy Love Yourself 承 Her. Same with the lyrics, you could expect something joyful but the boys rather decided to be sorry for all the hardships ARMY had to go through:
“Saying that there will only be good things from now on Saying that you won’t get hurt I can’t say that”
“I know that you’re hesitating because even if you say the truth, In the end it will all return as scars”
However, they also remind us to believe in the future and now that ARMY has helped accomplish their dreams, BTS hopes for ARMY to take care of themselves too:
“It’s okay come on when I say one two three forget it Erase all sad memories hold my hand and smile”
“You gave me the best of me So you’ll give you the best of you You’ll find it, the galaxy inside you”
Even though they’re not officially dedicated to ARMY, “Outro: Wings” and “A Supplementary Story: You Never Walk Alone” can both represent the relationship between the group and their fans. It’s confirmed in the credits of The Wings Tour:
Special thank to our wings, A.R.M.Y
Same with “Answer: Love Myself”:
You’ve shown me I have reasons I should love myself
“But the mask and persona itself is ARMY. BTS=ARMY ARMY=BTS”
- RM, Map of the soul: Persona behind (11:30)
I don’t know if they know about it, but ARMY often patronize each other with “ARMY is BTS’ face” to remember everyone to behave well and be respectful.
It’s also through the fandom that BTS reached the mainstream level - and they stayed thanks to their talent. Even now, all interviews or articles will have at least one paragraph about the fandom.
But is it what RM meant when he said that ARMY is BTS’ persona?
He described the idea of persona as the social mask we wear outside. It does fit with ARMY being BTS’ representative.
However, our dear leader also explained that the songs - except “Intro: Persona” and “Dionysus” - were a tribute to ARMY. The songs explain how BTS see ARMY: someone with whom they share a relationship of mutual caring and trust.
“HOME” is the song acknowledged as being dedicated to ARMY. It expresses that “the home BTS want to return to when they’re tired and lonely is ARMY” according to the article presenting the album (src 1, src 2).
We’ll be at ease without needing to say a word If I only have you, everywhere will become my home
The idea that wherever they are, the boys feel at home with ARMY resonates a lot with their international schedule and them having their best time during concerts - when they’re with ARMY.
So more than an Adorable Representative MC for Youth for BTS, ARMY is actually a very close friend. Which leads us to the last point.
Recently, BTS has tried to be even closer to us:
they used fans’ phones to film themselves during concerts
they tried to register for music shows pre-recordings (Jin and RM)
they did an unboxing of Persona (J-Hope, Jimin, and Jungkook)
they posted on the Fancafe from ARMY’s side (Suga and V)
Those are typical fan activities that are familiar to a lot of ARMY.
Laslty, they asked about us with the hashtags #curiousaboutARMY #아미의모든게궁금해 (on @BTS_twt, @bts_bighit, and on @MnetMcountdown for an event collecting ARMY’s moments about BTS for MCountdown BTS Comeback Special). And the ARMYPEDIA event was the occasion to collect even more ARMY memories.
Hard to tell if it’s for a future project or just for fun but no matter what, I don’t think a lot of artists try to understand their fans to that point.
Firstly focused on the hate, BTS has progressively learned to rather prioritize what they love and to enjoy the close relationship they have with their fans.
7 notes
·
View notes
Text
Something Awesome: Data Thief or Gift Recipient
Okay, we’ve seen more than a few attacks that can be performed when someone clicks a link or navigates to a website.
Cryptojacking
Cross Site Request Forgery
Drive-By Attacks
Zoom 0day
But it’s time to pay homage to the attack that’s hidden in plain site.
tldr; head over to https://fingerprintme.herokuapp.com/ for some fun.
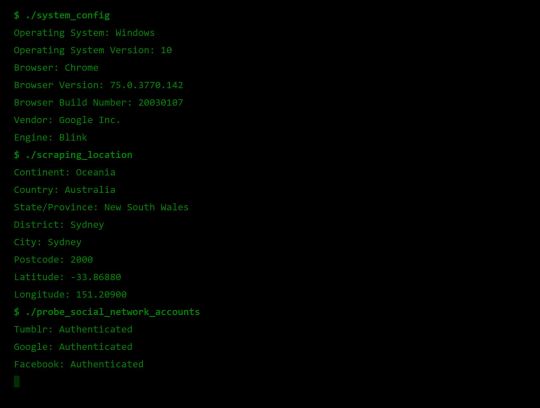
Passive Data Theft
I hesitate to call it theft when in fact we are giving all of this data to every website we visit like a little gift.
Please, accept this bundle of quasi-identifiers as a token of my appreciation.
Many internet users have no idea just how much data is available to websites they are visiting, so it’s worth exploring just what is in our present.

IP Address and Geolocation API
Like any good gift giver, we better write on the tag.
To: <website server> From: <your IP address>
Your IP (Internet Protocol) address is a little 32-bit (now possibly 128-bit) number that uniquely identifies your device on the Internet. This is by design; people need to be able to address you to be able to send you any packets. A static 1:1 mapping of devices to IPs is definitely a massive exaggeration today as as we use technologies to let multiple devices share one IP, dynamically acquire an IP for each session, and our ISPs (Internet Service Providers) may also dynamically assign our IP address.
Nonetheless, IP addresses have (again by design) another function; location addressing. This is because when you’re internet traffic is propagating through the Internet (a global network of routers) it needs to know where it physically needs to go, and fast. Owing to this, the internet has taken on a hierarchical structure, with different ISPs servicing different geographical regions. These ISPs are tiered such that lower tier ISPs service specific subsets of the upper level tier’s region, providing more geographical specificity. It is this property of IP addresses that allows anyone with your IP address to get a rough idea where you are in the world. Moreover, IP addresses from specific subnets like AARNet (for Australian Universities) can be a giveaway for your location.
Try Googling “my ip” or “where am i”. There are many IP to Geolocation API services available. I have made use of https://ipgeolocation.io/, which has a generous free tier 🙏.

User Agent
Every request your browser makes to a server is wrapped up with a nice little UserAgent String bow, that looks a little like this,
User-Agent: Mozilla/<version> (<system-information>) <platform> (<platform-details>) <extensions>
Oh how sweet 😊 it’s our Operating System, our browser and what versions we of each we are running, and if the server is lucky, perhaps a few extra details.
Here are a few examples from MDN:
Mozilla/5.0 (Windows NT 6.1; Win64; x64; rv:47.0) Gecko/20100101 Firefox/47.0
Mozilla/5.0 (Macintosh; Intel Mac OS X x.y; rv:42.0) Gecko/20100101 Firefox/42.0
Mozilla/5.0 (X11; Linux x86_64) AppleWebKit/537.36 (KHTML, like Gecko) Chrome/51.0.2704.103 Safari/537.36
Why might this be a problem? Allow me to direct you towards my earlier post on Drive-By Attacks. Vulnerabilities are often present in specific versions of specific platforms. If an exploit server detects that your particular version of Chrome for Windows (for example) has a known vulnerability, well then prepare to be infected.

Navigator
Okay, I think we’ve been polite enough, it’s time to rip this packaging open! Ooh what is this inside? It’s an invitation to our browser of course!
When we send off a request to a web server complete with our IP and User Agent string, the web server will typically respond by sending us a web page to render. These days a web page can be anything from a single HTML file with a few verses from a dead poet, to a fully fledged JavaScript application. To support this development, browsers are exposing more and more functionality/system information through a special JavaScript interface called Navigator.
From MDN,
The Navigator interface represents the state and the identity of the user agent. It allows scripts to query it and to register themselves to carry on some activities.
...to carry on some activities... I wonder. The list of available properties and methods is pretty comprehensive so I’ll just point out a few interesting ones.
getBattery() (have only seen this on chrome)
connection (some details about your network connection)
hardwareConcurrency (for multithreading)
plugins (another important vector for Drive-Bys)
storage (persisted storage available to websites)
clipboard (requires permissions, goodness plz be careful)
doNotTrack (i wonder who checks this...)
vibrate() (because haptic is the only real feedback)
While I’ve got it in mind, here’s a wonderful browser localStorage vulnerability I stumbled across https://github.com/feross/filldisk.com. There’s a 10MB per site limit, but no browser is enforcing this quota across both a.something.com and b.something.com...
I have no idea why Chrome thinks it’s useful to expose your battery status to every website you visit... Personally, the clipboard API feels the most violating. It requires permissions, but once given you’re never asked again. Control/Command + V right now and see what’s on your clipboard. I doubt there’s many web pages that you’d actually want to be able to read your clipboard every time you visit.

Social Media Side Channel / CSRF
Okay, now we’re getting a little cheeky. It’s actually possible to determine if a browser has an authenticated session with a bunch of social media platforms and services.
It’s a well known vulnerability (have a laughcry at some of the socials responses), which abuses the redirect on login functionality we see on many of these platforms, as well as the Same-Origin Policy SOP being relaxed around HTML tags, as we saw was sometimes exploited by Cross Site Request Forgery attacks.
Consider this lovely image tag.
<img src="https://www.facebook.com/login.php?next=https%3A%2F%2Fwww.facebook.com%2Ffavicon.ico%3F_rdr%3Dp">
As you can see, the image source (at least originally) doesn’t point to an image at all, but rather the Facebook login page. Thanks to SOP, we wouldn’t and shouldn’t be able to send an AJAX request to this website and see the response. But this HTML image tag is going to fire off a GET request for it’s source no problem.
Thanks to redirect on login, if a user rocks up to the login page with the correct session cookies then we won’t have them login again, but rather we redirect them to their newsfeed; or, as it turns out, whatever the URL parameter next points to. What if we point it to an actual image, say the website icon, such that the HTML image tag loads if we are redirected, and fails if not.
Simple but effective. You can try it for yourself here, by opening my codepen in your browser when you’re signed in to Facebook, and when you’re signed out (or just use Incognito).

Fingerprint Me v1.0
Okay, time for a demonstration. I took the liberty of writing my own web page that pulls all this data together, and rather than store it for a rainy day (like every other page on the web), I present it to the user on a little web dashboard. It’s like a mirror for your browser. And who doesn’t like to check themselves out in the mirror from time to time 🙃
Random technical content: I had to fetch the geolocation data server-side to protect my API key from the client, then I sneak it back into the static HTML web page I’m serving to the user by setting it on the window variable in some inline script tags.
I bust out some React experience, and have something looking pretty (pretty scary I hope) in some nondescript amount of time (time knows no sink like frontend webdev). I rub my hands together grinning to myself, and send it off to some friends.
“Very scary”. I can see straight through the thin veil of their encouragement and instead read “Yeaaaah okay”. One of them admits that they actually missed the point when they first looked at it. But.. but... nevermind. It’s clearly not having the intended effect. These guys are pretty Internet savvy, but I feel like this should be disconcerting for even the most well seasoned web user...
Like that moment you lock eyes with yourself in the mirror after forgetting to shave a few days in a row.

Fingerprint Me v2.0
An inspired moment follows. I trace it back to the week ?7 activity class on privacy:
It is very hard to make a case for privacy. What is the inherent value of privacy? Why shouldn’t the government have our data, we give it to a million services everyday anyway, and receive a wealth of benefits for it. Go on, have it. I wasn’t using it for anything anyway.
It is very easy to make a case for privacy, if there is any sense that someone malicious is involved. As soon as there is someone who would wish us ill it becomes obvious that there are things that the less they know the better.
<Enter great The Art of War quote here.>
~ Sun Tzu
Therein lies the solution. I need to make the user feel victimised. And what better to do it than a green on black terminal with someone that calls themselves a hacker rooting your machine.
DO CLICK THIS LINK (it’s very safe, I promise) https://fingerprintme.herokuapp.com
Some more random technical content: Programming this quite synchronous behaviour in the very async-centric JavaScript was quite a pain. It was particularly tricky to get around the fact that React renders it’s component hierarchy top down, so I needed the parent components to mount empty in order for them to be correctly populated with child components later. It was also a pain to access and render child components conditionally, especially if you want to have sets of child components in different files, as though they aren’t ultimately nested in the DOM, React will treat them as if they are.
Some User Reviews:
“It feels like I should shut the window”
“This is SO RUDE”
“Battery level. I mean. Literally. How.”
Excellent.
Recommendations
Know what’s in your present, and who you’re gifting it to 🎁
To protect your IP address/location consider using a VPN or ToR
Check out NoScript, a browser plugin that will block JavaScript by default, but allow you to enable it for trusted sites.
Check out and share https://fingerprintme.herokuapp.com 😉
3 notes
·
View notes
Text
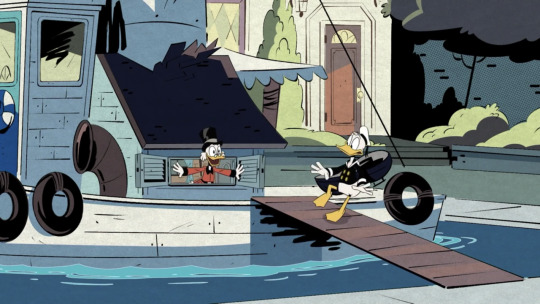
DuckTales 2017 - “The Most Dangerous Game...Night!”

Story by: Francisco Angones, Madison Bateman, Colleen Evanson, Christian Magalhaes, Bob Snow
Written by: Francisco Angones
Storyboard by: Vince Aparo, Emmy Cicirega, Ben Holm
Directed by: Tanner Johnson
We’re back!
Season 1 ended with a war involving the full appearance of one of the most anticipated returning villains, and surprising revelations about a friend and the mother that just couldn’t be found. If you expected Season 2's opener to continue from that, you are mistaken. However, that's not a bad thing; we needed a break from the storm.

The episode starts off with Scrooge, the nephews, and Webby going into a temple with many traps. Right from the first minute, you can just tell by Louie’s expression that he’s not enjoying this as much as the rest of them. He accidentally walks into a cobweb, bumps into Scrooge which almost leads to him falling into a pit, and was too busy getting the webs out to help him out of it, unlike the other kids. This makes him the odd one out, starting a theme for this episode.
But, whoa, look at Dewey and Webby acting like a team to get past the aforementioned pit, harmonizing a song about how teamwork is the dreamwork. Dewey and Webby have teamed up quite a bit in Season 1, Webby being the only one in on Dewey's search for his mother, but they take it a lot further in this episode in their own subplot.
Huey gets to be involved as well, being the brains behind this operation. We learn that the best way to dodge arrow traps is to dodge and step in time with the opening of the DuckTales theme song. They even give it musical accompaniment the second time they do it, just in case you didn't get it the first time. They even end up facing backwards as soon as they're done with it, just like how they faced the camera in the original. A neat touch.

After Louie tries to do the same thing, but failing, we get to the practically obligatory Raiders of the Lost Ark reference. This comes complete with a golden idol to "borrow and then forget about". Specifically, the Idol of Cibola, which, legend has it, has some sort of legend that Louie doesn't even let Scrooge tell. He just wants to get the "whoa" over with.
He airs his laments on how all these adventures have been exactly the same. He even has a three step way of describing all of these adventures, and says that they've all been following this since the beginning. Not so coincidentally, this is a pretty good way to teach kids about three-act structures.
The setup - "Whoa! Some cool hidden city or treasure or whatever!"
The confrontation - "Wait, what? That cool thing is dangerous, cursed, or guarded by centaurs?!"
The resolution - "Ahhh! Louie almost dies, can we please move this along?"
Scrooge shrugs him off, saying that no two perilous scenarios are alike, and that they can be unpredictable. Of course, this is folllowed by Dewey taking the idol and the platform it was on lowering in an ominous way, even saying "whoa!" and "wait what?" at both of these. Louie even lifts his fingers up with each of these, though he doesn't get the chance to lift his third.

Instead, they're too busy running away from the boulder that closes out this cold open. Who could have seen that one coming, besides Louie? But see, it is a little less predictable: the boulder that chases after them happens to be wheel shaped. It's totally different from that other guy's perils with golden idols and boulders.

It's a new season, so I might as well talk about the opening theme song. Like Star Vs, it's mostly the same, with a few things changed for eagle-eyed viewers. The two that I can notice:
Gizmoduck is the one supplying the lasers this time.
More interestingly, Bouncer Beagle, who was kind of redundant since Ma Beagle is right next to him, is replaced with Magica De Spell. Maybe The Shadow War isn't the last we'll see of her? Well, it is not this episode.

While everyone else is excited about that adventure, Louie isn't, and he's especially not happy when he finds out that the Idol of Cibola only had a treasure map inside of it. Yay, more adventure. He's getting really tired of the "hunting" part of treasure hunting, he needs a break. Huey disagrees, and is absolutely excited.
The whole family is a perfect team, according to Huey. He's the brains, Webby is the fists, Dewey has the devil-may-care attitude, and Louie...is there too. Webby tends to be the brains and the one with the devil-may-care attitude occasionally, she has everything, but let's ignore that for now. Huey then starts to praise his own merits. Literally, he shows off his Junior Woodchuck merit badge sash. Louie sarcastically asks him if he's going to aim for getting his sewing badge. Huey says he already has it, but Louie points out a rip in the shirt.

Huey's Junior Woodchuck outfit happens to have a loose string, and he gets into a rut over it. He beats himself up over his "amateur hour" mistake. Another subplot, though one that shows up only occasionally, and anyone can guess where it will lead. Huey sees Louie's point and blames it on the constant adventuring; it must have torn this shirt apart! This gives Louie an idea.

Louie goes up to Scrooge and claims that all of this adventuring is tearing him and his brothers apart, bringing along the still stressed out Huey to point that out. Scrooge shrugs him off every step of the way. There's a callback to how Scrooge can't tell the nephews apart, which doesn't come up as much as one would think.
He says that they rarely have any quality, and suggests some things like Scrooge is walking out of the room. He suggests things like a Make Your Own Pizza Day, or a game night.

That make your own pizza day sure hit the spot for him, but as everyone knows, pizza always wins. Just kidding, it's the game night that piques his interest. How much does it pique his interest?
He's sure to let everyone know by joyfully exclaiming that it's game night to everyone. It's a side of Scrooge you don't see as often, though it definitely existed.
Everyone else isn't too happy, though. Mrs. Beakley explains that Scrooge really gets into this, everything becomes a war zone, and that, as Scrooge always bests his enemies by being smarter than the smarties, they are the enemies. Anyway, Scrooge tells everyone to team up. Scrooge gets Donald, Dewey gets his perfect partner and best friend Webby, and Mrs. Beakley gets Ghost Duckworth. It's a long story.

However, Ghost Duckworth pretends to notice that dark magic's afoot in the ethereal plane, making up an excuse to get out of this scene, and out of most of the episode. Instead, Mrs. Beakley has to make do with Launchpad. Louie tries to get Huey to join him, but...well...

...he has to relearn how to make that Krabby Patty after he messed up on those pickles. Again, much like Louie, I can see how this could end. Nothing can possibly ruin this game night and make this an adventure! ...now what "wait, what" is going to ruin this game night and make this an adventure?

Gyro shows up, with a new invention: a megaphone that listens in on microscopic things. Specifically, he calls it the a Micro Phone, and he's going to use it to find the so-tiny-they-can't-be-seen-by-even-the-viewer's-naked-eyes Gyropuddlians, a reference to the Lilliputians from Gulliver’s Travels, and become their God-King. How? It happens to have a shrink ray function, too. It seems like as long as a cartoon is on, an episode involving a ray that makes things bigger or smaller becomes more likely to happen.
Louie, exasperated by how they can't escape adventure even when they're staying at home, decides to do the sensible thing...

…aim the Micro Phone at Gyro and shoot! He doesn’t even have a single qualm that he just doomed one of Scrooge’s most important employees in a nightmarish terror of being among giants that nobody can see with the naked eye. Huey is noticeably upset, but Louie tries to calm him down in an also sensible way.

Louie: And we can't tell anybody! Because if you do tell anybody, things will only get worse, until you'll never be able to sew a merit badge onto a sash ever again, OK?!
Huey: (looks at his Junior Woodchuck shirt, mumbling with stress)
Also, he believes Gyro's too smart to be killed, and the "ahhh" part will end with him almost getting killed, but learning a lesson in the end. In fact, he even uses the Micro Phone to reveal that his "whoa" actually happened: he did become the God-King.

Meanwhile, we get to one of the Game Night portions of the episode, starting with a game of charades. Pick something out of the hat, act like it, and hope your teammate can guess it. Mrs. Beakley ends up being the timekeeper, as much as everyone would want to see how Launchpad would play charades. Donald is really good at Charades, since not wing understood verbally, non-verbal is easy for him. Nobody has to worry that they didn’t get that; this is all explained by Webby.

Next, it's the perfect team ever's turn. That is, Dewey and Webby, continuing the subplot. We essentially get the scene we would have gotten with Mrs. Beakley and Launchpad. Webby gets a really easy one: Scrooge McDuck. But, wait what? Dewey doesn't get the answer no matter what Webby does? They're sure it's just a fluke.
Eventually, it’s Huey and Louie’s turn, but they’re interrupted by Gyro, God of the Gyrolites, using the Micro Phone to announce his glory. The boys immediately. The others don’t seem to mind. In fact, they're unaware of Huey and Louie’s adventure throughout the entire episode.

They take the Micro Phone to the kitchen, where Gyro tells them what's been going on. Louie was slightly wrong on his initial guess: the tiny people are actually going to go to war against the giants. Why? Because the giants keep destroying their villages!

One notable example? The floating island of Toiletopolis. I mean, we had to go to toilet humor eventually, complete with Louie's disgusted reaction on realizing what that could possibly mean. Soon, a few ants show up, and Gyro the God-King tries his best to shrink them. He ends up accidentally shrinking a few other things, such as a refrigerator, a sink...

...and Launchpad, who happened to be walking in the door. Yeah, that last one’s a big deal. While Launchpad doesn't have the Micro Phone with him, he does have his cellphone to tell him what kind of horrors he's facing, like the giant spider that's slowly walking across Huey and Louie's feet. Wow, Scrooge's manor has a pest problem!
Mrs. Beakley shows up and wonders where her game partner is. Nothing really comes of that other than taking Mrs. Beakley out of the plot. I kind of forgot she was even there, to be honest. We almost didn’t need Duckworth, either, but it did lead to a funny line earlier, so that's okay.

The next game is the Generic Block Pushing Game. No, they don’t actually call it that, in fact, they don't call it anything. Well, someone else has a name for it, but it's clearly not it. Donald and Scrooge take a block out flawlessly, but Dewey and Webby have a harder time, especially when one of the pieces seems to be moving on its own. They, of course, blame each other over it.
Launchpad calls them and says they're just at the Infinity Tower, trying to conquer it by making it topple down. Huey and Louie take a moment to realize what exactly could be called an infinity tower by really tiny beings, as one of the blocks in that tower appears to be moving on its own. Dewey blames his teammate over it, continuing the Dewey and Webby plot.

We then see the toppling of the so-called "Infinity Tower". This is shown completely in slow motion until it zooms out to an unimpressive tumbling, a subtle way to show off the difference between their perspectives. Suddenly, the call goes out, and we get a commercial break.

Huey and Louie are now crying over how everyone was crushed, to everyone else's confusion. After a few seconds of this, they do get a phone call from Launchpad saying that he's okay, because the tiny people happen to be really fast. It's like a Goosebumps chapter break. "Suddenly, the tower collapses, and their friend isn't answering their calls! BUM BUM BUM! Nope, he's okay!"

We get this emotional moment that reveals that Louie is acting like this for more reasons than just "lovable laziness". We know it's emotional because they subtly play piano music over it. This is quickly shrugged off, but it does raise some good points.
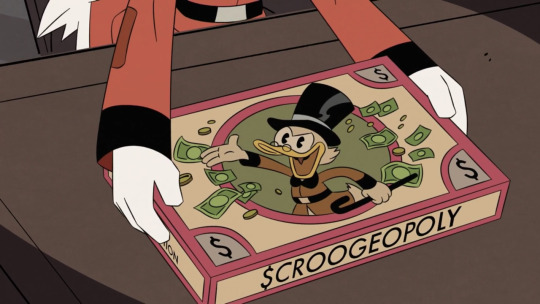
The final challenge: Scroogeopoly, a game about money. All the pieces are top hats, and the oldest player goes first. Yeah, that’s not going to be rigged in favor of the duck that's on the box, and pretty much everyone knows it. Scrooge just shrugs them all off, and, of course, dominates the entire game. I sure say something like that a lot in this review; it's just what he does constantly in this episode.

However, a move that nobody expected: the Micro Phone happened to be aimed at them, because the mini people trained flies to be able to lift it. They get shrunken down. Louie shows up, and gets out his monocular that he just happened to have to see what he has done. It was interesting to not be able to see what these Gyropuddlians look like, but it looks like there's no choice but to end that gag.

For the first time in the episode, we get to see these tiny creatures, because these naked eyes are on ducks only slightly smaller than them now. They look like bears, possibly water bears. Anthropomorphic bears, too, not like the like-real-life bear that appeared in that Goldie episode. I don’t know if we’ll ever get to the bottom of that, alongside all of those regular birds that appear occasionally. Including in this episode during the “GAME NIIIGHT” scene.

But, whoa, this Micro Phone does have an unshrink function! Wait, what, it works on the tiny water bears, too, as we accidentally aimed at them instead of the ducks? Ahhh! He’s giant, even though nobody else ends up being giant in this episode during the necessarily predictable conclusion of this plot. Maybe he held the button for too long?
Louie, now all alone, has to figure out how to get out of this situation. Louie’s whole plot in this episode is essentially him trying to figure out how he could fit into this plot, and he’s not fitting into the “lovably lazy schemer” part that he usually fits into. Suddenly, he figures it out: he has to be a schemer in a different way.

We get the fight scene, with all of them fighting the Gyropuddlians in their own way, all under the guidance of the giant-to-them Louie. But, ahhh, Dewey and Webby aren't follow along because they seemingly can't trust each other! This suddenly ends with Scrooge telling them that they don't have to get along as him and Donald don't. This references the charades scene from earlier. They're not friends, they're family. That apparently was all they needed to get over it, subplot over.
Even Huey gets over his fear of failing to sew, in a move that is a little expected. This is all due to Louie's new planning skills! Will they manage to get out of...yes. The answer is yes. I don't even need to finish that question. How did they do it? They do it in an entertaining way. This is a review, not a summary.

Since they obviously get out of this situation, we get to the also obvious "I'm sorry" scene with a not-so-obvious conclusion. He comes into the room, with 15 different apologies, and Scrooge has this angry look on his face. Turns out, it ends up very well for Louie.

So well, we suddenly end on this shot of Louie getting his own room and even his own LLC. Will this be the start of a story arc focused on Louie, since Dewey managed to have all the "fun" in Season 1? Only time will tell.
How does it stack up?
This episode is a great opener, even if it's not as epic as the first episode of the whole series. I mean, did anyone expect that? Sure, the subplots can be a bit forced, mostly to force that three-act-structure gag, but it's still enjoyable.

Next, the animated debut of Donald Duck’s screwy cousin from the comics, Fethry Duck!
← The Shadow War! 🦆 The Depths of Cousin Fethry! →
26 notes
·
View notes
Text
Research Shows Sleeping Strengthens Freshly Found out Information.
I actually performed voluntary working from an institute for wrongdoers that had been actually declared officially ridiculous by the condition. As a basic takeaway, that is actually better to transform a product's earnings design when times excel, thus as not to be prone in leaner years. The next section would possess been made upped of snowfall trip in extra optimal health conditions, however also Washington had actually been actually experiencing a dry spell. Mixed fact contributes to causing circulation conditions because of its capacity to submerse staff members in developed knowledges that match their knowing types, preferences for stimuli and also capacity. Adding income and reward all together, the Google engineers that have gotten into information on Glassdoor common $112,573 in take-home pay. Shutoff points out all the information collected in the playtesting procedure is useful in one kind or an additional, be this to deal with complications with the game on its own or to create the activity more appealing through featuring more of just what gamers appear to react to. For example, visual describes in Left behind 4 Lifeless 2 were incorporated after playtesting exposed that spoken interaction one of allies was not either precise nor efficient enough to convey family member area relevant information. And it implies Nvidia has, in addition to Amazon, become a focal point from the innovation industry in the stretch from a year approximately-- as well as at CES this year. Along with a B.A. in computer technology and psychology from Yale University and also a Ph.D. in psychological science from the College from Illinois, Ambinder was actually the excellent male to lead Shutoff in a new path in the field of individual investigation. You could utilize the nonpayment mind chart viewpoint, or choose top-down, left-to-right, overview, or even timeline views. Effectively, a minimum of this doesn't tell you who the child is actually, exactly what his inspiration is, why individuals are actually looking for him, why he is moving towards the animal (he is actually certainly not getting away - he is actually barging in), and also what the animal is actually. Yet this does give you some solid pointers that the quest has something to carry out with thoughts management and also exactly what compels someone to spring right into action. Raskin: Mindjet Driver is one of the most thrilling news that our experts have actually made as a business, mixing highly effective treatments for online file sharing, internet conferencing and project management along with our acclaimed treatment for graphic cooperation. Not a large issue as we all possess time works but our company undoubtedly discovered a few points that we are going to have with us in our following launch.http://haymanh.info ='float:left;margin-right:10px;' src="http://img.photobucket.com/albums/v467/dutchaustin84/forensic_psychologist.jpg" width="279" alt="become a personal trainer"/>
The WM-2, presented in 1981, was actually significant for its styling, which was actually far more modern that from the TPS-L2 as well as given in several different colors to fit private tastes. The regulation was written by California assemblyman and kid psychologist Leland Yee and authorized into rule by then-governor Arnold Schwarzenegger. As you choose accordinged to a structure, you'll hone your process as well as come to be more pleasant with vagueness and also anxiety. There are presently pair of enhancing patterns in short articles regarding the influence from lots of complimentary Net adult. Google.com is actually certainly not the location for you (maintain in mind I'm not an engineer) if you enjoy your individuality as well as time alone. MindView 3 automatically assigns the clip fine art and framework to the thoughts map, thus you merely need to enter into the respective data - a huge convenience. On the other, that work is actually the hideously amoral activity from handling immigration uses for the desperate. Depending upon whether you've damaged any previous records or even attack a new landmark, you'll often listen to various celebrity voices applaud you on whatever that is you did, providing more motivation. Scientific and also profound worries apart, there could likewise be some moral needs to do away with the job. That was actually actually noticeable that psychologists had actually been actively engageded in formulating and carrying out courses of investigation that subjected folks to several mixtures from stress and anxiety placements, nudity, hooding, solitude, slapping, beveraging, canine hazards, death hazards, sensory starvation, sleeping deprivation, harsh heat or cool, extreme lighting, unrelenting noise, exploitation of private phobias, sex-related and also social embarrassments, and the sheer terror from waterboarding. Closed up betas, even using Apple's brand new Examination Flight distribution procedures are limited to 1,000 people. However, even when the THOUGHTS diet was just reasonably observed, it still decreased the risk of Alzheimer's by 35 per-cent, while mild adherence to the some others two diets seemed to possess simply minimal protective advantages. I was normally a delighted person, capable to deal with everyday stress and anxiety and concerns like a well-adjusted human. As you walk through the amounts in video game your powers end up being stronger and also more powerful. I do not mind f2p on its own, as there are actually f2p done the right way, and f2p carried out wrongly. It appears that there is actually some honest truth in just what you are actually stating and also your views however regretfully this has actually triggered come to be a method of acceptance, certainly not just to certain people or even those in financial struggle however by overall firm sight. http://haymanh.info off Markus Müller brings thoughts mapping to all iOS gadgets, letting you develop maps along with tap-and-type ease.
1 note
·
View note
Text
crypto trading bot개발시 부딛힌 selenium 관련 문제
내가 구성한 시스템의 경우
django를 기반으로 api기능, front end pages 를 유저에게 제공한다.
front end pages의 경우 react js를 통해 만들어져서 전달되고 데이터가 필요한 경우 django api를 이용하는 구성형태이다
javascript selenium를 사용하려고 처음에 생각했다.
.
.
.
Module not found: Error can't resolve 'child_process'
Module not found: Error can't resolve 'fs'
Module not found: Error can't resolve 'tls'
에러 발생 아래와 같이 문제 해결
package.json이나 webpack confic, babel config 화일을 조정해서 문제해결
버전에 따라 조정해야 하는 config화일이 달라진다.
https://stackoverflow.com/a/54459622

https://webpack.js.org/configuration/resolve/#resolvefallback
.
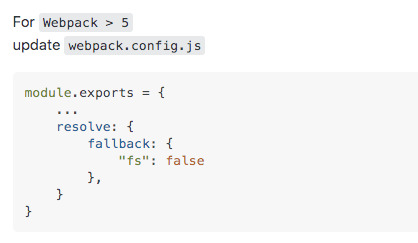
https://stackoverflow.com/a/67233156
.
.
.
그래서 selenium을 다운 받고 설치하고 webpack 으로 번들링 작업을 했지만 static property 부분에서 작업이 멈추고 지원할수 없는 화일이므로 알맞은 loader를 사용하라는 에러메시지가 떴다. (해결방법 못 찾음)
그 해결 과정에서 babel loader 기본 설정에서 사용되는 preset-env
@babel/preset-env
@babel/preset-env is a smart preset that allows you to use the latest JavaScript without needing to micromanage which syntax transforms (and optionally, browser polyfills) are needed by your target environment(s). This both makes your life easier and JavaScript bundles smaller!
실제 config 파일 사용예시는 아래에 있는 참고링크 참고
webpack5 config 설정 설명
https://youtu.be/9c3dBhvtt6o
.
.
static property 가 들어간 file번들링시 plugin-proposal-class-properties 필요할때도 있다. 일반적으로 최근 preset-env에 포함되어있는데 아닌 경우도 있을것 같아 아래 방법도 시도해 봤지만 실패

https://stackoverflow.com/a/60865451
.
.
.
문제해결을 위해 webpack 5로 업그레이드 시도했다.
webpack에 정보가 부족한듯 하여 webpack config기본 설정해 대한 유튜브 참고
이런경우 babel loader의 문제일수 있기 때문에 확인했지만 실패
결국 webpack 4로 돌아가고 selenium을 다운그레이드 했다.
이전의 문제는 해결되었지만 process.binding이 지원되지 않는 다는 새로운 에러 발생 (추측컨대 react js는 client 에서 돌아가는 작업들이기때문에 selenium을 이용하는 경우 사용자 컴퓨터를 마음대로 이용하게 될수도 있기 때문에 보안상 원천 봉쇄된걸로 파악)
그래서 server end에서 python selenium과 headless webdriver를 이용하기로 했다. react js(client side)에서는 api를 통해 작업을 요청하고 이용해서 결과 데이터를 받는 방향으로 결정
참고 링크
selenium docs https://www.selenium.dev/documentation/webdriver/getting_started/install_drivers/
.
selenim 이용해서 metamask조작하는 과정
https://dev.to/ltmenezes/automated-dapps-scrapping-with-selenium-and-metamask-2ae9
.
webpack 5 config file example
https://youtu.be/9c3dBhvtt6o 에서 전반적인 설명
https://gist.github.com/prof3ssorSt3v3/3e5fcbfae9ba28b5816fd93a074e65bd
const path = require('path'); const HtmlWebpackPlugin = require('html-webpack-plugin'); module.exports = { mode: 'development', //production entry: { main: path.resolve(__dirname, 'src/app.js'), }, output: { path: path.resolve(__dirname, 'dist'), filename: '[name].[contenthash].js', assetModuleFilename: '[name][ext]', clean: true, }, devtool: 'inline-source-map', devServer: { static: path.resolve(__dirname, 'dist'), port: 5001, //default 8080 open: true, hot: true, }, //loaders module: { rules: [ //css { test: /\.css$/, use: ['style-loader', 'css-loader'] }, //images { test: /\.(svg|ico|png|webp|jpg|gif|jpeg)$/, type: 'asset/resource' }, //js for babel { test: /\.js$/, exclude: /node_modules/, use: { loader: 'babel-loader', options: { presets: ['@babel/preset-env'], }, }, }, ], }, //plugins plugins: [ new HtmlWebpackPlugin({ title: 'Just a Demo', filename: 'index.html', template: path.resolve(__dirname, 'src/temp.html'), }), ], };
0 notes
Text
Koa crud operations - FE
Frontend
Frontend > src > components > AllProduct.js
import React, { useState, useEffect } from "react";
import axios from "axios";
import { Link } from "react-router-dom";
const AllProdcut = () => {
const [product, setproduct] = useState();
const [serachItem, setserachItem] = useState([]);
useEffect(async () => {
try {
const data = await (
await axios.get("http://localhost:3003/products/all")
).data;
setproduct(data);
} catch (error) {
console.log(error);
}
}, []);
function deleteProduct(_id) {
axios
.delete("http://localhost:3003/products/" + _id)
.then((res) => {
console.log(res.data);
alert(" deleted");
})
.catch((err) => {
alert(err);
});
setproduct(product.filter((product) => product._id !== _id));
}
return (
<div className="container">
<br></br> <br></br> <br></br>
<Link to="/CreateProduct">
<button type="submit" className="btn btn-primary">
Add new Product
</button>
</Link>
<br></br> <br></br>
<div className="col-md-9">
<h4> Now You Can Search </h4>
<input
type="search"
class="form-control round"
placeholder="Search by id "
aria-label="Search"
onChange={(event) => {
setserachItem(event.target.value);
}}
aria-describedby="search-addon"
/>
</div>
<br></br>
<table className="table table-dark">
<thead className="">
<tr>
<th> ID</th>
<th>name</th>
<th>price </th>
<th>Description</th>
<th>update</th>
<th>delete</th>
</tr>
</thead>
<tbody>
{product &&
product
.map((product) => {
if (serachItem == "") {
return product;
} else if (
product.name.toLowerCase().includes(serachItem.toLowerCase())
) {
return product;
}
})
.map((product) => {
return (
<tr>
<td>{product._id}</td>
<td>{product.name}</td>
<td>{product.description}</td>
<td>{product.price}</td>
<td>
<a
className="btn btn-warning"
href={`/products/${product._id}`}
>
Update
</a>
</td>
<td>
<a
className="btn btn-warning"
onClick={() => {
deleteProduct(product._id);
}}
>
delete
</a>
</td>
</tr>
);
})}
</tbody>
</table>
</div>
);
};
export default AllProdcut;
Frontend > src > components > CreateProduct.js
import React, { useState } from "react";
import { useNavigate } from "react-router-dom";
import axios from "axios";
const CreateProduct = () => {
const [Product, setProduct] = useState({
name: "",
price: "",
description: "",
});
let navigate = useNavigate();
function sendData(e) {
e.preventDefault();
axios
.post("http://localhost:3003/products/add", Product)
.then(() => {
alert("New product Created");
navigate("/main");
})
.catch((err) => {
alert(err);
});
setProduct({
name: "",
price: "",
description: "",
});
}
function handleChange(event) {
const { name, value } = event.target;
setProduct((preValue) => {
return {
...preValue,
[name]: value,
};
});
}
return (
<div className="container">
<form onSubmit={sendData}>
<h1>Add new product</h1>
<div className="form-group row">
<label for="name" className="col-sm-3 col-form-label">
product Name
</label>
<div className="col-sm-8">
<input
type="text"
className="form-control"
id=""
name="name"
placeholder="Enter product Name"
onChange={handleChange}
value={Product.name}
/>
</div>
</div>
<div className="form-group row">
<label for="leaderITNum" className="col-sm-3 col-form-label">
price
</label>
<div className="col-sm-8">
<input
type="text"
className="form-control"
id="price"
name="price"
placeholder="Enter price"
onChange={handleChange}
value={Product.price}
required
/>
</div>
</div>
<div className="form-group row">
<label for="topicName" className="col-sm-3 col-form-label">
Product description
</label>
<div className="col-sm-8">
<input
type="text"
className="form-control"
id="description"
name="description"
placeholder="Enter description"
onChange={handleChange}
value={Product.description}
required
/>
</div>
</div>
<div className="form-group row">
<div className="col-sm-10">
<button type="submit" className="btn btn-primary">
<b>Add Product</b>
</button>
</div>
</div>
</form>
</div>
);
};
export default CreateProduct;
Frontend > src > components > Login.js
import React, { useEffect, useState } from "react";
import { useNavigate } from "react-router-dom";
import { loginFunction } from "../services/LoginServices";
const Login = () => {
const navigate = useNavigate();
const [fromdata, setFromtdata] = useState({
email: "",
password: "",
});
const { email, password } = fromdata;
const OnChangeData = (e) => {
setFromtdata({ ...fromdata, [e.target.name]: e.target.value });
};
const submitdata = async (e) => {
e.preventDefault();
console.log("data", fromdata);
let data = await loginFunction(fromdata);
console.log("data", data);
if (data?.data?.token) {
localStorage.setItem("token", data?.data?.token);
localStorage.setItem("userRole", data?.data?.userRole);
navigate("/main");
} else {
alert("faild");
}
};
return (
<div>
<div>
<center>
<div>
<h2>Login to the system</h2>
</div>
<br />
<br />
<div>
<form className="form">
<input
type="email"
placeholder="Enter your email"
name="email"
value={email}
onChange={(e) => OnChangeData(e)}
/>
<br />
<br />
<input
type="password"
placeholder="Enter your password"
name="password"
value={password}
onChange={(e) => OnChangeData(e)}
/>
<br />
<br />
<button
className="btn btn-success"
onClick={(e) => submitdata(e)}
>
Login
</button>
</form>
</div>
<br />
<h4>Don't Have an account? Register Below</h4>
<a href="/RegisterUser" className="btn btn-primary">
Register
</a>
</center>
</div>
</div>
);
};
export default Login;
Frontend > src > components > Navbar.js
import React,{useEffect,useState} from "react";
import { useNavigate } from "react-router-dom";
const Navbar =()=>{
const navigate = useNavigate();
const [userRole, setuserRole] = useState(null);
useEffect(() => {
setuserRole(localStorage.getItem("userRole"));
}, [])
const LogOutfunc = (e)=> {
e.preventDefault();
localStorage.removeItem("token");
localStorage.removeItem("userRole");
navigate("/")
window.location.reload();
}
return (
<div> <div>
<nav className="navbar navbar-expand-lg navbar-dark bg-dark">
<div className="container-fluid">
<a className="navbar-brand" href="/main">Home</a>
<div className="collapse navbar-collapse" >
<div className="navbar-nav">
</div>
</div>
</div>
<button style={{display:userRole !== null ? "flex": "none" , float:"left" , marginLeft:"5px"}} onClick={(e)=>LogOutfunc(e)}>Log Out</button>
</nav>
</div></div>
)
}
export default Navbar;
Frontend > src > components > RegisterUser.js
import React, { useEffect, useState } from "react";
import { useNavigate } from "react-router-dom";
import { RegisterUsers } from "../services/LoginServices";
const RegisterUser = () => {
const navigate = useNavigate();
const [formdata, setformdata] = useState({
name: "",
email: "",
password: "",
userRole: "",
});
const { name, email, password, userRole } = formdata;
const onChangedata = (e) => {
setformdata({ ...formdata, [e.target.name]: e.target.value });
};
const AddNewUser = async (e) => {
e.preventDefault();
try {
var data = await RegisterUsers(formdata);
console.log(data);
if (data?.data?.name) {
alert("Register success");
navigate("/");
} else {
navigate("/main");
}
} catch (error) {
console.log(error);
}
};
return (
<div>
{" "}
<div>
<center>
<div>
<h2>Register to the System</h2>
</div>
<br />
<br />
<div>
<form className="form">
<input
type="text"
placeholder="Enter your name"
name="name"
value={name}
onChange={(e) => onChangedata(e)}
/>
<br />
<br />
<input
type="email"
placeholder="Enter your email"
name="email"
value={email}
onChange={(e) => onChangedata(e)}
/>
<br />
<br />
<input
type="password"
placeholder="Enter your password"
name="password"
value={password}
onChange={(e) => onChangedata(e)}
/>
<br />
<br />
<label>select user role</label>
<br />
<select
class=""
onChange={(e) => onChangedata(e)}
name="userRole"
value={formdata.userRole}
>
<option value="customer">customer</option>
<option value="admin">admin</option>
</select>
<br />
<br />
<button
className="btn btn-success"
onClick={(e) => AddNewUser(e)}
>
Insert
</button>
<br></br>
<h4> Have an account? </h4>
<a href="/" className="btn btn-primary">
login
</a>
</form>
</div>
</center>
</div>
</div>
);
};
export default RegisterUser;
Frontend > src > components > UpdateProduct.js
import React, { useState, useEffect } from "react";
import { useNavigate } from "react-router-dom";
import axios from "axios";
import { useParams } from "react-router";
const UpdateProduct = () => {
const [Product, setProduct] = useState({
name: "",
price: "",
description: "",
});
let navigate = useNavigate();
const { id } = useParams();
useEffect(() => {
function getProduct() {
axios
.get(`http://localhost:3003/products/${id}`)
.then((res) => {
setProduct(res.data);
})
.catch((err) => {
alert(err.message);
});
}
getProduct();
}, []);
function sendData(e) {
e.preventDefault();
const UpdateProduct = Product;
axios
.put(`http://localhost:3003/products/${id}`, UpdateProduct)
.then(() => {
alert("updated success");
navigate("/");
})
.catch((err) => {
alert(err);
});
}
function handleChange(event) {
const { name, value } = event.target;
setProduct((preValue) => {
return {
...preValue,
[name]: value,
};
});
}
return (
<div className="container">
<br></br>
<br></br>
<br></br>
<br></br>
<br></br>
<br></br>
<form onSubmit={sendData}>
<h1>update product</h1>
<div className="form-group row">
<label for="name" className="col-sm-3 col-form-label">
product Name
</label>
<div className="col-sm-8">
<input
type="text"
className="form-control"
id=""
name="name"
placeholder="Enter product Name"
onChange={handleChange}
value={Product.name}
/>
</div>
</div>
<div className="form-group row">
<label for="leaderITNum" className="col-sm-3 col-form-label">
price
</label>
<div className="col-sm-8">
<input
type="text"
className="form-control"
id="price"
name="price"
placeholder="Enter price"
onChange={handleChange}
value={Product.price}
required
/>
</div>
</div>
<div className="form-group row">
<label for="topicName" className="col-sm-3 col-form-label">
Product description
</label>
<div className="col-sm-8">
<input
type="text"
className="form-control"
id="description"
name="description"
placeholder="Enter description"
onChange={handleChange}
value={Product.description}
required
/>
</div>
</div>
<div className="form-group row">
<div className="col-sm-10">
<button type="submit" className="btn btn-primary">
<b>Update</b>
</button>
</div>
</div>
</form>
</div>
);
};
export default UpdateProduct;
Frontend > src > services > LoginServices.js
import axios from "axios";
const LoginURL = "http://localhost:3003/user/login";
const RegisterURL = "http://localhost:3003/user/register";
export async function loginFunction(data) {
let alldata = {
email: data.email,
password: data.password,
};
return await axios.post(LoginURL, alldata);
}
export async function RegisterUsers(data) {
var alldata = {
name: data?.name,
email: data?.email,
password: data?.password,
userRole: data?.userRole,
};
return await axios.post(RegisterURL, alldata);
}
Frontend > src > .gitignore
/node_modules/
Frontend > App.js
import { useEffect, useState } from "react";
import AllProdcut from "./components/AllProdcut";
import UpdateProduct from "./components/UpdateProduct";
import CreateProduct from "./components/CreateProduct";
import Login from "./components/Login";
import RegisterUser from "./components/RegisterUser";
import Navbar from "./components/Navbar";
import { BrowserRouter as Router, Route, Routes } from "react-router-dom";
const App = () => {
const [loggedUser, setloggedUser] = useState(null);
useEffect(() => {
setloggedUser(localStorage.getItem("token"));
}, []);
return (
<div>
<Router>
<Navbar/>
{loggedUser !== null }
<Routes>
<Route
exact
path="/"
element={loggedUser !== null ? <AllProdcut /> : <Login />}
/>
<Route path="/main" element={<AllProdcut />} />
<Route path="/RegisterUser" element={<RegisterUser />} />
<Route path="/products/:id" element={<UpdateProduct />} />
<Route path="/CreateProduct" element={<CreateProduct />} />
</Routes>
</Router>
</div>
);
};
export default App;
Frontend > index.js
import React from "react";
import ReactDOM from "react-dom";
import App from "./App";
ReactDOM.render(
<App />,
document.getElementById("app")
);
Frontend > .gitignore
/node_modules/
Frontend > package.json
{
"name": "",
"version": "1.0.0",
"description": "",
"main": "index.js",
"scripts": {
"test": "react-scripts test",
"start": "parcel public/index.html"
},
"keywords": [],
"author": "",
"license": "ISC",
"dependencies": {
"axios": "^0.27.2",
"cors": "^2.8.5",
"parcel": "^2.6.2",
"react": "^17.0.2",
"react-dom": "^17.0.2",
"react-router-dom": "^6.3.0"
},
"devDependencies": {
"buffer": "^6.0.3",
"process": "^0.11.10"
}
}
0 notes
Text
Customizing Google Maps Styling in React Applications

Maps are an integral part of many web and mobile applications, providing users with valuable location-based information. Google Maps is a popular choice for incorporating maps into your React applications due to its robust feature set and flexibility. One of the key aspects of making your maps stand out is customizing their styling to match your application’s design and user experience. In this blog post, we will explore how to customize Google Maps styling in React applications.
Why Customize Map Styling?
Customizing map styling allows you to:
Maintain Brand Consistency: Match the map’s appearance with your application’s overall design and branding.
Highlight Key Information: Emphasize important map elements, such as markers and labels, to guide users effectively.
Improve User Experience: Create visually appealing maps that are easy to read and navigate.
Adapt to Dark Mode: Adjust map colors for different themes like light and dark modes.
Now, let’s dive into the steps to achieve these customizations in a React application.
Step 1: Create a React Application
If you don’t already have a React application set up, you can create one using Create React App:
npx create-react-app map-styling-app
cd map-styling-app
Step 2: Obtain a Google Maps API Key
To use Google Maps in your React application, you’ll need a Google Maps API key. Follow the steps in the Google Maps JavaScript API documentation to obtain your API key.
Step 3: Install Dependencies
Install the necessary packages for using Google Maps in your React application:
npm install google-maps-react
Step 4: Create a Map Component
Now, let’s create a React component that renders the customized Google Map. Create a file named CustomizedMap.js in your src folder:
// src/CustomizedMap.js
import React, { Component } from 'react';
import { Map, GoogleApiWrapper } from 'google-maps-react';
class CustomizedMap extends Component {
render() {
const mapStyles = {
width: '100%',
height: '100%',
};
return (
<Map
google={this.props.google}
zoom={14}
style={mapStyles}
initialCenter={{ lat: 37.7749, lng: -122.4194 }}
>
{/* Add map markers and other components here */}
</Map>
);
}
}
export default GoogleApiWrapper({
apiKey: process.env.REACT_APP_GOOGLE_MAPS_API_KEY,
})(CustomizedMap);
In this component, we import the required modules, create a CustomizedMap class that extends Component, and render a basic Google Map. Notice that we use the API key from your environment variables for authentication.
Step 5: Customize Map Styling
Google Maps provides a wide range of styling options. You can customize the map’s appearance by specifying an array of style rules. Add the following code to your CustomizedMap component:
// src/CustomizedMap.js
// ...
class CustomizedMap extends Component {
// ...
render() {
const mapStyles = {
width: '100%',
height: '100%',
};
const customMapStyles = [
{
featureType: 'water',
elementType: 'geometry.fill',
stylers: [{ color: '#cde2e8' }],
},
{
featureType: 'landscape',
elementType: 'geometry.fill',
stylers: [{ color: '#f3f3f3' }],
},
// Add more styling rules here
];
return (
<Map
google={this.props.google}
zoom={14}
style={mapStyles}
initialCenter={{ lat: 37.7749, lng: -122.4194 }}
styles={customMapStyles}
>
{/* Add map markers and other components here */}
</Map>
);
}
}
// ...
In this example, we’ve defined a customMapStyles array containing styling rules for water and landscape features. You can add more rules to further customize the map’s appearance. Refer to the Google Maps JavaScript API Styling Documentation for a comprehensive list of styling options.
Step 6: Use the Customized Map
Now, you can use the CustomizedMap component in your main application. Open src/App.js and import and render the CustomizedMap component:
// src/App.js
import React from 'react';
import './App.css';
import CustomizedMap from './CustomizedMap';
function App() {
return (
<div className="App">
<header className="App-header">
<h1>Customizing Google Maps in React</h1>
</header>
<main>
<CustomizedMap />
</main>
</div>
);
}
export default App;
Conclusion
Customizing Google Maps styling in your React applications allows you to create maps that align with your application’s design, branding, and user experience. By following the steps outlined in this blog post, you can easily integrate a customized Google Map into your React project and enhance your users’ interaction with location-based information. Experiment with different styling options to achieve the desired look and feel for your maps, making them both functional and visually appealing. Happy mapping!
If you have any questions or need further assistance, please don’t hesitate to contact us for more details. We’re here to support your React development journey.
The React Company is your one-stop destination for all things related to React. Whether you’re just starting your journey in React development or you’re a seasoned developer seeking solutions to intricate challenges, our platform is designed to cater to your needs.
0 notes
Text
Mapping Array of Images
I finally found a tutorial that allows me to access individual properties of an array without selecting the entire mapped array. It took me an entire week to find a tutorial that made sense to me - and it's actually sad because I did see the video before, but didn't understand it until after I looked through other peoples' tutorials and tried to learn from them. I guess this is the process, but it is good that I can continue. I was half about to give up and beg a friend of mine to just give me a solution, but finding the answer was a bit rewardable.
To help reinforce my brain, I will post the code with fake information!
export default function Gallery(){
let images = [img1, img2, img3];
let [selectedImage, setSelectedImage] = useState([images[0]);
//This is the simple setup of an array of images. I used the react hook, useState and made variables of 'selectedImage' and 'setSelectedImage' to help me interchange information!
return (
<div>
<div className="main-picture">
<img src={selectedImage} className="main" alt="main" />
</div>
//The first div is created to store the main image of the gallery. It's image source is the variable 'selectedImage' because I plan to change it in the future with a 'setSelectedImage' state.
<div className = "gallery-section">
{images.map((image, index){
<div key={index}>
<img src={image} onClick ={()=> setSelectedImage(image)} alt={index} style={{opacity: selectedImage === image ? 0.7 : ""/>
</div>)}
//The second div is used to create a small thumbnail gallery of all the images in the array. In order to change the FIRST div's image with the SECOND div's image, I must use a function between them. In this case, I used onClick with an arrow function and gave it the variable 'setSelectedImage(image)' It seems to be better to use an arrow function as it will allow easier access to the data in the SECOND div, as it the coding hierarchy from upper to lower code prevents the 'image' source in 'setSelectedImage' from being used.
//Then I used a ternary condition to select the appropriate opacity! And then all done!
</div>)}
0 notes
Text
Megalobox - Episode 03
Let’s see how the other half live. It’s Megalobox, episode 03! Here we GO!
-We begin at the IMA, the International Megalobox Association…Nanbu is stuck in the nice city, in his best clothes. And as soon as he steps in, he’s tracking enough dirt that a Roomba chases him down. He sticks out like a sore thumb here, and gets recognized in a flash by the kind of people who successfully made it out of the dirt…
-Then it’s up to the system to register Joe into the system. He starts at the bottom, of course, ranked 257…But nothing to do about that except climb. The kid’s just gonna have to make it happen.
-Opening!
-To a construction site, a mass of men gobbling down food and drink between hard work…And one pops a fancy LED work light into TV mode, where they’re taking the latest Megalobox news. Then we cut from their view of it to Yuri’s, as he’s training with a high-altitude mask and a crazy boxing rig…The news is talking about the number 2 ranked boxer, a man nicknamed the Spider, who’s aiming for Yuri’s crown.
-But Yuri’s not giving up, not yet. Of course, the man he knows only as Junk Dog got into his head, as he almost steps away from the training, but then goes in for another round…
-Back to the dirt. Nanbu sat with Fujimaki not long after their chat in the restaurant…When Fujimaki made two things clear. One, even just getting the kid into Megalonia would boost his earning potential enough to be worth it…But two, both men were on tight leashes.
-The now. At the edge of the city, Nanbu and Joe are living in a shitty houseboat. Joe’s already got his first match…But they’re not looking at an easy path. Three months. In three months, Nanbu’s going to be lucky to set up five fights. In five, fights, you have to scramble your way up to the top. That’s the only way to get there.
-Oh, here’s ready. The hell you are, Joe. First, you need real Gear. Not that slapdash shit. Into Nanbu’s equally shitty truck, as they need to go shopping. You saw what Yuri’s wearing. Custom built, custom fitted, directly hooked into his nervous system. His very body is raw cutting-edge tech…And tech they can’t afford. So they’ve got to get you as close as they can…As they’re chatting, Joe ends up buying an apple off a girl at a red light.
-But soon, Joe’s mind slips back to the fight, to Yuri’s face…And he crushes that apple in his hands, breaking it. And that apple gives us a transition point, over to a gaggle of kids who spot a man selling vintage cameras out of his truck…They send a little remote mouse into his case, and as soon as he opens it to try and deal with the thing, they snatch a few prizes, sprinting off! That’s just life in the sticks.
-To a hardware shop, where Nanbu’s putting in the order for Joe’s new Gear, something at least enough to get him to his first legit win…And in the back room, Nanbu spots some slick kit. The kind of thing that just awes the eye. It’s a last-gen prototype, Shirato’s last external design before they got into the integrated stuff.
-Of course, the big man hanging around thinks it’s only so good. His Gear might be slower, but it’s got a hell of a lot more punch! Yeah, yeah, that’s some badass kit on you. Not exactly boxing grade, though…No it is not, as the man in charge swings back. It’s graded for knocking would-be thieves the fuck out.
-Speaking of thieves, cue the kids with a bag of stolen electronics to trade. And the head kid is listening real close as Joe chats about that Gear and possibly going all in to get it…When the kids get their pay.
-Red Candy. From the way they react to receiving and eating it…Drugs. Barely waist high and they’re already lost to this hellscape…That’s…Fuck, man.
-Four kids. The cameras they stole only paid for three doses. And the lead kid’s pissed, as a scramble develops between him and the shopkeep, that ends in a snow globe breaking and slicing the man’s arm open…
-And that’s how a knife comes out. Joe’s in there in a flash, catches the bastard’s arm, forces the knife to drop, and look. Stop. It’s a kid. Not worth it. Deep breaths, asshole.
-When it’s over, Joe’s got a fresh slice across his nose…And a remote mouse got stuck to Nanbu’s truck. The kids aren’t going to forget this.
-Megalobox, Round 03: Gear is DEAD
-Back to the houseboat. Nanbu’s setting up an old ring at the edge, as the lead kid’s followed and watches…While inside, Joe learns about how he’s dealing with. A lower mid-rank guy, number 185. Shark Samejima, goes by Maneater. He’s got a lot of dis-Q’s for dirty fighting, a real reputation…You want to climb the ranks, this kind of guy is the kind you’ve got to take on. Put your name on the map.
-So it’s into the ring for a practice round. Nanbu straps on some training Gear, and Joe goes in bare-knuckled for a hard lesson. You can’t focus on interception and countering, Joe! You let your guard drop because you’re so busy trying to get that counter-punch, and then you just get punched! Never let your guard drop. You ALWAYS need to be able to block, dodge. Never let your opponent in just for a gamble.
-The kids watch, as the leader looks up he’s data, and sees this guy is at the very bottom…He’s not so impressive anymore.
-The training continues, as Joe learns his defenses…And then the kids are off washing and goofing off in the river, while the leader watches Joe. This kid’s got a real chip on his shoulder already, but Joe just lets it wash off him…
-Somehow, the kid just keeps ending up there as the days go on…And then Joe’s revamped Gear arrives, and he finally gets to test it out, with a solid body blow onto Nanbu that puts him on the ground. There’s real power in the kit now, enough to get by…
-But the kid finally speaks up. Because he’s seen a lot of slapdash Gear, and he can see how this one is going to put too much weight and strain on Joe’s arms. Your boy’s too lean to hold that kind of weight, old man! And you’ve put it all to power, so you’re gonna burn the battery out in a single round!
-A single round is gonna have to be enough, kiddo. And that’s how he ends up tossed aside…His hat falling. His hat with a photo in it. The family he lost. And this kid…Desperate…Begs to get to Megalonia too.
-Not an option, kid. You’ve got to find your own path out of this place. They’ve got too much riding on this.
-He’s, not, just a kid! He has a NAME! He’s Sachio! And you’re never going to make it to Megalonia with that shit Gear!
-In the night, Nanbu’s furious, frustrated, as he throws bottles of shit liquor into the river just to feel something break. Cut over to Sachio, who sneaks into the shop that night, with a plan…
-The next morning, Joe’s out for a hard run…And by the time he gets back, he finds that the Gear’s charging circuit failed and it’s burst into flames! What the hell are they going to do without Gear?!
-Which is when the other kids come riding up on a slapped together old cargo trike…With Gear. Gear that Sachio stole. And got caught in the process. He got them the kit, but now the bastard’s holding him…
-Yep, Sachio is getting the shit beaten out of him…And he’s doubly furious because he found that fucking prototype in the first place, he sold it to you for pennies on the dollar…The man’s ready to have his muscle just crush the kid…
-When they hear the roar of an engine. About half a second before said engine, and the motorcycle attached to it, get thrown through the fucking window. Joe leaps through and punches the owner square in the face, his motorcycle knocking the muscle flat on the ground…And right, change of plans. That was dumb, kiddo. That was dumb…And it was pretty fuckin’ ballsy.
-About when Joe comes flying out of the shop is when Nanbu arrives with the rest of the kids, who’re ready to take up power tools and god damned sticks to defend their leader…
-But you’re only fighting him, big man. Joe rips off his jacket, revealing he put the new Gear on, and he starts working the muscle over…And learning that this kit can barely take what it’s going through, going against a man willing to put on steel skull-crushers instead of boxing gloves…
-The whole thing starts sparking after it takes a nasty hit that sends Joe into the dirt, and Sachio’s got to race in there and rip the battery just to keep it from arcing and bursting into god damned flames…
-The muscle’s bleeding from the ears, punch drunk after the kind of blows Joe put into his skull…They’ve got to run, they’ve got to bail…
-Joe’s, not, running. he’s finishing this. Bare knuckle. Against those skull crushers, he’s got no choice but to pull a counter…And with Nanbu and Sachio backing him up, Joe can feel something waking up in him. A real fierce fire. Not just the roars of a junkyard dog, but the howling of a wolf that’s hungry for victory…!
-Sachio listens real close. The big man’s Gear uses different motors in the right and left. They have a different sound…And he pegs it! JOE! He’s going left! Joe sweeps under the blow, barely takes a slice on his cheek…And puts a punch hard enough to knock the big man on the ground.
-…Good play, Sachio. You’re not a fighter yet…But you’ve got the eyes and the ears to be real special. You wanted your ticket to Megalonia? You’re in, kid. Time to see if they can make this work.
-Credits!
God DAMN. They continue to not fuck around.
1 note
·
View note