#reduce video size online free
Text
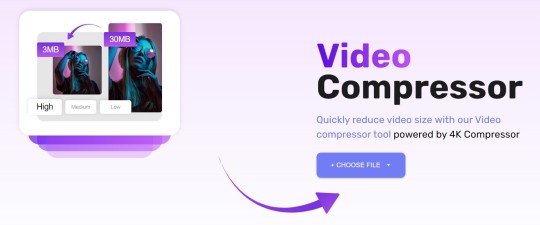
Compress Video: Downsize Video - Online Video Compressor
Are you looking for simple ways to decrease video size so you can upload them faster?🎬
Besides reducing video size, do you also want to share videos?
Meet Compress Video: Downsize Video, which is a versatile video mb size reducer. Have video size reducer for all your video editing and social media needs like video compressor for whatsapp. Whether you want to quickly compress videos and share this video file compressor is all you need.
Also available on Google play: Download Now

⏬Video mb Compressor - Compress SINGLE AND MULTIPLE FILES IN 3 STEPS with Video Size converter
● select the videos
● choose quality
● compress the videos and reduce video mb size
🔄 <b>VIDEO CONVERT TO AUDIO ONLY</b>
Whether it is a music video, a long video interview, a podcast, you can quickly convert videos to audio only (mp3) using the in-built video converter. Then listen to or use the audio as you wish.
🎞️ VIDEO TRIM
Want to quickly edit and trim videos? Remove unwanted parts of the video in seconds using the in-built video trimmer. With intuitive UI you can easily select, replay, and trim each video part to milliseconds.
⏩ VIDEO FAST-FORWARD
Want to add a fast-forward video effect to your video? Well upload the video and use our fast forward video feature to speed up videos and create impressive video effects.
Whether you want to compress videos that you want to upload on the most popular social network, or you want to do quick video compress to reduce video file size before sending it as an email or uploading to the cloud, our video compressor free for android is sure to help. Upload single or multiple files at once and enjoy fast video compressing with our 4k compressor.
▶️WATCH, SAVE & SHARE VIDEOS
Once your videos is compressed or edited you can view it in mini or full screen. Alternatively, compare it with the original one or with the trimmed or cropped version. Easily view your saved videos in separate section. Then share them easily on Instagram, Facebook, Whatsapp or anywhere you desire with 1 tap.
Now It’s time to get one of the most versatile video compressor free for android! Use our mp4 compressor and video mb size reducer to reduce video size.
☑️Download Compress Video: Downsize Video for FREE!
#video size compressor#Crop compress video#Video convertor mp4#reduce file size#video compressor video to mp4#compress whatsapp video#shrink large video files#compressor video cutter#compress video for email#video shrinker#easy to use video compression app#compress mp4 video size#Video compressor free#reduce the size of your videos#best compress video app#how to compress large video files without losing quality#techtool#tools#online tools
0 notes
Text
"Shopping for clothes is already intimidating. There are so many options and styles to consider, as well as factors like sustainability and ethics.
But for people in fat, disabled, or queer and gender-nonconforming bodies, it’s even more arduous.
Nico Herzetty, Emma K. Clark, and Paul Herzetty wondered: What if there was a way people could shop — not necessarily by color or size — but by measurements, materials, and ethics?
So they set off to create their website: Phoria.
Here, shoppers can set up a free profile, add their body measurements (and “typical fit challenges”) and peruse over 270 brands. Once these data points are entered, users can personalize their pages with “saved,” “recommended,” or “hidden” brands.
Pages can be totally private, or shared with the community to connect over styles and brands.
Aside from fit, brands in the Phoria database (which claims to be “the largest database of plus-friendly brands”) can also be filtered as “gender-neutral,” “woman-run,” “small business,” or “natural fibers.” Users can also filter for price, preferred styles, and more.
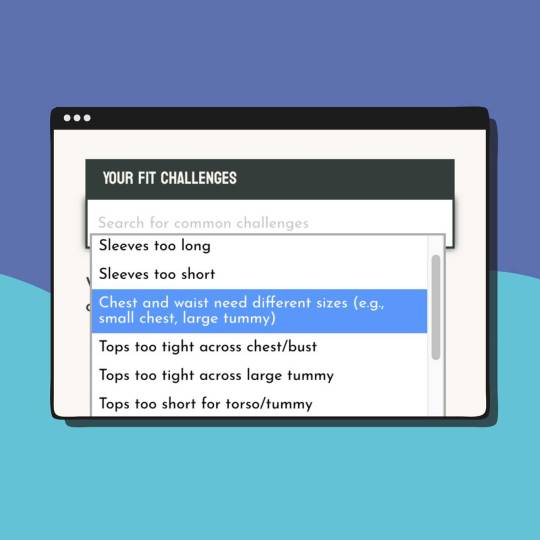
Pictured: A screenshot of the "Fit Challenges" feature on a Phoria user's profile.
Some brands include popular names like Athleta, Levi’s, and Patagonia. Others are small businesses, like Beefcake Swimwear, or Hey Peach.
“For so many people, it feels too damn hard to find and keep clothing that fits in all the ways that really matter. So we’re doing something about it,” the Phoria website reads.
“Unlike most online shopping experiences, we center the needs of plus-size women, nonbinary, and trans people, and prioritize supporting clothing brands focused on sustainability, ethics, and inclusion.” ...
That team — made up of Clark, and Nico and Paul Herzetty — calls themselves “fat, disabled, and very, very queer.”
“These are some of the main ways we identify, and they’re qualities that have directly impacted our ability to get dressed every day in a way that feels good,” the Phoria team introduces themselves on the website.
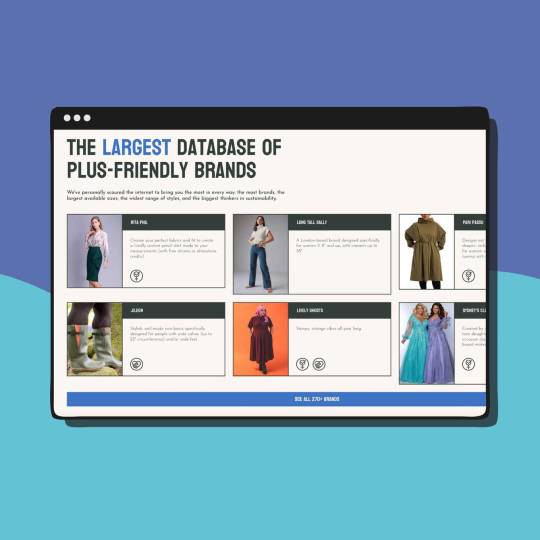
Pictured: A screenshot of Phoria's plus-size clothing brand database.
In addition to catering the user experience to women, non-binary, and trans people, Phoria is also a benefit corporation, or a B corp.
“We’ve legally required ourselves to consider the interests of all our stakeholders — customers, employees, the planet, and our shareholders,” the Phoria website explains.
“Our specific public benefit purpose is to reduce people’s dependence on buying mass-produced items made in unsustainable ways and to use human-centered business models to boldly challenge economic systems of inequity.”
Right now, in the early stages of the company’s business, it doesn’t make any money.
“We’re focused on building something that genuinely solves plus-size people’s challenges around clothes shopping and supports smaller and more sustainable brands,” Phoria’s website states.
So, spreading the word seems to be of utmost importance...
Additionally, TikTok creators @couplagoofs (a queer couple named Morgan and Phoebe), recently shared a video in which they discovered Phoria. They met the website’s creators at a fat liberation event in their city and were introduced to the tool.
Quickly, commenters responded with gratitude and excitement.
“It is so disappointing to sort through pages of plus size clothes that aren’t even plus size,” a TikTok user commented. “This is gonna be such a good tool!”
Some even shared emotional responses, speaking to the need at the heart of Phoria’s mission.
“I’m… gonna cry,” another commenter wrote. “I’ve needed this my whole life.”"
-via Goodgoodgood, November 20, 2023
#clothing#plus size#size inclusive fashion#body positive#fashion#slow fashion#style#gender affirming#trans inclusive#gender euphoria#disabled#lgbtq#gender nonconforming#small business#ethical fashion#ethical business#fatshion#fat positive#body positvity
1K notes
·
View notes
Text
Long-Term Strategy for Game Series Support
We're entering an era of Long-Term support for Video Games Series. (THAT'S A LIE, WEVE BEEN THERE FOR A MINUTE NOW.)
As Developers and Publishers start shutting down online services for older games (and in some cases disabling the game entirely)
Which is necessary, considering that servers take money to continue running. And older game players simply aren't bringing in revenue to keep the lights on. (Because they're not bringing in any money)
The question that AAA developers should be asking; "How do we integrate our games backend into a shared eco-system in order to reduce costs for each individual game, and increase adoption of newer services/games for our players?"
This is a question that must be asked because Developers and Publishers already know how difficult it is to retain profits while competing with the Resale and Third-Party markets like GameStop.
Many developers have started creating "Always On" services which require the game to be connected to the internet in order to play offline portions. (To verify authenticity that the game was purchased from an official source and not pirated.)
After-all it's hard to continue paying for online services if pirates are using them.
Still, services like Hearthstone provide a free service, free product, and still manage to turn profit. Part of this is because of the competitive environment and sponsored tournaments.
By offering a prize, plenty of players can be convinced to play, just in case they feel like going pro next year.
But they probably won't. Despite that; the game is incredibly fun to play. Except when several players in a row have the exact combo that enables them to keep tempo, and so you gotta grin and bear it till it becomes fun again.
Or buy more cards.
Still, how do you create an environment for the casual players of casual games. Like Animal Crossing, or Pokemon. Since most Pokemon players aren't competitive.
After a half-a-decade, the business model dictates that you sell a new game to replace the old one.
Part of the problem here is that each new game has a lot of the same content as the old game, and thus; in order to switch you need throw away your old save file and start from scratch.
Many players that would do that just because they can would have done so already. And so older players may end up giving up both the old and new, simply because it's easier to do so.
Despite the newest games having a lot of the same content, a lot of old content is lost. Like the Story. What would traditionally be called the "Movie" or "Novel" portion. Depending on if it was a cutscenes or several hundred lines of text.
And so in order to re-experience the old content; many players may instead choose to simply to pirate the old content, or read about it from online sources.
Part of the solution is to simply offer the old content to new players. And to try to convince older players into the new areas by allowing them to bring their old content and achievements with them.
This can be accomplished a few different ways. Crypto is one way to create a ledger tied to a players account so that they can share their content between platforms and games.
Nearly every platform, PlayStation, XBOX, and while Nintendo doesn't offer a platform specific variant, game often still include achievements.
And this system can be used to store certain content on a player basis to brought into newer or different games.
This would also enable cross-game items/content/achievements that players could bring with them from series to series.
Which would be a boom for cross-promotional purposes. And by creating an environment and a system that enables to store this in the same place(cloud). You could also control for DataBase specifications in order to reduce size and increase speeds for each individual game.
Now, I am pretty well Versed in Learning Content Distribution. SCORM(This is an acronym you don't need to know, and would only raise more questions if I explain it, so I'll stick to the surface here.) SCORM, TinCan, and xAPI (not to be confused with Twitter) are specifications created for the Learning Management Environment (Education, College, Government, and corporate training models) in order to do exactly what I'm talking about with as little or as much data bandwidth requirements, is relatively secure and includes cross-service achievement-like systems.
As well as content-distribution systems.
I would assume there's a way to integrate it with Crypto. It would replace the monkey WEBMs with something more substantial.
And this service or system would allow not only players to bring their accounts and achievements and items with them from game to game (or from game to social media) but games to communicate with each other.
Again, I'm thinking "Eco-system" here. Publishers would be able to do large-scale cross-promotional events with many games simultaneously. And enable platform-hoping between games with content from each individual event.
What this means is that you would also be able to provide a place for those old games to exist, even if they don't participate it the Events anymore. AND encourage players to try new and other games because they don't lose their original save files doing so.
9 notes
·
View notes
Note
hey!! you follow my plantblr (unexpectedplantblr) and i’ve learned so much just off your tags dude. wdym pruning omg i’m so wildly unprepared how and when should i be doing that! i can’t imagine they have yt videos on shit THAT basic do they!?.
and my apples are dwarfs?? i’ve been stressing abt them so close to the house and was trying to find an arborist to help me move them but do you think they’ll be ok with just some root guard? omg i’m so sorry to bug you feel free to ignore!
There’s no issues and I welcome the asks! This enthusiasm gives me old tumblr days vibes that I think many miss these days lol.
Inevitably most domestic fruiting woody plants need a trim up of pruning for maintenance. Some types don’t need it overall or don’t need it at certain life stages, but those are the lucky cases.
While I’m currently still in the midst of pruning season as of writing this, your photos imply it’s a smidgen late for you to be doing any at all unless it’s either for major issues or dead/diseased wood; it’s generally best to get the pruning before said woody plants leaf out but while they are still dormant to reduce shock, to avoid damaging freshly sprouted growth (since if you’re early enough there’s no leaves to worry about), and keep them wasting energy on wood that’ll be cut off in the process. I recall I got my info on pruning mostly by book literature but I wouldn’t be surprised if there’s some niche videos on the topic online- there are yt video journals and tutorials for niche fruits like Asimina triloba cultivation/maintenance so surely less exotic stuff would have online tutorials on it. Do try to find more than one source to try to average out the answers they give lest they give different answers or overlook different details (gardening can get subjective sometimes after all). If I recall the rule for Grape vines you try to keep one “lead vine” intact to be the one to produce new yearly branches/shoots that will then produce the grapes.
Fortunately I think you don’t have to worry about any issues with skipping the livewood pruning this year; let this year just help you get more familiar with what you’re dealing with.
For next year I can at least say from my own experience a few points; universally you want to prune to remove dead, damaged, and diseased wood, as well as any branches that crisscross with each other (since those will just make damaged wood from rubbing if allowed to stay), and generally you try to not cut more than a 3rd of the live growth (even if it means you gotta wait next year to fully shape a tree if the pruning work for some reason is major- which is my case with my older unkempt trees) to avoid having the pruning reach deadly amounts (there are exceptions- most Clematis are pruned to extreme amounts most of the time, well established Grapes and Kiwis can have a lot taken off too in certain cases). Oh and big one that newbies can miss; if you're getting tools, try to get bypass type pruning tools, anvil type pruning tools do damage to live wood (since they crush moreso to cut unlike bypass) and are better for exclusively dead/removed wood.
Observe what others do to their trees of similar kind to your own; I learned a little bit on what to do with my own apple trees from seeing what other people have done to their apple trees of similar size in my region.
It’s not easy at first but set goals for what you’re pruning. In my case a good chunk of my apple trees are quite old (we’re talking hollowed-out old for many of these trees), so my goal is generally to help extend their lives as well as fruit production as a bonus, so I try to reduce the sources of major weight burden on the large crumbling branches. Another goal in my case is making it that the branches are not as high up so that they are easier to maintain and harvest from, since yet again, my trees are on the larger/older end of what to expect from an orchard.
While not an option for me consulting Arborists is definitely not a bad option if you’re free to throw the cash.
Pruning rules/goals for your dwarf apple trees will probably be slightly different from what I do for my own trees since you’re dealing with very different growth forms from my own.
I am not 100% certain your apple trees by the house are dwarves but their growth habit feels more like what I’d expect/imagine from dwarf/semidwarf trees; as to what fruit variety it could be a lot of possibilities; apple trees tend to be grafted onto rootstock that affects their hardiness/size, so you could have similar cultivars to what I have for the fruit/scionwood but would definitely have very different cultivars for the rootstock that they are attached to. If the previous owners knew what they were doing they would’ve chosen dwarf roostock cultivars to avoid them becoming troublesome so close to the house.
In my opinion dwarves or not they are a bit big already to risk moving/transplanting away from the house without a painful and risky amount of long (worst case possibly years worth) of aftercare; if that is or was truly an issue you’d be better off getting new rootstock to plant in the new locations and grafting onto them from the house specimens onto those new rootstocks (you can hire/ask experts if you can’t quite do it yourself, we had a family member of a family member help save a heritage cultivar in our orchard by getting some successful grafts from the dying tree. I plan to do some grafting myself down the road I just dk what to graft rn). I am not familiar with root guard, from what I read it's a brand of fertilizer that claims to help stimulate root growth???
Also note with the Cherry/Plum trees mention before; one of the issues for ID sometimes for them is there’s just, a lot of species, a lot hybridize together, and that’s not even considering/factoring in domestic hybrids/cultivars where the diversity can be as wide as it is for apple cultivars. It can really muddy the waters for identification down to the exact kind unless you’re dealing with a very sharp specialist or a very distinct variety, and even then some may struggle with certain cases.
Lucky you to also have something as fancy as a finger lime! I already guessed so but that definitely solidified my guess that you are in a warmer growing zone from me lol.
#plantblr#ask#askbox#tried to break it apart to make it easier to read but dear lord that's a lotta text#wall of text
6 notes
·
View notes
Text

Do you wanna join me (@scoobydoodean) in trying to make gifs of the highest quality possible using only free tools, with workflows as painless as possible??? Here you can find gif-making tutorials, software tests, and comparison and example sets of gifs made using free tools!
Navigation
Very very basic "How a Gif Works"
Best Practices for Quality/Best Visual Result When Uploading Gifs to Tumblr (regardless of gif-making method)
How To Reduce The File Size of A Gif
Sourcing Video Files
Full tool list on Google Sheets with filters

TUTORIAL 1 | RECOLORED GIFS
Making GIFs with DaVinci Resolve and FFmpeg or Gifski
LINK | EXAMPLE SETS
This is how I usually make my gifs. I find it to be the most efficient and most versatile (in terms of coloring, captioning, clipping) of all the methods I've tried for making quality gif sets. This method also does not require the traditional process of screencapping a scene frame by frame which to me is a huge bonus.
Operating systems: Mac, Windows, and Linux. DaVinci Resolve is a pretty high power software though and it does have hardware minimum requirements.
Needed software: DaVinci Resolve and either FFmpeg or Gifski (GUI or CLI version).
Difficulty: Moderate
Time: 🐢🐢 _ _ _ (example set took me 17 minutes)
Input: video files
Competencies: Some general familiarity with video editors and using your computer's shell helps but isn't required. Mac and Windows users: There is a workaround that allows you to avoid the command line. Familiarity with recoloring tools is great but not required.

TUTORIAL 2 | NON-RECOLORED GIFS
Giphy Capture and Gifski
LINK | EXAMPLE SETS
If you are on Mac and just getting into Gif-Making, this is a great way to learn the ropes with what is probably the most intuitive gif-making tool I have ever used. I would just recommend giffing scenes that take place outdoors or in well-lit rooms since you can't make color adjustments.
Operating systems: Mac
Needed software: Giphy Capture and Gifski (GUI version)
Quality potential: High for non-recolored sets! Watch out for odd frame rate effects.
Difficulty: Easy AF
Time: 🐢 _ _ _ _
Input: Any video you can play on your screen that doesn't have screencapture protections in place.
Competencies: None. Very very beginner friendly.

TUTORIAL 3 | RECOLORED GIFS
Pure FFmpeg: Making GIFs with Command Line Scripts
LINK | EXAMPLE SETS
If you love command lines, this one might be fun to you—and YES—you do get visuals. Command line haters: check out Tutorial 4 for a similar process but in a GUI tool.
Operating systems: Mac, Windows, and Linux
Software needed: FFmpeg
Difficulty: Advanced as far as gif-making, but this is actually a good first shell scripting project in my opinion if you've ever wanted to learn how. (I learned a lot about how my command line works while making this tutorial!) For people familiar with bash scripts, I think this will probably be easy!
Time: 🐢🐢🐢🐢🐢
Input: Video files OR frame by frame screencaps if you have them already.
Competencies: General familiarity with your computer's shell (Powershell on Windows, Terminal on Mac) helps a lot! I will try to make it as easy as possible to follow.
NOTE (for Command Line Aficionados): If you are interested in expanding on/improving this tutorial, or making a video -> GIFs version instead of videos -> frames -> GIFs, this is very possible to do. There is also a wealth of troubleshooting help and community-based example scripts for FFmpeg available online through r/FFMPEG and Stack Exchange, and almost all visual filter and complex filter options can be used on any input/output combination in FFmpeg.

TUTORIAL 4 | RECOLORED GIFS
Making Gifs for Free With PhotoScape X
LINK | EXAMPLE SETS
I really like this method as far as the quality you can achieve, and it's pretty easy to use. I plan to try to make more sets with this method later.
Operating systems: Mac and Windows
Quality potential: High
Software needed: PhotoScape X; a frame by frame screencapoing method (See FRAME BY FRAME SCREENCAPPING METHODS/TOOLS section below for a list of methods for this that I've catalogued).
Difficulty: Moderate.
Time: 🐢🐢🐢 _ _
Input: Frame by frame screencaps.
Competencies: General familiarity with photo editors helps but is not required to follow this tutorial.

TUTORIAL 5 | RECOLORED GIFS
Making Quality Gifs For Free On iOS and Android
LINK
If you don't have a computer, just an Android or iOS device, you can still make GIFs! This ones for you!
Operating systems: iOS and Android
Software needed: VITA and a video-to-gif utility or app (ezgif.com or Better Gif Maker shortcut (iOS only))
Time: 🐢🐢 _ _ _
Input: Video files
Difficulty: Moderate.
Requirements: General familiarity with photo editors helps but is not required to follow this tutorial.

EXTERNAL TUTORIAL 1 | NON-RECOLORED GIFS
u/ChemicalOle's "GIMP Gifs 101"
LINK | EXAMPLE SETS
This tutorial is 8 years old. See External Tutorial 2 for a newer tutorial or see NOTE 1 below.
Operating systems: Mac*, Windows, and Linux
Needed software: GIMP with AnimStack; FFmpeg; VLC Media Player
Quality potential: Untested (tutorial needs to be updated)
Difficulty: Untested (largely—I haven't tested captioning with AnimStack yet)
Time: 🐢🐢🐢 _ _
Input: Frame by frame screencaps.
Competencies: Some general familiarity with GIMP and your computer's shell helps but isn't required to follow the tutorial.
LIMITATIONS: 1) Frame by Frame gif-making methods can take up a lot of space on your drive in the interim. 2) A community-contributed GIMP plugin called AnimStack is required. Plugins could break after a GIMP update or developers could simply abandon them at any time.
____
NOTE 1: If you want to try this tutorial, note that 1) There is no longer any need to install GAP separately. It is now part of your regular GIMP install. 2) Filters > Animation > Optimize (for GIF) can be used in place of the color index step. 3) *Author states the tutorial is Linux and Windows, but I see no reason here in 2023 that you can't also follow this tutorial on Mac.
NOTE 2, for Mac users: You may not have to do this, but I had to manually create the scripts folder on Mac to place animstack.scm there. If you need to make the scripts folder, you should place it within the Library/Application Support/GIMP/2.10 folder.
EXTERNAL TUTORIAL 2 | RECOLORED GIFS
DekaythePunk's "How to Make Gifs On GIMP"
LINK
Dekaythepunk has made many tutorials on using GIMP to make gifs and graphics using special coloring techniques and edits. You can find all of their tutorials here.
Operating systems: Windows, Mac*, and Linux.
Needed software: GIMP with AnimStack, G'MIC-QT or McGIMP*, and Layers Effects plugins; a way to screencap frame by frame.
Difficulty: Untested (I'm working on it :D).
Time: 🐢🐢🐢 _ _
Input: Frame by frame screencaps.
Competencies: Some general familiarity with GIMP is helpful but isn't required to follow the tutorial.
LIMITATIONS: 1) Frame by frame gif-making methods can take up a lot of space on your drive in the interim. 2) Community-contributed GIMP plugins are required. These plugins could break after a GIMP update or developers could simply abandon them at any time. (Mac users: also see NOTE 1).
*NOTES (for Mac users):
A G'MIC-QT installer is no longer officially supported for Mac by the makers of the plugin. However, you should be able to install McGIMP on Mac which includes G'MIC, and will also find and use your AnimStack scripts from regular GIMP (McGIMP page | Homebrew install).
You may not have to do this, but I had to manually create the scripts folder on Mac to place animstack.scm there. If you need to make the scripts folder, you place it within the Library/Application Support/GIMP/2.10 folder.
I installed GIMP, then added my AnimStack scripts to GIMP and ensured they worked, then installed XQuartz, then installed McGIMP via Homebrew (you can also just use the provided installer).

EXTERNAL TUTORIAL 3 | RECOLORED GIFS
Lacebird's "How to Make A GIF With Photopea"
LINK
Theoretically, you should be able to use this tutorial to make nice GIFs even on a Chromebook.
Operating systems: Any. Photopea is a browser-based GUI. However, if your device has a very small amount of RAM or you are using certain browsers, you may have issues with the page reloading. You may also need to test with different browsers to see which internet browser manages your available RAM best (I used Brave to test this tutorial out).
Needed software: A good internet browser; whatever software you use to screencap. (See FRAME BY FRAME SCREENCAPPING METHODS/TOOLS section below for a list of frame by frame screencapping methods I've catalogued).
Difficulty: Moderate.
Time: 🐢🐢🐢 _ _
Input: Frame by frame screencaps.
Competencies: Helps to have some familiarity with photo editors or drawing softwares with layer panes.
LIMITATIONS: 1) Frame by frame gif-making methods can take up a lot of space on your drive in the interim. 2) You need a good internet connection to run this smoothly. 3) If your computer doesn't have a lot of RAM or you use certain internet browsers, you may have issues with the page reloading. You can backup your project as a PSD repeatedly in the event of a page reload.

VIDEO/GIF -> OPTIMIZED GIF TOOLS
These are tools that receive a video input or a large GIF and output an optimized/compressed GIF for the web.

FFMPEG
The linked scripts below receive video clips you've already cut to length and captioned (for example, in DaVinci Resolve—see Tutorial 1) and render them into optimized GIFs.
SCRIPT 1 TUTORIAL | SCRIPT 2 TUTORIAL
Interface type: Command Line (CLI).
Difficulty: Moderate.
Operating Systems: Mac, Windows, and Linux.
Input: Video files.
GIFSKI
Gifski was made purely for compressing videos into quality, optimized GIFs and absolutely nothing else. It is meant to be combined with other tools and it is very, VERY good at what it does.
GUI AND CLI SCRIPT TUTORIAL
Interface type: Graphic User (GUI) and Command Line (CLI).
Difficulty: Easy (GUI); Moderate (CLI).
Operating Systems: Mac, Windows, and Linux (CLI only).
Input: Video files (MP4).
EZGIF.COM OPTIMIZE PANE
The Ezgif Optimize tab will receive video files, existing GIFs, or a collection of image files to render into a GIF, and optimize them for upload in other tools.
Interface type: Web-based GUI.
Difficulty: Easy to Moderate.
Operating Systems: Any. You just need a web browser.
Input: Image files (GIF, JPG, PNG, APNG, HEIC, MNG, FLIF, AVIF, WebP) or Videos files (MP4, WebM, AVI, MPEG, FLV, MOV, 3GP).
FRAME BY FRAME SCREENCAPPING METHODS/TOOLS
You can get screencaps of videos frame by frame in several different media players, with various levels of clunkiness/tediousness. I am cataloguing various methods in this section. If there is a method you use and like that is not listed here, please let me know.
FFMPEG
This is my preferred method for grabbing caps. If you aren't scared of the idea of opening your command line, this is absolutely the most efficient and versatile way to get source-resolution quality frame by frame screencaps.
TOOL TUTORIAL 4
Operating Systems: Mac, Windows, and Linux
Interface type: Command Line (CLI).
Difficulty: Even if it's your first ever script, I think you can do it! I have a template for you and an example in the linked tutorial and I believe in you! :D
Input: Video files of any extension.
SCREENTOGIF
If you're on Windows, this is a nice, intuitive way to get frame by frame caps. However, note that the resolution of your caps will be limited by the resolution of your computer screen.
Operating Systems: Windows
Interface type: Graphic User (GUI)
Difficulty: Easy (for batch capping)
Input: Any video you can open and screencapture.
VLC MEDIA PLAYER
VLC has a function that can automate frame by frame screencapping, but to be honest, I have had difficulties getting it to work properly. However, you can also screencap manually frame by frame in VLC with hot keys.
EXTERNAL TUTORIAL
Operating Systems: Windows, Mac, and many popular Linux distros (Debian, Ubuntu, Mint, ArchLinux, and more).
Interface type: Graphic User (GUI)
Difficulty: Easy (for batch capping)
Input: Any video you can open and screencapture.
NOTE for mac users: If you want to try the automated method, there is no section called "Preferences" in the Mac app. To reach the proper menus, in the top menu in VLC, click "VLC Media Player" > Settings > Video, then click the Show All button in the bottom left corner.
EZGIF.COM
Ezgif.com is a web-based GUI, so it can only accept a video file so large and is limited to a 20 FPS capture for 10 seconds at a time. However, if you have short clips or maybe a Youtube video you've downloaded, this is a good option.
TOOL TUTORIAL 5
Interface type: Web-Based Graphic User Interface (GUI)
Difficulty: Easy.
Operating Systems: Any. This is a free online tool.
Input: Any video clip under 100 MB. If you have a whole episode of TV, you'll have to clip to just the scene you want first to make your video file small enough to upload.

This section is for partial tutorials with one or more hurdles to being posted as a full tutorial (ex: not able to crop, not able to apply the same action to multiple frames at a time with ease, etc). If you want to pick up where I left off to troubleshoot/come up with workarounds (or maybe use the utilities that are available in a given tool to cover gaps in others) you're welcome to give it a whirl—and let me know if you make any headway!
UNFINISHED WORKFLOW 1 | LINK
Making GIFS with Autodesk Sketchbook
Operating systems: Mac and Windows
Needed software: Autodesk Sketchbook
Quality potential: High for non-recolored sets, but has various limitations to implementing coloring (even though some coloring options are supported) and also cropping.
Difficulty: Easy
Competencies: None.
ISSUES:
Can't crop frames in Flipbooks (you could crop externally with FFmpeg, GIMP, ezgif.com, Photoscape X).
Native text captioning options don't support outlining your text and have very limited drop shadow settings.
Limited FPS export options.
If you wanted to recolor your set, you'd have to do it one frame at a time in a very tedious way.

Let me know of any tools you think I should look into that aren't on this list!
✅ Tools I have tried + shared at least one tutorial.
🔄 Tools I am in the process of testing or have finished testing but have not shared a tutorial for yet.
☑️ Tools I am aware of but haven't tested yet.
GRAPHIC USER INTERFACE (GUI) TOOLS
DOWNLOADABLES
✅ DaVinci Resolve
✅ Gifski
✅ Giphy Capture
🔄 ScreenToGif | No tutorials yet
✅ Photoscape X
🔄 GIMP | WIP Testing | External tutorials available
✅ Autodesk Sketchbook | Unfinished Workflow
☑️ Blender
BROWSER-BASED
✅ Photopea.com
✅ Ezgif.com
COMMAND LINE (CLI) TOOLS
✅ FFmpeg
✅ Gifski
☑️ Image Magick
☑️ Gifsicle
31 notes
·
View notes
Note
Yo, what do you use to make your Gifs? Seems like everyone else has gifs that look amazing. Even on my highest "quality" setting. They still post looking like a bunch pixels that wants to know if it looks like it knows what a Jpeg is.
Hey! I'm not sure about the exact result just from the description lol but gifs can turn blurry or lower quality because of various reasons. On Tumblr, it might be caused by the dimensions of the gif. For one gif on a row, the max size used to be 500 pixels, now it's 540. (This post has a quick overview.) If it exceeds that width, the gif will appear more blurry. Tumblr also compresses gifs if the file sizes are between 5-10 MB, though I have no idea how/if that effects the quality tbh.
The size of the video/screenshots you work with is also important. Since I have a copy of HoA, I record my own gameplay of it with 2304 x 1440 dimensions. An 8 min video with those dimensions has a file size of like 1 GB, and 1 screenshot has a file size of 1-2 MB, but it helps being able to gif only a small part of a scene and with image quality in general. Tbh I'd love to freely share either video or screenshots with other folks for editing purposes, in a way where people can just nab them if they wanna, but the file sizes make it difficult.
Probably unnecessary to add, but anyway: within the game, you can also set various image quality options to a higher or lower quality, so if your computer can handle it I recommend putting those settings as HQ as they can go.
Another important factor is not to oversharpen or undersharpen the images. If I crop out a lot of the canvas I usually sharpen it once, and if I keep almost the full image in the gif I sometimes sharpen it twice (in steps, eg first reduce the image size from 1400 x 1400 to 950 x 950, sharpen, then reduce the image to 540 x 540 and sharpen again). But that really depends on how the final result looks. More advanced folks use more detailed ways of sharpening (such as Smart Sharpen... or Unsharp Mask... in Photoshop) but personally, I stick to regular sharpening since it looks nice enough too and it's 1 click, as opposed to sliding the bars around to find the exact result I want.
I don't think doing 1 of these points wrong will lead to a horrible quality, but combining all of the bad points may lead to very blurry or pixelated gifs.
For recording I use what Windows has (by hitting Windows + Alt + R), for screenshots I use VLC media player, and for editing PS.
And for anyone looking to get into editing or giffing without PS: Photopea is an online website that emulates a lot of PS functions. The gif and text functions are sadly still a bit limited compared to PS, but it's free, doesn't even require an account, and it does incredible work imo <3
Lemme know if anything's unclear or if you have any other questions. (Same goes for other folks, I love seeing people's HoA edits, and if I can help anyone looking to start with that process I'm happy to)
4 notes
·
View notes
Text
Demystifying Digital Images and Video: Formats, Tools, Copyright, and More.
Introduction
In today's digital age, images and videos have become an integral part of our daily lives. From personal photographs shared on social media to professional content uploaded on platforms like YouTube and Twitch, understanding the intricacies of image and video file formats, codecs, and manipulation tools is essential. This blog post aims to provide a comprehensive overview of these digital elements, focusing on the definitions of common file types, export settings for popular broadcasting platforms, image manipulation tools, and the critical aspects of image copyright.
Definitions of Commonly Used Image and Web Video Formats, Wrappers, and Codecs
Image Formats:
JPEG (Joint Photographic Experts Group): JPEG is the most widely used image format for photographs and digital images. It uses lossy compression, which reduces file size while maintaining reasonable image quality.
PNG (Portable Network Graphics): PNG is preferred for images with transparent backgrounds or crisp, high-quality graphics. Unlike JPEG, it uses lossless compression.
GIF (Graphics Interchange Format): GIFs are a popular choice for short, looping animations and simple graphics. They use lossless compression and support transparency.
TIFF (Tagged Image File Format): TIFF is a versatile format commonly used in professional photography and graphic design. It supports lossless compression and maintains high image quality.
BMP (Bitmap): BMP is a Windows-native format known for its lack of compression. It results in large file sizes but retains image quality.
Video Formats and Codecs:
MP4 (MPEG-4): MP4 is a widely supported video format that uses the H.264 codec. It offers a balance between quality and file size, making it ideal for streaming and sharing on the web.
AVI (Audio Video Interleave): AVI is an older format that supports various codecs. It is not as efficient as MP4 in terms of compression and is used less frequently nowadays.
MOV (QuickTime Movie): MOV is a format developed by Apple and is popular among Mac users. It can use various codecs, such as H.264 and ProRes, for high-quality video.
MKV (Matroska): MKV is an open-source container format that can contain videos with a variety of codecs, making it highly customizable.
Export Settings for Popular Broadcast Platforms
When it comes to sharing images and videos on popular broadcasting platforms like YouTube, Twitch, and Facebook, selecting the right export settings is crucial for optimal quality and compatibility.
YouTube: For video content on YouTube, the recommended format is MP4 with H.264 video codec and AAC audio codec. The ideal resolution is 1080p (1920x1080) or 4K (3840x2160) for higher quality. These settings balance quality and compatibility across devices.
Twitch: Twitch also prefers the MP4 format with H.264 video and AAC audio codecs. A resolution of 720p (1280x720) or 1080p is recommended, depending on the viewer's internet speed and quality preferences.
Facebook: Facebook accepts a wide range of video formats, including MP4 and MOV. However, MP4 with H.264 video and AAC audio codecs is a reliable choice. The resolution should be adapted to the target audience and device capabilities.
Commonly Used Image Manipulation Tools and Techniques
Image manipulation tools are essential for enhancing and editing images. Here are some commonly used tools and techniques, along with their purposes:
Adobe Photoshop: Photoshop is a versatile image editing software that can be used for tasks like retouching, color correction, and compositing.
Adobe Lightroom: Lightroom is perfect for photo organization and enhancement, with features like exposure adjustment, color grading, and batch processing.
GIMP (GNU Image Manipulation Program): GIMP is a free alternative to Photoshop, offering similar features for image editing and manipulation.
Canva: Canva is a user-friendly online tool for creating graphics and social media content. It simplifies design tasks for non-designers.
Cropping and Resizing: These techniques are fundamental for adjusting image dimensions and removing unwanted parts of an image.
Image Copyright Essentials
Artists and content creators must be aware of copyright laws to protect their intellectual property. Key copyright essentials include:
Ownership: Creators automatically own the copyright to their work upon creation, but registration provides additional legal protection.
Fair Use: Fair use allows limited use of copyrighted material without permission for purposes like criticism, commentary, news reporting, and education.
Licensing: Creators can license their work under specific terms, such as Creative Commons licenses, allowing others to use their work while respecting their rights.
Public Domain: Works in the public domain are not protected by copyright and can be used freely.
DMCA Takedowns: The Digital Millennium Copyright Act (DMCA) enables copyright owners to request the removal of infringing content from online platforms.
Attribution: When using copyrighted material, proper attribution is often required to credit the creator.
Conclusion
Understanding digital image and video formats, codecs, export settings, image manipulation tools, and copyright essentials is essential for content creators, whether amateur or professional. By adhering to best practices and legal guidelines, creators can ensure their work is of high quality, reaches the right audience, and is protected from unauthorized use. Whether you're a budding photographer, a vlogger, or a graphic designer, the knowledge presented in this blog post can serve as a valuable resource to navigate the digital content landscape successfully.
References
Reference list
Arts Law Centre of Australia 2010, Copyright - Arts Law Centre of Australia, Arts Law Centre of Australia.
Attorney-General's Department 2022, Copyright basics, Attorney-General’s Department.
Image Manipulation: The What, How, and Why 2021, Clipping Path Campus.
Image Processing: Techniques, Types, & Applications [2022] n.d., www.v7labs.com.
Video File Formats, Codecs, and Containers Explained | TechSmith 2018, Welcome to the TechSmith Blog.
By: Juan Gutierrez.
4 notes
·
View notes
Note
hey!! I want to start making gifs but i don’t know how, are websites like ezgif frowned upon here in the gif community? do we make them in a specific software?
hi anon!! thanks for asking!
I would say that yes, ezgif is generally frowned upon to make gifs, but if that's the only option available for you then it's whatever works. People frown upon it because the quality of the gif is reduced in ezgif software (converting from mp4 to gif) and there are very limited coloring options. You also can't sharpen a gif because the sharpening software simply doesn't exist on ezgif. I want to reiterate that ezgif isn't like, the worst thing in the world, but it's moreso limiting your toolbox greatly.
There's two paths that you can take: get Photoshop somehow, either paying the enormous amount of money yearly for a subscription, getting it from your school if they offer it, or getting a cracked (not legal) version of it. There are a lot of downloads available here (Tumblr link) and in my tag called #resources.
Your second option is photopea, which is a free online version of photoshop and is similar to Photoshop. I used photopea for years until a friend gave me access to her Photoshop account, and I personally prefer Photoshop over photopea due to the accessibility, the filters available for coloring and sharpening, and the saving options (which I know sounds really stupid, but the exporting options for Photoshop are generally better than those of photopea. IE you can make the same gif from both softwares but photoshop's will just be better quality by nature because of its export, ie when you click 'save as gif'). However, photopea's usefulness and breaking down that barrier for people who want to get into gif making or editing graphics in general when they can't get Photoshop is very powerful and I'm glad that photopea exists, I recommend it highly for people that cannot get Photoshop/aren't comfortable with getting a cracked version of it because it's similar (not the same) to Photoshop.
I have an old photopea tutorial on YouTube if you'd like to use it to learn! It's old not because of the age but because I do things differently now than I did when I made the video and if I could, I would add more to the video, the biggest being cropping and aspect ratios. Here's a detailed post on gif sizing since I didn't include it in my tutorial, and here's my YouTube tutorial on how to make a gif on photopea. There are a bunch of tutorials on how to make a gif on Photoshop, I'm sure, since it's a better known software. Maybe I'll redo my photopea tutorial at some point. That's a mighty fine idea tbh.
Another big tip, if you for some reason have a software related question, you can literally email the CEO and creator of photopea at support[@]photopea.com. I've done it before lol. He's really helpful. That's the perk of a small software, the CEO is behind the support email. He has literally changed the software when I've asked, for example you couldn't upload videos with a frame rate greater than 10, and I made him change it to the frame rate of the video. Lmao.
Sorry for all of these words lol, I hope they helped and feel free to reach out again if you have more questions!
4 notes
·
View notes
Text
How to design Interactive Web Design in best price?
Designing an interactive web design on a budget requires careful planning, creativity, and efficient use of resources. In this guide, I'll provide you with a step-by-step approach to creating an engaging and interactive web design within the best price constraints.
Interactive web design is a powerful tool for creating memorable and effective online experiences that benefit both users and businesses alike. As technology continues to evolve, web designers must keep innovating and adapting interactive elements to cater to the ever-changing expectations of users.
Set Clear Goals and Scope
Before starting any project, define your goals and project scope. Understand the purpose of the Interactive Websites, its target audience, and the specific Interactive Websites elements you want to include. Having a clear vision will help you stay focused and avoid unnecessary expenses.
Choose the Right Platform and Tools
Select a web development platform that aligns with your budget and requirements. Popular cost-effective options include WordPress, Joomla, or using a website builder like Wix or Squarespace. These platforms often come with built-in interactive features and templates that can save you time and money. Utilize free or affordable design tools like Canva or GIMP for graphics and image editing.
Responsive Design
Ensure your web design is responsive, meaning it adapts to different screen sizes and devices. Responsive Interactive Websites design eliminates the need for separate mobile versions, reducing development costs.
Minimalistic Design Approach
Embrace a minimalistic design approach that focuses on simplicity and clean aesthetics. Fewer design elements mean less time spent on development and lower costs. Use negative space effectively and choose a cohesive color palette to create an elegant yet cost-efficient design.
Open-Source Templates and Themes
Explore free and open-source website templates and themes available online. Platforms like WordPress offer a wide range of themes with Interactive Websites elements that can be customized to suit your needs, saving you both time and money.
DIY vs. Hiring Professionals
Assess your skills and expertise in Interactive Websites and development. If you have the required knowledge, consider doing some parts of the design yourself. For complex interactive features, like animations or custom coding, it may be worth hiring freelancers or a web development agency. Compare prices and portfolios to find the best fit for your budget.
Optimize for Performance
Performance optimization is crucial for user experience and search engine rankings. Compress images, minify CSS and JavaScript, and enable caching to reduce loading times. Faster-loading pages often lead to higher engagement and conversion rates with your Interactive Websites.
User-First Approach
Place user experience at the forefront of your design. Ensure that Interactive Websites elements enhance usability and engagement, rather than complicating the navigation. Conduct user testing and gather feedback to refine your design iteratively.
Integrate Social Media
Use social media integrations to increase user engagement and expand your online presence. Social media plugins and sharing buttons can be easily added to your Interactive Websites for little to no cost.
Educational Content and Tutorials
Create educational content and Interactive Websites tutorials that provide value to your audience. Informative videos, infographics, and interactive guides can be cost-effective ways to engage users and establish your expertise.
Continuous Maintenance and Updates
Regularly update and maintain your website to ensure it stays relevant and functional. Promptly fix any bugs or issues that arise to avoid costly repairs in the future.
Therefore creating an interactive web design on a budget requires smart decision-making and resourceful use of available tools and platforms. By following these guidelines and maintaining a user-centric approach, you can design an engaging website without breaking the bank. Remember to regularly evaluate the performance and user feedback to make improvements over time.
Interactive Web Design
Interactive web design refers to the process of creating web pages or applications that engage users and allow them to interact with the content and functionality. The primary goal of interactive web design is to enhance user experience, encourage user participation, and make the website or web application more enjoyable and effective.
Key Elements of Interactive Web Design:
User Interface (UI): The UI is the visual and Interactive Websites elements of the website that users interact with, such as buttons, menus, forms, and navigation. A well-designed UI makes it easy for users to understand and use the website's features.
User Experience (UX): UX focuses on creating a positive and seamless experience for users while they interact with the website. This involves considering user needs, preferences, and behaviors to design intuitive and efficient interactions.
Animation and Transitions: Adding subtle animations and transitions to elements can make the website feel more dynamic and responsive. However, it's essential not to overdo it, as excessive animation can lead to a cluttered and distracting experience.
Responsiveness: Interactive web design should adapt to different devices and screen sizes. This means the website should be mobile-friendly and work well on various devices, including smartphones, tablets, and desktop computers.
Feedback and Validation: Providing real-time feedback to users when they interact with elements like forms or buttons helps them understand their actions and prevents errors. Validation messages for form inputs are crucial to guide users and reduce frustration.
Microinteractions: These are small, subtle interactions that serve a specific purpose, such as liking a post, clicking a button, or expanding a menu. Microinteractions add a sense of delight and engagement to the user experience.
Scroll and Parallax Effects: Scrolling can be used creatively to enhance storytelling or to trigger animations and effects as users move down the page. Parallax effects, where background elements move at a different speed than foreground elements, can create a sense of depth and immersion.
Gamification: Incorporating game-like elements, such as points, badges, or progress bars, can make the website more fun and encourage users to explore and engage with the content.
Multimedia Elements: Using images, videos, audio, and interactive elements like sliders and carousels can make the website more engaging and visually appealing.
Personalization: Tailoring the user experience based on individual preferences and behavior can make the website feel more relevant and user-centric.
Remember that interactive web design should not sacrifice usability and accessibility for the sake of novelty. The goal is to strike a balance between creativity and user-friendliness, ensuring that all visitors can easily interact with and enjoy the website.
Interactive web design is a powerful and essential approach to creating engaging and user-friendly websites. By incorporating interactive elements, such as animations, hover effects, interactive forms, and dynamic content, web designers can enhance the user experience and encourage visitors to stay longer on the site.
One of the key benefits of interactive web design is its ability to create a more memorable and enjoyable browsing experience. Users are more likely to connect with a website that responds to their actions and provides instant feedback. This increased engagement can lead to higher user retention, increased conversions, and improved brand perception.
Furthermore, interactive web design plays a crucial role in keeping up with the ever-evolving digital landscape. As technology advances and user expectations grow, static and traditional web designs may fall short in delivering the desired user experience. By embracing interactive design principles, websites can adapt to various devices and cater to different user preferences, ensuring they remain relevant and competitive in the online space.
Additionally, interactive web design fosters better communication and interaction between businesses and their customers. Through interactive elements like chatbots, feedback forms, and interactive product showcases, companies can gather valuable insights, understand their audience better, and provide personalized solutions to their users' needs.
However, while interactive web design can be highly beneficial, it should be approached with care. Overloading a website with unnecessary animations or complex interactions can lead to slow loading times and a cluttered user interface, which can be counterproductive and frustrating for users. Thus, striking the right balance between functionality, aesthetics, and user-friendliness is crucial.
Interactive web design is a vital component of modern web development that can significantly impact user engagement, brand perception, and business success. By creating dynamic, user-centric, and visually appealing experiences, web designers can elevate their websites and ensure they stay ahead in an increasingly competitive digital world.
2 notes
·
View notes
Text
Which Elements Make Up a Website's Most Important Content?
In today’s digital world, a website is often the first place where a business connects with potential customers. Whether you’re an entrepreneur, a small business owner, or a content creator, having a well-organized and engaging website is crucial to your success. But what makes a website effective? In this post, we'll explore the essential parts of a website that help attract, engage, and convert visitors.
1. Easy-to-Use Navigation
User experience is critical for any website, and navigation plays a big role in that. If users can’t easily find what they’re looking for, they’ll likely leave the site.
Clear Menu Structure: Organize your site’s menu in a simple way, so users can easily find sections like “Home,” “About Us,” “Services,” and “Contact.”
Search Function: A search bar helps users quickly find specific content, especially on larger websites.
Breadcrumbs: These small links show users where they are on the site and help them go back to previous pages.
2. Responsive Design
Most people visit websites on their phones, so having a responsive design is a must. A responsive website changes its layout and elements to fit the screen size of the device it’s being viewed on, whether it’s a smartphone, tablet, or desktop.
Flexible Layouts: A flexible layout makes sure your content looks good on any screen size.
Responsive Images: Images should adjust properly with the layout, keeping their quality and importance.
Media Queries: Use CSS to apply different styles for different devices, improving the user experience.
3. Engaging Content
Content is the backbone of your website, and it’s what keeps users interested. Good content not only helps with SEO but also builds trust.
Well-Written Text: Make sure your content is clear, easy to understand, and free of mistakes. Utilize bullet points and headers to divide lengthy paragraphs.
Relevant Images and Videos: Visual content makes your website more engaging. Use high-quality images and videos that match your text.
Call-to-Action (CTA): Each page should have a clear CTA, guiding users to take an action, like signing up for a newsletter, buying a product, or contacting you.
4. Fast Loading Times
A fast website is essential for a satisfying user experience. Slow websites can frustrate users and make them leave, which can lead to lost opportunities.
Optimize Images: Reduce the size of photographs without sacrificing quality by compressing them.
Minimize HTTP Requests: Reduce the number of elements on your page, like scripts and images, to speed up loading times.
Browser Caching: Store some elements of your website in users’ browsers, so they don’t have to reload every time they visit.
5. Strong Security
Security is important for both website owners and users. A secure website builds trust and protects your business from online threats.
SSL Certificate: An SSL certificate encrypts data between the user and the website, keeping sensitive information, like credit card numbers, safe.
Regular Updates: Keep your website’s software, including plugins and themes, up to date to prevent security issues.
Secure Hosting: Choose a hosting provider that offers strong security measures, like firewalls and regular backups.
6. Search Engine Optimization (SEO)
SEO helps your website show up in search engines like Google. By optimizing your website, you can attract more visitors and improve your search rankings.
Keyword Optimization: Research and use relevant keywords throughout your content, titles, and descriptions to attract search engine traffic.
Meta Tags: Use descriptive meta tags to tell search engines what your pages are about, including title tags, meta descriptions, and header tags.
Alt Text for Images: Provide descriptive alt text for images to improve accessibility and help search engines understand what the images represent.
7. Contact Information
Making it easy for users to contact you is key to building trust and converting visitors into customers.
Contact Page: Include a contact page with your phone number, email address, and physical address if applicable.
Contact Forms: Provide a simple contact form for users who prefer to reach out directly through your website.
Live Chat: A live chat feature lets users get immediate answers to their questions, improving their experience.
8. Social Proof
Social proof, like customer reviews and testimonials, can influence a visitor’s decision. It builds credibility and shows that others have had positive experiences with your brand.
Testimonials: Feature customer testimonials on key pages, like the homepage or product pages.
Case Studies: Show detailed case studies to highlight how your products or services have helped others.
Social Media Integration: Include links to your social media profiles and display social media feeds or shares to highlight your online presence.
9. Clear Branding
Your website should clearly reflect your brand’s identity. Consistent branding helps users recognize your brand and builds trust over time.
Logo and Tagline: Your logo and tagline should be prominently displayed, typically in the header.
Consistent Colors and Fonts: Use the same colors, fonts, and design elements throughout your website to reinforce your brand identity.
Unique Voice: Maintain a consistent tone of voice in your content that matches your brand’s personality.
10. Analytics and Tracking
To keep improving your website, it’s important to track and analyze how users behave on your site. This helps you make decisions based on data and optimize your website for better performance.
Google Analytics: Set up Google Analytics to track key metrics, like page views, bounce rates, and conversion rates.
Heatmaps: To find out where people are clicking and how they are interacting with your website, use heatmaps.
A/B Testing: Test different versions of a page to see which one performs better.
Conclusion
Creating a successful website requires attention to detail and a focus on the user experience. By including these essential components—easy-to-use navigation, responsive design, engaging content, fast loading times, strong security, SEO, clear contact information, social proof, clear branding, and analytics—you can build a website that not only attracts visitors but also turns them into loyal customers.
Regularly update and optimize your website to keep it relevant and effective in a constantly changing digital world. This way, your website will remain a valuable asset to your business.
#web designing course center in coimbatore#web designing classes#wed designing training institute#education training insitute
0 notes
Text
Understanding Demelan Cream: Benefits and How to Use It Safely
This product is highly effective in brightening your skin.
However, if used incorrectly, it can worsen your skin condition.
In this article, I will cover:
how it works
what it can do
how to use it correctly
The product contains three main ingredients:
10% Glycolic Acid
5% Alpha Arbutin
2% Kojic Acid
1. Glycolic Acid (10%)
Glycolic acid belongs to a class of skincare ingredients called Alpha Hydroxy Acids (AHAs), which are exfoliants.
It brightens our skin in two main ways:
It removes old skin cells from the outer layer of the skin, allowing new and younger cells to surface.
Some of these old cells carry excess melanin, which causes hyperpigmentation. When these old cells are removed, the hyperpigmentation that they were carrying also is removed. This reduces the surface-level-hyperpigmentation.
This results in an instant brightening effect.
Among AHAs, glycolic acid has the smallest molecule size, allowing it to penetrate deeper into the skin, making it more effective than other AHAs.
However, because it goes deeper, it can also cause irritation, especially for those with sensitive skin. In skin tones other than white, this irritation can lead to hyperpigmentation.
Despite the potential for irritation, glycolic acid's benefits are significant. This product contains 10%, which is a medium-strength concentration.
While this concentration is effective, it's important to use it correctly to avoid irritation and pigmentation. Later in the video, I will explain how to minimize these risks.
2. Alpha Arbutin (5%)
Alpha Arbutin reduces pigmentation by inhibiting the activity of the enzyme tyrosinase, which produces melanin.
Normally, skincare products contain up to 2% alpha arbutin, so the 5% in this product is quite high and more effective in reducing pigmentation.
However, since most studies are conducted on products with 2% alpha arbutin, there is a chance of irritation. I recommend doing a patch test behind your ear before applying it to your face.
By calming the enzyme tyrosinase, alpha arbutin reduces the excess melanin production, which helps reduce hyperpigmentation on the skin.
3. Kojic Acid (2%)
Kojic acid is used in a safe 2% concentration in this product. It reduces pigmentation by inhibiting the activity of the tyrosinase enzyme, much like alpha arbutin.
Additionally, kojic acid is an antioxidant, meaning it neutralizes free radicals that cause irritation and inflammation, which can lead to pigmentation.
Therefore, kojic acid helps reduce pigmentation in two ways: by reducing melanin production and neutralizing free radicals.
How to Apply the Product
This product should be used at night. Follow these steps:
Cleanse your face.
Apply the product and wait for a minute.
Apply a moisturizer or light cream without fragrance, denatured alcohol, or essential oils, as these ingredients can irritate your skin.
The following morning, sunscreen is essential. Sunscreen is always important, but especially so after using this product. Without it, your skin may become more irritated, leading to further damage.
Additional Precautions
Avoid threading or waxing for at least 2 days before and after using this product.
Start by using it once a week, gradually increasing to twice a week, and eventually three times a week if your skin reacts well.
If you have sensitive skin, perform a patch test before applying it to your face.
Important Tips
Do not use this product on your underarms. While some online sources suggest it for dark underarms, glycolic acid is too strong for such sensitive skin and can lead to increased darkness.
You can use it on your knees to reduce darkness in that area.
Below is a video on my YouTube channel that is about this product’s review - Demelan Cream BENEFITS for Pigmentation Reviewed | How to USE | Side Effects
youtube
0 notes
Text
Budget-Friendly Booklet Design: Maximizing Impact on a Limited Budget with Sprak Design

Introduction
In today’s competitive landscape, effective marketing is essential for businesses of all sizes. One powerful tool is the booklet. A well-designed booklet, created by a reputable booklet design company, can showcase your products or services, inform your audience, and drive conversions. However, the cost of professional booklet design can be a barrier for many businesses with limited budgets.
At Sprak Design, we believe that exceptional design should be accessible to everyone. That’s why we specialize in providing budget-friendly booklet design services that deliver maximum impact without breaking the bank. In this blog post, we’ll explore some effective strategies for creating stunning booklets on a tight budget, and how Sprak Design can help you achieve your goals.
Understanding Your Budget Constraints
Before diving into the design process, it’s crucial to have a clear understanding of your budget. Consider the following factors:
Overall marketing budget: How much can you allocate to booklet design?
Quantity: How many booklets do you need to print?
Design complexity: Are you looking for a simple design or something more elaborate?
Once you have a firm grasp of your budget, you can start making informed decisions about your booklet design.
Leveraging Free Design Tools
There are many free design tools available online that can help you create professional-looking booklets. Some popular options include:
Canva: A user-friendly platform with a vast library of templates and design elements.
GIMP: A powerful image editing software that offers advanced features for those with design experience.
Adobe Spark: A suite of tools for creating graphics, videos, and web pages.
By utilizing these free tools, you can significantly reduce your design costs.
Choosing the Right Paper Stock
The paper stock you select can have a significant impact on the overall cost of your booklet. While premium paper stocks can look stunning, they can also be expensive. Consider using more affordable options like recycled paper or coated paper. These materials can still provide a professional appearance without breaking the bank.
Crafting A Compelling Story: A Guide to Booklet Graphic Design
Optimizing Your Design
Effective design can help you maximize the impact of your booklet, even on a limited budget. Here are some tips for optimizing your design:
Keep it simple: Avoid cluttering your booklet with too much information or imagery.
Use high-quality images: Invest in high-resolution images to ensure they look sharp when printed.
Choose a consistent color palette: A cohesive color scheme can help create a visually appealing design.
Prioritize clear typography: Use fonts that are easy to read and that complement your overall design.
Working with a Budget-Friendly Design Firm
While DIY design tools can be helpful, working with a professional design firm can often yield superior results. Sprak Design is committed to providing affordable booklet design services that meet the needs of businesses with limited budgets. Our team of experienced designers can help you create a booklet that is both visually appealing and effective.
Why Choose Sprak Design?
Affordable pricing: We offer competitive rates without compromising on quality.
Customized designs: Our designers will work closely with you to create a booklet that aligns with your brand and goals.
Fast turnaround times: We understand the importance of meeting deadlines, and we strive to deliver your booklet on time.
Excellent customer service: Our friendly and knowledgeable staff is always available to answer your questions and provide support.
Conclusion
Creating a stunning booklet on a limited budget is possible with the right approach. By leveraging free design tools, choosing the right paper stock, optimizing your design, and working with a budget-friendly design firm like Sprak Design, you can create a booklet that will help you achieve your marketing goals.
Remember: A well-designed booklet can be a powerful asset for your business. Don’t let budget constraints hold you back. Contact Sprak Design today to learn more about our affordable booklet design services.
Read More:
https://maps.app.goo.gl/65YgVde9jDsE3Wcy7
View Source:
https://medium.com/@robinschley892/budget-friendly-booklet-design-maximizing-impact-on-a-limited-budget-with-sprak-design-dcf89546d2b0
0 notes
Text
Effortless Efficiency: Compress Images in Bulk Online for Enhanced Performance
In the digital landscape, where visuals play a crucial role in engaging audiences and optimizing web performance, the ability to Turn Photo Black and White Online is a game-changer. Whether you’re a photographer, web developer, or social media manager, utilizing a Free Image Converter Online compression tool can significantly enhance your workflow and user experience.
Understanding the Importance of Image Compression
Image compression is the process of reducing the file size of an image without sacrificing its quality. This is essential for several reasons: faster website loading times, reduced bandwidth usage, improved SEO ranking (due to faster loading speeds), and smoother user experience across devices with varying internet speeds.
Choosing the Right Free Image Compression Tool
When selecting a Jpg Image Compress Online for compressing JPEG images free online or other formats, consider factors such as compression ratio, supported file types, ease of use, and the level of control over image quality. Look for tools that offer a balance between efficient compression and preserving the clarity and detail of your visuals.

Benefits of Compressing Images in Bulk Online
One of the primary advantages of using a tool to Compress Jpeg Images Free Online images in bulk online is efficiency. Instead of manually compressing each image, which can be time-consuming, these tools allow you to upload multiple images simultaneously and apply compression settings uniformly across all files. This streamlines your workflow and saves valuable time, especially when dealing with large photo libraries or multiple projects.
Improving Website Performance with Optimized Images
For website owners and developers, image compression directly impacts site performance. Pages that load quickly not only provide a better user experience but also reduce bounce rates and improve conversion rates. By compressing images without noticeable quality loss, you can strike a balance between visual appeal and functional efficiency.
Convert Image to GIF Online: Adding Dynamic Visuals to Your Content
Beyond static images, online tools also enable you to convert image to GIF online, adding a dynamic element to your content strategy. GIFs are versatile, engaging, and ideal for conveying short, looping animations or highlighting key moments in videos. Whether you’re creating social media posts, email newsletters, or blog content, a free online GIF generator can enhance your storytelling capabilities.
Exploring the Best Online Video to GIF Converter
In addition to converting images, some tools offer the functionality to convert video to GIF online free of charge. This feature is particularly useful for marketers and content creators looking to repurpose video content into shareable GIFs for social media platforms or website banners. Look for converters that support various video formats and offer customization options such as frame rate and size.
Enhancing Visual Communication with GIFs
The popularity of GIFs lies in their ability to convey emotions, explain concepts, or showcase product features succinctly and effectively. By converting video snippets or images into GIFs using the best online video to GIF converter, you can enhance visual communication in your digital marketing campaigns and captivate your audience’s attention.
Streamlining Workflow with Free Online Tools
The convenience of free online tools extends beyond image and GIF conversion. These platforms often offer additional features such as batch processing, cloud storage integration, and compatibility with mobile devices. Whether you’re working from a desktop computer or on the go, access to versatile tools enhances your productivity and creative output.
Choosing Quality and Performance
While free online tools offer accessibility and cost-effectiveness, it’s essential to prioritize quality and performance. Opt for tools that employ advanced compression algorithms to maintain image clarity and fidelity, even after conversion to GIF or compression in bulk. User reviews, tutorials, and trial versions can help you gauge the reliability and effectiveness of a tool before integrating it into your workflow.
Conclusion
In conclusion, leveraging the capabilities of online tools to compress images in bulk, convert image to GIF online, and convert video to GIF online free not only enhances your creative projects but also improves website performance and user engagement. Whether you’re a professional photographer seeking to optimize your portfolio, a marketer aiming to elevate your brand’s visual content, or a developer focused on enhancing site speed, these tools empower you to achieve your goals efficiently and effectively. Embrace the efficiency and versatility of online tools to streamline your workflow and elevate your digital presence with compelling visuals that captivate and resonate with your audience.
0 notes
Text
3 Best Specification-Making Tools for Interior Designers in 2024
In today’s fast-paced interior design industry, the need for efficient specification-making software is more crucial than ever. These digital tools help designers streamline workflows, improve accuracy, and enhance collaboration. Here, we explore the features, user experience, and overall value of three top specification-making apps for interior designers: Intebee, Fringe, and Gather.
Intebee

Intebee.com
User Experience:
Intebee requires the installation of two separate applications, which complicates the initial setup process. New users may find the onboarding experience somewhat unclear and challenging.
Interface:
The interface appears outdated, with a steep learning curve that could be off-putting for users accustomed to more modern software.
Database:
Intebee lacks a built-in database, requiring users to create and manage their own, which can hinder efficiency.
Functionality:
The software limits exports to PDF format and lacks integrated floor plans or a procurement feature, reducing its utility for comprehensive project management.
Pricing:
Starting at $10 per user per month, Intebee is an affordable option for small to medium-sized enterprises.
Trial Period:
Offers a 1-month free trial with full functionality.
Fringe

User Experience:
Fringe is user-friendly and intuitive, allowing quick mastery of the app. Although the onboarding process could improve, it provides helpful tutorial videos and live online demos.
Interface:
Featuring a modern and visually appealing design, Fringe offers an enjoyable user experience.
Database:
Fringe comes with a built-in database of hundreds of suppliers, expanding monthly, which eliminates the need for manual data entry.
Functionality:
Fringe stands out with unique features like integrated floor plans and the ability to design custom products within the app.
Pricing:
Starting at 16 euros per user per month, Fringe is cost-effective, especially with volume discounts that can reduce the price to 9.9 euros per user per month for teams of five.
Trial Period:
Includes a 3-month free trial to explore all features.
Gather

User Experience:
Gather is known for its user-friendly design, making it easy for new users to get up to speed quickly through an effective onboarding process.
Interface:
Gather features a modern, sleek interface with intuitive navigation.
Database and Tools:
While Gather lacks a built-in database, it includes a clipper tool for web data extraction. However, this tool struggles with complex sites, often requiring manual data entry.
Functionality:
It supports PDF exports and includes a basic procurement feature, but manual operation is required, which could be a drawback for larger projects.
Pricing:
Gather’s plans start at $165 per month, with full-feature packages reaching up to $790, making it a more expensive option.
Trial Period:
Offers a 14-day free trial with full functionality.
These three tools—Intebee, Fringe, and Gather—offer a range of features tailored to the diverse needs of interior designers, making them top choices for specification-making in 2024. When choosing the right tool, consider your budget, desired functionality, and the user experience that best fits your workflow.
1 note
·
View note
Text
UNHIDDEN
Unhidden is an adaptive and universally designed fashion brand founded by Victoria Jenkins, who is one go the UK's leading adaptive fashion experts. Jenkins' aim for the brand is to normalise inclusive design in the fashion industry, using her own journey with her disability after a life changing surgery in her 20's. As Victoria has 16 years experience in the fashion industry, she uses her extensive garment construction knowledge in order to design and create stylish, comfortable products that have unique features to allow the disabled community to express themselves through fashion and giving them confidence in their style. Creating equality for the disabled and chronic sick communities is important to Victoria.
The brands mission statement is to design socially responsible, stylish inclusive adaptive clothing for people with and without disabilities. Unhidden is the first adaptive brand to become a member of the British Fashion Council.
youtube
This video explains the reasoning behind the importance of Unhidden and the values that the brand stands by. 1 in 5 people in the UK believe they are excluded in the fashion industry, Unhidden want to make a change in the industry and make everyone feel represented and included. Unhidden is a universally designed, socially responsible brand that represents a solution for the future of fashion, this meaning representing all sizes, ages, races, and people with and without disabilities, as well as using plastic free supply chain and deadstock fabric which reduces waste and stops unused fabric going to landfills. Unhidden is one of the most inclusive and sustainable brands and shows that it is easy to make everyone feel seen and heard, which is a huge step in the right direction.
youtube
This video shows the founder Victoria Jenkins explaining her inspiration behind starting an adaptive and universal brand. She also explains why it is important as well as sharing what her next steps are for her brand.
Some her products include:
Shirts with snap fastenings for arm openings for the 17 million people receiving cancer treatments without having to undress or wear clothing that makes them feel uncomfortable. Snap fastenings are also used instead of buttons for the 14 million people who have rheumatoid arthritis and have reduced dexterity because of this.


Tailored trousers with elasticated waistbands and concealed zippers for easy access at the waist and the ankle for the 75 million people who are wheelchair users to stop the uncomfortable pain that can come with tailored trousers.


Additionally, the brand created trousers with a from flap for inclusion of ostomy bags and concealed zippers for easy access, stoma bags, ports and other equiptment. It also includes an elasticated waistband for comfort and extra space.


They also held one of the most inclusive, diverse and representative catwalk runway show at London Fashion Week.


Harvard referencing:
Unhidden. (2022). About Us. [Online]. Unhidden. Available at: https://unhiddenclothing.com/pages/about-unhidden [Accessed 26 August 2024].
Unhidden. (2023). September 2023 London Fashion Week Runway. [Online]. Unhidden. Available at: https://unhiddenclothing.com/pages/fashion-collection-september [Accessed 26 August 2024].
London Fashion Week. (2023). Unhidden. [Online]. London Fashion Week. Available at: https://londonfashionweek.co.uk/designers/unhidden [Accessed 26 August 2024].
Unhidden. (2022). Future Proof Fashion - LFW February 2022. [Online]. YouTube. Last Updated: 28 February. Available at: https://www.youtube.com/watch?v=CBwfJdhfI34&t=208s [Accessed 29 August 2024].
Unhidden. (2022). Unhidden; the story so far and what's coming next.... [Online]. YouTube. Last Updated: 21 December. Available at: https://www.youtube.com/watch?v=1IRuY2t_q8c [Accessed 29 August 2024].
0 notes
Text
Kitty's Gone A-Milking #675
Songs of Ireland and more on the Irish & Celtic Music Podcast #675 . Subscribe now!
Tradify, High Octane, Sassenach, The Drowsy Lads, Altan, Brobdingnagian Bards, Louise Bichan, Hayley Griffiths, Toby Bresnahan, Natalie Padilla, Philippe Barnes, Tom Phelan, Jigjam, Lúnasa, River Driver
GET CELTIC MUSIC NEWS IN YOUR INBOX
The Celtic Music Magazine is a quick and easy way to plug yourself into more great Celtic culture. Enjoy seven weekly news items for Celtic music and culture online. Subscribe now and get 34 Celtic MP3s for Free.
VOTE IN THE CELTIC TOP 20 FOR 2024
This is our way of finding the best songs and artists each year. You can vote for as many songs and tunes that inspire you in each episode. Your vote helps me create next year's Best Celtic music of 2024 episode. You have just three weeks to vote this year. Vote Now!
You can follow our playlist on Spotify to listen to those top voted tracks as they are added every 2 - 3 weeks. It also makes it easier for you to add these artists to your own playlists. You can also check out our Irish & Celtic Music Videos.
THIS WEEK IN CELTIC MUSIC
0:15 - Tradify "Molly Malone & Kitty's Gone a - Milking" from Take Flight
3:35 - WELCOME
7:12 - High Octane "Jurassic Reels" from High Octane
13:14 - Sassenach "A Chuachag Nam Beann/The Cuckoo of the Mountain" from Passages
16:30 - The Drowsy Lads "Up and About in the Morning (Jigs)" from Wide Awake
21:08 - Altan “Gabhaim Molta Bríde" from Donegal
25:32 - FEEDBACK
29:48 - Brobdingnagian Bards "Paddy McCollough" from Songs of Ireland
33:13 - Louise Bichan "Margaret's Walk to the Pier" from Out of My Own Light
39:36 - Hayley Griffiths "Loch Lomond" from Far from Here
43:45 - Toby Bresnahan "Crabs in the Skillet - Ten Penny Bit - Colerain Jig" from All In Good time
48:24 - THANKS
50:37 - Natalie Padilla "Immortal, Invisible" from Paths and Places
54:25 - Philippe Barnes and Tom Phelan "Midnight Accountant" from The Clearwater Sessions
58:10 - Jigjam "Bluebird" from Phoenix
1:02:23 - Lúnasa "Man from Moyasta" from Live in Kyoto
1:06:05 - CLOSING
1:06:53 - River Driver "Home" from Flanagan's Shenanigans! Live at The Celt
1:10:30 - CREDITS
The Irish & Celtic Music Podcast was produced by Marc Gunn, The Celtfather and our Patrons on Patreon. The show was edited by Mitchell Petersen with Graphics by Miranda Nelson Designs. Visit our website to follow the show. You’ll find links to all of the artists played in this episode.
Todd Wiley is the editor of the Celtic Music Magazine. Subscribe to get 34 Celtic MP3s for Free. Plus, you’ll get 7 weekly news items about what’s happening with Celtic music and culture online. Best of all, you will connect with your Celtic heritage.
Please tell one friend about this podcast. Word of mouth is the absolute best way to support any creative endeavor.
Finally, remember. Reduce, reuse, recycle, and think about how you can make a positive impact on your environment.
Promote Celtic culture through music at http://celticmusicpodcast.com/.
WELCOME THE IRISH & CELTIC MUSIC PODCAST
* Helping you celebrate Celtic culture through music. I am Marc Gunn. I’m a Celtic musician and podcaster. This podcast is for fans of Celtic music of all shapes and sizes. Not necessarily from Ireland or Scotland, but from around the globe. Because there is much great Celtic music from around the world.
We are here to build a diverse Celtic community and help the incredible artists who so generously share their music with you.
If you hear music you love, please email artists to let them know you heard them on the Irish and Celtic Music Podcast. Remember. Musicians depend on your generosity to keep making music. So please find a way to support them. Buy a CD, Album Pin, Shirt, Digital Download, or join their communities on Patreon.
You can find a link to all of the artists in the shownotes, along with show times, when you visit our website at celticmusicpodcast.com.
Today’s show is sponsored by Richard Trest of the Middle Tennessee Highland Games & Celtic Festival on Sept 7 - 8, 2024 at Sanders Ferry Park, Hendersonville. You’ll enjoy music from Tuatha Dea, Kris Colt, The Secret Commonwealth, The Devil’s Brigade, The Sternwheelers, Doon the Brae, Nosey Flynn, and Colin Grant - Adams. Plus, there’s a piping competition, Irish step dancing, highland dance competition, ceilidh dancing and so much more. Join Richard just outside of Nashville Sept 7 - 8. And find more details at www.midtenngames.com
Are you a Celtic artist? Do you know one? We are looking to feature Celtic art in 2025. Please send your designs to us. You will be financially compensated if your art is used.
Next week’s show will officially drop Wednesday evening at 8 PM ET on Patreon. If you want to join other Celts to talk about this week’s show.
If you are a Celtic musician or in a Celtic band, then please submit your band to be played on the podcast. You don’t have to send in music or an EPK. You will get a free eBook called Celtic Musicians Guide to Digital Music and learn how to follow the podcast. It’s 100% free. Just email Email follow@bestcelticmusic and of course, listeners can learn how to subscribe to the podcast and get a free music - only episode.
Listen to Celtic Christmas Music in a podcast and find out how you can support the show.
THANK YOU PATRONS OF THE PODCAST!
You are amazing. It is because of your generosity that you get to hear so much great Celtic music each and every week.
Your kindness pays for our engineer, graphic designer, Celtic Music Magazine editor, promotion of the podcast, and allows me to buy the music I play here. It also pays for my time creating the show each and every week.
As a patron, you get ad - free and music - only episodes before regular listeners, vote in the Celtic Top 20, stand - alone stories, you get a private feed to listen to the show or you can listen through the Patreon app. All that for as little as $1 per episode.
A special thanks to our Celtic Legends: Bruce, Brian McReynolds, Marti Meyers, Brenda, Alan Schindler, Karen DM Harris, Emma Bartholomew, Dan mcDade, Miranda Nelson, Nancie Barnett, Kevin Long, Gary R Hook, Lynda MacNeil, Kelly Garrod, Annie Lorkowski, Shawn Cali
HERE IS YOUR THREE STEP PLAN TO SUPPORT THE PODCAST
Go to our Patreon page.
Decide how much you want to pledge every week, $1, $5, $25. Make sure to cap how much you want to spend per month.
Keep listening to the Irish & Celtic Music Podcast to celebrate Celtic culture through music.
You can become a generous Patron of the Podcast on Patreon at SongHenge.com.
TRAVEL WITH CELTIC INVASION VACATIONS
Every year, I take a small group of Celtic music fans on the relaxing adventure of a lifetime. We don't see everything. Instead, we stay in one area. We get to know the region through its culture, history, and legends. You can join us with an auditory and visual adventure through podcasts and videos. Learn more about the invasion at http://celticinvasion.com/
#celticmusic #irishmusic #celticmusicpodcast
I WANT YOUR FEEDBACK
What are you doing today while listening to the podcast? Please email me. I’d love to see a picture of what you're doing while listening or of a band that you saw recently.
Email me at follow@bestcelticmusic.
Jason Denen emailed this week: "Marc, I can't support the latest changes to Patreon, do you have a KoFi or PayPal I can use to send you some money."
Make a donation.
Éirinn O'Coscraigh (pron. pronounced Erin O - Cosgrove) emailed: "Dearest Celtfather and purveyor of fine Irish and Celtic music.
I and the Cosgroves have really enjoyed episode 660! I was cooking up a fine dinner with plenty of Irish stew while the episode was playing on the speakers... and the most common phrase we said was, "Who is this?" Wow. Eight debuts!!! from bands and performers never played on the show before and we have nearly never even heard of them before today!
The Low Kings, The Drowsy Lads, Fialla, The Crowfoot Rakes, Blackthorn, Conor Mallon, Fig for a Kiss, and Luas.... Love 'em all.
Thank you for turning us on to these and many others. We have a lot of favourites who are played regularly on the show.
We Cosgroves raise our glasses to you and yours.
Go raibh maith agat!"
Mattie Dalton emailed: "I am always trying but thank you for letting me know about July.
Yes I want a CD. I have been out of the loop for awhile due to illness. I am doing well in recovery, which is slow... Anyway...love you and family much! Oh, do you have the same number as before you moved? Take care!"
GEOFFREY HUFF emailed: "Been listening to your podcast for 18 years or so. Thank you for staying true."
Bill Arnold sent a photo:
Check out this episode!
0 notes
Last Seen Blogs

zelohun
Heaven~


roundfacekitty
Sul Sul

ubiquitous-mr-lovegrove
The Ubiquitous Mr.Lovegrove (new blog)

evo-lino
Evo's