#serger threading guide
Explore tagged Tumblr posts
Visit Tumblr Blog
Explore Tumblr blogs with no restrictions, modern design and the best experience.
Last Seen Tumblr Blogs


Fun Fact
The Tumblr app for Google Glass was released on May 16, 2013.
Text
Unlocking the Power of Sergers: Elevate Your Sewing Craft
In the dynamic world of sewing, efficiency and precision are key. Discover how integrating a serger sewing machine into your toolkit can transform your projects, offering professional finishes and unmatched versatility. Embrace this game-changing tool and take your sewing artistry to new heights.
In the fast-paced world of sewing, efficiency and precision are paramount. Enter the serger sewing machine, a game-changer that elevates your craft to professional heights.
The Serger Advantage: Speed and Precision
Time is a valuable commodity, and a serger maximizes it by streamlining your sewing process. Unlike traditional machines, a serger trims seam allowances and encloses raw edges simultaneously, delivering a polished finish swiftly. Imagine completing garments so efficiently that they rival boutique-quality pieces.
Professional Finishes: Elevate Your Craft
Details distinguish exceptional work. A serger provides durable, stretchy seams ideal for knit fabrics, eliminating fraying edges. Your creations will exude a refined, professional touch, enhancing both appearance and longevity.
Versatility Unleashed
Beyond edge finishing, sergers offer a spectrum of techniques. From rolled hems to flatlock stitching, they empower you to infuse creativity into your projects. Explore ruffles, gathers, and decorative edges to craft unique, personalized designs.
Conquering the Learning Curve
Mastering a serger may seem daunting with its myriad threads and settings. However, with structured guidance, you can navigate this learning curve effectively. Online courses, such as "Make Friends with an Overlocker or Serger" by Tilly and the Buttons, offer step-by-step instruction, from threading to advanced stitches.
Investing in Excellence
Acquiring a serger and the accompanying education is a strategic investment in your craft. The enhanced quality and efficiency translate to higher-value creations, whether for personal satisfaction or commercial endeavors. This commitment to excellence yields dividends in both pride and potential profit.
Join a Thriving Community
Embarking on this journey connects you with a vibrant community of serger enthusiasts. Online forums and social media groups provide platforms to share experiences, seek advice, and draw inspiration. Engaging with fellow sewists fosters growth and camaraderie, enriching your sewing experience.
Embrace the Serger Revolution
Elevate your sewing artistry by integrating a serger into your toolkit. The fusion of speed, precision, and versatility transforms your projects, reflecting a commitment to quality and innovation. Seize this opportunity to enhance your craft and produce creations that resonate with professionalism and personal flair.
For more information visit: https://virtualmegamall.blogspot.com/

#serger sewing machine#overlocker sewing machine#online serger course#professional sewing techniques#serger for beginners#advanced serger techniques#serger threading guide#serger sewing projects
0 notes
Text
Master Your Serger and Overlocker with the #1 Online Sewing Course!
Master Your Serger and Overlocker with the #1 Online Sewing Course! Tired of tangled threads, skipped stitches, or confusion over your serger’s settings? Whether you’re a sewing enthusiast or a professional looking to refine your craft, The Number 1 Serger and Overlocker Online Sewing Course is your ultimate guide to mastering these powerful machines. Say goodbye to frustration and hello to…
#advanced serger techniques#beginner serger course#best online sewing course#cover stitch mastery#decorative serger stitches#DIY sewing projects#fabric-specific serger skills#learn to use a serger#lifetime sewing access#online sewing classes#overlocker online classes#professional seam finishes#save time sewing#serger hacks#serger maintenance guide#serger sewing course#serger tension settings#serger video tutorials#serger vs overlocker#sewing community forum#sewing course enrollment#sewing machine troubleshooting#sewing machine tutorials#sewing tips for beginners#threading a serger machine
0 notes
Text
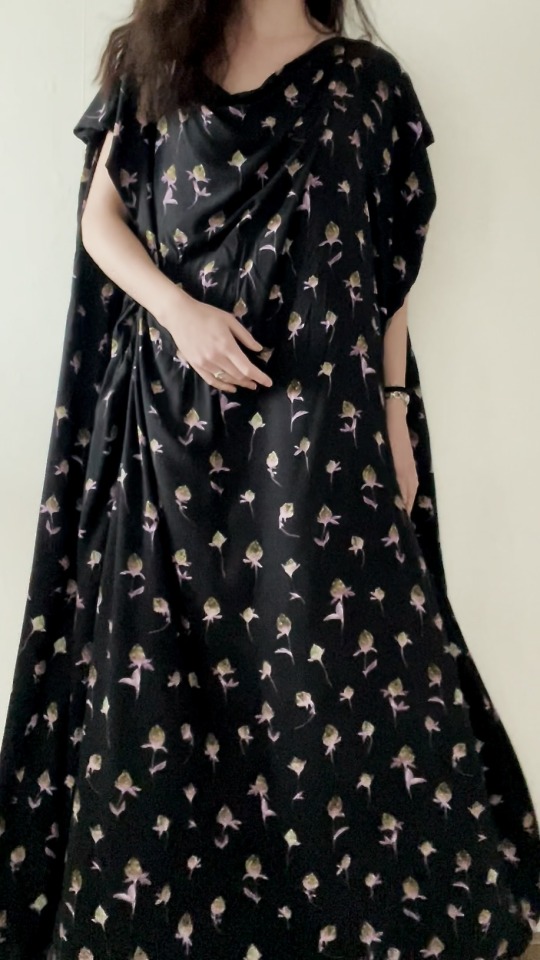
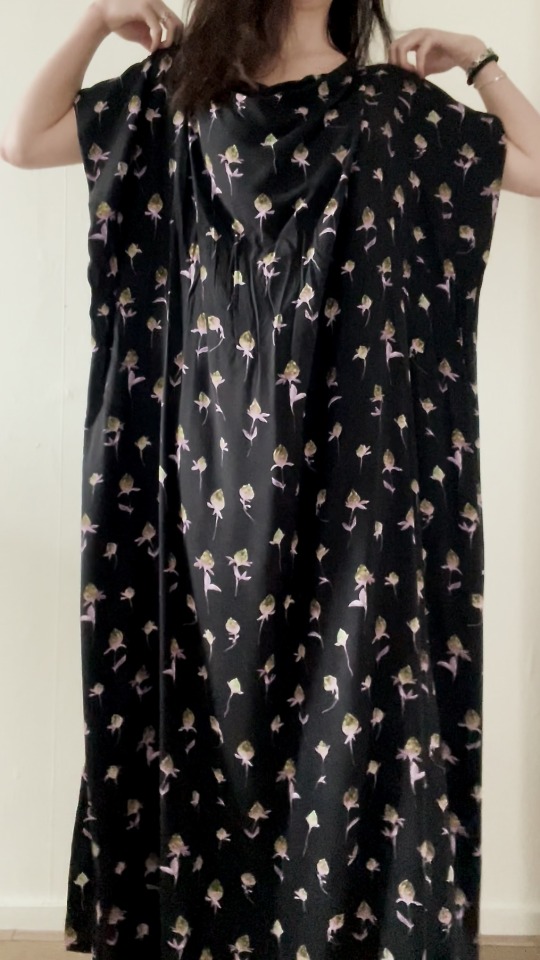
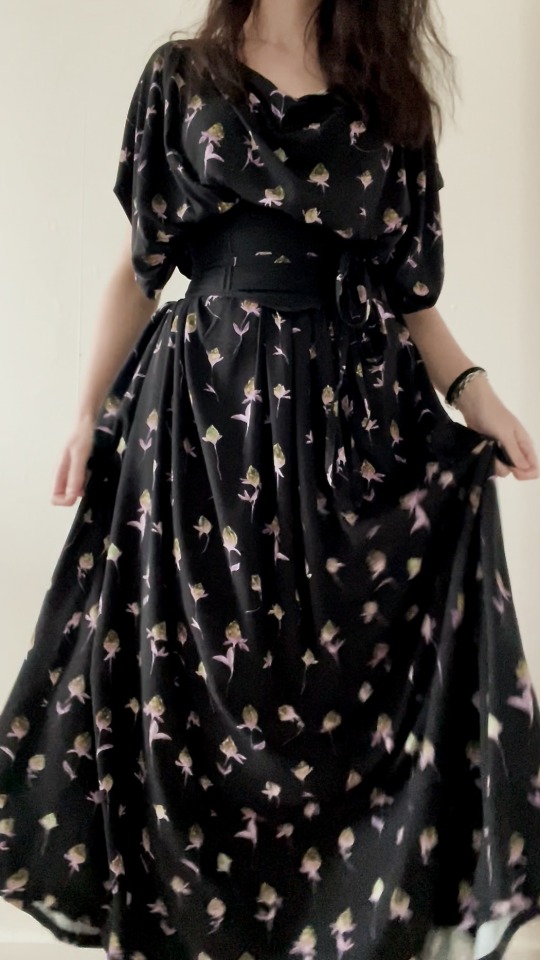
2024.10.20 - Making off the greek summer dress
I've recently finished the greek-inspired whimsygoth maxi dress. It's so comfortable and feels so luxurious, I've decided that I want to make some more before next summer. Below is how I've done it (this is as much a tutorial for future me as it is for anyone else interested).
The greatest thing about this dress? It is super beginner friendly to make (just sewing a bunch of long, straight, lines). Could easily be done with a “standard” sewing machine, serger, hand-held machine or even completely by hand.
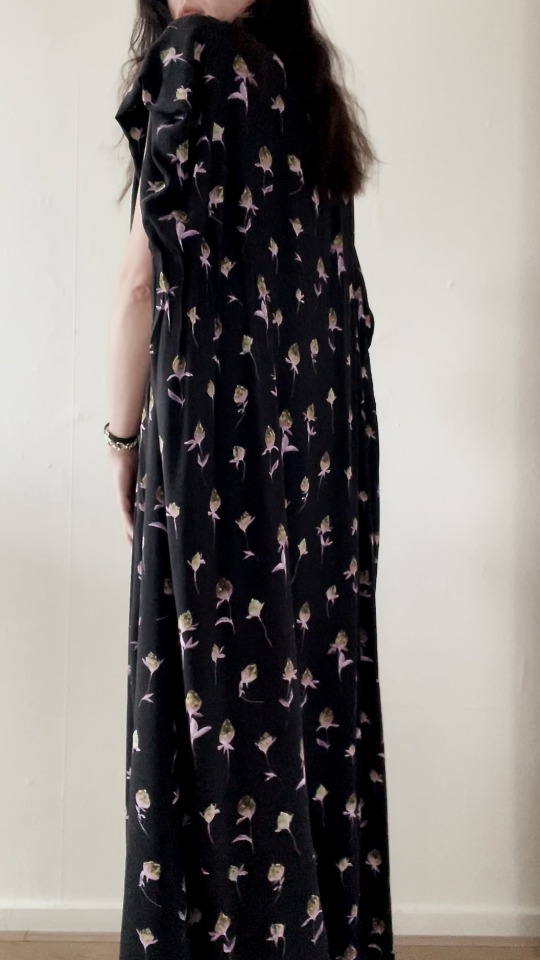
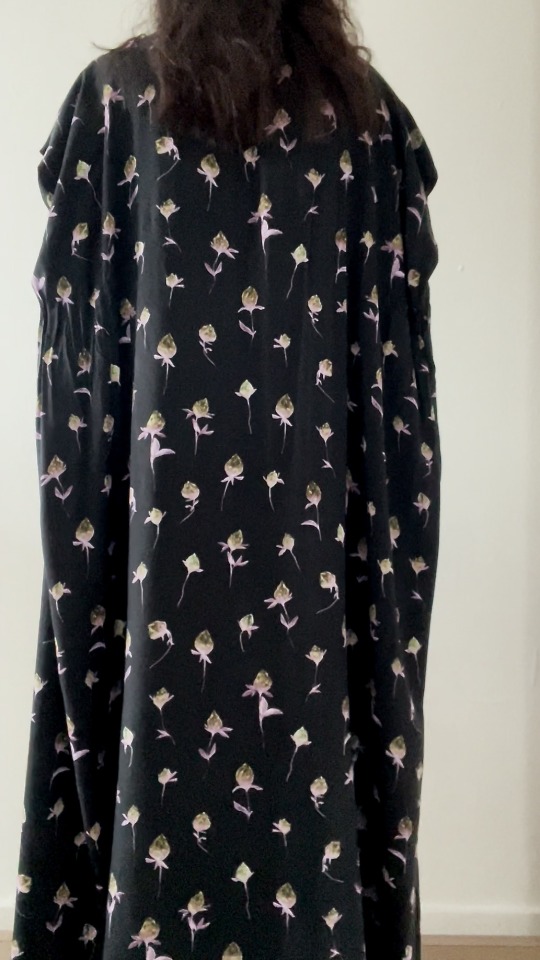
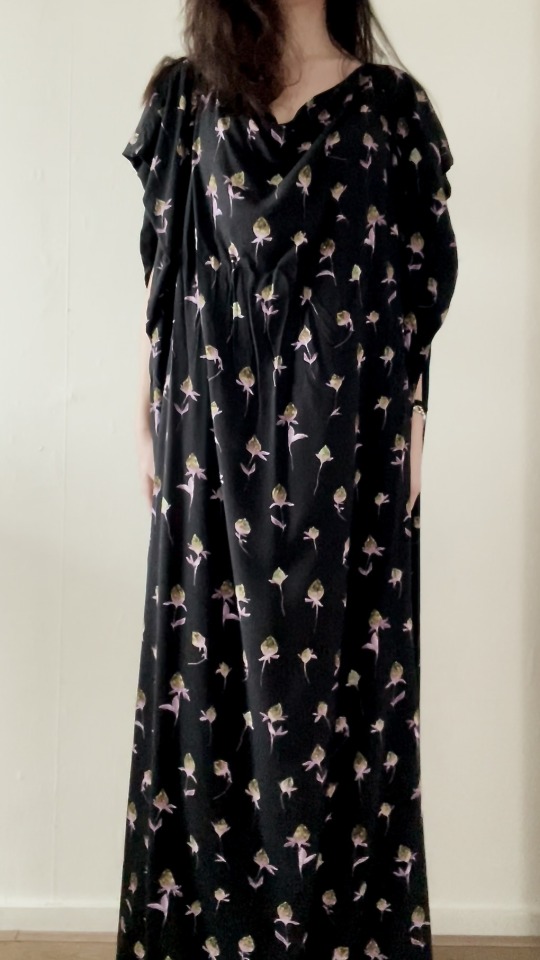
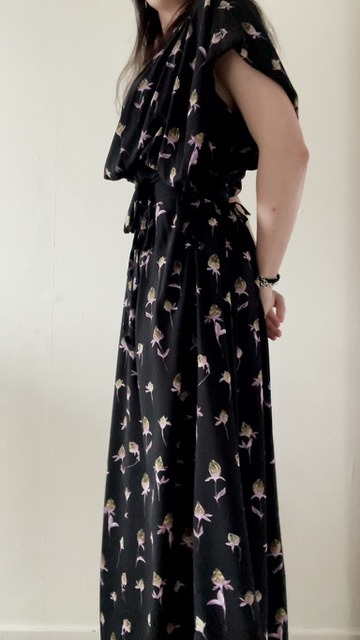
The basics: two rectangles sown together. the back-panel has triangles taken out of the top sides to make sure that the front panel gets a nice waterfall-neckline. The sides of the sleeves are folded-in to give it a nice cape-like effect.
Some notes:
I would suggest investing in a nice-feeling & drapy fabric, as that is what makes or breaks this dress since the rest is so simple.
Since the dress is basically two larger rectangles, it should be relatively easy to repurpose the fabric into other garments later on if you end up not liking it.
The tutorial is for a floor-length dress, however it can of course be made shorter if that’s what is wanted / if there’s a limited quantity of fabric. Similarly, the dress can be made less voluminous by using smaller panels.
The below schematics should be taken as a rough Gide, not an exact pattern. The pink line indicates seams that need to be stitched.
The details: The height of the front & back panel should be as long as your measurement from your neck to your ankles + ~5cm. The width should be as wide as possible (preferably the whole width of the fabric. I removed the selvedge but this isn’t necessary for all fabrics). I would suggest, at this point, to zigzag / overlock all fraying edges.
Using a dress form, or your own body, measure out how wide you want the back neckline to be. Put (safety) pins in place to mark it. Next, measure out how much drape you want at the front. Put pins. Adjust the back and/or front until satisfied. The diagram gives some idea, but should be taken as a guide not as strict instructions.

Sew the front panel to the back. Start at one side of the neckline and sew towards the armhole. Likely, the front-panel will have a “shorter” side-with than the back. Repeat on the other side.

Measure, on your body, how big you want the armholes to be (I went for ~60cm in the round). On either side of the back-panel, take out a triangle that measures 1/2 the armhole width on the side, and extends to where the front-panel ends. Remove this triangle of fabric (or fold it over and stitch into place) Finish raw edges.

Sew the side-seams together (I recommend from bottom to the top). Stop where the “armhole triangle” begins.

Lastly, fold the sleeve inwards to create the cape-like effect (light-pink arrow previous diagram). Put the dress on (or on a dress form) to determine how far you want the sleeves to be folded inwards (mine went almost all the way). Secure it with a few (hand) stitches at the point where the sleeve reaches furthest inwards (stitch in the stitch-line where the front is connected to the back panel in the same colour thread to ensure an almost invisible stitch).
That’s it! We’re finished.
The dress can be worn loose and flower, or with a belt / corset for a gathered look. The corset in the picture I also made.
#me myself and i#craftblr#craft blog#sewing#sewists of tumblr#sewblr#clothes making#fashion#dress making#me made wardrobe#tutorial#dress making tutorial
20 notes
·
View notes
Text
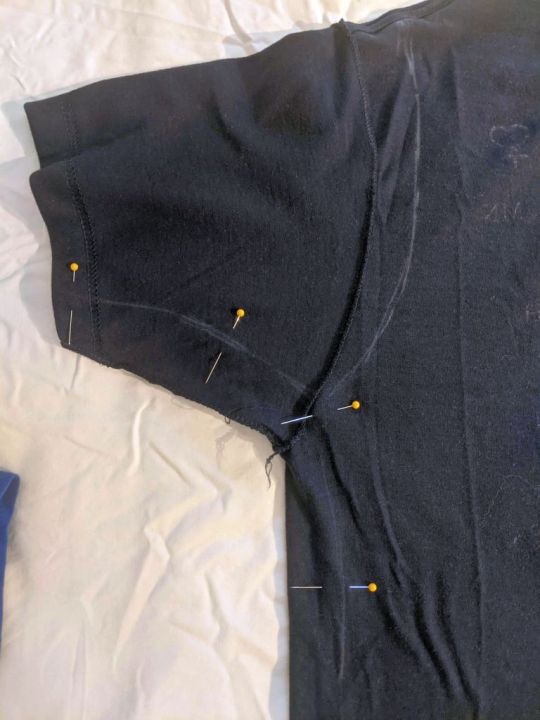
I get a lot of unisex, crew-neck t-shirts from various events and I typically alter the ones I have to/want to wear for one reason or the other. I am not a professional seamstress, but thought I would collect some of the things I learned here.
Now, the only thing you really need when altering a shirt is a pair of scissors, a needle and thread. It gets easier and faster if you have a few other things though;
another shirt with a shape that works for you. It can be shorter than you prefer, but pick something where you like the fit in the chest and waist.
a sewing machine capable of a zigzag stitch
washable fabric markers
sewing pins
a twin needle (unless you have a serger/coverstitch machine, but this post is probably not very helpful to you if that's what you are using)
A cutting mat and rotary cutter
A plate, bowl or something else hard and circular that is about 18-23 cm/7-9 inch wide
I have split this into two parts since you might like the fit of the shirt but hate the neckline, or vice versa.
Also, if it's your first time altering a t-shirt you probably don't want to do it on a shirt you really like!
Changing the fit
First off, iron the shirt inside-out. If you are using another shirt as a template, iron that as well. Try to make sure you iron along the side seams, if they don't have side seams use the sleeves and shoulders as a guide.

Keeping the shirts inside-out, you want to use your template shirt and use chalk or a temporary fabric marker to mark out where the new seams should be. If you don't have a template shirt you can put on the shirt and try to judge how much material you want to lose on the sides, or just wing it. Make a note of where on the sleeve seam the new shape comes together, and then mark the shoulders where you want the upper edge of the sleeves to end - then sketch out the new sleeve seam on both front and back. Be careful about this though, it is not a straight line so if you take too much the sleeve will be malformed. Preferably less than an inch/2 cm.


Next, pin the sides and sew them with a basting stitch - a straight stitch with a long stitch length. Because it is a stretchy fabric, this will probably snap - you can use a zig-zag stitch instead to avoid this, but we will do more seams to counter it either way. When the seams are done, try on the shirt - if the fit isn't right, use a seam ripper and try again.

Once the width of the shirt and the circumference of the sleeves feels right, cut away the slack leaving a ½ inch/1 cm seam allowance and use a three-step zig-zag stitch to seal the raw edges - this makes sure the fabric doesn't fray when you wash the shirt.

Moving on to the sleeves, flip the sleeves inside the shirt and pin along the marked edges. If there is any slack, try to distribute it evenly across the seam and stretch the shirt gently while sewing.
Work the same way as with the body, do a basting stitch first, try the shirt to make sure the fit works, then cut away the slack and seal the raw edges.

At this point we are done with the fit and can move on to the visible seams, so turn the shirt right-side out.
Changing the neckline and sleeve length
Now, before we begin sewing on the outside of the shirt it is important to note that t-shirts are made with jersey which is a knit fabric and very stretchy. You should not use a regular straight stitch on it - if you stretch the fabric before sewing the stitches will be loose, and if you don't they will snap when the fabric does get stretched. T-shirts solve this by having cover stitches like these:

This from a coverstitch machine, a type of serger, that has three or more threads - the bobbin thread is looped around the upper threads to create a zig-zag pattern on the back, if the shirt is stretched this straightens and the parallel seams are pulled closer together. you can use a zig-zag stitch to provide similar flexibility on a regular sewing machine, but you can also get a similar result as above by using a twin needle.


Twin needles work with most sewing machines that have a zigzag stitch - though note that you should use a straight stitch while using them. Otherwise they will likely hit the presser foot and break. You need an extra spool of thread - winding another bobbin works - and this needs to be put on a separate spool holder, check if your machine comes with one. If the manual explains how to thread the machine with several threads follow it, otherwise just thread the second one normally but skip the final step of threading it behind the needle bar thread guide.
If you are buying a twin needle specifically for jersey, look for a stretch or ballpoint needle as they are not as sharp and won't pierce the knit threads.


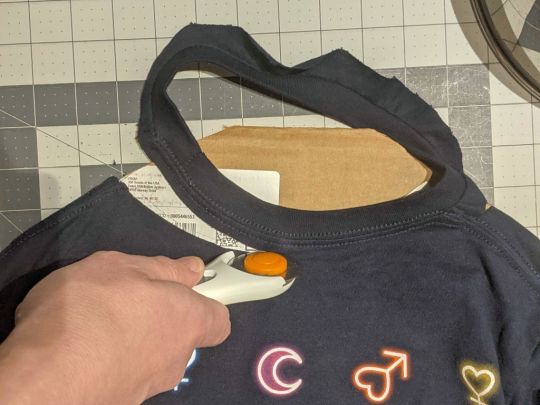

An easy way to get a clean and consistent look to your neckline is to center a plate around the existing neckline and use a rotary cutter. Make sure that the shirt is unstretched and the plate is exactly centered on the existing neckline. Also remember that you will need another 1 cm/½ inch of seam allowance so pick a slightly smaller plate than you want the neckline to be wide.
You can cut both the front and back at the same time if you want a plunging back as well, or you can put a smaller cutting mat or piece of cardboard in between and then cut the back a fixed distance from the original neckline. Note that using a rotary cutter on cardboard will dull it, so be careful.
You can also shorten the sleeves at this point - again, remember to account for seam allowance.


Pin the edges - if using a twin needle it is not strictly necessary to seal the raw edges but you can still do it if you want the shirt to be extra resilient.
You can also fold the hem twice instead of just once to make it more robust, and I recommend doing this if you are sewing by hand. Use a hemming stitch along the edge if you do this, you can keep the hem on either the inside or outside.

Finally, sew the neckline and shortened sleeves using the twin needle - be careful that you're catching the hem along the entire seam. Turn down the speed on your machine if you have to.
If your shirt is too long, you can cut it shorter and deal with the body the same way as the sleeves.
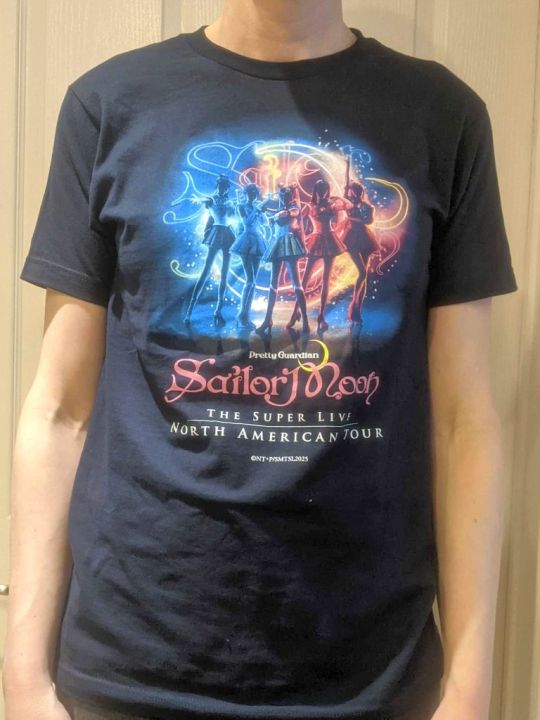

All done! Unfortunately these are the before/after pictures I am stuck with, but hopefully they give an idea of what you can do and it's been helpful to someone!
4 notes
·
View notes
Text
Your Comprehensive Guide to Successful Sewing

Guide to Successful Sewing
Whether you're a beginner just starting your sewing journey or an experienced seamstress looking to refine your skills, the Guidelines offer a wealth of knowledge to help you succeed in your sewing projects. This comprehensive collection of educational articles covers all aspects of sewing, from basic techniques to advanced methods. Exploring the Guidelines The Guidelines are organized into various categories, each focusing on different aspects of sewing. Let's take a closer look at what you can find: 1 - Sewing Tools Basic Tools Sewing Tools More Sewing Tools Mats for Rotary Cutters Rotary Mat Q&A Scissors and Shears Rotary Cutters Measuring Tools Marking Tools Tube Turners Part 1 Tube Turners Part 2 2 - Equipment Setting Up a Sewing Room Sewing Machine Basics Buying a Sewing Machine Pressing Equipment Ironing Boards Sergers Presses & Home Pressing Systems Serger Stitches Computerized Sewing Machines 3 - Understanding Patterns Pattern Markings Part 1 Pattern Markings Part 2 4 - Fabric The Right Fabric Preparing to Sew - Fabric and Pattern Preparation Cotton Identifying Fibers & Fabrics Denim - More Than Just Jeans Napped Fabrics Unconventional Fabric Sources Straightening Fabric Grain Sewing with Knits Working with Napped Fabrics Wool Slick Tricks: Laminated Fabrics and Vinyls Sewing with Handwovens Identifying Plaids Sewing with Minkee-like Fabrics 5 -Linings & Interfacings Interfacing 101 6 - Notions Button, Button Pins Invisible Thread Elastic - the Notion that Gives Selecting Snaps Bindings & Tapes Using Bias Tape Rick Rack 7 - Home Dec Bed Coverings Drapery Types Table Treatments: Tablecloths Table Treatments: Placemats, Napkins and Runners Decorating with Quilts 8 - Home Dec How To Pillows Fabric Napkins Covering a Lampshade with Fabric Making Rod Pocket Curtains Tab Top Curtains Making a Shower Curtain Covering a Bench Top Tassels 9 - Quilting Quilting Tools Quilting Terms Notions for Quilters Pre-Cut Quilting Fabrics Quilting Rulers Quilting Designs Making Bias and Bias Binding Binding a Quilt Prairie Points Yo-Yos Seminole Piecing
10 - Fashion/Apparel
Body Types Clothing Care and Repair 11 - General How-To Pressing Pants Simple Seaming Techniques Seam Finishes Part 1 Fold-Down Casings Simple Hems Staystitching Easing, Gathering & Shirring Working with Fold-over Elastic Applied Casings Twin-Needle Sewing Seam Finishes Part 2 Ruffles Working with Stripes Piping Princess Seams Flat Fell Seams Bound and Hong Kong Seam Finishes Beading Part 1 Beading Part 2 12 - Garment How-To Attaching Buttons Easy Waistband Casings Centered Zipper Button Loops Covered Buttons Understitching Dart Basics Topstitching Shirt Collar Pointers Read the full article
12 notes
·
View notes
Text
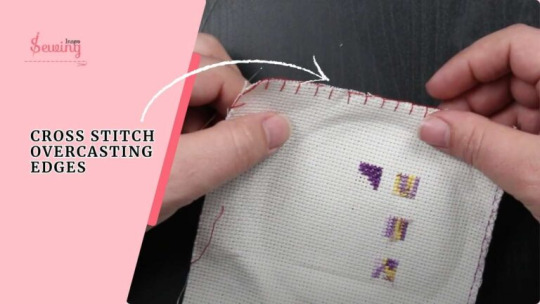
Cross Stitch Overcasting Edges
"Cross Stitch Overcasting Edges" can refer to a technique used to finish and secure the edges of a cross stitch project to prevent fraying, provide a neat appearance, and add durability.
This method is especially useful when working with loosely woven fabric or when the project is intended to be used or displayed long-term. Below is a comprehensive guide detailing what overcasting is and how you can execute it on your cross stitch projects:
1. Understanding Overcasting
Overcasting Defined: Overcasting is a finishing technique where you sew a row of stitches along the raw edge of the fabric. The idea is similar to a serger’s overlock stitch in machine sewing, but it’s adapted for hand embroidery. In cross stitch, this is typically done using a decorative or matching embroidery stitch that runs along the boundary of the finished design, essentially “capping” the edge.
Why It’s Important:
Prevents Fraying: Overcasting stitches secure the raw fabric, reducing the risk of the threads coming undone or the fabric fraying.
Enhances Appearance: A well-executed overcast edge gives the piece a polished, professionally finished look.
Adds Durability: By reinforcing the edges, you extend the life of your project, especially if it will be handled frequently.
2 notes
·
View notes
Text
Unspooling
If I am a pair of rumpled trousers, the tattered overnight shirt, or a too toe-worn shoe, yours would be the hand that mends, the steady heat of glowing iron, a phantom thread for shifting strands. From thine needle and forefingers, a delicate insect music, symphonies of broken bobbins, silent choirs of torn caftans. You are the patch beneath my wings, the guiding stitch along the folds, beneath the seams. Off the cuff, bold. Yours is the name sewn and secreted behind the breastplate, a thin veil of kerchief for one who is so close to my heart. Tailor, costumer, dressmaker, it is you who is the fabric, the textile and I so often the dummy. You who should have suits, skirts, garments all your own, cut and drafted by a million tiny rodent hands, stitched by the soft beaks of a thousand sergering songbirds. But I know better still, what it is your considered heart would most desire, what from this ragged pen-man might issue to stoke and reawaken your native fire. Be it ink or thread or sand that unspools and spills and spans, take with thee always the name of this pleated patchwork penitent and keep it close upon thy lips, thy ears between your strides, for our names are ever interwoven and without your love this fit is little more than ill-tailored disguise. - August 2022
[UPDATE]: Honorable Mention in the Poetry Competition for the 25th annual LACC English/ESL Department Writing Contest - May 2025
0 notes
Text
Which Sewing Machine Category Fits Your Needs? A Buyer’s Guide to Making the Right Choice”
Buying a sewing machine can be confusing, especially with so many different categories available. Each type of sewing machine serves a unique purpose—from basic repairs to professional embroidery. This guide breaks down the main categories of sewing machines so you can find the perfect fit for your crafting needs.
1. Domestic/Home Sewing Machines
Overview: These machines are designed for general home use and basic sewing projects.
Ideal For: Hobbyists, DIYers, and beginners working on clothes, home décor, and simple accessories.
Benefits:
Affordable
Compact and user-friendly
Often includes essential stitches and buttonhole functions
Limitations: Not built for heavy-duty or commercial use
2. Industrial Sewing Machines
Overview: Heavy-duty machines built for continuous operation in factories or workshops.
Ideal For: Professional tailors, upholstery workers, and small business owners.
Benefits:
Extremely durable and fast
Designed for heavy fabrics like denim and leather
Long-lasting performance under pressure
Limitations: Bulky, noisy, and more expensive Requires dedicated workspace and experience
3. Embroidery-Only Machines
Overview: Focused entirely on decorative stitching, these machines are perfect for creating monograms and intricate designs.
Ideal For: Craft sellers, custom embroidery work, and enthusiasts
Benefits:
Stunning, complex patterns
High-resolution touch screens (in modern models)
Built-in memory for saving designs
Limitations: Can’t be used for regular sewing tasks Often costly
4. Serger/Overlocker Machines
Overview: Not a substitute for a standard sewing machine, but a powerful complement.
Ideal For: Anyone who wants to sew professional-quality clothing at home
Benefits:
Finishes seams beautifully
Adds elasticity to garments
Trims fabric while sewing
Limitations: Learning curve for threading Limited to finishing and edging, not general sewing
5. Multi-Function Sewing Machines
Overview: Combines regular sewing and embroidery functions, offering the best of both worlds.
Ideal For: Users looking for versatility without buying multiple machines
Benefits:
Saves space and money
Great for small businesses and advanced hobbyists
Offers a broad range of stitches and design capabilities
Limitations: Can be expensive Might not be as powerful as separate dedicated machines
0 notes
Text
Unlocking the Power of Your Serger: Professional Advice for Success
If you're a sewing lover seeking to take your projects to the next level, integrating a serger into your arsenal can be a game-changer. Sergers, likewise called overlock makers, are versatile tools that can assist you accomplish professional-looking finishes on your garments and other sewing creations. Mastering the art of using a serger may appear intimidating at. Worry not! In this comprehensive guide, we'll walk you through whatever you need to understand about utilizing a serger effectively.Getting to Know Your Serger : Comprehending the Fundamentals Before diving into utilizing your serger, it 's vital to acquaint yourself with its basic parts. A typical serger features several thread spools, loopers, knives for cutting material edges, and numerous tension dials. Understanding how each part contributes to the stitching process will set you up for success when operating your serger.Threading Your Serger Like a Pro: Step-by-Step Guide Among the most challenging elements of using a serger is threading it properly. With practice and perseverance, you can master this vital step. Start by describing your maker's manual for specific threading guidelines customized to your model. Follow each thread course thoroughly, ensuring that threads are correctly seated in tension discs and loopers. As soon as you have actually threaded your serger a few times, you'll become more positive in this process.Adjusting Stitch Length and Width: Personalizing Your Sewing Projects Customizing stitch length and width on your serger enables you to attain different surfaces and results on your tasks. Experiment with various settings to see how they impact the appearance and sturdiness of your seams. Shorter stitch lengths are ideal for protecting knit materials, while wider stitches work well for decorative edges. Make the effort to check numerous settings on scrap fabric before devoting to your final project.Mastering Different Serging Strategies: From Rolled Hems to Flatlocking Sergers use a wide variety of sewing techniques beyond standard seam finishing. Check out sophisticated methods such as rolled hems for fragile fabrics or flatlocking for creating ornamental joints with contrasting threads. Each method requires specific adjustments to your serger settings, so make sure to practice on scraps till you feel comfy performing these methods flawlessly.Troubleshooting Tips: Common Issues and How to Repair Them As with any device, sergers can come across concerns from time to time. From skipped stitches to stress problems, troubleshooting typical concerns is essential for maintaining smooth operation. Describe your handbook for guidance on fixing particular issues or consult from online resources and stitching neighborhoods. Regular upkeep such as cleaning up lint build-up and oiling moving parts can likewise avoid numerous problems before they arise.Maintenance and Care: Keeping Your Serger in Leading Condition To make sure longevity and ideal performance from your serger, regular maintenance is essential. Clean out lint after each usage, oil moving parts as recommended by the producer, and have your device serviced annually by an expert if required. Looking after your serger will not just lengthen its life-span however also ensure constant stitch quality on all your projects.In conclusion, opening the power of your serger needs patience, practice, and a determination to find out brand-new methods. By comprehending the basics of how a serger works, threading it correctly like a pro, customizing stitch settings for different projects, mastering various strategies, fixing typical issues efficiently; keeping up with upkeep routines will make sure that your sewing journey with a serger is smooth cruising ahead !
help on sergers
0 notes
Text
Unlocking the Power of Your Serger: Specialist Advice for Success
If you're a sewing enthusiast wanting to take your tasks to the next level, incorporating a serger into your toolbox can be a game-changer. Sergers, likewise referred to as overlock devices, are versatile tools that can assist you accomplish professional-looking surfaces on your garments and other sewing developments. However, mastering the art of utilizing a serger might appear daunting initially. Fear not! In this extensive guide, we'll stroll you through whatever you need to know about using a serger effectively.Getting to Know Your Serger : Comprehending the Basics Before diving into using your serger, it 's necessary to acquaint yourself with its fundamental parts. A normal serger features several thread spindles, loopers, knives for trimming fabric edges, and numerous tension dials. Comprehending how each part contributes to the stitching process will set you up for success when operating your serger.Threading Your Serger Like a Pro: Step-by-Step Guide Among the most challenging aspects of using a serger is threading it correctly. Nevertheless, with practice and perseverance, you can master this essential step. Start by referring to your maker's handbook for specific threading instructions tailored to your model. Follow each thread course thoroughly, making sure that threads are properly seated in stress discs and loopers. As soon as you have actually threaded your serger a few times, you'll end up being more positive in this process.Adjusting Stitch Length and Width: Tailoring Your Sewing Projects Tailoring stitch length and width on your serger allows you to achieve different finishes and impacts on your jobs. Experiment with different settings to see how they affect the appearance and durability of your seams. Shorter stitch lengths are ideal for protecting knit materials, while larger stitches work well for ornamental edges. Make the effort to check different settings on scrap fabric before devoting to your final project.Mastering Various Serging Methods: From Rolled Hems to Flatlocking Sergers use a vast array of sewing techniques beyond basic seam ending up. Explore innovative strategies such as rolled hems for delicate fabrics or flatlocking for producing decorative joints with contrasting threads. Each technique needs specific adjustments to your serger settings, so be sure to practice on scraps up until you feel comfortable executing these techniques flawlessly.Troubleshooting Tips: Common Issues and How to Repair Them Similar to any maker, sergers can come across problems from time to time. From skipped stitches to stress problems, fixing common problems is important for maintaining smooth operation. Refer to your handbook for guidance on dealing with specific issues or consult from online resources and stitching neighborhoods. Routine upkeep such as cleaning up lint accumulation and oiling moving parts can likewise prevent numerous issues before they arise.Maintenance and Care: Keeping Your Serger in Top Condition To make sure longevity and optimal efficiency from your serger, routine maintenance is essential. Clean out lint after each use, oil moving parts as suggested by the maker, and have your maker serviced annually by a professional if required. Looking after your serger will not only prolong its life expectancy however also ensure consistent stitch quality on all your projects.In conclusion, unlocking the power of your serger needs persistence, practice, and a willingness to find out new strategies. By comprehending the essentials of how a serger works, threading it correctly like a pro, personalizing stitch settings for different jobs, mastering different techniques, troubleshooting common problems successfully; keeping up with upkeep routines will make sure that your sewing journey with a serger is smooth cruising ahead !
help on sergers
0 notes
Text
Do You Need a Serger Machine? What You Need to Know Before You Buy

If you're passionate about sewing or just starting to explore the world of garment creation, you may have heard the term "serger" floating around. But do you really need one?
Serger machines, also known as overlock machines, are popular among experienced sewists for their ability to give professional-looking finishes. If you're wondering whether adding a serger to your sewing setup is worth it, let’s break down what they do and what you need to know before you buy one.
What Exactly Is a Serger?
Serger machines are special types of sewing machines that are designed to trim and enclose raw edges while stitching seams. It does this by using multiple threads (usually three or four) to create a tight, durable seam that won’t fray. Sergers also sew much faster than regular sewing machines, making them a favorite for sewists who value efficiency.
One of the key features of a serger is its ability to create clean, finished edges—especially useful when working with fabrics that tend to fray, such as knits or linens. You might have seen these neat seams in store-bought clothing, where the inside edges are overlocked, preventing fabric from unraveling. That’s what a serger does best.
When Do You Need a Serger?
The short answer is: it depends on your sewing needs. A serger isn’t necessary for basic sewing projects, but it can be a game-changer if you want to elevate the quality of your garments or home décor items. Here are some scenarios where a serger can really shine:
Finishing Garments: If you love sewing clothes, a serger can give your pieces a professional, store-bought look. The finished edges are neat, strong, and smooth.
Working with Knits: Sergers handle stretchy fabrics like jersey and spandex exceptionally well. The overlock stitch allows the seam to stretch with the fabric, preventing popped stitches.
Speed: Sergers stitch much faster than regular machines. If you're tackling large projects or running a sewing business, this could save you a lot of time.
Durability: Seams created by sergers tend to be more durable because they use multiple threads. This is ideal for clothing that will see a lot of wear and tear, like activewear or children's clothes.
If you find yourself constantly working on garments, knits, or large projects, you may want to seriously consider getting a serger.
How to Choose the Right Serger for You
If you’ve decided that a serger is the right addition to your sewing arsenal, it’s important to choose one that fits your needs and budget. Here are a few factors to consider:
Number of Threads
Most basic sergers use three or four threads, but some models offer up to five. A four-thread serger is the most versatile and will work for most projects. If you're a beginner, sticking with a three- or four-thread machine is a good starting point.
Differential Feed
This is an essential feature if you plan to work with stretchy or delicate fabrics. The differential feed controls how the fabric is fed through the machine, preventing issues like puckering or wavy seams. If you're sewing knits or lightweight fabrics, make sure your serger has this feature.
Ease of Threading
Sergers can be notoriously tricky to thread, but newer models have simplified the process with color-coded threading guides and automatic air threading systems. If you're not confident in your ability to manage multiple threads, look for a machine that makes threading easier.
Speed and Noise
Since sergers operate at higher speeds than standard sewing machines, some models can be quite loud. If noise is a concern for you, read reviews or test a machine in-store to see if it operates at a comfortable noise level. Speed is another factor to consider if you’re working on large projects.
Shop for Serger Machines on Premier Stitching
If you’re aiming for professional results, working with a variety of fabrics, or just want to speed up your sewing process, then you might want to consider adding a serger machine to your setup. The best place to find them is Premier Stitching – they carry serger machines from some of the most reliable manufacturers in the industry, including Baby Lock, Janome, Juki, and Bernette. Visit Premier Stitching now to learn more.
For more information about Quilt Frames and Quilting Accessories please visit:- Premier Stitching DBA Sew Vac City
0 notes
Text
A Guide to the Best of Naaimachinewinkel
Sewing is not just a skill; it's an art form that requires the right tools and equipment to achieve perfection. Whether you're a professional tailor or a hobbyist, having access to a top-notch sewing machine store, or "Naaimachinewinkel" as it's known in Dutch, can make all the difference. One such store that has garnered attention in the sewing community is Naaimachinewinkel, renowned for its wide range of sewing machines, accessories, and particularly the highly sought-after Juki Lockmachine. This guide aims to walk you through everything you need to know about Naaimachinewinkel, the Juki Lockmachine, and why they should be your go-to for all sewing needs.

Why Choose Naaimachinewinkel?
Naaimachinewinkel has established itself as a leader in the sewing industry. Located in the Netherlands, this store specializes in a vast array of sewing machines and related accessories, catering to both beginners and experienced sewists. Here are some key reasons why Naaimachinewinkel stands out:
Extensive Range of Products: Naaimachinewinkel offers an impressive selection of sewing machines, from basic models for beginners to advanced machines for professionals. Whether you're looking for a simple sewing machine for household repairs or a sophisticated embroidery machine, Naaimachinewinkel has you covered.
Expert Advice and Support: The team at Naaimachinewinkel is composed of experienced professionals who are passionate about sewing. They are always ready to provide expert advice, helping customers choose the right machine based on their needs and skill level. This personalized service ensures that you make an informed decision.
Competitive Pricing: Naaimachinewinkel offers competitive pricing on all its products. They understand that sewing machines can be a significant investment, so they strive to offer the best value for money. Additionally, they frequently run promotions and discounts, making it even more affordable to purchase top-quality sewing machines and accessories.
After-Sales Service: A good sewing machine store doesn't just stop at selling products; it also provides excellent after-sales service. Naaimachinewinkel excels in this area, offering maintenance, repairs, and spare parts for all the machines they sell. This ensures that your sewing machine remains in optimal condition for years to come.
Convenient Online Shopping: For those who prefer shopping from the comfort of their homes, Naaimachinewinkel has a user-friendly online store. The website is easy to navigate, with detailed product descriptions, customer reviews, and an efficient checkout process. This makes it convenient for customers across the Netherlands and beyond to access their products.
The Juki Lockmachine: A Seamstress's Dream
Among the many products available at Naaimachinewinkel, the Juki Lockmachine stands out as a favorite among both amateur and professional sewists. Known for its precision, durability, and ease of use, the Juki Lockmachine is a serger that takes your sewing projects to the next level.
What is a Lockmachine?
Before diving into the specifics of the Juki Lockmachine, it's essential to understand what a lockmachine, or serger, is. A lockmachine is a type of sewing machine that uses multiple threads to stitch and overlock fabric edges simultaneously. This machine is particularly useful for finishing seams, preventing fraying, and giving garments a professional finish.
Features of the Juki Lockmachine
The Juki Lockmachine is celebrated for its outstanding features, which include:
High-Speed Sewing: The Juki Lockmachine is designed for high-speed sewing, capable of stitching up to 1,500 stitches per minute. This makes it an excellent choice for professionals who need to complete projects quickly without compromising on quality.
Automatic Rolled Hemming: One of the standout features of the Juki Lockmachine is its ability to automatically create rolled hems. This feature is particularly useful for delicate fabrics, ensuring a neat and professional finish.
Differential Feed: The Juki Lockmachine comes with a differential feed mechanism that allows you to adjust the feed ratio for different types of fabrics. This feature helps in preventing fabric from puckering or stretching, ensuring smooth and even seams.
Multiple Thread Options: Depending on the model, the Juki Lockmachine can use two, three, or four threads, providing versatility in stitch options. This allows you to create a wide range of finishes, from simple overlock stitches to intricate decorative edges.
Ease of Use: Despite its advanced features, the Juki Lockmachine is designed to be user-friendly. The threading system is straightforward, and the machine comes with clear instructions, making it accessible even for beginners.
Why Choose the Juki Lockmachine from Naaimachinewinkel?
While the Juki Lockmachine is widely available, purchasing it from Naaimachinewinkel comes with several benefits:

Authorized Dealer: Naaimachinewinkel is an authorized dealer of Juki products, ensuring that you receive genuine machines with full warranty coverage. This gives you peace of mind knowing that your investment is protected.
Expert Guidance: The team at Naaimachinewinkel is knowledgeable about the Juki Lockmachine and can provide detailed guidance on how to use it effectively. Whether you're purchasing your first lockmachine or upgrading to a more advanced model, they can help you make the right choice.
Exclusive Offers: Naaimachinewinkel often has exclusive offers on the Juki Lockmachine, including bundle deals that include essential accessories. This makes it more affordable to get started with your sewing projects right away.
Maintenance and Repairs: As with all machines, regular maintenance is key to ensuring longevity and optimal performance. Naaimachinewinkel offers maintenance services for the Juki Lockmachine, helping you keep it in perfect working condition.
Other Noteworthy Machines at Naaimachinewinkel
While the Juki Lockmachine is undoubtedly a highlight, Naaimachinewinkel also offers a range of other high-quality sewing machines that are worth considering. Here are a few:
Brother Sewing Machines
Brother is a well-known brand in the sewing world, and Naaimachinewinkel carries a wide selection of Brother sewing machines. Known for their reliability and user-friendly features, Brother machines are perfect for both beginners and experienced sewists. From basic mechanical models to advanced computerized machines, Brother has something for everyone.
Bernina Sewing Machines
Bernina sewing machines are synonymous with Swiss precision and quality. These machines are designed for serious sewists who demand the best. Naaimachinewinkel offers a range of Bernina machines, including models with embroidery capabilities, quilting features, and more. If you're looking for a machine that can handle complex projects with ease, Bernina is a great choice.
Pfaff Sewing Machines
Pfaff is another top brand available at Naaimachinewinkel. Known for their innovative features and high-quality construction, Pfaff machines are a favorite among sewists who need a machine that can handle heavy fabrics and intricate stitching. With features like the IDT (Integrated Dual Feed) system, Pfaff machines ensure perfect stitching every time.
Accessories and Supplies at Naaimachinewinkel
In addition to sewing machines, Naaimachinewinkel offers a comprehensive range of accessories and supplies to complement your sewing experience. Here are some of the essential items you can find:
Needles and Threads
The quality of your sewing project often depends on the needles and threads you use. Naaimachinewinkel offers a wide selection of needles for different types of fabrics, as well as high-quality threads in various colors and materials. Whether you're working with delicate silks or heavy denim, you'll find the right needles and threads at Naaimachinewinkel.
Presser Feet
Different sewing projects require different presser feet, and Naaimachinewinkel has you covered. They offer a variety of presser feet, including zipper feet, buttonhole feet, and walking feet, among others. These accessories help you achieve precise and professional results in your sewing.
Sewing Machine Maintenance Kits
Keeping your sewing machine in top condition is crucial for its longevity and performance. Naaimachinewinkel offers maintenance kits that include cleaning brushes, oil, and other essential tools to help you care for your machine.
Fabric and Patterns
In addition to machines and accessories, Naaimachinewinkel also offers a selection of fabrics and patterns. This makes it a one-stop shop for all your sewing needs, allowing you to start a project right away without the need to source materials from multiple places.
Conclusion
Naaimachinewinkel is more than just a sewing machine store; it's a hub for the sewing community in the Netherlands and beyond. With a wide range of high-quality machines, including the highly recommended Juki Lockmachine, and a comprehensive selection of accessories and supplies, Naaimachinewinkel is the go-to destination for all your sewing needs. Whether you're a seasoned professional or just starting your sewing journey, you'll find everything you need at Naaimachinewinkel.
The Juki Lockmachine, in particular, is a standout product that offers exceptional performance, versatility, and ease of use. By purchasing it from Naaimachinewinkel, you not only get access to a top-tier machine but also benefit from expert guidance, competitive pricing, and excellent after-sales service.
So, if you're in the market for a new sewing machine or simply want to upgrade your existing setup, look no further than Naaimachinewinkel. Visit their store or browse their website today to explore their extensive range of products and take your sewing projects to the next level.
0 notes
Text
The Ultimate Guide to Altering Shirt Sleeves for the Ideal Length
In the world of fashion, the perfect fit is king. Whether it's for a business meeting, a casual outing, or a special occasion, wearing clothes that fit you perfectly can make a huge difference in your appearance and confidence. This is particularly true for shirts, where the length of the sleeves can significantly impact the overall look. For those in London seeking to refine their wardrobe, mastering the art of shirt sleeve alteration is key.

Understanding the Basics of Shirts Alteration in London
Before you decide to alter your shirt sleeves, it's important to understand what makes for a perfect fit. Ideally, the sleeve should end at the hinge of your wrist, allowing a quarter to a half inch of your shirt cuff to be visible under your jacket. This subtle detail signifies sartorial expertise and ensures a polished look.
When to Consider Dress Alteration
Long Sleeves: If your shirt sleeves extend to cover your hand, it's time for an alteration.
Short Sleeves: Sleeves that end above the wrist bone can make your shirt appear too small.
Baggy Sleeves: Excess fabric around the arm not only looks untidy but also feels uncomfortable.
Step-by-Step Guide to Altering Shirt Sleeves
Tools You'll Need:
Seam ripper
Measuring tape
Pins
Sewing machine or needle and thread
Iron
Steps:
Measure the Ideal Length: Put the shirt on and bend your arm slightly. Mark where you want the new sleeve length to be with a pin. Remember to consider the cuff size in your measurement.
Remove the Cuff: Use your seam ripper carefully to detach the cuff from the sleeve. Keep it intact, as you'll be reattaching it later.
Trim the Excess Fabric: Measure the amount of fabric to be removed based on your new length, leaving extra for seam allowance. Cut the fabric carefully.
Reattach the Cuff: Pin the cuff to the trimmed sleeve, ensuring it's evenly attached. Sew it back on, either by hand or with a sewing machine.
Press the Sleeve: Use an iron to press the sleeve and the newly attached cuff to give it a professionally altered look.
Tips for Perfect Dress Alteration
Always measure twice before cutting to avoid any mistakes.
For a professional finish, match the thread color to the existing stitches on the Shirts alteration.
If you're unsure about your sewing skills, consider taking your shirts to a professional tailor for alteration.
Finding Professional Shirts Alteration Services in London
For those who prefer a professional touch, London boasts a wealth of skilled tailors specialized in dress and Suit alteration London. These experts can ensure your shirts are altered to your exact specifications, providing advice on fit and style along the way.
When altering shirt sleeves to achieve the ideal length, there are several common techniques and considerations to keep in mind:
1. Measurement: Start by determining the desired sleeve length by measuring from the shoulder seam to the desired cuff length.
2. Pinning: Use pins to mark the desired sleeve length while wearing the shirt. This allows you to see how the altered length will look and make adjustments as needed before cutting or sewing.
3. Cutting: Once the desired sleeve length is determined, carefully cut the excess fabric from the sleeves.
4. Hemming: Depending on the fabric and desired finish, hem the sleeves by folding the raw edge under and sewing it in place. Alternatively, you can use a serger or overlock machine to finish the edges for a clean look.
5. Cuff Adjustment: If the sleeve cuffs need to be resized along with the sleeve length, carefully remove the cuffs, shorten them to match the new sleeve length, and reattach them using a sewing machine or hand stitching.
By following these techniques and considerations, you can effectively alter shirt sleeves to achieve the ideal length and enhance the overall fit and appearance of your shirt.
0 notes
Text
Understanding the Price and Product of Overlock Sewing Machines: A Comprehensive Guide

Overlock sewing machines have become an essential tool for many sewers, offering a range of benefits that enhance the quality and efficiency of their work. These machines are particularly useful for those who work with stretchy fabrics, such as knits, or who need to finish seams quickly and effectively. However, with so many options available on the market, it can be challenging to determine which overlock sewing machine is right for you and what you should expect to pay. This guide aims to provide a comprehensive overview of the price and product of overlock sewing machines, helping you make an informed decision for your sewing needs.
What Are Overlock Sewing Machines?
Overlock sewing machines, also known as sergers, are designed to finish seams quickly and efficiently. They use a combination of two to five threads to create a strong, stretchy seam that prevents fraying and provides a professional finish. These machines are particularly useful for sewing stretchy fabrics, such as knits, and are often used in the production of clothing, home decor items, and accessories.
Types of Overlock Sewing Machines
Overlock sewing machines come in a variety of styles and sizes, each with its own unique features and capabilities. Some common types of overlock sewing machines include:
Basic Overlock Machines: These machines are designed for basic sewing tasks and are often the most affordable option. They typically have a simple design and limited features.
Advanced Overlock Machines: These machines offer more advanced features, such as adjustable stitch length and width, and are designed for more complex sewing tasks.
Computerized Overlock Machines: These machines are equipped with advanced computerized features, such as automatic threading and tension control, and are designed for high-volume sewing operations.
Factors Affecting the Price of Overlock Sewing Machines
The price of an overlock sewing machine can vary significantly depending on several factors, including:
Brand and Quality: Overlock sewing machines from well-known brands tend to be more expensive than those from lesser-known brands. Similarly, high-quality machines with advanced features and durable construction tend to be more expensive than basic models.
Features and Capabilities: Machines with more advanced features, such as automatic threading and tension control, tend to be more expensive than those with basic features.
Size and Portability: Smaller, more portable machines tend to be less expensive than larger, more heavy-duty models.
Warranty and Support: Machines with longer warranties and better customer support tend to be more expensive than those with shorter warranties and limited support.
What to Expect to Pay for an Overlock Sewing Machine
The price of an overlock sewing machine can vary significantly, depending on the type and features of the machine. Here are some general price ranges to expect:
Basic Overlock Machines: $100-$500
Advanced Overlock Machines: $500-$2,000
Computerized Overlock Machines: $2,000-$5,000
Conclusion
Overlock sewing machines are an essential tool for many sewers, offering a range of benefits that enhance the quality and efficiency of their work. By understanding the different types of overlock sewing machines available and the factors that affect their price, you can make an informed decision for your sewing needs. Whether you're a beginner or an experienced sewer, an overlock sewing machine can help you achieve professional-looking results and streamline your sewing process.
0 notes
Text
Singer 14SH644 serger test and review

Singer is a reference brand in terms of sewing. It is therefore natural that we find sergers in its range. Are they up to the sewing machines that made its reputation? We have tested the Singer 14SH644 serger for you and we give you our opinion.
Introducing the Singer 14SH644 Serger
It is a particularly complete material that Singer delivers with the 14SH644 overlocker. Like all sergers, this device has been designed to cut, sew and overcast fabrics in a single step. But where the 14SH644 serger stands out favorably from its competitors is that it allows you to sew two fabrics at the same time. It therefore offers great versatility, with the work of thin or thick fabrics, including the production of hems. The stitches made are neat and precise, ensuring the aesthetics of the work and the solidity of the seams. Budget level, the indicative price recommended by Singer is 369 €. This puts the Singer 14SH644 serger in the middle price range for such equipment. Technical characteristics of the Singer 14SH644Here are the technical characteristics of the Singer 14SH644 serger: 1300 stitches per minute; 4 thread spools; 2 needles; 2 loopers; Voltage adjustable for each coil independently; Telescopic thread guide; Automatic Thread Cutter; Automatic ejection of the presser foot sole; LED lighting ; Simplified threading; Color code for donning; Removable upper knife; Fixed lower knife; Convertible needle plate; Stitches adjustable in width and length; Accessory kit.ts strengths The Singer 14SH644 serger is sold ready to use and the spools are pre-installed. This is a real plus for beginners, who can see how the machine is threaded and get to work quickly. When renewing the thread cones, the preparation of the Singer 14SH644 serger is made easier thanks to a color code that helps to position the threads of the 4 spools correctly and to adjust the tension, one by one. The telescopic thread guide also contributes to this. The threading of the left looper is simplified and the sole of the presser foot with automatic ejection. Within a short time, the serger is ready for use again. But the most notable highlight for the Singer 14SH644 serger, given its range, is its ability to sew multiple fabrics at once. This is a rare feature for a serger that even higher end machines don't have. It is close to professional equipment. Just like the rendering of sewn overlocks. Adjusting the stitches in width and length delivers very high quality work. Among the points, we find the overcast and the rolled, the latter being rather intended for fine fabrics. The LED-lit worktop is a real comfort for the seamstress, who will be able to work with precision and resume her work at any time, regardless of the surrounding natural light. As for the free arm function, it quickly becomes essential for hemming sleeves and trousers. With its two needles and its powerful motor that can sew up to 1300 stitches per minute, the work progresses quickly when working on the Singer 14SH644 serger. The accessories provided allow you to maintain your equipment at no extra cost for the first uses, which is very appreciable. The device is equipped with a carrying handle, to move its equipment at will. Its selling price of €369 represents a substantial budget, but remains reasonable for an overlocker whose prices can soar much higher.Its weak points The Singer 14SH644 overlock user manual is detailed and illustrated. However, the seamstress will have to familiarize herself with the technical terms used, which are not necessarily familiar to beginners. The drawings and diagrams have the merit of existing but are not always the most explicit. Only 4 stitches can be made with the Singer 14SH644 serger: 3-thread overlock, for overlocking and sewing common fabrics; the flat 3-thread overlock, for assembly and decorative seams; the 3-thread overlock, for rolled and decorative hems; the ultra-stretch 4-thread faux-safety stitch, for stretch fabrics, double jersey... This number of stitches is much more limited than on other competing overlockers. Also, it is not possible to work with only two threads, as other machines offer. Which seamstresses is it for? The most experienced seamstresses are the ones who most often consider using a serger. The 14SH644 has what it takes to meet most of their needs. However, even if it comes close in many ways, it is not a professional serger. For some projects, choosing even better equipped and more powerful hardware is preferable Beginner seamstresses can also get started with this serger. With a little patience and perseverance, its use is within everyone's reach. And thanks to its features, the investment pays off in the long run. Our review of the Singer 14SH644 serger Our test allowed us to see that the Singer 14SH644 serger provides a result that meets the expectations that a seamstress can expect. It honors the reputation of the Singer brand. Despite having a limited number of stitches, the 14SH644 serger is still versatile and suitable for most projects. Read the full article
1 note
·
View note
Text
How To Do An Overcast Stitch On A Sewing Machine?
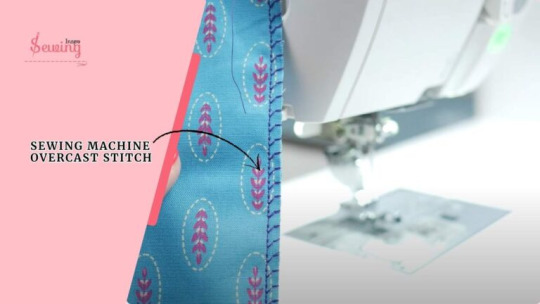
An overcast stitch on a sewing machine is a stitch designed to finish the edges of fabric to prevent fraying. It's commonly used on raw fabric edges to give a neat, professional look and is especially useful on fabrics that tend to unravel easily. Here's a detailed breakdown of the overcast stitch on a sewing machine:
1. What is an Overcast Stitch?
An overcast stitch is a type of stitch that wraps around the edge of the fabric to prevent the raw edges from fraying. It's similar to what you’d get with a serger but done with a standard sewing machine. The stitch looks like a zigzag stitch, but it’s typically wider and more focused on the edge of the fabric, creating a neat and finished appearance.
2. How to Set Up Your Sewing Machine for an Overcast Stitch:
Select the Overcast Stitch: Most modern sewing machines have a dedicated overcast stitch, often marked with a symbol that looks like a zigzag with a stitch along the edge. If your machine doesn’t have a specific overcast stitch, you can use a zigzag stitch set at a wider width and shorter length.
Needle and Thread: Use a universal needle for regular fabrics or a ballpoint needle for knit fabrics. Match your thread color to your fabric or choose a contrasting color for a decorative touch.
Presser Foot: Some machines have a special overcast foot designed to help guide the fabric while stitching. If you don’t have one, you can use a regular presser foot but make sure the fabric is feeding smoothly.
3. How to Sew the Overcast Stitch:
Prepare Your Fabric: Start by aligning the raw edge of the fabric with the edge of the presser foot. If you're using an overcast foot, there will usually be a guide to help keep the fabric aligned properly.
Sew Along the Edge: As you sew, the overcast stitch will wrap around the raw edge of the fabric. The needle will move in a zigzag motion, covering the edge and creating a neat, protective finish.
Adjust the Stitch Width and Length: If needed, adjust the stitch width to make sure it covers the edge completely. A wider stitch will give you more coverage. The stitch length should be shorter, typically between 1.5-2.5mm, to ensure the stitch is secure and tightly wrapped around the edge.
4. Benefits of an Overcast Stitch:
Prevents Fraying: The overcast stitch prevents fabric edges from unraveling and fraying, especially on woven fabrics.
Neat Finish: It gives the fabric a clean, finished look, making it perfect for hems, seams, or any raw edge of a project.
Easy and Fast: The overcast stitch is a quick way to finish edges, especially compared to hand finishing or using a serger.
5. When to Use an Overcast Stitch:
Raw Edges: It’s ideal for finishing raw edges on woven fabrics like cotton, linen, and polyester.
Preventing Unraveling: If you’re working with fabrics that tend to fray (like chiffon or tulle), this stitch will keep everything in place.
Hemming: You can use it when hemming lightweight or medium-weight fabrics to prevent fraying without adding bulk.
Using the overcast stitch is an efficient way to cleanly finish fabric edges and prevent them from coming apart over time. It’s perfect for quick and tidy work, especially when you don’t have access to a serger.
1 note
·
View note