#threading a serger machine
Explore tagged Tumblr posts
Visit Tumblr Blog
Explore Tumblr blogs with no restrictions, modern design and the best experience.
Last Seen Tumblr Blogs


Fun Fact
There were a total of 171.5 billion posts on Tumblr in 2019.
Text
Master Your Serger and Overlocker with the #1 Online Sewing Course!
Master Your Serger and Overlocker with the #1 Online Sewing Course! Tired of tangled threads, skipped stitches, or confusion over your serger’s settings? Whether you’re a sewing enthusiast or a professional looking to refine your craft, The Number 1 Serger and Overlocker Online Sewing Course is your ultimate guide to mastering these powerful machines. Say goodbye to frustration and hello to…
#advanced serger techniques#beginner serger course#best online sewing course#cover stitch mastery#decorative serger stitches#DIY sewing projects#fabric-specific serger skills#learn to use a serger#lifetime sewing access#online sewing classes#overlocker online classes#professional seam finishes#save time sewing#serger hacks#serger maintenance guide#serger sewing course#serger tension settings#serger video tutorials#serger vs overlocker#sewing community forum#sewing course enrollment#sewing machine troubleshooting#sewing machine tutorials#sewing tips for beginners#threading a serger machine
0 notes
Text
I actually love threading industrial embroidery machines it's like an obstacle course to me (pic below for reference)

#this is from a website this isn't actually a machine i use. though it is the same model. they're old as hell#i would like to try working at a bigger and better embroidery place some day those new machines are crazy cool#and would you believe... threading a serger still scares me LMAO
2 notes
·
View notes
Text
My question to anyone who can hand sew but not machine sew:
how
#I'm the opposite#I can tame that piece of machinery no problem#sergers too#but I become utterly useless when given a needle and thread#it just does not make sense in my mind the way the machine does#rambles#polls
4K notes
·
View notes
Text
.
.
#im noticing that people talk about traveling to other countries like that’s a common thing that everyone does#and it’s a constant reminder that there is indeed some impenetrable bubble that people in my own communities live in#maybe it’s just because that gets more attention on social media? idk#somewhat related but there have also been many times I’ve searched for DIY stuff just to see redditor say#why don’t you just buy it for $-$$$ dollars?#or telling people with a casual interest in a hobby to invest in expensive and honestly mostly unnecessary tools#idk it feels weird! maybe it’s just me idk > _ >#im thinking of maybe doing sewing tutorials or something one day#but like no sergers or sewing machines just a needle thread and fabric and stuff#and maybe sharing my other hobbies and providing some accessible alternatives to approach them?#idk#idk!#maybe I’ll think about it more when I get some energy back#the past few weeks have left my spirit feeling a little pruny for some reason
1 note
·
View note
Text
Unlocking the Power of Sergers: Elevate Your Sewing Craft
In the dynamic world of sewing, efficiency and precision are key. Discover how integrating a serger sewing machine into your toolkit can transform your projects, offering professional finishes and unmatched versatility. Embrace this game-changing tool and take your sewing artistry to new heights.
In the fast-paced world of sewing, efficiency and precision are paramount. Enter the serger sewing machine, a game-changer that elevates your craft to professional heights.
The Serger Advantage: Speed and Precision
Time is a valuable commodity, and a serger maximizes it by streamlining your sewing process. Unlike traditional machines, a serger trims seam allowances and encloses raw edges simultaneously, delivering a polished finish swiftly. Imagine completing garments so efficiently that they rival boutique-quality pieces.
Professional Finishes: Elevate Your Craft
Details distinguish exceptional work. A serger provides durable, stretchy seams ideal for knit fabrics, eliminating fraying edges. Your creations will exude a refined, professional touch, enhancing both appearance and longevity.
Versatility Unleashed
Beyond edge finishing, sergers offer a spectrum of techniques. From rolled hems to flatlock stitching, they empower you to infuse creativity into your projects. Explore ruffles, gathers, and decorative edges to craft unique, personalized designs.
Conquering the Learning Curve
Mastering a serger may seem daunting with its myriad threads and settings. However, with structured guidance, you can navigate this learning curve effectively. Online courses, such as "Make Friends with an Overlocker or Serger" by Tilly and the Buttons, offer step-by-step instruction, from threading to advanced stitches.
Investing in Excellence
Acquiring a serger and the accompanying education is a strategic investment in your craft. The enhanced quality and efficiency translate to higher-value creations, whether for personal satisfaction or commercial endeavors. This commitment to excellence yields dividends in both pride and potential profit.
Join a Thriving Community
Embarking on this journey connects you with a vibrant community of serger enthusiasts. Online forums and social media groups provide platforms to share experiences, seek advice, and draw inspiration. Engaging with fellow sewists fosters growth and camaraderie, enriching your sewing experience.
Embrace the Serger Revolution
Elevate your sewing artistry by integrating a serger into your toolkit. The fusion of speed, precision, and versatility transforms your projects, reflecting a commitment to quality and innovation. Seize this opportunity to enhance your craft and produce creations that resonate with professionalism and personal flair.
For more information visit: https://virtualmegamall.blogspot.com/

#serger sewing machine#overlocker sewing machine#online serger course#professional sewing techniques#serger for beginners#advanced serger techniques#serger threading guide#serger sewing projects
0 notes
Text
Crotch Mending
Hello everyone! We all know the answer to this one. Where do your pants wear out the fastest?
[Audience yelling: THE CROTCH!!!]
Exactly! I've already done DIY ripstop on (almost) all the pants I own. This pair of shorts tore out above the ripstop earlier in the summer, but I replaced them with secondhand basketball shorts and forgot about them in the Tote of Doom.
Anyway, I desperately needed an easy W in the books tonight, so I pulled out whatever odd-shaped scraps of black canvas came to hand, and I patched the crotch.


I started out by sewing a box all around this rip to stabilize it. My machine has a cool diamond stitch that I use as a serger dupe, but you can do the exact same thing with a little straight stitch grid. It's just enough to lock all the OG threads in place, with enough patch showing through to relieve tension on the rip.
Also, as I've learned the hard way, I have to use polyester thread for this. I'm always a slut for cotton, but it just can't stand up to my tactical thighs. Also, long-leg boxer briefs are the key to negating the sensory input from the mends.

I proceeded to stitch this semi-geometric sorta-concentric pattern all over the patch to hold it down. The easy W was complete! But I'm a creature of momentum. My favorite words are "While I'm at it," so I did the other side too.
Final product:


I'm so pleased! I'll have to see how well they wear. Using dark grey thread rather than black was a good choice.
I hope this inspires you to try saving or reinforcing some pants. While I'm not posting a photo of proof for obvious reasons, you truly can't see crotch mending, especially when the thread matches because it's all up in your undercarriage and shadowed. Nobody's looking that closely, and if they are, kick them.
Go forth and make stuff. As @dog-of-ulthar said in his pants-mending tutorial, "The revolution starts with your ass."
#solarpunk#sewing#diy#beginner sewing#mending#patching#cj sews#it's not waste until you waste it#use it up wear it out make it do or do without
135 notes
·
View notes
Text

Pant!
what if I just start making pants at 10pm? free will and all that? I think it's pants time.
#gonna leave the sewing for tomorrow bc I'm going to the city center to buy stuff and I might just buy the threads for the serger while there#also bc neighbours probably won't like me using a sewing machine in the middle of the night
3 notes
·
View notes
Text
So last August I bought a Kenmore 158 sewing machine at the sangha yard sale. I set it aside because I didn't have spoons for reading the manual and figuring out how to oil it and get it running. But my other machines are currently broken and I desperately need the pair of pants I've likewise had the pieces of cut out and sitting since last summer.
Well, he runs now! This is Mr Darlene (Mr D for short), my late 60s/early 70s sewing machine. I decorated him with stickers so he's fancy now.

Had to oil him, which is A Whole Process took me like 3 hours to get him oiled and threaded and my top thread kept either snapping or bunching up on the bottom of the fabric and I have no idea what I did differently the third time but he stopped doing that finally...
And guess what else!!!
This guy does buttonholes!!!

Not the neatest but I didn't have a buttonhole foot so that didn't help. I haven't tried the other stitches to see if they work yet but all I really needed him for was straight stitch and buttonholes so it's fine if they don't work.
He sounds different than my modern machine. It's kinda nice. I should probably buy additional feet but that'll have to wait. All three of my regular machines use the same bobbins and all four of my machines (I also have a serger from the 90s) use the same needles. Ya gotta love the standardization of sewing machines.
19 notes
·
View notes
Text
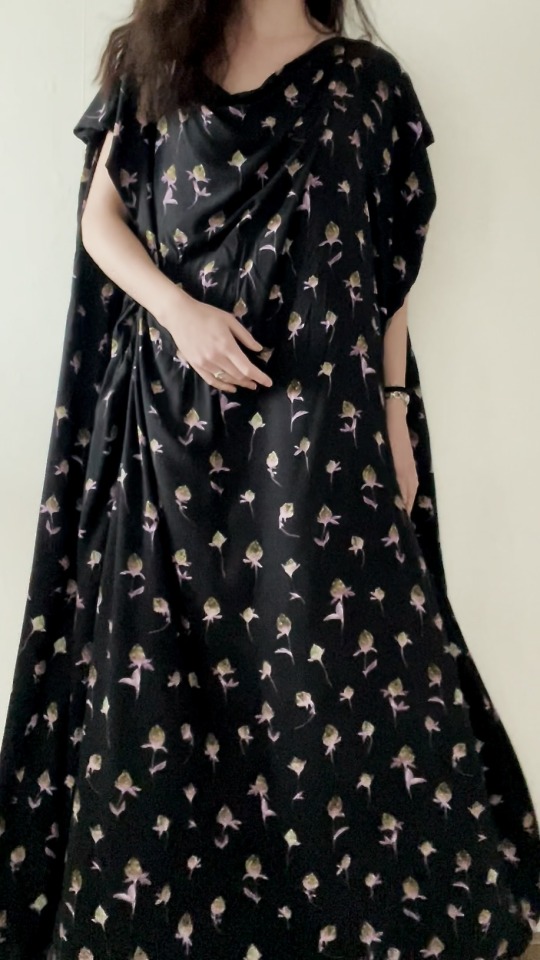
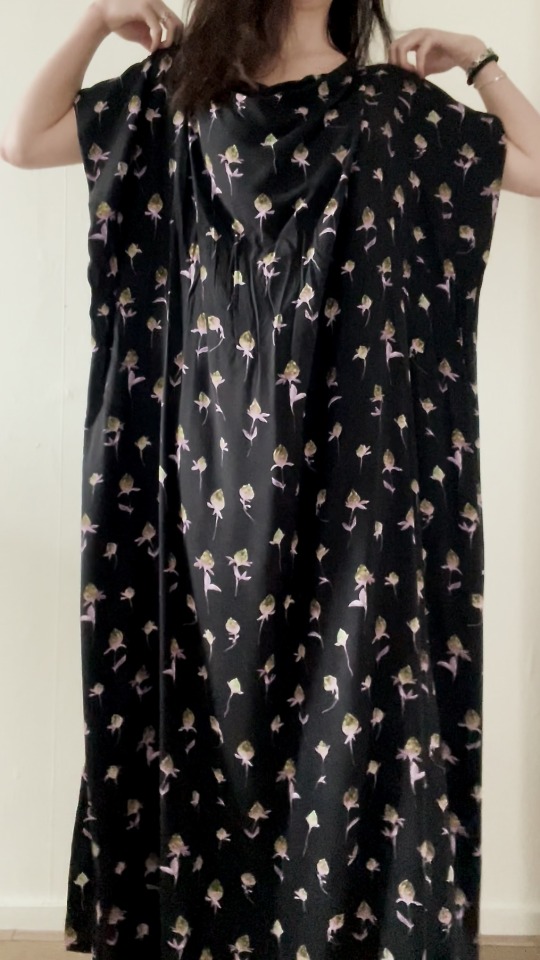
2024.10.20 - Making off the greek summer dress
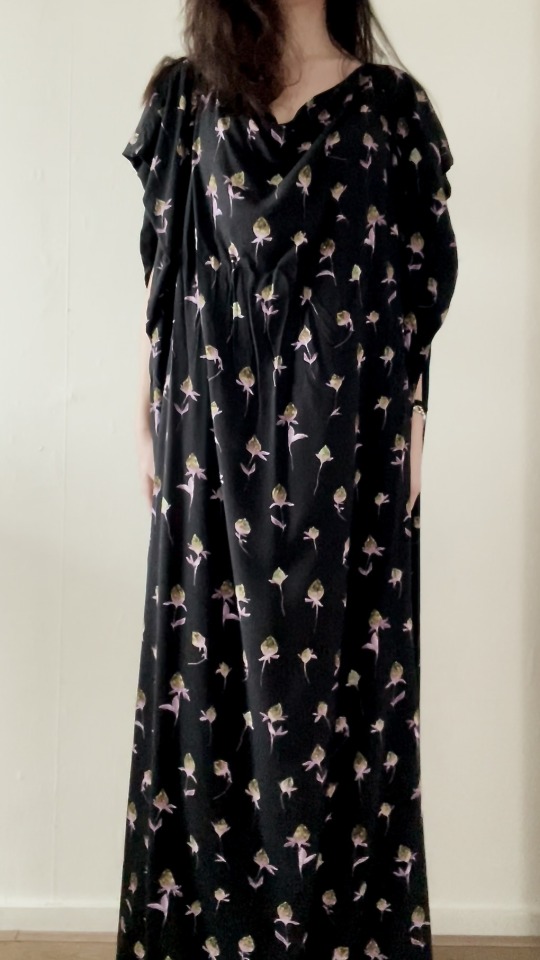
I've recently finished the greek-inspired whimsygoth maxi dress. It's so comfortable and feels so luxurious, I've decided that I want to make some more before next summer. Below is how I've done it (this is as much a tutorial for future me as it is for anyone else interested).
The greatest thing about this dress? It is super beginner friendly to make (just sewing a bunch of long, straight, lines). Could easily be done with a “standard” sewing machine, serger, hand-held machine or even completely by hand.
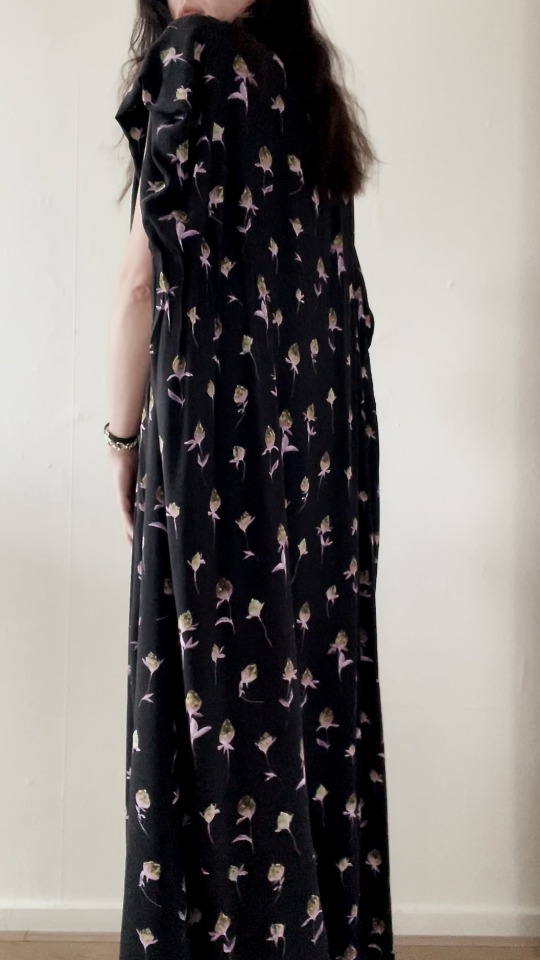
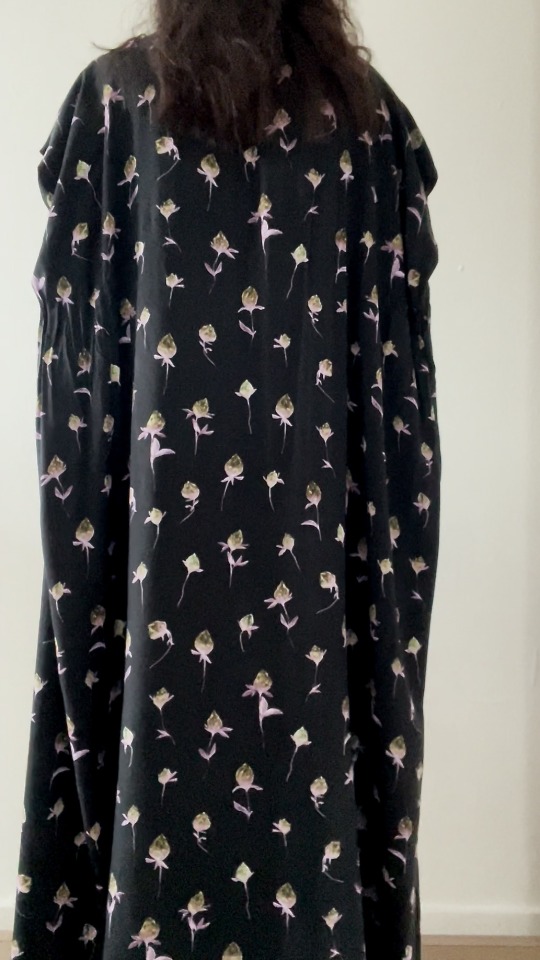
The basics: two rectangles sown together. the back-panel has triangles taken out of the top sides to make sure that the front panel gets a nice waterfall-neckline. The sides of the sleeves are folded-in to give it a nice cape-like effect.
Some notes:
I would suggest investing in a nice-feeling & drapy fabric, as that is what makes or breaks this dress since the rest is so simple.
Since the dress is basically two larger rectangles, it should be relatively easy to repurpose the fabric into other garments later on if you end up not liking it.
The tutorial is for a floor-length dress, however it can of course be made shorter if that’s what is wanted / if there’s a limited quantity of fabric. Similarly, the dress can be made less voluminous by using smaller panels.
The below schematics should be taken as a rough Gide, not an exact pattern. The pink line indicates seams that need to be stitched.
The details: The height of the front & back panel should be as long as your measurement from your neck to your ankles + ~5cm. The width should be as wide as possible (preferably the whole width of the fabric. I removed the selvedge but this isn’t necessary for all fabrics). I would suggest, at this point, to zigzag / overlock all fraying edges.
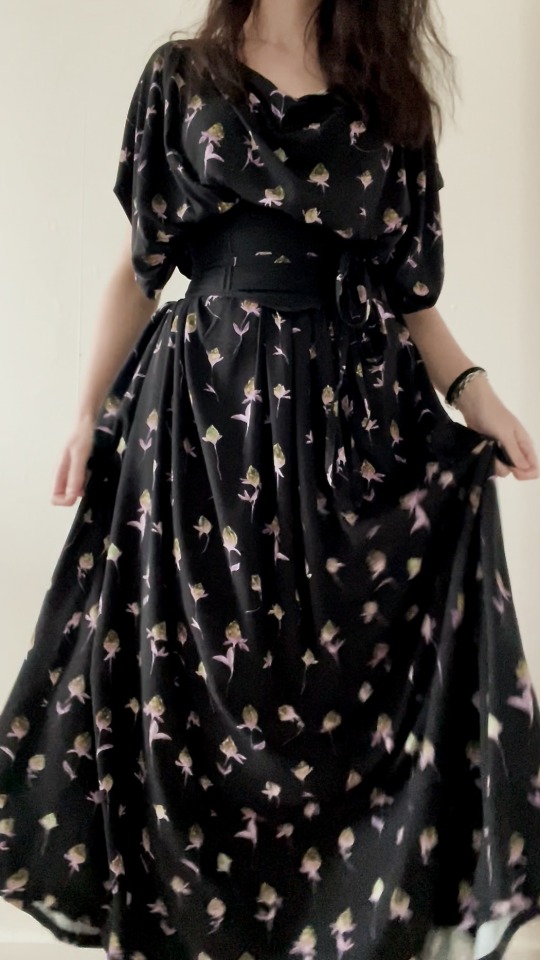
Using a dress form, or your own body, measure out how wide you want the back neckline to be. Put (safety) pins in place to mark it. Next, measure out how much drape you want at the front. Put pins. Adjust the back and/or front until satisfied. The diagram gives some idea, but should be taken as a guide not as strict instructions.

Sew the front panel to the back. Start at one side of the neckline and sew towards the armhole. Likely, the front-panel will have a “shorter” side-with than the back. Repeat on the other side.

Measure, on your body, how big you want the armholes to be (I went for ~60cm in the round). On either side of the back-panel, take out a triangle that measures 1/2 the armhole width on the side, and extends to where the front-panel ends. Remove this triangle of fabric (or fold it over and stitch into place) Finish raw edges.

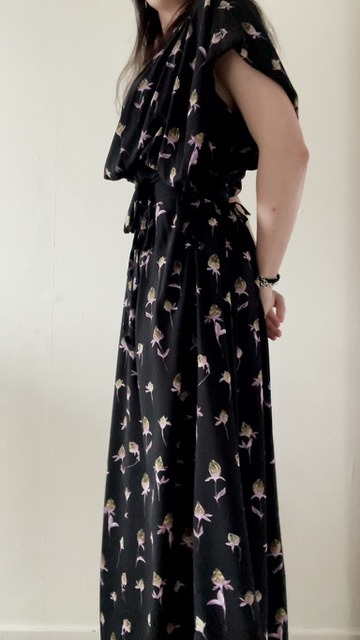
Sew the side-seams together (I recommend from bottom to the top). Stop where the “armhole triangle” begins.

Lastly, fold the sleeve inwards to create the cape-like effect (light-pink arrow previous diagram). Put the dress on (or on a dress form) to determine how far you want the sleeves to be folded inwards (mine went almost all the way). Secure it with a few (hand) stitches at the point where the sleeve reaches furthest inwards (stitch in the stitch-line where the front is connected to the back panel in the same colour thread to ensure an almost invisible stitch).
That’s it! We’re finished.
The dress can be worn loose and flower, or with a belt / corset for a gathered look. The corset in the picture I also made.
#me myself and i#craftblr#craft blog#sewing#sewists of tumblr#sewblr#clothes making#fashion#dress making#me made wardrobe#tutorial#dress making tutorial
20 notes
·
View notes
Text
Reassembly 4
ch1 ch2 ch3
Kon and Peter: clown to clown communication commences.
New York had some massive craft stores. Peter had to direct Kon to one, which was fair but nerve wracking since he didn't actually know for sure it existed here.
Luckily it did.
Kon’s stepdad must have been loaded, or maybe Kon didn’t understand finances the same way that Peter did. He loaded up a cart with everything that Peter pointed out. He got two pairs of sewing scissors, which was a wild decision Peter could barely wrap his mind around. Was Kon planning to cut with both hands at one time, or for buddy crafting sessions? Those things were like fifty dollars a pop!
Some consultation with the staff helped them get metal decorative bits and three different sturdy mesh fabrics, one of which had glitter on it. They were all black. Peter eyed Kon for that, kinda impressed by the commitment to an aesthetic. Kon was like a little kid in the store, rolling down aisles on the back of the cart and tossing everything in without even checking prices. Peter found himself caught up in the euphoria and talking waaaay too much shit about projects he wanted to do, despite knowing he definitely couldn’t afford it. He really shouldn’t have. But Kon actually seemed interested when Peter talked about his design for a spidersuit- in a subtle way! And Kon just wheeled back to the big section and started trying to talk him around on the merits of red and blue tinted leather instead of athletic fabric.
It was funny, so he went along with it. And then Kon tipped the entire rolls into the cart and went in search of thread to match.
Peter stared at the back of his head for a long moment processing. Was he for real?
“Hey, I didn’t mean today,” Peter said, scrubbing a hand through his hair and trying to sound casual. “I don’t have any cash with me. I mean, I’ve got some, but not like that much-”
“Don’t worry about it.” Kon interrupted. His voice was a little weird. Almost short. Like he really didn’t want to talk about money. “I have that covered. Luther pays for whatever I want as long as I keep in contact.”
“...Okay, thank you,” Peter said, because that seemed like a great minefield to stay out of. He mentally reclassified Luther to an estranged and possibly financially abusive Dad, not a Stepdad. “Hey, if we’re sewing leather, I don’t think we can do that by hand. You want to look at the machines?”
Two industrial sewing machines and a serger later, Peter desperately and unsucessfully tried to talk Kon down from buying his very own bedazzler. He slouched behind Kon in the checkout line, wondering if this was just the kind of mistake a man had to make for himself. No way was he actually going to get enough use to make it worthwhile, right? Right?
The total made Peter feel kind of green. Kon paid for it all with a swipe and not so much as a blink. Then he bundled up all the bags and hefted them with no apparent effort.
“Hey, let me help,” Peter protested, strategically snagging a couple. They had two sewing machines for jiminy cricket’s sake, that had to be heavy for a normal guy.
A moment too late, he realized that Kon was a big strong guy who lifted a lot of weights. He’d probably deliberately taken the heavy bags because he had good reason to think he was stronger than Peter. Aw, fiddlesticks. Should he pretend this was heavy? Had he just given too much away? Kon seemed like a nice guy but Peter really didn’t know-
Kon just let the bags go with a bemused smile and a, “Thanks, dude.” He appeared to have not a single thought about the situation as he started walking to the door.
Good. He didn’t know that these were like, heavy. It must be nice to be a big strong guy.
Ah, well. Peter trotted after him.
His day had gone off the rails. The library was open now for sure. He had planned to be there by now, refreshing his website design skills. Maybe he’d gotten an email back about a possible job. He really should check-
But it was only one day at the absolute most, Peter justified to himself. And it was really really nice to feel normal again and do something impulsive but harmless with another teenager.
They wound up in an unsettlingly clean, empty apartment. Kon carelessly threw their loot on a pure white rug and walked in without kicking his shoes off. He pulled off his leather jacket and threw it at the couch without looking in a show of coordination that Peter could respect.
Peter shucked his tennis shoes carefully and lined them up against the wall before he ventured in. Kon was already opening up the fridge and pulling out cans. He threw one to Peter.
Peter caught it without a thought and then blinked at it. Carbonated juice? Weird, but probably good. He said, “Thanks, man,” as he cracked it open. He took a sip and made a face. It was good, but very weird. He looked at it again and noticed that it was also somehow a yogurt drink. Fruit carbonated yogurt was a concept that he had not encountered before.
‘Don’t be a dork. It’s probably a rich person thing.’
Kon perked up like a dog hearing a car approach. “I have to-” He gave Peter a distracted smile. “I’ll be right back. I have to do something. Could you uh, entertain yourself? Maybe set up our stuff?” He was already edging to the door.
Peter shrugged, confused at the sudden turnaround but amiable. “Okay, I’ll wait,” he agreed easily.
Kon was gone so fast that Peter almost thought there was something supernatural about it. He shut the door, bemused.
And he did what he said. He cut off tags and threw away packaging. He plugged in the machines and set them up, one on the desk and one on the table. He mused that the apartment was furnished like a fancy hotel room. He sat down on the sofa to wait.
It took a while. He couldn’t track the time without turning on the evil janitor phone, but Peter was pretty sure that at least like, ten minutes passed. He shifted uncomfortably. Was this weird?
Kon was awfully casual about leaving someone he’d just met in his space. Peter didn’t mind, exactly. He knew that Kon wasn’t dangerous to him because his spider sense hadn’t gone off at all. But Kon didn’t know that! Didn’t he, like, know about stranger danger? Objectively, Peter could be a pretty dangerous person. Not by temperament, but still…
He sat there for a while and worried about Kon’s self preservation skills. After that, he ended up just getting started on his spidersuit.
Frankly, the leather idea was… Well. He had to rethink some of his concepts, that was for sure. It was easy to make a spandex suit. The hardest part of that was dealing with the endless teasing from Mr. Stark. But leather didn’t have the same stretchiness to it. So he sketched out a few ideas, tossing out numbers and proportions and trying to figure out how much he needed around each joint to accommodate his spidery range of motion.
And then he remembered that he uh, was doing this with another person present.
The jumpsuit thing? It made sense when he was wearing Stark tech. There was a big benefit to having no seams. But there was a reason that his first ever suit had actually been in two pieces: that was how normal people dressed.
‘I can’t exactly tell Kon that I’m a misplaced superhero.’ Peter choked down a laugh and borrowed the leather jacket off of the couch. It would work as a pattern.
He traced the main pieces onto the scrap material they’d gotten. It was a real pain in the ass to do without cutting the clothes apart, but he had a pretty good understanding of how a 3 dimensional object was made from a bent 2 dimensional object and figured out something that he was mostly confident was accurate enough.
Peter put his hands on his hips and looked at his tracing victoriously. Then he frowned. He looked at the jacket again.
Aww, man. He sadly started drawing another line, a couple inches inside the first one.
Kon was big, okay? Kon was a big strong jacked guy! Peter was pretty jacked for his size, too, shoulders way bigger than his waist. But he was uh, just built smaller. The shape would work for Peter, but the size was going to be way off if he just replicated the pattern. He bit his lip as he worked.
“What are you doing?”
Peter jumped four feet straight up in the air and flipped onto the couch. He landed in a spidery crouch on the balls of his feet with both hands splayed down for balance.
He stared at Kon with wide eyes. Oh, shit. Oh, shit, oh fuck.
Kon laughed. “Sorry, did I startle you?” He draped himself over the couch backwards, head pointing towards the floor and knees over the backrest. The smell of smoke wafted over.
…smoke? What had he been doing?
“Yeah, sorry,” Peter said slowly.
‘Did he- he didn’t notice that wasn’t normal? Or maybe that’s something normal humans can do here. I mean, Kon can fly!’
Holy shit, he was in the clear.
“I was going to cut myself a jacket pattern,” Peter explained. He got back off his crouch on the sofa cushion. He tried to be as normal as possible about it. Wow, he was killing this. “I used yours to make a pattern, hope that’s okay. I didn’t mark it up or anything.”
“It’s cool,” Kon assured. He tilted his jaw upwards so that he was watching Peter upside down. “Sorry about how long I was gone. I got caught up helping my neighbor’s cat.”
“...With a fire?” Peter asked before he’d thought about it.
Kon frowned at him.
“I mean, you smell a little smoky,” Peter demurred.
The other guy laughed nervously. “Yeah, my neighbor is a bad cook.”
Peter nodded and accepted that. He knew all about bad cooks. “Do you cook?” he wondered. “I’m not great, honestly, but I can do a few things.”
Kon perked up again- and wow, this guy was like the world’s largest, most handsome golden retriever sometimes. “Cooking? I ordered everything in- can you show me?” His eyes sparkled like he had never before considered that he could cook for himself.
Wow. Peter smiled, but he silently judged Kon’s parents. Why didn’t he have any practical life skills? “Yeah, of course. What do you have for groceries? Your parents won’t mind if we cook?” He started cutting out his pattern pieces in the test fabric. He had 5 main ones- two sleeves, a back panel, and two front pieces. Shit, he’d need to get a zipper, wouldn’t he?
Kon snorted and let his head fall back and hit the bottom of the sofa. “I live alone,” he said. “No one is going to even notice.”
“...How old are you?” Peter asked.
“Two,” Kon lied blithely.
Peter made an aahhhh of comprehension. Fair enough. “I would have guessed like, 17,” he said.
“Is that how old you are?”
“...Yes,” Peter lied, remembering that’s what his ID said now. He finished cutting out the back panel and put it aside.
Kon flipped himself up and back onto his feet. “Cool. I’m like, 16,” he said. “Basically.”
…That was a weird thing to say, but Peter noted it. Maybe he meant he was 15 going on 16. That would actually make them the same age.
“Are you from here?” Peter decided to move the conversation into more neutral territory. “I am, I’m from Queens.”
“Baller,” Kon said. “Nah, I’m from Hawaii. I recently moved to the mainland. I still have a place back there, but I have some things to do over here and they’re always kinda last minute, you know?” He scrunched up his face. “Flying over everytime someone has an errand gets kinda tedious.”
“That’s true,” Peter agreed.
Kon seemed to brighten. “Plus, my friends are here.”
“That makes a big difference.” Peter smiled at him, genuinely happy for the dude. Maybe he had a shit time at his high school in Hawaii. Maybe he got bullied for being too big and handsome and friendly. “Hey, did you think about how you want to add the mesh to your jacket? It is this jacket you wanna alter, right?”
“I want to replace the back panel,” Kon said instantly. “Like, the seams and structure are the leather, and then the back is see through. Wouldn’t that look so fucking cool?”
“It would look cool,” Peter had to admit. It was the kind of look he wouldn’t go for, personally, but he might if he had traps like Kon. Still, he had to check. “You don’t use this for protection, right?”
Kon stared at him blankly.
“Like, for riding a motorcycle or something?” Peter prodded. Wow, he felt awkward. This was dumb. Kon wasn’t actually a 2 year old with no life experience. He should have kept his mouth shut.
“No, but why would that matter?” Kon asked slowly.
Peter felt his shoulders ride up, like he could turtle away from the conversation “Uhhh, well the mesh isn’t going to be as strong as the leather. Obviously. So if you fell, you might get more scratched up. That’s all.”
God, why did he talk? Why did he ever talk?
“Ohh,” Kon said. Then he huffed out a laugh. “Nah, that’s not an issue for me. I’m tougher than that. Also, I don’t ride a bike.”
“You don’t do anything dangerous, then,” Peter confirmed with some relief. “Cool. So, I was thinking that we should leave a bit of the leather to attach the mesh to. Gimme? Thanks.” He took the jacket. He barely noticed that Kon was giving him a really weird look. “So, if it was my project, I would cut out a rectangle…. Well, it curves by the neck, but still. I would cut out the leather, leaving like an inch beside each seam. What do you think?”
“Sounds good.” Kon took the jacket back and picked up one of the sets of scissors. He played with the scissors for a moment, opening and closing them at high speed. “Vroom vroom, let’s go.” He flung himself onto the floor, back pressed to the sofa, and started cutting.
…Peter took a moment to hope that he hadn’t given advice that would ruin Kon’s jacket. He went back to his project until Kon said, “I’m done. What’s next?”
“Which mesh do you want?” Peter asked. Then he sucked in a break. “Ah, fuck.”
“What?” Kon was standing so fast that Peter didn’t actually see him move. He looked tense and ready for action.
Peter didn’t notice. He was pressing his thumb and forefinger on either side of his nose and wondering why he was such a dummy all the time. “We need to wash the fabric first,” he said apologetically. “Obviously not the leather. But the mesh needs to be washed. Where’s your washer?”
He gathered up the fabric and followed Kon’s instructions. Kon trailed behind, obviously curious. “Why do we need to wash it?” he asked.
“Uh, it’s never been washed before, right?” Peter explained. He shoved the fabric inside and started looking for detergent. “Usually fabric shrinks when you wash it for the first time. So if you cut it first, sew it in place, and then eventually wash it, it’ll shrink and like, warp, and ruin your stuff.” He grimaced at the memory. Kon had bought the supplies like the cost was nothing, but Peter remembered vividly the crushing disappointment and pain of accidentally ruining something he’d made. Fabric wasn’t expensive, but it was expensive when you didn’t have money.
‘I just lucked into this,’ Peter thought, and felt guilty. ‘I’m going to be able to have a spidersuit just because I happened to meet Kon and he was nice enough to spend money on me. Am I taking advantage of him?’
He put the detergent into the load and started the washer. Man… He needed to make sure he was a really good friend to Kon. Because that’s what this actually was, wasn’t it? Kon had immediately started hanging out with him and bought him things because he was lonely. He was trying to get a friend. It was kinda like Mr. Stark, except less pathetic, because Kon wasn’t a super rich superhero with awesome super friends who could just tell them he needed help. Kon was a teenager who lived on his own and had an estranged Dad and maybe like, no one else in his life. Did he even go to school? Was whatever was going on with him even legal?
“...Do you want to get started on lunch?” Peter suggested. He was hungry, but that wasn’t why he asked. They had time to kill and he wasn’t going to make Kon watch him work on the spidersuit.
“Yeah! What do you want to make?” Kon followed him back to the kitchen and watched with a sort of pleasant curiosity as Peter checked the fridge and cupboards. Literally the only things sitting out on his countertop were a bottle of dish soap and a sponge. That was it.
The fridge had canned drinks and take out leftovers in it. The cupboards had two cups, one of which was storage for a fork, spoon, knife, and pair of chopsticks.
Peter gave Kon a strained smile and bent to check the lower cupboards.
They were empty and eerily clean. There weren’t even any cleaners in there, so that was wild. “Kon,” he started, and then didn’t know where to go with it. “Do you own a pot or pan?”
“No, why?” Kon cocked his head at him. He honestly seemed just curious and not a bit embarrassed. “Should I?”
“...We need one to cook in,” Peter said. And a few other things. Did– did Kon not own any plates, either?
‘I guess he wouldn’t need one if he gets take out and uses the containers all the time,’ Peter rationalized. ‘But who lives like that? Why didn’t someone teach him how to live like a person?’
And who was cleaning this place? It hadn’t seemed so weird when he entered. But now that he knew Kon lived alone, this was just bizarre. If Kon wasn’t living with a neatfreak parent and he didn’t own anything but dish soap, how was his apartment so clean? Did he have a maid service or something?
Kon was way weirder than Mr. Stark. Peter gave his new friend a queasy smile when he realized that. Man, this guy needed help. “So, if we don’t wanna do takeout, we need to go shopping,” Peter said. That was an understatement. “A pan, a couple of plates, and groceries.”
Kon pulled the wallet out of his back pocket and waved it around. “That’s fine. Lexy has it covered.”
‘Lexy? Not Luther? Is Lexy his stepmom or something? Or is that a nickname?’
Normally, Peter would feel bad about spending someone else’s money. But this time he felt a kind of vicious satisfaction in the idea of running up this dude’s credit cards. Wherever Kon’s Dad was, he was a dick and he owed his kid some vegetables and a frying pan. “Yeah, okay. Do you have reusable bags we should grab on our way out?”
“I don’t think so. What are those?” Kon asked.
“...We’ll buy some,” Peter decided. “They’re usually made of canvas or something. It’s so that you don’t have to buy the one use plastic bags all the time. Let’s go.”
“Cool.”
Kon in the group chat: guys I have made a CIVILIAN FRIEND.
Bart: neato im happy for u!
Cassie: big if true
Tim: What’s his ssn i just wanna check something
Kon: I don’t think he knows I'm a superhero. It’s nice, but is that weird?
Cassie: probably because you’re not famous enough yet sorry
Tim: get gud
Bart: get good
Kon: fuck u guys. I’m undercover. I’m being so normal.
65 notes
·
View notes
Text
Okay @katharkness here are a couple of tutorials and refs.
The first two are the ones that @phoenixyfriend dropped in the replies, thank you so much for that! The second link here is definitely my favorite ref of the bunch, so I'm glad you had it!!
This one is a post with a book rec on visible mending and a youtube video of a guy doing a type of visible mending called sashiko. If you were interested in the white crosses on patches I mentioned in the tags, this would be that. I know my library carries Mending Matters, so you might check and see if it's at yours!
This post is a short visual guide to several common repair techniques. It talks about it in the context of holes in the knees, but they will work just as well for thigh holes (just don't use the ladder stitch). The "patch on the inside of the jeans" technique is what I recommend most, because it's stronger and lasts longer and it's easier for beginners. The "darning" technique is what I personally usually use, because I'm lazy and also because most of my fabric is packed but my thread is not. If you do the patch, you will automatically have a border from sewing the patch to the pants, but if you do the darning, sew a border around the hole first to strengthen the edges and make it less likely that the hole grows.
The next two are a couple references that I dug up.
This post is the DIY clothing repair guide pdf from the university of kentucky. It's been a while since I've read it so I don't remember if there's something immediately useful in it but it's a neat little general resource.
This post is a step by step guide with pictures on how to specifically patch an inner thigh hole. The holes of the pictured jeans are gigantic, so it's a pretty clear tutorial. It is machine based but the steps are basically the same if you hand sew it. I recommend reading the two links from Phoenix first, and then this one, and that should give you a pretty good idea on where to go with your jeans.
Bonus tips:
The fabric you patch with matters, mostly because of stretch. If your jeans are 100% cotton, use a fat quarter or some regular woven cotten to patch. If they are stretch jeans (5-15% nylon or spandex or whatever) go with jersey cotton (like an old t-shirt) or something with the same fabric content cuz that will stretch a bit also. If they're jeggings...idk. Patch with an old pair of leggings, probably? You could also use like, actual jean patches for patching jeans like what they sell at walmart, if you want, but I don't like them and I have one billion fat quarters laying around so. Up to you.
If you don't have an exact match for thread because all you have is like a dollar store sewing kit, use white thread for tan or blue jeans and black thread for black jeans. If you have weird colored jeans and a dollar store sewing kit, use whatever color is closest in the kit. It's on the thighs so no one will likely notice anyway.
Put on an audio that you like when you are sewing. It is best to put on something you already know you like because mending thigh holes can get very annoying when it is not going well and if you are ambivalent toward your audio things are double worse.
Do NOT sew on your bed. If you lose your needle you don't want to lose it on your bed!!! Also have a magnet and a flashlight nearby :) Trust me on this one :)))
If you get some thread on a spool from like walmart or some shit or if you used the thread out of your dollar store sewing kit it will almost certainly be polyester. If you do not want polyester thread, go to the embroidery section of walmart or a craft supply store and you will almost certainly find cotton embroidery thread. Personally I do not find that the type of thread matters.
I hate knowing how to sew. I hate that knowing how to sew compels me to fix my own clothes when their shoddy construction destroys them cuz I don't wanna spend another fuckin thirty dollars to replace it when I have $1 of thread. Mending is the worst and it's 90% of the sewing I do these days.
#chit chat#sewing problems#lol i typed out a small rant about sergers but none of that actually matters re patching holes so i deleted it#i understand why people have and use sergers but also fuck serged seams all my homies hate serged seams#anyways...#if you are a machine seamster consult the fourth link i have no personal advice for you#my sewing machine has been packed since 2020 and my mother's is possessed so i do not trust it for mending purposes#also if your hole is less than the size of a quarter it takes like 30 minutes to hand sew it anyway so like who cares#actually does walmart even sell embroidery thread anymore#i have no idea#if not just use the shit on a spool it works great and you will be using it for a long time if you hand sew#polyester shit on a spool is the $1 thread from walmart btw#i don't think it's a dollar anymore but it sure was when i bought it#please excuse the fact that i keep calling it shit on a spool#i frequent a yarn shop now and am corrupted by old ladies with Opinions#but random spool of thread you found in a drawer is a time tested and honorable thread for patching things
3K notes
·
View notes
Text
Empty serger thread cones! Empty cardboard tubes that held 1000m of thread! Empty instances of those weirdly complicated little mixed plastic flip top slidey boxes that better quality sewing machine needles used to be packaged in! You can all go!
Molded pulp berry basket...you get a reprieve, to now hold some things that had been just laying on my sewing table, but I could still change my mind someday (especially after looking things up to double check what you're called and finding I can get 25 of you for $4, or 500 for $38. Restaurant supply stores are always full of so many temptations.)
13 notes
·
View notes
Text
sewing other things
OK so. I have talked about the Loftus Bralette so much on here that one could be forgiven for chuckling gently when i said I should sew other things. But I do actually have several other projects I've been wanting to work on. And i have actually cut some of them out.
Also when I was last at the farm my niece brought me some of her t-shirts and said "I really like this one can we cut it apart and re-sew it bigger so I can still wear it", and I remembered that her BFF's mom, who works at the farm twice a week doing the books and managing store inventory, owns a serger she didn't know how to thread, so I texted her to ask if I could borrow it and indeed she had accidentally unthreaded it and there was a stuck lever and needed me to fix it anyway, and maybe I mentioned that on here but I did actually make my niece a couple of tunics while I was last at the farm. Including hand-sewing a whole bunch of details on the last one while the family was driving on a road trip one weekend.
So I brought all that stuff home with me and was hoping to get to work on it this week. All I've sewn has been the bralettes but I still have today. We'll see what I can get done.
I measured Farmkid and she's ten years old so her shape isn't the same as that of an adult woman, but she's five feet two and like 130 lbs, and some of her measurements put her in a women's size 12. So. She expressed interest in a garment I wear frequently, a Studio Tunic from Sew Liberated. I printed off the pattern in a size 12 and have assembled it, but I'm stuck deciding what fabric to use for her. I should decide that today. She's ten, her favorite color is ostensibly yellow but she mostly wears pinks and purples, she's a grubby kid who wipes her hands on her shirt and always winds up with stains on the belly of her shirt still, and she wants this tunic I think largely so she can cram her tablet into the pocket and go climb trees while listening to audiobooks on speaker. So I want a bright color but not too pale, and I want a tough fabric but not unbreathable, and I'm just. Deciding, still.
Probably what I should do is use some undyed fabric I own, and then bring my supplies and let her tie-dye it. I have a couple other things I could tie-dye, or will by then. That would be a fun bonding activity. I don't know if I'll have time to do it this trip though. So maybe I'll postpone the project and ask her for help once she's on summer break. (Good luck catching her, kids these days have so many summer camps.) As a bonus I bet I could loop her BFF and BFF's Mom in on the tie-dyeing, they're both into that shit.
Hell we could do ice-dyeing, the farm has a 1000-lb ice machine that is very frequently turned on (weekly for the market, biweekly for chicken processing-- there could be ice available at pretty much any time lol).
So anyway. I know she wants me to make a tunic out of a trio of large-print cat shirts she's outgrown, and she wants to wear it for her 5th grade moving up day ceremony, and I looked at it while I was home but I haven't done it yet. I need to get my shit together.
What I might do is print off a size 12 version of the t-shirt pattern I own, it's just that it's designed for busty women because I'm a busty woman, and she's Not, yet (oh, she will be. soon. but not yet.) so I have to kind of. Well, I own a pattern for a swing tunic that's close to what she wants actually. Oh, I should just print that one off. (The joy of the Cashmerette Club subscription patterns is that you get all the sizes, 0-30, and I've now made a couple of them for smaller friends, because like. I mean I own the pattern! PDF patterns are so great because you can reprint them in the smaller size instead of trying to trace it off. I never ever got the hang of tissue paper patterns.)
Yeah here this one, the Wexford Top/Dress, would be easy enough to kind of carve out the bust curve a little and make it fit a kid, because it's not meant to be that fitted. I'll just sort of use that as a general guideline and then make the cut-out-and-patchworked t-shirts fit into that approximate silhouette. The way I made the other tunics for her, I just used a shirt whose neck and shoulders still mostly fit her. But these cat shirts she's thoroughly outgrown, so making a new neck/shoulder area would be best.
Orrrrrr.... I could use one of the zillion old t-shirts of mine that I've saved to cut up. The neck/shoulders of a fully adult-sized garment are no longer too big for her. That's easier.
I also have a bunch of garments I want to make for myself, as I don't seem to buy clothes much anymore (I can't bring myself to pay $40 for a dress off the clearance rack that won't fit me and will mostly be polyester and won't be that interesting and will pill the first time I wash it). The Club's latest pattern is a skort/shorts/skirt dealie, and I need more shorts all the time-- I've largely given up on underpants and just wear boxer-briefs or anti-chafe shorts and I just don't see the point now of wearing a pair of panties and then shorts over the top under my skirt. Like. Just wear the shorts! So being able to choose the materials and print and look of that would be pretty great. And the Cashmerette one is inseam-less, like my favorite anti-chafe shorts are.
So I have cut out a pair of just the shorts in a clearance cotton mesh from Dharmatrading, and I even have the correct elastic for the waistband, so that kind of rules. I will sew those up as soon as I get a chance. I would like to make several skorts as well, probably from synthetic ponte or something, but my ideal would be to get some decent merino/nylon jersey and do a few from that. You never see merino skorts but I would wear the shit out of those.
I also have a lovely underpants pattern from the Club from ages ago, and while I rarely wear underpants of that style anymore, I would like having some cute matchy ones to go with the bralettes. Also, I have a shitton of foldover elastic, and I suspect I could use foldover elastic in some of the bralettes I want to make, so I want to get proficient in its use, and there are directions for applying it in the underpants directions, and it seems like a good way to practice. So I cut a muslin of those from the same cotton mesh as the shorts, and just have to sew the pieces together.
I also want to make myself more pretty dresses, and I have parts of a new Studio Tunic for myself already cut out, but not the rest.
And I recently made myself the button-up shirt from the Club, I know I posted about it on here. And I wanted to immediately make myself several more, and I got out some fabric and prepared it and cut out one pattern piece and then ran out of time. So yesterday I finally cut out the rest of the shirt from this fabric, a print from Mood covered in tiny dinosaurs. So I have that all ready to go in a plastic baggie too, just waiting for me to have time to sit and sew it. (Once I do that, I would really like to make myself a dress version of it from the cool green not-quite-seersucker I got from that remnant bolt at Promenade Fabrics in New Orleans.)
AND. i also have resolved to make my BFF, the one in Rochester who I lived with for a bit in the pandemic, with the little kids-- MM-- I am going to make her a sloper, before I see her next weekend, or maybe while I see her next weekend if i don't get to it in time argh, and I am going to at least try that on her and figure out approximately what shape she is so that I can put together a master pattern for her to make herself dresses from. I took her measurements ages ago, and she's a 14CD bust, a 16 waist, and an 8 hip in Cashmerette's sizing, and so I think just making a sloper with those sizes all graded together will be a huge start. And then we can mildly tweak the fit for her frame, and-- the thing is, she's always buying custom dresses on Etsy because what she wants is very specific and not usually available in stores, and then the dresses come and don't fit her so she has to get them tailored, and then they were just made of cheap quilting cotton from Joann's so they wear out after she washes them a few times, and she's had to add on pockets anyway because they didn't have them.
So I just feel like if I could get her a paper master pattern that fit her... heck i could even just make her dresses if *I* had the pattern. It would be easier and more efficient. I could do the basic construction and then turn over the pockets and embellishments to her, which is what she does anyway. So that's my goal there, and we'll see if I can reach it.
Anyway. If only I didn't have to work at all and could just sew all the time. I am not the first person to say this, LOL.
I have a lot of irons in the fire but at the moment am trapped under a cat so those irons are not going anywhere.
24 notes
·
View notes
Text
I get a lot of unisex, crew-neck t-shirts from various events and I typically alter the ones I have to/want to wear for one reason or the other. I am not a professional seamstress, but thought I would collect some of the things I learned here.
Now, the only thing you really need when altering a shirt is a pair of scissors, a needle and thread. It gets easier and faster if you have a few other things though;
another shirt with a shape that works for you. It can be shorter than you prefer, but pick something where you like the fit in the chest and waist.
a sewing machine capable of a zigzag stitch
washable fabric markers
sewing pins
a twin needle (unless you have a serger/coverstitch machine, but this post is probably not very helpful to you if that's what you are using)
A cutting mat and rotary cutter
A plate, bowl or something else hard and circular that is about 18-23 cm/7-9 inch wide
I have split this into two parts since you might like the fit of the shirt but hate the neckline, or vice versa.
Also, if it's your first time altering a t-shirt you probably don't want to do it on a shirt you really like!
Changing the fit
First off, iron the shirt inside-out. If you are using another shirt as a template, iron that as well. Try to make sure you iron along the side seams, if they don't have side seams use the sleeves and shoulders as a guide.

Keeping the shirts inside-out, you want to use your template shirt and use chalk or a temporary fabric marker to mark out where the new seams should be. If you don't have a template shirt you can put on the shirt and try to judge how much material you want to lose on the sides, or just wing it. Make a note of where on the sleeve seam the new shape comes together, and then mark the shoulders where you want the upper edge of the sleeves to end - then sketch out the new sleeve seam on both front and back. Be careful about this though, it is not a straight line so if you take too much the sleeve will be malformed. Preferably less than an inch/2 cm.


Next, pin the sides and sew them with a basting stitch - a straight stitch with a long stitch length. Because it is a stretchy fabric, this will probably snap - you can use a zig-zag stitch instead to avoid this, but we will do more seams to counter it either way. When the seams are done, try on the shirt - if the fit isn't right, use a seam ripper and try again.

Once the width of the shirt and the circumference of the sleeves feels right, cut away the slack leaving a ½ inch/1 cm seam allowance and use a three-step zig-zag stitch to seal the raw edges - this makes sure the fabric doesn't fray when you wash the shirt.

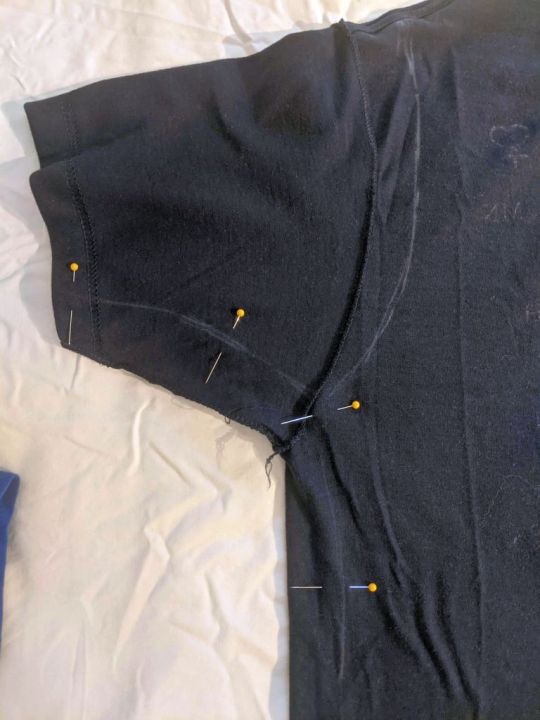
Moving on to the sleeves, flip the sleeves inside the shirt and pin along the marked edges. If there is any slack, try to distribute it evenly across the seam and stretch the shirt gently while sewing.
Work the same way as with the body, do a basting stitch first, try the shirt to make sure the fit works, then cut away the slack and seal the raw edges.

At this point we are done with the fit and can move on to the visible seams, so turn the shirt right-side out.
Changing the neckline and sleeve length
Now, before we begin sewing on the outside of the shirt it is important to note that t-shirts are made with jersey which is a knit fabric and very stretchy. You should not use a regular straight stitch on it - if you stretch the fabric before sewing the stitches will be loose, and if you don't they will snap when the fabric does get stretched. T-shirts solve this by having cover stitches like these:

This from a coverstitch machine, a type of serger, that has three or more threads - the bobbin thread is looped around the upper threads to create a zig-zag pattern on the back, if the shirt is stretched this straightens and the parallel seams are pulled closer together. you can use a zig-zag stitch to provide similar flexibility on a regular sewing machine, but you can also get a similar result as above by using a twin needle.


Twin needles work with most sewing machines that have a zigzag stitch - though note that you should use a straight stitch while using them. Otherwise they will likely hit the presser foot and break. You need an extra spool of thread - winding another bobbin works - and this needs to be put on a separate spool holder, check if your machine comes with one. If the manual explains how to thread the machine with several threads follow it, otherwise just thread the second one normally but skip the final step of threading it behind the needle bar thread guide.
If you are buying a twin needle specifically for jersey, look for a stretch or ballpoint needle as they are not as sharp and won't pierce the knit threads.


An easy way to get a clean and consistent look to your neckline is to center a plate around the existing neckline and use a rotary cutter. Make sure that the shirt is unstretched and the plate is exactly centered on the existing neckline. Also remember that you will need another 1 cm/½ inch of seam allowance so pick a slightly smaller plate than you want the neckline to be wide.
You can cut both the front and back at the same time if you want a plunging back as well, or you can put a smaller cutting mat or piece of cardboard in between and then cut the back a fixed distance from the original neckline. Note that using a rotary cutter on cardboard will dull it, so be careful.
You can also shorten the sleeves at this point - again, remember to account for seam allowance.


Pin the edges - if using a twin needle it is not strictly necessary to seal the raw edges but you can still do it if you want the shirt to be extra resilient.
You can also fold the hem twice instead of just once to make it more robust, and I recommend doing this if you are sewing by hand. Use a hemming stitch along the edge if you do this, you can keep the hem on either the inside or outside.

Finally, sew the neckline and shortened sleeves using the twin needle - be careful that you're catching the hem along the entire seam. Turn down the speed on your machine if you have to.
If your shirt is too long, you can cut it shorter and deal with the body the same way as the sleeves.


All done! Unfortunately these are the before/after pictures I am stuck with, but hopefully they give an idea of what you can do and it's been helpful to someone!
4 notes
·
View notes
Text
Your Comprehensive Guide to Successful Sewing

Guide to Successful Sewing
Whether you're a beginner just starting your sewing journey or an experienced seamstress looking to refine your skills, the Guidelines offer a wealth of knowledge to help you succeed in your sewing projects. This comprehensive collection of educational articles covers all aspects of sewing, from basic techniques to advanced methods. Exploring the Guidelines The Guidelines are organized into various categories, each focusing on different aspects of sewing. Let's take a closer look at what you can find: 1 - Sewing Tools Basic Tools Sewing Tools More Sewing Tools Mats for Rotary Cutters Rotary Mat Q&A Scissors and Shears Rotary Cutters Measuring Tools Marking Tools Tube Turners Part 1 Tube Turners Part 2 2 - Equipment Setting Up a Sewing Room Sewing Machine Basics Buying a Sewing Machine Pressing Equipment Ironing Boards Sergers Presses & Home Pressing Systems Serger Stitches Computerized Sewing Machines 3 - Understanding Patterns Pattern Markings Part 1 Pattern Markings Part 2 4 - Fabric The Right Fabric Preparing to Sew - Fabric and Pattern Preparation Cotton Identifying Fibers & Fabrics Denim - More Than Just Jeans Napped Fabrics Unconventional Fabric Sources Straightening Fabric Grain Sewing with Knits Working with Napped Fabrics Wool Slick Tricks: Laminated Fabrics and Vinyls Sewing with Handwovens Identifying Plaids Sewing with Minkee-like Fabrics 5 -Linings & Interfacings Interfacing 101 6 - Notions Button, Button Pins Invisible Thread Elastic - the Notion that Gives Selecting Snaps Bindings & Tapes Using Bias Tape Rick Rack 7 - Home Dec Bed Coverings Drapery Types Table Treatments: Tablecloths Table Treatments: Placemats, Napkins and Runners Decorating with Quilts 8 - Home Dec How To Pillows Fabric Napkins Covering a Lampshade with Fabric Making Rod Pocket Curtains Tab Top Curtains Making a Shower Curtain Covering a Bench Top Tassels 9 - Quilting Quilting Tools Quilting Terms Notions for Quilters Pre-Cut Quilting Fabrics Quilting Rulers Quilting Designs Making Bias and Bias Binding Binding a Quilt Prairie Points Yo-Yos Seminole Piecing
10 - Fashion/Apparel
Body Types Clothing Care and Repair 11 - General How-To Pressing Pants Simple Seaming Techniques Seam Finishes Part 1 Fold-Down Casings Simple Hems Staystitching Easing, Gathering & Shirring Working with Fold-over Elastic Applied Casings Twin-Needle Sewing Seam Finishes Part 2 Ruffles Working with Stripes Piping Princess Seams Flat Fell Seams Bound and Hong Kong Seam Finishes Beading Part 1 Beading Part 2 12 - Garment How-To Attaching Buttons Easy Waistband Casings Centered Zipper Button Loops Covered Buttons Understitching Dart Basics Topstitching Shirt Collar Pointers Read the full article
12 notes
·
View notes
Note
hi!! i saw in your tags that you work at a fabric store, and as an occasional fabric store customer i have to ask... are there any Fabric Life Hacks and/or Things Customers Always Ask or Get Wrong that you want to share? i would love the fabric inside scoop!!
Oh yeah! Sorry it took me a bit to respond I just wanted to get everything right! This one has a lot less to do with fabric and more with machine sewing, but I’m always surprised how many people don’t know that changing the needle can really effect how your machine sews through different types of fabric!
I get super passionate about this kind of stuff, so I’m putting the run-down behind a cut….
Sewing machine needles are specialized for different fabrics! The ones that come with your machine will only take you so far! Using the wrong one can sometimes break your needle and damage your fabric!!! The nice part about sewing machine needles is that unless you’ve got a REALLY old machine (like anything before 1900’s) you can just go out and buy any old brand of machine needle.
Most needles fall under several different types! Including: Universal needles, jeans/denim needles, ballpoint needles, microtex needles, and leather needles! I’m probably forgetting some and I KNOW that people and companies have different names for them.
Important rule of thumb! The bigger the number on the package the thicker the fabric is meant to be! I’m gonna use a Shmetz package as an example because they’re the kind I’m usually explaining at work.

Highlighted in red is where you look for the needle number! This one is a multi-pack that has couple of weights, I recommend getting these kind packs if you’re just starting out and don’t plan to sew and specific fabrics!
Microtex needles: for sewing lightweight fabric! They’re thinner and sharper so sewing with them will leave less of a hole in your fabric
Universal needles: good for sewing pretty much any medium weight fabrics! These guys will be labeled with numbers like 11/75 and 14/90
Jeans/denim needles: also sometimes called upholstery needles! These are the guys that you want to use for when you’re sewing thicker fabric or lots of layers! Don’t underestimate how much this will expand how the amount layers of fabric you can sew through!
Ballpoint needles: these are a whole other type with it’s own scale of weights! These needles are for sewing with knit fabrics, they’ve got a smooth tip that means it won’t potentially cut threads and fuzz the knits! If you don’t have access to a serger you can still sew with knits, just use a zigzag stitch and sew over it a couple of times!
Leather needles: these are like the jeans/denim needles but specifically for leather! It might just be that whatever leather you’re sewing is too thick for your machine, but a leather needle can go a long way to making it possible to sew leather on a regular sewing machine! Leather is a strange beast to sew
Bonus round! Chrome needles: just a fancy term for needles that are made out of a higher quality metal! They’re supposed to last longer and be more sturdy but if there’s a difference I haven’t seen one. Some people swear by them though!
And that was…. Sewing tips hour! I feel like I have to give the rundown on needles to at least one customer a day, so this is something I’ve got the whole spiel for! Apologies in advance if you’re a hand-sewer or if already knew all of this junk!
25 notes
·
View notes