#sewing machine tutorials
Explore tagged Tumblr posts
Visit Tumblr Blog
Explore Tumblr blogs with no restrictions, modern design and the best experience.
Last Seen Tumblr Blogs


Fun Fact
Mobile Tumblr US users spend an average of 4.04 minutes per session on the app.
Text
Master Your Serger and Overlocker with the #1 Online Sewing Course!
Master Your Serger and Overlocker with the #1 Online Sewing Course! Tired of tangled threads, skipped stitches, or confusion over your serger’s settings? Whether you’re a sewing enthusiast or a professional looking to refine your craft, The Number 1 Serger and Overlocker Online Sewing Course is your ultimate guide to mastering these powerful machines. Say goodbye to frustration and hello to…
#advanced serger techniques#beginner serger course#best online sewing course#cover stitch mastery#decorative serger stitches#DIY sewing projects#fabric-specific serger skills#learn to use a serger#lifetime sewing access#online sewing classes#overlocker online classes#professional seam finishes#save time sewing#serger hacks#serger maintenance guide#serger sewing course#serger tension settings#serger video tutorials#serger vs overlocker#sewing community forum#sewing course enrollment#sewing machine troubleshooting#sewing machine tutorials#sewing tips for beginners#threading a serger machine
0 notes
Text
Wednesday, November 29.
You reap what you sew.
Never have truer words been spoken. But they come as good news for Tumblr's sewing community, however, who have been sewing some absolute delights. Some real œuvres d'art. Some winner-winner chicken dinners.
As luck would have it, #sewing is trending. And it's trending right now, so we have reaped a selection of these very dinners for your eyes only. We have then asked ourselves just what did we do to deserve y'all, and your resplendent talents.
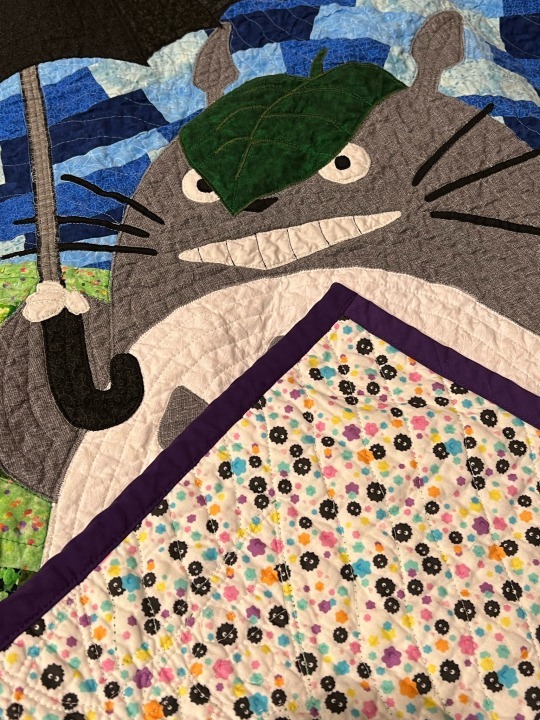
#today on tumblr#sewing#sew#sewblr#crafts#sewing machine#crafting#sewing project#textile arts#crochet#sewing patterns#sewing tutorial#sewing tag#craftblr#contemporary art#artists#artists on tumblr
1K notes
·
View notes
Text
Progress Pride Flag Quilt Block Pattern & Tutorial
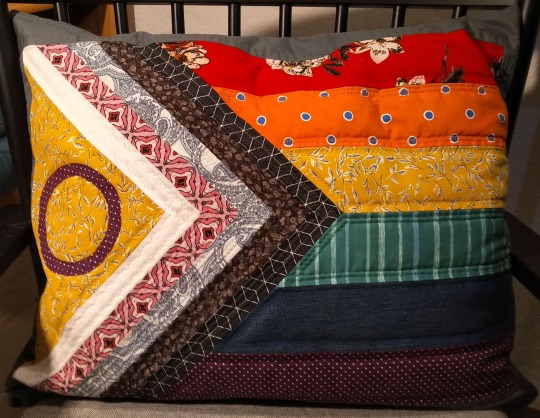
Don't you just love the flag of our people? Do you have an inner grandma that years to make stuff? Do you want to combine these two things and make a queer quilt?
Well, I've got you.
Behold the pattern! And my lack of graphic skills, so I drew it on paper!
Basically it's a bunch of rectangles, one half square triangle and a fuzzy cut circle. I don't know shit about quilting and I was able to come up with it. Why centimeter, you ask? Because I'm German and that's what I'm familiar with. Why weird measurements and not jelly rolls and layer cakes and stuff? Because I'm German and quilting is not really a thing here.
Onto the tutorial!
You'll need:
A scrap of fabric of red, orange, yellow, green, blue, purple, black, brown, light blue, pink, white each
additional fabric for the border
Cutting mat, quilting ruler, roll cutter
sewing machine
thread
pins
double sided interfacing
iron and ironing board
fabric sheers
compasses
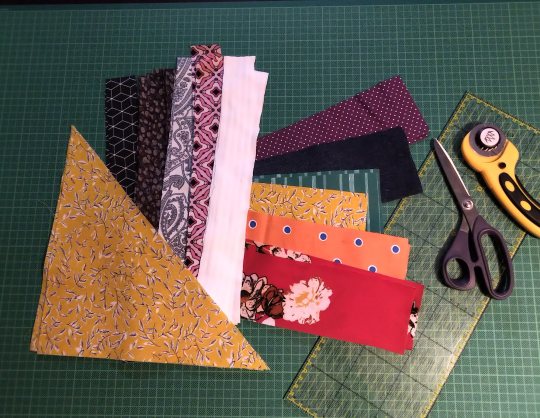
Step 1: Cut everything. Duh. We'll take care of the circle later, don't worry about that now. The half square triangle is exactly what it sounds like. A square and then you cut it diagonally. That's why I didn't give the length of the hypotenuse.
(Note: I'm making two blocks at the same time, that's why there's so much fabric. Also this is a middle of the night project, hence the lighting.)
I'm using all kinds of different fabrics, different weights and drapes, some stretchy, some transparent, so I needed to interface some of them.
Step 2: Sew the rainbow together. 0,5cm seam allowance on everything, that's exactly the edge of the foot on your machine. Double and triple check that everything is facing the right direction before sewing. The seam of yellow and green does not get sewn fully, only 21,5 cm! That's important later! Also backtack there. Don't forget to iron.
Step 3: Sew the strips to the half square triangle. For this you have to switch between the sewing machine and the ironing board constantly. Attach the shorter strip diretly to one side of the HST, iron it open. The second strip of the same colour gets attatched to the other side of the HST and the first strip. Look at the pictures closely if you're unsure how that works. Also the strips are longer than the triangle. We'll square that up later.
All strips attatched will look like this. See how the two strips meet at the tip!
Step 4: Cut the rainbow part to size. The length between yellow and green is 22cm long. The shorter seam from before plus some seam allowance. The outsides of red and purple are 44,5cm long. These two points are the beginning and end of your cutting line. You will cut a little triangle from every single colour. Do this slowly and carefully. Maybe your fabrics have stretched a bit (mine did). Don't worry, it will be ok.

Step 5: The Y seam, part one. Y seams are tricky, but there's only one for this block. So put your strips part on your rainbow part and line them up so that the tip of the strip part overhangs the seam between yellow and green by about half a centimeter. Remember that it's not about the edges of the fabric, but where the seam will be. But don't sew all the way! Leave 0,5cm at the tip!
You can also mark on your strip piece two lines 0,5cm from the edges of the black. They should form a little square at the tip. There they meet is where the actual tip on the finished block will be. So place this spot directly on the seem between yellow and green and only sew right up to it. Not beyond.
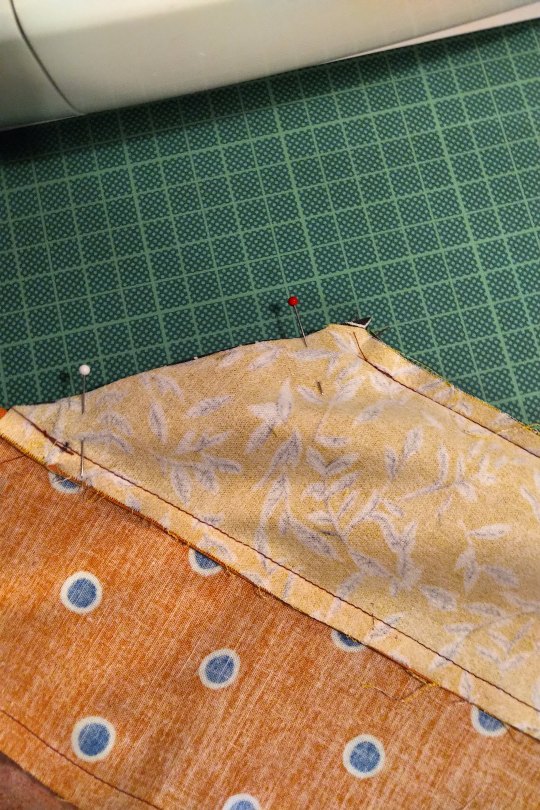
Step 6: The Y seam, part two. Now, fold both the rainbow part and the strips part in half and if you've done the last step correctly, the remaining two edges will allign. Pin and sew.
I can't explain it better than I've done here, I'm sure there are tutorias out there. Good luck!
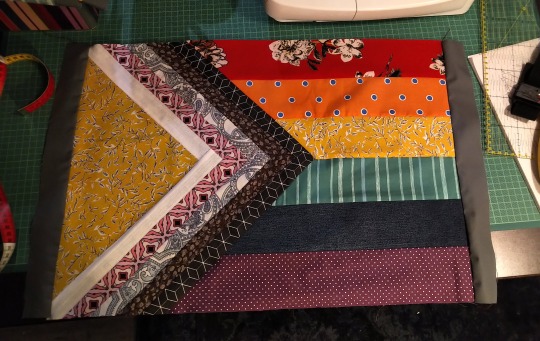
Step 7: Square up. Iron your block to that everything is nice and straight and flat. Then use the fabric edges of the red and purple to cut the remaining ends of the strips. Use the HST to cut the white. Be careful, the long side of the triangle is on the bias and likely stretched a bit.
I already added borders here. I'm making a pillow case.
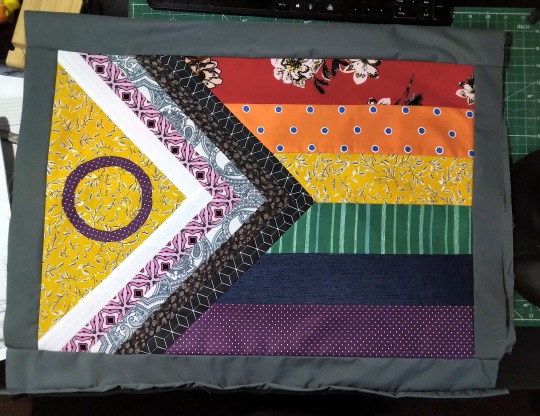
Step 8: Fuzzy cut and raw edge applique. Double sided iron on interfacing is essentially double sided tape. It has two types of glue, one gets activated by 2 seconds of heat, the other by 5 or so (depends on the product). The second side is also covered with a paper that needs to be removed before the second gluing. Read the instructions of the product you are using!
Use your compasses to draw a circle on the protective paper side of the interfacing. It's actually two circles from the same middle point, see pattern. Cut it out roughly. Then place it with the rougher side on the backside of your purple fabric and iron for 2 seconds on middle heat. If you've just ironed your fabric before and the ironing board is still hot, wait for it to cool down. Also let the fabric cool down after applying. Then cut out your circle. The interfacing will have stiffened the fabric, so that shouldn't be a problem. Then remove the protective paper, place the circle on the yellow triangle where you want it and iron for 5 seconds. Let cool.
And you're done! The applique at this point is only secured with the interfacing, but it should hold fairly well. The quilting will secure it further.
And that's it. BTW, did you know that this design was made by Valentino Vecchietti for Intersex Equality Rights UK in 2021? Now you do. Happy quilting!
#lgbt+#lgbtq+#lgbtq community#pride flag#progress pride flag#valentino vecchietti#quilting#quilt#quilt block#quilt pattern#quilt tutorial#sewing#sewing machine#sewing tutorial#sewing pattern
251 notes
·
View notes
Text
Man, people on marketplace really suck at taking photos of furniture.
#how do you expect to sell a table if you can't even be bothered to get it from more than one angle?#or clear the garage clutter off it? or include measurements? SO MANY DON'T INCLUDE MEASUREMENTS!#at least 85% of marketplace furniture is Mystery Sized#just looked at one that had FIVE photos from the EXACT same angle all at slightly different levels of tilt and blurriness#there was a cat walking by in the background of 3 of them#I still don't have a table for my sewing machine and I can't start filming the sewing portion of my shirt tutorial until I get one >:(#I just need something smallish and sturdy#complaining#(not the lady I bought my desk from though! she was great and had all the measurements and a good set of clear photos)
109 notes
·
View notes
Text
Figuring Out Presser Foot Pressure On My Juki DDL-8700 (success!) (pictures!)
I had difficulty finding any detailed or visual breakdown on how to achieve optimal presser foot pressure, and since this is my first Big Girl sewing machine...I never really had an option before. My goal was to not only adjust the presser foot, top + bottom thread tension to suit machine quilting, but to be able to recreate that setting whenever I switch between garments and quilting. My only rule/limitation was that I would figure this out using a plain 1/4" presser foot, and not rely on the comfort of a walking foot. My captions will be beneath the photos they're referring to.

My test piece: lightweight cotton batting sandwiched between two pieces of cheap cotton, pin basted. Approximately 6"x6". If I was going to test things out, I didn't want it to be obscured with nice fabric.


My initial top thread tension. Any adjustments will happen while the presser foot is down.


My initial presser foot pressure knob measurement. This was the aspect that I felt I needed most explained to me. Measured in centimeters for accuracy. If using a sewing gauge like this one, I stood it next to the knob in a way that allowed the slider to stop at the top. Measured at 3.4cm. Adjustments to this knob will happen while the presser foot is up.

To keep it familiar, initial stitch length set at 2.5. I tend to go all over with stitch lengths, as I make a variety of things.

"Unchanged tension. 3.4cm. 2.5 length"
This stitch line is what those settings produced, using 40wt Glide thread for top (gray green) and bottom (white). Looks fine-ish, but bottom thread is pulled up, and stitches aren't consistent. The foot additionally pushed the fabric around unfavorably.

Here, "threads" refers to threads of the SCREW that are exposed. I initially thought that my solution was to tighten the top thread tension, but as the bottom thread never changed...I realized the opposite was true lol.

These are all of my experiments with the pressure knob at 3.4cm. Likely unintelligibly, when I tightened the bobbin case I drew how the screws were now oriented when looking at the case from that perspective. The tightened bobbin stitch line was the only one where there was no bottom thread showing. Ultimately the fabric was being pushed around too much, still.


Next, I loosened the pressure knob to 3.6cm, and loosened the top thread tension until the convex part of the screw was just barely poking out. Bobbin tension stayed the same.

These are what my experiments with 3.6cm looked like, with the arrows indicating "this is the same, but..." I experimented with 3.0 stitch length partially through this knob height. Ultimately, I am most pleased with the presser foot pressure knob sitting at 3.6cm, the bottom thread tension like my drawing, and top thread tension with screw barely showing. CRITICALLY, however, was that within these last stitch lines, I tried regular overlock thread for the bottom. It 100% made a positive difference. I actually kind of dislike shiny slippery thread, but wanted to throw an extra curveball to the test.
There are so many variables that go into settings, and compared to our computerized automatic machine cousins (soft hands), the task of creating reliable settings every single time can be daunting. Struggling with it has been a little upsetting, because it's affected my ability to produce things worth selling. Hopefully soon I'll TRULY put it to the test :) I also need to figure out the settings for lightweight + weird fabrics. I hope that even if my own numbers aren't useful, maybe someone can benefit from seeing the process.
#personal#sewing tips#juki#juki ddl 8700#industrial sewing machine#quilting#machine quilting#sewing tutorial
19 notes
·
View notes
Text
the cosplay worms won im learning to sew
#had to look up how to thread my sewing machine#it's going Great#i have a vague idea of how to do things#this piece in particular looks simple enough and has a video tutorial with it so im not too concerned
23 notes
·
View notes
Text

This is a beautiful antique sewing machine!
(1868 Gold Medal Johnson Clark Hand Crank)
#crafts#gifts#decor#sewing#quilting#briar rose quilts#bedding#shopping#holiday#quilters of tumblr#sewing machine#fibre arts#textiles#crafting#hand sewing#antique sewing machine#vintage sewing machine#johnson clark hand crank#hand crank sewing machine#art quilt#quilting as art#quilt tutorial#fabric art#patchwork#quiltblr#quilt pattern#textile art#quilt#quilts
8 notes
·
View notes
Photo

Hey there, fashionistas! I'm excited to share a fantastic sewing tutorial on creating your own stunning balloon sleeves. If you're looking to add a touch of drama and elegance to your outfits, this tutorial is perfect for you!
In my latest video, I guide you through the process of drafting and sewing balloon sleeves. Whether you prefer a lined or unlined version, I've got you covered. To make things even easier, I've included a free printable PDF pattern that you can download and use right away.
These balloon sleeves are incredibly versatile and can be added to a variety of garments, from tops to dresses. They instantly transform any piece into a fashion statement. Even if you're new to sewing, fear not! This tutorial is beginner-friendly, with detailed step-by-step instructions and useful sewing tips to help you along the way.
Head over to my channel to watch the video now and embark on this exciting sewing journey. Don't forget to give it a thumbs up if you find it helpful and consider subscribing to my channel for more inspiring sewing content.
I can't wait to see your fabulous creations! Share your experience, ask questions, and connect with fellow sewing enthusiasts in the comments section. Let's make fashion magic together!
Stay stylish🤍🥥
youtube
#diy fashion#sewing tutorial#balloon sleeve#sleeves#fashion inspiration#sew#sewing#modern sewing#modern fashion#sparrowrefashion#diysewing#sewing machine
155 notes
·
View notes
Text
Once i get a sewing machine its over for al of you ( dk how to sew)
#girl blogger#Girlhood#female rage#girl interrupted#this is a girlblog#tumblr#lizzy grant#vibes#life#it girl#Pretty#black swan#Talk#White swan#nina sayers#lana del rey#gaslight gatekeep girlblog#Girl interrupted#girl interrupted syndrome#female hysteria#sewing machine#sewing tutorial#sewing tips#sewing
33 notes
·
View notes
Text
Your Comprehensive Guide to Successful Sewing

Guide to Successful Sewing
Whether you're a beginner just starting your sewing journey or an experienced seamstress looking to refine your skills, the Guidelines offer a wealth of knowledge to help you succeed in your sewing projects. This comprehensive collection of educational articles covers all aspects of sewing, from basic techniques to advanced methods. Exploring the Guidelines The Guidelines are organized into various categories, each focusing on different aspects of sewing. Let's take a closer look at what you can find: 1 - Sewing Tools Basic Tools Sewing Tools More Sewing Tools Mats for Rotary Cutters Rotary Mat Q&A Scissors and Shears Rotary Cutters Measuring Tools Marking Tools Tube Turners Part 1 Tube Turners Part 2 2 - Equipment Setting Up a Sewing Room Sewing Machine Basics Buying a Sewing Machine Pressing Equipment Ironing Boards Sergers Presses & Home Pressing Systems Serger Stitches Computerized Sewing Machines 3 - Understanding Patterns Pattern Markings Part 1 Pattern Markings Part 2 4 - Fabric The Right Fabric Preparing to Sew - Fabric and Pattern Preparation Cotton Identifying Fibers & Fabrics Denim - More Than Just Jeans Napped Fabrics Unconventional Fabric Sources Straightening Fabric Grain Sewing with Knits Working with Napped Fabrics Wool Slick Tricks: Laminated Fabrics and Vinyls Sewing with Handwovens Identifying Plaids Sewing with Minkee-like Fabrics 5 -Linings & Interfacings Interfacing 101 6 - Notions Button, Button Pins Invisible Thread Elastic - the Notion that Gives Selecting Snaps Bindings & Tapes Using Bias Tape Rick Rack 7 - Home Dec Bed Coverings Drapery Types Table Treatments: Tablecloths Table Treatments: Placemats, Napkins and Runners Decorating with Quilts 8 - Home Dec How To Pillows Fabric Napkins Covering a Lampshade with Fabric Making Rod Pocket Curtains Tab Top Curtains Making a Shower Curtain Covering a Bench Top Tassels 9 - Quilting Quilting Tools Quilting Terms Notions for Quilters Pre-Cut Quilting Fabrics Quilting Rulers Quilting Designs Making Bias and Bias Binding Binding a Quilt Prairie Points Yo-Yos Seminole Piecing
10 - Fashion/Apparel
Body Types Clothing Care and Repair 11 - General How-To Pressing Pants Simple Seaming Techniques Seam Finishes Part 1 Fold-Down Casings Simple Hems Staystitching Easing, Gathering & Shirring Working with Fold-over Elastic Applied Casings Twin-Needle Sewing Seam Finishes Part 2 Ruffles Working with Stripes Piping Princess Seams Flat Fell Seams Bound and Hong Kong Seam Finishes Beading Part 1 Beading Part 2 12 - Garment How-To Attaching Buttons Easy Waistband Casings Centered Zipper Button Loops Covered Buttons Understitching Dart Basics Topstitching Shirt Collar Pointers Read the full article
12 notes
·
View notes
Text
Baby's first alteration!
So, I got my old sewing machine fixed and serviced, and I set up a sewing table! So of course I've been going through and happily mending holes in pajama pants and backpacks and sheets and what have you. And because I've also been sucked into the whole "visible mending" thing, I took a bag of not-so-great clothes that I was going to scrap, and started reevaluating them as potential patches for visible mending projects.
Which is when I came across this shirt:

The reason I was going to get rid of it is because of the turtleneck. The very, very, VERY small turtleneck, that made me feel like it was going to strangle me every time I wore it. And then I started thinking that having a sewing machine means that you can change things about clothes that you don't like....oh no, I'm going to start learning alterations and tailoring, aren't I? Oh. No.
So I came across this very excellent tutorial:
youtube
And I figured, I was going to get rid of that shirt anyway....what if I tried to take off the strangle-neck and make it into something wearable?
And then I got intimidated. I've never done anything like this before.
And then I remembered another turtleneck in my scrap pile, that was there because it doesn't really fit me very well:
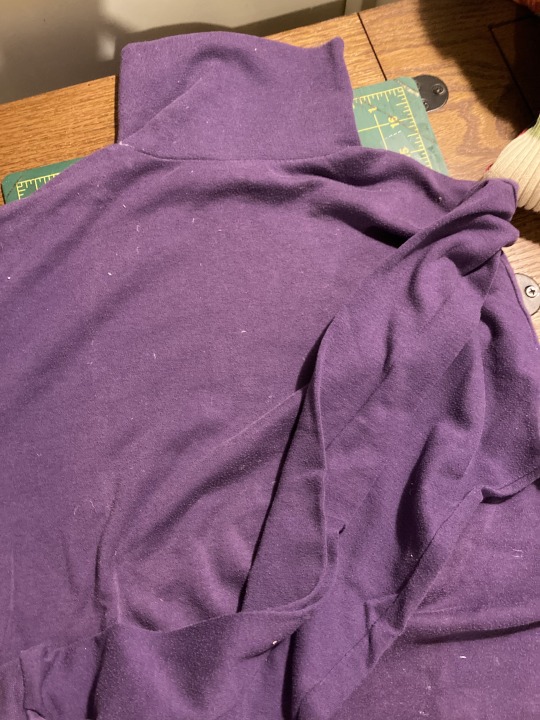
I figured I could use this as a practice piece, because there's a lot more cloth in case I screw up (it's always been very baggy on me), and there's basically no way I would be wearing it again anyway.
So I started going through the tutorial:
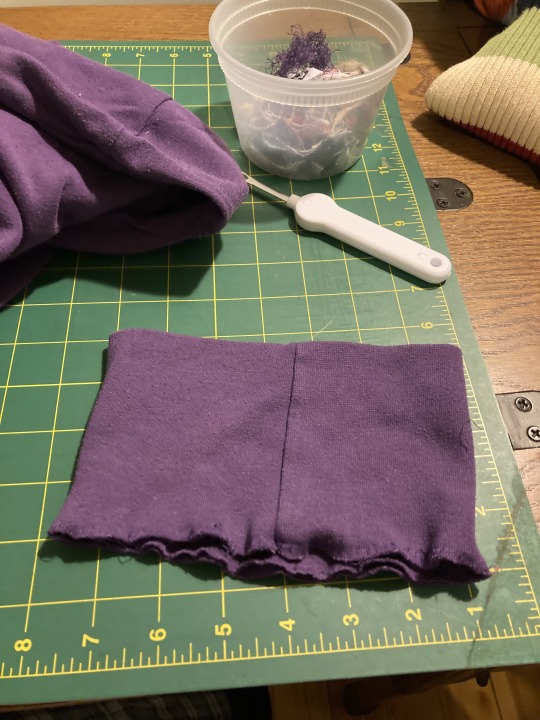

I removed the turtleneck part and picked it apart
(Look at how much longer the purple turtleneck was compared to the blue!)

The tutorial was for a scoop-neck, but I always look better in a boat neck, so I marked the fabric with soap and cut a boat-neck neckline into the shirt (which was scary, but I was pleased with how it turned out!)
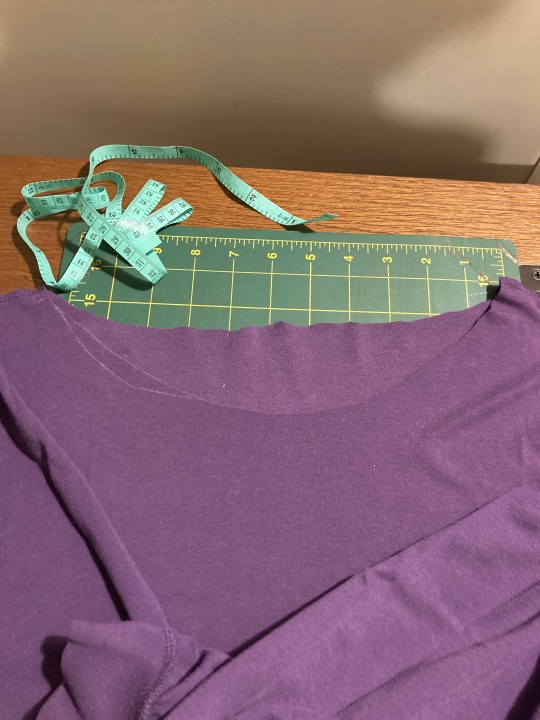
Then I followed the tutorial for how to measure and estimate the lengths of the strips for the front neckline and the back neckline seams:

Then I sewed them together

Panicked because one of the seam attempts caught in the sewing machine and was drawn UNDER THE FEED DOG PLATE which caused all kinds of problems including a broken needle! And I was worried that the fabric of the seam was so chewed up that I'd have to start over......
But then realized that the chewed-up part was going to be folded up and oversewn with the seam. So I pinned it up:
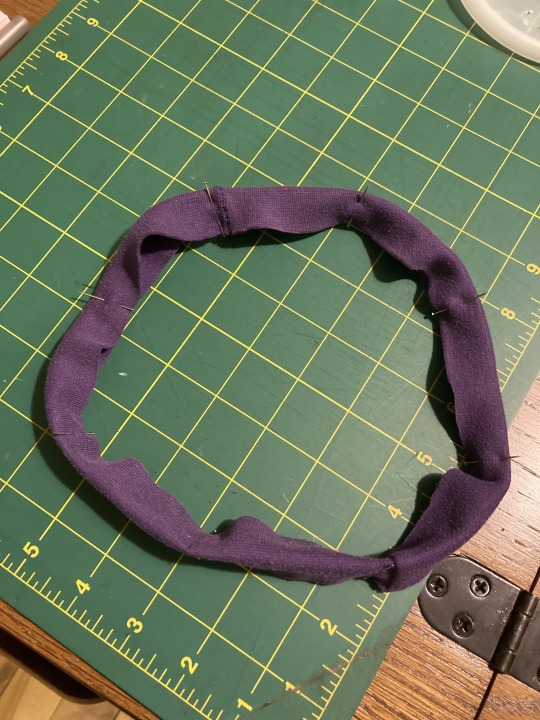
then got scared and added more pins
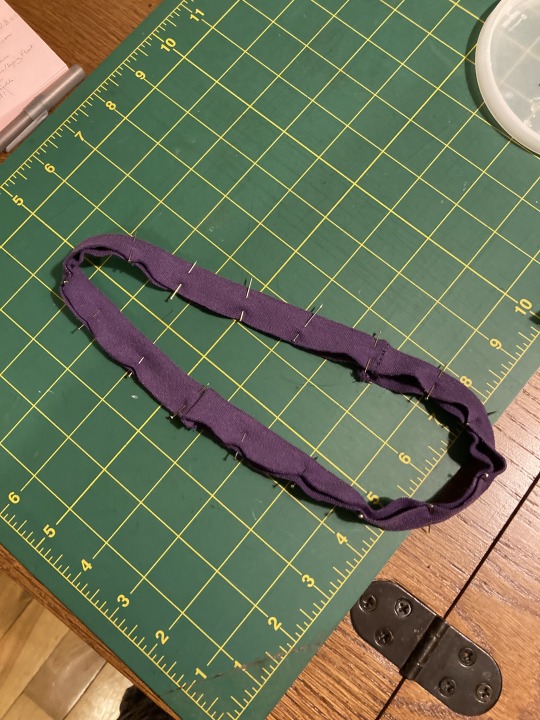
Matched it up to the shirt

And then I SEWED IT ON!

The shirt still doesn't fit at all, but I'm pretty pleased with the neckline now! (Oh no....does that mean I'm going to have to learn how to tailor an overly-baggy shirt?)

(Side note: Starting off new with super-stretchy fabric made some interesting problems. But! I now know how to replace a broken needle, pick a new foot that's better suited to the fabric, fight with stretchy fabric without a serger, etc etc etc. Good learning project, all in all. :D )
#sewing#mending#upcycle#sewing machine#new skills#first time#newbie#turtleneck#boatneck#tutorial#alterations
44 notes
·
View notes
Text
I think that starting a new medication with side effects of nervousness stomach pain and sweating was a really good idea at the same time that a bunch of stressful work things are happening
#it's good i feel good#i started playing the Jurassic world game to see if that would calm me down but i got so worked up about unsafe animal handling#i had to stop partway thru the tutorial#like it's accurate to the bad science and husbandry in the movies but it is TOO MUCH for me right now#i would like to get high but i have a zoom dr appt at three so that's a no go#and my partner won't be home till after three so i think I'm just gonna move my sewing machine to the living room#and watch something and get some quilting done
3 notes
·
View notes
Text
✂️🧶🎉🎊🧵Wave Lace Fabric For Wedding Dress Design Diy Supply 12cm🪡🧵🧶🎉🎊
#accessories🧵🧵#Supplies#boom boom boom boom#embroiderylove#embroiderypattern#handembroidery#handembroidered#embroideryart#freehandembroidery#embroiderylife#embroideryflowers#embroideryhoop#tabitha smith#cannonball#roberto da costa#anna marie darkholme#boom boom pow#julio richter#embroiderydesign#sewing patterns#sewing tutorial#sewing tips#crafting#crafts#embroidery#hand sewing#sewing machine#sewing project#fiber arts#tape bound
10 notes
·
View notes
Text
just found out there’s a regency themed ball in my area on october HRK
#oohhh I wanna go BADLY.#u need to dress up for it and they have costumes for hire but u can bring ur own#see my toxic trait is that I’m delusional enough to believe that I can do anything as long as I follow a tutorial#i AM considering on making the dress myself. no I have no sewing experience but we have a sewing machine.
10 notes
·
View notes
Text
everytime someone says doll customising is (outrageously) expensive an angel loses its wings
#maybe im biased bc i have an artsy family so i have like. a sewing machine and paint.. and i guess wire lying around#but unless you're planning on keeping your dolls in pristine condition +/ selling them#what you really needs a doll maybe nail polish remover + some crayons and#some old clothes... maybe a needle? but theres so many no-sew options and tutorials out there.#charms from jewellery you never wear are good to easily make into earrings or braided into preexisting hair#doll hair can be chopped off dollarstore wigs#or hell i bet someone you know has a wig they've been kicking around since last halloween#you can do cool tricks with hair with straws and boiling water (and patience)#liquid glue that dries clear can be used as a face sealant. not a very good one but hey im talking about having fun here#anyway no one come for me#OH and i forgot to mention you can just straight up melt the plastic with a lighter to get a cool effect#i used toothpicks as a rerooting tool once
2 notes
·
View notes
Text

Completed this Queen size Quilt and sent home with the customer! This one was a Quilt top that was made by Mabel back in 1984 and given to me to complete. I added the green boarder, added the batting, quilted it and added the backing. It was a fun challenge.
The Rose Blocks are all Hand Painted then pieced together with blue and white. We decided on the green boarders because we could not match the blue (the fabric was from 1984), so we matched the green to the flower greenery. I did not quilt across the painted roses because A. I was afraid of damaging the paint, B. I don't do long-arm quilting. Thus, I did Straight-Line Fancy Stitchwork Quilting following all the seams.
#crafts#gifts#decor#sewing#quilting#briar rose quilts#bedding#shopping#quilters of tumblr#quilt#quiltblr#art quilt#quilting as art#quilt pattern#quilt tutorial#textile art#embroidery#quilts#textiles#tapestry#quilt work#roses#flowers#hand painted#quilt blocks#vintage quilt#fabric#sewing machine#crafting#holiday
5 notes
·
View notes