#serger video tutorials
Explore tagged Tumblr posts
Visit Tumblr Blog
Explore Tumblr blogs with no restrictions, modern design and the best experience.
Last Seen Tumblr Blogs


Fun Fact
69% of Tumblr users are millennials.
Text
Master Your Serger and Overlocker with the #1 Online Sewing Course!
Master Your Serger and Overlocker with the #1 Online Sewing Course! Tired of tangled threads, skipped stitches, or confusion over your serger’s settings? Whether you’re a sewing enthusiast or a professional looking to refine your craft, The Number 1 Serger and Overlocker Online Sewing Course is your ultimate guide to mastering these powerful machines. Say goodbye to frustration and hello to…
#advanced serger techniques#beginner serger course#best online sewing course#cover stitch mastery#decorative serger stitches#DIY sewing projects#fabric-specific serger skills#learn to use a serger#lifetime sewing access#online sewing classes#overlocker online classes#professional seam finishes#save time sewing#serger hacks#serger maintenance guide#serger sewing course#serger tension settings#serger video tutorials#serger vs overlocker#sewing community forum#sewing course enrollment#sewing machine troubleshooting#sewing machine tutorials#sewing tips for beginners#threading a serger machine
0 notes
Note
do you have a pattern for that black edwardian-esque shirtdress you made?
Hey all. So one of my sewing posts has gotten a lot of unexpected traffic in the past day. Whenever this happens, it's usually because the tumblr algorithm is pushing the post onto the dash of anyone who follows the sewing tag. So for everyone who is sick of the dress in question assaulting your dash for absolutely no reason, I am so sorry.
@curiouscalembour
Short answer: yes, scroll down to the photos below
Longer answer: kind of, not really, I mean I have a pattern but it comes with no instructions and you're going to enjoy it about as much as most people enjoy scaling up Patterns of Fashion patterns, maybe even less. Also, this is not a tutorial, just an approximate recounting of what I did. So, uh, good luck.
So here's the thing. I don't use commercial patterns because they often have me finishing seams with a serger which I don't own, or constructing garments with the modern bag-lining method which just breaks my brain. I'm also not a professional pattern maker and have no idea how to digitize patterns, so I do all my drafting with good old-fashioned pen and Christmas wrapping paper. I'm also entirely self-taught and learned everything I know about pattern alterations through osmosis from TheClosetHistorian's videos, so I don't know if anything I'm doing here is industry-standard.
I got the original base pattern by tracing a modern button-down shirt that already fits me, and then converting it to be back-closing, then slashing and spreading the pattern pieces to get the desired style lines and amount of pintuck/floof I wanted, and then adjusting the fit over a series of wearable mockups. (5, to be exact. I now have 5 of these things in my wardrobe, and only 1.5 of them are successful.)

So here's^ the yoke piece. Wait, why are there 3 of them? Why do 2 of the pieces have a weird diagonal line running through them with the grid lines all messed up? Because I suck at this, that's why. I frankensteined this pattern from a previous mockup pattern that had a narrower V-shaped yoke and needed to widen it. If you want to digitize this for yourself and clean it up, you'll have to take one of the faint blue squares (they're 1"x1") and make a grid and then overlay that on top of the photo of the pattern shape. The back yoke piece has 2 different grainlines marked because the fashion fabric has a bias pintucked yoke, so its grainline is going to be different from the lining. The fashion fabric is meant to be pintucked beforehand, and then the pattern pieces traced on top of the pintucked panel and then cut out. Oh, and all of these pieces are drawn net, so you'll need to add seam allowance all around. Except at the center back, apparently, where past-Me already added allowance for a bound edge.

The bodice front and back pieces^ are a little more straightforward. No pintucks needed here. The upper edges ease into the bottom edge of the yoke, and the bottom edges gather/tuck down into the waistband. The center front tucks you'll have to drape on a dress form (or on yourself - I pinned a strip of twill tape which was my skirt waistband around my waist and then pinned the excess front bodice fabric onto the twill tape, then covered the raw edges with a dip-waist belt). The center back is a lot shorter than the rest of the bodice because I have a swayback. I learned from a previous mockup that if I leave the back of the bodice longer, I have to constantly tug my shirttails back down into my skirt because it gradually gets untucked throughout the day. These pieces also need seam allowances added. I assembled my bodice by sandwiching the bodice front and back pieces between the fashion and lining layers of my yoke pieces, but it was a bit bulky dealing with the folded back pintucked parts of the yoke seam allowances, so you can finish your seams however you want.
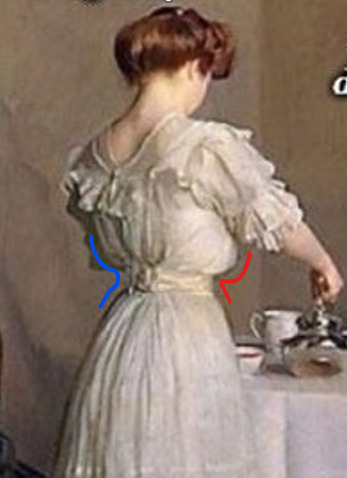
I'm fairly short-waisted, so if you have a longer torso than mine, then you'll want to lengthen the pieces vertically. You want these pieces to be longer than your torso, so that they poof out a little like a subtle muffin top, to get that Edwardian silhouette where the waist looks tiny under the poof:
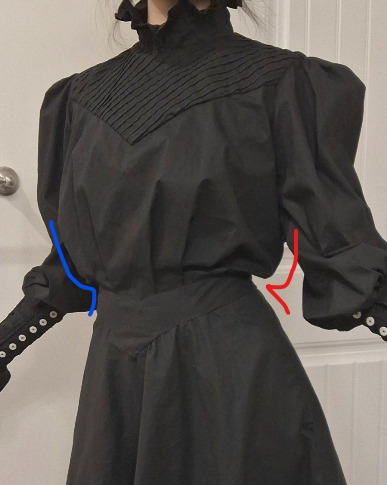

Here's^ part of the sleeve pattern. Again, sorry it's a chaotic mess. I had to use bits of scrap paper and cobble the pattern together. The pattern above is just the upper arm part of the sleeve and ends at the elbow. You'll have to extend about 10" all along the bottom edge to make the smocked part that covers the forearms. I only sewed the sleeve seams closed down to the elbow, then left the seam open from the elbow down to the wrist, so that it closed with rows and rows of buttons and loops. The smocking will give the lower sleeves a bit of stretch, so you might still be able to get your hand through even without the button closure.
This is also a net pattern so you should add seam allowances, but the sleeve is ridiculously puffy already, so forgetting the seam allowances here isn't a big deal.
(I call it my Elphaba shirtdress but it's not an actual replica of anything she wears in the movie. If you want your sleeve to look more like Elphaba's, which is puffy at the shoulders and elbows and fitted around her biceps and forearms, you can change where you add your rows of gathering/shirring.)

And finally, the collar piece. I'm not completely satisfied with how mine gapes at the center front (I think I need to contour/curve it a bit so that the top edge is narrower than the bottom edge), and I think the whole thing could be another inch taller all around, but this is the pattern piece I used to get my finished product. Notice that the back half of the collar slowly curves downward so that the center back is about 1/2" longer than the center front. That's on purpose. If you leave this little detail out, your collar will tilt backwards and make you feel like the front is trying to strangle you.
And because I'm nothing if not inconsistent, this piece features hem allowance already added to the top edge, but no seam allowance pre-added to the bottom edge where it attaches to my bodice yoke, and no allowance for overlap for the center back closure. So be very careful when making and marking your own copy and maybe be a little more consistent than I am?
Speaking of inconsistencies, remember how I drafted my yoke pieces to be cut from an already pre-pintucked panel of fashion fabric? Well, I didn't do that here for the collar. Instead, this collar piece is meant to be cut (on the fold) directly from flat fabric, and THEN pintucked (with lines of vertical pintucking perpendicular to the collar) after cutting. The pintucks are 1/4" deep, spaced 1/4" apart. So the pattern piece you cut out will pleat down to half its original length.
So this:

Becomes this:

Also, note on the pattern piece that I drew a horizontal line across the entire length, running parallel to and about 1.25" below the top edge? That's the point at which your pintucks stop. This gives the collar that ruffle you see at the top.
#sewing#sewing patterns#long post#idk what to tag this as#tricia sews (kind of)#asks#answered#curiouscalembour
10 notes
·
View notes
Text

This is such a dumb meme, and post it's from is even worse.
No one starts with this.
For any hobby.
Everyone posting "out of touch" how to videos started somewhere.
A tbh there is a point at which its reasonable to expect you to have the basic equipment or ingredients for whatever tutorial you're following on hand.
(And that's assuming whatever it is was made as a tutorial. A lot of things are more meant as "here's how this works" than something actually intended to be followed along with. Especially on the channels pulling out thousands of dollars worth of equipment every video. And if that still bothers you, you might just need to watch something else)
But if you're watching a video on drafting your own prom dress (which is not a single person's first sewing project) then yes, they're going to assume you have access to a machine and basic sewing tools.
And yeah, the person who runs a baking channel has a stand mixer. They do this for a living, they're going to get stuff that their job easier (and they're assuming you can fill in the blank to stir by hand if you don't have one) (same thing goes for sergers, that's another one everyone loves to complain about)
And someone with a CNC machine probably doesn't actually think the majority of their audience is going to copy them
I don't know, if click bait times and prices annoy you that's fine, but I just find that attitude so annoying. You can learn how to work around things. It'll make you better in the long run. But acting like it's ridiculous to think you have the stuff for the tutorial you're watching is stupid.
#also you can just stop watching someone's channel if they make you feel that insecure#i don't know why the original post annoys me so much but it just feels so obnoxious#the cooking channel assuming you have pantry staples on hand is not a personal insult#madeleine's mic
1 note
·
View note
Text
Bestie Bag Sewing Tutorial | BF Patterns | Blackbird Fabrics | Easy Crescent Bag Sewing Tutorial
youtube
The Bestie Bag from Blackbird Fabrics is one of my all-time favorite bag patterns. It’s a classic crescent bag with beginner-friendly instructions (and no serger necessary!!). In this video, I make the Medium size with a self-tap. All fabrics and notions used are from Blackbird Fabrics:
To view further information, go here - https://www.youtube.com/watch?v=hYirP9xx9_E
0 notes
Photo
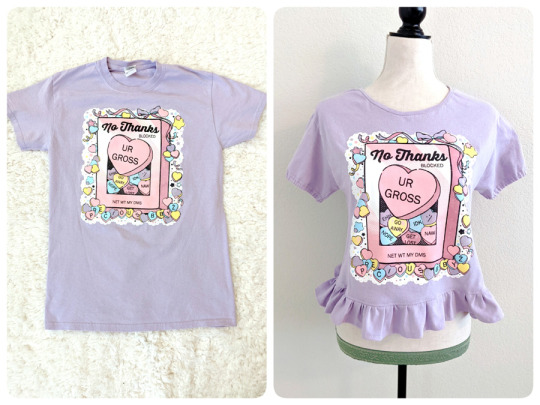
T-shirt refashion from regular unisex shirt to cute lolita-style cutsew! No serger/overlocker machine used, only some elastic. So happy to have finally redone this shirt to something that fits and is comfy but cute. Base tee shirt from https://preciousbbyz.com/
Check out the tutorial and video here!
https://starsbegantofall.blogspot.com/2022/06/diy-tutorial-precious-bbyz-cutsew-from.html
#handmade lolita#cutsew#t-shirt refashion#lolita tutorial#casual lolita#fairy kei#cutsew tutorial#diy lolita
40 notes
·
View notes
Note
How were you able to get into so many different crafts? Do you have a dedicated craft room? (Ur entire setup is aspirational to me as a college student!)
I have an office that has become my craft room!! My computer is in there and I work from home so I work in there too, but most of the space is dedicated to different tools/workspaces.
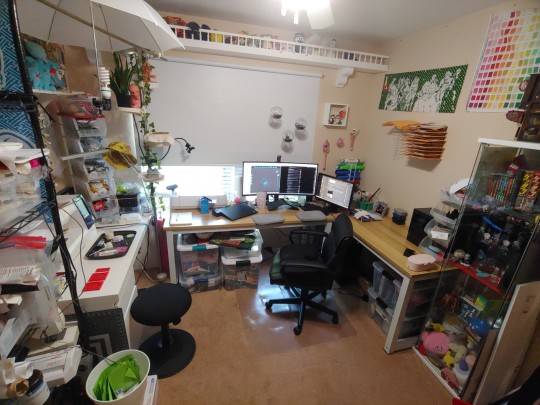
MESSY but here's the majority of my office. I have 3 desks in a big C shape. The left desk has all my sewing stuff, middle has my cricut and computer, then right has all my resin casting stuff and little SLA 3D printer. There's a paper drying station above it that I made from vinyl record racks mounted sideways lol
Off to the far left you can see part of an enormous shelf where I store other tools abd materials (keyboard building stuff, rug making stuff, knitting machine, spray paints, bulky sewing materials, dremel kit, serger, regular printer, sewing patterns, unfinished sewing projects, my old sewing machine, packaging for my store, god what else...)
If you want to get into a lot of hobbies it will seem really daunting with how many tools you need to buy, but realistically you shouldn't expect to get everything you want/need all at once. (DON'T get into leathercraft unless you can buy a lot of stuff immediately btw)
I started just with sewing years ago. The sewing machine I had was a tiny little Kenmore my mom got me for Christmas when I was in 5th or 6th grade. I stuck with that for a long time while slowly picking up more stuff.
Second hand is the best way to go for getting new tools when you join a hobby. Ebay is ok but people will try to rip you off sometimes. Shopgoodwill randomly has amazing deals on equipment. I you can get lucky with them for sergers and sewing machines if you're ok waiting around for specific models or buying older models that are available.
Joann Fabrics has great sales every so often on various sewing machines, but I've become partial to Ken's Sewing Center because they carry refurbished items with pretty decent discounts. Costco also has sewing machine deals but I haven't explored that option super well. Heads up though sewing machine and the like prices have gone up a lot the past 2 years :/
My knitting machine I got for an AMAZING deal on eBay because it was from an estate sale (like $100 shipped, which is nuts), and the serger I'm "borrowing" from my sister. Also I got a TON of knitting needles and crochet hooks from goodwill once for next to nothing.
Being buddies with boomers can get you cheap or free tools too. My stepdad gave me a dremel he never used and also a hot knife that I have somewhere. Also keep your ideal purchases in mind and watch out for sales rather than impulse buying. My 3D printer was on sale for $100 from $150 so that guy wasn't too costly.
Um I kind of went off here lol but just keep a list of what interests you and have patience and you can build up a mighty collection of tools. Just be careful because space becomes a premium after a while :')
As for actually getting into different crafts, I like to see what other artists are making and watch tutorial videos for random stuff to see if the craft seems fun. and like 99% of the time whatever the thing is does seem super fun to me. it's especially interesting when a new craft is something I can incorporate with a craft I already know to expand upon a skill I already have.
This is why I love when my friends show off their art and why I set up a discord for sharing your art. It's so inspiring just to be around other artists and bounce ideas around with them!!
I think the only craft that's ever turned me off though was macrame because you have to be ORGANIZED to do that and omg I am not.
18 notes
·
View notes
Note
Do you have any advice or suggestions on how to use serger and embroidery machines for people who are used to regular sewing machines, but realized that they might need to beef up their machinery collection?
I'm actually not really good with a serger; @dadhoc is the one who owns our serger. I just sort of fumbled my way through using the embroidery machines and watched a LOT of video tutorials on YouTube, experimented as much as I could stand, etc. This is why the first keychains I made were total garbage, but I got better once I watched some videos on in-the-hoop projects. :)
132 notes
·
View notes
Text
Some Updates for w-i-p wednesday:
First things first: I finished my serger dust cover!


If you'd like to make one yourself, here's the tutorial I used to make mine!
Now this isn't really a full-on tutorial as it skips some steps and doesn't explain everything in detail, for e.g. you should know how to make and sew double fold binding (I didn't!)
I also highly recommend using a fusible foam stabilizer! I've struggled quite a bit with the rather large front/top/back-piece which resulted in some gathers and puckering during quilting!
I have since started making my sewing machine dust cover (with fusible foam stabilizer this time) and the quilting turned out much neater:


The design follows the one of the serger dust cover: floral at the sides, green sewing theme at the front, back and top.
However with this one the outer layer and the lining are finished seperately and the seams will have to be topstitched in the end (instead of bound in binding) for the dust cover to keep its shape.
The tutorial for the sewing machine dust cover can be found here.
Again this isn't the best tutorial ever. I feel that some steps aren't well visible in the video but it's a good starting point!
I also recently invested in some special top stitching thread and did some trials for another quilted heart bag:


For the red heart bag I used regular thread and (non-fusible) quilt batting, the little squares are sewn with topstitching thread, left square with fusible batting, and right with foam stablilizer.
And what a difference the foam stabilizer makes!
Now I might have to tweak my original bag design to accommodate for the foam stabilizer. I also already dream of making a quilted pleather bag but I think neither my skill nor my machine can accomplish that....a girl can dream right?!
ALSO! I am still working on the 3rd part of the fabric covered boxes tutorial but the heat is making me lazy...so it might still be a while ¯\_(ツ)_/¯
#handmade#sewing#diy#wip#w-i-p#work in progress#work in progress wednesday#sewing machine dust cover#sewing machine cover#sewing machine cover diy#quilted heart bag#heart bag diy#bag diy#I basically have everything on hand for heart bag No.2 but I'm too anxious to start#jenrenfieldhandmade
19 notes
·
View notes
Photo
historical sewing videos are great for this, if they enjoy original practice (or close enough to it). regardless of what you're making and its historicity or lack thereof, they're an excellent resource for sewing tutorials without a bunch of fancy tools
per the tags above, nobody had a home serger in 1890-whatever
55K notes
·
View notes
Text
Original Practice vs Modern Sewing
During our sewing adventure, we will be using videos and tutorials made my Bernadette Banner, an amazing youtuber, historian, and seamstress who works mainly in historical/original practice. For many of her pieces, she hand sews them. While we are using her as inspiration and her tutorials to bolster the authenticity of our projects I wanted to make it very clear that we are NOT using original practice and will be using the modern instruments of sewing machines and sergers (overlock machines). While many of the notions and fine details may be hand sewn we are making modern interpretations of historical items using modern patterns and machines.
5 notes
·
View notes
Photo

New mini🐣 sewing tips video is up🙋🏻♀️ Please subscribe to my channel if you haven’t yet🥰 チャンネル登録よろしくお願いします🙇🏻♀️ 구독 부탁드립니다💓 #sewing #diy #howto #tutorial #sewingtips #sewinglove #sewingisfun #useful #serger #sew #lifehacks #sewingmachine #youtube #costura #couture #nähen #шитье #裁縫 #ソーイング #ミシン #ロックミシン #ハンドメイド #手作り #diy女子 #自製 #手作 #핸드메이드 #미싱 #오버록 #만들기 https://www.instagram.com/p/Bq9_pRInrTF/?utm_source=ig_tumblr_share&igshid=79yrjbrsic61
#sewing#diy#howto#tutorial#sewingtips#sewinglove#sewingisfun#useful#serger#sew#lifehacks#sewingmachine#youtube#costura#couture#nähen#шитье#裁縫#ソーイング#ミシン#ロックミシン#ハンドメイド#手作り#diy女子#自製#手作#핸드메이드#미싱#오버록#만들기
1 note
·
View note
Text
Brother CS7000i Sewing and Quilting Machine
Looking to create your next quilting masterpiece? New to sewing? The Brother CS7000i Sewing and Quilting Machine , feature-rich, sewing and quilting machine is a great option for a range of users.
This machine also features 70 built-in sewing stitches, including decorative stitches, quilting stitches, and seven styles of one-step, auto-size buttonholes. The free arm capability makes it easy to sew cuffs, sleeves and skinny jeans and the drop feed mechanism allows for free-motion sewing and quilting. The CS7000i is a great value, including sewing and quilting accessories right in the box.
There are 10 presser feet included - ¼” piecing, spring action quilting, walking, buttonhole, overcasting, monogramming, zipper, zigzag, blind stitch, and button sewing feet, plus quilt guide. Also included is the detachable wide table that is perfect for larger quilting projects and a hard-protective case for convenient portability and class use.

The Brother CS7000i Sewing and Quilting Machine and quilting machine come with a printed Quick Start guide and complete instructions manuals in English and Spanish, a bilingual user manual, and a 25-year limited, and free customer phone and online technical support for the life of the product.
Get product review:
I sincerely love this Brother CS7000i Sewing and Quilting Machine! I usually use this machine for making my own clothes, accessories (bags, home items, gifts, etc.) + shooting DIY video tutorials. In all scenarios, it has proven to be an excellent workhorse. The machine is lightweight, very user-friendly + comes with a generous amount of feet/accessories.
If you have any doubts about using the machine, the user manual is seriously your best friend! It's easy to be a little suspicious of the quality because of the lower price-point, but I would recommend this machine to both beginners + more advanced sewers that are in need of a reliable home machine.
Hope this helps! I sew for a living and mainly use my serger, so I just needed a basic sewing machine with a decent number of stitch options. I bought a cheap $80 brother at Walmart and it was terrible. No power, no-stitch options, and just felt cheap. I was very skeptical of this one because Brother CS7000i Sewing and Quilting Machine was the same brand and not much more expensive, but wow.
This hands-down has to be the best value around for a sewing machine that comes with several stitch options and a lot of computerized perks. Threading the needle and bobbin is a breeze! The only complaint I have is that the fastest speed isn't very fast, especially on a zig-zag stitch. All in all, if you're doing basic sewing, I highly recommend it!!
I was a little hesitant to buy a Brother CS7000i Sewing and Quilting Machine initially, but am so glad I did. First, a little about the sewing I do, then the pros and finally the cons of this machine. My Background: I don't do a ton of sewing, but all the machines I have ever had were Singers. My sewing was mainly for things like hemming, basic repairs, and home dec.

I also did some clothing -- mainly shirts, skirts, and simple dresses. Nothing fancy. However, as years passed, I wanted to get into more creative sewing and my Singer wasn't very feature-rich. Plus it was starting to give me problems -- time for a new machine! But which one to buy? My first thought was another Singer, but after doing a lot of research, I decided on the Brother CS7000i Sewing and Quilting Machine.
And I do not regret my decision. BTW, I am writing this review after using it for 2+ years, so I've been through quite a few projects. Has it always been easy? I've run into the occasional problem, but the vast majority were "user error". But for 98% of the time, it has been trouble-free.
Product model:
Brand: Brother.
Color: 2.0" Lcd Display, Wide Table.
Material: Metal.
Item Dimensions LxWxH: 16.02 x 6.69 x 12.09 inches.
Power Source: Treadle Powered.
Is Electric: Yes.
About Brother CS7000i Sewing and Quilting Machine item:
70 unique built-in stitches: The Brother CS7000i comes with 70 built-in sewing stitches including utility, quilting, decorative, heirloom stitches, and 7 auto-size buttonholes.
Automatic needle threader and drop-in top bobbin: This sewing and quilting machine includes an automatic needle threader that perfectly pushes thread through the needle and a convenient, jam-resistant drop-in top bobbin.
Included accessories: The CS7000i includes a protective hard case, wide table, 10 sewing feet, instruction manual, and more.
LCD Screen: The backlit LCD display allows you to easily make and view your stitch selections.

At your side support: The CS7000i quilting and sewing machine comes with Brother at your side support offering free technical support via online, live chat, or phone for the life of your machine. This product is intended for sale only in the US at 120 volts, and any other use or sale voids the warranty.
Product update:
Many people have had trouble with the tension. Brother CS7000i Sewing and Quilting Machine is usually the bobbin causing problems, and improper threading is usually the cause of the problem. It can cause bird-nesting of thread on the back of your fabric. I made a short phone-cam video about threading the bobbin which I hope might help someone. That little silver lever cannot be overlooked!
>> If you want to know about Brother CS7000i Sewing and Quilting Machine product, please click here...
1 note
·
View note
Text
Empisal Deluxe 400 Overlocker Timing Setting Procedure

Before sergers leave the manufacturing facility, the timing is professionally set by technicians. Over time, a serger can lose its timing, causing the needle to skip stitches, break and possibly bump other parts of the machine. Thick fabrics, needle jams and thread debris can also cause a serger to have timing issues. 3.) Hypothetically speaking, if the cam timing marks don't have to be EXACTLY parallel with the head, and the spring would have happened to stay in the head, what's the proper procedure for setting valve clearance? I have a Haynes manual and followed it pretty well, but it's not very clear.
Update: I have since created a much better tutorial for how to thread your sewing machine right here and it’s still my Janome sewing machine 🙂
You can watch the video for how to thread a Janome sewing machine or read the step-by-step instructions below.
The height of the needle bar will most likely need to be adjusted. Most sewing machines have marks to help you easily set the height of the needle bar. To loosen the needle bar, you will need to consult your user’s manual. Once it is loosened, adjust the height to alight with the top timing mark even with the lowest point on the timing bar.
Want to see more videos on how to setup your sewing machine and get sewing? See my Learn to Sew videos here

Or click here to watch this video on YouTube
In my experience I have found that many sewing machines are threaded in a similar way. There are some slight differences with thread guides that, if they are missed, may impact the timing on you machine. This is why I created a video and instructions for how to thread a Janome sewing machine in particular.
You will need:
Sewing machine (I’m using a Janome DC2101)
thread
Bobbin
Step 1 – Wind the Thread onto the Bobbin
Place your thread onto the spool pin and secure in place with the spool disk.
place the thread around the bobbin thread guide at the top of the machine (there should be a picture diagram at the top next to the bobbin thread guide).
Put the thread through the hole on the bobbin going from the inside to the outside.
hold the end of the thread with your finger tips while you push the bobbin onto the bobbin spindle.
Push the bobbin spindle over to the right to engage the automatic declutch function (this automatically stops the needle from going up and down). Some older machine may also require you to pull out the hand wheel if you don’t have the automatic declutch function.
Press the foot pedal and wind until you have the desired amount of thread on the bobbin.
Remove the bobbin from the spindle and snip the little piece of thread from the beginning of the winding process and cut the thread to detach the bobbin form the rest of the thread on the machine.
Step 2 – How to Thread a Janome Sewing Machine

Take your thread out from around the bobbin thread guide and place it around the thread guide at the top of the machine.
run the thread down the line on the front of the machine and under and to the left and head back up the thread guide towards the take up lever.
put your thread through the hole at the front of the take up lever. There should be a little gap at the back of the take up lever for you to slide the thread through easily.
Run the thread back down the same thread guide line that you just came up until you get to the bottom of the plastic casing of the sewing machine. There should be another thread guide that you will need to slide the thread behind.
At the top of the needle bar there will be one last hook to the left that you need to slide the thread behind.
Use the automatic threader to put the thread through the eye of the needle or do it by hand.
Step 2 – Load the Bobbin into the Top Loading Casing
Remove the hook cover plate (or the bobbin cover) from the top loading bobbin case.
hold the bobbin so the thread is going in a counter clockwise direction and insert it into the bobbin casing.
Run the thread through the first thread guide groove and in between the tension spring blades.
while holding the top thread, turn the hand wheel towards you. you should see the top thread going over the bobbin.
Once the top thread has gone all the way over the bobbin, gently pull the top thread and that should bring the bobbin thread up with it.
ensure that both pieces of thread are under the foot and place towards the back of the machine.
If you are unsure of any of these steps you can watch the clear step by step instructions in the video.
You now know how to thread a Janome sewing machine well done!
You might also like:
Powered by YARPP.
Sewing Machines
Our range of sewing machines includes the following models for you to choose from:
Overlockers
Our range of overlockers includes the following models for you to choose from:
Embroidery
Our range of embroidery includes the following models for you to choose from:
Haberdashery
Our haberdashery includes an extensive collection of the following:
Ironing Equipment
Empisal Deluxe 400 Overlocker Timing Setting Procedure Manual
Our range of ironing equipment includes the following models for you to choose from:
Empisal Deluxe 400 Overlocker Timing Setting Procedure Tool
Who are We?
Empisal is a leading supplier of sewing machines, overlockers, ironing equipment and haberdashery items in Sub Saharan Africa. At Empisal, we are not only a trusted sewing brand on the market, but more so your creative assistant. We provide top quality and affordable sewing machines for novice and more advanced sewers. Simply let us know what you need and we will present a range of viable options to you.
Why should you choose an Empisal sewing machine?
Our brand is one that has been trusted on the market for 35 years. We have become a reputable and reliable household name with our products made readily available in various retail outlets. The Empisal brand caters to a diverse market and we are confident we can cater to your every need.
Empisal Deluxe 400 Overlocker Timing Setting Procedure Video
Quick View
Empisal EMS17 Machanical Machine
Quick View
EECM9900 HR
R 20,189.00
Quick View
EEM350 HR
R 12,390.00
0 notes
Text
Just Pinned to !! Top Bloggers To Follow ...On Pinterest !!: 100+ Serger Links: Serger Tips, Serger Tutorials, Serger Books, Serger Videos... Everything you need, all in one post (available in PDF too!)... only on http://bit.ly/2GwRsKu http://bit.ly/2G0QUge http://bit.ly/2GbCixU
Just Pinned to !! Top Bloggers To Follow ...On Pinterest !!: 100+ Serger Links: Serger Tips, Serger Tutorials, Serger Books, Serger Videos... Everything you need, all in one post (available in PDF too!)... only on https://t.co/dANqWscTR6 https://t.co/NmqiNEclNp pic.twitter.com/hLP6MHEZca
— MammaNene (@mamma_nene) March 22, 2018
from Twitter https://twitter.com/mamma_nene
1 note
·
View note
Text
From Under the Worm Moon
Below are links and pics of DIY stuff that are useful. Feel free to add on to this with your own suggestions.
I decided to shift my witching towards a more practical route before the pandemic broke. Specifically, I made the decision on March 9th when I learned what the Worm Moon is.
My first step, further incentivized by other outside factors, was to switch to homemade cloth pads. I used Luna Wolf’s free pattern (giving her a tip when I had the money to do so) and made a variety of sizes with scrap fabric I have around the house (including old t-shirts and towels):
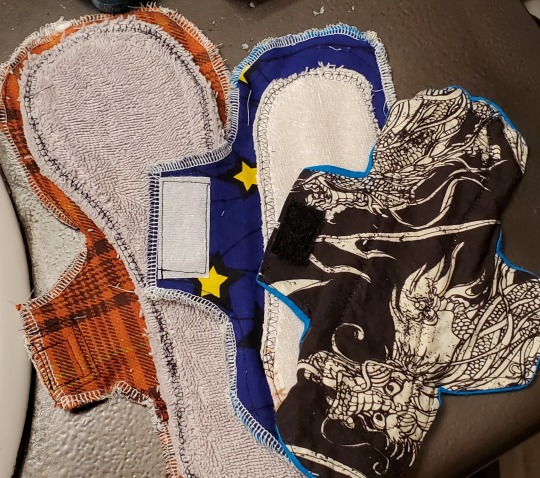
please excuse my poor edges; it’s been a long time since I��ve used a serger. as for the rest of the uneven stitching, I believe I’m cursed. no matter how careful I am, they always come out awkward. whatever, they still work.
Late last week, I read glumshoe’s post about wearing masks to go shopping. Since panic-buyers have made a run on everything, from TP to first-aid essentials (and flour for some reason (quick tip: flour doesn’t keep for very long, just 3-6 months)), I made three pairs of my owns masks:
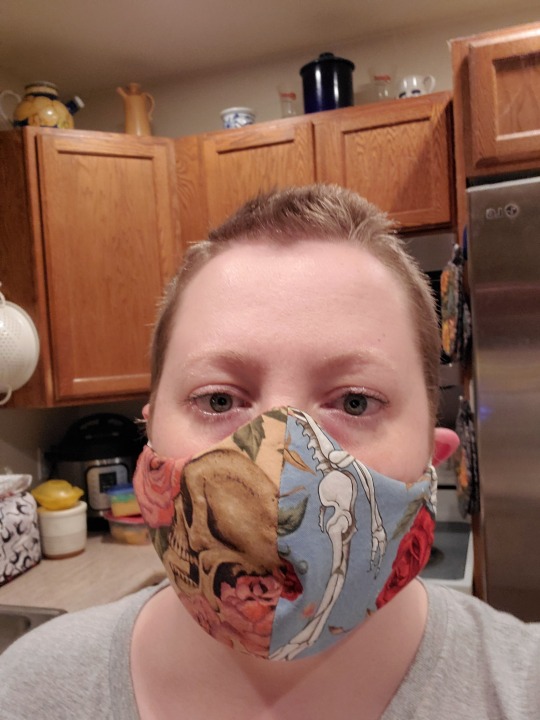
I used this pattern and this tutorial (felt filter) to make them. Don’t do what I did and cut your pattern out before reading the instructions. I’m just used to seam allowances being included in the pattern, itself. *shrug*
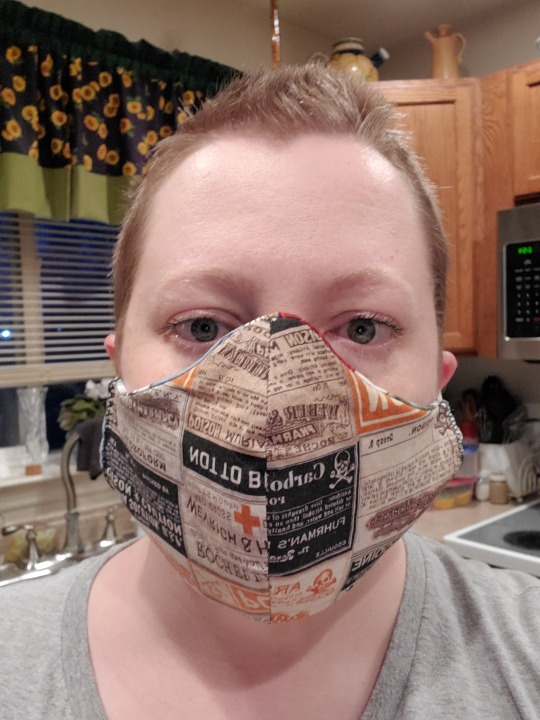
Do you like my fabric choices? Too on the nose?
The other four, I gave to my folks for when they go out and about during these plague times. Reason being is best explained in @glumshoe’s post above, but also because I live with my parents; I pay rent, buy groceries, work, and keep unfortunate relatives from horning in, and I do everything I can to keep them safe (especially with that last one).
Both my parents are at higher risk for Covid-19 because of age, but especially since diabetes is a factor. See Max Brooks’ video for a good explanation about how, even though I would probably be okay if I am exposed to the virus, I could still bring it home. The masks work to a) remind people to keep a good distance from me each other and b) simply work.
My future plans include both a kitchen and a medicinal garden (also a garden for making beer and gruit (beer without the hops, basically), which do count as medicinal), and making a buttload of handkerchiefs. Since the panic-buyers have made everything either desolation or very expensive, I’m going back to the old ways. Once I get those things done and/or started, I’ll add to this post with the handy-dandy links I’ll end up using.
I’m also putting this guide and future edits/revisions/additions to my Patreon; I have a memoir idea about this and the almanac moons, so will thus inflict my readers.
If anyone has any suggestions or requests for tutorials, projects, recipes, etc, hit me up. Feel free to add to this.
PS I had no idea Max Brooks of World War Z was at all related to the King of Slapstick, Mel Brooks. I mean, it makes sense.
0 notes
Photo

Had to spend a chunk of money to replace this today, but it's ok. My good old workhorse. Best machine I ever owned. ((The tension is complely out of whack (has been for a year) and it's been needing replaced. It's cheaper to replace than repair... It would need a tune up (over $100) + multiple repairs.)) I've had it a whopping 6.5 years, using it professionally (HARD) even though it's a home machine, and haven't paid a penny after purchase. It still works for heavy fabrics, so I'll keep it for that, but anything medium to lightweight, the tension has to be set crazy and I can't get rolled hems or anything to work. For example, normally the tension is set at 4, 4, 4, 4 for each dial for regular serging on a new machine for standard fabric. For regular serging now, it's been set at 3.5, 3.5, *10*, and 6.5. I've pushed it 6.5 whole years way harder than I should, and wanted to push it more, but I'm having trouble with all the chiffon on my current commission. And really, really need a working serger. So getting the same model delivered next week. It's more expensive than the newer model (1034D vs 1034DX) by about $20 - but newer isn't always better. This machine, this version, has been a DREAM and I hope by getting the same model I'll get another 6 years out of it. I've been meaning to do a "6 years later" video for the serger since my 1034d tutorials were my most popular on Youtube, and I'll eventually do one when it's less hectic. I think this serger has slowed down a bit too after so much use, so I'm eager to get the new one and see if it's faster, or if I'm just crazy. Thank you @brothersews for making great machines! With how much I use this, I thought it would've broken down years ago. Quality, top notch machine that has made SO many costumes & been with me from the start! 😍 #brothersewing #brother #sergers #1034d
8 notes
·
View notes