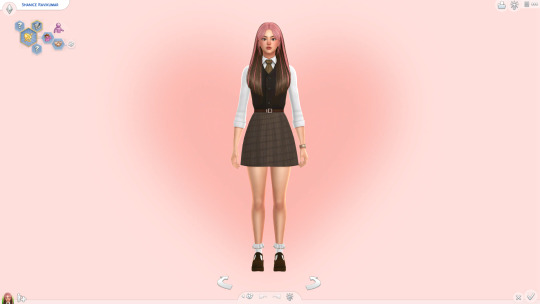
#sims 3 cas tutorial
Explore tagged Tumblr posts
Visit Tumblr Blog
Explore Tumblr blogs with no restrictions, modern design and the best experience.
Last Seen Tumblr Blogs


Fun Fact
Hackers stole 65M passwords from Tumblr in 2013.
Text
A Micro Tutorial on Blending Face Presets for Sims 3 CAS by Papermint-Airplane

So I have this Sim here and I'm using this mouth preset. It's nice but it's a little downturned for my liking and I'd prefer more of a Cupid's bow.
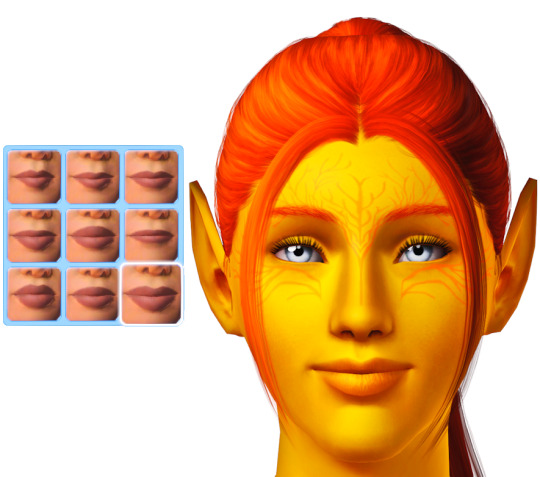
I choose the next preset which is more upturned and has the Cupid's bow I want but it's a little too sharp.
What if I merge the two presets?

I right click the first preset to blend it with the second preset. Now I have everything I want! It's not too downturned, not too upturned, and the Cupid's bow is nice and soft.
You can do this as many times as you want with as many different presets you want to get different effects. Experiment with it!
Happy Simming! 💚
#sims 3#ts3#mine#sims 3 cas#sims 3 tutorial#tutorial#tutorials#sims 3 cas tutorial#resources#sims 3 resources#just simblr things
483 notes
·
View notes
Text

Tutorial - Extracting the assets from Shining Nikki for conversion for Sims games (or anything, really)
Finally! In advance I'm sorry for any errors since english isn't my first language (and even writing in my actual language is difficult for me so)
And first, a shoutout to The VG Resource forums, where I found initially info about this topic 😊 I'm just compilating all the knowledge I found there + the stuff I figured out in a single text, because boy I really wanted to find a guide like that when I first thought about converting SN stuff lol (and because there's a lot of creators more seasoned than me that could do a really good job with these assets 👀)
What this tutorial will teach you:
How to find and extract meshes and textures (when there's any) for later use, and some tips about how stuff are mapped etc on Shining Nikki.
What this tutorial will not teach you:
How to fully convert these assets for something usable for any sims game (because honestly neither I know how to do that stuff properly lol). It is assumed that you already know how to do that. If you don't know but has interest in learning about CC making (specially for TS3), I'd suggest you take a look at the TS3 Tutorial Hub, the MTS tutorials and This Post by Plumdrops if you're interested in hair conversion. Also take a look on my TS3 tutorials tag, that's where I reblog tutorials that I think might be useful :)
What you'll need:
An Android emulator (I recomend Nox)
A HEX editor (I recomend HxD)
Python and This Script for mass editing
AssetStudio
A 3D Modeling Software for later use. I use Blender 2.93 for major editing, and (begrudingly) Milkshape for hair (mostly because of the extra data tool).
Download everything you don't have and install it before starting this tutorial.
Now, before we continue, a little advice:
I wrote this tutorial assuming that people who would benefit from it will not put the finished work derivative from these assets behind a paywall or in any sort of monetization. These assets belong to Paper Games. So please don't be an ass and put your Shining Nikki conversions/edits/whatever behind a paywall.
The tutorial starts after the cut (and it's a long one).
Step 1:
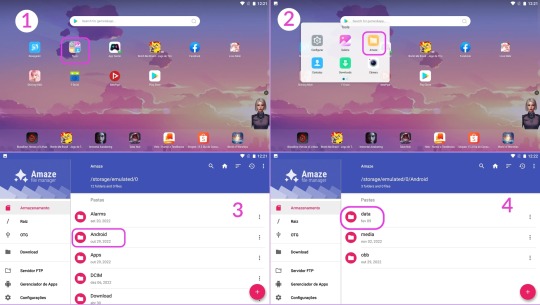
Launch Nox, then open Play Store and log in with a Google account (if you don't have one, create it). Now download Shining Nikki from there.
After downloading the game, launch it. It will download a part of the game files. After that, log in on the game, or create a new account in any server (the server is only important if you want to actually play the game. For extracting it doesn't really matter since the game already has the assets for the upcoming events and chapters. It also doesn't matter if you actually own an item in game, you can extract the meshes and textures even if you don't have it in game). If you're creating a new account, the game will lead you through the presentation of it etc (unfortunately there's no way to skip it).
After that, click on that little arrow button on the main screen. There, you can download the actual clothing assets. Wait for the download to finish (at the date I'm writing this tutorial, it is around 13GB). When finished, close the game (not the emulator).
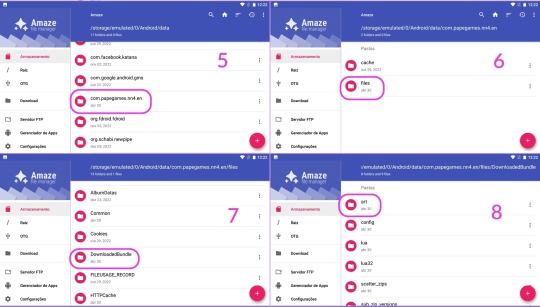
Step 2:
Now we're going to copy the assets to our computer. Click on Tools, then on Amaze File Manager. Navigate to Android > data > com.papergames.nn4.en > files > DownloadedBundle > art > character. This is the folder where (I believe) most of the assets are stored.
Now, where the stuff is located respectively:
Meshes are on the meshes > splitmeshs folder
Textures are on the textures > cloth folder
Tip: Want to really data dump everything? Just select the folders you want and copy to your PC! 😉
Click on the three dots on the side of the wished folder, then in copy. Then click on the three lines on the left upper corner to open the menu, and then click on Download. Now just pull the header of the app to show the Paste option and click on it. It might take a while to copy completely (the cloth folder might take longer since it's bigger, so be patient).
If you're confused, just follow the guide below:
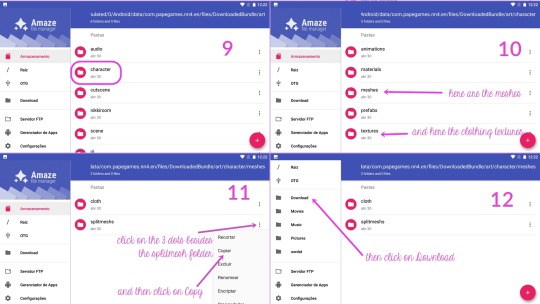

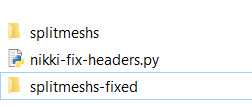
The copied folder will be located at C:\Users\{your username}\Nox_share\Download
Step 3:
Now that we got the files, we need to make them readable by AssetStudio.
For this, we need to open the desired .asset file on a hex editor, and then delete the first 8 bytes of the file, and then save.
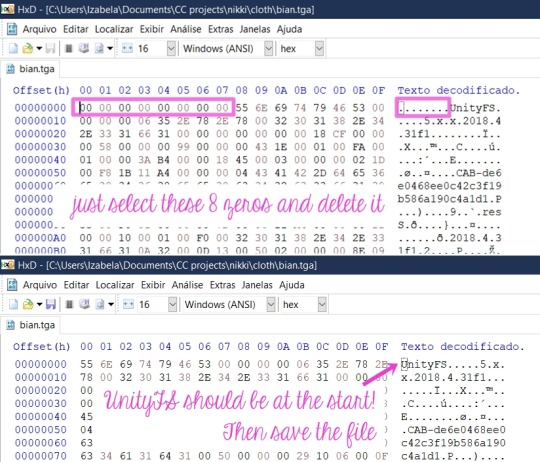
You can see it is a pain to do that manually to a lot of files right? This is why I asked my boyfriend to create a script to mass edit them. (I only manually edit when I'm grabbing the textures I want, because afaik the script won't work with .tga and the .png files, more about that forward this tutorial)
How to use the script:
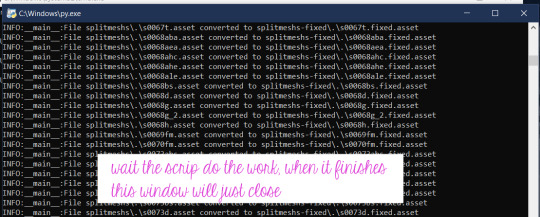
Make sure Python is already installed, grab the nikki-fix-headers.py file and place it on the folder where you copied the folder from the game (mine is still the Nox_Share Download folder).
It should look like this, the meshs folder and the script.

Let's open the Command Prompt. Hit Windows + R to open the Run dialog box, then type in cmd and hit Enter.

Now follow the instructions pictured below:
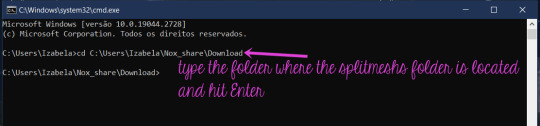

The folder with the edited files will be at the same location:
Now, we finally can open it all on AssetStudio and see whats inside 👀
Step 4:
Open AssetStudio. Now click on File > Load Folder and select the folder where your edited meshes are (mine is "splitmeshs-fixed"). Wait the program load everything. Click on Filter Type > Mesh, and the on the Asset List tab, click twice on the Name to sort everything by the right order, and now we can see the meshes!
To extract any asset, just select and right-click the desired groups, click in Export selected assets and select a folder where you wish to save it.
Stuff you need to know about the meshes:
Step 4-A: Everything is separated by groups.
Of course you'll have to export everything to have a complete piece. Only a few pieces has a single group. When exporting, you have to select every group with the same name (read below), and the result will be .obj files of each group that you have to put together in a 3D application.

Step 4-B: The names are weird.
They're a code that indicates the set, the piece, the group.
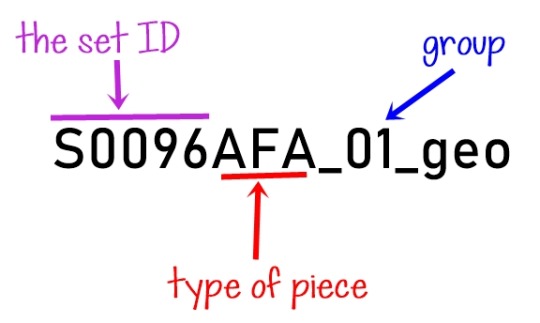
Items that doesn't belong to a set won't have the "S...something", instead they'll have another letter with numbers, but the part/piece type and group logic is the same.
As for the parts, here are the ones I figured out so far:
D = Dress
H = Hair
AEA = Earrings
ANE = Necklace
BS = Shoes
ABA = Handheld accessory
AHE and AHC = Headpieces/hats/hairpins
AFA = Face accessory (as glasses, eyepatches, masks)
(maybe I'll update here in the future with the ones I remember)
Step 4-C: The "missing pearls" issue.
Often you'll find a group that seems empty, and it has a weird name like this:

I figured out that it's referent to pearls that a piece might contain (as in a pearl necklace, or a little pearl in a earring, pearls decorating a dress, etc). The group seems empty, but when you import it to Blender, you can see that it actually has some vertices, and they're located where the aforementioned pearls would be. I think that Unity (SN engine) uses this to generate/place the pearls from a master mesh, but I honestly have no idea of how the game does that. So you'll probably have to model a sphere to place where the pearls were located, I don't know 🤷♀️ (And if you know how to turn the vertices into spheres (???) please let me know!)
Step 5:
Now that you already extracted a mesh, we're gonna extract the textures (when any). Copy the textures > cloth folder to your PC like you did with the splitmeshs folder.
Open it, and in the search box, type the name of the desired item like this. If the item has textures, it will show in the results.

Grab all the files and open them in HxD (I usually just open HxD and drag the files I want to edit there), and edit them like I teached above. Then you can open them (or load the cloth folder) on AssetStudio, and export them like you did with the meshes.
Stuff you need to know about the textures, UV map, etc:
Step 5-A: The UV mapping is a hot mess (at least for us used to how things works in sims games).
See this half edited hoodie and the UV map for a idea:
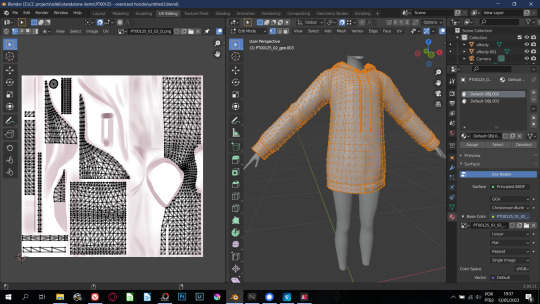
So for any Sims game, you'll have to remap everything 🙃 Also, stencil-like textures all have their own separated file.
As for hair, they all use the same texture and mapping! BUT sometimes they are arranged like this...

Here's the example of a very messed one (it even has some WTF poly). Most of them aren't that messy, but be prepared to find stuff like this.
Shining Nikki just repeat the texture so it end up covering everything, for Sims you'll need to remap, and the easiest way is by selecting "blocks" of hair strands, ticking the magnet button to make your seletion snap to what is already placed (if you have familiarity with blender, you know what I'm saying). Oh, some clothes are also mapped with the same logic.
Regarding the hair texture, I couldn't locate where they are, but here is a pack with all of them ripped and ready to use. You can also grab the textures from any SN hair I already converted :)
The only items with a fine UV map are the accessories, at least for TS3 that the accessory has a UV map independent from the body.
"But I typed the ID for the set and piece and couldn't find anything!"
A good thing to do is to search with only the set ID and edit all the files with it, because some items (especially accessories) share the same texture file. But if even then you can't find anything, it means that there's no texture for this particular item/group because Shining Nikki use material shaders* to render different materials like metal, crystal, some fancy fabrics, etc. So you'll have to bake or paint a texture for it.
*I believe that those shaders are located on the other cloth folder in the game files. This one is way bigger than the other one and once I copied it to see what it was, AssetStudio took ages to load everything, almost used all my 16GB of RAM, and then there was only code that the illiterate me didn't know what it was 🤷♀️

So that was it! I hope I explained everything, although it is a little confusing.
If you have any questions, you can comment on this post or send me a PM!
#sims 3 tutorial#converting stuff for sims#honestly idk what else to tag#reblog so your fave cc creator sees this!#sims 3 how to#sims 3 cas tutorial#sims 3 clothing tutorial#sims 3 hair tutorial
32 notes
·
View notes
Text
youtube

Tutorial : Face Preset Editor
After releasing my default replacements presets, I don't want to be the only creator to do so. Having many people share their content is amazing and that alone creates growth of custom content for the Sims 3.
Therefor, I think it is important for me to share my knowledge with you so you can be able to better understand how to use the Face Preset Editor by LazyDuchess and create your own custom presets or default replacement presets
What I'm assuming in this tutorial :
You have S3PE installed
You're familiar with the basics of S3PE.
You know what game files are
You know what a default replacement is
Download - Default Presets Folder :
SimFileShare - GoogleDrive
Questions and Answers
What's in the default presets folder ?
They're the default presets from the basegame and world adventures that I extracted from the game files and organized according to their names and categories
Can I use your already existing face presets default replacements as a base to make my own presets ?
Yes, feel free to use them all, just credit me if you do so ! - Heads Eyes Noses Lips -
Credits :
S3PE
FacePresetEditor
#ts3#sims 3#the sims 3#tutorial#siims 3 face preset editor#sims 3 face presets#sims 3 presets#ts3 face presets#ts3 face preset editor#sims 3 custom presets#sims 3 default replacement presets#sims 3 mod tutorial#sims 3 tutorial#ts3 tutorial#ts3 cas#sims 3 cas#sims 3 create a sim#ts3 create a sim#ts3 mods#Youtube#CAS : Presets#tutorials
198 notes
·
View notes
Text
Gonna try to make all of these in the sims
It's gonna be really hard cause I don't have any cc or overhaul mods cause I don't know how to install them :( (it's sims 3)


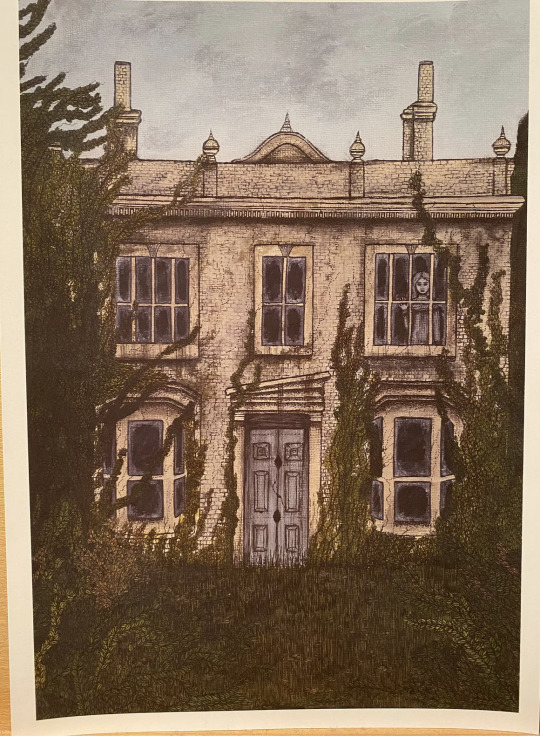

Haunted House Art Prints by TheArtofNatalieDean
#sims 3#sims 3 help#sims 3 mods#sims 3 cc#sims 3 custom content#sims 3 tutorial#sims 3 creator#sims 3 CAS#sims#my sims#sims 3 gameplay#sims 3 screenshots#sims build#sims 3 build
2K notes
·
View notes
Text
Sims 2 Databases Database
(Alright it's an index, I just had to)
Made it for myself, I might as well share. If there's something I've missed please let me know. This list is being updated, Tumblr is being a pain and updates won't show up on re-blogs. Visit the original post to view the most current version. Mirror: Dreamwidth.
CC:
By Type:
Sims 2 Object Default Database [Discontinued - DW].
Sims 2 Object Default Database [Active - Spreadsheet].
Sims 2 Default Database [CAS].
Sims 2 Hair Database.
Sims 2 CC: Afro Hairstyles.
Sims 2 Shoes Database.
Sims 2 EA Store Items 2016.
Sims 2 The Maxis Match Repository Project [CAS] [Pinterest Ver.]
Sims 2 Repository Finds [CAS&Objects] [sorted into categories].
Sims 2 Functional Finds [Sorted by function].
Resource list: Clutter and decorative items [massive index at GoS].
Sims 2 Lot Database [Maxis ones emptied out].
Sims 2 Lot Makeover Database [of Maxis Lots] [Note the Uploading Tutorial].
SkyBox/Horizons/Skylines Database.
Maxis Career Conversions TS1+3+4 to TS2 [Sorted by Game&EP - Under Downloads].
Fractured Moonlight's Stone Super Set - Database [Creator Unknown, let me know if you know].
By Theme:
List of Maxis Lost & Found Objects Converted into Usable Items.
Stories to Sims 2 Conversion Database. [DW Backup]
TS1 to TS2 Conversion/Recreation Database.
TS1 Catalog Conversions [Active, Include OG Object Descriptions].
TS3 to TS2 Conversion Database [DW Backup].
TS3 to TS2 Traits Project Mod Tracking Sheet [Blog Ver.]
TS4 to TS2 CAS Conversion Archive [EA].
TS4 to TS2 CC Clothing Conversion Database [Custom - ts4 only?].
TS4 to TS2 Build/Buy Conversion Database [EA].
TS4 to TS2 CC Build & Buy Database [Custom].
The Sims spin-off games to the PC TS2 [&3+4].
TSM-to-TS2 Conversion Database [DW Backup].
Sims 2 Historical Finds [CAS&Objects] [Sorted by Era/Period].
Historical Sims 2 Wiki [New!].
Grunge Masterlist Project 2025.
List of Asian Sims 2 Sites With Working Downloads [As of 2017?].
CC Archives:
Sim Archive Project, at The Internet Archive [Introduction Post].
Sims Cave.
Sims Graveyard.
Simblr.cc - Dead-Site Repository.
Liquid Sims - Community Archives.
The Booty, at PSMBD.
Sims 2 Packrat, on Tumblr [Watch out for the recent SFS Hacking problem].
Ekrubynaffit (a.k.a bestbuild4sims) has re-uploaded a lot of archives of defunct creators. Albums with DL on her pinterest. Mainly build and buy mode, thanks a lot!
Resources:
CEP-Extras List, Huge Lunatic at Sims 2 Artists.
The Sims 2 Tutorials Database [Active] (Really needs a backup outside of Tumblr).
Several Lists of Maxis Resources for Modding,Pick'n'Mix Mods, own website, under Notes.
Sims 2 GUID Database Revival (Yes I'm shamelessly promoting it).
Sims 2 Trait GUID Database, by FireFlower.
Sims 2 Painting Sizes Database.
List of all Color Actions, With DL, ZeroDark/Graphic at GoS.
List of all WSO Actions, by Blue Heaven Sims, under Resources.
Giant List of Simlish Fonts - Collect ‘Em All!, by franzillasims
List of Hacks & Mods That Use Tokens, Bulbizarre at MTS.
Update notes are under the cut:
Update: Custom Clothing Conversion db [4t2], by @brandinotbroke/ Hair db, by @krabbysims/ Sims 4t2 CAS Conversion Archive [EA], by @mdpthatsme/ CEP-Extras List, by @hugelunatic/ Lists of Maxis Resources for Modding, by @picknmixsims/ Sims 2 Tutorials db [Active], by @sims2tutorials/ Sim Archive Project at The Internet Archive, by various - see @simnostalgia. Update 1: added EA ts2 store items at GoS/ Painting sizes db/ Tutorials db, by @sims2tutorials. Update 2: GUID db Revival. Update 3: believe it or not, there's more - Shoes db/ Sims 2. Functional Finds [sorted by function], by @sims2functionalfinds. Update 4: Resource list: Clutter and decorative items, at @gardenofshadowssims. Update 5: added archives section. Update 6: added @ekrubynaffit's Pinterest Archive. Update 7: Fixed TSM link, added Stories db/ Afro Hairstyles db, by @letomills/ SkyBox/Horizons/Skylines Database, by @simmergetic/ Grunge Masterlist Project 2025, by @pixeldolly/ and DW backup links (Everything that's exclusively on Tumblr/LJ should be backed somewhere else). Update 8: List of Asian Sims 2 Sites With Working Downloads [as of 2017?] by @0201-sims. Update 9: added Sims 2 Repository Finds [sorted into categories], by @sims2repositoryfinds. Update 10: added Sims 2 Object db [Discontinued], because the more the better. Update 11 Yet another (!): The Maxis Match Repository Project [CAS], by @whattheskell [how did i forget?]/ TS3 to TS2 Traits Project Mod Tracking Sheet, by Rowena Sims & @noodlebelli. Update 11: Maxis Career Conversions TS1+3+4 to TS2 [Sorted by Game&EP - Under Downloads], by @sims2idea-lientebollemeis2i. Update 12: HS I found another one: List of all Color Actions - Names, Creators, and Download Links. Maintained for over a decade by @zerographic at GoS :P Update 13: separated by type & theme. added Sims 2 Historical Finds [CAS&Objects] [Sorted by Era/Period], by @ts2history. Update 14: added to resources Trait GUID db, by @fireflowersims. Update 15: I shit you not, there's more - Sims 2 Lot Makeover db [Maxis Lots], by @ts2lotmakeoverdb/ List of Hacks & Mods That Use Tokens, Bulbizarre at MTS/ TS1 Catalog Conversions [Active], by @kitteninthewindow/ WSO Action Masterlist, by Blue Heaven Sims under Resources. Update 16: List of Maxis Lost & Found Objects Converted into Usable Items, @kirlicues. Update 17: Sims 2 Lot db [Maxis ones emptied out], by @mikexx2 @mrsktrout @ts2lots. Update 18: Historical Sims 2 Wiki [New!], by @theacmecatalogblog. Update 19: under archives; Simblr.cc - Dead-Site Repository by @simblrcc-site. Jackpot!
Update 20: added Giant List of Simlish Fonts - Collect ‘Em All!, by @franzillasims.
#ts2#sims 2#the sims 2#resources#ts2 resources#ts2 database#ts2cc#ts2 cc#ts2 download#sims 2 cc#the sims 2 cc#sims 2 download#the sims 2 download#the sims 2 resources#tagging is a bitch#sims 2 database#the sims 2 database#sims 4t2#sims 3t2#sims 1t2#1t2#3t2#4t2#ts2 defaults#sims 2 default replacement#GUID Database#The Sims 2 GUID Database#ts2 archive#ts2 archives#sims 2 archives
2K notes
·
View notes
Text
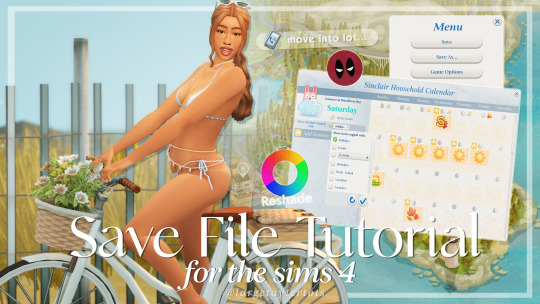
Save File Tutorial For The Sims 4 Here are my must-have steps for creating a new save file.
How To Install Custom Content/Mods
CAS Mods Stand Still in CAS by mizoreyukii More Traits in CAS by thepancake1 and mizoreyukii PreferencesPlus by helaene This mod requires 3 other mods in order to work. See the required mods at the bottom of the download post. Instant CAS Story Preferences by vicky sims More Columns in CAS by weerbesu
Map Replacement
Fanart Map Replacementsby dershayan
Mods MC Command Center by deaderpool Tags: #MCCC_Bypass or #MCCC_Include UI Cheats Extension by weebersu Phone Case Replacement by apricotrush
Calendar School Holiday Tradition by littlemssam Go Swimming Holiday Tradition by kiarasims4mods Sunbathe Holiday Tradition by kiarasims4mods Fall Fun Holiday Tradition by renegadesims Family Dinner Holiday Tradition by kiarasims4mods Winter Fun Holiday Tradition by kiarasims4mods Light Incense Holiday Tradition by littlemssam Eat Pizza Holiday Tradition by kiarasims4mods Hug Parent Holiday Tradition by kiarasims4mods Gift a Parent Holiday Tradition by kiarasims4mods More Holiday Icons by littlemssam
Lighting Mods Sunblind mod by softerhaze - (Installation Tutorial) NoBlu V2 by luumia (I use the darker version) NoGlo by luumia Reshade - (Installation Tutorial) GShade - (Installation Tutorial)
youtube / tiktok / twitch / patreon / gallery id: largetaytertots
635 notes
·
View notes
Text

Gorillax3 - Tie Shoulder Mini Dress converted for The Sims 3
DOWNLOAD:
simfileshare.net/download/5316612/ (alt) www.mediafire.com/file/651tuim5gpvow6s/saturn0sim_gorillax3_tieshoulderminidress.package/file
heyy! this is my first ever downloadable cc/conversion so please expect some issues and let me know of any! - Comes in 1 Recolourable Swatch (Patterns work too) (1024x1024) - 9300 Polycount - All LODs - Correct Bones assignment & body morphs - Blank Specular & Normal Map - Categorised for YA Female & Adult Female - Everyday & Formal (Disabled for random)
** GLITCHED LIGHTING CAS BUT LOOKS FINE IN GAME, DUE TO POLYCOUNT** let me know if anyone has converted this before or if theres any issues! if someone else has a conversion, i will delete this one <3 CREDITS @gorillax3-cc FOR THE ORIGINAL GORGEOUS CC (and generous TOS tysm!)
@sofayya for her cc converting streams - making it look so easy converting such pretty cc made me want to do it 😭 @nightospheresims AMAZING converting tutorial with list of resources THANK YOU SO MUCH!! 💞
#ts3cc#4t3 conversion#ts3 download#ts3#ts3 female clothes#ts3 clothing#s3cc#the sims 3#sims3#sims 3 cc#mycc
411 notes
·
View notes
Text
3d rooms for all

How to convert Sims 4 CAS Rooms to Sims 3

Disclaimer: If you’re not familiar with Blender/TSRW/UVs then this tutorial may not be for you. If you don’t have Sims 4 Studio which needs the Sims 4 base game (or don’t know how to extract the meshes without it) this tutorial may not be for you. Honestly it’s pretty straight forward, but there’s a lot of trial and error and going in game and out of game checking placement, etc. I use Blender 4.1 for this. The older Blender versions annoy me now lol I’m sorry 😅 but you should still be able to do the same things in the older versions. I'm trying to make this as easy as possible. I’m here to answer any questions though 💕 Tutorial below
Things you’ll need:
Blender (whatever version you prefer)
Sims 4 Studio
TSRW ( I use version 2.0.86)
My Christmas CAS Room here
My TSRW work file here
Tutorial:
Find a Sims 4 CAS room that you like and open it up in Sims4Studio. This is the one I'll be using for the tutorial.

In the Texture tab, export the textures. The only textures that matter are the first 3 diffuse. Go to the Meshes tab and export the mesh, it will save as a .blend file. After that you can close out of Sims4Studio.


Open my Christmas CAS Room in TSRW. You'll get this message. Hit ignore and don't send. We only need this file as a reference to resize the SIms 4 CAS room. Export the mesh as an obj, name it whatever you like. You can close TSRW for now.

Open Blender and open the .blend file you exported from Sims4Studio. Make sure to delete studio_mesh_0 as it's just the shadow map and we don't need that. This is what mine looks like after fixing the textures.

Then import the wavefront obj you just exported from TSRW. Again we're just using this as a size reference.
This is what it looks like after I added the obj. I scaled, moved, and rotated the room to match up as close as I could with my reference mesh. When you have it lined up to your liking you can delete the reference mesh. I usually import the sims 3 body to see where my sim would be in CAS as well so feel free to do that too.

Now we have to separate the objects that use transparency in the scene to their own group. The transparent objects will always be located on studio_mesh_1. I usually do this in UV mode. Make sure UV Sync Selection is on. Where the red arrow is, that's the UV Selection button. It's blue so that means its on.

Tip: If you're using the same Blender version I am (I'm not sure if the older versions below Blender 3.0 do this) you can disconnect the alpha in shader editor and then you can easily see what uses transparency because it has a black background like the plants. Don't worry about the one outside the window as that's on the backdrop image and doesn't show in CAS.
Important: Also, make sure you delete the back of the mirror frame or it will show through the mirror in game. I usually select it in the UV editor as well and delete it.

After selecting all the objects that use transparency, I go to the 3D viewport window and press P, then selection. Now they're on their own layer as you can see. That's a very important step so please don't miss it.

Sims 4 CAS Rooms don't have a closed room like ts3 and if you don't add walls/planes you'll be able to see that it in CAS. You can do this in any way you're comfortable with. If you don't understand how to do it feel free to ask me. For this tutorial I will not be doing this perfectly lol I've done enough rooms and I'm just trying to teach here 😩

Okay now last is renaming groups to import into TSRW. Make sure it's in this exact order and uses the exact group numbers.
Group 0 - Mirror
Group 1 - Windows/Curtains
Group 2 - View outside the window
Group 3 - Walls
Group 4 - Objects with transparency
Depending on the CAS Room you convert, yours may not have a mirror you know. You can delete groups in TSRW, experiment, feel free to ask me questions as well.
After renaming the groups, select only the groups you renamed and export as an obj. Make sure that object groups is checked so that they can stay in groups.

Open TSRW and open the testroom_cas.wrk file.
After opening the file you'll see this exact room in this tutorial lol because I had to test some things first 😅

Import the CAS room you converted from. You'll get these two messages. Click yes on the first and no on the second.


Import your textures (yours may be different than mine depends on the converter) but most have been the same that I've seen. Group 0 is the mirror it doesn't require a texture. Group 1 and Group 4 usually have the same texture.
After export to sims3pack or export as package file. Make sure you compress your files and you should be good to test your CAS room in game.
If you would like to make your own from the original ts3 cas room, I would suggest watching this Youtube video (it's for TS4 but it still applies and is helpful) and the link to the original ts3 cas room is here.
Thanks to @mookymilksims for testing things for me and converting her own. If you would like to try this tutorial out and experiment with room placements using @boringbones Ultra wide CAS mod which changes the field of view in cas so that you can see the whole cas room, it is here. I didn't use it for mine, but that's only because I found out about it after from Mooky lol and I'm tired of converting them 😅 but feel free to ask me any questions if you need help 😊
169 notes
·
View notes
Text


MY FIRST RECOLORABLE CONVERSION! RIMINGS NEW GIFT BOX 19 Glossy Maxi Dress CONVERSION
so i finlly gave it a try and did a conversion with a recolor (two slots one for the chest strings and the other for the rest of the dress
also shine ON THE DRESS is CUSTOM AND PUT IN BY ME!
POLY: 20K
Age: young-adult and adult
credit: rimings
recolorable: yes! (3 variants and 1 non recolorable)
CUSTOM THUMBNAIL: ON
before you download: if you will try to make your sims body fat with this dress pls dont i tried to make it for all body types but the glitching in tsrw was insane even tho i did everything i should have from the tutorial so the only body thing that you can adjust are boobs in cas :)
here is how it will look if you try t o make your sims body big and wide:

known issue: armpit clipping on one side

if you still want to download here it is!
DOWNLOAD
#the sims 3#sims 3#ts3#the sims#s3cc#4to3#ts4 to ts3#4t3 conversion#ts3 cc#ts3 download#s3cc download#s3ccfinds#sims#4t3#sims 4 to sims 3#4to3 conversion#my conversions#ts3 simblr#ts3cc#sims 3 simblr#thesims3
485 notes
·
View notes
Text


🌊Coastal Cas Room by largetaytertots [4t3]


♡ You can only have ONE cas room replacement at a time
♡ This only replaces the CAS room and nothing else
♡ Will conflict with any cc that replaces the cas room
♡ I am not the original creator, I just converted the cc
♡ I reduced the polycount a bit, ion know if that info helps
♡ The rug has a black 'border' just because when I make it transparent, it kinda messes up.... so beware
♡ Ensure to always read my TOU
♡ Credit has been given to the relevant users/softwares

🌊Coastal Cas Room
🍰Patreon (alt) (FREE)
Feel free to tag me if you use these in your game, I'd love to see it! And if there is any problems don't hesitate to contact me <3

♡ @largetaytertots literally obsessed with everything she does <3
♡ @lalasimmer for the tutorial, couldn't have done it without you lol!
♡ Blender 2.76, Photoshop 2021

Wanna buy me a coffee ☕ or even a slice of cake 🍰, feel free to donate via my ko-fi.
My Ko-Fi Page 🎀
Or sub to my Patreon!
💌 Thank you to everyone who is reblogging and supporting my content! Y'all are greatly appreciated!

♡ PERSONAL USE ONLY: My original cc & overrides are free for personal use in you Sims 3 game. DO NOT redistribute or claim as your own.
♡ CREDIT OF USAGE: If you share my cc in any way, please credit me.
♡ NO PAYWALLS: DO NOT put my cc behind any paywalls or adlinks such as linkvertise.
♡ REDISTRIBUTION POLICY: DO NOT reupload my cc on other sites. Please share my original download links to respect work put into my cc and spread the word.
♡ MODIFICATIONS: If you edit or recolour my cc, and want to share it, please give full credit where it's due.
#cozykhuwa cc#sims 3#sims 3 simblr#the sims 3#ts3#ts3 cas#ts3 simblr#sims 3 cc#sims 3 cas background replacement#sims 3 cas rooms#sims 3 3d cas rooms#sims 4 to sims 3#ts4 to ts3#creator: largetaytertots#dl: overrides
247 notes
·
View notes
Text


Downtown Roles Mod Tutorial - TS3 - Mature Gameplay Ideas
NSFW 18+ mature content / a long read
TLDR: this is a compilation/recommendation list of mods, a tutorial on how to set up NPCs, and how to tie it all together to add some mature gameplay to your save. 😈
Misukisu/Virtual Artisan had a “Downtown Roles” mod that sadly does not work anymore for the latest versions of TS3. Her mod basically allowed players to add role sims to community lots so your sims could have more NPCs to interact with, making the lots feel more alive in a mature "downtown" sort of way.
I was inspired by her mod and I want to share how you can recreate and expand her mod’s functions with Nraas Register and Arsil’s Custom Generic Role mod. Some players might already know how these mods work, but it was a new discovery for me. I didn’t know how useful role sims could be! It got the gears in my dirty mind turning.
The main purpose of this mod list/tutorial: to add role sims to community lots for your main sims to interact with, while they’re out on the town. These will be sims outside of your household. Their main “job” is to hang out at the lot. You can let the game generate new sims to fill these roles, or assign existing sims in the town to fill the roles.
Examples of role sims you can create:
A regular patron at a dive bar for your sim to befriend or make enemies with.
A sexy single sim at a beach, gym, pool, bar or club for your sim to mingle and hook up with.
An escort at a brothel for your sim to woohoo with (Passion mod).
A client for your sim to sell drugs/weapons to (MonocoDoll Vile Ventures mod and Arms Dealing mod) - I have not tested this but in theory it should work.
You can add multiple role sims on each lot. You could have a number of partygoers on a club lot/a number of escorts on a brothel lot/a number of mobsters or criminals on a warehouse lot who will always be there when your sim visits.
Why role sims?
Townies are unpredictable - you never know which lot they’ll show up on, and how long they’ll stay. Role sims will consistently be there as the supporting characters in your main sim’s story.
Having consistent NPCs at certain locations around town can help with story-driven gameplay scenarios.
You can move a household of your own sims into town and assign them to fill various roles. See pretty NPCs around town!
If you let the game generate new sims for the roles, then it saves you the hassle of setting up new households yourself. You can always edit them later in CAS.
Limitations:
According to Arsil, it seems like sims who are already employed (such as most townies) will be removed from their jobs if they are assigned to be role sims. So I would avoid using any employed townies for this unless you are ok with that. Use unemployed residents instead.
I believe the role sim cannot leave the lot during the designated work hours. Your sim cannot form a group with them and go to another venue. However, you can invite the sim over or hang out afterwards from the relationship panel.
Mods Needed:
Nraas Master Controller + Integration Module
Nraas Register
Arsil‘s Custom Generic Role mod (both the floor marker and the desk)
Passion (if you want your sim to be able to have sex with the role sims on the lot or have the role sims dance on the stripper pole)
MonocoDoll’s Vile Ventures mod (if you want to create NPC clients for your sim to sell to)
MonocoDoll’s Arms Dealing mod (if you want to create NPC clients for your sim to sell to)
How to Set Up:
Step 1: Install the mods listed above. Then, open the save file you want to add some downtown sleaze to.
Step 2: Find a community lot you want to add role sims to. This could be a bar, nightclub, brothel/motel/strip club, a run-down warehouse or block of buildings, casino, etc. I have downloaded many lots from Flora2 at ModtheSims and @simsmidgen here on Tumblr that fit the gritty urban vibe.
Step 3: Enter Build/Buy mode. You can do this from Live mode.
Press Ctrl + Shift + C, enter this cheat: testingcheatsenabled true
Press the Shift key and click on the ground of the community lot.
Click on “Build on this lot”.
You can also enter Edit Town mode to renovate the community lot.
Step 4: Place Arsil’s Custom Generic Role floor marker or desk on the lot. Place one for each role sim you want to create. They are located in Build Mode -> Community Objects -> Misc. If the desk looks out of place, use the floor marker instead.
Step 5: In Live mode, click on the object -> Settings to set:
The name of the role (clubgoer/stripper/escort/mobster/etc.)
The “work” hours the sim will be on the lot for
The days off
The motives to freeze or not (I recommend freezing all the motives to avoid interactions being interrupted/sims complaining due to low motives)
If the sim you want to assign to the role already lives in town, click on the object -> Nraas -> Register -> Select -> Choose criteria -> select the sim from the list. I would avoid choosing any employed townies as they may lose their job when switching to this role. Choose unemployed residents to avoid conflicts.
Remove assigned roles: click on the object to remove the sim from the role.
Step 6: In Live mode, click on City Hall -> Nraas -> Register
Allow immigration: choose whether you want new sims to be moved into town to take the roles (enable this if you want the game to generate new sims for the roles)
Allow immigration = False: if you set this option to false, then a new option called "Find Empty Roles" should appear. You can then assign any sim to the role object you placed, from City Hall.
Allow resident assignment: choose whether you want existing unemployed townies to be randomly assigned to fill the roles (I recommend to disable this. I had Buster Clavell show up to work at my strip club. NO!)
Pay per hour: I'm not sure how to adjust the pay for each custom role but you can just leave it at the default or change it globally
Remove roles: click on the object to remove the sim from the role, or click on City Hall -> Nraas -> Register -> Global Roles -> Remove by sim
Step 7: In Live mode, give the game some time to generate the role sims. Visit the community lot and have a look at your new role sims. The role sims should autonomously interact with other sims and objects on the lot. Using Nraas Master Controller, you can take the sim into CAS to give them a makeover, edit their traits, or replace them with a sim from your sim bin.
Step 8: Make your sim interact with the shiny new role sims and play out the storylines you always wished were possible. Public hookups, functioning brothels, selling drugs and guns - this is what The Sims 3 was made for, baby!!!
Related Mods:
Arsil’s Exotic Dancer Stage - if you have a club community lot, you can use this mod to hire dancers. You can use role sims to add other NPCs to the club such as guests, shady business sims, or non-dancer sex workers.
Nraas Relativity - this handy mod can slow down the speed of time so your sim can spend more time doing their "activities"
Nraas Woohooer - if you don’t want the explicit sex animations from Passion, you could use this mod instead to provide more woohoo options.
Passion - for brothels/strip clubs, this mod will add sex animations and the ability to have role sims dance on the stripper pole.
MonocoDoll’s Vile Ventures mod and Arms Dealing mod - you can use role sims to create more clients for your sim to sell drugs and weapons to, like different individuals/gangs/mobs. You could have different clients hanging out at different spots in the city.
LazyDuchess Lot Population - this mod populates community lots with townies, and they can interact with the role sims you’ve created.
Service Sims Out on the Town - this pushes service sims to visit community lots, to add even more variety to your crowds.
Conclusion
If you made it to the end, thank you for reading. Please let me know if you try out this style of gameplay, and if you have ideas for more role sims and community lots to make. This tutorial was NSFW-oriented but you could easily adapt it to create NPCs for SFW community lots.
560 notes
·
View notes
Text
TS2 Legacy Collection CEP Extra Tutorial
Hi guys! I just wanted to make this quick tutorial on this since it's the first time a lot of players will be doing this.
Step 1: Download CEP Extra Manual installation from ModTheSims linked here (Read all instructions included if you get confused)
Step 2: Extract the Zip to a folder
Step 3: Open the folder and place the package _EnableColorOptionsMMAT into the Sims3D folder located here: Program Files > EA Games>The Sims 2 Legacy>Base>TSData>Res>Sims3D
Step 4: Place the package _EnableColorOptionsGMND into your Downloads folder located here: Documents>EA Games>The Sims 2 Legacy>Downloads **Note: You will likely have to create this folder yourself which is easy. Simply right click inside The Sims 2 Legacy folder and create a new folder named "Downloads" and place that file right inside.**

Step 5: Open the 'Extras' folder inside the Zip
Step 6: Open the folder 'MyDocuments' and place the entire zCEP-EXTRA folder inside your Sims 2 Legacy document folder located here: Documents>EA Games>The Sims 2 Legacy
Step 7: Open the folder 'ProgramFiles' and place the entire zCEP-EXTRA folder inside your Catalog folder located here: Program Files > EA Games>The Sims 2 Legacy>Base>TSData>Res>Catalog

And thats it! You should be good to go now. You can check if it's working by the start up message. If you have that setting turned off you can also check to see if it's working by going into one of the households and using the design tool on objects that were previously not recolorable or expanded objects. I believe you can also check to see if it's working by checking the skin tone range in CAS but don't quote me on that lol. Anyway I hope this helped someone 💜
EDIT: Quick reminder for those that are extremely new to the game that you need to start the game at least once first The Sims 2 Legacy folder to appear in your documents folder or you could simply create it yourself, add your folders, and then start the game after and it’ll populate around your newly added CEP and Downloads folder.
#ts2#ts2 community#ts2 tutorial#the sims 2 legacy#ts2 legacy collection#the sims 2 legacy collection#ts2 legacy collection tutorial#ts2 cep#ts2 resources#TS2 LC Tutorial
231 notes
·
View notes
Text
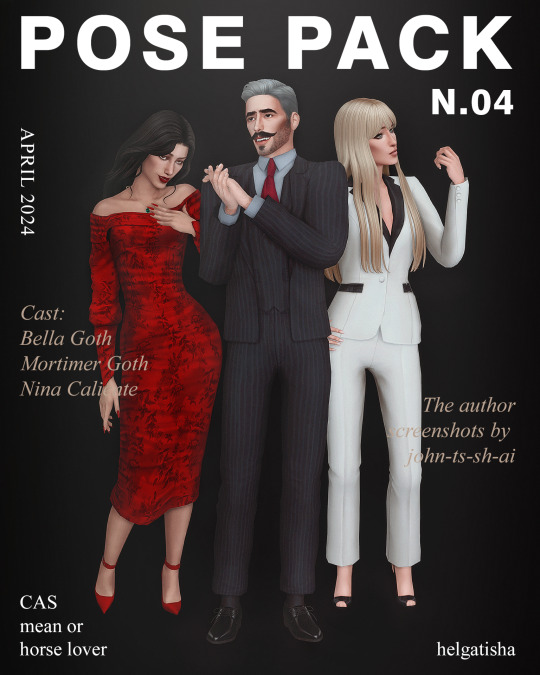
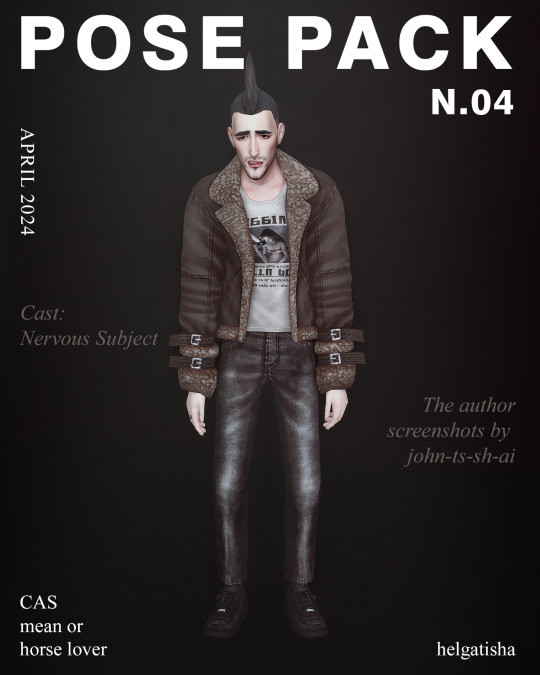


(TS4) POSE PACK N04 |& CAS|
Download: boosty | patreon | simfileshare
The author screenshots by @john-ts-sh-ai <3
Cast: Bella Goth, Mortimer Goth, Nina Caliente, Nervous Subject,Mary-Sue Pleasant.
ENG | You will NEED
- andrew’s pose player
or WW (tutorial)
- teleporter any sim (x1 on the same spot)
or using mc command center
Including: 30 poses
unisex
all in one
CAS - mean or horse lover trait
| Tag ‘’ helgatisha ‘’ so I can see it
– The poses all of them are from the CAS traits and slightly edited. I hope it will be useful for you –
RUS | Вам НУЖЕН
- andrew’s pose player
или WW (урок)
- teleporter any sim (1 шт. в одном и том же месте)
или с помощью mc command center
входит: 30 поз
унисекс
все в одном
CAS - черта характера задира или любовь к лошадям
| Тэг ‘’ helgatisha‘’ так я увижу вас
please read and respect my tou
Linktree
#helgatisha#mycc download#my cc#ts4 mypose#sims 4 pose pack#sims 4 female poses#sims 4 male poses#ts4cc#sims 4#ts4 bella goth#ts4 motimer goth#ts4 nina caliente#ts4 nerveous subject#ts4 mary-sue pleasant#sims 4 cas poses
1K notes
·
View notes
Text
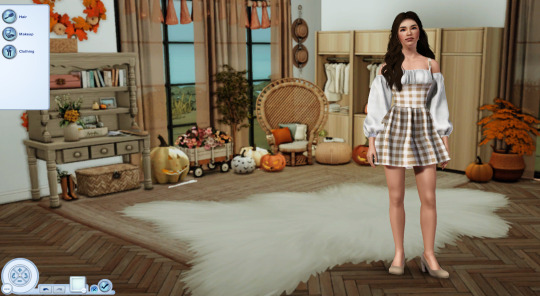

SimsDeoGloria 4t3 Pilar Leon CAS Background Replacement
Some Fall Themed CAS Background for your Sims 3 Games. More info under the cut :)

Download: simfileshare / simblr.cc
A huge thank you to Pilar Leon for allowing me to covert their beautiful CAS Backgrounds. This is the first of several I've done so keep an eye out for more.
And a huge thank you to Nectar Cellar for the tutorial!

The background uses a 2048x2048px.
The CAS Room Default will replace the basegame CAS Room.
The Stylist Room Default will only replace the Stylist Room. (The Stylist Room Requires Ambitions)
You can only have 1 CAS/Stylist Room Default at a time.
Credits
A huge thank you to @pilarleon for allowing me to covert these and for all the beautiful CAS backgrounds they have created. Originals can be found here: Autumn & Marina
@nectar-cellar for the tutorial and doing so much work to get us TS3 players some new backgrounds! I can't thank you enough! Go look at Nectar Cellar's Tutorial Here: Make your own using this tutorial!
@johziii for the beautiful sims in these pictures. Models used were Paula Benjamin and Angeline Knight
Other Mods used in photo is @boringbones CAS UI Overhaul

306 notes
·
View notes
Text
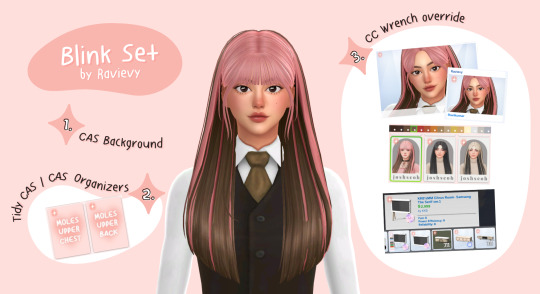
✨Blink Set ✨
Hello 👋👋👋 I made blush pink things for CAS room 💗 This set contains
1. CAS Background in Solid color and Solid color with heart 💗

2. Tidy CAS / CAS organizers that functions like a table of contents 📑📑
3. CC Wrench override that replace the blue wrench banner on CC thumbnails in CAS and Build/Buy mode, CC color swatch and Gallery post. 🔧➡✨
✅ Work with patch 1.113 (Update: 26th Feb. 2025)
💗 Download Here 💗
💗 How to use: Download and put them in the Sims 4 mod folder (and choose 1 of CAS Bg file)
✨ T.O.U. ✨ Please do not reupload or claim as your own.
💌 Special thanks 💌
💗 @katverse for template and tutorial for CAS Background 💗
💗 @yoruqueenofnightsims 's tutorials for Tidy CAS template 💗
💗 MizoreYukii tutorial for CC Wrench override How to 💗
✨I use the cute elements from canva. thanks for all elements creators ✨
#the sims 4#ts4#sims4#sims4cc#thesim4cc#ts4 mods#ts4cc#the sims 4 cas#cas backgrounds#tidycas#sims 4 cas background#cas organizers#sims 4 custom content#sims 4 cc#simblr#the sims#custom wrench#ts4 cc#wrench cc#wrench override#ravievy
181 notes
·
View notes
Text
The sims 4 is not a lost cause, it just needs some love.
SO i recently came back to playing sims 4 after a long hiatus and i have to say i'm surprised. I'm no EA apologist, they are indeed cashgrabby. But to see that lots of new features were integrated over the last few years that facilitated different styles of gameplay actually surprised me.
It seems tho that a pattern has been set, were they will release the most lackluster pack (whatever it is) and keep fixing it over the next few years. Pack reworks became a thing and thank god for it, since the releases don't seem to be stoping in order to give us better results.
It's a bittersweet feeling for sure. The game has more than 70 packs released and somehow it can still feel dead when it comes to live mode. And that's what this post is about: how could they bring the love the other games had for live mode in a base game that's so purposefully made for cas and build/buy?
Part 1: Nostalgia driven gameplay

Seeing the UI from the sims 1, 2 and 3 brings me back a lot of memories. It was a staple to this series that was lost due to a cleaner redesign. Not only that, but a core mechanic was also changed: the wants and fears system.
I believe that what makes me so nostalgic is TO KNOW that this worked so perfectly and hardly needed any refreshes.
Your sims now have emotions and yet, they rarely feel like something integrated to a goal or something you can truly affect while in gameplay.
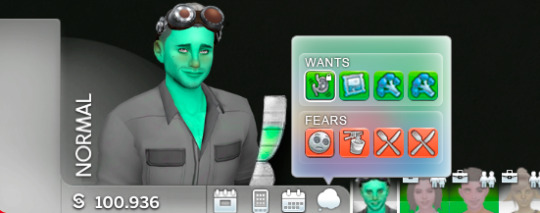
Bringing back the wants and fears system would not only make our decisions during gameplay more impactful to our sims emotions, but also help to choose the direction any story could go.
An aspiration meter that's connected to the rewards shop would make decisions much more impactful (rather than getting them just by working through what is currently known as the "tutorial aspirations").
Your sims moods should be important, and so what makes them feel that way.
Part 2: World overload
With the amount of packs released, the world selection menu quickly became a problem. When seeing that screen, it all just feels like a blur of information that's been set in a certain way for convenience.

Maps such as these became popular in the community for a reason. The experience of playing needs to be inviting from the get go. It's clear tho that the reason behind not giving us something like this is no long term planning and pack exclusive experiences.
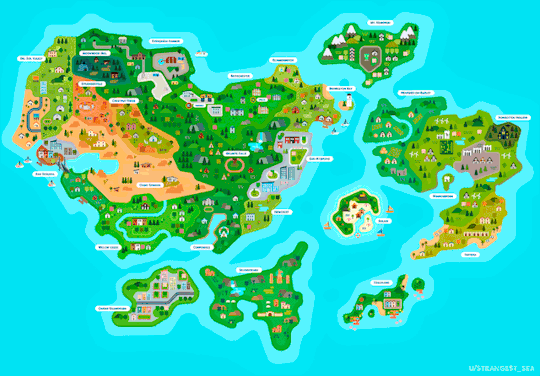
So what if it just became a larger sims world? A concept were you wouldn't select the city at frist, but the entire region were it is located in order to acess the one you prefer.
That would also make this refresh friendly to a future create a world tool (whenever that may come).
Part 3: Pack refreshes are the bread and butter of the future
Let's face it: we're stuck with this game for another 10 years at least. So other than dwell on the fact that we don't have open worlds or things of that nature, we should look at what can reasily be solved, and that's pack refreshes.
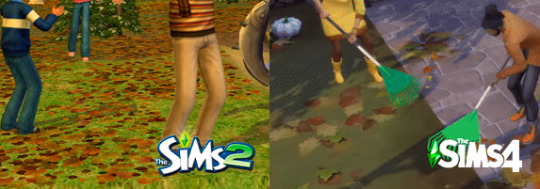
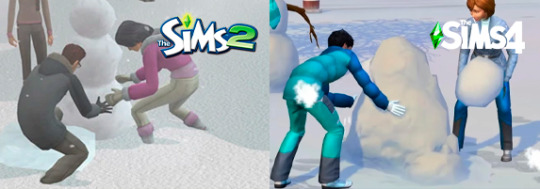
From seasons coming out without properly made textures and snow depth to functions that will simply not work as they should, I like to believe we do have a voice in this community. I made this post several years ago and now, looking back at it, I see so much improvement over things that we were desperately asking for.
Don't get me wrong, by that I don't mean that EA developers are searching through my page or yours to find what we think and expect for The Sims 4. But talking about these things openly as a community is what makes the difference.
Part 4: Simmers Unite
In conclusion: uniting our voices to ask for these things to come as refreshes and revamped features are crucial for the next few years. Let's, together, avoid a "my first snowdepth pack" or similar things that could yet come our way.
I created a blog called @sims4-communitywishes to reblog rants and wishes such as these. Our blogs and separate voices may be small, but a repository of it is much more impactful.
So thank you for reading this all the way through and in case you want to share your wishes for the future of The Sims 4, tag it as #s4comunitywishes
331 notes
·
View notes