#slider pro
Text
I’m always thinking about my Slider’s music taste…like, is it ooc if he liked The Cars? New Order? Bauhaus?
Then I look at this picture of Rick Rossovich and be like nvm he looks like someone from new wave/goth bands
I mean look at how gorgeous

#ron slider kerner#top gun 1986#top gun fanfiction#ao3 writer#whereas on the other hand I’m fully convinced Mav likes Cheap Trick and Red Hot Chili Peppers#give it away give it away give it away now#that’s my anthem for cleaning shit in my closet and donating good ones to my local thrift stores#Rick just looks like he’s from mid 80s goth band…so cool#he’d sing#Mav would be on the drum set#Goose is a piano man#and Ice is the backbone of the band AKA BASS#Rick Rossovich#bass pro shops pyramid in Memphis Tennessee#lowkey looks like Peter Murphy
25 notes
·
View notes
Text

the number of reference photos I had to take for this one pose to work was insane lol
#top gun#tom iceman kazansky#current wip#so many ideas#so little time#also did you guys catch that one part where slider tries to set the ball#and ice is so ready to spike it#but then it goes in the OPPOSITE DIRECTION#and he's like f it and free balls it over#also the net touches are killing me lmao#just adds so much to the scene bc yeah ofc they're not gonna be pros#and it feels so much more genuine like that#absolutely iconic
73 notes
·
View notes
Text



You are the love of my life, Kurt. And I'm pissed off that I have to learn, for the next year, what being alone is gonna be like.
#glee#gleeedit#klaine#blaine anderson#blangst#I mean he was right! they were not good at coping with the change!#anyway look who MADE A GIFSET#if anyone has uhhhh any advice on altering/coloring scenes from TBU so blaine doesn't fade into the bg let me know!#because I have no idea what I'm doing lol#just moving little sliders around arbitrarily#with each gif I learn something new tho#i am so POWERFUL#mine#my gifs#also this is a pro-klaine space okay#it's all about the angst but they GROW okay#they made some mistakes but i love them
95 notes
·
View notes
Note
I love your interpretation of Mav and Ice. I love how realistic they both feel because well, they're white men in the Navy starting in the 80s. What it does make me wonder about Carole? I know you don't write for her but your analysis of Top Gun itself just made me wonder about her. Like whether she was a traditional military wife or just kinda met Goose and fell into it. Did Goose's death and the period between his death and her's change anything? Did it make her more skeptical of the military because of the cause of Goose's death or was her asking Mav to not let Bradley fly purely out of her hurt for Goose's death and not a moral/political thing also. PS. I read your Slider fic and absolutely adored it
well… i think any attempt to flesh out Carole’s character is gonna be completely based on conjecture, because we’re not given more than “slightly naive Christian woman who doesn’t always say exactly the right thing.”
But I think it’s helpful to remember where she fits into the narrative at large, and why: Carole Bradshaw is the villain of the Top Gun franchise. Top Gun is her villain origin story.
The rhetorical purpose of the top gun franchise is: to make money, obv, AND to get people to join the navy. (to what extent it’s successful at achieving that latter goal is the topic of a different post… im certainly not the first to say it’s pretty easy to find an antimilitary reading of TG.) but if top gun is aiming to portray the navy as someplace you want to be, and someplace where you have to earn a spot to be (as I keep repeating over the last couple weeks, it’s all about honor), then Carole Bradshaw becomes the villain of the recruiting story of Top Gun: Maverick, because she (momentarily) prevented her son from joining the navy with the honor he thought he deserved, and she is to blame for the emotional through line of the entire movie. Thank God! we don’t have to blame maverick for fucking up and preventing Bradley from achieving his Dream Of Working As A US Military Contractor! we can blame his dead mom instead, so that maverick is still a good guy whom we, a moderately-conservative pro-navy target audience (🤑), can still root for & pay money to see.
so yeah narratively speaking she’s just a scapegoat. She has no agency in the story whatsoever, she’s only an object to receive blame. any backstory/reasoning/character we invent for her doesn’t really matter. It doesn’t really matter WHY she does it—whether she hates the military or not, narratively speaking we have to blame her just the same either way—it just matters that she does it. and then she has to immediately die so she can’t explain herself and maverick has to self-sacrificially take the blame. Because otherwise the plot of TGM wouldn’t happen, which would not achieve the rhetorical goals of making a bunch of money and getting kids to sign up for the navy.
#always a treat to remember that the target audience of tgm is republican dads of teenage boys#i only watched top gun bc i (teenager) was forced to by my formerly republican dad#i saw ur Carole post & i actually think she was fridged.#in case you couldn’t tell i am a little pissed about it.#very rarely are side characters just characters. everyone (paramount pictures and me included) has an axe to grind.#thanks for the ask glad you liked slider! It’s my favorite thing I’ve written for the fandom so im glad#top gun maverick#top gun#carole bradshaw#asks#pete maverick mitchell#* pissed about the fridging not about your post. i liked your post#she is killed not to strengthen the emotional throughline of the story but#solely to further TGM’s pro-navy pro-recruitment agenda and absolve the male MC of guilt.#that is the purpose of her death & her character at large in the franchise#sooooooo imo it doesn’t really matter what her outlook is/was#she’s the villain#and also part of joining the navy/having family members in the AFUSA is accepting the risk. esp if ur husband is an aviator there is so#much risk involved independent of enemies etc. people die flying all the fuckin time. she would’ve had to accept that#the fact that she doesn’t accept that is what makes her an anti patriotic villain etc etc#and remember she TOLD maverick GOOSE would’ve accepted the risk ‘he would’ve flown anyway’#again she is incredibly out of character in TGM (as is Mav) re: papers pulling & its all to serve this rhetorical goal
31 notes
·
View notes
Text
this week on i'm an idiot: headphones that i thought were broken for the last year had a mute setting i didn't know about and wouldn't you know it turning off the mute setting makes them play sound again
#speak friend and enter#any koss porta pro owners out there - if your headphones suddenly die make sure the little slider on the mic isn't pushed down
2 notes
·
View notes
Photo

https://studioevoke.co.uk/
#EVOKE#design#studio#brand#Brighton#slider#portfolio#typography#type#typeface#font#TT Norms Pro#2022#Week 45#website#web design#inspire#inspiration#happywebdesign
7 notes
·
View notes
Text
bc my mother does not believe in non-decorative curtains, the big windows in the main area cannot simply be covered during the eclipse. therefore, to prevent the possibility of my cat looking out at the sun during said eclipse, i must corral him in these side rooms (with working blinds and the lone functional curtain in the house) for a while until the danger passes. however, he hates this and will attempt to leave by any means possible. so i must minimize opening the door back out to the rest of the house. which means holing up with food supplies (just like old times, but minus the unpleasant sounds of loud arguments in the rest of the house!). so he is serenading me with displeased, annoyed, and forlorn tones. and discovering that he cannot dig through hardwood to escape. but he will settle soon enough, his food and water bowls and litterbox and toys are in here and he has a whole other room to sulk in if he doesnt want to be on my bed.
#pros of the slider door: no visible doorknob so he wont be making an attempt at it. cons: does not actually lock so i must keep something#he wont step on in front of the crack so he doesnt work it open that way. this precludes sleep on my part for the next few hours
0 notes
Text
Dragon Age: The Veilguard info compilation Post 1
Post is under a cut due to length.
There is a lot of information coming out right now about DA:TV from many different sources. This post is just an effort to compile as much as I can in one place, in case that helps anyone. Sources for where the information came from have been included. Where I am linking to a social media user's post, the person is either a dev, a Dragon Age community council member or other person who has had a sneak peek at and played the game. nb, this post is more of a 'info that came out in snippets from articles and social media posts' collection rather than a 'regurgitating the information on the official website or writing out what happened in the trailer/gameplay reveal' post. The post is broken down into headings on various topics. A few points are repeated under multiple headings where relevant. Where I am speculating without a source, I have clearly demarcated this. if you notice any mistakes in this post, please tell me.
as this post hit a kind of character limit, there will probably be at least 1 more post. :)
Character Creation
CC is vast [source] and immensely detailed [source]
We will enter CC straight after Varric's opening narration [source]
You are given 5 categories to work your way through in CC: Lineage, Appearance, Class, Faction, Playstyle. Each of these has a range of subcategories within them. There are 8 subcategories within the "head" subcategory" in "Appearance" alone [source]
Lineage dictates things like race (i.e. human, elf, dwarf, qunari) and backstory [source]
Backstories include things like factions. Factions offer 3 distinct buffs each [source]
There are dozens and dozens of hairstyles [source]
There are separate options for binary and non-binary pronouns and gender [source]
"BioWare's work behind the scenes, meanwhile, goes as deep as not only skin tones but skin undertones, melanin levels, and the way skin reacts differently to light" [source]
CC has a range of lighting options within it so that you can check how the character looks in them [source]
There are a range of full-body customization options such as a triangular slider between body types and individual settings down to everything from shoulder width to glute volume [source]. There are "all the sliders [we] could possibly want". The body morpher option allows us to choose different body sizes [source]
All body options are non-gendered [source]
They/them pronouns are an option [source]
Rook can be played as non-binary [source]
Individual strands of hair were rendered separately and react remarkably to in-game physics [source]
Special, focused attention was paid to ensuring that hairstyles "come across as well-representative, that everyone can see hairstyles that feel authentic to them, even the way they render" [source]
The game uses strand hair technology borrowed in part from the EA Sports games. The hair is "fully-controlled by physics," so it "looks even better in motion than it does here in a standstill" [source]
The ability to import our choices from previous games is fully integrated into CC. This will take the form of tarot cards - "you can go into your past adventures" and this mechanic tells you what the context was and what decision you want to make [source]
In CC we will also be able to customize/remake our Inquisitor [source]
A core tenet of the game is "be who you want to be" [source]
There are presets for all 4 of the game's races (human, elf, dwarf, qunari), in case detailed CCs overwhelm you [source]
Story
The story is set 9 years since Inquisition [source]
The Inquisitor will appear [source]
Other characters refer to the PC as Rook [source]. This article says they are "the Rook" [source]
The ability to import our choices from previous games is fully integrated into CC. This will take the form of tarot cards - "you can go into your past adventures" and this mechanic tells you what the context was and what decision you want to make [source]
The prologue is quite lengthy. A narrated intro from Varric lays the groundwork with some lore and explains about Solas [source]. In this Varric-narrated opening section, the dwarf recaps the events of previous games and explains the motivations of Solas [source] (Fel note/speculation: this sounds like this cinematic that we saw on DA Day 2023)
What happens first off is that Rook, who is working with Varric, is interrogating a bartender about the whereabouts of a contact in Minrathous who can help them stop Solas. The bartender does not play nice and we are presented with our first choice: talk the bartender down or intimidate them aggressively [source]
The first hour of the game is "a luxurious nighttime romp through a crumbling city under a mix of twinkling starlight and lavish midnight blue" (Minrathous) [source]. The game begins with a tavern brawl (depending on dialogue options) and a stroll through Minrathous in search of Neve Gallus, who has a lead on Solas [source]. Minrathous then comes under attack [source] by demons [source] (Fel note/speculation: it sounds like the demo the press played is what we saw in the Gameplay Reveal). Off in the distance is a vibrant, colorful storm where Solas is performing his ritual. [source] Eventually we come upon Harding. [source] and Neve. Rook and co enter a crumbling castle, where ancient elf secrets pop up, "seemingly just for the lore nerds". [source] Then we teleport to Arlathan Forest, have a mini boss fight with a Pride Demon, and there is the climactic confrontation with Solas. After a closing sequence, at this point it is the end of the game's opening mission. [source] (Fel note/speculation: So the Gameplay Reveal showed the game's opening mission)
The action in the story's opening parts starts off quite quick from the sounds of things: the devs wanted to get the player right in to the story. because, “Especially with an RPG where they can be quite lore-heavy, a lot of exposition at the front and remembering proper nouns, it can be very overwhelming.” [source]
BioWare wanted to make the beginning of Dragon Age: The Veilguard feel like the finale of one of their other games [source]
Rook's Faction will be referenced in dialogue [source]
Minrathous is beautiful, with giant statues, floating palaces, orange lantern glow and magical runes which glow green neon. These act "like electricity" as occasional signs above pubs and stores [source]
The story has a lot of darkness tonally. These dark parts of the game contain the biggest spoilers [source]. However, the team really wanted to build in contrast between the dark and light moments in the game, as if everything is dark, nothing really feels dark [source]
Our hub (like the Normandy in ME or Skyhold in DA:I) is a place called The Lighthouse [source] (Fel note/speculation: I guess this screenshot shows the crew in The Lighthouse? ^^)
Each companion has a very complex backstory, their own problems, and deep motivations. These play out through well-fleshed out character arcs and missions that are unique to them but which are ultimately tied into the larger story [source]
We will make consequential decisions for each character, sometimes affecting who they are in heart-wrenching ways and other times joyously [source]
Decisions from previous DA games will be able to be carried over, it will just work a bit differently this time [source]. The game will not read our previous saves. For stuff pertaining to previous games/choices, players will not have to link their accounts [source]
Characters, companions, romance
Varric is a major character [source]
Every companion is romanceable [source]
BioWare tried to make each character's friendship just as meaningful, regardless of romance [source]
If you don't romance a character, they may end up romancing each other [source]
There will be some great cameos [source]. Some previous characters are woven into the game [source]
Companion sidequests/optional content relating to companions is highly curated when it involves their motivations and experiences [source]
We could permanently lose some companions depending on our choices [source]
Our choices can influence if characters get injured and what they think about us [source]
The bonds Rook forges with companions determine how party members grow and what abilities become available [source]
Each companion has a very complex backstory, their own problems, and deep motivations. These play out through well-fleshed out character arcs and missions that are unique to them but which are ultimately tied into the larger story [source]
We will make consequential decisions for each character, sometimes affecting who they are in heart-wrenching ways and other times joyously [source]
Gameplay, presentation, performance etc
Each class (warrior, rogue, mage) has 3 specializations. The ones for Rogue are duelist, saboteur and Veil ranger [source]. (Fel note/speculation: Veil ranger reminds me of Bellara. Maybe this is her 'spec' too?)
Duelist gameplay involves a sharp combination of dashes, parries, leaps, rapid slashes and combos [source]
Faction-related buffs include being able to hold an extra potion or do extra damage against certain enemies [source]
Individual strands of hair were rendered separately and react remarkably to in-game physics [source]
Playstyle settings include custom, distinct difficulty settings for options as granular as parry windows, meaning "players who might fancy that playstyle but typically struggle with the finer points of combat can give it a go" [source]
Combat mechanics is a mix of real-time action and pause and play. Pausing brings up a radial menu split into 3 sections: companions to the left and right, Rook's skills at the bottom, and a targeting system at the top which helps get in focus on certain enemies. [source]. In the pause system you can queue up your whole party's attacks [source]
Tapping or holding the shoulder button pauses the game, allowing us to stop the action and issue orders to companions [source]
There is a system of specific enemy resistances and weaknesses [source]. Weaknesses and resistances plays a big role in combat and abilities are designed to exploit these accordingly [source]. An example is that "one character might be able to plant a weakening debuff on an enemy, and another enemy might be able to detonate them" [source]
There is a vast skill tree of unlockable options [source]
You can set up specific companions with certain kits, e.g. to tackle specific enemy types, to being more of a support, or as flexible all-rounders [source]
Healing magic returns [source]
Abilities can change together with elaborate results, e.g. one companion using a gravity well attack that sucked enemies together, another using a slowing move to keep them in place, and Rook using a big AOE to catch them all at once [source]
A shortcut system lets you map a few abilities to a smaller pinned menu at the bottom of the screen [source]
There are class-specific resource systems. For example, Rogue has "momentum", which builds up as Rook lands consecutive hits [source]
Each class will always have a ranged option [source]
Rogue Rook can do a sort of 'hip fire' option with a bow, letting you pop off arrows from the waist [source]
Warriors can throw their shield at enemies, and can build an entire playstyle around that using the skill tree [source]
There is light platforming gameplay [source]
The game runs on the latest iteration of the Frostbite engine [source]
The game targets 60 fps
On consoles it will feature performance and quality modes so we can choose our preferred visual fidelity [source]
The game is mission based [source]. Some levels that we go to do open up, some with more exploration than others. "Alternate branching paths, mysteries, secrets, optional content you're going to find and solve." [source]
Everything is hand-touched, hand-crafted and highly curated [source]
Some sidequests and optional content is highly curated, especially when it involves the motivations and experiences of the companions. In others we may be investigating for example a missing family, with an entire open bog environment to search for clues and a way to solve the disappearance [source]
Gameplay, presentation, performance etc continued, after the above bullet list hit a character limit
There is sophisticated animation cancelling and branching. Gameplay is action-like, and the design centers around dodging, countering, and using risk-reward charge attacks designed to break enemy armor layers [source]
The dialogue wheel returns [source]. It gives truncated summaries of the dialogue options rather than the full line that the character is going to say [source]
The bonds Rook forges with companions determine how party members grow and what abilities become available [source]
For stuff pertaining to previous games/choices, players will not have to link their accounts [source]
We can play the game fully offline [source]
There are no microtransactions [source]
The game itself is not as cell-shaded in look as the first trailer looked [source]
[☕ found this post or blog interesting or useful? my ko-fi is here if you feel inclined. thank you 🙏]
#dragon age: the veilguard#dragon age: dreadwolf#dragon age 4#the dread wolf rises#da4#dragon age#bioware#lgbtq#video games#long post#longpost#solas#mj best of#mass effect#character death cw#injury cw#update: there is now a part 2 and 3 and 4 of this post#tumblr unfortunately wont let me edit the link to them into this post for some reason thought sorry :<#you will have to browse through my more recent posts to find them#thanku to dreadfutures who also let me know about the accessibility tweet in this comp :>
2K notes
·
View notes
Photo

GP pro leather gloves
These High profiles GP pro leather gloves are designed to make sure that they thrill every eye that sees and makes your ride perfect. Providing the best safety and comfort measures to the rider.
GP pro leather gloves
#deerskin motorcycle gloves#gp pro gloves#GP pro leather gloves#Gp Pro Leather Gloves Motogp#motorcycle gloves with palm sliders
0 notes
Text
Macbook pro brightness slider not working

Macbook pro brightness slider not working how to#
Macbook pro brightness slider not working full#
Macbook pro brightness slider not working portable#
Macbook pro brightness slider not working pro#
Now, Drag the Brightness Slider to adjust your MacBook Air/ MacBook Pro/ iMac Brightness.Īccording to our information- you want to change display brightness but in some older Apple devices, in OS X V 10.10 or later, the slider to change brightness may no longer appear in the display pane of Display Preferences. Manually way to adjust brightness in OS X System Preferences if you enabled Auto-Display Brightness on Macbook. MacBook users can find the sensor next to the iSight camera on display, Confirm the location by holding your palm on the Sensor, and Your Macbook display goes down. See the below screen, Where is the Sensor for Auto-Brightness on MacBook? Your iMac display brightness goes down if the Automatically adjust brightness option is enabled under the settings as explained above. Where is the Sensor for Auto-Brightness on iMac 24 Inch?Īs per our test on iMac 24 inch, Auto-Display brightness sensor is available on the front edge of the top left corner, To test yourself, Put your Palm on the Left top corner edge. turn-off-automatically-adjust-brightness-on-mac Step 2→ Select Display > Disable the “Automatically adjust brightness” Toggle. Step 1→ Go to the Apple Logo > System Settings (System Preferences).
Macbook pro brightness slider not working how to#
Get Here: How to Activate Dark Mode on Mac as well Enable Dark Mode using Keyboard Shortcut or Touchbar on Mac How do I stop your Mac from automatically adjusting screenįor mac, there is no direct shortcut to manage Screen Brightness on Mac, but we can adjust it from the System settings on Mac’s Display settings. Note: if you don’t appear in the “ Automatically adjust brightness” checkbox, then don’t worry you can do it manually. At last, select “ Automatically adjust brightness.” Click on Apple Logo from top left corner menu If your Mac Installed Earlier macOS Version then Follow the below steps, On macOS Monterey & Earlier Adjust Brightness Settings Use it to Manually adjust brightness on Mac Computer or MacBook. Step 3→ Also There is an Option for changing the “ Brightness” Slider. change-display-brightness-or-increase-display-brightness-on-mac Step 2→ Next, Scroll to Display option > and see the Option “Automatically adjust brightness” toggle. Step 1→ Go to the Apple Logo from the top menu > System Settings. If your Mac has an ambient light sensor, though follow the beneath step On MacOS Ventura Adjust Brightness Settings Step to Auto Adjust Brightness on MacBook Air, MacBook Pro, and iMac If you’ve a desktop Computer – Press the F14 Key to decrease the brightness, and Press the F15 to increases the brightness.
Macbook pro brightness slider not working portable#
If you’ve a Portable computer/ MacBook/ Apple Keyboard/ iMac/ iMac Pro – Press the F1 Key to decrease the brightness, and Press the F2 to increases the brightness.
Step to Set Brightness using the function key From the Display section, we can enable Dark mode and Night Shift. if you are looking for a Keyboard shortcut then follow the next step. Adjust Display Brightness on MacĬlick on the Control center icon from the top Mac menu > And See the Display Brightness bar to change the screen brightness intercity using a mouse. Adjust brightness is also comes in to control center. By Default Contol center is enabled at the top right corner of the mac screen, and we can add & Customize the control center on Mac at the Primary level. Without Moving to your Mac settings and Shortcut, we can turn on and turn off some customer settings from the Mac menu. In Latest macOS, Apple gives Control Center on the Mac screen just like iPhone and iPad. Change Brightness Using Control center on Mac Make Sure, if you having an issue with auto-Brightness then Remove the cover from your Mac, if the cover hides the Brightness sensor on edge of the Mac.
Macbook pro brightness slider not working full#
Use Ever Full luminous At Night – Adjust Mac Display Brightness
Macbook pro brightness slider not working pro#
MacBook Pro Increase Brightness without Touch Bar.
How Do I Adjust the Brightness on My External Monitor Mac.
MacBook Screen Dim and Cannot Change Brightness.
Where is the Sensor for Auto-Brightness on MacBook?.
Where is the Sensor for Auto-Brightness on iMac 24 Inch?.
How do I stop your Mac from automatically adjusting screen.
On macOS Monterey & Earlier Adjust Brightness Settings.
On MacOS Ventura Adjust Brightness Settings.
Step to Auto Adjust Brightness on MacBook Air, MacBook Pro, and iMac.
Step to Set Brightness using the function key.
Change Brightness Using Control center on Mac.
Use Ever Full luminous At Night – Adjust Mac Display Brightness.

0 notes
Text
Macbook pro brightness slider not working

MACBOOK PRO BRIGHTNESS SLIDER NOT WORKING HOW TO
MACBOOK PRO BRIGHTNESS SLIDER NOT WORKING FULL
MACBOOK PRO BRIGHTNESS SLIDER NOT WORKING PRO
MACBOOK PRO BRIGHTNESS SLIDER NOT WORKING WINDOWS
Have you been able to go hands-on with a Touch Bar-enabled MacBook Pro? If so, please share your thoughts on the experience. You won’t of course, gain any of the other dynamic benefits that the Touch Bar is known for in macOS. You also get access to the Escape key and pressing and holding the physical Function (fn) key will reveal a set of 12 function keys. When used with Windows, the Touch Bar will display basic controls for things like keyboard brightness, screen brightness and volume.
MACBOOK PRO BRIGHTNESS SLIDER NOT WORKING WINDOWS
You can use the Touch Bar on a Boot Camp Windows installation Simply tap that key to reveal media controls. No matter where you are on your Mac, you’ll see a handy media key on the left side of the Control Strip in the Touch Bar area. What makes the scrubber nice is that it is always available when eligible media is playing, even if that media isn’t a part of the top-most window. You can even use it to scrub through YouTube videos while watching via Safari. This scrubber is present when playing music via iTunes, Safari videos, QuickTime videos, etc. When playing media on your MacBook Pro, you’ll notice a persistent media scrubber in the Touch Bar. When invoking Siri via the Touch Bar, you can touch and hold the Siri key to make it listen to your commands for the duration of your touch. It’s now available for public beta testers. To use this functionality, you’ll need to run macOS 10.12.2 Beta 3 or later.
MACBOOK PRO BRIGHTNESS SLIDER NOT WORKING HOW TO
Zac provided us with an excellent how-to that shows how to create Touch Bar screenshots. This means that you can do things like move a shape in Pixelmator while, at the same time, changing its color or the size of its border. MacOS allows you to interface with both the trackpad and the Touch Bar simultaneously. To wake the Touch Bar, tap the Touch Bar, trackpad, or press a key on the keyboard Trackpad + Touch Bar The Touch Bar will dim after 60 seconds, and time out completely 15 seconds later. The escape key is located in the upper left-hand corner of the Control Bar, but it doesn’t align perfectly with the hardware keyboard keys directly below it. But if you’re a touch typist, your Escape key presses will still register, even if your finger doesn’t fully make contact with the key. While editing an app’s Control Bar settings, you can quickly switch to editing the Control Strip just by giving it a tap. How to customize the Control Strip while editing an app region If a Touch Bar-enabled app supports customization, you can go to View → Customize Touch Bar while using the app to configure its key layout in the Touch Bar. How to customize the app region of the Touch Bar for favorite apps
MACBOOK PRO BRIGHTNESS SLIDER NOT WORKING FULL
If you tap the chevron button while in the middle of customizing the Control Strip, you’ll gain access to more system functions and controls, allowing you to customize the full expanded Control Strip. Tap the chevron button to the left of the Control Strip to access an expanded list of system functions and controls. Open System Preferences → Keyboard, and click the Customize Control Strip button. How to customize the Touch Bar’s Control Strip Instead of tapping the brightness or volume key on the Touch Bar Control Strip, simply tap, hold and drag the slider to the desired level for a quick adjustment in one fell swoop. Subscribe to 9to5Mac’s YouTube channel for the latest videos Quickly adjust brightness and volume If you press and hold the Function key while using this app, the expanded Control Strip options on the Touch Bar will be revealed. With this setting enabled for a specific app, function keys will be displayed by default while using that app. But what if there’s an app that requires you to use standard function keys often?Īll you need to do is go to System Preferences → Keyboard → Shortcuts, select Function Keys, and click the ‘+’ sign to add an app of your choice. You can quickly show the normal function keys by pressing and holding the Function (fn) key on the keyboard. How to always show function keys for specific apps These keys can be revealed within any app at any time. keys, simply hold the Function (fn) key in the bottom left-hand corner of the keyboard to reveal them.
MACBOOK PRO BRIGHTNESS SLIDER NOT WORKING PRO
In this walkthrough video, we’ll discuss 15 tips and tricks for the new MacBook Pro Touch Bar to help you get started. The Touch bar is simple to use, but it’s somewhat deeper than it may appear at first. It’s a small touch surface that offers dynamically changing content based on the current app you’re using. The Touch Bar is the flagship feature for the new MacBook Pro.

0 notes
Text

🤳 Instagram Post PSD Template
Font used is SF Pro Display
Single- or double-lined caption
2 or 3 comments
3 or 6 bullets in picture slider
Heart icons are 'likable'
Credit: Icons from freepik
⤷ download simfileshare • patreon

489 notes
·
View notes
Text
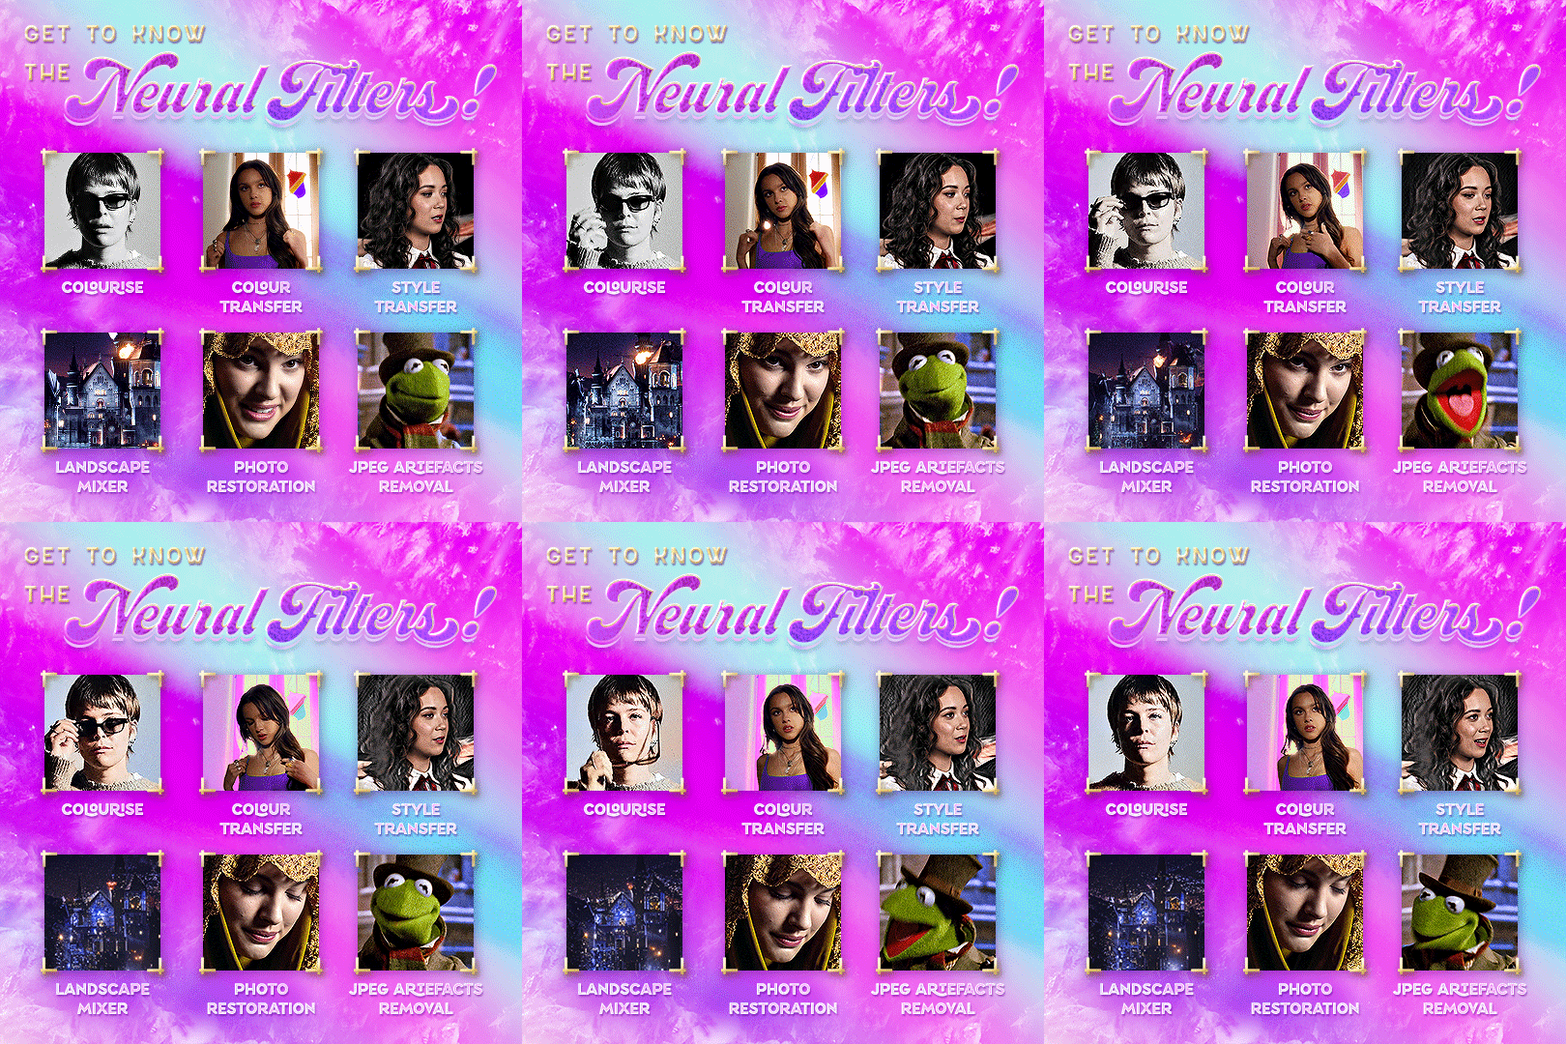


Neural Filters Tutorial for Gifmakers by @antoniosvivaldi
Hi everyone! In light of my blog’s 10th birthday, I’m delighted to reveal my highly anticipated gifmaking tutorial using Neural Filters - a very powerful collection of filters that really broadened my scope in gifmaking over the past 12 months.
Before I get into this tutorial, I want to thank @laurabenanti, @maines , @cobbbvanth, and @cal-kestis for their unconditional support over the course of my journey of investigating the Neural Filters & their valuable inputs on the rendering performance!
In this tutorial, I will outline what the Photoshop Neural Filters do and how I use them in my workflow - multiple examples will be provided for better clarity. Finally, I will talk about some known performance issues with the filters & some feasible workarounds.
Tutorial Structure:
Meet the Neural Filters: What they are and what they do
Why I use Neural Filters? How I use Neural Filters in my giffing workflow
Getting started: The giffing workflow in a nutshell and installing the Neural Filters
Applying Neural Filters onto your gif: Making use of the Neural Filters settings; with multiple examples
Testing your system: recommended if you’re using Neural Filters for the first time
Rendering performance: Common Neural Filters performance issues & workarounds
For quick reference, here are the examples that I will show in this tutorial:
Example 1: Image Enhancement | improving the image quality of gifs prepared from highly compressed video files
Example 2: Facial Enhancement | enhancing an individual's facial features
Example 3: Colour Manipulation | colourising B&W gifs for a colourful gifset
Example 4: Artistic effects | transforming landscapes & adding artistic effects onto your gifs
Example 5: Putting it all together | my usual giffing workflow using Neural Filters
What you need & need to know:
Software: Photoshop 2021 or later (recommended: 2023 or later)*
Hardware: 8GB of RAM; having a supported GPU is highly recommended*
Difficulty: Advanced (requires a lot of patience); knowledge in gifmaking and using video timeline assumed
Key concepts: Smart Layer / Smart Filters
Benchmarking your system: Neural Filters test files**
Supplementary materials: Tutorial Resources / Detailed findings on rendering gifs with Neural Filters + known issues***
*I primarily gif on an M2 Max MacBook Pro that's running Photoshop 2024, but I also have experiences gifmaking on few other Mac models from 2012 ~ 2023.
**Using Neural Filters can be resource intensive, so it’s helpful to run the test files yourself. I’ll outline some known performance issues with Neural Filters and workarounds later in the tutorial.
***This supplementary page contains additional Neural Filters benchmark tests and instructions, as well as more information on the rendering performance (for Apple Silicon-based devices) when subject to heavy Neural Filters gifmaking workflows
Tutorial under the cut. Like / Reblog this post if you find this tutorial helpful. Linking this post as an inspo link will also be greatly appreciated!
1. Meet the Neural Filters!
Neural Filters are powered by Adobe's machine learning engine known as Adobe Sensei. It is a non-destructive method to help streamline workflows that would've been difficult and/or tedious to do manually.
Here are the Neural Filters available in Photoshop 2024:
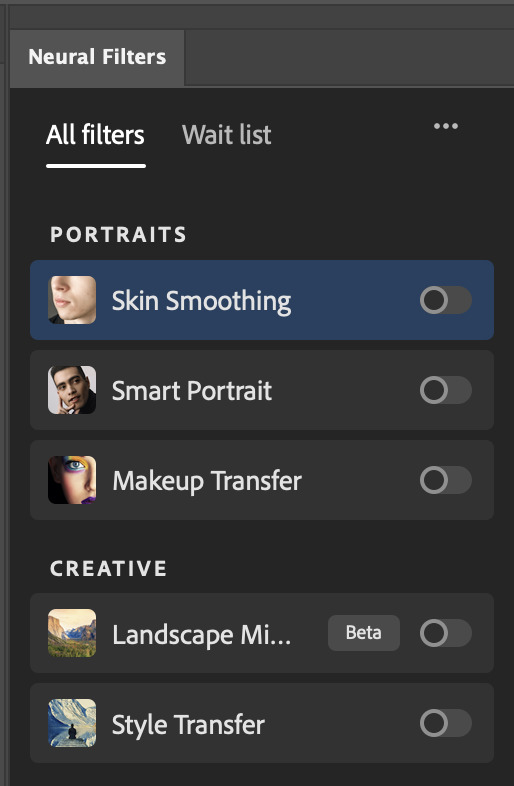

Skin Smoothing: Removes blemishes on the skin
Smart Portrait: This a cloud-based filter that allows you to change the mood, facial age, hair, etc using the sliders+
Makeup Transfer: Applies the makeup (from a reference image) to the eyes & mouth area of your image
Landscape Mixer: Transforms the landscape of your image (e.g. seasons & time of the day, etc), based on the landscape features of a reference image
Style Transfer: Applies artistic styles e.g. texturings (from a reference image) onto your image
Harmonisation: Applies the colour balance of your image based on the lighting of the background image+
Colour Transfer: Applies the colour scheme (of a reference image) onto your image
Colourise: Adds colours onto a B&W image
Super Zoom: Zoom / crop an image without losing resolution+
Depth Blur: Blurs the background of the image
JPEG Artefacts Removal: Removes artefacts caused by JPEG compression
Photo Restoration: Enhances image quality & facial details
+These three filters aren't used in my giffing workflow. The cloud-based nature of Smart Portrait leads to disjointed looking frames. For Harmonisation, applying this on a gif causes Neural Filter timeout error. Finally, Super Zoom does not currently support output as a Smart Filter
If you're running Photoshop 2021 or earlier version of Photoshop 2022, you will see a smaller selection of Neural Filters:

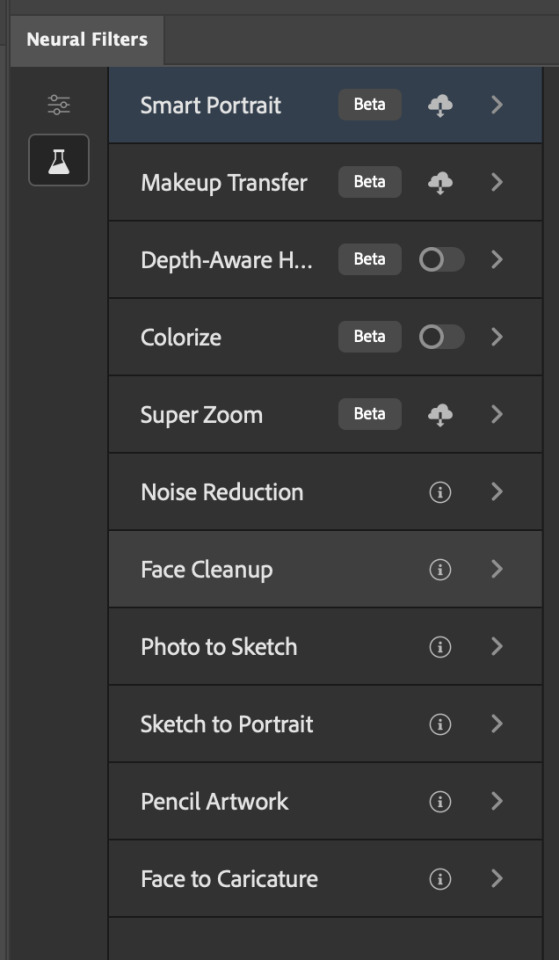
Things to be aware of:
You can apply up to six Neural Filters at the same time
Filters where you can use your own reference images: Makeup Transfer (portraits only), Landscape Mixer, Style Transfer (not available in Photoshop 2021), and Colour Transfer
Later iterations of Photoshop 2023 & newer: The first three default presets for Landscape Mixer and Colour Transfer are currently broken.
2. Why I use Neural Filters?
Here are my four main Neural Filters use cases in my gifmaking process. In each use case I'll list out the filters that I use:
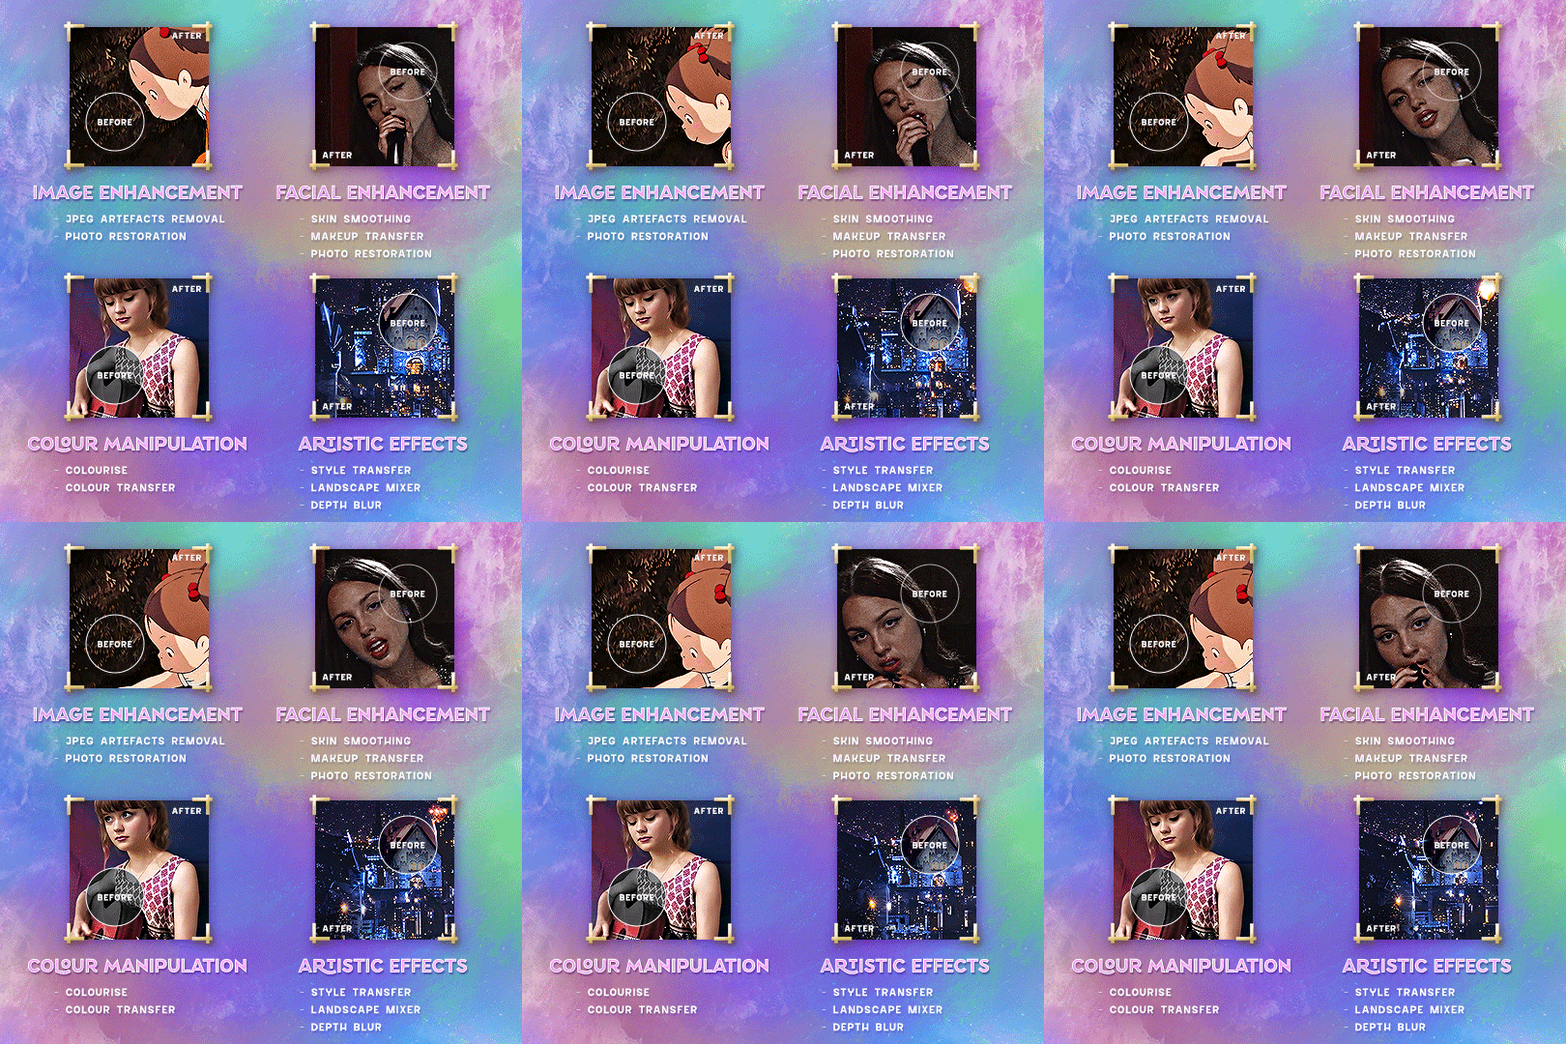
Enhancing Image Quality:
Common wisdom is to find the highest quality video to gif from for a media release & avoid YouTube whenever possible. However for smaller / niche media (e.g. new & upcoming musical artists), prepping gifs from highly compressed YouTube videos is inevitable.
So how do I get around with this? I have found Neural Filters pretty handy when it comes to both correcting issues from video compression & enhancing details in gifs prepared from these highly compressed video files.
Filters used: JPEG Artefacts Removal / Photo Restoration
Facial Enhancement:
When I prepare gifs from highly compressed videos, something I like to do is to enhance the facial features. This is again useful when I make gifsets from compressed videos & want to fill up my final panel with a close-up shot.
Filters used: Skin Smoothing / Makeup Transfer / Photo Restoration (Facial Enhancement slider)
Colour Manipulation:
Neural Filters is a powerful way to do advanced colour manipulation - whether I want to quickly transform the colour scheme of a gif or transform a B&W clip into something colourful.
Filters used: Colourise / Colour Transfer
Artistic Effects:
This is one of my favourite things to do with Neural Filters! I enjoy using the filters to create artistic effects by feeding textures that I've downloaded as reference images. I also enjoy using these filters to transform the overall the atmosphere of my composite gifs. The gifsets where I've leveraged Neural Filters for artistic effects could be found under this tag on usergif.
Filters used: Landscape Mixer / Style Transfer / Depth Blur
How I use Neural Filters over different stages of my gifmaking workflow:
I want to outline how I use different Neural Filters throughout my gifmaking process. This can be roughly divided into two stages:
Stage I: Enhancement and/or Colourising | Takes place early in my gifmaking process. I process a large amount of component gifs by applying Neural Filters for enhancement purposes and adding some base colourings.++
Stage II: Artistic Effects & more Colour Manipulation | Takes place when I'm assembling my component gifs in the big PSD / PSB composition file that will be my final gif panel.
I will walk through this in more detail later in the tutorial.
++I personally like to keep the size of the component gifs in their original resolution (a mixture of 1080p & 4K), to get best possible results from the Neural Filters and have more flexibility later on in my workflow. I resize & sharpen these gifs after they're placed into my final PSD composition files in Tumblr dimensions.
3. Getting started
The essence is to output Neural Filters as a Smart Filter on the smart object when working with the Video Timeline interface. Your workflow will contain the following steps:
Prepare your gif
In the frame animation interface, set the frame delay to 0.03s and convert your gif to the Video Timeline
In the Video Timeline interface, go to Filter > Neural Filters and output to a Smart Filter
Flatten or render your gif (either approach is fine). To flatten your gif, play the "flatten" action from the gif prep action pack. To render your gif as a .mov file, go to File > Export > Render Video & use the following settings.

Setting up:
o.) To get started, prepare your gifs the usual way - whether you screencap or clip videos. You should see your prepared gif in the frame animation interface as follows:

Note: As mentioned earlier, I keep the gifs in their original resolution right now because working with a larger dimension document allows more flexibility later on in my workflow. I have also found that I get higher quality results working with more pixels. I eventually do my final sharpening & resizing when I fit all of my component gifs to a main PSD composition file (that's of Tumblr dimension).
i.) To use Smart Filters, convert your gif to a Smart Video Layer.
As an aside, I like to work with everything in 0.03s until I finish everything (then correct the frame delay to 0.05s when I upload my panels onto Tumblr).
For convenience, I use my own action pack to first set the frame delay to 0.03s (highlighted in yellow) and then convert to timeline (highlighted in red) to access the Video Timeline interface. To play an action, press the play button highlighted in green.

Once you've converted this gif to a Smart Video Layer, you'll see the Video Timeline interface as follows:

ii.) Select your gif (now as a Smart Layer) and go to Filter > Neural Filters
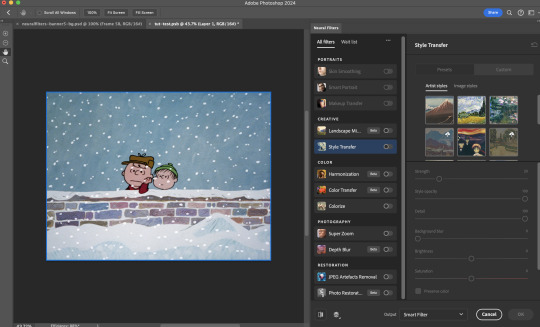
Installing Neural Filters:
Install the individual Neural Filters that you want to use. If the filter isn't installed, it will show a cloud symbol (highlighted in yellow). If the filter is already installed, it will show a toggle button (highlighted in green)
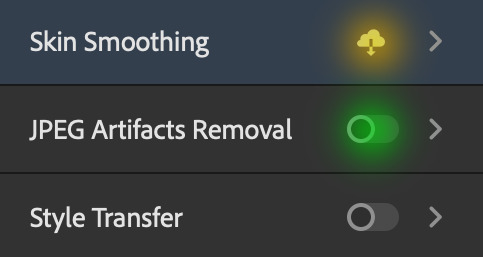
When you toggle this button, the Neural Filters preview window will look like this (where the toggle button next to the filter that you use turns blue)

4. Using Neural Filters
Once you have installed the Neural Filters that you want to use in your gif, you can toggle on a filter and play around with the sliders until you're satisfied. Here I'll walkthrough multiple concrete examples of how I use Neural Filters in my giffing process.
Example 1: Image enhancement | sample gifset
This is my typical Stage I Neural Filters gifmaking workflow. When giffing older or more niche media releases, my main concern is the video compression that leads to a lot of artefacts in the screencapped / video clipped gifs.
To fix the artefacts from compression, I go to Filter > Neural Filters, and toggle JPEG Artefacts Removal filter. Then I choose the strength of the filter (boxed in green), output this as a Smart Filter (boxed in yellow), and press OK (boxed in red).
Note: The filter has to be fully processed before you could press the OK button!
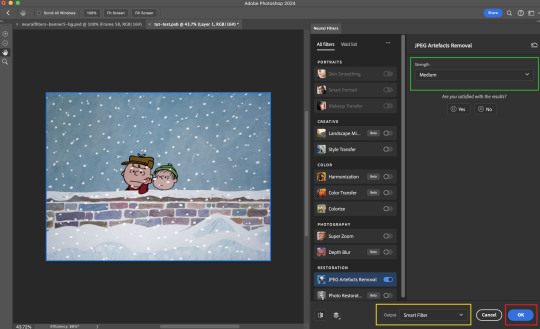
After applying the Neural Filters, you'll see "Neural Filters" under the Smart Filters property of the smart layer

Flatten / render your gif
Example 2: Facial enhancement | sample gifset
This is my routine use case during my Stage I Neural Filters gifmaking workflow. For musical artists (e.g. Maisie Peters), YouTube is often the only place where I'm able to find some videos to prepare gifs from. However even the highest resolution video available on YouTube is highly compressed.
Go to Filter > Neural Filters and toggle on Photo Restoration. If Photoshop recognises faces in the image, there will be a "Facial Enhancement" slider under the filter settings.

Play around with the Photo Enhancement & Facial Enhancement sliders. You can also expand the "Adjustment" menu make additional adjustments e.g. remove noises and reducing different types of artefacts.

Once you're happy with the results, press OK and then flatten / render your gif.
Example 3: Colour Manipulation | sample gifset
Want to make a colourful gifset but the source video is in B&W? This is where Colourise from Neural Filters comes in handy! This same colourising approach is also very helpful for colouring poor-lit scenes as detailed in this tutorial.
Here's a B&W gif that we want to colourise:

Highly recommended: add some adjustment layers onto the B&W gif to improve the contrast & depth. This will give you higher quality results when you colourise your gif.
Go to Filter > Neural Filters and toggle on Colourise.
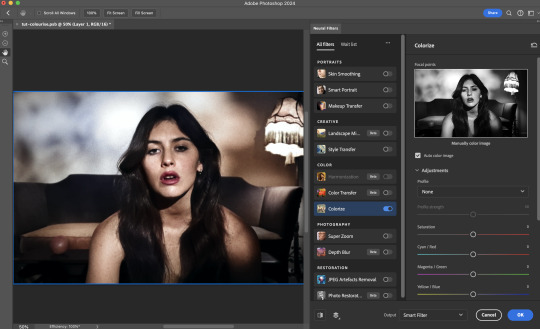
Make sure "Auto colour image" is enabled.
Play around with further adjustments e.g. colour balance, until you're satisfied then press OK.
Important: When you colourise a gif, you need to double check that the resulting skin tone is accurate to real life. I personally go to Google Images and search up photoshoots of the individual / character that I'm giffing for quick reference.
Add additional adjustment layers until you're happy with the colouring of the skin tone.
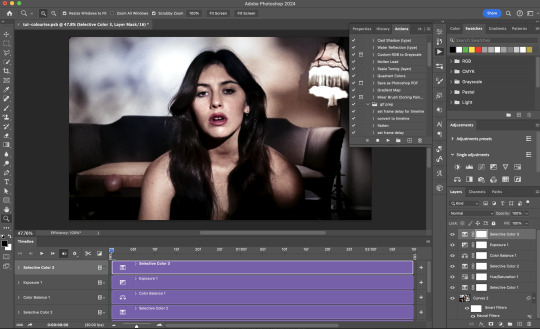
Once you're happy with the additional adjustments, flatten / render your gif. And voila!

Note: For Colour Manipulation, I use Colourise in my Stage I workflow and Colour Transfer in my Stage II workflow to do other types of colour manipulations (e.g. transforming the colour scheme of the component gifs)
Example 4: Artistic Effects | sample gifset
This is where I use Neural Filters for the bulk of my Stage II workflow: the most enjoyable stage in my editing process!
Normally I would be working with my big composition files with multiple component gifs inside it. To begin the fun, drag a component gif (in PSD file) to the main PSD composition file.
Resize this gif in the composition file until you're happy with the placement

Duplicate this gif. Sharpen the bottom layer (highlighted in yellow), and then select the top layer (highlighted in green) & go to Filter > Neural Filters

I like to use Style Transfer and Landscape Mixer to create artistic effects from Neural Filters. In this particular example, I've chosen Landscape Mixer
Select a preset or feed a custom image to the filter (here I chose a texture that I've on my computer)
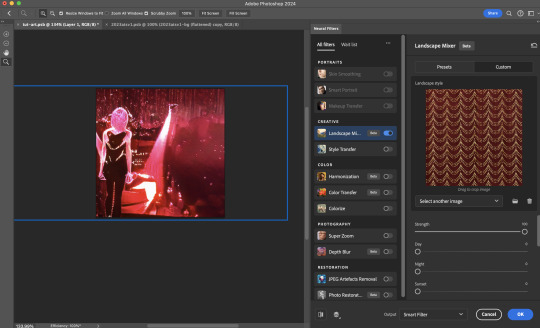
Play around with the different sliders e.g. time of the day / seasons
Important: uncheck "Harmonise Subject" & "Preserve Subject" - these two settings are known to cause performance issues when you render a multiframe smart object (e.g. for a gif)
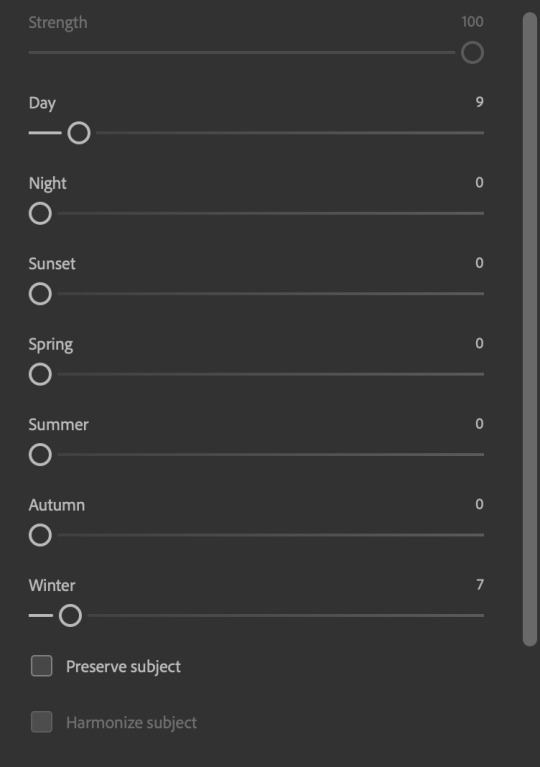
Once you're happy with the artistic effect, press OK
To ensure you preserve the actual subject you want to gif (bc Preserve Subject is unchecked), add a layer mask onto the top layer (with Neural Filters) and mask out the facial region. You might need to play around with the Layer Mask Position keyframes or Rotoscope your subject in the process.
After you're happy with the masking, flatten / render this composition file and voila!

Example 5: Putting it all together | sample gifset
Let's recap on the Neural Filters gifmaking workflow and where Stage I and Stage II fit in my gifmaking process:
i. Preparing & enhancing the component gifs
Prepare all component gifs and convert them to smart layers
Stage I: Add base colourings & apply Photo Restoration / JPEG Artefacts Removal to enhance the gif's image quality
Flatten all of these component gifs and convert them back to Smart Video Layers (this process can take a lot of time)
Some of these enhanced gifs will be Rotoscoped so this is done before adding the gifs to the big PSD composition file
ii. Setting up the big PSD composition file
Make a separate PSD composition file (Ctrl / Cmmd + N) that's of Tumblr dimension (e.g. 540px in width)
Drag all of the component gifs used into this PSD composition file
Enable Video Timeline and trim the work area
In the composition file, resize / move the component gifs until you're happy with the placement & sharpen these gifs if you haven't already done so
Duplicate the layers that you want to use Neural Filters on
iii. Working with Neural Filters in the PSD composition file
Stage II: Neural Filters to create artistic effects / more colour manipulations!
Mask the smart layers with Neural Filters to both preserve the subject and avoid colouring issues from the filters
Flatten / render the PSD composition file: the more component gifs in your composition file, the longer the exporting will take. (I prefer to render the composition file into a .mov clip to prevent overriding a file that I've spent effort putting together.)
Note: In some of my layout gifsets (where I've heavily used Neural Filters in Stage II), the rendering time for the panel took more than 20 minutes. This is one of the rare instances where I was maxing out my computer's memory.
Useful things to take note of:
Important: If you're using Neural Filters for Colour Manipulation or Artistic Effects, you need to take a lot of care ensuring that the skin tone of nonwhite characters / individuals is accurately coloured
Use the Facial Enhancement slider from Photo Restoration in moderation, if you max out the slider value you risk oversharpening your gif later on in your gifmaking workflow
You will get higher quality results from Neural Filters by working with larger image dimensions: This gives Neural Filters more pixels to work with. You also get better quality results by feeding higher resolution reference images to the Neural Filters.
Makeup Transfer is more stable when the person / character has minimal motion in your gif
You might get unexpected results from Landscape Mixer if you feed a reference image that don't feature a distinctive landscape. This is not always a bad thing: for instance, I have used this texture as a reference image for Landscape Mixer, to create the shimmery effects as seen in this gifset
5. Testing your system
If this is the first time you're applying Neural Filters directly onto a gif, it will be helpful to test out your system yourself. This will help:
Gauge the expected rendering time that you'll need to wait for your gif to export, given specific Neural Filters that you've used
Identify potential performance issues when you render the gif: this is important and will determine whether you will need to fully playback your gif before flattening / rendering the file.
Understand how your system's resources are being utilised: Inputs from Windows PC users & Mac users alike are welcome!
About the Neural Filters test files:
Contains six distinct files, each using different Neural Filters
Two sizes of test files: one copy in full HD (1080p) and another copy downsized to 540px
One folder containing the flattened / rendered test files
How to use the Neural Filters test files:
What you need:
Photoshop 2022 or newer (recommended: 2023 or later)
Install the following Neural Filters: Landscape Mixer / Style Transfer / Colour Transfer / Colourise / Photo Restoration / Depth Blur
Recommended for some Apple Silicon-based MacBook Pro models: Enable High Power Mode
How to use the test files:
For optimal performance, close all background apps
Open a test file
Flatten the test file into frames (load this action pack & play the “flatten” action)
Take note of the time it takes until you’re directed to the frame animation interface
Compare the rendered frames to the expected results in this folder: check that all of the frames look the same. If they don't, you will need to fully playback the test file in full before flattening the file.†
Re-run the test file without the Neural Filters and take note of how long it takes before you're directed to the frame animation interface
Recommended: Take note of how your system is utilised during the rendering process (more info here for MacOS users)
†This is a performance issue known as flickering that I will discuss in the next section. If you come across this, you'll have to playback a gif where you've used Neural Filters (on the video timeline) in full, prior to flattening / rendering it.
Factors that could affect the rendering performance / time (more info):
The number of frames, dimension, and colour bit depth of your gif
If you use Neural Filters with facial recognition features, the rendering time will be affected by the number of characters / individuals in your gif
Most resource intensive filters (powered by largest machine learning models): Landscape Mixer / Photo Restoration (with Facial Enhancement) / and JPEG Artefacts Removal
Least resource intensive filters (smallest machine learning models): Colour Transfer / Colourise
The number of Neural Filters that you apply at once / The number of component gifs with Neural Filters in your PSD file
Your system: system memory, the GPU, and the architecture of the system's CPU+++
+++ Rendering a gif with Neural Filters demands a lot of system memory & GPU horsepower. Rendering will be faster & more reliable on newer computers, as these systems have CPU & GPU with more modern instruction sets that are geared towards machine learning-based tasks.
Additionally, the unified memory architecture of Apple Silicon M-series chips are found to be quite efficient at processing Neural Filters.
6. Performance issues & workarounds
Common Performance issues:
I will discuss several common issues related to rendering or exporting a multi-frame smart object (e.g. your composite gif) that uses Neural Filters below. This is commonly caused by insufficient system memory and/or the GPU.
Flickering frames: in the flattened / rendered file, Neural Filters aren't applied to some of the frames+-+
Scrambled frames: the frames in the flattened / rendered file isn't in order
Neural Filters exceeded the timeout limit error: this is normally a software related issue
Long export / rendering time: long rendering time is expected in heavy workflows
Laggy Photoshop / system interface: having to wait quite a long time to preview the next frame on the timeline
Issues with Landscape Mixer: Using the filter gives ill-defined defined results (Common in older systems)--
Workarounds:
Workarounds that could reduce unreliable rendering performance & long rendering time:
Close other apps running in the background
Work with smaller colour bit depth (i.e. 8-bit rather than 16-bit)
Downsize your gif before converting to the video timeline-+-
Try to keep the number of frames as low as possible
Avoid stacking multiple Neural Filters at once. Try applying & rendering the filters that you want one by one
Specific workarounds for specific issues:
How to resolve flickering frames: If you come across flickering, you will need to playback your gif on the video timeline in full to find the frames where the filter isn't applied. You will need to select all of the frames to allow Photoshop to reprocess these, before you render your gif.+-+
What to do if you come across Neural Filters timeout error? This is caused by several incompatible Neural Filters e.g. Harmonisation (both the filter itself and as a setting in Landscape Mixer), Scratch Reduction in Photo Restoration, and trying to stack multiple Neural Filters with facial recognition features.
If the timeout error is caused by stacking multiple filters, a feasible workaround is to apply the Neural Filters that you want to use one by one over multiple rendering sessions, rather all of them in one go.
+-+This is a very common issue for Apple Silicon-based Macs. Flickering happens when a gif with Neural Filters is rendered without being previously played back in the timeline.
This issue is likely related to the memory bandwidth & the GPU cores of the chips, because not all Apple Silicon-based Macs exhibit this behaviour (i.e. devices equipped with Max / Ultra M-series chips are mostly unaffected).
-- As mentioned in the supplementary page, Landscape Mixer requires a lot of GPU horsepower to be fully rendered. For older systems (pre-2017 builds), there are no workarounds other than to avoid using this filter.
-+- For smaller dimensions, the size of the machine learning models powering the filters play an outsized role in the rendering time (i.e. marginal reduction in rendering time when downsizing 1080p file to Tumblr dimensions). If you use filters powered by larger models e.g. Landscape Mixer and Photo Restoration, you will need to be very patient when exporting your gif.
7. More useful resources on using Neural Filters
Creating animations with Neural Filters effects | Max Novak
Using Neural Filters to colour correct by @edteachs
I hope this is helpful! If you have any questions or need any help related to the tutorial, feel free to send me an ask 💖
#photoshop tutorial#gif tutorial#dearindies#usernik#useryoshi#usershreyu#userisaiah#userroza#userrobin#userraffa#usercats#userriel#useralien#userjoeys#usertj#alielook#swearphil#*#my resources#my tutorials
456 notes
·
View notes
Text
S/O to a few of my favorite TS3CC Creators
I know this community is small, and therefore doesn't get as much love and attention as it deserves, but know that it is alive and well, much like my love for it, and it's many thanks to these ppl for keeping it fresh and fun even today.
@simtanico literally what would my sims be without you and your amazing sliders, slider fixes, and conversions.
@rollo-rolls you always work so hard to keep our sims looking stylish, I know a lotta people in this community appreciate you as much as I do!
@johziii you put so much love into your CC as you do your sims, homes and gameplay, you're truly the whole package!
@sim-songs an absolute legend for helping revive the Maxis Match ts3 community!
@nectar-cellar an absolute legend, period.
@imamiii idk how you do it, but you make this game look how it probably would had it been released today. Whether it's your gameplay posts, or your CC, I know when I see your post on my dash, I'm bound to be blown away.
@sourlemonsimblr still can't tell whether we're playing the same game, bc everything you post looks like The Sims 10, but I am so glad you're willing to share your CC with us, so maybe one day we will be playing the same game, lol.
@pleaseputnamehere just thought I'd let you know that I kiss your nosemasks goodnight as I tuck them into bed.
@xiasimla an amazing talented and devoted creator all around, every download post is a WIN.
@martassimsbook you keep my love for ts3's buy/build mode alive!
@billsims-cc ty for never giving up on us. 😭😭😭
@bioniczombie for sharing your amazing conversions, and helping run one of my favorite ts3cc finds blogs!
@satellite-sims although you aren't too active right now, I miss you, and I love your conversions sm. The extra work you put into making them the absolute best quality, just like all your posts is so loved and appreciated.
@simbouquet your mods and fixes are such a MUST, you always know exactly what this game needs, and execute it like a pro.
@phoebejaysims another amazing modder keeping this game truly interesting, ty so much for your dedication.
@criisolatex you're like some ethereal being sent to Earth on a mission to make ts3 the best it can be, and you're kind enough to share it with us.
@nemiga-sims-archive you pop out every once and a while like an all year round Santa giving us presents to throw into our games. TY!
@olomaya you work so hard to expand and improve and also make the gameplay in ts3 a lot more interesting.
@twinsimming you know you carry ts3 simblr, right? 💕
@thesweetsimmer111 besides being just the most talented animator I've ever seen in any modding community, your dedication to the youngest and ignored age groups is most admirable, ty.
@flotheory yet another talented and devoted modder giving ts3 the love and attention it deserves. I just know the devs would be so proud.
@greenplumbboblover you've always got something big up your sleeve, your ambition knows no bounds, and the ts3 community is so lucky to have you.
I'm likely forgetting some folks, so I'll probably add some more when I remember, and ty again everyone on this list for working so hard to keep this game alive, and fun, and freeeeeee!
450 notes
·
View notes
Note
So heroforge.com has released a beta version of their face sliders and....
I made Buttons. You're welcome. https://www.heroforge.com/load_config%3D42105427/
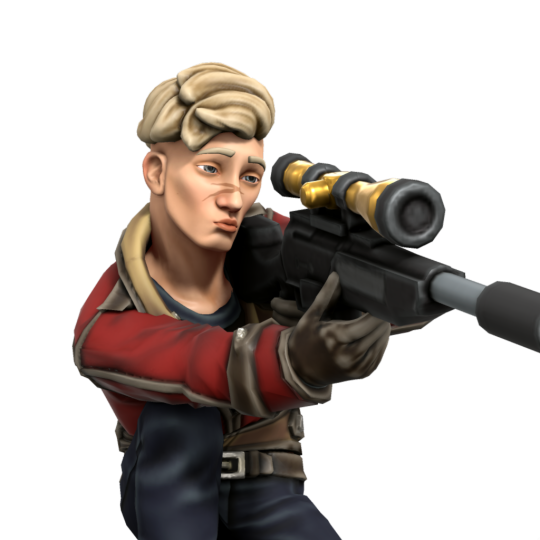
I can't look at it in detail because it needs a Pro account but the hair is giving...
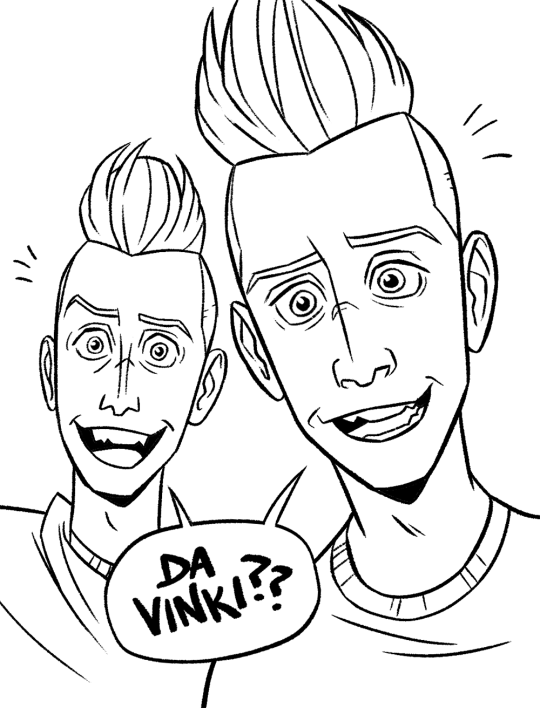
#which is funny because the Voros twins are also of Hungarian descent lol#Heroforge#lookalike#Buttons#Voros Twins#The Voros Twins#netsimmer
975 notes
·
View notes