#so for that you get this frame I colored out of the gifset
Photo
Sam Wilson (Captain America) in Avengers: Quantum Encounter
#mcuedit#mcu#sam wilson#justsamwilson#captain america#my graphics#I'm experimenting with coloring coz damn this source vid has too much blue in it lmao#so for that you get this frame I colored out of the gifset#i love playing with colors though but definitely is a different approach to the way i color gifs but anyhow
72 notes
·
View notes
Note
dec it is important to me that you know i'm finishing up my fourth black sails rewatch now and every time i watch this damn show i flip my lid at the appearance of someone wearing green. because of you.
this is me thanking you, to be clear.
I’M SO GLAD!!!!!!!!!!
In retrospect, I feel like my Black Sails clothing color analysis was extremely unhinged, but that doesn’t mean I was WRONG.
Green is truly just SUCH a color in Black Sails. A surefire sign that something is Wrong, though what that thing is may not be immediately obvious. It is a warning of bad things to come (Miranda in her green dress being the most on-the-nose example, but there are many, many others). An ill omen.
… in other words, it’s a LOT of fun!!!!!
#when Madi gets her final green shirt 😭😭😭😭😭#RIGHT AFTER ELEANOR’S GREEN DRESS OF DEATH#like. Nooooooooooooooo :((((((((((((#terrible#(i love it)#gotta find that green outfit gifset i made again#every SINGLE frame of it was colored by hand - it was insane to make#and it came out REALLY good i’m so proud of it!!#but ANYWAYS - so glad you’re having fun!#(as much fun as it’s possible to have at the END of a black sails rewatch 😭😭)#feel free to share any other Thoughts you’re having - if you want!!
13 notes
·
View notes
Text

Someone asked me how I created the fade transition in this gifset which I’ll try to explain in the most comprehensive way that I can. If you've never done something like this before, I suggest reading through the full tutorial before attempting it so you know what you'll need to plan for.
To follow, you should have:
basic knowledge of how to make gifs in photoshop
some familiarity with the concept of how keyframes work
patience
Difficulty level: Moderate/advanced
Prep + overview
First and foremost, make the two gifs you'll be using. Both will need to have about the same amount of frames.
For ref the gif in my example is 540x540.
I recommend around 60-70 frames max total for a big gif, which can be pushing it if both are in color, then I would aim for 50-60. My gif has a total of 74 frames which I finessed using lossy and this will be explained in Part 4.
⚠️ IMPORTANT: when overlaying two or more gifs and when using key frames, you MUST set your frame delay to 0.03 fps for each gif, which can be changed to 0.05 fps or anything else that you want after converting the combined canvas back into frames. But both gifs have to be set to 0.03 before you convert them to timeline to avoid duplicated frames that don't match up, resulting in an unpleasantly choppy finish.
Part 1: Getting Started
Drag one of your gifs onto the other so they're both on the same canvas.
The gif that your canvas is fading FROM (Gif 1) should be on top of the gif it is fading INTO (Gif 2).

And here's a visual of the order in which your layers should appear by the end of this tutorial, so you know what you're working toward achieving:

Part 2: Creating the grid
Go to: View > Guides > New guide layout
I chose 5 columns and 5 rows to get the result of 25 squares.

The more rows and columns you choose, the more work you'll have to do, and the faster your squares will have to fade out so keep that in mind. I wouldn't recommend any more than 25 squares for this type of transition.

To save time, duplicate the line you've created 3 more times, or as many times as needed (key shortcut: CMD +J) and move each one to align with the guides both horizontally and vertically. You won't need to recreate the lines on the edges of the canvas, only the ones that will show.
After you complete this step, you will no longer need the guides so you can go back in and clear them.

Follow the same duplicating process for the squares with the rectangle tool using the lines you've created.
Align the squares inside the grid lines. The squares should not overlap the lines but fit precisely inside them.
This might take a few tries for each because although to the eye, the squares look all exactly the same size, you'll notice that if you try to use the same duplicated square for every single one without alterations, many of them will be a few pixels off and you'll have to transform the paths to fit.
To do this go to edit > transform path and hold down the command key with the control key as you move one edge to fill the space.
Once you're done, put all the squares in their separate group, which needs to be sandwiched between Gif 1 and Gif 2.

Right click Gif 1 and choose "create clipping mask" from the drop down to mask it to the squares group. This step is super important.
After this point, I also took the opacity of the line groups down to about 40% so the lines wouldn't be so bold. Doing this revealed some squares that needed fixing so even if you aren't going dim the lines, I recommend clicking off the visibility of the lines for a moment to make sure everything is covered properly.

Part 3A: Prep For Key framing
I wanted my squares to fade out in a random-like fashion and if you want the same effect, you will have to decide which squares you want to fade out first, or reversely, which parts of Gif 2 you want to be revealed first.
In order to see what's going on underneath, I made Gif 1 invisible and turned down the opacity of the squares group.

If you want text underneath to be revealed when the squares fade away, I would add that now, and place the text group above Gif 2, but under the squares group.

Make a mental note that where your text is placed and the order in which it will be revealed is also something you will have to plan for.
With the move tool, click on the first square you want to fade out. Every time you click on a square, it will reveal itself in your layers.
I chose A3 to be the first square to fade and I'm gonna move this one to the very top of all the other square layers.
So if I click on D2 next, that layer would need to be moved under the A3 layer and so on. You'll go back and forth between doing this and adding key frames to each one. As you go along, it's crucial that you put them in order from top to bottom and highly suggested that you rename the layers (numerically for example) which will make it easier to see where you've left off as your dragging the layers into place.

Part 3B: Adding the Keyframes
This is where we enter the gates of hell things become tedious.
Open up the squares group in the timeline panel so you can see all the clips.
Here is my example of the general pattern that's followed and its corresponding layers of what you want to achieve when you're finished:

So let’s try it!
Expand the control time magnification all the way to the right so you can see every frame per second.

As shown in Part 3A, select your first chosen square.
Where you place the time-indicator on the panel will indicate the placement of the keyframe. Click on the clock next to opacity to place your first keyframe.

Move the time-indicator over 3 frames and place the next key frame.

Things to consider before moving forward:
Where you place your very first keyframe will be detrimental. If you're using a lot of squares like I did, you may have to start the transition sooner than preferred.
If you're doing 25 squares, the key frames will have to be more condensed which means more overlapping because more frames are required to finish the transition, verses if you're only using a 9-squared grid. See Part 4 for more detailed examples of this.
The opacity will remain at 100% for every initial key frame, and the second one will be at 0%.

Instead of creating two keyframes like this and changing the opacities for every single clip, you can copy the keyframes and paste them onto the other clips by click-dragging your mouse over both of them and they'll both turn yellow. Then right click one of the keyframes and hit copy.
Now drop down to your next clip, move your time-indicator if necessary to the spot where the first keyframe will start and click the clock to create one. Then right click it and hit "paste".


Tip: When you have both keyframes selected, you can also move them side to side by click-dragging one of them while both are highlighted.
Your full repetitive process in steps will go as follows:
click on square of choice on the canvas
drag that square layer to the top under the last renamed
in timeline panel: drop down to next clip, move time-indicator tick to your chosen spot for the next keyframe
create new keyframe
right click new keyframe & paste copied keyframes
repeat until you've done this with every square in the group
Now you can change the opacity of your squares layer group back to 100% and turn on the visibility of Gif 1. Then hit play to see the magic happen.
PART 4: Finished examples
Example 1

the transition starts too soon
Cause: initial keyframe was placed at frame 0
the squares fade away too quickly
Cause: overlapping keyframes, seen below.
(this may be the ideal way to go with more squares, but for only 9, it's too fast)

Example 2

more frame time for first gif
transition wraps up at a good point
Cause: in this instance, the first keyframe was placed 9 frames in, and the keyframes are not overlapping. The sequential pair starts where the last pair ended, creating a slower fade of each square.


Part 5: Final Tips and Saving
You can dl my save action here which will convert everything back into frames, change the frame rate to 0.05 and open the export window so you can see the size of the gif immediately.
If it's over 10gb, one way to finesse this is by use of lossy. By definition, lossy “compresses by removing background data” and therefore quality can be lost when pushed too far. But for most gifs, I have not noticed a deterioration in quality at all when saving with lossy until you start getting into 15-20 or higher, then it will start eating away at your gif so keep it minimal.

If you've done this and your gif is losing a noticeable amount of quality and you still haven’t gotten it below 10gb, you will have no choice but to start deleting frames.
When it comes to transitions like this one, sometimes you can't spare a single frame and if this is the case, you will have to return to the timeline state in your history and condense the key frames to fade out quicker so you can shorten the gif. You should always save a history point before converting so you have a bookmark to go back to in case this happens.
That's pretty much it, free to shoot me an ask on here or on @jugheadjones with any questions.
#gif tutorial#photoshop tutorial#transition tutorial#grid tutorial#usergif#ps help#tutorials#tutorials*#requested
261 notes
·
View notes
Note
I want to hear your thoughts on fandom and the recent influx of the term content creation!
Well, anon, you are in luck! (Or not, depending on your definition of luck. 😉) I just so happen to have many Thoughts & Opinions™ about this. I will get wordy, this will get lengthy, and I will be social and put most of my thoughts under a readmore cut.
I personally try to avoid the terms ‘content’ and ‘content creation’ when talking about fandom works and a fandom’s creative pursuits nowadays. Occasionally, sure, it happens that it slips out anyway – it’s a term we’re all really used to using! – but I want to be as mindful about its use as possible. This is a personal decision on my account and I won’t get uppity about other people’s use of these terms, though.
But, Killy, you might say... why would you avoid using these terms? For me, here’s why:
Content is not synonymous with art;
Content creation indicates something different than art creation;
Fandom should not be subject to consumerism;
Fandom is about connection.
If all a fandom puts out is classified as content, that fandom is going to die.
Yeah. I know. Melodramatic much? I’m on my fainting couch here, folks. 😂 But let’s dig in, shall we?
You know, maybe it’s just the archivist in me that balks at the term ‘content’. Content is a data entry field in the archival system we use at my real-life job: literally speaking, this data entry field is where we put a brief summary of the document attached to that specific archival file. It contains information that tells you the key takeaways of what the document is about, but it will not contain the full text of the document itself. Content is one of the points of access for our archival search: I know what I’m looking for, so I put a few keywords into our search and it pulls up the relevant file. But what do I need, really need, in my line of work? It’s the document itself, not the data entry field. The document tells me the whole story that I need to be able to truly do my job well. The content-field is a cliffnotes edition of that story.
It’s the same way with the art we create in fandom. I’m gonna take myself as an example here, because I create a fair bit! (Shocking, I know. Local Tumblr cryptid sighting, more at 11. 😎) I spend hours writing fic. I spend hours sorting through screencaps before screeching at Photoshop for a lengthy amount of time. I spend days pouring over quotes, books, documents, photographs, tutorials, and other things that will help me create something cool. I apply color theory, art framing/perspective, narrative focus, and many other theories and techniques to my writing and my giffing. If I were to put my finished work or any of my WIPs in that same archive system, it would be the document within the archival file. The tags I use on my posts? Those are markers similar to the content-field. They tell you who my gifset depicts and from which show it is. They tell you which OC of mine my fic is about. My work contains these things I tagged.
But my creative work is not content itself.
Content is marketable, easy access, blurb-y stuff. Content is something you absorb within one minute flat. Content is the highlight reel. It’s what fills a page, something you’ll scroll past in a heartbeat, something that barely stands out in a long long long list of stuff. Content is what you consume on a lazy Sunday afternoon without ever being forced to read lengthy pieces, take in the details of what you see, pause mid-scroll to ponder the meaning of life, whatever else have you. Create content and you create a flash in the pan, a quick laugh maybe, before it fizzles back out again. Create content and it’s here today and gone tomorrow without anyone mourning its absence for too long.
Art should last longer than that, don’t you think? 😉
So when I see people put a fic request in an askbox and it’s phrased like “Speirs x spy!reader fluff” and that very same request makes its way into about ten more askboxes before the fandom starts comparing asks? I might be inclined to classify us all as slot machines. Put an ask in and out rolls a fic. Who cares which slot machine it came from? As long as you’ve got your painstakingly crafted fics that you consume the same way you do actual content, right? We, its writers, are just lucky if we get a pat of acknowledgement on our little slot machine head for our troubles, aren’t we?
When I see an overly detailed summary of what sounds like a full-fledged fic in an askbox and the demand is “write this for me”, I recoil from the screen and go “child, who the hell birthed you, were you raised in a barn?” out loud. If you can tell a story in the space of an askbox, consider asking for help to let that story – a story you own, a story that is more yours that it could ever be mine – grow into what it has the potential to be.
When I see fics and gifsets and other creations get likes but not reblogs, I mutter something about the state of fandom economy these days. We exist in a little fandom bubble. Our bubble can’t expand or blow from place to place without a little help from our friends. And you’re my friends, right? I know the follow-button says follow, guys, believe me, I’m not that far gone, but for me ‘follow’ means ‘friend’. 💚 You’re my buddy now. Suck it up. We’ll share a can of peaches. 🍑
When I see fics and other creations get reblogged without tags or comments attached, I die a little on the inside. I feel like a little Victorian orphan child going “please, reblogger, a little penny of thought for its creator, if it pleases?”. I feel like commentless and/or tagless reblogging is giving me nothing, nothing at all, about who you are.
And I want to get to know you! I want to know who’s in my notes. I want to know who’s scrambling through my MotA gifsets like a fat little raccoon inhaling its third helping of a box of jelly-filled donuts. I want to know who is adopting which character and why. I want to know that it’s your birthday, or that you had a bad day and needed a pick-me-up, or that you are locked in an Ikea at three in the morning reading my blog by the bright lights of countless Solhetta bulbs. I want to know that you love my OC Darlene but that you ain’t sure what the hell my OC Lottie’s got to do with anything. I want to know what tickles you – a turn of phrase I used, a color in a gifset, a little detail I captured that made me go !!!!!! on the inside while I was creating too – and I want to know what moves you.
What reaches into the soil of your being and nourishes you enough to blossom into whichever lovely self you can grow to be? What is precious to you? What comforts you in the dark nights of your soul, when all light feels like it’s faded out? What do you love, truly love? What feeling and thought and idea and love love LOVE do you consume – truly consume, head to tail, no takebacks – and what are you consumed by in turn?
Let me connect with you. Let me know the little internet scraps of you that tell me you’re a DeMarco girlie, or that you’re here for Hoosier only, or that you’re as feral and batty about Speirs as I am, or that you actually really can’t stand the one dude everyone else raves about. Let me know that you like angsty quotes on gifsets – feel free to yell at me for making you schedule an impromptu therapy session – or let me know you saw what I did in my fic there and you’ll be demanding compensation from me while you lie down and wail about it. Let me know you’re very into those lovely blues on a gifset (I know, SO good, right??) or that you are side-eyeing me because that close-up of your fave turned you into a little puddle.
Let me know what moves you, because I created these things with love. I created them because they moved me, too. I created them because I have a story to tell, somehow. I created them because the whole world is a string of stories and I want to pass the heart of them on to you. I created them not because I want to jump on a hypetrain that races past all the episodes and all the alternate universes and all the stories without stopping, but because I want to soak up the sun and point at something and tell you “look, isn’t this beautiful?”. I created them not because I am looking for a quick fix or a distraction or an escape, but because I want to give you something that nourishes you as it has nourished me.
That’s so much more than that quick flash in the pan, yeah? That’s so much more than what content could ever hope to be. That’s something that lasts beyond the clicks and gives you an ever-expanding horizon that leaves you wondering just what in the world is next.
Let me repeat point five: if all a fandom puts out is classified as content, that fandom is going to die. Because content doesn’t sustain you. Connection does. And connection? That happens with meaningful interaction. That happens when you stop getting followers and start getting friends. That happens when you treat all forms of art as something unique that can be precious to someone, rather than something to like today and forget about tomorrow.
Can I do a lil mic drop? Yeah. I think I’m gonna. Just this once. 🎤
#fandom things#yeah so this got long but in my defense I have never pontificated about this in public much before#sometimes I reveal myself as the crochety little fandom old I am#creative asks
61 notes
·
View notes
Note
Hi! Do you mind sharing your coloring tutorial or tips? especially for the animation ones, they're so good! your gifs are crisp and HD
hi, anon. tysm! 🫶 i don't mind at all since i’ve gotten more than a few requests from before, ig it's time to give it a go. (more) details are under the cut. 😁

before we start, i want you to take note of the following things that will be helpful in the process of making/coloring gifs.
if you want to get the know-how on making gifs, @redbelles did us a solid and gave us this comprehensive guide that will save me the time for explaining lmao. 😅✌️
make gifsets without skipping frames. keep frame delay 0.05 and 0.06 for less than 25 frames. anything more or less is too fast or too slow. additionally, it's also important to note that if you're dealing w videos that are faster than 30fps you change the frame delay to 0.04.
gif using the the new dimensions (in this tutorial i used the dimensions of 540px x 510px since it's all about big gifs now 🙄).
use the standard sharpening settings (smart sharpen, amount 500%, radius 0.3px, remove gaussian blur and tick more accurate) also note the sharpening settings for 2d as you've specifically requested.
you can use action that will convert your gif back to frames and set your timing to 0.05 with a single click. basically photoshop will follow out all of these time-consuming steps for you! just download the action and double click it. it should now be added to your list of actions. to see your actions, go to window > actions. find the folder that says "GIF ACTION" and select the lines that says "CLICK HERE" and voila! ps will do all the hard work for you.
the coloring on your gifs will look good if you have a good base so try not to skip on video qualities. use high quality copies like 1080p or 2160p (4k ones are good) the higher the gb the better. it makes coloring so much easier and reduces grains.
*cracks knuckles* let's start!
for 2d animation's sharpening settings, it usually varies so i just move the amount around and see what looks or works better for a specific gif. i used amount: 189 and radius: 0.2 for this ponyo gif. anything can work between 189 to 350 for me but i maintain the radius at 0.2. again, you can just play the amount around until you find the one that looks good for your gif.

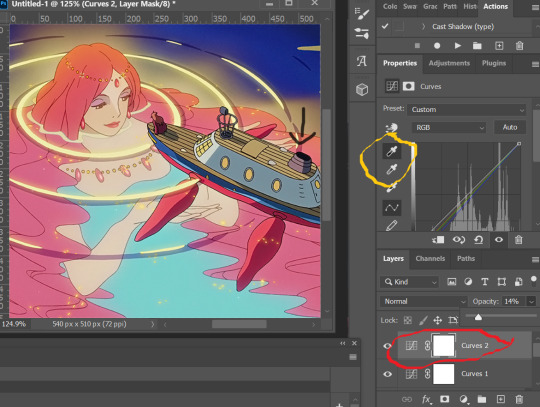
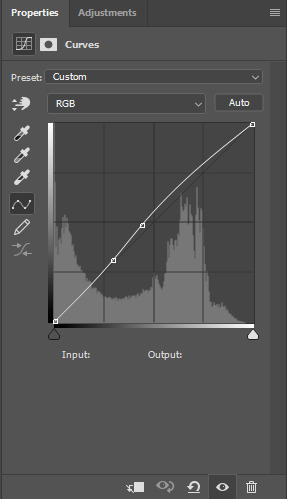
when i’m making gifs. i look for that notorious contrast between the light and dark parts. i think it gives life to the gif- so exposure, levels and curves are best to achieve that. for curves, just go to layer > new adjustment layer > curves. this layer is going to help brighten up the gif in certain areas, and darken others. select the white eyedropper. click the lighter part of the gif like the white/light part of the ship.
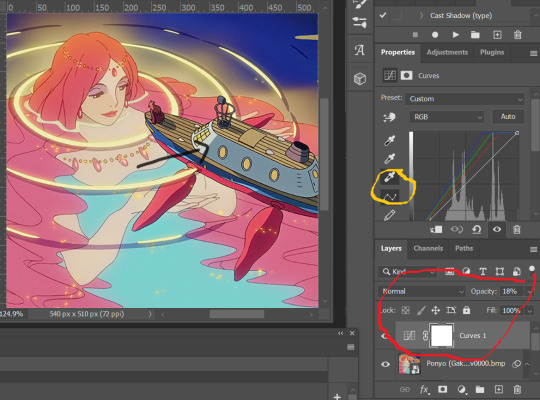
next, select the black eyedropper and click on a black/dark area of the gif (refer to the arrow bc i don't know which part of the ship is that called lmao).
you can skip the black eyedropper if you're already satisfied w the result of the white one.
color balance and selective color are your two best buddies. they’re great when you’re trying to change some tones or specific colors of the gif, like the skin tone which is very tricky.
using selective color is pretty simple, here’s a really useful guide:
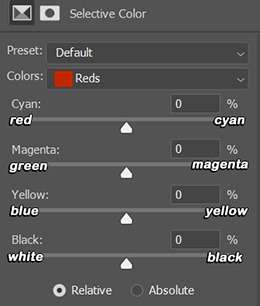
if you pull any of the tabs to the right, it increases the amount of color (cyan, magenta, yellow and black), and reduces the amount of opposite color (red, green, blue and white).


i also use the blacks and whites in selective color especially if the gif is saturated w colors to tone down some parts and make shadows more visible (idk if this is still making sense 😅).

in working with color balance, i use midtones and highlights sparingly. it's really helpful in removing or balancing out a certain tone.

here's my save setting ⬆️
idk why but ps puts the default frame delay to 0.07/0.03 so open your gif in ps again and don't forget to change the delay to 0.05.

and we're done!

i sometimes go back and forth and do some tweaking until i’m satisfied with the result. this is how i color and i know it’s not perfect but i learn by constant practice. there’s really no standard in coloring so you can make yours the way you like it. just enjoy- until you get the hang of it and it becomes less daunting (or something like that). i hope this helps. if you have more questions, my askbox is always open 😊.
#completeresources#usergif#userpayton#usersugar#rresources#yeahps#itsphotoshop#userbells#dailyanimatedgifs#usercharl#usersavana#Chaoticresources#hisources#ps help#tutorials#ask replies#anon
177 notes
·
View notes
Note
Hi!
I was just wondering if you have a tutorial on how you created this effect in your gifset, it's something I'd like to try but have no idea where to start. Your set is so pretty! Any helps appreciated x
https://www.tumblr.com/tawaifeddiediaz/712911415428743168/ill-take-you-with-me-then-well-both-die-you?source=share
Hey Nonnie, thank you! This is super late, but I don't actually have the psd for this set anymore (I delete them as soon as I post them), so we're just gonna wing it with a gif I made the other day. I think this ask is about the text, but if it's anything else, just drop me another line and I'll get to it when I can!
I'm pretty sure I got this tutorial from the wonderful @eddiediaaz but I then turned it into Lazy Girl Hours :)) anywho, here we go!
We’ll be making this gif:

This tutorial assumes basic knowledge of gif-making, Photoshop, and coloring. I’ve only described the typography tutorial in this, but you can reach out if you have any questions.
Tutorial under the cut:
Couple things to note beforehand:
There is a lot of trial and error involved when doing any sort of effect, and this is no exception! You might have to play around with the colors and the settings before you find something that looks good and readable and that fits your set!
This text effect works better on big gifs (540px width).
For this, I find that a simple font works better than a fully-cursive one, but play around with what you like. The boxes may need some adjusting if you use a font with too many tall or tail letters (i.e. text where all the letters aren't on one uniform line - that's why capital letters work so well.)
Movement works really well with effects like these, but again, it depends on your gif + readability. If you have a blended gif, it may take a little more trial and error.
I work in frame animation for all my text effects, but this works just as well in timeline as well.
We’re going to start with this gif:
First, I like to put my text on the gif. You can obviously move this around later so don't worry too much about how it looks right now.
The dialogue is "Just don't feel it." "Feel" is one of those Big Words for this quote, so I'm going to emphasize it with cursive text.
I am using Moon for the sans serif text, and Santa Fe Spring for the cursive text. Keep both of these in white for now:
Next, we're going to use the rectangular marquee tool to draw our rectangles around the capital letters (we're not touching the cursive text right now). I just eyeball this, and then try to center it as much as possible.
(The rectangular marquee tool has a keyboard shortcut of M, and it's the second tool in that little toolbar on the left of most people's Photoshop.)
This is what that'll look like:

Next, we're going to go down to the icons at the bottom right of the layers panel and select the half-black half-white circle > Color Fill.... You should get a color dialogue box. Choose your color - I'm using #8d0000. Then, we're going to move that layer below the corresponding text layer, and set its blending mode to Difference. This is what that looks like (click the image for better quality):
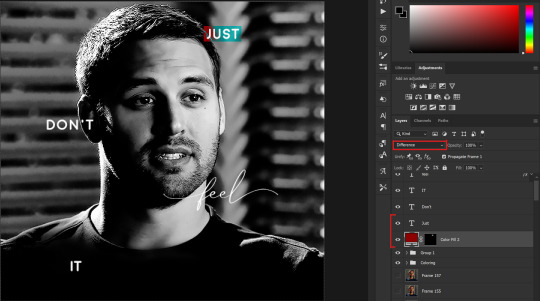
I'm going to repeat that with the other two boxes as well, using the same color. The boxes will look different with the Difference blending mode because of the shadows underneath.
For example, the box with "it" looks like a solid red square because it's against a completely black background, while the other two have some blue shading to them since there are some highlights behind them.
This is what my gif looks like now:
Next, I like to go The Lazy Girl™ route and put all three color-fill layers into one group underneath all the text layers. This just lets me edit the drop shadow of all three of them at the same time.
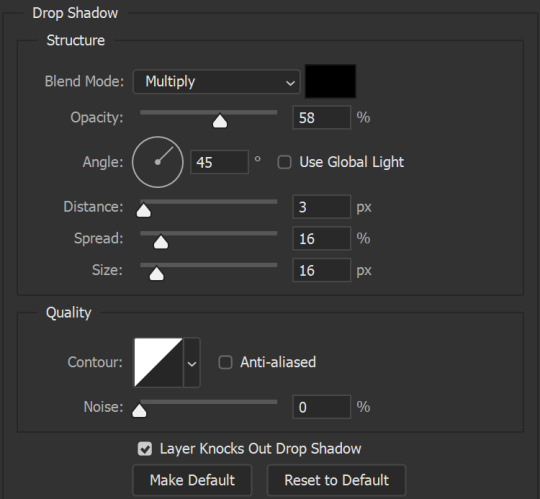
Right-click the group and open up the Blending Options. In Drop Shadow, these are the settings I'm using. The drop shadow color is #0c6477:

(Note: uncheck "Use Global Light" especially if you're working in frame animation to make sure all the drop shadow has the same angle on all frames.)
This is what my gif looks like now:
Now that we've finished that, time to move on to the cursive text.
I usually match the cursive text to the palette of the rest of the text, and since the drop shadow is our "accent" color, so to speak, I'm going to use a lighter version of that color. I am also going to add a drop shadow for readability.
The color I used for the text is #acfffe and I actually ended up adding two drop shadows, just because I needed something subtle that doesn't overwhelm the text, especially since it's a delicate font. Here are the settings for both layers:
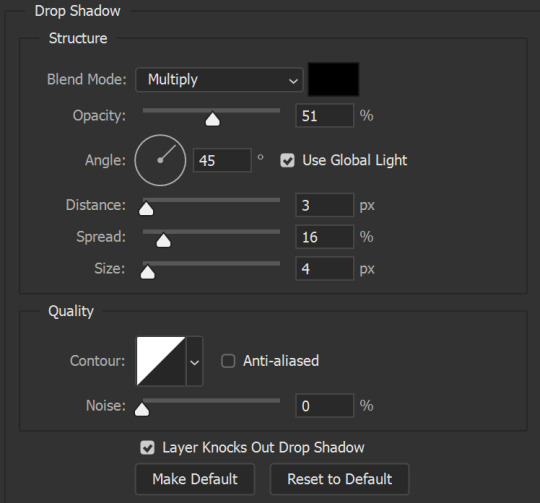
And here's what my gif looks like now:
Now, before we move on to the lines, just check the adjustment of all these text layers, see if there's anything you want to change. It's easier to change now than after the lines are added, since you'll most likely have to redraw them if you move the boxes after the fact.
To draw the lines, we're going to use the Line Tool. I just freehand all of this, and I try to go from center to center of the boxes when I can. It all depends on your angles.
My lines are 2px thick, but you can change these depending on your preference. Here's what mine look like right now:

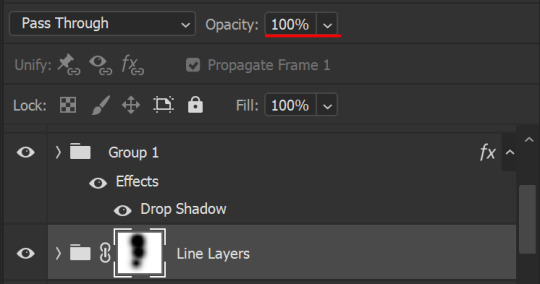
We're going to do the same lazy hack that we did for the color fill, and put all three line layers into a group. Move this group below the text layer and the color fill layers. The reason for this is so that the lines look like they're coming seamlessly from the box, rather than from on top of them or something.
Then, set the group to opacity 50%. I like more subtle, simple looks in my gifs, so I don't like super high opacities.
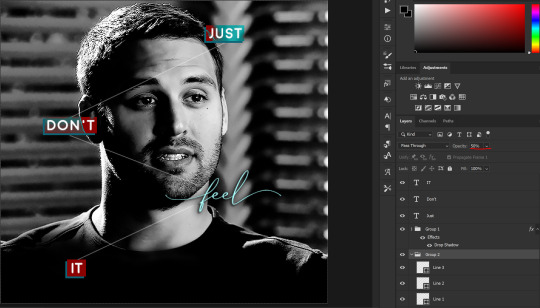
And that's it! This is our final gif:
Some final notes:
Absolutely play around with the blending modes of the color fill layers for this effect. These two gifs are the exact same color we've been using, just two different blending modes. You can see how drastically different they look. The first one is Linear Dodge (Add) and the second one is Vivid Light:
It can change how your gif looks in a BIG way, so play around with it, see what you like, especially if you don't really like the "two toned" thing going on.
Sometimes, I also like playing with the width and height of the text in the font settings, making it shorter and wider, or making it taller and more compact. You can play with the letter spacing as well. The world is your oyster, etc etc.
One other thing I've started doing is erasing the lines with a big brush, just to fade them from his face a little, like this:

To do that, use a layer mask on the line layer folder, and a brush that's 0% hardness, and at least 200px big. For this gif, I also changed the opacity of the lines back to 100% so the fading effect is a little more pronounced:
(this gif isn't the best example for this, but oh well. Anywho, hope this helps, Nonnie! Let me know if you have any questions.
Enjoy!
#zee's tutorials#tutorials#gif tutorial#photoshop tutorial#resources#dailyresources#completeresources#itsphotoshop#allresources#dailypsd#userisha#userdahlias#alielook#userabs#tuserheidi#userelio#userjaelyn#userisaiah#usermorgan#usergert#zee answers#im so pissed at myself for losing the tutorial the first time like you do not know how mad i am right now#i didn't even do anything tumblr just hates us all
195 notes
·
View notes
Note
hello. it’s me again who asked for the ripped paper tutorial. i can’t wait to try it out later!! are you able to make a tutorial on how you put the text on the ripped paper? thank you so much ☺️
hello! sure! i'll explain how i made the ripped paper effect from this gifset in more details under the cut ��� (it’s a different method than what i did on my previous tutorial here)
i apologize in advance for my lack of coherence, i’m not always the best at explaining stuff, especially not in english haha
first things first: make your gif, color it, sharpen it etc etc, and put all of it's layers in a group. i called mine “blended gifs”. oh and make sure you are in timeline mode, not frame animation!

then you want to import the ripped paper texture(s) you want to use onto your canvas and position them the way you want them to be on top of your gif, like this:
(i am using these textures for most of this gifset)

what you want to do next is create a mask of this torn up area so the gif layers only show up around the "hole". to do that, select the texture layer and press "ctrl" while clicking on the texture's thumbnail. this will create a selection of your ripped paper texture (you'll see a flashing dotted line showing your selection).

btw: the ctrl + click method works only if the image/texture has transparency like this texture does.
[if you want yo create your own torn/ripped shape with 2 or more textures, you can place them on top of each other and create a mask by doing ctrl + selecting the thumbnail of the first one, then while still holding ctrl, also hold the shift key and click on the second texture’s thumbnail (and the third, fourth, etc). this will add the shapes to the same selection and then you can create one layer mask with all of the shapes selected together.]
with that selection still active, you want to select your gif's folder you created earlier and click on the add layer mask button.
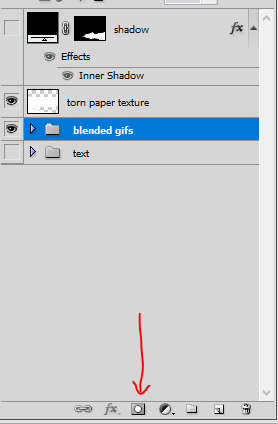
this will create a mask for the ripped paper edges on your gif, the group layer should look like this:
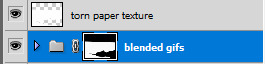
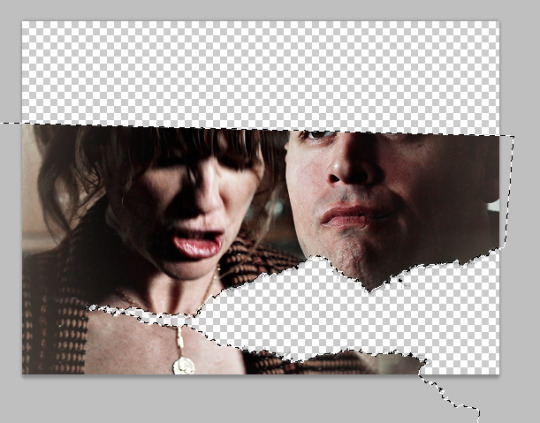
now disable the torn paper texture (by clicking on the eye next to it, you won’t need that torn paper texture layer again), and your gif should look like this so far:
as you can see, there's a transparency issue, and we're losing the top part of the gif. to fix that, you need to brush some white color onto the mask.
to do that, hit ctrl and select the group's mask thumbnail again, you will see the same selection as earlier show up. with the selection ready, select the brush tool in the color white (and 100% opacity), and go brush/paint some white over the whole layer mask. this should fix the transparency issue and the gif should look like this:
once you're done, hit ctrl + D to make the selection disappear, and still with the layer mask selected on the gif's group, with the brush tool paint some white at the top so we get the top of the image back. it should look like this:


(you can also brush more white or black to add/remove parts to this layer mask if you want to, it’s what i did for the original gif, actually.)
now you should be ready to put whatever you want in that ripped edges “hole” you’ve created.
what i did for this gifset is i found a random paper texture on google and used it as a background for my text. make sure you put this background texture under the gif folder, so it will only show up in the “hole”. (i put my texture in a group i renamed “text” because i love my psd compositions to be tidy lol)


then i just typed the text i wanted and positioned it the way i wanted it to look. the text layer should be over the paper texture but still under the gif folder:


to finalize the look I color corrected the paper to be a bit more bright and added some highlight on the text, here you can do whatever you want to make the text look the way you want it to look.
i also added a bit of dropped shadow on the edges of the ripped paper. to do that I selected the mask (ctrl + click the smart mask thumbnail), created a new color fill layer (the color is not important). this will create a layer with a layer mask of the selection. i then selected the smart mask thumbnail and hit ctrl + i to invert it, so my mask is not only the inside of the “hole”. then i put this layer on top of everything, and the fill at 0%. finally i added an inner shadow in the layer style options (by double clicking on that color fill layer).


and that is the final result!
i hope that wasn’t all too over the place or not too detailed? i wasn’t sure how familiar with photoshop you are 😊
@nightmaarebeforechristmas here u go!
#*ps help#resource#photoshop#agentplant#userdean#tutorial#usermadita#omgari#userrainbow#alie replies#anonymous#completeresources#allresources#resourcemarket#useryoshi
668 notes
·
View notes
Text
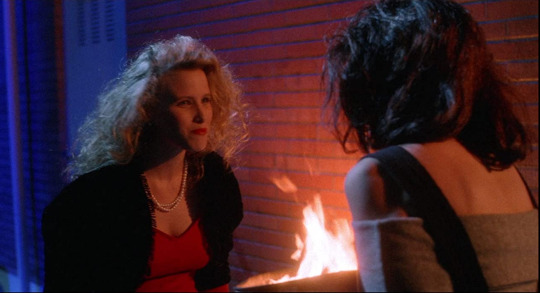
on red and blue symbolism in heathers: an essay
i read one of those buzzfeed listicles the other day that was like “crazy fun facts and secrets about your favorite 80s movies!” and one of the first fun facts was “did you know that in heathers, every character is associated with a color?” that’s not a fun fact. it’s not even a secret. heathers is a lot of things but one thing it’s not is subtle. heathers practically beats the viewer over the head with color symbolism but in this essay, i would particularly like to draw attention to the colors red and blue and their significance in heathers’ narrative.
a short preface: when possible, i cite stills sourced from the movie itself. some images, however, are served better by the gif format, so whenever i post a gif i will also cite the tumblr user who made it. if your gifs are used in this post and you would like me to remove them, please let me know.
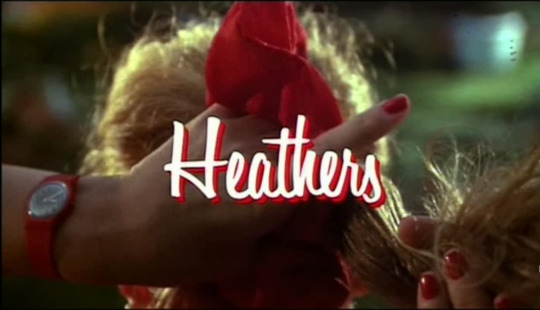
okay, with that out of the way, let's start at the beginning (naturally). below is the title card. right away, the cinematographers inundate the viewer with red, informing the viewer that red (and whoever wears it) will be significant to the narrative.
red represents the social order and the natural hierarchy of predators and prey at westerburg. red is omnipresent throughout the production design of the school's campus.
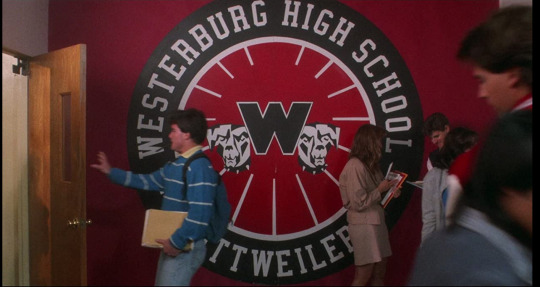
by assuming the color of the school itself, heather chandler assumes control of the school. and when she drags veronica along to the remington party to help boost their reputation, the whole dorm is bathed in red light.


when we first meet veronica, she's wearing gray and black, with only occasional pops of blue (the brooch in the outfit above, her croquet mallet, etc) but as veronica's discomfort and unease begins to grow, something interesting begins to happen!

blue light slowly begins to creep into the frame, and once veronica has finally had enough of brad's bullshit, it becomes even more prominent. just as red represents control of the social hierarchy, blue symbolizes discontent and rejection of the social order.

(gif by @/fireairshadow)
meanwhile, heather chandler isn't having a great time at the party either. this scene is the only time in the film we see heather chandler completely alone, in a moment of vulnerability and self loathing, and she's surrounded by the color blue.
(gif by @/tibby ily tibby)
and then all hell breaks loose. i honestly dont think one image or gif alone can do this scene justice so im linking to tibby's (beautifully colored) gifset of the scene.
note how as veronica declares war ("lick it up, baby!"), red and blue lights flicker across her face. and as heather promises to ruin veronica in turn, the red light casts heather's face in shadow and overpowers the blue.
of course, heather never gets the chance to make good on this promise because veronica and jd kill her. and that may have been a mistake, but the color of their poison is quite deliberate.

(gif by @/nowadayz)
and right before she dies, she takes off her red scrunchie - conceding her control.

of course, heather's death doesn't mean her exit from the narrative. red lingers throughout the rest of the film. but guess what color veronica wears to the funeral?

tumblr is a little bitch and i dont have the time or energy to expound upon the rest of my argument at the moment. it's probably been examined and analyzed in greater detail by people smarter and far more eloquent than me. but i'll conclude with veronica's reclamation of the red scrunchie at the end of the film. you could choose to interpret this as veronica conceding to the hierarchy even after all she's been through, but i choose to interpret it as a bitter compromise.

(gif by @/nowadayz)
and so it ends the way it begins.
anyways all this to say vote for chansaw in the @redandbluebracket tomorrow or i'll kill you.
ETA: a note to anyone who came to my blog from this post - hi! you don’t have to like chansaw romantically/as a ship. im not expecting to proselytize and convert people en masse (although if you HAVE been converted, welcome). even without the shipping element, i believe that veronica and hc’s dynamic as character foils is the backbone of the narrative, which is why i genuinely think they deserve to win the red and blue bracket. vote here. my name is heather chansaw and i approve this message.
223 notes
·
View notes
Note
I've got thoughts on your post about that specific gif of the lives of college girls, especially the one where that girl (it's just Jordan in my mind because it just went there immediately) squeezes Leighton's boobs...
First, yes, this entire gifset is Jordan Li coded, and I fucking love it ❤️
Second, I can litteraly see Jordan squeeze your still clothed boobs and hear them say some shit like "Let's free my girls, okay ?" with a grin.
I feel like they'd worship your breast, almost as much as your ass, licking, sucking, squeezing, just the right amount to make you feel good from just that stimulation.
Also, please, you wearing a nice little set of underwear and bra, cute or hot, and they'd go feral at the thought of you going out of your way to please them. It really goes well with the hero worship, I think, to a point.
Jordan wants to be valued, and you doing things like that for them ? Because you think they deserve the surprise, that they work so hard it's the least you can do for your number one superhero from their number one fan ?
You're going to stay up all night girl. All night.
Writing this in psychology class, I'm down bad... Anyway, love you an take care ❤️
-🥖
wearing pretty lingerie for them 🥺🥺🥺 yeah, yeah <33 wanting to please them, see their eyes go hot and dark at the sight of you. they love how the soft fabric clings to your curves - how it barely covers your nipples - your cunt, curving into the crease of your ass. in such pretty colors light and pastel it makes their throat dry, having someone so pretty all dolled up for them. because you want them. you did it for them, makes their head fuzzy.
they spend so long running their hands up and down your thighs, cupping your tits, squeezing them, gripping your asscheeks. they pull the fabric to the side gently so they can see you - getting more and more worked up the more they see of you.
lace pulled to the side so the plush folds of your cunt are revealed - they hiss like its the first time they've seeing you all over again. parting your lips to see that wet center - pretty and slick and framed by your lingerie like a fucking gift wrapped present.
"holy fuck, baby. you're so fucking wet - so pretty. you got this pussy all dolled up for me, huh?"
they know it is, but fuck, they love to hear you say it. holding you open, knuckle running through the wet slit of you - grinding it into you.
n you're flushed and bashful yet so so, hungry. nodding shyly as you spread your legs even wider for them. tilt your hips up, offering your cunt to them like a platter.
"then daddy better say thank you," they nudge back the hood of your clit, revealing that throbbing little nub. tiny and hard and pulsing with need. jordan leans forward till you feel their warm breath skating across your slick folds - your clit. "so fucking lucky to have you, baby - this fucking pussy -"
their mouth between your legs has your legs kicking out, but jordan has your thighs gripped and held open - pushed down toward your chest - toes pointed toward the ceiling as they get to work. moaning into the slippery mess of your cunt - sliding their tongue from the bottom of your cunt to the top. sucking your clit into their mouth, bullying it with swipes of their tongue back and forth.
and its just the beginning - they plan on eating you from the inside out. touching and kissing and worshipping every part of you. because this is for them, and you're going to let them.
50 notes
·
View notes
Text
Full giffing process - tutorial (*≧ω≦*)
Due to little demand, i will be going thru my complete process for making gifs. so this will cover all the basics i hope! keep in mind this is just the way I personally do things! please feel free to send me asks or dms if you have any doubts or questions!
☆☆☆☆☆☆☆☆
DISCLAIMER: Everything I know about giffing, I've learned from other tutorials, including the VapourSynth Resources I'll be using in this tutorial so I'll leave links to those tutorials I've used here as well!
In Depth Giffing Tutorial (link here)
How to use VapourSynth (link here)
☆☆☆☆☆☆☆☆
(o´▽`o) I'm a windows user so idk if this works exactly the same on mac!
First things first, you will need:
☆ 4k video downloader (download it here!)
☆ Vapoursynth (download it here!)
☆ Photoshop (download it here! -64bit version only)
Okay! The first thing you need to do is make sure you're working with the highest quality material possible to ensure a decent looking gif!
I'd say the minimum quality needed for decent gifs is 1080px. But if you really want to gif that low quality 2 frame milisecond of your fave, i respect that
☆ lives / streams and tiktoks are typically not very high quality
☆ for stage performances such as music shows, ts/tp files are preferred but those can be really hard to get a hold of (this is a whole deeper level of giffing hell and more of an advanced class topic so nevermind this for now!)
☆ those occasional 4k facecams on youtube work fine tho!
☆ for mvs, variety shows etc, you can download the video with good quality from youtube using 4k video downloader
_(:3 」∠)_
Now let's talk about tumblr and it's pre-requisites for a good looking gif post :D
Tumblr can be sooooo annoying about gifs okay.... I find it's best to plan my whole set before I actually start doing anything but hey that's just me. Some things to keep in mind are: dimensions, file size, number of frames and post layout!
☆ Dimensions
You have 3 main options here and it's all about the width!
☆ 1 collumn: single gifs! these should be 540px wide
☆ 2 collumns: split that in half! 268px wide so there's a lil breathing space between the gifs!
☆ 3 collumns: 3's a party! 177px for each gif please
You can go crazy on the height but the width should mostly stick to one of those 3 unless you want tumblr to pull and squeeze your gif around like a piece of gum.
☆ File Size
This is really important because tumblr has a single image size limit of 10mb. Which means that every single gif you make has to be under that size or you won't be able to post it. The other thing about this is that the dimensions, number of frames and ammount of varying colors throughtout your gif will greatly impact on the final file size. Basically, the larger the dimensions and the more frames it has, the bigger the final file will be. Later on I will show you how to check your gif's final size before exporting it!
☆ Number of frames
This has more to do with the length of your gif, the longer it is, the bigger the final file will be. Typically gifs should be under 3 seconds long. So if you are making a set, try to break the moments you want to include in your set by increments of up to 2 - 3 seconds each, otherwise it might not fit all into one single gif. The number of frames is also extremely important when making combined gifs but that's for another tutorial.
☆ Post layout
If you want to make a cool looking gifset (where some gifs are larger in dimension than others, or when you want to have a single gif followed by a line of 2 gifs next to each other), then it might be worth it to plan out the layout before you start making the gifs. This way you ensure you won't have to remake gifs down the line because they don't fit together the way you wanted to.
☆ミ(o*・ω・)ノ
Timestamping
For this step, you will go through the video you want to gif from and you will just write down all the sections you want to use, down to the exact seconds. Example: 02:30 - 02:32.
(^◕ᴥ◕^)
VapourSynth (VS) - Clipping the video
I know VS can look pretty intimidating with it's bare coding and all but I promise it can be your friend. You just have to set it up correctly and pay close attention whenever you're using it. This software is a must for giffing, it will do all your cropping, resizing, sharpening and denoising for you, making sure your gifs look good. It is also indispensable when giffing ts/tp files because it deinterlaces those files so you can clip them.
First, let's set it up. This is the most annoying and difficult part of this tutorial so make sure you pay full attention to every single step!
☆ step 1) download a version of VS here (link).
☆ step 2) unzip the file on your desktop area.
☆ step 3) open the folder and find the file named "vapourscript (drop video file on me)" - make a shortcut of that file and move it to the desktop.
☆ step 4) find the folder named "gifs" - make a shortcut of that file and move it to the desktop.
☆ step 5) drag your video file you want to gif from and drop it on top of the "vapourscript (drop video file on me)" shortcut on your desktop.
☆ step 6) enter the timestamp input, in the first line it will be the starting of your timestamp, in hours format, then hit enter. in the second line enter how long your timestamps lasts, in seconds, also in hours format. then hit enter and let the code run.
☆ step 7) the resizer tab should now load on a web browser, then you will set the dimensions of your gif on the top left corner. you can also adjust the position of your gif within the video screen and zoom in if wanted.
☆ step 8) choose the preprocessor, denoise and sharpening options on the left and tick the boxes on. I usually just stick to the settings i'm using in my video down below.
☆ step 9) now in the VS box, go to file > load, choose the script saved in the gifs folder.
☆ step 10) copy the code from the resizer into the code in the vs screen, under the designated line.
☆ step 11) alter the code exactly like I did in my video down below. save it. this is now your default vs script for clipping your gifs. what you are doing by adding the hastag and the quotation marks is you're disabling those sections of the code. the reason you do that is in case you want to run the preview before exporting. this is because those lines involve some heavy graphic processing which can make the computer slow. I will talk about the script in more detail later on.
☆ step 12) i don't usually use this option but you can also preview your gif and set specific frames to start and end your gif. This is around the 4:30 mark in the video.
☆ step 13) time to export your clip! now you will temporarily remove the marks you added to disable the code and then go to script > encode video. in the popup box, you will select the option "export to MOV", then start so that you can use that video file in photoshop later.
☆ step 14) after you are done exporting, close the encoding box and then close vapoursynth, never agree to save the script when closing it, or that will override your default script.
☆ step 15) now you need to rename the encoded file for your gif. go to the gifs shortcut folder you created on your desktop, then go to output. this is the folder where VS will save all your encoded files. but everytime it saves the file with the same name so you need to come to this folder and change the name for every gif file you encode before you clip a new one, otherwise VS will just replace the previous clip with the new one you just finished.
Here's a detailed walk through of each step in this video tutorial:
youtube
IMPORTANT
After you are done processing your first clipped file, now you have your default script already built in VS, so whenever you run it to clip more videos, this script will already be in your VS screen. So now all you need to do whenever you want to clip more files (to make more gifs) is to adjust the dimensions, positioning and zoom of the video in the resizer screen and then change a few numbers in your script! then run encode to save the clipped file.
☆ To make new clips: go thru steps 5- 7, also do 8 if you want to mess with the denoise and sharpening filters again, but I don't really know much about how those work so I can't help you with this.
Now what you need to alter in the code, each time you are making a new gif:
after you run VS and change the settings in the resizer to what you want, you need to change the zoom numbers and the video positioning in the code.
you need to replace the numbers in the VS script on the left so they match the numbers in the resizer on the right.
Do step 12 if you want to set specific frames to clip. Then steps 13 - 15 and you are done! You need to do all this every single time you want to make a new gif.
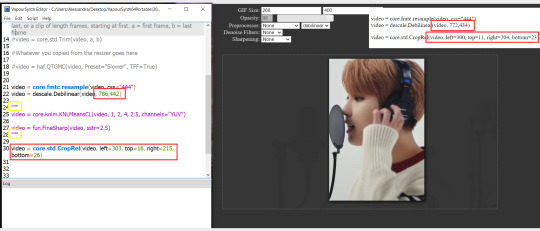
Now let me talk a bit more about some of the lines in this script:
☆ line 14: #video = core.std.Trim(video, a, b)
this line is to set specific frames to trim your video section, your final encoded file will be only the frames inbetween the numbers you input here. a = first frame, b = last frame. you will need to run the preview option in VS in order to see every single frame of your clip and select your first and last frame. I usually do this in photoshop later instead so I don't bother with it on VS unless i'm making combined gifs, in which you need all the clips to have the exact same number of frames. the hashtag at the beginning of this line means that the script won't follow this command when executed. so if you want to include it, you need to remove the hashtag before encoding your file.
☆ line 18: #video = haf.QTGMC(video, Preset="Slower", TFF=True)
this line is for the preprocessor option in VS, that tool is mainly only used when giffing ts/tp files because you need to deinterlace them before you can use them on photoshop. so you will only need to remove the hashtag and enable it when giffing those types of files. when im giffing those files, i usually always keep it with this setting:

I don't really understand much about this so I never mess with it. If you want to know more, I believe there's more info about it in the tutuorials I linked at the beginning of my post.
☆ line 22: video = descale.Debilinear(video, 786,442)
this line is for the zoom of the video screen. you just need to match what you have in your VS script to what you end up with in your resizer.
☆ line 25: video = core.knlm.KNLMeansCL(video, 1, 2, 4, 2.5, channels="YUV")
this line is for the denoising filters, in my case I always use KNLM and this is what it's line looks like. I know you can change those numbers to change the filtering settings but I never messed with it so I'd usually just have it like that.
☆ line 27: video = fun.FineSharp(video, sstr=2.5)
this line is for the sharpening, in my case I always use FineSharp and this is what it's line looks like. I know you can change the number to change it's settings but I never messed with it so I'd usually just have it like that.
note: lines 25 and 27 (which have to do with denoise and sharpening) are the ones within quotation marks in your default script. I believe the quotations work in a similar way as the hashtag, in which the script only executes the lines when the quotations are removed. Which is what you do everytime you are about to encode your clip, otherwise they stay on. I think you should also remove them if you want to test how they affect your gif in the preview screen but i think these filters also require heavier graphic processing which my computer can't handle well so I never do that.
☆ line 30: video = core.std.CropRel(video, left=303, top=16, right=215, bottom=26)
this line is for the positioning of your video screen within the gif dimensions. you just need to match what you have in your VS script to what you end up with in your resizer.
ʕ •̀ o •́ ʔ
Photoshop (PS) - let's make a gif!
Now that we have clipped and preprocessed our video file, it's ready to go to photoshop!
☆ step 1) after you have opened PS, go to File > Import > Video Frames to Layers. Then choose the clipped file you created through VS.
PS should open a box like this:
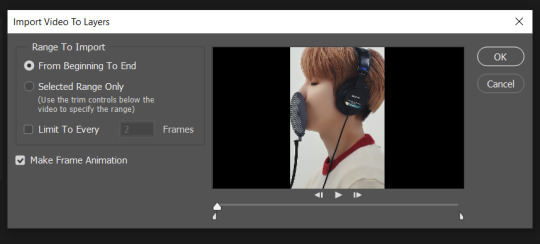
Keep those options ticked and hit OK
☆ step 2) now you need to go to Window > Timeline to bring up the timeline tool box. This window will always be necessary when making gifs. Let's take a look at it, I've marked down all the important buttons you will need:
timeline menu: there are several commands in here, you will need to use some of them later on.
convert to video / frame timeline
play controls to watch your gif
trash can to delete selected frames. (when deleting frames, first delete them here and then delete it's matching layers which are still there after deleting the frames)
frame delay time: this is where you set the time for how long that frame will be visible in your gif
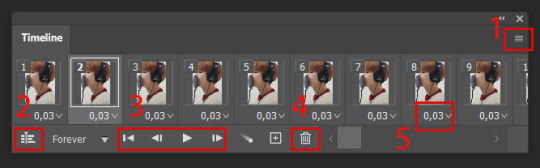
☆ step 3) remember how I mentioned the preview option in VS and how i don't usually use it to trim the frames of my clip? That's because I usually do that at this step of the process, in PS. Notice how each frame is also a layer, and when a frame is selected, the matching layer has the eye symbol next to it turned on. So now you should play your gif and see if there are any frames you don't want to keep, then delete the frames and it's matching layers.
Since we applied sharpening filters back when we were clipping the video on VS, your clip should probably already look pretty decent even before the next steps, so steps 4 - 9 are optional. The coloring part of my video has been sped up.
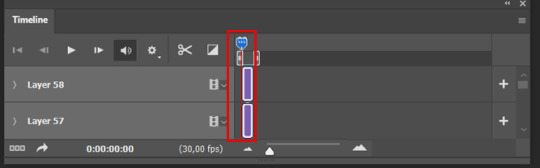
☆ step 4) click on the timeline menu and select "Select all frames", then go to the select menu at the top of the PS screen and select "All layers". Now click on button 2 of the timeline at the bottom left, switching from the frame timeline to the video timeline.
☆ step 5) before you do anything else, make sure the blue holder is at the beginning of the track before you do anything else. Then go to Filter (at the top of PS) and select "Convert for smart filters". This will convert all the layers into one single layer.
☆ step 6) now make sure the layer is selected, then go to Filter > Sharpen > Smart Sharpen. A box will open with several options:
I usually keep the amount to around 30, I don't touch on radius and you can also mess with reduce noise if you think your gif is looking too sharp. Hit OK when you're done.
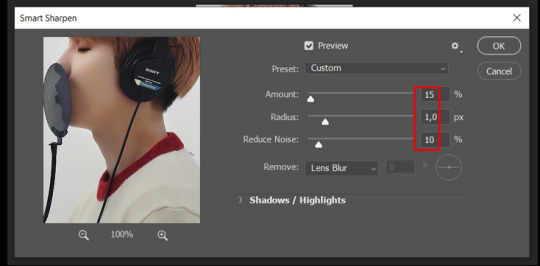
Since this is a filter applied to a smart object (the converted layer that contains all our layer - frames), this means you can turn this filter on or off as long as the layers are in the form of a smart object. You can also go back to it and alter it's settings (like I've done in my video down below)
☆ step 7) now while making sure the blue holder is still at the beginning of the track and the layer is selected, click on the timeline menu that i mentioned above. Then go to Convert Frames, then select Flatten frames into clips.
☆ step 8) again go to the timeline menu, Convert Frames, but now select Make Frames from Clips. Now click on the button at the bottom left of the timeline box, to convert the video timeline back into a frame animation. Then hit continue in the pop up box.
☆ step 9) now you are back to the frame timeline screen from before, but now the first frame is empty. You need to delete that first frame and then check the final frame because sometimes PS also creates another empty frame at the end at this point.
☆ step 10) PS also created a new layer under the layer 0, where the filter is still applied, you can delete this new layer as well. Now for organizational purposes, select all remaining layers (that contain your frames) and group them (you can see how in the video).
☆ step 11) This step is also optional, now I like to add the coloring to the gif. I have a separate tutorial exclusively on this topic. You can check it here:
☆ step 12) This is the time when I also add my signature. This is optional. You need to have the signature layer(s) on top of all the other layers. I usually have it in all black or all white, with lowered opacity of around 40%.
NOTE:
When adding elements (such as a signature) to a gif, it's important to always make sure you have the first frame selected, otherwise PS can move your newly added elements around the canvas on different and random frames. This also applies to anything in the layers pannel that has specific opacities. It's best to already add the elements with the final wanted opacity with the first frame selected.
Exporting + Delay time
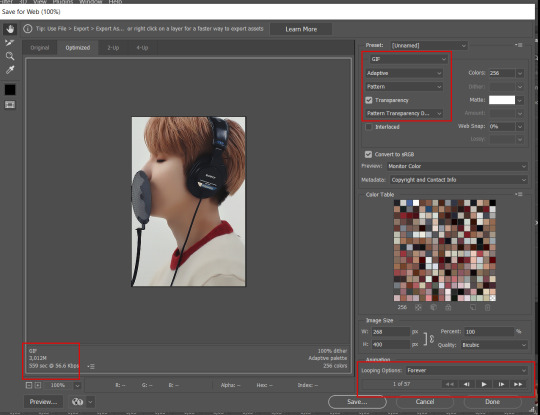
☆ step 13) To export: go to File > Export > Save for web (Legacy). PS will open this box:
First I just use the exporting screen to test the delay time of my gif, and to check the gif's final size.
About the size:
The final size is displayed at the bottom left. Remember it needs to be under 10mb. If it's above that, then you will have to go back and delete frames and test again until the size is within the limit.
About the delay time:
To test the delay time, hit that play button and the gif will play at it's default delay time. If it's too fast or too slow, you will hit cancel and change the delay time (at the next step).
For actual exporting:
The highlighted box at the top right of the screen is very relevant now. Make sure the first box has the GIF option selected. At the next box, you can select either perceptual, selective or adaptive. I usually like to use adaptive. At the next box you need to choose either diffusion or pattern. I like to use pattern. Tick the transparency box and then select either pattern or diffusion transparency dither.
Once you are satisfied with all aspects of your gif, hit save to export your final gif.
To fix the delay time:
After you have exited the export box, go back to your timeline, click on the menu button at the top right and select "Select all frames". Then, on any random frame, click at the small arrow next to the numbers under the frame. Select the option "Other". That will open a pop up box to alter the delay time. To test it again, use the export box explained above. Once you are satisfied, save your gif! I've also altered the delay time in my video to show you the process.
☆ step 14) After your gif is done and saved, I'd suggest to save your psd file if you added any coloring to it. This is so you can reuse the coloring later in other gifs without having to redo it all. This is useful if mking a set of gifs from the same moment / video.
Here's a detailed walk through of each PS step in this video tutorial:
youtube
I hope this tutorial is helpful! Feel free to send me any asks if you have doubts or need extra help! (つ≧▽≦)つ
176 notes
·
View notes
Text


It's been requested so here it is: my gif tutorial! I hope to make this very simple as I've made gif making very simple for myself with the help of .atn made by myself and others. More under the cut!
First, what you'll need.
Photoshop (here's a link to a masterlist of free photoshop resources from birdysources)
KMPlayer, to get your screencaps.
These PS actions. (My gifmaking one, and this sharpening action from insomniacgifs.)
Some understanding of how to color gifs (I'll be linking my psd shown here, as well as including the process of making one.)
Next, how to get the videos that you want to gif.
I personally source my videos from Youtube, Twitter, and streaming services. (Firefox browser is your best friend, as it doesn't black out the screen that some services have.) If a Youtube Video Downloader isn't working, or if I'm capturing my own footage, I use the Xbox Game Bar's recording feature (windows + alt + r) to capture footage. There's also applications like OBS Studio. For Twitter, I use twittervideodownloader.com
Now, making the gif.
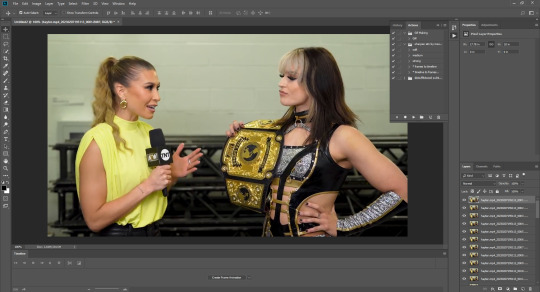
I use Photoshop CC 2018, but any PS with a timeline will work. But first, we gotta take our screencaps. Open your video in KMPlayer, and press alt+v. This will open up this second screen

These are my settings, with an easily accessible folder that I save my frames to. Find the scene you want to clip, and hit start & play your video, then stop when you have the frames you want.
Next up we're going to open up Photoshop. I changed my keyboard shortcuts so all I've got to do is hit ctrl+alt+o, but for you guys, you gotta go to File -> Scripts -> Load Files Into Stack

Select your screencaps of the scene you want to gif. Now that Tumblr allows gifs up to 10MB, the amount of caps you want is totally up to you. I stick to around 45-50, but sometimes there's a scene I need that's up to 150+ caps, and it still fits under the size limit. It all depends on the dimensions and coloring of your gif. I'm loading up 51 frames as the sharpening .atn deletes the final frame of your gif once it reverts back to frames, so I'll have an even 50 framed gif.
Your PS should look like this. Here comes the gif making itself. You want to hit Create Frame Animation at the bottom, where your timeline is. If your timeline isn't already open, click your Window tab up top, and find timeline in the dropdown.

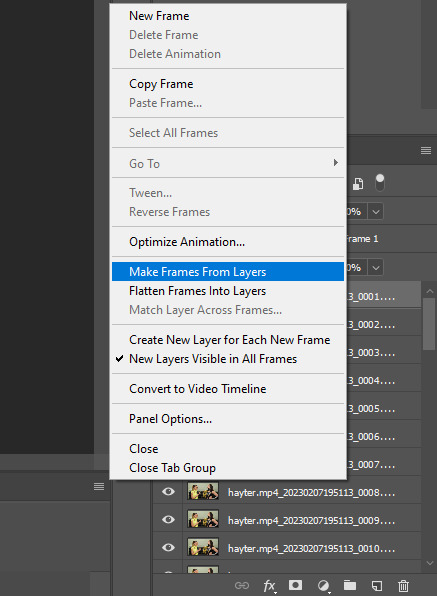
After you hit Create Frame Animation, you want to Make Frames From Layers, which you'll find when you click the three lines on your timeline.
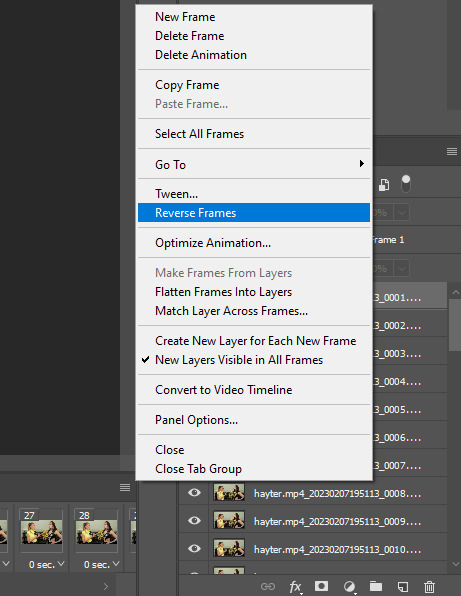
Then, reverse your frames.
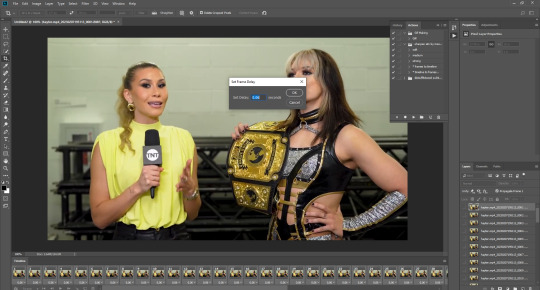
Finally, Select All Frames, click the arrow on the frames, and change the frame delay to .06 seconds.
Way to go! You've made a gif! Now, if you're like me, you'll get tired of having to do that over & over when making a gifset. So, I recorded and uploaded an .atn, which means all you gotta do is load up your frames, hit play on the .atn, and your gif is good to go. I'll link it again so you don't have to lose your place in the tutorial.
So you've made your gif, now what? Now we crop, sharpen, color, and save for the web. Let's get to it.
Tumblr dimensions can be tricky, but they're easy to remember. (I even made a little graphic for it!)

For my tutorial, my Jamie gif will be 268 x 268 :)

Here is my unsharpened, unedited gif of Jamie Hayter. I believe this clip was snagged from YouTube, but it's been awhile since I saved it. I use insomniacgifs' gif sharpening atn, as I hate manually sharpening gifs. So let us run that real quick. (I'll be using the Strong option. Don't forget to delete the final frame.)
Onto coloring! The example I whipped up for this tutorial is super simple, so let's go!
I typically edit the curves first. I'm not sure why, just something I picked up from my photo journalism class back in HS.

Next, I add a little brightness. (+10)

Then, I mess with Selective Color, just a bit. (Neutrals, Black +10. Blacks, Black +5.)
Now, I don't know exactly what Channel Mixer does, but it's fun. Here's my settings.


Some Saturation (+5)

And lastly, I edit the Color Balance!

Aaaaand here's my final product! I also uploaded this as a PSD for you to save and use yourself!

Once your gif is all done, we need to save it properly. File -> Export -> Save for Web (Legacy). Here are my settings.

Note: Make sure your looping options is set to forever so your gif doesn't loop once and freeze!
And that's it! I hope this helped, and if you have any questions, my ask box is open!
#tutorial#gif tutorial#photoshop tutorial#wweedit#wrestlingedit#aewedit#*tutorial#keyara.gif#she's here!!#long post
206 notes
·
View notes
Text
Bruiseshipping Exchange 2024! (Sign-up, how-to, and rules)
I've gotten a good few people that say they're interested in reblogs and DMs so I decided to go ahead an get the ball rolling with the sign-ups! (We'll see how the turn-out is and go from there.) Fill out this below to join as an author or (multimedia) artist! (What is an exchange? What's the schedule? See the read more below!)
Sign up here:
An exchange is a fun opportunity to put more content into the world for our favorite ship! In the sign-up form, you'll put a few prompts (of any level of description) for fic/art you'd like to receive, and then describe some things that you'll be willing to create yourself. I'll go through the entries and match people based on compatibility, and you'll soon be emailed with the "wishlist" of a fellow bruiseshipper! These will be your guidelines to create either your art or fic. On May 25th, you'll post your work and reveal who you are to your giftee!
Rules:
Fic: Minimum will be 1,000 words, as of now. (If you want to join but are unsure if you can meet this in the time frame, please reach out! We can work something out.) No maximum limit! Make sure to tag properly and reach out to me if you have any questions about content.
Art: Digital and traditional pieces of course, and if you want to join with something such as edits or any other kind of media that's not mentioned, please mention so on your sign-up! This exchange is to simply put more bruise into the world, so we don't want to limit what kind of creativity that takes the shape of. Finished drawings must be colored and lined. Videos must be at least 30 seconds. For visual edits such as moodboards, gifsets, etc., I'm roughly putting the minimum at 2. It will be case by case (email to talk about specifics if this applies to you!)
Anything goes as far as content, as long as you meet the criteria provided by your giftee (you will be emailed all this information once you've been matched!) If you want to use any tropes/ratings/etc. that you're unsure of, please reach out to me (NOT your giftee) to act as a liaison to double-check.
Don't tell your giftee that you have them! We'll be operating secretly to add a little extra fun to the exchange, so wait until the posting date to let your person know who you are!
Communication is welcome, so please feel free to send a message or ask if you have any questions or things to say :)
See previously asked questions here
Schedule:
✅ Sign-ups: thru March 1
✅ Giftee info sent out: March 4th
✅ Check-in
Gift reveal: May 25 (Bruise Day!)
Take all of this with grain of salt, as if not enough people sign-up I might switch this over to a Bruise Week or something like that. Anything to bring this fun ship fandom together and spur more fanwork <3 No worries if this is the case, we are an old fandom after all! (We're all a go for an exchange, y'all are wonderful!)😊
-Arella
#bruiseshipping#bruiseexchange2024#ninjago#lego ninjago#cole x jay#jay walker#cole brookstone#cole hence
30 notes
·
View notes
Note
Feel free to ignore this if you don't want to share/don't feel like it but HOW do you do your coloring. Esp on your oc gifsets. It's beautiful your gifs are beautiful. <3
I feel like I'm answering this a little late so I hope you see this anon! Keep in mind tho that I use an AI upscaler for my clips that I get for my gifs but I don't think that ACTUALLY matters. Anyways, once I "import video as frames" I group all the frames together. Then I convert the group to a video timeline

Its the button that looks like bars underneath. Ignore that there's no frames, I'm typing all of this after I already made the gif asadfzdf. Then I convert the timeline to a smart object under "filter" and mess with smart sharpening as well as the various layering effects, for example:

These might be different for everyone and everyone messes with their settings differently. I personally like to make mine a tad brighter and colorful and vibrant. Selective color is something I JUST started learning so I can't really go into detail on it as I JUST started using it in my gifs, but I messed around with it to make colors in the background more green. But brightness and exposure are good to mess with when wanting brighter gifs (depending on the scene). For hue/saturation, I greyed out the colors that weren't prominent on Othello such as blues, cyans, and magentas.
Finally, for the coloring I did in Othello's set, I actually JUST started utilizing new methods. For example in this one:

It's a bunch of green to VERY opaque black gradients, but they're all like... angled differently around his face.

So the gradient fill 1 is a saturation layer effect which kinda made the green blend into the background but still wasn't what I wanted. Gradient fill 2 was a duplicate of this layer that I slightly moved and used a screen layer effect which made the green really overlay the background but not him. Gradient fill 4 (idk why its out of order?) is more of a circular gradient around the back of his head and is a soft light layer effect. Finally, I duplicated that layer and used a screen layer effect again. It's A LOT of playing around with it, but screen and hue/saturation seem to be friends.
I hope this helped because i've never had to like... do a tutorial before. I'm more of a verbal teacher than someone who writes instructions 😭
13 notes
·
View notes
Note
hi jenna gif questions for u 💜 what's your favorite part of making gifs? what's the most valuable thing/tip/trick you've learned? what's some of your favorite gif sets you've made?
hi ida!!!! sorry i took a couple days to answer this i wanted to wait until i had some time to think about it before i answer! i loooove these questions tho so thank you so much for sending them 💜💜
my favorite part about making gifs is probably coloring and like...that moment when i get the gif to look exactly how i want it to. i like to play around with coloring and try a lot of different things with it and that can be so fun! i think over the last like 6-8 months my coloring has really improved a lot and i've been having a lot of fun learning new ways to do things! but i actually had a really hard time coming up with an answer for this question because i mostly enjoy the entire process! the only part that i don't really enjoy is picking out the frames for each gif. i always start with way too many and then i have to cut stuff out and i hate that part. also it's reaaally hard sometimes to not end up with like 20 gifs cause there's so much i want to include!!!
okay im gonna cheat on this one and give a few things i've learned since i started that have been sooooo valuable to me. first is the importance of having a good quality download to start with. i think my gifs got significantly better when i finally downloaded all of the episodes in 1080p instead of using the screen recording on netflix like i had been before. second sharpening is so important! i did not do any sharpening on my first gifs i made! sharpening makes the gifs loook sooo sharp and crisp and pretty. third and kind of similar to sharpening was learning/figuring out how to use the camera raw filter. there's sooooo much you can do with camera raw filter (coloring sharpening lightening). and finally one thing i learned that i think made my coloring look significantly better was to try not to lighten the gif too much and/or to figure out ways to lighten darker gifs without it messing up the background too much (sometimes when they're lightened too much it will like pixelate the background and it looks awful)
and finally (in order of when they were made from oldest to newest) here are links to some of my favorite gifsets:
Bloody Dean Throughout the Seasons Set - this one actually came out really good considering the fact that it was made only a month after i first started making gifs! if i remember correctly it's the first set that i ever used sharpening on.
6x20 F+TM King Set - this one is a favorite mostly just because i love the song so much and tmwwbk is one of my favorite episodes. i think some of my favorite sets to make are the ones that i add lyrics to.
2022 Nov 5th Set - i was really happy with how this one came out! it's so hard to get gifs from episodes over different seasons to look the same! and this one had gifs from 12 different seasons! also i think this was the first set i ever made that got over 1000 notes which i remember being really excited about!
Laughing Dean Set - this one is a favorite purely based on the content of the set. it feels like injecting serotonin every time i look at it<3
1x12 Faith Set - another one based on the content of the set. i just love this episode so much.
Season 9 Dean Set - i LOVE the coloring in this set! and season 9 dean is so beloved to me. he is just so beautiful and bloody and sad.
2023 Cas Day Set - another f+tm lyric set! i love the space overlay that i added and the blue-pink of the coloring so much!
4x18 Destiel Every Episode Set - i loooove this scene so much! this gif series has by far been more popular than any of the other gifs that i post and this set is definitely the most popular in the series. no other set has ever even come close to getting 4k notes like this one did. also i really like the purple coloring a lot<3
14 notes
·
View notes
Text
YOOO i finished stampede last night so here are my rambling thoughts bc i just woke up:
first of all the opening theme is a bop. kudos to whoever fought for that color scheme during the beginning titles. it reminds me of the children of dune miniseries from the early 00s (all the orange), early 90s orange/teal/purple and like, taco bell. sick. good font choices, sand blowing away to reveal lettering always goes hard. windmill and things sinking into the sand, awesome.
i don't know how kids are straight up rawdogging stampede without reading the manga first though!! the manga is the backbone of trigun, it is the Primary Source document of trigun!! no question. in stampede, there is so much crammed in this short frame of time, there is like so much happening, I DO NOT MIND THIS THOUGH bc i'm well acquainted. but i feel like someone with no prior trigun exposure might have difficulty keeping up with all of it? at the same time, i get the vibe that stampede was made primarily for people who already HAVE decades of massive trigun brainrot, who know how plants work, etc. it's cool that stampede's ushered new fans into this universe. someone on crunchyroll was saying how they hit you with all the lore and secrets up front, there's no buildup. but like imo it's understood you KNOW the backstory and stampede is just this fresh re-imagining of it. stampede's just a really pretty, lovingly-wrought cherry on the sundae of your existing trigun fandom. it is like, a gift to all of us??
it started out and i'm like okay this is literally Tremors, now it's The Wolfwood Show, i loved how they did the badlads even though no BDN (BDN my beloved), lots of character design diversity, not alot of "sameface" which i respect, great voice acting. i have never been a huge fan of cgi in anime but zamn they made it work SO well like the cell shading was just phenomenal. glad that they didn't shy away from blood. well utilized gore, not gratuitous. the final battle with vash and knives was gorgeous. SO WELL ANIMATED MY GODD. love how knives has this classically "good" angelic color scheme and vash is all chthonic black and dark purples?? this is my initial reaction after powering through it once, i'll rewatch soon for stuff i missed.
someone do a gifset of meryl kicking ww in the shin and making him shiver like a traumatized shiba inu PLEASE bc i haven't seen that on here yet lmao. also love how wolfwood would say some tough edgy shit to appear callous/indifferent but you can immediately tell by his eyes/actions that he truly feels otherwise. boy we see right thru you.
14 notes
·
View notes
Photo
HOW TO: Make an Animated Sound Wave Overlay
In this tutorial, I’ll show you a quick and easy way to get this animated sound wave effect that’s unique to any song you choose! (You can check out a similar effect in my Obi-Wan Kenobi and Miles Morales gifsets too.) Disclaimer: This tutorial assumes you have a basic understanding of gif-making in Photoshop.
PHASE 1: Make Sound Waves Using VEED.IO
You can do this using several methods like downloading sound wave videos on YouTube and making them into gifs (which I’ve done before too!). But I’m going to show you how to make sound waves specific to the song of your choice using a free site called VEED.IO
1.1 – Upload a YouTube link of your song to VEED.IO
Open VEED.IO and click Choose Video! Try to find a studio recording if you can, instead of a clip of the film/tv scene which might have distracting background audio that could influence the sound waves.


UPDATE 09/17/23: At the time of writing this tutorial, VEED.IO allowed you to upload a YouTube link directly. However, I’ve been made aware that this doesn’t always work with the new version of VEED.IO. As an alternative, you can instead download the YouTube video using any video downloader and use the “Upload a File” method instead!
1.2 – Make the video a black screen.
If the video you used isn’t already fully black, click on your media in the timeline and toggle over to the Adjust tab. Pull the Brightness slider all the way down to -100 until the screen is completely black. This black background is key to getting a seamless blend on your gif later!
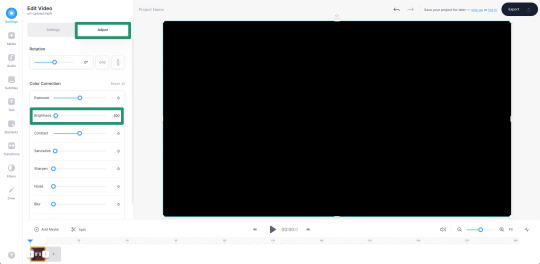
1.3 – Insert sound waves.
Click Elements in the left sidebar and navigate to Sound Waves. Select any sound wave design you prefer! I like the vertical, rounded orange bars. Don’t worry about the color when you choose, we’re going to change it to white later!
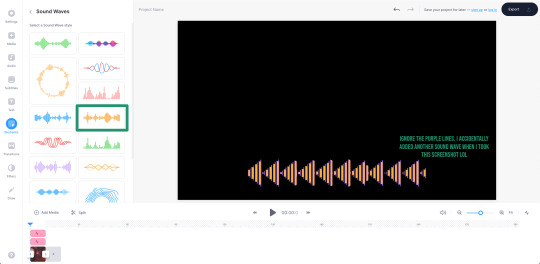
1.4 – Trim your audio clip.
It’ll depend on the amount of frames in your gif, but you shouldn’t need more than 10 seconds of your song. You can choose to trim based on the scene of your gif, the lyrics you’re going to type on the gif, or even just choose a section where the music goes wild and the sound waves move a lot. In this Max gif, I took a clip toward the end where the lyrics are: “I’d be running up that road, running up that hill, with no problems” because it matched the main clip I giffed.
Use the white parallel lines to drag the clip where you want it to start and end:

1.5 – Adjust the audio decibel controls.
(Disclaimer: As with most things, I know almost nothing about what I’m doing here. 🤡) I just know that I don’t want the bars of my sound wave to be clipped like they are below, so I have to change the decibel range so the loudest part of my audio doesn’t go “outside the lines.”
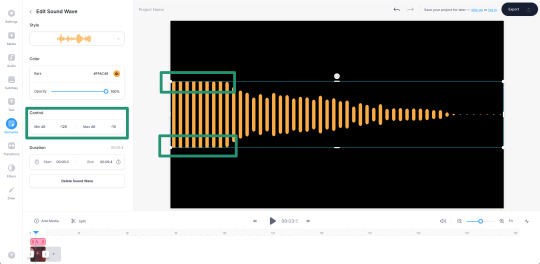
I changed my minimum to -100 and my maximum to 25:
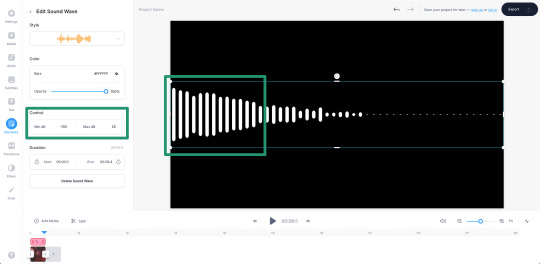
1.6 – Make your sound wave white.
Still in the Edit Sound Wave window, change the color of the bars to white. It doesn’t matter what color you want your sound wave to be in your final gif — we’ll change it later! White is the best base for any color, especially if you want the gradient/exclusion effect in the overlay.

1.7 – Resize the sound wave to your liking.
Use the corner sliders to enlarge the sound waves. I always prefer making a big gif smaller than trying to make a small gif bigger (and grappling with a low quality image). So I like to resize my sound wave as big as possible, cutting out any bars that don’t move so I can have a high-quality animation in the end. :)

1.8 – Export as a gif.
One of the most convenient things about VEED.IO is that you can export the sound wave as a GIF! So you don’t have to screencap it yourself. Click the export button in the top right corner, select Export Video, and then download it as a GIF.
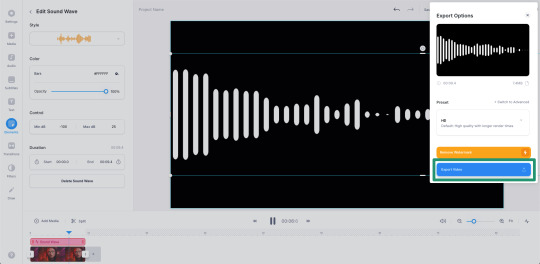
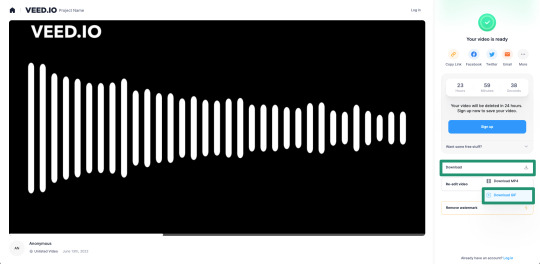
And here’s the sound wave gif I got:
Don’t worry about the watermark, we’ll take care of that in Phase 2. :)
PHASE 2: Overlay Sound Waves On Your Gif
Note: I’ll be working in Video Timeline for the most part of this section! If you want to see my process in Video Timeline, here’s my step-by-step gif-making tutorial.
2.1 – Make your base gif.
This is all up to you and your style! I like to make my sound wave gifs color-focused and I think blending adds a nice touch. Also, my gif is 540x540px.
Now, one of the most important things to remember is this: make sure your frame delay starts out at 0.05 seconds, even if you work in Video Timeline like me. This is crucial to make sure you don’t get duplicate frames when adding the sound wave gif.
2.2 – Import your sound wave gif.
Create a new file by opening the gif you exported from VEED.IO. Change the gif’s frame delay to 0.05. This is to match the base gif so that when you convert to Timeline, you don’t get duplicate frames! (Note: I also deleted the first frame of mine because all of the waves weren’t moving.)
2.3 – Resize the VEED.IO gif and convert to Video Timeline.
For my gif, I resized the sound waves to 505px width and then I used the Sharper action in this action pack to convert to Video Timeline. (You can read more about how I use these actions in the gif tutorial I linked above!) You can also remove the sharpen filters if you feel you don’t need them!
2.4 – Hide the watermark.
Create a layer on top of the gif layer and use the Marquee tool to make a box around the watermark. Use the Paint Bucket tool to fill that box with black so the watermark disappears.
Select both layers (the black box layer and your gif layer), right-click, and select Convert to Smart Object to merge the layers together.
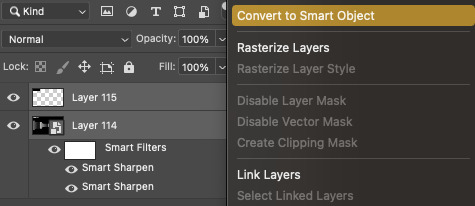
2.5 – Drag/duplicate the sound wave gif over to your base gif.
Either click and drag the sound wave layer into the tab with your base gif OR right-click the layer, select Duplicate Layer, and choose the document you want to paste the gif to! Make sure the sound wave layer is above your base gif!
2.6 – *OPTIONAL* Create a music player overlay.
This is just a style I came up with because I’m currently obsessed with rounded shapes. But you don’t need to have the semi-circle music player for the sound waves! I just like how it looks. For my design, I just made a white ellipse, created my own shapes for the play and skip buttons and masked them out, set the blending mode to difference, and added a gradient overlay.
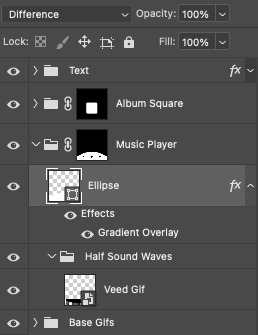
I won’t go into my design in a lot of detail here because this is a style choice that’ll be unique to how you want your gifs to look. Plus, this is just a tutorial on how to make animated sound waves. But if you have specific questions about my gif style for these kinds of sets, feel free to ask me at my main @sith-maul :)
2.7 – Set the blend modes.
Put your sound wave gif in a folder and set the folder’s blend mode to Exclusion. Put that folder inside another folder, and set this folder’s blend mode to Pass Through (it should do this by default). Here’s a screenshot that hopefully explains this clearer:

Now, your sound waves should have gone from looking like this:
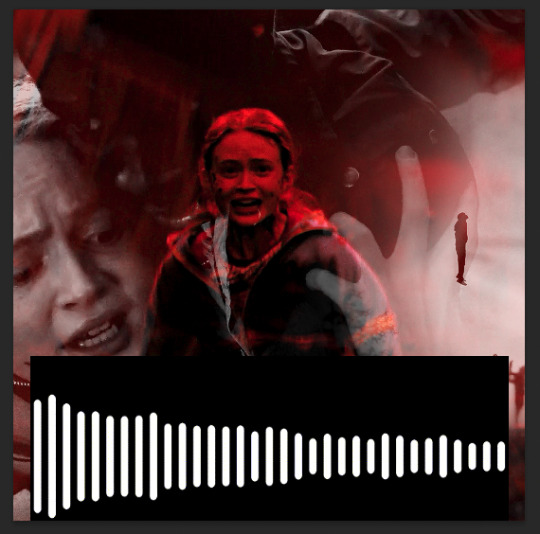
To this:

You can totally stop here if you like this look! But I want my sound waves’ color to match the rest of my gif, so...
2.8 – Add a gradient map.
Within the sound wave gif folder (the one set to Exclusion), add a Gradient Map layer above the sound wave gif:

I recommend going for a Black to Color gradient because the black will help the background of the sound waves stay dark and fully blended with the rest of your gif. I went with this Black to Red gradient:
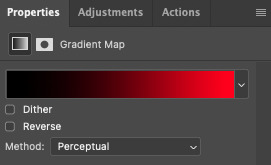
Now my sound wave gif looks like this:

But I don’t like how there’s now some cyan peeking through where the bars touch the lighter gray parts of my gif. So, let’s add one more adjustment layer.
2.9 – Add a Hue/Saturation layer.
In the outer folder (the one set to Pass Through), add a Hue/Saturation layer so it’s above the other Exclusion folder:

Decide what color you want to get rid of (in my case, cyan), go to that color channel, and adjust the hue slider until that color matches your main color as best as possible!
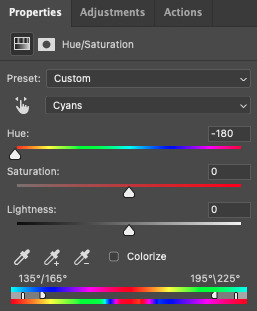
PHASE 3: Export Your Gif!
As always, when you convert your gif back to frames, do a quick double-check that you didn’t end up with any duplicate frames before saving your gif. Again, you can read more about how I do these steps in my gif tutorial here.
Finally, with just a little extra nudging layers around, my gif looks like this now:
Of course, for my actual gif, I created a music player design — so I decided to only use the upper half of my sound waves to fit inside the half circle.
I’m sure you know how I did this already, but in case you don’t, just move the sound wave gif down the canvas to your liking until only half of the waves are visible! I like using this method where my sound wave gif is under a gradient overlay because of how dark it makes the sound wave bars and how I don’t have to get rid of any cyan colors:
But that’s it! I hope you found this tutorial helpful and easy to follow! If you have any questions, my main inbox is open @sith-maul. If you decide to try out this effect, feel free to tag me with #usernik or tag us with #usergif ! Thanks for reading :)
#gif tutorial#completeresources#userkosmos#usershreyu#uservalentina#useralison#usernums#tuserkay#usercim#userannalise#useryoshi#userelio#tuserabbie#uservivaldi#userstar#usernorah#usersole#*usergif#*tutorial#by nik#stranger things spoilers#flashing gif
452 notes
·
View notes
Last Seen Blogs
trb752
Tom's Art Deco & Streamline Moderne

troibby
lolita

mineeceee
Ece
mineeceee
Ece

flxwer-angel
sunshine and hope