#software installation testing
Explore tagged Tumblr posts
Visit Tumblr Blog
Explore Tumblr blogs with no restrictions, modern design and the best experience.
Last Seen Tumblr Blogs


Fun Fact
28.6 is the average number of monthly visits per US mobile user.
Text
I have spent the last ten hours repeatedly reinstalling Windows to track down a single registry change that was causing an embroidery program to not launch. AtlasOS is great but it really is annoying that there's not really a way to revert its changes easily
#not even exaggerating#started soon after I got to work#so probably 9AM#it was mostly downtime but still#install Atlas - test software - if good enable more modules - if bad disable more modules - reinstall base windows - repeat#luckily Atlas is open source and has a discord to ask people about it#but still very annoying#it works now though!
3 notes
·
View notes
Text

just a little microsoft paint doodle i did to test out my new drawing tablet!
#ignore how wonky joeson is lol#i havent installed the drivers or anything yet i just wanted to test how it'd work#still gotta find a software to use for it!#joeson tag!#joe's doodles
6 notes
·
View notes
Text
for some reason ive been extremely paranoid about my phone getting an eas alert while im sleeping or trying to sleep, but ive been especially since the national test back in october. like generally im pretty good about them, they scare me but the fear is completely gone after a couple days max and i don't worry about it going off again. not sure why ive been so afraid since the test. the night before last i almost shut off my phone but i went into settings to turn off all alerts except for national, but i suddenly got really scared i was going to accidentally wake my whole house by somehow blaring the noise (it doesn't unless you go to past alerts and tap one). last night i had the same fear but didn't touch my phone and went to sleep fairly quickly after i cried. and instead of my phone in real life making a sound, my phone and computer in my dream made the sound instead. so now im scared of falling asleep and my own dreams
#not a vent#i feel like my phone vibrates more when getting those alerts than like phone calls#when the national test went off i was holding my phone and then again it was on the floor next to me#and both times it was loud vibrating louder than the vibration i get from phone calls#that sound is terrifying like compared to alert sounds from around the world why is ours so fuckingscary#i know it's to get your attention but is it required of me to be extremely paranoid and feel like im being watched as soon as i hear it#also laptops don't receive eas alerts at least mine doesn't. you have to install some software or something
3 notes
·
View notes
Text


doodles of this girl
#art#traditional art#pencil#oc art#ocs#oc group: unsorted#oc: unnamed#ive drawn her a few times now i think. shes from a dream i had once#ALSO i had a mild art drought for a bit there because ive been so bothered by my busted scanner#im borrowing a new one from my family and currently testing how it works#hopefully it works okay for now. it seems a little crisper which makes sense because it is over a decade newer than my old one LOL#i cant get it to work with picasa but i dont think its the fact that its a new scanner (i also tried an even older scanner)#(that a family member had around and that also didnt work with picasa so i think its some installation driver nonsense)#so ive been using the built in scanning software to scan to a folder that picasa reads and THEN i can go in and crop all the pics#my art scanning process is absurd and convoluted sorry#WHAT you need to know is my scanned images may look a little different for the next little bit as i get used to new technology
2 notes
·
View notes
Text
Hhh
#my laptop is here and its downloading the necessary updates.#it is so small and thin. like holy moly i need a case for this thing. its like. smartphone thin but the soze of a small netbook#its so nice though. it came with the stylus and when it lets me get into the actual installation of art software ill test it right away
0 notes
Text
A few years ago I had a phase of being REALLY into digital privacy, using tor, duckduckgo, etc before suffering some burnout because I was trying to be 100% secure. So I'm by no means a expert I'm just relaying experience.
The culture of a lot of left leaning and "fandommy" sites (tumblr, twitter, etc) tends to fear/dislike (or just not know about) a lot of the IT stuff used by people into online privacy because they asscoiate it with "techbros". ESPECIALLY anything even remotely involving cryptocurrency. But if Trump is going to start censoring things and making morning after pills harder to get now might be a VERY good time for Americans to get into online privacy and how to avoid being tracked as well as avoiding censorship. Perhaps even some crypto to buy things discretly (or perhaps if ICE agents start caring about cash?) and because many activists groups also take donations in crypto. Never dealt with crypto myself but from what I know Monero was designed to be more untracable than Bitcoin. Don't know how succesfull that is though. Definetly get into privacy in general though.
I'll leave some useful links to get started. Words of advice:
Don't install a fuckton of privacy extensions on your browser, your unique combination of extensions will give your browser a unique fingerprint. Instead read up on and pick a few commonly used ones.
The BIGGEST annoyance for me was acedemic/proffesional settings because noone wants to switch over to some software they never heard off for one group project. Personally I use some normie software for exclusivly proffesional purposes with NO other information on me and do my actual browsing/leisure computer use more privatly.
https://www.privacytools.io/os: General software/browser/etc recomendations.
https://coveryourtracks.eff.org/: Test how private your browser is.
https://www.torproject.org/: THE gold standard for privacy focused browsers. Also obscures ip. Might not always be practical. Has the disadvantage of being notoriously slow and is blocked by some services/websites to avoid people bypassing ip bans and whatnot. Probably don't use this as your everyday browser but if you ever need to look up anything without censorship use tor.
https://tails.net/: Install a portable mini operating system on a usb stick to browse privately from any computer.
https://www.eff.org/ Electronic frontier foundations website.
https://mastodon.social/explore Don't have experience with it myself. But open source social media that should be much harder to censor.
Tumblr probably won't like me talking too directly about this because of ties to piracy but for people interested in banned books https://en.wikipedia.org/wiki/Shadow_library should be an interesting read...
3K notes
·
View notes
Text
to all the weary Windows-using soldiers out there fighting a valiant rearguard action against our new Win11 overlords... i am taking you very gently by the hands. i am looking you deep in the eyes. and i am saying. with the utmost regret. that we may be at the point where following the instructions to turn a USB drive into a Linux Mint installer, booting up your afflicted device from the USB drive, and taking Mint's (very Windows-like) UI for a test drive... may be easier than figuring out how to weedwhack even a fraction of the intrusive crap Microsoft is pushing on you. at minimum, it'll give you a striking moment of peace and relief to boot into an environment that isn't actively harassing you.
i hate that this is how bad it is, and i fucking hate sounding like a smug Linux evangelist. there is no told-ya-so coming from this ex-Windows girlie; i'm just seeing a bunch of people eyeing the exit door, and want to hold it open and be an enabler and pinky-promise that the Mint flavor of Linux is, like, super fucking easy for normal-ass people to use, and probably way easier to install than it'd be to unfuck Win11.
-
once you're in the installer, it'll give you three options: 1. run a live, temporary version of Linux Mint right off the USB stick for you to fool around in; 2. nuke Windows from orbit and install Linux as the only operating system; or 3. banish Windows to the shadow realm (an isolated corner of your hard drive) so the two operating systems won't mess with each other, install Linux alongside it, and let you pick which one to use every time you boot up the computer.
so... try it out if you want. use the live demo to check out the software-installation ecosystem, which is probably the most unfamiliar part. consider what fits your situation. if you have non-negotiable Windows-only software chaining you to the beast, or you don't want to totally abandon having Win11 available as a fallback, the installer can walk you through option (3) with a minimum of fuss. (just be careful about how much disk space to assign to each "side," because altering it after the fact is trickier.) if it doesn't suit you, oh well - lend the USB drive to a friend, or keep it to noodle around with later when Microsoft's driving you up the wall. or wipe it, whichever.
448 notes
·
View notes
Text
A summary of the Chinese AI situation, for the uninitiated.

These are scores on different tests that are designed to see how accurate a Large Language Model is in different areas of knowledge. As you know, OpenAI is partners with Microsoft, so these are the scores for ChatGPT and Copilot. DeepSeek is the Chinese model that got released a week ago. The rest are open source models, which means everyone is free to use them as they please, including the average Tumblr user. You can run them from the servers of the companies that made them for a subscription, or you can download them to install locally on your own computer. However, the computer requirements so far are so high that only a few people currently have the machines at home required to run it.
Yes, this is why AI uses so much electricity. As with any technology, the early models are highly inefficient. Think how a Ford T needed a long chimney to get rid of a ton of black smoke, which was unused petrol. Over the next hundred years combustion engines have become much more efficient, but they still waste a lot of energy, which is why we need to move towards renewable electricity and sustainable battery technology. But that's a topic for another day.
As you can see from the scores, are around the same accuracy. These tests are in constant evolution as well: as soon as they start becoming obsolete, new ones are released to adjust for a more complicated benchmark. The new models are trained using different machine learning techniques, and in theory, the goal is to make them faster and more efficient so they can operate with less power, much like modern cars use way less energy and produce far less pollution than the Ford T.
However, computing power requirements kept scaling up, so you're either tied to the subscription or forced to pay for a latest gen PC, which is why NVIDIA, AMD, Intel and all the other chip companies were investing hard on much more powerful GPUs and NPUs. For now all we need to know about those is that they're expensive, use a lot of electricity, and are required to operate the bots at superhuman speed (literally, all those clickbait posts about how AI was secretly 150 Indian men in a trenchcoat were nonsense).
Because the chip companies have been working hard on making big, bulky, powerful chips with massive fans that are up to the task, their stock value was skyrocketing, and because of that, everyone started to use AI as a marketing trend. See, marketing people are not smart, and they don't understand computers. Furthermore, marketing people think you're stupid, and because of their biased frame of reference, they think you're two snores short of brain-dead. The entire point of their existence is to turn tall tales into capital. So they don't know or care about what AI is or what it's useful for. They just saw Number Go Up for the AI companies and decided "AI is a magic cow we can milk forever". Sometimes it's not even AI, they just use old software and rebrand it, much like convection ovens became air fryers.
Well, now we're up to date. So what did DepSeek release that did a 9/11 on NVIDIA stock prices and popped the AI bubble?
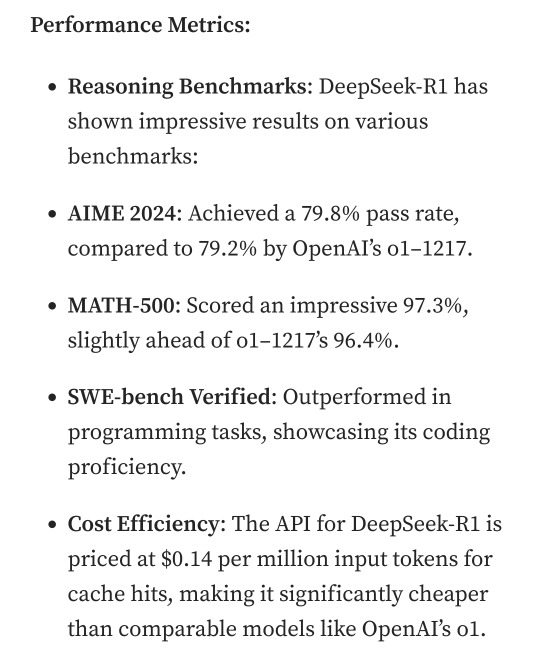
Oh, I would not want to be an OpenAI investor right now either. A token is basically one Unicode character (it's more complicated than that but you can google that on your own time). That cost means you could input the entire works of Stephen King for under a dollar. Yes, including electricity costs. DeepSeek has jumped from a Ford T to a Subaru in terms of pollution and water use.
The issue here is not only input cost, though; all that data needs to be available live, in the RAM; this is why you need powerful, expensive chips in order to-
Holy shit.
I'm not going to detail all the numbers but I'm going to focus on the chip required: an RTX 3090. This is a gaming GPU that came out as the top of the line, the stuff South Korean LoL players buy…
Or they did, in September 2020. We're currently two generations ahead, on the RTX 5090.
What this is telling all those people who just sold their high-end gaming rig to be able to afford a machine that can run the latest ChatGPT locally, is that the person who bought it from them can run something basically just as powerful on their old one.
Which means that all those GPUs and NPUs that are being made, and all those deals Microsoft signed to have control of the AI market, have just lost a lot of their pulling power.
Well, I mean, the ChatGPT subscription is 20 bucks a month, surely the Chinese are charging a fortune for-
Oh. So it's free for everyone and you can use it or modify it however you want, no subscription, no unpayable electric bill, no handing Microsoft all of your private data, you can just run it on a relatively inexpensive PC. You could probably even run it on a phone in a couple years.
Oh, if only China had massive phone manufacturers that have a foot in the market everywhere except the US because the president had a tantrum eight years ago.
So… yeah, China just destabilised the global economy with a torrent file.
#valid ai criticism#ai#llms#DeepSeek#ai bubble#ChatGPT#google gemini#claude ai#this is gonna be the dotcom bubble again#hope you don't have stock on anything tech related#computer literacy#tech literacy
433 notes
·
View notes
Text

Start Me Up: 30 years of Windows 95 - @commodorez and @ms-dos5
Okay, last batch of photos from our exhibit, and I wanted to highlight a few details because so much planning and preparation went into making this the ultimate Windows 95 exhibit. And now you all have to hear about it.
You'll note software boxes from both major versions of Windows 95 RTM (Release To Manufacturing, the original version from August 24, 1995): the standalone version "for PCs without Windows", and the Upgrade version "for users of Windows". We used both versions when setting up the machines you see here to show the variety of install types people performed. My grandpa's original set of install floppies was displayed in a little shadowbox, next to a CD version, and a TI 486DX2-66 microprocessor emblazoned with "Designed for Microsoft Windows 95".

The machines on display, from left to right include:
Chicago Beta 73g on a custom Pentium 1 baby AT tower
Windows 95 RTM on an AST Bravo LC 4/66d desktop
Windows 95 RTM on a (broken) Compaq LTE Elite 4/75cx laptop
Windows 95 OSR 1 on an Intertel Pentium 1 tower
Windows 95 OSR 1 on a VTEL Pentium 1 desktop
Windows 95 OSR 2 on a Toshiba Satellite T1960CT laptop
Windows 95 OSR 2 on a Toshiba Libretto 70CT subnotebook
Windows 95 OSR 2 on an IBM Thinkpad 760E laptop
Windows 95 OSR 2.5 on a custom Pentium II tower (Vega)

That's alot of machines that had to be prepared for the exhibit, so for all of them to work (minus the Compaq) was a relief. Something about the trip to NJ rendered the Compaq unstable, and it refused to boot consistently. I have no idea what happened because it failed in like 5 different steps of the process.
The SMC TigerHub TP6 nestled between the Intertel and VTEL served as the network backbone for the exhibit, allowing 6 machines to be connected over twisted pair with all the multicolored network cables. However, problems with PCMCIA drivers on the Thinkpad, and the Compaq being on the blink meant only 5 machines were networked. Vega was sporting a CanoScan FS2710 film scanner connected via SCSI, which I demonstrated like 9 times over the course of the weekend -- including to LGR!
Game controllers were attached to computers where possible, and everything with a sound card had a set of era-appropriate speakers. We even picked out a slew of mid-90s mouse pads, some of which were specifically Windows 95 themed. We had Zip disks, floppy disks, CDs full of software, and basically no extra room on the tables. Almost every machine had a different screensaver, desktop wallpaper, sound scheme, and UI theme, showing just how much was user customizable.
@ms-dos5 made a point to have a variety of versions of Microsoft Office products on the machines present, meaning we had everything from stand-alone copies of Word 95 and Excel 95, thru complete MS Office 95 packages (standard & professional), MS Office 97 (standard & professional), Publisher, Frontpage, & Encarta.
We brought a bunch of important books about 95 too:
The Windows Interface Guidelines for Software Design
Microsoft Windows 95 Resource Kit
Hardware Design Guide for Windows 95
Inside Windows 95 by Adrian King
Just off to the right, stacked on top of some boxes was an Epson LX-300+II dot matrix printer, which we used to create all of the decorative banners, and the computer description cards next to each machine. Fun fact -- those were designed to mimic the format and style of 95's printer test page! We also printed off drawings for a number of visitors, and ended up having more paper jams with the tractor feed mechanism than we had Blue Screen of Death instances.

In fact, we only had 3 BSOD's total, all weekend, one of which was expected, and another was intentional on the part of an attendee.

We also had one guy install some shovelware/garbageware on the AST, which caused all sorts of errors, that was funny!
Thanks for coming along on this ride, both @ms-dos5 and I appreciate everyone taking the time to enjoy our exhibit.

It's now safe to turn off your computer.
VCF East XX
#vcfexx#vcf east xx#vintage computer festival east xx#commodorez goes to vcfexx#windows 95#microsoft windows 95
209 notes
·
View notes
Text
Three AI insights for hard-charging, future-oriented smartypantses

MERE HOURS REMAIN for the Kickstarter for the audiobook for The Bezzle, the sequel to Red Team Blues, narrated by @wilwheaton! You can pre-order the audiobook and ebook, DRM free, as well as the hardcover, signed or unsigned. There’s also bundles with Red Team Blues in ebook, audio or paperback.

Living in the age of AI hype makes demands on all of us to come up with smartypants prognostications about how AI is about to change everything forever, and wow, it's pretty amazing, huh?
AI pitchmen don't make it easy. They like to pile on the cognitive dissonance and demand that we all somehow resolve it. This is a thing cult leaders do, too – tell blatant and obvious lies to their followers. When a cult follower repeats the lie to others, they are demonstrating their loyalty, both to the leader and to themselves.
Over and over, the claims of AI pitchmen turn out to be blatant lies. This has been the case since at least the age of the Mechanical Turk, the 18th chess-playing automaton that was actually just a chess player crammed into the base of an elaborate puppet that was exhibited as an autonomous, intelligent robot.
The most prominent Mechanical Turk huckster is Elon Musk, who habitually, blatantly and repeatedly lies about AI. He's been promising "full self driving" Telsas in "one to two years" for more than a decade. Periodically, he'll "demonstrate" a car that's in full-self driving mode – which then turns out to be canned, recorded demo:
https://www.reuters.com/technology/tesla-video-promoting-self-driving-was-staged-engineer-testifies-2023-01-17/
Musk even trotted an autonomous, humanoid robot on-stage at an investor presentation, failing to mention that this mechanical marvel was just a person in a robot suit:
https://www.siliconrepublic.com/machines/elon-musk-tesla-robot-optimus-ai
Now, Musk has announced that his junk-science neural interface company, Neuralink, has made the leap to implanting neural interface chips in a human brain. As Joan Westenberg writes, the press have repeated this claim as presumptively true, despite its wild implausibility:
https://joanwestenberg.com/blog/elon-musk-lies
Neuralink, after all, is a company notorious for mutilating primates in pursuit of showy, meaningless demos:
https://www.wired.com/story/elon-musk-pcrm-neuralink-monkey-deaths/
I'm perfectly willing to believe that Musk would risk someone else's life to help him with this nonsense, because he doesn't see other people as real and deserving of compassion or empathy. But he's also profoundly lazy and is accustomed to a world that unquestioningly swallows his most outlandish pronouncements, so Occam's Razor dictates that the most likely explanation here is that he just made it up.
The odds that there's a human being beta-testing Musk's neural interface with the only brain they will ever have aren't zero. But I give it the same odds as the Raelians' claim to have cloned a human being:
https://edition.cnn.com/2003/ALLPOLITICS/01/03/cf.opinion.rael/
The human-in-a-robot-suit gambit is everywhere in AI hype. Cruise, GM's disgraced "robot taxi" company, had 1.5 remote operators for every one of the cars on the road. They used AI to replace a single, low-waged driver with 1.5 high-waged, specialized technicians. Truly, it was a marvel.
Globalization is key to maintaining the guy-in-a-robot-suit phenomenon. Globalization gives AI pitchmen access to millions of low-waged workers who can pretend to be software programs, allowing us to pretend to have transcended the capitalism's exploitation trap. This is also a very old pattern – just a couple decades after the Mechanical Turk toured Europe, Thomas Jefferson returned from the continent with the dumbwaiter. Jefferson refined and installed these marvels, announcing to his dinner guests that they allowed him to replace his "servants" (that is, his slaves). Dumbwaiters don't replace slaves, of course – they just keep them out of sight:
https://www.stuartmcmillen.com/blog/behind-the-dumbwaiter/
So much AI turns out to be low-waged people in a call center in the Global South pretending to be robots that Indian techies have a joke about it: "AI stands for 'absent Indian'":
https://pluralistic.net/2024/01/29/pay-no-attention/#to-the-little-man-behind-the-curtain
A reader wrote to me this week. They're a multi-decade veteran of Amazon who had a fascinating tale about the launch of Amazon Go, the "fully automated" Amazon retail outlets that let you wander around, pick up goods and walk out again, while AI-enabled cameras totted up the goods in your basket and charged your card for them.
According to this reader, the AI cameras didn't work any better than Tesla's full-self driving mode, and had to be backstopped by a minimum of three camera operators in an Indian call center, "so that there could be a quorum system for deciding on a customer's activity – three autopilots good, two autopilots bad."
Amazon got a ton of press from the launch of the Amazon Go stores. A lot of it was very favorable, of course: Mister Market is insatiably horny for firing human beings and replacing them with robots, so any announcement that you've got a human-replacing robot is a surefire way to make Line Go Up. But there was also plenty of critical press about this – pieces that took Amazon to task for replacing human beings with robots.
What was missing from the criticism? Articles that said that Amazon was probably lying about its robots, that it had replaced low-waged clerks in the USA with even-lower-waged camera-jockeys in India.
Which is a shame, because that criticism would have hit Amazon where it hurts, right there in the ole Line Go Up. Amazon's stock price boost off the back of the Amazon Go announcements represented the market's bet that Amazon would evert out of cyberspace and fill all of our physical retail corridors with monopolistic robot stores, moated with IP that prevented other retailers from similarly slashing their wage bills. That unbridgeable moat would guarantee Amazon generations of monopoly rents, which it would share with any shareholders who piled into the stock at that moment.
See the difference? Criticize Amazon for its devastatingly effective automation and you help Amazon sell stock to suckers, which makes Amazon executives richer. Criticize Amazon for lying about its automation, and you clobber the personal net worth of the executives who spun up this lie, because their portfolios are full of Amazon stock:
https://sts-news.medium.com/youre-doing-it-wrong-notes-on-criticism-and-technology-hype-18b08b4307e5
Amazon Go didn't go. The hundreds of Amazon Go stores we were promised never materialized. There's an embarrassing rump of 25 of these things still around, which will doubtless be quietly shuttered in the years to come. But Amazon Go wasn't a failure. It allowed its architects to pocket massive capital gains on the way to building generational wealth and establishing a new permanent aristocracy of habitual bullshitters dressed up as high-tech wizards.
"Wizard" is the right word for it. The high-tech sector pretends to be science fiction, but it's usually fantasy. For a generation, America's largest tech firms peddled the dream of imminently establishing colonies on distant worlds or even traveling to other solar systems, something that is still so far in our future that it might well never come to pass:
https://pluralistic.net/2024/01/09/astrobezzle/#send-robots-instead
During the Space Age, we got the same kind of performative bullshit. On The Well David Gans mentioned hearing a promo on SiriusXM for a radio show with "the first AI co-host." To this, Craig L Maudlin replied, "Reminds me of fins on automobiles."
Yup, that's exactly it. An AI radio co-host is to artificial intelligence as a Cadillac Eldorado Biaritz tail-fin is to interstellar rocketry.

Back the Kickstarter for the audiobook of The Bezzle here!
If you’d like an essay-formatted version of this post to read or share, here’s a link to it on pluralistic.net, my surveillance-free, ad-free, tracker-free blog:
https://pluralistic.net/2024/01/31/neural-interface-beta-tester/#tailfins
#pluralistic#elon musk#neuralink#potemkin ai#neural interface beta-tester#full self driving#mechanical turks#ai#amazon#amazon go#clm#joan westenberg
1K notes
·
View notes
Text
Installing Linux (Mint) as a Non-Techy Person
I've wanted Linux for various reasons since college. I tried it once when I no longer had to worry about having specific programs for school, but it did not go well. It was a dedicated PC that was, I believe, poorly made. Anyway.
In the process of deGoogling and deWindows365'ing, I started to think about Linux again. Here is my experience.
Pre-Work: Take Stock
List out the programs you use regularly and those you need. Look up whether or not they work on Linux. For those that don't, look up alternatives.
If the alternative works on Windows/Mac, try it out first.
Make sure you have your files backed up somewhere.
Also, pick up a 5GB minimum USB drive.
Oh and make a system restore point (look it up in your Start menu) and back-up your files.
Step One: Choose a Distro
Dear god do Linux people like to talk about distros. Basically, from what all I've read, if you don't want to fuss a lot with your OS, you've got two options: Ubuntu and Linux Mint. Ubuntu is better known and run by a company called Canonical. Linux Mint is run by a small team and paid for via donations.
I chose Linux Mint. Some of the stuff I read about Ubuntu reminded me too much of my reasons for wanting to leave Windows, basically. Did I second-guess this a half-dozen times? Yes, yes I did.
The rest of this is true for Linux Mint Cinnamon only.
Step Two: Make your Flash Drive
Linux Mint has great instructions. For the most part they work.
Start here:
The trickiest part of creating the flash drive is verifying and authenticating it.
On the same page that you download the Linux .iso file there are two links. Right click+save as both of those files to your computer. I saved them and the .iso file all to my Downloads folder.
Then, once you get to the 'Verify your ISO image' page in their guide and you're on Windows like me, skip down to this link about verifying on Windows.
Once it is verified, you can go back to the Linux Mint guide. They'll direct you to download Etchr and use that to create your flash drive.
If this step is too tricky, then please reconsider Linux. Subsequent steps are both easier and trickier.
Step Three: Restart from your Flash Drive
This is the step where I nearly gave up. The guide is still great, except it doesn't mention certain security features that make installing Linux Mint impossible without extra steps.
(1) Look up your Bitlocker recovery key and have it handy.
I don't know if you'll need it like I did (I did not turn off Bitlocker at first), but better to be safe.
(2) Turn off Bitlocker.
(3) Restart. When on the title screen, press your Bios key. There might be more than one. On a Lenovo, pressing F1 several times gets you to the relevant menu. This is not the menu you'll need to install, though. Turn off "Secure Boot."
(4) Restart. This time press F12 (on a Lenovo). The HDD option, iirc, is your USB. Look it up on your phone to be sure.
Now you can return to the Linux Mint instructions.
Figuring this out via trial-and-error was not fun.
Step Four: Install Mint
Just follow the prompts. I chose to do the dual boot.
You will have to click through some scary messages about irrevocable changes. This is your last chance to change your mind.
I chose the dual boot because I may not have anticipated everything I'll need from Windows. My goal is to work primarily in Linux. Then, in a few months, if it is working, I'll look up the steps for making my machine Linux only.
Some Notes on Linux Mint
Some of the minor things I looked up ahead of time and other miscellany:
(1) HP Printers supposedly play nice with Linux. I have not tested this yet.
(2) Linux Mint can easily access your Windows files. I've read that this does not go both ways. I've not tested it yet.
(3) You can move the taskbar (panel in LM) to the left side of your screen.
(4) You are going to have to download your key programs again.
(5) The LM software manager has most programs, but not all. Some you'll have to download from websites. Follow instructions. If a file leads to a scary wall of strange text, close it and just do the Terminal instructions instead.
(6) The software manager also has fonts. I was able to get Fanwood (my favorite serif) and JetBrains (my favorite mono) easily.
In the end, be prepared for something to go wrong. Just trust that you are not the first person to ever experience the issue and look it up. If that doesn't help, you can always ask. The forums and reddit community both look active.
178 notes
·
View notes
Note
Boothil has me on a chokeholdI want to fuck him so bad.Maybe install a few softwares, up his sensitivity, play with his mind.. Or maybe a lewd virus.. Make him so horny and needy, his head can literally think of you fucking him so good..Or him accidentally plugging the wrong USB, thinking it's his usual data after rebooting, but it's your USB and it messed with him.. I want to fuck his pretty hole so bad
hi anon this is tasty oml
imagine his sensitivity's been all off, some kinda glitch maybe from an incident during one of his missions. one moment it's been too low, and the next (just like now) it's way, way too high. for every other touch it's just annoying, but every time you've brushed past him today, he's failed to mention his issue with just how aroused he feels himself getting. it's different when it's your touch.
when he finally bucks up and admits that he's been having issues, you're so caring, so much more considerate of his senses (he wishes you wouldn't be - he really just wants you to fuck him dumb every time you so much as graze him) as you set out a few USBs and ask him to wait while you go grab some other tools to fix up his sensors. he asks what they're for, and when you tell him they're various types of sensations compiled into USBs to better test each type of touch, he figures he might as well just get a jumpstart with the testing so he doesn't waste your precious time.
he opts for the USB sitting the furthest away. the fool, he hadn't even asked you what sensation each one was before trying it out. it could've been pain, a ticklish feeling, but no, he got arousal. it was like he was overwhelmed like an animal in heat at once, his eyes shooting open as his cock strained against his trousers painfully. images of you involuntarily flashed through his mind, and he had to fight to keep himself breathing normally, but it was no use...
you get back to find him practically humping the air, strands of black and white hair sticking to his forehead as he pants and moans and begs for your help. you're concerned until you see the USB sticking out of his port and realize at once what he's done, lightly chastising him (horrendous torture for him in this state, surely, to have your breath so gently tickling his ear as he suffers) on not touching your tools without asking you first.
unfortunately, it'd be too risky to go in and fix this via his inner wiring while he's this worked up... it might burn you with how much he's overheating. so the only solution is to fuck his brains out until he's at least semi-conscious enough to cool down. good thing you made sure he'd be able to fuck in any way a normal man could when adding his sensitivity! giving him all the facilities is coming in handy.
poor guy doesn't even have the time or mental faculties to ask why the hell you had an arousal USB among the testers present.
ooooh, maybe use a toy on his cock while you pound into him... it'll give you a nice view of his face while he's being completely overwhelmed, his eye filled with hearts, rolling back as his tongue sticks out from behind those pretty lips of his. a nice, slick onahole should do wonders to cool him down after one, three, five... maybe more orgasms, even as he begs you to stop despite his hips continuing to rut into the gadget. the fun thing about fucking a robot is that he can go a lot more than a human can, and as much as boothill tosses his head from side to side, actual tears beginning to spill, you can also see the drool beginning to fall from his lips, his lolling tongue as he groans your name over and over.
he's got a pseudo-prostate that you make sure to nail with precision every time your strap slides inside of him, the impeccable design of his insides allowing you to slip in and out with ease. you remove the onahole from his weeping cock (another feature that aids the toy and your current activities as a whole), pushing his legs up and folding him in half into a mating press, just to see if he can cum only from his prostate. and cum he does - his voice coming out higher and higher pitched as he wails in both euphoria and humiliation at your treatment of him.
finally, you slow when you realize he has indeed begun to cool. his eyes are rolled back, hair messy and splayed across the table, harsh scratches made by his metal nails into the steel table (somehow). he's not quite unconscious, but he certainly can't form any further words, his breathing heaving with small, scattered moans as he tries to regain himself. his emergency cooling procedure had kicked into high gear at last, aiding you in fixing up his sensitivity.
oh, but perhaps leave that special USB lying around. mark it clearly, and pretend not to notice when boothill digs through your messy desk to find it and plug it back in, acting for all the world that he didn't mean to use that special little one on himself again. he's got too much pride to admit it, after all. oh well, it seems you'll have to help him once more!
#sub boothill#boothill x reader#hsr x reader#sub hsr#boothill smut#hsr smut#katze works n/sfw#n/sfw#katze's secret corner#I got carried away oops#I also want to fuck his pretty hole anon... kindred spirit...
919 notes
·
View notes
Text

Fully Underwater Lot Tutorial
@creida-sims @kitkat99
UPDATE January 2025
There is now a much, much easier way to do this. This version of SimPE now includes a tool to change terrain geometry. To edit the terrain in SimPE, go to Tools/Neighborhood/Neighborhood Browser and load your neighborhood. In the Resource Tree, select Neighborhood Terrain Geometry (NHTG) and select the only resource in the Resource List. In Plugin View, click Terrain Editor. It's very intuitive, but basically, you can edit the terrain under a lot to make it be underwater. You can also delete the road with the Road Editor.
I'll keep the old tutorial for archival purposes, but unless you can't or don't want to install this version of SimPE, it is pretty much obsolete.


Some warnings and disclaimers
1. This is not a beginner tutorial. I have tried to explain with as much detail as I can, but still, if you just started playing The Sims 2 I recommend trying out other building tutorials first.
2. I have tested it but there's always a possibility that some new problems will come up. Follow at your own risk. Backup your neighborhoods before trying this. Test it first in a new empty neighborhood.
3. These lots are roadless, so they require specific gameplay conditions to avoid breaking immersion (pun intended).
4. They will behave like normal lots in the sense that sims can walk around and do anything as if they were on land. There's one big problem to consider: when sims go fully underwater, their hair and some parts of their clothing might disappear visually.
So this is more useful for structures that sit above the water, shallow water that doesn't reach a sim's head or, with some modifications, small islands surrounded by water. So unless you want bald mermaids, I don't recommend this for sims that live underwater.
5. If you use Voeille's hood water mod, reflections will look glitchy in lot view, because this is technically not a beach lot. The only solution I found is enabling "Lot view ocean reflections" in RPC Launcher. Otherwise you'll have to deal with glitchy reflections.
6. Before following this tutorial, make sure you know the basics of creating, editing, importing and exporting SimCity 4 terrains. Written tutorial by SimEchoes here, video tutorial by loonaplum here.
Software and mods used
The Sims 2 FreeTime expansion pack (required for the modifyNeighborhoodTerrain cheat)
SimCity 4 (required) Hood Replace by Mootilda (required)
Lot Adjuster by Mootilda (required)
Portal revealer by Inge Jones (required)
Voeille's pond and sea water overhaul and RPC Launcher (optional, see disclaimers)
The Sims 2 Apartment Life and Bon Voyage expansion packs (optional, for "walk to lot/work/school" options)
Cheat codes used
moveObjects on/off
modifyNeighborhoodTerrain on/off
1. Creating/editing a terrain in SimCity 4
1.1. You can edit an already existing terrain or create your own from scratch. In both cases, you need to keep two things in mind: If you want the usable area of the lot to be underwater, such as making houses for mermaids or a coral reef, make sure the water is shallow. No more than a few short clicks with the terraforming tools in SimCity 4. This is because The Sims 2 live mode camera won't go underwater, so making the water too deep might make it uncomfortable to build or play the lot.
If you goal is to build a structure mostly above water, like a ship or an oil rig, you can get away with making the water a bit deeper, but not too much. I've noticed that sometimes the lot terrain tools stop working correctly if there a hill that's too steep.
1.2. Once you've created the terrain, you will need to add a small island on the area where your lot will be. I know it seems contradictory, but trust me, it will make sense. Create and name your city. Use the terraforming tools in city mode to make a tiny island of about 6x2 squares.

1.3. On the island, use the road tool to place a straight road that takes up 4 squares. Then, using the street tool (the last option), place two short streets at each end of the road.
Streets will disappear in TS2, only roads translate to roads in ts2, so why do we place them? Well, placing a street at the end of a road will get rid of the rounded end bit in TS2, which can't be used to place lots. This will be important for the placement of the lot and to make sure the edges of the lot are underwater. If this doesn't make sense yet, don't worry, it might make sense later.
1.4. Save the terrain. Don't exit SimCity 4. Copy your new/edited sc4 terrain from your SimCity 4 folder to your SC4Terrains folder in your Sims 2 documents directory. It is usually
"C:\Users\YOURUSERNAME\Documents\EA Games\The Sims 2 Ultimate Collection\SC4Terrains"

1.5. Back in SimCity 4, we're going to make a second version of this terrain. Remove the roads and streets you made before, with the bulldozer tool. With the level terrain tool in Mayor mode, carefully remove the island, so it's on the same level as the bottom of the ocean/lake. Don't change anything else. Save, exit and copy this second terrain to your Sims 2 SC4Terrains folder. Make sure you rename the file to something different from the first one, like adding "no roads" to the filename. You should have two terrains by the end of this step. One with the small island and one without it.
2. Editing the terrain in The Sims 2
2.1. Open The Sims 2 and create a new neighborhood using your new terrain. Something to keep in mind: if you want the terrain to be a subhood of another neighborhood, make it a subhood from the start. You will not be able to move the lot once it's finished, since it will be roadless. I don't recommend decorating the neighborhood for now. Leave it empty until the end of this tutorial.

2.2. Place the smallest empty lot (3x1) on the island.
2.3. In neighborhood view, open the cheat console by pressing Control + Shift + C, and type
modifyNeighborhoodTerrain on
To quote The Sims Wiki:
"This allows you to alter the neighborhood terrain by raising or lowering it. To use this cheat, be in the neighborhood view, then enter the cheat "modifyNeighborhoodTerrain on" (without the quotation marks), and click over the area you would like to change. To select a larger area, click and drag the cursor to highlight the desired area. Press [ or ] to raise or lower the terrain by one click, press \ to level the terrain, and press P to flatten terrain. When you're finished, type “modifyNeighborhoodTerrain off” in the cheat box (again, without the quotations)."
If you use an English keyboard, these instructions will probably be enough for you. If you don't, I recommend first testing the cheat, because the keys for using this cheat are different in other languages. For example, in my spanish keyboard, the question marks are used to raise and lower the terrain and the º/ª key flattens it.
Another aside: When you select an area using this cheat, a green overlay is supposed to show up. Some lighting mods make this green overlay invisible, like the one I use. If that's your case, you kind of have to eyeball it. Remember that one neighborhood grid square in TS2 is equivalent to 10 lot tiles, or the width of a road. I recommend getting a mod that allows you to tilt the neighborhood camera on the Y axis, which will allow you to have a bird eye's view of the terrain.

2.4. Flatten the terrain around the lot so it's at water level. This cheat won't allow you to edit the terrain inside the lot, so you have to edit the terrain around the lot. Make sure there is plenty of flat underwater space around the island. You should end up with something like the picture above. The water will have some holes, but don't worry, those get filled with water the next time you load the neighborhood.
2.5. Enter the lot and place any object on it. Save the lot and exit the game. This is so LotAdjuster recognizes the lot in the next step.
3. Expanding the lot with Lot Adjuster
3.1. Open Lot Adjuster and select your neighborhood and lot.

3.2. Click "Advanced…". Check "Over the road (only enlarge front yard)". Use the arrows to add 20 tiles to the front yard. Click "Finish" and "Restart".

3.3. Select the same lot again. This time, check "Add and remove roads". Uncheck the road checkbox for the front yard. Add 20 Tiles to the back yard, 20 tiles to the left side and 10 tiles to the right side. Check "Place portals manually". You should end up with a 60x60 lot, which is the biggest size. You might want a smaller lot, but unless you know what you are doing, I recommend starting with this size. You can shrink it later. The goal of making the lot this big is making sure the edges of the lot are underwater. Click "Finish" and exit.
4. Moving portals and flattening the lot

4.1. Make sure you have the portal revealer by Inge installed in your Downloads folder before the next step. Open your game and load your neighborhood. The lot should look something like the picture above.

4.2. Load the lot. Delete the object you placed before. Place the portal revealer on the lot near the mailbox/phone booth and trashcan. It looks like a yellow flamingo and you can find it in Build Mode/Doors and Windows/Multi-Story Windows catalogue. You will notice that when you select the object from the catalogue, some yellow cubes appear on the lot, and when you place the object, the cubes disappear. After placing the portal revealer, pick it up and place it again. This will make the yellow boxes visible again.
So what are those yellow boxes? They are portals. They determine where sims and cars arrive and leave the lot. The ones on both ends of the sidewalk are called pedestrian portals, and in the street, one lane has portals for service vehicles (maids, gardeners, etc.) and the opposite is for owned cars and carpools. You can see the portal's names if you pick them up. Make sure not to delete any of them.
Now, since this is going to be a roadless lot, ideally there won't be vehicles in it. This means that the lot would ideally be accessed through walking only. In community lots, this would not be an issue if you have the Bon Voyage expansion pack, which allows sims to walk to lots.
In residential lots, you might run into some problems. Service NPCs always arrive on vehicles, and unless your sim owns a vehicle, the carpool and school bus will always come to pick sims up for work/school. It might break your immersion to have a vehicle show up underwater or on a ship. There are many options to avoid this: having sims work on an owned business instead of a regular job, not having kids on the lot, making the kids homeschooled, avoiding calling service NPCs… it depends on how you want to play the lot. For example, my icebreaker is a residential lot, only adults live there, some sims live in it temporarily and none of them have a regular job.

All of this is relevant because we're going to move the portals. Where you move the portals depends on you. Think about how you're going to use the lot. In my icebreaker, I placed the car portals (which won't be used) underwater, on a corner of the lot. I placed the pedestrian portals on the ship, to pretend that the walkbys are part of the crew or passengers. But for now, just move the portals, mailbox/phone booth and trashcan to a corner of the lot. To be able to pick up the mailbox/phone booth and trashcan, use the cheat moveObjects on. Delete the street and sidewalk tiles using the floor tool (Control + click and hold left mouse button + drag).


4.3. Flatten the island with the level terrain tool. Save the lot. Almost done! Don't mind the hole in the water, this will be fixed. You will notice that in neighborhood view, the island is still there. This is because the neighborhood terrain under the lot hasn't updated. I don't know why this happens, but it does. Normally, moving the lot would fix it, but we can't move this lot using the game's tools. Instead, we are going to fix the terrain with Hood Replace. Don't exit the game yet.
5. Updating the terrain with Hood Replace
5.1. Create a new neighborhood using the new roadless terrain. Make sure it has the same type of terrain (lush, desert, etc.) as the first one. Again, name it "NO ROADS" or something similar. Exit the game.

5.2. Open HoodReplace. On the left column you will select your "NO ROADS" neighborhood. In the right column, select the neighborhood that has the underwater lot. Check these settings: Replace terrain, replace road, and versioned backups. Leave everything else unchecked. Click Copy.

5.3. Open The Sims 2 and load the neighborhood to check if the changes worked. That concludes the tutorial. At this point you can shrink the lot if you don't want it to be so big. Remember to move the portals to their final placement when you're done building the lot. Also keep in mind pedestrians (walkbys) always walk by the mailbox, so keep the mailbox accessible for sims.
If you're going to have multiple underwater lots, I recommend making them first, and decorating the neighborhood after. Doing this in an already existing neighborhood might be more difficult, mainly because, if you made any changes to the terrain using the modifyNeighborhoodTerrain cheat in the past, they might get reset when using Hood Replace.
154 notes
·
View notes
Text
ok i upgraded my gpu from the radeon 5600 XT to a 2080 super and literally everything about VR is working so much better
EXCEPT
last night when i tried to enter whiterun while streaming it performed so bad that steamvr crashed and my entire PC was stuttering like crazy. whiterun loads just fine at full frames when OBS isn’t open but the second I open OBS everything on my pc crashes. i tested it off stream, it’s not even the strain of streaming it’s the software itself. What could possibly be causing this? this is the literal only thing performing worse than my radeon. i have the FUS modpack installed so my thought is it’s one of those city enhancing parallax fuck ass mods but that doesn’t explain why it runs perfectly when OBS isn’t open - it does that even with the OBS preview off so it’s not that either. it’s like a very specific kind of computer stuttering like something with the two programs interacting wrong
92 notes
·
View notes
Text

The Artisul team was kind enough to send me their Artisul D16 display tablet to review! Timelapse and review can be found under the read more.
I have been using the same model of display tablet for over 10 years now (a Wacom Cintiq 22HD) and feel like I might be set in my ways, so getting the chance to try a different brand of display tablet was also a new experience for me!
The Unboxing
The tablet arrived in high-quality packaging with enough protection that none of the components get scratched or banged up in the shipping process. I was pleasantly surprised that additionally to the tablet, pen, stand, cables and nibs it also included a smudge guard glove and a pen case.
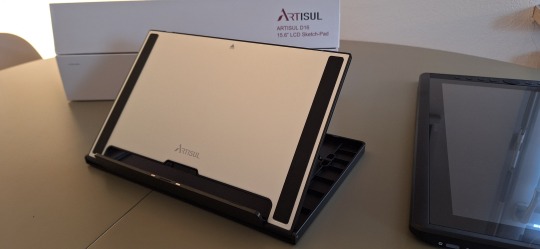
The stand is very light-weight and I was at first worried that it would not be able to hold up the tablet safely, but it held up really well. I appreciated that it offered steeper levels of inclination for the tablet, since I have seen plenty other display tablets who don’t offer that level of ergonomics for artists. My only gripe is that you can’t anchor the tablet to the stand. It will rest on the stand and can be easily taken on or off, but that also means that you can bump into it and dislodge it from the stand if you aren’t careful. It would require significant force, but as a cat owner, I know that a scenario like that is more likely than I’d like.
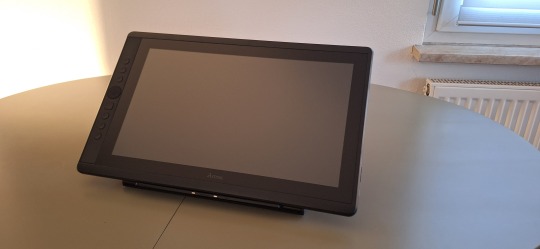
Another thing I noticed is how light the tablet is in comparison to my Cintiq. Granted, my Cintiq is larger (22 inches vs the 15.8 inches of the Artisul D16), but the Artisul D16 comes in at about 1.5kg of weight. While I don’t consider display tablets that require a PC and an outlet to work really portable, it would be a lot easier to move with the Artisul D16 from one space to another. In comparison, my Cintiq weighs in at a proud 8.5kg, making it a chore to move around. I have it hooked up to a monitor stand to be able to move it more easily across my desk.
The Setup
The setup of the tablet was quick as well, with only minor hiccups. The drivers installed quickly and basic setup was done in a matter of minutes. That doesn’t mean it came without issues: the cursor vanished as soon as I hovered over the driver window, making it a guessing game where I would be clicking and the pen calibration refused to work on the tablet screen and instead always defaulted to my regular screen. I ended up using the out of the box pen calibration for my test drawing which worked well enough.
The tablet comes with customizable hot-keys that you can reassign in the driver software. I did not end up using the hot-keys, since I use a Razer Tartarus for all my shortcuts, but I did play around with them to get a feel for them. The zoom wheel had a very satisfying haptic feel to it which I really enjoyed, and as far as I could tell, you can map a lot of shortcuts to the buttons, including with modifier keys like ctrl, shift, alt and the win key. I noticed that there was no option to map numpad keys to these buttons, but I was informed by my stream viewers that very few people have a full size keyboard with a numpad anymore.
The pen comes with two buttons as well. Unlike the hot-keys on the side of the tablet, these are barely customizable. I was only able to assign mouse clicks to them (right, left, scroll wheel click, etc) and no other hotkeys. I have the alt key mapped to my pen button on my Cintiq, enabling me to color pick with a single click of the pen. The other button is mapped to the tablet menu for easy display switches. Not having this level of customization was a bit of a bummer, but I just ended up mapping the alt key to a new button on my Razer Tartarus and moved on.
The pen had a very similar size to my Wacom pen, but was significantly lighter. It also rattled slightly when shook, but after inspection this was just the buttons clicking against the outer case and no internal issues. The pen is made from one material, a smooth plastic finish. I would have liked for there to be a rubber-like material at the grip like on the Wacom pen for better handling, but it still worked fine without it.
Despite not being able to calibrate the pen for the display tablet, the cursor offset was minimal. It took me a while at the beginning to get used to the slight difference to my current tablet, but it was easy to get used to it and I was able to smoothly ink and color with the tablet. The screen surface was very smooth, reminding me more of an iPad surface. The included smudge guard glove helped mitigate any slipping or sliding this might have caused, enabling me to draw smoothly. Like with the cursor offset, it took me a while to get used to the different pressure sensitivity of the tablet, but I adapted quickly.
So what do I think of it?
Overall, drawing felt different on this tablet, but I can easily see myself getting used to the quirks of the tablet with time. Most of the issues I had were QoL things I am used to from my existing tablet.
But I think that’s where the most important argument for the tablet comes in: the price.
I love my Cintiq. I can do professional grade work on it and I rebought the same model after my old one got screen issues, I liked it that much. But it also costs more than a 1000 € still, even after being on the market for over 10 years (I bought it for about 1.500 € refurbished in 2014, for reference). The Artisul D16 on the other hand runs you a bit more than 200€. That is a significant price difference! I often get asked by aspiring artists what tools I use and while I am always honest with them, I also preface it by saying that they should not invest in a Cintiq if they are just starting out. They are high quality professional tools and have a price point that reflects that. You do not need these expensive tools to create art. You can get great results on a lot cheaper alternatives! I do this for a living so I can justify paying extra for the QoL upgrades the Cintiq offers me, but I have no illusion that they are an accessible tool for most people.
I can recommend the Artisul D16 as a beginner screen tablet for people who are just getting into art or want to try a display tablet for once. I wouldn’t give up my Cintiq for it, but I can appreciate the value it offers for the competitive price point. If you want to get an Artisul D16 for yourself, you can click this link to check out their shop!
AMAZON.US: https://www.amazon.com/dp/B07TQLGC81
AMAZON.JP: https://www.amazon.co.jp/dp/B07T6ZT84V
AMAZON.MX: https://www.amazon.com.mx/dp/B07T6ZT84V
Once again thank you to the Artisul team for giving me the opportunity to review their display tablet!
105 notes
·
View notes
Text
📥 How to install everything ?! 🗂️
It's a very big project ! Between the lots and the sims, you have to be very sure of what you are doing. However, this post is there to guide you through the steps of installing everything.


🟪 Phase one - The "Lot Master Meshes Post" 🏗️ (for the unpopulated neighborhood) : This post contains links for custom content (Building and Buying Mode) needed that does not install itself with the packaged files and needs to be installed for lots to display properly. Not downloading those things can cause bug, especially food/shop displays. 🟥 Phase two - The "Chapters" posts : install the lots 🏡 These posts contain links to big downloads or entire download sub-folders containing the lots.packages (Neighborhood, Downtown, MagicTown etc.). Each lot.package file must be installed for every lot to display properly in the neighborhood with The Sims 2 Clean Pack Installer by Mootilda. For the lots, every CC is needed. The CC presentation in the lots posts (between pictures) serves to illustrate (or to show you an alternative or to thank a creator) and is included in the packaged file or the lot master-meshes post. The lots post where only to show what you are downloading, and for the ones who just want to pick and choose a particular lot for their own game. 🟧 Phase three - The Neighborhood 🏘️ The "Chapter 5" post includes every neighborhood decoration CC you need for the neighborhoods, after you installed every lot packaged file. When, you passed the check-list, you can choose what to download between all the options presented to you. 🟨 Phase four - The CAS Master Meshes Posts 1 and 2 A lot of CC presented in those posts are not strictly necessary. If you don't install a default replacement, you will end up with the maxis content. If you don't load a custom hairstyle or clothing, you can have a display bug, but that is quickly corrected with the "change appearance" option. Big bugs can occur when an eye or skin color is missing, so I deliberately build my sims with the Maxis eye/skin options. These posts are for the ones who want to install my populated neighborhood. For those who only want to choose a few sims from the families, each sim in each family post has their own content listed. 🟩 Phase five - Download & install the TS1 families Subhood 🧑🤝🧑 I'm working on making one big neighborhood, but the issue with main hoods is unwanted sims spawning, especially custom PT and NPCs. And then potential corruption when you try to clean that freaking mess. The Main (completely unpopulated) hood with the populated subhood is the best option to have a "Fresh Start" clean neighborhood. After deleting the subhood, you have to move the family in houses. The Sims 1 has a big family bin. Choosing who is going where is part of the game, it doesn't seem right to choose for you. 🟦 Phase six - Passed the check list 🎮 You chose, you installed, you PLAY ! (veni, vedi, vici...)


⚠️ I'm not going to lie to you. It's a big project. I tried by the past to handle that kind of installation and here is my advice, good or bad, I don't know :
1 - Install every master-meshes, well organized in your files. 2 - Install every CC included in lot packages in the same folder, to make the duplicate replacing themselves (there are a lot since I use a lot of time the same items... logic). 3 - Install the neighborhood deco nicely organized in your folders. 4 - Test the lots/neighborhoods, see if everything works. 5 - Exit your game and Run a program to search for duplicates (like this one for exemple), and suppress all duplicates files from the "lots packaged file CC folder" (suppress where it's still messy) 6 - If you want to organize the "messy" folder, you can run a program like the great Delphy Download Organizer to efficiently re-dispatch files according to your own classification. However, I strongly advise against using this software to locate duplicates. It has the option, but it doesn't work well.
💡To go faster ? - The "Navigation" page on my Simblr !


#sims 2#sims 2 download#ts2 simblr#ts2#1t2#the sims 1#sims nostalgia#sims 1#the sims 2#ts1#ts1t2 families#ts1t2 neighborhood download#ts1t2 neighborhood project#ts1 to ts2#FAQ
57 notes
·
View notes