#software testing methods
Explore tagged Tumblr posts
Visit Tumblr Blog
Explore Tumblr blogs with no restrictions, modern design and the best experience.
Last Seen Tumblr Blogs


Fun Fact
Forty percent of Tumblr users are between the ages of 18 to 25.
Text
i was actually trying to do a completely different thing but ended up here because i got curious in testing shit out
i present to you the definitive neru lmao - a morph of high-pitched miku & low-pitched rin
(excerpt is from a shitty vpr i made myself from a midi [which i can no longer find] of "the bluefin tuna comes flying" , thumbnail is from this post)
#my audio lol#vocaloid#fanloid#akita neru#did i really learn a wholeass new software for future shitpost purposes? YES I DID nothing can stop me#ok to be fair vocalmorph wasn't that hard to learn it was pretty basic... no disrespect to the people who couldnt figure it out#like yeah its in japanese but i got. deepl to translate and i referenced creator's og demonstration?#anyway this sounds kinda janky but im noticing most things that warp audio do that... vocalshifter does this too#so idk if this method is suitable for making a whole cover but this was just for funsies anyways lol#this vpr (which i converted to other formats too) is like my main 'test purposes' file lol? interesting considering the lyrics...#idk if i can 100% say its an og vpr actually since i just isolated the main melody from the midi and input the lyrics#its not properly tuned or anything#but i cant find said midi anymore my dumbass forgot to save it... i think it was on niconicodouga but it's been down for months now so...
7 notes
·
View notes
Text
Tumblr so desperately needs Bug Bounty or equivalent.
#there are so many bugs which I can understand not showing up in testing as someone working in software eng#but that’s why you have SRs or other methods like Bug Bounty to have users point them out#and tumblr just doesn’t#there are so many people here that could give useful suggestions too#not whump#hellsite
4 notes
·
View notes
Text
So quick way of saying this, no, tumblr labs is not a better way of testing this. In fact, what tumblr is doing here in random a b testing is industry standard for a lot of reasons. For the company, it is indeed the best solution and when done well it is generally the best solution for the end users as a whole (I don't think tumblr does it particularly well and if the nature of the changes in question are not part of how they are tested).
Ok so I tried to think of a nice way to put this next part, but I just can't think of anything so please understand I am not trying to insult you or anyone else, but your last point shows pretty clearly you have not thought this through. See, if/when they roll out a major change to the site, the vast majority of users will receive a sudden layout change they didn't ask for or get warned about. Maybe a couple percent of their user base will be dialed in enough to see it coming, but like 98% wont be. A big part of these random tests is to see how users will react to that unexpected change. It is actually one of the most important things to understand and why it is so important to do random testing like this. Again, this is industry standard practice for a reason.
really not a big fan of how tumblr will ''test'' changes by just. like. rolling them out to random users without warning? like dont they already have tumblr labs as an opt in way of testing new features?
stuff like the new icon changes where they directly say in their blog post about it that they're ''running a new experiment'' like okay. thats not even a good way to get feedback because objectively way more people are going to be negative about a sudden layout change they didnt ask for or get warned about? this is. like. surely there is a better way to do this. guys. please.
#now I think the lastest tumblr thing with avatars is stupid as hell and the fact that it even got to this stage#tells me it is some idiot's pet idea#but the actual method of testing is so standard and mundane that it is kind of funny#every major software company does it this way#you just never noticed because you are not as dialed in to changes on steam or windows or firefox
7K notes
·
View notes
Text

In the field of technology, there can absolutely be no compromise when it come to the reliability of software and systems. This is where reliability testing services step into the spotlight, playing a pivotal role in ensuring that applications and platforms perform consistently and flawlessly under various conditions. Hence, we are about to discuss and explore the different types of reliability testing services such as feature testing, regression testing, and load testing that are widely used.
0 notes
Text

End-to-end testing, often depicted in infographics, is the final and comprehensive phase in the software testing process. This crucial step ensures that all components of a system, from user interfaces to backend databases, work seamlessly together, replicating real-world user interactions. Through a visually engaging infographics, viewers can grasp the holistic nature of end-to-end testing, where various test scenarios are executed to confirm that the software functions as a cohesive whole, ultimately delivering a high-quality, error-free user experience.
#End to end testing methods#end to end testing points#end to end testing infographic#software testing#studying#teaching#success#institute#software testing course in thane#software#software testing in mumbai
0 notes
Text

#application development#application development services#app developers#cloud computing company#software testing types and methods#data analytics company
0 notes
Text
"When Ellen Kaphamtengo felt a sharp pain in her lower abdomen, she thought she might be in labour. It was the ninth month of her first pregnancy and she wasn’t taking any chances. With the help of her mother, the 18-year-old climbed on to a motorcycle taxi and rushed to a hospital in Malawi’s capital, Lilongwe, a 20-minute ride away.
At the Area 25 health centre, they told her it was a false alarm and took her to the maternity ward. But things escalated quickly when a routine ultrasound revealed that her baby was much smaller than expected for her pregnancy stage, which can cause asphyxia – a condition that limits blood flow and oxygen to the baby.
In Malawi, about 19 out of 1,000 babies die during delivery or in the first month of life. Birth asphyxia is a leading cause of neonatal mortality in the country, and can mean newborns suffering brain damage, with long-term effects including developmental delays and cerebral palsy.
Doctors reclassified Kaphamtengo, who had been anticipating a normal delivery, as a high-risk patient. Using AI-enabled foetal monitoring software, further testing found that the baby’s heart rate was dropping. A stress test showed that the baby would not survive labour.
The hospital’s head of maternal care, Chikondi Chiweza, knew she had less than 30 minutes to deliver Kaphamtengo’s baby by caesarean section. Having delivered thousands of babies at some of the busiest public hospitals in the city, she was familiar with how quickly a baby’s odds of survival can change during labour.
Chiweza, who delivered Kaphamtengo’s baby in good health, says the foetal monitoring programme has been a gamechanger for deliveries at the hospital.
“[In Kaphamtengo’s case], we would have only discovered what we did either later on, or with the baby as a stillbirth,” she says.
The software, donated by the childbirth safety technology company PeriGen through a partnership with Malawi’s health ministry and Texas children’s hospital, tracks the baby’s vital signs during labour, giving clinicians early warning of any abnormalities. Since they began using it three years ago, the number of stillbirths and neonatal deaths at the centre has fallen by 82%. It is the only hospital in the country using the technology.
“The time around delivery is the most dangerous for mother and baby,” says Jeffrey Wilkinson, an obstetrician with Texas children’s hospital, who is leading the programme. “You can prevent most deaths by making sure the baby is safe during the delivery process.”
The AI monitoring system needs less time, equipment and fewer skilled staff than traditional foetal monitoring methods, which is critical in hospitals in low-income countries such as Malawi, which face severe shortages of health workers. Regular foetal observation often relies on doctors performing periodic checks, meaning that critical information can be missed during intervals, while AI-supported programs do continuous, real-time monitoring. Traditional checks also require physicians to interpret raw data from various devices, which can be time consuming and subject to error.
Area 25’s maternity ward handles about 8,000 deliveries a year with a team of around 80 midwives and doctors. While only about 10% are trained to perform traditional electronic monitoring, most can use the AI software to detect anomalies, so doctors are aware of any riskier or more complex births. Hospital staff also say that using AI has standardised important aspects of maternity care at the clinic, such as interpretations on foetal wellbeing and decisions on when to intervene.
Kaphamtengo, who is excited to be a new mother, believes the doctor’s interventions may have saved her baby’s life. “They were able to discover that my baby was distressed early enough to act,” she says, holding her son, Justice.
Doctors at the hospital hope to see the technology introduced in other hospitals in Malawi, and across Africa.
“AI technology is being used in many fields, and saving babies’ lives should not be an exception,” says Chiweza. “It can really bridge the gap in the quality of care that underserved populations can access.”"
-via The Guardian, December 6, 2024
#cw child death#cw pregnancy#malawi#africa#ai#artificial intelligence#public health#infant mortality#childbirth#medical news#good news#hope
910 notes
·
View notes
Text
Here’s an short unsuccessful test I did today; attempting to create an animation in a program I quite literally have ZERO experience with using ahaha :’)
Storytime/long ramble (unimportant):
I wanted to be like the “cool kids” and shift out of my comfort zone—no more relying solely on FlipaClip! Gotta branch out to a more effective program (ideally one that has an interface resembling animation software used directly in industry work)! I’ve seen people make good use of AlightMotion and figured it’s worth a shot!….that goal quickly fell apart <<
There’s definitely a wide variety of tools and especially emphasis on built-in editing features. I was intimidated by the sheer amount of mechanics going on at first, but gradually you get used to navigating stuff (even if some stuff I’m still trying to figure out the purpose of lmao). The only issue is that (to me at least) AlightMotion seems to handle tweening better then frame-by-frame animation. Which immediately lands me in a predicament of sorts since uh…can’t say I’m good at tweening. That would require me to actually finish coloring characters/have the ability to polish things using clean linework :P
Tweening (from my perspective) is about making something visually appealing by rigging separated assets of characters (like you would for puppets) rather then the whole. Or alternatively, some people tween by slightly moving the same drawn lines around on a singular drawing…so TLDR the exact opposite of frame-by-frame. I’m not an illustrator, I’m a storyteller. I can only manage rough line work with uncolored motions. Usually the smooth flow of frame-by saves me, else it would all look rather unfinished. I know where my strengths and my weaknesses lie; I’ve given AlightMotion a shot, but unfortunately it’s not gonna be solving the FlipaClip replacement problem 🥲
Was still beneficial challenging myself to play around with an unfamiliar environment! It’s a step in the right direction to encourage myself to try different things/figure out what works or doesn’t. If my patience didn’t wear thin, I’m sure I could’ve attempted authentic tweening instead of trying to push the program to work with frame-by-frame (it kept crashing, lagging, and pixelating while I tried to force it to comply with my methods. Think it’s safe to assume it doesn’t like me fighting against tweening lol). Who knows! Might return to AlightMotion in the future or might not. Depends on how adventurous or up for a challenge I’m feeling :3


Also goes without saying that online video tutorials would have probably helped—I’m just stubborn & prefer taking hands on approach sometimes. Learning any new program is gonna be overwhelming and scary at first, it is normal! I don’t think anything bad about AlightMotion. Just not for me at the moment. Was fun to play with while it lasted
#hplonesome art#mr puzzles and leggy animation#mr. puzzles and leggy#leggy and mr. puzzles#smg4 leggy#smg4 mr. puzzles#mr puzzles smg4#smg4 mr puzzles#leggy smg4#update#(not feeling up for other tags since I kinda deviated too much in my rambling :P)
78 notes
·
View notes
Text
I know I’m screaming into the void here but do not witch hunt people with AI accusations
As someone whose job for the last two years involved me reading and rereading essays and creative fiction written by my students (a group of writers notorious for using AI despite being told not to because they worry about their grades more than their skills) let me tell you straight up that detecting AI in any written work isn’t straightforward
AI detection softwares are bullshit. Even Turnitin, which is supposedly the best, has an error rate that is slowly increasing over time. They’re not reliable. The free ones online are even worse, trust me
“Oh but it’s so obvious!” Sure. If you’re trained to notice patterns and predictive repetitions in the language, sure. I can spot a ChatGPT student essay from a mile away. But only if they haven’t edited it themselves, or used a bunch of methods (Grammarly, other AIs, their friends, a “humanizer” software, etc) to obscure the ChatGPT patterns. And it’s easier with formulaic essays—with creative fiction it’s much harder.
Why?
Well because good creative fiction is a) difficult to write well and b) extremely subjective. ChatGPT does have notable patterns for creative writing. But it’s been trained on the writing that is immensely popular, writing that has been produced by humans. Purple prose, odd descriptions, sixteen paragraphs of setting where one or two could be fine, all of that is stylistic choices that people have intentionally made in their writing that ChatGPT is capable of predicting and producing.
What I’m saying is, people just write like that normally. There are stylistic things I do in to writing that other people swear up and down is an AI indicator. But it’s just me writing words from my head
So can we, should we, start witch hunts over AI use in fanfic when we notice these patterns? My answer is no because that’s dangerous.
Listen. I hate AI. I hate the idea of someone stealing my work and feeding it into a machine that will then “improve itself” based on work I put my heart and soul into. If I notice what I think is AI in a work I’ve casually encountered online, I make a face and I stop reading. It’s as simple as that. I don’t drag their name out into the public to start a tomato throwing session because I don’t know their story (hell they might even be a bot) and because one accusation can suddenly become a deluge
Or a witch hunt, if you will
Because accusing one person of AI and starting a whole ass witch hunt is just begging people to start badly analyzing the content they’re reading out of fear that they’ve been duped. People don’t want to feel the sting or embarrassment of having been tricked. So they’ll start reading more closely. Too closely. They’ll start finding evidence that isn’t really evidence. “This phrase has been used three times in the last ten paragraphs. It must be AI.”
Or, it could be that I just don’t have enough words in my brain that day and didn’t notice the repetition when I was editing.
There’s a term you may be familiar with called a “false positive.” In science or medicine, it’s when something seems to have met the conditions you’re looking for, but in reality isn’t true or real or accurate. Like when you test for the flu and get a positive result when you didn’t have the flu. Or, in this case, when you notice someone writing sentences that appear suspiciously like a ChatGPT constructed sentence and go “oh, yes that must mean it’s ChatGPT then”
(This type of argumentation/conclusion also just uses a whole series of logical fallacies I won’t get into here except to say that if you want to have a civil conversation about AI use in fandom you cannot devolve into hasty generalizations based on bits and parts)
I’m not saying this to protect the people using AI. In an ideal world, people would stop using it and return back to the hard work of making art and literature and so on. But we don’t live in that world right now, and AI is prevalent everywhere. Which means we have to be careful with our accusations and any “evidence” we think we see.
And if we do find AI in fandom spaces, we must be careful with how we handle or approach that, otherwise we will start accusing writers who have never touched AI a day in their life of having used it. We will create a culture of fear around writing and creating that stops creatives from making anything at all. People will become too scared to share their work out of fear they’ll be accused of AI and run off.
I don’t have solutions except to say that in my experience, outright accusing people of AI tends to create an environment of mistrust that isn’t productive for creatives or fans/readers. If you start looking for AI evidence everywhere, you will find it everywhere. Next thing you know, you’re miserable because you feel like you can’t read or enjoy anything.
If you notice what you think is AI in a work, clock it, maybe start a discussion about it, but keep that conversation open to multiple answers or outcomes. You’re not going to stop people from using AI by pointing fingers at them. But you might be able to inspire them to try writing or creating for themselves if you keep the conversation open, friendly, and encourage them to try creating for themselves, without the help of AI
123 notes
·
View notes
Text


Neural Filters Tutorial for Gifmakers by @antoniosvivaldi
Hi everyone! In light of my blog’s 10th birthday, I’m delighted to reveal my highly anticipated gifmaking tutorial using Neural Filters - a very powerful collection of filters that really broadened my scope in gifmaking over the past 12 months.
Before I get into this tutorial, I want to thank @laurabenanti, @maines , @cobbbvanth, and @cal-kestis for their unconditional support over the course of my journey of investigating the Neural Filters & their valuable inputs on the rendering performance!
In this tutorial, I will outline what the Photoshop Neural Filters do and how I use them in my workflow - multiple examples will be provided for better clarity. Finally, I will talk about some known performance issues with the filters & some feasible workarounds.
Tutorial Structure:
Meet the Neural Filters: What they are and what they do
Why I use Neural Filters? How I use Neural Filters in my giffing workflow
Getting started: The giffing workflow in a nutshell and installing the Neural Filters
Applying Neural Filters onto your gif: Making use of the Neural Filters settings; with multiple examples
Testing your system: recommended if you’re using Neural Filters for the first time
Rendering performance: Common Neural Filters performance issues & workarounds
For quick reference, here are the examples that I will show in this tutorial:
Example 1: Image Enhancement | improving the image quality of gifs prepared from highly compressed video files
Example 2: Facial Enhancement | enhancing an individual's facial features
Example 3: Colour Manipulation | colourising B&W gifs for a colourful gifset
Example 4: Artistic effects | transforming landscapes & adding artistic effects onto your gifs
Example 5: Putting it all together | my usual giffing workflow using Neural Filters
What you need & need to know:
Software: Photoshop 2021 or later (recommended: 2023 or later)*
Hardware: 8GB of RAM; having a supported GPU is highly recommended*
Difficulty: Advanced (requires a lot of patience); knowledge in gifmaking and using video timeline assumed
Key concepts: Smart Layer / Smart Filters
Benchmarking your system: Neural Filters test files**
Supplementary materials: Tutorial Resources / Detailed findings on rendering gifs with Neural Filters + known issues***
*I primarily gif on an M2 Max MacBook Pro that's running Photoshop 2024, but I also have experiences gifmaking on few other Mac models from 2012 ~ 2023.
**Using Neural Filters can be resource intensive, so it’s helpful to run the test files yourself. I’ll outline some known performance issues with Neural Filters and workarounds later in the tutorial.
***This supplementary page contains additional Neural Filters benchmark tests and instructions, as well as more information on the rendering performance (for Apple Silicon-based devices) when subject to heavy Neural Filters gifmaking workflows
Tutorial under the cut. Like / Reblog this post if you find this tutorial helpful. Linking this post as an inspo link will also be greatly appreciated!
1. Meet the Neural Filters!
Neural Filters are powered by Adobe's machine learning engine known as Adobe Sensei. It is a non-destructive method to help streamline workflows that would've been difficult and/or tedious to do manually.
Here are the Neural Filters available in Photoshop 2024:


Skin Smoothing: Removes blemishes on the skin
Smart Portrait: This a cloud-based filter that allows you to change the mood, facial age, hair, etc using the sliders+
Makeup Transfer: Applies the makeup (from a reference image) to the eyes & mouth area of your image
Landscape Mixer: Transforms the landscape of your image (e.g. seasons & time of the day, etc), based on the landscape features of a reference image
Style Transfer: Applies artistic styles e.g. texturings (from a reference image) onto your image
Harmonisation: Applies the colour balance of your image based on the lighting of the background image+
Colour Transfer: Applies the colour scheme (of a reference image) onto your image
Colourise: Adds colours onto a B&W image
Super Zoom: Zoom / crop an image without losing resolution+
Depth Blur: Blurs the background of the image
JPEG Artefacts Removal: Removes artefacts caused by JPEG compression
Photo Restoration: Enhances image quality & facial details
+These three filters aren't used in my giffing workflow. The cloud-based nature of Smart Portrait leads to disjointed looking frames. For Harmonisation, applying this on a gif causes Neural Filter timeout error. Finally, Super Zoom does not currently support output as a Smart Filter
If you're running Photoshop 2021 or earlier version of Photoshop 2022, you will see a smaller selection of Neural Filters:


Things to be aware of:
You can apply up to six Neural Filters at the same time
Filters where you can use your own reference images: Makeup Transfer (portraits only), Landscape Mixer, Style Transfer (not available in Photoshop 2021), and Colour Transfer
Later iterations of Photoshop 2023 & newer: The first three default presets for Landscape Mixer and Colour Transfer are currently broken.
2. Why I use Neural Filters?
Here are my four main Neural Filters use cases in my gifmaking process. In each use case I'll list out the filters that I use:

Enhancing Image Quality:
Common wisdom is to find the highest quality video to gif from for a media release & avoid YouTube whenever possible. However for smaller / niche media (e.g. new & upcoming musical artists), prepping gifs from highly compressed YouTube videos is inevitable.
So how do I get around with this? I have found Neural Filters pretty handy when it comes to both correcting issues from video compression & enhancing details in gifs prepared from these highly compressed video files.
Filters used: JPEG Artefacts Removal / Photo Restoration
Facial Enhancement:
When I prepare gifs from highly compressed videos, something I like to do is to enhance the facial features. This is again useful when I make gifsets from compressed videos & want to fill up my final panel with a close-up shot.
Filters used: Skin Smoothing / Makeup Transfer / Photo Restoration (Facial Enhancement slider)
Colour Manipulation:
Neural Filters is a powerful way to do advanced colour manipulation - whether I want to quickly transform the colour scheme of a gif or transform a B&W clip into something colourful.
Filters used: Colourise / Colour Transfer
Artistic Effects:
This is one of my favourite things to do with Neural Filters! I enjoy using the filters to create artistic effects by feeding textures that I've downloaded as reference images. I also enjoy using these filters to transform the overall the atmosphere of my composite gifs. The gifsets where I've leveraged Neural Filters for artistic effects could be found under this tag on usergif.
Filters used: Landscape Mixer / Style Transfer / Depth Blur
How I use Neural Filters over different stages of my gifmaking workflow:
I want to outline how I use different Neural Filters throughout my gifmaking process. This can be roughly divided into two stages:
Stage I: Enhancement and/or Colourising | Takes place early in my gifmaking process. I process a large amount of component gifs by applying Neural Filters for enhancement purposes and adding some base colourings.++
Stage II: Artistic Effects & more Colour Manipulation | Takes place when I'm assembling my component gifs in the big PSD / PSB composition file that will be my final gif panel.
I will walk through this in more detail later in the tutorial.
++I personally like to keep the size of the component gifs in their original resolution (a mixture of 1080p & 4K), to get best possible results from the Neural Filters and have more flexibility later on in my workflow. I resize & sharpen these gifs after they're placed into my final PSD composition files in Tumblr dimensions.
3. Getting started
The essence is to output Neural Filters as a Smart Filter on the smart object when working with the Video Timeline interface. Your workflow will contain the following steps:
Prepare your gif
In the frame animation interface, set the frame delay to 0.03s and convert your gif to the Video Timeline
In the Video Timeline interface, go to Filter > Neural Filters and output to a Smart Filter
Flatten or render your gif (either approach is fine). To flatten your gif, play the "flatten" action from the gif prep action pack. To render your gif as a .mov file, go to File > Export > Render Video & use the following settings.

Setting up:
o.) To get started, prepare your gifs the usual way - whether you screencap or clip videos. You should see your prepared gif in the frame animation interface as follows:

Note: As mentioned earlier, I keep the gifs in their original resolution right now because working with a larger dimension document allows more flexibility later on in my workflow. I have also found that I get higher quality results working with more pixels. I eventually do my final sharpening & resizing when I fit all of my component gifs to a main PSD composition file (that's of Tumblr dimension).
i.) To use Smart Filters, convert your gif to a Smart Video Layer.
As an aside, I like to work with everything in 0.03s until I finish everything (then correct the frame delay to 0.05s when I upload my panels onto Tumblr).
For convenience, I use my own action pack to first set the frame delay to 0.03s (highlighted in yellow) and then convert to timeline (highlighted in red) to access the Video Timeline interface. To play an action, press the play button highlighted in green.

Once you've converted this gif to a Smart Video Layer, you'll see the Video Timeline interface as follows:

ii.) Select your gif (now as a Smart Layer) and go to Filter > Neural Filters

Installing Neural Filters:
Install the individual Neural Filters that you want to use. If the filter isn't installed, it will show a cloud symbol (highlighted in yellow). If the filter is already installed, it will show a toggle button (highlighted in green)

When you toggle this button, the Neural Filters preview window will look like this (where the toggle button next to the filter that you use turns blue)

4. Using Neural Filters
Once you have installed the Neural Filters that you want to use in your gif, you can toggle on a filter and play around with the sliders until you're satisfied. Here I'll walkthrough multiple concrete examples of how I use Neural Filters in my giffing process.
Example 1: Image enhancement | sample gifset
This is my typical Stage I Neural Filters gifmaking workflow. When giffing older or more niche media releases, my main concern is the video compression that leads to a lot of artefacts in the screencapped / video clipped gifs.
To fix the artefacts from compression, I go to Filter > Neural Filters, and toggle JPEG Artefacts Removal filter. Then I choose the strength of the filter (boxed in green), output this as a Smart Filter (boxed in yellow), and press OK (boxed in red).
Note: The filter has to be fully processed before you could press the OK button!

After applying the Neural Filters, you'll see "Neural Filters" under the Smart Filters property of the smart layer

Flatten / render your gif
Example 2: Facial enhancement | sample gifset
This is my routine use case during my Stage I Neural Filters gifmaking workflow. For musical artists (e.g. Maisie Peters), YouTube is often the only place where I'm able to find some videos to prepare gifs from. However even the highest resolution video available on YouTube is highly compressed.
Go to Filter > Neural Filters and toggle on Photo Restoration. If Photoshop recognises faces in the image, there will be a "Facial Enhancement" slider under the filter settings.

Play around with the Photo Enhancement & Facial Enhancement sliders. You can also expand the "Adjustment" menu make additional adjustments e.g. remove noises and reducing different types of artefacts.

Once you're happy with the results, press OK and then flatten / render your gif.
Example 3: Colour Manipulation | sample gifset
Want to make a colourful gifset but the source video is in B&W? This is where Colourise from Neural Filters comes in handy! This same colourising approach is also very helpful for colouring poor-lit scenes as detailed in this tutorial.
Here's a B&W gif that we want to colourise:

Highly recommended: add some adjustment layers onto the B&W gif to improve the contrast & depth. This will give you higher quality results when you colourise your gif.
Go to Filter > Neural Filters and toggle on Colourise.

Make sure "Auto colour image" is enabled.
Play around with further adjustments e.g. colour balance, until you're satisfied then press OK.
Important: When you colourise a gif, you need to double check that the resulting skin tone is accurate to real life. I personally go to Google Images and search up photoshoots of the individual / character that I'm giffing for quick reference.
Add additional adjustment layers until you're happy with the colouring of the skin tone.

Once you're happy with the additional adjustments, flatten / render your gif. And voila!

Note: For Colour Manipulation, I use Colourise in my Stage I workflow and Colour Transfer in my Stage II workflow to do other types of colour manipulations (e.g. transforming the colour scheme of the component gifs)
Example 4: Artistic Effects | sample gifset
This is where I use Neural Filters for the bulk of my Stage II workflow: the most enjoyable stage in my editing process!
Normally I would be working with my big composition files with multiple component gifs inside it. To begin the fun, drag a component gif (in PSD file) to the main PSD composition file.
Resize this gif in the composition file until you're happy with the placement

Duplicate this gif. Sharpen the bottom layer (highlighted in yellow), and then select the top layer (highlighted in green) & go to Filter > Neural Filters

I like to use Style Transfer and Landscape Mixer to create artistic effects from Neural Filters. In this particular example, I've chosen Landscape Mixer
Select a preset or feed a custom image to the filter (here I chose a texture that I've on my computer)

Play around with the different sliders e.g. time of the day / seasons
Important: uncheck "Harmonise Subject" & "Preserve Subject" - these two settings are known to cause performance issues when you render a multiframe smart object (e.g. for a gif)

Once you're happy with the artistic effect, press OK
To ensure you preserve the actual subject you want to gif (bc Preserve Subject is unchecked), add a layer mask onto the top layer (with Neural Filters) and mask out the facial region. You might need to play around with the Layer Mask Position keyframes or Rotoscope your subject in the process.
After you're happy with the masking, flatten / render this composition file and voila!

Example 5: Putting it all together | sample gifset
Let's recap on the Neural Filters gifmaking workflow and where Stage I and Stage II fit in my gifmaking process:
i. Preparing & enhancing the component gifs
Prepare all component gifs and convert them to smart layers
Stage I: Add base colourings & apply Photo Restoration / JPEG Artefacts Removal to enhance the gif's image quality
Flatten all of these component gifs and convert them back to Smart Video Layers (this process can take a lot of time)
Some of these enhanced gifs will be Rotoscoped so this is done before adding the gifs to the big PSD composition file
ii. Setting up the big PSD composition file
Make a separate PSD composition file (Ctrl / Cmmd + N) that's of Tumblr dimension (e.g. 540px in width)
Drag all of the component gifs used into this PSD composition file
Enable Video Timeline and trim the work area
In the composition file, resize / move the component gifs until you're happy with the placement & sharpen these gifs if you haven't already done so
Duplicate the layers that you want to use Neural Filters on
iii. Working with Neural Filters in the PSD composition file
Stage II: Neural Filters to create artistic effects / more colour manipulations!
Mask the smart layers with Neural Filters to both preserve the subject and avoid colouring issues from the filters
Flatten / render the PSD composition file: the more component gifs in your composition file, the longer the exporting will take. (I prefer to render the composition file into a .mov clip to prevent overriding a file that I've spent effort putting together.)
Note: In some of my layout gifsets (where I've heavily used Neural Filters in Stage II), the rendering time for the panel took more than 20 minutes. This is one of the rare instances where I was maxing out my computer's memory.
Useful things to take note of:
Important: If you're using Neural Filters for Colour Manipulation or Artistic Effects, you need to take a lot of care ensuring that the skin tone of nonwhite characters / individuals is accurately coloured
Use the Facial Enhancement slider from Photo Restoration in moderation, if you max out the slider value you risk oversharpening your gif later on in your gifmaking workflow
You will get higher quality results from Neural Filters by working with larger image dimensions: This gives Neural Filters more pixels to work with. You also get better quality results by feeding higher resolution reference images to the Neural Filters.
Makeup Transfer is more stable when the person / character has minimal motion in your gif
You might get unexpected results from Landscape Mixer if you feed a reference image that don't feature a distinctive landscape. This is not always a bad thing: for instance, I have used this texture as a reference image for Landscape Mixer, to create the shimmery effects as seen in this gifset
5. Testing your system
If this is the first time you're applying Neural Filters directly onto a gif, it will be helpful to test out your system yourself. This will help:
Gauge the expected rendering time that you'll need to wait for your gif to export, given specific Neural Filters that you've used
Identify potential performance issues when you render the gif: this is important and will determine whether you will need to fully playback your gif before flattening / rendering the file.
Understand how your system's resources are being utilised: Inputs from Windows PC users & Mac users alike are welcome!
About the Neural Filters test files:
Contains six distinct files, each using different Neural Filters
Two sizes of test files: one copy in full HD (1080p) and another copy downsized to 540px
One folder containing the flattened / rendered test files
How to use the Neural Filters test files:
What you need:
Photoshop 2022 or newer (recommended: 2023 or later)
Install the following Neural Filters: Landscape Mixer / Style Transfer / Colour Transfer / Colourise / Photo Restoration / Depth Blur
Recommended for some Apple Silicon-based MacBook Pro models: Enable High Power Mode
How to use the test files:
For optimal performance, close all background apps
Open a test file
Flatten the test file into frames (load this action pack & play the “flatten” action)
Take note of the time it takes until you’re directed to the frame animation interface
Compare the rendered frames to the expected results in this folder: check that all of the frames look the same. If they don't, you will need to fully playback the test file in full before flattening the file.†
Re-run the test file without the Neural Filters and take note of how long it takes before you're directed to the frame animation interface
Recommended: Take note of how your system is utilised during the rendering process (more info here for MacOS users)
†This is a performance issue known as flickering that I will discuss in the next section. If you come across this, you'll have to playback a gif where you've used Neural Filters (on the video timeline) in full, prior to flattening / rendering it.
Factors that could affect the rendering performance / time (more info):
The number of frames, dimension, and colour bit depth of your gif
If you use Neural Filters with facial recognition features, the rendering time will be affected by the number of characters / individuals in your gif
Most resource intensive filters (powered by largest machine learning models): Landscape Mixer / Photo Restoration (with Facial Enhancement) / and JPEG Artefacts Removal
Least resource intensive filters (smallest machine learning models): Colour Transfer / Colourise
The number of Neural Filters that you apply at once / The number of component gifs with Neural Filters in your PSD file
Your system: system memory, the GPU, and the architecture of the system's CPU+++
+++ Rendering a gif with Neural Filters demands a lot of system memory & GPU horsepower. Rendering will be faster & more reliable on newer computers, as these systems have CPU & GPU with more modern instruction sets that are geared towards machine learning-based tasks.
Additionally, the unified memory architecture of Apple Silicon M-series chips are found to be quite efficient at processing Neural Filters.
6. Performance issues & workarounds
Common Performance issues:
I will discuss several common issues related to rendering or exporting a multi-frame smart object (e.g. your composite gif) that uses Neural Filters below. This is commonly caused by insufficient system memory and/or the GPU.
Flickering frames: in the flattened / rendered file, Neural Filters aren't applied to some of the frames+-+
Scrambled frames: the frames in the flattened / rendered file isn't in order
Neural Filters exceeded the timeout limit error: this is normally a software related issue
Long export / rendering time: long rendering time is expected in heavy workflows
Laggy Photoshop / system interface: having to wait quite a long time to preview the next frame on the timeline
Issues with Landscape Mixer: Using the filter gives ill-defined defined results (Common in older systems)--
Workarounds:
Workarounds that could reduce unreliable rendering performance & long rendering time:
Close other apps running in the background
Work with smaller colour bit depth (i.e. 8-bit rather than 16-bit)
Downsize your gif before converting to the video timeline-+-
Try to keep the number of frames as low as possible
Avoid stacking multiple Neural Filters at once. Try applying & rendering the filters that you want one by one
Specific workarounds for specific issues:
How to resolve flickering frames: If you come across flickering, you will need to playback your gif on the video timeline in full to find the frames where the filter isn't applied. You will need to select all of the frames to allow Photoshop to reprocess these, before you render your gif.+-+
What to do if you come across Neural Filters timeout error? This is caused by several incompatible Neural Filters e.g. Harmonisation (both the filter itself and as a setting in Landscape Mixer), Scratch Reduction in Photo Restoration, and trying to stack multiple Neural Filters with facial recognition features.
If the timeout error is caused by stacking multiple filters, a feasible workaround is to apply the Neural Filters that you want to use one by one over multiple rendering sessions, rather all of them in one go.
+-+This is a very common issue for Apple Silicon-based Macs. Flickering happens when a gif with Neural Filters is rendered without being previously played back in the timeline.
This issue is likely related to the memory bandwidth & the GPU cores of the chips, because not all Apple Silicon-based Macs exhibit this behaviour (i.e. devices equipped with Max / Ultra M-series chips are mostly unaffected).
-- As mentioned in the supplementary page, Landscape Mixer requires a lot of GPU horsepower to be fully rendered. For older systems (pre-2017 builds), there are no workarounds other than to avoid using this filter.
-+- For smaller dimensions, the size of the machine learning models powering the filters play an outsized role in the rendering time (i.e. marginal reduction in rendering time when downsizing 1080p file to Tumblr dimensions). If you use filters powered by larger models e.g. Landscape Mixer and Photo Restoration, you will need to be very patient when exporting your gif.
7. More useful resources on using Neural Filters
Creating animations with Neural Filters effects | Max Novak
Using Neural Filters to colour correct by @edteachs
I hope this is helpful! If you have any questions or need any help related to the tutorial, feel free to send me an ask 💖
#photoshop tutorial#gif tutorial#dearindies#usernik#useryoshi#usershreyu#userisaiah#userroza#userrobin#userraffa#usercats#userriel#useralien#userjoeys#usertj#alielook#swearphil#*#my resources#my tutorials
538 notes
·
View notes
Text
youtube
Meet the MOLA AUV, a multimodality, observing, low-cost, agile autonomous underwater vehicle that features advanced sensors for surveying marine ecosystems. 🤖🪸
At the core of the MOLA AUV is a commercially available Boxfish submersible, built to the CoMPAS Lab's specifications and enhanced with custom instruments and sensors developed by MBARI engineers. The MOLA AUV is equipped with a 4K camera to record high-resolution video of marine life and habitats. Sonar systems use acoustics to ensure the vehicle can consistently “see” 30 meters (100 feet) ahead and work in tandem with stereo cameras that take detailed imagery of the ocean floor.

Leveraging methods developed by the CoMPAS Lab, the vehicle’s six degrees of freedom enable it to move and rotate in any direction efficiently. This agility and portability set the MOLA AUV apart from other underwater vehicles and allow it to leverage software algorithms developed at MBARI to create three-dimensional photo reconstructions of seafloor environments.
In its first field test in the Maldives, the MOLA AUV successfully mapped coral reefs and collected crucial ocean data. With the MOLA AUV’s open-source technology, MBARI hopes to make ocean science more accessible than ever. Watch now to see MOLA in action.
Learn more about this remarkable robot on our website.
86 notes
·
View notes
Text
Yeah so anyway, I'm making my response to this fucking garbage its own separate post in case people want to reblog it without having to reblog a scare-mongering lie.
This video pisses me the fuck off whenever I see it, and today I'm not in the mood to just scroll past.
Wow! Am I being lead to panic by scaremongering algorithm fodder completely unsupported by real evidence?! test:
The reason you think something exists is just what you're being told by a nefarious *them*, there is actually a conspiracy behind it!
I, an ordinary person with no expertise who critically examines the world around me, have uncovered this conspiracy.
"That's what they're telling you." (put the emphasis wherever appropriate for the conspiracy of your choice - in this case, it's on *telling*)
This new tech thing is actually a bad idea and the old school method was better - which clearly proves there must be a secret conspiracy, because why allow the possibility of incompetence and investor tech-hype when you can instead assume a highly-competent evil conspiracy?
I will now tell you my conspiracy theory while scrolling rapidly through a document without pausing or allowing you to actually read any of it. This allows me to look like I have proven my claims while doing nothing of the sort. Because do you really think someone could do that? Quickly flash a document on screen and just lie about what it says?
But Owl! This is real! A user upthread found the patent and it *does* prove it!
Yeah. I read the linked patent. Did you?
Let's quote the "real purpose" hidden in the patent, as claimed out in the video:
"The real purpose of these screens is to use the little camera at the top right here to scan your face and use AI facial expression analysis to judge whether or not you like the packaging designs of the product you're looking for."
This is complete made up horseshit.
First, let's look where the reblogger directs us, to column #4 on page 17:
"Preferably, each retail product container further comprises customer-detecting hardware, such as one or more proximity sensors (such as heat maps) , cameras, facial sensors or scanners, and eye-sensors (i.e., iris-tracking sensors). Assuming cameras are employed, preferably cameras are mounted on doors of the retail product containers. Preferably, the cameras have a depth of field of view of twenty feet or more, and have a range of field of view of 170 degrees with preferably 150 degree of facial recognition ability. Preferably, software is employed in association with the cameras to monitor shopper interactions, serve up relevant advertisement content on the displays, and track advertisement engagement in - store." (emphasis added and references to figures removed for readability)
That is the extent of the "nonconsensual data collection."
Now, to be fair, there is some stuff on page 18 and 19 which kinda-sorta-maybe has at least some relation to the claim in the video:
"Preferably, the controller/data collector is configured such that as a shopper stands or lingers in front of a given retail product container, the display associated with the retail product container changes yet again. At this point, preferably the controller/data collector has been able to use the customer-detecting hardware to effectively learn more about that particular customer, such as gender, age, mood, etc. The controller / data collector is configured to take what has been detected about the customer to determine which advertisement and other information to present to that particular customer on the display associated with the retail product container in front of which the customer is standing. By tracking shopper data in parallel with which advertising content is being served on all displays within the viewing range of the shopper, the retailer and the brands are better served, providing new analytics. As such, the system provides advertising, influence opportunities at the moment of purchasing decision, optimizing marketing spend and generating new revenue streams....
"Additionally, preferably all inputs collected by the IOT devices will be analyzed locally as well as remotely (via cloud) to provide the feedback inputs for the system to push more relevant/targeted content, tailored for the consumer. The analytics are preferably conducted anonymously, images captured by cameras are preferably processed to collect statistics on consumer demographic characteristics: (such as age and gender). This data is preferably subsequently analyzed for additional statistics for the retailers that are valuable for in-store merchandise layout design and smart merchandizing, including the ability to track the shoppers “traffic” areas, known as “heat maps”, areas were [sic] customers would concentrate more and spend more time exploring, etc." (emphasis added and references to figures removed for readability) (And note the repeated emphasis on preferably - they don't have a patent to do any of this.)
Which, like, not great! I fucking hate the idea of shit like this! But there is literally nothing here about monitoring your expressions to sell the data about how you react to packaging!
This isn't a nefarious plan hidden in the patent. It's tech bros adding on totally sick ideas about how they can sell this shit to walgreens. (Because to be clear, I'm sure walgreens's corporate office would love to collect and sell this kind of information. But just because they would, doesn't mean they can or are. And this patent sure as hell doesn't prove it.)
Because let me be clear: the image capture of consumers is so irrelevant to the product that it literally isn't even included in the claims section of the patent.
Because the patent is quite explicit and detailed about the idea they are selling big retails stores on - this is a better, new, innovative, tech-driven way to "provide an innovative advertising solution"! (The words "AI," "intelligent," and "machine learning" are deployed liberally, but in the same way that "blockchain" was a few years ago. It's advertising tech hype.)
I want to make it clear - the OP in the video is straight up lying to you. Whether for fun or profit or just attention, I don't know and I don't care. If you shared this, you probably should have know better, but everyone makes mistakes. OP, on the other hand, is just a fucking liar.
But Owl! What about "the senators looking into this"?
I don't know how to tell you this, but thing linked about is a press release by a politician's office. That doesn't mean it's not true, but it's not evidence on it's own. Like, the letter linked in the link included links to sources, but is not itself evidence (ooh, layers of links to actually get to a source, my favorite)(actually my computer wouldn't even goddam open the links to the source, I had to independently search for it).
Anyway, the letter to Kroger linked in the press release by the senators contains a single sentence and a single link relevant to the claim here (linked for your convenience because it sure as hell wasn't for mine). Unfortunately, this article is itself based on a goddam press release (That isn't linked! Again, you're welcome.)
And when we finally get to the underlying fucking source. "In addition to transforming the customer experience and enhancing productivity for associates, the EDGE Shelf will enable Kroger to generate new revenue by selling digital advertising space to consumer packaged goods (CPGs) brands. Using video analytics, personalized offers and advertisements can be presented based on customer demographics." So it's purporting to something *kind of* like the claim in the video, but an entirely different format completely unrelated to the thing the video is scaremongering about.
Now Kroger did actually start using the advertising screens in 2023. And you can believe what you want about the data privacy claims and the claims about not using video, just sensors (which remember is entirely consistent with the patent). But remember: being skeptical of a company's claims is fine and good! It does not mean you have proven they are lying, and it especially does not prove you have claimed they are doing something extremely specific! And most of the articles, and the letter from the senators, are (much more reasonably) concerned about so-called "dynamic" or surge pricing. (Which is not related to the screens.)
Like goddamn. Aren't there enough real problems with surveillance and price-gorging to be concerned about without having to make up fake ones? Hell, why can't we at least be concerned with the real problems with those dumb screens, which is that the a) make shopping harder and b) catch fire?
103 notes
·
View notes
Note
I adore your art! I especially love how you do faces and capture the small details in expression/clothing! Do you have any tips about how to go about getting anatomy and facial structures correct? I do drawing as a hobby but I always find it so frustrating. Thanks for sharing your art with us on here :)
Thank you so much! Trust me I totally understand and I don't fully get anatomy myself.
The way I draw faces kinda kicks off from the Loomis method by drawing the circle first and then working around that. I think that's a good place to start, it's really good for face proportions and knowing where to put everything. After you do it so many times you don't need to lay everything out and you'll just know by hand. I can churn out so many faces now just drawing the circle part. I went ahead and looked online and I found a free PDF of one of his books you can take a look at :)
I still struggle with anatomy but whenever I try to figure it out I usually block in what I want on a canvas with a big dark pen and shave it down. I turn down the opacity and then try to sketch over.

I will say, use any resources you have available to you - they are there for you to use. I always use references and If I'm still struggling to get my idea out, I'll pull up a 3d model and sketch over. It saved me a lot of tears and frustration in the end and a lot of options out there are completely free or one-time purchases.
CSP has built-in software for modeling and lots of downloadable poses, Magicposer you can use for free but some stuff is locked behind membership subscriptions. DAZ studio software is free but that one has a bit more of a learning curve to operate. Handy I think is a one-time purchase and there are many options for hand and lighting reference. These are just ones I've tried for anatomy that worked for me but I definitely encourage looking around and doing some testing with other software if you're interested!
Best of luck lovely!
52 notes
·
View notes
Text

THE SIMS 3 TUTORIAL
HOW TO CREATE DEFAULT REPLACEMENT MOD USING CUSTOM MESH & TEXTURE FOR SIMPLE OBJECT
⚠️ Tumblr has 30 pictures limit, so I cannot include too many pictures. If you want to zoom in the pictures, click the pictures to enlarge, or save the pictures into your PC, zoom the pictures on picture viewer or zoom in the pictures on your mobile phone. ⚠️
----------------------------------------------------
I create this tutorial to make easier to follow because there are older tutorials available before but scattered on internet and usually only say "Export to replace s3asc" without explaining how to export the edited object properly.
My method is using TSR Workshop instead of exporting the object using Sims 3 Object Export/Import plug in because exporting to replace the s3asc using that plug in always giving error notification "ERR: Model has 1 groups; original had 0" and cannot be exported.
For beginners who are very new using s3pe and haven't created default replacement mod before, better start from simple object first.
Simple objects I mean in-game object that has single MODL and single texture with no morphs, no GeoStates, no presets, no CAS colour channels, and easily cloned from OBJD on catalogue. Usually as utensils that Sims holding in their hand, not buy/build objects. For example: Pencil, pan, fork, spoon.
----------------------------------------------------
Tools to prepare:
s3oc
s3pe
Milkshape 3D for bone assignment (Version I use 1.8.5 beta, discontinued by its developer, therefore feel free to download the full version with its license key provided).
Sims 3 Object Export/Import 1.01 by Wesley Howe (Milkshape plug-in. Download msS3ObjPluginsV101.rar )
TSR Workshop (Older version for TS3 only version 2.0.88)
TSR Workshop plug-ins for export.import TSRW Object.
3D Program (Blender/Maya/3dsMax)
Editing images software (Photoshop, make sure you have to install .dds plugin by Nvidia. For free software alternative, you can use GIMP with its .dds plugin)
This tutorial will not teach you how to:
Meshing object ❌
Create alpha texture ❌
Change thumbnails in-game ❌
Install programs and plug-ins ❌
This is how I created Chinese chopsticks replacement mod using custom mesh and texture.
In summary, this tutorial has 10 steps:
Step 1. Clone the Object using s3oc
Step 2. Open S3PE to Copy the Original Resource Code and Export the Files
Step 3. Export the Original Mesh as Base Mesh to .obj format
Step 4. Create Your Custom Mesh
Step 5. Bone Assignment & Create Group
Step 6. Create custom Texture
Step 7. Import the .wso of Edited Mesh on TSR Workshop & Export the package
Step 8. Export MODL file from Package saved from TSR Workshop
Step 9. Finalizing in s3pe & Replacing the Original file with Edited File & Correcting the Code As Same As Default Code
Step 10. Test the CC in your game.
-----------------------------------
✳️ Step 1. Clone the Object using s3oc
Before cloning the object, check the Game Folder for in-game object file location. Settings > Game Folders...
Take a look if the Base Game or Expansion Pack for object file you want to clone is in the right folder. For example, my The Sims 3 game are all bought from Steam, so the location is D:\SteamLibrary\steamapps\common\The Sims 3
If you want to clone object from Expansion Pack, make sure input the folder location. For example, the location for World Adventures EP is D:\SteamLibrary\steamapps\common\The Sims 3\EP1

If you are done, close the pop-up box. You can continue click Cloning then choose Normal Object...
Wait until you get the whole catalogue. Click Search...

For example, I clone object from World Adventures Expansion Pack. You can clone object from Base Game or other Expansion Packs as long it is considered as "utensil" that Sim holding on hand. For example: "Pencil" or "Pan"
Search for text: chopsticks
or if you want to clone object from Base Game, search: utensil
Tick check marks for Resource Name, Object Name, Object Desc then click "Search button"
Search result gives you results with name "chopsticks". Here is the object we are looking for: UtensilChopsticks
We need the OBJD file to clone. OBJD = Object Data.

Click "Clone or Fix" at the right bottom. Then you see the next page to determine if you want to clone with renumber or not. If you want to make default replacement, then do not check the Renumber box. Keep it blank.
Tick check box means the s3oc will generate new resource code for new item. Not tick the check means the s3oc will overwrite the same resource code, it is to replace object you cloned in-game.
I am personally a detailed person, so I usually tick as many as I want: tick "Deep clone" "Missing String Tables" and "Include Thumbnail" to include more details. Then click "Start" to proceed.

It will give you file name [CreatorName]_ObjectName_Number
Then save your package file in "DBPF Package" format in your project folder. Always make folder for any file to make everything organized.
✳️ Step 2. Open S3PE to Copy the Original Resource Code and Export the Files
Open S3pe, locate your package file you cloned from s3oc. Find the MODL of Utensil Chopsticks, Right-Click, "Details..."

On Resource Details, click "Copy TGI" to copy the Resource Code. Type, Group, and Instance will automatically be copied on clipboard. Then open Notepad, Right-Click to "Paste".
Click GRID on bottom of the s3pe (I mark it red on picture), it will give you pop-up box with Data Grid. Click "Resources", it will be highlight blue and there's 3 dots button appeared on the right side. Click the 3 dots button. It will give you TGI Block List Editor.
Inside MODL's TGI Block List Editor only has IMG. You may wondering why, but that's how the game coded. Type, Group, Instance of _IMG inside TGI Block List Editor should be the same as _IMG on the package.
Copy the TGI, Group, Instance to your Notepad.

After you copied code of MODL, do the same for the texture image (_IMG), but only copy the code from Resource Details. You cannot edit TGI Block List Editor for _IMG as the Grid button for _IMG is greyed out.
The main task is the code of your edited mesh and texture should be the same as the code you copied now from original package you cloned with s3oc.
Keep the code on notepad. You will need this code later.
Export the MODL file. Right-Click, "Export to s3asc". The file appears in long string such with name for example: S3_01661233_08000001_B619DB2238C3430B%%+MODL_filebase
Do not rename the file. Save.

Export the texture file. Right-Click "Export > To File..." The file will be saved in .dds format. Do not rename the file. Save.

✳️ Step 3. Export the Original Mesh as Base Mesh to .obj format
Open Milkshape. Import the s3asc file you saved before.
More steps click spoiler tag "Read More / Keep Reading" below
File > Import > Sims 3 Object Import v 1.01 by Wesley Howe

Locate the s3asc file, then the original chopsticks mesh appears.
Click the "Joints" tab. It has 4 codes. Check box "Draw vertices with bone colors" It will show Bone Assignment colors on the original mesh. Yellow on top chopstick and light blue on bottom chopstick. The colours are to make the object has rig and movement following the Sim's interaction.

Take a look at the 4 codes on Joints Tab. You can play around to see which colour of the code will appear, after that copy paste the code to Notepad to make it easier to comprehend.
Click Select from Tools menu, Select Options: Face. On "Right/Left/Top/Bottom 2D View", Left-click make selection of one part of chopsticks. While the part of object being selected (Red), click Joints then Choose "Assign".
0x96239247 --> Yellow 0xFEAE6981 --> Purple 0xCD68F001 --> Light Blue 0xD0DECA8E --> Red
Your edited mesh must have the exact same Bone Assignment colour later. Check again if the code and colour are correct.

You can save object mesh as .obj to other 3D software such as Blender or any other 3D software.
✳️ Step 4. Create Your Custom Mesh
Use the original .obj as base model. While you can create longer mesh or any edited version as you wish.
Make sure the scale and position of the edited mesh is same as base original mesh, because the edited mesh will be used on Sim's hand.

If you are done editing the mesh, export the UVmap.
You can export the uvmap in higher resolution, as long as it is Power of 2. 64x64, 128x128, 256x256, 512x512, 1024x1024, 2048x2048, 4096x4096. I export in 1024x1024 pixels to make the size of texture larger and have more details.
Then export the mesh object in .obj format.
✳️ Step 5. Bone Assignment & Create Group
Open Milkshape. Import the original mesh.
Check the Groups Tab. Original mesh has 1 group, "group 00". Group 00 means it is the main mesh. There is no shadow beneath the object.

Import the edited mesh as .obj file.

My edited mesh has one single name "default" name on the Group Tab. While edited mesh may have a lot of file name scattered on Group Tab. Regroup the file name to simplify your edited mesh into one single name. Select > Regroup.
The main task is replacing the EA's original mesh with your edited mesh.
Before you delete anything, you must do Bone Assignment first to the edited mesh you created.
Your edited mesh does not have Bone Assignment, so it appears white.
Remember the 4 codes you copied earlier in Notepad.

Copy Bone Assignment from original mesh to your edited mesh.
This case, your want to Bone Assign Yellow colour.
Select > Face to select one part of chopsticks of your edited mesh. On Joints Tab, double click the appropriate code 0x96239247 in blue highlight then the code box on the right side of "Rename" will appear 0x96239247. Make sure the code is correct. Then you can click "Assign".

Your edited mesh will appear in Yellow colour. Then do the same for another part of chopsticks.
Select another part of chopsticks of your edited mesh. On Joints Tab, double click the appropriate code 0xCD68F001 in blue highlight then the code box on the right side of "Rename" will appear 0xCD68F001. Click "Assign".

Your edited mesh will appear in Light Blue colour.
Then what's the other code for? With colour purple and red?
Leave them. Let the codes have the same exact codes as appear in original mesh and let the colours only assigned Yellow and Light Blue. The colours are to determine rig for interaction in-game, which only use Yellow as upper part of chopstick and Light Blue as bottom part of chopstick.
You can safely delete the original mesh with name group00 until it remains your only your edited mesh.

Rename your edited mesh to group00. Type group00 on the box then click "Rename" on the left side.

Export to TSRW Object in .wso format. .wso is format with bone assignment on object attached.

Save your .wso in your project folder.
✳️ Step 6. Create custom Texture
Import original texture you exported from s3pe to your editing image software.
Look at the original texture made by EA. 32x64 pixels. It is very low resolution, blurry and stretched, because the texture should be compressed as low as possible by game designer. As player you want it has higher detail to look realistic as possible and your PC of course can handle high resolution content, sure you can make the resolution much higher than EA's.

Import the UVMap you saved from 3D software. For example, UVmap I imported has 1024x1024 resolution. Add your custom texture. Then save it to .dds format in the same name as original texture. Save in separate folder, name it "Edited Texture" to keep it separated from original texture.
✳️ Step 7. Import the .wso of Edited Mesh on TSR Workshop & Export the package
Open your TSR Workshop.
Create New Project > New Import >Next...

Then Browse original mesh by EA in package format in your project folder.
On Open file box, you cannot see .package file because the filter is .wrk (TSR Workshop Project). Choose the .package dropdown.

Then you can see .package file.
Open the .package. After the file is located, then Next. On Project Details I usually skip without giving name of Project Name and Title. Next.
You must have seen green land with white blank sky.
Where's the mesh? It is actually there... just being zoomed in too close. You need to zoom out by scrolling down mouse.
You can see the original chopsticks mesh by EA. You can save the project file in .wrk format. After you save the file, import the .wso of your edited mesh. Mesh tab > High Level detail. Click green arrow folder icon to import. Then your edited mesh will appear replacing the original EA mesh.

As you see, the texture is messed up because the texture is still using original EA's texture. But then you check Textures tab and it has blank dropdown...
I cannot change the texture on this TSR Workshop!
Don't worry, we can replace the texture on s3pe later.
No need to change anything other than importing mesh. Click Edit > Project Contents to save as package.
You will see pop up box with number or files DDS, FTPT, LITE, MODL, OBJD, OBJK, etc. Export > To. package. Give name such as "EditedChopsticks_TSRW"

✳️ Step 8. Export MODL file from Package saved from TSR Workshop
Open S3PE, File > Open package "EditedChopticks_TSRW" that you saved from TSR Workshop.
Export MODL. Right-Click, export. It gives you file name with [StringOfNumber] .model .
Save it on project folder. Keep it organized and separated from original MODL. Name the folder "Edited MODL". Do not rename the file.
✳️ Step 9. Finalizing in s3pe & Replacing the Original file with Edited File & Correcting the Code As Same As Default Code
Open s3pe, File > Open original package that you cloned from s3oc. [CreatorName]_ObjectName_Number
Find the MODL. Right-Click > Replace...
Locate to your edited MODL with filename .model .
Then click Open.
The original MODL of the package should be replaced with your edited mesh.
Do the same for the texture.
Locate to your edited texture with filename .dds
Then click Open.
The original texture of the package should be replaced with your edited texture.
Take a look at MODL's Type, Group, Instance. It has the same code as original MODL in the original package cloned with s3oc (because it has been replaced)
Don't forget to see the code inside TGI Block List Editor.
Repeat step 2 how to check the code. Right-Click on MODL/IMG > Details... and click GRID > Resources > TGI Block List Editor.
The Type, Group, Instance of the _IMG are different compared from IMG from original package clone, which means that is the evidence of edited mesh replaced the original.
Rename the Instance with default/original Instance you copied on notepad from Step 2. Type, Group, Instance should be the same as default/original Type, Group, Instance.

Open notepad with resource code you copied from Step 2. Make sure the Type, Group, and Instance are all the same.
If the codes are the same, then your edited mesh and texture will overwrite the default mesh and texture with the same code in the game. Save, Commit, Save the package.
Check again if the texture is replaced properly. Right-Click on _IMG > ViewDDS.
ALTERNATIVES!
Yes, you can delete unwanted files in your edited package, to keep the package clean. Simply Right-Click>Deleted.
The only files needed in package are: MODL, _IMG, _KEY
They are the only files with your edited mesh/texture including codes to overwrite the default codes.
You can Start new fresh blank s3pe. Right-Click>Import from file...
Locate your edited MODL and _IMG (texture) file.
On Resource Details box, tick mark "Use resource name" > OK.
Make sure all the Type, Group, and Instance of MODL and _IMG including in the TGI Block List Editor are all the same as the code in original package.

Save the package.
✳️ Step 10. Test the CC in your game.
Put the package to your CC folder in your The Sims 3 document folder to see if the CC is working or not.
If the CC is working as your intended, with your custom mesh and texture, then test the animation. Are the chopsticks animation working as the same as original EA's? If the animation are working well too, then congratulations!

Your default replacement are working. Give applause to yourself. 👏
-------------------------------------
QUESTIONS!
Q:
Can I use this tutorial for making default replacement for buy/build object?
A: This tutorial covers basic method of using TSR Workshop and replacing the default codes (Type, Group, Instance), so you will understand the basic principle of doing default replacement mod.
Keep in mind that different object has different case. Buy / build object has MLOD (not just MODL) more than one, texture images more than one, has presets, and CAStable colour channels.
The TGI Block List Editor for buy/build object has a lot of codes, so have to spend a lot of time to do trial-and-error to make the default replacement working properly, because a lot of times the texture doesn't work (still using default EA's texture), or when the object appears right with your edited mesh and texture, after you choose the presets, the object reverts back to your edited mesh with default EA's texture.
Q:
Help! The texture is black! / still using same EA's texture when tested in the game!
A: The texture codes must be not the same. Check the Type, Group, Instance of _IMG. Do the codes are the same like codes in original package? Check the TGI Block List Editor for MODL, is the _IMG inside has the same Type, Group, Instance as in original package.
Q:
Help! The object disappears when tested in the game!
A: You must be replacing OBJD in your package. Do not replace OBJD. Just MODL and texture only.
#tutorial#the sims 3#the sims 3 tutorial#thebleedingwoodland#the sims 3 default replacement mod#modding#s3pe#s30c#TSR Workshop
120 notes
·
View notes
Text
Microsoft's CEO Satya Nadella has hailed the company's new Recall feature, which stores a history of your computer desktop and makes it available to AI for analysis, as “photographic memory” for your PC. Within the cybersecurity community, meanwhile, the notion of a tool that silently takes a screenshot of your desktop every five seconds has been hailed as a hacker's dream come true and the worst product idea in recent memory.
Now, security researchers have pointed out that even the one remaining security safeguard meant to protect that feature from exploitation can be trivially defeated.
Since Recall was first announced last month, the cybersecurity world has pointed out that if a hacker can install malicious software to gain a foothold on a target machine with the feature enabled, they can quickly gain access to the user's entire history stored by the function. The only barrier, it seemed, to that high-resolution view of a victim's entire life at the keyboard was that accessing Recall's data required administrator privileges on a user's machine. That meant malware without that higher-level privilege would trigger a permission pop-up, allowing users to prevent access, and that malware would also likely be blocked by default from accessing the data on most corporate machines.
Then on Wednesday, James Forshaw, a researcher with Google's Project Zero vulnerability research team, published an update to a blog post pointing out that he had found methods for accessing Recall data without administrator privileges—essentially stripping away even that last fig leaf of protection. “No admin required ;-)” the post concluded.
“Damn,” Forshaw added on Mastodon. “I really thought the Recall database security would at least be, you know, secure.”
Forshaw's blog post described two different techniques to bypass the administrator privilege requirement, both of which exploit ways of defeating a basic security function in Windows known as access control lists that determine which elements on a computer require which privileges to read and alter. One of Forshaw's methods exploits an exception to those control lists, temporarily impersonating a program on Windows machines called AIXHost.exe that can access even restricted databases. Another is even simpler: Forshaw points out that because the Recall data stored on a machine is considered to belong to the user, a hacker with the same privileges as the user could simply rewrite the access control lists on a target machine to grant themselves access to the full database.
That second, simpler bypass technique “is just mindblowing, to be honest,” says Alex Hagenah, a cybersecurity strategist and ethical hacker. Hagenah recently built a proof-of-concept hacker tool called TotalRecall designed to show that someone who gained access to a victim's machine with Recall could immediately siphon out all the user's history recorded by the feature. Hagenah's tool, however, still required that hackers find another way to gain administrator privileges through a so-called “privilege escalation” technique before his tool would work.
With Forshaw's technique, “you don’t need any privilege escalation, no pop-up, nothing,” says Hagenah. “This would make sense to implement in the tool for a bad guy.”
In fact, just an hour after speaking to WIRED about Forshaw's finding, Hagenah added the simpler of Forshaw's two techniques to his TotalRecall tool, then confirmed that the trick worked by accessing all the Recall history data stored on another user's machine for which he didn't have administrator access. “So simple and genius,” he wrote in a text to WIRED after testing the technique.
That confirmation removes one of the last arguments Recall's defenders have had against criticisms that the feature acts as, essentially, a piece of pre-installed spyware on a user's machine, ready to be exploited by any hacker who can gain a foothold on the device. “It makes your security very fragile, in the sense that anyone who penetrates your computer for even a second can get your whole history,” says Dave Aitel, the founder of the cybersecurity firm Immunity and a former NSA hacker. “Which is not something people want.”
For now, security researchers have been testing Recall in preview versions of the tool ahead of its expected launch later this month. Microsoft said it plans to integrate Recall on compatible Copilot+ PCs with the feature turned on by default. WIRED reached out to the company for comment on Forshaw's findings about Recall's security issues, but the company has yet to respond.
The revelation that hackers can exploit Recall without even using a separate privilege escalation technique only contributes further to the sense that the feature was rushed to market without a proper review from the company's cybersecurity team—despite the company's CEO Nadella proclaiming just last month that Microsoft would make security its first priority in every decision going forward. “You cannot convince me that Microsoft's security teams looked at this and said ‘that looks secure,’” says Jake Williams, a former NSA hacker and now the VP of R&D at the cybersecurity consultancy Hunter Strategy, where he says he's been asked by some of the firm's clients to test Recall's security before they add Microsoft devices that use it to their networks.
“As it stands now, it’s a security dumpster fire,” Williams says. “This is one of the scariest things I’ve ever seen from an enterprise security standpoint.”
144 notes
·
View notes
Note
something about your art style makes me want to eat it /pos
Would you be okay to show how you do anatomy? Or software/brushes you use? /Not forced
Thanks you sm <3!!—Im also SO SORRY for responding so late!!
Im an Ibispaint user :D! Though I use Flipaclip for animation + Capcut to add text on said animations. On Ibispaint, for both sketch and outline, I use "Pen Fade" :3
(sorry if the anatomy is not understandable, I have no idea what Im doing lmao)
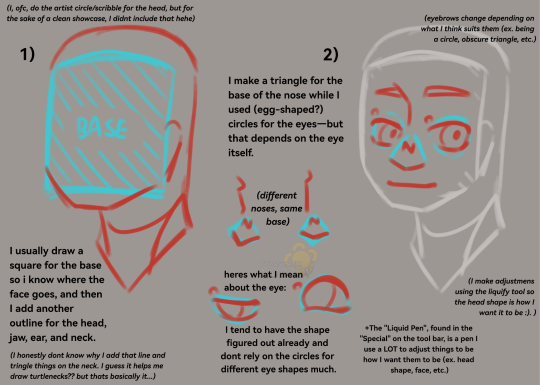

I will note that my artstyle takes inspiration from many great artists that I look up to (such as the thumbnail artists for the channels and just artists in general + an artist who uses semi-realism that Ive been looking up to for years now—Im kinda nervous to @ them, but its WolfyTheWitch :'3..!!), but I also take notes on things in reality to help me get a more "life-like" look to them while I put my own spin to it!
I like observing how joints bend, even on simple dolls I see and even my long-owned stuff bear animal, and I especially love observing the animatronics from FNAF (..DCA especially.....) so I get a better grasp on how to draw them since theyre generally helpful in anatomy (for me, at least)! Even the VRChat models I usually see when watching the shows, custom or not, are wonderful as I wanna test my limits :)
Its those things that remind me how uniquely creative everyone is :O!
bonus for how I draw heads for the animatronics (DCA and Monty models since I draw them most :) )
I mean, for drawing Foxy/Roxanne models, Freddy models and Bonnie models, I use the same method I do for Monty models! Albeit, the snout would be shortened so I wont have much difficulty :).
49 notes
·
View notes