#testing out some shader/lighting stuff...
Explore tagged Tumblr posts
Visit Tumblr Blog
Explore Tumblr blogs with no restrictions, modern design and the best experience.
Last Seen Tumblr Blogs


Fun Fact
US Tumblr user growth rate is estimated to slow down to 4.1%.
Text

new star
5K notes
·
View notes
Note
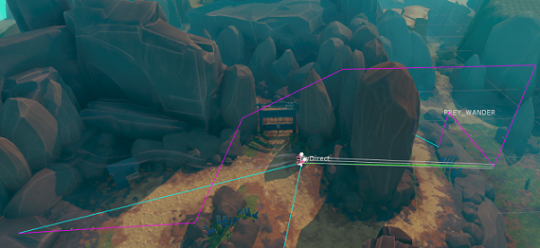
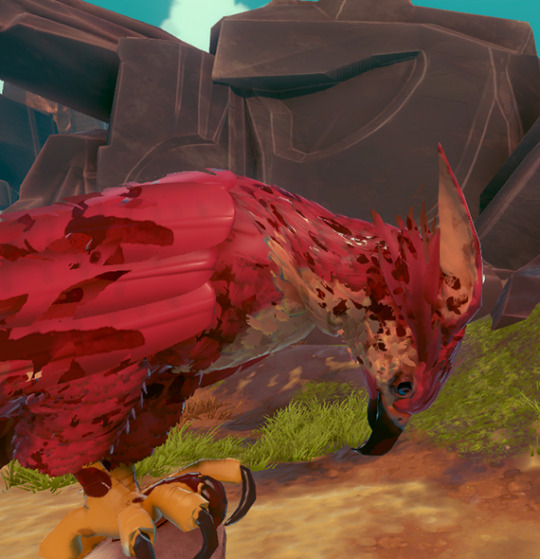
do you put the filter on afterwards or do you have a mod that changes the lighting to grim, because i just stumbled upon this blog and it broke me out of my builder's block. Problem is I want all my worlds to look like Hollow Creek otherwise I can't build.
I’m don��t edit my photos after taking them, the effect is achieved using shaders!
The one I’m using is a custom preset I made myself specifically for the save file. I will release it soon (for free ofc) still doing some testing and stuff. It works with both reshade and gshade so it won’t matter which program you prefer:)
You are free can wait a bit for me releasing mine, or you can have a look here on tumblr for other presets people have created. I know multiple exists that will give you a spooky vibe!🦇
4 notes
·
View notes
Text
Migrating Projects to Unreal Engine 5: What to Expect and Watch Out For
So you're thinking about taking the plunge and migrating your project to Unreal Engine 5? Smart move! UE5 brings some genuinely game-changing features to the table, but like any major upgrade, there are some bumps along the road you'll want to navigate carefully.
As someone who's helped several teams make this transition, I wanted to share what you can realistically expect – both the awesome improvements and the "why is this breaking at 2 AM before our milestone?!" moments. Let's dive into what makes UE5 migration both exciting and occasionally hair-pulling.

The Good Stuff: Why UE5 Is Worth the Migration Effort
First, let's talk about why you're probably considering this migration in the first place. Unreal Engine 5 isn't just an incremental update – it represents a massive leap forward in game development technology.
Lumen: Global Illumination That Actually Works
Remember all those hours tweaking lightmaps and bake settings? Lumen changes the game with dynamic global illumination that actually works in production. This means:
No more waiting hours for lightmaps to bake
Realistic lighting that adapts to time of day changes
Light bouncing that updates in real-time as you modify your level
One developer I worked with literally cried tears of joy when they realized they could delete their entire lightmap optimization documentation. That's hundreds of hours of work suddenly made obsolete (in the best way possible).
Nanite: Say Goodbye to LODs
If you've spent countless hours creating LOD versions of models or battling with draw distance issues, Nanite will feel like magic:
Import film-quality assets directly into your game
Forget about manual LOD creation
Maintain incredible detail even at distance
Achieve polygon counts that would have melted your PC in UE4
Enhanced Editor Experience
The UE5 editor has received major quality-of-life improvements:
A more intuitive UI layout
Better organization for large projects
Improved Blueprint visual scripting
More responsive viewport performance
The Migration Reality Check: What to Watch Out For
Now for the part they don't always highlight in the flashy demo videos – the migration challenges. Having guided several unreal game development projects through this process, here are the pitfalls you should prepare for:
Materials Need Rework
Your carefully crafted materials might need significant updates:
PBR workflows have evolved in UE5
Many shader functions have been deprecated or changed
New material parameters are available, but require implementation
Material instances might need rebuilding
A mid-sized game I worked on had to assign a dedicated technical artist for two weeks just to update their material library. Plan accordingly!
Performance Profile Changes
UE5's performance characteristics are different from UE4:
CPU/GPU balance shifts with new rendering technologies
Memory requirements increase significantly
Some optimizations that worked well in UE4 might actually hurt in UE5
Mobile platforms require extra attention
One team I consulted for saw their memory usage double overnight after migration. They eventually got it back under control, but it wasn't the instant upgrade they expected.
Plugin Compatibility Nightmares
If your project relies heavily on third-party plugins:
Many haven't been updated for UE5 compatibility
Some will never be updated if they're abandoned
Marketplace assets might need updates
Your own custom plugins will need review and updates
Blueprint Refactoring Required
Your Blueprint logic will likely need work:
Deprecated nodes need replacement
Some function signatures have changed
New best practices have emerged
Performance-critical Blueprints might benefit from conversion to C++
Practical Migration Strategy: A Step-by-Step Approach
Having been through this process multiple times, here's my battle-tested approach to migrating unreal game development projects to UE5:
1. Create a Proper Testing Environment
Don't just dive in with your production project:
Make a separate branch in version control
Set up a clean UE5 project first
Create a small test scene with your core mechanics
Migrate this small slice before attempting the full project
2. Tackle Dependencies First
Before touching your main content:
Update or replace critical plugins
Test each third-party integration individually
Document any API changes you discover
Have fallback plans for unsupported features
3. Adopt a Phased Migration Approach
Don't try to migrate everything at once:
Start with core systems and mechanics
Then handle character and animation systems
Migrate levels and environments next
UI elements typically come last
Test thoroughly between each phase
4. Rethink Rather Than Port 1:1
Some systems deserve reimagining rather than direct porting:
Could your lighting setup benefit from Lumen instead of static lighting?
Would Virtual Shadow Maps solve issues you were working around?
Might some complex Blueprint logic be simplified with new features?
Could Nanite eliminate optimization headaches?
Real Talk: Timeline and Resource Expectations
Be realistic about what this process requires:
Small projects (solo/tiny team): 1-3 weeks
Medium projects (5-15 people): 1-2 months
Large production (15+ team): 3-6 months minimum
One studio I advised initially estimated their migration would take two weeks. Reality? It took them closer to two months. The good news is that much of that time was spent implementing new UE5 features that dramatically improved their game.
Specific Features to Watch During Migration
World Partition
UE5's World Partition system replaces the old level streaming approach:
Automatic streaming based on distance
Better organization for massive worlds
But requires significant rethinking of level design workflows
If you're using complex level streaming, expect to spend extra time here.
Animation Systems
The animation pipeline in UE5 has evolved:
Control Rig offers new capabilities
IK Retargeter changes how you handle animations
Full-body IK solutions are more accessible
For character-heavy games, this area requires special attention.
UI Systems
UE5 brings UMG improvements but also changes:
Some widget behaviors have changed
Responsive design features are expanded
DPI scaling works differently
Is It Worth It? The Honest Answer
After helping numerous teams through UE5 migration, here's my unfiltered take:
For new projects: Absolutely start with UE5. The learning curve is worth it, and you'll avoid migration altogether.
For early development projects: Yes, migrate now. The pain is minimal compared to the benefits.
For mid-development projects: It depends. Calculate the time cost versus benefits for your specific case. The newer your UE4 version, the easier the transition.
For projects near completion: Probably not worth it unless a specific UE5 feature solves a critical problem. Finish in UE4 and consider UE5 for your next project or DLC.
Final Thoughts: Embracing the Future of Unreal Game Development
Migrating to UE5 isn't just a technical exercise – it's about embracing a new generation of game development possibilities. The teams I've seen succeed approached it with both excitement about the possibilities and realistic expectations about the challenges.
Remember that even with the bumps along the way, UE5 represents a massive leap forward for creators. The lighting is better, the geometry is more detailed, the workflows are improved, and the possibilities are expanded. When the migration dust settles, you'll have a more capable foundation for bringing your creative vision to life.
Have you already started migrating your project to UE5? I'd love to hear about your experiences in the comments below. And if you're just beginning the journey, drop any questions you have – our community has probably faced and solved similar challenges already!
#game#mobile game development#metaverse#multiplayer games#nft#vr games#blockchain#gaming#unity game development
0 notes
Text
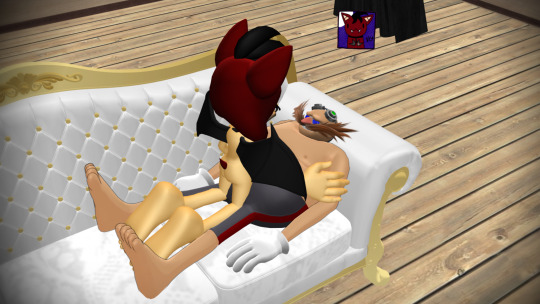
So it's Valentines day and I worked on a short NSFW fic for it. 😊
I hope you all have a great Valentines day too.
Enjoy my baddies 🦇 💜
Story below the credits.
Credits for the pic.
The Eggman model was ported by SAB64 on DA.
Eggman belongs to SEGA.
The stage was found on a Japanese website.
The couch model was ported by Clyriss on DA.
Effects used:
Vintage HQ x, Adult Shader x, Shadow Frame x.
A Valentine's Day gift.
A NSFW fic.
“I'm sure she'll like this gift.”
Dr. Eggman was preparing a gift for Dr. Spiral, it was valentine's day and he wanted to make this night perfect.
“There we go, it wasn't easy making this but I hope she enjoys it.”
Eggman puts his gift in a box and goes to the living room, lights some candles and places a box of chocolates on a coffee table.
“Boss, Ms. Spiral will be coming home soon.”
Cubot and Orbot rushed into the living room.
“Crap! Did you tuck Sage in?”
Eggman panicked.
“Yes we did, she had her supper and she's asleep.”
Orbot replied.
“Good, now go! I need to get this stuff ready.”
They leave as Eggman lights up the fireplace and grabs a rose and lays down on the couch in a sexual pose. The door opens as Spiral enters the castle.
“I'm home dear, it's been a busy day..Oh my~”
Spiral's ears perked up as her tail wagged.
“Hello my lovely bat, I've been waiting for you.”
Eggman got up, hugged her and gave her a kiss.
“Let's enjoy some chocolate, I also have a surprise for you~”
“Mmm sounds good to me.”
They sit down and enjoy some luxury chocolate.
“Happy Valentine's day dear, I made you a special gift.”
Eggman got out a small box and handed it to her.
Spiral opened the box and smiled.
“Oh Eggman, it's perfect.”
Inside the box was a pocket watch for her collection.
“Hoho that's not an ordinary pocket watch my dear, It's an upgrade to your hypno pocket watch. I thought tonight would be a perfect test for it.”
Spiral's ears twitched as she gave him a smirk.
“I see. You wanted a special hypnosis session for your gift?”
Eggman nodded as he stroked his mustache slowly and smiled.
Spiral didn't need any more hints, she took her shirt, skirt, and belt off slowly, then her high heels.
“It's time for your hypnosis session, you've been a bad boy.”
She notices her hypnotic pocket watch had a few more buttons than her one already added.
“Hmm, let's test this baby out.”
She presses the left button on the watch as she gets closer to him and dangles the watch above his eyes.
The watch began to show flashing hypnotic lights in the center of it.
“Hmm, interesting. Now my dear you've been very bad. You need to watch the flashing lights before you~ Notice how your vision grows hazy as all you can see is the lights, all you can hear is my voice. Your mind is draining.”
Eggman's eyes glaze over as his mouth hangs open his penis starts to get erect as his hips thrust.
“I'm a bad boy mistress, please punish me.”
Spiral chuckles a bit.
“Oh I will my dear. Get up and strip!”
Eggman got up slowly and started to strip. His penis was fully erect as he got on his hands and knees.
“I am yours, mistress.”
Spiral went to get a whip and came back.
“That's right my dear.”
She whips Eggman on his back.
Eggman moaned as he enjoyed this, he already was erect by the sound of her voice, the hypnotic effect was an added bonus, this amplified his horniness tenfold.
“Every time I whip you your mind grows more blank.”
She whips him again and again.
“Your words begin to slur, you can hardly speak. You don't need to speak though, I will speak for you.”
Eggman's mind was draining as his eyes flutter and roll.
“So… Good..”
He couldn't speak much as he began to drool a bit.
Spiral puts down the whip and turns him over onto his back and mounts him.
“I think you've earned a reward my slave~”
She begins to thrust into his erect penis and rub his chest.
Eggman's eyes widen as he's entering pure bliss. He thrusts with the rhythm of Spiral.
“Mistress.. I'm.. About to cum..”
Spiral smiles.
“I'm feeling generous my dear, you may cum.”
Eggman couldn't hold it and as soon as she gave the command he ejaculated.
“Good boy, now when I snap my fingers you'll awaken from your trance and remember everything that happened.”
Spiral snaps her fingers as Eggman awakens from his deep trance.
“Oh Spiral, you make me so happy. This is the best gift you've given me.”
Eggman cuddles her.
“Happy valentine's day Eggy. And your gift is just as great.”
They cuddle for a bit then head to bed.
0 notes
Photo
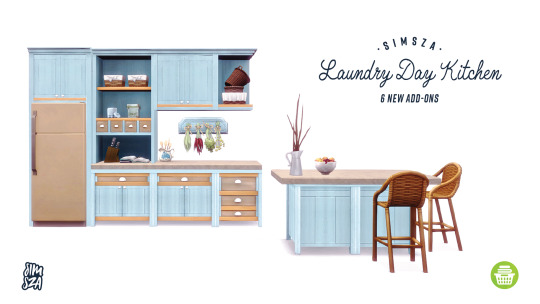
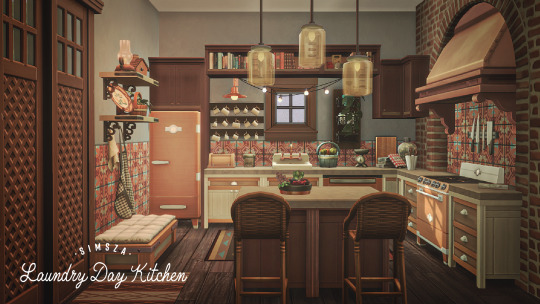
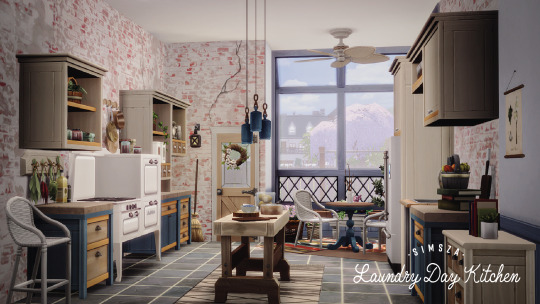
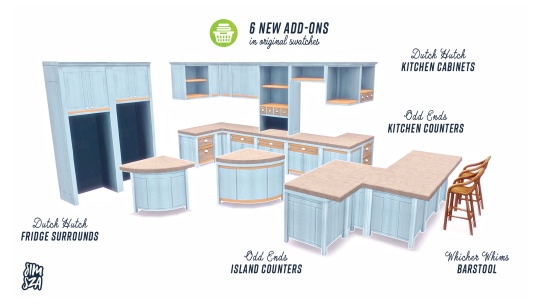
Laundry Day Kitchen from simsza
6 New Add-ons for the Sims 4 Laundry Day Stuff.
This set has been put off for so long but I am happy it’s now finished and I can share it with you! The Sims 4 can always use more kitchen cabinets and counters. I was inspired when Laundry Day came out to make a companion kitchen. There also were no matching barstools for this pack so I added them in as well. Hope you all love it and happy simming!
Details:
Six new objects (Wicker Whims Barstool, Dutch Hutch Cabinet, Odd Ends Counter, Two Dutch Hutch Fridge Surrounds, & Odd Ends Island)
Each item includes all original swatches
Requires Laundry Day Stuff
Barstool found in Seating, Misc. §120
Cabinet and Fridge Surrounds found in Surfaces, Cabinets §100
Counter and Island found in Surfaces, Counters §125
Custom thumbnails
Download:
Sims FileShare | Mediafire
I want to recommend @peacemaker-ic‘s No Occluder Applicances as I have altered the cabinets shader for even lighting.
Credits:
I used a lot of @brazenlotus separated Laundry Day items in the previews. Definitely worth downloading to go with this kitchen.
Thanks @pictureamoebae & @jenba for testing (a long time ago lol) and as always, Peacemaker for helping and keeping me sane.
Sims4Studio, Photoshop, Blender, TS4, EA
**TOU: Give credit if you: recolor it, clone it, change it, upgrade it. Just please don’t upload under some shit, upload with lots, or claim it as your own. If you use them, please credit me and tag me because I would love to see what you have done with them.
simsza / 06-13-20
7K notes
·
View notes
Text
Mod Log - September
Howdy! I thought this might be a fun little thing to do, both for my own desire to document, and for anyone who wants to tune in.
I’m counting on this to be a lax “series”(?) which serves as a catalog of minor experiments, mod progress, and bloopers that occured during a set period of recreational modding.
And maybe it is also a little bit self-indulgent - but gosh darnit, I will be enthusiastic about my dorky hobby! :p
Item 1: Tests and Tribulations
Question: What happens when a Sim dies on a lot on which there is no physical place for a tombstone to spawn?
Answer: A tombstone... is not spawned! Verified by forcing an error and scouring the lot dump. This may lead to a Sim being in a “dead, linked, but no tombstone” state, without any mods (although the set up is a bit tedious - fill every tile with a diagonal wall or impassable object). Kinda neat!
Also, I made a statue out of Grim Reapers, pictured above.
Question: hey build/buy thumbnails are tiny can we like enlarge those
Answer: Yes!...ish.

Unfortunately I was unable to find the parameter (singular? 🤞) that influence/s the grid layout within the UIScripts, meaning that (a) I just can’t see (b) It’s multiple variables making it more difficult to narrow down [c] This behaviour (that is, the automatic management of the geometry and populating of the grid) is exclusively executable-based so because of this all items overlap. :/
Pretty cool though how the actual thumbnails themselves adjust automagically to increased... ‘thumbnail... holder’... size. Also, I think the black transparency issue could be resolved with a properly sized UI images of the border to match. don’t mind the blue tearing that’s just me being silly
Item 2: Modunkles Spelunkles
This mod... is actually almost fully functional! Here is a video of it in action. Permitting your one-household Sims have a pool, they should no longer be doomed to a Death By Fire if noone extinguishes them... assuming they get there in time, and they’re happy with the risk of spreading the fire as they go :p
youtube
It’s not released yet, though, as I would like to add showers to the mix also, but that’s... tricky and likely to conflict with other mods out there. I also need to add compatibility for custom pool portals, and I still haven’t figured out the non-Destination version of this mod.
By the way - it seems to be impossible to add new functioning destination objects - I had to override a Maxis one! >:( (though this also seems like an excellent candidate for a plug-in framework to allow for multiple user mods. along with maybe showers).
Check out these bloopers though lol.
And dang, look at this Actual Flowchart I Made to try and figure out the code beforehand. It looks better than my thumbnails fafasfafsa

Speaking of a Plug-In Framework - I am working on one, at least for the mailbox, to make it easier for modders to do cool cross-compatible stuff with it. Planning to make something pretty in-depth with it!...eventually. Sims getting actually paid by the hour was a good start, but before I knew it I was rewriting half of CareerGlobals
so uh that’s on the backburner ._.;;
Did you know that there is a lot of redunancy concerning road textures in the game? It seems as though Maxis had more ambitious plans than what we received, likely due to being rushed [speculation]. With this we have quackery such as separate road textures/overlays being possible for different weather conditions, such as snow and hail, but in the full game this only being applied on road corners, but also almost none of the special textures are used.
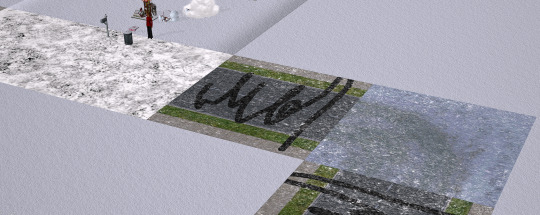
With some tweaking of the shader, though, I manage to make it possible to have separate road textures for light snow/heavy snow weather [pictured heavy snow overlay below]:
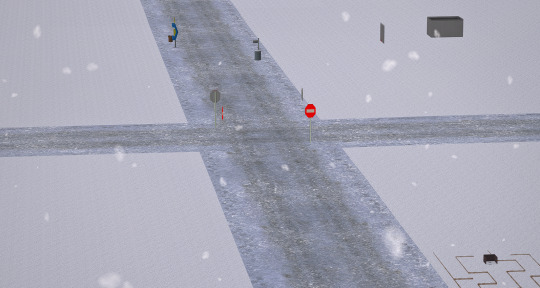
This is not a road texture default - well, actually, for private testing purposes, I used textures from this creator’s defaults - but I have Voille’s True Neighbourhood Grass installed in the above screenshots, which comes with a road default. I also increased the fidelity of the appearance of the snow on the roads because it looks blurry af (no idea who thought 4 was a good value for number of passes over a cumulative <200 tiles in the unmodded game).
It is not yet released, though, because I want to (a) ensure compatibility with other popular shader mods and (b) create my own textures to redistribute. (although if anybody wants to create textures, feel free?? 😳) and [c] ‘c’ what can I do to make the neighbourhood coordinated with this system.
Really cool how this stub of a feature was just... there, though!
Oh, and a blooper from this set of tests.
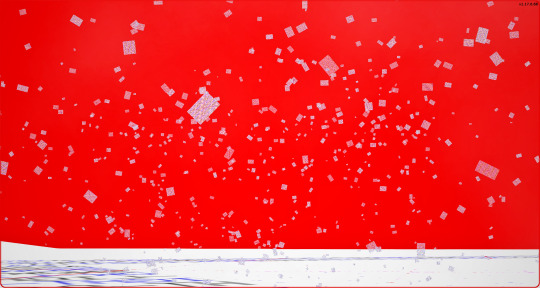
Nothing more Christmassy than a blood-red sky. Then again, I suppose it is October :p
Item 3: Fin
At the end of this draft now, and dang, this was really fun to put together actually! Even if this documentation is largely insignificant in the grand scheme of things I might do more of these in the future. Would be fun if other creators tried it too, I think! If you want to filter this tag, I will be using ‘bstu mod log’ for these sorts of post. Maybe I’ll make a dedicated page to these and post future ones privately? 🤔 Happy Simming! <>
80 notes
·
View notes
Text
State of the Game bullet points
If you don't have time to read the State of the Game post Bungie just put out, here is a some bullet points with exciting and important info for the future of Destiny 2. It's still a good bit of text but I hope to get most of the important details across.
The Witch Queen expansion has been pushed back to an early 2022 release date
Another "unannounced chapter" after Lightfall needed to be added to complete the first saga of Destiny
More about Witch Queen and beyond in late-summer of this year
Sunsetting gear has been stopped. Bungie says they missed their mark with it.
Armor and weapons will not be sunset starting Season 14; Gear that has not reached the power cap at the beginning of Season 13 will not have a powercap
Bungie still believes they need a method to shift metas but sunsetting is no longer the right answer
Felwinter's Lie and Warmind Cell tuning mentioned
Power level jumps per season will now be only +10 levels instead of +50, starting with Season 14, for non-expansion seasons; this is experimental. Bungie feels +50 increase is too steep and feels like more of a "reset". Bungie believes this will help players have an easier time jumping in season to season. Instead of Season 14 pinnacle cap being 1360, it will be 1320.
PvP balancing
Stasis and their supers will be tuned. Examples are Behemoths losing their freeze AOE on cast, Hunters losing damage resistance during Shatterdive, and Warlocks are getting bug fixes (apparently some tracking stuff is broke), and crystal shatter damage reduced. And damage resistance while frozen. Those are just a few examples.
Buffs to light-based subclasses in Season 15
Three-peeking being addressed in Season 15 for Comp and Trials (emotes are turned off and can't use swords to peek corners if you have no ammo for it)
Doubling the size of the game security team
Ability usage rates will be looked at in Season 15; more gun play.
Rebuilding the reward and matchmaking structure of Trials and Iron Banner (IB after Trials)
Vault of Glass returns in Season 14.
There will be a World's First and contest mode will be on during the first 24 hours
World's First will be a bit different. In addition to finishing the raid, there are challenging Triumphs needed to finish too.
There will be Bungie Rewards for completing the Raid (I assume first week completion rewards a cool sexy jacket; but we will see)
Bungie would like their RAD (Raid and Dungeon) content to have Master difficulties to reward Adept gear from respective activities. Might come in later seasons
Transmog coming in Season 14 with Ada-1 as the vendor. Transmog will be called Armor Synthesis. This will cost Synthesis materials. At the beginning of Season 14, you will receive some starting material to try it out at Ada's Loom.
Ada-1 will have bounties each season that give you the materials to turn items from your collection into universal ornaments. Players short on time can buy synthesis materials for Silver
New appearance screen in Character menu to manage ornaments
Shaders are now permanent unlocks! No more stacks of shaders in your inventory. Shaders can be applied one at a time to each piece of gear or applied to ALL armor pieces at once in the new Appearance menu.
Crossplay comes officially in Season 15 with internal and Alpha testing in Season 14.
PC and console players will NOT match in Crucible unless a PC player invites a console player to play in PC crucible pools.
Ikora will be a real vendor again in Season 14 and will be a big part of The Witch Queen
Season 15 will introduce the first Stasis legendary energy and power weapons
258 notes
·
View notes
Text
so first up some explanations about Unity & coding in general just cause ik it can be confusing. This probably isnt like 100% accurate explanations, its just the way I think about it and I am Technically a professional software developer that knows a bit about unity.
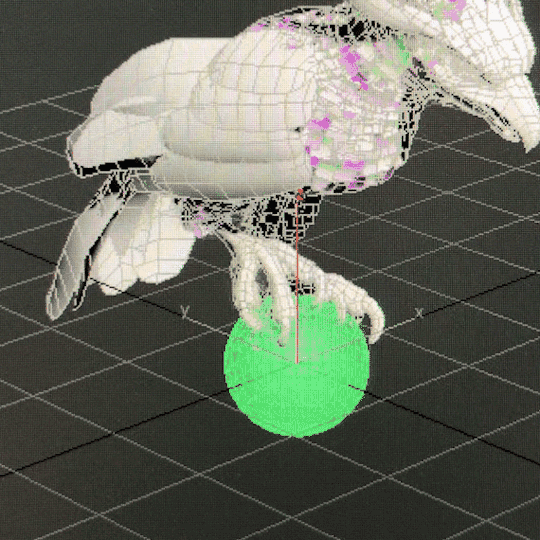
Shaders themselves are written in a language called OpenGL - they're actually a pretty weird kind of code? Basically, all a shader does is take in one value, and output another. Like a basic RGB shader might take in a Vec3(red value, green value, blue value) like Vec3(255, 0, 0), and then just just output that exactly. That's what an 'unlit' shader does. The shader is still necessary because thats the piece of code that tells the GPU what to do when its given a 3D object.
I'm sure most folks playing video games know this to a degree, but all 3D shapes in digital space are typically made up of a ton of triangles linked together. Those triangle faces are made up of vertices, and the explanation of how all thats calculated and figured out by your computer is personally boring so I'm not going to bother with it, but it is relevant to how shader code works. Most shaders need to know where in digital space they're calculating and where stuff like light sources are.
All of the fancy bits of lighting in a shader are really just equations using the point in space, the location of light sources, and commonly, the color of the base texture of the 3D object to determine the final color of the object after its processed.
This is one of the purposes of "UV mapping" an object's texture actually - it's how you tell the computer where the color on a 2D image relates to a location on a 3D object
-
in Unity specifically, most stuff is handled through different kinds of objects. I think part of the original draw of Unity as an engine was the ability to package up any combination of assets and send them to someone else? Since as long as you hold all the different pieces of an object, anyone can use it. Even different scripts can be attached to different objects in many ways - thats why you might hear about crazy sounding things like "every object that moves is actually a door pretending very hard to not be a door" out of context for a game. That "Door" script just happens to swing exactly the same way a falling platform needs to, so why bother writing a second script to do the same thing.
-
For shaders, and this I think is common for most things that render in 3D not just Unity, they are typically packaged into "Material" Objects. this is your basic out of the box Unity material

Unity does let you directly edit their shader code but its kind of a mess to look at so here's a basic shader from the site "ShaderToy"

if someone wants a break down of whats happening there lmk this is just to show you its all math, always has been.
Materials in any 3D program can be put on as many objects as you want - so the same metal material can be applied to anything metallic - and the color and texture for individual objects can be still be different. This is where the issues with Shining Nikki's skin materials come into play; most likely, they just used the same exact material as the base skin tone on all the skin tone without testing or caring how it interacted with the other textures.
Skin is a very difficult thing to replicate - as @alenadragonne mentioned on Miss K's post, the shader/material effects often involve several layers put on top of each other in a funky math way to get that feeling of softness. Theres also other effects that are used as well. A "Bump map" masks where lighting shines to replicate the feeling of texture in the lighting, and a "Displacement map" makes it visually appear as though the bumps and cracks in a texture were actually modeled
shamelessly taken from Wikipedia:
this is how a bump map breaks up the lighting
and this is how a displacement map changes the shape of the base object

I dont actually know much about subsurface scattering when it comes to coding shaders, but you can see the effect of it in real life pretty easily!

cursed au canceled i want to refresh my memory on shaders and talk about it more now
12 notes
·
View notes
Text
My mind is blown.
I’m totally serious. And this is a seriously long post, for which I apologize, but you might think it worth it in the end.
I did some fiddling with my Simming computer while solving the mystery of the super-lag/abysmal FPS rate in my TS3 game. While I was reading up on things to do that might improve that situation, I ran across this MTS forum post. It's about NVIDIA graphics settings (meaning, settings outside of the game, controlled by the video card itself) that improve the appearance of TS3 in-game. Now, maybe among the more gamer-types out there, doing this kind of stuff is common knowledge. But I didn't know, and my gamer husband never saw fit to inform me of these things, for which he’s gonna get a whuppin’ :), and my mind is blown, so I thought I'd share info for other non-gamer-types like me who don't know about this stuff. :)
After I fixed my TS3 game and tried out the NVIDIA settings and they made my TS3 game look awesome, I wondered what would happen if I applied the same settings to TS2. I had to test the game anyway because part of my problem-solving in TS3 was to update my GPU's driver to the version that was released about two weeks ago instead of a 5-year-old one. *laugh* I feared this would screw up TS2, but Mustang Valley and my creating set-up, at least, are fine with it. (Might be a totally different story when I play a regular, active, populated neighborhood, of course!) But I figured, what the hell, let's make a profile for TS2 with these settings, too. The worst that could happen is the game freaks out and I have to revert back to the default settings.
Well, the game didn't freak out and, in some ways, it looks a lot better. I'll go into more detail about that, via many pics, behind the cut. In front of the cut I'll say this:
You need an NVIDIA graphics card. I mean, I'm sure there's ways to do the same things with AMD cards. I just don't know how. You can't do this stuff with Intel integrated graphics.
Moreover, you need a decent NVIDIA video card. In the linked MTS post, the OP has a 700-series card and the guy who posted the settings was dubious about whether or not the OP should mess with this stuff because it might cause lower FPS rates and lag in TS3. But I'm gonna venture a guess that you could do this with a lesser card for TS2, since it's a much less demanding game even when it's all tricked out. And either way, there’s no harm in trying. (For the record, my card is a GTX 1050Ti. It's decent, the best card I can put in my Simming machine without needing a stronger power supply, and it’s more than adequate for both TS2 and TS3, but it’s certainly not high end.)
You need the Nvidia Profile Inspector, if you don't already have it. It's freeware, and you can download it here. Note that it's a program for Windows; I have no idea how you’d go about doing this stuff on a Mac.
Once you've downloaded/installed the Profile inspector, open it up. It looks like this when you open it:
Under the drop-down at the very top (circled in red in the pic), there's a huge long alphabetical list of games and programs, old and new, that you can create an individual graphics profile for using this program. This means that the settings you choose will affect only that program and no others. So, if you play other games, Sims or otherwise, or use other programs (my CAD program's on the list, yay!), you might want to fiddle with those, too. But anyway, for TS2, find Sims 2 (with no "The". And it lists all the EPs, too, but just pick the base game) on the list and choose it. Then, plug in the settings in the post I linked to above. They’re all in the drop-downs for each setting, so all you have to do is click and choose the right setting. When you're done, click "Apply Changes" in the upper right corner of the program window. Done. Easy-peasy. It'll take you two minutes to do, if that.
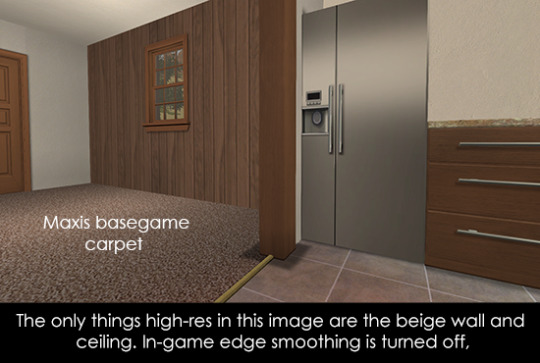
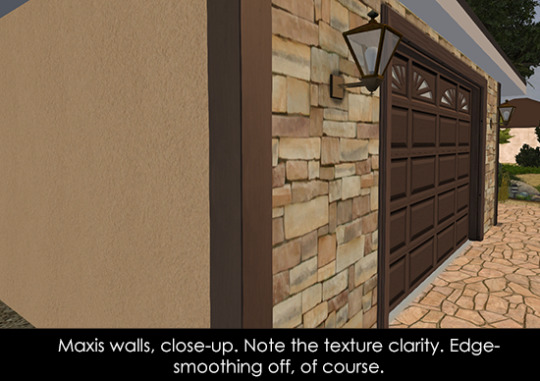
Then load up your game, and in your graphics settings you can (and probably should) turn off the game's native edge smoothing. It's being overwritten with much stronger anti-aliasing, so there’s no point in having it turned on. In the pics below the cut, all of my graphics settings are at max except that edge-smoothing is turned off, I have no lighting or shader mods installed, and the game is in windowed mode. (It tends to look better that way.)
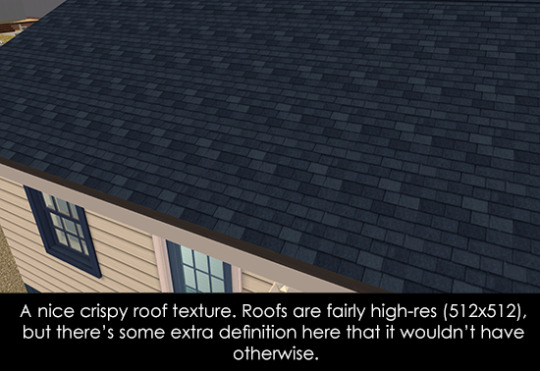
Now as to what it looks like... There’re a bunch of pics behind the cut. I'll say up front that the changes are subtle. Don't expect miracles in a 15-year-old game! :) But for me -- since I'm pretty damn picky about how my game environment looks, what with wanting high-res and stuff - they make enough difference that I'm definitely keeping these settings in place.
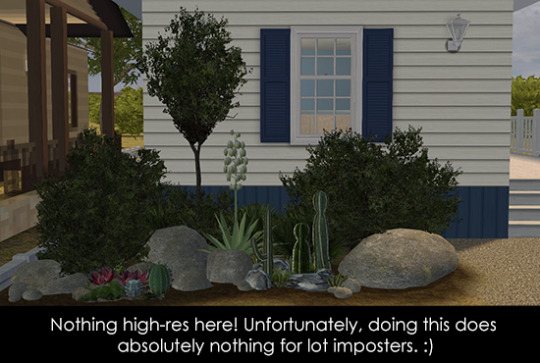
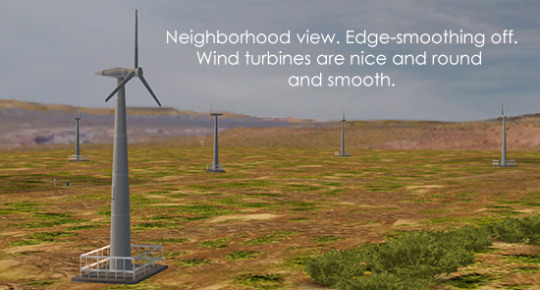
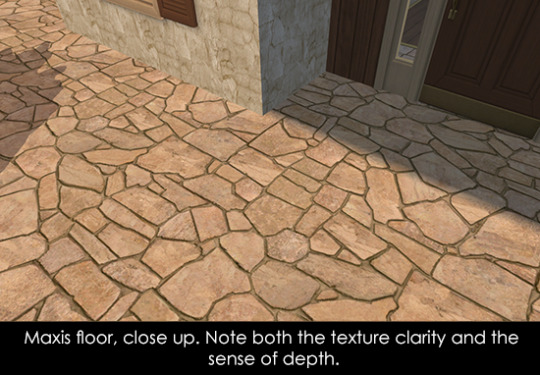
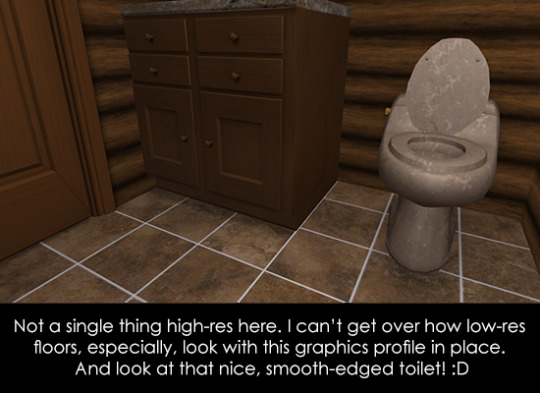
I don't see much difference in neighborhood view -- including skyboxes/horizons -- aside from meshed stuff having smoother edges and a bit (not a lot, just a bit) better texture quality/clarity. Rather, the main difference that I see is in the on-lot textures. There is better clarity and more depth, even in things like basegame carpets. It affects objects, walls/floors/terrain paints, hair textures, everything. (Well, OK, I didn't notice much difference with clothing and other non-hair CAS stuff, but all I had available to look at was my defaults and Maxis clothing, and...yeah.)
Overall, you get a higher level of detail and more depth, even close-up, without having higher-res textures. (But if you do have high-res stuff, it looks even better than it did before, with no further increased resolution.) Which means that you get better-looking textures WITHOUT contributing to pink flashing at all.
So! On to the pictures, none of which are edited in any way except for cropping/resizing and adding text. No sharpening, no fiddling with brightness/contrast. Nothing. I wish I could give you “before and after” pics, but...nope. You’ll just have to take my word that there is a difference. Which you can verify by fiddling with your own settings. (Don’t worry about breaking your game or anything. Since these are settings that exist entirely outside the game, there’s no way you can hurt the game with them. :) ) So, pictures...


And now for some hair...
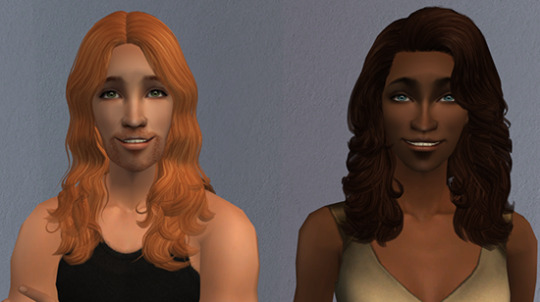
Unfortunately, all I have to show you are my own hair textures, which are neither Maxis-match nor Pooklet-y. However, this graphics profile does tend to bring out extra depth in all textures, including hairs, and with hairs specifically it does nice things to hair ends so that they aren’t so stringy-looking. I’m assuming other textures would also gain extra definition/depth.
One (and only, so far) bad thing about using this profile: It gives you better transparency. Unfortunately, this means that if you use hairs with transparency issues, the issues will be more noticeable, not less. I’m slowly weeding out such hairs in my collection, but I noticed that on the female hair in the first hair pic, there’s a transparency that wasn’t noticeable before, right next to her neck, about half-way down it, on the viewer’s right side. It’s hard to see on the sized-down pic, but it’s the bit that appears to be a blue-ish dot. So, if you do use a lot of hairs with transparency issues, you might want to use a not so high transparency sampling setting. That might help.
As for other stuff that goes on a Sim’s body, I didn’t notice any huge difference in the stuff I looked at, but what I had to look at was limited since I didn’t fire up my full game with all the CAS CC. :) I think my default skintones and the body meshes themselves might be a bit smoother/less pixellated...but that also might be my imagination. :) I do think accessories like glasses and jewelry would probably see some improvement.
So, um, yeah! If you made it through this post, I hope you found the info relevant to your interests. :) I wish that I had learned that you can do this a looooooong time ago!
852 notes
·
View notes
Text
--MODS (ver. 1.16.4 ~ 5 only)--
EASY; OBVIOUS
better third person (TEST THIS 🚨)
wool to string wool tweaks is better ✅
tameable rabbits ✅
more flower bushes ✅ + custom mod for more small flowers 🔲
string lights ✅ (In-game book with recipes/tutorial?⚠️)
botany pots ✅ (learn recipes ⚠️)
invisible armor (actually 1 utility armor slot and 1 visible armor slot but same thing) ✅
NEW
added camels ✅
added chimneys ✅
bell noise when fish on fishing line ✅
can sleep slightly earlier (before stars show up) ✅
better caves, better mineshafts, and stronghold saver ✅
DID NOT add better portals because no they aren't ❌
supplementaries ✅ (hanging signs, notice boards, item shelves, fireflies, etc.; life is good)
added endermail (endermen will deliver packages for you) (do test this one 🚨 it's hard to do in creative)
added flower doubler ✅
added "kelp acts like bonemeal" ✅ (note: only one of either kelp or bonemeal will grow a vine and I forget which 🚨)
added "eggs hatch when they despawn (but only on hay bales and also only when there are fewer than X chickens around already)" ✅
added sleeping bags (skip night without setting spawn point) and hammocks (skip day) ✅
added ability to use banner pattern on bed ✅ (test this 🚨)
added tea ✅ (are the teapots and stuff placeable though..?? 🚨)
BIG DEAL; CONSIDERING
create ✅ (disabled ugly ores and custom stone types in worldgen; they aren't needed to make water wheels which are ALLLLL I care about 📝)
quark (some. mob variants, maybe vertical slabs, oddities for item pipes, etc) ✅
mcmmo 🔲 (pros: taming. cons: I don't actually even like mmos)
inventory tweaks quark has everything we need actually ✅
tree felling ✅ (serilum ver.) (it's so good) (NO AUTO-REPLANTING)
lava lamps ❌❓
ON THE LOOKOUT
one person sleeping makes night be over (check which version this became a thing in) QUARK HAS ✅ BUT TEST IT THOUGH 🚨
always show coordinates and ONLY coordinates (no F3 PLEASE) (Resource pack I got for this seems not to be working. Alt: serilum's gui compass. 🚨) 🔲
immortal neutral mobs (incl. bees) Does not appear possible with any currently existing mod. However, friendly fire prevents damage to pets and I have added passive endermen to prevent aggroing our very tall friends, which should mitigate this as much as possible. ✅ WATCH OUT for cats and rabbits though, that is very much still a massacre waiting to happen. CROSS-TEST WITH RABBIT TAMING 🚨
mooblooms & moolips ✅ CHARM HAS REALLY GOOD ONES
dog variants ✅ betterdogs. Con: to get specific dog type, name of type of dog must be in nametag name, which is mildly weird. Pro: fuck it !
legible signs. (editable signs also?) ✅ vanilla tweaks and quark, respectively.
feathers + leather without killing mobs ✅ charm "chickens drop feathers passively" rule, plus combination of "rotten flesh to leather" & all-paper books.
renewable saddles + name tags ✅ saddle recipe + nametagtweaks. (note: I think I actually have more than one thing installed that adds a nametag recipe but whatever. do test both of these though 🚨 also horse armor?)
more stars/more interesting night sky 🔲 (I hate texture packs. maybe I have to fucking make one)
candy colored texture packs and shaders 🔲 (I DUNNO, YOU GUYS)
BETTER STAINED GLASS? ?? also glass slabs, stairs, etc. might have to do this myself 🔲 (absent by design may add the shapes, as would glasscutter if it were ever updated to 1.16. try absent again now that optimization mods are working? the stained glass though, I do actually have to fucking do myself; nobody understands my aesthetic tastes apparently. CROSS-TEST ABSENT W/ QUARK'S FRAMED GLASS BLOCKS? 🚨)
GOING CONCERNS
proximity chat (found a voice chat mod that might work. to test. 🚨)
teach everyone how to screenshot
NEW PROBLEMS
"In Control!" does make mobs noticeably less lively if you're not within a couple dozen blocks of them. BUT the performance increase is VITAL... play with settings.
Charm (I think?) villager adjustments COMPLETELY fuck up the village near spawn. (Solution: maybe just turn them off... they're not that good. Also, may be able to get away with JUST turning off lumberjack and leaving beekeeper on. Test savanna and extreme hills villages with these rules.)
Better Caves fucks up the cool tunnel I wanted to make next to the ice spikes but I might just worldedit it into submission lol
Quark mob variants are OKAY. I do actually need to test 🚨 whether quark and charm can both have them enabled at the same time and have that like. work. Because charm's are slightly cuter in general but I like quark's purple cow hsjdjfjf
Chimney mod is cool but oh my god I have to 🔲 turn the amount of smoke particles it generates down
QUARK CANDLES ARE MADE FROM TALLOW AND NOT BEESWAX FOR SOME REASON... but charm's only come in one color. also neither of them cluster like the ones from 1.17!!! I HAVE COMPLAINTS 🔲 (solution: different mod OR custom mod OR crafttweaker)
also quark's blossom trees are a cute idea but they're ugly. fix? 🔲 AND fix the decorated paper wall and lantern.
related: macaw's doors has sliding paper doors. pros: MANY MORE DOORS, TRAPDOORS, WINDOWS. cons: choice paralysis? cluttered recipe book?
🔲 STILL DO HAVE TO PUT MORE FLOWERS.. IN IT..THE GAME.
wooden axe is the wand tool for worldedit and so does not work as an axe. I'm pretty sure there's a way around this but I think it's funnier to just ban the use of wooden axes specifically. unhinged server laws. also yes I want everyone to have access to worldedit. yes I will murder and kill them if they use it to be rude. we live in a society
the nether is still ugly. there's not really anything I can do about that though
🔲 Limiting factor on arrows is now flint, which is annoying to get, so maybe do something about that too.
🔲 also I totally have not found a good lead recipe so that too
🚨🔲🚨 and finally: this post is now way too long so I have to work on making a coherent file that lists included features, and another that lists stuff I'm still looking to add remove or change. NOT EVEN I WANT TO READ ALL THIS !!!
2 notes
·
View notes
Text
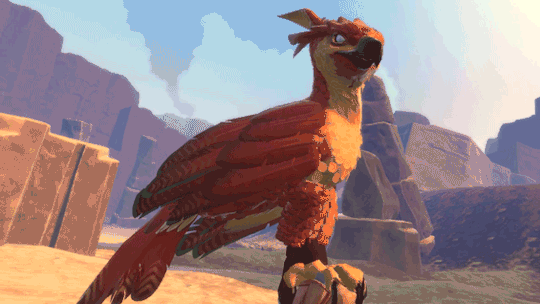
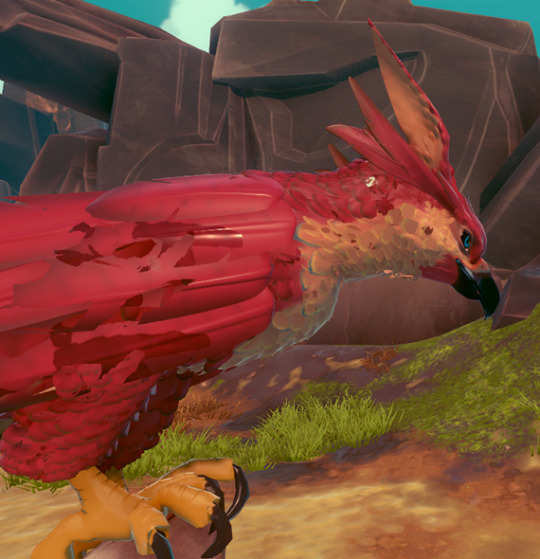
Anatomy of a Falcon
youtube
We recently announced Falcon Age, a game about nurturing a falcon from a baby, bonding with them, and together resisting the forces that colonise your planet. Falcon Age will be out in 2019 for PS4 and PS VR.
We showed off the game at PAX last week, got a great response, especially on the falcon. Let’s do a deep dive of the design of the falcon, animation and rig setup, AI and navigation, feather tech, and raptor sounds.
Falcon Design
Chandana Ekanayake and Darran Hurlbut

Our falcon design combines multiple raptor types. She is big as a golden eagle, fights like a hawk, has some eagle-hawk resemblance, some owl-like tufts, and falcon tendancies. She’s one of the last of her kind left in our world and we wanted to make her unique visually for the story and also visually stand out during gameplay against the sky and desert like environments.

One of the early inspirations for Falcon Age came from videos of golden eagles hunting large mountain goats. That led to some research on falconry and the idea of having a falcon as a pet and designing mechanics and gameplay around that core idea. We made a rough prototype early on to test out the ideas. The first time we successfully whistled for the bird in VR and saw the scale change from it approaching from a distance to landing on our hand, we knew we were on to something that could serve as the core of a unique game.
Animation and Rig
Aung Zaw Oo
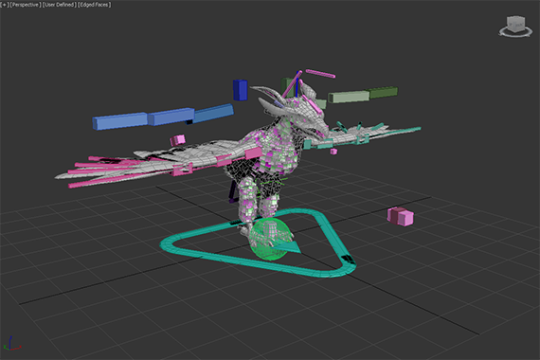
FALCON FEET TRACKING
There are lots of animation options out there, but none of them would easily solve our specific falcon feet tracking needs. Inverse kinematic setups, root motion and other complex plugins could do the job if we had a bigger team and more time to dedicate to it. We wanted a more predictable outcome so we went with a multiple pose based solution made in 3dsmax.
However, the biggest reason for not using IK, is that this is the best way I could come up within a couple of days. We were building the prototype so fast back at the beginning of the project that we didn’t have time to look at what other solutions are available. This is the most reliable and least ugly way I found and we’ve stuck with it since. If it's not broken, don’t fix it.
Here is how I imagined the bird claws blending IRL. The ball is the fist that is attached to the VR motion controls.There are limits to this method. The claws needs to be able to wrap around a fair chunk of the fist and the fist pose needs to be as spherical as possible.
Note that head and legs are siblings of the pelvis. This makes the bone masking and making separate blend trees easier. Ignore the word ‘eagle’ in the naming. That was just a temp asset name before we figured out the bird design.

Short version of how its done; the fist is a ball and the bird’s feet rotate around the ball using 30 blend poses and shuffle animation to get the feet back to center when the ball(motion hand) has rotated too far.
30 Blend Poses on a ball

A shuffle animation let feet recenter
And the the blends start again after that quick shuffle animation from the new rotation of the hand. According to our programmer Justin, he is doing some regular old quaternion and linear algebra math. And I’m using 3 float values that he’s giving me and feeding them into those anim blend states.
For baby bird, the 2nd knuckle on the index finger is treated like a ball.

The one edge case where the ball concept doesn’t work is when the glove is pointed directly down. Pictured below.

We had several ways we could’ve dealt with that case. One solution was to have a collider on the forearm part of the glove and have the bird fly away if bird’s collision intersects with it. Ultimately we decided to let it be as is. It’s more player friendly that way since it lets you scratch your left hip while in VR without having the bird leave you. Also most people would never have their hands positioned that way in normal play.
Unless they’re playing in a headstand for some reason. All kinds of animation features would look wrong or broken in a headstand.
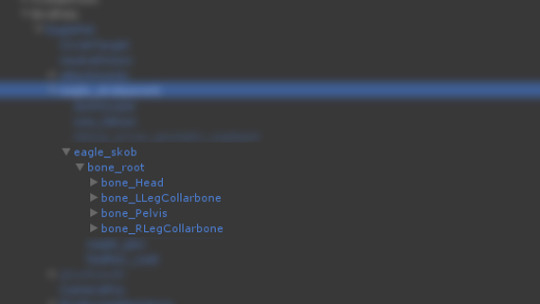
FALCON HEAD TRACKING
Short version of how its done; the head (bone_Head) is a direct child of the highest object in the bird skeletal hierarchy ( bone_Root ).
Bone_Root’s position(not rotation) follows the position of the motion controller and bone_Head counters that motion. Basically a 2-object hierarchy where a positional blend is used to counter motion of the parent object to keep the child object in same global position. The rest of the bird body uses a blend of 27 poses to try its best to keep the bird looking natural.

With the size of the adult bird we have, a 12 cm translation in all axis(24x24x24 cube) seemed ideal for getting the stabilizer effect without stretching the neck too much. The head will also move at the edge of that range and when the motion hand stops moving, that new position is now the new center and another 24cm cube is formed there. Math wise, headlock is mostly just a vector transform with a lot of extra 'fluff' for limiting speed, transitioning in and out, and moving the lock point when it gets too far from the body but the bird is still in the area.
Bird Navigation and AI
Justin LaLone
BIRD BOREDOM
For the most part, the falcon obeys Ara’s commands and follows her around. If you stand around long enough in one area while the bird is just circling or if you launch her with no orders, she will start looking for something else in the area to do - usually hunting or landing on a point of interest. She will also take some initiative when perched on Ara if anything else tries to grab her (she’s possessive like that), and likes to help lead Ara to the next hole in lightning golf.
SUN BLINDING PREY
Some of the prey, such as the rabbits, are very skittish and as soon as they notice a falcon diving towards them they will take off for the nearest bolthole. They have a more difficult time seeing Ara’s bird if she approaches with the sun behind her, so paying attention to where the light is coming from and sending the bird from that direction can make catching prey easier and more reliable. On the other hand, simply diving from higher up can be good too, as the bird can pick up more speed before being noticed, giving her prey less time to dodge out of the way.
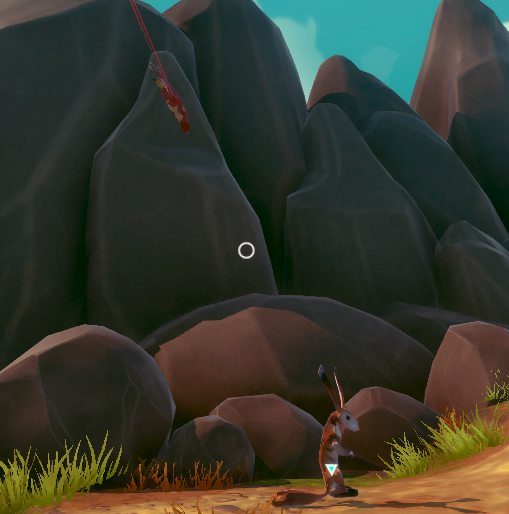
Coming in fast and and from the sun, for a guaranteed hit.
FALCON 3D NAVIGATION
Getting a flying animal to reliably traverse a 3D space in a somewhat natural looking way isn’t something you typically find out of the box in a game engine. We have roughly three levels of bird-navigation logic going on to get the bird from point A to point B without running into too many things or getting stuck in a corner.

For high-level navigation to find its way through the world, we build a 3D navigation graph and use A* to find a path. What’s probably somewhat unique in our implementation is that we are using the fairly new Unity job system to do all our A* pathfinding, giving us fast searches that stay off the main thread, allowing more time for other AI, physics, and more stuff in general. Most of the graph is generated automatically, with manually placed connections for flying through narrow gaps like windows that are small or require an approach from a good angle.
The purple line is a rough path for it to follow to get around the big rocks in between where the falcon started and where Ara is standing. The bird doesn’t try to follow this line very closely; it would be trying to make some pretty strange and sharp turns if it tried, so as soon as it has a clear shot to the next part of the path it heads there instead.

Sometimes smaller objects or moving objects can get in the way. The falcon looks ahead and goes over or around these objects. This rock is actually just big enough that it would normally navigate around it with A*, but I forced it to “forget” about that for now. Here, it’s turning left to go around the rock - the red lines show where it has been looking for the past few frames. It usually won’t try to go under things in this way, but the A* navigation can direct it to go under arches or walkways.
The last level of bird flight logic is the actual maneuvering logic, or how the bird decides how fast it wants to go, how much to ascend or descend, how quickly to turn, and how it applies physics accelerations, limited by what it is allowed to do, to get there. This feeds into the animation system telling it how hard the bird is working, what sort of pose it should be in, if it should be banking, etc. The object avoidance is tied in somewhat strongly with this, but all the A* navigation is completely separate. It is also a big pile of math and logic.
Feathers and Rendering
Ben Golus
The small body feathers, or contour feathers, on our birds flutter in the wind, and react to the player’s hands brushing against them to give a greater sense of tactile interactivity. The way this was done for the PAX demo is a bit of a hack which I hope to replace before we ship. (This of course means it’s the solution that will ship with the game.) The short description is each small feather on the bird is a treated like many grass or vegetation shaders. Several overlapping sine waves are used to calculate some simple noise used to flutter the feathers and give them some life. Their timing is offset by a random value per feather stored in the vertex color, and the flutter movement is scaled also using the vertex color. This means the base of the feathers don’t move, but the tips do. It also means longer feathers move more than shorter ones.
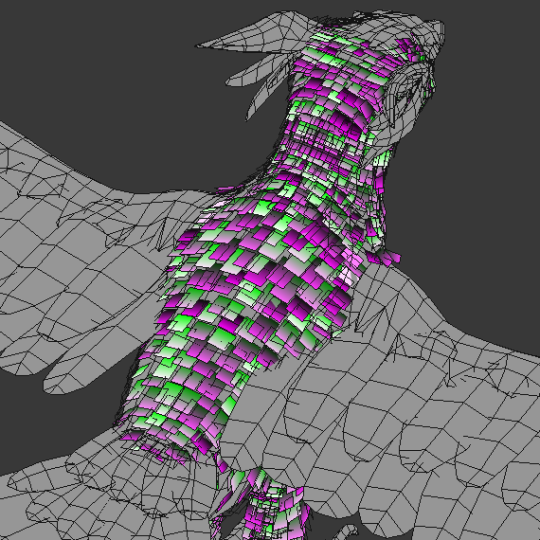
Unlike most grass shaders, we need the feathers to not move in random directions, so we can’t use world or local space directions. Plus this is on a skinned mesh which makes the direction even more dynamic. Instead I use a combination of the feather’s vertex normal and tangent so the feathers flutter in and out and side to side relative to their orientation. This isn’t strictly accurate, but for small movements like this it won’t be obviously wrong.
To handle hand interactions, the player’s hand has a script which tracks the bones and creates a list of capsules that follow the shape of each finger, and a sphere for the palm. If the hand is in range, the vertex shader iterates over the list of capsules to find closest distance to one and softly scales down the flutter if a capsule one is overlapping it. The feathers are also squished down towards the body. The capsules are oversized as the overlapping tests are soft, so this isn’t an instant on-off, but a gradual change. It’s roughly tuned so that once the visible finger is touching the feather it has stopped moving entirely and will push down.

Here’s an early test of this system in action. You can see how the feathers react to the sphere before it actually touches it, but the interaction is still convincing.


For the final release of the game I’d like to move to a geometry shader or compute shader approach which would solve some of the issues the effect currently has when only one vertex of a feather is being overlapped, and the fact the feathers light normals don’t change when being touched.
FALCON DAMAGE FEEDBACK
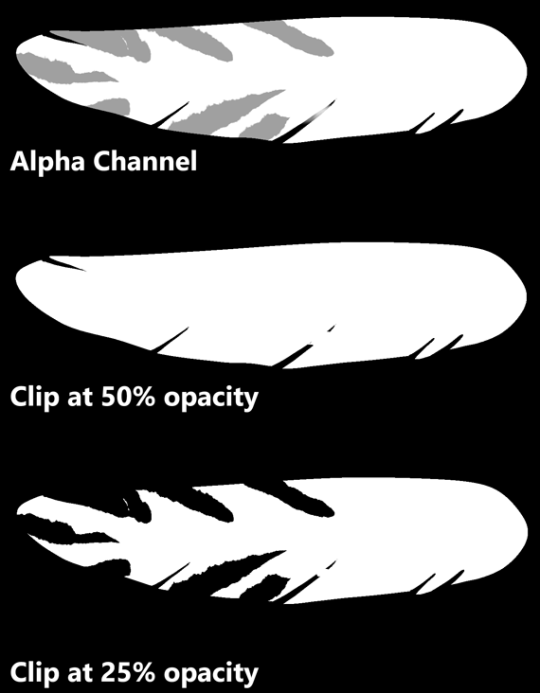
We needed some way to show when the bird is hurt, and we wanted to avoid using a health bar or similar mechanic as much as possible. Animation is used to make the bird look tired, and in pain, but we still didn’t find that it was clear enough to users that she had taken damage. We decided we wanted her to look physically damaged with blood and frayed feathers to really strongly communicate her state. The obvious answer was to do a material swap. However we also wanted to show a gradual increase in damage rather than a hard on / off, and did not want to have to have a lot of different maps. There was also the issue that most feathers shared the same UVs, which meant blood spots would be repeated all over the bird.
The solution we ended up with was done in two parts. First was feather damage and fraying. The alpha channel of each feather is setup in a special way so that both an undamaged and damaged version exist in the alpha at different opacities. The feathers are using alpha test cutout (actually alpha to coverage) at 50% opacity when at normal health, and 25% opacity when damaged to switch between the two states.
For blood splatter the bird has a second UV for the blood texture so we don’t have to reuse the original feather texture UVs, and then we blend in the blood on top of the base texture. The result is we only need one base texture set, and one blood splatter texture set for the bird and we can get variable damage effects on the bird.

Raptor Sounds
Rob Pearsall

The bird wasn’t designed to be different - futuristic or magical - from any bird in our world, just an amalgam of several flying raptors (except for wearing hats); so, it didn’t make any sense to create a voice for it that might sound ‘cinematically awesome’ - it just had to work and be believable.
That said, I did have the choice of “borrowing” the calls of any raptor I thought would communicate to the player the various moods, feelings, and responses of the bird. So, I listened to the sounds that raptors make; and to my surprise, the biggest, most impressive bird - the eagle - was absolutely the worst sounding predator of them all. First place for “don’t use this”.
The hawk is always a great choice. Everybody loves the screech of a hawk. I used to think that there was only one good recording of a hawk screech and every sound designer owned it and that’s why all hawks in all shows and movies sound the same. Not true. It turns out, all hawks sound the same. Not much variation at all. Now, don’t get me wrong, it sounds awesome, so yea… we’ve got that sound on our bird too. But that’s not all.
The best thing I had going for me was that I didn’t have to limit our falcon voice to one specific kind of falcon; and there are many kinds. Because of this, I could liberally choose any sound any falcon produces that makes sense as a kind of emotional statement from the bird.
Conveniently, the emotions were limited; I name them as statements from the bird:
All is calm, all is well
I hear you call me
I’m attacking
I’m hurt, but I’m still flying
That hurts
Getting a recording of a raptor that’s annoyed is really easy; show up with a bunch of recording gear, get into it’s space, and it’s already annoyed. So, there’s a lot of material of raptors sounding negative and mad. This works for ‘pain’. The hawk’s sounds work for flying responses and attack calls. The “all is calm” sounds were the difficult ones. There were several chirps that worked, but then I had to edit a lot of different kind of calls to get partial, short squawks that fit with the chirps, and it worked.
Keeping track of the bird sonically while in game… well, that’s another story for later.
Thank you!
Thanks for reading. For more info and latest updates follow @outerloopgames
15K notes
·
View notes
Text
Retrospective - ProtoDungeon: Episode II
The second episode of ProtoDungeon is just about complete, and I hope you're all looking forward to its release as much as I am! :D
And as devtober (working on the game every day for the month of October) is over, it's about time for a retrospective too. I prefer that term over "post-mortem," which makes it sound like the project died (though I guess this episode is graveyard-themed, so that might be appropriate!).
What didn't go well:
Mainly, I took on too much. This wasn't intentional, but it WAS a result of:
Not planning long-term.
Not breaking down big tasks and spreading them out
For example, the menu should’ve been broken out into the basic menu, audio settings, video settings, saving, and control remapping, and then divvied them up over the next few episodes. Instead, I did ALL OF THEM AT ONCE. It was a big task, and doing it all at once slowed me wayyy down. The lack of variety made it tough to make good progress.
Also the mausoleum… as happy as I am with the results, building out an extensive series of logic that I would only ever use once… bad idea. If I’d thought it through, I would have built it differently. Unfortunately, by the time I realized this, I was already halfway through, and undoing it would’ve been more work than just forging ahead.
What went well:
Devtober! I was able to work on the game every single day, and despite that I wasn't able to finish the game by the end of the month (not necessary for Devtober, just something I wanted to do), I made a ton of progress in little tiny steps. Momentum is a great ally.
Speaking of momentum, posting every day on the social medias—even just images of code or my Trello board—helped regain some of the interest that had waned over my quiet months. Posting every day forever is certainly not sustainable, but it’s something I could consider for once or twice a week.
Oh, and despite that I did too much this episode, I'm happy I won't have to build all these systems in the future. :)
What to start doing next time:
List out the remaining (known) tasks for the whole ProtoDungeon series
Make sure the tasks are broken down to an appropriately small size
Build these into a (flexible) roadmap
I wouldn’t say this went badly, but I’d like to keep early alpha testing more restricted and then only open it to patrons when it’s closer to being finished.
I think with some better planning, I’ll be able to finish Episode III quicker than six months.
The major new things we got in Episode II:
Ring of starlight—a new item is always a big deal and will be for every episode!
New audio engine—thanks to Wandersong for this! I was able to do some cool stuff with two different versions of the same music track
Menus—Episode I was just a static screen, but now we have new/continue game, audio settings, graphics settings, and controls remapping!
Autosaving—a huge undertaking, much bigger than expected. But now you can actually quit the game and come back and pick up where you left off. This is part one of the complete saving system, but it is the biggest, most difficultest part.
NPC—I’d planned a lot more dynamic action for this guy walking around and tending to the graveyard, but I managed to trim it down after spending so much time on everything else.
Day/night—another huge undertaking, including the ability to switch between day/night, lighting, day/night sensors and logic, and the palette shift shader (which means I had to rewrite how everything gets rendered due to the pixel scaling).
That’s not to mention dozens of fixed bugs and incremental improvements in various areas!
Anyway, I hope you’ll look forward to Episode II’s release on November 9. If you haven’t yet, check out Episode I here (it’s free!). And if you’re a patron, I’ll be opening up the poll for the Episode III item soon!!
17 notes
·
View notes
Text
KSP Weekly: Mapping with Magellan

Welcome to KSP Weekly! Tomorrow, September 15th, it’ll have been 28 years since the Magellan spacecraft began its primary mission, so it is as good a time as any to talk about this cool Venusian orbiter. Aptly named after the sixteenth-century Portuguese explorer Ferdinand Magellan, known for his exploration, mapping, and circumnavigation of the Earth, the spacecraft’s main goal was designed to make quality radar maps of at least 70 percent of Venus' surface, providing a clear look at the topography below the planet's thick, perpetual cloak of clouds.
Also referred to as the Venus Radar Mapper, the Magellan spacecraft was launched by NASA on May 4 1989 aboard the Space Shuttle Atlantis, making it the first interplanetary mission to be launched from a shuttle. It was also the first one to use a solid-fuel motor called the Inertial Upper Stage booster to continue its journey as it was released from the shuttle’s cargo bay, and the first spacecraft to test aerobraking as a method for circularizing its orbit. Magellan was the fifth successful NASA mission to Venus, and it ended an eleven-year gap in U.S. interplanetary probe launches.

The spacecraft carried a sophisticated imaging radar, called Synthetic Aperture Radar (SAR), which was used to make the most highly detailed map of Venus ever captured during its four years in orbit around Venus from 1990 to 1994. After concluding its radar mapping, Magellan also made global maps of Venus's gravity field.
Magellan mapped 98 percent of the planet’s surface with a resolution of 100 meters or better. The radar images showed that most of the surface was covered by volcanic materials, that there were few impact craters (suggesting that the surface is relatively young geologically), and that there was no evidence of plate tectonic activity or water erosion, although there was some evidence of wind erosion. Despite the high surface temperatures (475°C) and high atmospheric pressures (92 atmospheres), the complete lack of water makes erosion an extremely slow process. As a result, surface features can persist for hundreds of millions of years. The Magellan mission also determined the topography of the Venusian surface, measured the Venusian gravity field, and provided suggestive evidence that the planet’s interior differs in major ways from Earth’s interior.
On Oct. 12, 1994, the spacecraft made a dramatic plunge into the thick, hot Venusian atmosphere, and was crushed by the pressure of Venus's atmosphere. Magellan's signal was lost at 10:02 Universal Time (3:02 a.m. Pacific Daylight Time) that day. What a glorious end to such an amazing mission, don’t you think?
Although Magellan was the agency's last dedicated Venus mission, we’re sure that the lessons learned from the spaceship's aerodynamic dive into the Venusian atmosphere will be applied to future planetary missions… even if conducted by little green creatures.
[Development news start here]
The progress on Update 1.5 is on track, and, naturally, this week wasn’t without its developments. The team is currently working on some cool features regarding one of our favorite Celestial Bodies: Asteroids! As you know, before the Making History Expansion, it was very hard to get an asteroid within the atmosphere of other Celestial Bodies, at least without mods or some sort of cheats. When Asteroids were originally introduced into the game, only space interactions were in mind, but that changed with the expansion as now players can easily spawn asteroids on collision routes with other Celestial Bodies. In light of this, we have been working on ensuring that asteroids behave properly whenever they enter the atmosphere of a Celestial Body, similar to a spacecraft. So far, we have added VFXs as they go through reentry heat and included explosion effects when they actually collide. Check this Gif to see the progress.
In other news, the endeavor of revamping parts continues! Each week we gather insightful feedback from the community as we show the new look of some of these parts, but we haven’t shown you everything just yet. This week we have some stuff to show off. For instance, there’s more to the revamping task of the MK1 Command Pod that we want you to look at. Let’s start with the new IVA, which has been done over from scratch. As you know the look of this Pod takes inspiration from the Project Mercury Pods, so it made perfect sense to draw inspiration from these command pods to model the new command panel. What do you think?

Click here to see the high-res image
Additionally, the team also worked on creating a couple of additional texture variants for the MK1 Command Pod. This way you’ll be able to give your rockets the right look: Dark, White or a Gray & White pattern, it is up to you! Also noteworthy is the detail that our artists have added to the Pod’s texture.

Click here to see the high-res image
The Probodobodyne OKTO command modules also were in the artistic agenda this week. The new look of these command modules was based on the ones used in the Mariner Program, and to achieve that our artists made completely new texture maps using diffuse, normal and specular maps. They also retouched the geometry and added a new shader to the module’s tops to make them shine and interact with light, just like they did with the HECS modules. On top of that, with resource optimization in mind, they put both textures into a single map. Moreover, the collision mesh was tweaked to better fit the shape of the probes. Check these gifs to see the new models in motion: OKTO and OKTO 2. Bear in mind that the config files of these parts were not modified in any significant way.

Click here to see the high-res image
[KSP Vault]
This week in the KSP Vault…
Matt Lowne released the 4th episode of his new Green Harvest series! Since the Duna Attacks, we loved Matt’s cinematic storytelling and Green Harvest doesn’t disappoint. Check it out!
youtube
Finally, Marcus House made a simulation of a SpaceX Falcon Heavy sending a self-refueling (ISRU) vessel to the Moons Surface. A double booster vertical landing included! Impressive...
youtube
Have you seen cool KSP-related content that you consider worth highlighting? Share it with us and help us give content creators more exposure. :)
Remember that you can also share and download missions on Curse, KerbalX, the KSP Forum and the KSP Steam Workshop.
That’s it for this week. Be sure to join us on our official forums, and don’t forget to follow us on Twitter and Facebook. Stay tuned for more exciting and upcoming news and development updates!
Happy launchings!
*Information Source:
ASP: The Magellan Spacecraft at Venus. (n.d.). Retrieved from http://www.astrosociety.org/edu/publications/tnl/18/18.html?PHPSESSID=4aff07778bb9b4b6b5727a1050ec3e91
Hamilton, C. J. (n.d.). Magellan Mission to Venus. Retrieved from http://solarviews.com/eng/magellan.htm
In Depth | Magellan – Solar System Exploration: NASA Science. (2018, January 26). Retrieved from https://solarsystem.nasa.gov/missions/magellan/in-depth/
Logsdon, J. M. (2018, June 11). Magellan. Retrieved from https://www.britannica.com/topic/Magellan
Magellan. (n.d.). Retrieved from https://www.jpl.nasa.gov/missions/magellan/
22 notes
·
View notes
Video
tumblr
Every once in a while I get “accusations” of using Unreal Engine’s default settings, or people asking me UE4 questions even though my stuff is done in Unity. I always get a laugh out of it, and at one point I was getting it so often that as a joke I started putting the infamous LIGHTING NEEDS TO BE REBUILT text on my HUD.

It still happens. The last time I was told I was using Unreal was Tiny Combat Redux's main menu. Just adding Unity’s post processing stack to your project and then turning the sliders up does basically the same thing that UE4's post processing shaders are doing. Honestly, it's only because Unity's default settings and scene don't include the Post Processing Stack V2, that default Unity projects look the way they do. I suspect including them is the plan going forwards, as the new and still experimental scriptable render pipelines both default to a scene with all that stuff turned on.

However, I do think Unreal's starter content is of higher quality and better looking than Unity's. That smoke and explosion particle for example are real good. So good, that I “borrowed” the smoke and have used it in a couple Unity projects.
Plus, they just have nice test objects to look at like the chair, table, and cool looking material sphere, along with some really dynamic looking materials that take advantage of cool render tricks like cubemaps and screen space reflections.
2 notes
·
View notes
Text
Hello (Procedural) World! - UE4 Voxel Project Devblog 1
tl;dr version: I’ve always wanted to play with 3d procedural spaces, and I’ve always wanted to learn UE4. So I’m doing both by making a voxel project in UE4!
For years now I’ve wanted a good excuse to dive into two different things: a deep dive into building things in UE4, and generating 3d procedural worlds from scratch. Recently some time opened up in my schedule to work on some new things so I decided to combine those desires and make a small voxel world game in UE4.
As of right now this is not a full game project, simply a technology testbed where I can learn more about working with UE4 and more about working with voxel data and procedural 3d spaces. That said I’ll be implementing various game’ish systems over time since that goes hand in hand with learning the engine.
So, after the first bit of work what does this all look like in action? Take a look!
youtube
Here’s a list of the bits I’ve implemented so far that make that video possible:
Using noise to generate a seamless/infinite world (including simple caves) and generating meshes
Multithreaded loading chunks of the world on demand
Basic player interaction to create/destroy voxels
A shader that textures voxels based on their material type
Also for fun I took the voxel generation and embedded it in an augmented reality application so I can build voxel objects in the real world. :)
UE4 Stuff I’ve Learned So Far
ProceduralMeshComponent
The ProceduralMeshComponent is doing the heavy lifting for all of my mesh rendering and world physics state, and it couldn’t be easier to use. It has a function called CreateMeshSection that you pass vertices, triangle indexes, normals, uv’s, etc to and it creates the mesh and collider for you.
One thing I found while I was testing is that a single ProceduralMeshComponent allows for multiple meshes - each CreateMeshSection call takes a “section index” and if you specify a new index it will add another submesh to the component and you can give it a separate material. However there seems to be an increased processing cost each time you add a submesh that I need to investigate. The processing was sufficiently large with the number of chunks I’m making (~512 chunks) that I ended up switching to an array of ProceduralMeshComponents and each one only has to handle a single chunk.
Long term I think this will be a better route anyways, since then I can use section indexes to handle materials that need different rendering options (e.g. water or stuff with animated tiles).
FNonAbandonableTask
As I started generating caves I hit stutters again since generating 3d noise is computationally expensive. What I wanted ideally was for chunk generation to be kicked over to another thread, and then update meshes on the main thread when the generation is finished. FNonAbandonableTask has been perfect for this so far - for each chunk I create a struct to hold all of the generation results and pass it to a new GenerateChunk task, which then does the work, fills out the struct, and marks it as complete. I was really happy with how easy this was to get going, between reading up on it and implementing it I think I probably only spent 2 hours? Works great. Worth noting that these are *not* immediately killed when a game stops, so if they rely on a memory/reference that gets destroyed on game stop it can bring down your editor. The joys of threaded programming. :)
FCriticalSection
One issue that I ran into with the threading experiment was that my sparse voxel volume data structure wasn’t threadsafe, so when I kicked chunk generation into the task graph all the different threads started stomping all over each other. Not good! I reworked the tasks to use a FCriticalSection to lock access to the volume for writes. The expensive part of the computation (noise generation) can still happen freely since each voxel is computed independently. So a single tasks generates all of the data for a chunk, grabs the lock, updates the volume, and then releases the lock. I was worried about how a locking data structure would work with the task system but so far it’s been smooth sailing.
Misc Stuff
Lots of little things about creating materials for the voxels, e.g. using world space + the block material to calculate UV’s for the block faces
Putting input handling into the player controller instead of the pawn - being able to swap in a new pawn type is handy!
Using SCOPE_CYCLE_COUNTER to track performance of various code blocks is super handy for tracking down what’s causing stutters in your code
Along those same lines: the profiler in the session frontend is great for digging into why you had a spike
UGameplayStatics has a ton of useful functions
Misc Augmented Reality/Mobile Stuff
If you’re on android, don’t enable Vulkan - it hard crashes on launch as of UE4.19
Ambient occlusion doesn’t work on mobile!
I still haven’t figured out how to get a directional light to cast shadows for my voxels
Getting close to the surface where you’re editing blocks causes the AR system to lose tracking -- not enough feature points?
Use the “launch” feature for testing, packaging/deployment is pretty slow otherwise
Voxel Stuff I’ve Learned
Generation
There is no magic single noise formula to get interesting results, use different noise functions for different aspects and combine them all for the result you want. Right now I’m using 3 sets of noise and will probably need a lot more before I’m done
3d noise is expensive. If there’s something you can do with 2d noise instead for a similar result, do it
Perturbed cellular noise is great for all sorts of stuff
Simplex noise is pretty boring to look at but great as modifier/argument to more noise stuff
Caves are really hard to do well when you’re generating each voxel independently
You can lose an entire night’s worth of work time just tweaking your noise parameters and testing the result
Always have an easy way to see the seed of your current world so you can repro bugs as you find them
Always showing player coordinates in dev mode is a really handy tool so you know how to get back to an area that had a bug
Rendering
Turn off all the static lighting stuff, you can’t use it anyways
For cubes, ambient occlusion adds a nice effect at the seams. But don’t overdo it otherwise it looks like your world is being taken over by black mold :(
Using world space coords to generate uvs for blocks is great - just make sure to inset everything slightly so you don’t bleed into neighboring tiles in your tile atlas
When you create/destroy a block on the edge of a chunk make sure you tell the neighboring chunks to update as well, otherwise you can end up with discontinuous areas
What’s Next?
Now that the basics are working I’m still deciding what I want to do next. On the UE4/gameplay side I’m thinking I might have block destruction spawn materials that players can pick up and use to build new structures. It’d be a good lead-in to eventually adding something like a crafting system.
For the generator, I’d really like to figure out a better way to assign material types to voxels (and add new material types for increased diversity). Also I’m not happy with the generated caves at all right now, in particular with how they present themselves on the surface.
On the voxel side of things I’m tempted to give up on the minecraft/blocky look entirely and try to move to a smooth world mesh like you see in Astroneer and No Man’s Sky. I need to read up more on how those systems work before I dive into it though.
Other things would be reading up on UE4′s static instance mesh system to start adding foliage, changing chunk generation to be based on player line of sight instead of a naive ‘load all chunks in radius x around player’. Also starting to think about how to handle chunks that need multiple material types (e.g. animated lava/water)
Well, that’s all for now I think, hopefully the next dev blog will be shorter! This one was a bit of a brain dump since I waited so long to write it. As always if you have questions or something in particular you want to know about - feel free to hit me up on twitter. Thanks for reading!
6 notes
·
View notes
Text
Game Status Update:
Okay we're officially back into coding territory!
Today I've gotten my NPCs movement code working again. To do this I needed to upscale everything up to the new perspective I switch to a few iterations ago which was as easy as multiplying a few variables. Next, I needed to mesh the old NPC movement code with the new player movement code and call from the new animations instead of the old pixel art ones. I'm actually quite surprised with out smoothly this process went. But as of now the new NPCs are up and running around great! I do still need to play with their collisions a bit more (or maybe just remove them?) but I'll burn that bridge when I get to it.
Next, I made my first foray into lighting. Now, what I've done is incredibly rudimentary in that all I've done is place a dark, semi-transparent ellipse at the feet of my player and NPCs which follows their movement exactly. This was mostly done to help me practice using the draw event again purely because it's been so long since I've used this stuff. I do have much bigger ideas for casting light and shadows for both characters and scenery, but that will come later.
Finally, as I have gone through about a million different iterations of this project throughout this whole process I took quite a bit of time to do some housekeeping. I've scrubbed through my entire resource tree and deleted everything which is not currently being used in some way. This includes old animation sprites, outdated scripts, old dialog systems, and a ton of testing objects which I no longer need. This will make building new systems a ton easier because I won't be confused as to what I should be referencing moving forward, which has honestly been a problem for a while now.
Next Up!:
The next "baby step" I plan on getting working again is the "thought bubble" dialog boxes I'll be using throughout the game. Right now if you talk to a character or object or whatever you get something which aesthetically looks like an audible conversation. Now this is great, but it doesn't look right when the main character is more or less talking to themselves when inspecting objects. So I need to bring back a system I used to have for that. Should be easy enough.
After that I plan on getting my object-highlighter shader working again for my new perspective. I need to find a way to thicken the outlines without making them too hard. Additionally I want to come up with a system which displays what the object is called when hovering over it to better signify what it is, and that is important to the story or whatever.
So, let's do those things!
3 notes
·
View notes