#thedollplanethair
Text


My friend twinklebat made these OUTSTANDING custom dolls (as her first custom project!). Sharing with her permission here along with her caption:
Harrow's base doll is an Ever After High Melody Piper, Gideon's is Ginger Breadhouse. There's a few painted and modified Monster High accessories. Sunglasses are from Bratz. Hair is from TheDollPlanetHair on Etsy. Belt supplies are from CharleneluDesign on Etsy. I used a couple patterns from DGRequiem on Etsy. Sword is from lingling0216 on eBay.
I decided to start with EAH dolls instead on Monster High for the natural skin tone variety available. Gideon and Harrow should look like they're of mixed Maori descent.
#the fact that she went and got the fence as well is killing me#the locked tomb#tlt#griddlehark#gideon the ninth#harrow the ninth#harrowhark nonagesimus#gideon nav#custom dolls#monster high
153 notes
·
View notes
Text
Behind the Scenes: Olivier Mira Armstrong
WARNING: VERY LONG POST AHEAD!
This was definitely a journey for me! This project was completely new territory for me because A) this is a character/series I’m not familiar with, and B) I’d be attempting a FULL reroot all by myself. I’d wanted to practice, and my friend and I both decided it would be a good opportunity to do so. If I failed, I did have a rerooter friend who I knew could fix my mistakes.
But the first step was making sure the outfits could be made. Without them, this entire project would be in vain. I’d need an outfit for both dolls, though Alex will be posed wearing only his pants with his shirt and jacket suspended in the air like in this scene:

So anyway, that was the first step. I contacted my favorite seamstress, Elenpriv, and asked if this was something she could do. The doll I’d planned to use was a Made to Move petite Barbie, and the guy has slightly different measurements than a traditional Ken, but since the pants were all that really mattered, it should be okay. Anyway, Elenpriv said the outfits were totally doable!!! YES!
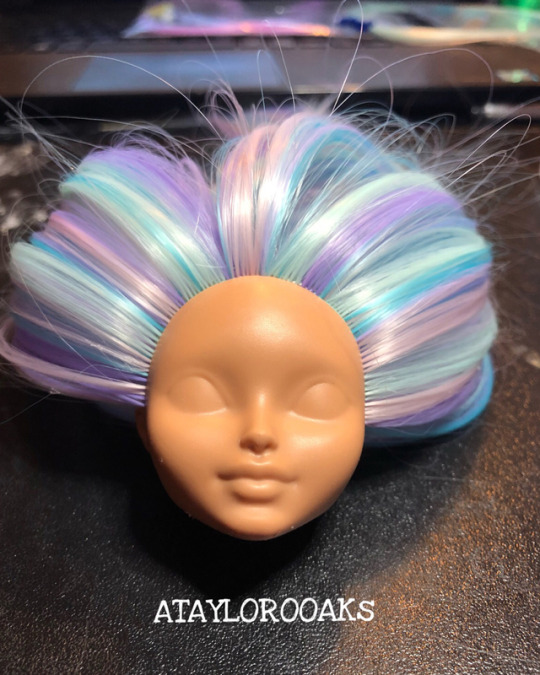
So the next step was finding the doll to use. I knew what body I wanted - the petite Made to Move Barbie because Olivier is pretty short compared to her brother. My friend informed me that Olivier’s typical face is a “resting bitch face” LOL. Unlike my Inuyasha dolls, this series of characters has noses and mouths that are more pronounced than just lines. That actually made finding a candidate easier.
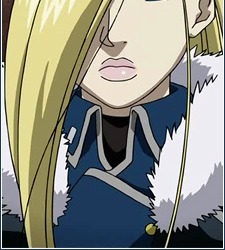
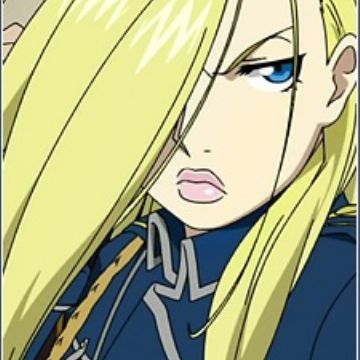
Out of total coincidence, the doll I ended up using had the petite Made to Move body AND the perfect face! She wasn’t smiling and had short hair that could easily be removed for a reroot:
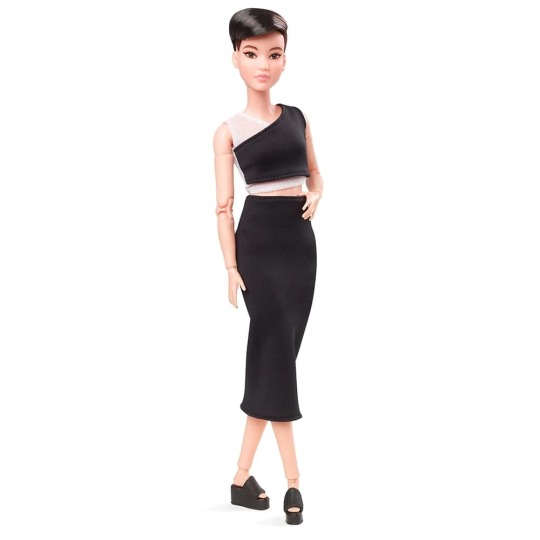


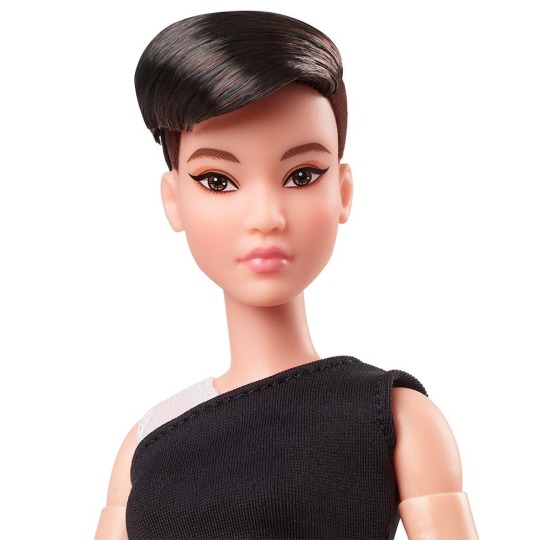
For the record, I’m not a fan of the flocked doll hair. LOL Anyway, that’s beside the point. Her face sculpt looked perfect, so I knew we had our candidate! And the outfits were a go!
So next up was choosing the proper hair color. I got my hair and the rerooting kit (I’d had some in the past but I got more just in case lol) from TheDollPlanetHair on Etsy. My friend helped me choose the color, and we went with Lemon Blonde. Or was it Lemon Drop? I got both because screens make it hard to tell colors, but in person they look almost identical LOL.
So then I got to work! I’ll spare the details of the rerooting process, except for the fact that, this being my first time doing it, it was certainly a learning curve. I’d watched several videos of people doing reroots, and no one ever plugged every single factory-made hole. So I didn’t, either. I also had to make my own holes (glad I had that extra tool to help with that!) because the flocked areas didn’t have any underneath.
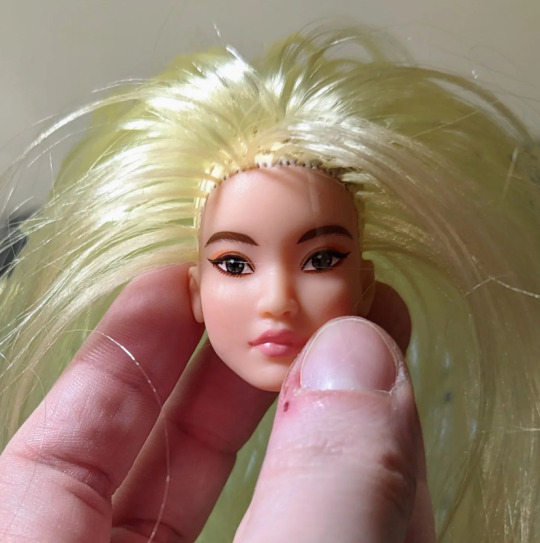
Well, I got that part done, and after the boil wash, it looked way too thin. And because I was afraid the hair could come out during that boil wash, I’d already glued it inside the head. So then I had to go back and add more hair because there were totally bald spots. I did that about two more times in total before (and yes, I added glue inside each time prior to a boil wash) before I was satisfied with the thickness. I was worried it would look completely uneven, but fortunately it seemed to be okay!
Once that was done, I pulled the hair back into a ponytail so I could begin working on the face. I didn’t want to do the face first only to realize I majorly messed up the reroot lol. For the face, the only thing that needed altered was the eyes. I wanted to just paint over the original factory paint, but the eyes were too small for that. Anime eyes, you know? I also wanted to try to use watercolor pencils like I’ve seen so many customizers do. I bought some Mr. Super Clear, a protective breathing mask, and Prismatic watercolor pencils. I started with a practice doll to make sure I knew what I was doing. I sprayed her face with the MSC, then began using the pencils... and the colors just didn’t shine through. At least, not over the original factory paint. I didn’t want to remove that because I can’t draw to save my life. I need a base to trace over. But alas, it wasn’t working. I’m guessing because I didn’t use acetone to remove the original factory paint, which everyone else does prior to spraying the MSC. But no way was I going to take off the original factory paint and start from scratch. So I used my Miroku method and just extended the eyes how they needed to be. I did discover that the watercolor pencils will draw over the top of acrylic paint, so that helped. I had more control with them than a paint brush. I was also able to use a regular pencil for light drawing that I could go over later with paint.
This took some time, and of course there are two eyes, and it never failed - they would never look even lol. Something was always wacky in at least one of them, and I, being a perfectionist with a hint of OCD, was going nuts. But then I remembered that one eye is always covered. So if it’s a little off, it won’t matter too much. Hopefully. So I did the best I could, getting the shapes to match as closely as possible, adding in the two different shades of blue to the iris, then that tiny black dot in the middle and the white light dot, eyelashes, and the unique eyebrows, and I was finally satisfied enough to begin the next step.
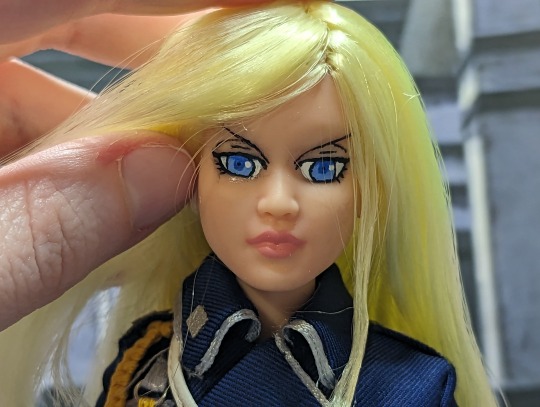
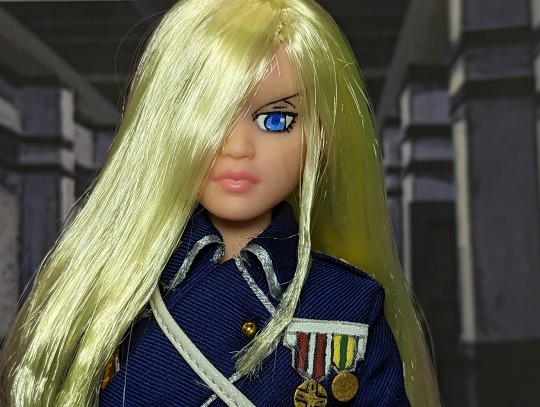
That next step was cutting and styling the hair. Olivier has a relatively simple hairstyle. It kind of ends in a curled point, and there is one batch that’s always covering her right eye and draped across her chest. There is an even smaller strand next to her left eye ending at pretty much the same length as the batch. So I sprayed the hair and got it completely soaked, then took my curling iron to the back side to give it a little curl, then curled the batch and strand just a little bit. I think it works!

Once that was finished, it was time for the tops of the boots. I used the same Barbie boots I used for Sango and painted them black, but Olivier’s boots have tongues on the tops of them.
I had the outfits already at this point, and I’d already put Olivier’s on her so I could make sure everything fit okay. Of course, it was perfect! And the details are absolutely incredible. Elenpriv is truly the best!!! Just look at this detail!


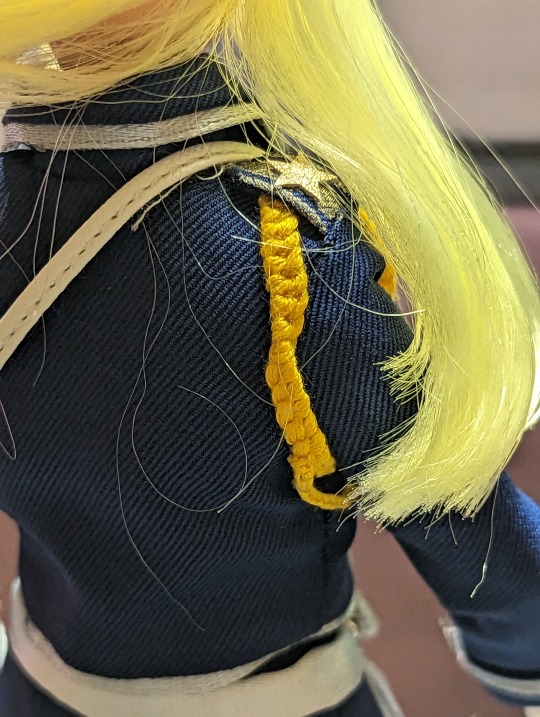
The gold rope, the stars on the shoulder pads, the buttons - everything is there, and perfect!!! Her services are worth every penny!
Back to the boots. I’m a fan of nothing being permanent with doll stuff in case A) I change my mind later and B) a better method comes along later so I can easily modify an already existing design. So, remembering how I made Sango’s armor completely out of cardstock, bias tape, and paint, I used that trusty method once again. I sketched out a design on black cardstock, cut and glued a few layers together, then covered them with bias tape and painted the whole thing black. I left a little triangular shaped wedge at the bottom to slide in between the boot and the pant legs. Not perfect, but no way am I gluing anything to that uniform!!!


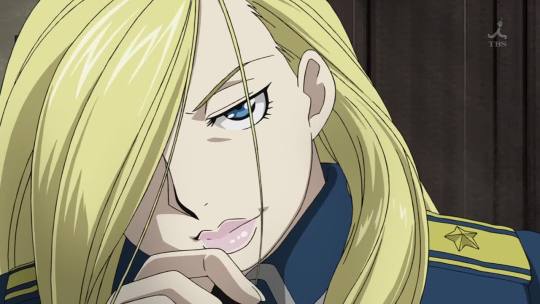
After that came the medals! I forgot to even mention them to Elenpriv, so that was on me. But I had some ideas on how I could pull them off. My first thought was to attempt to use my new Cricut I’d gotten for Christmas to do it, but I didn’t even know where to begin. And I wanted to make sure to have this project done because in a week or two I’d be dropping it off to my friend’s neighbor, who was staying at her second home in Kansas temporarily, and she would take it back to her. So I took some measurements of the area the medals would go based on this picture:
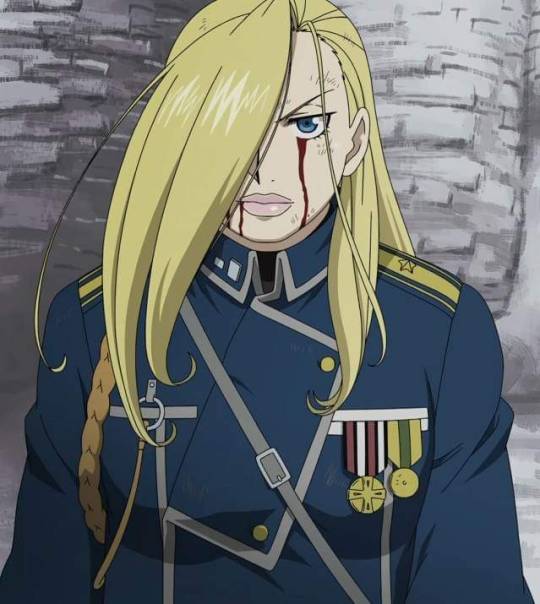
That’s also a nice picture with a straight-forward view of the medals. So I made them in a few different sizes in Photoshop, printed them out, and then held them against the doll to determine the best candidate. After choosing one, I literally measured every centimeter tick of each piece of those medals I’d printed, determining the length/height/width of each individual color, plus the coin part. I sketched the design out on bias tape, and then I used acrylic paint to bring the colors to life.
Why didn’t I just use what I’d printed? Because A) it was on cardstock, so the details weren’t nearly as sharp, and B) if I’d used photo paper, the entire thing would be way too shiny/unrealistic. So this had to be done by hand.
For the coins, I immediately thought of a hole punch. At least that way I’d get perfect circles! So I took my gold paint and covered a spare area of cardstock in it, then used two different hole punch sizes to create the medals (yes, one is bigger than the other). To add thickness, I stacked and glued two of each size together, then painted the edges gold since that part was white after cutting them out. Then I used a pencil to sketch out the cross design, then lightly went over it with black paint. I love my tiny paint brushes!!!
To attach them to the ribbons, I glued a mini strip to the back of them, then glued that to the back of the cardstock behind the ribbons. I felt that would be easier than trying to glue those tiny edges of the coins and ribbons together. I’m really proud of how these medals turned out.

To attach them to the uniform, I just used some double-sided tape. Because, again, NO glue on that uniform!!!
And with that, the doll was DONE! It was definitely quite a process, especially since I’m not familiar with this show or character, but I’m pleased with how it all turned out! My friend informed me not to share this until after the intended recipient had the dolls in her possession, and now she does. And she approves! YES!!!
#My Plastic Life#Barbie#Barbie photography#doll photography#Barbie doll photography#OOAK Barbie#OOAK doll#custom doll#custom Barbie#anime doll#OOAK anime doll#custom anime doll#FMA Brotherhood#Fullmetal Alchemist Brotherhood#Olivier Mira Armstrong#one sixth scale#TenderWolf
33 notes
·
View notes
Note
I wabt to start customizing dolls, do you have any tips? :) i got a rerooting tool abd a stand for christmas but thats all i have so far lol
I can recommend where I get my hair from if that's anything? thedollplanethair on etsy. they have a ton of cool varieties and the people who run the store also post tutorials for pretty much everything and they're just super friendly people!
38 notes
·
View notes
Text


SOLD
My first paid commission since opening my official shop, made for my good friend @fade-steppin ! She offered me a Star Wars OC to bring to life, and I was more than delighted to take on the challenge. That, and she was so patient with me while I figured out shipping! This was another full reroot, using hair from TheDollPlanetHair on Etsy. Made with a Monster High Abbey Bomidable
10 notes
·
View notes
Text
I found this amazing kinky natural doll hair from TheDollPlanetHair on Etsy and got a shien of it for Ioxi's re-root. I've never worked with natural doll hair before and it took me a but to figure out the best way to thread it onto the reroot needle. But once I got the hang of it, it was smooth sailing.
And you really cannot argue with the results, I'm Obsessed with the look and feel of the reroot, it came out so good! Took about two and half hours to do.


2 notes
·
View notes
Photo

I’ve posted so many photos of Marie Antoineigh, you probably forgot I actually made two entries for the @thedollplanethair rehairing contest! 🤣 Isomalt was actually my first entry! The entries didn’t strictly have to be customs, and so my earliest idea was to make two Pinkie Pie rehairs, very simple, with the fluffy and the s-curl hair types, to show two different ideas of how an animated Pinkie Pie might translate to a real-world toy. But then I thought, oh, let’s push ourselves a little... everyone keeps saying this brown pony looks like chocolate, and brown and pink go great together! And then Marie Antoineigh came together as an idea to use the fluffy pink and white I ordered, and we were off to the races! #mylittlepony #mlp #mylittleponyg4 #mlpg4 #mylittleponycustom #mlpcustom #customtoy #mylittleponyfriendshipismagic #custompony #ooakpony #easter #ponygurucustom #thedollplanethair #thedollplanet #friendshipismagic https://www.instagram.com/p/CN_PoaLA5q5/?igshid=plz1hc7k6hc2
#mylittlepony#mlp#mylittleponyg4#mlpg4#mylittleponycustom#mlpcustom#customtoy#mylittleponyfriendshipismagic#custompony#ooakpony#easter#ponygurucustom#thedollplanethair#thedollplanet#friendshipismagic
7 notes
·
View notes
Photo

This might be a bit mundane but i bought my first batch of synthetic doll hair! I usually make it out of yarn cuz im cheap and i love how yarn hair looks, but for my code realize series, i wanted to use hair meant for dolls. I used #thedollplanethair because they have all the perfect shades i need and their prices are perfect! This order is just for my first four dolls, but if turns out well i plan to buy more from them in the future! I cant wait for them to arrive! And when i finish my current collab doll ill be getting started on my code realize series! https://www.instagram.com/p/BtQxKVjjZyM/?utm_source=ig_tumblr_share&igshid=kvgzgiwccbwe
1 note
·
View note
Photo

It’s Friday night, do you know where your dolls are? #rerooting #rerootdoll #ooakdoll #dollcustoms #dollcustomizing #dollcustomization #thedollplanethair @thedollplanethair https://www.instagram.com/p/B3yaUcwDWWh/?igshid=1buyqv8xucea9
0 notes
Note
What in your opinion is the best place to buy doll hair in EU? With shipping being quite cheap etc.
It's been a while since I did any research on this so any other folks who know suppliers, please add.
There are two UK hair sellers:
dollhairemporium (formerly retrodolls) shipping to eu starts at £10 (can be worth it if you make a large order)
mylittlecustoms starts at £4.40. Both have low stock at the moment.
restoredoll shipping to eu starts at $14.73
shimmerlocks shipping to eu starts at $15
customdollau shipping to eu starts at $16
thedollyverse.com doesn't ship outside of the US
etsy.com/shop/TheDollPlanetHair shipping $25
I've been getting HQ nylon from aliexpress under the name "silk milk doll hair" at about $7 per 30g.
5 notes
·
View notes
Photo

c. 2021
Pawla Wolf. I really liked her design, but really didn’t like her execution, so I made my own version. How Do You Boo Clawdeen head on a pre-reboot articulated body. Hair from TheDollPlanetHair and CustomDollHairAU on Etsy.
4 notes
·
View notes
Photo

My #gwyndolin ooak is finally under way, with glow in the dark hair from @thedollplanethair and a #btsdollsofficial #jimin head. #dolls #dollstagram #ooakdoll #darksouls #darksouls1 https://www.instagram.com/p/CHgVeLdDDlV/?igshid=14ywcj6azf1ld
10 notes
·
View notes
Photo
#wip finally able to work on stuff! Her hair kinda came out like some lucky charm marshmallow hair 😍😍 if the weather permits I can start sealing her! #ooakcustom #ooak #everafterhigh #custom #dollcustom #reroot #decoradoll #trend #thedollplanet #thedollplanethair
#wip#ooakcustom#ooak#everafterhigh#custom#dollcustom#reroot#decoradoll#trend#thedollplanet#thedollplanethair
0 notes
Photo


My hair came today!! So excited!!! It looks so much better in person though.
0 notes
Note
Hi. You are the first person I found that made an utena doll. Please tell me everything. Did you reroot her? How did you styled the hair? Which doll model was? You used watercolor pencils?
Hi there! Her body is a Barbie made to move, and her head is an old Volks 1/6 Dollfie head (sh-09 I think??) that I rooted with hair from TheDollPlanetHair on Etsy. She’s painted with Golden acrylics and some pastel blush.
6 notes
·
View notes
Text


NOT FOR SALE
Another hybrid project, and another beloved OC brought to life! Repping more nylon from TheDollPlanetHair on Etsy, but not a reroot this time. The head was too hard for my rooter to get through, so I used the weft method to get the silky textured hair on. It was a laborious process, but I learned quite a bit! I can’t decide what I’m most proud of… her delicate, expressive face, or her ornate royal robes! Head is a Project MC2 McKeyla, and the body is a Disney Snow White
#ooak#ooakdoll#customdoll#my art#my dolls#ocs#disney#disney dolls#snow white#project mc2#fantasy#original story#original fantasy
2 notes
·
View notes
Photo

And here’s my last pony hair Cyber Monday buy; some great finds from @thedollplanethair ! I didn’t get as much hair as I did cool tools, like a dolly/hobby saw! I also got the “demolition kit”, which is a bunch of fun pliers! The two hair hanks glow in the dark, but the white hair has a texture I’ve never felt before. It’s soft and very delicate, like cornsilk!! 🥺 I’m not sure how I’ll work with it, but I love running my fingers through it! Many thanks for a great buy! #mylittlepony #mylittleponyrehair #nylonhair #thedollplanethair https://www.instagram.com/p/CJUqP8tg1O5/?igshid=1nijkqmd6vxr4
4 notes
·
View notes
Last Seen Blogs

mastersamevansjonesarchive
Sammy Says Jump? You Better Jump!

aalbkarneval-blog
Untitled

kurokikemono
The Beast

theappalachianhomestead
The Appalachian Homestead

merianalis
Khalilah ummah