#trying out a new way of colouring/lineart
Text
Here ye here ye, another breaking down processes post from yours truly!
For this animation, my plan was to make something I'm proud of AND also something to force me to take my time since with all previous animation works they were all rushed. I normally tend to speed through work as someone whose illustrations are painterly and I like to keep them rough. Also lets be totally honest my other plan for this animation was to animate Mizrox being so sickeningly sweet.
Fun fact, this animation was going to be longer. I had tried to plan out Olrox climbing on top of Mizrak during the kiss to lay on his chest. There was an attempt trying to rough that out and several ref videos It was scrapped because for the life of me I could not figure it out. Also hypothetically if I was going to keep it, I would cut to another angle (perhaps Mizrak's face close up) and then cut to another angle that would make it easier to see that climbing over the top. OR, consider Olrox already sleeping on his chest (im just rambling now but this is basically 'if you were able to do this again' section).
I wish I actually went through a more proper tie-down process because the jump from going from my rough straight to clean was rough (badum tsk) for the first few seconds. Defintely learnt my lesson ALSO Olrox is surprisingly really fun to draw from behind.
I challenged myself to see if I could get the idea of "bigger movements, less in-betweens, smaller/slower movements, more in-betweens." Though the effect of Olrox rubbing his face against his arm may be a little too jarring and I steered quite a bit away from my rough and self-reference video in hopes of making the face rubbing more apparent because I thought the character acting was too subtle and wanted a contrast to the other half of the scene. I reconfigured my CSP animation workspace for this too so it definitely made the process less tedious when cleaning up the animation.
(Which by the way I do record a lot of self-references depending on the section! For things I can't do/uncomfortable doing, I'll end up looking up videos. It's the easiest for me to catch subtle things in body language and also get a feels for the motion.)
Also I'm really satisfied with Olrox's anticipation before his smooch and the shoulder roll at the end even though technically the arc doesn't complete itself. MIZRAK THOUGH, when cleaning up I realised my rough wouldn't make sense because he's already looking at him so there's no need for a turn, and then the lack of a shoulder movement felt jarring, so all of that was done without any thought, wish I did think about it more though.

Now compositing was a monster in its own right and basically me jumping back and forth between turning on and off different layers, but here are all the new things I did; I duplicated and blurred the lines of the lineart, beveled the shadows so it was lighter on the inside, and added a rim of blur so the focus drew towards the couple. Also will absolutely admit that my fanboy ass went "... be crazy and try to mimic the show." The final did not go that route because I thought it was more important to emphasize the mood/atmosphere (Also Olrox is intentionally stylized differently because i wanted him to be softer here and I had to give him eye highlights for plot HELP). THOUGH to say I did not try to mimic the style, the #2 lighting test was my 'attempt' LOL 😭 I can never consume media normally.
Here are the lighting tests I went through. I definitely knew I wanted to go with a morning vibe, though I tested out a night ver for fun and did some edge lighting which led to mixing both version #2 and #3 to make #4.
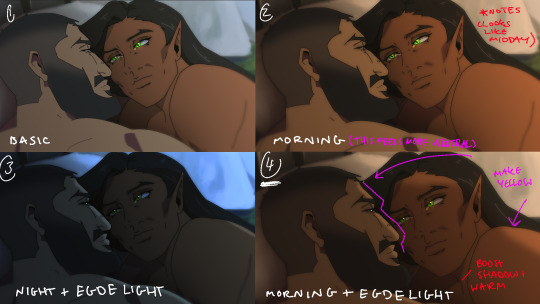
Fun fact, I almost went with #2 due to fear of getting too heavy-handed with compositing and therefore losing the animation (even though I really liked #4 at the time). Thanks to a friend, they also shared the sentiment of liking #4, though pointed out it felt like midday and encouraged me to make the colours warmer and deepen the shadows. It is a really tough balance but I think for a softer scene like this, the more additional layers of comp worked out in the end.
The edge light was a last minute thing because someone told me to add sound and to have light stream in. Also at this point I deadass forgot that you know, Olrox, is a vampire, but hey rule of cute overrules. We can pretend its light not from the sun LOL

Also yay I got to show off my own style a tad, I love paintingggg. It's not as completely fully rendered coz I knew that it would get covered up but I still made sure it was quite clean regardless. I didn't realise how much of it would be covered up even though I did make sure they would fit/make sense for bg LOL
Now we are done!
If you've gotten this far thank you! There's gonna be less frequency of these animations due to the semester starting back up soon and I don't get many opportunities to actually 2D animate (despite it being an animation degree RAH). Also I remembering cringing and laughing a lot when I immediately started putting colour down going "oh i can see the end of the horizon, i have too much power as an artist, people will see this i cant let them see me be crazy"

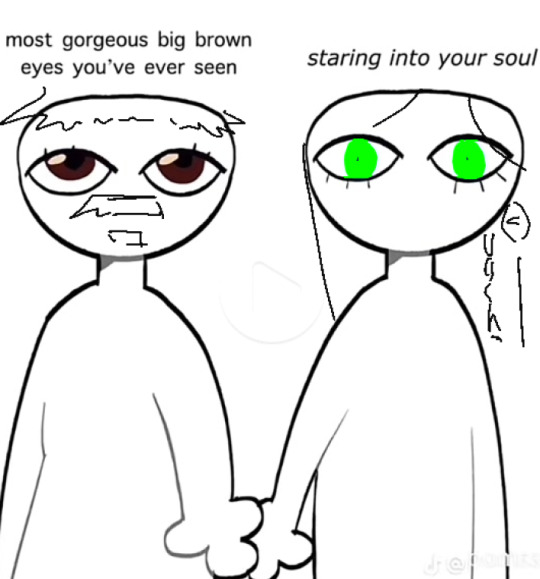
[Here's some memes I drew over while my friend was reviewing my work]
#mystery talks#castlevania nocturne#artists on tumblr#castlevania#castlevania fanart#fan animation#olrox/mizrak#i still keep going “oh no people who worked on the show will see this theyre gonna see im insane /lh”#its ok coz being crazy pushes you to achieve things
77 notes
·
View notes
Text
rough art tips to learn and then break at your leisure.
the distance between your eyes is roughly one eye. the corners of your mouth dont extend past the middle of each eye. ears are roughly in the middle of the tip of the nose and the eyebrow. the eyes are in the very centre of the head. the neck is just a Little slimmer than the width of the head (varies with fat distribution, but fat tends to build up under the chin). hair is easier to draw when you plot out the hairline and then where it parts. leaving appropriate distance on the side of the face (cheekbone area and back to ear) contributes to making characters look more realistic/hot as hell. i dont know specific tips for that so use reference. an amazing reference/study site is lineofaction.com . if you think of the face in planes it makes it easier to construct (look up tutorials). if you draw a spiral like a tornado it can help you figure out awkward perspective for extended limbs (look up foreshortening coil technique). tangent lines are when two lines intersect and cause visual confusion (when it looks like a line that defines an arm is part of the line that defines a building, for example) and avoiding them makes your art way easier to comprehend. quick trick to good composition: choose a focal point (where you want your viewer to focus), detail that area the most, and make sure various elements of the piece are pointing to that focal point. you can use colours to contrast hue, saturation, and brightness and make certain elements of your drawing stand out. drawing in greyscale can help you figure out values. using black in a piece isn't illegal but you should know what you're doing when you do use it- it desaturates a piece and if used as a shading colour can desaturate and dull whatever youre shading too. if you use almost-black lineart and then add black to darken the very darkest areas it will do a lot to add some nice depth. the tip of your thumb ends just above the start of your index finger- your thumb also has two knuckles and all your other fingers have three. if you see an artist doing something you like (the way they draw noses or eyes or hair or anything else) you can try to copy that and see if you want to incorporate it in your style <- this is ENCOURAGED and how a lot of us learned and developed our styles. there are ways to add wrinkles to faces and bodies without making the character look a million years old, you just have to keep experimenting with it. The smile wrinkles around your muzzle dont connect to your mouth or to your nose; there should be a small space in between smile or nose and the wrinkle line. eyes when viewed in profile are like < aka a little triangle shape. think of the pupil like a disk and apply foreshortening to it (it looks like a line when seen from the side instead of a full round dot). subtle gradients can add a LOT to a piece. texture can also add a LOT. look up Tommy Arnold's work (his murderbot pieces are some of my FAVOURITE) and zoom in. find those random little circles he added and try to figure out why he added them there. light bounces. there's lots of way light bounces. sometimes it even spreads through the skin. i do not know these light tricks yet but i want you to know that they exist. draw a circle to indicate hand placement, draw a straight line between that circle and the shoulder, and then (normally at a right angle) draw a straight line on top of that line to find the placement of the elbow. elbows are normally placed Just above the hip when standing and your arm is at rest. there are no bad colour combos if you're brave enough about it, just fuck with the saturation and brightness until it works. keep playing. try new things. add your own tips to this post if you want or even expand on some ive mentioned here. good luck go ham etc
#look at this post#the sum of almost all of my art knowledge#all that i can remember rn anyway lmaooo#shit i didn't mention the tips for backgrounds that i know#eh that's environment most of this deals with character work anyway#i learned most of this from tutorials and kind artists who like to talk about their work#i would not know NEARLY as much about creative shit as i do if it weren't for the people who were willing to talk about their skills#and their tricks and their observations. id be nothing without them i dont remember most of them but i am so so grateful for that kindness#so ig here ill spread that a little further#if you have any questions go ahead and ask i am a NERD about art okay i do not know everything but i am always willing to talk about what i#do know#art tips#one of the most important things for you to do as an experienced or beginner artist tho#is to PLAY#experiment#figure out what's fun and what looks nice and what looks nice faster and just. whatever the fuck you want to learn#it is SUCH a joy
274 notes
·
View notes
Text

trying out a new way to colour with some awesome lineart by @sad-leon
#tarts&crafts#my art#ish#once again done and posted with permission#rottmnt#rise of the teenage mutant ninja turtles#digital art#rise of the tmnt#rise fanart#rottmnt fanart#tmnt#rise leo#future leo
303 notes
·
View notes
Text

Since today I will not be bringing any new Jacob drawings, I've decided to do a little walkthrough of the process for my previous piece. Keep in mind that I'll be explaining how I personally draw, not the "correct" way to draw.


I also add the noise and do a slight "glitch" effect at the very end to give the drawing a level of softness.
I highly recommend staying minimalistic with your idea, colours and brushes. Otherwise, your art will start to wander just like your mind will, and the final piece will end up being all over the place.
Trying out new brushes is fun but you should also try picking a certain amount of favourites that you usually use, as your hand will get used to their settings and your style will heavily depend on it. I use two brushes to do 98% of the drawing.
Also... please use references. Naturally, you don't have to use them on a daily basis and to casually doodle, but references can highly boost your learning of human or inhuman anatomy. Ethan Becker, a great animator, has covered it on his yt channel - highly recommend it.
Edit: I completely forgot to mention but I also colour my lineart (or sketch in this case). Also, Ethan Becker talked about it too, but if you want to learn anatomy, try out new poses that you've never drawn before, constantly challenge yourself rather than fall into the comfortable routine.
488 notes
·
View notes
Note
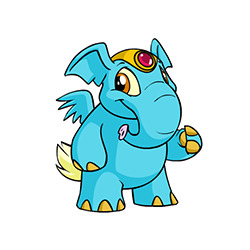
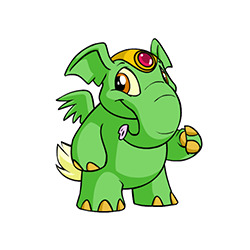
I am so late to this but I had only just realised Neopets added new gray nostalgic styles with brand-new artwork for combos that don't exist pre-conversion! Do you have a favourite out of them?
(I already did the main grey review here before the new pet styles were released.)

Even as someone who enjoys customization, I think the execution of it was pretty poor. It definitely should've been that you could freely switch between the UC design and the converted design at any point, and the option would exist for pets that were painted after conversion instead of it being a thing you had to grandfather into. Likewise, I'd argue that TNT should've done new UC designs for colours that used to get special poses even after customization, so you wouldn't be losing the beautiful art.
It took the NC Mall and 17 years, but new TNT finally wised up and switched all UCs over to purchasable NC pet styles. Originally it seemed like they were only going to include pre-existing UCs; then, it seemed like they'd do pre-existing UCs plus some other pets with old art but no UCs; and then, finally, we learned that TNT would be giving pets that didn't even have old art styles. This is a great idea, as it gives the pets that didn't get a chance at unique art (Lutaris and Vandagyres being good examples) to have some. Plus the converted versions still exist, so it's just more designs for everyone.


(Pictured: Two UC/styled grey pets with pre-existing old art.)
The most interesting part about these new styles is watching new TNT trying to mimic the classic Neopets' art styles. There's no hard rule as to how old Neopet art worked (because different artists worked on different pets), but the following are what I'd consider the most consistent and important points:
Shading: Hard-lined cel-shading with only one or two layers. Generally high-contrast, especially for grey pets. Sometimes there'll be a small amount of highlights, but not always.
Lineart: Not too thick or too thin with natural weight variation.
Design: Not always present, but often times will include fun little plays on the original design like the Yurble's uncurled ears.
Pose: Easy to read with a good sense of motion. Matches the proportions of the original basic colour pet.


Of course, just because a new pet style isn't quite on point doesn't make it inherently bad (though I personally like the on point ones more, and have highlighted the best in that regard below). The new grey Xweetok style is pretty off compared to an actual UC; like, here's the old sad blue Xweetok pose, which is somewhat similar to it:

You can easily see that there's way too much detail in the shading and highlights (highlights too thin/plentiful, shading too hairline and layered too closely together), and the proportions and design details are also way off model (eyes missing the black "liner" at the back; head way too big; paws too big; ears slightly too big). But dang, it's absolutely adorable, and much much better than the converted version, which looks vaguely ill. It's a good example of how much personality a style can add.
Favorite (New) Species:


Blumaroo: BROKEN HEART FEET. BROKEN. HEART. FEET!! That's such a wonderful detail, and 100% feels like something a UC version would've had. The pose is also really good, and the shading and lineart are pretty accurate (the lines are just a smidge too thick, but obviously not actually a problem).


Bruce: Another pretty good pose with excellent lineart and shading (might be the same artist for this and the Blumaroo)? It's adorably mopey and little things like the extra chubby cheeks and bigger bow add a lot.


Hissi: The shading's not quite as accurate as the above two (one too many layers on the wings, which are also a little too fluffy relative to the non-converted Hissi's wings), but the pose on this one is perfect and really feels like something that existed back in the day. I really like the eye shape in particular and how it affects the entire upper brow, so to speak.
Least Favorite (New) Species:


Bori: Sorry, Bori, but you're not quite right. There's just a lot of things slightly off with this one, like the shading (WAY too much fur detailing that doesn't flow with the actual lineart fur; too low contrast; highlights too minimal in areas like the tail fur). Like I said above, accuracy doesn't matter if the design and pose are good, but that also feels off here. The pose is just kind of strange, like it's about to be smacked or something, and the head is like... off, like it's too far down and too far in in a way that makes it look like it has no neck. It's still got a lot more personality than the converted though, so that's good.
33 notes
·
View notes
Note
Have you ever done/thought about doing a tutorial on your style? I know it's a more simple (looking) style but I love it so much and want to use it as inspiration to develop my own. No pressure!!
I don’t really know how I do it but I’ll try to explain it the best I can
Step 1: map out the pose you want, make sure you know what character you’re doing so you can stylize the body and face accordingly.
My whole artstyle is basically a mix and match of different features so look at different ways I draw eyes, faceshapes, bodies, hands and mix the ones that fit with whatever character you’re drawing.
Step 2: sketch the character and their details.
Theres not alot I can say about this one but all you want to do is exaggerate and stylize, use stereotypes if you want, but not too much because then that’s not good morally.
Step 3: lineart.
Use a tool that has alot of pressure sensitivity. (If you wanna be real fancy line and colour the facial features on a different layer than the rest of the drawing, it actually does help sometimes.)
Step 4: iris.
Colour it underneath the lineart and merge it (only with the face layer if you followed the optional step)
Step 5: colour.
Use bright colours and only shade it if you feel like it that day.
Step 6: hair.
Depending on the colour of the hair, get a lighter or darker colour, use alpha lock on your lineart and colour in the parts of the hair. (You can also add a highlight to your colour layer if you want)
Step 7: add a bunch of effects.
I like to save my piece, re enter it as a new layer then add some different types of blur, glitch effects and noise before lowering the opacity of the layer. I also like to add a grayish, yellowish colour on a linear burn layer and turn down the opacity.
This artstyle is def the best one I’ve ever tried I highly recommend it.
33 notes
·
View notes
Note
Something about my drawing feels off , i only got into digital drawing few weeks ago and I'm stuck at the same point and lost .. any advice?
mmm okay first of all this is really good- first impressions-wise, the proportions and anatomy look very solid so there are no major glaring issues so to speak
if you were to ask me, what i think this artwork needs is that sort of 'volume' or depth that most beginner digital artoworks lack. You can achieve this sort of volume in two ways depending on the style you are going for: either by improving the lineart, or by treating the lines just as part of the sketch and painting over them for a more.. ''painterly/rendered'' look
if you want to keep the lineart in, what i suggest is adding some "line weight" so that the artwork doesn't look so flat. What i mean by this is to thicken the lines where body parts would naturally overlap (like the neck and shoulder, the nostrils area, the corners of the mouth as well as the tip of the lips etc) and where shadows would normally be for the illusion of volume. After that, i'd also add more shadows and color variation in the colouring layer so that the skin looks more lively and again, for that volume. You can do it with some dark blue or orange on a multiply or an overlay layer, just experiment a bit with colors and blending modes.
If you want a more messy/painterly look (which is more down my alley or in line with my artstyle), what i'd personally do is i'd create a new layer on top of everything and just paint over the lines with broader strokes and a darker color in an attempt to add some volume to the shapes and to make the artwork look more cohesive and less "digital" because at the moment, i can tell that it is made up of a Lineart layer, then a Colouring Layer below, that very religiously follows the lineart layer and then maybe a layer on top of that for the other colors and the hair. This is a very common digital art process and a good one to keep in mind but a little secret i can give out that i've noticed in 80% of the artists who have this sort of drawing process is that they will always, always merge everything in one layer at the end and adjust things as they go. They will not keep the layers separated and just never revisit them in the process, despite what it may look like. There will always be something that needs fixing and they will fix it as they go so i suggest doing the same and being a bit more "freeform" with your layers
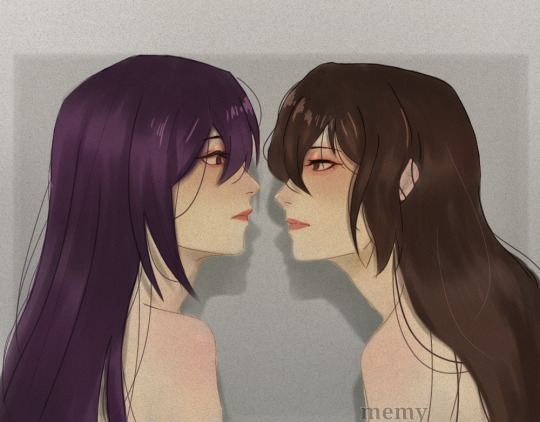
Anywayss, besides that, I'd also introduce some color variation like in the previous method. As a general tip, try to move the color slider around and don't just shade with a darker variation of the base color. I like how the hair is painted and the shine and everything, it looks very good and everything is pretty much set in place, i'd just render it even more, make it More voluminous. It's just missing a little pop a color: i'd add some blueish gray hues in the brown hair and for the purple hair i'd make it more rich by adding some deep dark blue hues and some faint yellow highlights (bc purple and yellow are complementary colors blabla) As for the shape, think of the hair as chunks of volume that reflect light and that are also affected by gravity.. or as spaghetti if u like flat hair like me bsjsjd
That's all i could think of; Again, it's very good and promising considering you started just a few weeks ago, so keep going at it! I hope it was at least somewhat helpful and that i wasn't being too technical with the wording (and that it made sense)
#i hope it didn't come across as mean or something#i have a bad habit of being pretty blunt with my words#and upseting people#the artwork is really nice and pretty but i was asked for critique so i pointed out some parts that could be improved#you don't even want to know what my art looked like a few weeks into digital art lmfao#this is 10x better#keep at it op!#and again hopefully i didn't offend with anything don't take it to heart you don't have to listen to me do what u want#ask iztea#if there are any typos no there aren't
52 notes
·
View notes
Note
Do you have any art tips for beginner artists?
hi! i'll do my best to list the most useful ones for me from the top of my head! but if you're asking about something specific, lmk too!
always use references! this is 100% the fastest way to improve quickly! and don't forget if you're posting artworks using references, to always ask for permission if needed and to credit the reference! here's a very good post with links to various art tutorials and references :) try to do things out of your comfort zone!
i remember my sister drilling this into my head as a kid lmao: if you're going to draw people, make it a habit to draw the whole body, not just a face or bust. this way you can improve drawing the face and body at the same rate, rather than perfect the face and have like. a shoddy body HAHAHA (<- speaking from experience - my sister warned me but i still did not listen) here's an example from when i was 12 lol i went so hard on the eyes but my anatomy wasn't great so the drawing looks kind of goofy
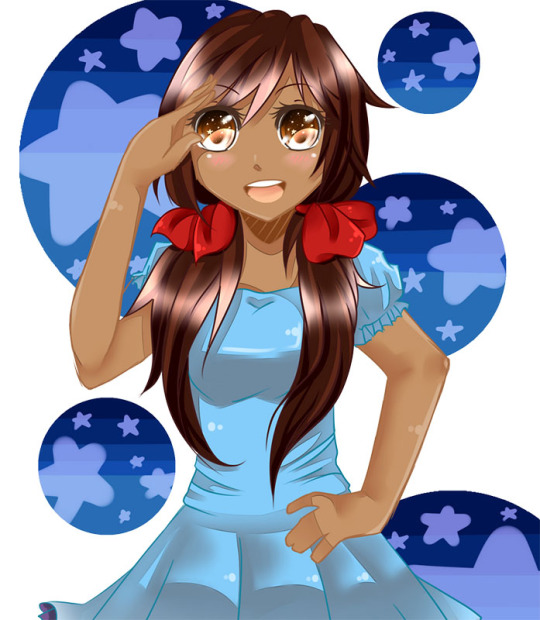
if i'm being honest nothing has really changed even now HAHAHA you can still tell i spend too much time on the faces and neglect my anatomy studies a lot 🥲
3. don't worry too much about building a signature art style if you're a beginner! experiment and imitate art styles that you like, and it'll eventually develop into something you're comfortable with
4. speaking of art styles, Naoki Saito-sensei does very in-depth art videos for people looking to develop and improve their art, and he covers a variety of different topics! the link i provided is for his new YouTube account, since his first one was unrightfully terminated :( since it's new, there aren't a lot of videos up yet but he'll be re-uploading all his old ones soon
5. this video by tppo is also a useful tutorial/explanation for style breakdowns, using Mika Pikazo-sensei's artworks! also another good reference for building art and colouring styles
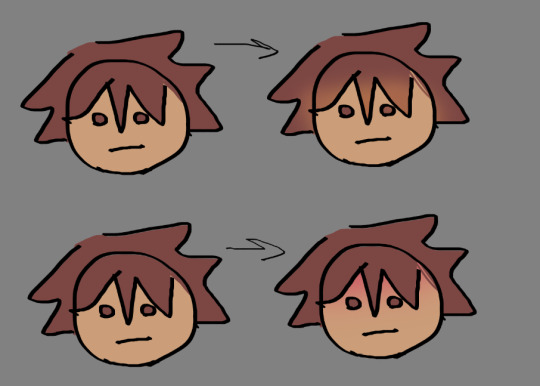
6. unless you're going for a specific art style, try not to use black colours for shading. Instead, try using a darker version of your base colour with the hue slightly adjusted. it's a little difficult to explain so i made a tiny diagram underneath:
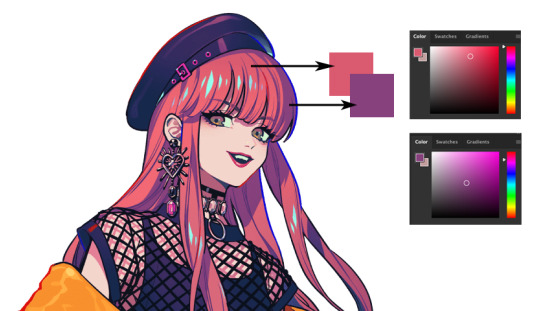
it makes the colours pop a lot! Kurahana Chinatsu-sensei and Akiakane-sensei are really good at doing this 😭💖 that can also apply to lineart! but again, only if you're going for this kind of colourful art style :') do what feels right to you!
7. lastly try to enjoy drawing! if you do what you enjoy, learning and improving will come so much easier to you :) i can understand the urgency to improve (it's like my default state of mind 🥲) but if you keep focusing on that, drawing will eventually just start to overwhelm and frustrate you. try to combat it by doing something self-indulgent! i like to draw my ocs whenever i start getting burnt out :')
8. actually i lied this is the last one!! never give up!! it's so easy to feel bad or frustrated about your art no matter where you are in your art journey, so what i like to do to try and fight that is to look at my old art and compare the improvements! here's one of the earliest oc drawings i could find from my childhood vs my most recent oc drawing :pensive:

#this is a tiny psa to please dont bully me for my incredibly early 2000s core naruto oc i was a victim of the times#/lh#i hope this helps a bit! i'm really bad at making these lists im so sorry 😭#but from the top of my head these are the most helpful tips that have rlly stuck with me since i first started drawing#also confession#i'm actually very guilty of rarely using references bc im lazy#thats why my art sucks!!!!!!! dont be like me#also i'm so sorry for this incredibly late reply#!#ive been thinking for the longest time on how to answer it and this is the best i could come up with 🥲#za answers#Anonymous
217 notes
·
View notes
Text
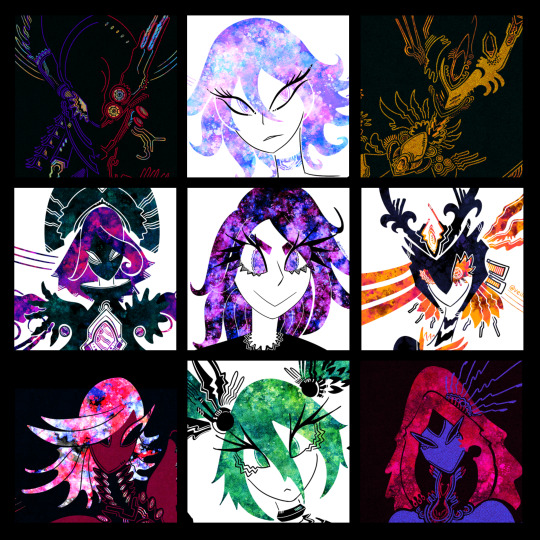
LOST
LOST really is 2023's theme for me. I spent most of this past year on my PhD project, so my output has been quite scarce overall - certainly so compared to the industriousness of years past. When I had chances to draw this year it was often like a gasp of air amidst a sea of my other efforts. "What's the next step forward?" I think at times. Consider the center drawing my face of course, because in real life I look like if cannonbolt was a sad refridgerator.
I started a new physical sketchbook and made some breakthroughs in my personal illustrations, but nothing I'm happy to share - in previous years I didn't have as much nervousness to experiment in public. Anyway this feels like a good opportunity to do a bit of a retrospective on the last ones of these I did.

In many ways 2022 was the best year of my work, I both did my most challenging (and correspondingly complex) pieces this year, and had the confidence to make several things a week. Past the initial few months I had really started to hone my mix of solid shapes, lineart and linelessness thats ubiquitous in my pieces now, though I wonder if I have grown too comfortable with the stability of a partial formula.
One disadvantage about only choosing nine pieces was that in wanting them to look good together I had to exclude a series of the coloured background pieces that interspersed the dark background ones. In those, I felt like a lot more of my effort went into the shape language, so there was a synergy with both approaches letting me understand things.

In 2021 I started using colours instead of grayscale, that years inktober could almost be said to be my best work, there was both a variety and scale to it..I drew something virtually every day for almost three or four months straight and crucially, I also shared it all after I was done. It really felt worth it planning art ahead, but also spontaneously filling the blanks it in the moment. That being said maybe that productiveness was not sustainable because I'd have very little time for much else after school, work and art.
Late in that year I realised I could just draw the things I like if I wanted, instead of the things I thought people wanted - so some of the later pieces really resembled discount warframes. That game has so deeply hooked itself into my visual library that I draw it even when I'm not intending to, and so when I started deliberately trying to evoke it (with very fledgling art analysis skills), I think I got more and more familiar with what I wanted.
In 2020 I was just starting out so I did not yet recognise there was something specific to aspire to - I dont have a retrospective montage like these other years for 2020. You can see virtually every piece I've ever uploaded on my instagram page, so I think I might not narrate as much about those in this post. Maybe in the future I'll review all these years through a completely different lens.
#veilantares#digital art#my art#illustration#art vs artist#art vs artist 2023#artvsartist2023#retrospective#q&a#voidpunk#character design
36 notes
·
View notes
Text
So, i finally managed to finish it! It's not as good as i hoped it to be, but i really enjoyed this, and found out that lineart isn't my forte, but lineless art works better. The eyes could really use improvement, but first time trying this kind of artstyle, things aren't going to be perfect 🥰
Either way, thank you for all the fanart you make, i have so much of it saved in a fanart folder that it practically takes up over half of it 😭 but your art makes me happy and its inspired me a lot. Your style is so tasty, and its the thing that inspired my new way of colouring and shading :D
Here he is, thinking about his stong boyfriend @ritasanderson

20 notes
·
View notes
Note
The coloring process also
Your art doesn't seem to one or the other both are essential to making the abusolute eye candy that you make
HAHAH thanks so welcome back then
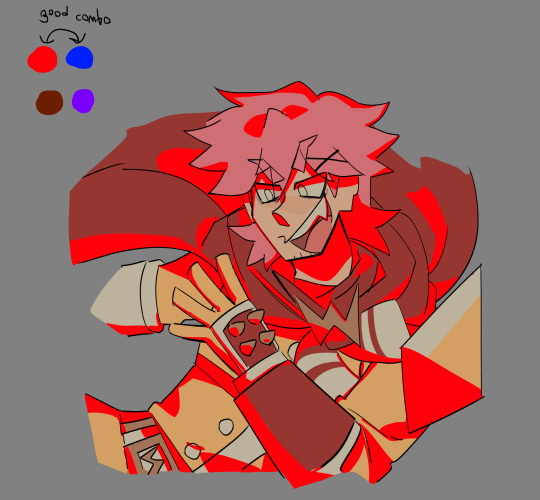
im gonna use the scuffed giovanni for this . you should have a gray background by the way (in the progress at least, white backgrounds in the end are fine)

pick a white (which is not white) (i might change it later)
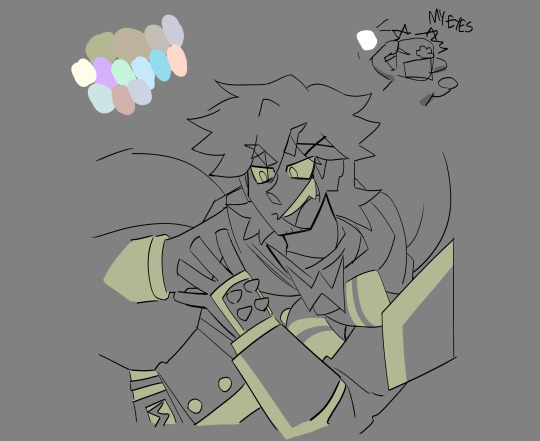
base colours (i like to go pastel / less saturated so the shading can be the heavy + showy but you can do whatever)
you have all the base colours in 1 layer then you do this (described in the other post) basically you put a gray layer above it so you can picture better where the shading would be

i was going to show the next step but remembered some tips to help stuff blend better
(first one adds the tone of the skin to the bangs) (second one adds fading on the forehead) LOL now back to giovanni
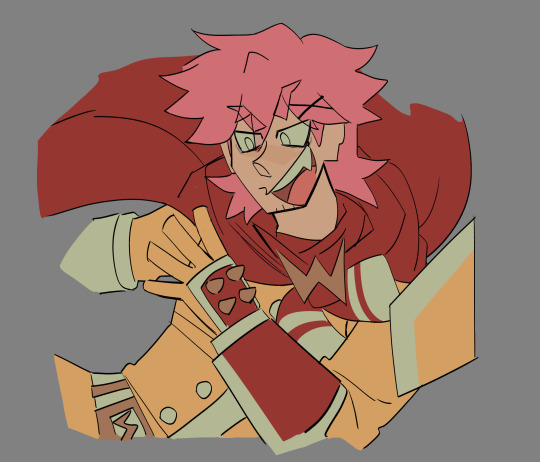
above the grey layer you create a new one in the same mode where it doesnt go out of the lines and you shade with red (or any colour, its your choice)

you delete the gray layer anddd you copypaste the shading layer 3 times (in the colours i recommend :>)
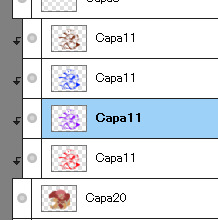
gotta look like this , i like to put the brown, red and blue in multiply (the layer mode) and play with the opacity until i find something i like (purple not that much)

(%25 brown multiply, %13 blue multiply, %5 red multiply if you like the recipe)
tada (im going further in shading but this actually is a good solid result to end in) okay okay , now new layer on top

you go and fill the shading enough so it has an outline (i understand myself) and experiment with the layer modes again , im gonna try light blue/purple and green, not pink because giovanni is already pink , he has warm colours so gotta go to the opposite side of the wheel
%13 of green on luminosity if u care, i could try flashy colours but no need to over-do it, its just him chilling

this isnt part of the tutorial i just like to add shade to his face like if he was up to something, also i made him look evil idk i dont like how he looks (bc i wasnt planning on colouring this)
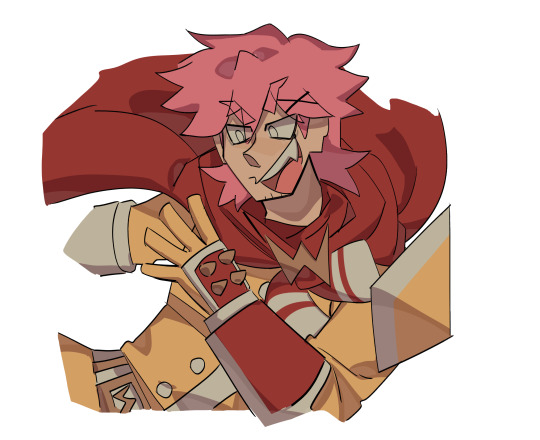
now lets put colour in the lineart

better

i went to add fading to his arm because i dont want it to be the focus and i ended up adding light also to his cape LOL pretend i know what im doing (soft light layer)
im stopping here but thats it
21 notes
·
View notes
Note
Same anon from earlier but if ur rly feeling unconfident i recommend also giving a pill a try bc I see a lot of artists feel way better after doing a pricing poll (like “how much would u pay for a piece in this style (full color/bust/lineart/whatever) and then having a few different prices for the poll options)
Think like this post:
https://www.tumblr.com/sevenyeargap/724742149196906496/new-poll-because-i-need-more-money-than-i
Srsly it helps and if ur doing commissions because u need money fast u want to at least be able to reach ur goal without burning out before then plssss I love ur art SOO much but even just as a fellow artist PLS don’t let ur self sell heinously low bc u will wish u picked sth higher later 😭
Wait actually now this is an idea everyone look at this old art of mine (waist or 3/4 length fully coloured art in my style)
#ask#anon#i was gonna do the conversion rate for all of them but got lazy after the 0#honestly im just not cut out for the commission game guys#im too weak#too tired
23 notes
·
View notes
Note
Good day to you! :)
I’m very new here and I wanted to share how much I love your work, I’ve just recently followed you and I’m just done stalking you on most of your socials haha! I love your writing and your artwork is gorgeous; I’m still trying to find my own style (with both my hands and mind), and you’ll definitely be one of my inspirations :) (if you don’t mind, of course)
I was curious of the process of making your comics ? Do you usually start with the poem and then get to the illustration, or is it kinda the opposite?
I plan on saving a bit before grabbing copies of your two comics, but I also saw you mention another anthropology that I can’t seem to find ^^’, if it’s a Patreon exclusive I would be more than happy to join! Anyway, thank you for your time, I hope you have a good one! :)
hello! good day to you too! there's a couple of points here you mentioned, and I'll try to get to them all.
i definitely don't mind being used as an inspiration! it's genuinely an honour, and I hope the style that you end up settling on serves you well.
my comic process always starts with the poem itself. most of the time I write my poems after getting out of the shower and just chilling in bed. The hardest step of the process is almost always just fiddling with the poem/concept itself - i hold myself to a high standard for what I make so if the visual isn't strong enough or I don't like the poem enough I just don't do anything with it (the notes app on my phone is a graveyard of abandoned ideas). after that, I'll thumbnail the entire comic either in my notebook or in clip studio paint (my art program). then it's a matter of lineart, colours, shading and any extra touches i think is necessary.
the anthropology i think you're talking about at the end is the one i'm working on at the moment called hearteaters. it's not done yet since i want to make it my longest comic anthology so far (i've planned 15 comics, so i'm about a third of the way done). after it's all finished, I'll post about it on all my socials and put it up for sale on my store. thank you for expressing interest in it!
i believe that's all, but feel free to ask more questions if you have any!
#askbox#hearteaters is taking a while but im trying not to rush myself#have to balance a few things at the same time as making it unfortunately
51 notes
·
View notes
Text
God I should be drawing but I'm pissed off about how long drawing takes for me and you're all going to hear about it now.
I'll admit it! I'm sickeningly envious of the artists whose work I see on social media every day when they call something a "quick doodle" or say that they "try not to take more than an hour" on pieces like it or whatever and it's like. Full colour, shaded, usually at least somewhat rendered, meanwhile I've been working on my poxy lineart for several hours and it's still not finished. If I were colouring and shading this fucking thing it would take me two weeks.
All of the advice for getting faster at art is along the lines of "OH JUST FOCUS ON DRAWING QUICKLY AND DON'T WORRY ABOUT QUALITY! THE QUALITY WILL COME ON ITS OWN WHEN YOU GET BETTER AT DRAWING FAST! :))))))))" and it makes me want to chew glass because that's already my fucking drawing technique. I know it's going to take me an age to draw anything so it's a hustle from the start; no warmups, just get straight into it, there's no time for shit like that or we're going to miss our deadline. This sketch isn't as good as it could be but it's good enough. It felt like I was focusing well but it's already nearly midnight and we're only half done. Oh, that doesn't look right - but there's no time to fix it now, I need to get the colours down. Doing it that way looked good when I did it over there, why does it look like shit when I do it again over here? I can't remember how I did it the first time, surely I'm doing it the same way, but if I was, it wouldn't look so terrible. This would look a lot better if I knew how to blend but I don't have time to learn, there's too much to do and I can't afford the time it'd take to experiment when I can't guarantee it'll get the result that I want. This piece looks like dogshit to me but it's the best I can do; here's hoping no one notices how bad it looks! Aaaaaand post! 👏
It's exhausting! Having the Patreon means I draw at least a couple of times a month when I might otherwise just gravitate towards doing nothing for years at a time, but god. It takes up so much of my time and I'm seldom happy with what I make, and for all of the effort I put into it, it feels like I haven't improved in a decade. There's shit I drew years ago that looks better than the stuff I put out now and it's fucking infuriating. How did I do that? I can't remember. I've added all kinds of new techniques to speed up my art but it still seems to take just as long as ever and actively looks worse for it (but it's a cinch that if I went back to doing things like I used to, it would take substantially longer now). What's wrong with me? Why can't I get better?
I work so fucking hard, and for what?
8 notes
·
View notes
Note
every time I try digital art I get intimidated and stop (especially with coloring) do you have any advice?
My good anon, I feel you I feel you. I hardly think I'm the best person to ask advice on this topic, but since you have I'll roll up my sleeves and do my best.
The best thing to do is start, which seems like a cop out I do admit, but it's the only way to begin. Once you've got something on the page (it doesn't have to be good it just has to be) you're already most of the way there. If you have trouble with beginning than I also recommend finding a ref that you like and start from there.
On the colouring side I have the most trouble, as you anon already know. To get over my fear/make a little shortcut, I make a new layer underneath the lines/sketch and colour the whole figure/prop/whatever one solid colour, something saturated. From there I'm lazy AF, I use so few layers because I'm a monster. Using the lasso tool I separate the things I know will be different colours, and rather than painting them directly I just fiddle with the hue/saturation/brightness level until I find something I like. This helps me stick to a more concise colour scheme. Sometimes I colour my lineart, but most times I don't.
Another thing is using pre-prepared palettes! Let other colour masters do the work for you!
And for shading I just copy the coloured layer twice and slap it on the multiply and lighten/overlay filter and erase.
For texture I abuse the noise filter.
I hope this helps, and I hope this works with whatever program you use, anon. I'm using Procreate if that helps.
12 notes
·
View notes
Note
thoughts on the skeith? or elephante? whichever isn't in your queue yet
(The Skeith review can be found here.)


Ironically, despite its incredibly original name, the Elephante is actually not just a regular elephant; it's bipedal, it has small semi-vestigal wings/a fluffy tail, and it has a fancy headpiece with a gemstone in it. I'm not always big on "default" clothing on Neopets, but the hats here actually look pretty nice and are passable as fancy jewelry that anthro characters could potentially wear.
Color-wise, the default Elephante colours are mostly solid, though the toenails, hats, and tail break things up a bit. I do wish the default colours had more cohesion—like the gemstones matching the base color instead of always being red—and the pink snout feels ever-so-slightly out of place, but otherwise they look fine.

Elephantes definitely benefited from customization. Their lineart was cleaned up considerably, which helped fix some of the jankier elements like the wings and legs. Another big benefit of customization is the ability to remove the default clothing, which is always appreciated.
I also like the change in expression—the old Elephantes always felt a bit weird, like they burned down the house while you were gone and now they're trying to act normal while they figure out how to break the news to you.
Favorite Colours:
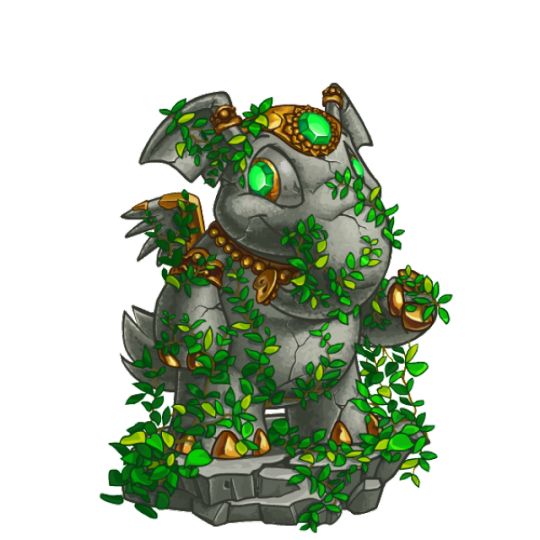

Relic: The relic Elephante just released earlier this year, and I gotta say, I really like it. The base is nicely shaded and textured with plenty of cracks, and it's then complimented by beautiful bronze metal accents. The body is also covered in leaves, which match the green of the eyes and hat, which are slightly lighter to make sure they pop. Great stuff. The base also looks great with just the little bit of bronze around the iris.
My only minor issue is that the amount of plants feels just a smidge too much. They are removable, but it's an all-or-nothing situation. I wish the ones on the body were separate from the ones on the base—especially because that could open non-relic Elephantes to wearing them.

Candy: Peppermint swirls aren't technically anything too fancy, but the sutble texturing here is great and really makes it look like hard candy. I also love how the stripes properly fit with and conform to the body shape, which is something a lot of Neopet colours forget to do. Also, the extra little peppermint in the hat is absolutely perfect.


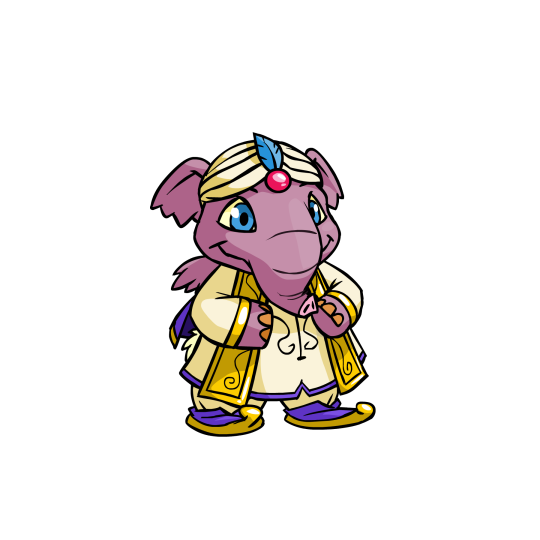

Royal: Neopets evidently decided to take the "Indian elephant" idea to its logical conclusion by giving the royal Elephants things like sari wraps. Granted, I'm not sure what region India would be considered in Neopia, but hey, it's a fun concept and it looks beautiful. Between the two I think I like the royal girl more just for the palette, but both are solid.
UC/styled versions also exist. These versions obviously have more personality, but thankfully the converted designs are pretty spot-on save for the strange lack of fingernail polish.


BONUS: The zombie Elephante is shockingly gory for Neopets all things considered, only rivaled by the zombie Jubjub. Exposed skull, giant gaping wounds, stitches, ripped ears and wings—you name it. It looks fantastic and properly undead, and the whole thing is nicely drawn and shaded. It comes with clothing but the base itself is also solid (it's a bit strange that the skull is considered a wearable, but it's a play on the normal hats so I suppose that's why).
My only issue with it, and the reason it's a bonus, is that the expression is WAY too cheerful. The irises needed to be way smaller, less focused, or just plain missing, and the mouth looks too smile-ly. If it had a slightly more haunted expression it would've been perfect, but as is, it's still pretty good.
29 notes
·
View notes
Last Seen Blogs

wackybutton
Another Sick Girl

zembiarz
zembiarz

heart-meme
Heart meme

edunext
Untitled
short-yandere-stories
Yandere Fanfictions