#ts4 tutorials
Explore tagged Tumblr posts
Visit Tumblr Blog
Explore Tumblr blogs with no restrictions, modern design and the best experience.
Last Seen Tumblr Blogs


Fun Fact
If you dial 1-866-584-6757, you can leave an audio post for your followers.
Text
youtube
Composition and Screenshot Tricks Edutainment Workshop 📸
This is a video I wanted to put together to show off some helpful easy compositional tips to keep in the back of your mind as you screenshot as well as show off some fun tricks and resources I’ve found over the years.
I hope you find it entertaining and helpful! ✨💗
208 notes
·
View notes
Text
youtube
In this new video series I want to show you the harsh truth behind custom content creation for The Sims 4. I will show my whole process while telling a bit about what I do and why I did it like that. Hope you enjoy this kind of videos!
The process took almost 6 hours in total, and I tried to whittle everything down to a time and speed that is enjoyable to watch. Feel free to leave feedback so I know what I can improve in the future!
42 notes
·
View notes
Text
i found this absolute treasure of gameplay tips! check it by yourself ;)
Simming Tips Index
7 notes
·
View notes
Text
TS4 CC not working despite installing correctly? Make sure Windows unblocked the file!
I've seen this a lot on some CC creators Patreons, where the person can't seem to get the CC working despite installing it correctly. If you're using Windows 10 or 11, it could be that Windows is blocking your downloads.
This is a security feature by Windows and AFAIK, you can't disable it but you can fix your downloads (including things you've already installed!). Though this is tedious, you only have to do this once per folder.
If you have CC that's in a zip/rar/compressed file, you can just do the first few steps on the zip/rar/compressed file and it was unblock everything within the zip file but ONLY if that file has the "unblock" notification seen in my screenshots.
You can't make things faster by tossing all of your CC into a zip/rar/compressed file and then unblocking it - you would have to use the Powershell command that's in part two of this.
A quick note: I'm using Windows 10 and a custom theme with custom-made cursors as well as custom-made taskbar and desktop icons, so my UI might look different than yours.
Read on, I have you covered in this super short tutorial.
PART ONE: UNBLOCKING SINGLE FILES.
When I download CC, I put my .package files into a folder on my desktop and name it Creator Name - Date, so that if I'm having trouble with my game being weird, I can do back and see what I last installed by looking for the date in the folder name. After I know this CC won't cause trouble, I'll just remove the date sometimes but usually I just leave it.
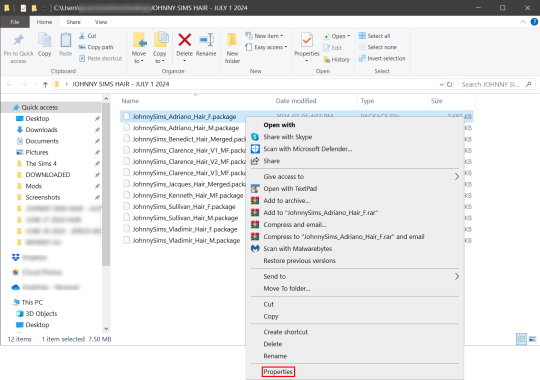
For this tutorial, we're going to assume your CC is in a folder like mine:

So, you can see I have a few Johnny Sims hair I've downloaded today. It's ready to go into my CC folder but first I need to 'unblock' it. Let's right-click the first file, "JohnnySims_Adriano_Hair_F.package" and left-click "properties".
Now you're going to have a new window come up with a message:
This file came from another computer and might be blocked to help protect this computer.
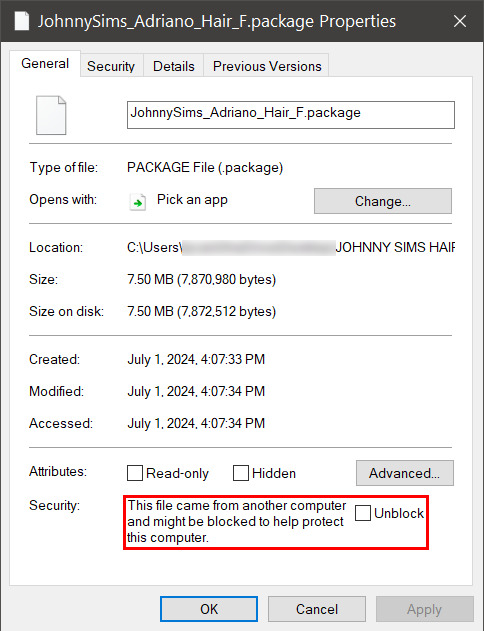
Click the checkbox (the square) next to the word Unblock that is to the right of the message, and then click "apply" and "okay". This window will now close. Do this for each of your .package files.
That's it! You're done and can now move your CC into your mods folder. You will have to do this each time you download new CC as Windows has this security feature on by default and it's not a good idea to disable it unless you really know what you are doing. It protects your computer from allowing harmful malware to run.
There is a command to use to unblock an entire folder in one go if you're wanting a quick means to do this, so read on for that.
PART TWO: UNBLOCKING AN ENTIRE FOLDER WITH WINDOWS POWERSHELL
If you want to unblock an entire CC folder, the easiest way is with a Windows PowerShell command. This requires you to be on an administrator account on your Windows machine, otherwise you will have to enter the administrator password or have some other means to bypass UAC.
I would recommend making a backup/copy of your mods folder and making a backup before doing this, as well, moving your mods folder to your desktop and executing this command there, rather than doing so within the Sims 4 folder.
You'll want to click "file" up on the top left of your CC folder, then hover over "Open Windows PowerShell":
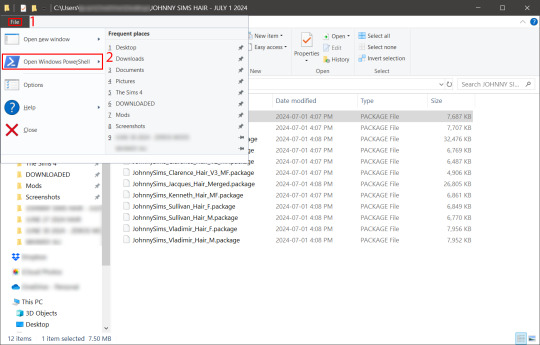
From there, a second menu should come out that gives two options: "Open Windows PowerShell" and "Open Windows PowerShell as administrator".
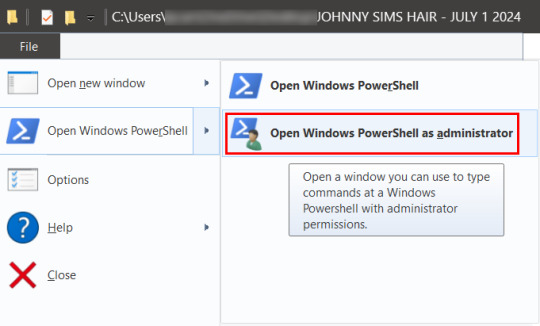
We want to click "Open Windows PowerShell as administrator":
You'll have a command prompt-looking window pop up then. Mine is blue, yours may be a different color depending on if you have a different Windows theme or dark mode enabled (I do not have dark mode).
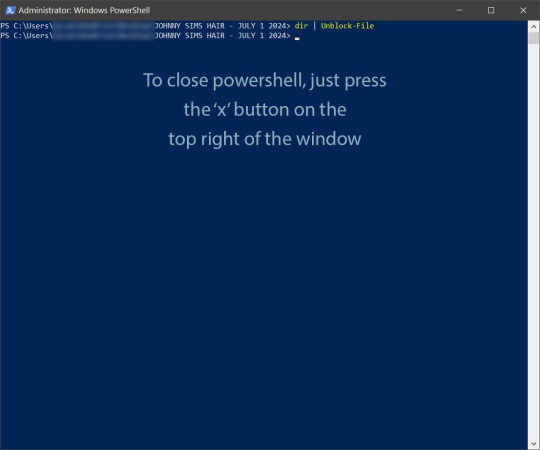
With this window open, you'll see that the directory listed is the one for your CC folder we were just in. Click at the end of the directory where the > is, and type: dir | Unblock-File (capitalization is important here, and for QWERTY keyboards, the | button is above the 'enter' key, you just have to use the 'shift' key while pressing it, otherwise you'll get a backslash):

Now hit 'enter'. You won't get any sort of message telling you the command has worked. If you get an error message, you typed something wrong. Just type correctly on the next line and hit 'enter' again.
If your user directory shows up like mine with a flashing cursor, that means Windows PowerShell is waiting for another command and you did it correctly. Close out of this window by clicking the 'x' on the top right of the window.
Check your CC by right-clicking any of the .package files as we did at the start, going to 'properties' and then making sure that message is gone:

See how it is blank under 'attributes'? The message is gone, meaning our CC is unblocked. Now we can move it into our mods folder and it should show up in the game.
If you have any questions, feel free to send me a message/ask and I'll do my best to help!
2 notes
·
View notes
Text
SIMS 4 - CHANGING INFORMATION IN SIMS 4 STUDIO FOR MULTIPLE SWATCHES SIMPLIFIED
This tutorial can also be viewed on GOOGLE DOCS.
WHY I MADE THIS TUTORIAL
The purpose of this tutorial is to help creators and simmers alike simplify and speed up how to change information in the Warehouse tab in Sims 4 Studio for multiple swatches, especially if you have more than one section that needs adjusting.
So, let’s say you’ve created an entire package with 15 swatches and have saved your package. Then you realize, OMG I forgot to change something in Warehouse mode and now have to go in and change each swatch separately. (cue dramatic music)
I don’t recommend this for only a few swatches, though, because, while helpful, this is not a one shot process, but it will save time for those packages with several swatches that require fixing/changing in the Warehouse tab.
For the purposes of this tutorial, I am using the example of changing the Composition Method in a lipstick with 31 swatches from 4 to 0. It is entirely possible to make multiple changes using this process. Literally anything in the Warehouse tab that you need to change and have applied to multiple swatches can be done.
Note: Sims 4 Studio already allows for changing information in the Studio tab on multiple swatches. This is only helpful for Warehouse mode.
I have also used this method to change the diffuse ratio on a set of walls that were supposed to be three panels wide for a wallpaper mural, and forgot until after all of my swatches were in and the package was saved. This would normally have to be done 3 times for every swatch, so the work is tripled! Multiply that by 20 swatches and you can see it’s just too much. I could have started over with a new package, but then I would have to change the catalog name, price, any categories like color and whether it’s paint or wallpaper, ambience effects, if it reduces bills, bring in all the diffuse (texture) files (there’s a trick for bringing in new diffuse files as well, all in one shot btw), and possibly more! With makeup and clothes, or buy mode objects, there are even more categories to be sure match your project.
To simplify, you’ll be saving your color palette, exporting your texture files, changing whatever is necessary in the Warehouse tab, and re-importing your textures. There are a few more steps involved, but everything is explained here in detail with pictures.
Rest assured, it takes a while to read this tutorial, but once you do it a few times, you will complete the entire process very quickly!
----------------------------------------------------
You can view the entire tutorial on Patreon, Google Docs, or the Sims 4 Studio website in the tutorials section. It is currently still in the Creator Help section on S4S, but will be moved shortly.
5 notes
·
View notes
Photo
Thank you.
Creating Poses
How to Create Custom Poses: click
How to Create CAS Poses: click
How to Create All in One Pose Pack: click
How To Make Poses With Accessories: click
Creating Makeup
How to create custom content Eyeliner: click
How to create custom content Lipstick: click
Photo editing
How I take super high-quality pictures in The Sims 4: click
Photoshop Tutorial - Smooth Skin: click
How to Download Backgrounds directly in Photoshop: click
Drawing the perfect Eyeliner in Adobe Photoshop: click
How to Create Glitter Text in Photoshop: click
How to create a Drop Shadow in Photoshop: click
Removing Green Screen Background using GIMP: click
Removing Green Screen Background in Photoshop: click
My favorite Adobe Photoshop Brushes: click
How to Add Filters in Photoshop: click
How to edit Sims 4 Screenshots - Quick & Easy: click
How to draw hair with a mouse in Photoshop: click
Miscellaneous
My favorite Alpha Custom Content creators: click
My favorite Maxis Match CC creators: click
My favorite Sims 4 Sliders and Presets: click
How To Post To Instagram From PC: click
How to remove unwanted CC with the Sims4Studio: click
How to Install ReShade on The Sims 4: click
My favorite ReShade presets for The Sims 4: click
Quick The Sims 4 Tray Importer Tutorial: click
How To Download My Sims From The Gallery: click
How to install custom content in The Sims 4: click
Pose creators you should check out: click
A cure for Adf.ly/Shorte.st links: click
Free and good music for your Youtube videos: click
7K notes
·
View notes
Text
Since the new eyelash update is here, I'm gonna teach you how to convert old eyelash cc into the new eyelash option!
First of all, we will need the Sims 4 Studio. The download link can be found here: https://sims4studio.com/board/6/download-sims-studio-open-version
Now, head into the app and click the "My Projects" button on the main menu.

Open the eyelash file (.package file) you want to convert. I'll just pick a random one for reference. Once you picked the one you want, hit open.
You will be directed into the studio, which will look like this:

Now on the right side of the screen, find the CATEGORIES button and click on it.

Once there, change the OUTFIT TYPE to MASK DETAIL EYELASHES and APPLY TO ALL SWATCHES. Save the file, and the .package file will be updated in your game. Also, make sure to double check in-game before continuing with your other custom content.

As you can see in my game, It worked! Hopefully it works for all of you, too.

And that's about it. Thanks for reading all the way.
And by the way, If you're going to distribute these publicly without the original creators consent, just don't do it. This is meant for private use only or for content creators who want to convert their eyelashes into the new eyelash section.
EDIT: As trillyke has said, This does not work with eyelashes in the glasses section as they will collide with rings and most of the accessories
#sims-4-custom-content#ts4#thesims4#customcontent#ts4cc#the sims 4 cc#the sims 4 custom content#tutorial#the sims 4#the sims community#the sims cc#sims#sims 4#simblr
4K notes
·
View notes
Text

IF YOU CAN'T ENABLE CC 🌸
Sul sul ^^
After today updates, I wasn't able to enable CC again. It doesn't matter how many times I closed and launched the game.
So I remembered that this had already happened to me before.
If you're going through the same problem, this is how you can fix it:
🌸🌸🌸🌸🌸🌸🌸🌸
HOW TO ENABLE CC AGAIN:
1- On the game home page, in the bottom right corner of the screen, you can see what the current game version is. After today's update, mine was: 1.108.318.1020. Launch the game and check the number that appears for you.
2- In your game folder (Documents>Electronic Arts> The Sims 4) you'll find a file called "GameVersion". There will be a number.
The number in that file has to match the current game version number.
When I opened mine, it was "1.107.151.1020". So I just updated it to "1.108.318.1020" and saved. Then when I launched the game I could enable CC again.
Note 1: There's a "space" before the number in "GameVersion" (as if it were a paragraph). Keep that space. Change the numbers exactly where they are.
Note 2: If you prefer, before changing the number, make a backup copy of "GameVersion" just in case. It won't harm your game, but it's better, just to prevent and make it safer.
💎 If you want a tutorial video, I made one about it some time ago. You can watch it here :)
🌸🌸🌸🌸🌸🌸🌸🌸
ALSO IMPORTANT AFTER UPDATES:
Remember to delete "localthumbcache". You can find the tutorial here.
🌸🌸🌸🌸🌸🌸🌸🌸
I'm currently checking my CC to see if they're still working.
If anything, I'll let you know :)
I hope it helps you if you're having any problems :)
Happy Simming ^^
4K notes
·
View notes
Text
hmm this tickles my brain in a very good way and i may have to play around with it in my game 💭

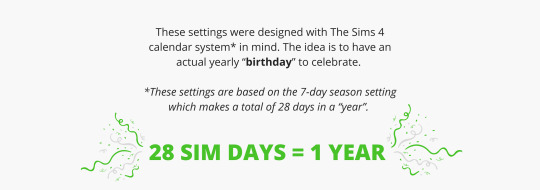
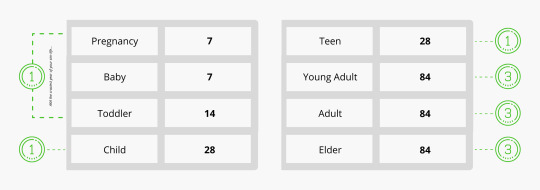

I spent a lot of time doing the ✨ math ✨ on lifespans, and so far it’s been working great for me.
Disclaimer: I use MCCC to change the lifespans in-game. Happy to help anyone who doesn’t know how! It’s really easy, promise 💛
4K notes
·
View notes
Text

hey guy's i made a quick and easy tutorial on youtube about how you can frame your sims screenshots with any cc frame you want, you don't need photoshop or any other of these overwhelmimg programs and you also don't need any kind of photo editing skills! you can find the video here. i hope it's helping some of you. love, jodie ♡
#tuts*#sims 4 mods#sims 4 cc#sims 4 simblr#sims 4 custom content#the sims 4#the sims#the sims community#sims 4 tutorial#the sims 4 custom content#sims 4 maxis match#sims custom content#sims 4#ts4 simblr#sims community#ts4
435 notes
·
View notes
Text
how to clean & organize your mods folder + update broken/outdated mods by ashley plays
this video goes over the following:
how to organize your mods folder
how to update your mods folder after a patch update
how to find broken/outdated mods
how to clean out custom content & find duplicate files
↓ mods, programs & helpful websites mentioned below
mods:
better exceptions
mc command center
programs:
sims 4 tray importer
sims 4 mod manager
helpful websites:
sims 4 news & updates
scarlet's realm: the mod list
bienchen's mods
littlemssam's mods
kiarasims4mods's spreadsheet
mizoreyukii's spreadsheet
2K notes
·
View notes
Text
TS4, DirectX 11, and ReShade
Patch notes today say that finally (finally!) The Sims 4 is moving over to use the DirectX 11 rendering api. Until now TS4 has used DirectX 9, which has given us some limitations when using ReShade.
They're bringing the official rollout sometime in the future, but for now you can opt in to switching to DirectX 11 on a voluntary basis.
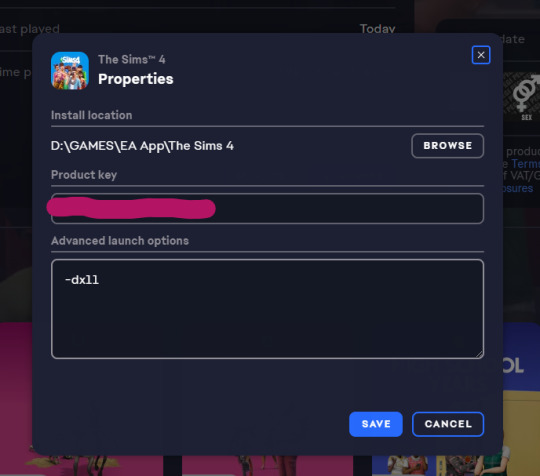
You don't need to uninstall your game or install a new version. To switch to using DirectX 11, update your game with today's patch, and then click on Manage > View Properties from the The Sims 4 game page on EA App and enter -dx11 in the advanced launch options box. You can remove this at any time to go back to using DirectX 9.
Note: the game developers have warned in the patch notes that some mods may have visual glitches until they are updated to accommodate dx11, so it may be advisable to wait until your mod authors have confirmed everything works okay
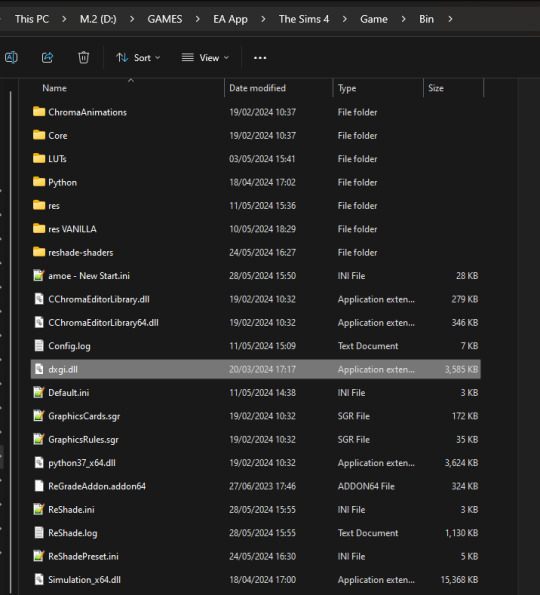
If you have ReShade installed currently for DirectX 9 you can make it start using DirectX 11 instead by finding the d3d9.dll inside your Bin folder and changing its name to dxgi.dll. No need to uninstall and reinstall ReShade, that's all you need to do. If you want to go back to using dx9, just revert the name back to d3d9.dll.

The main benefit of using ReShade under DirectX 11 is that you'll have access to more shaders than usual. You've probably noticed a lot of red errors (also known as compiling errors) -- those are more often than not these days caused by DirectX 9 limitations.
#reshade faq#reshade for ts4#ts4 reshade#reshade tutorial#reshade installation#reshade help#reshade tips
1K notes
·
View notes
Text
TUTORIAL
How to FIX CUSTOM EYELASHES after update 1.108.349.1020 The Sims 4
YOU NEED:
Sims 4 Studio @sims4studioofficial
Blender (I use Blender 2.79)
Instruction manual:
Opening the eyelashes that need to be repaired in Sims 4 Studio

2. Go to the "Categories" section - Item "Outfit Type" - "Eyelashes"

3. Click "Apply to All Swatches" - Click "Yes"

4. Now we need to assign the correct color to the Vertex in Blender. Go to the "Mesh" category and export the eyelash mesh

5. Open the Mesh in Blender and switch to the "Vertex Paint" mode

6. Select the display mode "Wireframe" or press the "Z" key

7. If the eyelashes are broken, they will have the wrong color. Now we need to assign the correct color

8. Click on the palette icon

9. Go to the HEX item and enter the color code. Color Number: 007F3F

10. After you entered the color code. Click "Paint" - "Set Vertex Color"

11. After that, the color of the eyelashes will change. Save the file and close the Blender

12. Go back to SIms 4 Studio and import the mesh

13. Saving the package file

14. Checking the result in the game
714 notes
·
View notes
Text


Shop Sign Wall Lights
I put together a few sets of shop sign wall lights. But there are instructions. I kept some swatches as a default white color so that you could pick which color you want the light to be while in live mode. This saved on the file size of the package file because the more textures a file has, the more bloated the file size is.
I had some fun with some shop names although I mainly included generic titles in both English and Simlish.
DOWNLOAD for FREE: SFS
OR at Patreon*
*You must be over 18 to access my Patreon page.
INSTRUCTIONS ON CHANGING LIGHT COLORS
Once you place the light in build mode, then go to live mode. Click on the light and you will get the following pie menu.

Select SET COLOR AND INTENSITY and then choose THIS LIGHT. The color options will then appear so you can select which color you want.

If you use the name signs along with the Awning Lights, make sure to place the name on top of the awning so when you select the color picker, the correct sign changes colors. The other option is to place the name separate from the awning, go to live mode and change the color, then go back to build mode and add the awning light you want.
Enable the bb.moveobjects on cheat and then you can make adjustments to location and size of objects. You can adjust the position of the light on the wall by depressing the Alt key while placing the sign (on PC). You can adjust the size of the item by depressing the Shift key and either [ (for smaller) or ] (for bigger) (on PC).
CREDITS
Awning Shop Lights - 19 swatches of various awning wall lights. 18 are pre-colored and one is white so you can change the color yourself in game.
Candy Shop Lights - 20 swatches
Pottery Shop Lights - 25 swatches
Tattoo Shop Lights - 21 swatches
Enjoy!
Creations by SexyIrish7
These cc objects are new 3d meshes created using Blender and Sims 4 Studio.
Polygon Count: 6
All CC have:
*Ability to search catalog using search terms: sexyirish7 and si7
*Customized thumbnail
*******
CREDITS:
Software credits:
Sims 4 Studio v. 3.2.4.1 (Star): https://sims4studio.com
Blender 4.0: https://www.blender.org/download/
GIMP v. 2.10.34: https://www.gimp.org/
Inkscape v. 1.2: https://inkscape.org/
Thank you to the creators and moderators producing tutorials and answering questions!
*******
Model and Image credits:
Mesh created by me.
Simlish font credit to Franzilla: https://modthesims.info/
Image credits:
Awning Lights Image credits: Modified image from Adobe Stock
Candy Shop Image credits:
Swatches 1-3: Image by pch.vector on Freepik https://www.freepik.com/free-vector/christmas-candies-symbols-set-neon-style_11241813.htm#fromView=search&page=1&position=26&uuid=8b541325-0e62-4e37-9468-6bacd30f8963&query=neon+lollipop+candy
Swatches 4-8: Image by gstudioimagen on Freepik https://www.freepik.com/free-vector/sweet-candy-neon-seamless-pattern_5595774.htm#fromView=search&page=2&position=30&uuid=e2259de5-014d-4d04-af87-1198ee0f35e2&query=%40gstudioimagen+neon
https://www.freepik.com/free-vector/sweet-candy-neon-seamless-pattern_5595775.htm#fromView=search&page=1&position=27&uuid=e2259de5-014d-4d04-af87-1198ee0f35e2&query=%40gstudioimagen+neon
Swatches 9-10: Image by openclipart.org https://all-free-download.com/free-vector/download/peppermint_candy_clip_art_13182.html
https://all-free-download.com/free-vector/download/round_candy_with_stick_card_on_pink_background_6823183.html
Swatch 11: Image by All-free-download.com https://all-free-download.com/free-vector/download/round_candy_with_stick_card_on_pink_background_6823183.html
Swatches 12: Image by katemangostar on Freepik https://www.freepik.com/free-vector/ice-cream-cart-neon-sign_3238564.htm#fromView=search&page=8&position=42&uuid=2f82b4d1-5ca8-449c-ae22-4573861ebcb0&query=neon+sign+retail
Pottery Shop Image credits:
Swatch 1: Crafting icons created by andinur - Flaticon https://www.flaticon.com/free-icon/pottery_17392031
Swatch 2: Image by katemangostar via Freepik https://www.freepik.com/free-vector/aquarius-neon-sign_5561944.htm#fromView=search&page=2&position=5&uuid=c55e5e21-0550-46f0-b9be-cfa85ff38796&query=Ceramic+Neon
Swatch 3-4: Pottery icons created by Smashicons - Flaticon https://www.flaticon.com/free-icon/vase_3760867
https://www.flaticon.com/free-icon/vase_3760970
Swatch 5: Icon by istar_design_bureau via Freepik https://www.freepik.com/icon/pottery_1958438#fromView=search&page=2&position=20&uuid=096084ae-13fe-429c-a419-e6e13ccd37b9
Swatch 6:Icons by Eucalyp - Flaticon https://www.flaticon.com/free-icon/pottery_6552610
Swatch 7: Icon by berkahicon via Freepik https://www.freepik.com/icon/spin_13785816#fromView=search&page=2&position=0&uuid=096084ae-13fe-429c-a419-e6e13ccd37b9
Swatches 8-11: Icons by Freepik https://www.freepik.com/icon/pottery_8540816#fromView=search&page=3&position=43&uuid=096084ae-13fe-429c-a419-e6e13ccd37b9
https://www.flaticon.com/free-icon/machine_9200546
https://www.flaticon.com/free-icon/vase_8838322
https://www.flaticon.com/free-icon/pottery_3305262
Tattoo Shop Image credits:
Swatch 1: Modified Image by katemangostar on Freepik https://www.freepik.com/free-vector/tattoo-salon-neon-text-with-tattoo-machine-neon-sign-night-bright-advertisement_2438198.htm?log-in=email
Swatch 2: Image by Nippy Custom https://www.nippycustom.com/products/tattoo-neon-sign
Swatches 3-5: Image by bohlam via Vecteezy https://www.vecteezy.com/vector-art/2185717-tattoo-studio-neon-signs-style-text-vector
https://www.vecteezy.com/vector-art/34210463-neon-sign-tattoo-studio-with-brick-wall-background-vector
*******
TOU:
Do not re-upload and claim as your own
Do not re-upload and hide behind a paywall
#the sims 4 cc#ts4cc#sims 4 cc#the sims 4#wall decor#sims 4#ts4#lights#wall lights#signs#shop signs#retail#pottery#ceramics#tattoo#ink#candy#lollipop#sweets#sugar#light tutorial#sexyirish7
269 notes
·
View notes
Text

As storytellers, realism and continuity are important to us, and they're sometimes hard to achieve within the confines of the game. I’m personally a big fan of posing Sims in open doorways, and unless you want to be limited to the CC options that exist, you’re stuck having to make some poor Sim walk in and out and pausing at just the right moment for the desired effect. But it’s actually very easy to edit a door in Blender to make your own open version!
I initially learned about "posing" objects from surelysims' Wicked Whims posing tutorial, which I highly recommend as a whole. However, it might be a little overwhelming to learn a whole new posing system for the sake of a screenshot or two, which is where this tutorial is meant to come in. Some of my explanations might seem overly simplistic, but I wanted it to be approachable even for beginners. I am far from an authority on using Blender or making CC, and I'm sure there are flaws in this process or easier ways to achieve certain things, but it works well enough for my purposes and I hope it will work for yours too. 💗
Now, onto the tutorial...
Figure out what door or gate you want to create an open version of. If it’s from the vanilla game, all you need to do is make note of its name. If it’s CC, find the package in your mods folder, make a copy, and paste it into My Documents > Sims 4 Studio > Mods. This will allow you to find it in S4S in the next step!
Open S4S. On the main screen, make sure “Standalone Recolor” is checked under the “Object” button, then click the button.

A new window should pop up (if it’s your first time doing this, it may take a while to load). At first, it will show every single object in the game. If you know the name of the object you’re looking for, you can use the search bar to find it. You can also use the filtering options to narrow the selection down by category, game pack, and whether it’s vanilla or custom content. Here, I’ve filtered the search to only base game doors. Once I find the door I want to adjust, I click on it and hit “Next.”

This will pop up a window prompting you to save a new file. Place it somewhere you know you’ll be able to find it easily later and name it accordingly. This file will ultimately contain your mesh edit, so you don’t want to lose it! I suggest placing it in a dedicated folder, on your desktop, or in your Mods folder directly.

On the next screen, you’ll be looking at the contents of the package itself. For this tutorial, you don’t need to worry about grabbing anything but the mesh. Click on the “Meshes” tab and then “Export Mesh.” You’ll again be prompted to save.

Open the mesh file you just saved in Blender. (If the view is funky to start, I recommend hitting 1 on your keyboard’s number pad to get a forward-facing view.) [It should also be noted I’m using Blender 3.6, so my screenshots and the location of certain settings may be different than in earlier or newer versions.]
You’ll see that there are actually multiple meshes involved (and the number can vary from object to object). Right now, we’re only concerned with the “rig.” If you’re familiar with posing, you’ll know that all Sims have a rig that is used to move different parts of their bodies around. Objects also have a rig, and objects that can open will have “bones” that control their moving parts. So click on “rig” and then change “Object Mode” in the bottom corner to “Pose Mode.”


Now, if you hit A on the keyboard, it will select all bones and you can see where they’re located. As far as I can tell, all doors have two bones that control their swinging movement. They both do essentially the same thing. I tend to stick with the top bone, which is called something like “bind_doorSwing.”

Pro-tip: If you’re having trouble seeing or selecting the rig's bones, you can change the view on the right side of the screen to “dope sheet.” Then when you save the position of the bones, just like when posing a Sim, by selecting all with A then clicking I and selecting “Location & Rotation,” the list of available bones will pop up there.


Rotate the door open using this bone or bones, if it’s a double door. On double doors, I recommend rotating each side individually rather than trying to rotate them together, as you may get unexpected results. You can use the R+Z combo on the keyboard to limit the direction of movement. (You can also use this in combo with numbers to swing them more precisely. For example, if you want a 45 degree swing, you can press R+Z+45.) Specifying the Z axis allows you to only swing the doors open and closed while restricting their movement in other directions.

Once you’ve got the doors swung open to where you want them, hit A to select all bones, then hit I and select “Location & Rotation” to save the position. (If you’re a poser, this maneuver is already familiar to you - and you know how important it is! If you skip it, the new position won’t save and the doors will revert back to closed.)

That’s it! You don’t have to do anything else to the mesh. Save your file in Blender. If you want to keep it separate from the original door mesh, save as instead and name it something different. (This is why you may want a dedicated folder, since the number of files does add up!)
Reopen the package you made earlier in S4S (or simply return to it if you’ve kept it open). From the same place you exported the mesh, you will now import the edited mesh. Hit “Import Mesh,” navigate to your edited Blender file, and you should now see your edited door replace the original. Since it’s the same mesh, all the swatches will still work perfectly with it.

You’ll notice that you’ve only replaced the “LOD 0 (High)” version of the mesh. When you click the drop-down menu, you’ll see that there are also medium and low detail versions, as well as shadow meshes at all levels of detail. If you’re only making an object for personal use, you don’t have to worry too much about LODs. You can probably just import the same mesh into LOD 1 and LOD 2 and be fine (so long as your computer isn't a potato). And if this is just for you, I honestly wouldn't even touch the shadow LODs.
The only other thing you might do is go back to the “Catalog” tab and alter the object name so you can find it easily in the game catalog. You can also edit the description, price, etc. if you so desire. Hit “Save.”

Test in game! If the package isn’t already in your Mods folder, move it there. As long as you didn’t mess with any of the tags, it should still be in the door section of build mode and work perfectly as a functional door. The door swinging animation will look different, and you could probably get rid of it if you wanted, but that’s above my current skill level and I don’t think it’s really necessary for our purposes. If all you need is an open version of a very specific door for storytelling purposes, it gets the job done.


(First screenshot: doors swung open as intended, second screenshot: doors swinging in the opposite direction as they’re walked through)
These steps can also potentially be used to create open versions of other in-game objects like gates, books, chests/boxes, etc. I’m only just beginning to experiment with minor mesh edits, but once you get the hang of it they can often be faster and easier than trying to line up the best circumstances to get the perfect shot in-game. I might make more tutorials for small edits like this that help with storytelling realism and continuity in the future!
#ts4#sims 4#ts4 storytelling#ts4 tutorial#sims 4 storytelling#sims 4 tutorial#this is the first tutorial i've written so do let me know if anything's confusing!!!#*tbw
271 notes
·
View notes
Text
omg this kind of thing is SO HELPFUL TO ME and we're about to have the new pack with the ability to have apartments anywhere we want sooooo i'll probably come back to this often haha

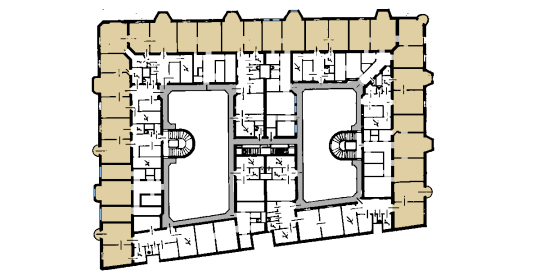
~ Middle Class Apartment Guide by Lili~
Main focus on Central Europe
Let's start with a story first:
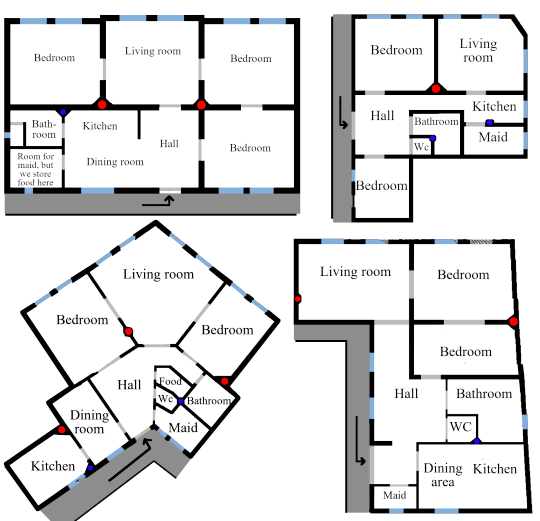
My grandma lived in a house which was built in the 1920s. When I was younger, I always played tag with my siblings and cousins there. It's layout looked something like this:

See? No corridor. You could access a room by going through another. Perfect place for tag! When I build, I imagine kids playing tag and running around the rooms.
MY RULES:
❗ Walls:
Straight & logical.
Keep in mind that they are made of bricks
Therefore they are heavy
So if you build more floors, the main walls should be in the same position in all floors!!
❗ Fireplaces
Every fireplace belongs to a chimney, but there aren't as much chimneys as rooms
Every important room must be heated! ...but how? With logic!
RED DOTS shows where to put a fireplace
Every fireplace should be on the same position in all floors!
in modern homes, you can have radiators: place them under the windows!
❗ Plumbing
Kitchen, WC, Bathroom
These rooms should be next to each other!
Sinks, toilets and bathtubs should be as near to each other as possible
BLUE DOTS shows where to put them

HOW TO PLACE ROOMS? ~ Detailed description

👞👠 Hall
first place you see when you enter
a lot of cabinets for random stuff, clothes, shoes, clothes hangers and boxes, etc...
👪🛋️ Living room:
the center of the composition, representative
sofa and armchairs, piano, radio & gramophone, etc...
in some cases there was a table with 4-5 chairs for dining purposes, if there was no individual dining room.
it's always facing to the street as well as the bedrooms
🥂🍰 Dining room:
radio
representative cupboard with luxury plates
wasn't very common, but sometimes there were place for it
Originally, bigger apartments had 3 representative rooms: one bedroom, one living room and one dining room, but since ppl had children, they made the dining room into an other bedroom
Therefore most of the time the dining table was in the living room.
🛌💤 Bedroom:
usually a master bedroom and one for the children
You could mainly access it trough the living room
The doors were open most of the time
since an average apartment didn't have space for a study, the desk was close to the windows, and behind it, there was a bookcase
facing to the street always!
🛁🚽 Bathroom:
Sometimes you could access it trough the hall & the master bedroom too
the toilet was always separated from the bathroom
usually had no windows, or a small one which opens to the side of the house
🧹🧽 Maid's Room:
Lot of households had maids. They were young unmarried girls from the country, or old poor lower-class widows
wasn't the best job, but it provided a great opportunity to break out of poverty
they had a separate room with a bed and a cupboard, but sometimes they slept in the kitchen
this room opens to the hall or you can only access it trough the kitchen
🔪🧇 Kitchen
it was a separate and small room facing to the inner garden
besides the stove & basic kitchen furniture, it had a small table in the middle or next to the wall with 2-3-4 chairs.
If the home was small, this could be the dining area. In this case, use a pretty table here
If the dining area wasn't here, it was for the maid, and was used for cooking. Then use an average boring table here.
HOW DOES A WHOLE BUILDING LOOK LIKE?
Representative rooms are facing to the street!

STAIRCASES, HANGING BALCONIES: Main features of old tenement houses & my sources
🌸Arcades, corridors, hanging balconies
every apartment can be reached trough them
use your imagination
ppl often decorate it with flowers
others use it for a terrace
🏵️ Staircases & Elevators
there are two types of staircases !
One of them is the main representative staircase that almost opens to the street. It's richly decorated with tiles and frescoes. At the end of the stairs there is corridor. You can find at least 5 trashcans and a lot of mailboxes & bicycles there.
In many houses, the stair has a square or oval shape, and in the middle, there is an elevator.
The other one is for the maids. It isn't decorated at all, and as small as possible. It opens to the inner garden.
🌹 Maids & Families ~ Keep in Mind
I marked the route of the maids with BLUE, and the family's with RED
They tried to meet the maids as little as possible. That’s why the maid’s room is next to the kitchen, and that’s why a separate staircase was built for them. Many times they had a separate door to the hanging balcony and to the street.
PLACING THESE INTO THE GAME
❗ Wall thickness
Brick walls in real life are thick, and somehow EA thinks we only need thin paper walls. Well, no...
The angle of the walls sometimes not 90 or 45 degree,
❗ Wall height
Medium is the best for upper floors, high for ground floor if you have no living area there
❗ Size
The biggest lots are 64x64, but they are in the middle of nowhere
You'll always have to edit the original layout and add a staircase
The big corridor can be in the center, or the corner of the house
Sometimes there was enough space for cars and carriages, but it was more common to be used only by humans.
When these houses were built, there were no cars! Just keep in mind. If you don't have enough space for a car there, it's okay, since ppl used taxi or public transportation. A small, 3 tiles wide corridor is accurate as well.
Flower shops , restaurants, and various other stores operated on the ground floor.
❗ Some ideas for ground floor layouts:

~ MY SOURCES AND INSPO ~
FORTEPAN ~ best for furnishing. Type 'interior' to the search bar. Typing "ELADÓ NAGYPOLGÁRI LAKÁS" ~ (upper middle class apartment for sale) They include blueprints! This Facebook Goup ~ in Hungarian as well, but you can see the inside of these gorgeous tenement corridors. Memorizing each house I enter ~ yeah, I do this for fun. Best way to understand their logic.
Hope you liked my 2k followers gift <3
914 notes
·
View notes