#sims 4 tutorials
Explore tagged Tumblr posts
Visit Tumblr Blog
Explore Tumblr blogs with no restrictions, modern design and the best experience.
Last Seen Tumblr Blogs


Fun Fact
Tumblr Inc. is using 66 technologies for its website.
Text

Since folks are trying to paywall written guides, here's all of my written guides, free. (The links aren't all broken this time, yay)
Making a Pose: From Start to Finish
How to make your Pose Packs Easy to Use
How to Make a Deco Sim
Reducing CC File Size
Tips for Posing Expressions
How to make a Toy / Action Figure of your Sim
How I made the Deco Gryphons from 'Gryphon Rider' Pose Pack
How to make a Fun Wall Light using Vector Images
How to Edit Poses to fit Fat Sims
How to make a UI Emotions Pose Override
Non-CC-related
Sims Story / Challenge Planning Document
Sims Story Character Questions
Guide on How to Start and Plan a Sims Story
Guide to GShade
Custom Content Editing: Terms of Use
Side note for those of you learning posing... A lot of posemakers don't allow reuploads with edits, but I do - my Pose Terms of Use ALLOW EDITING AND RE-UPLOADING under the following conditions:
Poses based on mine MUST credit me in the pose pack's in-game description and on the post you share it on, and you must link back to the original pose pack you used as a base.
No paywalls, AdFly, SimsFinds/Simsdom or CurseForge.
206 notes
·
View notes
Text
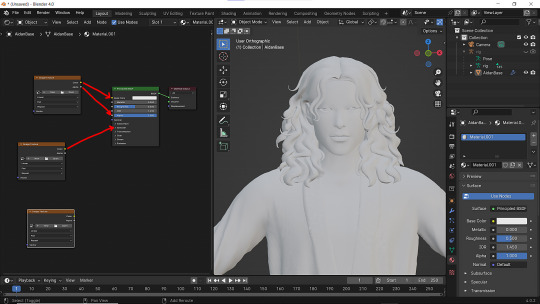
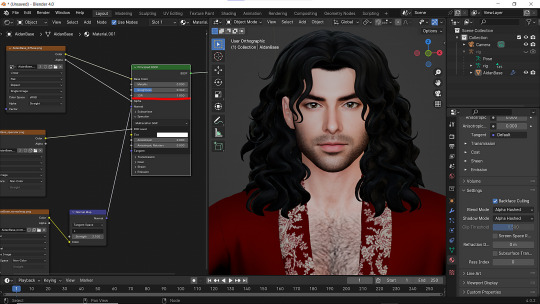
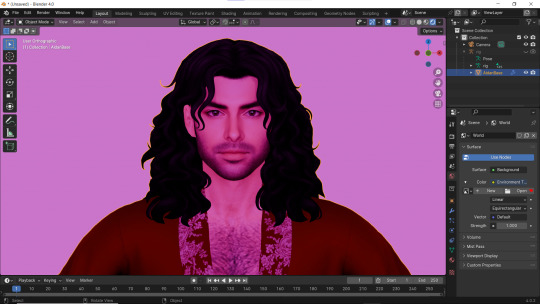
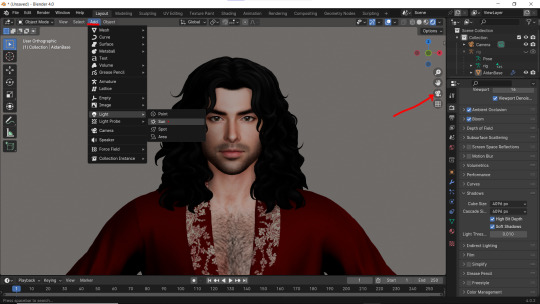
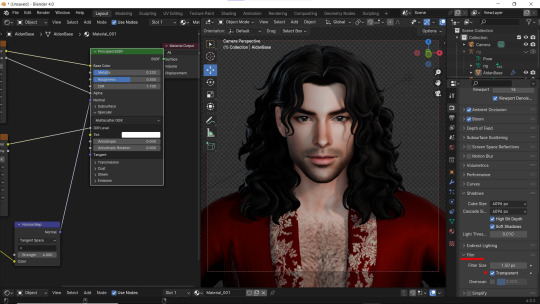
How to apply textures in Blender 4.0 For newbies (´。• ᵕ •。) ♡
So you imported your lovely doll into Blender 4.0, but the textures are messed or missing, here's how to apply base simple textures from the scratch!
I'm using Blender 4.0.2 (Sorry 4.3, but your EEVEE is currently nothing but tears for me) and my lovely Aidan is here to assist me. SO! Seat your bum comfortable and let's begin!
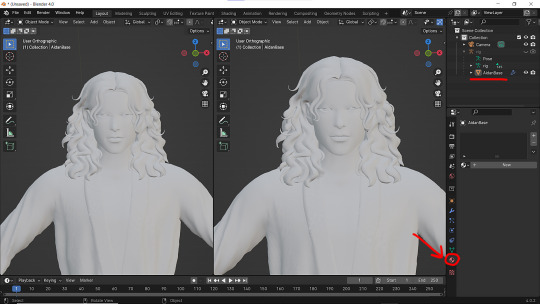
1 - Split your working space by pulling the corner of the screen:
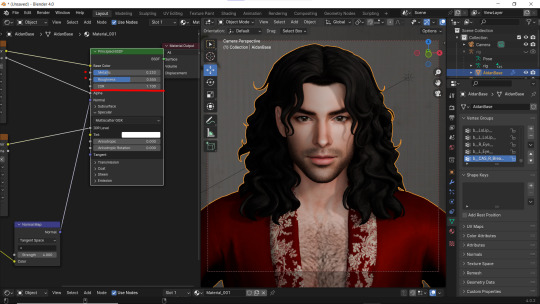
2 - Then click on Material with your mesh selected.
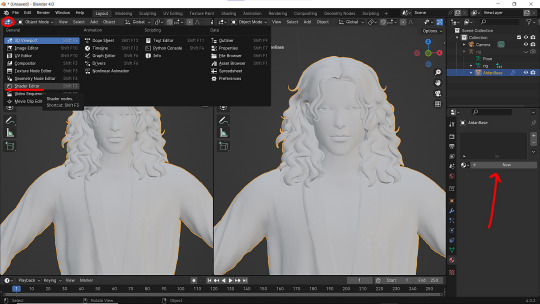
3 - Pick Shader Editor on the left part of the screen and hit New in the Material on the right. You'll get something like this:
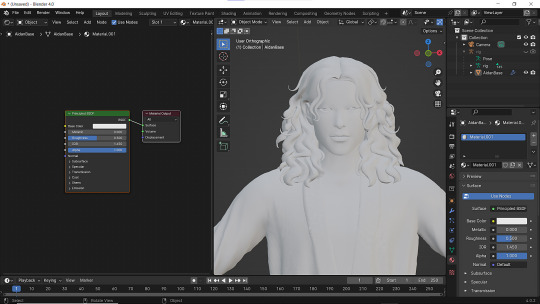

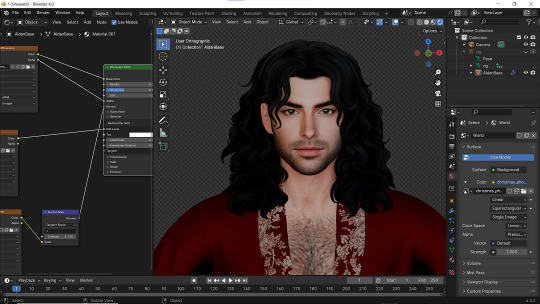
4 - On the left choose Add - Texture - Image Texture. We need three of them at very least :D
5 - First Image texture: Connect Color to the Base Color and Alpha to Alpha. Second Image texture connect to Specular IOR Level. Don't forget to upload your textures! Color - is well... color pics. Specular looks like Black/White pics and Normal is purple!
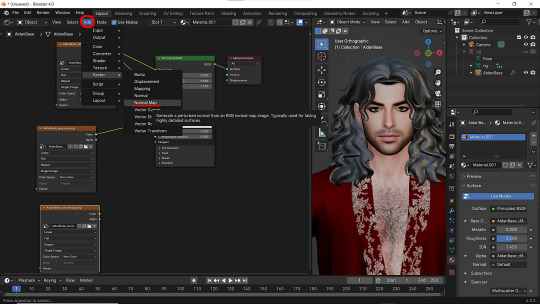
6 - Now add Normal Map. And connect it like on the picture below:
7 - Specular and Normal maps should be NON - COLOR in the Image Texture - Color Space
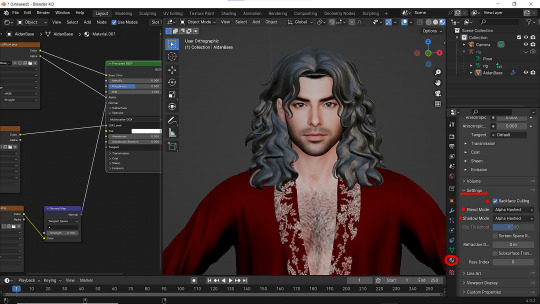
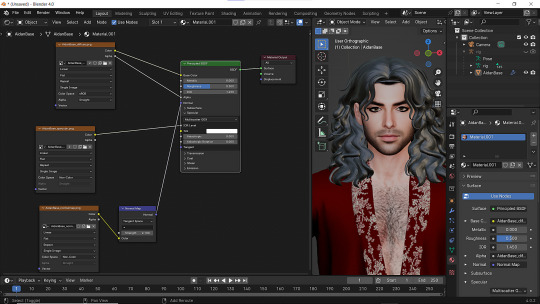
8 - Turn on the alpha. In Material - Settings - Blend Mode/Shadow Mode change on Alpha Hashed + You can check Backface Culling. In some cases it's vital :D
9 - Change the Specular settings in case of weird shining by changing IOR and Roughness parameters.
10 - You did it! (ノ◕ヮ◕)ノ:・゚✧
#WistfulTutorialSims4#the sims 4 blender#sims 4 blender render#blender 4.0#blender eevee#sims 4 tutorials#blender tutorial#sims 4 blender render tutorial#blender render
289 notes
·
View notes
Text
youtube
Composition and Screenshot Tricks Edutainment Workshop 📸
This is a video I wanted to put together to show off some helpful easy compositional tips to keep in the back of your mind as you screenshot as well as show off some fun tricks and resources I’ve found over the years.
I hope you find it entertaining and helpful! ✨💗
210 notes
·
View notes
Text

Straightening Labels for Recolors: A Tutorial
I made a tutorial with plenty of pictures to show how I get perfectly straight labels to apply to my retextures. PDF file; French version coming soon! Link under the cut.
Here!
#sims 4 custom content#sims 4 cc#ts4 cc#s4cc#ts4cc#sims custom content#custom content#sims 4 horses#mycc#ts4 horses#sims 4 resources#ts4 resources#sims 4 tutorial#ts4 tutorial#sims 4 tutorials
19 notes
·
View notes
Text
SIMS 4 - CHANGING INFORMATION IN SIMS 4 STUDIO FOR MULTIPLE SWATCHES SIMPLIFIED
This tutorial can also be viewed on GOOGLE DOCS.
WHY I MADE THIS TUTORIAL
The purpose of this tutorial is to help creators and simmers alike simplify and speed up how to change information in the Warehouse tab in Sims 4 Studio for multiple swatches, especially if you have more than one section that needs adjusting.
So, let’s say you’ve created an entire package with 15 swatches and have saved your package. Then you realize, OMG I forgot to change something in Warehouse mode and now have to go in and change each swatch separately. (cue dramatic music)
I don’t recommend this for only a few swatches, though, because, while helpful, this is not a one shot process, but it will save time for those packages with several swatches that require fixing/changing in the Warehouse tab.
For the purposes of this tutorial, I am using the example of changing the Composition Method in a lipstick with 31 swatches from 4 to 0. It is entirely possible to make multiple changes using this process. Literally anything in the Warehouse tab that you need to change and have applied to multiple swatches can be done.
Note: Sims 4 Studio already allows for changing information in the Studio tab on multiple swatches. This is only helpful for Warehouse mode.
I have also used this method to change the diffuse ratio on a set of walls that were supposed to be three panels wide for a wallpaper mural, and forgot until after all of my swatches were in and the package was saved. This would normally have to be done 3 times for every swatch, so the work is tripled! Multiply that by 20 swatches and you can see it’s just too much. I could have started over with a new package, but then I would have to change the catalog name, price, any categories like color and whether it’s paint or wallpaper, ambience effects, if it reduces bills, bring in all the diffuse (texture) files (there’s a trick for bringing in new diffuse files as well, all in one shot btw), and possibly more! With makeup and clothes, or buy mode objects, there are even more categories to be sure match your project.
To simplify, you’ll be saving your color palette, exporting your texture files, changing whatever is necessary in the Warehouse tab, and re-importing your textures. There are a few more steps involved, but everything is explained here in detail with pictures.
Rest assured, it takes a while to read this tutorial, but once you do it a few times, you will complete the entire process very quickly!
----------------------------------------------------
You can view the entire tutorial on Patreon, Google Docs, or the Sims 4 Studio website in the tutorials section. It is currently still in the Creator Help section on S4S, but will be moved shortly.
6 notes
·
View notes
Text
Инструмент "Цветовая палитра" и работа со цветовыми палитрами в Sims 4 Studio (Sims 4)
Привет всем) В этом уроке я вам расскажу, как работать со цветовыми палитрами в Sims 4 Studio (на примере версии 3.2.0.3). Этот инструмент называется "Цветовая палитра" и предназначен для управления цветовыми палитрами и необходима для облегчения процесса назначения перекрасок. Особенно важно это для создания тех вещей, которые по вашей задумке должны иметь одинаковые цвета (например, когда вы создаёте отдельные части форменного костюма: отдельно пиджак с рубашкой и отдельно брюки или юбка).
Вызвать эту утилиту можно через меню "Инструменты" (Tools)>"Цветовая палитра" (Color Palette)

А теперь я опишу интерфейс этого инструмента: а) Справа расположен список всех созданных вами палитр. Вы можете добавить новую палитру с помощью кнопки "Добавить" (Add), продублировать имеющуюся с помощью кнопки "Дубликат" (Duplicate) или удалить ненужную с помощью кнопки "Удалить" (Delete).

б) В по��е "Имя" (Name) вы можете указать название вашей палитры, в поле "Имя разработчика" (Creator Name) - ваше имя, а в поле "Описание" (Description) - описание вашей палитры (хотя это не так важно).

в) Чуть ниже полей "Имя", "Имя разработчика" и "Описание" расположен список перекрасок. Вы можете добавлять перекраски (кнопка "Добавить перекраску" (Add Swatch)) или удалять ненужные (кнопка "Удалить перекраску" (Remove Swatch)), а также импортировать палитру (кнопка "Импортировать палитру" (Import Palette)) из любого файла package или добавлять её в свой (кнопка "Применить набор палитры к файлу package" (Apply Palette to Package))".

Если после добавления палитры у вас вылезет вот такое окошко:

то, это означает, что у перекрашиваемого вами предмета есть перекраски, не являющиеся частью применяемой цветовой палитры. Если нажать "Да" (Yes), то они останутся. А если нажать "Нет" (No), то применяемые перекраски вытеснят уже имеющиеся. Пример работы показан в с��едующем видео:
youtube
г) Ещё ниже расположен редактор перекрасок, в котором вы можете назначить до трёх цветов на перекраску, поле "Название перекраски" (Swatch Name), где вы можете назначить название перекраске, и раздел "Теги" (Tags), который почему-то нерабочий.

Подводя итоги, я скажу, что инструмент "Цветовая палитра" - вещь полезная и удобная, особенно если вы делаете вещи в одном и том же стиле. Нет никакой необходимости вручную переносить каждую отдельную перекраску с одного предмета на другой.
На этом у нас всё! Надеюсь, этот урок вам помог. Ставьте лайк! Делитесь с друзьями, чтобы они тоже знали, как работать с перекрасками! Комментируйте! Подписывайтесь! Всем пока и мирного вам неба над головой!
#sims#simblr#sims 4#ts4 simblr#the sims 4#sims 4 урок#ts4#симс 4 уроки#sims 4 уроки#sims 4 tutorial#sims 4 tutorials#симс#симс 4#Youtube
0 notes
Text
It's mid-2025, and many sims 4 creators still struggling to make quality paintings and wall art. This tutorial will teach you EVERYTHING you need to know, including some basics about CC in general.
Please check it out and reblog if you find it helpful! 💜

📗 The Sims 4 Flawless Posters Tutorial | Beginner Friendly
READ ON PATREON (FREE)
This is basically a comprehensive tutorial on making flawless posters. I know a lot of simmers start their modding journey with custom paintings and it can feel a bit overwhelming at first.
But don't worry, I'm here to make everything crystal clear and show you just how easy it really is. With just a little guidance, anyone can create amazing CC right from the start! So, if you’ve always wanted to make posters for The Sims 4 but didn't know how, this is your chance! 😊
I would love to hear your feedback on this tutorial! And feel free to share it with other simmers to help them create perfect posters as well!
#sims 4#sims 4 mods#sims 4 cc#ts4 cc#sims 4 wall art#sims 4 wall decor#sims 4 aesthetic#sims 4 interior decor#sims 4 custom content#sims 4 creator#sims 4 decor#the sims 4#ts4#ts4cc#sims 4 download#sims 4 cute#ts4 deco cc#ts4 decor#simblr#sims 4 tutorial#ts4 tutorial#sims 4 how to make posters#sims 4 poster tutorial#sims 4 painting tutorial#cc tutorial#making posters is easy lol (it really is!)#sims 4 tutorials#ts4 tutorials#the sims 4 tutorials#sims 4 how to make paintings
78 notes
·
View notes
Text
Since the new eyelash update is here, I'm gonna teach you how to convert old eyelash cc into the new eyelash option!
First of all, we will need the Sims 4 Studio. The download link can be found here: https://sims4studio.com/board/6/download-sims-studio-open-version
Now, head into the app and click the "My Projects" button on the main menu.

Open the eyelash file (.package file) you want to convert. I'll just pick a random one for reference. Once you picked the one you want, hit open.
You will be directed into the studio, which will look like this:

Now on the right side of the screen, find the CATEGORIES button and click on it.

Once there, change the OUTFIT TYPE to MASK DETAIL EYELASHES and APPLY TO ALL SWATCHES. Save the file, and the .package file will be updated in your game. Also, make sure to double check in-game before continuing with your other custom content.

As you can see in my game, It worked! Hopefully it works for all of you, too.

And that's about it. Thanks for reading all the way.
And by the way, If you're going to distribute these publicly without the original creators consent, just don't do it. This is meant for private use only or for content creators who want to convert their eyelashes into the new eyelash section.
EDIT: As trillyke has said, This does not work with eyelashes in the glasses section as they will collide with rings and most of the accessories
#sims-4-custom-content#ts4#thesims4#customcontent#ts4cc#the sims 4 cc#the sims 4 custom content#tutorial#the sims 4#the sims community#the sims cc#sims#sims 4#simblr
4K notes
·
View notes
Text

IF YOU CAN'T ENABLE CC 🌸
Sul sul ^^
After today updates, I wasn't able to enable CC again. It doesn't matter how many times I closed and launched the game.
So I remembered that this had already happened to me before.
If you're going through the same problem, this is how you can fix it:
🌸🌸🌸🌸🌸🌸🌸🌸
HOW TO ENABLE CC AGAIN:
1- On the game home page, in the bottom right corner of the screen, you can see what the current game version is. After today's update, mine was: 1.108.318.1020. Launch the game and check the number that appears for you.
2- In your game folder (Documents>Electronic Arts> The Sims 4) you'll find a file called "GameVersion". There will be a number.
The number in that file has to match the current game version number.
When I opened mine, it was "1.107.151.1020". So I just updated it to "1.108.318.1020" and saved. Then when I launched the game I could enable CC again.
Note 1: There's a "space" before the number in "GameVersion" (as if it were a paragraph). Keep that space. Change the numbers exactly where they are.
Note 2: If you prefer, before changing the number, make a backup copy of "GameVersion" just in case. It won't harm your game, but it's better, just to prevent and make it safer.
💎 If you want a tutorial video, I made one about it some time ago. You can watch it here :)
🌸🌸🌸🌸🌸🌸🌸🌸
ALSO IMPORTANT AFTER UPDATES:
Remember to delete "localthumbcache". You can find the tutorial here.
🌸🌸🌸🌸🌸🌸🌸🌸
I'm currently checking my CC to see if they're still working.
If anything, I'll let you know :)
I hope it helps you if you're having any problems :)
Happy Simming ^^
3K notes
·
View notes
Text

hey guy's i made a quick and easy tutorial on youtube about how you can frame your sims screenshots with any cc frame you want, you don't need photoshop or any other of these overwhelmimg programs and you also don't need any kind of photo editing skills! you can find the video here. i hope it's helping some of you. love, jodie ♡
#tuts*#sims 4 mods#sims 4 cc#sims 4 simblr#sims 4 custom content#the sims 4#the sims#the sims community#sims 4 tutorial#the sims 4 custom content#sims 4 maxis match#sims custom content#sims 4#ts4 simblr#sims community#ts4
443 notes
·
View notes
Text
downloading a bunch of files from sfs folder a bit more comfortably (on PC)
you know this feeling when you see a sfs folder with many separate files and no full set archive, so you just sigh, click on a file, download it, go back, repeat with the next one, go back, try to recall which one you already downloaded and which you didn't... so i've come up with a little workaround that'll make it faster and a bit more comfortable! it's pretty 101, but my friend found my explanation useful, so maybe someone else needs it too.
there's this thing about SFS, that if you open the same page again in a certain period of time, i think it's a day or maybe a few hours, it won't open the page again, but instead it'll just automatically download its file. that's exactly the thing we'll be utilizing here. when you left click on a link with pressed ctrl, this link will be open in another (inactive) tab. so to "automatically" download files from this folder, just hold ctlr and click on each file you need twice.

on the first click, it'll open the inactive tab with it, on the second click, it'll just straight up download the file without you having to go away from the page you're on. when you're done downloading everything you need, just close all tabs it opened. not ideal, yes, but much faster and less annoying than having to manually open each page and click on the button. happy simming!
1K notes
·
View notes
Text
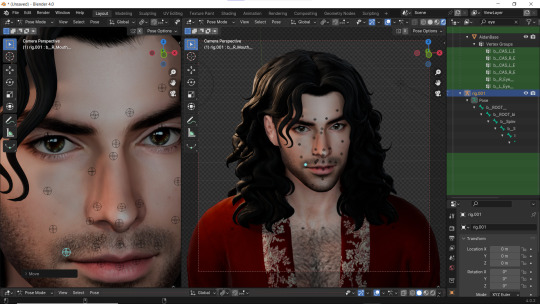
How I do my lighting in EEVEE for Blender 4.0 (´。• ᵕ •。) ♡
Are you running your Blender on a toaster? Don't wanna spend much time on rendering in Cycles? Here's some EEVEE tips for you!
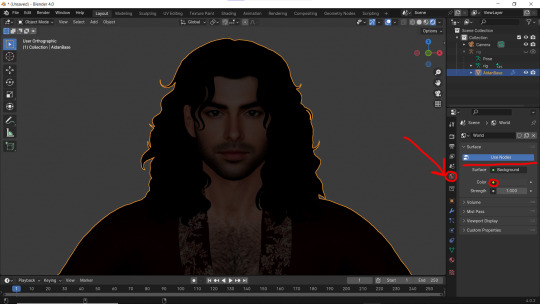
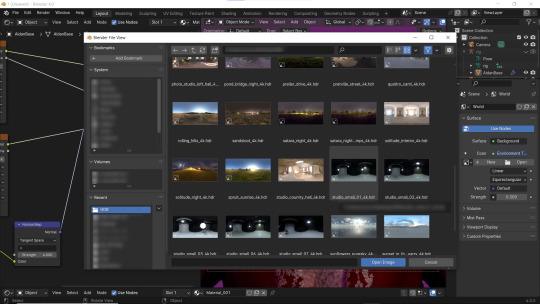
1 - Let's put some HDR lighting on! Go to the Worlds, choose Use Notes and hit that little yellow dot next to the Color.
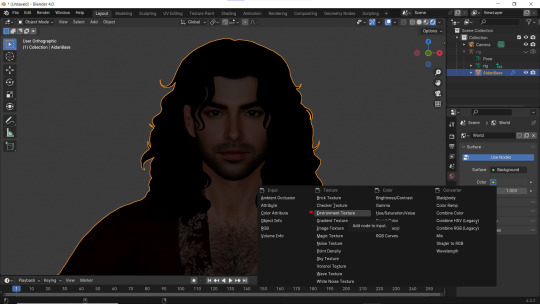
2 - Pick 'Environment Textures'
3 - You'll see everything in purple. But worry not! It's just bc you haven't applied any textures yet! Just go on and hit Open.
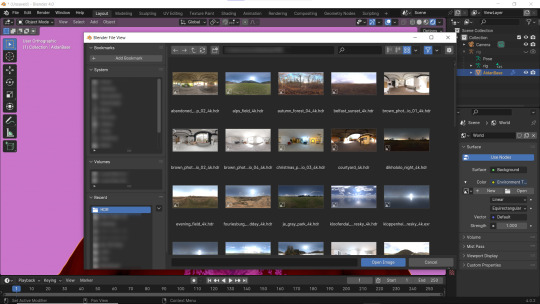
4 - You can find plenty of free, high resolution HDRI textures on Poly Haven. I have almost all of them! Go get some for yourself too and navigate to their location. Pick any you like!
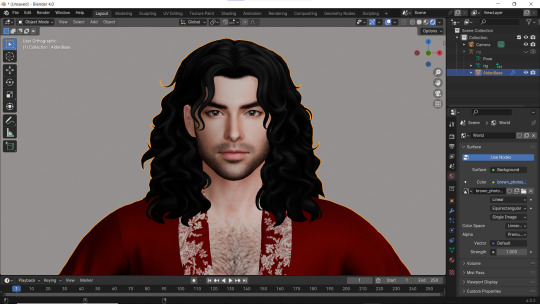
Well... It doesn't look good yet :D
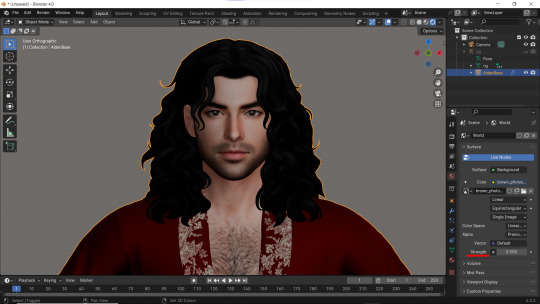
5 - Lower the Strength of the light.

6 - Now. Let's go to the Render Properties and check Ambient Occlusion and Bloom (you can play with it's parameters and see which fits you better). THEN... Go to Shadows and increase the resolution to the max. High Bit Depth and Soft Shadows must be checked too!
7 - Let's Add our very first light (The Sun)! And go to the Camera Mode.

8 - In the Sun Shadow settings: Soften the light by increasing the Angle; Lower Bias to the max.
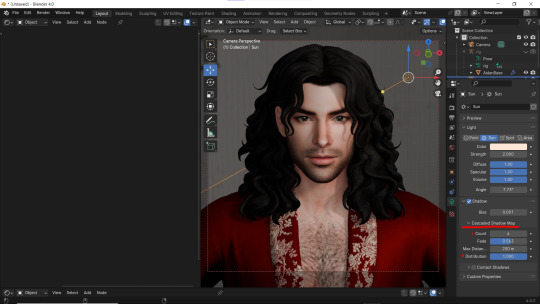
9 - Change the parameters of Cascade Shadow Map the way it looks better for you.
10 - Also don't forget to fix the specular appearance of your model ;3
Now. I don't hate it. But I don't like it much either... So I played and tried several Environment textures for better result.
11 - Looks way better! Now let's go to the Render Properties once again and remove the background in the Film category (in case you don't want one)
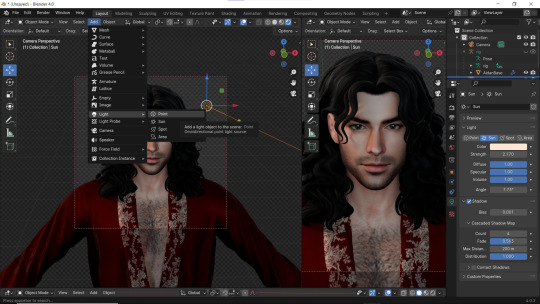
12 - It's time to add another light source!
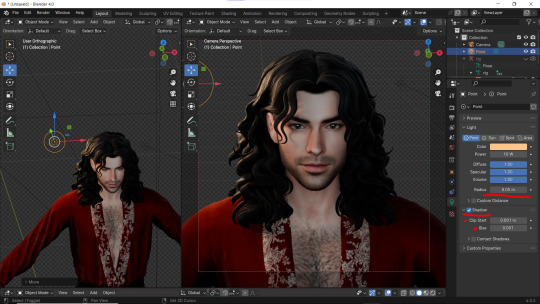
13 - Settings for the new light are quite similar. I made them softer, lowered Bias, changed color, etc.
14 - Preparing for the shoot. ▓▒░(°◡°)░▒▓
15 - You did it! (ノ◕ヮ◕)ノ:・゚✧
#WistfulTutorialSims4#the sims 4 blender#sims 4 blender render#blender 4.0#blender eevee#sims 4 tutorials#blender tutorial#sims 4 blender render tutorial#blender render#blender eevee lighting#blender environment textures#sims 4 blender#blender render eevee#blender light#blender light eevee#eevee#blender#simblr#the sims 4#my sims
157 notes
·
View notes
Text
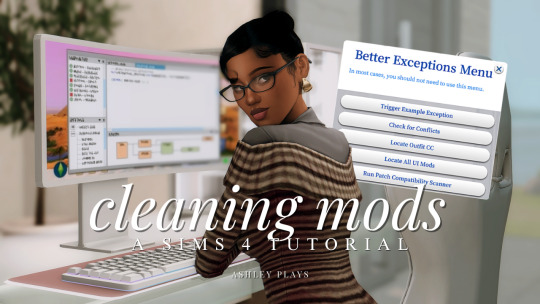
how to clean & organize your mods folder + update broken/outdated mods by ashley plays
this video goes over the following:
how to organize your mods folder
how to update your mods folder after a patch update
how to find broken/outdated mods
how to clean out custom content & find duplicate files
↓ mods, programs & helpful websites mentioned below
mods:
better exceptions
mc command center
programs:
sims 4 tray importer
sims 4 mod manager
helpful websites:
sims 4 news & updates
scarlet's realm: the mod list
bienchen's mods
littlemssam's mods
kiarasims4mods's spreadsheet
mizoreyukii's spreadsheet
2K notes
·
View notes
Text

Quick Guide: Stay Safe While Downloading Sims 4 CC & Mods
I just published a quick guide to help you download Sims 4 CC & mods safely. ⚠️ From trusted sources to spotting red flags. Keep your game clean and secure! 😊
Read it now
#avoid malware in sims 4 mods#how to avoid malware sims 4 mods#how to download mods safely sims 4#patreon sims 4 cc download#safe sims 4 cc creators#safe sims 4 download sites#sims 4 cc best practices#sims 4 cc community guide#sims 4 cc download checklist#sims 4 cc education#sims 4 cc folder structure#sims 4 cc mod manager#sims 4 cc mod security tips#sims 4 cc mods support guide#sims 4 cc protection#sims 4 cc safe download#sims 4 cc safe hosting platforms#sims 4 cc safety guide#sims 4 cc safety tutorial#sims 4 cc virus warning#sims 4 cc zip file tips#sims 4 custom content security#sims 4 custom content tips#sims 4 mod folder organization#sims 4 mod malware prevention#sims 4 mod safety#sims 4 mod safety checklist#sims 4 modding guide#sims 4 mods antivirus#sims 4 script mod warning
277 notes
·
View notes
Text
TUTORIAL
How to FIX CUSTOM EYELASHES after update 1.108.349.1020 The Sims 4
YOU NEED:
Sims 4 Studio @sims4studioofficial
Blender (I use Blender 2.79)
Instruction manual:
Opening the eyelashes that need to be repaired in Sims 4 Studio

2. Go to the "Categories" section - Item "Outfit Type" - "Eyelashes"

3. Click "Apply to All Swatches" - Click "Yes"

4. Now we need to assign the correct color to the Vertex in Blender. Go to the "Mesh" category and export the eyelash mesh

5. Open the Mesh in Blender and switch to the "Vertex Paint" mode

6. Select the display mode "Wireframe" or press the "Z" key

7. If the eyelashes are broken, they will have the wrong color. Now we need to assign the correct color

8. Click on the palette icon

9. Go to the HEX item and enter the color code. Color Number: 007F3F

10. After you entered the color code. Click "Paint" - "Set Vertex Color"

11. After that, the color of the eyelashes will change. Save the file and close the Blender

12. Go back to SIms 4 Studio and import the mesh

13. Saving the package file

14. Checking the result in the game
718 notes
·
View notes
Text
Мой способ чистки кэша Sims 4/My method for clearing the Sims 4 cache
Со временем кэш Sims 4 переполняется, что может вызвать падение производительности и прочие глюки в Sims 4. В этом видео будет показан мой способ чистки кэша. Надеюсь, что мой способ вам помог.
Over time, the Sims 4 cache will fill up, which can cause performance drops and other glitches in The Sims 4. This video will show my method of clearing the cache. I hope my method helped you.
youtube
#sims#simblr#sims 4#ts4 simblr#the sims 4#sims 4 урок#ts4#симс 4 уроки#sims 4 уроки#sims 4 tutorial#sims 4 tutorials#симс#симс 4#Youtube
1 note
·
View note