#tutorial video
Explore tagged Tumblr posts
Visit Tumblr Blog
Explore Tumblr blogs with no restrictions, modern design and the best experience.
Last Seen Tumblr Blogs


Fun Fact
BuzzFeed published a report claiming that Tumblr was utilized as a distribution channel for Russian agents to influence American voting habits during the 2016 presidential election in Feb 2018.
Text
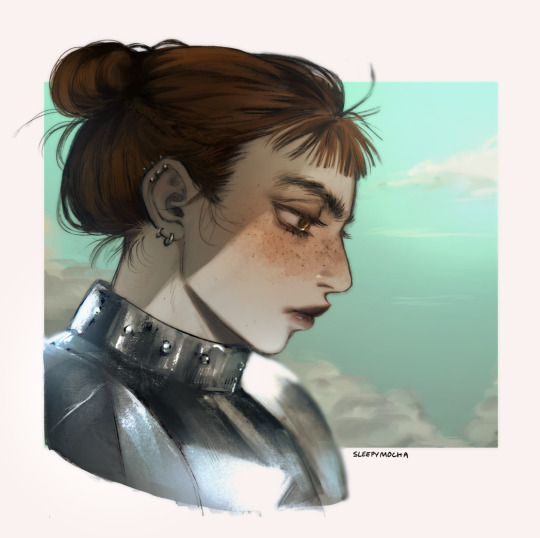
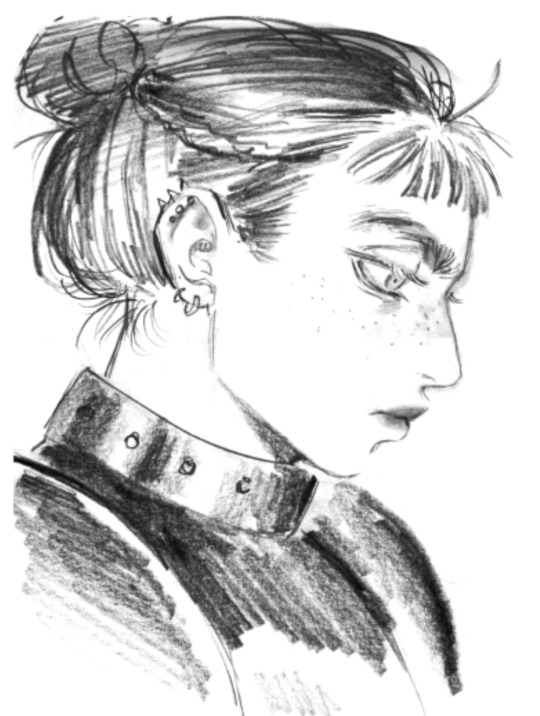
Posted the tutorial for this piece early on p4tr30n!!! 🧡 You can watch it now there, or wait til Christmas Day to see it on youtube for free!
I talked about how I colored and rendered this sketch from my october sketchbook pdf :3
#my art#knight#lady knight#knight lady#how to paint#how to render#tutorial#tutorials#how to color#tutorial video
258 notes
·
View notes
Text
youtube
Lucy Bellwood walks you through how to think like an artist when writing for comics. A must-watch if you're struggling with fitting action and emotion into a tight script or looking to work with an artist for the first time
#lucy bellwood#how to make comics#writing for comics#studio members#tutorial video#making comics#video#think like an artist#Youtube
195 notes
·
View notes
Text
Tutorial on How to Use Banner/Icon Masks
req by MANY PEOPLE- I'm so sorry for keeping you guys waiting for a tutorial that I should've posted ages ago🫠
---------------------------------------
NOTE:
the wm is there for anyone that wishes to post my tutorial on other platforms without mentioning me at all. Tbh I'm not that crazy about creds normally, it's just annoying how some people will go to such lengths just not to give creds where it's due... At least don't claim it's yours pls😭
#rentry#rentry mask#discord banner#tumblr banner#discord headers#headers#icon mask#icons#discord icons#tumblr headers#tutorial#tutorial video
304 notes
·
View notes
Text

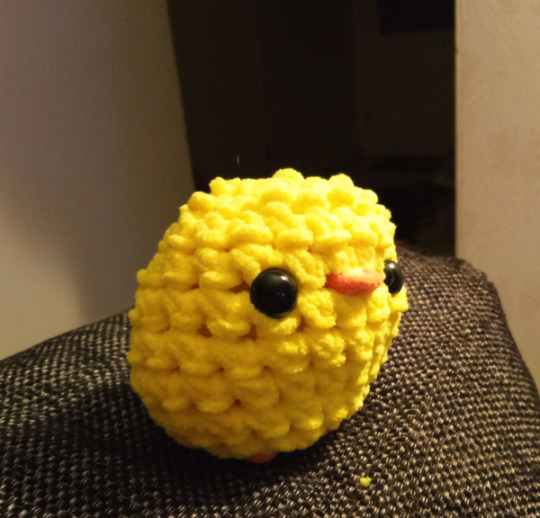

Behold! My very first crochet chic! Thank God for tutorial video! :D
But even with the video (which said this can be done in 15min), I struggled an hour or so. First 15 minutes ALONE went on me trying to get that "magic loop" right and the first and second round since there ALWAYS were too many big holes etc. issues.
Another issue is that my hook was too big. Should had been 5mm but I bought 8mm... :'D So my chick has more holes and is bigger in size than the original in tutorial video.
youtube
#Crochet#craft#chick#youtube#tutorial video#neis photo#photo#Nei crochets#My chick could take part in NAILED IT! show :'D#It's not worst tho! I really like it!#but it could had been better with right sized hook#virkkaus#Youtube
145 notes
·
View notes
Text
I MADE AN ALIGHT MOTION TUT!
super basic, but just to help people get started :p
youtube
TRANSCRIPT BELOW (is it called a transcript?)
so i use alight motion for most of my tweening and such and ill try to share what very little stuff i know for my sillies. im not good at explaning so err yay. this is on alight motion mobile!!!
i begin with drawing a sketch of whatever im gonna tween. the sketch is normal and not cut into pieces yet.
afterwards, when im outlining i draw all the body parts on different layers, so separating the body parts. a tip for doing any head movements is giving the neck a bit more height
do this, dont do this
when doing arms i tend to leave some parts open because itll appear as one when im tweening it later
if you have a part of the body you know will be moving more drastically than the others you should close it off/ like turn it into a nub so its less awkward to tween later
after thats done, colour it. first time tweeners should avoid going in with shading or whatever because it makes it harder to connect those lines lol (it might be easy for you tho i just found it hard. give it a go if u want)
afterwards i save all the layers as transparent.
now we are on alight motion. click the cross at the bottom of the screen. if you have certain ratios feel free to enter them by clicking the pen. mine was a preset ratio by ibis (4:3) so i wont be changing mine.
to input photos or videos, click media. click on your media and press the plus button on the upper right hand corner
some basics— click the bottom buttons to cut off or divide.
long press the arrows on the side and slide it left to shorten the clip and right to make it longer.
click your layer, then this button to duplicate the currently selected layer. long press it to move the entire layer.
to reorder layers , hold the three lines and move it up or down.
to input audio, select a video from media and click on the layer. find the button ‘extract audio.’ after that, a layer should appear which is the audio layer. delete the video layer if you have no use for it now.
ok now how to tween.
begin by putting in all your layers. you can reorder them once everything is in. it also helps to name everything, because it does get confusing when youve got lots of parts. click the layer and at the top right of your screen click (unnamed layer) and name it. i dont do this often because i cant be bothered but its helpful.
now im reordering it.
afterwards it is time to place pivot points. pivot points means where the thingy will be rotating around. or something. It makes tweening much more easier and is why i prefer alight motion to capcut in this aspect.
heres without pivot point placing. the pivot point is always auto set in the center.
and heres with. i have placed the pivot point at where the body parts would join.
to place a pivot point, click on your layer and on the right side buttons click ‘move and transform’.
tap the first button out of the four that pop up. these four buttons control your movement, rotation, size and angle (in tha order). after clicking the first button, two blue coordinates should appear. these are the coordinates of your pivot point. glide your finger around the square to move the dot towards where you want ur pivot point. pivot pointe are typically at where the body parts would join (if ur tweening a person)
now for parenting layers. click on your layer, and on the top right hand side click the button next to the trash bin. parenting layers basically means we are connecting two layers together. if we have two layers here, and connect layer two to layer one, two will move whenever one does, but one will not move when two does.
ok so again, click your layer. click the button next to the trash bin. select the other layer which will become your parent layer.
now for keyframes. if youve used capcut this should be relatively familiar.
we begin with clicking the layer, then move and transform button. click on whichever of the four youd like to keyframe. i will click rotation. on the left side, beneath the undo and redo button should appear the keyframe symbol. place it wherever you want on your layer. there needs to be at least two keyframes to allow for movement. one of the keyframes should be the original placement, while the other has been altered.
after the two keyframes have been placed, beneath the keyframe symbol is now graphs. this dictates the easing of your animation. like how fast the animation goes from position one to position two.
you can also make bounces/loops with this, and it’s typically how i do headbopping. glide the yellow button to decide the speed of the bopping/movement.
if youd like to copy and paste a graph to a different layer, click on the three buttons at the bottom left. and click copy. go on your other layer, click the graphs button, the three buttons again then paste.
after all of your tweening is done, you can (if u want to) group it together. this way, if youre looking to move this thing around its much more easier to. long press over here until it lights up, and select the layers youd like to group together. once that is all done, you can move it around.
if u wanna use effects like bounce to make your silly thing go crazy, click effects. im not gonna go through them all because i honestly dont know what half of these do. click bounce, and scale it however you like. its liteally just keyframing and what we did before.
if you need to edit the grouped together layers, click on the layer and then u can edit it.
ok thank u for watching follow my socials i post there everyday. yay.
#eure-k-a#alight motion#tweening#oc animation#tutorial video#art tips#art resources#art tutorial#alight motion animation#alight motion tutorial#artists on tumblr#Youtube
11 notes
·
View notes
Text
since i got tired of synchronising subtitles manually, here cometh an explanation of an art project i am currently making with automatically synchronised subs
contains my accent, a bit of spite, and a fleeting Keanu Reeves
youtube
static pic kinda shows how out of control the current prank is

17 notes
·
View notes
Text
Crochet Accounts I Really Like (Youtube)
The Woobles for learning stitches, how to change colors, magic ring, really anything that you might need as a beginner crocheter (and they have a duplicate video of each for lefties!)
Knotting Hook Crochet for beautiful patterned tutorials for bags, appliques, tapestries, granny squares, really anything you might want. This is my personal favorite. I also like The Bumbling Busy Bee for the same reason, this one just doesn't have as many.
TL Yarn Crafts for reviews on yarn, hooks, and methods, inspiration for your next project, tips to crochet better/faster, and even the occasional tutorial!
Will be reblogged with updated as I find more, and feel free to add your own!
#crochet#crochet clothes#crochet bag#crocheting#blanket crochet#granny square#yarn#yarnblr#tutorial#youtube#tutorial video#tips
26 notes
·
View notes
Text
How to integrate using Change of Variables
For the full video with more explanation and examples, also more tutorials on different mathematical subjects, go to my channel at; https://www.youtube.com/@futuremath1
4 notes
·
View notes
Text

Here you go if anyone is wondering :3
#digital art#drawing#art#artists on tumblr#artwork#digital painting#hair#how i draw#how I draw hair#pink#hope this helps#tutorial video
10 notes
·
View notes
Text
youtube
Got an idea for a new low-level questline, featuring an Argonian named "Hides-Things-Away." His deal is that he got tired of just stealing things himself, so now he hides things and sends thieves/adventurers off to retrieve them as a test of their skills. Once you've proven your worth, he may have information about items that other entities have hidden away....
Anyway, I'm going to be recording my making of this questline as a modmaking tutorial series. I know that I've already posted some tutorial videos, but now I have a headset with an actual microphone, and so the audio is waaay better
Anyway, I hope this helps!
2 notes
·
View notes
Text
I've seen this technique called a "Russian join," if anybody wants to look more into it. It really is a great technique.
How I join skeins
47K notes
·
View notes
Text
how to wave magic wand by 街头尬术师【魔法披风】
17K notes
·
View notes
Video
youtube
How I WRITE from START to FINISH
I can’t believe I’ve never made a writing tutorial video before! Welp, I hope you all enjoy this one, and that it gives you plenty of tips and inspiration for your own fictional adventures!
Thanks for watching!
#youtube#youtuber#writing tutorial#writing video#writing#fanfiction#fanfic#original story#original stories#tutorial video#tips and tricks#literature#creative writing#tutorial
0 notes
Text
youtube
#huh I wonder why the band that talks about piracy to combat corporations encroaching on freedom is sharing an#urbex#tutorial video
1 note
·
View note
Text

What I mean by studied for 2 hrs and i'm only 16 mins in 😭and have been taking notes and coding along the whole time. Ill post a snippet of my notes which will be just the top of the page for me setting up anaconda but this is going to be a long journey fs
2 notes
·
View notes
Text
Space Tutorial Video [PATREON]
One of the #1 things I get asked about

#rushed tutorial video#ignore the typos#am in the middle of another project in the works#tutorial video#space tutorial#art tutorial#patreon#karebeast#heavily watermarked cuz i onow one of you fucks are gonna try and nab from me >:[
0 notes