#v select default value
Explore tagged Tumblr posts
Visit Tumblr Blog
Explore Tumblr blogs with no restrictions, modern design and the best experience.
Last Seen Tumblr Blogs


Fun Fact
Tumblr has been banned in Indonesia for providing people with access to pornographic content.
Text
Alright. I'm making this post because I was unpleasantly surprised to find Microsoft had forcibly downloaded an """"ai assistant"""" onto my computer (called Copilot), and because finding a site that actually told me how to kill it for good -- in clear, truly step-by-step terms -- was way harder than it needed to be.
Preface: this is only relevant if you're running Windows 11.
Here is your target:

If you see this logo on your taskbar -- or... have Edge installed on Windows 11 -- you've got Copilot. You can't delete it on its own, Microsoft has integrated it into the OS as best they can. The most you can do is disable it (instructions for which are at the very end of this post).
So... to REALLY get rid of it you need to uninstall Microsoft Edge, because it's a part of/reliant on Edge. A lot of bells and whistles of Windows are also reliant on Edge, like widgets, but I never use those. I use my PC almost exclusively for gaming, and I don't want this slimy "ai" shit on my computer. I use Firefox anyway. Edge can go die as far as I'm concerned.
Here's the actual steps, copy-pasted from a website that took me way too long to find. It also really makes my browser chug for some reason, which is why I'm copy-pasting the whole thing. If you still want to look at the site itself, put it in reader view as fast as you can (link to site).
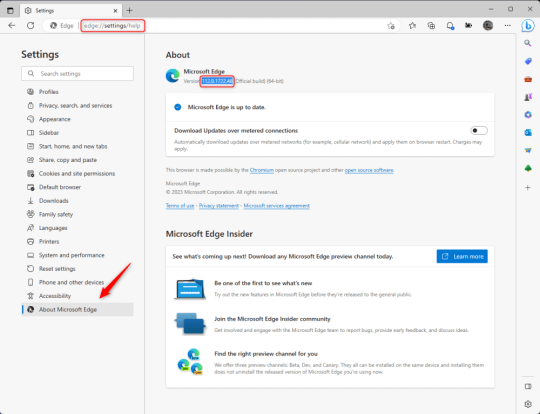
1.) Open Microsoft Edge, type "edge://settings/help" in the address bar, and then press Enter.
2.) Click "About Microsoft Edge" at the bottom of the left-hand pane. Copy the version number at the top of the screen, under Microsoft Edge.
3.) Press Windows Key + S to open Windows Search.
4.) Type "Command Prompt", right-click the result, and then select "Run as Administrator".
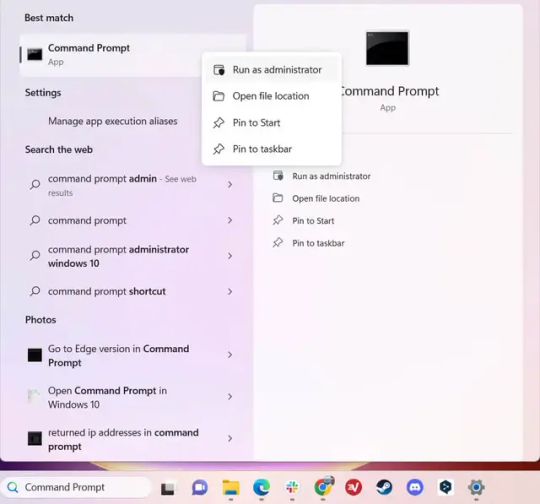
5.) The User Account Control (UAC) prompt will appear. Click "Yes".
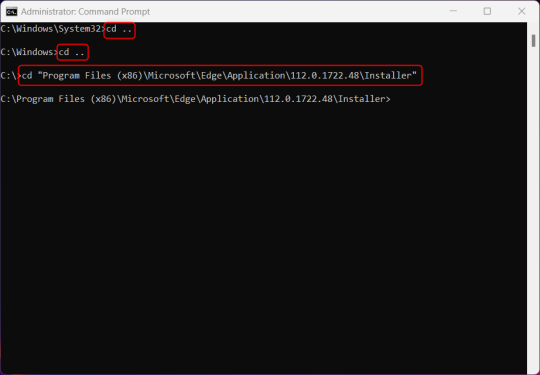
6.) Navigate to Edge’s “Installer” directory by using the cd command. Depending on which directory your Command Prompt opens in by default, you may need to use the "cd .." command to go back a level or two.
Once ready, run this command:
cd “Program Files (x86)\Microsoft\Edge\Application\Version Number\Installer”
Replace "Version Number" with your actual version number copied earlier.
7.) Next, run this command to uninstall Microsoft Edge:
setup –uninstall –force-uninstall –system-level
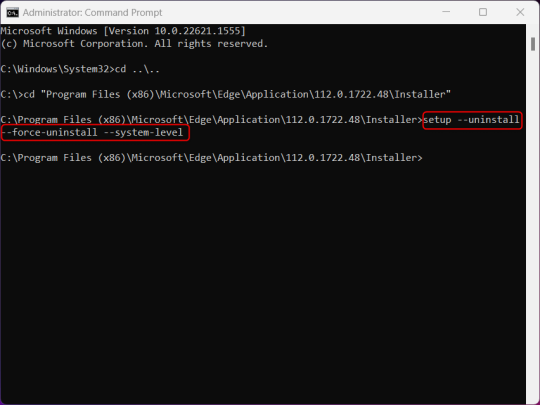
((It will look like nothing happened! Don't worry!))
8.) Restart your PC for the changes to take place.
((HOWEVER, Windows will try to reinstall it the next time your PC updates (or whenever it feels like it lol) so there's a second half to this))
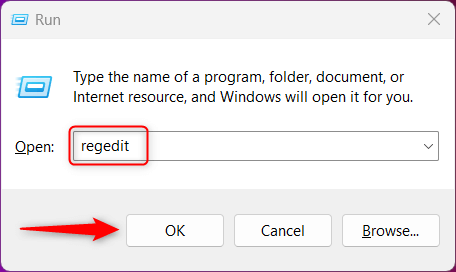
1.) Press Windows Key + R to open Run.
2.) Type "regedit" in the text box and click OK to open the Registry Editor.
3.) The User Account Control (UAC) prompt will appear. Click "Yes".
4.) In the Registry Editor, navigate to HKEY_LOCAL_MACHINES\SOFTWARE\Microsoft.
5.) Right-click the "Microsoft" folder, hover your cursor over "New", and then select "Key".
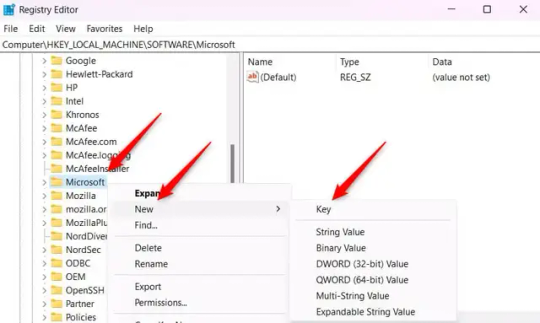
6.) Rename the new Key to "EdgeUpdate".
7.) Right-click EdgeUpdate, hover your cursor over "New", and then select "DWORD (32-bit) Value".

8.) Right-click the new value, which is currently named "New Value #1".
9.) Select "Rename" from the context menu.
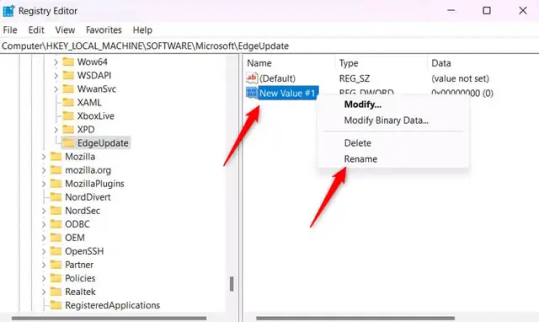
10.) Rename the value to "DoNotUpdateToEdgeWithChromium".
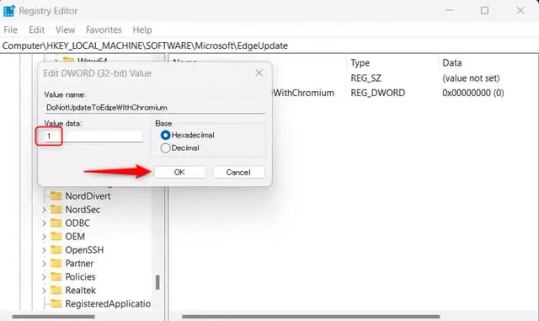
11.) Right-click the newly-named DoNotUpdateToEdgeWithChromium value and select "Modify" from the context menu.
12.) The Edit DWORD (32-bit) Value window will appear. Change the Value data to "1" and then click OK.
((You are now free. If you ever run into a really serious, unavoidable issue with your OS that's clearly a result of Edge being gone, you can redownload it like a regular app. But you should be fine.))
((And, if for some reason you want still want Edge around but just want the copilot thing gone, here's what you do:
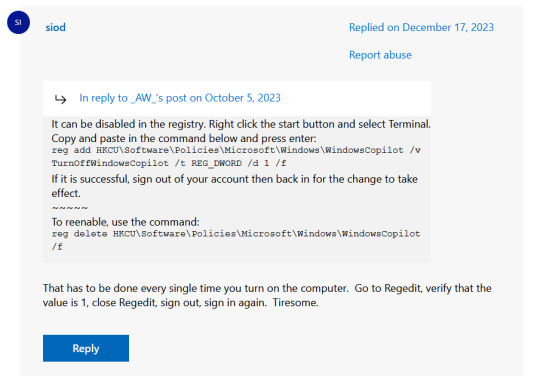
The command, for ease of copy-pasting: reg add HKCU\Software\Policies\Microsoft\Windows\WindowsCopilot /v TurnOffWindowsCopilot /t REG_DWORD /d 1 /f
You can't actually truly delete Copilot (without deleting Edge), only disable it. And as the reply says, you do have to do this every time you turn the computer on. I haven't tested that myself, but I believe it. I assume/hope that excludes just waking the computer up after it goes to sleep, but I don't know for sure.))
120 notes
·
View notes
Text


More Slots on Signs
For those of you with Cats & Dogs, Dine Out, and Business & Hobbies packs, there are signs that you can apply certain decals to. However, I found those slots to be limiting and therefore I looked into and have updated the signs for Dine Out and Business & Hobbies. I will work on the Cats & Dogs Signs in probably a month or so.
THESE ARE NOT DEFAULT OVERRIDES!
Also, because these signs are pack-specific, they do require the associated pack in order to work. If you do not have Dine Out, but do have Business & Hobbies, only download the Business & Hobbies signs and vice versa.
DOWNLOAD for FREE: SFS
OR at Patreon*
*You must be over 18 to access my Patreon page.
As part of this, I am in the process of updating all of my wall decals and neon wall lights so that they can be placed on these signs.
This is also my first time creating gifs, so I apologize if they are very slow to load. However, I felt it was better to use gifs to show you the slots than individual pictures. Thank you to Khlas for helping with this part.
From the Dine Out Pack (GP03):
Download: SI7_MoreSlotSigns_GP03.zip
Unfulfilled Floor Sign
Unfulfilled Wall Sign

Unfulfilled Hanging Sign
From the Business & Hobbies Pack (EP18)
Download: SI7_MoreSlotSigns_EP18.zip
Mild Maxel's Micro Marquee

Mild Maxel's Mini Marquee

Mild Maxel's Swivel Sign

Please let me know if there are any issues. Enjoy!
Creations by SexyIrish7
These cc objects were produced as selective clones using Sims 4 Studio.
Dine Out Signs
Unfulfilled Hanging Wall Sign: Increased from 6 slots to 24 deco slots (12 on each side)
Unfulfilled Wall Sign: Increased from 5 slots to 88 deco slots
Unfulfilled Floor Sign: Increased from 10 slots to 108 deco slots (54 on each side)
Unfulfilled Hanging Wall Sign Polygon Count: 66
Unfulfilled Wall Sign Polygon Count: 80
Unfulfilled Floor Sign Polygon Count: 82
REQUIRES: Game Pack 3: Dine Out
Business & Hobbies Signs
Mild Maxel's Swiveled Sign: Increased from 2 slots to 8 deco slots (4 on each side)
Mild Maxel's Mini Marquee: Increased from 5 slots to 25 deco slots
Mild Maxel's Micro Marquee: Increased from 1 slot to 4 deco slots
Mild Maxel's Swiveled Sign Polygon Count: 138
Mild Maxel's Mini Marquee Sign Polygon Count: 286
Mild Maxel's Micro Marquee Sign Polygon Count: 122
REQUIRES: Expansion Pack 18: Business & Hobbies
All CC have:
*Ability to search catalog using search terms: sexyirish7 and si7
*Customized thumbnail
*******
CREDITS:
Software credits:
Sims 4 Studio v. 3.2.4.3 (Star): https://sims4studio.com
GIMP v. 2.10.34: https://www.gimp.org/
Inkscape v. 1.2: https://inkscape.org/
Thank you to the creators and moderators producing tutorials and answering questions!
Thank you to qolygonal for their helpful tutorial https://sims4studio.com/thread/26149/wall-deco-slot
*******
For decals or other wall objects like wall lights to fit in these slots, go to object catalog on warehouse tab. The SlotTypeSet should have the following value: B102F9605A81DFB7
*******
TOU:
Do not re-upload and claim as your own
Do not re-upload and hide behind a paywall
#ts4cc#the sims 4 cc#the sims 4#sims 4 cc#sims 4#Dine Out#Business & Hobbies#Retail Signs#Signs#sexyirish7#featured
5 notes
·
View notes
Note
Hey I have a question about how you make stuff like this (the photo). I really want to try it but I have no idea where to start. 😅
Thanks in advance!
Hi! I would love to help you! 😊I am gonna go through this from the very beginning, so if you already know some of this stuff feel free to skim around! I thought I'd be thorough in case it helps anyone else too :)
Update!! : After you read this, Part 2 is here!
So first things first, you'll need to be on PC cuz we'll need some mods. Be sure to download all required dependencies and read the main page to make sure they install and work! To start with the basics, the mods I use for photomode capabilities are these ones here:
Photo Mode Unlocked (PMU) This mod adds extra features to photomode and removes a lot of the restrictions.
Appearance Menu Mod (AMM) This lets you do all sorts of things like place decorations, spawn NPCs, change character's outfits, teleport to other locations, and so much more! It's basically crucial for taking photos a wide variety of photos! I will say, a lot of people do their character spawning and posing directly through AMM. Using AMM is a great way to do it and allows for more variety and ease, but unfortunately I frequently get a bug that makes it frustrating so I just don't Lots of tutorials out there on it though, so look around if you'd rather use this method! Personally I use something else which I will describe below!
Nibbles to NPC
This mod allows you replace Nibbles in photomode with an NPC of your choice! This allows you to pose them together with V directly in photomode. You still need to download AMM for this to work!
Again, make sure you've downloaded all the dependencies for these! Under the cut I'll explain how I set up a basic shot. :)
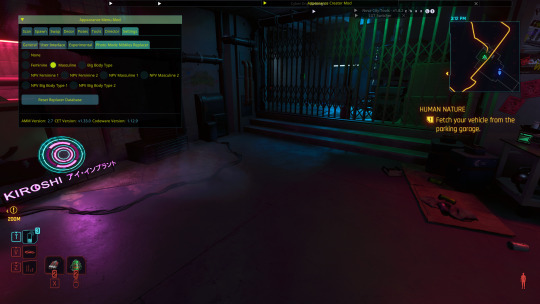
So to start with the basics, once you have everything installed let's pick a spot and set up our Nibbles replacer! So, using the hotkey I set up through Cyber Engine Tweaks (there should be instructions on how to do this on the CET page), I'll open up CET and start messing with the AMM tab. Let's teleport to Vik's clinic! You can go wherever you'd like though. You can save these location presets yourself with AMM or you can download large location packs from Nexus.

So the first thing I'm gonna do is look at Vik, open AMM, and send him to the shadow realm so that we won't risk any clones of him in the background of our shots. Don't worry! If you teleport out of the location and then return he'll come back! You can ignore this step if there are no background characters you care to remove from the scene.
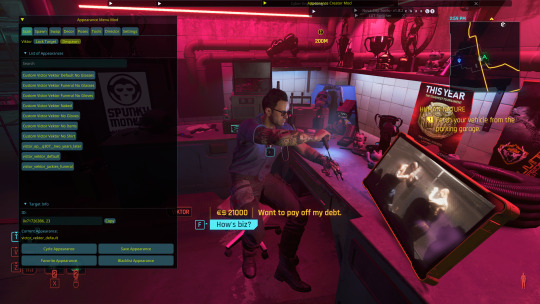
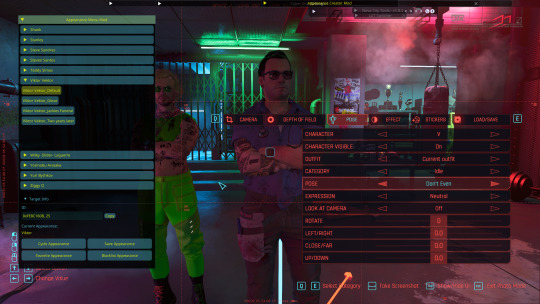
Now, in the AMM window I'm gonna go to the settings tab. If you installed Nibbles Replacer correctly you should have have a sub tab called Nibbles Replacer. Go ahead and click on that then select what category of NPC you want to spawn. Masc is most male NPCs, Fem is most female NPCs, and MBig are the large NPCs like River, Jackie, Ozob, etc. I don't use NPVs (custom characters) so I can't explain that unfortunately. I'll select Masc because that's the section Vik is in, you can choose whatever you'd like! Note: You cannot switch this inside photomode, you have to select the category outside of it.
Next, open up photomode and go to the pose tab and click the arrows on the character section until it says replacer. Turn this to on! You'll see Mr. Hands appear for Masc (or Songbird for Fem). Open AMM and go to the tools tab. Select "target replacer". Now go over to the scan tab and you should have a list of characters with this body type. You can change the character in photomode as much as you like, you just can't, say, switch from fem body type to masc without closing and reopening photomode. I'll scroll down and select Viktor. There's a few outfits to choose from, but I'll select his default outfit without the glove.
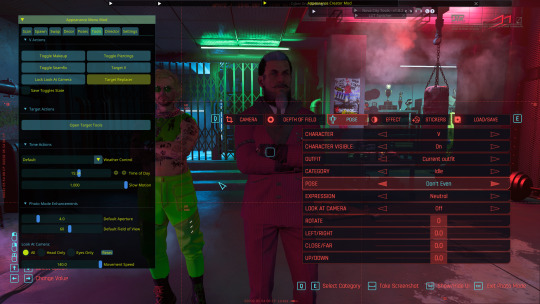
Next, I'll get the two characters aligned by making sure their location values are all set to the same thing (in this case zero). This is crucial for making sure two-person poses are synced correctly. For this I'll be using Rev's bromance pose pack. I'll choose the corresponding A&B poses for them. You can do this by selecting which character you're working with in the photo mode character tag. Now go ahead and choose whatever expressions you want for each of them too!
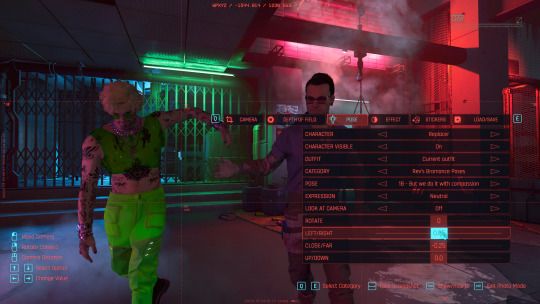
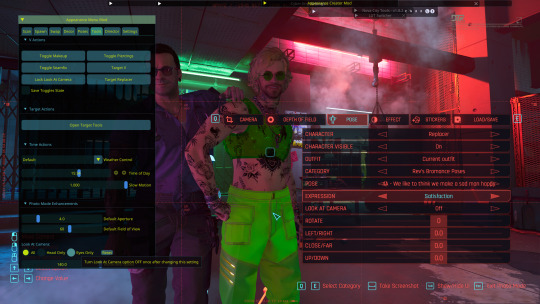
Now I'm going to go back into AMM in the tools tab and hit "target V" then go down to the look at section and select "eyes only". I'll do the same for the replacer. Now I'll close AMM and turn on look at for both characters! This is not mandatory but it really helps characters not have a lifeless stare.
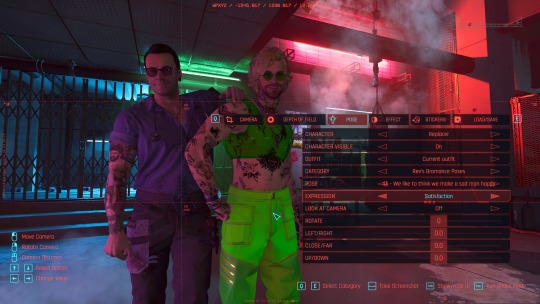
Now we have the basics of our scene all set up! It looks a little something like this!

It's totally fair and valid to stop here if you'd like, but I personally use some additional mods to add in artificial lighting, get a better FOV, and so on! I'll explain that in another post (and tag you so you can see it!) since I've almost hit the image limit 😅 Here's how it could look with said additional mods and tweaks, as a little preview:

5 notes
·
View notes
Text
Making my Game using a Tutorial Part 3
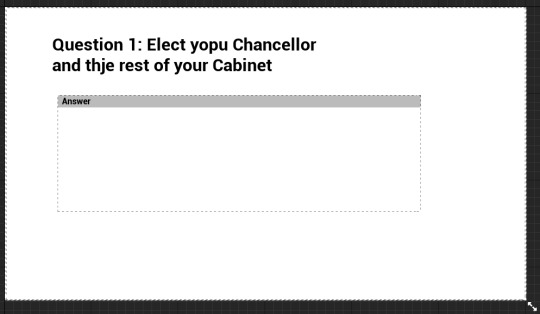
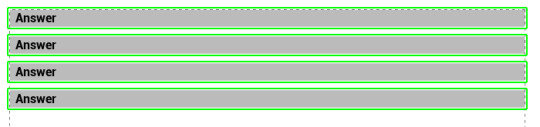
This is what my screen ended up looking like.
Now because the example the video uses has 4 answers same as mine it tells you to just Copy + Paste 3 more buttons. You do this my Ctrl C on the Button and then Ctrl V on the Vertical Box
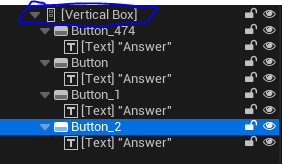

Now to make some distance between the buttons we select all of them by clicking the Top and Bottom one while Holding Shift


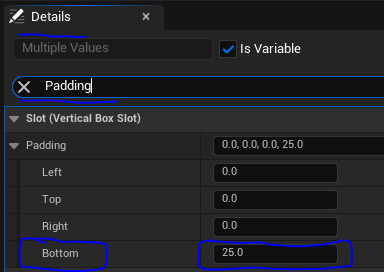
Then in Details search up Padding and change Bottom from 0.0 to to what you want I'm going to set it to 25.0
Now we make a Next Button to allow the player to Confirm an Answer and go to the next Question. So we add another Button.
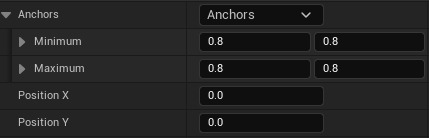
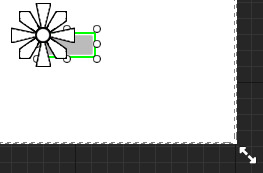
For this one's Anchors Set the Minimums to 0.8 and the Maximums to 0.8 and then set Position X to 0.0 and Position Y to 0.0
And then Under there is Alignment and change the X value from 0.0 to 1.0

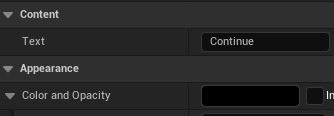
Then add a Text to it. I wrote my Text as Continue and I changed the Colour to Black in Color and Opacity
Now we go into the Event Graph

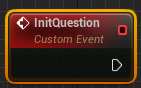
Then Right Click the Blueprint and search up Custom Event. Then call it what you want I followed the Tutorial so I called it InitQuestion.
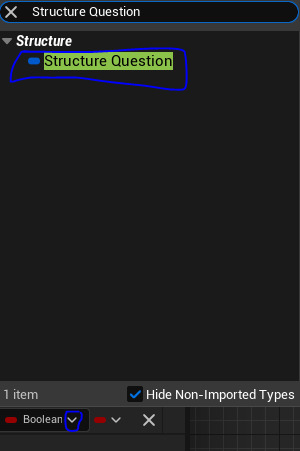
Now in the Content Drawer Right Click and go to Blueprint then Structure


Now open it. The only thing on your screen should be this.

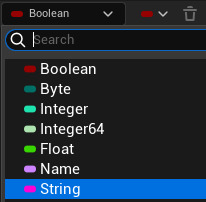
Then you change MemberVar_0 to Question and change it from a Boolean to a String
Then at the top click + Add Variable

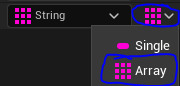
Then change its name to Answers and from a Single to an Array
Then select on Default Values

Then in Question type Question. Then at Answers click the plus

Then in the Box type Answer (the number it is) keep doing this until you get the number of answers you want the Tutorial uses 4 my game also uses 4 so I'm going to do 4.

Now back to the Widget's Event Graph. Inputs click the Plus.

Now click the Boolean arrow click it and search up Structure Question.
And change the name from NewParam to Question

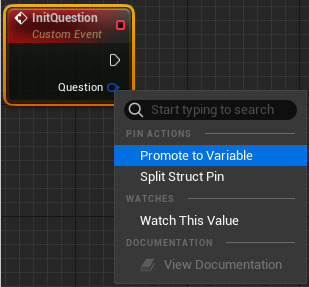
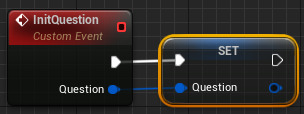
Now out of Custom Event's Question Right Click it and Promote to Variable.
Now back into the Structure, + Add Variable and call it Correct Choice and change it from a String to an Integer and from an Array to a Single.

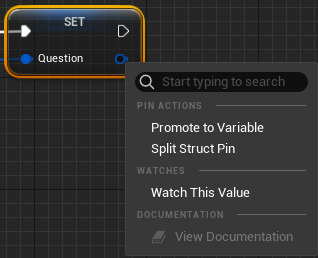
Now back in the Widget On the Set Question's Right Blue Node Right Click it and select Split Struct Pin

0 notes
Text
Fiduciary Duties: Maximizing Shareholder Value

When selling your company, you owe special fiduciary duties to minority investors or other shareholders. Directors, officers and other individuals who control a company (“control persons”) have certain baseline fiduciary responsibilities toward shareholders. For the purpose of ease we'll discuss this under Delaware law (check with a local attorney if dealing with an entity formed in a different state) —widely regarded as the benchmark for corporate governance in the U.S.—these responsibilities are applied differently in the context of mergers and acquisitions ("M&A"). To understand fiduciary duties in M&A transactions, it’s essential to familiarize yourself with the three standards of review that Delaware courts use to evaluate decisions made by control persons: - The Business Judgment Rule - Enhanced Scrutiny - Entire Fairness 1. The Business Judgment Rule The business judgment rule presumes that control persons act: - On an informed basis, - In good faith, and - In the honest belief that their actions are in the best interests of the company. This default standard in Delaware protects control persons from judicial second-guessing if their decisions can be attributed to any rational business purpose. In essence, courts defer to the judgment of control persons unless there is evidence of a serious flaw in the decision-making process. To benefit from the protections of the business judgment rule, control persons must inform themselves of "all material information" reasonably available before making a decision. However, shareholder plaintiffs can challenge this presumption by alleging: - Undisclosed conflicts of interest, - A majority of conflicted or interested control persons, - Gross negligence, or - Lack of good faith, such as willful disregard of relevant facts or failure to exercise reasonable oversight. When this standard applies, courts generally do not evaluate the wisdom of decisions unless flaws in the process are proven. 2. Enhanced Scrutiny Enhanced scrutiny applies when control persons are selling the company. Under this standard, courts assess: - The adequacy of the decision-making process, including the information used, and - The reasonableness of the actions taken in light of the circumstances at the time. Here, the burden shifts to control persons to prove they were adequately informed and acted reasonably. However, "reasonable" does not mean "perfect." If a control person selects one of several reasonable alternatives, courts will generally not second-guess the decision, even if hindsight suggests another choice might have been better. In the landmark case Revlon, Inc. v. MacAndrews & Forbes Holdings, Inc., the Delaware Supreme Court established that when the sale of a company becomes inevitable, control persons must seek the highest value reasonably available to shareholders. This is commonly referred to as "Revlon duties". A subsequent case, Paramount Communications Inc. v. QVC Network Inc., further clarified that: The consequences of a sale of control impose special obligations on the directors of a corporation. They must act reasonably to secure the best value reasonably available to stockholders. While Revlon duties are not an independent fiduciary duty, they represent a specific application of baseline fiduciary responsibilities in the context of a company sale. These duties do not mandate a rigid approach but require actions judged reasonable based on the circumstances. It’s important to note that certain stock-for-stock transactions, as opposed to cash sales, may not trigger Revlon duties because they do not constitute a change in control. 3. Entire Fairness The entire fairness standard applies when control persons have conflicts of interest, such as being on both sides of a transaction. This is the most stringent standard under Delaware law. Control persons must prove: - Fair Dealing: Demonstrating that decision-making was informed, properly structured, and appropriately timed, with approvals obtained from disinterested parties. - Fair Price: Showing that the financial terms of the transaction fall within a range of values a reasonable seller would accept. Conflicts triggering the entire fairness review typically arise in scenarios like: - A controlling shareholder engaging in a “going-private” transaction. - A personal financial benefit derived by control persons that is not shared proportionately by all shareholders. To mitigate risks associated with the entire fairness review, companies often implement procedural safeguards, such as: - Forming a special committee of disinterested and independent directors to oversee the transaction. - Requiring approval by a majority of the minority shareholders. In M&A transactions, control persons face heightened scrutiny to ensure that shareholder interests, especially those of minority investors, are protected. The applicable standard of review—business judgment, enhanced scrutiny, or entire fairness—depends on the nature of the transaction and the control persons’ role within it. Adhering to these fiduciary duties is critical for navigating the complexities of selling a company while maintaining compliance with Delaware corporate law. Raetzer PLLC Read the full article Joseph J Raetzer
0 notes
Text
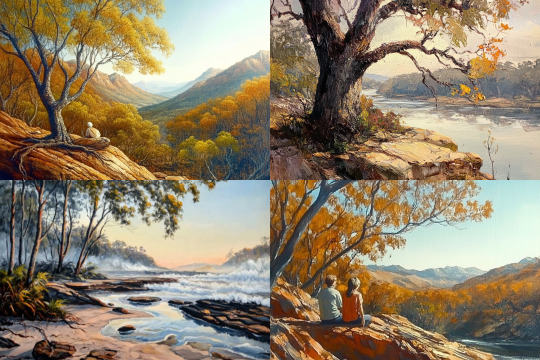
Australian Landscapes with Midjourney : Parameters
An exploration of Australian landscape images created with Midjourney starting with a generic prompt and working to through different styles.
This can provide a frame work to explore the use of Midjourney to different artists, subjects and styles.

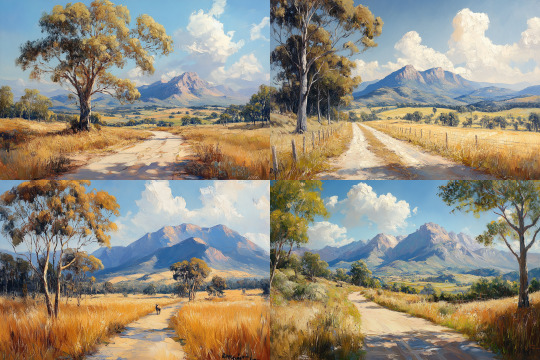
Prompt : A oil painting of an Australian landscape --v 5.0 --w 2000 --c 90 --s 900 --ar 3:2
The use pf parameters provides more variety in the types of images produced while not deviating significantly from the subject and style in the text prompt.
Australia landscape was chosen through personal interest and a way to compare Midjourney result with the existing landscape images for Australia which has a specific artistic tradition.
This article will focus of the Midjourney parameters and their impact on the images created. Working with the Discord version of Midjourney provides more options with the slash (/) commands and and the ability to use macros as custom options.
The process will:
create an initial default image and compare to a style raw created image.
use different materials on a default image such as oil painting, watercolour, sketch, illustration
Select one material and work through different stylize, weird , chaos and version parameters and values. There is the assumption that regardless of the materials used the parameter impact would be similar.
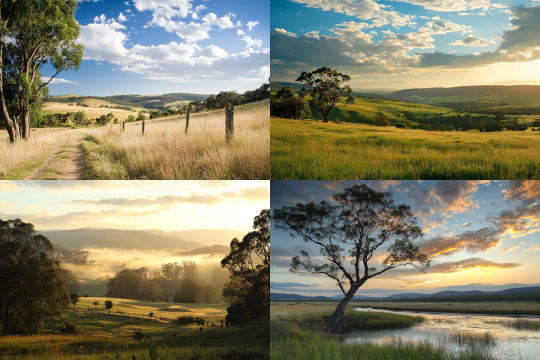
The initial prompt : Australian Landscape
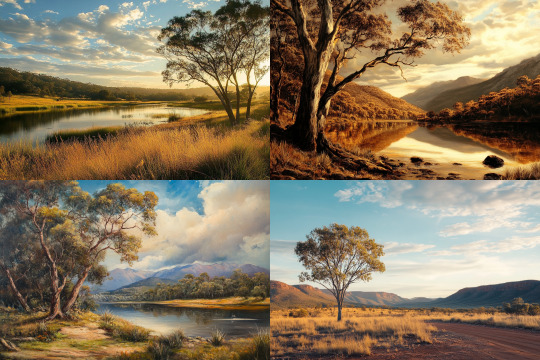
Photographic style images with the Midjourney patina. The images created are very similar in subject with a single tree or group of trees in an arid area with some low mountains in the background. Various iterations will have a river.
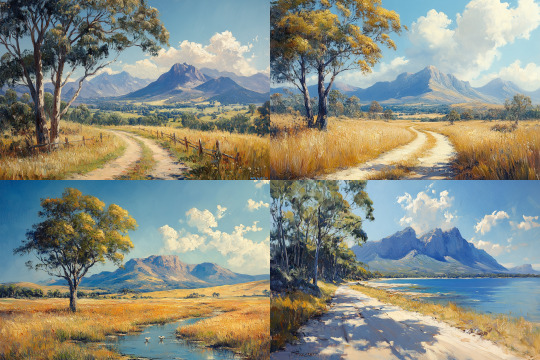
Prompt with style raw : Australian Landscape --style raw
The Midjourney patina was been reduced from the phots images and there is more variety in the subjects. Greener and less arid , though the single tree clump is still prominent.
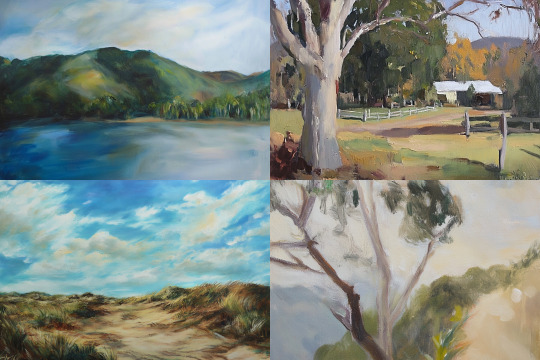
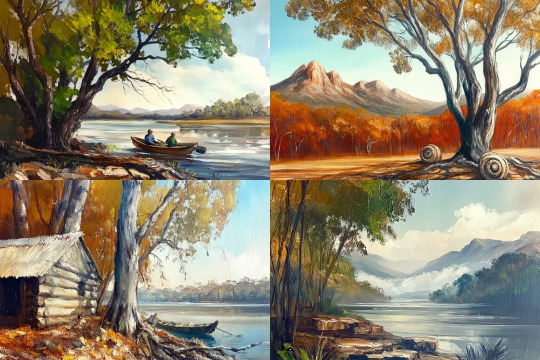
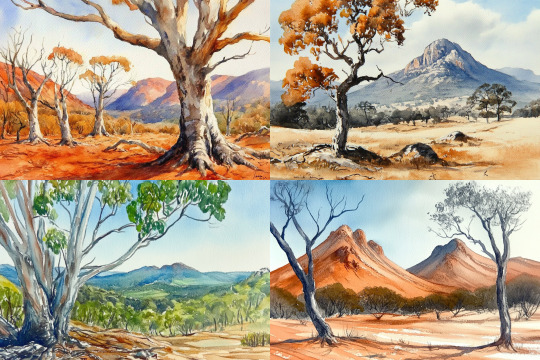
Trying different materials with the prompt :An {oil painting, watercolour, sketch, illustration} of an Australian landscape

More painterly, especially 3 and 4, with the arid area, the single tree.
Style raw is documented as using a different model with less 'beatification'
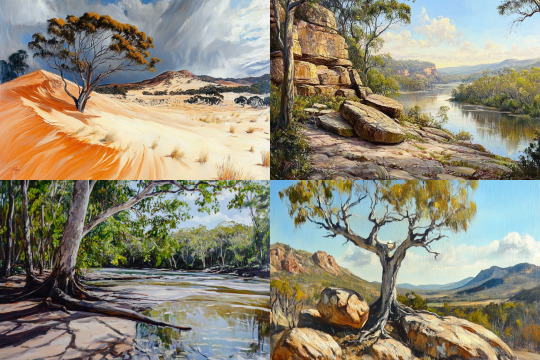
The raw version prompt : An {oil painting, watercolour, sketch, illustration} of an Australian landscape --style raw
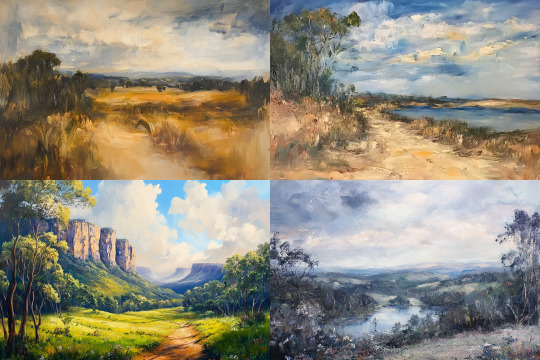
This style raw version more variety with location and a less precise style.
With style raw and testing the --stylize parameter.
Prompt : An oil painting of an Australian landscape --style raw --s 0 -
Different styles and different subjects while increasing the --stylize parameter reinforces Midjourney's style model.
Prompt : An oil painting of an Australian landscape --style raw --s 500 --ar 3:2
Similar style with the Midjourney patina with the predominate single tree, arid ground and mountain in the background.
Without --style raw the results are similar though more precise; less loose in style.

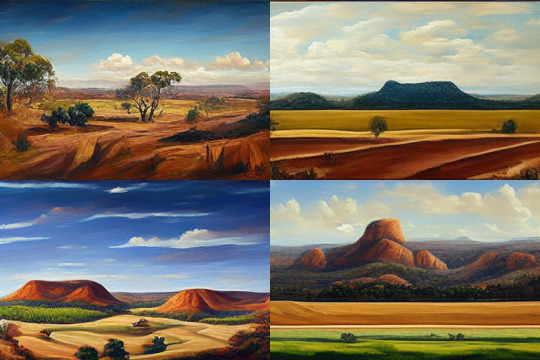
Prompt : An oil painting of an Australian landscape --s 0 --ar 3:2 -
Increasing the Midjourney stylise variable reinforces both the subject and the style of the image. Single tree, arid ground, mountains and with a some element leading the viewer into the image,; stream, a path or a coastline .
Prompt : An oil painting of an Australian landscape --s 700 --ar 3:2
Using --weird
Midjourney defines the "--weird" (0 - 3000) parameter as :
This parameter introduces quirky and offbeat qualities to your generated images, resulting in unique and unexpected outcomes.
Prompt : An oil painting of an Australian landscape --w 2200 --ar 3:2
With this generic prompt even at high values the results are more variable but not that weird. There is still the emphasis on the single tree and the mountains in the background.
With the inclusion of the --stylize raw parameter the results include images with strokes more loosely represented with a wider range of subjects.
Prompt : An oil painting of an Australian landscape --w 2200 --style raw --ar 3:2
Using high values of the --chaos (0-100) parameter will give more variety in the initial 4 image proof sheet.
Prompt : An oil painting of an Australian landscape --w 2200 --style raw --c 90
The settings are more varied but the single tree motif still creeps in.
The results are consistent across broad styles.
Prompt A watercolour painting of an Australian landscape --w 2200 --style raw --c 90
And still the one tree .
Versions --v 6.1, 6, 5.2, 5, 4, 3
The difference versions of Midjourney use different models for the creation of the images. Images rendered by Midjourney version 6, 6.1 are more detailed and accurate though early versions can still render painterly images especially in the landscape genre. Be cautious using images of people in the earlier versions> These would often have errors, notably in the much mocked number of fingers.
Prompt : A oil painting of an Australian landscape --v 3 --ar 3:2
Different versions have different acceptable parameters and can be rendered less distinct. Weird, chaos and style all work. Version 3 can be a bit rough and not used.
This exploration was for my own benefit as so far I have not ventured beyond the default parameter values in constructing my prompts. More experimentation will be done in the future. Though more images mire fast hours.
0 notes
Text
ORACLE APEX V

Unveiling the power of the Oracle APEX v() Function
Oracle APEX, a rapid, low-code application development platform, provides developers with many tools and shortcuts to streamline their work. One such gem is the v() function, a deceptively simple tool with a surprising amount of power under the hood. Let’s explore what it does and how it can supercharge your APEX development.
What is the v() Function?
At its core, the v() function is a dynamic way to reference Application Express session state values. Think of session state values as temporary variables that store information throughout a user’s session within your APEX application. Some common examples include:
APP_ID: The unique ID of your current APEX application.
APP_USER: The username of the currently logged-in user.
PAGE_ID: The ID of the currently displayed page.
Custom items: Values you create and set within your application.
Why Use v()?
Convenience: The v() function streamlines your code by replacing longer APEX_UTIL.GET_SESSION_STATE(‘ITEM_NAME’) calls, making your code cleaner and easier to read.
Flexibility: You can use v() in various contexts within your APEX applications:
PL/SQL code: Integrate user-specific data into your database logic.
SQL queries: Filter data based on session state values.
Dynamic Actions: Create actions that react to user input or session values.
Examples in Action
Let’s see how the v() function works in real-world scenarios:
Displaying a Welcome Message:
SQL
SELECT ‘Welcome, ‘ || v(‘APP_USER’) || ‘!’ FROM dual;
Use code with caution.
content_copy
Conditional Logic:
Code snippet
IF v(‘APP_USER’) = ‘ADMIN’ THEN
— Show admin-specific options
END IF;
Use code with caution.
content_copy
Setting a Page Item based on a URL Parameter:
You can use this in a dynamic action or computation
JavaScript
$s(‘P1_ITEM_NAME’, $v(‘REQUEST’));
Use code with caution.
content_copy
Important Notes
The v() function is case-sensitive. Watch out for typos!
If an item specified in v() doesn’t exist, it will return null. Consider using the NVL function to provide default values when necessary.
Beyond the Basics
While v() is most commonly used to get values, it can also set session state values in specific limited contexts. For maintainability and best practices, it’s usually better to use appropriate APEX APIs to set values.
Mastering the v() Function
The v() function is handy in your Oracle APEX toolkit. You’ll write more efficient and dynamic APEX applications by understanding its purpose and capabilities.
youtube
You can find more information about Oracle Apex in this Oracle Apex Link
Conclusion:
Unogeeks is the No.1 IT Training Institute for Oracle Apex Training. Anyone Disagree? Please drop in a comment
You can check out our other latest blogs on Oracle Apex here – Oarcle Apex Blogs
You can check out our Best In Class Oracle Apex Details here – Oracle Apex Training
Follow & Connect with us:
———————————-
For Training inquiries:
Call/Whatsapp: +91 73960 33555
Mail us at: [email protected]
Our Website ➜ https://unogeeks.com
Follow us:
Instagram: https://www.instagram.com/unogeeks
Facebook: https://www.facebook.com/UnogeeksSoftwareTrainingInstitute
Twitter: https://twitter.com/unogeeks
0 notes
Text

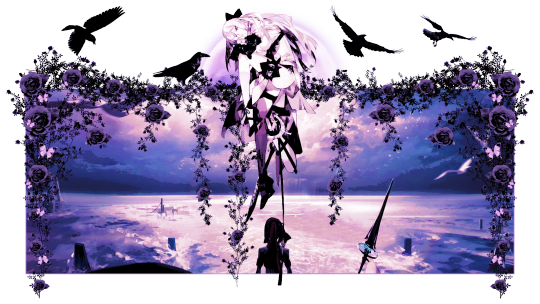
In the ruins you smile / For you, my light, my sun / I'll sacrifice / Eternal night, my last dance / Survive, you whispered / In the moon's embrace / Our destiny's planned / Let us fly, to the twilight road / Where joy and sorrow meet / Reborn with raven wings, I soar / In the arms of fate / To the sun I swore / Give all to you
#𝑨𝑬𝑻𝑯𝑬𝑹𝑶𝑺𝑬 — An independent, selective, mutuals-only, multiship & multiverse, multifandom multimuse roleplay blog that's OC, crossover, & duplicate-friendly — 𝑩𝑳𝑶𝑶𝑴𝑬𝑫 𝑩𝒀 𝑹𝑶𝑺𝑬, your local 𝘘𝘜𝘌𝘌𝘕 𝘖𝘍 𝘉𝘙𝘈𝘐𝘕𝘙𝘖𝘛. Originally established as @/popolaroleplayhub (later renamed @/etherose) on 12/01/2021, re-established on 03/29/2024. Mun began RPing on 10/29/2021. Activity is often sporadic.
PLEASE READ THIS POST IN FULL & THE CARRD & THE MUSES YOU ARE INTERESTED IN'S BIOS BEFORE INTERACTING!
Currently in indefinite mostly hiatus as I've been overwhelmed and scattered since the end of December 2024 and haven't felt like writing on Tumblr. I'm more active on Discord presently. Thank you for understanding.
Featuring muses from Hoyoverse's games, Project Moon, Baldur's Gate 3, Punishing: Gray Raven, other miscellaneous fandoms, & personal OCs. Also features various verses for many of the muses. Elysia from Honkai Impact 3rd is the muse you'll see most often & is who I usually default to when unsure who to throw at folks.
𝑪𝑼𝑹𝑹𝑬𝑵𝑻 𝑳𝑶𝑼𝑫𝑬𝑺𝑻 𝑴𝑼𝑺𝑬𝑺: N/A (Last updated 06/10/2025)
NON-RP BLOGS ARE BLOCKED ON SIGHT UNLESS THEY HAVE A RP SIDEBLOG OR ARE A FRIEND OF THE MUN. Additionally, THIS BLOG CAN ONLY UTILIZE THE BETA EDITOR.
I do not claim ownership of anything I utilized for my graphics or icons besides my own art and the work I put in editing the images used. Most of the images are from official media. However, if any fanart used is your own & you are uncomfortable regarding its usage, message me and I will stop using it immediately. Here is the credit for the fanart used in my current graphics; ye_rhythm / STAR影法師 / setsumushi.

𝑾𝑨𝑹𝑵𝑰𝑵𝑮𝑺 𝑭𝑶𝑹: Spoilers for all media featured on this blog, muses being heavily headcanon-based & sometimes canon-divergent, violence, death, murder, grey morality, unhealthy coping mechanisms, mentions of various types of abuse, mentions of human experimentation, childhood trauma, self-worth issues, & general existential & philosophical ponderings & horrors. This list isn't exhaustive; each muse has warnings of their own on their bios, and I could have always missed something.
ㅤㅤㅤㅤㅤㅤ"𝑻𝒐 𝒘𝒆, 𝒘𝒉𝒐 𝒂𝒍𝒘𝒂𝒚𝒔 𝒄𝒉𝒂𝒔𝒆𝒅 𝒕𝒉𝒆 𝒇𝒍𝒂𝒎𝒆—"
I. CARRD II. OPEN STARTERS III. PATCH NOTES IV. PROMOS V. ASKS VI. THREADS VII. HEADCANONS VIII. OC LORE IX. WISHLIST X. MEMES XI. DASH GAMES XII. GALLERY XIII. MUN ART XIV. EDITS XV. DRABBLES
𝑨 𝑺𝑻𝑼𝑫𝒀 𝑰𝑵: The meaning of existence and life; what makes someone human & the nature of humanity; whether ends justify the means; the weight of self-sacrifice; the cost and value of freedom; the suffocating nature of loneliness; the cycle of abuse; horrible truths; new beginnings; pushing onward despite everything; absurdism; & 𝘯𝘰 𝘮𝘢𝘵𝘵𝘦𝘳 𝘸𝘩𝘢𝘵 𝘦𝘯𝘥𝘪𝘯𝘨 𝘭𝘪𝘦𝘴 𝘢𝘩𝘦𝘢𝘥, 𝘸𝘩𝘢𝘵 𝘮𝘢𝘵𝘵𝘦𝘳𝘴 𝘪𝘴 𝘵𝘩𝘢𝘵 𝘵𝘩𝘦 𝘫𝘰𝘶𝘳𝘯𝘦𝘺 𝘵𝘩𝘦𝘳𝘦 𝘪𝘴 𝘶𝘯𝘧𝘰𝘳𝘨𝘦𝘵𝘵𝘢𝘣𝘭𝘦.

4 notes
·
View notes
Text
Use v-select in Vue js
Use v-select in Vue js
In this article, we will learn about how we can use v-select in Vue js. I will show you step by step guide to implement v-select with options in Vue js. Basic Example of v-select In the below example you will learn how to implement v-select with options. <template> <div> <v-select v-model="selected" label="title" :options="multipleOption"/> </div> </template> <script> import…

View On WordPress
#multiple select#multiple select vue js#v select default value#v select dynamic options#v select multiple example#v select options#v select reduce#v select vuejs#v select vuetify example#v-select vue json#vue select
0 notes
Note
your gifs are so hd!! omg how do you do it?
hiii, tysm i do try !!
i don't know how to be concise so bare with me if i ramble too much please !
i'm going to assume you know how to gif already bc i'm mostly going to explain how i use adjustment layers. but i listed the softwares i'm using here + links to gifmaking masterposts !
the process™️details under the cut :
the obvious answer would be to use high quality videos for hd gifs but i work with lq or faux hq videos all the time, so it's all about faking it ngl... my goal is to have a good contrast and full blacks.
tl;dr : play with sharpening settings, boost your black with curves/levels/selective colour, flatten&brighten then fix the contrast, exposure and voila !
also, make sure your monitor / laptop screen is probably calibrated bc i've had bad surprises lol
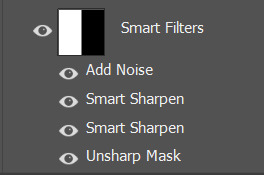
FOR SHARPENING :
unsharp mask -> my go-to settings are 30/30, 40/20 or 60/10. i adjust the amount/radius depending on gifsize and subject size. holy grail, it WILL add depth and dimension to your gifs just trust.
smart sharpen -> usual amount/radius : 10/10, 30/20 or 40/10. highlights are very sensitive to this one so i adjust accordingly.
smart sharpen -> for finer details, i do 500/0.3 in general, but for some fancams i put through vapoursynth 300/0.3 is less harsh
noise (optional) -> uniform > 1,5-3%. sometimes you just need texture to fake good quality lol, adding noise to flat lq gifs does magic. would also recommend if you use gradients but don't like the "smooth look". the only downside is that it makes your file larger. and i never add noise to fancams.
high pass (optional) : radius 2-5 > 30% opacity > soft light ; if you want a glowy finish, this is your filter. if i use unsharp mask i dont do high pass tho, it's just too much...
FOR COLOURING
how i use adjusment layers for contrast and depth, no particular order, i freestyle it 90% of the time :
curves/levels : use black and white points mostly, pretty intuitive to use. recently my default values in levels are (0 ; 1,27 ; 230) in rgb. both to brighten and fix contrast. i can use up to 3 of each on a single gif ngl bc do this in increments to avoid something too harsh.
channel mixers : not particularly relevant to the depth/hd thingie but it does perform witchcraft to remove tinted filters. HOWEVER, sometimes you look at your gif and you wonder why it's flat and it's because the dominant colour of your gif is tinting the rest, channel mixers is here to bring back balance and dimension !
colour balance : same reasoning as channel mixers, i try not to touch midtones and focus on highlights/shadows, but i like cold toned gifs so i'll always add some blues/cyan in there
selective colour - the star of my show, i use it 1) for colour manipulation, 2) tame harsh lights, 3) undo whitewashing -> for 2&3 i set sc to multiply > set black values to black in all tabs except white and neutral > adjust white and neutrals until i get a neutral skin colour or natural lighting, and/or good contrast. , 4) boost the blacks (2nd to last layer), +10 black values in black tab, sometimes i also add +5 black to neutrals
exposure (last layer) : the final pop, up to +0,60 ; sometimes i go with a layer mask to only target the subject/faces. sometimes i also adjust the gamma value but not often
black and white gradient map : also good for contrast, it will also reduce the number of colours on your base gif. if you have a super saturated original gif with heavy contrast this is v nice to play with to fix that
a tip specific to colourful gifs : if you're transition from vastly opposite colours, do it in increments, and have a solid colour layer of your dominant colour somewhere set to soft light or overlay (or both) on a 20-40% opacity to uniformize all that good stuff and make the blending look natural, it will prevent your gif from looking flat or hazy trust me. sometimes i also do this with a either colour balance shadows or a selective layer set to hue/color.
FOR EXPORTING
if you're working with timeline, say goodbye to exporting directecly from tl and reopening to fix the frame delay bc it causes quality loss. instead, flatten back to frames and reset the frame delay before exporting, that will save you headaches and time. -> here's a link to an action for this !
my preferred combo is adaptive/pattern
i don't know which gifset made you send the ask but here's a before/after comparaison from a gif i made from an IGTV/Reel, so not the best quality or hd finish but yeah.

3 notes
·
View notes
Text
Download Forest Pack Pro 7 crack (keygen) latest version NK9?

💾 ►►► DOWNLOAD FILE 🔥🔥🔥 Added support for V-Ray 6 stable version. Fixed rare crash using Point-cloud mode with GrowFX objects. Fixed crash with recent releases of Laubwerk Plants. Please download and install the Itoo Software License Server v1. New features and improvements Added support for 3DS Max Added support for Arnold 7. Previous Arnold versions are no longer supported. The target folder for 3DS Max and above can be customized in the installer. Support for silent installation to render nodes has been added. New field for Forest Lister: Stats. It shows the Forest build time. By default this field is hidden. You must add it from the Lister configuration. The match must be complete, not only for a part of the expression. The Distribution Map Channel is always set to 1 for new FP objects previously it would inherit the value of other FP objects in the scene. Now it just selects the object. Fixed rare crash getting internal statistics. Fixed: Forest Color no longer working on non Forest objects. Assigns a specific item, matching the name of the referenced object with the names of the Geometry list. Uppercase and Lowercase are equivalent case insensitive rule. If there are multiple matches, a random Geometry from the matching items is assigned. If none matches, the first Geometry in the list is assigned. Support for 3DS Max groups is rewritten from scratch. Random Rotation rotates the item using its pivot, not the group pivot. Same when the item is placed over a surface. Also, items are excluded individually for camera clipping, exclude areas, etc. If your existing scenes using groups are misaligned, please align the group pivot properly usually moving Z to its base. Added support for VRayVolumeGrid objects. Added support for native light instancing in V-Ray. Requires V-Ray 5. Now they are stored internally. Billboards are now limited to simple planes one to four faces. Other models are removed. If templates already exist in the layer i. Added compatibility with Arnold 7. You can upgrade to the latest release from here When Forest is not compatible with the current Arnold version, a warning message will be displayed. Restored the Camera parameter. When empty, the Camera is taken automatically from render view, as before. Distribution by Path uses path direction for Random Translation, instead of translating the item on XY plane. This is more efficient in recent Max releases. Added support for non-geometric objects to Library Browser. Fixed issues with scaled Custom Objects. Fixed: VRayCryptomatte renders Forest objects in black colour. Fixed: colours generated by Forest Color are not consistent when scattering lights. Fixed Maxscript security error when closing Optimize Material dialog. Fixed rare crash cleaning the Forest template layer, when the scene is saved. There are several things you need to know, depending on the render engine you use. Items are scattered as in frame 0. Other engines may be supported in the future. When enabled, the object is handled as a non-geometric object. Forest will try to instance it keeping the original format, instead getting a mesh. For many objects this is not necessary and Forest will detect the correct format automatically. The effects can be disabled for specific textures by turning off Apply Color Correction in a Forest Colour map. Two types are available, linear presets that distribute hedges along a spline, and Topiary presets that use a surface to create bushes of any shape. New Stumps Library of 40 photoscanned assets. Optimised presets are also included for scattering over large areas. The3DGarden samples are now integrated into Forest Pack, creating a free and growing collection of high-quality plants. Animation Animation modes are now supported in Corona. Scattering over animated UV Surfaces is improved to generate a more consistent result during the animation. Real time Supported by Unreal Datasmith. Supported by Project Lavina. Unity compatible, export through new Forest Tools options and import to Unity using a new experimental plugin package available by clicking here. Using References Reference mode has been improved with the following features: Multiple Items per face. The ability to randomise each items position on the marker. The ability to filter markers by material ID. When enabled, a single Forest rollout is open at time. Opening one rollout collapses the others. For 3DS Max and earlier, this feature works only clicking the rollout title, not using the contextual rollouts menu. Custom Edit mode is removed. The Geometry List can be populated from scene selection first select objects in the scene, next create Forest object. If there are items selected both in a library and the scene, the library has priority. Two new ways to add items to the geometry list based on a scene selection. When creating a new Forest Object: Select items from the scene. Go to the Create panel and click to create a Forest Object. Create a Forest Object as normal. Select objects from the scene. Reselect the Forest object. Turn off Pin Stack. Also, the Pick button is enabled automatically when a new item is added. Camera rollout is reorganized and simplified. To improve viewport performance, Camera features are disabled on viewport by default. Fixed issues with Batch render when rendering from different cameras. Library Browser The library Browser has been rewritten from the ground up to make it easier to develop new features in the future. This initial release adds the following improvements. Material Library and Max scene is generated automatically. Assets can be collected to a maps folder. Added toolbar option to open Library Browser. Improved search that finds matching items across all libraries and includes. If enabled, network paths are excluded the scan maps process. Both options are enabled by default. Element mode is not supported. V-Ray GPU is not supported. Forest Color can even be used on non-Forest objects, with the same restrictions as items instantiated by Forest Tools. Previous versions would create visible patterns. To keep the distribution of existing scenes, this is applied only to new FP objects. In previous versions the topmost spline area would be used. Now proxies and non-geometric objects are rendered using the V-Ray instancing engine similar to VRayInstancer , instead of iToo functions. Updated the Material Optimiser tool. Added support for Corona. Added speed improvements when many items share the same material. Hold down Control to select multiple items. Right-click on the Select button to select all. It affects only to custom Forest dialogs as Library Browser, Effects, etc. Improved UI responsiveness adding or updating multiple items of Geometry List. To keep distributions on existing scenes, the fix is applied only to new created objects. If not, the ID of the source Geometry. Updated Qt style to match better with 3DS Max style. Macros can now be used on all attributes of Library Items such as object names. Motion blur now works again with distributions driven by particle systems. Fixed inconsistent distribution using exclusion of other Forest objects due to multithreading. Switching between Paint Areas no longer disables the paint button if it was enabled. Links to the documentation are now included for license error dialogs. Data dependent on UV coordinates is now preserved when switching to Custom Edit mode. Fixed crash using Animation modes with interactive render modes. This fix just avoids crashing. Fixed wrong scale instantiating with Forest Tools when Display mode is set to Proxy. Fixed updating issues with V-Ray interactive render mode. Fixed: License configuration is not loaded from enviroment variables. Fixed crash creating Forest object when there is not a license. Fixed bug checking texture paths using normal slashes, instead backslashes. Fixed: Distribution by Reference displays on viewport less items than intended, when using large meshes and Material ID filter. Added support for V-Ray 5. Forest Pack 6. Fixed crashing bug with Mental Ray. Fixed: fpItem. Fixed crash with Paint areas and huge coordinate values i. Improved performance when loading objects with high material ID values. Fixes Removed support for 3DS Max Fixed the alignment of the first item on closed splines when using Distribution by Path mode. Fixed Distribution by Path using spacing zero generates the maximum number of items defined on Display limits. Fixed an issue where animated Effects parameters were not updating correctly. Fixed performance issue loading objects with high material ID values. Fixed a crash that occurred when adding items in Custom Edit when Geometry List is empty. Fixed errors in Lister when there are duplicated object names. Fixed crash using Forest as a XRef Object. Fixed missing items when rendering Particle Flow distributions. Tree Editor is renamed to Items Editor in Settings dialog. Fixed slowdown evaluating heavy models with displacement maps as Maxtree models. Fixed rare bug which causes a continuous updating of the FP object, when using animated splines and the time slider is not zero. Fixed: multiple selection is lost after changing any parameter in the rollup. Fixed updating issue when switching between Paint Areas and painter is enabled.
2 notes
·
View notes
Text
hey!!!! uhm . . . anon i'm sorry i completely missed the mark on ur question, so i'm rewriting everything lmfao
ok so!! i received a question about how to play lsdde, i'll try to sumarize it as best as i can
lsdde is basically, well, a dream emulator! each time you press "start" at the beginning, you get different dream-like sections where you can interact with things in your surroundings. bumping into walls, npcs, and other objects takes you to another map (that's often called linking)
each map has its different music, its different npcs, and its different layout in general. the point of the game, well, is just . .. walking around and seeing every map and its artistic value. it's basically a walking simulator. there's no story, no goal, nor anything that would normally be required for a game to be good, i guess.
sometimes the game has different unskippable cutscenes play instead of the regular gameplay; but that also doesn't mean you did anything wrong, it's just. the game being itself
so yea! i guess that's pretty much it. i'd advise you to maybe take a look at the lsd dream emulator fandom wiki, there's a lot of stuff there that might help you. i'm sorry for the original reply not answering anything :'')
original answer
i usually play it through an emulator. idk if you're having problems with emulating it or playing it, so i'll just write everything down in a neat little post :)
this video contains the download for the game, plus the necessary steps to set up your emulator. https://www.youtube.com/watch?v=dpCTm1bFNMM&ab_channel=ImStupidButFunny
the default controls consist of: arrows to walk, enter to pause, z to run, a and x to move the camera and s to select. f12 is also useful if you'd like to take a screenshot!
that's assuming your on windows, ofc. idk if the process is the same for macOS.
now when it comes to cellphone emulation, you might need a few more things. (my phone is an android device btw) i often use the epsxe emulator - for it to work you'll need to download a psx bios, which is quite easily available online; and then just use the same .bin and .cue for the game that you'd use for pc emulation.
if you'd like, i can try and record a video to demonstrate how to run lsdde both on pc and on mobile :) i'm sorry for my broken english, i'm trying my best though lmao
47 notes
·
View notes
Note
hi! if you guys still doing it, can i request the whole fluff alphabet for akutagawa? thank you!

A - activities: what do they like to do with their s/o? how do they spend their free time with them?
he really generally just enjoys any time he spends with his s/o, from just sitting comfortably with them and both doing their own thing, to something planned like going out together. he doesn’t mind either but he does prefer anything where it’s just the two of them there, as it’s more private.
B - beauty: what do they admire in an s/o? what type of person would they fit best with?
would prefer it if his s/o wasn’t in the mafia, it’s too easy to lose them from something so simple as a job gone wrong, even so he’d rather lose them than his s/o lose him. i think he would fit well with someone who isn’t too sensitive, as he can sometimes come off as blunt in the relationship and have trouble expressing how he feels about his s/o. something he would like best in an s/o is for them to understand how he feels, and be able to be patient with him, and know how to calm or comfort him if he needed it.
C - comfort: how would they help their s/o when they feel down/have a panic attack etc.?
if panic/anxiety attacks are something his s/o has often, he reads up on how to help them deal with them. he follows the advice almost to the point, enough to calm you down and that's it. he's much better helping cheer you up after an attack or when you're just upset, often by putting on your favorite film or tv and trying to look after you (making food, grabbing things you need etc.)
D - dreams: how do they picture their future with their s/o?
he struggles to see a future that includes both the mafia job and his s/o. it goes unsaid that he would definetely rather drop the mafia than his s/o, though. however in the case that his s/o is still with him in the future, or he finds a compromise so that they can still be with him if he remains in the mafia, then he doesn't really see things like marriage and children a necessity; though that doesn't mean that he won't want those things one day, or agree with you if you do.
E - equal: are they the dominant one in the relationship, or rather passive?
rather passive, especially if his s/o has dated before or has more experience in it. given his life so far, he’s new to relationships and being romantic and is learning about relationships and how they work, etc. from his s/o and occasional advice from chuuya people he trusts within the mafia.
F - fight: would they be easy to forgive their s/o? how are they fighting?
he holds grudges easily, but hardly ever for the wrong reasons. he doesn’t fight about small things often, especially with his s/o, unless he’s already annoyed with something else. even then, he apologizes and admits that was his fault, albeit a little awkwardly, as soon as he’s calmed down. however, one of the things he’s most likely to argue about is if his s/o ever does something, or wants to do something that would put them in danger.
G - gratitude: how grateful are they in general? are they aware of what their s/o is doing for them?
yes, but has a little trouble showing it in any other way other than just bluntly thanking them for what they do. he’s not exactly the best at expressing his feelings, especially through actions rather than words, but he still means well even if his thanks don’t sound genuine at times.
H - honesty: do they have secrets they hide from their s/o? or do they share everything?
yes and no; there’s certainly things he hasn’t told them, especially if they aren’t in the mafia like him, but most of those are things he would tell them if they asked the right questions or talked about the right topic. he doesn’t generally feel the need to keep secrets from his s/o, unless it’s to keep them safe.
I - inspiration: did their s/o change them somehow, or the other way around? like trying out new things or helped them overcome personal problems?
for akutagawa, being with his s/o has really helped him with dealing with people. there’s a clear difference between things like his levels of patience or care for others from before the relationship to during/after it. he still only shows that to a few select people though, such as his s/o themselves.
J - jealousy: do they get jealous easily? how do they deal with it?
yes, but not to an obsessive point. he’s not the type to get jealous because of his s/o hanging out with close friends rather than him, nor to cut corners and assume there’s something going on between his s/o and any of their friends, but seeing someone else flirting with his s/o or being romantic with them is a different story. most likely gets angry with the other person and telling them to leave you alone because you’re with him, generally not even in a subtle way through calling you pet names and being affectionate, he just wants them gone and will be as blunt as possible about it.
K - kiss: are they a good kisser? what was the first kiss like?
his kisses are simple; he has no real prior experience with it, and shared his first kiss with his s/o.
L - love confession: how would they confess to their s/o?
by accident. he was trying to stage a way to confess to his s/o, only for them to overhear him nervously talking to himself to practice it and chime in to say that they would love to be with him. needless to say he was taken aback and flustered hearing them say it.
M - marriage: do they want to get married? how do they propose? what would the marriage be like?
he doesn’t want to get married for as long as he’s in the mafia. even if he loves his s/o enough to want to marry them somewhere along the line, their safety is one of the things that matters most to him and to marry them would be bringing them further into that life than he already had just by being together with them. he isn’t keen on the idea that being married would change anything about their relationship, other than hoping that by then he’d have learned how to express himself more and he could be more affectionate.
N - nicknames: what do they call their s/o?
likely a nickname or two that references something about them (like calling atsushi “jinko”, but in a more affectionate way) and/or something standard like “baby” and other romantic pet names. since he’s not particularly one for using them, he just defaults to some of the usual ones he’s heard other people use.
O - on cloud nine: what are they like when they are in love? is it obvious for others? how do they express their feelings?
it’s tragically obvious for others, almost everyone he works with who has heard him mention his s/o knows he’s in love. he talks highly of them to anyone he trusts, and goes soft if they’re ever mentioned. especially when he and his s/o interact, it’s so obvious with how he goes soft whenever his s/o holds his hand, gives him a kiss, or a hug, etc. he doesn’t express his feelings well physically, moreso in words and his reactions to physical affection from you compared to from anyone else.
P - pda: are they upfront about their relationship? do they brag with their s/o in front of others? or are they rather shy to kiss etc. when others are watching?
he’s rather shy about it around other people, and shows physical affection a lot less than usual whenever he and his s/o are around other people. however, he’s not going to complain if his s/o does something like hold his hand, he’ll just get a little flustered about it.
Q - quirk: some random ability they have that’s beneficial in a relationship.
R - romance: how romantic are they? what would they do to make their s/o happy? cliché or rather creative?
something cliche, but he tries his best to make his s/o happy. he tries hard to make the smallest of things he does to surprise them special, and it’s quite endearing.
S - support: are they helping their s/o achieve their goals? do they believe in them?
contrary to how he shows affection, he’s better at helping his s/o practically rather than through verbal encouragement. he helps them practice, or study, or leaves them be and tries to help through giving them less to worry about, by trying to cook or tidy up himself so that his s/o doesn’t have to think about it. even so, when you reach the thing they’ve been learning, or practicing for, he does offer them a quick, bashful “good luck” before they go.
T - thrill: do they need to try out new things to spice out your relationship? or do they prefer a certain routine?
he’s completely fine with a simple, certain routine to things; he’s so taken by even the small things he does with his s/o, like eating together, cuddling, he still isn’t even completely over his s/o giving him kisses and hugs.
U - understanding: how good do they know their partner? are they empathetic?
he knows his s/o well, mostly from listening to them attentively each and every time they wanted to just talk, or vent to him about something. he isn’t very empathetic in general and struggles with it, and if his s/o is ever sad he still tries his best to cheer them up even though he can’t fully understand what they’re feeling.
V - value: how important is the relationship to them? what is it’s worth in comparison to other things in their life?
as far as akutagawa is concerned, his relationship with his s/o is the best thing that’s ever happened. he sees it as worth much more than other things in his life, except for things like his sister and members of the mafia he has a close relationship with, but even then he holds his s/o at the same worth as those.
W - wild card: a random fluff headcanon.
X - xoxo: are they very affectionate? do they love to kiss and cuddle?
at the start no, he’s not particularly one for physical affection, but it ends up growing on him though. only in private, and only from/with his s/o; he’s better with receiving it than he is with giving it.
Y - yearning: how will they cope when they’re missing their partner?
“if i ignore it, the feeling will go away.” spoiler alert, it doesn’t, but he doesn’t know how else to cope with it, other than quietly putting up with it and perhaps telling his s/o that he missed them when he’s able to see them again. however throughout the time he’s missing them, he would think about them more than usual as expected, and perhaps worry about them a little as well.
Z - zeal: are they willing to go to great lengths for the relationship? if so, what kind of?
every so often, he attempts to make some kind of grand romantic gesture, or at least what he thinks is one anyway. he’s acutely aware of how much he takes rather than gives in the relationship, and doesn’t want his s/o to leave him because of it. things he attempts range from stepping out of his comfort zone to go somewhere or do something that would make them happy, attempting to make a romantic dinner despite not being able to cook that well.
#bsd#bungo stray dogs#akutagawa ryuunosu#akutagawa headcanons#akutagawa bungo#bungo stray dogs hcs#bungo stray dogs headcanons#alphabet headcanons
45 notes
·
View notes
Text
Blog #5 The Last of the Tools Chapter
On the same tutorial, I got much further than I usually go, onto the time 1:36:31. Today I was able to complete the video's chapter: "Krita navigation and tools". I am glad that's over. These are becoming more or less transcripts than summaries, but I guess I have to do that for speed.
.
You can assign shortcuts to a brush, but you first need to enable a small Python script (though you don't need to know it's a Python script). Follow this path: Tools -> Scripts -> Ten Brushes Choose and swap the brushes you want, then follow this path: Settings -> Configure Krita... Type "brush" in the search bar and you'll see scripts. You can set up short cuts there.
The color selector, or picker, tool is what you'd expect. It samples colors for your use.
To quickly swap to the Color Selector Tool, hold Control. Don't tap it because you will go back to the brush. From there, you can click on any color to pick the color. It's a nice Krita trick that helps in a nice art trick called blending, or layering different colors on top of each other to better blend different colors. Skip to timestamp 1:05:05 for an example of how to blend.
Alternatively, by the Tools & Options panel, you can turn the color selector into a blender by lowering the Blend slider. Any color you pick will be put in a blend with the previous picked color, and form a new color between the two colors.
.
To darken a color by a shortcut, press K. To lighten a color by a shortcut, press L Both of these will darken or lighten a color by a set number, as can be seen in the advanced color selector. From my experience, lighten changes the saturation and darken changes the value.
In the advanced color selector panel, press the newspaper icon to change the color selector. He already picked one of the two square ones, and I changed mine to match his square color selector. You can mess with the mode "Color Selector Uses Different Color Space Than Image", but he says he usually keeps the mode off.
If you click on Docker and go to Color Hotkeys, you get more settings. Hooray. You get to adjust by how much the lighten and darken shortkeys lighten and darken. By default, for lightness, saturation, and hue, it is 10, 10, 10 respectively.
Going back to Dockers, you can pull up Palette to get a palette of colors. The talker, sociamix, never uses palettes, but who knows, it might save you. You can pick different colors, add delete new color swatches, or create delete new palettes. And of course, you can delete color swatches and palettes too.
By going to the far right, near top corner, you will find a newspaper icon alone, by itself. That is where you can save or load workspaces. There's already a couple of saved workspaces, including a Default option.
Now onto layers, a very important part of any digital software. You can turn individual layers on or off. Control + t automatically selects a layer that is the most top up and that isn't disabled. Shift allows you to select multiple layers. Control + g groups layers into one group, so selecting selects all the layers in the group. Ungroup layers by moving them out. Control + h hides the visual indicator (dashed lines) of the selection, without removing the selection. Control + e merges layers into one. Control + c & control + v creates a new layer out of a selected object. Helps in reseperating some shapes out of a layer. Double click a layer to rename a layer. Opacity slider to determine how clear through it is. You can lock a layer by pressing the lock icon. You can lock the transparent parts of a layer by pressing the checkerboard icon; it is useful for only drawing on drawn parts. You can reorder layers by dragging and dropping in the Layers panel. You can create a selection mask by holding control and clicking on the desired layer. It allows you to work on the already drawn parts without worrying about creating new parts. In the layer panel, you can activate blending modes. By default, it's set to normal. These are specific to individual layers.
Art trick: create a selection, draw in it, then lock the layer's transparency to draw on it.
.
Before covering basic blending modes we use often when painting with layers, he explains how a computer sees a gradient. A computer sees black as 0, white as 1, and one shade of gray as 0.5, for example. For colors, it has three channels for red, green, and blue. Its RGB. For example, pure red is R:1, G:0, B:0. Pure green is R:0, G:1, B:0. Mixing channels gets unique results, like R:1, G:1, B:0 gets yellow. Orange could be like R:1, G:0.6, B:0.
Blending modes take the pixels on a layer and match them with the pixels on a lower layer. They get blended with a formula.
One very common method is multiplication. It multiplyies the color. For example, if the first pixel was (0, 1, 0.5) and the other pixel was (1,1,0.5), then the final color would be (0, 1, 0.25).
The first mode he shows is darken, which uses multiplication to blend a color. The second mode he shows is addition, which uses addition instead and helps in placing highlights. The third mode he shows is overlay, which saturates a color. The fourth mode he shows is color. He does a poor job of explaining it. Know it takes the luminonsity, value, etc from the bottom pixels without changing the saturation and hue of the upper pixel. The final mode he shows is soft light (photoshot), a weaker version of addition mode. You have to look down in the Lighten pop up to get it.
.
Press the weird a in the layer panel to make all colors that aren't on top of a color below to be hidden. Keep in mind you must use groups for this to work. This is Krita's equivalent to the clipping mask in Photoshop. By the way, you can create groups in groups to better organize your layers.
Layer styles are options for layers, like in Photoshop. You can get drop shadows, outlines, etc. Not something he really uses.
Recolor your layer by going into the filter tab, then adjustment. One path that works is the HSV Adjustment. Another one is the auto contrast that balances colors so they will work better. Alternatively, you can use a filter layer.

An external plugin oh no: G'MIC. It gives a lot of filters to stylize your art. The effects are applied to the current layer you are on.
.
That is all of Krita nagivation and tools. The rest of the chapter is simply an introduction to the next chapter of the video, "Let's learn about drawing". It might as well end on 1:35:17, and that is where I will start from on the next blog. Goodbye!
2 notes
·
View notes
Note
tell me more about lancer!! (I’ve heard of it but never played)
“It is 5016u, and the galaxy is home to trillions. At the core of humanity’s territory there is a golden age, but outside of this newly won utopia the revolutionary project continues... Your character in the world of Lancer is a mechanized cavalry pilot of particular note – a lancer. Whatever the mission, whatever the terrain, whatever the enemy, your character is the one who is called in to break the siege or hold the line. When the drop klaxons sound, it’s up to them to save the day. “ - Introduction, Lancer core rules (pp 10-11)
Lancer is a very good role-playing game about piloting giant robots and using them to make Utopia happen. I’m going to organize this into mechanical things that are Very Good about Lancer and lore things that are Very Good. Here are 12 things I like Very Much about Lancer.
MECHANICAL
1. COMPCON
2. In addition to a primary system of regular old weapons n attacks n hitpoints, there is an entire other system of technological attacks and “heat” hitpoints to represent hacking enemy robots to increasingly bizarre effect. Making regular physical attacks is tied to physical weapon “mounts” on your mech, and these mounts may be destroyed over the course of a fight, so the technology attack system gives players who might otherwise be neutralized something to do the whole time.
3. So much player choice: There are 29 mechs in the core rulebook, another 5 in the first rules supplement, another 3 freely available on the publisher itch.io, then various others in the nooks and crannies of the Lancer discord. Do not be daunted, however! i. In a source like COMPCON above, all the mechs are organized by manufacturer and role. Each in-universe manufacturer matches one of the 4 fundamental mech stats so if you know you’re aiming for a mech that especially interacts with a particular part of the mechanics you’ve already selected out 75% of the choices. a. The matches go like this: Harrison Armory matches to the “Engineering” stat and so their mechs deal with the Heat mechanics in interesting ways, HORUS matches to the “Systems” stat and so they specialize in hacking other mechs and other technological attacks, Interplanetary Shipping-Northstar matches to “Hull” and so builds tanks and tough guys, and Smith-Shimano matches to “Agility” and so builds the sexy ones the ones that have interesting ways of avoiding getting hit. b. Roles are relatively straightforward too! Striker mechs are the close-quarters fighters, artillery are... artillery- long range fighters, controllers do big Areas of Effect or impose conditions or alter character movement, defenders have big shields or are mobile bunkers or are just so darn big they protect those behind them, and support is... support- they share bonuses like repairs with their allies. ii. Take this all together and finding the mech that best suits you is actually real easy despite the long long lists. And if you ever get locked into a build you grow to dislike? At every level up, you can completely replace and overhaul the mech licenses (which represent your ability to use the relevant equipment and frame associated with a given robot) you have so you can try other robots.
4. The NPC system: There are 33 NPC statblocks, organized by the kind of role they have in a potential fight. In addition, there are 12 templates you could potentially apply to an NPC. Both statblocks and templates are defined by “systems”- just little traits and qualities and there are often many optional systems you can slap on for an extra level of customization. Therefore, you can tailor hundreds if not thousands of NPCs out of a seemingly-limited stock. i. The template system means any potential moveset or archetype can be made into a miniboss or boss ii. The template system means you can flavorfully telegraph how an encounter can go- telling the players they are fighting a group of pirates prepares them for coreworm rockets and grapple leashes (hallmarks of the pirate template) regardless of the actual statblock in use. iii. Each statblock is effectively 3 statblocks in one, set to different tiers to match and scale to the level of the players throughout the game (so oops I guess there are 99 NPCs by default) iv. Monstrosity- it’s for Kaiju! it’s also one of the most modular statblocks for all the little tweaks you need for Big Monster v. Squad- for footsoldiers!
5. There is no class system (mechanically speaking, in the lore Union is working on it). Character creation functions through selecting Skill Triggers for situations outside your mech and Talents for situations inside your mech, and mech licenses themselves. Even Backgrounds are mostly just lists of questions in order to prompt character introspection.
6. I put this last down here because it’s kind of at the intersection of the mechanics and the lore, but Lancer has some good random tables for generating things like planets, space stations, people on space stations, Pirate crews, and big Enterprise companies. It’s just good clean fun.
LORE
I also created this google doc for totally unrelated reasons
1. The naming convention of the rings of Union and the Blinkgates- Blinkgates are Lancer’s mechanism of faster-than-light travel. They are Big installations and passing through one can take you to any other instantly. They’re organized into “rings” of the stations that are physically closest to one another, emanating out from Earth. Each ring is named after a mountain range on Earth (now called Cradle because of course) and each gate is named after a peak in that range. This is a real small detail in the grand scheme of things but I adore it because this naming convention is a clear reflection of the priorities and values of the people who did the naming. Every gate by definition is situated in places that humans have already settled, but they’re not named according to local convention. Just so, every gate is situated somewhere in Cradle’s night sky, but they’re not named for things like constellations. Each blinkgate is named after a feature on Cradle because the blinkgates were named by the Second Committee of Union, who had a driving philosophy of Anthrochauvinism (a manifest destiny attitude towards humanity on the galactic stage, with a heavy bias towards humanity as it is on Cradle) and so of course blinkgates are named as a projection of life on Earth onto space without regard for the actual space they occupy.
2. On a related note, according to the starship-battle spinoff Battlegroup, Union names its largest starships- its battleships- after environmentalists. That just warmed my little Environmental Scientist heart, and also is a clear reflection of the Third Committee’s values and priorities (Union rose from the ashes of an environmental disaster on Earth, and the Union Navy under the Third Committee has a general mandate of acting protectively and defensively, so Union has effectively named one set of their people’s protectors after another set of protectors).
3. The fact that every faction is simultaneously in a state of escalating tension. "The Good War" is this inevitable conflict that everyone constantly expects, but it is constantly not here, which just increases the tension further. This makes for good adventure fodder. i. KTB and HA are about to have the Second Interest War in the Dawnline Shore, ii. Union and the Aun are about to have the Second Distal War in Boundary Garden, and SSC is gonna wade into it because geneticists gotta get their samples I guess, iii. IPS-N is about to fall apart from infighting, iv. In the Long Rim HORUS is closing in on Horizon, finding the Fourth Metavault is around the corner
4. Utopia is a verb. Corollary: Union are the enemy you want. Or: Life is good, but it can be better. All this to say, Union is presented as an unambiguous force for good, but the game and the creators make no bones about how Union can be made better (and thus directly put improving the world in the players’ court!).
5. Many Factions are defined by a fundamental expectation-subverting "What If?" i. Union- what if the big bad hegemony that rules over everything was (at least trying to be) the good guys? ii. The Aun- what if the mysterious and mystical theocracy explicitly and literally had the support of a god and thus could back up their claims of manifest destiny? iii. The Corpros- what if all of these awful organizations actually did materially improve people’s lives, instead of that just being a propaganda line they throw out to justify themselves?
6. NHPs- Explaining what’s up with NHPs in full would be a whole Thing, so for now I’ll just share my favorite thing about them: they’re like droids in Star Wars, except the creators actually acknowledge the immorality of the situation and thus generate and encourage discussion about it in the playerbase, rather than just let it be taken for granted (and thus directly put improving the world in the players’ court!).
62 notes
·
View notes
Text
Ren'Py: Cleaned up the glossary code for Your Dry Delight
Events
We have several activities planned for this week!
First community event of the year, happening on Friday! The event takes place in Discord, and more information will be released throughout the week in #events. Just know that the activity will be a collaborative artwork created over the course of 24 hours!
Saturday @ 0730PST/1030EST we have our weekly dev stream
Saturday @ 1700PST/2000EST we will have a game stream. We’ll be posting a list of games to play, and you can cast votes for what order to play them in.
Your Dry Delight glossary
The YDD glossary code was initially an ugly hack that used different screens for when you clicked on a word from the dialogue and when you looked it up in the glossary. While it worked, it was not pretty.
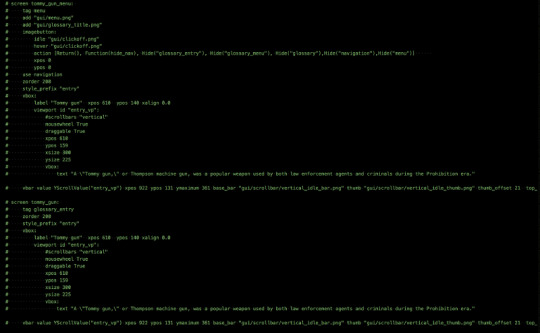
It was especially bad when we went to get YDD translated. To get that working, we had to append _language to every screen, make sure the translator knows how to add the _language to the translations, and duplicate the screen. If the translator wanted to add or remove words, then that would require adding extra conditionals to the sidebar with the list of words to ensure the wrong words in the wrong languages didn’t get all mixed up. The end result was 2 large glossary files per language that was difficult to debug for typos or strange behavior.
With the most recent language update, we decided to redo the glossary code to make it easier for future translations and just generally adding entries to a glossary (DMR’s glossary will be updated too). The glossary data is all stored in an external csv-like file, and then at the start of the game, we read the file and dynaimcally generate the glossary. For each language, we create a glossary.csv file. It has columns: language, key, entry, and definition. Language is unnecessary now, but it was originally created to have all the glossaries for every language combined into a single file. The key is for programming purposes; spaces are one of the greatest evils for coding, so we need a version of the word without any spaces (e.g. kid_gloves for “Kid gloves”). The key is also used to determine the order of the entries in-game. The word list is alphabetically ordered, so if there is a particular order that another language wants their words in, they can easily adjust that. The entry is the word to look up in the glossary, and the definition is the word’s (or phrase’s) meaning.

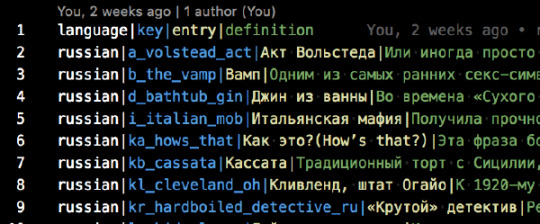
The code for reading in the glossary:
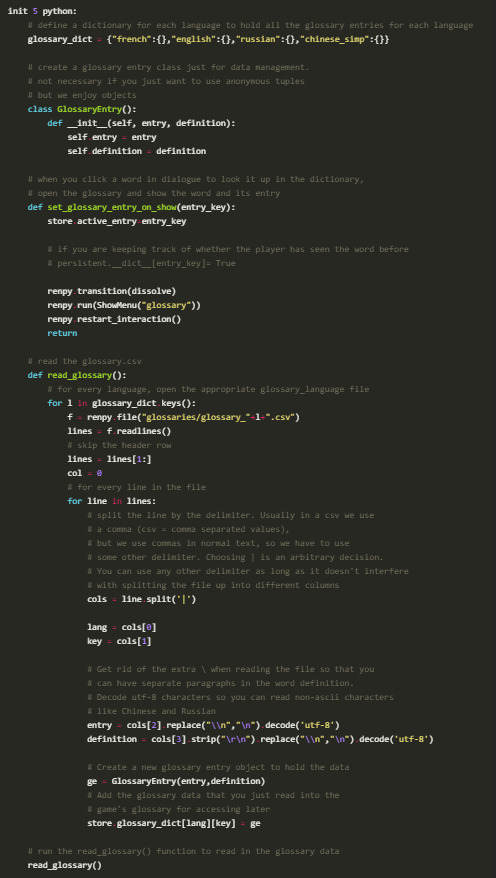
The Ren’Py screen code for actually accessing the glossary in-game:
screen glossary(): # This is the glossary that is accessible via the side menu
zorder 199
modal True
tag menu
if main_menu:
add "gui/mainmenu.jpg"
# this is the definition of the word once selected
use glossary_single
# this is the navigation containing all the words that you can open
use glossary_menu
# set the glossary scrollbar so that when you switch between words, the scrollbar
# resets to the top of the definition
default glosssary_scroll_value = ui.adjustment()
screen glossary_single():
# the screen with the info after someone clicks a word to show the definition
add "gui/menu.png"
add "gui/glossary_title.png"
imagebutton:
idle "gui/clickoff.png"
hover "gui/clickoff.png"
action [Return(), Function(hide_nav), Hide("glossary_single"), Hide("glossary_menu"), Hide("glossary"),Hide("navigation"),Hide("menu")] xpos 0
ypos 0
modal False
# if the glossary has just been opened, then we don't want to display an entry's information
if store.entry_data is None:
$ store.entry_data = ""
if store.entry_definition is None:
$ store.entry_definition = ""
tag menu
zorder 200
style_prefix "entry"
vbox:
ysize 320
# the entry that was clicked on
label store.entry_data xpos 610 ypos 140 xalign 0.0 xsize 300
viewport id "entry_vp":
mousewheel True
draggable True
xpos 610
ypos 159
xsize 300
yadjustment glosssary_scroll_value
# the definition of the entry that was clicked text store.entry_definition
vbar value YScrollValue("entry_vp") xpos 922 ypos 131 ymaximum 361 base_bar "gui/scrollbar/vertical_idle_bar.png" thumb "gui/scrollbar/vertical_idle_thumb.png" thumb_offset 21 top_gutter 25 bottom_gutter 15 right_gutter 20 left_gutter 10 xsize 42 use navigation
screen glossary_menu():
zorder 205
# when we first open up the glossary, we don't want an entry to already be showing
$ store.active_entry = None
# make sure we open the english dictionary entries if we are in english
if _preferences.language is None: $ entry_lang = "english"
else:
$ entry_lang = _preferences.language
# if the player has selected an entry, then we should update the screen
# to display the information for the selected entry if store.active_entry is not None:
$ store.entry_data = glossary_dict[entry_lang][store.active_entry].entry
$ store.entry_definition = glossary_dict[entry_lang][store.active_entry].definition $ glossary_keys_sorted = sorted(glossary_dict[entry_lang].keys())
$ lang_dict = glossary_dict[entry_lang]
vbox:
xpos 318
ypos 140
xsize 210
ysize 346
spacing 23
viewport id "g_list":
mousewheel True
draggable True
vbox:
style "list_text" spacing 13
# dynamically create the list of words in the glossary
for k in glossary_keys_sorted:
$ v = lang_dict[k]
textbutton v.entry action [SetVariable("store.active_entry",k),\ SetVariable("store.entry_definition",v.definition),\ SetVariable("store.entry_data",v.entry),\ Function(glosssary_scroll_value.change,0)] text_color "#262118" text_size 24 text_hover_underline True text_selected_idle_underline True text_idle_underline False # textbutton glossary_dict[key].name action [SetVariable("store.active_entry",key),SetScreenVariable("entry_definition",glossary_dict[key].name),SetScreenVariable("entry_data",glossary_dict[key].entry)] text_idle_color "#1d1818" text_selected_idle_color "#818181" text_hover_color "#818181"
Questions or Comments?
Feel free to send in any AG-related questions! Our Ask Box is always open.
Q: This may be too early to ask but for the potential new VN competition idea, would you all consider only people with experience and with a finished script or would it be open to people with a concept and at least an outline as well?
A: If you have a concept and an outline, and you can provide evidence that you are able to see the project through and complete the script, then you would be a good fit for applying to the competition. There will be more information on the specifics and details required from outlines, as well as general specs for designs (max number of characters, backgrounds, etc.)!
Thanks so much for all of your amazing support, and stay safe out there!
JOIN ARGENT GAMES ON:
AG Twitter | Discord | Patreon
17 notes
·
View notes