#with links and things to where I got my patterns and tutorials from
Explore tagged Tumblr posts
Visit Tumblr Blog
Explore Tumblr blogs with no restrictions, modern design and the best experience.
Last Seen Tumblr Blogs


Fun Fact
Tumblr has 411 employees.
Text
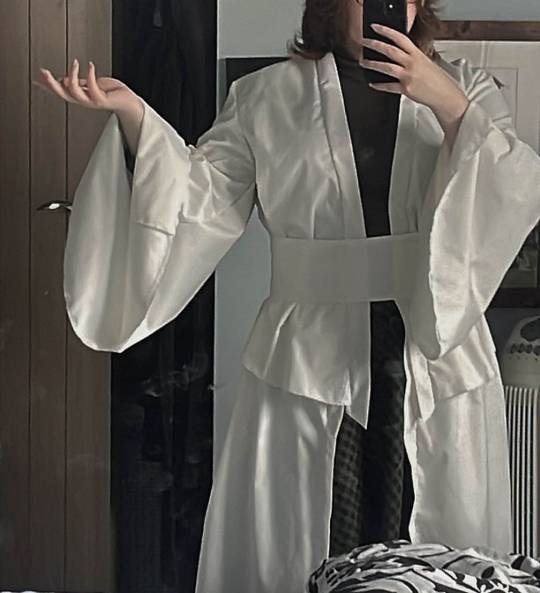
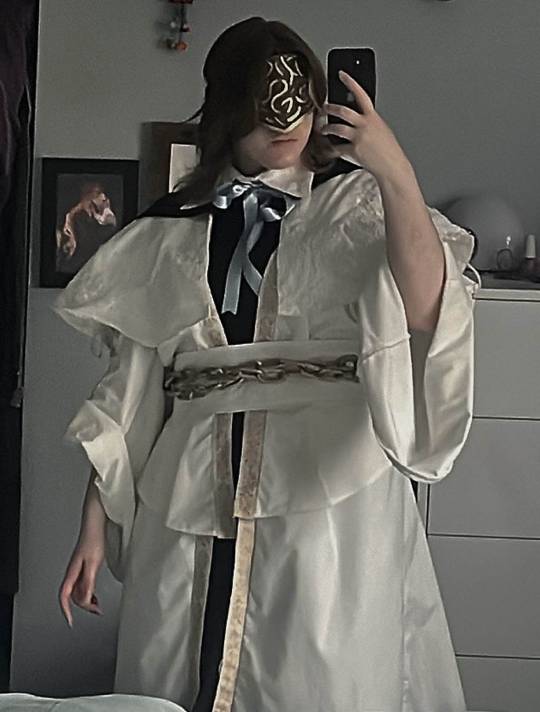
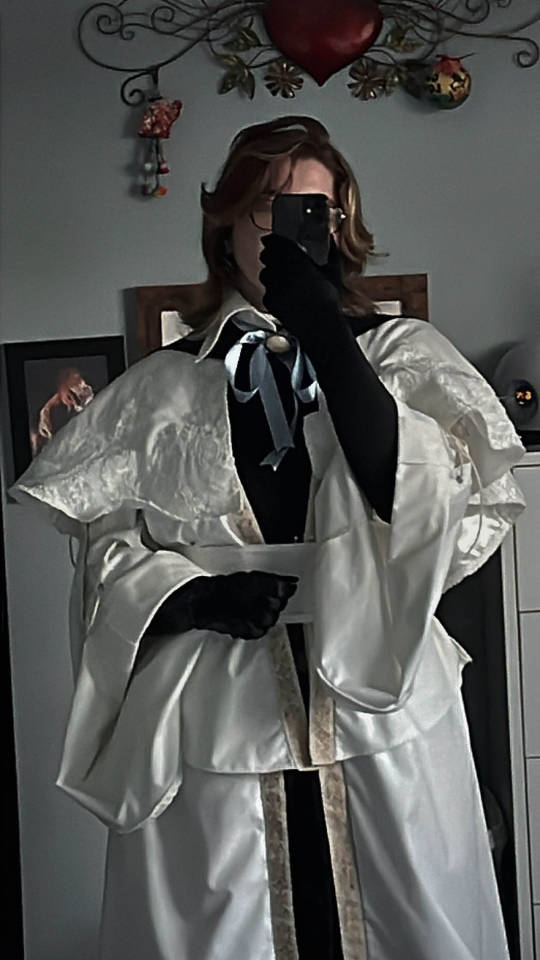
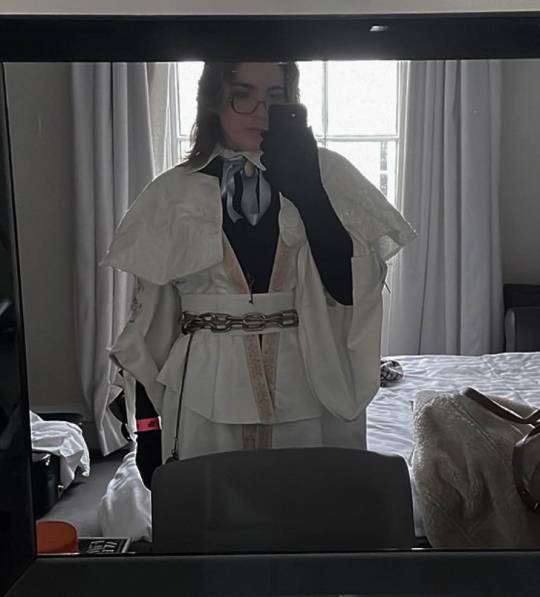
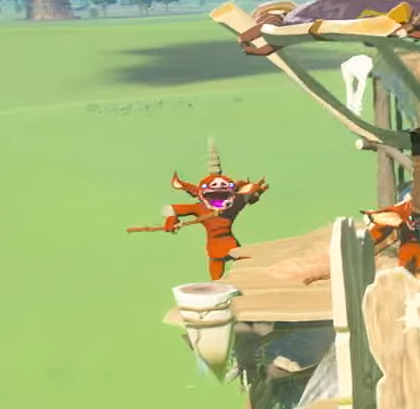
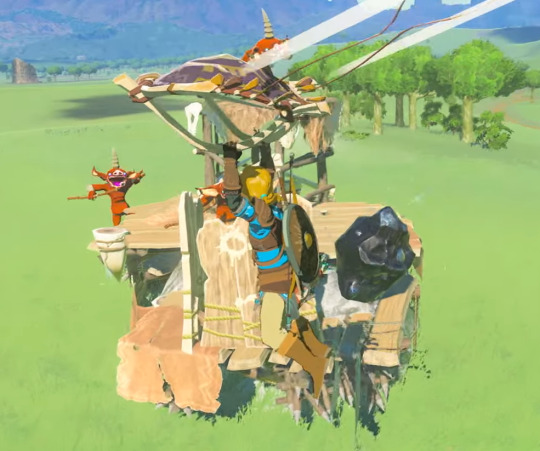
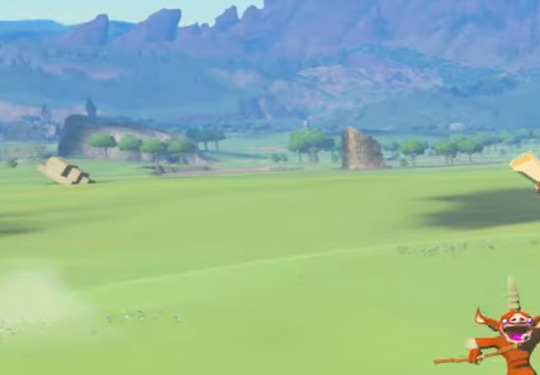
Hello!! breakdown of Choir Cosplay!! This is not really gonna be a step by step but a general vibe of what I did to make this cosplay :) To note: I haven’t sewn anything since I was in highschool which was 8 years ago, so a lot of this is like a ‘ya that works’ - make improvements where I could not :p Overall I wanted the cosplay to not be an exact copy of what is in game, personally I prefer more fitted clothing so I went close to my size with the pattern. Fabric: I used an ivory polycotton, ivory satin and black cotton. 1. I started hunting for a pattern that at least captured the vibe of the choir garb. I had split up the garment in my head into 3 separate parts: The base, the capelet, all the extra fancy bits. The big concern when picking fabric is I didn’t want the garment to be translucent, which is a problem for lighter coloured fabric. BUT!! I found that I didn’t have to make a lining and could instead flatline the fabric - where you cut double the piece and stitch them flat against each other - making it both thicker and opaque!
Flatlining tutorial:
https://www.youtube.com/watch?v=5N-qdP9tcc4&pp=ygUSZmxhdCBsaW5pbmcgc2V3aW5n
I found this pattern by Gunnar Deatherage on Etsy (as a beginner I loved this pattern, it’s very in depth and easy to follow)
https://www.etsy.com/uk/listing/1270370974/maxi-duster-wrap-pattern-instant?ga_order=most_relevant&ga_search_type=all&ga_view_type=gallery&ga_search_query=gunnar+deatherage&ref=sr_gallery-1-14&pro=1&sts=1&dd=1&content_source=95a164c411331c5aaff8fee029dee1e6377d3f92%253A1270370974&search_preloaded_img=1&organic_search_click=1
I did not use the sleeve pattern from it, instead I made my own to have the right fall and size.

Use the sleeve cap from the pattern so it can attach correctly to the bodice/back pieces - then where the sleeve starts to become longer draw out diagonally on both sides. For length I used the original pattern and went slightly longer! :) I used the same pattern for the peplum sorta top section and again for the skirt on the bottom. It creates a stitch line along the front but it’ll be covered by the belt!
I bought this embroidered ribbon and attached it around the edges of the garment! https://www.etsy.com/uk/listing/840215852/35-mm-golden-victorian-jade-jacquard?click_key=2c042e9416627d9bf9d2f1e85385ba93e48ca464%3A840215852&click_sum=1fe453a7&ref=shop_home_active_1&sts=1 Corset/rolled sleeves: I did this last Corset pieces: Cut out 4 pieces (twice) - and attach them together leaving the end open to turn them inside out. Use a grommet tool and punch some holes through your fabric - make sure they line up. Roll the sleeves to roughly where your inner elbow is and attach another piece of fabric around the width of the roll - pin it in place. Hand sew the corset pieces on and the other piece of fabric so it is all secure :) Thread some similar coloured lacing to the fabric through the holes.
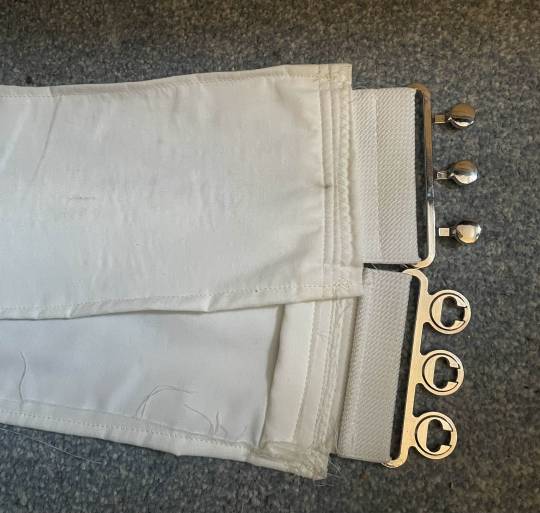
2. The belt! (My mum helped me a lot on this and was my voice of reason) Originally I had bought an elasticated belt with a clasp, but it didn't work at all and ruined the fall of the garment.
I chopped off the end of the belt, leaving me with some elasticated ‘fabric’ and the clasp. Measured my waist and cut out a thick piece of fabric twice and one piece of iron on interfacing. The measurement I did with the base on and added slightly more for both seam allowance and so there was breathing room for myself. Put the clasp piece on either end of the fabric and sew it all together! :) (marks are from the paint of the chain rubbing off onto the fabric :P)
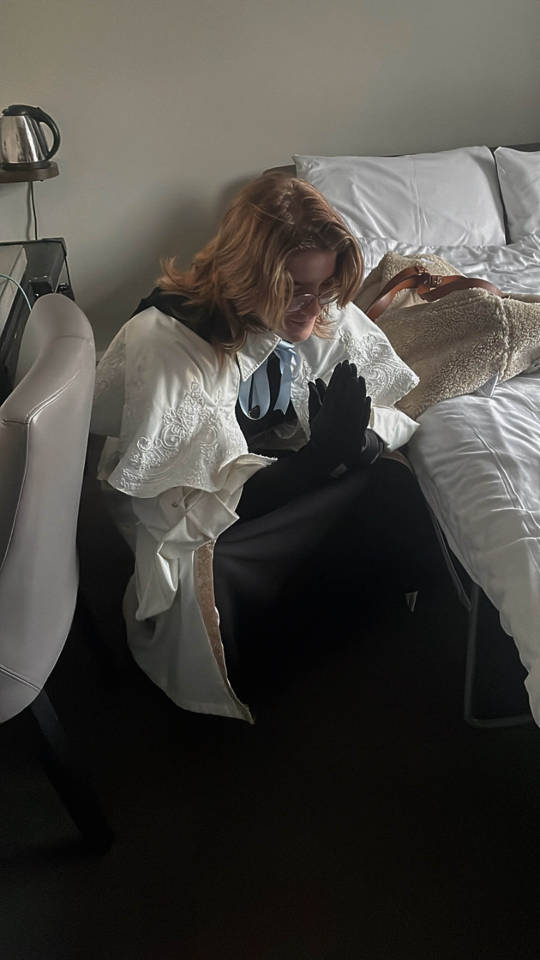
3. The caplet! For the capelet I used this tutorial Easy DIY Capelets | For Halloween, Thanksgiving & Christmas🎃🍂🎄 (The only issue with this is I couldn’t get my head around how to attach a non circle collar) Ivory polycotton + Ivory satin used. Doing the base of this is pretty straightforward with the tutorial - it’s just a circle skirt but for your neck. If you want to be evil to yourself, you can do what I did and hand sew bridal applique all around the garment. If you can machine sew it please do :p I went for a big swooping shaped applique in ivory - any gaps I had were filled with more applique https://www.etsy.com/uk/listing/628065500/beaded-sequinned-lace-flower-wedding?click_key=d8b4937d8079ab34b301cf2d4dc7fbd0d6ede960%3A628065500&click_sum=81fb49a9&ref=shop_home_recs_1 I used poppers on the base and the cape to attach them together - it kept choking me if i didn’t 4. The collar - made me want to cry ngl I could not figure out for the life of me how to attach a non circle collar to the capelet (which is how I wanted it). Instead we have a removable collar!! I copied the size of collar from one of my own shirts and followed these tutorials TWO PIECE COLLAR TUTORIAL | KIM DAVE How to Sew a Collar and Collar Stand Easily by Sew Sew Live 5. Graduation hood???? For some reason you can’t just buy these in the UK without paying £30, so I made my own Cut out double for the pieces around your neck and one for the ‘hood’ part Gather the ends of the rectangular piece and attach them to the other pieces!
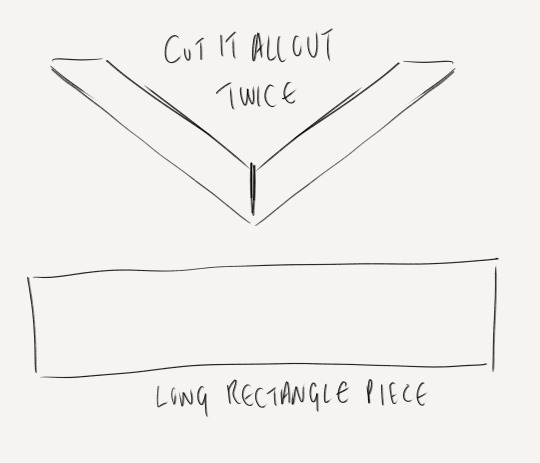
6. The Fancy back panel piece Measure from mid shoulder blade to the bottom of the garment for the main rectangular piece. Cut out two other rectangles of the same width coming into an arrow shape. Sew them all together and start sketching on the design. The great thing here is you can make it up, because it’s too complicated and nobody is gonna look at it and be like ‘u did it wrong’ I used a fabric medium and gold metallic acrylic
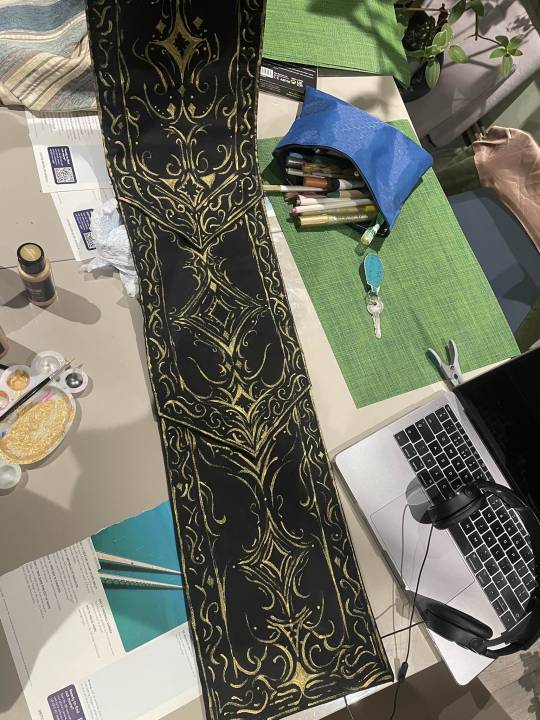
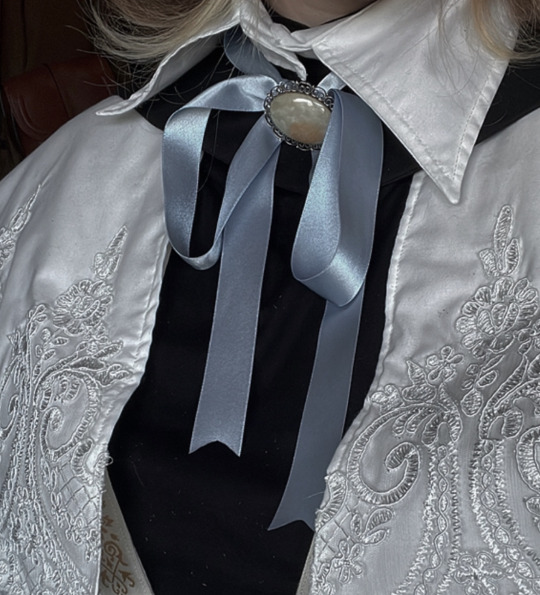
Once it’s all done, I machine sewed it to the back of the base garment because it’s hidden by the cape. 7. THE REST Chain: Me and the chain belt had a fight - Originally I used metal chain,, but I’m allergic to some metal and can’t deal with the smell,, I switched to a plastic chain with 2 D Ring clasps - had to sand it down but the gold spray paint loves to flake off. If I knew about it before, I’d use EVA foam chain :) Black pieces underneath: I bought a turtle neck and a long black skirt :P but you could make it as a dress or smth! Purchased long black velvet gloves, a pocket watch and a key necklace (I didn’t want to use a censer - and they are v expensive/idk how to make one) Ribbon + brooch: I bought chunky soft blue ribbon and found a vintage brooch on vinted
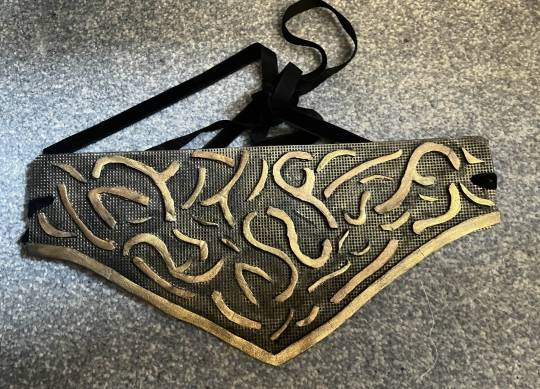
The mask: If you have contacts you’d probably be fine, but I don’t and this mask messed with my depth perception and balance so I had to take it off so I could wear my glasses :(
Use buckram plastic mesh - the thicker kind, used for fursuit eyes and in black! You can see out but nobody can see in. I made a mock up with paper but sorta looks like this shape :)

Eva foam pieces cut out into swirls and filigree like shapes, glue it onto the buckram I did a base coat in grey over the entire thing and painted it with black, gold and bronze acrylic! I hole punched and put the ribbon through it so the mask could be tied around my head.
If you’re making the mask and hat - I’d attach the mask to the hat so it’s one piece :) Where I went wrong/what I’d improve I wish I had been able to attach the collar to the rest of the garment. There is a gap that appears between the collar and the caplet/base at the back (mainly due to gravity and it moving) that can be annoying, since my hair is on the longer side it was covered but still I wish it wasn’t there. I’d also want a bigger collar! I’d not use satin as a lining for the skirt and capelet - it’s so annoying to use and it’s so slippery Maybe would not hand sew all that applique because it took me over a week :P BUT OVERALL for a first cosplay, it’s pretty good! I’m mostly happy with the outcome and it was one of my dream ones to do! :) I hope this helps, I didn’t take photos of all the steps unfortunately but hopefully it makes sense :)
#Choir cosplay breakdown as best as I could#with links and things to where I got my patterns and tutorials from#I hope it helps - if you wanna know more or see more photos feel free to dm and ask idm showing!!#bloodborne#bloodborne cosplay#choir cosplay#bloodborne art#bloodborne choir#cosplay#fanart#art#artist#fromsoft
54 notes
·
View notes
Note
Can I ask how you do the color overlay/backgrounds on your color palette posts? Specifically the rose tyler one.
Sure nonnie, sorry it took me a while to get to I had some other colour palette requests and wanted to make a little tutorial for you using one of them when I got to them. So I'm gonna use this gif from this gifset because I really liked how the colours came out. I'll be honest I have no set colouring pattern for these, the colouring differs from gifset to gifset but it follows the same basic steps. (also a little warning, I tend to ramble when I'm making tutorials so hopefully it makes sense)

For this tutorial you will need:
Basic gifmaking knowledge (I make mine on the timeline option on PS but it works with frames too)
Your gif prepared with your preferred colouring and sharpening
Knowledge of using layer masks when gifmaking (if not don't worry i'll show where to find them)
So here's the gif before all the colouring;
and here's the gif after I've put my normal base psd on and made the adjustments to it;

Now we come to the fun part, like I said before what I do varies from gifset to gifset so just play around with it. A good tip though I've found for changing the background though is choosing a scene that has a lot of blue or cyan because I find them easiest to change the colour of, but it works with any colour to be fair.
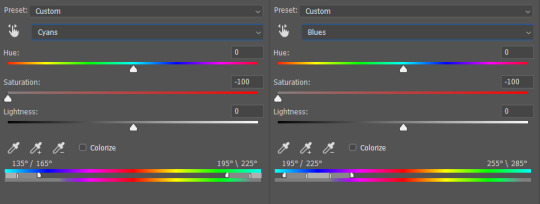
For this gifset I started by adding a hue/saturation layer and setting the cyan and blue (or whatever the main colour of you gif is) and setting them to -100, it's not an essential step but it does help if the blue/cyan route is the way you went.
that make the gifset look like this;

All the blue and cyans have turned have turned to gray so now we can start experimenting with our colour overlays. So I created a new layer and filled it with my desired colour, which was this lovely purple colour here;

And i set the layer blending mode to soft light.
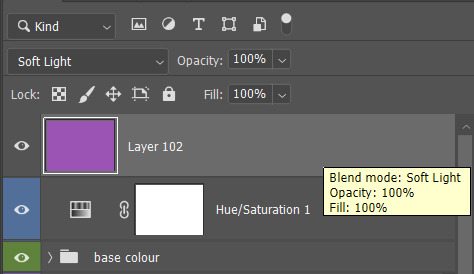

And got this nice result, the parts that were gray now have a purple colour to them, but it's not quite the same shade I'm trying to get, so I duplicated the colour layer, keeping the same blending mode.
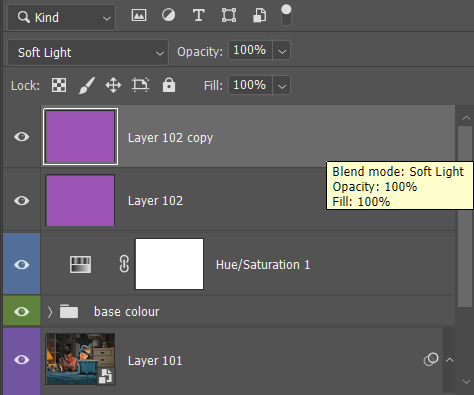

We're getting there now, but I want to try making the purple a bit brighter now, so I duplicated the purple layer again, but this time I set the blending mode to lighten, and turn the opacity down to 12%


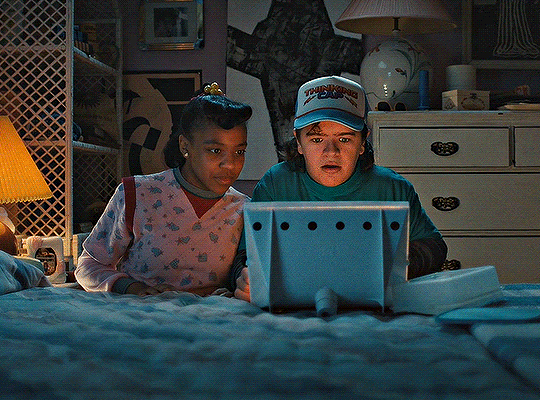
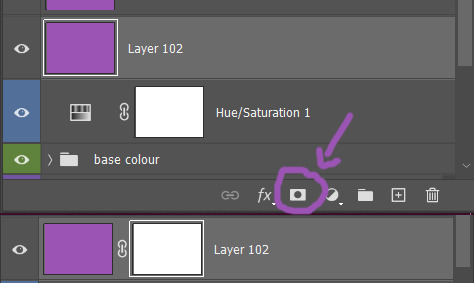
It's a tiny difference, but it's perfect for the shade I'm trying to get, but like I said above it's all down to experimenting with different blending options. Now my only issue is I want to bring back Dustin and Erica's natural skin tones that have been given the purple shade due to the layers. That's where layer masks come in. To get a layer mask pick the layer you want and and click the little icon I've circled underneath where your layers are, which brings up the mask as a white box next to it.
With the white box selected I select the brush tool and make sure the colour of the brush is set to black and paint over the areas of the gif I want to take the purple shade away from (note this step works better on subjects that don't show a lot of movement in the gifs, but there are other tutorials out there that show key frame colouring and stuff that I'll link at the bottom of this)
So now the mask should look like this;
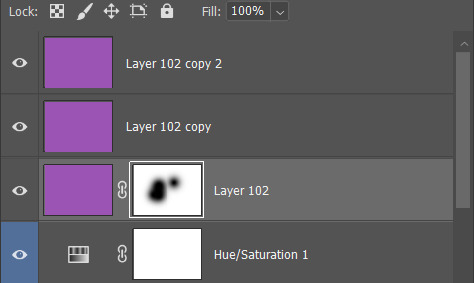
Then I need to apply the ayer mask to the other purple layers, for that I press ctrl and click on the layer mask (not sure what that would be on mac sorry)
It should look simular to this, the outer area selected is where the purple colouring is the the circles are the are you're trying to change, with that select your next colour layer and apply layer mask, that will then give it the same altered layer mask from the pervious layer. Then repeat these steps on all your colour layers.

They should all now look like this leaving you're gif looking like this;

And here's the final result, Dustin and Erica have their normal skin tones while the surrounding areas of the gif are now the colour I changed them to. I hope I explained things clearly enough, if not don't hesitate to ask me any follow up questions, here's some other tutorials for changing colours in gifs:
my own colour gradiant tutorial
gradiant colour map blending
key frame colouring
gradiant fill layers
colour manipulation
Just remember to be creative and mess around with it, there's all sorts of results you can get from different blending options that might work better for you ;)
#here you go nonnie#i hope my rambling paid off and this helps :)#asks#tutorials#tutorials*#resources#gifs*
15 notes
·
View notes
Text
HELLO @okartichoke I AM HERE WITH MOSSY'S GUIDE ON HOW TO START SEWING: A VERY MESSY TUTORIAL
I am extremely self taught, so this is gonna be a lot of links and infodumping!!!! Hopefully this helps a even just a little bit :>
SO! I honestly got into sewing through youtube during covid, largely bc i wanted silly fun clothes! There are a loooot I could recommend to you out there, but I personally find that the more chaotic and learn-as-they-go people help me the best! Rachel Maksy and The Stitchery are, to me, some of the best to learn from! Which is honestly pretty funny since they tend to just fully wing it most of the time lol. While i could recommend excellent sewists like the amazing Bernadette Banner (who is actually the first sewing channel I watched!), I find that the more loosey goosey the process, the more i can learn, if that makes sense? I find it helpful to watch people trial-and-error their way through projects and show where they succeeded and failed since I get a better grasp on their process that way.
The best way to start sewing, in my humble opinion, is to grab whatever sewing machine you can get your hands on and play around with it! Read the manual, find a tutorial video on how to thread the machine, grab some scrap fabric and play around! You don't really need any special needles or feet (the little thing that holds the fabric down), unless you wanna get started sewing denim or velvet or something Speaking of which, learn about fabrics!!!!! I learned mostly by going to joanns, touching the fabrics, and looking at the content labels. Everything has different uses, and while two things might both be cotton, one could be knit while the other jersey (tshirt fabric). I like this video for learning the basics! Tbh this one took me a while. Usually patterns have recommendations for what fabrics to use, so that's always a good place to start!
Patterns. Ah my arch nemesis. Unless you decide to start drafting your own patterns (or get a mannequin and learn how to drape fabric), you're probably gonna need to use one. There's two major things i recommend for this: 1) Make sure there's a video tutorial online before buying, and 2) start with something you might actually use/wear. Pattern instructions are notoriously vague, but thankfully many wonderful people make video tutorials for them! And while you might be tempted to grab one of those beginner friendly patterns, they can sometimes be. real ugly and not well fitting. Also boring! Finding something you like will hold your attention better and make you actually wanna finish it!
Ok SO. getting into more of the cosplay sewing stuff. First things first my knowledge here is a bit more limited, unfortunately. Fortunately there are many wonderful people out there with tutorials!! So if you wanna learn more definitely look there!!! General tip for cosplays + more complex sewing: MAKE MOCK UPS PLEASE IT SUCKS BUT IT HELPS SO MUCH. Go find the ugliest fabric in the sale bin and buy a few yards, then use it whenever you wanna test patterns. It might be tempting to immediately start cutting and sewing the finished garment, but the truth is that patterns rarely fit perfectly well (especially if they're fitted/tighter on your body). Make an ugly, barebones version first with your bad fabric, take notes, and then start making the finished piece. It'll save you money and sanity.
As for cosplay youtubers, I heartily recommend Sarah Spaceman, since not only do her videos show her process, she also does segments teaching you more about sewing!! She tends to tackle more complex projects, and watching her take those on has helped me a lot :} For cosplay patterns etsy usually has quite a few! I like Indigo Patterns (they have a good array of loz patterns I need to buy) as well as Alice in Cosplay Land. Please note that I haven't bought from either, but both their etsy shops have wonderful reviews and I plan to buy from them in the future!
not gonna lie I am getting very sleepy so I'm gonna cut it off there for now! Hopefully my rambling helped lol. Feel free to ask me any questions or for any clarification!
#wowie this is longer than I thought#and i didnt even get into any specifics#tbh my whole method for learning things is mess around and find out#you'll only get better once you start!!!#it looks really daunting at first#but you gotta start sometime!#the time will pass anyways#anyways you're more than welcome to dm me with any questions!!!#i will do my best to answer them :]#I was gonna include pictures of my projects and mockups#but *apparently* i deleted them all for some stupid reason#and i'm currently trying to finish all my half done projects before I start any more#so no pictures for now 😔#mossy’s sewing adventures#sewing#mossy talks
29 notes
·
View notes
Note
Hi! I hope it's okay that I'm sending you an ask.
I was looking at some of your posts about diy clothing and things like that, and I've been really into diy/alt clothing for a while, and I've been wanting to maybe make my own, but I don't know where to start.
I want to start small since I'm actually terrible at art (every time I try to learn how to sew, it just ends in me giving up in frustration, for example).
Do you have any advice you could give me?
-Anon
hey anon!
asks are always welcome, i love answering asks so dont hestitate to reach out. sorry for the wait on this, ive been busy.
i made a post about this months back but cant find it atm so ill just make one again.
if sewing, as you say, is difficult for you, id advise starting with something that doesnt require sewing to train yourself in crafting.
an easy one is for example making armwarmers from old socks by cutting them off above the heel, and using the top part (that goes on your ankles and legs). cut a slit in that on the side for your thumb, and youre done. you can bleach nice patterns or anything on them. which will also teach you how to work with bleach.
some other things you can make/do without sewing are: chokers and cuffs from old belts, bottlecap buttons (i have made a tutorial on those, ill put the link in the comments), fishnet/see-through top from old thights, painting/bleaching clothes, making jewellry from safety pins, chains from soda tabs, and a lot more.
in the long run learning how to sew really is a good and useful skill, and i advise investing time in learning it. it allows you to make way more clothes and accessoires, and also helps when you need to fix up old clothes.
remember it takes time to learn these skills! ive been crafting constantly for about three years to get to the level i am at rn. and i still have a lot to learn too. dont be harsh on yourself when your projects dont turn out how you wanted/expected them to. thats all part of the learning process. look at where you can improve and try different techniques to see what works for you.
also! you are not terrible at art. the "aesthetic-ization" of diy and art as a whole is really bad imo cause a lot of people feel pressured that their diys need to look perfectly aesthetic or else they cant wear/make them. and thats not what diy is about! make whatever you want, and if someone tells you its ugly or not good enough they should get a hobby.
ehh i think thats it for now? let me know if you got any more questions. (again ill drop a link to the bottlecap tutorial in the comments)
40 notes
·
View notes
Text
My latest work
After completing @sewdesune 's tutorial plushies, I went ahead and tackled some of her more intermediate designs. Here's how they turned out:
Sylveon (eeveelution sitting pattern)


This absolute icon (and best eeveelution, no cap) was a true step up in difficulty for me.
For starters: I made some basic mistakes in a few details, like not checking the eyes for symmetry (rulers are your best friend!) nor cutting the bow seam allowance in the right shape, leading them to getting slightly deformed after turning outside out.
The most difficult part was the neck, since it involved sewing a straight edge into a curved one, which I had never done before. Took me a few tries, and it still didn't come out quite right (its a bit sunken in). But it was a valuable learning experience, nonetheless.
This sylveon served as a warm up for an even more challenging project:
Fluttershy (mlp pattern)


This was my very first commisioned work (kinda?), since I made it as a birthday gift to my older sister, who loves horses in general. She really liked the gen4 patterns I showed to her, and so I went right to work on this shy equine.
The body is much more slender and complex in comparison to the previous patterns, which required some very careful sewing on my part. like sylveon's neck, the foot bottoms also involved a lot of curved sewing, but I managed to do it right this time (for the smaller front hooves, I would recommend hand sewing.)
I got to fill some spots with poly pellets this time around. They really help with dustributing weight around the plush, especially towards the limbs and hind bottoms. (Always remember to use a funnel though, cuz these things are a nightmare to handle by hand >_<)
For the wings, I tried to add more stability to the pieces by adding a layer of felt underneath them. This helped the wings keep their shape, but they still hang a little bit too flopply from the main body. Still, a noticeable step up from previous projects.
Needless to say, Sis really loved her gift :)
If you would like to try your hand on these projects, here is the links to @sewdesune 's site, where you can download the pdfs for yourself:
eeveelution sitting plushies:
https://cholyknight.com/2023/08/18/eeveelution-sitting-plush/
mlp plushies:
https://cholyknight.com/2024/08/02/my-little-pony/
that's all, folks!
4 notes
·
View notes
Text
Hi everyone!!
Lots of people asked for the pattern I used for my Joel and Lizzie dolls, but due to my mental unwellness, my "pattern" was actually a chaotic blend of multiple patterns, as well as my own spontaneity.
Nonetheless, I am going to attempt to explain the method to my madness in this post! (Fair warning, it will get long.)
(If you actually want to try to recreate this please PLEASE reach out to me!!! I can go into way more detail and do diagrams and whatnot if you really wanna see the full idea!!!)
I'm gonna do my best to divide this up into sections based on how I made them, but because I modified a lot of things and Joel and Lizzie are clearly not the same, it may get a little muddled along the way, but here goes!
The Bodies
First thing's first, this is the link to the tutorial I used for the basic body shape. Super great video, easy to understand, fantastic starting point for any doll!! :D
For Joel, I followed the tutorial pretty exactly, minus that middle seam for a belt. I changed colors for the boots, pants, and coat and kept all the measurements the same.
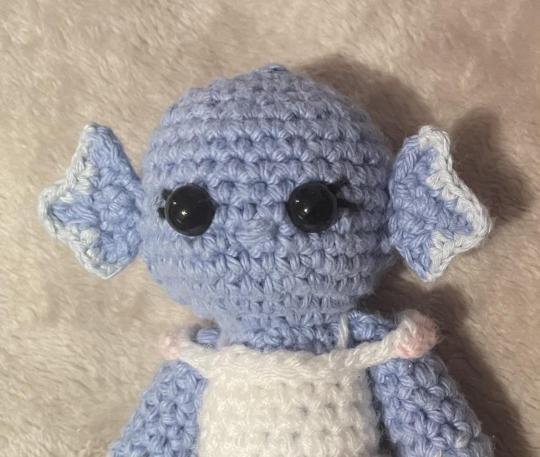
For Lizzie, I modified her pattern to be a little bit bigger bc haha funny tall wife. On parts of the pattern where the stitch count stayed the same, I added a few more rows to make them longer. I added 4 rows to the legs, 3 rows to the chest, and two rows to the arms.
Like this!
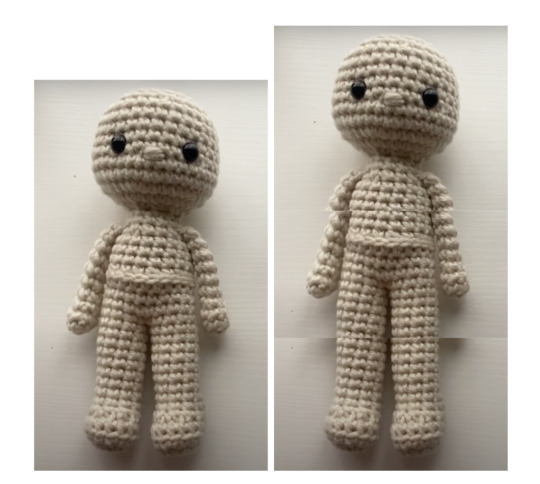
listen I had to visualize it somehow-
I also did a gradient for Lizzie's arms/legs/tail! Here is the video I used to figure out how to do it (I don't have the measurements for where I changed colors I'm sorry I'm goofy </3)
Also, here is a link to a post where I half-heartedly liveblogged the early stages of making them. You can kinda get a rough idea of where I changed colors for different parts of their outfits, etc. but I only got two steps, really- oops.
The Clothes
Now, this is the part where I documented virtually nothing, but honestly, it still turned out just fine!
For Joel, I made boot and sleeve cuffs by just single crocheting a chain to fit around his arm/leg and adding a couple of sc (single crochet) rows. Then I sewed the ends together with a long yarn tail, used thinner gold yarn to add some detailing (look up backstitching! it works really well!!), and sewed the edges on.
His coat ends were made in the same way, but bigger, and instead of sewing the edges fully together, I only connected the top stitches when I was attaching it. And because I'm a messy sewer, I easily hid the seam with a black sc-chain belt :)
The gold details of his coat is also a sc-chain just sewed on. The edges at the bottom... were sorta a sc-hemming type deal-? I don't know, I winged it and I don't like how it turned out </3
The shoulder pads I actually can tell you! It's 5 sc in a magic circle, sc around, and then I picot stitched around in each stitch. Then I tied off a long tail and sewed it onto the top of the arms before I attached them. The badge/flower is the same pattern, but without the sc round in between the mc and the picots.
The sash was a little wonky doing it as a full loop the whole time, so it was basically a long rectangle and when I was attaching the ends together I did it under the shoulder things so it wouldn't be bulky and ugly on top. I think it's decently easy to understand from the pictures in the original post, but if not lmk! (if any of this is coming across at all then bless you tbh.)
The collar is just two rectangles I sewed side by side, they don't continue to the back at all bc they were ugly /lh
And this is the tutorial I used for the crown! I threaded a little piece of green yarn through to make the jewel and tied a knot in the back :)
For Lizzie, I literally made the skirt up as I went along, but it was roughly based on this video. I started with a sc chain to get the right size, then made it a rectangle for a couple of rows (maybe like four?) before joining it together. (That way, I could make the skirt separately and still be able to get it back on her when I was done without being too tight!)
At some point, I picked a stitch as my "center point" and started going back and forth from about that point instead of completing the full circle, doing half double crochets close to it, then double crochets, then triple crochets, then back to dc and hdc as I got close to it again. I think I did about 6-8 for each stitch type section? The GOAL was to make the skirt's hem asymmetrical, which worked, but it's hard to explain bc I literally made it up.
Then I made another sc chain for the belt thing after I attached it :)
The top detailing is also a sc chain, but with some joined yarn above the arms for extra color. There's also bits of yarn that are supposed to be straps, but you can't really see them in any of the pictures, so that's optional rip.
For the frilly hem, I joined the yarn at the "center point" and basically just worked around the whole hem repeating (1 dc, 2dc inc) to make it all wavy and fun!
The Hair
The pattern I based the hair off of was from this kpop star doll that I was originally going to base my entire Joel doll off of.
The difference is I changed the lengths of the strands (I did it based off looks, so all of them are slightly different in length to look more natural) and also color changed the very front few strands of Joel's hair to be green. I also put two strands in a few of the back stitches instead of just one so they completely covered the back of the head (so there are 15-16 strands instead of 14.)
To attach the hair, I used pins to mark out where I wanted to place each strand. Here's a quick progress shot I sent to my friends:
Now, I wasn't smart, and used long pieces of thread from tying off the "hair mop" to sew all the strands onto the head individually. It took forever and make it kinda messy in the back because of weird overlapping. If I could redo it now, I'd use fabric glue or something to glue each strand so it lays flat, although if you don't have it or want to avoid the potential mess, sewing it does in fact work just fine.
Extra Bits (mostly for Lizzie)
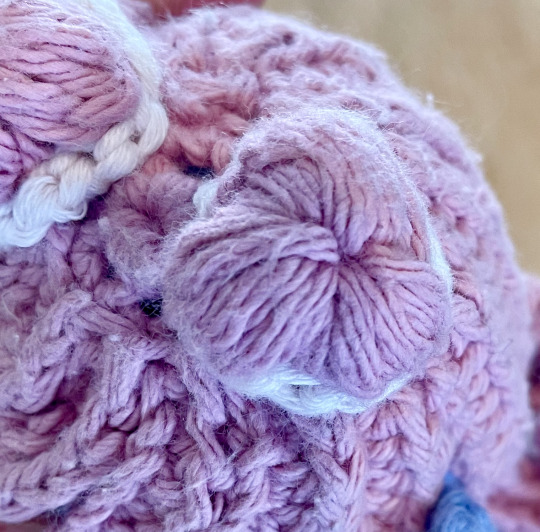
Lizzie's tail is more or less the same as her arm, but it starts thinner and goes for longer at the end. For the frilly edge, I remember using a crochet beta fish fin design, but I can't for the life of me find it in my history now?? But it was essentially joining the yarn a few stitches from the point and crocheting (hdc, dc 2x, tr, dc 2x, hdc, dc 2x, tr) and mirroring it on the other side so it looked like this:
Here's a closer view of both the tail and the skirt's hem.
Lizzie's fins were made by making a magic circle, chaining 4 and sc-ing back, and slip stitching back into the circle three times to make the three points. Then I joined onto one point with the lighter color and sc-ed along to the other point to make it more detailed.
Here's a cursed image I sent to my friends of bald Lizzie and her fins.
Lizzie's space buns were a fever dream to me because I made them at 1 am, but I did something that looks similar to this puff stitch flower with only three "petals." I attached it to the head and then used a short chain of another color to add some color and detail.
Here's a view of a bun from the top.
---
I think that's just about it! If I missed anything or want to know how I did something better, please please PLEASE reach out to me!!
I'd love to go into more depth on things, but I predict this post will top off at 5 notes so I don't really want to spend hours explaining something that'll go completely unseen /lh
Nonetheless, I hope you enjoyed this little insight into the inner workings of my brain! Feel free to share and tag me in anything if you decide to try to do this yourself.
Cheers!! <3
#WOO I DID IT.#hope you enjoy this it took forever AHSJDSA#pho.posts#pho.doodles#<- bc it's from my project haha#when i eventually make a dl pearl i'll document it better so you can see it in action haha#empiresblr#empires smp#esmp s1#smallishbeans#joel smallishbeans#ldshadowlady#lizzie ldshadowlady#jizzie#crochet#amigurumi#amigurumi doll#pho.crochets
30 notes
·
View notes
Text
Cat pattern (written down by me) and video tutorial link (not mine)
Easy to middle-ish in difficulty. Video tutorial is beginner friendly. My cats have a slight change in the eyes, they're longer.

I do some things different than the video. Just a heads up Mini kitty: Tail: Rnd 1: 6sc (6) Rnd 2: inc, sc (9) Rnd 3 - 5: sc (9) Rnd 6: sc dec (6) Rnd 7-10: sc (6) leave a long tail, u'll need it Stuff the tail Use a needle to close the tails Ears: Rnd 1: 4sc (4) Rnd 2: inc (8) Rnd 3: sc (8) fasten off only on the first ear Body: continue in 2nd ear. stitch marker. Rnd 4: sc 4, chain 3, in other ear sc 8, sc 3 in chain, sc 5 (22) Rnd 5, 6: sc (22) Rnd 7: sc 10, inc, sc 10, inc (24) Rnd 8: sc 3, inc (30) Rnd 9 - 12: sc (30) Sew eyes, mouth and side stripes on* Rnd 13: 3sc, dec (24) Rnd 14: 2sc, dec (18) Rnd 15: sc, dec (12) Rnd 16: dec (6) Close the hole on the bottom by pressing the sides together and making straight lines going through them. Sew the tail on with safety pins and then the long thread from the tail.
Sew eyes, mouth and side stripes on: eyes between row 8 & 9 how I do it is look at the cat, look at where the ear ends and bridge starts. I keep in the ear space, but on the edge of it. go the in between of row 8 & 9 go into the second from where the needle is rn. Do some rounds, until eye is visible. From the lower part of the eye, go into the second stitch and go through the next. Reapeat. U got the mouth. Eye, move into second from left. Go upwards into the second stitch hole of where your needle is. Reapeat, to make eye visible. Cut yarn and knot ends together. Stripes: From an eye out go either two left or right, depend on which one chose first. Go one diagonialy outwards down. That is where the first stitch ends of the upper stripe. Go three left/right. that's the full upper stripe (make 1 or 2, depends on preference). Go one down. Now 4 to the right/left. U have the front facing stripes. On the upper go three right/left and the one down four right/left. Now the other side, but mirrowed.
youtube
10 notes
·
View notes
Text
Nameless Bard Cosplay Breakdown
Why? Why not (I want to share my creation especially with seeing so many tiktok cosplays of them, but never any guides/posts about how people. did stuff for them /lh)
I..don't know how well screen-readers will handle such a long post. I hope it works out okay.
Note: final image does not have alt image text at the time of posting, but I intend to add it later on
add alt text to images (all minus final since that would be a picture from the morning of)
Cloak
This thing is LONG. I'm about 5'1/155 cm, and this thing goes down to my KNEES (& big hood too!)
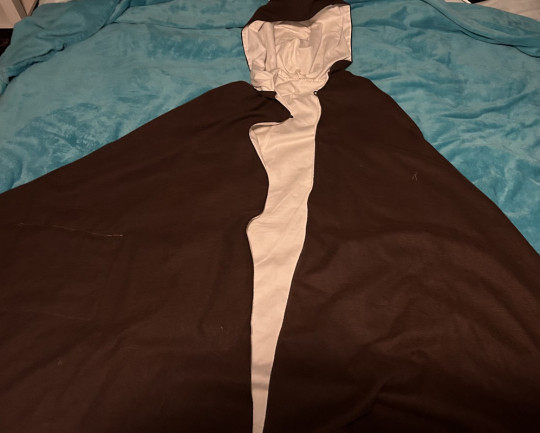
The inside fabric is from old off-white/beige bedsheets, and the outside fabric was from joann's (link).
I used a pattern from Aliceincosplayland on Etsy (link) (note: you don't need to buy a pattern to make a cloak- I bought it because of the different options between the lengths & hood sizes) ; for mine, I used the knee-length pattern & the larger hood size.
The large covered hook & eye also from joann's (link).
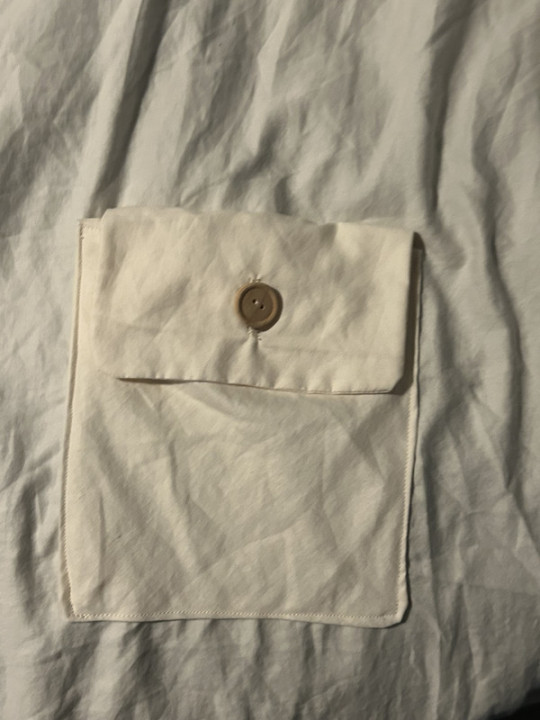
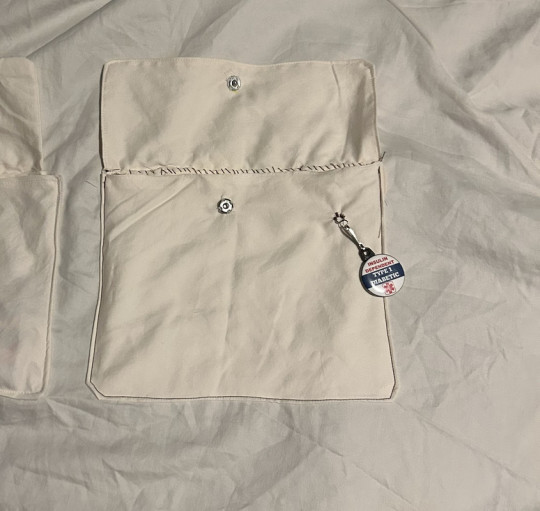
POCKETS! There's 2 small pockets close to the edges, & a bigger one I added this year to fit things like my PDM, testing kit, battery pack, etc. The smaller pockets have wooden buttons & button holes, the bigger one has a snap w/ a wooden button hot-glued on top because I didn't wanna tinker with the button hole foot.
Windblume Flower
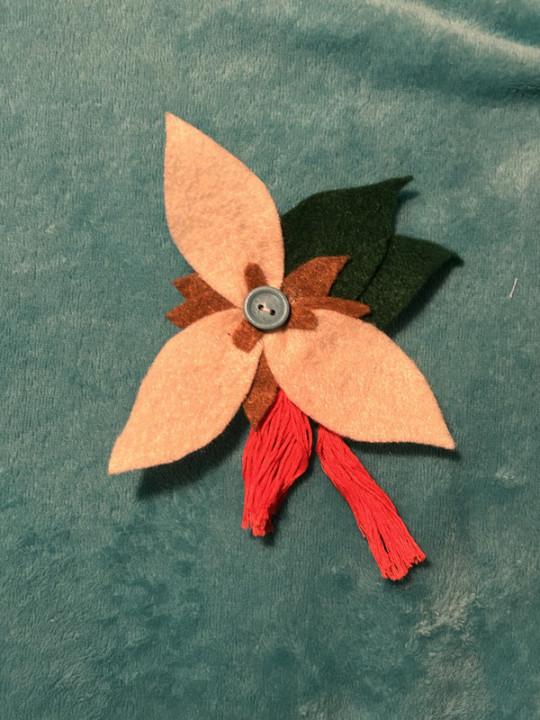
I forgot what I traced but I made patterns for the leaves and petals & used a tutorial to make the tassels with red embroidery thread.
It's made of felt, hot glue, and I hand-sewed some bits like the button in the middle. It's also removable & fastens via safety pin sewed into the back.
Shirt
I gotta be honest, I forgot to work on it and tried to finish it about a week before the con. It looked like it was going well, but little errors made it look not up to the standard I was holding myself to and I hated it. I didn't even add the finishing touches with the shirt's collar's closure, or the ruffles on the cuffs of the sleeves. Instead, I'm using the original shirt I got off amazon last year (link), which I'm glad I kept intact when trying t make the second version's pattern.
I wanted to make another variation that was closer to his canonical outfit and was not made out of that plasticky fabric material (not that it was uncomfy, I just thought it'd be better for a convention center with a lotta people). The arm holes were a bit too big, the neck hole was a bit snug, and I botched the collar almost entirely. Lesson learned, make mockups and do not procrastinate on your projects until the week before the event.
I have the picture of it in this post.
If it counts, last year I made a slight alteration to the original shirt in which I sewed part of the slit in the top so it didn't go as deep. That's about it, honestly.
Shorts
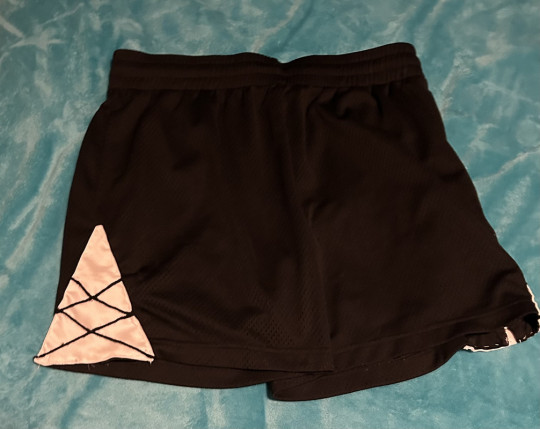
Honestly, these weren't too bad overall. I cut the triangle panels out of white fabric, used embroidery thread for the criss-cross bits, and hand-sewed said panels onto the shorts.
It's great 'cus it has pockets and it's adjustable with the drawstring on the inside.
Wig
This fucker (part 2)
I combined a wig off Amazon (link) with wefts from hair extensions (link; though it comes with two I used just under one weft for both briads) to get the general shape
I went into detail on how I redid it here (also where the pictures are) but to sum it up: washed out hairspray/gel from last year, trimmed & rebraided the longer strands, used hairspray to do the bangs & gel to fix the ends.
Belt
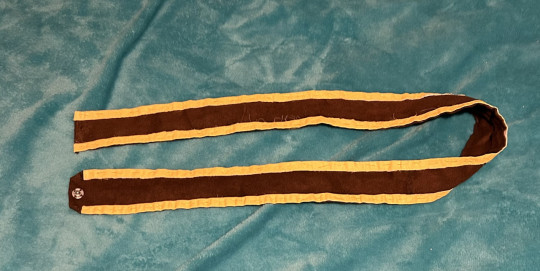
I had this old brown fabric from an old sewing class project that I used. I measured the length by putting the rest of the costume on and using a measuring tape, overlapping a little so there was room to add the snaps for a closure. I think I used the trim from an old bedsheet and put it on either of the longer ends, then painted it yellow to match the bard's. Semi-reliable snap closure sewn in later, then boom, belt!
Lyre Prop
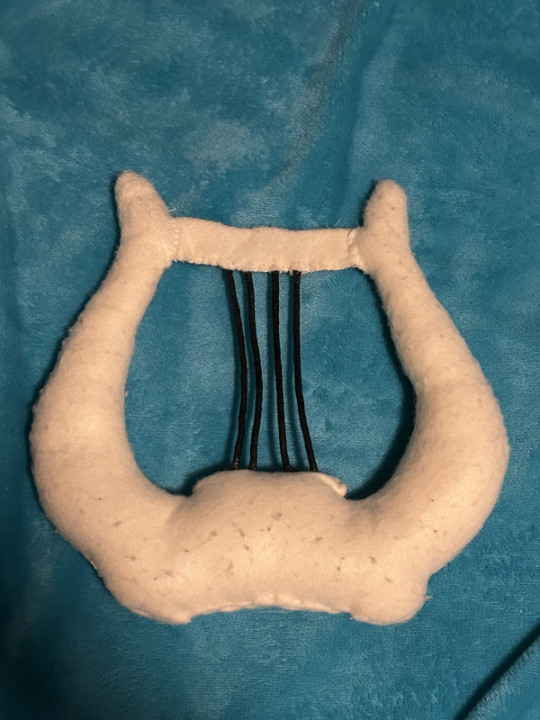
I forgot what I traced to make this pattern too, but I made it out of felt, essentially a stuffed toy. The little bar bit at the top is a separate pattern piece, as I tried making it all into one and was unable to turn it inside out. I forgot what kind of cord/string I used for the lyre strings, I just remember using mod podge to stiffen it as a finishing touch.
I used it last year as a prop, but I ended up just carrying it around so it might be best to leave home unless you plan to take a lotta pictures.
Miscellaneous Parts
Corset Belt: bought off amazon (link) ; It's comfy for the most part. liked the idea of a faux corset as opposed to the vest
Boots: last year I used a different set of boots that I've had for years, this year I'm using slightly newer boots that I got off my brother since they're small on him. They're timberlands I think? A li'l bit of height, lace-up, slight heel, feels 3% more badass /j
Makeup: I... know very little about makeup. I highly doubt the bard used makeup back then (/j). With that in mind, I really just use black eyeshadow & an eyebrow brush to fill my brows in and that's it. I use an old eyeshadow palette, but I also have an eyeshadow stick from the dollar store that works if you wet it slightly (mostly because it's a year old and is dried out by now..probably).
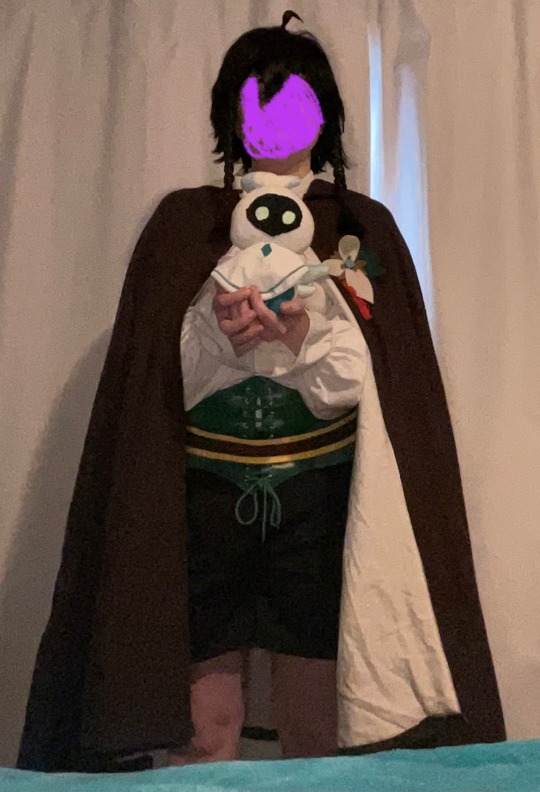
Wisp Prop: Touched on in this post, I like to take along one of my wisp dolls- the second one I've ever made, specifically. Made with my own personal pattern, he's easy to tuck away into a smaller pocket with just his head sticking out. I'll never forget the excitement of the Bennett and Fischl cosplayers I ran into last year when I took the wisp out to show them. 100/10, easily my favorite prop. The only real change made to him is that he has glow in the dark paint on his eyes, which probably won't do much in a convention setting but I still think it's cool.
Sword Prop: Very unnecessary & impromptu, but also very fun. At last year's con there was a vendor selling foam game/anime weapons and I got a foam Freedom Sworn. At the time of writing this out, I'm unsure if I will be taking it with me this year or not, since I can't exactly store it under my cloak when I'm not holding it.
Final Reveal!
(like I said at the top, this image is the only one w/out alt image text; I'll add it later)
(face scribbled over for comfort reasons)
#genshin impact#cosplay#genshin#nameless bard#old mondstadt#genshin cosplay#nameless bard cosplay#🎭 | og posts#cosplay genshin impact#long post#sewing#cosplay guide#today's the day of the con & I'm fuckin' pumped >:33
14 notes
·
View notes
Text
baka review: touhou hero of ice fairy (+ prologue)
putting the prologue here because it is free and fun and not in the full game at all (which is fun but not free)
you get to fight the scarlet sisters and get a taste of the gameplay. emphasis on taste because the mechanics actually feel a lot better in the full game, so if you're hesitant on buying it because the prologue gameplay feels slightly clunky, you should buy it anyway and see for yourself and refund if you find you still don't like it. i managed to beat 3 of the story bosses before 2 hours so you can definitely get a good taste for it and your money back if you didn't like it
that is all about the prologue
baka game. real 9/9. link here:
https://store.steampowered.com/app/1955830/TouhouHeroofIceFairy/
overview
touhou hero of ice fairy is a bullet hell boss rush where you play as resident baka cirno, the hero of ice, on a quest to save her princess daiyousei from the clutches of the evil nightmare miko. it's a cute plot and the story segments are presented to us like a puppet show theater style that's super endearing with the art
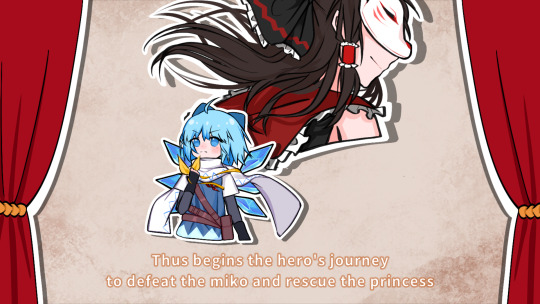

even the tutorial stage plays into it, i love it
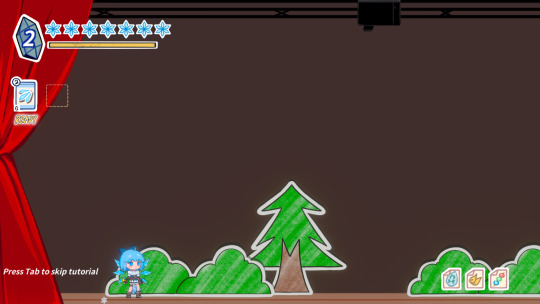
gameplay

cirno has two types of attacks, a basic shot and spell cards. hold down LMB or whatever is assigned to the controller to shoot and deal damage to the boss. to use spell cards you need courage, gained by dealing damage (i actually can't remember if there are other ways, but uh you'll mostly get it by dealing damage anyway). gain enough courage and you can use spell cards, consuming it. it's worth noting that some shot types do much better with higher courage, and all of them have additional benefits from being at higher levels of courage.
dash with RMB, and fly by dashing in the air. flying is completely free invincible movement and is really strong, but uses stamina obvs. the game honestly feels a bit like a souls-like, not that i play souls likes. there's a lot of dodging involved, but attacking is pretty much a continuous effort
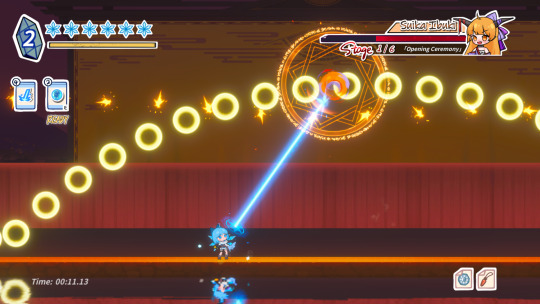
i forgot to take pics of the gameplay and apparently this is the only screenshot i have. your goal is to clear the many phases/stages of the fight either by waiting out the timer or depleting their health bar. some phases force you to wait out the timer by making the boss invulnerable, indicated by chains
here's a store page screenshot
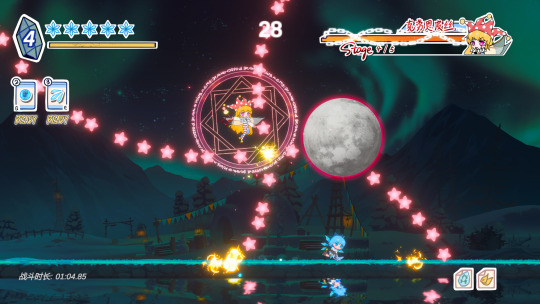
after finishing the main story battle, you can eventually choose to challenge past opponents in challenge mode. for completionists, there's no-hit and pacifist no-hit runs you can try
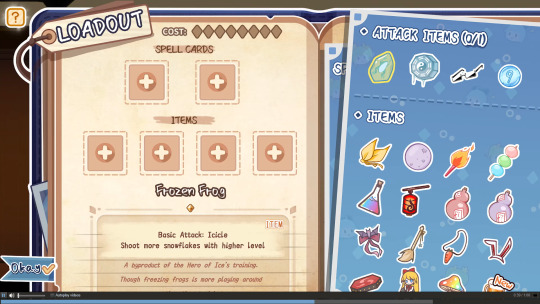
forgot to mention items, they're basically to modify your shot type and give you passives, you can see 'em in the lower right portion of the screenshots above
screenshot from the trailer
and, another thing i forgot to mention was the presence of an assist mode. it said it decreases boss difficulty as you lose so it's a pretty neat way to slowly lower difficulty as suited for you. it also gives cirno this cute chick thing on her head lol

story
the first stage sees us at the misty lake, where cirno begins her search for the nightmare miko's lair.
she's kinda dumb

we're then introduced to our first opponent, clownpiece

her being in a one piece latex suit might be a joke in itself i'm realizing. she's our first taste of real gameplay, and uses bullet patterns akin to someone who—as my partner so aptly put it—has a surface level understanding of what america is.
beating her shows her in a battle damaged state which i will not be showing here because she has her whole ass on display, but that'll be the trend for mostly everyone yeah. though, i think hers has the uh, most damaged outfit out of all of them. also losing enough times triggers taunting dialogue from them too, really made me wanna beat suika up more when i got it the first time.
oh yeah she promises to tell you the way to the nightmare miko's lair too! hooray! though, unsurprisingly, she is somewhat of a jester

and our hero is kind of dumb. in the forest, cirno stumbles upon some fairies harassing a bunny. after driving the fairies away, they invite us into their train

tewi's outfit is so cute
there are, naturally, bunnies on the bunny train


this bunny train serves as the menu and hub, i quite like it. there's an encyclopedia, a jukebox, etc.
reisen here changes your loadout for you


pls be nice to her, she's overworked

there's this cute board showing all the bosses you've beat thus far, too. incredibly charming
the story ramps up a bit later, coming with the difficulty spike (at least for me, idrk how others fared). will not be discussing it because uh no time rn, got other things to do
closing thoughts
this game is cute, charming, has great music. i'm impressed by it's quality, and it leans into its aesthetics very well. the redesigns i find quite interesting, and it's fun to compare and contrast the world they establish to canon lore
hmm, the english translation is a bit wonky, but it's honestly serviceable. other than that i've got no real complaints

edit: beat a challenge and like, this is a bit unfair i feel... i mean, i guess i could watch it on youtube....
if you like touhou for the shmup gameplay you will definitely find it here. if you like it for story and characters you will also find it here, feel free to use assist mode and stuff. if you don't like touhou, give it a try anyway
if this game looks fun, buy it over here:
4 notes
·
View notes
Note
Hi, I really love the plushies you made of RoR Captain and Bandit! I would like to ask how did you get into making plushies like them: where did you learn to make them (like tutorials or something like that), what materials do you use, etc. I would love to make my own plushies in the future! Thank you in advance!
I got into plushie making bc i could never stand my grandma wasting material, lmao. i learned from online tutorials and there was this one website run by a person called "CholyKnight" who offered TONS of free patterns and beginner friendly stuff! her patterns hold up even when you have three years of experience like me--whetehr youre new to the business or old, shes got something for you. as for what i use, i use fleece to make my plushies. its cheap and easy to work with and you only have to worry about the right and wrong sides, not that its going to have a weird texture because you didnt perfectly align it with the seam.
heres a link to cholyknight's free pattern page. I think you'll find a lot of good stuff here :) she even has a beginner guide for people who have never worked a sewing machine!
5 notes
·
View notes
Text
Final animation
music: my animatic is based off of the movement of music and how music makes us move, I wanted to explore the movement of music through dance and shape as well as creating a scene or story of how before music we grow almost static and down at times, but when we put on our favourite songs we can't help but to move to the rhythm and beat!
Here is the finished video link..........
Aoife Music Project (youtube.com)

For my final animation I didn't get to add my painted backgrounds as I found it confusing to animate over unfortunatly, however I opted to make digital background versions of my paintings as this made it easier for me to animate.
Overall I am happy with how this animatic turned out, I feel I have put a lot of research into it.
Things I could have changed: think I could have created a better story or spent more time on the album covers and music as that was the reason for the animatic, I was too focused on how good the background story was and didnt have enough time centred around the movement of music. Perhaps now that I have made my first longer length animation I know how long it takes and I should reconsider my story ideas and key moments to improve on my story telling skills, I also think I should've looked up more animation tutorials as they wouldvé been helpfull.
Inspiration: For this animation I took a lot of inspiration from the anime Your Name, however I also used reference from an animation I was recommended to watch recently. Called Destino this is an animation that tells the tragic love story of Chronos, the personification of time, who falls in love with a mortal woman.
There is beautiful music within the film and the way the character dances and how her hair flows really inspired me to create something as delicate and flaccid. I used this the most for the transitioning of my first album cover where it flows into the next, in the film they transition things seemisly, for example when the woman becomes a part of the shadow.

youtube
seminar: I decided to go over a seminar to help me with my work, I chose to watch the animation seminar, In the video I got to understand the considerations we must take on when moving images, these were things such as;
we have to take in the audience considerations such as physical or shared experience and their different device formats
Composition considerations such as screen orientation, staging, posing, directing attention and contrast
Editing considerations: transitions, types of editing, narrative, pacing
Genre and styling considerations you must take into account for mood, tone, look and feel, scene details.
Linking in Graphic Design and Painting into my animatic.
in Graphic Design I explored music through it's actions such as- strumming, rhytm, beat and pattern. creating patterns inspired by those helped me to do this for my animation, I knew what shapes and patterns to use because i practiced this many times in that elective.
in Painting I got to learn about contrast, light and shadow as well as drawing live modles and what to capture and illustrate from them to make a successful drawing that contained energy and essence of character, this is what I tried to implement into my animation also.
3 notes
·
View notes
Text
So, BO2W Breakdown
Buckle up, this is gonna be a long one.
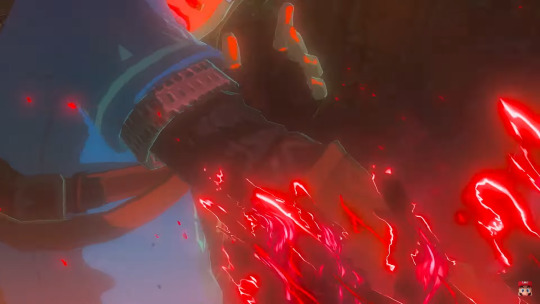
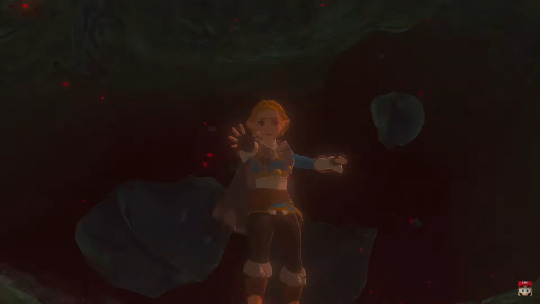
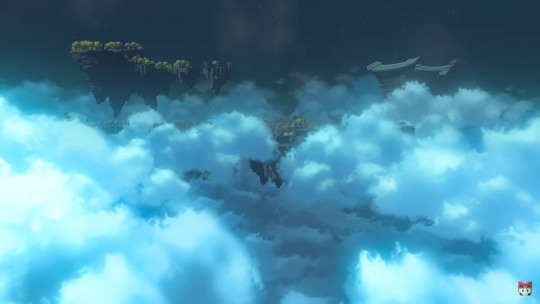
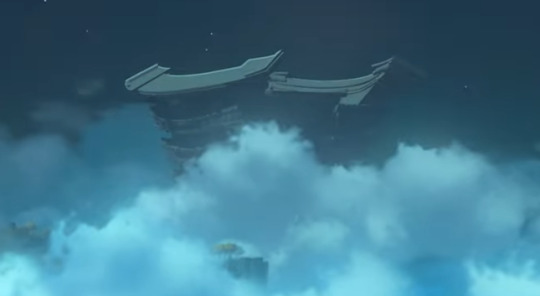
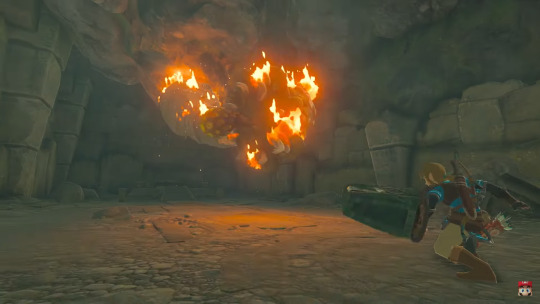
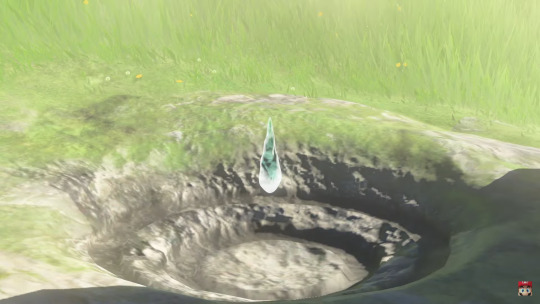
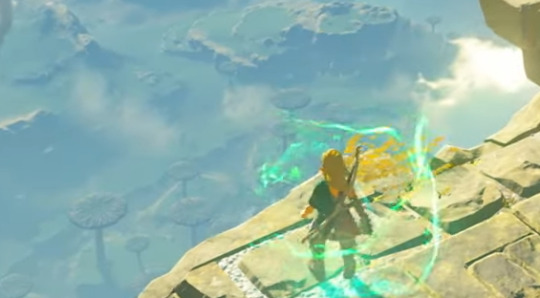
Here we’ve got Ganon’s...energy taking over Link’s arm. Ordinarily, I’d call it Malice, but based on what it turns into, I’m just going to be calling it corruption. We don’t get much information from this scene besides this expression:
Link’s grabbing the corruption with his other hand, and wincing. It looks painful. I personally think it’s for cinematic effect that it was included, but it COULD be a gateway into a Phantom Hourglass sort of mechanic--Link has to function on a time limit, or using the corruption’s power could drain his life.
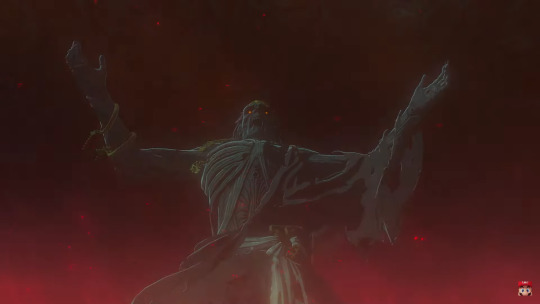
Next we’ve got a closeup of Ganondorf. F in chat to the rehydration theorists.
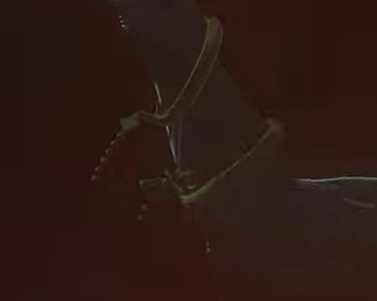
And the closeups of his jewelry. The only significant thing I can see is his necklace, which looks like a cross between the Gerudo symbol and a Fleur de Lis:


But what I’M most interested in is this tie on his belt:

For one, it’s WAY bigger than it needs to be, and that’s deliberate. Ganondorf’s got a jewelry aesthetic he’s already hit above; everything else is gold, why not this bit?
Most importantly, you can barely make it out, but the designs either look Sheikah or Zonai--they’ve got that same kind of swirly busy pattern to them. The red tint and tan-ish lines in it makes me think it’s possessed Sheikah tech.
Next, we’re shown Zelda falling. This looks like it happens right after these two caps from the first trailer:
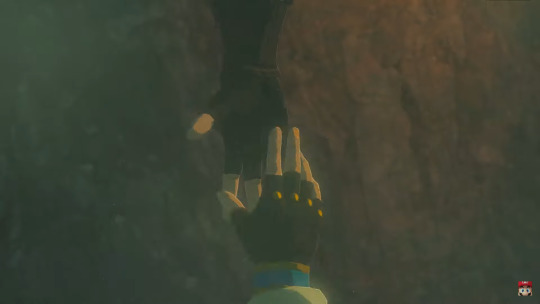
So we reach for her as the ground collapses, and evidently, we fail to pull her back up. So my next question for that scene is going to be what the in-game reason is for us not diving in right after her. Maybe we won’t get one, since the appeal of the original BOTW was that you could fight Ganon whenever you wanted.
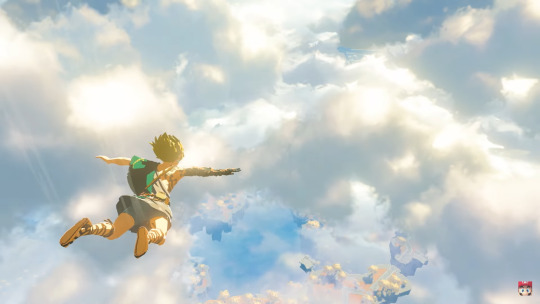
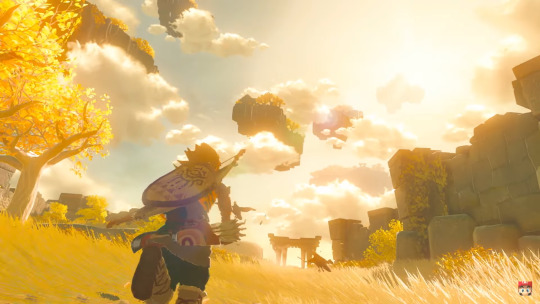
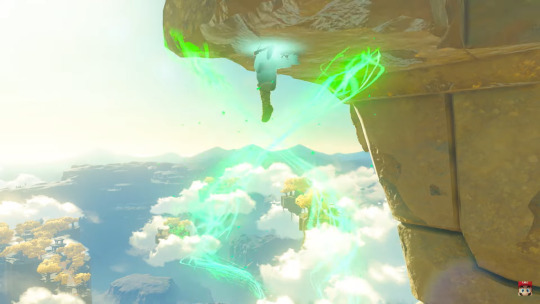
Up next, we’ve got a skydiving shot:
The first thing to notice is that Link’s pose while skydiving is just about identical to his pose in Skyward Sword:

Second is that, yes, he’s falling towards a floating island, and that in itself is noteworthy, but he’s FALLING. There’s something either above him that he jumped off of, or a force that carried him high enough TO fall, and I doubt Nintendo’s encouraging magnesis flying.
So, there’s a few options: Loftwings making a return (which is unlikely, but a hope I have), something like Revali’s Gale boosting Link up for a cinematic shot, indicating that the corruption arm has that kind of power, or islands higher than the one shown here.
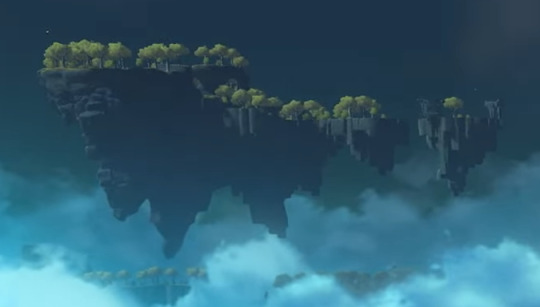
Now the island itself:
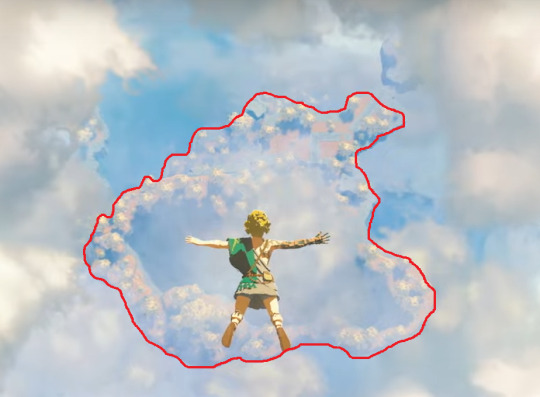
In Skyward Sword, Skyloft looks like this:
And (spoiler alert) we loose this island here over the course of the game:

Now, it’s not a PERFECT 1:1 match, as most things between games aren’t, but a quick rotate and overlay shows it’s got the same kinds of shapes between the two. The same “W” shape along the eastern side, the same tiny island off the northeast point, the same relative edges.
Now, I don’t know what happened to the plaza at South Skyloft, or the Knight’s Academy isle, but it could very easily be drift away from the central island.
The presence of other islands through the clouds seems to support that theory. Now let’s look at Link here:
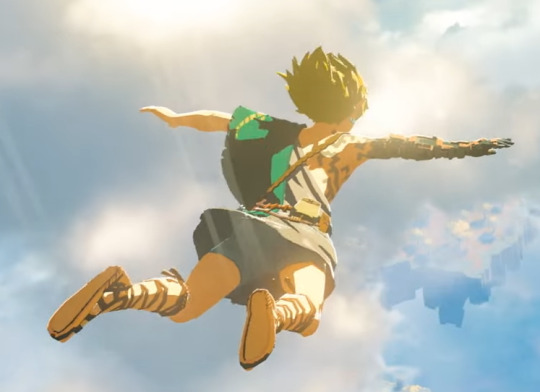
The outfit is new. We haven’t, to my knowledge, seen one of this design in other games. My gut reaction to this image was “oh, we go back in time and we’re the first hero now!” because it’s vaguely reminiscent of Tapestry Hero.
But upon closer inspection, that theory’s null and void. Under Link’s tunic in the image above, you can see that he’s still wearing the shorts he woke up in in the first game. So either Sheikah boxers haven’t changed in 10,000 years, or it’s taking place in present day. Jokes aside, I’m curious to know if the outfit he’s wearing is modeled after Tapestry Hero.
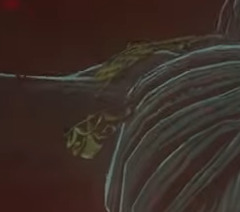
Next thing to point out is the obvious:
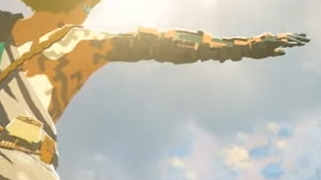
Link’s arm here looks less prosthetic and more...withered, I almost want to say. The corruption here’s made his hand look frailer, and armored them up with Zonai patterns before it fades out at his shoulder. Based on how the tattoos look, I think they’re an artifact of the corruption taking hold.
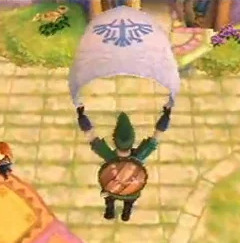
Also, the belt here:
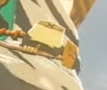
Aesthetic purposes, or specific function? The presence of the second, smaller one on the side reminds me of Skyward Sword’s adventure pouch, which could be how the new game handles inventory size:

Next we’ve got another flying shot:

It seems like he’s flying towards Ruined Skyloft, and you can see the bottoms of islands above it, possibly meaning that the sky serves as more than just a hub world like it did in Skyward.
Now let’s look at the paraglider he’s using. It’s new.
This is how the paraglider looks in the original BOTW. It looks like we still have the Rito symbol in the center, but other than that, there’s a LOT of changes here.

First off is the color. We’re now blue and gold. The shade of blue makes me think of the Kochi Dye Shop’s navy blue:
So, possibly a dyeable paraglider?
The new pattern surrounding the Rito symbol makes me think that it’s combining the paraglider with Skyward Sword’s sailcloth:
Other than that, there isn’t much else to say about the paraglider besides the handles looking like they’re made of bone. Craftable paragliders? God, I hope not.
Back to Link:

Here we have him in different gear than the last shot. He’s wearing the snow boots, he has a shield with a stylized Eye of Truth looking upwards, and he looks like he’s carrying a traveler’s sword and an unknown bow. The presence of the bow makes me think that the shield here is a lower tier item, rather than this game’s Hylian Shield equivalent.
Now, let’s get a better look at the horizon:
The trees here look a lot like the smaller trees you can find in Akkala, but there’s a distinct lack of red among them.
Then it looks like we’ve got some ruins at the furthest isle.

Whatever the rock formations are over there, they don’t LOOK natural.
Another thing I noticed is the bottoms of the islands.
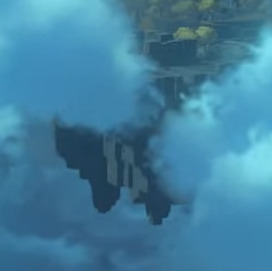
These look a little too geometric to be natural, too. Now, this one, I’m a little muddy on, because it COULD be a stylistic choice. But it also reminds me of the Shrines if you clip out of bounds:

And a little bit of the dormant Gate of Time from Skyward:
My money’s on the cube-like nature of the islands’ undersides being deliberate, rather than just a far-off render.
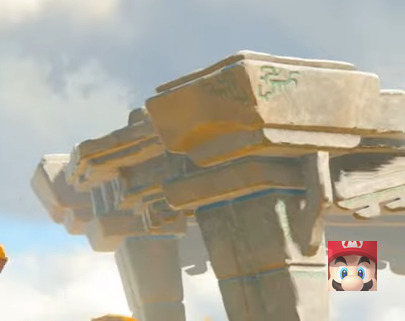
And then there’s this thing!
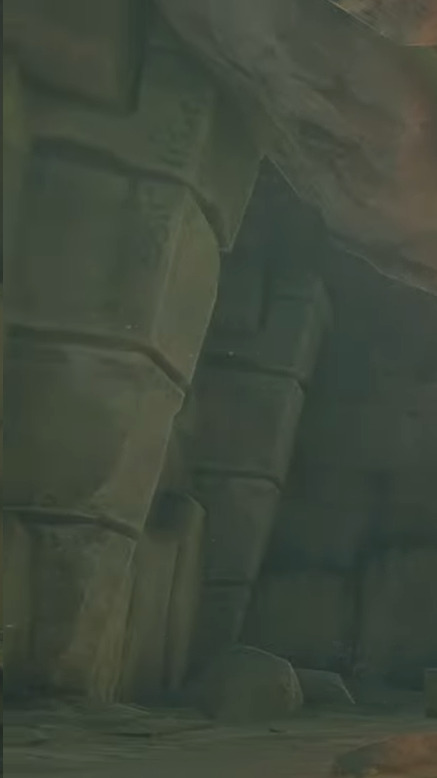
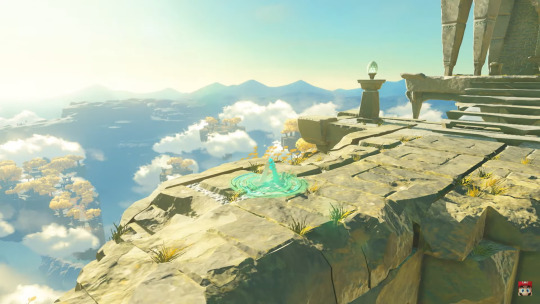
What is it? It doesn’t look broken at all; look how nicely the roof(?) is kept. The ribbing on the sides makes me think it might be a Zonai thing, but the shape makes it difficult to figure out. A giant temple? An airship? A sloped coliseum? This thing haunts and vexes me.
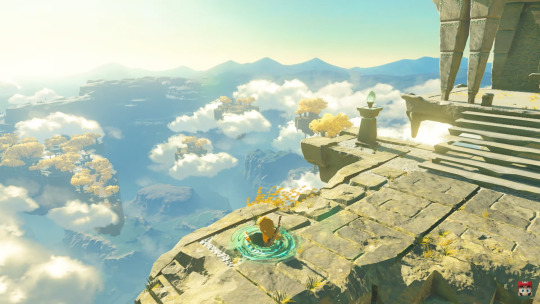
Our next shot is presumably from one of the islands, based on the color. Here we can see that there are definitely ruins all over the place. Link is in the same gear as before, so I won’t touch on him.

This, however, has my interest. The design here has more geometric patterns--Zonai ruins?

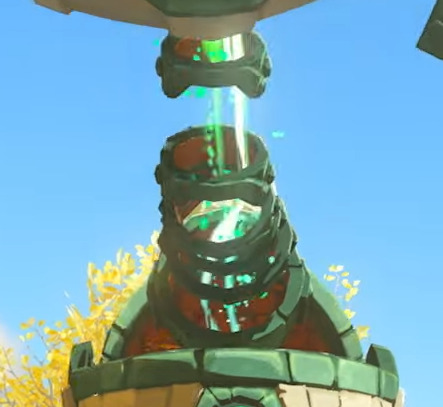
We’ve got another one off in the distance here. Sky checkpoints, like Sheikah towers?

Now this guy here. There’s a LOT to look at. First off is the eye design, it’s the same sort of upward looking one that Link has on his shield in the previous shots.
The energy that’s pulling this thing towards its base looks like the same green energy that surrounds the arm holding Gan in place in Trailer One:
This stuff. That, plus the fact that the robot has to be pulled into its base rather than just existing, implies that either A: Link activates it himself, like a trial thing, or B: that the green energy here functions in the same way Malice does in the original BOTW.
This pattern at its base is intriguing, too. I don’t recognize the gold symbol in the center, but the green around it reminds me of the portals from Twilight Princess.
Which, yes, everyone’s already said that the Twilight Princess patterns look like Zonai things. But another thing this weird dial thing reminds me of is from Lanayru Desert:
On top of that, the color palette of this guy looks like that of the Lanayru Robots from Skyward:
BO2W robot on the left, Lanayru robot on the right. Given that Skyward is a lot more vibrant than other non-Toon Zelda games, I think this is a fair enough comparison to draw similarities from.
And then we get a closer view of the sky ruins from the last shot. I don’t know if the geometric pattern in the corner is a deliberate carving, or wear from time, but since the pattern looks ALMOST mirrored around the corner, I’m going to go with the former.

A better shot a few frames later. The robot has HANDS, which I do not like in any way shape or form. However, we get a better look at the sky ruins.
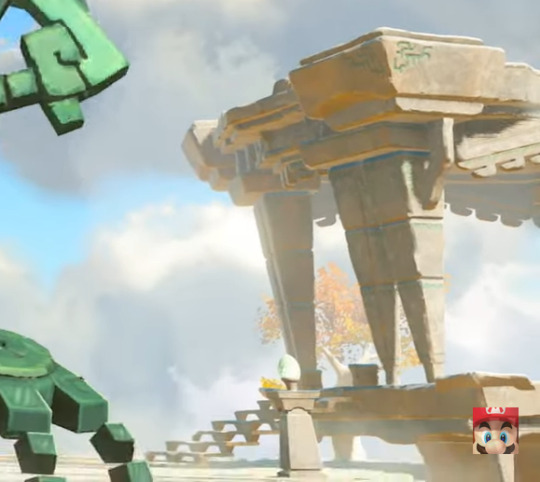
We haven’t seen this style of stairs before, to my knowledge. The pedestal out front looks like a light source, and it has the same floral egg thing the robot above has on each shoulder; the eggs could easily be a power source for Zonai tech. And at the top of the stairs, we see a pedestal, backing up the theory that these ruins function as our new Sheikah towers.

This is our next shot. Which...
Unikoblins. Can we talk about that? UNIKOBLINS.
Anyways, Link is here again in his old clothes. This is a very early game shot, because his right arm isn’t corrupted yet; this means we get to explore Hyrule before we embark on the main quest. Which gives rise to a question: Where’s Zelda?
The hopeful side of me wants to say that she’s a tutorial companion, like Navi or Tatl, at least for the beginning here. The pessimistic side of me thinks that she’s waiting for us at a predetermined location, and this is just part of getting to her.
Now the unikoblin structure itself is built on a Talus, meaning that the dev team at least intends to have more inter-monster interactions. But if you kill the Talus, does that mean that the base falls apart, or does it just drop down as a separate entity?
Also, what are these background ruins? The one on the left looks like it’s a distinctly different style than the one on the right. It looks almost like a giant guardian arm.
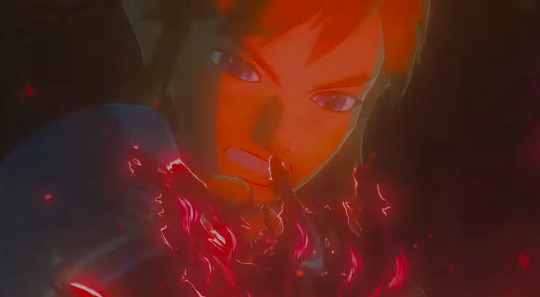
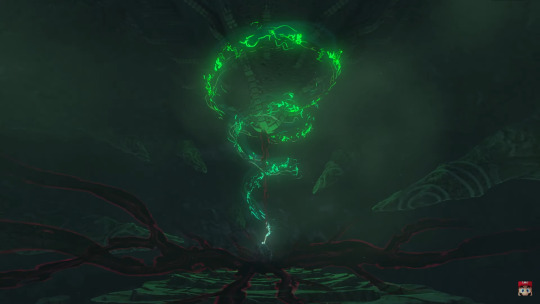
Our next shot is Link’s arm getting corrupted. Which, first of all, the effects look beautiful.
Now, we can see a corner of Link’s hip here, and we know that this is his right arm. So Link’s lying down here. Unconscious? Knowing how Zelda games like to start with Link waking up, probably. Although it looks like at least part of his shorts got an update.
We can see what looks like circuits here. It looks a bit like the electricity puzzles you can find in the Divine Beasts and Shrines in the original.
Then we’ve got these strange symbols.
Whatever this circular stone he’s lying on is, it looks a lot like the Zonai puzzle from the “A Fragmented Monument” sidequest.
This one that everyone thought was the Mirror of Twilight for years.
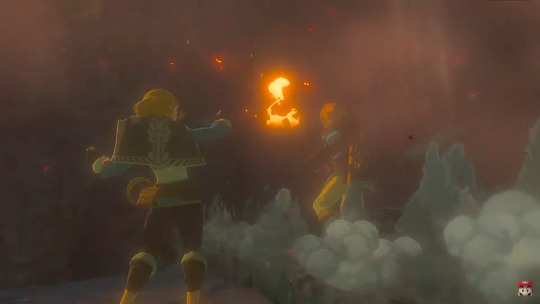
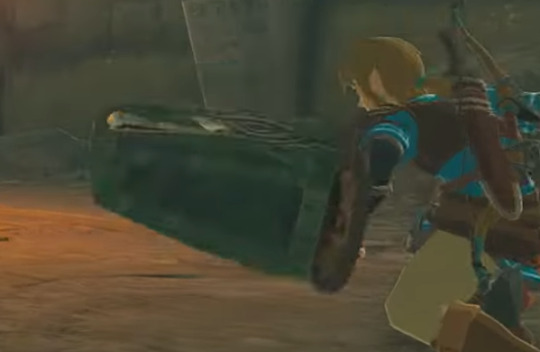
Our next shot is Link using the corruption powers against enemies:

The spike ball itself looks solid; the question is, is this a duplication power, or a visualization of how the spike ball is set into motion?
We see it barreling over a poor Unikoblin or two, but I’d like to turn your attention to the Moblin and the background.

The moblins here have helmets, and the bases, while they carry the same design, look like they have more cause and effect in mind. The left base’s rock, for instance; that’s a lot bigger than the rocks we got to play with in the last game, and it looks like we can barrel anything in the screen over with it.
The helmet, though, concerns me a little bit. It looks natural rather than forged; like it’s the moblin’s horn, just very much deformed. Does it mean a harder enemy, or is it just for flavor?
Our next shot is this strange flower thing. Note that Link’s right arm is perfectly fine in this shot, meaning that it’s still early game.
This is what Link’s flamethrower looks like. And this:
Is Zonai art.
So the question is, what IS the flamethrower? My first thought was that it’s either a new item in its own, or it’s a Sheikah Slate upgrade. The latter might sound a little far fetched, but Link in this game is right-handed, and in BOTW, he always held the slate in his LEFT hand when using it.
We have more of the weird faded designs that we saw on the Sky ruins:
And we’ve got some kind of pedestal or stage behind the ground flower thing:
It looks like it’s either an altar or a grave, from what I can tell. The stairs aren’t the same design as the ones in the sky, and there aren’t any patterns on it.
More importantly, though, is that this place is underground. This could be a part of the game you’re required to go through, in order to get to Raisin Gan.
A few seconds later, though, we get our answer to what the flamethrower is!
It’s a shield!
Off to the left side, we can see pillars with more weird scribblings towards the top. These match the Sky ruins’ pillar shape, with a narrow base and a wider top.
Our next scene is...weird.
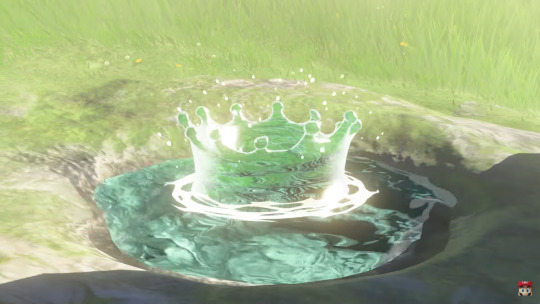
We see a puddle splash in reverse. It’s hard to tell if it’s actually water or not, but the design on the ground implies that it’s either been there for a long time, or that that’s a dedicated splash spot. And the quality and zoom makes me think that this is part of a cutscene. Return of the timeshift stones?
We then see Link...surfacing out of the island? I don’t know how else to describe it. However, his arm is changed again, and glowing, meaning that this is a corruption power. And the “water” he rises out of here looks a lot like the puddle in the last clip.
We get a good look at the Zonai Lights:
A Sky ruin that looks like it contains a room:
And a glimpse of other isles’ ruins in the far distance.
And then as the camera zooms out...
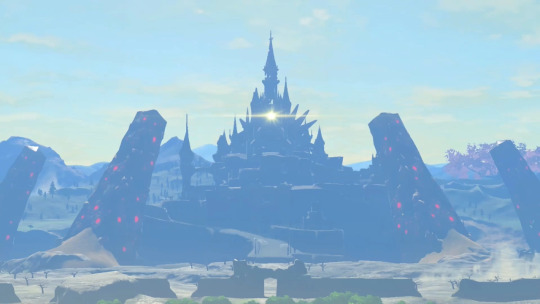
We can place a location!
We’re right over Thundra Plateau!
We also get a mildly better look at the back wall of the sky ruin, which looks to be some kind of table:
The next scene is Hyrule Castle:
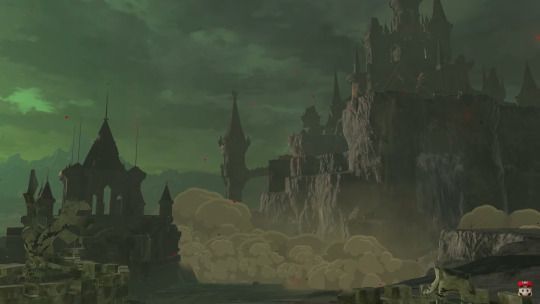
The ground shakes and it starts to rise up. However, notice that the columns surrounding the castle are now missing.
We’ve also got red sparks in the air, like we would have in a blood moon. However, due to the sky color, we can assume that this is a conscious decision by Gan himself, and that he isn’t drawing power from his surroundings.

We then see that power bleeding out of the ground. It’s MUCH more red than Malice is, which has always been a kind of burnt pink-ish color.

However, even though Ganon lifts the castle up, he doesn’t lift it very high.
The castle’s about triple the height it was. But since we’re talking Skyloft levels of floating islands, this is still pretty ground-level. What’s interesting to me, though, is that in this shot, despite the game now being about sky islands that we should be able to see from ground level...there aren’t any here. This, to me, means that there’s going to be a sudden appearance of the isles in the sky, rather than them simply being accessible now.
And that’s the whole trailer! I have many questions.
My blog! If you have any opnions/questions/theories, feel free to drop an ask!
Part 2 is up! We missed a lot!
2K notes
·
View notes
Note
What do you recommend as a first project for learning to use a sewing machine and do you have any tips about sewing with a machine in general? Any youtube videos you’d recommend for it, maybe?
Unfortunately I do not watch YouTube! I learned from books and watching my mom. Matt's suggestion is dollightful, she's got some beginner tutorials linked in the description of this video for the very basics and some specifically for doll clothes, and sells mh doll patterns on etsy
First sewing project for learning your machine, and for learning machines for the first time in general? A lot of people say a pincushion, which you're going to want at some point if you didn't buy one, but here's what I learned first and what I've always had other people learn first:
Pillowcase. Get thrift store sheets cheap, ones that do not stretch (most sheets don't, avoid nylon and spandex until you want to up the difficulty level), and make yourself two pillow cases. They're going to suck, but they'll teach you how the machine works, to regulate the speed, how to sew a straight line, and how to pivot your project without taking it off the machine. If new machines don't anchor your thread for you (remember the newest sewing machine I've touched is from 1960) as I have heard they might? You're going to learn that too.
If you don't have the fabric for this and want to just jump in, make doll pillows, stuff them with the scrap you're going to end up with if you have no stuffing, and make those pillows pillowcases. This will teach you to work small, and will need more precision, which'll be more to learn in one go, but you'll be skipping a step in going to doll clothes. Working at this size will also help you gauge how big things end up being once they're sewn at that size (smaller than you'll likely expect)
If your machine doesn't auto thread itself (again I am not sure what modern machines DO), it's good to spend some time threading it a couple times before trying to use it. It's going to be tempting to pull your fabric through, don't do that, just guide and feed or you'll snap your needle. Always give yourself more thread than you think you need. Your stitches should look the same on the topside of your fabric as on the bottom side, and if either side looks tighter, you may have to adjust your tension to suit the fabric you're using, and the problem is going to be on the opposite side of where it's visible. 9/10 times it's your top tension and for this reason your bottom tension is hard to get to because you may never ever need to touch it. Keep your machine oiled and learn what it sounds like because they'll often tell you when they don't like something by complaining.
If all else fails speak to your machine in a firm tone to let it know you're in charge
5 notes
·
View notes
Note
how did you make ur neocities website and how do you come up with comic ideas?
HEHEHE THIS GOT LONG <3 WHOOPSIE <3
hm hm... basically i just looked at w3schools.com HTML and CSS tutorials until i understood enough to feel confident enough to start sharing the site 😌😌😌 GKJLDFSH
plain HTML and CSS isn't really all that complicated for the most part!
they are markup and styling sheets so there's no actual programming involved but there is a lot of adjusting for CSS elements to make things look the way i want them ! i know neocities also has its own guides + links + tips and such somewhere!!
what is complicated is actually adding interacting javascript stuff which i havent learned yet 😔 i wanted the little email application to be more interactive and have functioning tabs + buttons so you could look at the other emails but i never got around 2 learning how 2 do that...
FOR THE COMING UP WITH IDEAS PART: man i dont know (JOKE MOSTLY) <3 my tip for just coming up with ideas is READ A LOT OF THINGS and THINK ABOUT THEM but in a writing sort of way. what did you like about it ? what DIDN'T you like? what made this story work or what pulled you out of it? what themes and patterns reoccur in the media that you like ?
then just let that roll around in your head + write down literally any vague idea that you have EVER somewhere to look at later.
i often see things and go haha i can do that Better (or at least, interesting to me specifically).
BASICALLY I MAKE THINGS THAT ARE INTERESTING AND ENTERTAINING TO ME SPECIFICALLY. i see a neat idea and bat it around in my head like a cat.
how would i have done this idea? how could it have gone differently? how much of an effect does the setting and worldbuilding have on this? would this idea/character/thing behave the same in a different location? and so on !
my process usually comes from me seeing an element in Media of some sort and it lives in my head forever now. then i scribble out a character design or two based around said elements and themes, then try to build the basics of a world around them.
for example, i designed daisy, salesman, and k2 first! all of dreamland was originally informed by the designs and basic personalities of those three :-D! mostly it was just "i want a character who is just a REALLY regular, sorta dick-ish guy, trying to do errands in a dream logic vaporwave hell where people try to sell them things constantly and are incapable of sincerity"
then i let myself get really invested in the world itself and started just. populating the setting with people who Live there and just try to go about their lives, before i went back to refining the actual story/plot !
that is just my process of making stories and it may not work for everyone, but that is usually how i do things <3
i make the basics of the major characters, start to detail the world they live in + background elements, then go back to working the main plot!
just, dont be afraid of being unoriginal! nothing exists in a vacuum, basically any idea has been done in Some way before. things get rearranged and reused constantly. dont be afraid of shelving ideas to look at for later, or cutting things from stories completely! feel free to rearrange and reuse your Own ideas !
also get into weirder or more obscure media. get into media that Kind Of Sucks Bad and dissect it like a bug. play free rpg maker games. watch animated childrens movies from the 80s but the ones you never watched as a kid. look at weird abandonware games! youtube web series with only 4 episodes!
let yourself Dislike Things and analyses Why you dislike it, but also look at what it does good or interesting! what made some things intriguing and what made some things fall flat?
even with things you do like a lot! what could it do better? what felt unsatisfying? why did it feel unsatisfying?
and by god. write it down <3
27 notes
·
View notes
Text
Stitch marker variety has probably improved since *checks date* whoof 2006 when this blogger made this post, and since.... idk probably around 2012, 2014? when I was looking for stitch markers and wasn’t happy with the plastic ones available commercially lol, but I think this really is still my favorite way to make stitch markers: (link to blog page here)
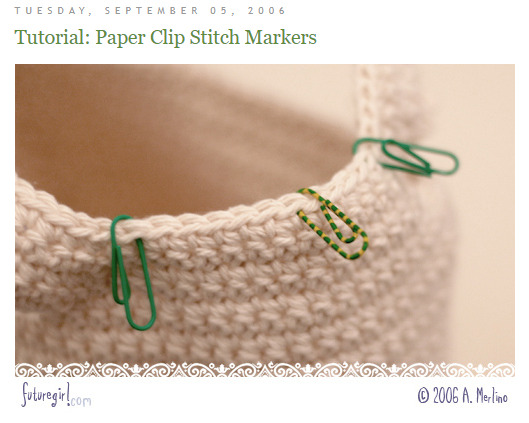
Basically the idea is you take a paperclip and tweak it to make it more convenient to use as a stitch marker. Supposedly the naked metal ones are fine, and I’ve used them before in the past, but I find I highly prefer the coated ones now. Yes, the naked ones tend to be a bit thinner than the coated ones, but really you can bend the inside part smaller than the tutorial has, and it’ll slip into smaller gauge stitches just fine. The plain metal ones tend to react to the oils in your hand, I find, and don’t seem to hold up as well in the long run. I have a couple plain silvery metal ones from years ago that I just don’t use anymore, especially since I made a bunch new coated paperclip ones recently lol. (The gold ones might be fine? I’m not sure if they’re made of a different type of metal or if they’re coated with a different metal or what. But the plain silvery paperclips, I’d recommend against.)
I really like this type of stitch marker bc you can customize them for larger or smaller needle sizes since paperclips are fairly bendable, they’re really easy to access (Dollar Tree has 250-packs of coated silver and colored paper clips, Daiso has these metallic-colored coated ones, you could probably even use those novelty-shape paperclips if they’re not too big? so many possibilities!), and they’re an easy to way to either have color-coded stitch markers, or just fun colors to have. They’re also a good weight, without being too heavy like some of the stitch markers with charms on the ends are. And also they’re removable! You can easily slip them either onto any stitch, or even onto a knitting needle if you want to add in a marker there. They’re low-profile enough to be easy to store too, they’re fairly stackable even with the inside loop bent out. Plus, they’re easy to make if you need more, and low stakes if you lose or misplace any.
The only thing I’d consider replacing them with are those bulb safety pins, and those are a bit less substantial than paperclips are; plus I’d be a bit concerned about the pin head being too sharp, which may be a problem if you’re trying to add a stitch marker to an already-worked stitch.
These are just very versatile, easy to make and easy to access, and quite fun if you can get your hands on some patterned paperclips like the OP has. 10/10 highly recommend.
(more on how I specifically bend my clips below for anyone curious)
I’ve managed to get the inner part even thinner than she has by unbending it first at one of the inside bends of the inner U, and then rebending it back down at the remaining bend point, and this is just by hand. If you have a set of jewelry-making tools (I have this mini set from Michaels I bought ages ago) then you can get it even slimmer still by clamping it with the pliers, though depending on how you unbend and rebend it, that might not even be necessary. I’m usually a bit lazy about how I unbend and rebend, but I was paying more attention this time and got it quite low profile.
So first, unbend the center loop at one of the bend points. I usually pick the loop that’s closer to the outside loop/farther down the inside loop, since I don’t want the inside part to be too long, but I also pick through my paperclips and don’t use the ones where the inside end is longer than the outside end. The green one I picture below for comparison is one I wouldn’t use for a stitch marker, I’d just use it as a paperclip.
It should look like this:
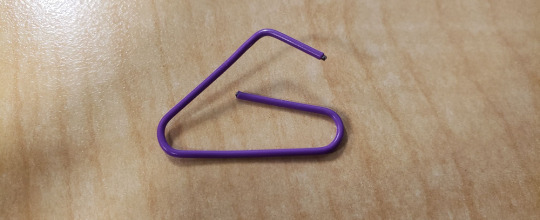
(I bend the middle part out to make it easier to access/work with. paperclips are so bendable that really you can do whatever with them to make them easier to work with, tho be aware that if you unbend the outside bends, you gotta be a bit careful bending them back or they may want to bend more at one pivot point vs another. You can rebend it around something, like the end of a pencil, to help it have a smoother curve)

^ the blue arrow points to the part I unbent
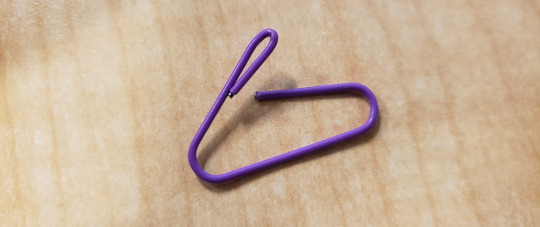
and then I put my thumbnail at the inner bend, and bend the end back down:
This is actually me being slightly more careful about how I bend it lmao, so I got a slimmer result.
My first attempt which I redid for the sake of explanation, and which is probably more average to what I tend to do, looks like this:
the difference being that it bent back a little at the old bend, which made the loop a bit bigger. You can remedy this with some jewelry tools, or as I show above, you can in fact make it smaller by hand.
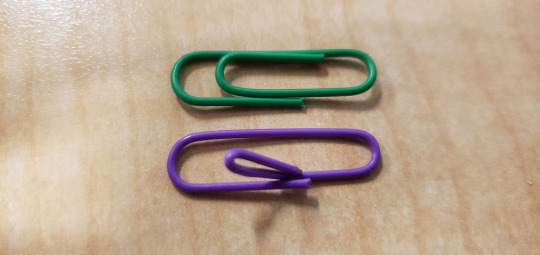
Here’s a regular paperclip for comparison of your final inner loop:

(the green is sliiightly smaller than the purple one, but you get the idea)
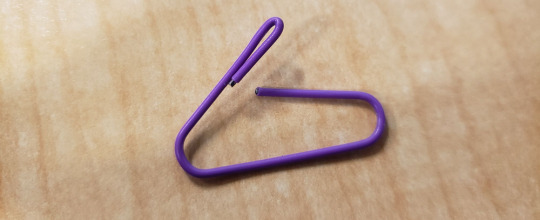
I then do futuregirl’s 5th step now, where I put my nail at the very base of the end of the inside loop and bend the inner loop out:
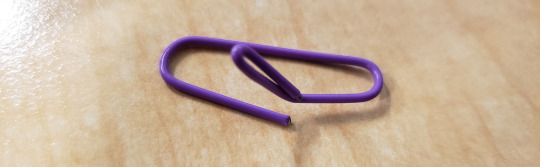
I also tuck the end in bit so it’s “on top” of the bend now.
And then I kind of zhuzh the ends and sides back into place so the outside ring is vaguely paperclip shaped and lying flat again, like futuregirl’s 4th step:
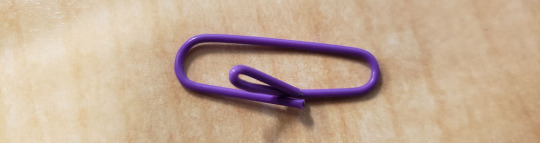
And here is the finished thing next to the green paperclip:
if you want the bottom loop to be bigger to fit around larger knitting needle sizes, I’ve unbent and rebent them bigger before. I recommend doing it around a rounded thing, like a pen or pencil, since otherwise it doesn’t really want to bend evenly.
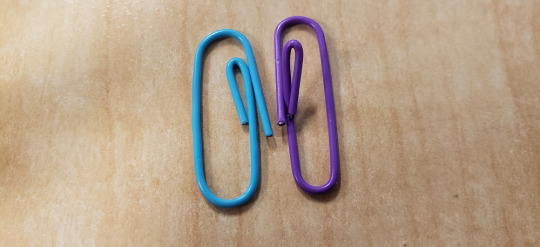
This blue one, for example, I unbent and re-bent around the end of a pen (where the pen tapers down to the point). This blue one did start its life at the same size as the purple one. The top of the loop you can see is a bit uneven, that’s where I bent it by hand. The bottom is much more rounded and even. Also, it doesn’t look it bc the purple’s inner loop sticks out more, but the blue one’s inner loop is also a bit bigger and less carefully done lol. Like I said, I find that even at this size, they slip into stitches fine; though if you wanted it slimmer still, you can get a much closer crimp with some pliers.
And there you have it! Paperclip stitch markers.
#crafts talk#actually paperclips are great#before I got some 'proper' cable needles I had this one large paperclip I unbent and bent into a large U#it's not ideal but it worked in a pinch#the other stitch markers I had are these plastic locking rings that Home Depot had yeeaaarss ago#when they had this one brand of paint that had swatches that came with little holes so you could collect a bunch of paint cards and then us#the little plastic locking ring to keep them together#they're fine but they're a bit thick so for finer gauges they're not as great. and also as I'm using them they feel a bit... breakable#mine
38 notes
·
View notes
Text
LoZ AU- The Courage of Running Away PART FOUR
#AU August
#LoZ AU: The Courage of Running Away
To start, have this Very Important picture of Marla and Tonbo being cute, since this is otherwise a very compressed post:
[Image Description: Marla and Tonbo; Tonbo is a Goron with furry shoulders and a mohawk and Marla a Zora patterned after a Blue Tang. Tonbo has his hand pulling away from Marla’s face, and there’s a hibiscus flower tucked behind Marla’s headfin as behind a human ear. They’re both grinning. Marla says, “Tonbo you know this flower isn’t going to survive the next time I hit the water,” and Tonbo answers, “So I’ll enjoy how cute it is UNTIL then.” End ID.]
A handful of important things happen during Link's stay on Windfish Isle:
1. Marla ends up teaching Link how to swim.
"he was training you to be a child soldier and he didn't teach you how to swim?? TONBO this boy doesn't know how to swim!!"
"does seem like a problem if you need to breathe air," Tonbo says, sewing some floral shorts in Link's size.
[Image description: A series of panels. In the first, Marla is holding Link in the water. She says, “Okay! I’ve got you, and the water’s only four feet out here so you can stand up if you start to panic, okay?” Link, clinging to her, answers “I am start to panic.” In the second, implied to be after some time, Marla is clapping with a grin. She says, “Eeee you DID it, I’m SO PROUD OF YOU, good job, Link!” The next two panels are of Link wet in the water, staring back at her. Marla asks, “Link?” Link’s eyes shine wetly and he blushes with the legend “POSITIVE REINFORCEMENT?” surrounding him, along with floating effect flowers. End ID]
Pictured here btw is the moment Link develops An Attachment.
There’s actually a lot of other little moments I have in mind; Link realizing he’s passed his seventeenth birthday while passed out, Marla asking what his favorite food is so they can celebrate and poor Link not knowing because he mainly subsisted on gruel and health potions, so she and Tonbo decide that he should try as many different things as possible, Link just getting to LIVE for a little while because nobody who’d have a problem with it knows where the hell he’s gotten off to.
2. Link has a moment of horror when Adventure Game things start happening, as he remembers that he left his sword at the Sky Temple Monastery.
Tonbo supplies him a new one from souvenirs his uncles have brought or sent (one of Tonbo's uncles, Torock, is a merchant, and another, Torik, runs the ferry to the mainland).
Tonbo’s Uncle Torik at the ferry dock:
[Image Description: A scene in Windfish Isle’s main village. The center of the image is Uncle Torik, a Goron with a very wide brimmed straw hat, a narrow, long, and shaggy beard, hairy arms, a patterned open shirt, shorts, and bracelets on both his wrists and ankles. He wears an easygoing smile and is tipping his hat back while standing in front of a small boat against a dock. In the foreground are both child Zora and Gorons (the Goron children are rolling in ball form) and an adult Goron mostly cut from view. In the background is the village of little round roofed buildings, some palm trees, and the horizon past the island. A Goron and Zora are speaking to one another in the distance. End ID]
I don’t know why I drew this instead of literally anything else I could have drawn??
3. Link ends up fighting the first story boss outside of Astramorus's tutorial hell dungeon, and despite it being hard and the fact that he didn't want to do it....
It wasn't actually that bad? It wasn't actually as hard as dealing with Astramorus every day was, maybe even because he HASN'T been dealing with Astramorus every day.
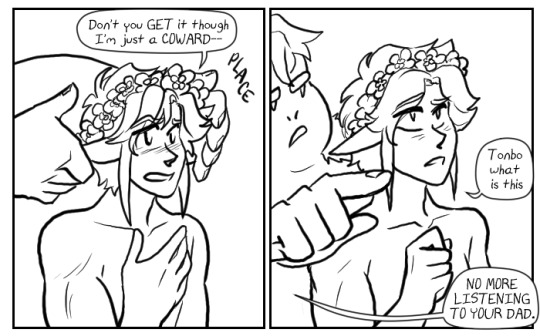
[Image description: Link is starting to say “Don’t you GET it though, I’m just a COWARD-” and cuts himself off as Tonbo places a flower crown in his hair. Link looks up towards the crown and asks “Tonbo what is this.” Tonbo points past him and says, firmly, “NO MORE LISTENING TO YOUR DAD.” End ID.]
4. Link decides to take the ferry to the mainland. He’s not sure what he’s going to do with himself yet, but like Marla said about finding a favorite food, now he has time to find out.
5. Marla and Tonbo decide to go with him.
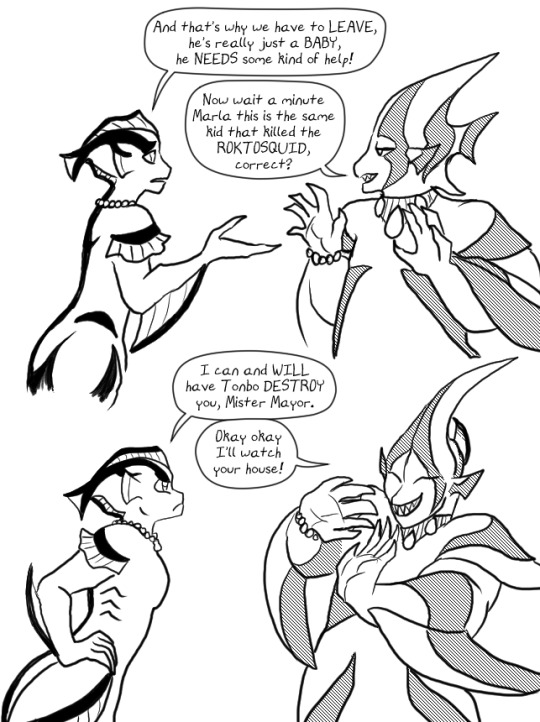
[Image Description: Marla is speaking to another Zora, designed after a Moorish Idol (a black, white and yellow fish with severely swooping fins; this Zora has a prominent crest on his head.) Marla, hands forward and open, says, “And that’s why we have to leave, he’s really just a BABY, he NEEDS some kind of help!” The other Zora asks “Now wait a minute Marla is this the same kid that killed the ROKTOSQUID, correct?” Marla puts her hands on her hips and frowns. “I can and will have Tonbo DESTROY you, Mister Mayor.” He puts his hands up as if in self defense, grinning. “Okay okay I’ll watch your house!” he says. End ID.]
Marla can talk to the Mayor like that because they’ve known one another for forever, obviously.
I’ll do a post kind of illustrating Mr. Roktosquid eventually but I’m trying Very Hard not to let AU August ruin my sleep schedule this year lmao.
So hopefully some of that will be for tomorrow on my day off!
20 notes
·
View notes