#you get the link in the original post AND NO TAGS
Text
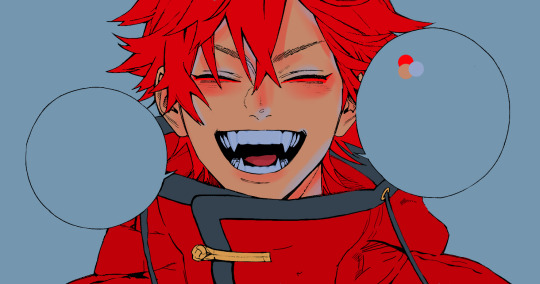
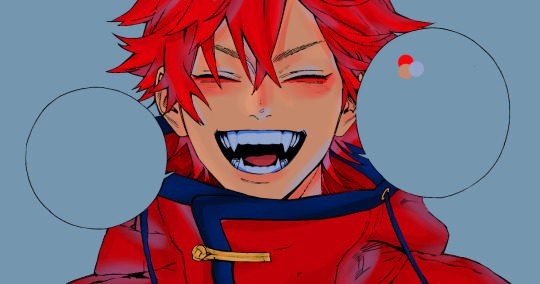
"You will rot."
I'm currently writing a post about this quote right now and I was wondering how other people see the emotions behind it and the reason for it's wording. Without giving to much away it's specifically trying to unpack the connotations of 'rotting' and what that means in universe. This poll is specifically about the last thing he says to Genesis ("You will rot.") and not the rest of the conversation that precedes it.
Here is the direct time stamp for the line in both Original CC and Reunion (both in the standard english release) I'm linking both because of the va delivery differences.
So to the like 5 people that will probably see this and care:
I tried to keep the options as tone neutral as possible so feel free to elaborate even if you didn't choose the nuance option.
Also because every time I see it get brought up this issue arises: Yes, Genesis has just said some absolutely awful stuff to Sephiroth in a very disordered attempt to gain help from him. This is not about that- that's a different conversation.
#sephiroth#RB for sample size :3#final fantasy vii#ff7 crisis core#ffvii#ff7#Nibelheim Inc#crisis core#I'm going to do my best to respond to peoples thoughts but it might be a sec#This post won't be out for a week or more#other things on other topics are coming before it#i just wanted to see what other people think its not going to change my analysis too much since it's mostly already written
69 notes
·
View notes
Note
Hey so any thoughts on people who tag non-LU stuff as LU (despite the creators of said AU aren't connected to LU in any way)?
...They need to stop doing it.
This has been a problem for years, and it drives me nuts because people I follow, and friends, and myself, have all had to deal with this and it’s incredibly discouraging.
I say this as someone who truly loves linkeduniverse— people seriously need to get it through their heads that other AUs exist out there. Often with similar or identical nicknames and/or designs for Links. And it takes all of ten seconds to click on a post and check the original tags to see if the artist meant it as lu or not. it’s not hard!
There are several posts out there that have put it more more elegantly than me, but it’s so disheartening to work hard on an au and put so much work into it and then having people take one look and go “oh it’s more lu!”. But it’s not, it’s something different and I can’t articulate exactly why it hurts so much when something you worked hard on gets tagged as someone else’s work, but it really, really does.
So just... be mindful. Be respectful of other AUs. Take ten seconds and make sure what you’re about to tag as linkeduniverse actually is that.
Don’t just mindlessly consume, okay?
46 notes
·
View notes
Text
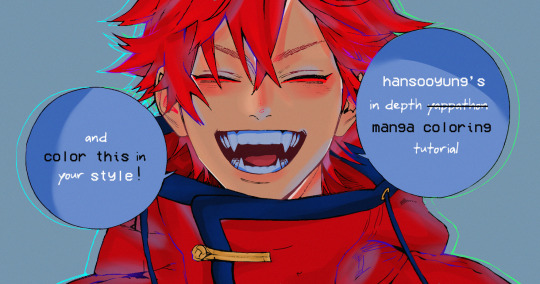
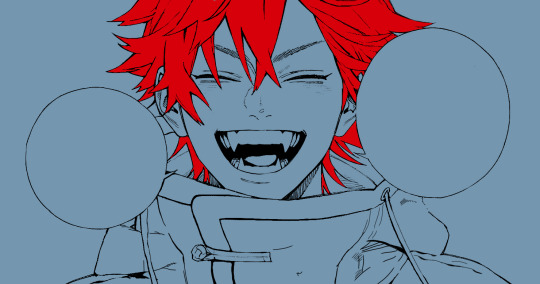
hansooyung's coloring tutorial & ctiys: alma time! 🍒
hello everyone! though i've been meaning to for a while, i've finally gotten around to making my first manga coloring tutorial! i'll be going over cleaning panels and screentones, choosing base colors, and finally shading and lighting.
this will also be a color this in your style challenge, so if you're willing, feel free to post your colored panel and tag me in it!! i'd love to see all the results :)
find details under the cut! 🦋
DISCLAIMERS:
this is just how i personally color! i know for a fact that some of my other friends follow other methods and have such beautiful colorings <33
for colors specifically, i play around a LOT. if you don't like your color scheme for the time being, mess around with it! i don't use psds since i like to mess around by hand with color palettes, but maybe i'll look into it for the future.
i explain a lot just bear with me gang 🙏
TECHNICAL STUFF:
software: ibis paint x (on iphone). i use ibis since it is FREE for all phones and it worked on my chromebook as well.
while this tutorial is made for ibis paint x, everything works on other softwares except the brushes, which i've provided alternatives for below.
brushes: i will be using dip pen (hard) which is automatically included with ibis, and two other brushes i made myself which you can find here and here. for more brushes, @/bkdkdh was incredibly helpful and posted her awesome set here!
for other softwares, you can use similar brushes. dip pen (hard) can just be the default brush, while wet edges is just the default brush on lowered opacity (and more of a rectangle/marker shape?). watercolor pencil is a watercolor brush in the rectangle/marker shape as well. if you can't get the shape, you can always smudge your lines into shape as well, so don't fret too much! a bunch of people only use one brush for coloring everything (which is insane to me, personally, they are so talented!)
fun fact: the first brush listed that i made was originally called "aki tao watercolor smooth" 👍
ok here we go guys!!
STEP ONE: CLEANING THE PANEL
i think of this part as setting up the panel for coloring! usually it's pretty exhausting cuz it's all b&w but it's all worth it i swear. the panel i'll be coloring is this beautiful one of alma from chapter 2:
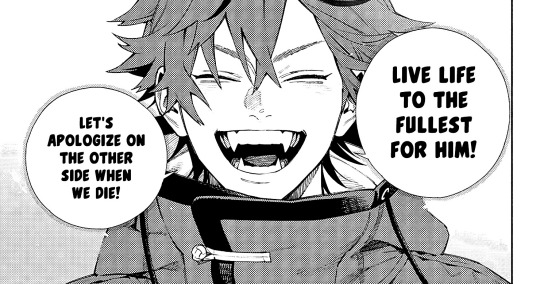
imgur link here (x)
a lot of people redraw their lines to avoid screentones, which is extremely helpful. however, i work on a phone and my fingers are not steady even with the stabilizer turned all the way up T~T. i do it this way, but a different (possibly easier) way may work for you!!!
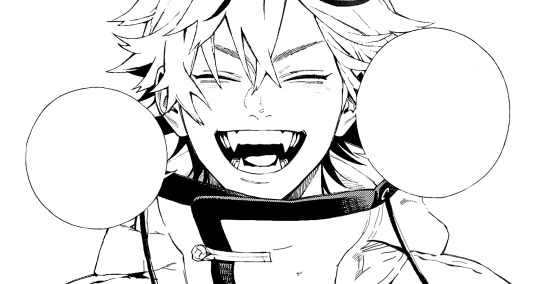
your first step will be to remove all the white, giving us a transparent background to work with. THIS IS THE NUMBER ONE REASON WHY I USE IBIS PAINT X.
when you upload the image to ibis, a popup comes asking if you would like to "extract line drawing". this creates a lineart of your image. click yes, and your work is like 90% done.
if you're not on ibis, you can redraw your panel, put lineart layer on screen, etc. or you can just extract line drawing from ibis and upload to software of your choice
for those of you not on ibis, i've included the line drawing here (x) if it looks black, don't worry and set your background to white.
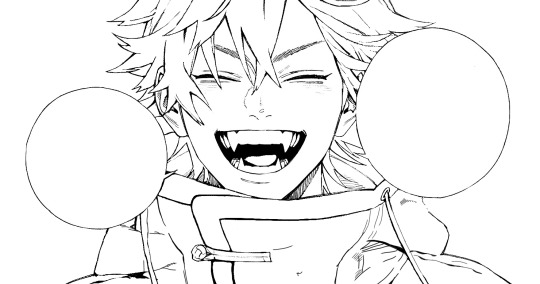
omg i was not kidding when i said i explained a lot. ok now onto the three main steps of cleaning the panel:
cleaning background
removing screentones
repainting black lines
for cleaning the background, we're going to clear off all the extraneous stuff. this includes the text in the speech bubble, the gradient screentones behind alma, and the panel line on the left side. just use your eraser tool and go crazy! (i forgot to save the panel at this point of the coloring OTL)
for removing screentones, we're going to remove all those "dots" that mangakas use for shading. these are used to show value for b&w art, but since we're coloring we don't need them—a lot of people have really cool ways of incorporating screentones in their colorings though, and it looks amazing! i used it on nana's hand in my bnha coloring.
remove the screentones from alma's hair and jacket with your eraser tool. this will take time, but it's worth it in the end!
for portions with a bunch of lines, you can create A NEW LAYER and redraw some of the lines. that way, you can erase indiscriminately from the original layer but the lines you drew are still there. again, like i said, my hand is really shaky so i don't do it a lot, but it's extremely helpful for smaller parts where i have control! i used this on alma's jacket, and here's a screenshot of the process:

(i made his jacket purple so i could distinguish between layers easily).
it should look like this when you're done:
for the final step of cleaning, i like to erase all the things colored black (the collar and strings of the jacket, along with the back part of his hair). that way, i can color them in with dark colors and it adds to the whole look of the coloring.
i've circled the parts i'm going to erase below:

and it should look like this when you're done!
ok everyone cheer we're ready to color now!!!!
STEP TWO: BASE COLORS
CROWD CHEERS ok lets go!
this part is the most important to me, because it sets the tone for the whole coloring. i like to use three-four main colors in my colorings, and it's usually background, skintone, hair, and the secret fourth color. the secret fourth color is usually whatever color fits the character's vibe, or if the character's color is the bg, it'll be an accent color.
for example, with my nagi coloring, i used white for the hair, i had my skintone, i had blue as the main coloring vibe (as nagi's color), and black as the accent color.
for alma, i chose his main color to be red! it's the color of his hair and his jacket, so i wanted it to be vibrant and stand out. since blue contrasts red, i went for a greyish-blue shade for the background. (i went for grey rather than solely blue because then it would clash rather than complement).
disclaimer please please please take your device off night mode warm mode f.lux whatever you have. this has screwed me over more times than you may think :(
i like to make my vibrant colors closer to the right end of the color square. for alma's hair, i chose this color:

i dragged it down from the corner a bit but kept the saturation since his hair is kind of dark. we can use vibrant colors to shade it though, so don't worry!
here's his hair and the background together:
now from here, play around with skintones until you find one that matches the hair!
i usually drag around the wheel to the orange-red intersection, and have it on the lighter, more saturated side. here's the color i chose for alma's skintone.
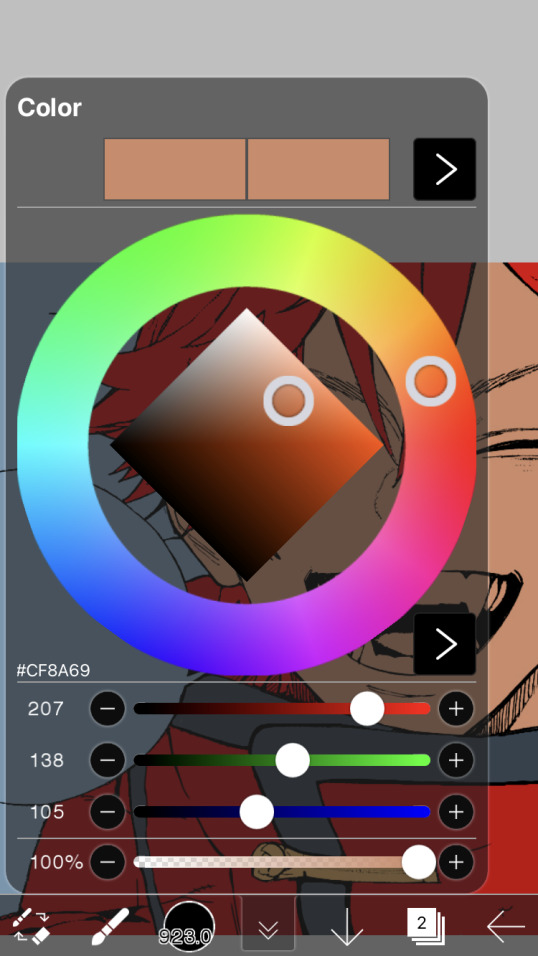
i thought his original skintone looked a bit too orange, so i pulled the saturation back a little bit (moved closer to the left side of the square).
after that, color in his jacket with a bit darker red than hair, choose a gold color for the accents on his jacket, and color in the black parts with a grey-ish color (we will change that later).
here's the base colors!
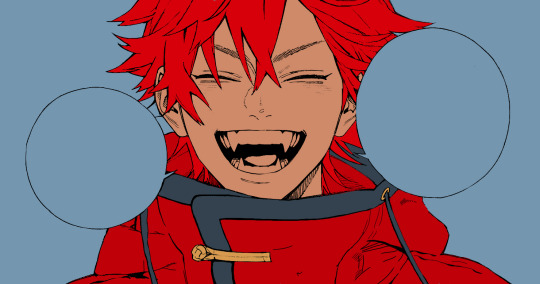
if it looks a bit bright, don't worry! we can change that with shading. or you might just have to. accept the light.
STEP THREE: SHADING AND LIGHTING
wooo we made it!!!!!!! ok now i lied, we have a bit more of base colors to go. on a layer above the skin, color in your teeth and tongue. for pieces that have a more red feel (like this one), i like to make the teeth and the shading a more vibrant blue color. (for blue pieces, i make it a purple!).
IMPORTANT NOTE: ALL SHADING AND ALL COLORS SHOULD BE DONE ON NEW, CLIPPED LAYER.

i'll then go in and do some light shading with my wet edges brush. i'll use a darker color for hard shadows and then a lighter, more vibrant color to accentuate it.
next up we have blush! a lot of people do this in very different ways but i like to do it directly under the eyes, in a vibrant red shade. make a new layer above the skin and clip it on. color pick alma's hair and drag it to the most saturated shade (red corner). then using the watercolor pencil brush, lower the opacity of the brush and drag a line under the eyes on both sides.
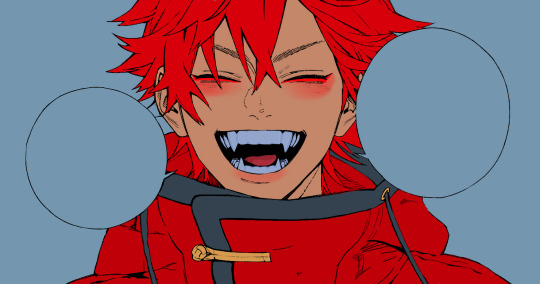
make sure to erase the portion of blush that goes above the eyeline. i also added some lips for alma as you can see, and then added a red line under the eyes! this was back to the regular dip pen (hard) brush on 100% opacity. it may take a few tries to get your blush to the way you want it, so don't worry too much.
now we can start our actual shading!
i break this part up into three steps: skin shading, blue shading, and light shading (highlights?)
for all of them, think about where the light is falling and how it will look on alma.
quick interlude about brushes: i use the watercolor pencil brush for softer, bouncy looks (like blush and noses) and i use the wet edges brush for more hard lines in shading.
again, make a new layer above the skin and clip it on. (i like to have it below the blush, so it doesn't cover it). for skin shading, i take the vibrant red and lower the opacity of the wet edges brush by a significant amount (specifics don't really matter, as long as you're happy with it). i'll trace his neck, from the shadow of his face, shadows of his hair falling on his face, ears, and nose. (for the nose i used the watercolor pencil brush for a softer look).

this is what i have once i'm done!
next we have skin shading part two, where we basically make a new layer on top of our first shading, lower the opacity further, and trace outside whatever we just did to blend it in more.

i used the watercolor pencil brush since it's more softer shading meant for blending! i also added it around the eyebrows for depth.
next up we have our blue shading! this is a technique that i learned from @/bkdkdh's colorings, but adding blue as a shadow really adds to the whole coloring. using the watercolor pencil brush, select a light-ish blue shade (a bit more saturated than background color) and use it to shadow a few more areas than your skin shading. i always make sure to hit the underside of the nose, cuz i think it adds depth!
finally, to wrap up our skin shading we have our lights. i use an orange-ish yellow color, which i set pretty light to not blend into the skin. using the watercolor pencil brush, i'll basically highlight any areas opposite to where the blue was, and highlight different parts. i always highlight one side of the nose as well.
i erased the line around the nose since we now have shading there, and added a darker shade to the teeth since i felt it wasn't shaded enough.
now onto the hair!!! (guys we're almost done bear with me, skin and hair are the two main things and then you can half-ass the clothes)
color pick alma's hair color, then drag the red a bit further down to get a darker yet still saturated color. here's mine:

then, using the wet edges brush, draw lines of shadow wherever clumps of his hair fall or overlap with each other. you can have the opacity set to whatever level you want, i just went with around 90. just try to follow the natural lines and patterns of the original line drawing, and everything should work out fine.

here's how mine looks! then, just like we did for skin shading, place a layer on top and lower the opacity to around 50%. place some more shading to blend it in. you can also shade more parts with this shade for some softer shading. i actually forgot to take a screenshot of this step but you'll see it in the next one!
for our (almost) last part of hair shading, take a layer and place it below both of your shading layers. this is going to be our highlight layer! you can see it below, labeled 49%.

remember how we set alma's hair a bit darker from the corner color? now select that corner color and draw highlights in the center of each hair clump.

lightly visible but it's there!
now here i skipped around a bit bc i was having fun and forgot i was doing a tutorial, but repeat the shading (not highlighting) steps with darker colors for alma's jacket. you should have your base layer, a dark shading, and a softer shading for blending.
we're almost there guys!!!
for the pretty much final step of shading, select a light blue color and do some blue shading with the watercolor pencil brush opposite to wherever your darker shading falls (just like we did on the face). make sure to do it to both your hair and your jacket! here's mine:
now for the black portions, we're going to color the whole thing in a dark blue color. just alpha lock your layer and make a big stroke of dark blue, almost black. for our black shading, we're actually going to go lighter.
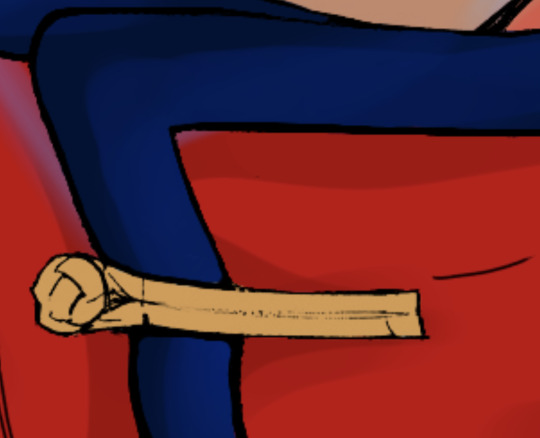
select a lighter (but still dark) color and place highlights on the base layer, then take an even more vibrant, lighter blue and place it on the very outside for highlights. a better example of this would be nagi's legs in his blue lock uniform here. then, choose a shade to apply shading to the gold accents on alma's jacket and we're done!
CROWD CHEERS!!!!!
STEP FOUR: FINISHING TOUCHES
we made it guys!!!! for finishing touches, i'll usually do background effects or text or that kind of stuff.
step one is coloring your lines. you can add a new layer and clip it to your lineart, or simply alpha lock your lineart and color directly on top. for hair i like to add vibrant blue/purple lines, along with a few red ones. for skin lines i try to do dark brownish purples, but leaving some black is good too bc it adds flavor!
i colored in the text boxes and added shadows using the wet edge feature, then added some text. for the glitch effect, i duplicated the lineart, dragged the layer below all of my colors (including speech bubbles) and then used the glitch effect with height full from ibis. if you don't have ibis, you can look into features on your software, or you can also just drag your lineart layer a bit to either side and color it in. i also applied just the tiniest bit of noise on top of everything
and there we go!!!!! we made it to the end :)
if you've read all the way til here, thank you so much! if you decide to color this panel of alma (or any other panels!) don't be afraid to post them and tag me for a color this in your style type of thing! (you can also put it in my tracked tag, #user.roy) i'd love to see everyone's works :)
here's the full timelapse: (it stalls for a bit at some times but hey we can't have everything)
#roy colors#tutorials#manga coloring tutorial#useraki#usergojoana#usermica#usernikiforova#tagging some friends <3#alma#gokurakugai
42 notes
·
View notes
Text

"It will be alright, Mini-moto..."
No context here. I needed some background texture, so I went to back these shapes. Maybe pretend they're glitches or something?
And where is his cap? Good question!
#ntwewy#neo the world ends with you#coco atarashi#sho minamimoto#my art#my twewy series art#twewy#neo twewy#i always want to give minamimoto a surprise hug but this mood just swept in and took that idea over#originally he was just going to be defeated like - arms hanging limply by the sides#so now we have...whatever the heck this is#colourful erasure of something? idk. i like these coloured shapes a lot#and i realized that coco hugging him like this is uh...maybe not the most reassuring. and saying that#side question: who would minamimoto like a hug from? like thinking in theory... If he's a hug person that is#edit: staff fixed the post not appearing in the search tags - and i imagine dashboards too#because the notes were suspiciously empty. even for low note art posts i usually get more than anyone i gave a direct link to the post#check the reblog for more additions :D
62 notes
·
View notes
Text
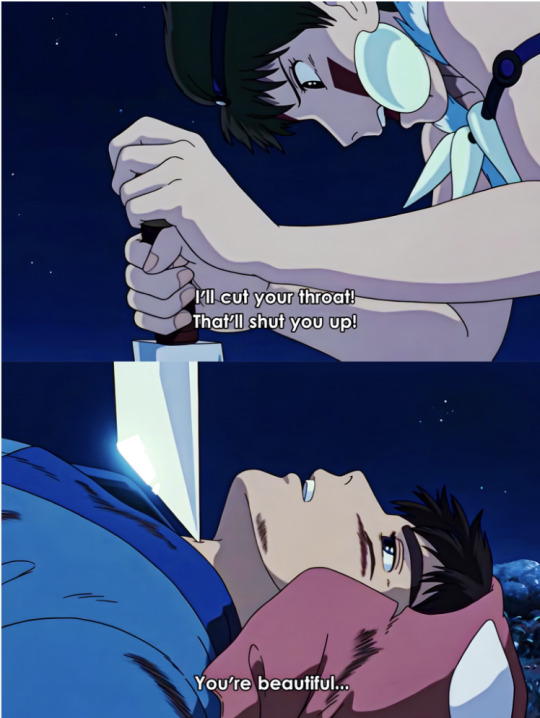
" just...come here. just sit here with me" (...that one scene from princess momonoke, click for better resolution)
#tw death mentioned for the tag rambles!! (sorry)#meme redraw gone wrong (high effort). don't ask me how i did this- i don't know either. consider this perhaps an AU of the pyre scene?#or more accurately just my internal wonderings visualised. sometimes the vibes from the implications don't pan out the same way#i also lost the original sketch somewhere in my papers. alas. i vaguely recall thinking this would be haha funny and then somewhere down#the line it turned to angst. other quotes that inspired this from the show were 'ily. i'm sorry' and 'i will always be so proud of you'.#smth smth they met on the roof!! vincent stops quincy from jumping off and then. vincent tries to die + eventually quincy kills him on the#very same roof. anyway the quincent death scene was spinning around for a bit in my head and out of the miscellaneous sketches this won out#wanted to play w the strong blue lighting + bg + silhouette things that you get w stage lighting // replaced the knife w vincent's scalpel#quincy is kneeling bc poses + idk why it's fun staging for him ;-; // also the proximity + intimacy.. // the pyre is also in the bg#but it's silhouetted behind quincy. i think the last quincy post made me associate symbolism (help??) bc as i was painting i was thinking o#angel wings ksdjfh // not to mention the halos. halos are always fun to paint.. shiny stuff...#and from the last vincent art. i guess the star and eye imagery carried over. hm. tried to get the quincy halo to match so its like a#rounder less spiky star? which hehe aligns w the sun vibes (that i??can't explain??) but more importantly here i was thinking about#binary stars for the glowy parts. two in orbit in pull to one another.. tension.. ue. also the glow for vincent goes to stabby eye so like#behind the face shown to viewer. meanwhile for quincy it goes in front of the face#and of course u have the downward linking implied line from quincy's tears +scalpel + glowy eye.#this is supposed to be rotatable.. in landscape form u can have either quincy or vincent upright (pov) + it should work both ways#//bonus stuff is vincent holding the skask w bloody hands + shadow looks like blood spatters. like it would if quincy did the stabby.#hhhh this is the most. confused i have been making a piece lately.. just toss in a lot of fun visual stuff and mix..#if the rambling analysis here seems pointless and confused i think that's why. this is why u should plan out your essays o.O..#oh. stuff i just remembered: the whole impetus for vincent planning his own death was so quincy would be happy / it's already#mentioned before quincy kills vincent that he's severely injured- vincent says it's fine- ig u could intepret it as a finishing blow?#hastened over the phaethon announcement- when they make the second announcement quincy looks up smiling until the admin gives it to#beatrix-he didn't know.. // <- so for this it's possible to infer that vincent wasn't very attached to living anymore.. hence why they look#more accepting above. while quincy is looking very angsty and conflicted. yeah.. // tldr! don't look into it too deeply it's a meme redraw#adamandi#quincy cynthius martin#vincent aurelius lin#tw knife
50 notes
·
View notes
Photo


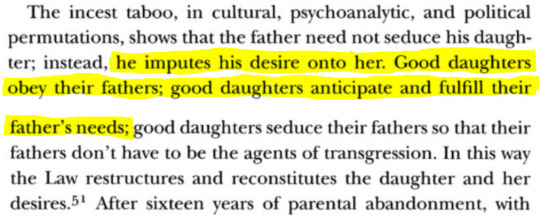
Rosaria Champagne, “Law of the (Nameless) Father: Mary Shelley’s Mathilda and the Incest Taboo” // Star Trek: Deep Space 9, 2x22 “The Wire”
#incest tw#RENT LOWERING GUNSHOT POST#''I never met anyone who relished a good interrogation as much as you did.''#and then we proceed to hear a story about how Garak preferred to stare at someone for four hours straight rather than interrogate them#and THEN we proceed to watch him try to interrogate someone and not be able to do it even when he literally doesn't even have to doanything#because the anti-changeling machine basically does it for him and he still can't even watch it happen#hm. hmmmmmmmmmm#''We're both getting sentimental in our old age.''#Fathers love to tell you you enjoyed it actually. and also you're basically a fellow adult really.#it's their favorite thing in the whole world#Starky's Original Posts#Star Trek: Deep Space 9#watch these tags look stupid after I watch Broken Link or something. whatever I'm basking in them for now.#not sorry for posting this due to the fact that I wanted to do so. however I am sorry you had to see it.#god I looked up TDIC script for this and I cannot do it anymore#NO NEED TO PRETEND. YOU'RE FOND OF MILA. AREN'T YOU? YOU DON'T WANT HER HURT DO YOU?#SICKO TELEVISION SHOW I CAN'T WAIT FOR ALL OF CARDASSIA TO GET EXPLODED BY ONE TRILLION BOMBS#GOODBYE
65 notes
·
View notes
Note
How did you first get into Nier? And who is your favorite character(s) in each game?
was over at a friend’s house early summer in 2016 and they asked “do you want to play a game about a hot single dad” and that’s how it all started.
my favs are dad nier, yonah, weiss, a2, and 6o :) here is a bad picture of my dad nier shrine on my bookshelf
#if you (reader of this post) make dad nier merch link it to me i’ll buy it#loneask#majorminer4567#post tags. i really have complicated feelings for nier series now unfortunately where i’m kind of divorced from it#because dad nier is my favorite character ever it really sucks to see him totally ignored. Especially bc i shilled hardcore for nier-#-pre automata. like my reward for liking nier for a long time is my favorite character being erased from the world#on top of other reasons i don’t want to get into. i still love the original nier though and that’ll never change#But my brain is permanently in like march 2017 right when automata came out. I dont think about the after#i really do love dad nier so very much. he will probably be my favorite character forever.#if you fansplain the situation behind dad nier’s creation youre just getting blocked like yeha i know. It doesnt change the fact that -#i love him and a LOT of other people who supported yt before he blew up did too. It really just hurts.
47 notes
·
View notes
Text
Ya know. I spent most of my life with horrible painful soul-crushing social anxiety.
And after about 25 years of continuous hard work, suddenly, people started pointing out - to my utter bafflement - that I had, in fact, achieved my lifelong dream of being charismatic. I'm 29 now; I feel comfortable in most social situations, and it is a very rare person whom I cannot make laugh.
I am, undoubtedly, finally, charismatic.
But do you know what I found?
I found that now that I have an understanding of which social rules serve which functions -- Now that I have an understanding of just how much damage my awkwardness was doing to people, well,
I found that, actually, my awkwardness never really hurt anyone at all. People were just judgmental dicks to me about it.
Now that I have the skill-level to (most of the time) creatively vocalize what is in my head as soon as I think it and without fear, I can confirm once and for all what I had always suspected:
I was worth talking to when I was quiet.
I was worth talking to when I was awkward, and when the words in my head took time and patience to hear, and when most of my jokes didn't land. I was worth talking to the whole time.
So I just... I hope that if you've ever wondered whether you are worth communicating with, the answer is yes. Absolutely yes. Each of us has a soul worth sharing - and if you and I were talking, I would happily wait for you to speak (or communicate in other ways) without condescending, and I would never shame you for that harmless awkwardness that so many people feel the need to violently stomp out.
You are worth talking to. You just are. And you deserve people who will speak to you with kindness, with patience, and with the basic immutable respect owed to all people.
(I talk about this with some frequency, both on tumblr and in real life. At some point, maybe I'll gather all my thoughts on the matter into one post. At some point, I wrote about my personal experience trying to build my social skill. But I felt the need to say at least a little bit tonight after seeing this other lovely post, and I'm glad I did. It will happen again.)
#original#social anxiety#autism#that one post#actually autistic#self-diagnosis is valid - in case that last tag implies otherwise to anyone. i think it just denotes i am an autistic and not just an ally.#social skills#socially awkward#socially anxious#autistic positivity#autism positivity#like actually genuinely who does it hurt if i tell a joke that doesn't land? esp if the joke is not about another person#this is not a live comedy show this is life ya gotta learn to say 'ah well they can't all be golden!'#which btw is a line i use when my own jokes don't land and it usually plays pretty well actually. i've got a higher hit rate but#genuinely they just can't all be good! anyway i go into that in the post linked at the end there i think#people can tell when you're not sure of yourself socially and a lot of folks instinctively use that against you. and i am here to say that#it's fucked up that they are doing that and they need to step off actually. imagine getting to decide on which social cues are#acceptable and then using that power to be unkind. fuckin gross. i regret so deeply each time in my life i have made that choice.#being a kid who is abused like that so often it was eager to power trip when i met kids more awkward than myself. but it was wrong#and i regret it. and i am proud to say i haven't done that in a long time and instead when i find myself with that power i try to say#actually what do YOU want? to the people shyer than me.#i'm pretty rad now is what i'm saying lol#like all the ways that having a good social stat has improved my life just made me realize what bullshit it is that this was necessary#doing what I did is not desirable or possible for everyone. they deserve just as much out of life as i do.#side note: i think I've actually surpassed a lot of neurotypicals who had never even had to think about social rules 🤣.#like I feel no competition with other people who have struggled socially but now that I'm more charming than people who were dicks to me#I do feel like fuck you!! I win!!!! I can finally see enough of the full picture to say that your arbitrary rules were FUCKING ARBITRARY#I'm also aware of the fact that not everyone finds me charismatic but i am. in all the ways that matter to me. and I'm still growing!#note to future jack: you did save these posts in your notes app on the day this was written.#tbh i am often still awkward i am just not sorry anymore if i'm not hurting ppl. 'confident and awkward' really throws 'em for a loop! XD
29 notes
·
View notes
Text
Summary: follow along on Vio and Shadow’s journey through Hyrule by scrolling through the camera roll on their Purah Pad.
Pairings: Vio/Shadow
There are two versions of this story posted, the first chapter is spicy and the second chapter is the SFW version. They both tell the exact same story, though the ending has been slightly changed for each. I wasn’t sure whether to split them into two postings or not so I just put them both together.
I also sketched out a little scene from halfway in the fic. Granted, I kind of gave up on the drawing like ten minutes in hence why it looks like that but I’d still like to post it lol not my best work hahaha
#reuploaded because i went to edit my original post and then freaking deleted it by mistake#my fics#art tag#vidow#vioxshadow#shadow Vio#four swords#four swords adventures#four swords manga#fsa#Vio link#shadow link#the last time I posted a fic I had someone swearing at me lmfao#could you imagine actually getting upset by a fic post?#just block me and move on it’s not a big deal#the legend of Zelda#totk#botw
19 notes
·
View notes
Text
from this point on, if I see someone share a screenshot of an article with no link and no alt text, it's an instant block for everyone involved. there have to be some fucking standards
#alt text#I get it if you don't have time/spoons to type out alt text#but the article is right there#you can copy/paste!!!#and there is no excuse for not linking it#ever#“but what if I don't have access to the original article?”#then don't post it!!! why would you post an article you didn't read???#me tag
3 notes
·
View notes
Note
whenever you tag a post with your 'secret project' tag it makes me smile! it's going to be a banger
ahhhhh, tysm!!!!! it's actually an anthology of things i've been working on seriously for close to four years (had the nebulous idea for an additional four years before that) that is (somehow) still in the plotting stage. the aesthetics are there the vibes are there the general direction is there but word count? nada i'm starting to think it should be a film/game project, asfjdgjnlifhfnlwwmpjfmq
#inbox#q: tsupertsundere#when this fits the vibe for the secret project that you're working on but don't want to talk about on tumblr.com#a prime example of having bitten off more than you can chew............. i have two works that have branched#off from the original anthology into their own full fledged WIPs with character names and settings and everything. again no word count#just the knowledge of it in my head rip#originally the reason i gave it that tag was bc it was fresh off of a very traumatizing experience in the writeblr side of this hellsite#and i did not want to talk about it to anyone. did not want them asking questions did not want them accusing me of sh*t#they didn't know about nothing. now it's snowballed and i'm more open to people who are curious but the tag stuck and i can't#get rid of it now it works too well#if you ask nicely i will post the Pinterest link. key word is nicely bc i still guard that sh*t over there with my life
3 notes
·
View notes
Text
i am SO IRRITATED with @support @staff right now
like this detaching a post from its link to each individual reblog in a chain is a NIGHTMARE
-> new hyperfixation, and i'm trying to backread some of the associated blogs that have been around a while, yeah?
and i'm on mobile, which is relevant because hey fuck app users is i guess the motto?
so used to, if you wanted to read a few months/years back on a blog you could: find a tag of theirs, click on a post that was around the time you were interested in, be ported to the blog's dash AS OF THAT TIME IN THE PAST, and just scroll along
but now, because tumblr, for whatever moronic reason, has isolated posts so that
clicking takes you to an individual pane for *only* that post, not where it is on the blog timeline
AND NOW you CANNOT reach a previous reblog from clicking on the username in the reblog (only the og post)
the ONLY way to get back to older posts is to SCROLL MANUALLY FOR LITERAL HOURS
if i want to see posts from 2017, finding an old post and clicking on it does NOTHING to help me - it has been snipped out of its native environment and shown to me, but the other posts available as links at the bottom pane are just whatever tumblr algorithm thinks are 'relevant', not access to the rest of the blog timeline
this is true EVEN ON MY OWN BLOG and
I HATE IT
either make the Archive function work on mobile or GIVE BACK THE FUNCTIONALITY THAT WE HAVE ALWAYS HAD
#tumblr#GODDAMMIT my hand is tired#i KNOW that on desktop you can hotkey around THAT IS WHY I AM COMPLAINING#the are always desktop workarounds for everything it's only mobile users that get treated like trash#give me back a way to click back to 'prev tags' or whatever and GIVE ME BACK A WAY TO 'GO BACK IN TIME' ON A BLOG#that is the entire FUNCTION of a blog or did you blackout everything you know about wordpress somehow?#the point of a blog as opposed to pure 'social media' say twitter is that it fuctions as a RECORD#posts are supposed to remain accessible not vanish never to be accessed after a few days except by direct link#and direct links don't even work anymore!!! bc now you're requiring people to sign in to see posts and comments#plus a native shared link now takes people to the crappy default 'mobile' view of a post not the ACTUAL BLOG POST#that someone made on their ACTUAL BLOG that has their custom theme and header sidelinks bio etc#nowdays if in my notifications someone says something to me referencing my own tags on a post#and i click on that - i CAN NOT navigate back to my own post to see what my tags even were if i don't remember my exact wording#i have to exit notifications go back to my blog and just ... scroll until i reach that old post just to have a reference#like what the fuck tumblr?#i will say it again: STOP FUCKING WITH THE SITE NAVIGATION we NEED that shit this is not tiktok we find posts on OUR OWN#there's a difference between making something accesdible for new people and flat out ruining original infrastructure
5 notes
·
View notes
Text
everybody read sundials in the shade now. send in your reviews. enjoy the symbolism & lore-building. enjoy the standalone character-driven mild plot. enjoy the dialogue. just do it
#tis i#this doesn't get the writing tag because this is a repost#admittedly unspecific dialogue#this story has 90 hits probably thanks to it being linked to in the description of my blog but That Isn't Enough#(90 hits being high for my original stories on ao3. original stories which i like. tdm stories.)#truthfully i make this post just because i Like sundials in the shade an awful lot. there you go#i'd like it if people could read the other tdm stories too though#uq
9 notes
·
View notes
Text
#oh look an original post#is there a way to get it to not do the link preview now that they've changed my#post editor#what the fuck do you mean I'm only allowed 80 characters per tag
2 notes
·
View notes
Text
Also… the landlady who runs straycatj obviously loves when people make art of her cats? She reblogs drawings that people make of them & is excited to see them all the time? The issue is painting something that looks exactly like the original photo and making money off of it without permission or credit. It’s also not a cultural difference because I’ve literally seen this exact same thing happen on western Twitter, where the original photographer was equally (& rightfully) upset.
Photography is art, and even if the original photo wasn’t meant to be hung in a museum that doesn’t mean you can create something that looks exactly like it and claim it as your own. There’s also a huge difference between like… painting a well known meme image that anyone could recognize and painting a photo from a niche cat blog on tumblr. With the former, most people who see it will recognize that it’s based on the original, and with the latter anyone who looks at the painting will assume it’s a completely original piece. Just because its not illegal to do doesn’t make it ethical especially when there’s money involved.
#‘credit is a courtesy not a necessity’ oouhghhhhgh what are you even talking about.#especially in this day and age where it’s so so easy to link back to the original#idk my personal opinions on this normally follow journalism standards which is credit everything always#tldr landlady is right. why are you guys arguing with her.#& yeah looking at the Instagram post it looks like they did a (very bad) credit in the tags but like#that’s really not helpful. especially when you’re getting the name wrong.
8 notes
·
View notes
Text
annual realization where this gas station’s operations and my life owe it all to visualive i’m serious
#kommento#// thinking if i should put all my thoughts in the body of the post instead of tags like these but oh well it’s a quirk of mine#// friendship is so important to me cca is so important to me that one skit with that mention of cca is SO IMPORTANT TO ME friendship is so#// without vl i would have never think of adachi as affectionately as i do right now like no dojima hangout times are going to save me in#// any alternate timeline there’s no going back#// i would still love mimi yes but just in a different flavor#// i really don’t how how to describe that fork in the road but yeah i just /waves hands around/#// unlike most adachinators i develop adachis super weak and sad sympathy and basic morality with a gas station attendant instead#// of detective yaoi and family fun times#// you thinking adachi would win the idgaf war but those two skits in vl blow that all out of the water#// i mean there’s the rest of the game but like i commit favoritism crimes okay#// LITERALLY JUST TOSS HIS SOCIAL LINK AWAY for a second think about what adachi is think about him in the ps2 context#// LITERALLY JUST READ THE MANGA PLEASE i’ve had my theories tested and confirmed on how much you can care about tohruadachi#// at the bare minimum information you have on him and experiencing him as organically as possible IN THE ORIGINAL NON GOLDEN CONTEXT#// you could even go through the drama cds and see how genuine of an adachi he is like seriously forget the golden era and fanservice#// get bancho out of the equation and think about who is right now at that moment#// okay i’m tired now i’ll stop here but i wish people could just enjoy adachi more without the sentiment hes a fuckable antagonist#// dont romanticize his emptiness and hate for the world Like That but rather as human as he already is before you learn he’s a pawn for god#// adachis a special character to me genuinely i wish i could talk about him more often if i didn’t have chronic Not Like Other Girls diseas#// such a fun brain excercise sometimes just wish that i wasn’t poisoned by fandom and that fact they gave him a rep like this that makes me#// so embarrassed or even ashamed to say his name out loud and admit i like him#// LIKE close your eyes and forget hes the villain and he’s the murderer just look at him and think how and why he’s a fucked up guy underne#// underneath the goofball facade he pulls. now think and wonder how much of a genuine goofball he is#// it’s like thinking about ichinose except everyone else is a mysoginist that’s why they take don’t take her seriously#// okay adachi tag most used tag blogger is signing out goodnight guys mwa
5 notes
·
View notes
Last Seen Blogs

royal-dragon7
Irratiønal Dragøn

johnstonredcczggdn
Untitled

redgrve
handmade / heaven !

riyajaglan
Untitled