#you have to desaturate and over-darken everything SO MUCH
Text
> uploads a gifset whose coloring i slaved over on my laptop and and love
> opens mobile, sees that gifset
> Pain
#you have to desaturate and over-darken everything SO MUCH#for it to not look garish on mobile#and i refuse
1 note
·
View note
Text
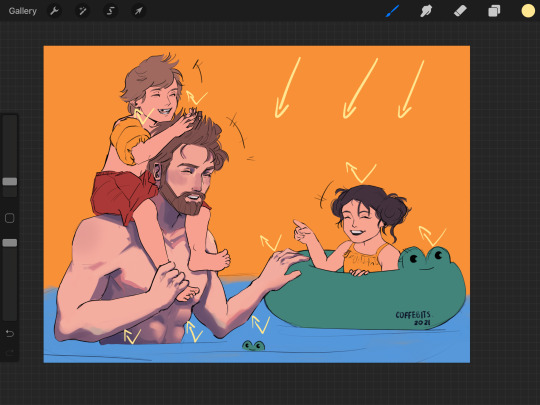
It's finally time to share my fic for @shatteredestiny-zine aka Dark Road Zine! I had quite the time figuring out what to write about for this zine. There's so much to explore! It's a part of the fandom I don't think is focused on enough, so this was the perfect opportunity to dive into it.
The entire team was just lovely and there are so many incredible fics and artworks throughout the zine that explore each of the characters. I personally chose to explore none other than Luxu. He's an intriguing one and I've always wondered how his possession powers worked. So that's what I decided to focus on!
Each writer also had an artist or two creating illustrations for their pieces! One of the artists for my story was the lovely @amyhayanora <3 Which I have the permission to share alongside the story! She found the soul of the piece and laid it bare. The combined Stations of Awakening and the desaturation on Bragi's half, it captured the atmosphere perfectly.

-----
Cycle of Existence (1911 words) by CurryFury13
Summary:
Luxu stands amongst the gravestones of his fallen 'friends'. It's not the first time he's been in this position, nor will it be the last. The cycle of his existence continues… There's just one last loose end to tie up before he moves on.
----
Lightning pulsed through the thick clouds, flashing with strikes of whites and blues against the heavy gray. Rumbling thunder followed, roaring with unrestrained fury. It reverberated between the rows of tombstones, echoing and carrying across the cemetery like a wail. Luxu stood on a worn path, silent and listening. He wore a thick black coat. It was long, encapsulating, and concealed his identity beneath a hood that shrouded even his eyes from the world around him. Sharp rain bounced off the leather of his coat, spattering to the cobbled ground below.
He remained perfectly still while the whistling wind billowed the bottom of his coat. His gaze went from one gravestone to the next, reading the freshly etched names—Hermod, Urd, Vor… Bragi. He paused at the final name and for the first time since arriving he let out a noise—a single, breathless scoff that was lost in the wailing of the storm.
With a single motion, he pushed back his hood. Rain darkened his auburn hair, sticking it to his cheeks. He leaned his head up towards the clouds, welcoming the storm and closing his eyes. Another life, there and gone again.
“There…” he said softly. “One last time.”
“So that’s it then?” A voice asked from inside his mind, fleeting as if a stray thought.
Luxu’s brow raised at the voice, though he wasn’t surprised. With a flick of his wrist wisps of darkness sprouted from the ground. Blues and purples surrounded him, concealing the storm. Then everything went quiet. Luxu took in the silence, letting out a breath before opening his eyes. Stained glass spread out beneath his feet, brilliantly glowing from an ethereal light beneath it. Soft, yet vibrant hues splashed over Luxu’s coat, creating a shimmering kaleidoscope across the leather. He paid no mind to the light display, however. It was a familiar sight—too familiar sometimes.
He recalled the Master of Masters referring to it as a Station of Awakening—a physical representation of a heart. Or two, in Luxu’s case. Deep fissures webbed down the center of the intricate stained glass, each half depicting a different heart. One belonged to Luxu, the other to whichever hapless host Luxu decided to prey upon that century. At least, that was how his first host, Brain, had put it.
“Guess it’s about time you move on to the next victim, huh?” The same voice from before asked.
Luxu looked towards the other station. Its colors were fading. White cracks leaked over the faces depicted across it. Bragi sat in the center of it. He was kneeling, disheveled, his skin pasty white compared to the warmth it had in the outside world… when Luxu wore his face.
Bragi’s tired eyes didn’t even feign Luxu a glance. He stared at the glass, his thin fingertip tracing the veiny white cracks beneath him.
In return Luxu crossed his arms and scoffed in a playful way he often recalled the Master of Masters doing to him. “Now you don’t have to go saying it like that. Last I checked, I did you a favor.”
A pained laugh shook Bragi’s shoulders. “Fair enough… Still, you didn’t answer my question.”
The sharp edge of Luxu’s smirk dipped and he looked at Bragi, studying him. Seeing him now reminded him of when he’d first chosen Bragi as his carrier, host, whatever anyone wanted to call it. A sick boy — lost, forgotten, nearly on his deathbed. No one would have noticed him dying. Luxu liked to tell himself he gave him another chance at life. Brought him along for an adventure he never would have had the chance to go on otherwise. But it all ended the same way it always did. Back where they started.
Luxu turned away. He gazed out at the stirring cosmos beyond their Stations. “Gotta move on at some point.”
Silence was all he got in reply.
The silence stretched. Their breaths filled the quiet, Luxu’s long and even, Bragi’s labored and hoarse. Luxu’s grip tightened along his arms. The wait never got easier —w aiting for life to fade. He should have been using the time to find another host, but he didn’t move. It ate at him, nagging at the back of his mind as he watched the floating colors against the black emptiness around them. He needed to go, move on, but hearing Bragi’s slowing breaths… leaving didn’t seem right just yet.
He peeked over his shoulder and Bragi’s eyes averted to his fading Station. Luxu watched him for a moment, seeing the furrowed brows as Bragi’s finger repeatedly scratched the glass beneath him.
Luxu looked back to the cosmos. “You gonna say it or are you planning on stewing?”
Glass cracked, sounding like twinkling chimes as thin fissures webbed from where Bragi rested. Bragi swallowed thickly. “Why didn’t you do anything…?”
“Why didn’t I —what exactly?” Luxu asked, feeling Bragi’s glare against his back.
“You knew what Baldr was doing,” Bragi clarified, his voice trembling. “Why didn’t you save…?” His voice trailed off and he sucked in a breath. “I thought they were our friends.”
As if…
The thought immediately crossed Luxu’s mind and he winced. Over the years, losing friends didn’t carry the sting it used to. He looked up, even though the same cosmos awaited him in what should have been the sky.
“Figured by now you’d know the drill,” Luxu said finally. “Can’t draw too much attention, can’t interfere. I’m just here to watch.”
Silence stretched after his words fell to fading echoes. An entire minute passed before Bragi spoke again, “I guess I thought they’d be the exception.”
A scoff escaped Luxu before he could catch it. “You make one exception and suddenly everyone begs to be the next.”
“Speaking from experience?” Bragi asked.
Luxu chuckled and turned around. The cracks in Bragi’s Station were already thicker and spreading. He walked towards the center fissure, where their Stations met together; it was wider than before. Luxu traced his foot along it, watching loose shards fall away into the abyss below.
“It’s been quite the ride, hasn’t it?” Luxu asked.
Bragi watched Luxu for a moment, then looked away.
Blowing out a breath, Luxu straightened out his coat. “Well, I suppose the hunt begins.”
-----------------------------------
Even at night, the flowers in Radiant Garden were vibrant with color. Luxu walked amongst them, his attention on the towering castle in the garden’s center, rather than admiring the beauty around him. He stopped at the bottom of a stairwell that led right up to the main gates, but he didn’t move any further.
“This is the place,” Luxu whispered.
“ Are you sure?” Bragi’s voice asked weakly inside his mind.
Luxu smirked. “Word has it there’s a crazy old scientist in there studying hearts. And he’s got a whole lot of apprentices in there helping.” He turned around and disappeared into the garden, finding a shrouded corner to settle into. “So yeah, I’m sure.”
Bragi didn’t reply right away. A warm breeze whistled through the trees, swaying the flowers and twirling the occasional petal in the air. Luxu leaned back against a tree trunk, crossing his arms and watching the castle. “Now we wait and find the right person for the job.”
“ You seem excited about this…” Bragi muttered.
Luxu shrugged. “Maybe I am.”
“You’re about to ruin someone’s life,” Bragi started to say before breaking into a cough.
“Did I ruin yours?” Luxu asked.
He half expected the silence he got in response. Looking around from his hiding spot, he scanned over the garden and the castle grounds. Two burly men stood guard at the gates, lances firmly in their hands. A giggling couple waltzed along the outskirts of the garden, hands held and the rest of the world invisible to them.
Then Luxu saw him.
A man sat alone on a bench, hands linked between his knees as he stared up at the castle. He kept to himself so much that upon first glance, Luxu hadn’t noticed him. Luxu smirked, a familiar fire igniting in his chest. With a flick of his wrist, darkness wisped around him and his black coat transformed into Bragi’s clothes. He stuffed his hands into the pockets of the familiar blue hoodie and came out from the darkness.
“Mind if I join you?” he asked as he approached the bench.
The man startled, his brown eyes darting over to Luxu. He ran his fingers through his black hair and cleared his throat, scooting over.
“Thanks.” Luxu smiled and sat beside him.
He gazed up at the castle and leaned back in his seat. The man watched him for a moment before looking back to the castle as well.
“Pretty incredible, isn’t it?” Luxu asked.
The man nodded but didn’t reply.
Luxu continued, “You ever thought about seeing what’s inside?”
The man looked at Luxu from the corner of his eyes, then back to the castle. His brows knitted together before he answered, “I hope to soon.”
“What do you think is in there?” Luxu slightly turned towards him.
Straightening, the man said. “The sort of things you couldn’t comprehend.”
Luxu chuckled. “Is that right?” He turned to face forward and leaned far back in his seat. “Well, maybe I’ll just have to get in there and find out for myself.”
“Maybe you will,” the man replied.
“Luxu… ” Bragi said weakly.
Luxu blew out a breath and abruptly got up. “Nice talking with you.”
The man watched him leave with an arched brow and small wave of his fingers. Luxu waved back with more of a salute, then turned on his heel and disappeared into the darkness. Once out of sight, wisps of darkness surrounded him and he reappeared in his Station.
To his surprise, he found Bragi standing. The color from Bragi’s Station was nearly grayed out completely. Entire sections of the glass were missing, leaving Bragi a single shard to stand on. Luxu met him in the center, both of them standing on their respective Stations. Bragi swayed side to side, and gradually lifted his sullen eyes to Luxu.
“This is it… isn’t it?” Bragi asked with a hoarse whisper, unable to hold Luxu’s gaze.
“Seems like it,” Luxu replied, studying him. “You ready?”
Bragi’s brows knitted together and he looked around. Luxu’s Station was brighter than before, pulsing with power and anticipation of the next heart. And there was Bragi’s… shattered and gray, about to be lifeless. Bragi let out a shaking breath.
“Yeah… it’s time,” he said softly. His eyes flickered towards Luxu, then away again. “This is the last chance I’ll get to say it… Thank you…”
“Thank you?” Luxu repeated.
“For giving me a second chance.” Bragi’s entire body shivered, more shards of glass falling away beneath him. “The years with the others, my friends, I…” His voice trailed off and he abruptly looked directly at Luxu with a determined glint in his eyes. “Don’t forget.”
“About you?” Lucu asked.
“About all of us,” Bragi corrected him, standing firm and tall for the last time. “Xehanort, Eraqus, Hermod, Urd, Vor, even Baldur. I don’t care how long you keep this up and cheat death. Don’t forget about us.”
Luxu stared back at him, rendered speechless for a moment. A faint warmth washed over his Station, a warmth he’d forgotten. Swallowing, Luxu placed his hand on Bragi’s shoulder. The corners of Bragi’s mouth curved into a subtle smile and Luxu chuckled. “As if I ever could.”
38 notes
·
View notes
Text


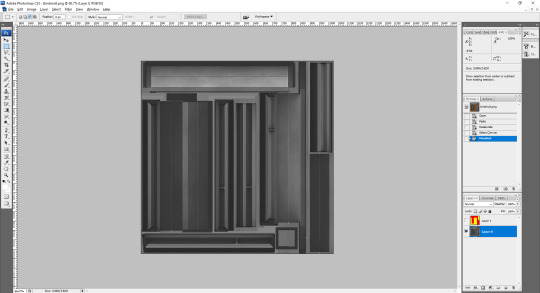
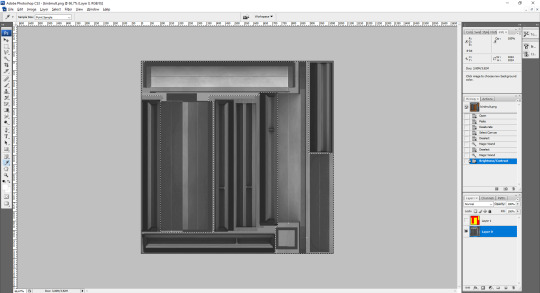
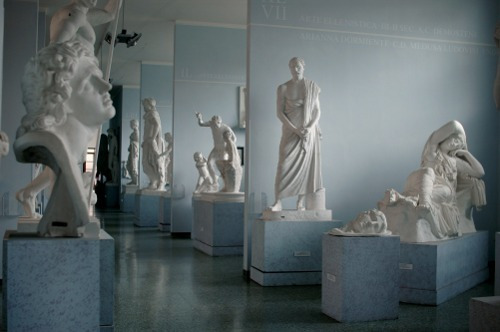
It's been over a decade since I had a photography seminar at uni and I have not done any serious photographing or editing since, but I'm pretty happy with this one. In order, the processed jpg the camera shows, the raw image, and my edit. Files are pretty big, sorry if you're on mobile.
This is my first time using darktable and I had to google like every other tool because everything is named differently, so it took over an hour, but with practice I'll easily shave off a lot of time. The most time-consuming part though was drawing a mask for the tree with my mouse so I could selectively darken and desaturate the background, and that doesn't tend to get all that much faster with experience, if you want to do it right, i.e. zoomed in all the way.
#mine#my art#digital photography#darktable#i'm a little turned on by the subtle shadow i added it came out really well i think
4 notes
·
View notes
Text
Missing in Action - Part 5 (END)

Missing in Action Masterlist
Pairing: Dean x Reader
Summary: Dean, was hit by a spell cast by an apparently lovesick witch. And though your little group tries to keep him from her, he breaks free. Breaking your heart along the way.
Triggers: Heartbreak, jealousy, betrayal, break up, ANGST, injuries, gunshots, blood, possible death, gun violence.
Y/N = Your Name | Y/E/C = Your Eye Colour
Start Here | Last Part | THE END
---
Your vision was dimming at the edges, yet you still forced your eyes to focus on Dean. Watching him numbly from where you’d crumbled on the floor as he pushed himself away from Jane’s body on the ground.
You expected him to keep looking her way, to keep being drawn to her, yet green eyes never left you as he turned his back on the dead witch to face you. His eyes were wide and shoulders heaving as trembling lips formed words you couldn’t hear. Struggling to catch the words, you frowned as the ringing in your ears and the sound of your own heartbeat drowned out everything else.
Nothing could break through the stillness as you felt yourself struggle to breathe through the taste of blood in your mouth and the heartbreak still lodged in your chest.
And suddenly you understood them… The words you’d read so many iterations of in countless books. The quietness of death. Of worlds ending with whimpers instead of bangs. But it wasn’t peaceful. The authors of your favourite books had still gotten that part wrong at least.
There was no peace in the numb stillness that was slowly eating away at your still thundering heartbeats as you watched Dean scramble to his feet in front of you. It was just…Quiet. Cold. Like a silent movie, with the colours of the world, your world, bleeding out on the floor together with the last few moments you had.
You felt like you were stuck under water. Everything was moving so painfully slowly, so achingly silently. And all you wanted was to hear Dean’s deep, reassuring voice. Your Dean. Not the shell that had worshipped at the feet of that bitch.
If you were going to die anyway. Was it too much to ask to not have to go out with only the echo of Dean’s hatred and rejection ringing in your ears?
---
You could feel yourself slipping.
The darkening edges of your vision were taking over, and Dean’s normally brilliant green eyes looked desaturated and nearly grey to you. Like the rest of the world. Like he would just fade away into the background along with the last of your heartbeats.
Yet, as you watched, he rushed to your side. And with him, came a fresh rush of air as you tried to find the will to fight the pain. Your body somehow trying to keep you alive on just willpower and some ancient instinct of fight or flight alone, as you steeled yourself for what you’d see once he finally reached you. Once he was close enough that you could properly interpret the heartbreak and agony you could still see in his eyes.
In just a few steps, Dean was by your side, sliding down to the ground next to you as those big hands that you’d believed would always keep you safe reached out for you. Now looking nearly dangerous as you feared the invisible strings left by the witch that had turned him into a puppet would twist the normally tender, warm hands of your Dean into weapons to beat you down with. Seeking her revenge even after death.
Flinching away from his touch you glanced up at him gritting your teeth. Both from the fresh shots of pain coursing through your veins from the sudden movement and from what you feared you’d see when you finally met his eyes up close. Fearing that his eyes, stained with hexed hatred and a spellbound need to avenge a false love, would be the last thing you would ever see.
But, as your eyes finally connected with his again… Bringing with them fresh colours and new sounds as the world came back into focus, all you saw was more of that heart wrenching pain and worry.
“(Y/N)...” Dean’s voice was shaky as it finally managed to break through the hollow nothingness that surrounded you. His hands trembling where they were left hanging in the air after you’d flinched away from his touch.
Letting your tongue wet your lips, you tried to find your voice, but found only the coppery taste of blood as you looked up at him hesitantly. Still uncertain. Still rattled by the ringing in your ears of both gunshots and heated, angry words as you tried to interpret the heartbreak you saw there. Yet, before you could try to find your voice again. Sam spoke up. Somewhere to the side, outside the pinprick of light left in your vision that was only filled with Dean.
“Dean?” Sam’s voice pulled Dean’s eyes away from yours. Somehow breaking whatever hold the heartbreak fractured in slightly dimmed green eyes held over you as you forced yourself to glance towards the younger Winchester as well.
If nothing else to ensure he was still ready to uphold his promise, even if you couldn’t keep yours. Yet, as your blurry eyes finally managed to focus on him. All that caught your eyes were the last embers of flame next to him. Drawing your eyes like the light at the end of the tunnel you could feel yourself slowly being pulled down.
In the back of your mind, the parts of your brain that had not been rattled and unravelled by the gunshots that had echoed against concrete and back into your skull, connected the dots. And a shaky breath shaped like hope left you.
The witch’s box.
Sammy had burned the small tin the witch had been playing with. Which meant… Shifting your focus back onto Dean, where he was still looking at Sam, you held your breath, though each new gasp of air was becoming harder to come by. If the box was anything like a hex bag then… Could your Dean really be back? Was the worry in his eyes really for you? Or was it all just one last hope for the cruel world to crush before it cut your life short and sent you, barreling, down to hell?
“Are you… Is that really you Dean?” Sam pushed as he watched his older brother struggle. Eyes going from you to the side where you knew the burned out tin box was lying by Sam’s side.
“Yeah… Yeah Sammy, It’s me. I mean, I’m me again, but…” Dean’s voice was broken and shaky as he finally answered. His hands, frozen where they’d been reaching for you as you flinched, finally falling into his lap as he fully turned to face you again. Green eyes overflowing with guilt and the glassy shards of his broken heart spilling down his cheeks as he gasped around words he seemed unable to push out. His lips trembling as he tried and failed to form them over and over again.
Dean was back.
You’d guessed right. Just like with a hex bag, the spell was broken by destroying the vessel that housed it. Attempting a small smile, your features twisted into a pained grimace instead as you gasped for breath. Sam had done it. The younger Winchester always did have a good head on his shoulders.
Yet, even though the realisation that your Dean was back lifted the worst of the worry and pain off of your broken body. The agony you saw painted in his green eyes only pushed fresh shards of heartbreak into your lungs as you struggled to gasp for air around it.
“It's…Oh God… (Y/N). I’m so sorry,” Finally finding his voice again, the words left Dean as an explosive sob as he hesitantly reached out for you. Flinching away from you just as his fingers brushed against your arm when the soft touch drew a whimper of pain from your trembling lips.
The guilt and blazing agony in his eyes tore at you as you forced yourself to breathe through the pain. Gritting your teeth around the gasps of anguish that wanted to leave you as you tried to find the words to soothe his hurt. To remove his guilt.
After all, you didn’t blame him. You could never blame him. Not for this. Not for anything. Not when you knew he already carried the weight of the world on his shoulders.
“It’s…” You tried to form the words. Telling him it was ok. That it wasn’t his fault. But Dean rejected them with a shake of his head as his trembling hands finally connected with your skin. Feeling nearly too hot against your ice cold body.
“The bleeding… Need to stop the bleeding,” His voice was breaking as he spoke, more to himself than anyone else. Busying himself with checking the wound on your arm as you followed his eyes down to where lead had torn through your skin. Only managing a muted sound of surprise at the deep red coating your arm and side as you watched where your lifeblood was slowly but surely ebbing out of you.
Though you’d flinched from the initial feel of Dean’s fingers against your skin. Your arm had gone so numb, and the rest of your body was in such agonising pain, that you could barely feel the steady throb of your life leaving you anymore. All you felt was pure exhaustion.
Now that Dean was back, you were suddenly just so tired.
“Oh…” Was all you managed to say as you watched, as if from outside your body, as Dean’s trembling hands moved frantically in the air in front of you. Trying and failing to find some way to help you as you slowly bled out. Yet, as your eyes lifted from red to meet green, you fought your way through the copper taste on your tongue to soothe him. Even if your words were barely a whisper.
You needed to make everything ok again. You had to calm your weary soldier. Just like you’d soothe him whenever he’d wake up in a cold sweat next to you on nights where the ghosts of lives lost haunting his dreams got just a little too close.
“I’m fine Dean. I’ll be fine…” You whispered.
You wanted to say so much more but the words were lost in another gasp of air as your lungs struggled against the pull of the darkness that still waited at the edges of your vision. Tempting you with oblivion. With an empty nothingness, an existence free from pain and heartache. A pull that was only growing stronger as the minutes ticked past like bullets in a barrel. Like the sound of the empty chamber once you’d run out of bullets to pepper that bitch with.
Only knowing that your Dean was back kept you from giving into the darkness, as you forced yourself to breathe around the numb, hollow feeling in your chest. Focusing on his words to not lose sight of him.
“You’re dying (Y/N)! I shot you. Oh God,” The explosive power behind Dean’s words made you flinch as you gritted your teeth against fresh shots of pain and the black spots in your vision. Fading in and out of consciousness as you tried to keep your eyes on Dean. Yet, you were clearly losing seconds, or possibly minutes, between each new flash of green as Dean’s voice ebbed in and out, like the slow tide trying to pull you under.
His voice would slowly emerge into existence under the thick blanket of darkness…
“Sammy! We need to…”
Before quickly ebbing out again. Replaced by an empty cold, seeping into your bones as you searched desperately for green eyes again. Finding them more to the left of you, towards your bloodied arm than where you’d last seen them.
“Cas… We need Castiel,” Sam was speaking.
The younger Winchester was suddenly in front of you. His phone in a big trembling hand as he looked from Dean to you and back again. Phone pushed to his ear as you tried to catch what he was saying. Before you faded again.
“You can’t die (Y/N)… You can’t. I need you,” Coming to again, Dean’s arms were around you. You were in his lap. The cold concrete floor that had been syphoning the warmth from your bones was replaced by Dean’s warm jean covered thighs as you tried to lift a shaky hand to wipe at the tears staining his eyes. Only to realise you couldn’t feel your body anymore.
Though you needed to soothe him. Your Dean. Even if you wouldn’t make it out of there. And by now you were sure you wouldn’t. Yet, before you could do anything to soothe his guilt, to let him know you didn’t blame him. That you freed him for whatever he thought he needed your forgiveness for… You were out again.
Floating in that same empty nothingness.
“Shhh… I’m sorry baby. Shit. I know, I know it hurts, but we need to put pressure on it,” Dean’s rushed, sobbed words returned to you along with the wretched sound of a broken scream. A cry of pain that you realised, belatedly, was leaving your own chapped, dry lips. A subconscious reaction to the blazing agony in your arm as the sudden pressure of Dean’s torn shirt shocked your nerves out of their numb state and chased the shadows away in a flash of blinding pain.
“(Y/N) don’t leave me… Please don’t leave me… Sammy!” Dean’s words sounded hollow to your ears, but the pain in them still pierced you as you tried to speak through the whimpers that were forcefully leaving your broken and bloodied body. Your words, if they even were words and not just gasps for air, couldn’t reach him. As you tried and failed to calm him.
Dean wasn’t listening. Too busy begging you for forgiveness, begging you to stay with him, pleading with your stuttered, weakening heartbeats to hold on. Just a little bit longer. Just until help could reach you.
Yet, before you could try again. Green eyes were torn from where they were intently watching you form voiceless words on trembling lips to look up at his brother. As Sam’s relieved gasp stopped his endless prayers to you with just a few words.
“He’s here Dean!”
---
Grace.
It was a shapeless word. A shapeless presence.
Yet the way it filled your body was beyond your understanding of shape. It was colour and light; warmth and forgiveness. It was larger than you, larger than the world itself.
It felt like heaven. So your heart translated it into the only definition of heaven you knew.
Grace felt like Dean’s hand in yours. Like strong arms wrapped around you, keeping you safe. It brought with it memories of his whispers of forever, and the way the slight nervous shake to his voice had made butterflies out of heartbeats when he proposed to you. Grace felt like Dean. Like the shapeless, all-consuming presence of love. And to you, that love would always feel like Dean.
Grace was a shapeless word, yet to you it had a shape. It had a name. It had forest green eyes, a dusting of freckles and laugh lines that always crinkled when he smiled at you.
And even if it was Castiel’s steady fingers on your forehead pushing life back into your nearly lifeless body through his weakened grace, Dean’s hand was the one that was pulling you up out of the darkness. The memory of how his kiss tasted was the sugar and spice that chased away the taste of copper blood on your tongue.
As the lingering pain faded away; it was replaced with Dean. Just… Dean. But not the hollow imitation that the witch had pulled along on hexed strings. This was your Dean.
Sweet, perfect and whole.
Yet, before you could let yourself drown in the grace flooding your veins. It was gone. Pushed to the wayside along with the shadows and the black dots crowding your vision as the world came back into focus, along with startlingly green eyes. Leaving you gasping for air as oxygen flooded your system and warmth seeped back into your freezing body.
“Oh thank God,”
Dean’s broken voice was the first thing you heard once you finally fully returned to your body. Turning (Y/E/C) eyes to look up at him with a small shaky smile, you finally found the strength to gently wipe at the tears staining his eyes and flooding the normally bright forest that you loved getting lost in.
Yet, as you went to rest your still weak palm against his cheek, Dean flinched away from your touch. Guilt staining his eyes as you watched his heart break a little bit more from the way your hand fell numbly back into your lap.
“We should move her… My grace, it’s not what it once was. (Y/N) is still not fully healed, but…” From somewhere behind you, you heard the calm cadence of Castiel, your saviour. Speaking in muted tones to what you guessed was Sam as you gingerly lifted your head to look over at them. The small movement inadvertently prompting Dean to gently place you back down on the concrete floor from where he’d been cradling your body as he moved away from you. Leaving you feeling chilled to the bone again the moment you couldn’t feel his warm, steady arms around you.
Yet, you bit back the pained whimper that wanted to leave you at the silent rejection as you met his guilt ridden eyes. Still carrying the blame you’d never wanted to place on his shoulders for your current state.
“Cas…” Sam’s voice pulled your eyes off of the broken hunter next to you as you glanced up just in time to catch the younger Winchester shake his head at the angel. Motioning to Castiel to follow him across the room as he silently gave you and Dean some much needed space.
Sending the two men a weak, grateful smile, you took a shaky breath as you turned to face the man you loved more than life itself. The same man that was currently busy torturing himself behind dimmed eyes as he looked at your through tearstained lashes.
Your heart ached for him. Your weak fingers trembled with a nearly indescribable need to reach out to him. To soothe his hurts. To hold your broken hunter close and whisper soft words of love into his hair until they flooded his senses and sutured his broken heart. Yet, before you could even find the words. Your defeated soldier spoke up instead.
“I was there… You know,” He whispered, head bowed, like a condemned man waiting for judgement. His cryptic whispers were left to hang in the air as your own words were left unspoken on the tip of your tongue. Replaced instead with a soft confused noise as your brow furrowed, trying to decode his whispers.
“I was… I was locked in my head. I watched as I hurt you. I heard every word I…” Dean gritted his teeth as he forced the words out. Green eyes squeezing shut as his shaking hands curled into fists in his lap. He was trembling. Your normally steady soldier, your rock, was shaking as if he was moments away from unravelling completely. Falling apart in front of you.
For a second, your heart was lodged in your throat, as tears filled your eyes once his words finally fully registered. Oh God. He had been breaking his own heart along with yours, with every bitter, acrid thing he’d said while under the witch’s spell. An unwilling audience, forced to watch as he destroyed you… And himself right along with you.
“Dean…” You tried, your hand lifted to reach out to him, but before your fingers could brush against one of his balled up fists he shook his head. Eyes opening and stealing your breath away as the light fractured against his pain.
“I was screaming at myself (Y/N). I begged myself not to… But I still heard it all. I watched as I broke your heart. I felt myself pulling the trigger. I… I felt myself hurt you,” Dean’s shoulders heaved as he fought through ragged breaths, forcing the words out as he let his eyes drop. Normally safe, steady shoulders hunched as he refused to meet your eyes. Already condemning himself, though you didn’t blame him.
Not for any of it.
“It wasn’t you Dean,” You pushed, yet, every time you tried to brush the guilt off of his shoulders, he only piled more onto them. Folding in on himself as he refused to take the hand you willingly offered him and lift himself out of the shadows of condemnation.
“But it was me. Even if I… It was still me saying those words. Still me kissing… Someone who wasn’t you,” Dean flinched as his own words, his face twisting in a mix of hurt and disgust as he lifted a shaky hand to his mouth. As if he could wipe away the traces of the witch left there.
The mention of the kiss burned through your veins as bile rose in your throat. But you pushed it back. It wasn’t Dean. It wasn’t your Dean. And you refused to be haunted by the ghost of a kiss that meant nothing. A hollow imitation that could never live up to your love for him, and his for you.
“Dean, please…” Your voice was just a whisper as you tried to get him to stop letting those same ghosts haunt him. Still too weak to physically pull him back into the light, you hoped the sound of your voice, the shape of his name on your lips, could function as a beacon for him to find his way back to you himself. Yet, Dean didn’t stop as he shook away salvation and chose the shackles of guilt.
“I couldn’t stop any of it. I could feel it (Y/N). I felt like I wanted to kill you. Even as I screamed at myself to go to you. To wrap my arms around you and protect you. I felt like I hated you, even though I also knew that I loved you. I…” His voice was breaking over every word as they rushed past trembling lips. Shaking along with every broken heartbeat that rattled in your own chest as you watched the strongest man you knew fall apart in front of you. Torn between two contrasting emotions and statements as he suffered from the aftershock of the war he’d been waging inside himself the whole time he was under the witch’s control,
“It was all her Dean, not you…” You tried. Though Dean kept speaking, shaking away the lifeline like he had the many others you’d tried to offer up. Willingly drowning himself in the endless tears you’d shed over the half day you’d spent apart.
“She might have been behind it, but I was the one that pulled the trigger. I was the one that nearly killed…”
“You were just the weapon she used, Dean. An unwilling weapon. I know you’d never hurt me. Not the real you. You don’t blame the weapon. You blame the person wielding it,” You couldn’t listen anymore as you forced yourself to sit up a bit straighter. Gritting your teeth against the pain, you raised your voice just a fraction. Forcing Dean to hear you, over the explosive sounds left by his own voluntary demolition of his heart.
“But I did hurt you. Even though I… Damn it, even though I’d rather die than see you hurt,” Dean argued back.
His eyes finally lifted to meet yours. Begging you to see the truth in them, hidden between a veil of self-hatred and angry tears. Yet all you saw was a man walking willingly to a gallows not meant for him. All you felt was the panic clutching your chest as you feared for your heart. Since you’d long since given it to Dean, and if he went and did something foolish out of some stupidly misplaced penance, he’d just take your heart with him six feet under.
“Don’t say that. Please don’t say that,” You urged as you tried to block out even the mention of Dean dying in your place from your mind. Your bruised and battered heart couldn’t handle another blow. Not now. Not when you had finally gotten him back.
“Why not? It’s the fucking truth. When I was… I kept wishing I’d just die. That I’d choke on the awful things I was saying to you and just…” Dean’s voice was bitter and acrid as he spat out the words. But the hatred in them was all aimed inwards. As he shaped every syllable into a blade and stabbed it at the very core of himself. Yet, you were left feeling the sharp agony of every blow along with him as you gasped for air around a wordless sob.
“Dean!” Your voice was loud enough to echo in the concrete room, just like the earlier gunshots had, as you finally gave into your own explosive pain and yelled at your stupid self-sacrificing fiancé.
Lifting your arm, you tried to reach out to him again, to cover his trembling fist with your hand and make him listen. Yet, you’d misjudged the state your body was in. Using your formerly bullet ridden arm to reach for him in a moment of heated agony and panic, you flinched from fresh shots of pain rushing your system. The small flinch functioning as a reminder to your both of the gunshot that had nearly torn you away from his side forever.
“And I’m still hurting you… See?” A hollow laugh left Dean as he grimaced in an echo of your pain. His hand lifted, fist unfurling as he reached out to check on your injury.
Yet, before his fingers could connect with your still bloodsoaked skin, he pulled back, as if burned. As if he thought he wasn’t even worthy of touching you anymore. Letting his hand drop, his shoulders fell with a shake of his head. Looking up at you with heartbreak in his eyes as he wet trembling lips.
“I don’t know if you can ever forgive me…” The words left him as a whisper as he hesitated over every single syllable. Eyes locked on the hand that had reached out for you in a mix of admonishment and wistfulness. As if he both wished he could touch you and hated himself for believing he had the right to do so. Though all you wanted was to feel his warmth again. To know your Dean was really back, by your side.
Where he belonged.
“I do. I never blamed you to begin with,” You replied as you said to hell with the pain and let your fingers ghost against his chin, urging him to lift his downturned face and see the truth of your words in your eyes.
“I know it will take some time. For the… Wounds to heal. But that other Dean. He wasn’t you. And I love you,” You continued, making sure to fill every word with as much sincerity as possible. Because you did mean every word.
Sure, the pain was still there. The dull ache of heartbreak, the echoes of vicious words and the mixed feelings of loss and nauseousness from picturing Dean with someone else. But it hadn’t been him.
This, however?
The man on his knees next to you who loved so deeply that he’d rather offer up his own heart and body as a shield than ever watch another person he cared about get hurt.. This was your Dean. And your Dean never stopped loving you. Even under the powerful spell of the witch. Your Dean had still been somewhere in there, lost and fighting.
For you.
“I don’t deserve you…” He whispered. Still unwilling to drop his own chains of guilt. Yet, his cheek subconsciously pushed against the warmth of your hand as his eyes fluttered closed. A soft sigh escaping, as he indulged in the feel of your fingers against his skin.
“You deserve the world Dean,” You pressed, letting your fingers trace the shape of your broken soldier’s fallen features. From the furrowed crease in his brow down to his still trembling bottom lip.
Reaching up, Dean tentatively let his calloused fingertips brush the back of your hand. Before just as quickly pulling away again. But this time you didn’t let him, as your fingers slipped from his face to catch his hand in yours. Squeezing his hand, you tugged gently on it until he finally gave in with a soft sigh. Shifting his body so he could lift you into his lap and wrap you up in his warm embrace.
Holding you close, gently and carefully, as if he was worried he’d hurt you, Dean let his head drop to your shoulder. Soaking your hair in his hurt as he breathed you in with shaky breaths. The tension finally bleeding from his tired body as his lips brushed against your neck in a ghost of a kiss, yet didn’t fully connect. Hesitant and careful, as if he was still unsure he deserved to hide his sins in the crook of your neck.
Sins he shouldn’t be carrying at all.
---
“I never gave it to her… I managed to keep it safe,” He mumbled against your neck after simply holding you silently for a while. The shaking of his body had finally stilled, and the arms that were barely even holding you at first had tightened ever so slightly. As he familiarised himself with the feel of you again and drowned in your scent.
At his words, however, you were forced to pull slightly out of his embrace to look questioningly at him. The small annoyed groan that slipped from his lips at the loss of your warmth teasing a careful smile out of you as you caught a glimpse of the old Dean in it. The same man that would pull you closer and hold you tight against his body whenever you tried to leave the bed every morning.
Yet, your smile fell away as you met with sad eyes. Wetting his lips, Dean reluctantly dropped an arm from where he was holding you close to dig through his pocket.
Your unspoken question was left hanging in the air as his brow furrowed trying to get a grip on something in his jeans pocket without jostling your body on his lap too much. The silence remained unbroken until his fingers finally came back into view, pinching a small piece of gold between two trembling fingers as you felt the ghost of it around your ring finger.
“Your engagement ring. I hid it… From her. I couldn’t let her get it. Even if I didn’t know if you’d even want it anymore. After… I made sure to keep it safe,” He finally continued, holding up the small gold band that gleamed in the dim light of the room. The small ring looked even smaller when held by his big hand as you swallowed a sob from the sight of it.
When he’d asked for it back, in the motel room. You never thought you’d see it again.
You’d been terrified to look too closely at Jane’s hands. Afraid you’d break apart completely if you caught a flash of gold around her finger. Worried you’d have to live with the ghost of the ring against your skin haunting you for the rest of your life.
Yet, there it was.
Dean had held onto it. He hadn’t let her get it. Even when under the full weight of her spell, he’d kept the ring, and the promises of forever that were nestled securely in the engraving of your two names on the inside, safe from her.
Holding out your hand you waited for Dean to slide it back on your finger. But even with your hand outstretched, he still hesitated. Downcast eyes looking from you to the ring as he kept holding it gently between two shaky fingers.
The simple action of holding out your hand wasn’t enough, as Dean seemed to need to hear you say it. To say you still wanted to wear his ring; that you still wanted him.
So, with a shaky breath, you reshaped words you’d spoken a year ago. When your boyfriend of five years had gotten down on one knee and offered up his heart to you with similarly hesitant words. Worried you didn’t want a forever with him, when forever could be so painfully short in the life of a hunter.
“Of course I want it Dean. Of course I want you. It’s the only thing I’ve ever wanted. A life with you,” You whispered, letting your fingers gently caress his and the gold band he’d kept safe for you with a soft smile.
With a small relieved sigh, he slipped the ring back on your finger before wrapping you back up in his arms as you twisted slightly in his lap to face him fully. The whispered thank you that he slipped against your skin not lost on you as you gently lifted his face. Making his eyes meet yours where he was once more trying to hide in the crook of your neck as you let your thumb run over his bottom lip. You wanted to kiss him. You wanted him to kiss you. To seal your renewed promise of forever with his lips on yours.
Wetting his lips, Dean leaned in. Hesitating just an inch from your lips as he looked from them and into your eyes. The soft crease back on his brow as he searched for any signs of rejection in your (Y/E/C) eyes. Waiting a beat, then another, he took a shaky breath before he finally let his lips brush against yours. Once, twice, three times. As he kissed you, softly, gently and oh so heartrendingly carefully.
Each kiss only lasted a fraction of a second as he kept glancing back up at you between each small taste of your lips. As if he was worried you’d pull away from him. When all you wanted was for him to kiss away the pain and the heartache. To finally erase the taste of copper and salt, of blood and tears, from your lips and replace it with the taste of him.
Lifting your arms, you fought through the fresh shot of pain, careful to not let it show on your features, as you wrapped your arms around your fiancé’s neck and pulled him close. Your tongue tracing his full bottom lip as he gasped in relief and eagerly fell into your kiss.
And as you lost yourself in him. The world was finally right again. The feel of his warm arms, securely around you, paired with the gold band snug on your finger and the taste of Dean on your tongue, quickly sutured up wounds that you knew would heal. Because you would be there for each other every step of the way. Soothing the past hurts with soft touches and even softer words and setting broken hearts with more days, more love and more promises of forever.
You’d be fine, you were always fine. After all, you had each other. And somehow that was enough to make you want to believe in fairy-tales.
Even in your messed up world.
---
Dean Winchester Tags: @ria132love @woodworthti666 @defenderrosetyler @akshi8278 @justanotherwinchester @lyarr24 @torn-and-frayed @all-will-be-well-love @wearesuchstuff1 @thefridgeismybestie @adoptdontshoppets @starsandmidnightblue @screechingartisancashbailiff @septixtrash @punof-agun @deandreamernp @dean-winchester-is-a-warrior @justagirlinafandomworld
Missing in Action: @hopingforrainydays @vicmc624 @sucha-fake-betch @lokalokawhore @busy-bee-angel-misska @moron225 @spideysimpossiblegirl
#dean winchester#dean winchester x reader#tales89writes#dean x reader#dean winchester angst#dean angst#dean#dean winchester reader insert#supernatural#winchester angst#spn angst#supernatural angst#dean supernatural#Supernatural Dean Winchester#spn#spn reader insert#supernatural reader insert#angst#tw: violence#tw: gun violence#reader insert#hexed dean
141 notes
·
View notes
Note
hello !! i'm absolutely in LOVE with your art and i wanted to know how did you colour and choose your colour palette (especially the skin,,,) in your latest uncle obi post ? 😳👉👈
i dunno how to explain but there's that soft yet sharp?? pink glow that contrasts with the skin tone and the blueish-shadows and it's so so pretty...
plz continue to make beautiful art and take care of yourself 💖
AAAA TYSM 💖💖💖 I’m literally the worst explaining these things tho :’) I’ll try my best :’o
Also little disclaimer before starting: drawing is just my hobby so I’m not posting this as a tutorial (?) this is just to show you my process aaaa, I’m sure a professional would help you a lot more than me with this but I hope I’m able to help you in someway 💖💖💖) (also, I know someone else asked me about my drawing process a while ago, it had to do with shading, lighting and color picking, but I wasn’t sure how to respond until now aaaa, sorry about the delay 😔, I’ll answer both questions here)
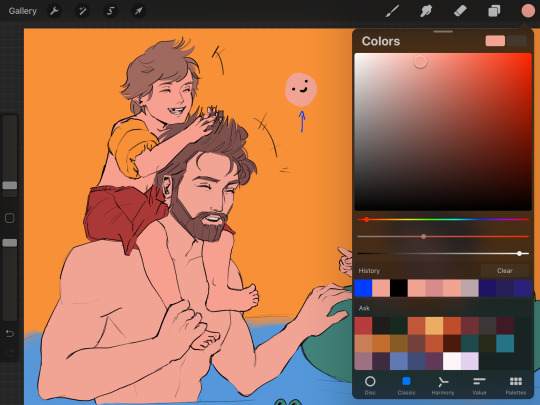
Ok, so first of all, I choose my background color :0. Background colors affect how your eyes perceive all other colors so it’s very important for me to start with that (like white background makes you choose whiter (?) or less saturated colors. Red background: redder colors, etc)
When I want a white background, I tend to use another color at first and then when I’m finished, I change it back to white just because most of the time my colors are not that good when I’m painting on a white canvas.
This drawing, for example, I painted first on a yellow background and later I changed it to white :) (this also applies to complex backgrounds... I always start with painting the background)

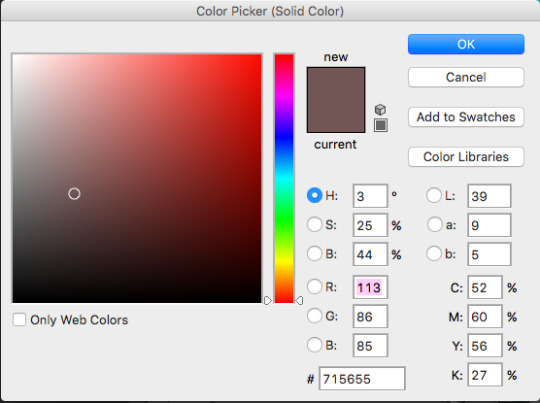
Then I open a new layer and place base colors :). I pointed out the color I used on Obi’s skin :)...
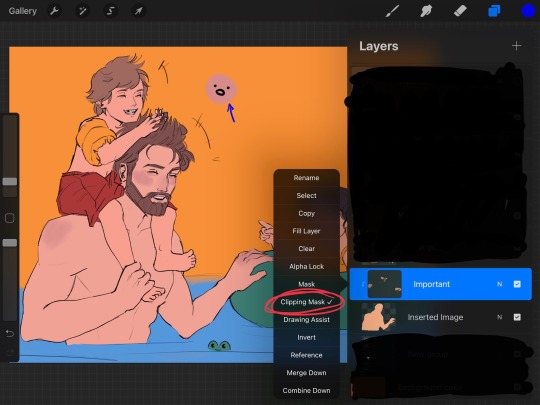
Now I open another new layer, set it to clipping mask and I paint a little bit of blush here and there on the skin with the standard round brush on approximately 40% opacity. I also use the same color for the lips :). (I covered up stuff that is not necessary with black to not confuse you lol 💖)
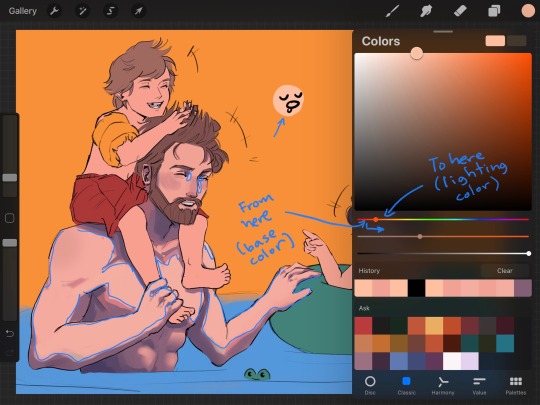
Now here’s where the fun begins :D... I have two things I apply to pick shadow colors and light colors
1. First I pick my “most common” colors (these would be the purpleish/blueish for shadows and kind of a yellowish tone for light, I circled them with blue on the pictures) but how did I got to these? (This might sound so stupid but it works for me lol) (look at the pictures below to understand better 😂) When I want to pick a color for shadows, I slide the color picker to the left, and if I want to pick a color for lighting, I slide it to the right :D ISKDMDKKF LOL Yes you read well aaa it doesn’t always works but 90% of the time does lol, if I’m using pretty “normal” lighting like this one on a drawing, works perfectly 😂
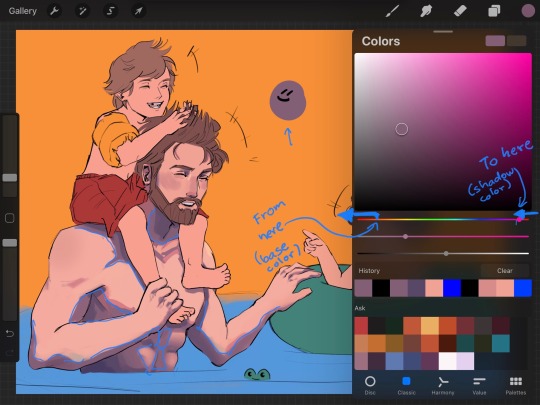
There’s no rule for me to know exactly where to “stop sliding” lol I just test how it looks and also play around with saturation a little. I must poin out, I never use the same color on all shadows (like a solid cell of color) I pick more tones of purple/ blue for shadows and more tones of yellow for lighting to put in there so it looks more natural. I use the airbrush to help me with that as well as the round brush.
2. So this is what really makes it look good. First some VERY short theory to understand why I do this and to help you apply it on other things. Light can not only come from a direct light source (like the sun, a lamp, fire, etc), light bounces, and when it bounces it kind of “brings the colors with it”
The arrows are pointing the direction of sun light. See what it does?
So when I’m coloring, I pay attention to the surroundings. In this case, light bouncing from the water, light bouncing from the green float tube, light bouncing from Luke’s red shorts, etc, all coming to Obi’s skin. Adding these, imo, makes everything look awesome
Of course, as the light bounces more and more, the colors become less saturated. Let’s take the light coming from the water for example. How do I choose the right color to paint this light on Obi’s skin?: I go to the blue tones and I just pick a very desaturated tone :), with the help of the standard round brush with approximately 40% opacity, I put a little bit of blue tones where I believe this light will hit the skin (circles with blue⬇️)

*Red circle is showing where the less saturated colors are*
This drawing was made kind of fast lol, so I didn’t really pay much attention to this here, but other drawings of mine show this better :0.
The “pink glow” you mentioned is something that I like to add to separate light from shadow :) you can see it above pointed in green⬆️ (I just like how it looks aaa)
Finally I change the background color to white.
I also add some freckles to the arms and chest
I add a multiply layer with 40%- 50% opacity and, with a blue saturated tone, I darken some places I wish to be more dark (like the abdomen, Obi Wan’s neck, some parts on the water, etc)
I open another layer set on “add” (15%-20% opacity) and, with a yellowish saturated tone, I lighten some other places like hair, arms, float tube, etc
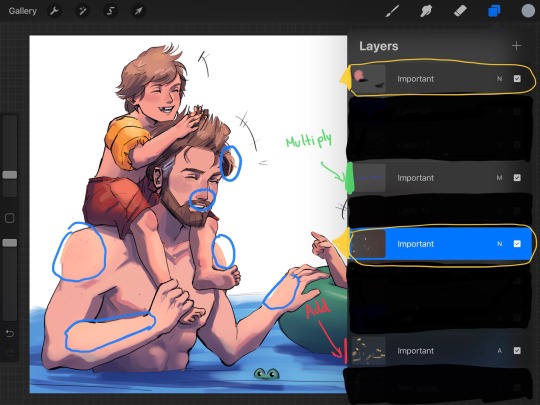
Finally I open a layer (or two) above everything (layers marked with yellow) and I start painting over the lineart where I consider needs some work (I marked those places with blue), sometimes I also add texture with other brushes in this layer too :0.
And that’s it oof lol, hope it wasn’t too long ;;; also ignore grammar mistakes aaa English is not my first language :’D
#obi wan kenobi#art process#ask#artists on tumblr#my art#coffe chats#hope it’s not super confusing :’)#coffe art
272 notes
·
View notes
Note
Hi! I was wondering when converting s4 to s3 how do you make the multiplier and specular? Thank you for your time!
Hmm, okay, how to explain it without taking too much time...
THE MULTIPLIER
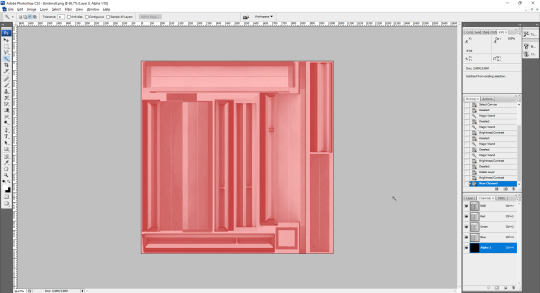
All right. While many people prefer to re-bake a multiplier on Blender (and you can find bake tutorials VERY EASILY), I actually REALLY LIKE the painted-on wooden texture of many EAxis objects, so I extract a diffuse from my object of choice:
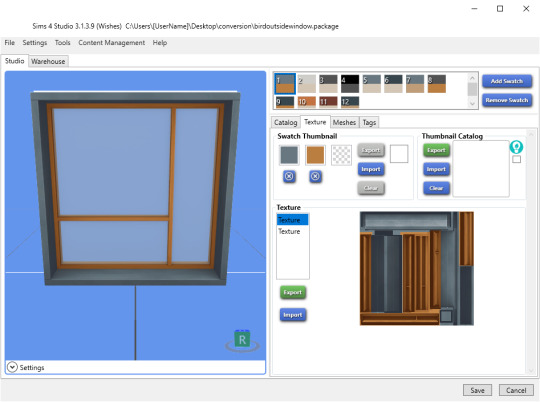
(as I told in a previous post, I actually extract two, a high contrast one for the mask, a low contrast one for the multiplier, and I make the mask FIRST.)
PNG is fine; I only had to extract a diffuse in DDS once, because EAxis screwed with the alpha.
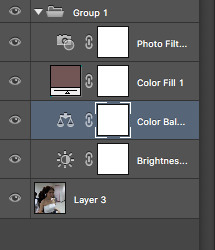
I make my mask (it’s basically selecting different colored parts and filling it with color channels, that’s for another time), then I add it as a new layer over my multiplier diffuse:
See the bottom right corner? Two layers!
But before playing with the magic wand, I go to Layer 0 / Background Layer / whatever it works on your image editor, and I desaturate the multiplier. In Photoshop, it’s Image > Adjustments > Desaturate.
My multiplier layer looks like this now.
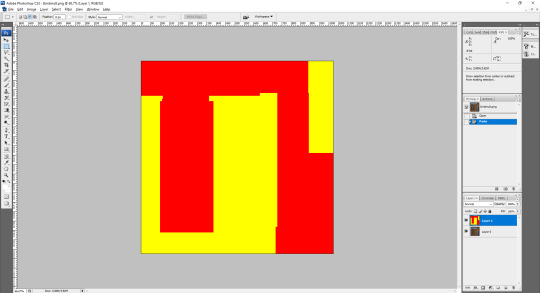
While it LOOKS like it’s finished, now I need to check if the average color of a certain part of the texture is middle grey, or RGB 128, 128, 128 (some people go for 133-133-133 to avoid flat blacks, assuming the risk of getting overblown pure white recolors, but that’s a matter of TASTE).
For that, I’ll reactivate my mask layer and use the magic wand to select the red channel, THEN I hide my mask layer again. Do not forget to set tolerance as 0, no anti-aliasing, not contiguous.
If you do it right, your selection will look like this

Now it’s just a matter of using the eyedropper tool to click on a not very bright, not very dark part of the selection and see if it’s 128-128-128 or very close to it (126 to 130 is an okay margin).
In this case, it’s a little too dark, so I go to Image > Adjustments > Brightness/Contrast and I fiddle only with the Brightness slider until getting close to my result (you CAN use the eyedropper without applying the changes, just look at the upper right corner to check the new value. For this selection, I used Brightness +38.
(Some textures, especially when too light, need to be darkened by Adjustment > Curves, but that’s more of an outright Photoshop tutorial than just fiddling with stuff. Practice, practice, pratice...)
All right, it looks like this now, with only the part of the multiplier that will be affected by the red channel brightened:
If your item has only one channel, then save your multiplier, it’s finished (and you really didn’t need to paste the mask as a new layer to help with the selections, since a one-channel mask is fully red, but it’s good to get into the habit)
For every other channel, press Ctrl + D to deselect everything, reactivate your mask layer, select the new channel, repeat everything. But IMPORTANT: different channels WILL require different Brightness values UNLESS you got a monochromatic diffuse, and not every item comes with a plain swatch.

In this case, my second channel needed an adjustment of Brightness +28, just to prove what I just said about different channels, different values :)
Since my example only came with two colors, I save it as PNG for now. I only convert to DDS when it’s over 1024x1024 or I’m pretty sure that the DDS compression won’t fill my texture with artifacts. Even multipliers with transparent or translucent parts work with PNG just fine.
THE SPECULAR
You’ll NEED a finished multiplier first. Yes, really.
The fastest way is to select everything, go to Image > Adjustments > Brightness/Contrast, and hike the Brightness to +100 or +110 and up the Contrast a little.

LIIIGHT.
Than you go to the Channels tab of your Layers window and add a new Alpha Channel by clicking this button:
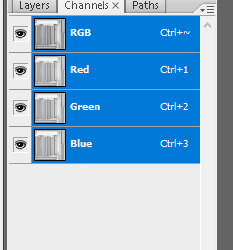
You’ll have a brand-new Alpha 1 channel that’s fully black. That’s fine, keep it that way.
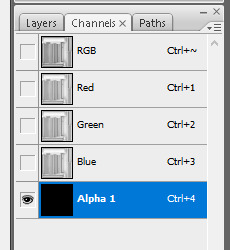
Select the RGB channel, you’ll see that your specular will have a faint red tint - no worries, that’s just to show that your Alpha is also active.
Now, you’ll have to save it as a DDS, no ifs or buts:

ALWAYS keep the Alpha Channels option ON, or else you’ll have an item that’s always shiny because no alpha means a fully white alpha, which means the game will force the brightness of the original, hyper-brightened texture ALL THE TIME. Black alpha, and it means things only get shiny if you add a shiny pattern in CASt.

In the next window, choose DXT5 compression.
And that’s... the basics. Checking if it gets noisy, if it needs more adjusts after you import it to TSRW, etc, are matters of practice, getting familiar with your image editor, and developing a good eye for subtle color changes. But the necessary parts are those that I explained, and they’ll work great in 95% of the cases!
(the other 5% are for when you need a translucent part in Phong Alpha shader to not be recolorable because Phong Alpha overlays SUCK, when TSRW messes with your textures no matter if it’s PNG or DDS and you’ll need to save a texture as 8.8.8.8 uncompressed DDS and replace it with S3PE, and all sorts of... annoying issues)
Also credits for @enable--llamas for finally showing me a way to make speculars that WORK.
This is a tad slapdash, but hope it helps!
61 notes
·
View notes
Text
Kord Center Mall: Out In The Rain, In From The Cold
Rating: E (the nerdiest smut you’ll read all week.)
Fandom(s): DC Comics, Jack Nought from Mass Effect makes an appearance, but familiarity with the game is not important
Ship: Rose Wilson/Jason Todd, mentions of Jason/Roy/Jack
Linkage: Ao3
Summary: Rose is finally ready to come clean with Jason, and admit the feelings she has for him. But is it too late?
Note: This is a cross over, mall-verse AU concocted by @scifi-ginger and myself. You’ve been warned. Also, I just want to state, for the record, that I wrote this before Titans: E.L._.O. hit the internet. I have the Tumblr snippets to prove it.
–>–>
The ground’s so dry when she leaves Cassie’s, Rose doesn’t even think to grab a jacket on the way. By the time she reaches Jason and Roy’s apartment, the sky’s dumping car-wash levels of water on the bus. Even though it only takes her five minutes to walk to the building, Rose’s clothes are sticking to her when she rings the doorbell. Lightning cracks in the clouds behind her.
Opening the door, Roy’s face flashes bright and dark as the thunder rolls around them. “Rose.”
“Roy.” Rose takes a breath. “Hey. Uh--”
“Fuck off,” Jack calls from the couch. “Jason doesn’t want to see you.”
Yeah. She deserves that. “Could you at least tell him I’m here?” Rose says it to Roy, not Jack.
Lighting flashes two more times before Roy sighs. “Fine.” He holds up a hand to keep Jack back. “But I swear if you hurt him again--”
“Fuck, Roy. I’m here to apologize.” Rose glances at Jack as she steps gingerly through the doorway. “Nice to see you, too. Jack flips a finger in response.
Just as Rose knocks on Jason’s door, the power goes out. “Oh come on!” Jason yells from the other side of the door, and she hears the crash of a controller hitting the floor and the rolling of batteries as they fall out.
Rose has perfect timing. She clears her throat, reaching to knock a second time when Jason opens the door. His cellphone casts soft grey light along his jaw and highlights the sheen on his nose. “If you’re an axe-murderer, I’ll--Rose!?”
“Hey,” she says softly, pulling out her own phone to cast some light---only to realize it died on the way here. “Shit.” Better not fuck this up.
Jason lingers in his doorway, his eyes roaming over her like she’ll vanish any second. “Didn’t expect to see you.”
“Yeah. Me either.” Rose dares to step closer, looking up at him. “Can I come in?” Jason hesitates ever so slightly, but it’s enough to kick Rose in the gut. She deserves that, too.
“Sure.” He steps to the side, swinging his arm wide. Jason never kept a tidy room. Rose would constantly remake the bed before she left. If she brought pizza, she’d have to clear off the beer bottles and carefully move the bong out of the way. But Jason always took care of his books--bookmarking them, closing them gently and sorting them on the shelves by genre, author, title, routinely cleaning them with a fucking feather duster. At this point, Jason doesn’t even have a bedroom--he has a personal library with a bed in it. Right now--it looks like a tornado had swept through the shelves.
“Fuck.” Rose muttered under her breath, frozen in the doorway.
“Did you come here to talk, or to judge me?” Jason folds his arms, and Rose notices the bags under his eyes for the first time. She’s reaching to push the hair from his eyes before she catches herself.
“To apologize,” Rose says quickly, ducking inside before Jason can change his mind. She finds a Complete Works of William Shakespeare lying open in the middle of his bed. Obviously, it’s too dark to read, but she’d know the size and thickness of that book anywhere. One of Jason’s favorites.
Rose sets it aside, sitting on the edge of the bed with one foot draped across her lap. Jason lingers by the door, but he does close it behind him. His eyes track the movement of the book before daring to glance at her again. “Why’d you come back?”
“I missed you.” Rose says. I’m sorry. I’m sorry. I’m sorry, she chants over and over in her brain, but “sorry” doesn’t feel good enough right now. Jason deserves the world, and Rose is just a tiny island wracked with storms.
Jason’s eyes soften ever so slightly before they harden--cold as steel. “Missed what, exactly?”
Rose allows herself a small smile. Jason loves the big questions--meaning of life, origins of the universe, whether true love exists--he always has his head up in the clouds. Meanwhile Rose stands back on earth--rooted in doing things--going, doing, fucking, eating, breathing. The thunder outside nearly drowns out her words. “I missed the way your eyes change color when you’re angry, happy, or sad. The way you smile when you think no one is looking.” She itches to get closer to him--show him exactly how much he means to her, but it’s not her choice to make. “The way you forget the world around you when you’re reading.” Her voice thickens, with love or want--she isn’t sure. “The way your face lights up when Roy comes in the room.”
Is it still raining? Rose isn’t sure. All she can hear is the thundering of her pulse in her ears and the sound of their breathing. Jason still hasn’t said a word or moved an inch--him and his fucking poker face.
At first Rose thinks her eyes are straining to see him in the darkness, but then she feels a tear slip down her cheek. Damnit. This is why she doesn’t do this stuff. Love, real love, hurts. “I realized I didn’t want to live without that. I didn’t want to live without you. I don’t want to.” Jason probably can’t even understand what she’s saying at this point, with the way her breath keeps shaking her voice.
Jason finally looks away, and Rose nods to herself. Figures. It’s too late for them. It’s always too late. “Sorry,” she mutters, standing up and wiping her nose and eyes. It’s gonna be a bitch getting home in this weather, but she’ll manage. Rose always does. She’s halfway to the door when Jason grabs her hand.
“Where’re you going?” he says softly, squeezing her hand.
“I…” I’m going home, Rose says in her mind, but the words don’t ring true. She turns, daring to face him. “Not sure.”
“Stay.” Jason tugs her ever so slightly, and she falls into his arms like she just jumped off a building. He reeks. Always has. Like dank weed and cheap beer. Rose wouldn’t have him any other way.
“Jerk my arm why don’t you?” His laugh rumbles against her chest and she pulls back just enough to look at his face. Rose traces his features with her fingertips, reacquainting herself with the tip of his nose, the jut of his eyebrows, the firmness of his lips.
Everything’s so desaturated in the dim room, but Jason’s eyes shine the brightest blue. “I love you, too.”
Rose couldn’t tell who kissed who first. She’s too busy tasting his mouth and messing with his hair. Jason breaks for air, only to pay careful attention to where her jaw meets her neck. His hands roam her shoulders, arms, sides and stomach as if he can’t get enough of her. He has far too many clothes on. No zipper on Jason’s hoodie, so Rose lifts it to his shoulders, but he gets tangled in the sleeves. “Candles,” Rose says hoarsely.
Jason peeks at her blankly through the bottom of his hoodie.
“Please tell me you have some. Jack’s surely got enough to set the apartment on fire but I’m not keen on asking her tonight.”
“Be right back.” Jason frees himself of his shirt and hoodie, slipping out the door shirtless.
Rose sits on the bed, unable to sit still, still humming with the thrill of his touch. She glances back at the Tome, and switches Jason’s phone’s flashlight on so she can finally read it. Jason has it open to Sonnet 87,
“Farewell! thou art too dear for my possessing,
And like enough thou knowst thy estimate.
The Charter of thy worth gives thee releasing;
My bonds in thee are all determinate.
For how do I hold thee but by thy granting,
And for that riches where is my deserving?”
Rose swallows, reaching to close the book when Jason comes back inside--his arms full of candles. He freezes when he realizes what she's reading.
“Oh, hey. Lemme take care of that.” Jason sets the candles on his tv stand, reaching for the book.
Rose swats his hand. “Candles.”
Rolling his eyes, Jason replies. “Fine. Fine.”
Leaning back, Rose watches as the candles, lit one by one, cast a soft glow along the lines of Jason’s body. She doubts she’ll ever tire of the view.
Lighting the last candle, Jason whisks around, lighter still in his hand. He nods down at the book. “You weren’t supposed to see that.”
“Interesting choice. Real depressing.” Rose kicks her heels against his box spring.
Setting the lighter aside, Jason grins slowly. “Actually. Hold on a sec.” He kneels, clearing a space on the floor.
Rose stares at him. “No. Absolutely not. Your floor is a fucking mess.”
“Don’t worry. You won’t be touching it.” Space cleared, Jason glances up at Rose. “Hand me Shakespeare.”
“Whatever.” Rose hefts it over, eyes widening as Jason sets it reverently in the space he cleared. “You’re shitting me.”
Jason snickers, shaking his head. “C’mon. The book may be hard, but the pages are soft.”
“Oh my god. I’m couching you for that.” Rose chides, but she gets down from the bed anyway. She glances at him one last time before sitting gently between the pages.
“Better.” Jason’s eyes have darkened to a warm green. The fact that a dead playwright and poet makes him all hot and bothered never ceases to amuse her. “Lean back.”
Rose rolls her eyes, grabbing a pillow and stuffing it beneath her arms.
Jason makes quick work of Rose jeans, shucking them off and tossing them across the room. Rose snorts as they take down a couple bottles in their fall. “Tell me if you’ve heard this one before.” His grins as he lowers himself to her neck.
“What’s in a name?” Jason murmurs into her skin, his voice as reverent as a priest’s on Sunday. His fingers drag the zipper of her soaked hoodie down her chest, and goosebumps prick across her skin.
“That which we call a rose
By any other name would smell as sweet.” Jason lavishes attention where her neck meets her shoulder, and Rose’s so caught up in his touch she almost doesn’t catch the reference. Almost.
“Romeo and Juliet? Really?” she snorts, pulling back to give him a look of disdain. “Most overrated play ever.”
“It’s a classic.” Jason pouts, his fingers edging underneath her t-shirt--a suitable challenge with the way the fabric sticks to her skin. He dives to kiss her collarbone. “And it has your name in it.”
“Jace, they off themselves because they’re impatient hormonal teenagers.” A moan slips from her mouth as he kisses from her waist to her chest, pushing her shirt up and out of the way. “It’s not romantic.”
Dragging the shirt and her bra up and over her head, Jason grins at her. Oh, he knows. “So Romeo would, were he not Romeo call’d.”
“Do you put Jack and Roy through this? Or am I special?”
Jason doesn’t linger on her breasts, just moves her damp bra off her skin, hanging it on one of his bedposts. “Retain that dear perfection with he owes.” He plants a reverent kiss in the valley between them.
“I am special, aren’t I?” Rose groans, for more reasons than one.
Instead of answering, Jason snickers against her skin, breathing her in. “Without that title. Romeo doff thy name, and for that name which is no part of thee,”
Rose has another comeback coming, somewhere, but it’s hard enough trying to keep her breathing steady the farther south Jason travels with his mouth. He stops just north of her thighs, grinning up at her. “Oh, come on, already,” she groans again, letting her head fall back.
Jason wets his lips and tongue, waiting for her to look at him again. Once he has her full attention, he whispers, “Take all myself.”
Then he plants a kiss against her clit, and Rose shudders despite herself. “Really? You think some, some poetry is gonna, oh.”
She can feel his grin as he toys with her licking gently around but never quite touching where she wants him most. His hair musses in her fingers as he kisses deeper, harder, licking her with nice, long strokes. Jason moans with her, the hum reverberating across her skin. Rose’s hips rise off the book and Jason holds her down with one arm. Pausing, Jason licks one finger, then another, and Rose can’t help but cry out his name as they thrust in and out of her while he lavishes attention on her clit. Fuck, she’s probably tearing his hair out, but she can’t help it. Now she’s so close she’s--
Jason pulls back, kissing her thigh, and Rose curses him and half his family. “I take thee at thy word:”
Fuck her, she’s pleading, pulling him back. “Jace, please. I need.”
Snickering, Jason plants a soothing kiss on her thigh before gathering her hands to her right side, holding them still. “Call me but love, and I’ll be new baptized;” he murmurs as he wets his lips again. Something in her belly roils as she realizes what he’s planning.
Mm, yeah, Jack and Roy definitely heard that scream. Let them, Rose thinks, until she can’t anymore, so focused on Jason’s feather light touch against her clit. She’s so close to falling right off the cliff when he pulls back again. This time, Rose bites her tongue, shaking as she waits for him to continue.
Jason watches her come down from the brink, his smile wide (and his lips covered in her slick), and his eyes bright. Part of Rose wants to hide from that look--she doesn’t deserve it--she’ll break his heart--he’ll find out what she’s really like and he won’t look at her like that any-- Squeezing her hands, Jason pulls Rose from her thoughts, and she swallows hard as she allows her walls to come crashing down. “Jason, I--”
“Shh. We’re almost there,” he whispers, kissing her hands, squeezing them again. Waiting until she’s relaxed again, Jason leans down one last time, his words barely audible, “Henceforth I never will be Romeo.” He brings her back slowly, using his fingers as well as his tongue, seemingly touching her anywhere and everywhere at once. Sliding one finger inside her, then another, he closes his eyes, gracing her with long, slow licks, pumping and curling. Rose isn’t even sure what sounds are coming out of her mouth anymore, as her hips rise and fall with his fingers.
Her world flashes whiter and hotter than lightning.
Maybe seconds pass, maybe hours, when Rose finally opens her eyes. The candles have nearly guttered out, and Jason lies, with his clothed legs intertwined with her bare ones. Rose should pay him back for that--when she finds the energy. She leans her forehead against his, murmuring. “Power still out?”
“Yeah.” Jason reaches out, trailing a hand down her bare back.
“You need to clean off the bed before the candles burn out.”
Jason groans, holding her tighter. “Fine.” He releases her standing up stiffly and reaching for the stuff scattered across his bed. “Love you too, Rose,” he muttered under his breath.
Rose sits up quickly, grabbing his hand. “Wait.”
Looking down at her in exasperation, Jason asks blankly, “What?”
“I love you.” The words feel so strange coming off her tongue, but Rose knows them to be true. “Meant to say it earlier but you were too busy going down on me and quoting lines to listen.”
Jason pulls her to her feet, and into a kiss. “You can say it whenever you want.”
Rose’s so busy tasting herself on his lips she almost doesn’t notice the hiss of the guttering candles. “Shit.”
“What?” Jason pulls back, looking around at nothing. “Fuck.”
#jayrose#dc comics#jason todd#rose wilson#au#mallverse#kord center mall#melody writes#jason is a nerd#I don't make the rules#and rose loves him for it
23 notes
·
View notes
Text
psd tutorial!!
okay guys so finally it’s here- today i’ll be showing you how to make any kind of soft psd! i will include an in depth tutorial with tips.
Part one: creating the psd.
step 1: find the image you’ll be using. now for me, i create psds based on the tone of the image. because i find that if you make a (in example) purple toned psd and try to add it to a warm toned almost orange-ish photo, it won’t look the best.
step 2 (optional): find an inspiration! lately i’ve been really really inspired by velvestuff unnie!!! i really enjoy how visually pleasing and aesthetic her soft icons are. they’re literally perfection and i dont think it’s possible for anyone to try and replicate her edits. but it’s ok to be inspired! set goals. otherwise, you won’t really have a base to your edits.
to create a purple/pink/brown psd in photoshop, it can be essential and effective yet optional to use the follower:
brightness & contrast ( main ): these two are mainly important for either brightening or darkening your psd. it’ll serve as a key factor.
vibrance: sometimes you’ll find your psd to be TOO vibrant and orangey. you’ll use this to tone down the image.
color balance ( main ): color balance is a huge factor in my opinion. it’s what will allow your photo to be either purple/pink toned or orange/brown tone. you’ll be seeing me using this a lot in my psds.
black & white ( main, if too contrasted ): to me, black & white substitutes as a contrast, but the good thing about this tool is that it’ll either tone down the red hues or make it darker, as well as the yellow hues.
photo filter ( main ): this’ll substitute the vibrance. you’ll see why it’s important by the end of this tutorial.
channel mixer: this will serve as a color balance option. it’s helpful for boosting red, yellow, and blue hues.
color lookup (sometimes optional): this tool will help get a color tone to your photos. let’s say i want something more pink; then i’ll use a pink color lookup and set the opacity low.
gradient map & solid colors ( main ): also important. serves as a color balance substitute and could tone down the vibrance or could raise the brightness. i always recommend using these in ‘color’.
i’ll be using this photo to start off:
step one:
i’ll start off using the brightness tool. here i’ll lower the brightness down to -9 & the contrast to -23.
step two:
then, i’ll proceed to add a solid color (aka color fill) of this shade. after doing so, i’ll change the setting to “color” and lower the fill to 37.
step three:
then, i’ll proceed to use the color filter with these settings.
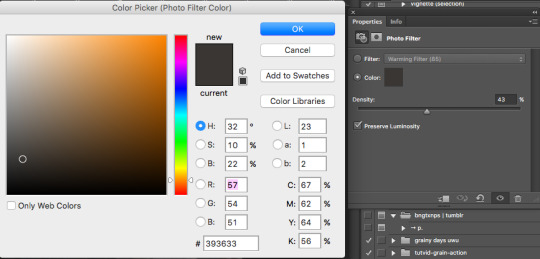
and so far we already have this layer lineup, and these are the results so far.

it’s up to you if you’d like to add more filters to your photos, but this is the base for a purple/brown psd that looks good on dark/semi bright photos and lq photos. i’ll continue on to add to this look to make it more purple and brown so follow along!
step four:
i’ve added a color balance layer and changed out the photo to test my psd to see how drastically it’d change: but it didn’t. but then again, since psd edits appear different on phone screens, i started to mess with the color balance to get a more purple look, so that the purple doesn’t get cancelled out on phone screens and still remains pretty. so i used the following settings:

i applied this color balance layer UNDERNEATH the solid color and photo filter layer, because if you add this on the top of everything, the blue will be overpowering. if you do not want a heavy blue filter on your edit, always apply a solid color, gradient, or color balance layer underneath a solid color that’ll lower the vibrance of your edit. and with this setting:
my outcome was:

and if you haven’t noticed, i did apply my softer action which you can find over here!
soo, now that you have the basis of your pink/brown/blue psd, you can continue to mess around with the same steps as before!
part two: tips
— stay away from hues. if you do decide to use hues, set the opacity to no more than 5%. this is because an overused hue can cancel out colors that’ll make your psd look decent. if you want to use a high opacity hue layer, at least use it on an image that you set your hue color to. (if i use a pink hue, i’ll use it on a pink photo) but make sure it’s not colorful, so it’ll look better on a pink and white photo [[like a cafe photo or ulzzang photo]]. because what the hue will do to a pink photo with brown in it is give the brown an unpleasant purple pink tone and i’ll just look not good. so overall: avoid hues. try to use the “color” option instead if you would like a color to pop more.
— if you’re creating a soft psd, use a soft action! i’ve created one on my blog. an action is basically a group of <<literally>> actions created in photoshop. so lets say i want to take this sharpen and blur then noise i added onto my image, and apply it to another one; it cuts the work of redoing it over and over. so you just record what you want to be done to another photo and boom, you have an action!
— keep in mind, you will always have to adjust a psd. even if you made a psd that looks amazing on a couple of photos with the same tones, one will always be maybe too orange or maybe too blue, and with that you’ll have to balance it out. if your edit comes out with a overruling color, use color balance to tone it down the opposite way. for example, if your photo comes out really pink and you aren’t satisfied, use color balance on the blues or yellows to make it more neutral. these would most likely be the things you’ll encounter when changing a psd. other than that, you should be satisfied with your creation!
— contrast will either be your blessing or your curse. sometimes, it’s easy to get carried away with lowering you contrast, this is because it does! do not be hesitant to lower your contrast down. but just no to the point where it greys out your photo and looks dullish. also, do not be afraid to use the default black & white gradient. set it to ‘soft light’ and lower the opacity and voila, you get a decent and balanced looking psd that’s not too consumed by low contrast.
— as you know, sometimes your icons after you post them will look somewhat different once you view them from your phone. technically, you cannot fix it. this is because you phone and computer have different screen viewings and color schemes (this is the easiest way i can explain it after researching about it for so long) it’ll typically desaturate your photo and make it look dull sometimes. what you can do is take time and observe well... it looks really desaturated on my phone screen? i’ll turn the saturation up just a bit. just use that mindset and you’ll be set! just remember, the less vibrant a psd is through photoshop, it’ll look even more less vibrant through your phone screen and on tumblr.
— don’t be afraid of lowering vibrance though! well, instead of lowering the vibrance, i just use the photo filter and set it to #333230 or #393633. these will act as a low vibrance but it’ll also add almost a greyish purple tint, which’ll come out pretty.
— sometimes, it’ll be best to lower the opacity of a psd but most of the times, you shouldn’t have to. because a psd should never have too much overruling colors. so, lowering the opacity to most layers will help out SO MUCH. you don’t want a photo that’ll be colorful. you want it to look balanced and neat.
— most of the time, you’ll have to be careful when selecting photos. because not only will it be for the sake of aesthetic and neatness; it’s simply also because not all psds will look good on every photo out there. most psds will look good on certain photos, and when you find a perfect photo to match the psd, just use the same color scheme or theme with your other photos.
so yeah, thats all everyone!! feel free to leave any concerns or message me if i missed something and i’ll add it onto this post! happy editing, and i truly hope i addressed everything and helped you guys with insight.
#psd#photoshop#learn photoshop#Photoshop resources#photoshop coloring#itsphotoshop#soft#soft packs#soft psd#soft icons#wasirahulspsd#opulencepsd#PSD COLORING#psd colorings#Resources#psd resources#chaoticresources#completeresources#petitpsds#tutorial#how to make a soft psd#photoshop help#ps help#ps resources#PS#PSDs
308 notes
·
View notes
Text
Can we talk about art for a second?
I’m pretty sure none of you are following me for art content because that’s just not what I do normally, but I’ve been working on some stuff and I just wanted to share. Here’s my current WIP:
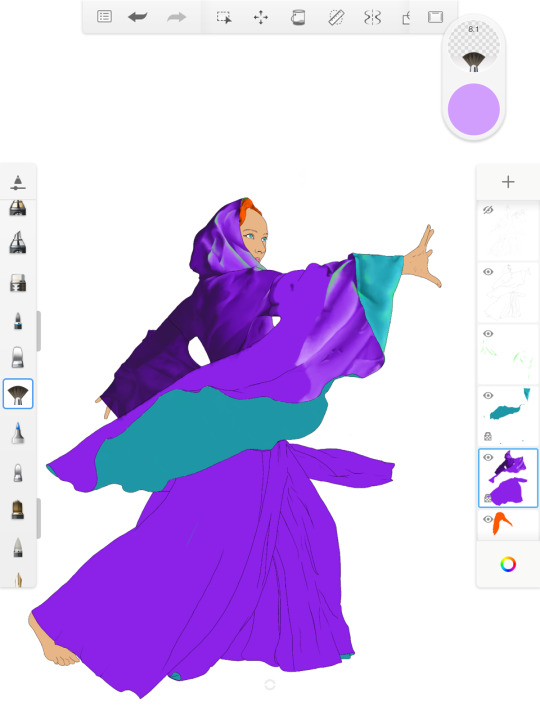
I’m using sketchbook on my iPad Pro, and...can we just talk about process for a second? I’m gonna put this behind a cut just in case it gets long and because this isn’t my normal content.
So I’ve been drawing almost my entire life, but I didn’t really start teaching myself anything good until around 9th grade (which is like...14 years old.). I started by copying Disney characters and then I was introduced to comic books and I copied those. I was in college when digital art start making its way into the art world. People would color their pencil drawings (this was shortly before tablets, so...with a mouse.). I grew into an artist around the time people like Aimee Major and Stephanie Lostimolo were really starting to stand out. And I don’t know about other fandoms, but I was in the gargoyles fandom and from what I can tell...a LOT of modern digital art has its genesis in that fandom. Anyway, what I’m trying to say here is that I started using photoshop with version 3.0 and I’ve had a Wacom tablet almost since the day they came out (gen one graphire tablet represent!).
I’ve never, in all that time, gotten the hang of digital painting. I have a hard time with tablets because you can’t tilt them like you can tilt a paper and it takes a weird sort of hand-eye-screen coordination that I just never mastered. But digital art is so beautiful that I’ve always WANTED to be able to do it. I can make graphics and edit photos but I have a hard time with painting. I have seen the million myriad ways of doing it, and most of them start with the same idea: lay down flats and then lighten or darken as necessary. And this never worked for me because a, the airbrush tool isn’t painterly enough for me and b, it takes for goddamned EVER. For. Ever. And I’m a fast artist! I can spit out a whole line drawing in like a half hour-45 mins with traditional media. But I have adhd, and so finishing long term large scale detailed projects is often not in the cards for me. So dumping like 48 hours of work time into a painting isn’t going to work for me.
But recently I’ve gotten back into art again and I’ve been watching the sky artist of the year and I decided I was curious about oil painting and, well, one hyperfixation later, here we are. I don’t have the money or space for actual oil painting, so I went to sketchbook to see if there was an alternative, and there is! So because I wanted to learn how to oil paint I finally figured out how to digitally paint and I’m gonna share that with you in case you, like me, struggle with the time input and focus required to do digital art.
First, I started practicing poses by drawing an outline over any image that caught my fancy. I have a good understanding of human anatomy because of my science background, but my poses aren’t creative and I especially struggle with perspective and multiple figures in an image. So I started to do line drawings over an image. Here’s the stock image I used for the WIP:
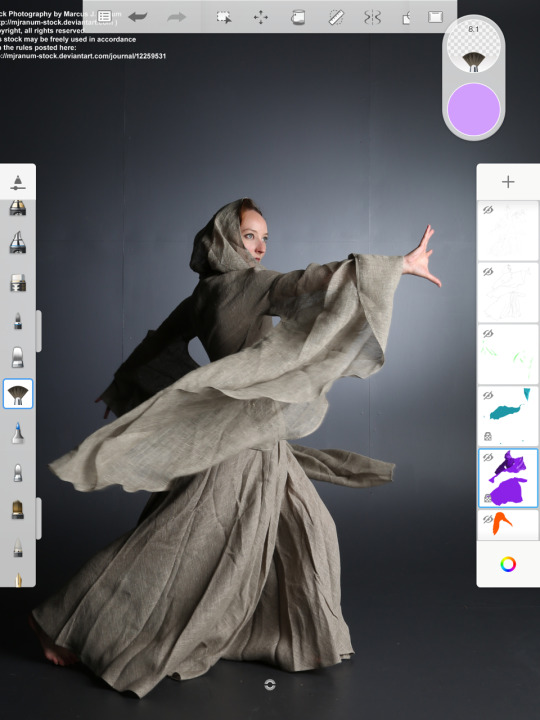
Look at all that fabric! Look at the movement! I love it. So I traced it:
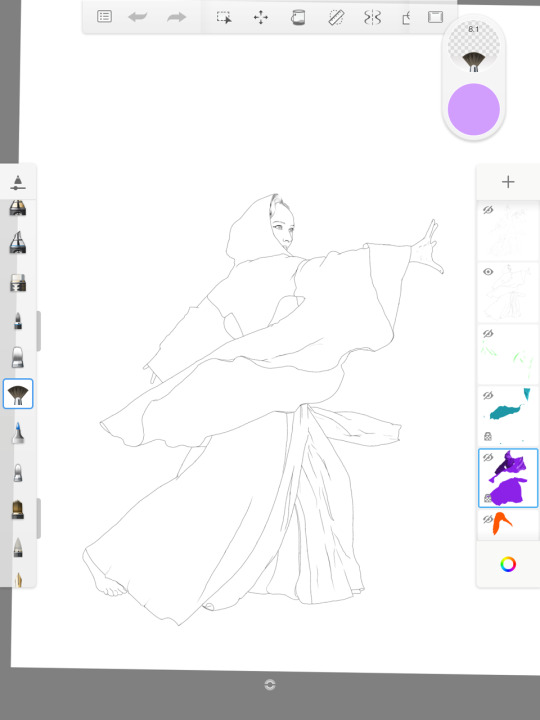
Yes, TRACED, because tracing is a tool like anything else.
Then I choose colors. I pick 5: a midtone (the color you want the thing to be perceived as. In my case, you can see it in the WIP at the top.), a slight dark, a slight light, a blackened tone for deep shadow, and a very light tone for highlights. I always default to white light when choosing these colors, and I’ll get to my reasoning further down. The palette for the robe looks like this:
(Ignore the tan and blue, they’re for another project)
Then you start to lay down flats. Now, I do this with the synthetic oil brush in sketchbook because I like the texture (this image though I’d laid down the flats with the airbrush months ago and didn’t want to redo it, hence the lack of texture and the 100% opacity.), and as with oils, my approach to digital now is to layer rather than cover. Staying in the lines isn’t important. In fact, you should go outside of the lines because it will help you get shadows and highlights along the edges later. What IS important is putting everything on different layers. When in doubt, new layer. I work from back to front, which means that the base layer is the background. In front of that is the skin, in front of that is the robe, in front of that is the teal inside of the robe, in front of that is accessories. Hair varies depending on what’s going on with the image. Here I’ll probably put it between the skin and robe. Ask yourself: what is this covered by? And the use that to decide layer placement. Special effects are a whole other thing, as are highlights. I’ll get to that in a second tho.
The next step is to create an oversketch. This serves much the same function as an undersketch in oil painting, only in reverse because your reference photo is under - and covered - by your work. I started doing it because as I was painting I was flicking the layer on and off, making it transparent, whatever just to see where the shadows are on the reference image. It was a real pain in the rear. So I started making the blobs and borders of the highlights and shadows with an oversketch. You don’t need a method for telling which boundaries are for shadows and which are highlights because for that you can just turn the layer on and off. Just mark where the General shapes are. Here’s the oversketch for this drawing:
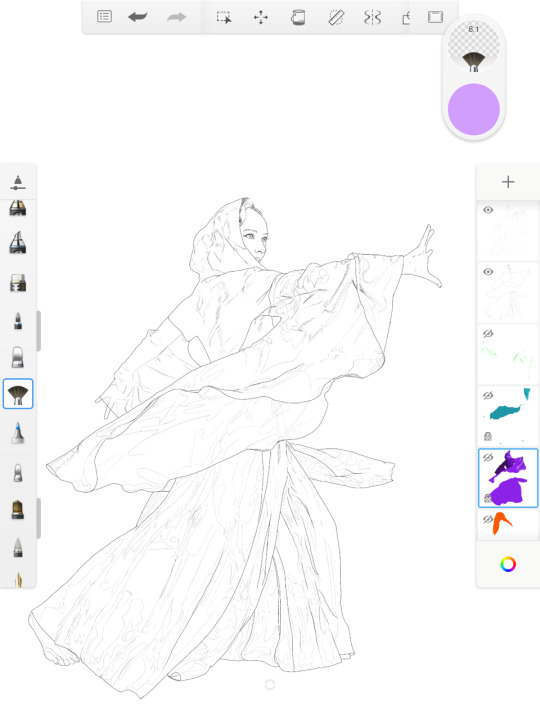
See? Blobs of General Area. When you’re painting, use them to lay down color and then turn them off when you’re blending because they’re not part of the final image and you don’t want to end up with gaps that were covered by the over sketch. To do this, I use the 9b pencil tool and black, but tbh just se whatever you like. That’s just my preference.
Now, for the shading. I started by trying a bunch of different natural media brushes but I eventually ended up sticking on a kind of weird choice: the fan brush. I keep the flow around 20%, which gives me these nice textured marks to lay down color, but then if I don’t lift the pencil up it stops laying down color and instead starts to blend. This means a, I can make it as smooth or painterly as I like with one tool and b, I can paint and blend with the same tool. No more muddying up my drawings by over-blending with the smudge. No losing the texture while blending because it blends with the texture. And the shape of the fan brush allows me to be smudgy with I like, but also will do hard edges. Plus the blending thins out the colors so I can get neat effects by laying down colors on top of each other because it stays a little transparent. You end up needing to lay down a lot of “paint” to get opacity but that’s ok because it allows you to make more complex colors. That’s good, because things like skin aren’t a color. They’re chemical: they’re melanin in cells over blood vessels and muscle and skin is transparent. Even very dark skinned people have undertones. So when you build up paint this way you can capture undertones without ruining your painting. Which, I’m pretty sure, is how it works in oils. But it translates well to digital.
So at this point, painting your image is basically a calming adult coloring book. You lay down color, blend, check your reference, repeat. But a few things to keep in mind:
- Take note of the darkest and lightest areas of the image. Nothing should be lighter or darker than these areas. Nothing in the drawing above will be darker than her back because that’s the darkest area of the painting.
- See the trees and the forest. Sometimes a detail doesn’t make any sense until you’ve seen it in context. Trust your guide and your photo reference. But also make sure that you don’t get so stuck in the details that you can’t relate one area to another. A fold that goes through two areas should be consistent across those two areas, even if you painted them separately. An area might seem dark in comparison to what’s next to it, but it isn’t as dark as the darkest area of the image so don’t go whole hog. Keep it in context.
- Folds in clothing aren’t nonsensical. They are a result of the movement and weight of the fabric. Ergo, the shadows and highlights that create them should also make sense.
- If you’re having a hard time figuring out where the highlights and shadows are, make a copy of the reference image layer and desaturate in, then turn off the colored reference layer.
Lastly, I’m finding it helpful to keep the highlights from colored light on its own layer. I didn’t used to do this, I used to use the colored light as one of my highlight colors. But the truth is that most objects are shaded by more than one light source, and so I’ve decided to do all the shading as white light and then the green (which will eventually be from some kind of green magic.) is on a different layer. My reasoning for this is that it helps keep the integrity of the shading and it prevents the colors from bending too much and getting muddy. So if I add a green highlight and I don’t like it then it’s easy to remove. I don’t have a highlight and shading that’s now ruined by green because I’ve been using light flow brushes. So colored light on its own layer. How much of a highlight you give it entirely depends on how strong your light sources is and whatnot. So far I’m satisfied with just hitting the high points, but I may change that later on.
When you’re done painting the area, go ahead and erase all of the excess paint around the edges of it and clean it up. I like to leave the black outline as part of the image, but if you don’t want to do that you should turn it on and off as necessary while painting so you can make sure to fill in gaps and get clean lines between the areas of color.
So if you made it all the way down here, thanks for reading my ramble. :)
#art#images#painting#digital art#digital painting#method#how to#reference image#sketchbook#ipad painting#ipad#hobbies#drawing#art help
8 notes
·
View notes
Text
gif + colouring tutorial! ✨
i’ve been asked about my gif-making process a couple of times, so as promised, i put a little tutorial together! i’ve never done a tutorial before, so this was an adventure! 😅
when it comes to colouring, i find that a lot of it is personal preference. i prefer vibrant and saturated (perhaps sometimes oversaturated) colours and smokey greyscales, hence why i chose our illustrious cardinal in chapter six for this. i love the story videos, but i hate how desaturated they are. so let’s fix that!
this is for PHOTOSHOP CC 2017, but i think other photoshop versions are fairly similar. we’ll start with the video already imported into layers on our canvas and appropriately cropped and trimmed, so i’m not going to take this right from the top.
okie dokie, here’s our before/after!

so all colouring is, essentially, is messing around with a whole bunch of adjustment layers. it’s honestly just.... trial and error and fiddling around with settings and opacities and different combinations of things until you find what you like. there’s no right or wrong way to colour something; there’s only experimenting and finding what works best for you. it takes practice.
when i’m colouring something, i usually like to start with a curves layer first to brighten things up. we do that by going layer ➜ new adjustment layer ➜ curves. all of the other adjustments we’ll be using are found in the exact same menu! adjustment layers are friends! these are my settings for the curves:

and you can see it’s already made a big difference:

after that i’ll typically put on a vibrance layer. i love the vibrance adjustment ‘cause it just makes things pop. it’s a really quick and easy way to adjust the saturation and the brightness of your gif.

i’ll also do a brightness/contrast layer, which is another big favourite, and does exactly what it sounds like. i’ll normally up both of these until i achieve my desired effect. lowering the contrast can be very helpful too! i particularly like lowering it if i’m editing for a b/w gif, as it can help create more of a gentle greyscale.

here we are after our curves, vibrance, and brightness/contrast adjustments:

getting there!!! but i’m still not satisfied, so i’m going to go for the levels. this layer can be very useful for enriching shadows. on it you’ll see three toggles (black, grey, white) which translate to shadows, midtones, and highlights. i rarely touch the highlights. shadows and midtones only, babey. but again, play around and see what works for you and for that particular gif. i’ll start by adjusting the shadows, then move to midtones, which i generally don’t take too far away from its 1.00 starting point. a little can go a long way.

after that i’ll typically pop on a selective colour layer to tweak the colours a little bit. there’s several adjustable colour menus, but i mostly use the blacks, reds, yellows, and neutrals. this layer can be particularly good for darkening your blacks. this is one where you really gotta dig in and play around. i’m not going to screenshot my settings for every adjustment, but this is what my reds looks like:

finally, if i’m still not satisfied with the colours, i’ll usually add on a hue/saturation layer. there is an additional “lightness” setting on it, but i generally don’t touch it. actually, i don’t tend to fuck around too much with the hue settings either. i use this layer to give a final boost to the colours.

annnnnnd that’s it for colouring! once i’m happy with where i’m at, i normally group all of my adjustment layers into a folder, just to keep things nice and clean. now we’ve just got to sharpen and then save our gif! sharpening is one of the most important steps -- i find the difference in quality between an unsharpened and sharpened gif to be immediately noticeable.
to do this, i’m going to start by ensuring that i have both the first frame and the first layer selected in their respective panes. this is important! then from the animation pane i’m going to go to select all frames. once all animation frames are selected, i’m going to select convert to timeline, again from the animation pane. right off the bat you’ll notice that every layer has been made “visible” and your timeline should now look something like:

from here, we’re going to select all layers, which i do quickly by just using the shift key. once all our layers are selected, we’re going to right click and select convert to smart object. this will condense everything into a single layer.

now it’s sharpenin’ time! i use the smart sharpen function for all my gifs, so filter ➜ sharpen ➜ smart sharpen. these are my settings:

that’s it! we’re ready to export. so file ➜ export ➜ save for web. what settings you have here can also affect the output of your gif. be patient here! since my laptop is a piece of shit, photoshop can take a good few moments to load the preview, just leave it alone to do its thing. hopefully you have a better computer and don’t have to wait! here are my current gif settings:

almost theeere... don’t forget to change the looping options to forever, of course! then smash that mf save button!!!!!
annnnnnnd tada! we’re done! (ノ´ヮ´)ノ*:・゚✧


you can do lots of cool things with layer adjustments, so branch out and experiment with them all, including the ones i didn’t use here. feel free to use as many or as few adjustment layers as you want, and don’t hesitate to use the same type of adjustment more than once if you need to re-correct anything. practice, experiment, and have fun!! alrighto....
thank you very much for sticking with me!! i hope everything was clear, but please ask if you’d like me to clarify anything. 💖
#*mine#tutorials#resources#yeah idk what to tag this as#but i hope someone finds it helpful!!!#it was interesting for me to like... dissect what i'm doing#bc don't let this fool you 99.8% of the time i have no idea what the hell i'm doing#all photoshop is is clicking things and hoping for the best#it is CHAOS#💜💜💜
52 notes
·
View notes
Text
Shaping History
I thought it’d be fun to write a little drabble on how a prospective narration for Mileena’s tower ending would go. Now, this is just my own idea for what she’d do, and if, by some miracle, she’s added as DLC and gets her own “canon” ending, I’ll almost certainly be happy to toss this aside. But like I said, this is just for fun! Visual details will be described in brackets.
MK11 Spoilers: Not necessarily anything that happens in the canon of the story, but more the setup for what happens after you clear the Klassic Tower with a character.
[First shot: Mileena standing before the Hourglass, fingers tracing along the frame. Kronika’s body lies in the background.]
Those who had betrayed me, thought they could get rid of me so easily...their undoing was within my reach. With the Hourglass under my control, I could reclaim my rightful place and bury them before they could even think to turn against me! Yet as tempting as this was...I could do so much more.
[The image of Shao Kahn appears reflected on the surface.]
Father...he was Outworld’s greatest leader, even greater than I, but his time was cut so short. Time that I could put back into his hands.
[Second shot: Shao Kahn standing before his throne, hammer raised in triumph. Sindel and Mileena stand close by, as do Baraka, Reptile, Ermac, etc. The camera slowly pans out to show Liu Kang, Kung Lao, and other Earthrealm warriors dead as Raiden is executed before a crowd.]
He and mother would live on far past where they had before, no merging of the realms necessary. Outworld would triumph, and I would get to stay by their side the whole time, watching how a true konquerer reigns over his people!
[The image darkens, desaturates slightly, with only Mileena retaining her color.]
Even so...I had once tasted that power he held. A taste so strong, so addictive, that I would never get again so long as he held the throne. So I watched his reign as long as I was able...then I watched it again, and again, learning everything I could about holding onto that power with an iron grip...and once I knew all I needed to...I struck.
[Final shot: Mileena, now in a variation on her Kahnum outfit, stands atop a high balcony with her throne upon it, pointing forward to direct an army marching down below. Tanya and some of her allies from before stand by, as do some of the former traitors, properly subjugated as she desired. The rest- among which D’vorah is included- have their heads on pikes surrounding Mileena’s throne. Shao Kahn- not wearing his helmet- and Sindel are close by again, but they are restrained and chained up, looks of shock on their faces.]
I wish it had not come to this, father...but now you can watch. Watch as I use what I learned from you to rule properly this time, bringing an era even greater than your own! No usurpers, no civil wars- all resistance will be choked out entirely! Perhaps you and mother will be free one day...one day when you are content to live with power in the hands of another, and are satisfied in knowing that your legacy will live on in your daughter, Mileena Kahnum of Outworld!
5 notes
·
View notes
Photo

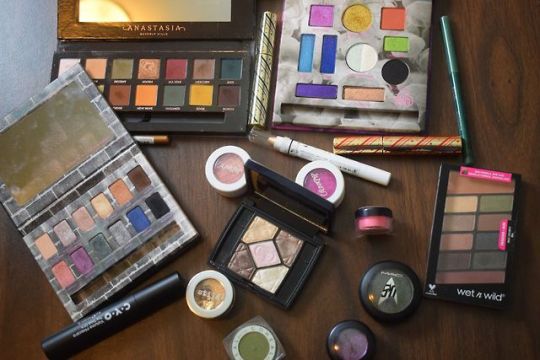

Here is probably everything else I wore out and about this year less often or less memorably, I guess? It doesn’t seem like it, but I guess!
eyes:
Recently I’ve been trying to get use out of Subculture’s stone shade, Mercury. I really, really want to do grey and taupe and stone eye looks but I do not have what I need. This particular shade darkens a lot. I want to keep Subculture out to try to do new things with it–make that shade work more with the yellows, use the rosy shades, wear that metallic ONCE (I never have!!). I don’t really even remember wearing the Kristen Leanne palette this year, it was probably either the purple or the gold. This thing really is very pretty but it’s full of the kinds of potential looks I’ve already mastered and am unchallenged by. The UD Nocturnal palette is getting quite old and I’m trying to breathe new life into it–tried some looks with that purple and silver but it’s not the Cool Toned™ look I’m craving… I only use the mattes WnW’s revamped Comfort Zone palette (for how many years will we refer to it like that?) but I like them, as far as neutrals go. That Dior palette came from one of you guys and I’m still trying to figure out what it’s good for–I think I’m going to wear it on my face? That center shade in particular is just lovely for me. These just feel delicious.
Colourpop Sprinkle Me (this is kind of my go-to shimmery neutral “topper” shade, to the extent that I think it makes me lazy and I’m trying to use it left) and Don’t Leave, L’Oreal Infallible in Golden Emerald (these are still so good!), a Stila Magnificent Metals, the old kind you mix with a medium, in Metallic Gilded Gold. I did wear one of the Glitter and Glows this year but I guess it didn’t end up in here! MAC’s Bird of Prey pressed pigment from that LE Star Trek line–this remains just okay for me but I respect my choice to purchase it based on having the best of all the shade names! Bunch of fucking pencils, idk, I’m very lost when it comes to pencils: a NYX jumbo in Cashmere, a NYX retractable in Gold, Milani glitter retractable in Emerald Stone: they are all fine. A lot of this green and gold stuff was my NYE look.
I seem to recall doing an all-over-the-face look with that fluorescent pink Sweetpea & Fay pigment. I still have this! Pigments last forever! I am gonna keep this out for a blush.
There are three Grinch liquid liners from Pur that Westlin got me for Christmas (!) and I’ve been playing around with them. Reader, I’m out of practice. I’m not good at liquid liner. That is why I had coveted this set in the first place, because I didn’t have any and they’re the brush kind, which I always liked back in the days when we all wore liquid liner. But the learning curve is killing me a little bit here.
Two things I got from @madmoths that I’m still playing around with. That CYO mascara is GREEN! A dark green, pretty subtle on bare lashes. I wore it a few times then I wanted to keep it closed for a while until I got a white primer to try it with, so it didn’t dry out (esp given I have 100 mascaras open currently). I will report how it looks over the primer! What color eyeshadow with an evergreen lash? This would be a great time for a milky matte pink or mauve, which I DO NOT have! Strawberry milk + pine is a good colour combination. Then, black cherry or plum (for spring) and maybe mustard yellow. Seems like that is the agenda! Then there is a MAC dazzleshadow in Can’t Stop Won’t Stop. This has a plummy base with a looovely perfect light blue glitter in it, I’m trying to figure out the best way to layer it to bring out the blue. It is part of my cherry for spring plan! Sometimes I feel like I have a hard time wearing dark shades on my lid without feeling too…formal? And this is something I’m trying to get over. I think wearing them in particularly informal settings will help. (Maybe this is reservations about “sexy”?) This would look so good with a powder blue liner.
face:
I realize now that I should have put Anastasia’s Moonchild palette in my more used pile, I had totally forgotten about how all of January I wanted to be tin man. That silver-grey looks very flattering on me, but I want it to look grey. I want a fucking grey face highlighter. Pale princess problems :(
UD’s Bittersweet Afterglow blush, NYX’s Codebreaker ombre blush and Pinky powder blush: these are fine. Becca’s Opal is fine. That WnW Zodiac highlighting bar (Earth) is nice, it’s fine. It kinda made me like Mary Loumanizer, of all things, more, in comparison. That peachy Vera Mona thing is an eyeshadow that I wear as a blush. I am always thinking that I wish I had a peachy shimmery blush and forgetting I have that. I do not recommend those WnW stick blushes. I somewhat strongly recommend the Revolution liquid highlighters and the WnW Hello Halo liquid highlighters, the above are in the shades Liquid Champagne and Guilded (?) Glow. I like the Revolution one marginally better on me, easier to blend out.
I really wanted to like that Hourglass Vanish stick highlighter when it came out and I was amped to get a mini, it was so hyped and well-regarded. The shade is Champagne something or other. Maybe it’s just that I don’t wear foundation? But I don’t find this to be any nicer than any other stick highlighter I’ve tried, and I do like that kind of thing. It’s okay.
That WnW Illuminating Palette is still pretty nice, I feel like whenever I get bored of it I find a new way to use it. I have an idea about that and that little Vintage pink blush-highlight, they are both relatively subtle and very smooth: I think I might try to use them as finishing powders all over my whole face. Will report back.
That Colourpop blush is in the shade Bardot and I’m making a point to use it henceforth, these things don’t have forever shelf lives. It’s nice! I don’t love the super shock formula for blush specifically, I think it’s finnicky on a brush.
Oh! and my City Color Be Matte blush in Fresh Melon. Still my favorite. I’m a little concerned that it’s getting drier, and I cannot replace it!!
lips:
MAC Watch Me Simmer, still maybe my favorite lipstick of all time when I wear it, still haven’t found a dupe, lately I’m into wearing it very blotted out, because their cremes do emphasize lip weirdness and my lips have been VERY WEIRD.
The only thing here whose color isn’t represented well is that Maybelline lipstick. It’s called Fiery Fuchsia and I got it on super clearance. It is fairly similar to the fuchsia from the new Maybelline line, the one Nyma Tang had me wanting to buy, but this one was on clearance for like $3 likely for that reason, AND its # is 810 (flint area code). So far I quite like it, one of my favorite lipstick color families on me is what I call “dark pinks,” which are hot lipstick pinks at a darker value that haven’t been desaturated. This one is the most vibrant one in my collection so far and I imagine it’ll be an everyday shade for me. I’d like to get myself a liner in this family, because I’ve been relying more on liners since my lips have been Extremely Weird.
Here is Fenty’s Vay Cray gloss–this gets less winter time wear from me, because it can emphasize Weirdness, but it is ideal in the summer. Revlon’s HD matte metallic something or other in HD Dazzle is fine, Lucas got it for me hoping it would replace this (the only lip item I have EVER LOST! and mourn daily). It doesn’t, but I like it. More of those Benefit glosses in Hoola and Bella Bamba. Tom Ford Indian Rose: this is really nice especially if you have Weird Lip problems, but I like that Bare Minerals one better, maybe! The Bite Sephora birthday gifts– the stick in Glace and the bullet in Chai–are good, they’re fine, I haven’t learned to love them. I’m mad at Bite because a very very old lipstick I had from them finally got like, lowkey rancid, and it was expensive, and I’m like: what if you didn’t use food grade ingredients, hm? I haven’t found a good reason to wear that green, UD’s Junkie, much since the Christmas season, but I’ll figure it out. That Rimmel is one of my favorite shades,109, but the last time I wore it it was Weird (due to weird lips), so I’ve been afraid of it.
That Colourpop shade is Scorpio Moon (lol of course I bought it) and the quality and experience of it is unbelievable and it makes me want to buy more of them all the time. I’m hoping to get Flower Szn. Their Lux Lipsticks could be the best thing on the market–not just for the price, but for any price–if they kept them consistent and were willing to fill out a permanent range, but they won’t, because they are Colourpop! So they become the best for the price, maybe, but I still think something like Maybelline is a safer bet across the range. Anyway this color is so strange–which is good, it is unique. It turned out to be way more cool-toned on me than I expected, but at the same time it is not cool-toned enough, so I keep wearing it hoping it will be a delicious creamy greige, but it is not. That has been a trend for me this year, I am craving a delicious creamy greige and I have none. Hence these NYX shades, Haze (the straight grey) and Castle (the lavender, what a cute name), both of which I reach for when I want greige, and I end up disappointed, even though they are both good, especially that purple, which is a dear shade to me!
8 notes
·
View notes
Text
How To Select and Change Colors In Photoshop - Replace Colors In a Photo.
We're going to be using three different techniques. The first will deal with the Color replacement tool. It's a tool that you probably haven't used before, but it can be very powerful. Then, I want to show you how you can use the Hue and Saturation Adjustment Layer so that you can work non-destructively and change the colors of objects in your image and if you change a line, you can always go back and easily make edits to those adjustments. So the first method that I'm going to show you is how to use a tool that you probably never used before. It's the Color Replacement Tool, which is nested under the Brush Tool. If you click on that tool, you can set the foreground color to use as your source color. So I'm going to double click on the foreground color picker.
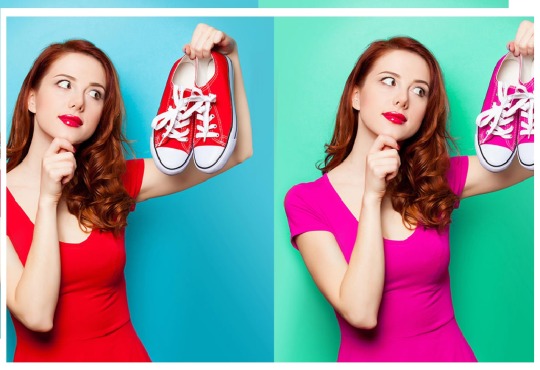
I'm going to click on the beanie hat and I want to click and drag this up to select a red that has the same luminosity, and, maybe, make even make it just a little bit darker, so I'm going to click and drag this down,and then, I'm going to press OK. With the Color Replacement Tool selected, I'm going to make sure that I have Color under Mode and under Limits, find Edges, so when you click and drag in an area, you'll notice that the colors will change to the color in the foreground. Now the good thing about this tool is that I can increase the size of the brush, so I'm tapping on the right bracket key on the keyboard and I can keep painting, and notice that I don't really go outside of that blue line because Photoshop knows that I'm trying to replace this blue color, and there is no blue found on her face or in the background.
The downside of this tool is that I'm working destructively, as you can see on this layer here, so I'm going to Undo those changes. If you wanted to use this tool, what I recommend you do so you work non-destructively is use the Lasso Tool to make a selection around the object whose color you want to change, in this case, the beanie hat. Then press CtrlJ, Command J on the Mac, to Duplicate that selection. So, now, we have a layer that contains the beanie hat, then you can use the Color Replacement Tool again. But to be frank with you, there are better ways of changing colors in Photoshop. This is just an easy tool to use but the downside is that if we decided to use green as the color, we would have to come in and paint everything all over again, and that just takes too much time. But for something small and quick, this tool will be just fine. But if you want to have more control, there are better alternatives. So it's better to have flexibility when working in photoshop. So what I'm going to do now is show you two different methods that I like using for changing colors of things.
So what we're going to do first is make a selection around the beanie hat. I'm going to click on the Quick Selection Tool, come over to the hat, click and drag, and just create a very quick selection. As you can see there, that was really very quick. I'm going to Zoom In by tapping on the Z key and then clicking, just so I can deselect some of these areas that shouldn't be selected, so I'm going to hold Alt, And I'm not going to spend too much time here,you get the idea, and that's going to be okay for this example. So what I'm going to do now is I'm going to Zoom Out, Fit to Screen, and I'm going to create a new adjustment layer—here and Saturation Adjustment Layer.
Then, I can click and drag on the Hue Slider to change the color of the beanie. Now the problem is that not all the colors change at the same time. Notice that we have some orange and then some yellow. If you have this issue, you can solve it by clicking on the Colorize checkbox here and it colorizes the entire area, so then I can find a red color that I want to use, maybe something like this, add a little more saturation, make it a little bit darker, maybe bring down the saturation a bit, so something like that. I'm just looking for something that matches the scene. But, anyway, so now that we have this set-up. We can always come back and make changes if you want to. We want to make her hat green, we can do that, and we can make all types of adjustments because we're using an adjustment layer and a layer mask. Now, what I would do if this were a real project is Zoom In on parts of her hair, like this one here, and just fix them by painting with black on the layer mask.
So we'll select the BrushTool, and with white, I reveal, with black I conceal. So with black, I would paint in areas like that strand of hair and just go around the entire area here, making sure that there's no green spilling on to her face. Obviously, I'm not going to take the time to do that in this tutorial, but that's something that you definitely should do with your image. Now, what if we want to make this into sort of a Christmas theme where her hat is green and also the blue on her shirt is green? One of your initial thoughts might be to use theSelect Color Range feature in Photoshop, which allows you to select the color, and then, find similar colors around the image clipping, and select those. Now, the problem with that is there are so many different shades of blue here that you're really not going to be able to get a good selection. A solution for a problem like that is to use the Hue and Saturation slider again, but this time, take advantage of the slider here. So if I click on it, I can hold Ctrl, Command on the Mac, and click anywhere on this image, and adjust the color that I click on. In this case, if I click on the hat, the color is blue.
Watch what happens when I hold Ctrl, Command on the Mac, then click and drag. Notice that I can change the color of her hat to green, but also, the other blues in the image turned green as well, then I can control exactly which shades of blue. Notice these gradients here. This is telling us exactly what's happening. We're taking these blues here on top and converting them into the green here on the bottom, and you could also make adjustments to those. Notice that in some areas, I'm not quite getting all the greens in there; there's still some blue. Well, I can click and drag this icon to the left and it pops here on to the other side, then I can continue clicking and dragging on that. And notice that now I'm selecting more of the colors on the hat and in the shirt, and I can do the same thing on the other side if need be, but there's no reason to do that. I can also adjust these as well. So that before and that's after. And after this, you can just take a little bit more time to adjust the image.
This green is a little too colorful and saturated for the image, so what I would do is maybe desaturate it a little bit and, maybe, darken it up just a tiny bit. So maybe something like that will work better with this particular image. Now, in this image, it's not really necessary, but if there were also areas of the image that also had blue, you can simply mask those out by painting with black on the layer mask of. this Hue and Saturation Adjustment Layer, but there's no blue in the background, so there's really nothing to paint, but you can paint that if you wanted to or, maybe, if you wanted to keep the hat blue, you will just paint with black over the hat on the layer mask to reveal the original blue. But that's not something we want to do in this case, so I'm just going to go ahead and undo that. And one other thing I want to mention that if we go back into the Hue and Saturation Adjustment Layer by clicking on the thumbnail here, you will see that the adjustments we made are not going to be shown here and that because we're now back on the master.
If you want to go back and make more adjustments to the blue, which is now green, you'll have to select blues from the dropdown, and then, we can come back here and make adjustments if need be. Also, you have more options. You have reds, yellows, greens, cyans, blues, and magentas. So maybe you want to adjust the reds. You can select reds and adjust the Hue and Saturation of the reds, as well as lightness, of course. And you can adjust this widget to select the colors that will be adjusted by the Hue, Saturation, and Lightness. Obviously, this is not looking very good, so I'm just going to Undo the changes that I made and go back to what I had before.
1 note
·
View note
Text
Right so I was wanting to share this for a while cuz idk it helps me and maybe it could help my fellow art memes. and I’m finally getting around to making a post of it so ey
Anyway here’s a small tutorial for coloring (shading) things to make it look Decent without really bothering with all that color theory or whatever the heck

so here you got your sketchy lines and good enough base colors, as exemplified by my pale pale little boy.
so you go make a new layer and clip it to your color layer, and set it to multiply

for the skin (at least with lighter skin,) you find some light reddish orangish color and plop it down over the neck and around any notable bunches of hair. Keep some vague idea of a light source in mind, but it’s eh, you’re being lazy today

for eyes you find a light blue/almost gray color and just draw a line under the top eyelid.

now for the rest? You find a very polite light purple/grayish color and drag it under any notable overlapping parts. This color is great because multiplying with it leads to quick and easy darkening of other colors, without drawing too much attention to itself. (i.e., if you try multiplying with green, you do make everything darker, but you also make it green. Doing this with a desaturated purple/violet darkens things in a way that looks more natural, and it works well with just about every other color.)
(don’t be scared of shading with different colors though? cuz you can get some real funky moods out of em if you play your cards right. but yEAH I stand by this color for the simple lazy stuff)

nooooow if you wanna be dramatic, you can find a darker desaturated purple and go like whoosh. then go in and fill the bits you missed when coloring your base layer cuz your boy is so damn pale you couldn’t tell it apart from the white background

And if you wanna be more dramatic, make an overlay layer this time, and splotch in some orange-ish color over the general lighter area
And then celebrate, cuz now you have a finished-enough picture done in as little time and with as little effort as you can get away with
4 notes
·
View notes
Text

Also Known As: “Why Blending Modes Are Fucking Awesome” and “Daily Doodle - 2/1/2018”
What You Will Need:
Art Program that has Blending Modes and Layers
A super basic, fundamental understanding of what Blending Modes are (or at least how to set one on your layers.)
A grayscale painting you already made.
This is going to be a very, very, VERY long and rambly tutorial, so buckle up and hit that Read More link. (Or “Read More Now” if you’re an x-kit user like me.)
To start with, you are going to need a grayscale painting you’ve already made. I happen to have this portrait of Lurial I created a while back for a daily doodle that I’ve always wanted to add color to. The biggest benefit of doing this grayscale-first-adds-color-later technique is to separate the hard work of establishing your values from sorting out your colors.

Your grayscale painting does not have to be super polished or finished. The primary thing your grayscale painting should achieve before you move on to adding color is that it is doing a lot of the hard work and heavy lifting in terms of values and shadow placement.
Now that I’ve picked out my grayscale painting, I’ll use blending modes to lay down the base colors I’d like to start with. I do this by creating a new layer directly on top of my grayscale painting and set it either to Multiply (the one I use most often) or Linear Burn (only started playing with recently!).
Multiply and Linear Burn work in similar, but slightly different ways. They both ‘tint’ and darken your grayscale painting beneath with the blend color on your brush. So for example, if you painted with WHITE on a Multiply or Linear Burn layer, it would leave your grayscale painting looking unchanged.
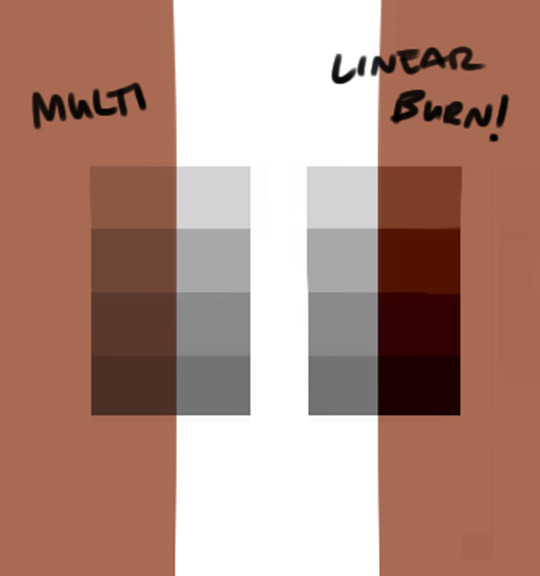
Because the color you choose will darken your grayscale image, you’ll want to pick a color slightly lighter than you normally would pick for a ‘midtone’ and then start painting on your blending mode layer.
Multiply will often lead to a softer, subtler more desaturated ‘base’. The biggest drawback is that it can be a bit ‘muddier’, but it can make for a really nice start if you want to build up more contrast and saturation later with the Overlay blending mode, (which I’ll be talking about later.)
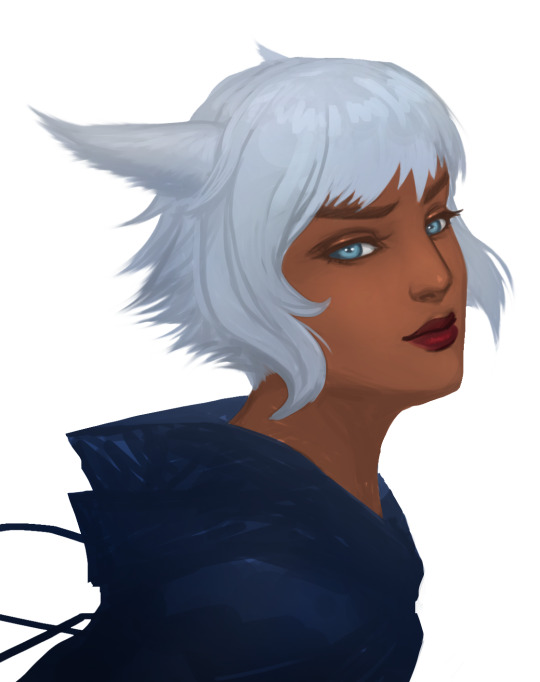
If I were to turn my Multiply Layer into a Normal Layer, it would look something like this:

Linear Burn will lead to a sharper, crisper, more saturated ‘base’. The biggest drawback is that it can sometimes get too dark too fast, going towards black much faster than Multiply, but it’s a great option if you feel like you’re struggling to get Multiply to do it’s magic for you and you want a more sharp, contrasty look.

Here’s how the Linear Burn Layer would look if I set it to Normal.

You’ll notice in both the Multiply and Linear Burn layers, I didn’t simply choose one color for all of the skin or one color for all of the hair. I introduced slight variations in color while also using brighter colors here and there to carefully push and build up the lighting I was going for. It’s subtle, but this is part of the magic of blending modes. You can introduce all sorts of color shifts and gradients without fucking up all the values from your base grayscale too horribly.
Now that we’ve got our ‘base’ Multiply or Linear Burn layer in place - things are probably looking a little too dark or muddy.
Let’s add a second layer on top of our Multiply or Linear Burn layer and set this one to the blending mode Overlay. We’ll be using the Overlay blending mode to add back in more brightness, contrast, and introduce even more color into our image.

If you have not used Overlay before - at 50% Grey, Overlay will do absolutely nothing to the layer beneath it. However, with any color LIGHTER or DARKER than 50% grey, Overlay will brighten or darken the layer beneath it while also adding in the color you selected. This can be used for color correction, lighting adjustments, or really rad lighting effects.
With my Grayscale + Multiply Layer version of Lurial - the primary issue is that it’s looking a big dark and muddy. WIth Overlay, I built up light, contrast, and brightness using some very light greys to brighten back up the image and used a darker grey to push the contrast in areas like the darkness of the eyelashes. I also selected a purple-blue tint for the shadow areas (like around her throat) to push warm lights and cool shadows. A bright pink was used on the highlight of her lips to push that lip highlight even further.
It’s looking way less muddy and dark now than it did with just the Multiply layer alone.

If you’re having trouble wrapping your head around all of this, here is how my Overlay Layer would look if it were set to Normal mode:
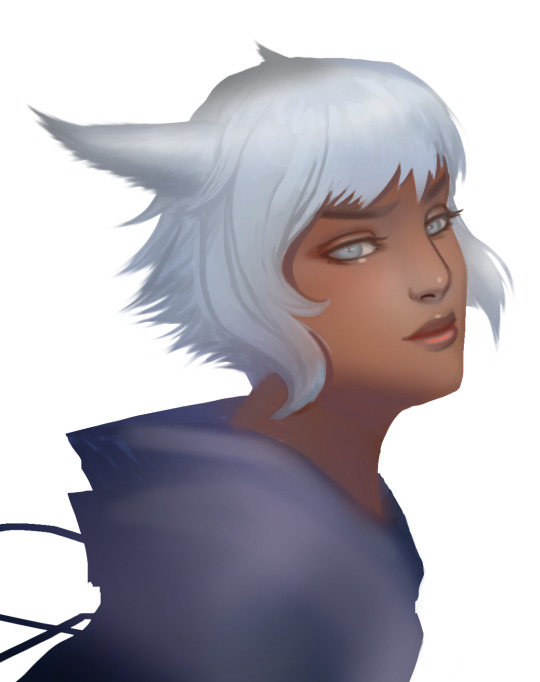
The Greyscale + Linear Burn version of Lurial doesn’t have the muddiness problem that the Multiply version did, but it is pretty dark. Using our Overlay layer, I brightened things up.using a light grey for lights and some dark purples for shadows just like before, but this time I was a little more heavy handed with pushing light so I could capture the right skintone I wanted for Lurial.

Here is how my Overlay layer would look if it were set to Normal:
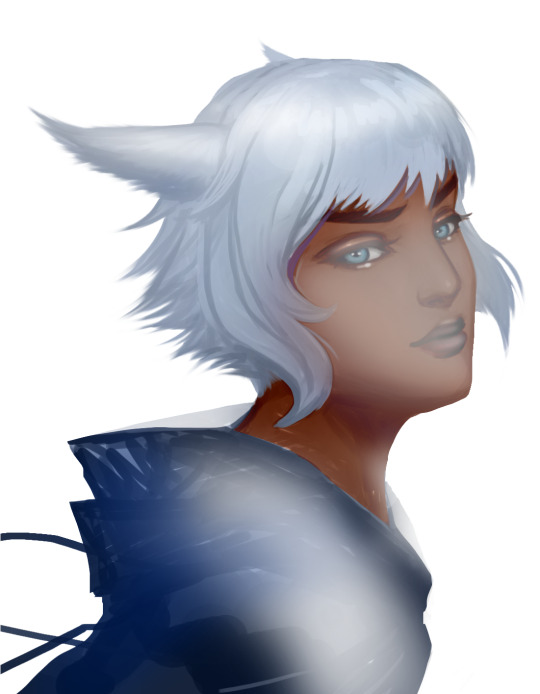
Remember that you don’t have to use just one of each blending mode layer. You can stack on a second Overlay Layer if you want to either add more color or lighting corrections without messing up what you have currently OR to introduce some rad and sophisticated lighting effects.
For example, with a second Overlay layer, I can add this Dramatic Beam of Light™ cutting across Lurial’s eyes.

In the first instance, I used a very light blue (which could perhaps be Moonlight). I also used a dark blue-grey color above and below the strip of light to push the contrast further and really bring out that beam of light cutting across her face.
In the second instance, I swapped out the pale blue for a pale orange (which could perhaps be the setting sun!). Below is how both Overlay Layers look like if I set them to ‘Normal”. Notice how much extra saturation was added to the image in the second instance with the light orange even though even though the light orange I used is very pale and doesn’t have too much intensity!

This is how you can add some saturation and punch to an image that is otherwise a little too desaturated, but try not to get too carried away or your characters could wind up with orange skin. (which is a mistake I’ve made in the past. <_<;)
With this painting, I hit a conundrum where I realised that the Multiply version felt too ‘soft and muddled’ to me while the Linear Burn version felt too harsh with shadows that got dark too quickly. So I decided to flatten the Linear Burn version of the painting down to one layer, put it on top of the ‘Multiply’ Version of the painting, and then lower that layer’s opacity down to 40%.
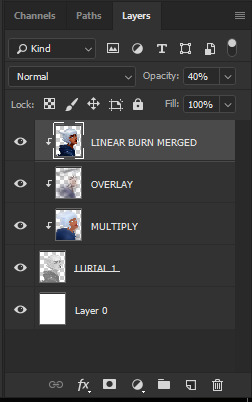
Now I had the best of both worlds!
At this point, I flatten everything down to one layer (minus the background) and continue painting in full color. This is my usual approach - once I feel like I’m happy with the general feel of the colors, I flatten and paint in color like normal. Below is where I stopped for the night, but I plan on continuing by detailing out the hair, figuring out clothing, and maybe working up even more highlights on her skin. Very, very often, I will throw on another Overlay layer or Multiply layer to tweak and adjust lighting or colors some more.
Sometimes I will even use one last Overlay layer as a last step before finishing an image to add in last minute highlight details or to harmonize my colors or lighting better.
Another really useful blending mode you can use for color correction or just to control your colors better is called the ‘Color’ Blending Mode. It takes whatever color you have set on your brush at the moment and attempts to apply that color across the various shades beneath it while fully respecting the grey levels (light/shadow values) of the image
So if I were struck by the sudden desire to transform Lurial into her Bizaaro World counterpart where she has green eyes, pink hair, and purple lips, I could do so in a snap just by adding a ‘Color’ blending mode on top and plopping in some green for her eyes, pink for her hair, and purple for her lips. Easy peasy!
Many artists will skip over using Multiply or Linear Burn all together and just use Color instead. The most important thing with the Color Blending Mode is to use a variety of colors. I could have easily used only pink for the hair or only a single purple for her shirt, but by using a mix, I made the colors feel more dynamic and real instead of boring and flat.
Below is what my ‘Color’ Blending mode looks like when I set it to ‘Normal’. You’ll notice the color I used for the hair is actually pretty dark. This is because like I mentioned before, the ‘Color’ Blending mode will tightly respect the grey/light/shadow values of the image it’s being applied to. Lurial’s hair was very pale, so no matter how dark the purples and blues I used were, it kept the color of her hair equally light in tone.

The very last Blending Mode I want to talk about is Linear Dodge (Add) - BUT that’s for another tutorial I will probably do on ‘Rim Lights and How To Add Them. (Also How to Make RAD LIGHT SABERS’ since Linear Dodge(Add) is super useful for that)’
I hope this giant ramble was somewhat enlightening or at least gave you something to toy around with the next time you paint! If it was helpful to you at all, please consider giving the ko-fi link on my blog a poke so I can fuel myself with most glorious caffeinated beverages.
Thanks for reading!
264 notes
·
View notes
Text
Digital Collage Experiment: 1
The first step of my digital collage was removing the parts of the image I wanted other images to show through. In this case, that’s everything within the doorway.
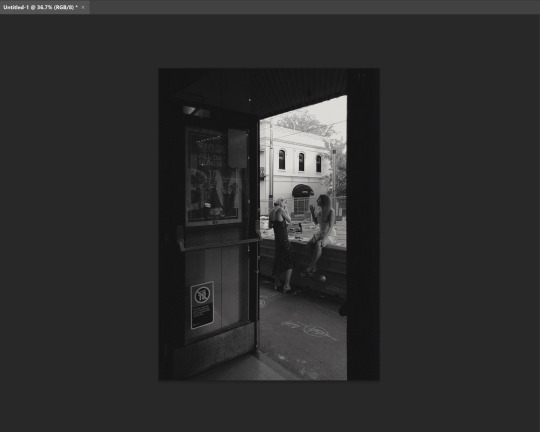
To cut around the shape of the doorway I used the Polygonal Lasso tool. This is a selection tool that makes selections using only straight lines. I thought this was ideal for the rectangular shape of a doorway, and you can see the selection around the doorway in the image below. I then proceeded to delete this part of the image by pressing the DEL key, which only works when the image is rasterized.
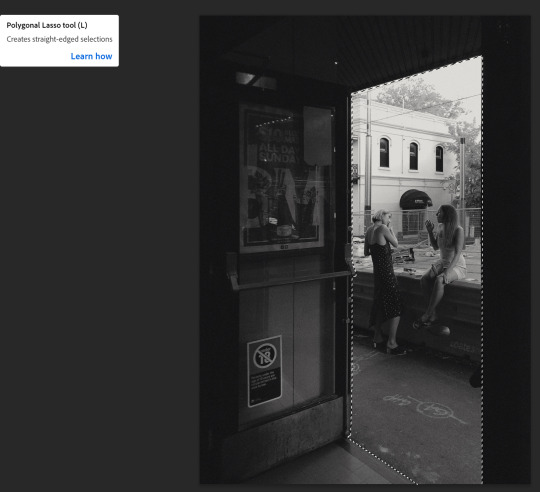
For the next step, I pressed CTRL+SHIFT+P to place an image. Here is where I selected an image taken of some clouds that I found on Pexels. I moved the image around to the ideal placement, as some of the image featured mountains. As I wanted the image to just be sky, I made sure the mountains were outside of the artboard.

As the doorway was now a hole in the image, I was able to bring the sky down a layer. This produced the effect of the sky being outside the doorway that you see below. This is the first instance of the design becoming more of a collage.

My next step in my design was to incorporate a moon into the sky. I found this image of the moon which I imported using the same CTRL+SHIFT+P shortcut. The resolution of this image was the same dimensions as the artboard so I didn’t have to worry about placement yet.

For this step I scaled up the image to the size of the moon I wanted, and rasterized the image. This allowed me to use the Ellipse Selection tool whilst holding SHIFT to create a perfect circle around the shape of the moon. This created a selection around it, but I wanted to delete everything other than the moon. I did this by pressing CTRL+SHIFT+I which inverted the selection to everything on the artboard other than the moon, which I deleted by pressing DEL. Finally I moved the moon to where I wanted within the design.

After looking longer at the placement, I decided to move the moon to the corner of the design. I did this by scaling up the moon and moving its layer to below the doorway layer but above the sky. This meant the moon would appear to be in the corner of the doorway. It also looked very unnatural in colour because of it coming from a different image, as well as it being daytime in my image. I combatted this by reducing the opacity down to 45%.

Using the CTRL+SHIFT+P command I had used previously, I brought an image of a toy robot into the design.
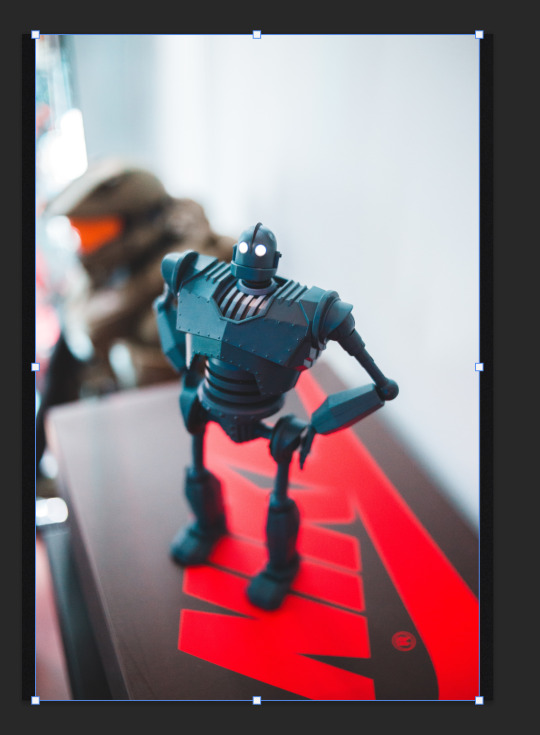
I scaled down the robot and proceeded to start removing the background of it using the Polygonal Lasso tool. I didn’t intend on keeping the legs of the robot visible so I didn’t bother trying to select them. This is fortunate as the legs are out of focus and therefore would of been hard to include.
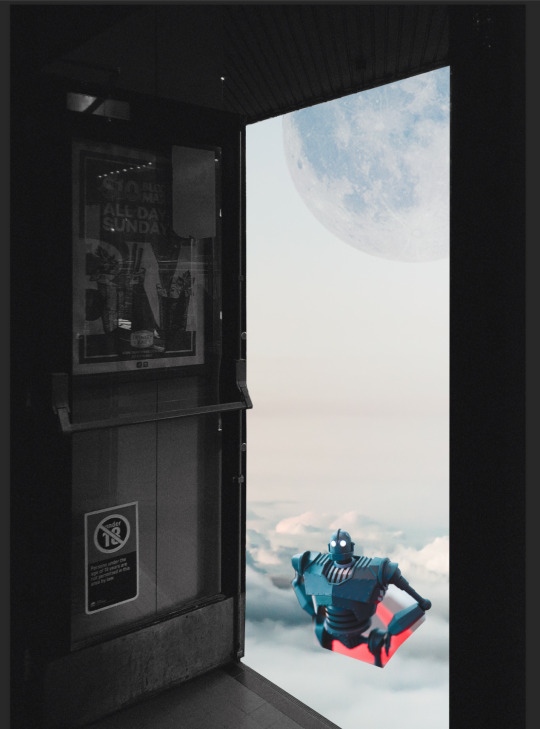
To make the robot appear to be poking out the clouds, I needed to use a clipping mask. To do this, I drew a selection using the Polygonal Lasso tool which went across the robot and outside the hole in the doorway image. Then, with the robot layer selected, I held ALT and pressed the clipping mask icon in the layers panel. This means the robot will only show outside of that area I selected.

Because it the robot is emerging out of clouds, the clipping mask shouldn’t be a clean cut line. To counter this, I pressed the link symbol on the robot layer and selected just the clipping mask. I then went to Effects > Blur > Gaussian Blur and dragged it along to what I felt was an appropriate level of blur for the image.
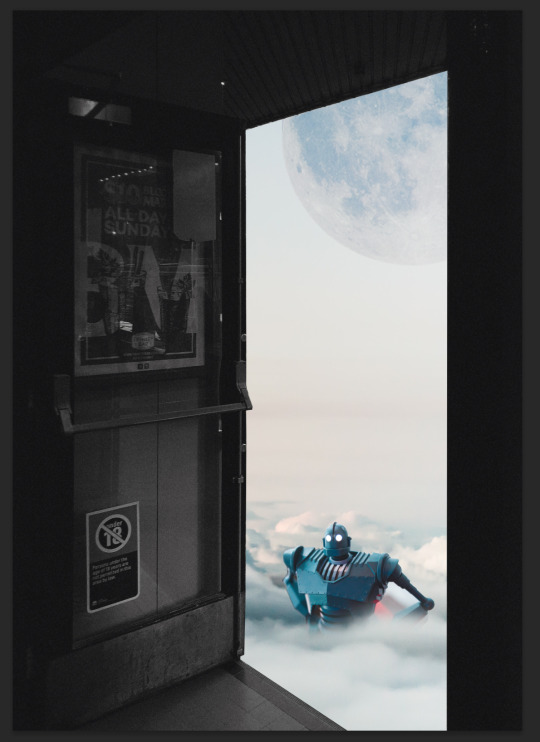
After looking at the image, I felt that the sky looked too bright. As the moon has a lowered opacity, there was no need to adjust the darkness of the moon as the sky would show through. To darken the sky, I made a Brightness/Contrast layer above the sky and dragged down the brightness slightly.
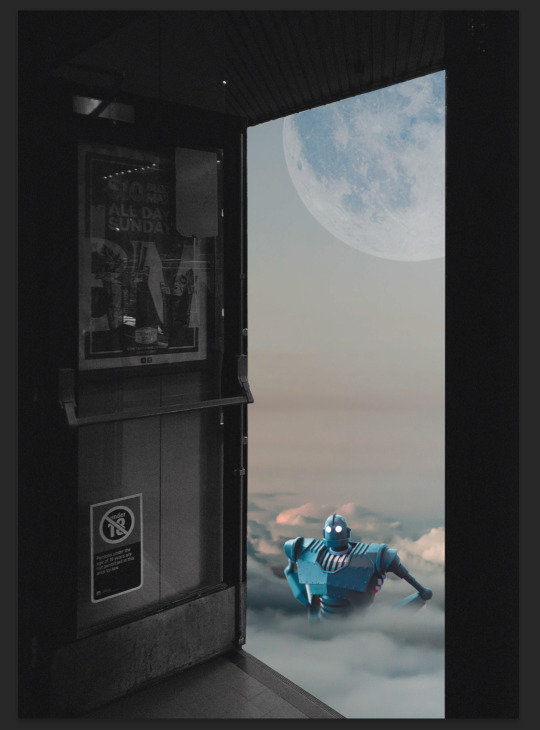
The next step was to try and make the toy robot look like it fit into the image better. I did this by by using the Camera Raw window in the Effects drop down. This allows you to edit the values of the photo. For the robot, I increased the black and shadows, and I decreased the highlights. This gave me the darkened outcome you see below.

However, after making the robot darker, I felt the whole image could do with being darker. However, I didn’t want to decrease the whites in the cloud. To achieve this, I created a gradient using the Gradient Tool. This gradient was black with 100% opacity to 0% opacity. This produced the outcome you see below.

I moved the gradient down slightly and removed the moon because I didn’t feel it added much to the design. I also slightly lowered the opacity of the gradient as I felt it was too dark at the top.

To match the black of the gradient, I went onto the Brightness/Contrast and increased the contrast of the sky.

For this step, it was as easy as going in and creating some red ellipses over the eyes. Once I had lined them up correctly, I selected them both by holding SHIFT and clicking the other eye. I then pressed CTRL+E which merged them together into one rasterized layer.
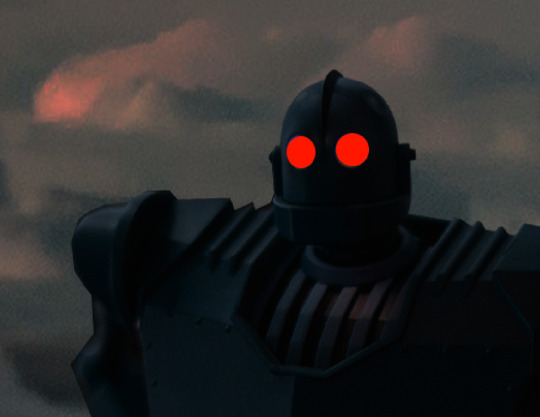
To create the glowing red eyes, I selected my rasterized layer with both eyes and right clicked it in the layers panel. I then pressed Blending Options and went to Outer Glow. Here is where I was able to change the glow colour to red and increase the spread to make it more obvious they are glowing.
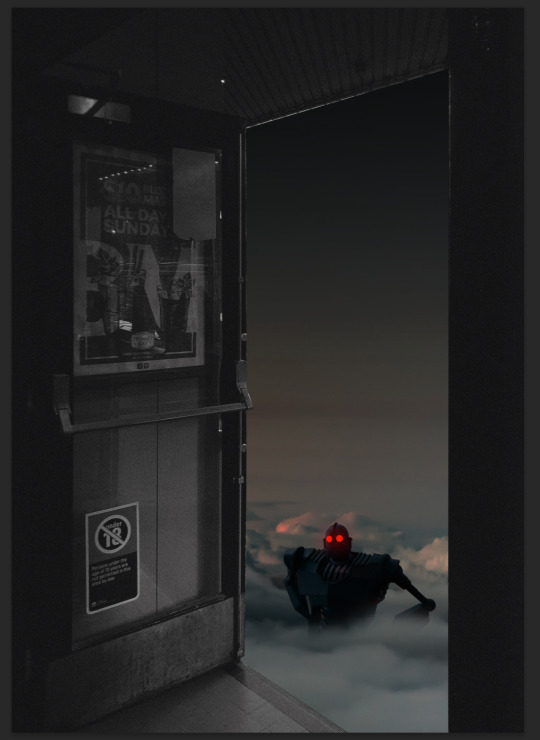
Using CTRL+SHIFT+P I brought an image of a starry sky. Because it was a landscape image, I scaled and placed the image in the way I thought was best suited to the layout of the design.

For this step, I cut off the bottom of the image using the Polygonal Lasso tool. This is the part of the image that contained the silhouette of trees. I then desaturated the image by pressing CTRL+SHIFT+U. To stop the stars going over the doorway, I brought the layer down to the one above the sky.

I also applied a clipping mask using the Polygonal Lasso tool. I selected around the clouds I didn’t want to be covered by stars and selected around the door way. With this selection active, I pressed on the star layer and clicked the clipping mask icon in layers whilst holding ALT. This produced what you see below.

To make sure the sky blended with the stars, I set the star layer blending mode to multiply. Then I clipping masked the stars to the black gradient by dragging the stars to the layer above the gradient. Whilst holding ALT, I hovered over the bottom of star layer and left clicked when an arrow appeared. This applied the gradient’s opacity to the stars.
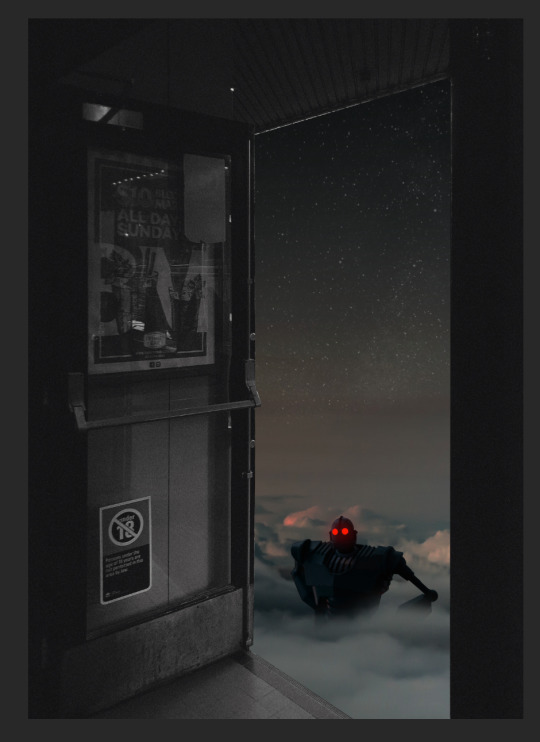
After the stars had been added, I took a look at the overall aesthetic of the image and decided the overall appearance was too cluttered. I therefore decided to hide the starry sky layer after all.

I also came to the conclusion I didn’t like the doorway either. I also hid this layer which left what you see below. Despite putting so much work into other elements of the design, I felt that less is more in this case.

The final step of my design was to add the moon back in. I scaled it up and placed it in the top left of the design. However, I felt it was too prominent in previous versions so decided to lower the opacity and apply a Gaussian Blur. I am very happy with the final product of my collage.

0 notes
Last Seen Blogs

unlikelybananaoafpony
Untitled
printgame-blog
Print Game - "the gamer number 2" :-)

janerosas
Jane
janerosas
Jane

girlsonshape
Girls On Shape