#1080p60
Text
MAMA LEI NON MORDE BABY CA DEATH STRANDING DC #Deathstrandingdirectorscut #samporterbridges #mama
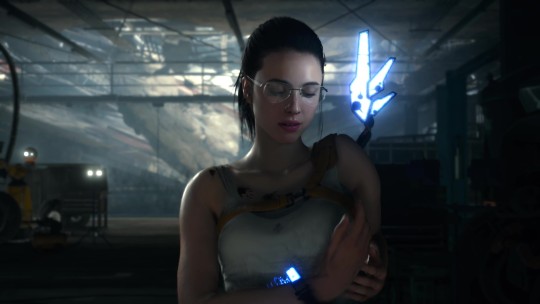
#shortgame#Deathstrandingdirectorscut#samporterbridges#mama#babyca#deathstranding#ps5#ps5share#shortsyoutube#shortsvideo#youtubeshorts#youtubegaming#XBOX SERIES X#PS5#XBOX ONE#PS4#SWITCH#PC GAMES#PC GAMING#DEATH STRANDING DIRECTOR'S CUT#PS5Share#DEATH STRANDING#1080P60#BRIDGES#easter egg#Metal gear solid#PS5share#DEATH STRANDING™ DIRECTOR'S CUT#GAMEPLAY#Fastcry
0 notes
Text
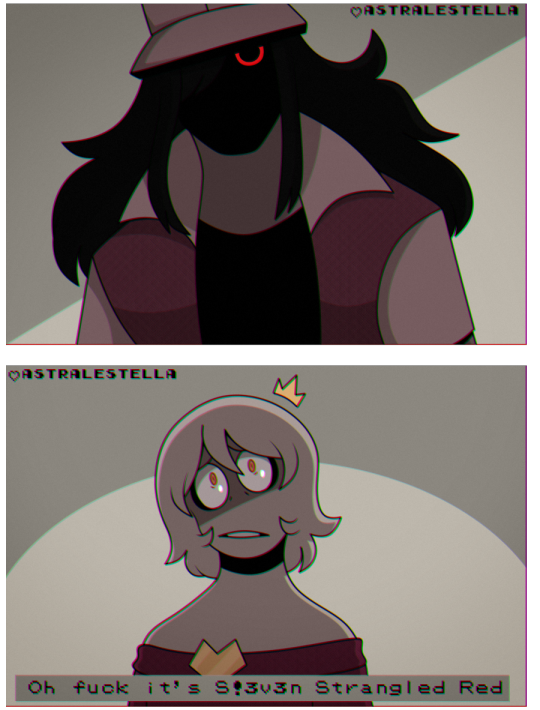
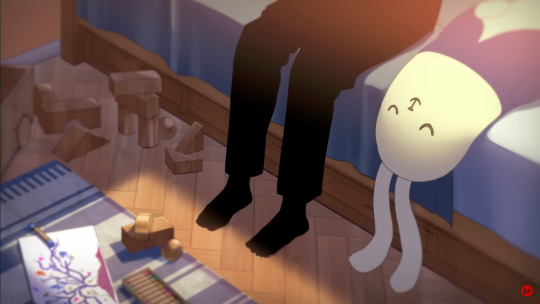
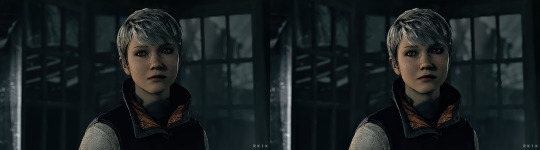
Posting this one by itself 'cause the difference between the doodle I made while I had a fever & the final thing is so funny to me
The original doodle btw↓↓↓
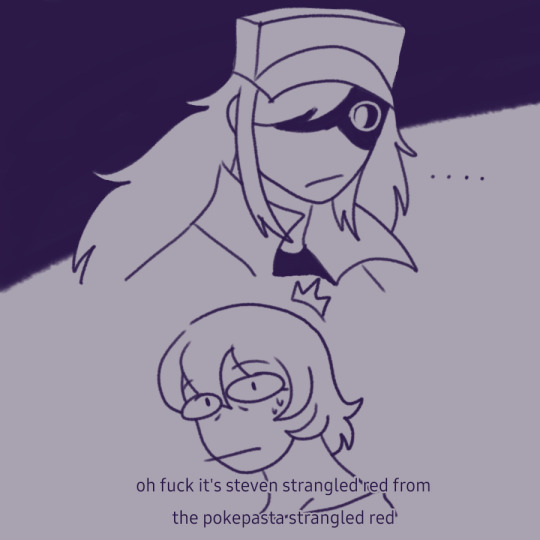
#strangled red#steven strangled red#pokepasta#hypno's lullaby#fnf#friday night funkin#steven stoughton#s!3v3n#Yomiel (sona)#self insert#my art#360p vs 1080p60 lookin mf. AHAHAHAHJDSFJ#PLEASEEEE ITS SO SILLY&DUMB LOOKIN#modern remakes of 90s games be like:#this is romance btw. it might not look like it but this is. romance#its like. in a cliche vampire encounter kinda way. in a (chuckles) i'm in danger kinda deal#oh wait vampire... that reminds me... the au....#aerhm🧍♂️ Anyway 🚶♂️#why did i make him so big... big man im fghhhngmgmgfhjmg
49 notes
·
View notes
Photo

changbin | music bank 230609
#seo changbin#changbin#madebystay#s class#music bank#dreamytag#heyale#/////#uh yeah these gifs dont match at all and i dont like them#i think its bc the top ones were from a lower down angle#also idk why the bottom one is so crunchy when its 1080p60 but ... ig thats what happens compared to 4k#anyway yeah#val's gifs#binkie
44 notes
·
View notes
Text
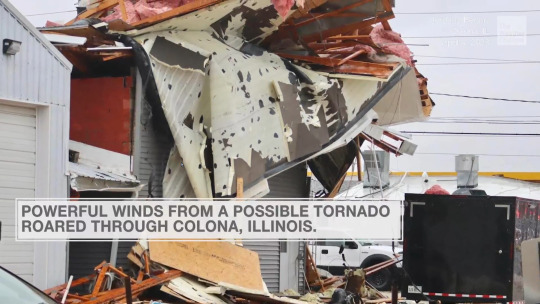
"possible" tornado
#the next text box in the video says the winds were up to 90mph. Buddy non-tornadic 90mph winds do not do that#the entire southeastern united states would be genuinely uninhabitable if a category 1 hurricane (90mph winds) did THIS kind of damage#absolutely ridiculous that they say “possible” tornado i'm assuming only because it wasn't officially spotted or radar-confirmed#it's like looking at an apple and saying “i can't confirm if that's an apple without genetic testing first. might not be an apple”#oh oh it's actually the exact same as how journalists use the word “alleged” even when there's 1080p60 video proof of the crime#id in alt#weather
2 notes
·
View notes
Note
just got caught up on mha manga and im thinking abt signing afo up for pitching lessons🙂no reason he should’ve missed endeavor’s lungs. also even more insight on dabi’s backstory just made me even MORE mad at endeavor
MISSED ENDEAVORS LUNGS LMFAOOOO it's the battle of the abusers...patiently waiting for touya to kill his good ol father <3
6 notes
·
View notes
Note
Hi yes hello kite i just wanted to tell you that the tags you wrote on that one trump post are mcfucking bonkers and words cannot explain how much I want them to happen thank you have a nice day
on one hand i feel like i'm trivialising the subject of terrible people and what could possibly even be done to bring them to justice but on the other hand i really want musk's deathstravaganza to be streamed live to us
#those attending will get to enjoy roasted pigs and hors douvres or whatever#the masses will get a nice 1080p60 stream conveniently accessible from the twitter front page with multiple viewing angles#to watch from the comfort of home or on the go#we won't get to drink his blood but maybe someone could sell keychains...#ask answer#anon
1 note
·
View note
Note
when was the last time you played bloobdorne?
Probs like, 2 yrs ago, judging from the dust my PS4 has accumulated on the shelf. I wanna play it at 60fps which I assume u can do on a ps5, but, yknow, money
0 notes
Text
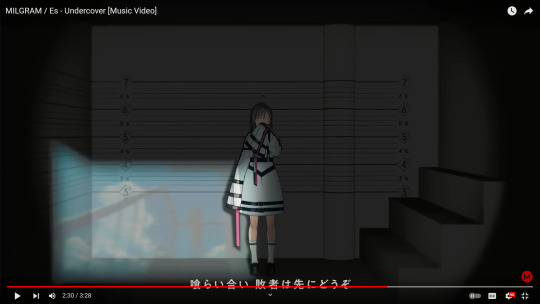
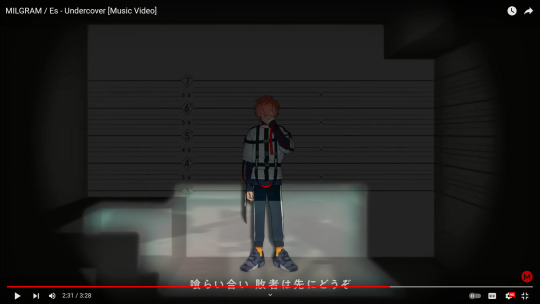
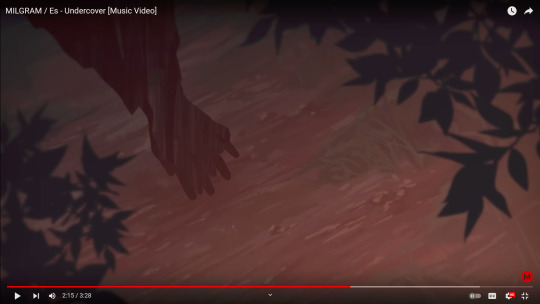
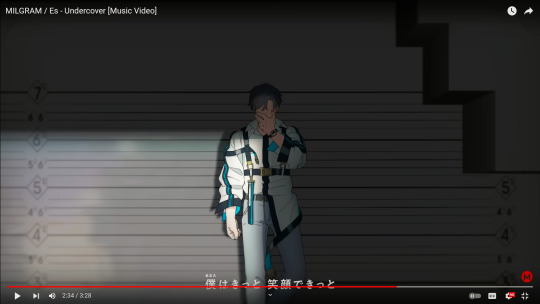
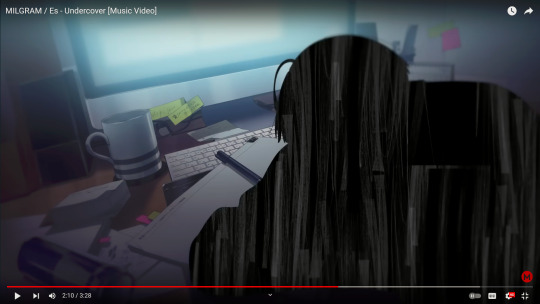
Those images in Undercover
Okay someone stop me if yall know this already but. i did see someone wondering about it (in relation to another, cooler theory). Those still images in Undercover
these. ive seen people trying to match the stills to each prisoner (i believe ive seen several folks attribute this one to haruka)
i haven't quite cracked the code on it but i found something while rewatching undercover in 1080p60 as one does
see this?

reflected in the quick shots of the prisoners is part of the still image (with haruka here it is the same as what i have copied up above, seeming to confirm that this still belongs to him)
this is going to get long due to the images but let's try and spot the matches
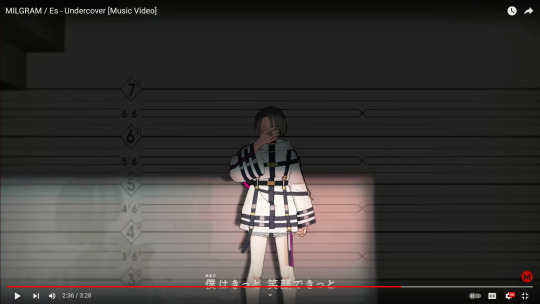
Yuno's is also fairly evident already- it's this shot of a girl on a balcony

fuuta's is a little harder, but between existing speculation and what i'm pretty sure are hands in this image im going to call it this still
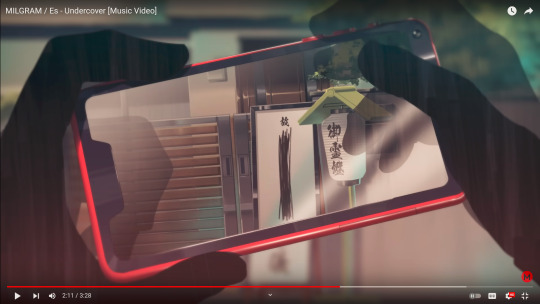

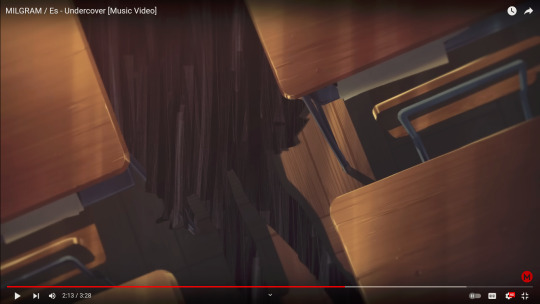
muu's also seems clear- pretty sure those are desks in the reflection and only one still has multiple desks

shidou's is hard because this bastard (affectionate) has his reflection all on the white background but i think i see some kind of pen or scalpel (something with a long and narrow handle) and that seems to match

...this one. which is also the most terrifying one so far, thanks shidou i hate it.
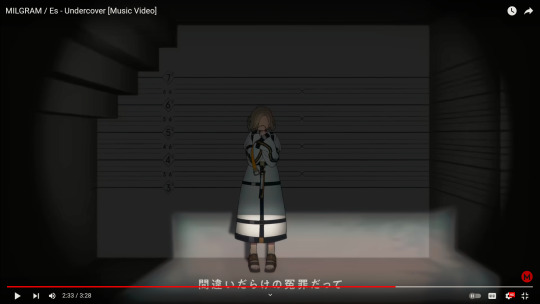
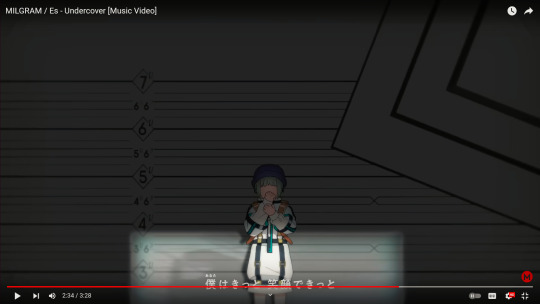
never mind shidou being hard to determine my sweet daughter mahiru is completely incomprehensible (which is also how i feel about her normally). the only thing i think i see is a somewhat spiky shadow in the corner. she's maybe this one?
but i'll be real I just picked it because of the folded hands seeming like a Mahiru Thing (and as you'll see, process of elimination)
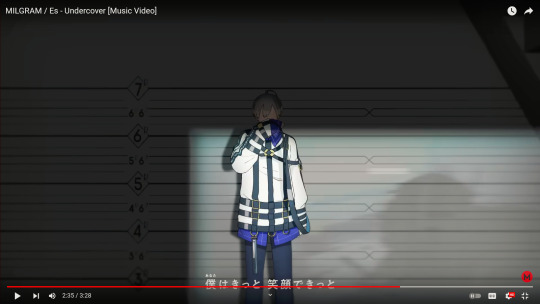
kazui is also hiding from us but i can see a color pattern in the reflection which makes me think

see? same dark bluish-purple on top and orange shade on the bottom.
amane's is hard because she is so tiny and her reflection is sized accordingly but i do think that's a hand at least which should help

that looks like a hand curled in approximately the same manner
that just leaves kotoko and mikoto which. i'll be real. theyre pretty obvious bc of their haircuts but i'll include them anyway.
wow i wonder who this is surely not the office worker with fluffy hair
also yikes mikoto is overworked someone save that boy (not you orekoto i love you but its not working)
again, the sharp bob(?) makes it pretty obvious. also pretty. kotoko i want your style

if you stayed here this long conga rats. also give amane and shidou hugs for their terrifying still images
#milgram#milgram theory#milgram analysis#milgram undercover#milgram meta#im gonna feel so dumb if someone has done this already
43 notes
·
View notes
Photo
allelitewrestlings’ gifmaking tutorial #1
hey there! this is a brief tutorial with technical tips for making wrestling/aew gifs. i won’t go through the basics of gifmaking, so some photoshop knowledge is expected. i hope this will help any new gifmakers in the wrestling fandom, or anyone who is interested 😊
tutorial content:
choosing the footage
gif dimensions
duplicated frames
sharpening and timing
colouring*
the full tutorial is under the cut! enjoy!
intro. as i mentioned, this is a very basic, very simple tutorial that goes through issues i have encountered since i first started giffing wrestling stuff. keep in mind that i am by no means an expert, and there must be better/easier ways of doing the things i do, but these are my methods.
*note: i will not be talking in-detail about how to colour aew gifs because it’d take most of the tutorial. but if anyone’s interested about a veeery basic colouring tutorial that focuses on aew, let me know 😊
1. choosing the footage
when it comes to making gifs, the rule of thumb is to always choose 1080p footage or higher. this makes your gifs look more hd. when it comes to wrestling/aew (in my personal experience) even 1080p can look pretty terrible sometimes.
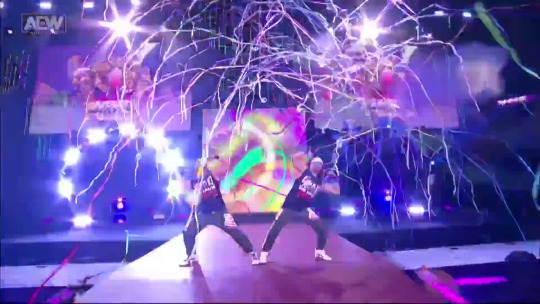
this is a screencap from a young bucks entrance. you can see how even when the video “is 1080p”, the image looks super pixelated and blurry. to me that’s a no can do, sorry young bucks. i often try to go for clear frames, but it’s a challenge when it comes to aew 😅 (unless it’s close-ups or backstage segments).
once you have your footage and once you’re exporting your video to frames on photoshop, remember not to limit the frames (unless you’re working with 1080p60, in which it’s totally fine to limit 2 frames if you don’t want your gif to look too “smooth”).
for the purpose of this tutorial, i will be working with backstage segments.
2. gif dimensions
now that you have your footage, you have to decide what kind of layout you’ll be working with. most set layouts consist of one, two, or three columns. depending on the layout you choose, the width of your gif will be different (the height can be whatever you want, just remember to keep the proportions). as of 2022 the tumblr width dimensions are as follow:


i usually crop my gifs using the crop tool (but there are other methods for sizing your gifs). this time i’ll be making a 540x450 one column gif
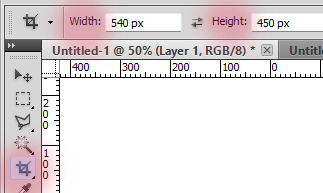

personally, i never fully select the bottom 3-4 pixels because (for some reason?) you’ll find a black line at the bottom of aew footage like 80% of the time. but feel free to crop the gif as you please! there are other ways of cropping and sizing your gif, this is just one :)
3. sharpening and timing
once you have your gif cropped, it’s time for sharpening. it’s important not to skip this step! i’d say that sharpening is as important as selecting the correct width/colouring your gif. there are many ways to sharpen your gif and it all depends on whether you work with timeline/smart object or you choose to sharpen each frame individually. both of these can be achieved through actions or manually. personally, i prefer actions. there are many great action packs available here on tumblr for free! they’ll make your life easier. one of my favourite action packs is @anyataylorjoy’s action pack #1. this action pack has two different sharpening actions and they’re both quite useful (and look good on my dated photoshop), but what i love the most is the save action.
this is when we need to talk about timing. i’ve been making gifs for a while, and it took me a long time to realise that 95% of the time, the correct timing for gifs is 0.05. the issue here is that when you save your gif and you’re still working with it as timeline/smart object, 0.05 is converted to 0.07, so it slows the gif down. sometimes it doesn’t seem like a big deal, but fixing the timing makes a huuuuge difference in what your gif will end up looking like. by using the save action, your work will automatically be converted back into frames and the timing will be fixed.
let’s look at examples.
this is what happens if you change the speed to 0.05 before converting the frames to timeline/smart object to sharpen it. (when you save it, the gif will automatically be 0.07. we don’t want this).
what we want is to convert the timeline back into frames and change the speed to 0.05 (so you can use the save option for this and save yourself some time!). after that, your gif will move way smoother/better:

4. duplicate frames
i didn’t know whether to talk about duplicates or sharpening first, but i decided to leave this for last. something that no one told me/i didn’t really notice when i started making gifs is that there can be a lot of duplicates in the footage you’re working with. if duplicate frames don’t bother you, you can just ignore this bit! it’s mostly a preference.
so, with aew/wrestling footage, you’ll mostly encounter duplicate frames in two occasions:
- backstage segments: this is the most common way of finding duplicate frames, and 98% of the time it’s a 1 in 5 duplicate frame. i usually fix this manually, but i know that avisynth has a very fast, very effective way of removing these duplicate frames. (i found this avisynth tutorial if anyone’s interested!). so, these kind of duplicates will show once every 5 frames. i’ve...memorised? by now that if the 1 and 2 frames are duplicated, then the 6 and 7 will be. so i manually delete every frame that ends with 1 and 6 (or 2-7, 3-8, 4-9, 0-5). it’s... complicated to explain haha.
most of the backstage segments and slow-motion videos found in, for example, all the roads to and countdowns to are likely to have 1-in-5 duplicates. “hey ew”, and those kinds of videos also have duplicates. as an example, let’s take a look at these:
this is a gif with 1-in-5 duplicates (which has been sharpened, and its speed is 0.05).
and now this is what the same gif looks like once you fix the issue with the duplicates.

- screen recording:
now when it comes to screen recording, it’s very likely that you’ll have duplicate frames. in my experience, unless you’ve just turned your computer on and you don’t have too many tabs/apps open, you’ll find random duplicates throughout the footage you’re working with. sometimes screen recording can also lead to skipping frames, so keep that in mind. to know whether or not your screen recorded footage has duplicates, it’ll look something like this even after you’ve sharpened it and fixed the timing:

the only way (that i’m aware of?) that you can deal with this if you’re using screen recordings is to manually delete the frames. that is, go one by one trying to spot duplicates and delete them. (yeah i’ve done it and yeah it’s a nightmare). so... my advice here is to try to download your footage whenever you can or try to screen record without having too many tabs/apps open 😅
5. colouring
the last step for me when i make gifs is deal with the colouring. some people prefer to do colouring before converting timeline to frames, but it’s just a preference (unless you’re making a gif that requires you to use timeline, etc). what’s important to know if you’re going to add your colouring when working with frames is that you have to always edit the layers on the first frame (so that the changes apply to the rest of the frames).
in-ring action is definitely a nightmare to colour because every shot will look different and aew does a very bad job when it comes to offering contrasted/colour balanced footage. as i mentioned earlier, i’m not gonna spend too much talking about colouring this time. if you struggle with your own colouring, we have shared a couple of psds in the past, which you can use as bases if you’re just getting started or if you find them useful! but there are a lot of good photoshop resources blogs where you can find brightening/base psds as well.
these are the two gifs i have been working with, now with a very basic colouring:
****
now the only thing you need to remember when saving is that your gifs need to be under 10mb! most of the time my saving settings are adaptive - pattern - bicubic sharper.
and... i think that’s all! 😊 hope this can help someone. and feel free to message us (or me @jonmoxleys) if there’s anything you’d like to ask.
#gif tutorial#resources#completeresources#wrestlingedit#aewedit#aew#ours: resources#ours: tutorials#*
373 notes
·
View notes
Text
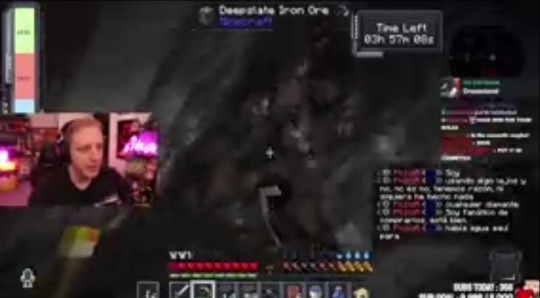
man i wish roier left his vods up permanently on twitch like cellbit so i could vodwatch with that perfect 1080p60 but no…….. youtube quality for screenshots;(
7 notes
·
View notes
Text
🎬Streamer Tech: OBS bitrate
OBS's default bitrate, 2500kbps, is unfit even for 720p. It is important to set this bitrate in accord with your resolution, framerate and upload speed.
⚠️please check this regularly (including right now) because OBS tends to reset this bitrate to 2500 on certain changes.
Twitch has a cap of 6000kbps
Youtube has an arbitrarily high cap
Here's some easy numbers:
9000 for 1080p60 (youtube only)
6000 for 1080p30, 1080p60 (twitch, low movement) 900p60 (twitch, high movement)
4500 for 720p60
3000 for 720p30
(twitch) If you're a mod/viewer and the stream you're watching is blocky, you can check for yourself if the streamer is streaming at an appropriate bitrate for their resolution/fps by clicking on the gear in the bottom right, then going to 'advanced' then turning on 'video stats'. Look at the 'playback bitrate'. Average it out since it can peak and dip significantly above and below the set bitrate.
Bitrates can be changed while live, unlike resolution or fps.

⚠️When informing a streamer about a mismatch in bitrate, use common courtesy! Streamers are often glad to hear about technical problems they can fix, like mismatched audio, but this is a little more niche so it might not click right away, and this might derail the stream.
Setting it up your bitrate:
(or else, thank you for your attention!)
I will be using OBS. Streamlabs is similar though the right buttons might be in different places. The theory is the same
Go to Settings, then to Output. It should look a little like this:

Or a bit more like this if you use advanced mode (be sure to stream in CBR):
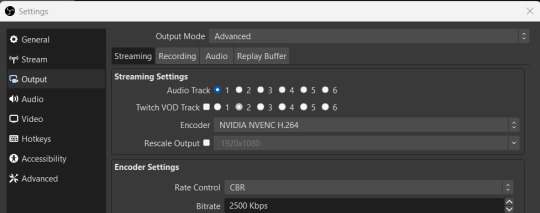
It's over here where you can see your current bitrate and change it to what's more fitting to your stream.
In the Video menu you can set the size and fps. It's the Output (Scaled) Resolution that determines the max resolution your stream will be on.

You would probably want to know what the max bitrate is you can stream at. On Twitch the maximum is 6000kbps, but in reality your internet might lower this maximum even more.
To find your maximum speed, you can use Speedtest. It's the upload speed that's important here. The results will likely be in mbps rather than kbps so to get the proper result for OBS, multiply your number by 1000. Then you want some overhead so your connection isn't strained. This can cause disconnections and lag that builds up during the stream. A rule of thumb is to not put your bitrate above 80% of your max upload speed.
Or in short, take the speedtest upload mbps and multiply this by 800 for your stream bitrate.
If you currently stream through wifi, try going wired instead. It greatly increases stability and somewhat to greatly increases speed.
I hope this was helpful! Stay tuned for more Streamer Tech blogs!
86 notes
·
View notes
Video
youtube
Casiopea - Space Road (Live at Yomiuri Land East '84) [1080p60 Upscale] ...
21 notes
·
View notes
Text
After years of playing on low settings I can finally watch my Skyrim character getting impregnated at 1080p60 Ultra
3 notes
·
View notes
Text
Ah, yes, watching streams on 1080p60 with my beloved Internet provider is definitely possible and my favourite thing to do
16 notes
·
View notes
Text
okay! this took a bit to type out, but here we are!
disclaimer: my way might not work for you and that’s okay! there’s no right or wrong to make gifs, so long as you enjoy the way you make them then that’s all that counts. this is only a detailed look into my own personal process and things i’ve learned along the way. i'm also an idiot who sometimes doesn't know what he's talking about, so if something doesn't make sense let me know so i can fix it!
but these are some of the things i'll be going into a little more detail than before:
tools
importing & converting to smart object
smart filters
coloring (lighting, basic, and gradient)
exporting
tools
there are a few things i use in the process, some new and some old. whether you want to use them is entirely optional, given that it can be a lot to take in at once.
photoshop 2024
if you use an older version of photoshop, then i think the layout is similar to newer versions. though iirc some older versions don’t have the timeline function so you might have to look that up yourself since i’m not familiar with any ps version without it.
handbrake
i only use handbrake if the recorded video is super long. usually i try to record each scenery shot (4-8 seconds at a time) or an entire cutscene so i don’t have to use handbrake to trim the video. if i do, then i have the settings set to export as super hq with 60 fps, deselecting align a/v start and passthru common metadata. the rest i leave alone.
vapoursynth
this is really useful and makes coloring easier imo. you can download it from the official site, but i found a portable version (i have the 200722 one) for windows here. i’m not sure how to set it up for mac users, and, truthfully, to this day i still don’t know how to use it entirely. i just followed a tutorial i i found on youtube and only changed the amount for the denoise filter and turned off the sharpen filter since i do that in photoshop itself. so it’s trial and error, and i’m erroring a lot sometimes ajdkjasvjdas. it’s also where i crop the video to my preferred dimensions, unless you choose to crop in ps.
jsfiddle code playground
if you want to have the text in the tumblr post be a gradient, then type whatever you want in the first box on the bottom right, change the color from red to your starting color of choice, then the same of the green for the ending color. hit run, copy the code, and paste it inside the text post while in html mode. ngl, i stared at the site for like ten minutes before i figured out how to use it asjdjasdasd
nvidia shadowplay
i use shadowplay since it comes with my laptop’s gpu, set to record in 1080p60. i’ve seen other giffers use obs for recording, but i don’t have any experience with it. there are scenepacks and gameplay walkthroughs on many sites, which you can use as long as you have the uploaders permission and credit them as they ask! please don't steal their videos!
reshade
i’ve started using reshade recently to tone out the blue tint of the game and sharpen it up a bit more. it makes a big difference and helps with coloring if you start out with near neutral colors.
the effects i use are:
• deband
• clarity
• sharpcontrast
• emphasize
• amd fidelityfx contrast adaptive sharpening
• fxaa
• prod_80_04_colorisolation
• adaptivetonemapper
i'm pretty sure some of these are redundant, but i’m too lazy to go back and see which ones i don’t need lol. but it’s all personally preference with how you want the game to look, and there are many effects to choose from.
importing & converting to smart object:
my preferred method is the video frames to layers, which is: file > import > video frames to layers, and then select the video. if you use vapoursynth, then there might be duplicates frames (or at least there are for me) so when the popup window appears i check the box to limit the frames to how ever many duplicates there are of each frame. usually in my case, it’s three.
after the video has been imported, i select all frames in the timeline and change the frame delay to either 0.03-0.04 depending on how fast or slow i want the gif to be. for converting to smart object, i recorded my own action set to save time by clicking on a couple of buttons, but the process is: select all layers currently > convert frame animation > convert to smart object.
let me know if you want the action set! it saves a lot of time in the process
smart filters
i don't think sharpening before or after coloring matters, but definitely do not sharpen before cropping if you haven't done already.
vapoursynth combined with the in game reshade sharpening effects doesn’t require as much sharpening as i normally use. just note that it varies from scene to scene, and whatever you're giffing. these are just the settings i used for the pirates’ cove set.:
smart sharpen #1: 500% with a radius of 0.2 px
smart sharpen #2: 10% and 10 px radius
gaussian blur: 0.7 px at 30% opacity
add noise: 1% uniform at 30% opacity
on to the coloring, which i'm breaking this up into three sections: lighting, basic coloring, and gradient coloring, with a brief description and the result after each section.
something to note is that all coloring is personal preference, and how you want your gifs to look. if you're just starting your giffing journey, here's a site i bookmarked that explains pretty well the adjustment layers and what they do if you have questions for how they work. but i'd be more than happy to answer any that you guys have!
lighting:
brightness/contrast:
with this, i’ve found that changing the blending mode to screen brightens it up well enough without having to move any on the sliders. if it’s too bright, then lowering the opacity should do the trick.
curves:
before, i used the white and black point with the eyedropper tool, but now i’ve started using the auto function that can be found in the four horizontal bars in the top right of the adjustment properties. i choose the find dark & light colors options and check the enhance brightness and contrast box. if it’s too bright or tinted too much one color, then i fiddle with the rgb curves individually to get it as neutral as i can.
levels:
with levels there’s not much to adjust other than moving the sliders for the shadows and midtones to give it a little more contrast.
basic coloring:
selective color #1:
for the first selective color set to absolute, i use it for the white/black colors to make them as white and black as possible. increasing the black can make it too dark, so i limit the increase by two or three. sometimes i change neutral if it needs it, after all the coloring is done if it still looks too much of one color that the other adjustment layers can’t fix. i don’t know exactly what the difference is between absolute and relative is, i just remember it being part of a tutorial i read and have been doing it ever since.
color balance:
i only change this as minimally as possible, usually one for cyan, one for magenta, and one for blue for all tones. sometimes i increase it more, but it all depends on how you want it.
selective color #2:
the last selective color i use it for all the other colors, set to relative, usually for reds, yellows, and blues. if there are people in the gif, then i focus mostly on skin tones, bringing out reds and yellows to make it look as natural as possible. a hue/saturation layer can be useful to even out darker skin tones by lowering the saturation for red or yellow.
with scenery, i boost whatever dominate color pops up while lowering the other colors by adding in a lot of white if the lighting is bright, or adding black for dim scenes. again, if it needs it, adding in an optional hue/saturation layer, but this time to lower the saturation for less prominent colors.
gradient coloring:
if you’re satisfied with the coloring of your gif, then this step can be skipped!
i’ve recently fallen in love with using gradient fills. there are several preset gradients available, but if you search around online there are other gradients available to download and use. or you can make your own gradient of your colors of choice.
for me, i often use blue/pink or blue/purple gradient fills. the blue/pink preset is the one i used in this case.
gradient fill:
after adding the gradient fill and choosing the colors, i change the blending to soft light and lower the opacity anywhere from 30%-50%. with darker skin tones it might be tricky as it would involve more tweaking of the settings until it looks nice.
gradient map:
i follow it up with a gradient map to help with the sharpness (i think? i’ve forgotten exactly) set to soft light again with varying opacity given how dark the scene is.
vibrancy
this is completely optional here, but i like the colors cranked to the max, boosted to 80% or slightly lower. some minor adjustments might have to be made after this, usually with it being too red or possibly yellow.
exposure
the final adjustment layer to top it all off is exposure. i like my gifs to have a matte-ish look, so i change the offset anywhere from +0.0010 to +0.0030. if the gif is still a little on the dark side, increasing the exposure helps.
the gradient coloring takes the longest to get the colors to look good, but i love my colors so much and the end result is so worth it.

logo:
this is optional of course, but since there's quite a few people out there who love to steal gifs, it's probably a good idea to put your logo on the gif to help deter them. mine's simple and uses either the font code bold or moon. i have it saved as a png so that i can go to file > place embedded and resize it to my liking before moving it to the bottom right corner.
but for me those are too many steps to do for each gif, especially if i’ve been working on them for hours. so i open up an old psd with the same dimensions and duplicate the logo layer for each gif to save time.
exporting:
under file > save for web (legacy) the window for it should pop up. i don't usually mess around too much with the settings here, keeping it at selective diffusion and changing the matte to none.
sometimes the size will be too large for tumblr's limit since i like bright colors, and depending on how many frames are in each gif, most of them end up on the large side. i have to fight photoshop sometimes to make it work by either trimming a few frames or messing slighting with the lighting. occasionally i end up having to go back and reimport the videos to divide the frames equally if i don't want to trim any off. it’s a pain, and it’s something i should honestly try to plan out before that point lmao.
but if you're satisfied with how it looks, save, and you're good to post!
7 notes
·
View notes
Text
i just watched the ltt vid where they clear out some independent computer store and there linus is ragging on a a 1st/2nd gen i5 toughbook, a mac g4 cube, dvi cables, 3.5" bay multi card reader...and like everything there sounds amazing to me.
that toughbook is a cyberdeck waiting to happen, that mac is old enough to be entering retro era, i literally use dvi for my 2nd monitor and tbh they're one of my fave cables bc they adapt to vga easily and are roughly equivalent to early hdmi sans audio support. and i don't run anything above 1080p60.
surprised they didn't take emily bc she would probably lose her shit over half the stuff this store guy had laying around
9 notes
·
View notes
Last Seen Blogs

restorerjourney
Restorer DTS 2021

aethers-travels
Aether_the_traveler_games
weasleyandweasley
Weasley and Weasley

scrumptiouskittyfart
Sin título

cedprevost-blog
cedprevost