#7segment
Text
youtube
FPGA Project IDEA | Design VA meter with VHDL code [In Hindi]
Discover the endless possibilities that FPGA and VHDL unlock for electronic enthusiasts. Whether you're a student, hobbyist, or professional, this project idea serves as a gateway to exploring the capabilities of FPGA and VHDL, showcasing their potential to revolutionize your electronic design projects. Join us on this educational journey and bring your VA meter project to fruition!
Subscribe to "Learn And Grow Community"
YouTube : https://www.youtube.com/@LearnAndGrowCommunity
LinkedIn Group : https://linkedin.com/company/LearnAndGrowCommunity
Blog : https://LearnAndGrowCommunity.blogspot.com/
Facebook : https://www.facebook.com/JoinLearnAndGrowCommunity/
Twitter Handle : https://twitter.com/LNG_Community
DailyMotion : https://www.dailymotion.com/LearnAndGrowCommunity
Instagram Handle : https://www.instagram.com/LearnAndGrowCommunity/
Follow #LearnAndGrowCommunity
#VHDLProjectIdea#VoltAmpereMeterDesign#FPGAIntegration#VHDLProgramming#DigitalDesign#ElectronicsProject#VHDLproject#FPGA#fpgadesign#Verilog#VerilogHDL#fpgaprogramming#learnandgrow#learnandgrowcommunity#hdlsimulation#synthesis#engineeringprojects#finalyearprojects#finalyearprojectideas#7segment#7segmentdisplay#diyelectronics#LearnFPGA#VAMeter#CodeWithFPGA#FPGATutorial#Youtube
1 note
·
View note
Text
Arduino Lektion 62: 7 Segmentanzeige
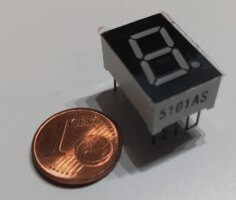
Die 7 Segmentanzeige, gibt es bequem als Modul oder einzeln als Bauteil.
7 Segmentanzeige am MakerUNO
Möchte man die 7 Segmentanzeige einzeln, als Bauteil am Arduino betreiben so benötigt man
- 9 Kabel
- 2x 220 Ohm Widerstände
und natürlich einen Mikrocontroller, ich verwende den MakerUNO welcher baugleich mit dem Arduino UNO ist.
Bezug
Die 7 Segmentanzeige kann für ca. 1,8 € bei ebay.de bezogen werden. Es gibt die Anzeigen in der Farbe, rot, blau, weiß und grün.
Des Weiteren sind die Anzeigen auch erhältlich mit gemeinsamer Anode und gemeinsamer Kathode hier muss man aufpassen denn in dem einen Fall muss GND an die PINs 3 und 8 angeschlossen werden und in dem anderen Fall VCC.
Technische Daten der 7 Segmentanzeige
- Abmaße
- Länge - 2 cm
- Breite - 1,35 cm
- Höhe
- inkl. Pins - 1,4 cm
- exkl. Pins - 0,8 cm
Anschluss & Schaltung
In der nachfolgenden Schaltung verwende ich eine 7 Segmentanzeige mit gemeinsamer Kathode, d.h. wenn du eine mit gemeinsamer Anode verwendest musst du hier statt GND, VCC anschließen!
Die 7 Segmentanzeige verfügt über 10 Pins, 8 sind für die Datenleitungen und 2 für GND.

7Segmentanzeige Pinout
7 Segmentanzeige
MakerUNO
10
digitaler Pin D8
9
digitaler Pin D7
8
220 Ohm -> GND
7
digitaler Pin D2
6
digitaler Pin D3
5
digitaler Pin D9
4
digitaler Pin D4
3
220 Ohm -> GND
2
digitaler Pin D5
1
digitaler Pin D6
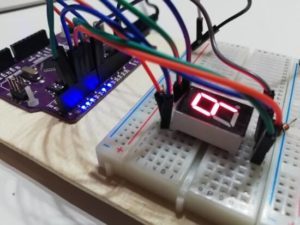
Schaltung am MakerUNO
Wenn die 7 Segmentanzeige wie oben in der Tabelle angeschlossen wurde, dann sollte die Schaltung wie folgt aussehen.

Schaltung 7 Segmentanzeige
Quellcode
In dem folgenden Beispiel möchte ich nun die Zahlen von 0 bis 9 anzeigen.
Es können neben Zahlen natürlich auch Buchstaben angezeigt werden dazu müssen dann die entsprechenden LEDs an bzw. ausgeschaltet werden.
//Array mit den Pins.
const int PINS = {8, 7, 2, 3, 9, 4, 5, 6};
//Wert für die Pause, welcher der Sketch einlegt,
//wenn die Zahlen von 0 bis 9 angezeigt wurden.
const int PAUSE = 4000;
//Array mit den Möglichen Zahlen und Buchstaben welche auf
//der 7 Segmentanzeige angezeigt werden können.
byte segDigits = {
{ 1,1,1,1,1,1,0 }, // = 0
{ 0,1,1,0,0,0,0 }, // = 1
{ 1,1,0,1,1,0,1 }, // = 2
{ 1,1,1,1,0,0,1 }, // = 3
{ 0,1,1,0,0,1,1 }, // = 4
{ 1,0,1,1,0,1,1 }, // = 5
{ 1,0,1,1,1,1,1 }, // = 6
{ 1,1,1,0,0,0,0 }, // = 7
{ 1,1,1,1,1,1,1 }, // = 8
{ 1,1,1,0,0,1,1 }, // = 9
{ 1,1,1,0,1,1,1 }, // = A
{ 1,0,0,1,1,1,0 }, // = C
{ 1,0,0,1,1,1,1 }, // = E
{ 1,0,0,0,1,1,1 }, // = F
{ 0,1,1,0,1,1,1 }, // = H
{ 0,0,0,1,1,1,0 }, // = L
{ 1,1,0,0,1,1,1 }, // = P
{ 0,1,1,1,1,1,0 }, // = U
{ 0,0,1,1,1,1,1 }, // = b
{ 0,1,1,1,1,0,1 }, // = d
{ 0,0,0,1,1,0,1 } // = c
};
void setup() {
//Die Pins der LEDs als Ausgänge definieren.
for(int i=0;i
Read the full article
1 note
·
View note
Text
Imranics TX108 5.1 DTS & PROLOGIC DECODER with HDMI Arc
Full function remote kit with 4 digits 7segment digital display. DIGITAL PCM & AUX analog audio signals are converted into 5.1 pro-logic effects into MUSIC, MOVIE, and PRO-LOGIC II. DTS & DOLBY audio signals are passthrough with original audio quality. Remote + rotary encoder for user control and settings. Volume up/down functions for individual volume trim and master volume.
Master volume…

View On WordPress
0 notes
Photo

Step 2 New project on the table, 160 x 60 cm 64 x 24 inch huge digital clock. Tomorrow I will start working on the body and the frame. It will be using RGB LEDs... #rgb #led #arduino #coding #rtc #nano #digital #7segment #seven_segments #stereofoam #black_painting #isolation #coating https://www.instagram.com/p/Bzqvy95pWCW/?igshid=17ynoaid7ruir
#rgb#led#arduino#coding#rtc#nano#digital#7segment#seven_segments#stereofoam#black_painting#isolation#coating
0 notes
Video
undefined
tumblr
Siemens DL-330
.11 INCH 3 DIGIT
RED 7 SEGMENT MAGNIFIED MONOLITHIC NUMERIC DISPLAY
For more details visit www.adatronix.com
0 notes
Text
Pls look...Today our Thailand client was installing our #gaspricesign for #caltex #gasstation⛽️ double sided outdoor IP65 front side 5lines & back side 5 lines back to back install synchronized display in 10inch Red /Green color 88.88 display format ! Excellent job !!!
#gaspricesign#gasstation⛽️#petrolpricedisplay#gasolineras#7segments#gaspricechanger#fillingstation#digitalclock#leds#segment#caltex#fillinggasstation#gaspump#gas station#gas prices#greenhouse gas emissions#petrolstation#petroliana#petroleum#petrobras#led signs#signboard#parking sign#signagecompamy#signages#pylones#pylon sign#electricity pylon#pylons#totemcompany
0 notes
Text
Visitor counter circuit using IC 4026 & 7-segment display
Hello Engineers. At places like small gatherings or meeting halls, small conferences, and classrooms its good to employ a visitor counter. This counter will count the visitor number of persons entered in the room or hall. The circuit explained in this tutorial today, is using two CD4026 ICs with two 7-segment LED display. This Digital visitor counter circuit can go up to 99 counts. As soon as a person enters the room, the counter value increments by 1. So, let's start with our topic Digital visitor counter circuit.
7- Segment LED Display
A 7-segment display module is an electronic device to display letters, digits, and numbers. These are the modules that are mostly used in devices such as electric meters, voltage stabilizers, test instruments, etc. Instead of the complex dot matrix displays, they are better and easier. They have separate seven segments that help to make a letter or number. Read more.. Demonstration picture on how it works.

Read the full article
0 notes
Photo

I'm building a thing for my son using a #microchip #pic16f, a rotary #encoder and a #7segments #led #display. There is also a #lipo #cell, a step-up module, a charging module and a little #amplifier made with an LM386. What is this? See on my #youtube channel: follow the link in the bio . . . . . . . . . . . . #embeddedelectronics #electronics #microcontroller #project #mcu #noarduino #arduino #diy #electronicprojects #developer #coder #programmer #engineering #circuit #Sound https://www.instagram.com/p/B8yJcUWoYLp/?igshid=5qavr58ixd7g
#microchip#pic16f#encoder#7segments#led#display#lipo#cell#amplifier#youtube#embeddedelectronics#electronics#microcontroller#project#mcu#noarduino#arduino#diy#electronicprojects#developer#coder#programmer#engineering#circuit#sound
0 notes
Photo

Little Hex Tricks Make Little Displays a Little Easier #7Segment #BitTwiddling #bit-manipulation #C++ https://t.co/1gmrTKL7EL http://twitter.com/iandroideu1/status/1220979749381558272
Little Hex Tricks Make Little Displays a Little Easier #7Segment #BitTwiddling #bit-manipulation #C++ https://t.co/1gmrTKL7EL
— iAndroid.eu (@iandroideu1) January 25, 2020
0 notes
Photo
🔰 صنایع مهندسی داتام ویرا 🔰
فروشگاه تخصصی برق ، کامپیوتر و رباتیک
🔆 دسته بندی محصولات 👇
✔ انواع رنج خازن ، مقاومت ، سلف ، دیود
✔ انواع IC های TTL و CMOS
✔ انواع رله
✔ انواع ترایاک ، تریستور ، دیاک
✔ انواع میکروفن و اسپیکر
✔ انواع هیت سینک
✔ انواع کریستال
✔ انواع کلید و سوئیچ
✔ انواع فیوز
✔ انواع نمایشگر کاراکتر ، گرافیک ، TFT
✔ انواع بردبورد و ویروبورد
✔ انواع سنسور ها و ماژول ها
✔ انواع بورد ها و شیلد ها
✔ انواع بورد های امبدد و مجتمع
✔ انواع پروگرامر
✔ انواع کیت و پک آموزشی و کاربردی
✔ انواع میکروکنترلر و میکروپروسسور
✔ انواع IC های مبدل و درایور
✔ انواع فن و گارد
✔ انواع Dot Matrix ، 7Segment ، LED
✔ انواع سیم و کابل
✔ انواع باتری و Cell
✔ انواع پاور و تغذیه
✔ انواع سوکت ، کانکتور ، فیش
✔ انواع موتور و پمپ
✔ انواع سازه و شاسی
✔ انواع قطعات و تجهیزات رباتیک
✔ انواع CNC و پرینتر 3D
✔ انواع قطعات و تجهیزات کامپیوتر
✔ انواع ابزارآلات
✔ انواع تجهیزات مونتاژ و لحیم
✔ انواع اسپری و چسب
✔ انواع پیچ ، مهره ، اسپیسر
✔ انواع تجهیزات اندازه گیری
✔ انواع قطعات و تجهیزات تابلو LED
✔ انواع دوربین مداربسته و تجهیزات جانبی
✔ و ...
🛒 فروشگاه 👇
🌐 www.shop.datam-vira.com 🌐
💡 وبسایت فروشگاه به زودی راه اندازی می شود و در حال طراحی و بارگزاری محصولات با بیش از ۴۰۰۰ رنج متفاوت می باشد ، در صورت پیدا نکردن محصول مورد نظر و یا ناموجود بودن آن می توانید از راه های ارتباطی سفارش خود را ثبت نمایید
🌐 www.datam-vira.com 🌐
#داتام_ویرا#نمایشگر#شیلد#فن#باتری#ابزارآلات#پیچ#میکروکنترلر#رزبری#آردوینو#ماژول#بورد#رباتیک#الکترونیک#برق#مهندسی#صنایع#فروشگاه
1 note
·
View note
Text
youtube
[in Hindi] | How to Design a 7-Segment Display Decoder in VHDL : Learn from Basics
Subscribe to "Learn And Grow Community"
YouTube : https://www.youtube.com/@LearnAndGrowCommunity
LinkedIn Group : linkedin.com/company/LearnAndGrowCommunity
Blog : https://LearnAndGrowCommunity.blogspot.com/
Facebook : https://www.facebook.com/JoinLearnAndGrowCommunity/
Twitter Handle : https://twitter.com/LNG_Community
DailyMotion : https://www.dailymotion.com/LearnAndGrowCommunity
Instagram Handle : https://www.instagram.com/LearnAndGrowCommunity/
Follow #LearnAndGrowCommunity
#VHDLtutorial#DigitalDesign#7SegmentDecoder#LearnVHDL#FPGAprogramming#DigitalCircuits#VHDLCoding#BasicsOfVHDL#7segmentdisplay#7segment#decoder#VHDL#verilog#fpga#project#learnandgrow#VHDLproject#FPGA#FPGADesign#beginnersguide#howtodesign#programmingforbeginners#Youtube
1 note
·
View note
Video
undefined
tumblr
Project 2: 7 Segment Counter Up DEMO!
Mula-mula 7 segment akan menampilkan angka 0, setiap push button ditekan, angka akan berubah menjadi 1 angka lebih besar. Jika sudah mencapai angka 9, akan kembali lagi ke angka 0 saat push button ditekan.
0 notes
Video
instagram
I don't know why, but I have a passionate soft spot for 7 segment displays. And with a little help of a MAX7219 LED driver, it's a walk in the park to connect and control these 8 digits using SPI.
Example code: https://gist.github.com/MichMich/2a4feec1c62df2eebac803c0cfb5732b
6 notes
·
View notes
Photo

Arduino Case-study: 7-segment LED Display (Part I) ☞ https://medium.com/@ngbaanh/arduino-and-led-7segment-display-part-1-1120748aa167 #Arduino #programming
2 notes
·
View notes
Photo

New project on the table, 160 x 60 cm 64 x 24 inch huge digital clock. Tomorrow I will start working on the body and the frame. It will be using RGB LEDs... #rgb #led #arduino #coding #rtc #nano #digital #7segment #seven_segments https://www.instagram.com/p/BzgIvJJphJc/?igshid=322jvfuf95ur
0 notes
Photo

Working on 7segment at Vision World Tech Pvt Ltd - Follow for new information @visionworldtech (at Jaipur, Rajasthan) https://www.instagram.com/p/B9B0Xw5nnc_/?igshid=3hvmfenmquup
0 notes
Last Seen Blogs

mail-man-mail
Mail

newhouserestoration
Untitled

hymnoeides
73

magnificenttyrantwerewolf-blog
Sem título

fullpatrolpersona
Untitled