#Arduino development
Explore tagged Tumblr posts
Visit Tumblr Blog
Explore Tumblr blogs with no restrictions, modern design and the best experience.
Last Seen Tumblr Blogs


Fun Fact
The KCSC sent more than 20K requests to delete posts related to prostitution and porn to Tumblr from January to June 2017.
Video
youtube
DIY Digital Laser Ruler Tutorial with VL53L0X GY-53, SSD1306, and Wemos ...
#youtube#DIY#digital laser ruler#VL53L0X GY-53#SSD1306#Wemos D1 Mini#Arduino project#laser distance meter#OLED display#DIY tutorial#maker#Arduino development#technology tutorial#Arduino#LaserRuler#ElectronicsTutorial#MakerCommunity#DIYElectronics
0 notes
Text
Desperately trying to find the tech AV/robotics/coding community of tumblr.
WHERE ARE YOU. PLEASE. GIVE ME LIFE. HEAR MY HASHTAGS AND FIND ME.
#tech crew#tech#audiovisual#theatre#backstage#backstage drama#lighting#robotics#coding#programming#developers#engineering#rusty the steam engine#c++#c++ programming#python#arduino#computing
10 notes
·
View notes
Text
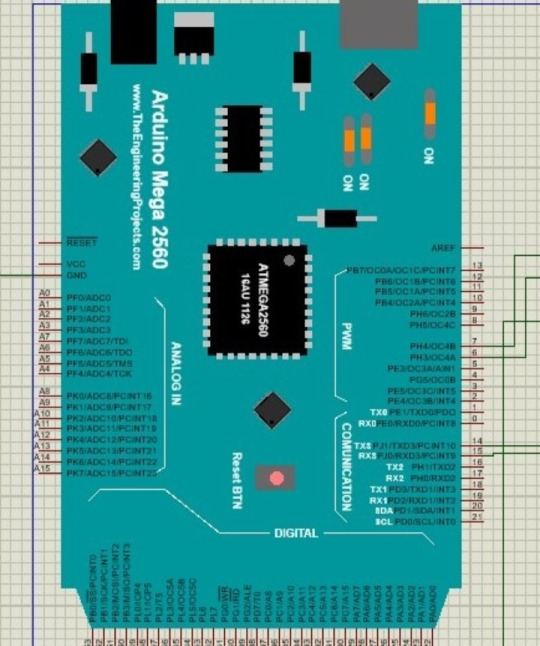
Arduino, in an era of rapidly changing technology, has excelled and revolutionized do-it-yourself electronics. Arduino is active, versatile, and accessible, inspiring creators, hobbyists, and innovators to turn their imaginative ideas into real-life working gadgets. In this paper, we will look at Arduino in detail including its general explanation of what it is, classification types, simulation tools for virtual experimentations, sensor and sensors of Arduino-based projects. This is a voyage of discovery and creation learn more.
#Arduino #electronics #technology #Arduino #DIYElectronics #Innovation #MakerCommunity #TechRevolution #ElectronicsProjects #VirtualSimulation #Sensors #InnovativeIdeas #Creativity #STEMEducation #IoT #TechExploration #HardwareHacking #Prototyping
7 notes
·
View notes
Text
We present a specific strategy on the basis of which the design and development of the Mobile Application Development Service in Dwarka . Our team of mobile app development consultants work with a team of UX and UI designers to ensure the best user experience while providing an excellent intuitive user interface. We study the latest industry trends and technologies, as well as proven techniques in the design of our mobile applications, ensuring a smooth, simple and aesthetic final prototype.
#mobile app development#Android development#iOS development#Flutter development#React Native#mobile apps#app developer#custom app development#arduino#Copy#Edit#app UI design#mobile UX#mobile UI#coding life#developer life#tech startup#programming#app builder#app marketing
0 notes
Text
Top 5 Programming Languages for Arduino.
Los 5 Mejores Lenguajes de Programación Para Arduino.
👉 https://blog.nubecolectiva.com/los-5-mejores-lenguajes-de-programacion-para-arduino/
programming #coding #desarrolloweb #devs #softwaredevelopment #arduino
0 notes
Video
youtube
GSM BASED PREPAID ELECTRICITY ENERGY METER USING ARDUINO
#youtube#GSM BASED PREPAID ELECTRICITY ENERGY METER USING ARDUINO & POWER THEFT ALERT SYSTEM | Design and development of SMS based prepaid electricit
0 notes
Text
Understanding ESP32 Pin Configuration: A Developer's Guide
The ESP32 microcontroller has become a cornerstone of IoT development, thanks to its versatility and powerful features. One of the most crucial aspects of working with ESP32 is understanding its pin configuration and capabilities. Let's dive into the essential aspects of ESP32 pins that every developer should know.

GPIO Pins Overview
The ESP32 boasts up to 34 GPIO (General Purpose Input/Output) pins, but not all are available for use in most development boards. Some key points about ESP32 pins:
GPIO 6-11: Reserved for internal SPI flash connection
GPIO 34-39: Input-only pins with no internal pull-up/pull-down resistors
ADC Capabilities: Two 12-bit SAR ADCs, supporting 18 measurement channels
Touch Sensors: Up to 10 capacitive touch GPIOs
Special Function Pins
Several pins serve dual purposes or have specific functions:
Boot Mode Pins GPIO 0: Bootloader mode when pulled low during reset GPIO 2: Connected to on-board LED in many development boards
UART Pins GPIO 1 (TX) and GPIO 3 (RX): Default UART0 communication Often used for flashing and debugging
SPI Pins VSPI: GPIO 5 (CS), 18 (CLK), 19 (MISO), 23 (MOSI) HSPI: GPIO 14 (CLK), 12 (MISO), 13 (MOSI), 15 (CS)
Best Practices for Pin Usage
Strapping Pins Always check the strapping pin status before using GPIO 0, 2, 4, 5, 12, and 15. These pins may affect boot behavior if incorrectly configured.
Input-Only Pins When designing sensor interfaces, prefer GPIO 34-39 for analog inputs as they're input-only and less susceptible to noise.
Pull-up/Pull-down Configuration
ADC Usage ADC1: Can be used with Wi-Fi/Bluetooth active ADC2: Only available when Wi-Fi/Bluetooth is disabled
Common Pitfalls to Avoid
Don't use GPIO 6-11 in your projects as they're connected to the internal SPI flash.
Avoid using strapping pins for critical functions that can't be changed during boot.
Remember that GPIO 34-39 don't have internal pull-up/pull-down resistors.
Be cautious with voltage levels - ESP32 pins operate at 3.3V.
Conclusion
Understanding ESP32 pinout is fundamental for successful project development. By following these guidelines and best practices, you can avoid common issues and make the most of your ESP32's capabilities. Remember to always consult the official ESP32 technical reference manual for detailed specifications and updates.
#ESP32 #PinConfiguration #DevelopersGuide #Microcontrollers #EmbeddedSystems #IoT #Programming #Hardware #Electronics #Arduino #ESP32S2 #ESP32C3 #ESP32C2 #ESP32C6 #ESP32S3 #ESP32H2 #ESP32P1
#ESP32#microcontroller#pinconfiguration#GPIO#ADC#DAC#I2C#SPI#UART#PWM#analog#digital#input#output#microcontrollers#embeddedsystems#IoT#InternetOfThings#electronics#hardware#software#programming#development#Arduino#ESP8266#RaspberryPi#microcontrollerprogramming#embeddedprogramming#IoTdevelopment#electronicdesign
1 note
·
View note
Text
Attiny85 Development Board

The ATtiny85 development board is similar to the Arduino, but cheaper and smaller (of course a bit less powerful). With a whole host of shields to extend its functionality and the ability to use the familiar Arduino IDE, this ATTINY85 Development Board is a great way to jump into microcontroller electronics. ATtiny85 development board come with the USB interface. Coding is similar to Arduino, and it uses the familiar Arduino IDE for development. This is a digispark clone. It has 6 port with several functions. Depending on the programming (with Arduino IDE) can it have 6 digital I/O, 4 analog inputs or 3 PWM outputs. It can be powered by a USB port or an external power supply of 6-35V DC.
Features:
Support for the Arduino IDE 1.0 (OSX/Windows/Linux).
Power via USB or External Source or 7-16 v to 5 v (automatic selection).
The On – board, 150 ma 5 v Regulator.
Built – in USB and serial was debugging).
6 I/O Pins (2 inform the for USB only if your program actively communicates over USB, otherwise you can use all 6 even if you are programming via USB).
8 k Flash Memory (about 6 k after bootloader).
The I2C and SPI (vis USI).
PWM on 3 pins (more possible with Software PWM).
The ADC on 4 pins.
The Power LED and the Test/Status leds.
1 note
·
View note
Text
Unlocking the Potential: Arduino Programming for Beginners
Arduino programming opens up a world of endless possibilities for beginners looking to dive into the exciting realm of electronics and robotics. Whether you're an aspiring engineer, hobbyist, or student, learning Arduino programming can be both rewarding and empowering. In this beginner's guide, we'll explore the fundamentals of Arduino programming, its applications, and how you can get started on your journey towards building your own innovative projects.
What is Arduino?
Arduino is an open-source electronics platform that provides a user-friendly interface for building interactive electronic projects. At its core, Arduino consists of a microcontroller board and a development environment for writing and uploading code to the board. With Arduino, you can create anything from simple LED blinkers to complex robotic systems, making it an ideal platform for beginners and experienced makers alike.
Understanding Arduino Programming:
At the heart of Arduino programming is the Arduino IDE (Integrated Development Environment), a software tool used to write, compile, and upload code to the Arduino board. The language used for Arduino programming is based on C/C++, but it's simplified and tailored for ease of use, making it accessible even to those with limited programming experience.
Getting Started:
Setting up the Arduino IDE: The first step in arduino programming for beginners is to download and install the Arduino IDE from the official website (https://www.arduino.cc/en/Main/Software). Once installed, you'll need to select the appropriate board and port from the Tools menu to establish a connection between your computer and the Arduino board.
Writing Your First Sketch: In Arduino programming, a sketch refers to the code that runs on the Arduino board. A simple "Hello World" example for Arduino involves blinking an LED connected to one of the digital pins on the board. With just a few lines of code, you can control the behavior of the LED, turning it on and off at specified intervals.
Understanding Basic Syntax: Arduino programming syntax is similar to C/C++, consisting of statements, functions, variables, and control structures. Familiarizing yourself with basic programming concepts such as loops, conditionals, and functions will help you write more complex Arduino sketches as you progress.
Exploring Applications:
The versatility of Arduino makes it suitable for a wide range of applications, from home automation and robotics to interactive art and wearable technology. Here are just a few examples of what you can create with Arduino programming:
Home Automation: Use Arduino to automate lights, thermostats, and other appliances in your home, making them smarter and more energy-efficient.
Robotics: Build robotic projects ranging from simple line-following robots to advanced autonomous drones, leveraging Arduino's motor control and sensor integration capabilities.
IoT (Internet of Things): Connect Arduino to the internet and gather data from sensors to monitor environmental conditions, control devices remotely, and create interactive IoT projects.
Interactive Art: Create interactive art installations with Arduino, incorporating sensors, lights, and sound to engage viewers in immersive experiences.
Wearable Technology: Design wearable devices such as fitness trackers, smart watches, and health monitors using Arduino and compatible sensors.
Resources for Beginners:
As you embark on your Arduino programming journey, there are numerous resources available to support your learning:
Online Tutorials: Websites like https://technobotics.in/ offer a wealth of tutorials, guides, and project ideas for beginners and advanced users alike. From basic LED blinking tutorials to advanced robotics projects, you'll find everything you need to kickstart your Arduino journey.
Community Forums: Join online forums and communities such as the Arduino Forum (https://forum.arduino.cc/) to connect with fellow makers, ask questions, and share your projects and experiences.
Books and Guides: Explore beginner-friendly books and guides on Arduino programming available online and in bookstores, providing comprehensive coverage of Arduino fundamentals and project ideas.
Conclusion:
Arduino programming offers a gateway to creativity, innovation, and exploration for beginners eager to delve into the world of electronics and robotics. With its intuitive interface, vast community support, and endless possibilities for experimentation, Arduino empowers individuals of all ages and backgrounds to turn their ideas into reality. Whether you're a student, hobbyist, or aspiring engineer, learning arduino programming for beginners is a journey worth embarking on as you unlock the potential to create, innovate, and inspire. Start your Arduino journey today and see where your imagination takes you!
#robotics courses#android app developer company#stem education#arduino programming courses#robotics courses for kids#robotics#technology#android app agencies#breadboard electronics for beginners#robotics for kids
1 note
·
View note
Text
month five. the nerds have accepted me as one of their own. (translation: the megasupercomputer guy offered me a student job next semester where i will be paid to sit around, organise cables and nerd out to anyone who comes asking for nerd shit)
i have been subtly invited and wordlessly accepted into a semisecret club of friendly nerds. we’ve got a guy who built a retractable disco ball above the ceiling tiles of his office. we’ve got a guy who has access to a 80k euro megasupercomputer that he used last night to transcribe a meme video bc he needed to find a specific clip of it.
i’m in good company.
#honestly sounds like the best job for current me#i’m def not ready to be in a software development job again#but i could use some extra cash#personal drivel#the nerd shit in question is microcontrollers and sensors and arduino stuff#and soldering#gotta love soldering#oh and there’s a robot arm#ok enough tags
7 notes
·
View notes
Text
Ad | Some Humble Bundle Goodies
One for the audio engineers - The Audio Arcade bundle gives you a whole bunch of royalty-free music and SFX as well as plugins to insert in all the major game engines. Ambient tracks, environmental sounds, explosions, you name it.
Money raised goes towards Children's Miracle Network Hospitals.
For those who dabble in Virtual Reality, the Upload VR Showcase with Devolver Digital has a bunch of Serious Sam VR games as well as the Talos Principle, a really solid puzzle game.
Money raised goes to Special Effect which helps people with disabilities enjoy games via accessible controllers. I've seen the stuff they do and it's honestly great.
Want to get into programming but don't know where to start? The Learn to Program bundle has a tonne of resources covering everything from HTML and CSS through to Python, C# and Ruby.
Money raised goes towards Code.org which seeks to expand participation in computing science by helping women and students of colour.
The Future Tech Innovators Toolkit is a software bundle with courses on Robotics, Electronics and programming with Raspberry Pi and Arduino.
Money raised goes towards Alzheimers Research UK.
The Home How-To Guides bundle offers a complete set of books for home improvements and projects. Want to know more about plumbing, home repair, bathrooms, wiring or carpentry? This bundle has you covered.
Money raised goes to It Gets Better, a charity that supports LGBT Youth.
Want to pick up the latest Elden Ring DLC? It's also available on the Humble Store with the key being redeemable on Steam.
105 notes
·
View notes
Text


Monty Jaggers McGraw:
I am writing new BASIC programs to demo at my VCF Southwest 2025 exhibit of my 1979 Tektronix 4054A color vector graphics computer.
One of the programs I am writing is a 1978-1979 Battlestar Galactica TV demo. That TV show had $500,000 of Tektronix vector graphics computers and test equipment and many screenshots of their green vector storage CRT displays - some stills - some animated. These computer graphics were generated on both 1975 4051 and 1976 4081 vector graphics computers - predecessors to my 4052 and 4054A computers (see first photo attached).
Miami Herald TV 1978 magazine interview with the Battlestar Galactica set designer indicated extras on the set stationed in front of the 4051 computers were playing games during filming to increase realism and were so absorbed they kept playing after the cut! (article page attached).
The 4051 and second generation 4052 were the same physical size and used the same CRT and same Display board, but the 4052 and 4054 computers replaced the 800KHz Motorola 6800 CPU with a custom four AMD2901 bit-slice CPU to create a 16-bit address and data bus ALU which emulated the 6800 opcodes and added hardware floating point opcodes to speed up these computers 10x over the Motorola 6800, doubled the BASIC ROM space to 64KB and doubled the RAM space to 64KB!
I created these vector bitmap graphics using a "3D CAD" picture I found on the web of the Battlestar Galactica (last attachment).
As far as I know - there was never any 4050 BASIC program to view bitmap pictures on any of the 4050 computers. The 1979 4014 vector graphics terminal had a grayscale bitmap mode in the Extended Graphics option board, but I have only found a couple of bitmap 4014 images on a single Tektronix demo tape cartridge.
My 4050 BASIC program to display bitmaps works on all 4050 series computers - with an optional Tektronix 4050R12 Fast Graphics/Graphics Enhancement ROM Pack. This ROM Pack speeds up displaying vector images (including vector dot images) 10x over using BASIC MOVE and DRAW commands.
The Battlestar Galactica bitmap image in R12 binary format is 332234 bytes - slightly larger than would fit on a DC300 quarter-inch tape cartridge in the internal tape drive of all three 4050 computers, but would have fit on a 3M DC600 tape cartridge with a capacity of 600KB - it would have been very slow to load.
I designed an Arduino board to emulate the Tektronix 4924 GPIB tape drive - with the help of my software developer. My GPIB Flash Drive board contains a MicroSD card with gigabytes of storage and the Flash Drive emulates a GPIB tape changer, storing all the files of a "tape" in a single directory. I have also attached to this post a photo of my GPIB Flash Drive.
I have recovered almost 100 Tektronix 4050 Tapes and posted the ones I think are the most interesting at this time on my github repository for Tektronix 4051/4052/4054 computers: https://github.com/mmcgraw74/Tektronix-4051-4052-4054-Program-Files I included Tektronix published MATH volumes 1, 2, and 3 and Electrical Engineering, but I don't think they have a lot of use today. I have in my collection but not recovered tapes on Project Management, Statistics, and over 100 more tapes from the very active user group, which Tektronix made collections and published abstracts in their newsletter and the newletter customer got the tape for free. Commercial software like CAD programs were likely encrypted to eliminate copying - since Tektronix 4050 BASIC included a SECRET command which would then encrypt the program file as it was recorded to tape and add a SECRET flag in the tape header that would signal to BASIC ROM when that file was accessed to decrypt the program when it was loaded into memory. One big limiter to the size of the program was RAM in the 4051 was limited to 32KB and the 4052 and 4054 were limited to 64KB of RAM, although Tek BASIC did include commands to allow program "chunks" to be overlayed as necessary. Tektronix used those commands in their 4050 System Tape which was shipped with every system and included a tutorial on many of their BASIC commands. The tutorial ran on the original 4051 with 8KB of memory, and if the program detected 16KB of memory it would APPEND larger program files to speed up the tutorial.

15 notes
·
View notes
Text
Raspberry Pi 5 / RP1 chip support for Neopixels with Python bindings coming soon 🎉💡🖥️🌈🐍
Hot off the PIO-presses, our resident Jepler created a Python binding for the Raspberry Pi 5 that lets us use the RP1 chip
on the 5/500 series boards to drive Neopixels using PIO. This is great because we can now use Neopixels
and friends on the latest Pi boards, and we can use any pin because PIO is not limited by underlying peripherals. You do need the latest kernel and firmware, so it is not quite ready for prime-time, but once piolib
is more readily available, we'll be able to have folks test this out.
#raspberrypi5#rp1chip#neopixels#pythonprogramming#pio#raspberrypi#adafruit#technews#opensource#hardwarehacks#makercommunity#ledlights#diyprojects#pythoncode#hardwaredevelopment#microcontrollers#embeddedprogramming#ledart#firmwareupdate#raspberrypilovers#neopixelmagic#techinnovation#raspberrypiupdate#codingcommunity#makerspace#iotprojects#diyhardware#ledprogramming#technologynews#pythonista
10 notes
·
View notes
Text
Now that I've calmed down from all the excitement of last night/this morning: it's very funny to me that a mass-produced product like the SilverLink could have a failure mode where it more-or-less just turns back into a development board. That's the sort of behavior you'd expect from a bespoke arduino-based automatic cat door you bought from a guy who builds them in his garage and sells them for cash under the table, not Texas fucking Instruments.
Who ships products with the default "waiting for firmware" fallback mode still enabled? Furthermore, who ships products with the default "waiting for firmware" fallback mode still enabled and then doesn't include the option to re-flash that firmware in any of their products?
Insane.
#my thoughts#calculators#none of their products besides the highly technical flasher utility meant for tusb3x10 development boards that is#which is absolutely not intended for end users or production tusb3410-based hardware
9 notes
·
View notes
Text
So I've decided to try something using my LittleBits Arduino bit and my LittleBits Adapter Eurorack module: the Dumbest Possible Quantizer.
(To overexplain, a quantizer takes a continuously varying voltage as an input and outputs a voltage that follows it, but in defined steps. The usual use case in Eurorack is mapping a control voltage onto the levels needed to produce, in the volt per octave tuning, a musical scale; you run random voltage levels through and get more musical results.)
Quantizer modules typically support different scales, modes, and keys, and sometimes even temperaments, but for the Dumbest Possible Quantizer, I'm limiting things to the bare 12-tone chromatic scale. And as suits the title, I'm doing this in the simplest possible way: I'm taking the 10-bit ADC value of the input — a number between 0 and 1023, covering from 0 to 5 volts — and mapping that onto the 60 midi notes that cover those five octaves. I'm then immediately turning around and mapping those 60 notes onto the 8-bit (0-255) value that the PWM "analog" output can take. This is nobody's idea of the proper way to do this, but since I actually had decent success using the second half as a USB MIDI to CV converter on this board already, it has a reasonable chance of approaching the desired functionality.
Long term, of course, I intend to build or otherwise acquire a quantizer module with real functionality, probably using a proper DAC; I'm following the in-development Teensy 4.1-based Ornament and Crime upgrade with great interest. But I really want to see how much I can do with very low effort!
9 notes
·
View notes
Video
youtube
Arduino Based Vehicle Accident
#youtube#Arduino Based Vehicle Accident & Alcohol Detection Alert System Using | GPS🛰️| GSM📱SMS Notification Alert | Design & Development of Arduin
0 notes