#Apply for import export code
Explore tagged Tumblr posts
Visit Tumblr Blog
Explore Tumblr blogs with no restrictions, modern design and the best experience.
Last Seen Tumblr Blogs


Fun Fact
In 2020, 44% of users from Denmark used Tumblr daily.
Text
Import Export Code (IEC) | KYC Renewal | Mandatory for Custom Clearance
If you are an importer or exporter and you have not yet renewed your KYC, then do not worry. Whether you are facing any problems or need the process of KYC renewal, then check out the link below.
youtube
#how to apply iec code#iec code registration procedure#import export code#Apply for import export code#IEC registration consultant#Youtube
1 note
·
View note
Text
🌍 IEC Registration in India : Step-by-Step Guide for Importers & Exporters
1. Introduction The Import–Export Code (IEC) is a mandatory 10-digit identifier issued by the Directorate General of Foreign Trade (DGFT) for individuals and businesses conducting any cross-border trade of goods or services. IEC is essential for customs clearance, availing export incentives, filing shipping bills, and opening EEFC/FEMA-compliant accounts. 2. Eligibility Criteria for IEC…
0 notes
Text
Know about Import Export Code
All companies which are involved in import and export of goods mandatorily requires an import export code or IEC. Registration
What does the import/export Code Mean?
A company or authorized individual that implements import/export may apply for an Import Export Code (IEC code), which is a ten-digit number that is permanently valid and issued by the Directorate General of Foreign Trade Ministry of Commerce and Industry. Without this code, Importers are unable to proceed and if they don't have this code ,exporters are unable to benefit from exports from DGFT ,Export Promotion Council and Customs.Hence, IEC code Registration is mandatory for businesses involved in import and export of goods.
Requirement of IE Code
Following are the samples where IE Code would be required.
Custom authorities need it, when an importer has to clear his shipments from customs.
When an Importer send money overseas through banks,it is needed by the banks.
It is needed by the customs port when an exporter has to send his shipment.
Submission of IE code is required ,when exporter receoives foreign currency directly into his bank account.
An individual does not need to be a registered entity in order to apply for an import export code. Import Export Lincense can be referred to as Import License,Export License,IE Code,IEC Code ,EXIM License.
0 notes
Video
youtube
How to apply for IEC|Get Import Export Code Instantly|Register yourself on DGFT website|
#youtube#import export code#how to apply for iec#how to apply for iec code#how to apply for iec code online in India#how to apply for iec code for Individual#how to apply for iec code for HUF#how to apply for iec for partnership#how to apply iec for company#iec update#iec renewal#iec registration#iec registration documents
0 notes
Text
TUTORIAL
How to FIX CUSTOM EYELASHES after update 1.108.349.1020 The Sims 4
YOU NEED:
Sims 4 Studio @sims4studioofficial
Blender (I use Blender 2.79)
Instruction manual:
Opening the eyelashes that need to be repaired in Sims 4 Studio

2. Go to the "Categories" section - Item "Outfit Type" - "Eyelashes"

3. Click "Apply to All Swatches" - Click "Yes"

4. Now we need to assign the correct color to the Vertex in Blender. Go to the "Mesh" category and export the eyelash mesh

5. Open the Mesh in Blender and switch to the "Vertex Paint" mode

6. Select the display mode "Wireframe" or press the "Z" key

7. If the eyelashes are broken, they will have the wrong color. Now we need to assign the correct color

8. Click on the palette icon

9. Go to the HEX item and enter the color code. Color Number: 007F3F

10. After you entered the color code. Click "Paint" - "Set Vertex Color"

11. After that, the color of the eyelashes will change. Save the file and close the Blender

12. Go back to SIms 4 Studio and import the mesh

13. Saving the package file

14. Checking the result in the game
718 notes
·
View notes
Text
complete beginner's guide to [kpop] giffing, as explained by me!
keep in mind everyone has a different style and process, so there are some things in mine that may not feel intuitive or helpful - if so, don't include it! if you can make the gif, and have fun doing it, that's good enough. this post also assumes interest in specifically kpop giffing, but can for the most part apply to other content as well. i would just recommend different sharpening and coloring for those.
separated by headings (not images, since i need those... for examples) - if you are skipping to a specific section, look for the orange text of what you are looking for!
table of contents: - picking your programs - additional tools and programs (optional) - finding files - importing to photoshop (vapoursynth, screencaps, etc) - photoshop shortcuts and actions - sharpening - coloring - export settings - posting on tumblr
programs:
if you already have photoshop / your giffing program installed and set up, go ahead. if you don't, i would recommend looking here to get photoshop. please make sure you follow instructions carefully and safely! i do know photopea is an alternative people use, and i'm sure there are others. i unfortunately don't know any tutorials to link and probably won't be much help in regards to those programs, but i'm sure there are some floating around on tumblr!
my gif process uses photoshop, so this tutorial assumes that as well. if you use a different one, you might be able to transfer this to what you use, i'm not really sure :(
additional tools and programs: - handbrake: upscaler, found here. i make my own settings and generally only use this on lower quality sources to give vapoursynth a better chance with encoding in higher quality. - davinci resolve: a program i use to make clips appear 60fps when they are choppy or too few frames for the gif to look nice, and occasionally to do pre-photoshop coloring! i use the free version. i do not use this all the time and it is a big program, so definitely don't get it if you think you'd forget to / not want to use it. - yt-dlp: open source, downloads pretty much any file i could want quite well. i use this for most of my downloads and for subtitles as well. does require some knowledge of code, or, at the very least, willingness to troubleshoot set-up. find it here! i can share the command lines i run for: video, audio, vid + sub. - 4k+ downloader: what most people use for youtube-source sets, i believe. you have a limited number of downloads per day on the free version, thus the other downloading programs. - jdownloader2: no limit but sometimes a little slow or will refuse to download because of not being logged into an account, etc. a good download alternative if you plan on downloading a lot and yt-dlp is too much. - vlc: free program, standard on some devices, good for viewing files. - mpv: excellent file viewing, can also deinterlace and screencap (if you do not have / use vapoursynth) - vapoursynth: mac users beware, it's not optimized or set up and is a huge headache. windows users, once you get it set up, it's golden.
finding files, what to look for, and how to use them: how to use is explained here, with a focus on smooth and nice speeds! but finding the file is the first step, so let's head there.
stages: k24hrs (invite only, feel free to private dm or send an ask off anon for a file - i will do my best to get it to you); kpopbuzzhub; sharing korea torrent (requires a torrent app); twitter (shrghkqud (only has recent files) and a few other uploaders, requires much more active searching). there are a few other places you can look, but it is often more trouble than it is worth (or costs $). i am also always willing to help people find materials, so you can ask me to help you look for something or to link a source i used for whatever set.
music videos: also sometimes on k24hrs. i use vimeo a lot (color graders, directors, etc., will upload clearer versions). sharemania.us has some kpop mvs, typically bigger groups (i.e. blackpink). this is a place i check for ggs. and if none of these places or searching for torrents on btdigg, or on google in korean works, i just download the highest quality setting from youtube.
other types: like vlogs and fancams, normally directly downloaded from youtube, instagram, or twitter using yt-dlp or sites specifically for the app (i.e. twittervideodownloader).
what do i look for? 1080i for stages (or 1080p) are often super nice as they're a .ts. 2160p/4k is often ideal, but it also depends on your computer and what you are comfortable working with! generally - not always due to ai upscale - a bigger file size (in the gbs, high mbs like 800) is better and has more detail that will look clear when you work on it. older stages (2nd gen and before, some 3rd gen) and music videos often always are lower quality due to camera quality, and much harder to find. if you have to use the youtube upload for a stage, it is definitely doable, but it may be slightly disappointing in the quality you want to achieve. it depends on what you're comfortable posting and making!
how do i use them? if you use vapoursynth, scenedetect (encode/process whole video) or timestamp (just a small clip) your file - if upscaling, using davinci resolve, or any other pre-processing, do that first. it will pull up a resizer and a program and once you encode, it will give you an output file using the size and settings you put. this will import to photoshop. if using mpv or another screencapping method, take your screencaps (again, all pre-processing first) and prepare to import. there are two ways to do that for screencaps. you can also just watch whatever you downloaded, i'm guilty of downloading concert files just for fun 😅
in the next sections, i will be using four different files of varying quality and sources to explain my steps. hopefully that is helpful!
example file 1 (4k and 60fps, obtained using yt-dlp) example file 2 (1080i, obtained from k24hrs) example file 3 (1080p HD, obtained using yt-dlp) example file 4 (pulled from the gg archive i use, master)
importing to photoshop (vapoursynth and mpv explained): using example file 1, i am processing in vapoursynth - i always do one extra second before and after the clip i actually want so it doesn't cut off any frames i'd like. i adjust my sizes based on what works best for tumblr (540px for wide, 268px for 2 column, and 178 for 3 column). i always use finesharp 1.5 (this setting is up to you! i used to use .7, so totally ok if it changes over time, too!) when you export in vapoursynth, you need the y4m header. i use export to mov preset.
when importing to photoshop using a video (so vapoursynth, video files, not screencaps):


i recommend making your selected range a little bigger than the frames you want so they don't accidentally not get included. delete any extra frames while in the frame animation and then turn it into video timeline. i turn all my layers into a smart object (select them all by clicking the bottom layer and then shift-clicking the top one, or use (on windows) ctrl + alt + a to have it select faster). set timeline framerate (if you want to, i always use 60).


now your smart object is ready to sharpen and color!
using example file 2, i am processing mpv - i hit 'd' until deinterlace is on 'auto'. find the clip you'd like and hit your screencap shortcut (alt+s) for me - your screencaps should be super clear, it depends on how you set up your software (if mpv, what compression you told it). screencaps can take up a ton of storage so i recommend only screencapping what you need and deleting them after. when you hit your shortcut, play the file to the end of the clip you went and hit the screencap shortcut again to stop. your frames should be in the folder you designated as pngs now. delete extra frames now!
you now have two options: import as is, which can be a little slow, or turn them into dicom files. importing as is is done through stack. it will prompt you to select what is being loaded - change Use: to folder, and let it process. it will be slow. hit ok when the file list updates.

when it is done loading: create frame animation -> make frames from layers -> reverse frames. i would crop now using the crop tool for processing speed, and then proceed to do video timeline, smart object, and frame rate. when cropping: on the top, above your document names, the second image should show up on the crop tool - this can set your dimensions. i zoom and crop screencaps using this.


the other option is DICOM files, and what i use. when you have your pngs, do alt + d in the folder (windows), type cmd, and run this command: ren *.* *.dcm. press enter. it will update the files. on macOs, just rename the file type to .dcm.

then, import as so (it will prompt you to select the folder your .dcm are in, and will not work if the files are not actually DICOM). i find it much faster than the stack import. crop when it is done importing for processing time, like the other screencap import style.

create frame animation -> make frames from layers -> video timeline -> smart object from layers -> 60 fps.
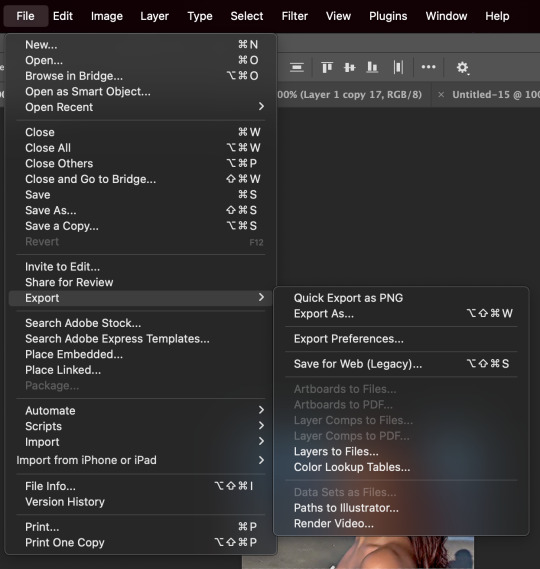
photoshop shortcuts and actions: (windows) - ctrl + alt + a: select all layers - ctrl + shift + alt + w: export as image - ctrl + alt + shift + s: save for web (legacy) - this is the gif one!
actions are imported or created, i've shared my sharpening ones before. there are plenty you can find (or make) for a variety of things, such as aligning objects to a fixed position on all docs, doing the screencap reverse and import for you, etc. they are imported using load actions - select the [downloaded] .atn file and it'll pop up.

sharpening: explained here, and has my actions (feel free to use). very important to the quality and clarity of the gif. the better the file, the clearer a gif looks, sharpening can only do so much. play around during this step!
coloring: very much the most personal taste stage of giffing. i explain my process here. in kpop giffing, we tend to focus on unwhitewashing. other giffing tends to be more aesthetic tastes and fun since the source has better colors to work with.
export settings: these are what i use! you need the 256 colors. i do not recommend lossy or interlaced. i think bicubic sharper is the clearest i have tried.

posting on tumblr: use these dimensions FOR GIFS. edits can be different. height is up to you - i would not go over 800, but i think my quality looks weird past 600 range anyways.

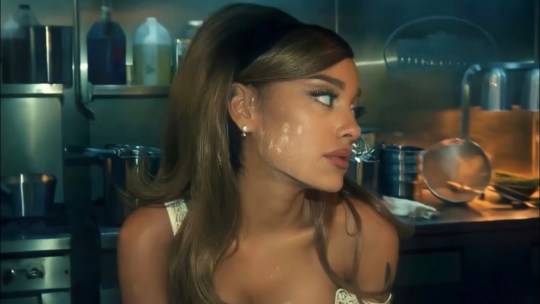
example gifs: yeji, from example file #1, imported using vs. uses no. 1 sharpening (altered) from my pack. colored. zhanghao, from example file #2, imported using mpv and the load via stack. uses no. 4 sharpening (altered) from my pack. colored. taeyeon, from example file #3, imported using mpv and the load via dicom. uses no. 1 sharpening from my pack. colored. eunbi, from example file #4, imported using vs. uses no. 2 sharpening from my pack. colored.


if your gifs don't look how you want right away, that's okay! it takes time. my first ones were not great either. i am always improving on and working on my gifs. good luck and have fun hehe ♡
#i do not feel that qualified to answer this so caveat im not the best. and please also take ideas from my lovely moots and their resource#tags and tutorials / shared things. they are all so good#m:tutorial#resources#long post#flashing tw#userdoyeons#awekslook#ninitual#useroro tuserflora#useranusia#userchoi
85 notes
·
View notes
Text


𐔌 ‧₊ᢉ𐭩˚ em's gif tutorial + atn 𐦯
what's going on friends ? here i am with a brand spankin' new gif atn for u all , with a brief tutorial and some tips under the cut . as always , pretty please give this post a like or reblog if u intend on using this code or if u just want to be a supportive hottie ! love u all bigly ; be sure to pet a cute animal today ! mwuah ! ♡♡♡
⟡⋆。⊹₊˚ this gif action is 100% free ! u can download it by becoming a free member on my patreon or via this dropfire link . enjoy !
⚠️ remember if using my action to change ur layer name to layer 1 before applying the action or it will not work ⚠️
okay angels , let's get into the nitty gritty of making gifs ! keep in mind there are hundreds of methods of giffing and none of them are wrong ! it's all about what works best for u !
⟡⋆。⊹₊˚ step one : pick out ur video u are going to gif , section it into smaller segments , export via render video
if u are using a longer video such as a youtube vid or a tv show , i personally follow this process : i open up the file on photoshop , i adjust the speed to my liking , and then i start sectioning my content . using the 'split at playhead' option to cut my clips . make sure u have the section u are going to make into a gif selected bc it can get confusing once u start sectioning off more and more clips . u can combat this by breaking ur longer videos into chunks and repeat the sectioning as described . u don't have to resize ur canvas at this point but i like to do it now so i don't forget later on . i make my gifs 268px by 150px . once u have the clip u want to gif all sectioned off and sized ( if u are doing that at this point ) , u then have to render and export it by clicking file > export > render video .
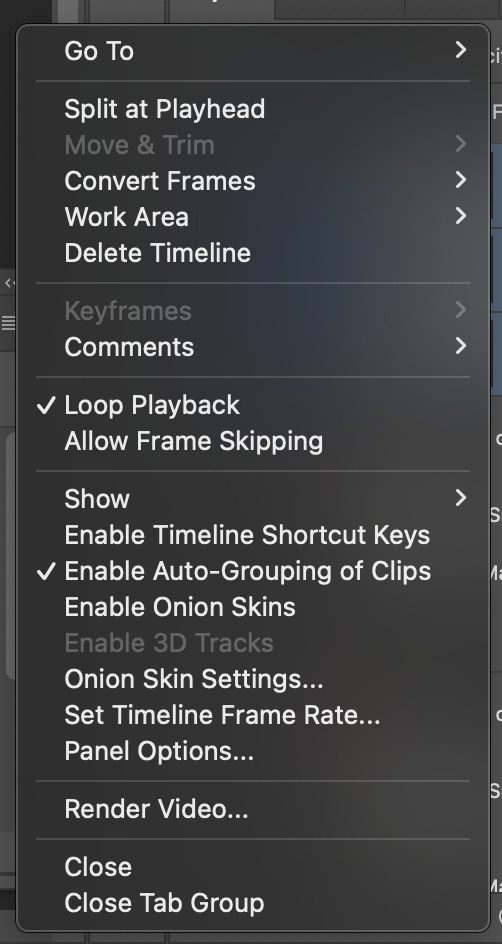
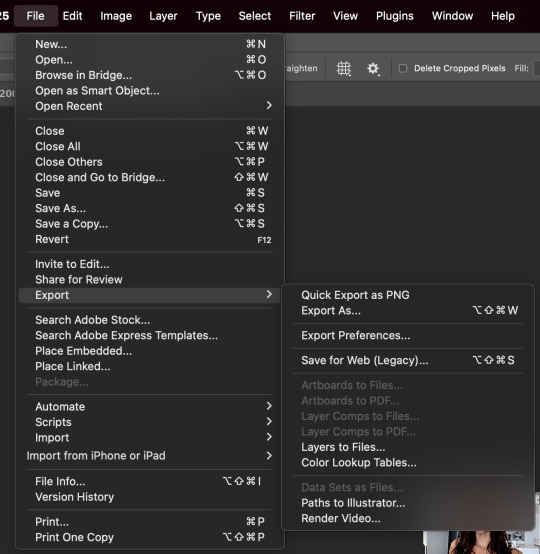
^ split at playhead visual & render video export , and rendering settings
⟡⋆。⊹₊˚ step two : import frames as layers , convert to video timeline , merge all layers into a smart object layer
next in my process , we will import the video we just rendered by clicking file > import > import video frames to layers . since u already sectioned off ur gif , u don't need to mess with sliders when the popup shows , just confirm everything and u'll have a video timeline in layers now ready for u . go ahead and open up ur timeline options and click 'select all layers' and once all ur frames are selected , click covert to video timeline . u will now be greeted with a bunch of layers on top of each other . turn ur focus to the righthand side and select all of the layers ... they are shaded in blue in the screenshot , make sure u have all of them selected and then click the option 'convert to smart object' . it'll condense all those layers into one singular smart object . ⚠️⚠️⚠️ if u are using my action here , this next step is very important ! ⚠️⚠️⚠️ ur only file will be named layer + a random number ( if u have forty frames , it'll be layer 40 and so on ... ) . u must rename this layer to layer 1 or my action will fail !


^ video layer as frames , importing video frames to layers , select all frames and convert to video timeline , a visual of ur new timeline , changing the name of remaining layer to layer 1
⟡⋆。⊹₊˚ step three : apply action , adjust as needed , add ur coloring
we're now on the home stretch ! it's time to apply the action ! go ahead and slap that bad boy onto ur video . depending on the quality of the base video of ur gif , u might have to make a few tweaks to the unsharp mask layer at the top ... it should be called 'layer 1 copy 2' . i would recommend adjusting the amount first and then tweaking with the overall opacity of the unsharp mask layer as needed if there is still some harshness surrounding the silhouette . now to add ur psd / coloring , add those layers to the very top so it'll be applied to all three layers of ur gif .
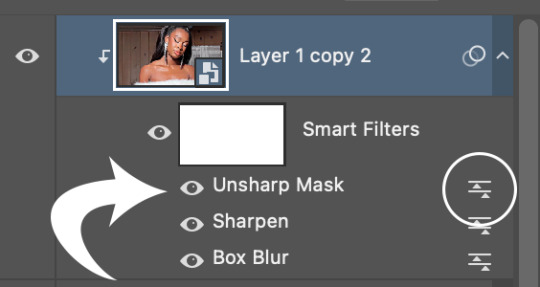
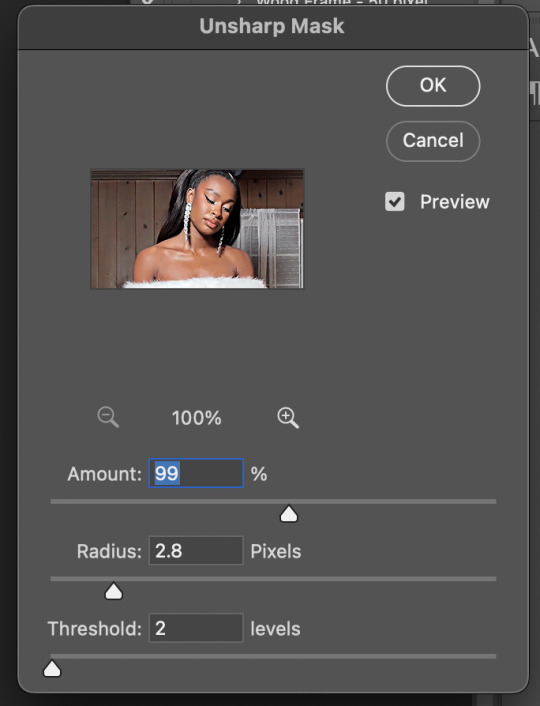
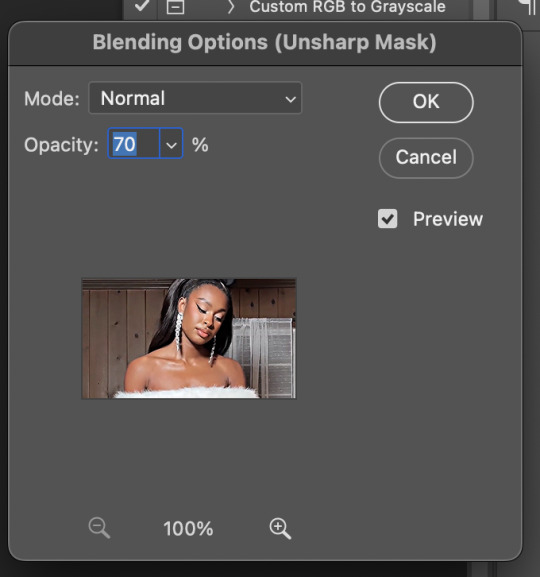
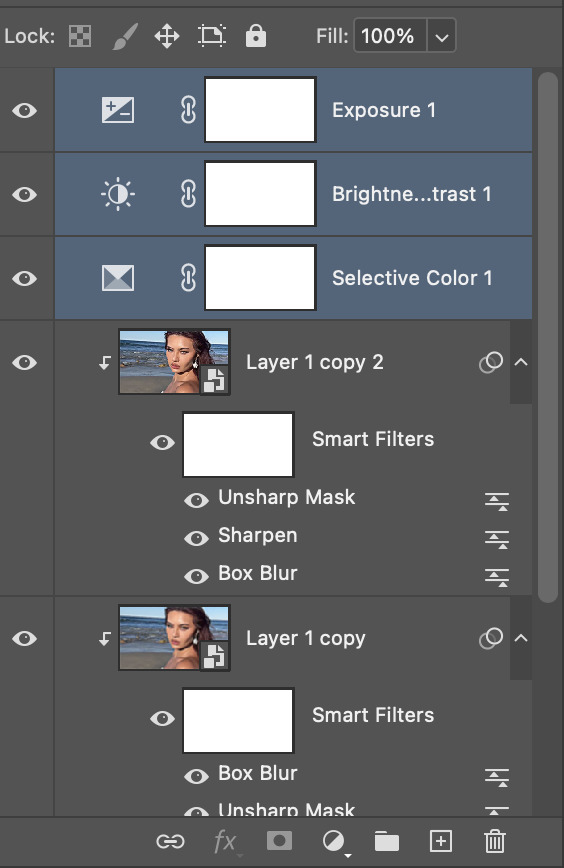
^ layer 1 copy 2 unsharp mask , editing the actual unsharp mask settings ( where the arrow is pointing ) , editing the blending options ( the circled icon ) , where to put ur coloring layers
⟡⋆。⊹₊˚ step four : saving ur gif
ur practically done now ! the last and most important part is exporting ur gif to use ! go to file > export > save for web . my typical settings are below but i do switch it up depending on the specific needs of the gif . for example , does the bg of ur gif look weird and splotchy after u saved it ? it's time to go back and re - save with a different setting .


the gif on the left was saved with my typical settings ... see how the background is splotchy and feels nosy and un - smooth ? this is because of the dither diffusion setting . if we switch to pattern instead as seen on the right , the difference is pretty staggering . u could also opt for the pattern dither setting to try and smooth out the blotchy background colors .

same gif with typical settings on the left compared to the same gif saved with the dither on pattern instead of diffusion . it's mainly up to ur personal preference !
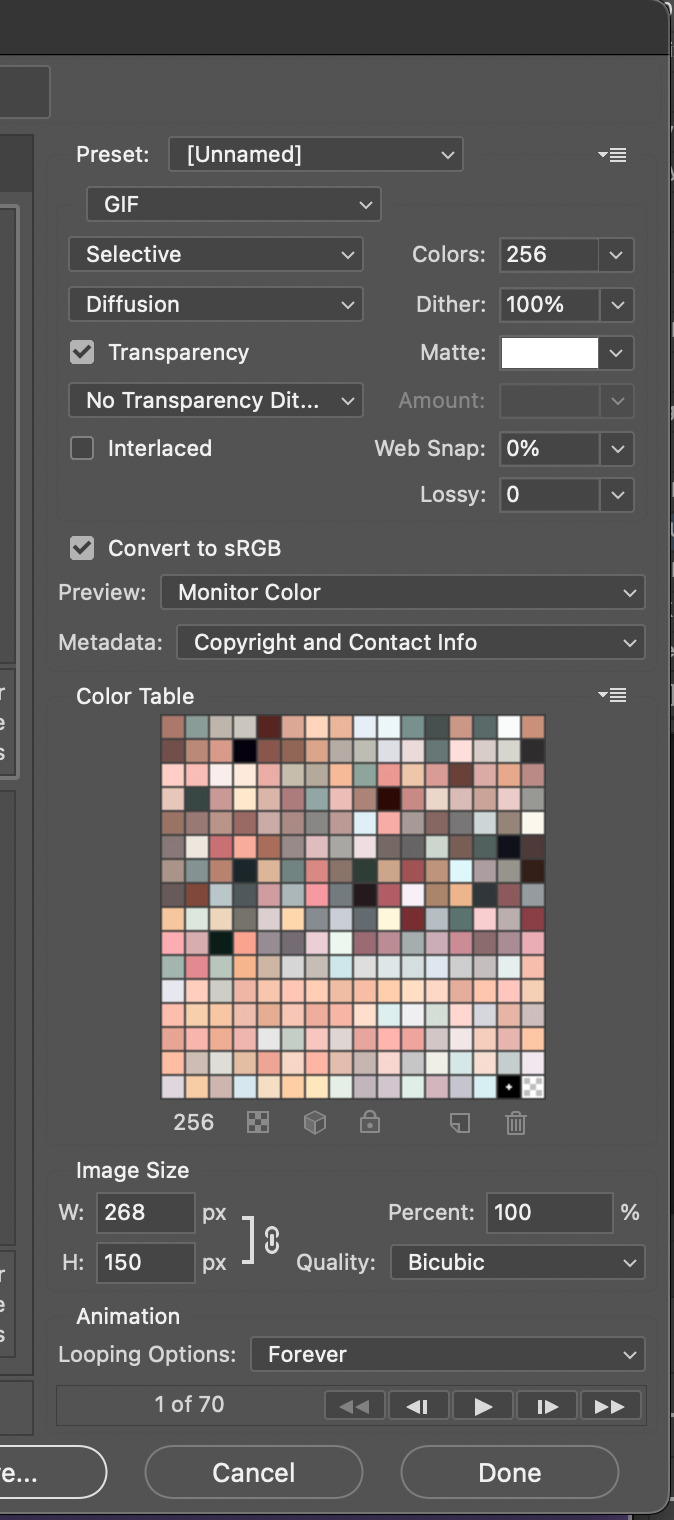
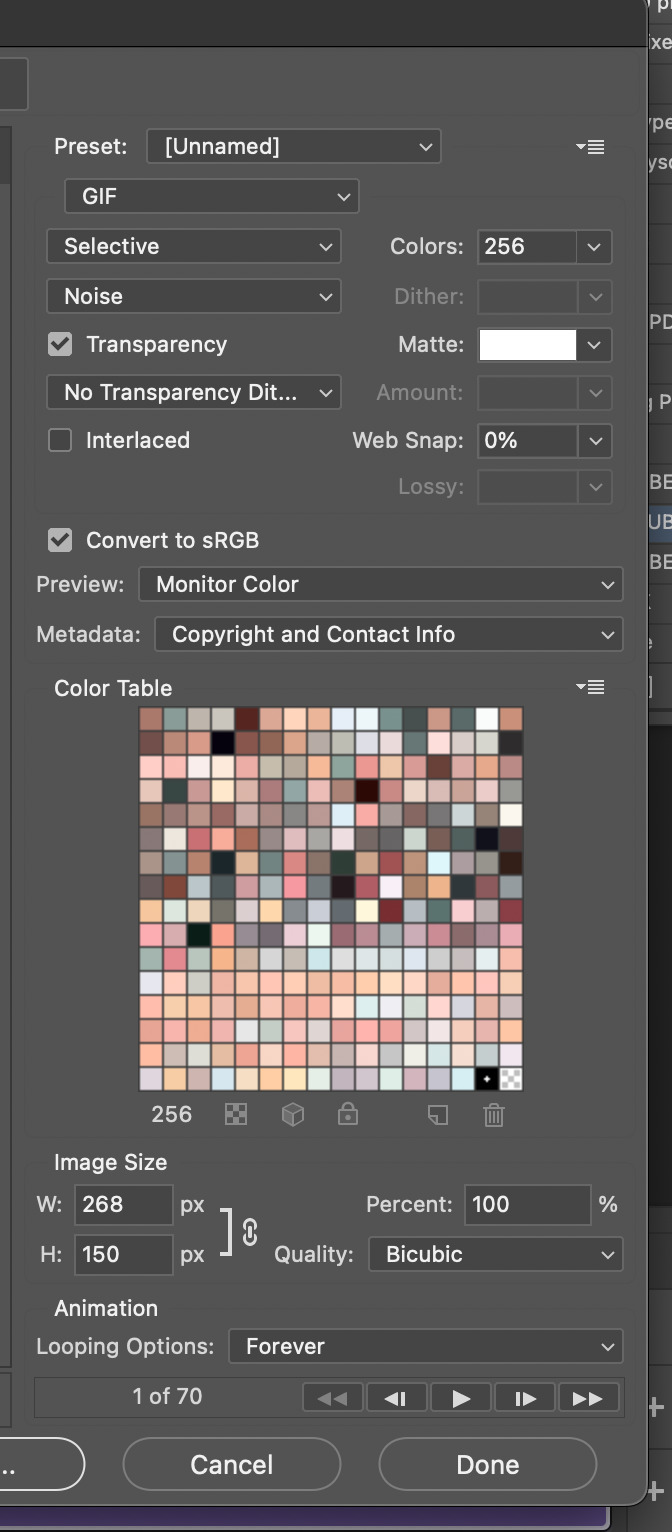
^ exporting with save for web , my typical settings , noise dither version
and that's it ! that's my current giffing process ... like i said , there is no one way to gif . it's a fluid , ever - developing process . don't be hard on urself and remember this is for fun ! if u have any questions or concerns please let me know !
67 notes
·
View notes
Text
Repost of my Mini WantTrees tutorial
Mini tutorial on custom WantTrees using the Break Up want as an example
Don’t ever open WantTrees without doing this though: Copy and paste your WantTrees (in Program Files not Documents!!) into a safe folder. Do not open it while it is in your Program Files.
Then, when it is safely somewhere else on your PC, you can open it, edit it, and then just copy and paste it into your program files. I always make a BACKUP of the Maxis want trees when I do this. I keep a folder of several different WantTree versions actually and I change them based on the hood (for example, Roaring Heights is edited to have no computer wants etc.)
Needless to say, you should only have one wanttrees at a time in your Program Files and only edit the boolean keys inside the individual WNTTs or … you could delete entire WantTrees but … I wouldn’t advise it.
In WantTrees in SimPe, it will look overwhelming. But gradually you will get used to it. The three instances for “Break up” wants are 0x6DB3A03E, 0xADE345CE and 0xCDCE5F06! You can sort by Instance in the WantTrees package. Let's look together! First, ensure you are looking at this file in the RESOURCE LIST

You will see a very long list of text files. They are basically just Notepad files and you can export them as text files for easier use, but I just edit them in SimPe.
Open those instances that I mentioned by clicking on them in the Resource List and then switching to PLUGIN VIEW and you will see what looks like this

What you want to be looking for is this line:

This tells you the name (and the ID number directly after the name) of the Want that the game is trying to assess based on the selected Sim.
If it says "alphaTrigger" then it is a Want TRIGGER, which means an event that happens in the game that triggers certain wants, so don't mess with those!
From this first section of code, it looks like the game is applying the upcoming wants to becoming a teenager - with a TRIGGER of the Sim becoming a Teen.

Once we scroll down, we get to the next referred want or want trigger. This one is what you need! It just says "alphaFallInLove" so this is referring to the want to fall in love, NOT a trigger. This can be verified by using PickNMix's object and want spreadsheet to check the 8 digit code AFTER it says "AlphaFallinLove" : the want ID for this particular want is cdaa9450
So, this section will tell you the Want that it's referring to, but you still have scrolling to do!

THIS is the important section. This section is determining WHICH TYPE OF SIM can roll this want!
From this, it looks like the Want is weighted heavily (do you see where it says WEIGHT? and it's set to 100?) to be rolled by Family Sims, but there are some other details that I am not sure of, so let's just look at the "Break Up" want.

Ok, we found the actual want. Now to scroll down and see what types of Sims are coded to roll this want.
I would also suggest looking at the order of the wants that are referred to. It can be confusing to figure out what MAXIS was doing, but often, if you scroll down to the VERY END of the XML editor, you will see comments from MAXIS explaining the specific WantTree. But not with all of them! It takes some context clues!

So, as you can see, in the "Age" section, Teens are the only ones who can roll the Break Up want. All you need to do is change where it says "False" to true for Adults and Elders!
Then you can add your own customizations! In the aspiration section, it is coded that only Family aspiration can roll the Want to break up, but what about changing False to True for Pleasure Sims? Try it out! Also, to reiterate, do you see where it says WEIGHT? And how it is set to ZERO for all the sections? I would play around with that. I assume certain wants are WEIGHTED to be rolled by certain ages, aspirations, or personalities.
Also, let's edit personality! Why not? Let's change False to True for Mean Sims to want to break up, and Serious Sims! notice I also changed the Weight

Now, this is untested, but the worst that will happen is wants will get rolled that don't make sense for your selected Sim.
You can play around endlessly with this. Just don't touch the TRIGGERS, only play with where the actual WANTS are being referred to. And investigate the ORDER of the sections ... most of the time the ORDER of the sections suggests a PROGRESSION of wants being rolled.
Any more questions? If so, feel free to DM me. I'm at my computer a lot :)
Happy Simming and modding!
#sims 2 simblr#sims 2 gameplay#sims 2#sims community#sims 2 guide#sims 2 wanttrees#sims 2 wants#sims 2 simpe#simpe#Sims 2 modding#the sims 2#ts2
30 notes
·
View notes
Text
making default replacement CAS - TS3
hi i'm writing a rough outline of one way to make default replacements. i discovered this method recently on reddit as shared by 80sBabyGirl and it's worked well for me so far, so i want to share with other creators out there.

a disclaimer: i'm no expert on how to do this so please read w a grain of salt. please also feel free to add further comments and correct me on any errors. i'm sharing this post not as a 100% foolproof tutorial but more of a guide or outline of the basic steps.
i like this method because you can easily turn any CC package into a default replacement package, without exporting a bunch of textures meshes etc that beginners may not be comfortable doing. also great for lazy people like me.
i have had success using this method to make default replacement hairs, beards, and clothing. i assume the principle is the same for most other CAS items although i'm sure there are more complicated exceptions out there.
so with those disclaimers out of the way, let's start:

first, you will need to download Sims 3 Package Editor (S3PE) and Sims 3 Object Cloner (S3OC)
next, you will use S3OC to clone the in-game item you want to replace, such as a hairstyle.
make sure to "deep clone", include the thumbnails, and do not check "renumber internally".
next, you will open the cloned in-game hair using S3PE. you will also be opening and editing your cc hair package in S3PE, so make a backup of that somewhere before proceeding with the edits.
80sBabyGirl on reddit:
"First, export the Maxis hair's CASP resource to a folder, and close the file. Then, export the CC hair's CASP resource to a different folder. Go back to the Maxis hair folder. Don't open the CASP file, don't copy the file either, just copy its name. Go to the CC hair folder and paste the Maxis hair's name to replace the CC hair's name. Then import the renamed CC CASP resource into the CC hair file. Delete the original CASP resource to avoid duplicates. Then you can do the exact same process with thumbnails. For hairs with accessories, you can retrieve thumbnails for all 3 swatches inside the CASThumbnails.package file that's in the Thumbnails folder."
finally, save the cc hair package, close it in S3PE, and put it in your overrides or packages folder to test in-game. it should now function as a default replacement.
thumbnails
another way to make the cc item's thumbnail into the default replacement item's thumbnail:
in your cloned game item, double-click on the thumbnail resource. click on "copy rk".
in your cc item, double-click on the thumbnail resource. click on "paste rk".
this will make the game read the cc item's thumbnail as the default item's thumbnail.
handy reference for which thumbnail codes are for what
in summary
ultimately you are just editing 2 resources in the cc package to turn it into a default replacement.
the CASP resource
the thumbnail resource
testing in game and the textures are fucked up??
whenever you default replace anything, you usually have to delete your caches and re-apply the item in CAS for it appear properly.
the textures are still fucked ?
if this happens, it may be because the default textures and the cc textures need to be properly linked in S3PE.
in your cloned game item, double-click on each "_IMG" resource. click on "copy rk".
in your cc item, double-click on the corresponding "_IMG" resource. click on "paste rk".
you will need to do this for the multiplier, mask, specular, and normal map textures.
this will make the game read each texture as the default item's texture.
in conclusion:
121 notes
·
View notes
Text
Crisps' Basic Blender Plugins
I made two basic Blender plugins, one to easily center objects in the scene, and the other to easily remove and re-add numbering from bone names.
Both plugins require Blender 2.8 or above. They were tested in Blender 2.9, 3.6 and 4.0 on Windows. (Please report if anything explodes so that I can fix it. I've not coded much for Blender before so these are probably wonky.)
Both are found in the Item tab in Object mode.
Basic Move Tool
Save a few clicks sitting objects’ asses on the scene origin.

Sit Selected at Scene Origin Moves all selected Mesh, Curve and Text/Font objects to the scene’s origin, their lowest points at height zero. The objects’ own origins (pivot points) move with them, but keep their relative positions in object space. Sit Selected & its Origin(s) at Scene Origin Moves all selected objects to the scene’s origin, their lowest points at height zero. Their origins (pivot points) are also moved there. ! Apply -> Rotation to your objects before use if they’ve been rotated. I use bounding box information to calculate objects’ lowest points. Bounding boxes are automatically updated when an object is translated or scaled, but not on rotation 🤔
Bone Name Manager
Remove a substring/pattern from bones’ names; save and restore the originals via save file. The default pattern is “#\d+$”: “#” followed by numbers at the end of the name string.
I created this one because the GMDC Import/Export plugin requires the bones to be numbered, but that breaks the symmetry mode for weight painting. I wanted an easy alternative to renaming and re-renaming them by hand.

Use Custom Regex? If ticked, the plugin will use the specified regular expression instead of its default pattern. Only the first match found in a name will be taken into account. Strip Bone Names Removes elements matching the pattern from bones’ names. The original names are not saved. Save Bone Names to File Creates a json file listing and mapping stripped and original bone names to each other. Uses the Save Path. The bones are not renamed. Strip Bone Names and Save to File Creates a json file listing and mapping stripped and original bone names to each other. Uses the Save Path. Removes elements matching the pattern from bones’ names. Restore Bone Names from File From a valid json file, loads the mapping of stripped to original names and renames bones accordingly. Uses the Load Path. Will fail if the current pattern is different from the one used by the file.
-> Download both at Box or SimFileShare
(I'm not sure about the ethics of putting non-sims stuff on SimFileShare, so I may remove that link.)
43 notes
·
View notes
Text
Women’s goods are taxed at a higher rate than men’s, an invisible bias that is estimated to cost women $2.5bn a year"
Perhaps with so much talk of boycotts women should boycott unnecessary purchases that would cost more due to pink tariffs and taxes.
Women pay 3% more in tariffs than men, though it could be more. Photograph: Thomas Barwick/Getty Images
By Alaina Demopoulos Mon 17 Mar 2025
Many shoppers know about the so-called pink tax – a needless markup on products marketed to women, even if those products are essentially the same, just cheaper, when sold to men. Personal care items such as razors, deodorants and shampoo fall into this category. But shoppers may be less aware of “pink tariffs”, or taxes on imported goods labeled as “women’s items”.
Pink tariffs are one reason women’s clothing tends to cost more than men’s at the checkout counter, and why some women might buy sweatpants or oversized sweaters technically made for “men” – it could save them some cash.
As first reported by the 19th, two Democratic House members, Lizzie Fletcher of Texas and Brittany Pettersen of Colorado, introduced a bill this session calling on the treasury department to study pink tariffs, and publish any findings on how these taxes might lead to a gender bias in retail.
The move comes amid Donald Trump’s continued tariff war, when more Americans are paying attention to how tariffs work and affect their day-to-day lives. (On TikTok, young people especially balked at how the taxes on China-made goods might affect Temu or Shein fast-fashion prices.) Ed Gresser, vice-president and director for trade and global markets at the centrist thinkthank Progressive Policy Institute, said in a statement that the bill “will help us design a better and fairer system”, noting that gender bias in clothing “likely costs women at least $2.5bn per year”.
Fletcher noted that women pay 3% more in tariffs than men, though in some cases it could be more. Things don’t get easier if shoppers head to a genderless aisle: unisex clothing, the 19th also reported, gets taxed the same rate as womenswear. Pink tariffs can also apply to personal care items, sneakers and toys marketed toward young girls as opposed to boys.
Sheng Lu, a professor of fashion and apparel studies at the University of Delaware, says the wide margin between tariffs on women’s and men’s clothing are “the results of decades-old negotiations” influenced by simple misogyny. “Men dominated these discussions, and women were not fully considered in these negotiations, and that’s a very important reason for the impact and legacy of the pink tariffs.”
The first US tariff laws were written in the 18th century and eased by the early 1900s with the implementation of income tax. After the 1929 stock market crash, President Herbert Hoover brought tariffs back, though those decreased after the second world war during the era of free trade agreements. Tariffs became a hot topic during Trump’s first presidency, when he proposed taxes intended to bring manufacturing jobs back to the US. (Fashion designers say that’s easier said than done, as China has become a world innovator in apparel manufacturing techniques.)
Studies show that women drive 70-80% of all consumer spending, which is also an incentive for governments to set higher import taxes on their clothing. One study found that in 2015, the tariff burden for US households on women’s clothing was $2.77bn more than on men’s clothing.
Women’s clothing also tends to be made from human-made fibers such as polyester, which is taxed more than cotton, one of the US’s largest exports. “Fashion brands cannot totally absorb these tariffs by themselves, so they are eventually passed to consumers,” Lu said.
The US Harmonized Tariff Schedule, a labyrinthian code which lays out set tariff rates for all categories of goods, contains what Susan Scafidi, director of Fordham’s Fashion Law Institute, calls “financial microaggressions”.
One example: men’s silk brief underwear is taxed at 0.9%, while women’s silk underwear is taxed at 2.1%. Meanwhile, overcoats are taxed by a combination of price per kilogram plus an additional percentage; a wool blend overcoat for men has a tariff rate of 38.6 cents per kilogram plus an additional 10% of the value; a women’s wool overcoat is taxed 64.4 cents per kilogram, plus an additional 18.8%.
You could make the argument that men’s clothing, which tends to be larger than women’s, weighs more, justifying the discrepancy – a higher tariff makes up for the difference in weight. But Scafidi doesn’t buy it. “The average women’s coat may be a little lighter than a man’s, but certainly many of the weights are similar or identical to each other, and that does not account for such a huge difference in tariffs,” she said.
Though Scafidi would like to see the elimination of pink tariffs, she’s not confident that will happen anytime soon. “Tariffs make money in a way that voters don’t see,” she said. The actual markup of an item due to tariffs is hidden from customers, unlike a sales tax, which is printed on a receipt or shown online during checkout. “We can see a price tag, we can see sales tax, but we don’t see the tariffs right in front of our faces when we shop. Those are invisible to us, so there is no incentive for politicians to roll them back.”
Still, the pink tariff’s cousin, the pink tax, is well known, partly due to a heavily covered 2015 study by the New York City department of consumer affairs that in turn inspired ad campaigns from companies including Burger King and the European Wax Center drawing attention to the issue. California and New York state have since enacted laws that prohibit businesses from charging different prices for “substantially similar” but gendered products.
Scafidi imagines that if retailers were required to list out how tariffs affect prices, then people would be more likely to demand change. “Pink tariffs can add up a little bit at a time, drip by drip, like slow water torture,” she said. “It’s unfair at so many levels, but it’s unlikely to be corrected.”
#Pink tax#$2.5bn a year#Lizzie Fletcher of Texas#Brittany Pettersen of Colorado#introduced a bill calling on the treasury department to study pink tariffs and publish any findings on how these taxes might lead to a gen#women pay 3% more in tariffs than men#The first US tariff laws were written in the 18th century and eased by the early 1900s with the implementation of income tax.#women drive 70-80% of all consumer spending#The US Harmonized Tariff Schedule#men’s silk brief underwear is taxed at 0.9%#while women’s silk underwear is taxed at 2.1%#Just boycott anything unnecessary that would have a pink tariff or tax
12 notes
·
View notes
Text
No-Google (fan)fic writing, Part 5: Obsidian
Storytime
In terms of how long I’ve been using Obsidian, well. Currently, a little more than a week ^^ And I’ll be honest, I’ll probably only use it for writing fic sporadically, because it’s proprietary software and I prefer Open Source (and I also love LaTeX too much, but that’s a different question).
The reason why I decided to give it a try in terms of writing fic was that I’ve been talking with others about moving to Markdown, Obsidian is Markdown-based and I’d been playing around with it in a different context for a while already. So, out of curiosity, I decided I’d try to write a story in Obsidian and see if it could live up to my demands.
Word/Google docs versus Obsidian
Again, Word and Obsidian do not work in the same way. If anything else I have described here so far can be compared to the way Obsidian works, it’s Zettelkasten. The same principle of “one note for one idea/scene/thought” also applies to Obsidian. Also like Zettelkasten, Obsidian relies heavily on connecting these notes by way of links, using tags to categorise/find specific notes and it also has the same feature of using folders for collecting “sub-notes”, which can be used for structuring in the same way the virtual desk is used in Zettelkasten. Actually, I would say that the main difference between those two is that Obsidian uses Markdown and a folder-with-subfolders structure, whereas Zettelkasten has its own file format and relies on XML behind the scenes.
Cost
The personal use version of Obsidian is free, so technically +1 for that. However, Obsidian is not Open Source. It is not free in the same way Writer, LaTeX, Zettelkasten and Markdown (= many MD editors) are free, the code behind it is proprietary. This does not have any impact on the cost, at least not at present, but there is a chance that at some point, the developers might choose to charge for private use of it. I think it’s unlikely, but. Just so you know.
File formats
Unlike Word, however, Obsidian relies on Markdown as its file format and stores every “note” as a separate .md-file in a folder. The “notebook” where all notes are collected is called a “vault” and it’s just one big folder with lots of subfolders. In other words, even if the software is proprietary, the files can be read and used without needing Obsidian itself. Which is really great, because again, it means you have plain text .md-files with your ideas, scenes and stories, and they wil be readable even if Obsidian as an app disappears.
+1 for that!
Features
What you need Obsidian for is the features. And of those, there are many. I’ll save words and say, read about Markdown features like bold, italics etc. here, but I really do want to talk about other features Obsidian offers that plain Markdown with an editor does not.
Firstly, an important feature that I talk about a lot is the export function. AO3 needs either HTML or RTF, fanfiction.net ODT or DOC(X). Obsidian can export to all of these, provided you install the Pandoc plugin. This is not the same as installing Pandoc on your computer; you need to install the plugin in Obsidian itself to use it. But as long as you do, you can export to whatever you like.
+1
Another feature very important for me when I tried Obsidian was whether outcommenting would work (again, I’ve talked about this here). Basically, what that means is that parts of the text are not exported when you export the rest of the note – such as comments to yourself, notes on what you still need to write in a scene or simply – as I use it frequently – stuff you wrote and don’t want to delete, even it doesn’t fit anymore. Much to my delight, it works in Obsidian as well, again because it’s Markdown and it works in Markdown. [text you want outcommented]: # will do the trick.
+1
Lastly, another plugin I would recommend is Smart Typography. It “[c]onverts quotes to curly quotes, dashes to em dashes and periods to ellipses”, as the description says, and that’s really useful if you use a regular keyboard layout to write, where you get the standard ' and ".
+1
Installing both the Pandoc and Smart Typography plugins is easy. Open the Obsidian vault settings (the little wheel you can see in the left lower corner, to the right of “example”, which is the name of the vault), Third-party plugins (which you need to enable) and then browse Community plugins by name and install and enable them. Done.

Now for the most important part: putting together a story.
If you want one big vault containing all of your stories, you need to create “folders” for every story and then store the single notes for that story in that folder. Personally, I prefer to have one vault per story, because I find it a lot easier to focus on working on one story at a time if I don’t have several other stories in the same vault. This, I want to note, is different to how I used Zettelkasten, where I generally had one big Zettelkasten containing all of my stories for a specific fandom. I don’t know why that’s different with Obsidian, it’s just that way.
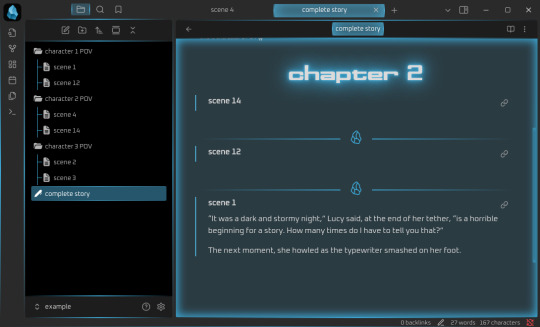
In any case, the following examples are for when you have one story per vault. In this case, I’ve decided that I’m going to write a story involving the POVs of three different characters. I’m going to keep their respective pieces sorted by character, so I always know who’s talking right now. Every scene where that character is the main narrator gets its own note within the respective character folder.

This, in theory, is no different than what I do with regular Markdown. What is very useful in Obsidian, however, is that Obsidian offers the possibility to “embed” notes in other notes.
And that, in turn, means that just like with Zettelkasten, you can use one note to put together the whole story and move around scenes without ever having to worry that you’ll accidentally delete and lose texts while copypasting.
It works like this: [[name of note]] establishes a link from one note to another (useful if you want to connect different ideas). If you add ! before the brackets, like so: ![[name of note]], it means that the whole text of the linked note will now be embedded in the note with the link. Which will give you this:

And, because you’ve installed the Pandoc plugin, this will now allow you to export the note named “complete story” to HTML, ODT or whatever, and all of the linked notes will be exported into that file. You need to change the order of scenes or move one scene from chapter 1 to chapter 2? Just delete ![[name of note]] in chapter 1 and put it in chapter 2. You can also insert horizontal rules, by the way, which I have done here. These will also be exported.
If you need your story structured in chapters rather than as a whole, the process is analogue: one note per chapter, where you !-link all the scenes that belong to the chapter in question. Then, if you want it as a whole, create a note where you !-link the notes for the single chapters, done. Export at your leisure.
Embeds are hands down in my opinion the best feature Obsidian has. They offer a distinct benefit over other Markdown editors like Ghostwriter, KATE or Notepad++, because Markdown, other than LaTeX, does not come with a feature that would make it easy to include “child files” in a “parent Markdown” file that only includes the header and the child files in the order in which they should appear in the final output document. Thus, none of the three editors I like to use for Markdown can show me the whole story if I decide to create a separate file for each of the scenes, and that is really annoying, because it means that I’m back to cutting and pasting pieces of text from one part of my Markdown document to another. Which in turn increases the probability that I will lose something, and well. See Zettelkasten as to how I feel about that.
So that is definitely an extremely useful feature deserving a big +1 because like with Zettelkasten, it means you can move the order of your chapters and scenes around without running the risk of losing the actual text.
Interface
Something I find quite enjoyable is that there are a lot of “skins” made by the community that can be applied to Obsidian. This is important to me because, as the previous instalments have probably shown, I’m a big fan of simple, clean, customisable interfaces. I’ve tried several of the community-made skins already, and my current favourite is Cyber Glow – but there are also others I’ve found quite nice.
Again, skins can be installed via the wheel/settings button, and just to show it, the below is the vault from above with Cyber Glow enabled.
Syncing
One of the big benefits of Obsidian is that it comes with a syncing service. Yes, you don’t need anything else, you can just create an Obsidian account and your notes will be synced across your devices, even on mobile devices. And file versioning is an option (I’ll get to that in due time). And that is really great, because it’s a one-in-all solution.
If you don’t need or want that, you don’t have to sign up for it. You can also continue syncing your Obsidian vaults with your preferred service (Dropbox, OneDrive, GIT, USB etc.). But you can and it’s at least nice to have the option. Downside: sync is a paid-for service, starting at 4$/month for 1GB of storage. Which isn’t a lot generally, except you’re writing plain-text/Markdown, so your files are Kb-tiny in most cases, and it takes a lot of Kb-sized files to fill up 1GB.
Personally, I will say that I’d much rather pay 4$ a month and know that my stories are not going to be scraped for AI, but it’s really a decision everyone has to make for themselves. Just remember – if you aren’t paying for the product, you are the product.
Ease of use for Word/Google doc-users
It’s not intuitive in the same way as moving from Word to LibreOffice Writer is. At least having a look at some Markdown guides (linked over there) is important if you are going to use Obsidian. But as I wrote there already, Markdown takes you about half an hour to learn, if you don’t know it already. And yes, you’ll have to wrap your brain around the concept of “one note = one thought/scene/idea” as well, but honestly? In terms of cost-benefit ratio, Obsidian is probably one of the most rewarding transitions you could make if you’re looking to get away from Word/Google docs. My only gripe with it is really that it’s proprietary software, but otherwise? Definitely recommended.
Read No-Google (fan)fic writing, Part 1: LibreOffice Writer
Read No-Google (fan)fic writing, Part 2: Zettelkasten
Read No-Google (fan)fic writing, Part 3: LaTeχ
Read No-Google (fan)fic writing, Part 4: Markdown
#degoogle#no-google (fan)fic writing#fanfiction#fic writing#fanfic writing#degoogle your fics#degoogle your writing#software recommendations#resources#obsidian
9 notes
·
View notes
Text

Hello! In this post I will share some tips I have to help you on your custom content making journey. These are more general rather than creating a specific item, but I may make another part in the future!
Things covered: learning curve of blender, free resources, learning your computer, using references

1️⃣ There’s no need to pay for anything
The only money I have spent on anything related to TS4/custom content is for some of the expansion packs. Every resource I have used I have only had to pay with time. Blender, Sims 4 Studio, and Sims 4 Tray Importer are all free! And for Photoshop, a good free alternative I use is Photopea, which is just a web version. Another good alternative is GIMP, which is an application.
There are applications like Substance Painter and Marvelous Designer, but I would only recommend those if you have a genuine interest in 3D modeling outside of TS4.
And in terms of finding tutorials, scouring the internet will always lead to some result. A good tumblr page is @thefoxburyinstitute, which has many sections based on your level of experience. Adding “reddit” to the end of a search helps too!
2️⃣ You can export anything from Sims 4 Studio as a reference (mod or EA object)
For an EA item, In S4S, go to Tools -> Browse Game Content -> then select the category you need a ref. If it’s a mod, click on My Projects and find the package you want.

From here, you can export the mesh, images, or any textures you need without having to create a new package for it! Best used when you have already created your own package and just need one aspect of the object.
If you want to append in Blender, go to File -> Append (works with any .blend file exported from S4S), then find the location of whatever you exported. Go to the Object folder, find anything labeled s4studio_mesh_number, then append. I just append all of them, then delete ones I don’t need.

Also, in the Scene tab, make sure the cut box is blank for the reference you imported! S4S will confuse this with your mesh if not, as the cut number determines which mesh will replace the EA one.
3️⃣ File management is important!
The more you create, the more random things you’ll download on your computer. You need to be aware of where you’re downloading things from, duplicate files, how much storage it’s taking up, etc. I recommend the Sims 4 Mod Manager by GameTime. Back up your files often and learn how your computer works because every device is different! Below is how I organize my CC (could use some improvement), but use whatever keeps you organized.

4️⃣ Learn Blender outside of Sims 4 CC
There have been so many times when I’m so frustrated about Blender that I have to take a step back and focus on a different hobby. The first time that happened years ago, I decided to learn how to make simple models in Blender, and not only did I enjoy it, but I also learned so much that can be applied to CC! Below are some tutorials that I watched.
Blender 3D Beginner Tutorial by 3DGreenhorn
A simple room tutorial.
3D Isometric Bedroom by artbytran
Another simple room tutorial, but with more cute details.
Creating Stylized Low Poly Characters by lacruzo
How to make a low-poly character and texture paint on it (I used this tutorial to texture paint on a hair clip!)
Intro to Creative Web Development by Andrew Woan
Okay I know the 5 hours is daunting, but only (lol) the first 2 hours are Blender. This video goes more into the technological aspect and making models optimized for video games/web (ahem TS4). After the 2-hour mark, it's all coding, which is not needed for CC making.
5️⃣ It takes time/consistency
As a person who only makes CC once every other month or so, it’s mostly muscle memory and consistent practice that makes someone feel confident in their CC making abilities. Remember how as a kid typing was the slowest thing ever, and today you’re (hopefully) better? It’s cause you kept practicing over a long period of time.
The first time I opened Blender to make poses was in 2021, and 4 years later, there’s so much that I have learned from others, and 10x more that I don’t know due to the endless possibilities of what can be created. But hey, I’m confident enough that I made this post of tips, right? Take small steps, the end goal is to make something you or others enjoy.
Thanks for reading this if you’ve come this far, and here are two pages I recommend reading to help you on your CC journey! :D
Internet safety regarding TS4 by crazy-hazy-sims (pls read this) Custom Content Creation by simlaughlove
6 notes
·
View notes
Text

Import Export Code Registration: A Key Step for Your Business Expansion In today’s globalized world, expanding your business beyond borders is a profitable opportunity. However, to engage in international trade legally, you need an Import Export Code (IEC).
0 notes
Text
.dae shader node configuration - updated!


I found a small bug in my script, so I've updated it! There was an issue with how glass meshes imported, but I found the problem and resolved it.
This script automatically configures shader nodes for .dae files exported from TS4SimRipper for use in Blender - currently, imported .dae files do not have properly configured specular or normal maps, so I wrote this to do it for you ❤️ I'm working on converting this to a Blender add-on to make it more user-friendly (hopefully should be done in the next few weeks) but it's fully workable in its current form. If anyone wants to give it a shot, I'd love to get your feedback and I'm happy to answer any questions!
To use the script in its current form:
Make sure you're using Blender 4 - I've tested this with 4.3 and 4.4
Export your model using TS4SimRipper - you must choose either "single mesh and texture" or "solid and glass meshes and textures." It will NOT work with all separate meshes.
Open the scripting tab. Either create a new script and copy/paste my code there, or download my script and open the file.
Select the collection where you want the model in the outliner.
Hit the play/run script button at the top of the scripting tab.
Blender will have you select the .dae file you want to use.
And there you go! This is pretty much what you'd get if you imported your .dae normally, but if you hop over to the shader tab you'll see that everything is set up for you!
One note - I personally don't use the 'Clean DAE mesh?' option in TS4SimRipper (it can be kinda buggy) and instead merge vertices in Blender. If you would prefer not to use Blender to clean your mesh, remove line 34:
merge_vertices(model)
I recommend doing that if you get weird shadows, especially around the cheeks and hairline. This generally isn't a problem using EEVEE, but it's a huge issue with Cycles (which is what I always use). Alternatively, feel free to reach out - I'm happy to help! It took me ages to figure out how to import models correctly and I've probably experienced any problem you run into.
I haven't figured out how to automate everything, so you still need to:
Attach emission maps for vampire eyes/other glowing objects - these do not seem to export properly in SimRipper so you may need to export the textures with S4S and manually attach them
Remove the lamp that is automatically created when you import a model - it will be in the same collection as the model
Apply your own subsurf modifier if you're planning to do that - you might need to take a few extra steps to stop weird awful shadows forming at the cheeks & hairline. It took me ages to figure out how why that was happening, so feel to reach out if you want me to walk you through the steps to fix that.
6 notes
·
View notes
Text
1. Goldman Sachs:
President Trump signed executive orders imposing a 25% tariff on imports from Mexico, a 25% tariff on imports from Canada apart from energy, which would face a 10% tariff, and a 10% tariff on imports from China. These tariffs would apply above and beyond existing tariffs. While the details of products eligible for the lower energy tariff have not been released, we expect it to cover oil, gas, and electricity. A Federal Register notice is likely to be published with implementation details, including specific product codes eligible for the lower rate. The White House has highlighted a “retaliation clause” in the executive orders that states that should one of the countries “retaliate against the United States in response to this action through import duties on United States exports . . . or similar measures, the President may increase or expand in scope the duties imposed under this order to ensure the efficacy of this action.” While this is a clear warning against retaliation, it has no automatic effect. The tariffs are scheduled to take effect at the start of Feb. 4. With only two days before implementation, the tariffs look likely to take effect, though a last-minute compromise cannot be completely ruled out. The White House fact sheet on the tariffs and the executive orders highlight fentanyl and immigration as the motivation for the tariffs, but there are no explicit criteria provided for lifting them beyond cooperation on and an improvement in the immigration and fentanyl situations. In light of their potential economic effects and the fact that the White House has set general conditions for their removal, we think it is more likely that the tariffs will be temporary but the outlook is unclear.
2 notes
·
View notes