#Beginner Sewing Patterns
Explore tagged Tumblr posts
Visit Tumblr Blog
Explore Tumblr blogs with no restrictions, modern design and the best experience.
Last Seen Tumblr Blogs


Fun Fact
In 2020, 27% of US Tumblr users had an annual household income of over $100,000.
Text
How to Read Japanese Sewing Patterns to Sew Clothing
In this post, you will learn how to read and understand japanese sewing patterns to sew amazing clothes from them. Check out my japanese sewing patterns [here]. Japanese sewing patterns are renowned for their precision, elegance, and unique style. However, they can seem daunting for beginners due to the different symbols and conventions used. This step-by-step guide aims to demystify Japanese…

View On WordPress
#Adding Seam Allowances#art#Beginner Sewing Patterns#books#Custom Clothing Patterns#Easy Sewing Projects#How to Read Sewing Patterns#Japanese Sewing Magazines#Japanese Sewing Patterns#news#Online Sewing Communities#photos#Popular Sewing Books#Sewing#Sewing Pattern Symbols#Sewing Skills for Beginners#Sewing Tips and Tricks#Step-by-Step Sewing Guide
24 notes
·
View notes
Text
Five easy beginner sewing patterns
Certainly! As a beginner, it’s best to start with simple sewing projects to build your skills and confidence. Here are five beginner-friendly sewing patterns that are perfect for a novice sewist: Drawstring bag: A drawstring bag is a quick and easy project that is perfect for beginners. You can use it to carry your gym clothes, store your knitting projects, or even use it as a gift bag for a…

View On WordPress
#beginner sewing class#beginner sewing patterns#easy patterns for learning to sew#pattern knowledge#sewing patterns for beginners
1 note
·
View note
Text

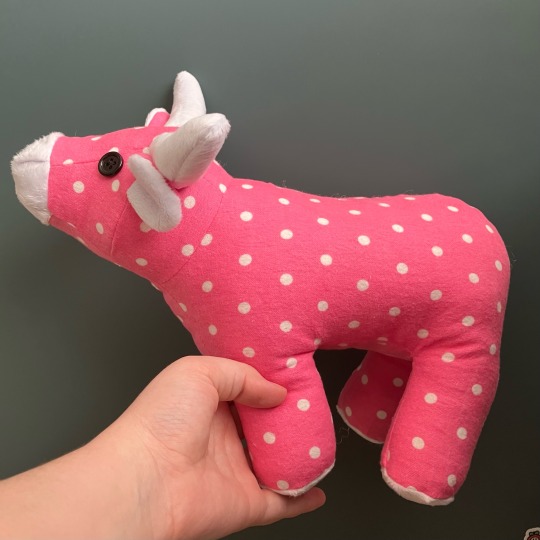
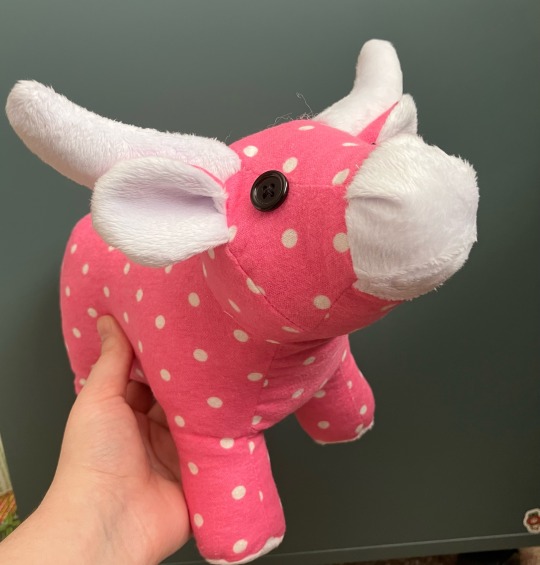
A little flannel cow!
I think her name has to be Dottie
#sewing#handmade#plushie#cow plushie#some interesting construction in this cow pattern#like. not unique but just enough different that it’s got me thinking of how I could do something like that#all in all 10/10 excellent pattern would make again#not super beginner friendly but also not difficult to make if you’ve made a plushie before
703 notes
·
View notes
Text
TSUM PATTERN!!!
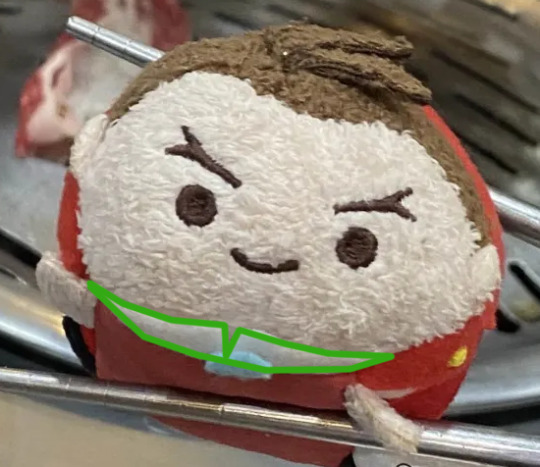
retested it after digitizing to make sure all the seams are in order, and everything's looking fine imo :3 here's a tsum made with this pattern with susato tsum for comparison:


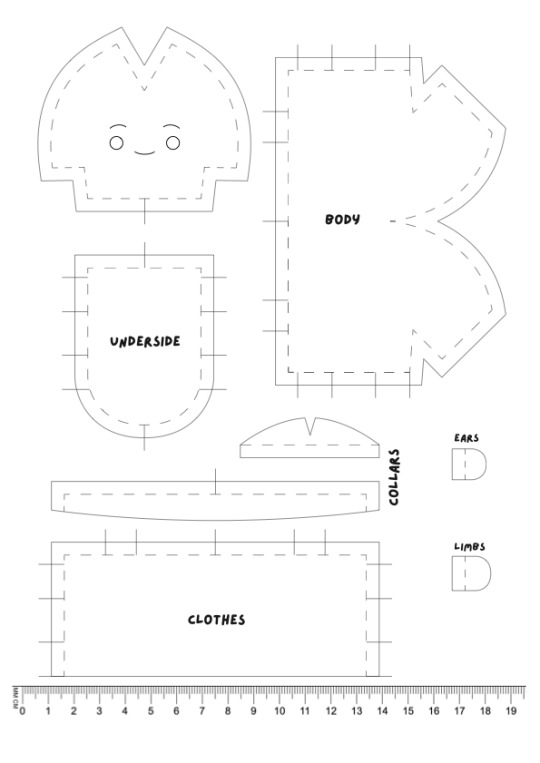
here's the pattern, formatted for A4 size paper :>> guides are for lining the pieces up + ears/limbs placement
if you wanted to be really accurate with printing out the pattern: in my experience, setting the custom scale to 100% in the page setup will get the ruler on the page to be 1:1 with a real life ruler
additionally: if you want the tsum to be as close as possible to official ones, they use non-stretchy fabrics for the underside part of the tsum. i only have minky but ironing on some lightweight fusible before sewing the pieces together made it non-stretchy ^^
it looks to me like they used a very thin faux suede with fusible interfacing for some structure (i could be wrong though as 1) i am not an expert in identifying fabrics and 2) i only took apart klavier tsum and no one else. but everyone else that i own seems to use the same fabric for the underside).
they also have a little bag of filler beads inside that weigh around 14.5g (bag they were in included), and the stuffing was ~8g if you wanna be REALLY accurate. anyway. enjoy!
EDIT: forgot to add that the collar pieces are more of a size/sewing guide so they'd fit onto the tsum in case your character has any clothing with lapels/collars and are meant to be changed according to your design! the smaller piece is the little piece between the face and the underside while the bigger piece is for the "lapels" (so in retrospect i should've named it that but whatever.) here's how they'd look like on the tsums for reference in case i'm not explaining well LOL

#.docx#sewing pattern#had to look up if light microsuede/faux suede was a thing#and it is! lmao#i found a listing on etsy for it#might order some from there n see how it goes. will update on my findings#also yes i weighed everything. just in case.#note for my edit: to anyone who's used to sewing that might be like. obvious#but i'm just adding an explanation in case any complete beginners would wanna try this out LOL
218 notes
·
View notes
Text
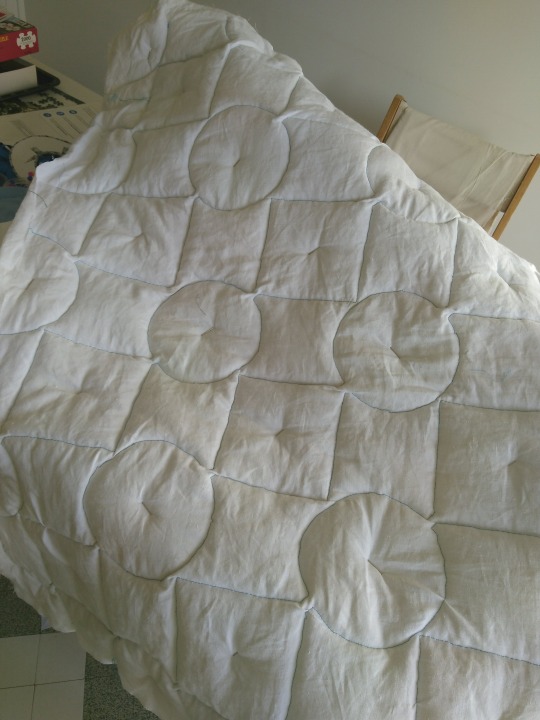
First Quilt!
It has been a lot of fun and a lot of trial and error but it's done!!!

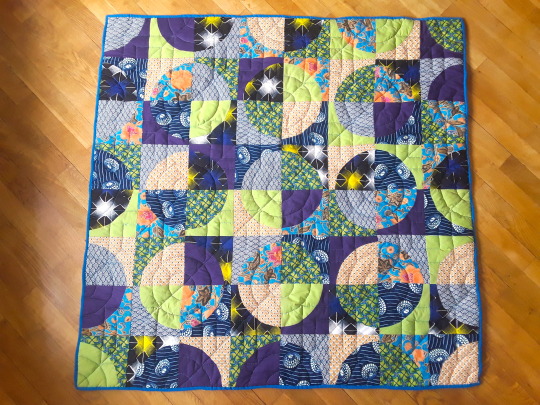

It's roughly 1.20 x 1.20m (which is a number of feet I can't be bothered to look up but let's say it's about child sized and it'll be great to chill on the couch).
I want to thank @langdon813 who I've never talked to (sorry if you hate being tagged) but whose gorgeous Drunkard path quilts made me wanna do it too :)
I had never done any quilting before (but I did sew), so here's what I've learned, if any beginner is interested in jumping off the deep end the way I did and wants advice from someone who has freshly acquired experience but will also not use any confusing technical terms (with pictures!) :
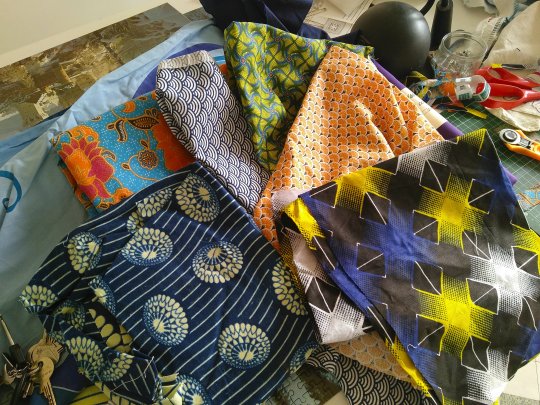
Fabric picking : so most advice I read was to go for pre-selected bundles of fabric that already go together, but I'm contrary and like to do my own thing so I used wax fabric (the blue ones on top the pile) I had laying around, which I strongly recommend: it's very easy to cut due to it being waxed, and I added a few fat squares from the shop, plus I also had the orange and blue floral and I based the coulour scheme on it. One thing that's true is it would have been easier to work with fabric of the same thickness, and the floral was givne to me by my ma who got in on trip to Thailand and it was alot thinner than the rest which didn't help.
Cutting: I got a rotary cutter for the occasion and it's great! Do not maybe push too hard on it and give yourself nerve damage the way I did (temporary but still), it's actually ery sharp and easy to use, so long as your template doesn't slip you're fine
Piecing :Yes you can do curved piecing even if you have zero experience, you just gotta make a template and
pin it a lot.
1/4 inch margins is the standard so I rolled with it because I don't like converting, but when you're strictly metric it is kind of annoying but doable because my machine does have a 1/4 inch mark and if you stick a length of tape along it it's pretty easy to follow, even for curved piecing.
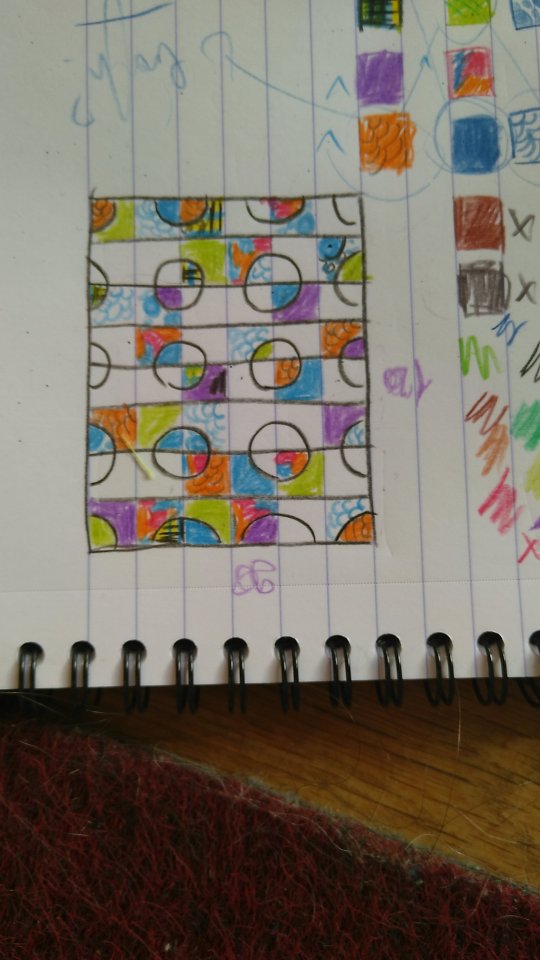
Layout: At some point you've got to decide the layout is done, because I've re-arranged the blocks at least 6 times and it's a very good way to go insane. (For rough reference, my plan was to have no repeat fabrics in any of the circle-in-a-square blocks, and I only made one mistake which I clocked too late to change)
Chain piecing!! Meaning you pile your blocks together in a specific order (that I personnaly wrote straight up on each piece with a very sophisticated letter/numbers down/across system) and then just sew them together in a line without having to cut the thread between each pair. Looks a little like a fanion banner and at some point it feels like you'll be forever tangled into it but then it's magic :) It's not that hard actually and will save you a lot of time + there's a lot of online tutorials you can use.
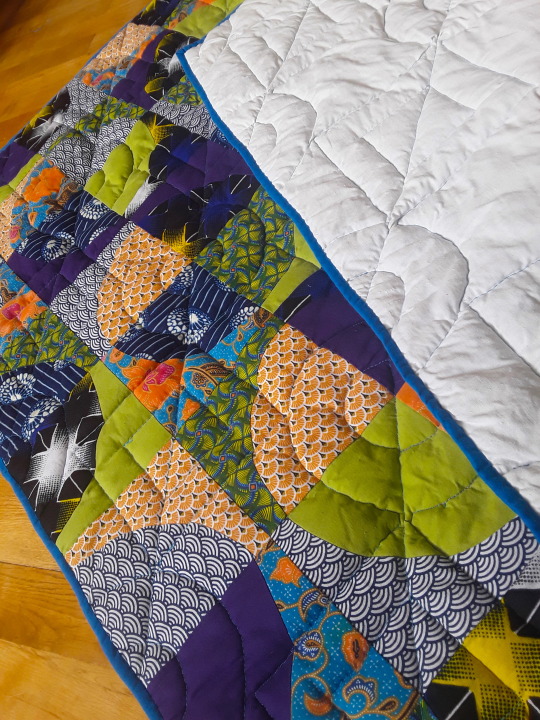
Basting! (which it took me while to understand is the part where you attach the backing, the fluff and the quilt top together) : you need more safety pins. Safety pins will save you from the wrinkles and the unfortunate oopsies of realising you've caught your backing double folded into your quilting stitch, which I did a good three times and was not fun to undo. Also, I forgot to tape the backing to the floor and it probably would have helped with the wrinkling...
Backing : I used an old linen table cloth I got for 10€ at a charity shop, and I've still got about 2/3 of it left, so I recommend that, it's sturdy but soft enough, doesn't thread easily and can be washed at very high temps, if that's a thing you do.
Quilting! Well, my machine came with a quilting foot for free motion quilting (which means you're the one moving the fabric along in whichever direction and you can sort of draw with your stitches) and it seemed fun so I did that, and here's what I learned : curves are hard but doable, also my machine doesn't like to go back (kept skipping sitiches for some reason) so it involves a lot of shifting the quilt around, which isn't easy considering the bulk. And also, drawing the quilting pattern you want so you can follow it while quilting actually does help, I used an iron/heat-erasable pen and it worked just fine. Check your stitch tension, mine was too loose and I realised too late so there's spots where I could pull on the thread and it looped, had to stitch back over that.
Quilitng pattern : I wasn't sure what to do, supposedly your batting (aka: the fluff) comes with instructions on how tight you should quilt to avoid it coming apart through use but I got mine cut at the fabric shop and forgot to ask so I just rolled with a rough 10cm maximum distance in between stitching lines but tried to do less in most places. According to many blogs : the tighter your lines the stiffer your quilt, so I kept it loose for comfort. (Picture is halfway done, I added a smaller square/circle inside each square/circle and if you look at it you'll see it's actually diagonal lines form one end of the fabric to the other.)
Binding is boring, and there's nothing to it. I got a length of pre-cut bias binding, machine-sewed it front to front to the quilt top side of the quilt and the folded it back and secured it by hand to the back with a ladder stitch. Took me roughly and entire rewatch of the Last Of Us. There's a trick to doing the corners that's fairly simple but I've lost the tutorial...
Overall : I got myself a quilting book with techinques and such and it helped, but there's a ton of stuff online, and once you get over the very Christian American mum vibe of most of the blogs, it's all very helpful (and gorgeous!) (no offense meant to Christian American mums, it's just a bit of a culture shock from where I'm standing).
#quilting#quilters of tumblr#quiltblr#quilt tutorial#quilt pattern#quilt#drunkard path#home sewing#sewing#sewing project#beginner's quilt#beginner quilting
181 notes
·
View notes
Text


Lane Pants PDF Sewing Pattern | Size Inclusive 0-34 | Beginner Friendly by SydGrahamPatterns
#SydGrahamPatterns#sewing pattern#sewing pattern pdf#pdf sewing pattern#pdf pattern#pdf download#sewing pattern download#sewing pattern for beginner
130 notes
·
View notes
Text
EVERYONE
i need to share what i have created


Spot Froglon
#newsies#92sies#livesies#spot conlon#but a frog#pls appreciate him#hes so cute#i know that pun was awful#but like#so silly#hehe >:)#uhhhh what else#felt art#felt frog#sewing#small sewing#beginner sewing#idk what else#its that pintrest frog pattern#this took me too long to make#my mom asked what i was doing#im just#like#“U h M-“#Isaac speaks#Isaac makes a thing
166 notes
·
View notes
Text

pretty pink floral cross stitch <3
you can buy this beginner friendly pattern on my etsy shop here >
#cross stitch pattern#fiber crafts#textile artist#textile art#cross stitch pdf#beginner cross stitch#cross stitch gift#hand stitched#hand sewing#etsyseller#etsystore#etsyshop#small business#pretty cross stitch#pretty girl#etsy seller#pink art#pink flowers#pink floral#pink blog#coquette#pink aesthetic#pink moodboard#pink girly#pinkcore#soft pink#pink and girly#x stitch pattern#x stitch#cross stitch
71 notes
·
View notes
Text


I don't have any fun, new, digital art to show for myself. Most of my time has been sunk into life obligations and comic work, but I have been dipping my toes into sewing (and have been working on tufted stuff, but idk if I'm proud of it enough to show it off yet, ha!)
But, how we feeling about little hand sewn frogs, Tumblr community?
I used the pattern from this etsy listing, in case anyone else wants to try it out. It's meant to be for a machine, but I did it by hand because that's what relaxes me, and it worked just as well.
#frog#plushies#fiber art#fiber crafts#sewing#hand sewn#sewn#minky#diy craft#crafts#art and craft#simple pattern#simple#beginner sewing#beginner craft#easy#easy diy#easy crafts#artists on tumblr
14 notes
·
View notes
Text

lil idiot i spent 2 hours working on this morning :] made the pattern myself, this was more of a tester to see how it would turn out, i fucked up the beak so ill have to fix that on the next round. also first time trying to embroider eyes so ill have to practice making those look better......overall i like the wing and the felt feet and the general shape!!!!! i want to make a lil army of seagulls........i think these would make for cute keychains :0
#lots of ladder stitching........definitely getting the hang of it#do not be too judgmental of my sewing skills i am very much a beginner and this was obviously a test of a pattern i made myself#hand sewing is v epic!!!! very meditative#my art#seagull
7 notes
·
View notes
Text
How to Sew Own Clothes for Beginners - Free Sewing Patterns
In this post, you will learn how to sew own clothes as beginner. Love what you see ? Support me by snagging some cool items from my shop! Every purchase helps me bring you more awesome content. Thank you! Shop Now Why Sew Your Own Clothes? Sewing your own clothes is a fantastic way to express your personal preferences and style. It offers the freedom to create unique pieces that fit you…
#Beginner-friendly sewing patterns#diy clothing#Easy Sewing Projects#free sewing patterns#How to Sew#Learn to sew#Personal preferences#Sewing journey#Sewing Machine Basics#sewing skills#Sewing Techniques#Sewing Tips for Beginners#step-by-step sewing guide
73 notes
·
View notes
Text
Easy DIY Flounce Tutorial for Beginners | Free Printable Pattern Included
youtube
#youtube#diy#sewing#sew#tutorial#free pattern#free sewing pattern#beginner sewing#sewing tutorial#sewing patterns#upcycling
23 notes
·
View notes
Text
just told a scam bot to kill themselves (Dots idea)
in other news I finished the blueprints for my doll, I have no sewing experience and to much free time, we start tomorrow, Eugene the octopus will have a new partner in crime

If you have any tips to improve the pattern please tell me
#I don’t know what I’m doing#sewing#crafts#art#digital art#pattern#Hand sewing#hand stitching#sewblr#Sewing beginner#beginner sewing
7 notes
·
View notes
Text
*looking at my abandon textile projects* I'll be back soon i promise
#making 26 smuppets in 13 months may or may not given a little burn out/boredom#but ive gotten out my red knitted blanket that hasnt been touch in like a year because of my smuppets#and i swear im gonna work on soon#setting the goal to get it finish this year#it's ugly and bad but it's my first blanket and a weird material for it a beginner to work with (i assume based on my sewing knowledge)#i have also gotten out my partly done smuppets again now that ive had a break#but maybe i should pivot back to other projects like my build-a-bear clothes (i gonna to digitise my patterns i swear)#but also i keep telling myself im gonna work on the smuppet gifts i promised for my friends and my SisIL#oh wait there was ANOTHER friend i promised a smuppet#but this one is meant to be a half size one so it looks silly next to the bruppet#i should make a smuppet for my partner. to go with faer Cal.#so many smuppets. so little time.#why do i have a job. i should be sewing & knitting and playing pokemon & balatro and writing muppets & hetalia fanfiction#and working on my VTM character tbh#WOW. talk abt word vomit.#talking lollie
7 notes
·
View notes
Text
So I smoked a little tonight and started talking with a friend about lost skills like sewing or knitting and the barriers that people face when they try to start those hobbies.
And my friend was like Tj, you literally sew. YOU know where to start. You want other people to learn then you have to teach them. Something something the corruption of the youth of Athens.
Anyway here’s my piss poor tutorial on how to sew pattern weights. Something you should absolutely have when you start sewing but no one ever tells you.
Materials: Fabric, ribbon, cutting tools of some kind, iron, something to stuff the weight with (I used rice), seem ripper, sewing machine and thread.
I’m using a 1/4 inch seem allowance. But you can make the same pattern with 1/2 seem allowance.
Step one: fabric.

I’m just using scrap cotton fabric that I have leftover from a bag I made.
Step 2: Cut (and presumably iron)
I forgot to take a picture of this step, but for a large pattern weight I cut a 4” by 8” piece of fabric. You can make a small one with a 3” by 6” piece. You’ll also need a piece of ribbon, roughly 3” for the large weight and 2” for the small one. Now you iron your fabric. Always iron. Always. The sewing gods will be angry if you don’t.
Pro tip: cut ribbon at an angel so it doesn’t fray.
Step 3: Fold ribbon in half and place about 1/2 inch from the corner. (If you’re using 1/2 inch seem allowance place the ribbon 1” from the corner.)
Make sure the folded part of the ribbon is on the RIGHT side of the fabric.

Now fold fabric so it’s right sides together

Clip or pin your ribbon into place so it doesn’t move as you sew and take it to your machine.
Sew around 2 sides, leaving the bottom open

I cut away a bit of the excess on mine, but you don’t have to.
Step 4: fold
Match up the seem to the center fold


Leave an opening to turn your weight inside out.

Step 5: turn

Turn your weight inside out through the opening you left in the bottom. I use a chopstick to help turn it, but you could use a pencil or even just your hands.
Step 6: Fill
Now you just fill the weight with whatever you might have. I had rice from a heat pack I made so I used that. Lentils, dry beans, whatever you have on hand that will give the weight some actual weight.
Step 7: Close
I simply hand stitched my weight closed.
Step 8: Pattern weight!
Now you have your pattern weight and can trace things without having to awkwardly hold them at the same time.


Jar for scale. Thanks for coming to my TED talk
10 notes
·
View notes
Text
Progress is slow going but it IS happening 😂 Just need to try adding the sleeves now.


#beginner sewer#sewing#diy craft#peppermint wrap top#free pattern#cotton#practice run#clothing#beginner sewist#wrap top#craft
5 notes
·
View notes