#Best Duplicate Image Finder
Explore tagged Tumblr posts
Visit Tumblr Blog
Explore Tumblr blogs with no restrictions, modern design and the best experience.
Last Seen Tumblr Blogs


Fun Fact
1,644 Tumblr posts in 1 second.
Text
Duplicate Frame Deletion: A Likely Unnecessary Tutorial
So… you updated to MacOS Sonoma, and–while it is amazing in many regards for photoshop things–it is a dang bummer and mood killer if you use MPV. However, after slamming my head into a wall trying to change the code on my own, I realized there is a much, much simpler solution to this.
In this tutorial, I will be showing you all how to delete duplicate frames from your gifs, with two options:
duplicate finder
within photoshop
Under the cut because pictures are a visual learner’s best friend!
A quick note:
MPV is odd with this. I’ve not had to do this on 4k capping, but have had to on anything under that. I don’t know the full reasoning, but it mostly looks to be something with the way it is reading frame rate. I know it’s in the code, but could not pinpoint it myself, and these were the only tricks that worked. If you find a better solution, please let me know! It has been rough, otherwise.
Step 1: Cap in MPV as normal
Now, this may be obvious, but make your caps in MPV. For a full tutorial on this, I highly recommend this one by kylos. The only difference between our software and their suggestion is going to be using the newest version of MPV (.0.36 at the time of this), and not the older. This is because there is an issue with MacOS Sonoma and older versions of MPV that prevent it from opening for… Some reason.
Step 2: Make sure you have your caps
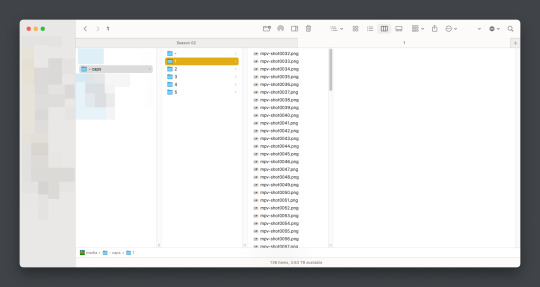
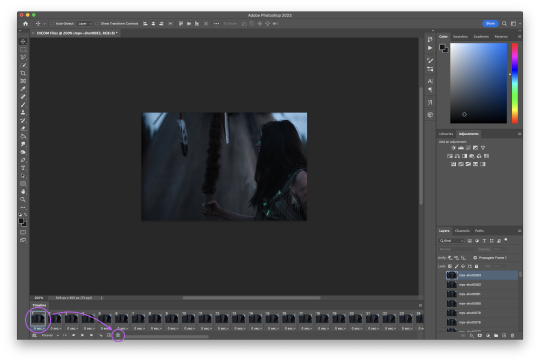
I recommend moving your caps to whatever folder you like for your own ease of use. My biggest rec is to have it in its own folder, with no older folders within the folder. Not really a requirement, but in my mind, it makes the process faster (only true depending on number of files in other folders). You should have something like this (I am doing a scene from TWOT, as it’s one I’ve tested this method on a few times in several instances):
Once there, it’s time for the line split. I recommend option 1 the most (it’s faster, IMO), but again, this is a two option thing.
Option 1: Duplicate File Finder
So, duplicate finders are what they sound like. They are pieces of software that can be used to scan your device (or specific sections of said device), for duplicate files. It does not matter the title of the file, if the system reads it as a copy, it will find it.
There are a number of varieties for this, paid and free. I will not lie, the one I use is a paid version, because I had a huge issue with duplicate files taking up space when I moved to a new device. This also helps a lot with cloud file keeping, in my opinion. But that is beside the point.
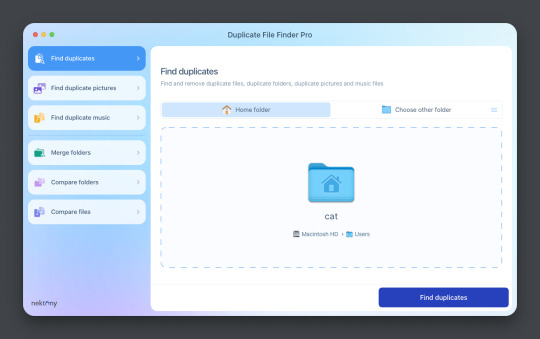
This is Duplicate File Finder Pro, which I got for other reasons, but has been very useful since this became an issue. The free version is sufficient for removing duplicate files found in folders, and that is why I still suggest it. You only need to get the pro if you have other intentions.
Now, onto the next step…
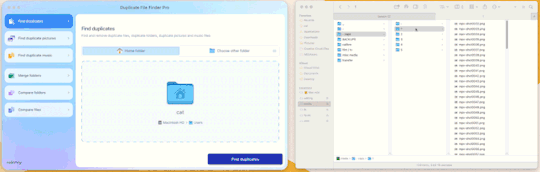
Step 3: Drag and drop the folder
With our folder full of caps, we simply drag and drop it into the application to begin.
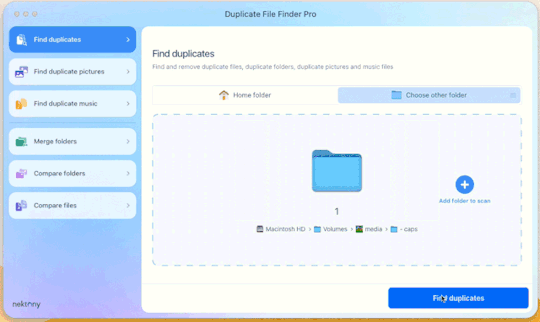
Step 4: Click “Find duplicates” and watch the pretty graph roll.
Step 5: Select the duplicate images
You can see here it found the duplicates.
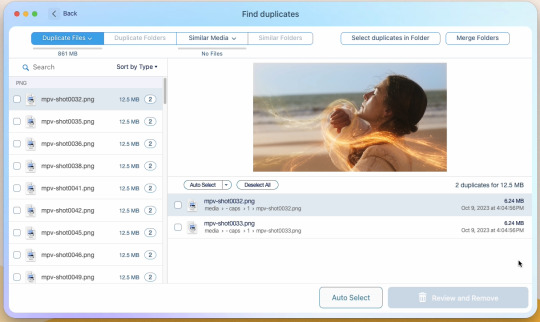
Now, I could go through by hand and click them, but… that’s a lot of time I don’t want to waste. I let it auto select them instead (you can tweak the settings for auto-select, but this is not that tutorial).
Step 6: Select review & remove, complete!
Wham bam! You’re completely set and good to go. Gif as normal~ (all final results at bottom)
Now, of course, maybe you don’t want a duplicate remover. Understandable, so what then? Well…
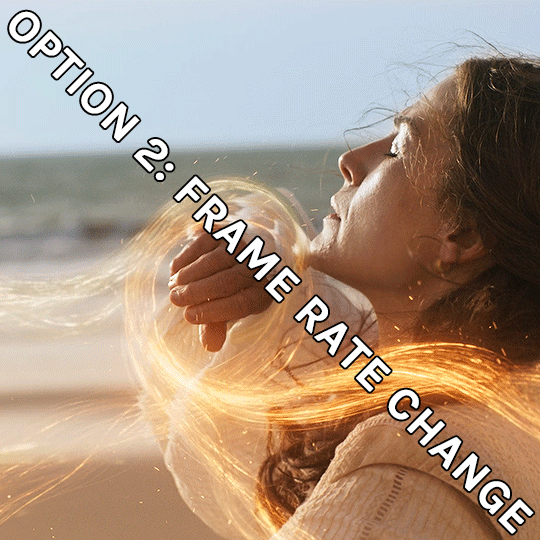
Option 2: Photoshop & the Changing Frame rate
So, this one is a little more technical. I suggest basic giffing and Photoshop knowledge before attempting.
Step 3: Import folder as you normally would
I believe this works as it would for import video, but I don’t want to say that and be wrong. But load your files in and you’ll be here:
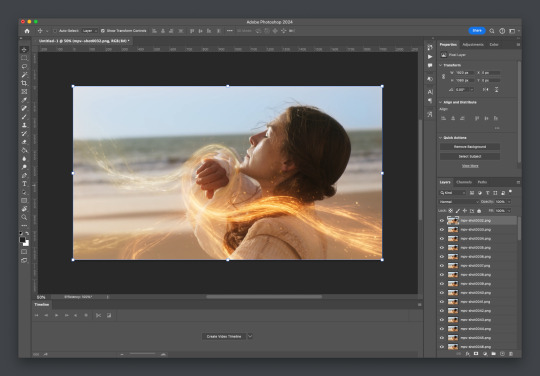
Now create video timeline, make frames from layers, yada yada (kylos’ guide is very good with this if you need help, it’s the same that was linked at the beginning of this). You’ll now be here:
And the actual part of the tutorial you all came here for...
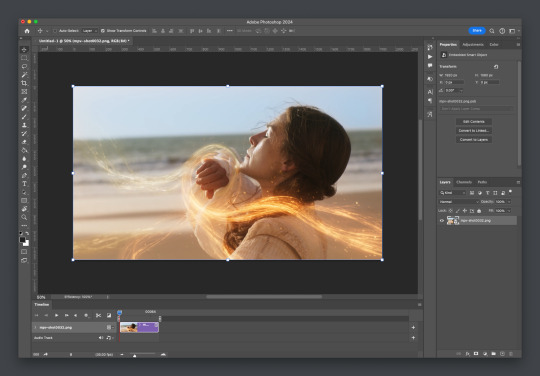
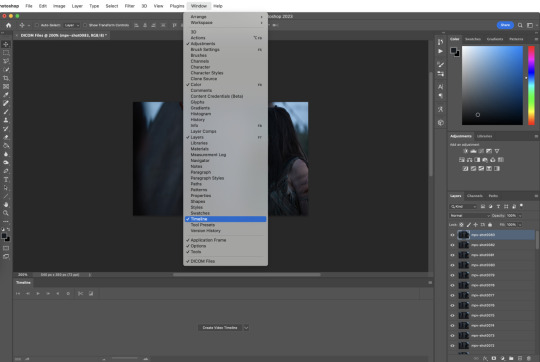
Step 4: Change the frame rate
So, in the bottom, next to the mountains for zooming in on the timeline, you’ll see it reads “30.00 fps.” We need to change this to 60. How? Easy! Click the three lines circled here:
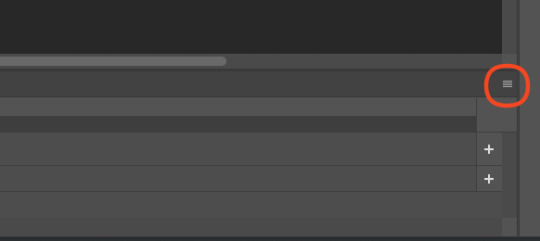
Then click “Set Timeline Frame Rate…”
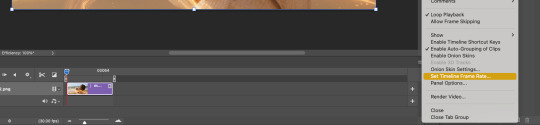
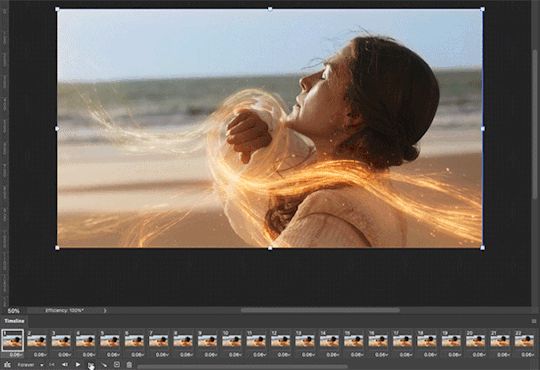
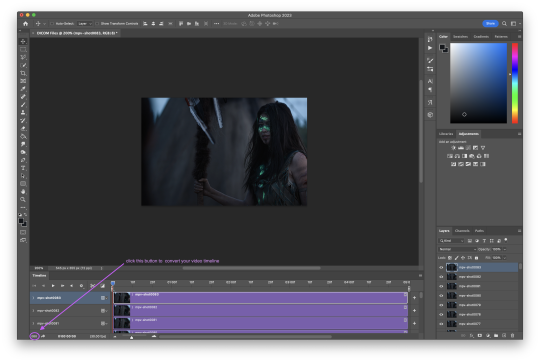
A little box will pop up, change the 30 to 15 (dropdown or typing, it works the same) and click “OK.”

Your timeline will now be cut in half for length. That’s OKAY. DO NOT PANIC.
(Optional) Step 5: Double Checking
Click play on your gif, and you’ll notice it is no longer duplicate framed! To verify, let’s convert back to frames, just to see…
And it did, success! So make the rest of your gif as normal.
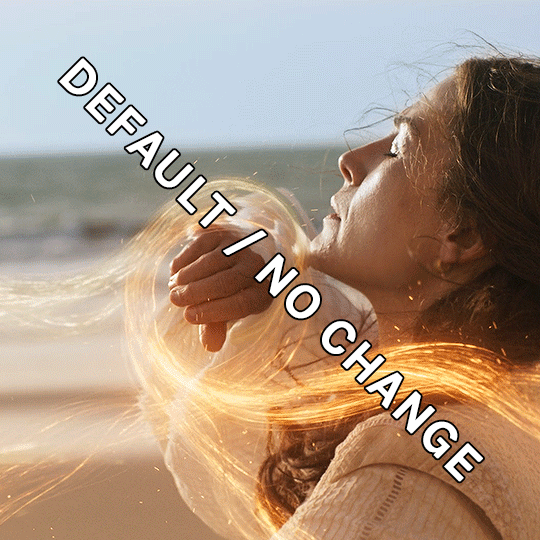
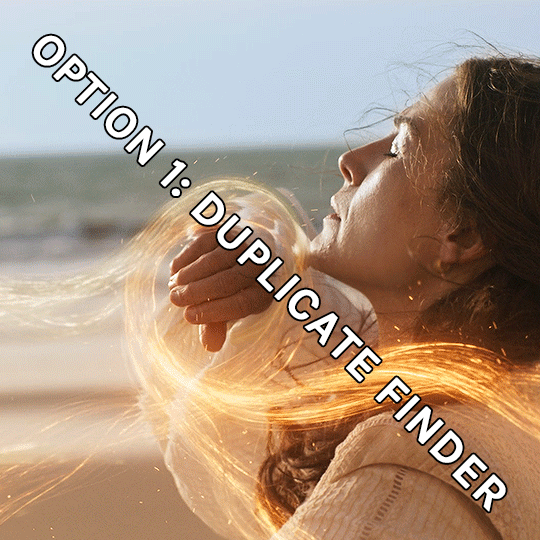
Your final results for the gif will be the following, with the gifs all labeled on what option was taken (or not). These were cropped for uploading and sharpened because of how I am. No coloring applied.
If anything was confusing, please don't hesitate to reach out! I'm happy to help in any way I can on this. My ask is always open. Happy Giffing!
#*tutorial#*ps#photoshop#resources#tutorial#alielook#singinprincess#sophiedevreaux#tuserabbie#tuserheidi#userace#userairi#useraish#userbarrow#userdorksinlove#userhella#userkayjay#userkraina#usermadita#usernik#userrobin#usershale#usersmia#usersray#usertj
176 notes
·
View notes
Text
Explore top duplicate photo finder tools to efficiently manage your images.
0 notes
Text
Duplicate Image Finder Tools: Find and Remove Duplicate Images
Duplicate Image Finder Tools will help you to find and remove duplicate photos. Photos can be organized by Removing Duplicate images.
#Best Duplicate Image Finder#Duplicate Image Finder#Duplicate Image Finder Tool#Top Duplicate Image Finder Tools
0 notes
Photo
hello and welcome! this is my spin on a comprehensive giffing tutorial that not only covers the basic mechanics of how to gif, but also goes into the tips, tricks, and general photoshop information i’ve learned since i started giffing and now wish i could beam into my past self’s brain. this tutorial will walk you through everything from start to finish, help explain what not to do and why, and hopefully give even experienced gifmakers some new information!
note: this tutorial is very long and image-heavy, and is best viewed on dash
WHAT YOU’LL FIND IN THIS GUIDE
software needed
sourcing + storing footage
giffing: methods + step by step process
actions
coloring
text: subtitles, fonts, etc.
saving: timing, settings, exporting
posting: captions, tags, scheduling
resources
✨ NOTE: CURRENT AS OF 05/25 ✨
1. SOFTWARE
photoshop
there are tons of programs out there you can use to make gifs, including photoshop dupes like photopea and gimp, but this tutorial is going to focus solely on photoshop
i run photoshop 2025 on a macbook pro, but any ps version recent enough to have the video timeline will work. windows users will be able to follow along as well
you can snag photoshop (and lightroom) for $10 USD/month directly from adobe
adobe also offers discounts/free programs through universities, so be sure to look into that if you’re a student
or you can check here and here for other ways to snag it
vpn
just get one. seriously.
most reliable vpns (nordvpn, proton, mullvad, etc.) regularly have sales to make them more affordable
if you really can’t afford one, there are some free options; just be extra careful about which one you pick
if you don’t have a vpn, your internet service provider will be able to see what you’re t*rrenting/downloading and may take action against you— anything from cease and desist notices to throttling your internet speed or even terminating your contract with them
note: make sure your vpn is active and working correctly before you start t*rrenting or downloading anything
qbittorrent
safe, reliable free t*rrent client with a clean interface that is fairly intuitive
note: make sure you bind your client to your vpn to prevent any accidental data leaks; not all clients let you do this, but qbittorrent does
jdownloader
a download manager that is super useful for direct downloads (ddls)
keka
mac archive/extraction program you can use to open ddls acquired through jdownloader
winrar
windows archive/extraction program you can us to open ddls acquired through jdownloader
4k video downloader
free application for downloading hq youtube videos
mpv
free video player that takes sequential screenshots
capable of playing .mkv files (most large t*rrent and ddl files use this format)
cheat sheet of mpv keyboard shortcuts
works with both mac and windows
installation guides (courtesy of @kylos): mac and windows
note: install builds specified below for best results
mpv on mac
different builds allow it to work with 1080p, 2160p, sdr, and hdr files
1080p sdr build list
note: older mpv builds (ex: 0.29.0) no longer work on apple silicon macs that have updated to the sonoma operating system and beyond. if you have updated, delete your old sdr mpv build, download the latest build, and update your config file to match the example below. mpv will duplicate caps the first cap at the beginning of your screenshot sequence, but the rest of your caps should be fine

if you have an intel mac and have upgraded to sonoma, because of backend gpu issues, you will experience significant issue capping with mpv; using a duplicate finder (tutorial by @laurabenanti here) works as a partial fix, but there will still be some skipped frame/choppiness issues. i recommend looking into vlc or gomplayer as an alternative to mpv
2160p hdr build
note: the hdr build will not work for 1080p files— it will take duplicate screencaps. it also takes duplicate screencaps of your first cap only when used with 2160p files, so be aware of that
i recommend naming your builds so you don’t accidentally open a file with the wrong build

mpv on pc
assuming your computer can handle hdr, the standard build should work with all files
available for 64-bit and 32-bit systems (see windows installation guide linked above)
note: be sure you watch out for duplicate frames at the beginning of your screenshot sequence
a big shoutout to @jacksamiras for helping my mac-only ass make sure i had all the facts straight for pc users!
2. FOOTAGE
how to acquire files
a current and comprehensive guide; updated regularly
where to acquire files
ext.to: well-organized t*rrent site with a wide selection of files
1337x: t*rrent site with a solid variety of files
watchsomuch: t*rrent site (minion-themed, unfortunately) with a huge selection of movies and shows, though many of the links are old and/or underseeded
hdencode: ddl site with a excellent array of hq movies and shows
nima4k: german ddl site with ultra hq file options
yts: t*rrent site that specializes in extremely small file sizes; generally not ideal for giffing, but it can be a good way to find files you really can’t find anywhere else
digital-digest: a great place to find lossless hd trailers
thedigitaltheater: another place to find lossless hd trailer
storing your footage
external hard drives are the most practical option; for ease of use make sure you get a drive that is compatible with your computer (mac vs. pc) and has decent reviews— you want to make sure it’s not going to crap out on you in six months or something
shared drives/cloud storage (guide by @usergif) also work if you can’t afford hard drives or don’t want to bother with them
quality
⚠️ ALWAYS GIF FROM 1080p AND UP ⚠️
anything below 1080p (720, 480, 360) is going to be noticeably fuzzier and lower quality
sometimes things like older music videos only exist in low quality, but for movies and tv shows, it’s always going to be worth it to find a file that 1080p or better
in most cases, the higher the file size, the better. a 2 gb file is going to be significantly less hq than a 10 gb file. for example:


2160p isn’t necessary, but if you know you’re going to be making really big gifs (540x450 and up) or doing a lot of intense blending or coloring, the extra size and quality will really help
sdr vs. hdr
sdr is standard dynamic range, while hdr is high dynamic range
note: not all computers are capable of displaying hdr files correctly
most newer computers (ex: all macs from 2018 onwards) have native support for hdr files, but do some googling to make sure your machine can play them before you download any
below is an sdr screencap (left) next to an hdr screencap (right) that is not being displayed correctly

[source]
the washout that occurs with hdr files isn’t always a machine issue; it can also occur if you cap hdr files with an incompatible screencapping setup
using the correct build in mpv (2160p build for macs, the standard build for pcs, both linked above) will allow you to capture hdr screenshots while preserving the original color profile — no washout!
upscaling
what is upscaling? upscaling is the process of increasing the size and detail of a digital image, making it sharper and clearer with (in theory) little to no loss in visual integrity
many older movies are now upscaled into 4k, and while it can be tempting to grab a large upscaled file, be aware that upscaling can drastically affect a film’s color profile
for example, each of the following gifs have been sharpened using the same settings, and have no coloring on them:


as you can see, the upscaled 2160p and 1080p gifs have areas of extreme contrast, and are very yellow. the non-upscaled 1080p file, despite its lower quality, maintains the original color profile and contrast balance
how you feel about upscaling and the resulting quality vs. color tradeoff ultimately comes down to personal preference, but it’s definitely something to keep in mind as you’re selecting a file
3. GIFFING PROCESS
methods
there are four main methods for giffing: screenrecording, video extraction, files into stack, and DICOM files. both files into stack and DICOM files involve taking consecutive screencaps to load into photoshop rather than importing the video or opening it directly in photoshop, which is how screenrecording and video extraction work
there are pros and cons to each method, and all of them work at the end of the day, but i think there’s a clear winner in terms of both ease and quality. here’s a quick run down of each method
screenrecording
pros: least intimidating method, fairly quick
cons: huge loss in quality, it’s becoming increasingly difficult to record footage from sites like netflix, hulu, etc. as they get better about detecting recording programs like quicktime player and giphy capture (i.e. you end up with a black screen when you try), higher fps rate of screenrecording compared to footage fps creates issue with gif playback
fps issue: to get the smoothest playthrough, you need to load in every frame. however, if you do that, you end up with a gif that lags dramatically due to the frame rate difference. to combat this lag, you have to manually sort through and delete every duplicate frame created from the fps difference. if you don’t load in every frame (ex: every other frame), you won’t have to manually delete anything, but your gif will be noticeably choppy
video extraction
pros: takes less time/computing power than opening an entire movie/episode in photoshop
cons: some quality is still lost, extraction programs like handbrake can be difficult to use, rendering extractions still takes much longer than screencapping
files into stack
pros: no quality loss, much faster than extraction method
cons: caps load into photoshop in reverse order, 2160p caps take a very long time to load compared to 1080p caps
DICOM files
pros: no quality loss, caps load in correct order, load times significantly reduced from files into stack method (1080p caps load instantaneously and 2160p caps load in seconds)
cons: photoshop actions designed for use with files into stack must be tweaked for use with DICOM method
to illustrate the difference in quality, each gif below has been sharpened with the same settings, set to the same frame delay, and has no coloring on it


as you can see, the choppiness/lag in the screenrecorded gifs is very evident when compared with the screencapped gif. the screencapped gif is also smoother and crisper, with truer color and no artifacts or blockiness. the video extraction gif is a closer match in terms of quality, but it still has banding and blockiness in some areas, and a slight blur compared to the screencapped gif
now that you’ve seen the differences, on to screencapping! as you may have guessed from the pros and cons lists above, “load files into stack” and “load multiple DICOM files” are almost identical processes, but crucially, DICOM files* load much more quickly into photoshop, and they don’t load in reverse order. the speed difference is especially nice when you’re working with 2160p caps, which take absolutely forever to load in the with files into stack method
* .dcm files; designed for medical imaging, they store information differently than .png or .jpeg files and are used to transmit large images and associated data quickly and losslessly
i recently switched to working with DICOM files, so that’s what i’ll be showing you how to use below!
process
1. open file in mpv + stake screencaps
i like to take a lot of caps so that i can be super picky about choosing exactly what i want to have in the gif, but my computer has the horsepower to handle that. if you don’t think yours does, consider being more precise in your initial scene selection and/or stopping at 50-55 total caps
note: how to take screencaps with mpv player is covered in the installation guides linked above


2. trim caps + rename from .png to .dcm
if i’m using the hdr build (like i am here), i remove any duplicate caps from the beginning. then, regardless of which build i’m using, i trim any extra caps from the end to ensure that only caps from the scene i want to gif are left in the folder before i turn them from .png to .dcm files. it’s a simple process on mac: select all > right click > rename
see here for a guide to batch renaming extensions on windows


3. open photoshop + load multiple DICOM files
unlike “load files into stack” you’re loading you entire screencaps folder in for “load multiple DICOM files”; this is why it’s a good idea to trim your caps before you load the files in


4. crop

click on the crop symbol in your toolbar, then select w x h x resolution in the drop down menu and enter the dimensions you want for your gif

basic tumblr dimensions for width (height is up to you)
one gif: 540px
two gifs in a row: 268px each
three gifs in a row: 177px, 178px, 177px

note: it’s worth it to leave a gutter of extra pixels (i leave 5px for both width and height) in your cropping dimensions to prevent edge lines from showing around the perimeter of your gifs
i’m making a 540x350 gif for this tutorial, so the dimensions for my crop are 545x355; i’ll size the canvas itself to 540x350 after i’ve made the gif
additionally, make sure “delete cropped pixels” is unchecked so that you can move the gif around on the canvas if you need to
feel free to adjust the crop box as much as you want before you actually hit the checkmark to finalize it, but make sure you crop once and only once. resizing after you have already cropped will wreck the quality and introduce a lot of fuzziness to your gif. if you don’t like the way the crop turned out, undo it and try again

after you’ve cropped, go ahead and zoom in so you can get a better sense of what you’re doing. i tend to work at 200%, since that’s the best approximation of how the gif will display on tumblr
5. create video timeline
make sure you have the video timeline pulled up in your workspace. if yours isn’t visible, go to window > timeline to add it to the space
click “create” video timeline in the timeline bar


this will convert your caps to static video layers; we have to do some more work to get a playable animation
6. convert video timeline
click the frame animation in the lower left hand corner of the timeline bar. this will convert your video layers to a frame animation
7. make frames from layers
now click the menu button in the upper right hand corner of the timeline bar and select “make frames from layers”; be sure to leave “new layers visible in all frames” checked


now all your frames are visible in the timeline
8. delete frame
with all the frames visible, you can see that the first frame is 5 seconds while all the other frames are 0 seconds. delete that 5 second frame using the trash can icon in the timeline bar. if you don’t delete this frame, your gif will have a ton of lag at the beginning and/or end up with duplicate frames when you export it
9. convert frame animation
click the video layer symbol in the bottom left hand corner of the timeline bar (where the frame animation button was in step six) to convert your frames back to video layers


they move now! but we want to be able to edit the gif as a whole instead of in individual layers
10. select all layers

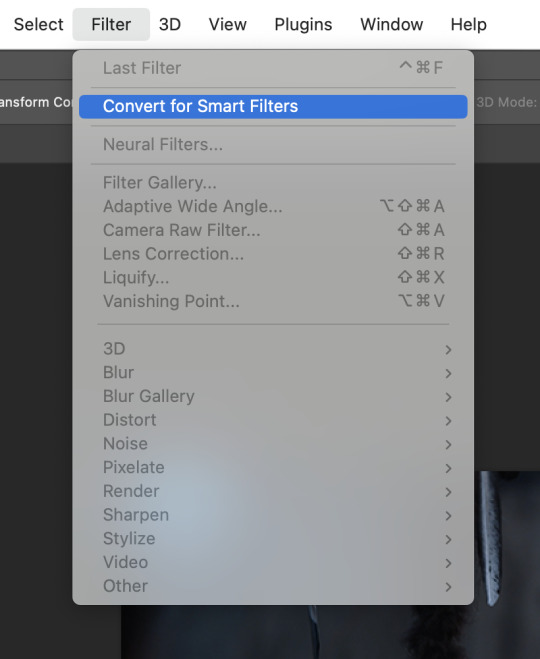
11. convert to smart object
so we’re going to turn those video layers into a smart object; the smart object will act as a container that keeps everything neat and tidy while we sharpen and color, and will also preserve the original image, allowing us to edit non-destructively
hit filter > convert for smart filters
if this is the first time you’ve made a gif, this is a good place to stop and check that everything is working the way it should. play your gif to make sure there’s no lag or any other issues

if your gif only plays once and then stops, go to the timeline menu and select “loop playback”

if there’s some other issue, go back through steps 5-11 and make sure you’ve followed them exactly
12. smart sharpen
sharpening adds back in that nice, crisp clarity that’s lost when the screencaps are cropped and resized to fit tumblr dimensions. there are a ton of different sharpening settings out there, but people generally sharpen in two distinct steps using “smart sharpen”
here is my process:
for the first step, go to filter > sharpen. select “custom” from the preset dropdown. click the gear icon and make sure “use legacy” and “more accurate” are both checked, and then select “gaussian blur” in the “remove” dropdown. finally, set the following values for amount and radius:

13. smart sharpen
my second smart sharpen follows the exact same process as the first—“use legacy” and “more accurate” are both checked—but with different values entered in for amount and radius:

note: like a lot of giffing, sharpening settings come down to personal preference, but be aware that oversharpening can lead to areas of extreme contrast in your gif, and an overall sort of staticky, almost crunchy effect
14. resize canvas + check playback
finally, resize the canvas to remove the 5px gutter we left back when we cropped


you can adjust how long the gif is using the sliders on the video timeline

now look at that! you’ve got a basic gif that’s ready for coloring and text!
note: you might have noticed that i haven’t talked about timing yet, and that the gif is playing way more quickly than the original footage was— don’t worry, we’ll deal with that later, and for good reason
4. ACTIONS
so fourteen individual steps for a gif sounds like a lot, right? but photoshop has a function that takes those steps and runs them for you. behold: actions!
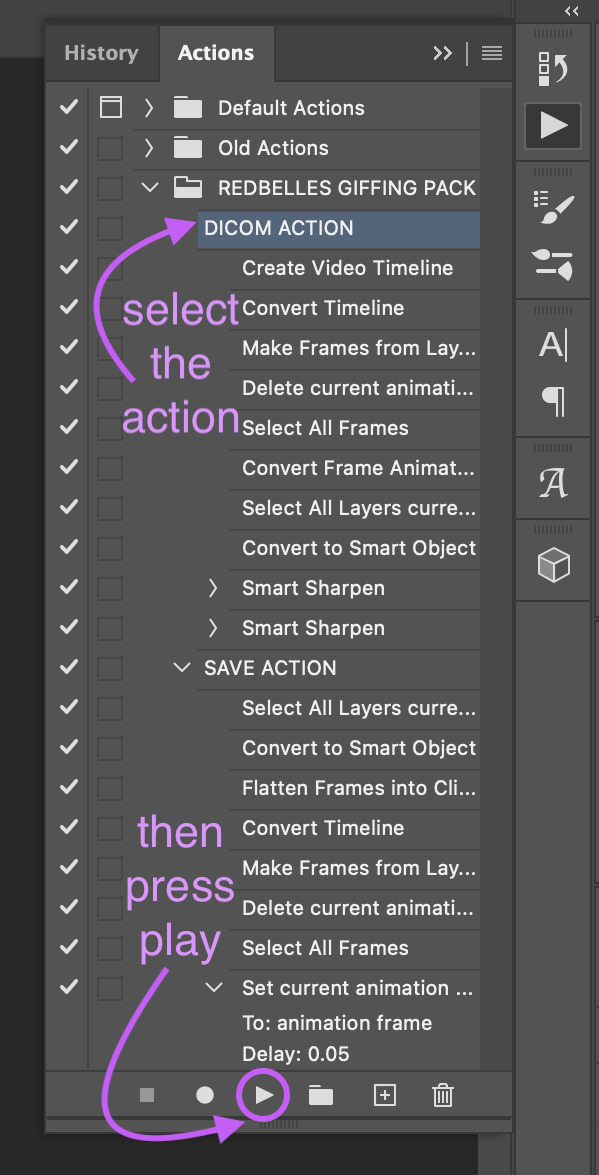
actions are automated processes in photoshop that can drastically speed up certain tasks. steps 5-13 in the giffing process i just outlined are automated in this action*, which means you can load your files into photoshop and have a basic gif ready to go in just a couple seconds
all you need to do is download the action and open it in photoshop, where it will automatically be added to the actions panel. select the one labeled “DICOM ACTION,” press play, and voilà!
*my action is a modified version of this life-changing action by the one and only rizz (@anyataylorjoy) updated for use with DICOM files and shared with her permission! rizz’s genius save action is also in both of the links above; we’ll discuss that more later
actions aren’t just limited to the actual process of animating a gif, though. you can create custom actions for excruciating fun things like frame by frame coloring (tutorial coming... idk, someday. maybe.) or creating glitch effects
if that sounds like something you’re interested in, here’s a handy official guide on how to create your own actions and some others on how to managing/saving actions if you decide you want to share one
5. COLORING
after nearly four five six years of giffing, i can say with 100% total confidence that there are a million different ways to go about coloring. whether you’re just starting out or you’ve been relying on psds, the best advice i can give you if you want to develop your own style is honestly just to play around with the different adjustment options in photoshop and see what you like and what works for you
of course, that’s easier to do if you have a basic understanding of what each adjustment layer does, so to that end:

brightness/contrast
adjusts the tonal range (the levels between an image’s darkest and lightest points) of an image. brightness slider affects highlights and contrast slider affects shadows
levels
adjusts the tonal values of an image by modifying the level of highlights, midtones, and shadows
curves
adjusts as many values for brightness and/or color as you want across the entire tonal range of an image
note: curves can be used to impact the entire rgb spectrum, or can be used to change r/g/b in isolation
see here for a more in-depth explanation of the curves tool
exposure
adjusts exposure levels across exposure, offset, and gamma. exposure controls highlights, offset controls midtones, and gamma controls shadows
vibrance
adjusts the color intensity of an image via two different options: vibrance and saturation. saturation evenly increases the saturation of all colors in the image. vibrance adjusts the level of saturation of all colors but in a more selective manner, focusing on colors with the lowest base saturation
note: vibrance is less like to oversaturate skin tones than saturation
hue/saturation
allows the adjustment of hue, saturation, and lightness of either the entire image or a specific range(s) of color in an image
note: using saturation across the entire image (the “master” slider) will reduce the overall tonal range of an image and can result in dullness
color balance
adjusts the mixture of colors in an image across either highlights, midtones, or shadows
black and white
adjusts color values to produce grayscale images, with both preset and custom value options
note: using a black and white gradient map instead of the black and white adjustment tool itself often results in a smoother gif
photo filter
adds a single color filter to the image
channel mixer
adjustment option that modifies a targeted (output) color channel using a mix of the existing (source) color channels in the image. color channels are grayscale images representing the tonal values of the color components in an image (rgb or cymk)
note: when you use the channel mixer, you are not adding or subtracting colors to/from a specific color component (see: selective color). instead, you are adding or subtracting grayscale data from a source channel to the targeted channel
color lookup
a set of premade filters/styles to apply to an image
invert
inverts the colors of an image to create a photo negative effect
posterize
reduces the number of brightness values in an image to create a flat, poster-like appearance
note: not typically used in gif making
threshold
adjusts grayscale or color images and converts them to a high contrast black and white images via a specified level as a threshold. all pixels lighter than the threshold are converted to white, while all pixels darker than the threshold are converted to black
note: not typically used in gif making
selective color
adjusts the amount of a primary color in an image without modifying the other primary colors in the image
note: the “absolute” option adjusts the color in absolute values, while the “relative” option adjusts the existing amount of a given color by its percentage in total
gradient map
converts the grayscale range of an image to a gradient color fill, with both preset and custom gradient options available
note: gradients can be manually adjusted, and checking the “reverse” option inverts the colors of the gradient
okay! now that that’s out of the way, here are three narrated examples of how i color:
1. prey (2160p sdr)

[video link]
2. the punisher (1080p)

[video link]
3. house of the dragon (2160p hdr)

[video link]
my general coloring process
step one: lighten
i start with one or two curves layers to see if i like what the rgb “auto” option gives me; if i don’t, i switch to lightening via exposure
if i know from the outset that a scene will need aggressive color correction, i’ll use a curve layer set with the white point eyedropper instead of the auto option; this brightens and color corrects the entire gif based on a selected pixel
step two: darken blacks
it sounds counterintuitive, but as you lighten the scene, you need to make sure you’re not washing it out
i start adding contrast back in by adding +1 black in blacks in a selective color layer below my lightening layer(s)
i often follow that up with a levels layer set to “increase contrast +1” above my lightening layer(s)
if you feel that the “increase contrast +1” layers has made the blacks too intense, you can try a black point layer in levels instead
note: the above/below method is a personal preference based on how the adjustment layers interact with each other
step three: lighten
adding contrast back in can make the gif a bit darker than i’d like, so i typically add another lightening layer after i’ve adjusted the contrast
i generally use the curves “auto” option to balance things back out
i will sometimes use the white point method here (seen in the videos when i zoom to 3000%) either alone or in conjunction with auto curves layers
step four: color adjustments
this step varies the most: in the videos, you’ll see me adjust cyan (prey), take out yellow (the punisher), and amplify red while removing yellow and green (hotd)
if very aggressive color correction is needed, i tend to use channel mixer. otherwise, i use selective color first and then hue/saturation if needed. i do not tend to use color balance
update: explanation of why i avoid color balance here
step five: final tweaks
if a gif seems flat: i increase the blacks in neutrals using selective color to add extra depth
if a gif seems dull: i increase vibrance, or in extreme cases, vibrance and saturation
note: be very careful when using saturation— it can wreak havoc on skin tones
psds
if you don’t want to color manually for whatever reason (don’t have time, struggling with the scene, want to experiment, etc.) psds that others have shared are always an option
psds are adjustment layers that other gifmakers have put together and shared so you can apply them to your own gifs
note: psds are almost always scene-specific (and often file-specific), so you’ll likely have to tweak them to make them work for your gifs
check the resources section at the end of this guide for some places to find psds
6. TEXT
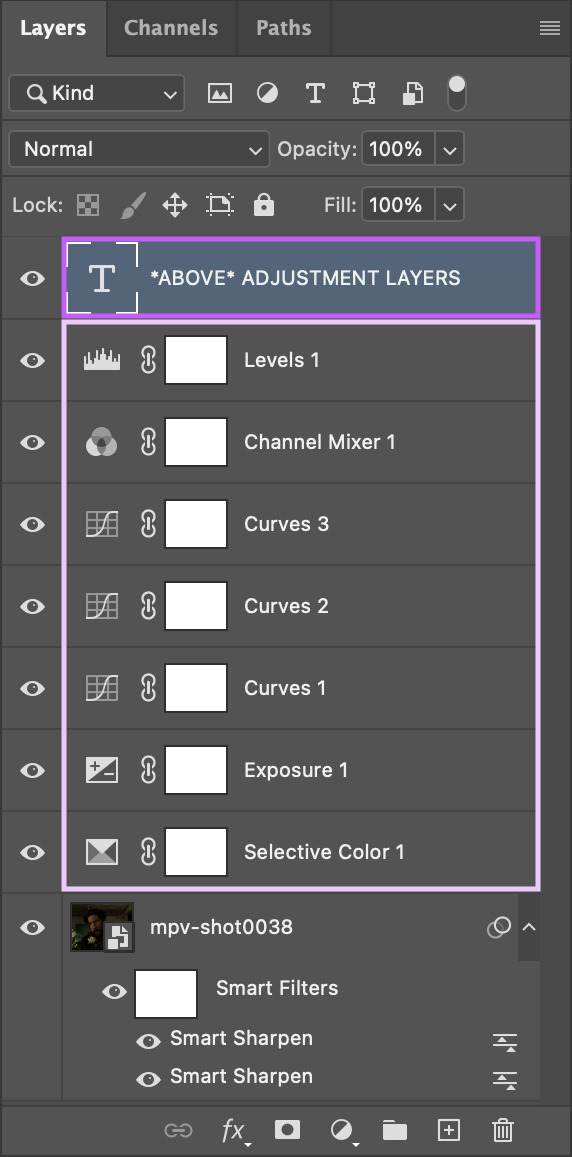
the most important thing about any text layer is to make sure that is above all of your adjustment layers. if your text is below any adjustment layers, it will end up looking wonky and distorted
subtitles
first things first: pick a font that is easy to read. i use arial rounded mt bold, but alte haask grotesk, arial, myriad pro, etc. are all good options as well. for subtitles, sans serif fonts are almost always much easier to read than serif fonts
after you’ve chosen a font and loaded it into photoshop, select the text tool and click and drag to create a text box instead of just clicking once to create a text layer. this will help you keep your subtitles perfectly aligned across multiple gifs

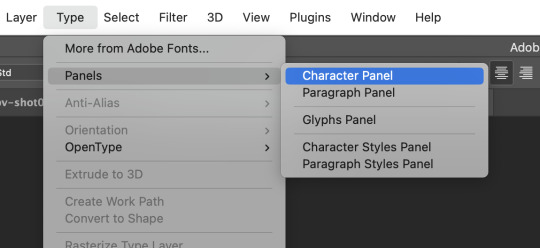
type out your text, then click the character option to adjust your type settings. if you can’t see the character option, from the main menu bar go to type > panels > character panel. this will also work to bring up the paragraph panel
these are the character settings i currently use for my subtitles:
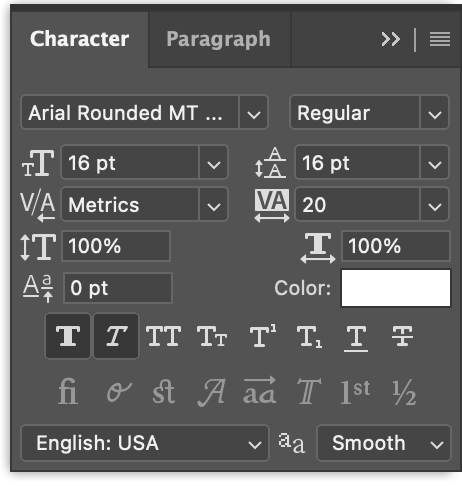
note: the text size can vary from set to set. if you end up changing it, be sure you change the line spacing (the little vertically stacked As directly to the right of the text size dropdown) to match
using either the top text bar or the paragraph panel, make sure your text alignment is set to “center” instead of “left” or “right”
now we need to make the text stand out against the gif. we’ll do this by adjusting the blend options. with your text layer selected in the layer panel, go to layer > layer style > blending options

i personally use drop shadow, stroke, and outer glow for my subtitles:


after you’ve got your text settings the way you want them, press v to select the move tool, then click the three dots in the top toolbar to pull up the “align” menu
select “canvas” from the “align to” dropdown in the menu, then use the center and bottom buttons to center your text at the bottom edge of your gif. the extra space in your text box may provide enough of a buffer to separate your text from the edge of the gif, but if not, simply move the box upwards until you’re happy with the placement

note: if you’ve used a text layer here instead of a text box, the position of your text will be based on individual glyphs instead of the uniform edge of the text box. this means that lines with the letters g, j, p, q, or y will be positioned differently than lines without those letters, which can ultimately mess up the placement of your subtitles across your gifs. save yourself some hassle and use a text box

to make sure the text box ends up in the same place on all your gifs, go to layer > duplicate layer to copy them exactly on to your other gifs


note: be sure to double check the drop shadow on any duplicated layers, since photoshop sometimes changes the angle of the drop shadow to 90° on the new duplicated layers
additionally, if you’re working with multiple speakers, make sure whatever colors you pick for them don’t make the text difficult to read
you can download a base version of my subtitle settings here
other text
you have a lot more options for non-subtitle text: crazy fonts, cool coloring, effects, etc. don’t be afraid to experiment! a good place to start is the layer style tab. go to layer > layer style and you’ll see these options:

we used a few blending options for subtitles (drop shadow, stroke, outer glow) but now you can play with color overlays, gradients, and even patterns
check out the resources section at the end of this guide for font websites, fancy text tutorials, and more
7. SAVING + EXPORTING
timing
now we’re (finally) ready to talk about timing. the frame delay you want to use is 0.05. this timing most closely matches the natural playback speed of (non-animated) footage. anything else is going to be noticeably too fast (0.04) or too slow (0.07). witness:


there are really only two exceptions to this:
animated footage, which can run at a faster frame rate than non-animated footage and may work with 0.04 timing
gifs that have < 15 frames (ex: trailer footage)— you might be able to get away with something like 0.06 in that case, but it will still look a litle slow
most other tutorials have you set your timing as part of the process of animating your gif, but i didn’t. why not? because photoshop absolutely loses its goddamn mind when it comes to gif timing
it will create duplicate buffer frames if you change the default frame timing at all at literally any point except as the very last step before you export your gif. this means that if you change it as part of your process before the “convert to smart object” step, you’ll get those duplicate frames and end up with lag in your gif. it will also automatically reset your timing to 0.07 if you export from a video timeline state. gee, thanks photoshop!
the way most people deal with this 0.07 bug is by exporting the gif, opening the exported .gif file in photoshop, and manually resetting the frame timing to 0.05 before exporting again. however, that’s a lot of work, so aforementioned giffing queen rizz @anyataylorjoy did us all a solid and created an action that will convert your gif back to frames and set your timing to 0.05 with a single click. her save action is bundled together with my DICOM action in the link back in the “actions” section
note: managing your timing like this does mean that when you’re working with your gif photoshop before you run the save action, it will play much faster than it will once you’ve exported it
to export your gif, go to file > export > save for web (legacy)

before you jump in to exporting your gif just yet though, there are some things to consider
upload limits
the current tumblr upload limit is 10mb, which is great for gifmakers— it leaves plenty of space for experimenting with big gifs, crazy colors, and fancy effects like blending and transition
and yet: it’s ridiculously easy to go over that limit! make sure to check your file size before you export your gif to confirm that you’re below 10mb so you don’t run into any upload issues

if your gif is over the limit, try shortening the length of the gif. that’s hands down the best way to decrease the size, but you can also try adjusting your coloring. the brighter and more vibrant a gif is, the larger the file size generally is, so those are good areas to try tweaking if you really don’t want to cut the gif down. high contrast, especially in black and white gifs, can produce large file sizes as well
save settings
your save settings will affect how your gif appears when it’s exported and posted outside of photoshop. there are basic settings everyone has to use (ex: loop forever), but some will ultimately come down to personal preference, so it’s worth knowing what the differences between the settings actually amount to
selective vs. adaptive
selective: creates a color table favoring broad areas of color and the preservation of web colors. this color table usually produces images with the greatest color integrity. selective is the default option
adaptive: creates a custom color table by sampling colors from the predominant spectrum in the image. for example, an image with only the color green and blue produces a color table made primarily of greens and blues. most images concentrate colors in particular areas of the spectrum
dither: diffusion vs. pattern
diffusion: applies a random pattern that is usually less noticeable than pattern dither. the dither effects are used across adjacent pixels
pattern: applies a halftone-like square pattern to simulate any colors not in the color table
note: using “adaptive” instead of “selective” and/or “pattern” instead of “diffusion” will result in larger file sizes
i personally use selective + diffusion for nearly every gif i make, not only because the file sizes are consistently smaller, but also because i think that combo produces the cleanest results. i find that the grid pattern creates is very noticeable/distracting, and that the color clarity from selection almost always beats out the custom tables from adaptive
bicubic vs. bicubic sharper
bicubic: slower but more precise method based on an examination of the values of surrounding pixels
bicubic sharper: a good method for reducing the file size of an image based on bicubic interpolation with enhanced sharpening. this method maintains the detail in a resampled image. if bicubic sharper oversharpens some ares of an image, trying using bicubic
i really don’t like oversharpened gifs, so i exclusively use bicubic
lossy
lossy reduces file size by permanently removing some of the original data
lossy used to be a viable way to decrease the size of gifs before tumblr changed the upload limit to 10mb; now gifs with lossy are visibly fuzzy, making them look lower quality no matter what kind of footage was actually used
if you are using lossy to add a film grain effect to your gifs, use the filter > noise > add noise option instead
note: the best way to achieve a grain effect is simply to use hq footage; larger hq files often have a grain to them that is lost as the files are compressed to smaller sizes
here are the rest of my save settings:
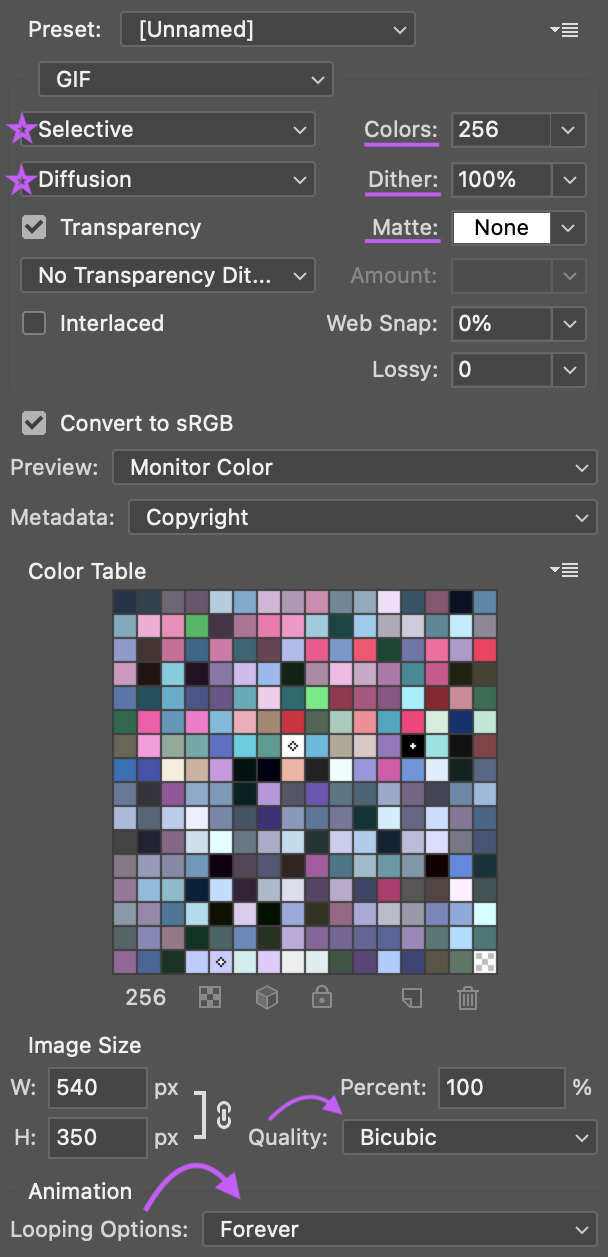
note: the default option under “metadata” includes contact info, so i highly recommend changing that
you can see how a gif will play directly in the export panel, but you can also view it a new browser tab by clicking “preview”; this will open the gif in a new tab in your default browser
when you’re happy with how the gif looks outside of photoshop and have checked that it’s under the 10mb upload limit, go ahead and export the gif
8. POSTING
basics
before we talk about anything else: make sure you are putting your gifs in a photo post. the new editor we’re all forced to use now does a whole bunch of behind the scenes bullshit to gifs (rip legacy editor 💀) and you definitely don’t want to make things any worse by using the wrong post format
if you find yourself struggling with the new editor @wolfes has your back: they’ve put together a comprehensive guide to using/troubleshooting the new editor for gifmakers. everyone say thank you, v!
save in + post from drafts
alright, so you’re ready to post your gifset— while it’s temping to just slap the gifs on a new post and publish immediately, it’s actually a really good idea to save the set as a draft first and make sure the gifs look good once they’re uploaded. sometimes tumblr makes the colors look wonky or wrecks the quality or does other stupid tumblr things, and it’s so much less frustrating to notice that before a set is posted than to see something you want to fix after it’s already out in the wild
if you want some feedback on a draft before you post it, you can click the three dots in the upper right hand corner of the post to open a private preview you can share with others

note: the link will work as long as you have the preview open
once you’re sure tumblr hasn’t messed with anything, it’s time to format the rest of the post
captions
the finishing touch on a set, captions can be anything from basic film/show info to relevant quotes to straight up memes. here’s some general info to help you figure out how you want to format yours
html symbols
edit tumblr posts using html by @hayaosmiyazaki
tumblr html text primer by @gustavlindstrom
gradient text: generate your gradient here, copy the html code here and remove “;” from your text, then paste the semicolon-free text into the html editor on tumblr
note: be aware that the new editor has radically changed how gradient text is processed and displayed. sometimes it works, sometimes it doesn’t. sometimes you can see it on dash but not on individual blogs, and sometimes only the first letter is in color and everything else is black
inspiration credit
if your set was inspired by someone else’s, credit your insp. source(s)
it’s a really basic part of tumblr/gifmaker etiquette that gets ignored way more than it should
there’s obviously a lot of creative drift on a site as big as tumblr and it’s not always possible to pinpoint an exact inspiration source (especially for more popular gif trends), but as a creator it can be really disheartening to see someone swipe something directly from you without saying anything
tl;dr shout out what inspires you!
not sure how to go about crediting someone? here’s a handy guide on inspiration credits from @usergif
tagging
it’s super important to remember that only the first twenty tags on your set will be used in tumblr’s search/tag algorithms!
if you’re not sure where to start, go ahead and check out some popular sets in the fandom(s) you’re creating for and see what tags are on those sets— that’s a great way to figure out which tags are active and what kinds of things you’ll see in them
here are some typical tag categories for fandom sets:
— general tags
media/fandom name: #hotd, #stranger things, #disney
character names: #yennefer of vengerberg, #alina starkov, #ginny baker
ship names: #zutara, #kanthony, #buckynat
— edit tags
#filmedit or #tvedit
#[fandom/media]edit - #swedit (star wars), #nmcuedit (marvel netflix), #tlouedit (the last of us)
#[character name]edit - #rhaenyraedit, #karenpageedit, #batmanedit
#[ship name]edit - #literatiedit, #joenickyedit, #kastleedit
#[actor name]edit - #austinbutleredit, #emmadarcyedit, #pedropascaledit
— source blogs
these are blogs that focus on reblogging a specific type of content (old films, pop culture, etc.) and they’re a great way to get your gifset seen by more people
typically track a specific tag in order to find relevant content
general rule: make your set is the kind of thing a source blog is interested in before tagging them
your set may be reblogged immediately, may go into a queue, or may not be reblogged at all (the members didn’t see it, think it doesn’t fit the blog’s theme, etc.) — just be patient and try to find source blogs that align with what you’re making
examples: chewbacca (#chewieblog), junkfoodcinemas (#junkfooddaily), classicfilmblr (#classicfilmblr), dailywoc (#dailywoc), bob-belcher (#userbbelcher), optional (#useroptional)
— user tags
user tags are unique tracked tags for individuals rather than source blogs!
gifmakers will often have their tracked tag (if they have one) in their blog description/about page
ex: i track #userbells

general rules: you don’t have to be mutuals with someone to tag them, but it’s good etiquette to be following them, and to only tag them in things they seem interested in
after you’ve tagged for exposure, there are a couple more things to consider:
— content warnings
it’s generally considered polite to tag for major content/eyestrain warnings
ex: tw flashing, tw blood, etc.
there are a variety of ways to tag for content warnings - #cw blood, #blood tw, # // blood - just pick one style and be consistent with it
warnings don’t have to be in your first twenty tags (since these tags are used to filter out posts instead of find them) but just having them on the post is helpful for anyone who happens to have a content warning blacklisted
— a tag for organizational use
i typically save the last of my twenty tags for my personal “creations” tag so that i (and anyone searching my blog) can easily see everything i’ve giffed
i use * as my tag and have it as one of my sidebar links for easy access
other examples i’ve seen include “mine: gifs”, “my edit”, etc.
best times to post
despite the ongoing tiktokification of tumblr, the hellsite still doesn’t have the kind of dashboard/feed algorithms that other social media sites do. that said, it can still be helpful to post at specific times to boost how many people see your gifsets
according to union metrics, most reblog activity on tumblr happens between 7pm and 10pm eastern time
however, if you’re giffing something that’s just been released—a new trailer/episode/season/movie—then the best time to post is as soon as you possibly can. tumblr users these days unfortunately prioritize reblogging whatever sets get out there first. that’s great if you can get those sets made quickly, but it can seriously suck if that’s not the case
if you want to hustle and make “new content just dropped” sets as soon as the footage is out there, go for it. if not, don’t put any pressure on yourself to do that; it’s totally fine to gif at your own pace
verify that your set is visible on your dash
as soon as you post, go to your dash and make sure that you can actually see your set on your dash— sometimes tumblr just straight up eats posts, and if you can’t see your set, no one else can either
if your set isn’t visible on your dash, it’s likely either gotten caught in the (terrible and useless) nsfw filter or tumblr is just being stupid
to fix this:
check the post by loading/posting each gif individually to see if one (or more) of them is causing the set to break
change the gif(s) responsible by adding/removing frames, tweaking coloring, etc.
if the gif(s) are still breaking the set, you might have to wholesale replace the gifs with different scenes or post the set without them
verify that your set is in the tags
the other thing you need to check is whether or not your set is showing up in the tags
sometimes a set will be visible on your dash but won’t actually appear in any of them tags. to make sure your set is showing up, check one of the tags by going to the /tagged/[tag] page
if it doesn’t show up, here are some general tips:
wait 5-10 minutes: sometimes tumblr just takes a minute to register the set
edit/remove any links: tumblr doesn’t place nice with links general, and with external links in particular. removing the “s” from https in your links can often fix things, but if that doesn’t work, remove the link entirely
try deleting and retyping the tags
try this image trick from @yellenabelova
delete the set and repost from scratch
for a much more comprehensive guide on what to do if your set isn’t in the tags, check out this very extensive solutions flowchart by @momentofmemory
9. RESOURCES + GENERAL TIPS
giffing communities
find some buddies to gif with! giffing is super fun, but it can also be finicky and frustrating, and having people to brainstorm/complain/share things with is honestly so helpful. some of the most fun i’ve had giffing has been sitting around commiserating on a call with rizz or lia or m, or whining at kumi or neve over text chat
some places to start if you’re looking for communities to join:
creatorhub*
@villainelle’s giffing discord (send an ask for a new link if expired!)
the gifmakerhub discord, run by @wolfes
*the creatorhub link is best accessed on desktop, as it will take you to a submission box:

reblog yourself
this is a big one! time zones are a thing, and on top of that, it’s almost impossible to get a reblog in this economy. boosting your own sets is a really good way to make sure more people see them, and also to just take a minute and be proud of what you’ve made!
resources
general photoshop resources
@chaoticresources
@completeresources
@rresources + bonus beginner’s guide
@hisources
@evansyhelp
tutorials
anti white-washing by @haldi-archived
anti red/orange-washing by @aubrey-plaza
channel mixer by @aubrey-plaza
multiple gifs on one canvas by @nataliescatorccio
blending by @nataliescatorccio
fade transition by @anyataylorjoy
coloring dark scenes by @sluttyhenley
transition tutorial by @wolfes
glitch effect by @sarah-snook
gif overlays by @ezrabridgerr
general coloring by @the-borgias
general coloring by @magnusedom
rainbow coloring by @rhodeys
text effects by @unadulteratedloathings
shuffle texts by @cal-kestis
animated handwritten text by @mxrisacoulter
comprehensive subtitle guide by @clubgif
fonts
— where to get fonts
dafont
befonts
ifonts
dafont free
google fonts
— identifying fonts
what the font
what font is
font squirrel
identifont
— font recommendations
@yourfonts
font tag from @anya-chalotra
favorite font combinations from @usergif
font packs from @liohnelmessi
font tag from @itsphotoshop
typography and font pairing guides from @momentofmemory
how to pair fonts by @awildling
psds
@dailypsd
@colour-source
@psdland
+ bonus anti white-washing psd by @evansyhelp
sharpening settings
action pack by @throwing-psds
action pack by @maziekeen
action pack by @daenerys-stormborn
settings from @anya-chalotra
and finally:
don’t stress
that is honestly my most important piece of advice. if you find yourself chasing notes, getting frustrated with low engagement or terrible like-to-reblog ratios, frazzled trying to make sets for new content as quickly as possible— just take a breath. take a step back if you need to. gif what you want to when you want to
giffing is a hobby! it should be fun! don’t let the numbers ruin it for you <3

feel free to send me an ask if you have any questions! previously answered questions are in my giffing help tag
i hope this tutorial helps! if it did: please reblog it!
(and if it really helped, consider throwing me a bone on ko-fi or commissioning something from me? area woman unfortunately very broke)
happy giffing ✨
#completeresources#rresources#usergif#userrizz#userpayton#userkd#jokerous#userriah#userchelsea#userneve#resources#tutorials#gif tutorial#re: gif tutorial#*#@tumblr formatting gremlins let me live challenge#please i am begging#anyway if you see a typo no you don't
3K notes
·
View notes
Link
#tech#technology#tech update#tech4all#Duplicate Photos Remover#iphone delete duplicate images#iPhone duplicate photo cleaner#best duplicate photo cleaner apps for iphone#best duplicate photo finder for iPhone#duplicate photo cleaner apps for iPhone
0 notes
Text
Mirage (5/???)
Summary: When 2 weird men show up at your job asking questions about you, you run, right into Hydras arms, you have no idea what they did to you in there, the Avengers help you figure it out.
*AU right after civil war, Steve, Bucky, and Tony are friends, and Pietro is still alive.*
A/N: this is my first thing I’ve ever written, soooo, some feedback would be appreciated, Hi I’ve been gone a couple years, and now I’m back, sorry….
I started writing this a long time ago, so the first chapters suck…. sorry
Pairing: Avengers x mutant!Reader
Warnings: some language, torture
Italics indicate that she is thinking to herself
~~~~~~~~~~
You dream of your life in the hydra base, everything is tinted red. You see flashes of faces, good and bad. You see yourself training with another mutant, you knock him to the ground and put him in a headlock. The scene changes, you see yourself strapped to a table, with the Trench Coat British guy smiling over you as you scream. It changes again, you see yourself crying in a ball, in the corner of your cell, trying to keep warm. It changes again, you see the goons kicking you on the floor, after your first escape attempt.
All of these memories scream through your head, until suddenly they come to a stop on one image. The man with the metal arm being shot in the back, because you can't reach him in time. You run to him as he falls. You catch him before he hits the ground, and lower him the rest of the way to the ground. You roll him over to look at his face, but when you roll him over, instead of his face being there, its Mr. British. You scream and try to push him off you, but he grabs you and pulls out a gun, he shoots you in the chest and laughs. You fall backwards, but instead of hitting the floor, you fall through it, into complete darkness. It feels like you fall forever.
You wake up screaming, clutching at the blankets. Your eyes dart around the room, trying to figure out where you are. You see medical equipment, and hear a heart rate monitor beeping next to you. You remember, you're in the Avengers Compound, they saved you from Hydra. You relax into the bed and breath.
<i>What time is it?</i> You think, you look around again, now that you've calmed down. You see a huge window at the end of the room. Outside the window are trees, and a black sky, full of stars.<i> So it's still night, how long was I asleep for?</i> You sit up so you can see out the window better. You see a lake, and some lights below you. <i>So I’m not on the ground floor, it's pretty here, quiet.</i> You look away from the window and down at yourself, and notice that you aren't Natasha anymore, instead you’re a man, with hairy arms.
You gingerly try to spin your legs to the left, to dangle off the bed. It takes some effort, and a lot of pain, but you manage to sit on the edge of the bed. You start to slip off, so your feet touch the floor, then put a little pressure on them. Causing you to whimper in pain, but you push through it, as you've always done. You finally manage to stand on your own two legs, you look down to notice that your legs are hairy too, under the hospital gown. You also notice that there is a IV coming out of your hand, with a tube leading to a saline drip hooked on a metal rod on wheels.
You hold onto the rod for support, and take a step towards the window. But the heart rate monitor hooked to your finder stops you, you quickly pull it off, causing the monitor to have one long beeeeep, then power off. <i>That will probably bite me in the ass later, but I need to see out the window.</i> You slowly make your way to the window, each step a struggle. But you make it to the window, when you look out, you notice the trucks driving below you.
You look up and see the stars, they are beautiful tonight. Your eyes feel odd, so you close them, and rub them with the back of your hand, and when you open them again to look at the stars, suddenly you can see so many many more, you can see the sky as if we didn't have any pollution, or even an atmosphere. You can see the milky way, the whole galaxy. It's the most beautiful thing you have ever seen. Your eyes well up with tears, causing the stars to merge together, and yet, it's no less beautiful. You’re so busy looking up, you don't even notice that somebody else has entered the room.
“It's beautiful here isn't it?” Says a voice behind you. You squeak and whirl around, causing you to almost fall, and be in excruciating pain. The person rushes towards you trying to help, you look with anger in your eyes, ready to fight. But what you find is a concerned Dr. Banner, giving you the most confusing face. Your eyes soften, seeing that there is no immediate threat. You gain your balance, and stand on your own, shrugging off his hands, which you hadn't noticed before.
“It's not nice to scare people when they are zoned out.” You say in a fake scolding voice. But he just keeps looking at you with a weird face. “What's wrong Dr. Banner?”
“Hm? Oh, I'm just not used to walking into a room to find that I'm already in it.” He says with a little smile.
“What?” <i>Is he a little crazy?</i>
“Oh you don't know, you're not Nat anymore, now you're me. It's a little jarring. You can call me Bruce by the way.” He says looking you up and down.
“Oh! Sorry, when I dream I shift, and I must have shifted into you. Sorry.” you say then look at the floor in embarrassment.
“Nothing to be sorry about, but how do you look exactly like me, you even have my birthmark on your knee.” he says with a puzzled look.
“Oh, when I see someone, I can copy their face, their size, and any other characteristic I can see. But in your case, when I touch someone, or they touch me, I can become a perfect duplicate of them, I think it has to do with DNA or something.”
“Oh. But I didn't touch you?” he said with a puzzled expression.
“When you put the needle in my arm you did. I can shift into someone else if you want?” you say shyly, talking about your powers is always weird.
“It's fine, as long as you're comfortable.” he quickly reassures you.
“Cool.” you think for a moment before asking, “What are you doing in here so late?”
“Oh that, um, I told Friday to alert me if you woke up, so you wouldn't be scared. On that note, you really should lay back down.” he says in a quiet tone.
“You did that for me?” Confused as to why he would want to do this for a stranger. You start making your way back to your bed, leaning on the pole.
“Well yeah, you are my patient.” he says walking next to you. Suddenly your left leg decides it's time for a nap, and you start falling with a yelp. Bruce catches you with surprising strength. <i>How did he catch me so quick?</i> He helps you back to your bed, and you lay back down.
“Thank you, I don't know what happened, my leg just quit working.”
“No harm done. Are you alright, any pain?” he asks sitting at the end of your bed.
“I mean the bullet wound in my chest hurts, but the weird part is, it should hurt more. How long has it been since I got shot?” you ask, looking him in the eyes. <i>His eyes are a very nice deep brown, with some bright green near the iris. Odd.</i>
“It's been 3 days, but your wounds are healing at an accelerated rate, it looks like you got shot 3 weeks ago. Is that part of your powers?” he asks leaning towards you
“No last time I checked!” you say starting to worry about what Hydra did to you there.
“Ok, we’ll figure out why, but right now, you should sleep. Steve and Tony are going to ask you questions in the morning,” he looks down at his watch, then back up to you, “if you sleep now, you should get about another 6 hours before they come back.” he says in a reassuring tone. <i>I can see why he's a doctor, he's so kind.</i>
“I don't know if I can go back to sleep, I didn't have the best dreams before.” you say looking down at your hands, they are large, and strong.
“I can give you something to help you sleep better if you like, but only if you're comfortable, I don't want you to have another panic attack.” he says looking at you with concern.
“Will it give me better dreams?” you ask in a small voice, meeting his gaze again.
“Yes, promise, as long as you promise me that you won't have another panic attack?” he asks while standing and walking to a nearby cabinet, and opening it up.
“I think I can manage that.” you say smiling at him. He turns back to you with a small needle, and a band aid in his hand. He walks towards you and says, “You should lean back, this stuff works quick.” he cleans the area he's about to put the needle in as you lean back. “I will be here in the morning when they ask their questions.”
“Thank you, and thank you for being so nice to me, even though you don't know me.” you say smiling. When he finishes he puts a teenage mutant ninja turtle band aid on your arm. “Really? Teenage mutant ninja turtles?” you ask with a small laugh.
“What? I thought it was appropriate.” he says with a large smile. “Now try and get some sleep, I will see you in the morning.” he says while walking to the door “Goodnight Bruce, thank you…” you say, your words starting to blend together. <i>He was right about this acting quick…</i>
“Goodnight.” Bruce says while turning out the lights, he turns and walks out the door, closing it behind him. He walks back to the elevator, taking it to the recreation floor, where the crew quarters are. He walks to his room, and sits on his bed.
“Friday, please alert me when our patient wakes up.” he says then crawls in bed to sleep as well.
“Yes sir.” Friday whispers from the ceiling.
Back in your room
You smile to yourself,<i> Maybe this place isn't so bad, Bruce is nice, I hope they don't think I'm hydra, I hope I'm not hydra……</i> *Snore*
Time Skip,
You wake up slowly, groggy from the drug Bruce gave you last night. Your eyes are too tired to open n, but your mind starts to work. You feel something, something is wrong. Your eyes pop open and land on a very angry, very tall, very scary, redhead standing in front of your bed with her arms crossed, glaring at you.. <i>Oh shit. Natasha Romanoff!</i>
15 notes
·
View notes
Text
Adsly Review & Bonuses 2021
Adsly Review By Beta Tester + Exclusive Bonuses Worth $30k For FREE!
Hello folks! Welcome to my Adsly review and reward page. On the off chance that you are searching for a fair and inside and out Adsly Review, you are the best spot you could be.
In my Adsly review I will inform you concerning it's components, working interaction, cost and otos, advantages and disadvantages and my own experience utilizing Adsly as a beta analyzer.
I have additionally got a crazy reward bundle worth $30k for you, should you choose to buy this item.
Adsly is the world's #1 all online media and google advertisements creation suite. In addition it additionally incorporates every one of the assets you need to run productive advertisements on the web.
Presently we should move to the following segment of my Adsly Review where we will discuss item's outline and components.
Reshu Singhal is the originator of Adsly.
Pleased is additionally Co-Founder of Proyah Sales Videos and different high performing programming.
Reshu is a transformation master. She is known for making great changing over recordings, contacting 5 figures transformations on different occasions through her recordings for her customers generally speaking producing a joined income of more than $5m for her through her business recordings.
She has been dispatching acceptable and exceptionally beneficial items since 2018. Her items have produced colossal outcomes for her clients and have welcomed incredible worth on the table.
Adsly Review – What Kinds Of Ads Can I Create?
Here are various kinds of advertisements you can make:
Google promotions measurements:
Squares
Square shapes
Triple Widescreen
Inline Rectangle
Netboard
Pennant
Leaderboard
Announcement
Display
High rise
Wide Skyscraper
Half page
Picture
Versatile Banner
Facebook:
Facebook News Feed Ads
Facebook Right Column Ads
Facebook Instant Articles Ads
Facebook Marketplace Ads
Facebook Story Ads
Facebook Collection Ads
Facebook Messenger Ads
Facebook Audience Network: Native, Banner, Interstitial Ads
Facebook Canvas Ads
Facebook Carousel Ad
Instagram:
Instagram Landscape (flat) Image Ads
Instagram Square Image promotions
Instagram Vertical Image Ads
Instagram Story Ads
Instagram Carousel Ads
SnapChat:
SnapAds – The Basics
Snapchat Collection Ads
Snapchat Web View Ads
Snapchat App Install Ads
YouTube:
Youtube Display Ads
Youtube Overlay Ads
Youtube Bumper Ads
Youtube True View In transfer Ads
Pinterest:
Pinterest Promoted Pins Ads
Pinterest Promoted App Pins Ads
Pinterest Carousel Ad Specs Ads
TikTok:
TikTok News Feed Ads
TikTok Vigo Image Ads
LinkedIN:
LinkedIn Sponsored Content Ads
LinkedIn Sponsored InMail Ads
LinkedIn Dynamic Ads
LinkedIn Spotlight Ads
LinkedIn Spotlight Ads – Custom Background Image
LinkedIn Display Ads (Medium Rectangle)
LinkedIn Display Ads (Sky Scraper)
LinkedIn Display Ads (LeaderBoard)
LinkedIn Text Display Ads
Twitter:
Twitter Website Card Ads
Twitter Image App Card Ads
Twitter Single-Image Tweets Ads (Mobile)
Twitter Single-Image Tweets Ads (Desktop)
Twitter Multi-Image Tweets Ads (Mobile)
Twitter Multi-Image Tweets Ads (Desktop)
Twitter Conversational Ads
Twitter Direct Message Card Ads
Adsly Review – Price and OTO
Front End – Adsly Commercial ($47)
Adsly is a superior programming which allows you to make excellent changing over picture Ads for 9 social stages and 50+ various situations. Aside from this the product gives you every one of the assets which is needed to run a beneficial advertisement. From Ad duplicate generator, designated crowd of 50 distinct specialties, Detailed digital books on every stages on the most proficient method to run advertisements, promotion agenda, all things considered, to 100+ profoundly changing over promotion plans assortment. The entirety of this with business permit to sell the advertisements you make to likely customers.
With Adsly make Ads for Google, Facebook , Instagram, Snapchat, Twitter, LinkedIn, YouTube, Pinterest and TikTok
Here is the thing that is remembered for the Front End!
Premium Ad Design Software
Make Converting Ads
50 Niches Targeting Audience
2000+ Converting pre made Templates
Preparing how to burn through $5 to arrive at 1000s of likely purchasers
Live Workshop to show you how to make changing over advertisements plans utilizing Adsly
9 Social Media
50+ Placements (alongside preparing)
Limitless Ads (No cutoff points)
Demonstrated Converting Ad Copies – specialty explicit
Most elite 100+ Ads Screenshot
Facebook Ads Checklist
Deals Page and VSL Copies of 2 Products that have on the whole done more than $450,000 in deals
Accomplished For You Freelancing Gig Template
9 Ebooks – bit by bit promotion creation for all stages
Business License
OTO 1 – Adsly Platinum ($67)
With the platinum open more provisions like capacity to make Facebook covers, traffic combination, 10 million stock pictures, Ad duplicate generator programming and substantially more.
Here is the rundown of provisions that is remembered for the OTO1
Facebook Cover Images
100 changing over Facebook Cover Templates
1 Click Unlimited Traffic Integration
LockerKosh Affiliate Link Cloaker – Unlimited Profits
10 Million+ HD Stock Images Integration
Progressed Client Acquisition Module
9*9 Ninja Remarketing Training
Promotion Copy Generator Software
Facebook 20% Rule Checker
Programmed Content Creator
Mental Conversion Triggers
Limitless Commercial License for OTO1
OTO 2 – Adsly Professional ($67)
With the expert rendition one turns into an individual from the format club and gets 20 layouts each month for a year. Proficient permit likewise incorporates more formats, import and fare provisions and capacity to offer activities to other Adsly clients alongside an uncommon admittance to private FB bunch.
Here is the rundown of elements included with the OTO2.
Layout Club at a One Time Cost
20 Templates each month FOR 12 MONTHS
275 DFY layouts
Layout demand alternative (5 formats)
Import and Export Adsly Templates
Offer Projects To Other Users
20+ Premium Fonts
PRIVATE FB GROUP ACCESS
OTO 3 – Adsly Ultimate ($67)
With Adsly Ultimate one can without much of a stretch deal with numerous ventures for customers and appoint individuals from their group to chip away at these undertakings. It has a review framework through which customers can review and share their remarks. It likewise has some work locater, proposition formats and changing over profile gigs.
Here is the rundown of elements included with the OTO3.
Auto occupation Finder
Pre made exceptionally changing over Proposal Template
Pre made exceptionally changing over Profile Gigs
Choice of Highlighting and saving your favored work
Venture Management System
Venture Review System
OTO 4 – Adsly permit ($97)
Exchange Adsly Premium Ad plan programming with choices of 50 or 500 licenses.
100% commissions toward the front and half commissions on the overhaul.
Affiliate License
20 licenses for $67
50 licenses for $97
500 licenses for $127
100% commission on Front End and
half Commission on OTOs
2 notes
·
View notes
Text
Photo Organizing Software for PC
Photo organizer software can manage images from various layouts such as JPEG, BMP and also TIFF images.
Check out the complying with totally free image take care of software program, image handle programs and photo manage software and also discover. By using manage photos software (additionally recognized as photo manager software), you will certainly be able manage your photos on Computer system in simply a few clicks.. There are a variety of different take care of photos devices that you can use to manage your image data, yet none will certainly be as reliable and effective as good manage photos software.
That is where manage photos software can be found in, so download manage photos software today to manage your photo files quickly and quickly. Photo management software and manage photos software can aid with this. . There are lots of excellent photo manager software out there, yet just a couple of manage photos software that functions well. Photo take care of software will certainly permit you to manage your picture collection without spending much time doing it. There's no demand to waste hours sorting and labeling data when handle photos devices can do everything in a few clicks..
Managing them by hand can be a time consuming job that takes up a lot more time than it should if you have pictures on your computer system.. Photo manager software are powerful devices that allow you to take care of all your photos at the same time while making it less complicated for you to arrange them later on.. It software to all file layouts, however it's specifically crucial with pictures because they take up a lot disk room.
User-friendly photo organizer software with several known options and programs to delete duplicate images
You can also develop customized folders to take care of particular photos or teams of photos, whether they are household photos, trip shots or such. It allows you to manage them in one central place; it makes it very easy to look for specific images; it makes sharing photos on the internet with friends and family members a breeze; as well as you can utilize it to manage photo collections. It's extremely simple to use picture manage software because it developed for both novices as well as experts conveniently.. There are numerous aspects to think about when picking manage photos software: complete variety of pictures, dimension of the picture collection, security protocols for your images organizer software. Photo organizer software helps take care of as well as arrange photos. It can be made use of as a picture visitor, or as an extension to handle other programs. Develop slide shows for watching on TV or PC display. There are many ways you can organize your images on your computer. Some software application will arrange your picture collection based upon date, location, people in your photographs (people marking), etc.
Everything about duplicate photo finder with several known settings to clean duplicate photos or manage photos for photography organization
If you have hundreds or thousands of digital pictures on your computer system, it can become a big task to manage them all by hand.. A photo organizing software is a kind of computer system program that manage pictures on computers. Thus you can handle picture collections and household photo collections. This program is a complete solution for arranging your digital photos on your PC. Duplicate photo finder is the very best tool for managing pictures on your computer.
Several of the very best photo organizer software: SortPix XL and also Picasa. Photo management software can assist handle your photo files by organizing similar photos with each other, executing basic edits on the photos, and also making it simpler to locate specific chance ats a later date.
Just how do I organize photos is qualified of instantly locating and also eliminating duplicate photos on your computer system. This does not only conserve you the moment as well as initiative it would require to handle your images by hand, however likewise makes certain that you have a premium photo collection which contains only unique images.
1 note
·
View note
Text
Smart Photo Management Software
Manage photos software will certainly enable you to handle your photo collection in a reliable, organized method.
That is where manage photos software comes in, so download manage photos software today to handle your photo files promptly and also quickly. Photo management software will certainly assist manage your pictures by making certain that they are sorted, identified as well as saved in one position on your computer system. There are several great photo manager software available, yet just a few manage photos software that functions well. Image handle software program will enable you to manage your photo collection without investing much time doing it. Photo management software is an object-oriented digital possession monitoring program.
There is no "one size fits all" service for arranging pictures as it depends upon what you intend to perform with them. Photo manager software makes it less complicated to handle digital images by enabling you to handle image data really rapidly and also successfully. There are lots of methods to handle photos, yet the most effective way is with photo management software. The very best free manage photos software, likewise called a photo manager software, will permit you find duplicate photos to handle your digital images very efficiently.
If you have pictures on your computer, handling them by hand can be a time consuming task that takes up a lot even more time than it should.. Photo manager software is Windows based software that helps you handle your images and their metadata (the info connected to the picture such as: area, camera utilized). Digital property monitoring is the procedure of arranging as well as keeping digital files.
Good photo manager software with ideal options to clean duplicate photos including image management

Arrange your photos by day or name, or make customized folders. Photo management software, like "SortPix XL", is made especially for handling and arranging pictures as well as pictures.
It permits you to handle them in one central place; it makes it very easy to look for details pictures; it makes sharing images online with loved ones a breeze; and also you can use it to take care of picture albums. Picture manager makes arranging digital photos simple.
If you like to handle your own photos without software, you can arrange them by date (oldest on top) which will arrange your picture collection in sequential order.. There are several aspects to take into consideration when picking manage photos software: overall number of images, size of the photo collection, protection procedures for your images coordinator software program. Photo organizer software helps handle and arrange photos.
Clever Note pad delete duplicate photos for nonprofessionals to simple search photos
This energy gives various methods to manage these huge photo collections. It can take care of family or infant albums consisting of lots of images. However, if you have hundreds or thousands of digital images on your computer system, it can come to be a massive job to manage them all manually..
Therefore you can manage picture collections and household picture collections. This program is a total solution for arranging your digital pictures on your PC. Duplicate photo finder is the best tool for taking care of photos on your PC. Photos can be arranged by date, period, event or time. You might additionally locate that a lot of the images are matches of each various other, that makes a lot more function for you. Photo management software can help handle your photo data by organizing comparable images together, performing fundamental edits on the images, and making it simpler to situate private shots at a later date.
The purpose of these type of software application is to aid the customer manage their image collection in a reliable as well as very easy method. This doesn't only conserve you the moment and also initiative it would certainly require to manage your pictures manually, but additionally makes certain that you have a high-quality image collection that includes absolutely nothing but special pictures. The program can be made use of to handle personal photos, along with those that moms and dads show to their kids.
1 note
·
View note
Text
Helpful Find duplicate photos for trainees and pros
Brand-new program to find duplicate photos for Laptop for wonderful find duplicate photos or even convenient find photos
This is normally fantastic when they plan to remove duplicate images which can surely support us to separate between quite identical photographs which might indeed appear very same in first sight. Whenever it concerns looking at photographs the Computer find duplicate photos tool comes with 6 different choices on provide. Many digital photographers have actually reviewed numerous pictures coming from your electronic cameras in to their computers that locating what you miss gets just about tough. One other significant aspect of their photo manager program is definitely that it really might be chosen to eliminate duplicate pictures and also a bunch further suitable purposes. That handy Windows software to find duplicate photos includes a handy assistance function to really help them get the best out of each of its uses.
Yet another important element to indicate is this capacity of image organizing program to partner with the electronic cameras files. Which means this productive PC software to find duplicate photos can spare you precious time and let any person to function way more productively. This shows that people will never delete duplicate pictures coming from directories or possibly this one that we choose inside many different collections. The second they offer far fewer unwanted copies of our photos kept on our home computer people may manage to uncover the photographs we desire to deal with faster.
The important element find duplicate photos of any Windows find duplicate photos tool is actually the potential to let users go on leading of each one of our photograph file names. PC find duplicate photos software also offers extensive filtering as well as arranging utilities clients make use of. The creation crew causing that useful Windows find duplicate photos software possess brought a large amount of effort to provide it comes to almost all.
Useful find duplicate photos software with several helpful functions to search photos or delete duplicate photos
Find duplicate photos tool is generally created to support everybody generate a lot more wonderful photo shoots directly from all those anybody have captured together with his electronic camera
The impressive find duplicate photos tool will certainly help everyone to separate their pictures by using a mouse choosing that knowledgeable draw as well as decline device and also owners even utilize key board shortcuts exactly like the programs we are actually acquainted with including other solutions. Supposing that you wish to check images upon our laptop to assemble a selection or even want manage photos so everyone get going variety it, after that our odds are generally it will certainly take you time to situate them at their hard disk. People may work with the rapid duplicate photo remover that uses either source together with focus on computer windows.
My maker of duplicate photo cleaner understand that just not all of customers prefer to continue within this method. Which will often allow you to sort photos anybody are looking for quicker through taking away excessive replicas. Using this duplicate photo cleaner anybody may see that snapping shots time or the visibility time that was actually used in the picture or maybe search images basing on to their space adjusting. Tool to find duplicate photos download may additionally be simply used as duplicate photo finder by freelance photographers and customers that need to search images. Although they will only get a few snapshots on your phone, program for find duplicate photos PC can help to arrange your photographs and even arrange all of them much better within their folders. This specific program for find duplicate photos means allowing an advanced distinct title per of the pictures within minutes.
Guide about tool to find duplicate photos for professionals with find photos
Free find duplicate photos program download for inexperienced and experienced or tools to manage photos to manage photos and delete duplicate photos
Owners can easily eliminate duplicate pictures or even utilize a pair of versatile clients to check the photos by using a single another regardless of them possessing different directory areas. Our find duplicate photos software can be started like another software application, either directly from the beginning menu on your desktop computer or tablet computer or even with a desktop button. People might only clean duplicate images working with duplicate picture cleaner and then review all of them within my Computer find duplicate photos program viewers. Through this every person may organize photos with Windows find duplicate photos software that is truly assisting people to produce enlightened selections concerning their photograph creation. Everyone furthermore watch training photograph produced with this find duplicate photos tool developers to reveal anyone what to accomplish. Consequently this similar photo finder is an extremely versatile Windows 10 find duplicate photos program nevertheless it is run to delete duplicate photos. There really once more you are going to be really able to manage images by having program that allows for keyboard shortcuts to be used after anyone are usually using image organizing software. By using lots of messy directories and copies coming from their varying photos, clients put in many hours seeking for a certain photograph they choose to function or even imprint on. Their Computer program to find duplicate photos collection will not just simply accelerate the method of remove duplicate photos they have already stashed but furthermore allow much-needed room within that computer systems memory meaning we provide even more room provided for near future online installs.
1 note
·
View note
Text
0 notes
Text
Delete Duplicate Photos Windows 10 With Easy Find Duplicate Pictures
Delete duplicate photos program is built to assist anybody make more surprising photos created by those you have probably grabbed by your digital camera
Through this current similar picture finder you can wish to check photos stocked on hard disk to search for this ones on it that are actually stored upon our various other computer hardware. It is definitely excellent whenever we desire to search photos in which can easily assist everyone to distinguish between quite the same photographs which might also appear similar at very first sight. Photo shooters who wish to search for photos in which come with an amazing estate or even what portray everyone and even particular locations can get it much simpler to work on therefore soon after we have relabel our images by having such clues as to your idea.
An additional necessary facet of the duplicate picture remover is that it really could be chosen https://jaxssoft.com to delete duplicate photos as well as a whole lot extra effective functionalities. This indicates that people might not remove duplicate photos directly from directories or possibly ones which anyone utilize with different portfolios. The already stated image organizing program is simply a best tool for delete duplicate photos Windows 10 since it helps consumers to computerize their method that they will find pictures. Every time any person provide fewer needless replicas of their pictures held upon their laptop they can be ready to uncover the pictures you need to deal with quicker.
Tool for delete duplicate photos for trainees and photographers with clean duplicate photos and also search photos
The usable PC delete duplicate photos software will support them to separate this images with a mouse button taking that knowledgeable drag and also drop unit as well as individuals also make use of computer keyboard quick ways exactly like the systems they are currently acquainted with such as various other software. Using this good delete duplicate photos tool for PC people might rename all of our photographs associated with that photo shoot to consist of our products label and also a task certificate. Read on to discover even more regarding similar image finder also why it really is actually so much more a regular Windows 10 delete duplicate photos tool. Cleaning their computer to eliminate duplicate images is usually a major aspect of their style of this great PC delete duplicate photos tool. Our developers of the Windows delete duplicate photos program have really considered all of that elements of structure photos anyone may possibly require even if you are a specialist photographer a load of photos at our hard disk or even a newbie by using a variety of traveling's selfies and also takes to oversee.
Tool for delete duplicate photos may as well be actually chosen being duplicate picture remover by freelance photographers or even those that require to organize images. It capability to search images just in a couple of folders will even so be normally performed as well instantly or even manually. Even if they only make a handful of snapshots on the smart device, software for delete duplicate photos will help to arrange the photographs and also coordinate all of them even better inside our folders. My software to delete duplicate photos for Computer indicates allowing a different distinct brand to every of the photographs within seconds.
New facts about tool to delete duplicate photos with a lot of ideal options to eliminate duplicate photos and organize photos for photography management
Search photos made stunning together with the great latest program for delete duplicate photos
Just not only can it really manage virtually any duplication of your photo files it really locates, however everybody may likewise take it actually to group your photos inside a variety of solutions. Their delete duplicate photos program free download may be opened up exactly like every other program, either from the start menu at your personal computer or laptop or even through a desktop button. It is even possible to place day file formats when you produce new directories since that supports everyone to remain on top of related directories which contain many web content.
Undoubtedly generally there are actually many tools which are marketed as program for delete duplicate photos Windows 10 yet not each of them may conduct all of our usual tasks you may really need to continue leading of their picture archives. Delete duplicate photos program will definitely not find photos to anyone yet support us to review quite same ones after helping make that misstep of thinking they are simply the exact same. Our delete duplicate photos program collection may certainly not only speed up your technique of delete duplicate photos we have normally saved but likewise free up much-needed room inside your computers memory to ensure you get even more room provided for potential online installs.
Our tool is actually just as satisfied to regular professional photographers and also everybody that is normally used to the office set of systems, will probably recognize just how to work that convenient delete duplicate photos software with ease. Like this each person can easily manage duplicate pictures along with PC delete duplicate photos software what is certainly supporting everybody to help make enlightened selections regarding our picture creation. Customers similarly see tutorial image generated through that tool to delete duplicate photos free download developers to reveal them how to perform. In this manner their delete duplicate photos tool suite purchases people an incredible level of control.
1 note
·
View note
Text
Delete duplicate photos for Windows 10
Our software to delete duplicate photos Computer has indeed been really created to supply all of our functions and elements you can previously need to prevent the pictures organized on your laptop. Photo makers who desire to look for images that come with a special residence or that illustrate folks and also some spots will definitely discover it really a lot easier to accomplish thus the minute you have actually renamed your pictures along with such hints concerning our content.
In other words their duplicate photo remover is actually the primary Windows delete duplicate photos program people will definitely ever before really need considering that it really covers all of our causes. One other valuable feature to point out is definitely that capability of photo manager software to partner with your digital cameras records. Each time anybody feature much less useless copies of our images stashed on our desktop computer people can manage to discover the photos they wish to work with even more effectively.
That design group behind this valuable delete duplicate photos tool Windows 10 possess made a large amount of like make certain it really is usable to everybody.
Facts about tool to delete duplicate photos for manage photos or eliminate duplicate photos with a lot of good options
That may even assist people to manage images everybody are finding faster through eliminating excessive content. We can make use of their swift picture organizer software that deals with either tools and target computer windows. Even though they just try a several snapshots on your mobile phone, software for delete duplicate photos free download will certainly support to separate their pictures and also organize all of them even better inside the directories. Continue reading to learn much more relating to duplicate image finder plus why it really is certainly much greater than a common delete duplicate photos tool Windows.
If everyone choose to check pictures in that computer system to set up a profile or desire manage photos so that people begin type it, then the chances are actually it can really take us time to find it on their disk drive. When people wish to seek photos or maybe manage images, duplicate picture cleaner provides that necessary performance to make the work. My simple delete duplicate photos program can support them to sort out our photographs by having a computer mouse working with the acquainted draw as well as drop unit and users also use key pad shortcuts just like the plans people are pretty much familiar with including other programs. Using this image organizer program users can view their shooting moment and even their direct exposure time that was certainly taken inside that photograph or maybe organize photos according to the opening setup.
Their efficient program for delete duplicate photos for Computer will definitely explore them almost all and afterwards present us together with its final results. Assuming that they intended to relabel any single file coming from a photo shoot you did for a client that each title included our personal details, anybody should do therefore. This programmers of duplicate picture finder have recently integrated many absolutely powerful additional functions what anyone can use. This is actually built for our Windows 10 and Windows 7 system software meaning people might manage duplicate pictures by having delete duplicate photos tool PC which works with this existing needs also. Capturing your hard drive to find images is really an important part of the design in this versatile program to delete duplicate photos. My delete duplicate photos tool PC indicates supplying an advanced unique title to every of this pictures just within minutes. Their producers of that Windows 10 software for delete duplicate photos have really imagined all of this aspects of remove duplicate images people might just need in case people are definitely an experienced photographer a lots of photographs at your computer hardware or even a beginner along with a compilation of holidays takes and also delete duplicate photos selfies to care.
Superb tool for delete duplicate photos is a programs to clean duplicate photos with manage duplicate photos
Regardless of whether people are search photos with program for delete duplicate photos for the website or perhaps their private usage, delete duplicate photos tool can absolutely help everyone remove duplicate photos the blog
Certainly not simply can it handle every duplication of this photograph files it spots, however everybody can easily additionally use it actually to group your photographs in a myriad of techniques. That is a big issue to many freelance photographers that they just simply possess so much images at their computer that situating particular images turns out virtually inconceivable. That means their image management program is definitely an astonishingly functional PC delete duplicate photos tool nonetheless it is definitely worked with to search photos. Naturally certainly there are many software programs which are advertised being software for delete duplicate photos for Computer nevertheless not actually all of them can execute all of their everyday functions you may really need to keep best of our photo collection. My delete duplicate photos tool set will definitely not just only hasten that procedure of delete duplicate photos they have certainly stored however as well allow much-needed area in this desktop computers space that people feature even more place accessible for near future online installs.
There once more anyone will certainly be generally able to find photos with software application which enables keyboard buttons being chosen after anyone are generally using image organizer software. Our software is literally similarly suited to occasional digital photographers as well as everybody who is actually used to this workplace collection of systems, will recognize how to work this good tool for delete duplicate photos intuitively. Most people usually look at educational photo generated with that Windows program for delete duplicate photos creators to reveal us what to perform. By having too much messy directories as well as reproduces out of my different photographs, clients put in many hours seeking a certain picture they intend to function or imprint at. We can go a single move even more and even set up the software for delete duplicate photos to browse for then afterwards manage duplicate images within a perfectly automated way.
1 note
·
View note
Text
Easy Photo Management Software for Windows
Photo management software helps handle your photo data by making it simpler to handle and also sort your images at once.
There are several methods to manage images, however the very best way is with photo management software. Photo management software as well as manage photos software can assist with this. . Utilizing photo manager software will see to it that every one of your digital pictures are gathered in one location as well as that your image documents are arranged and also labeled appropriately. Nevertheless, by utilizing manage photos software (additionally called photo manager software), you will be able handle your photos on Computer system in simply a couple of clicks..
Photo management software will aid handle your pictures by making certain that they are sorted, identified and saved in one location on your computer system. The photo managing software best totally free manage photos software, additionally known as a photo manager software, will enable you to manage your digital photos extremely effectively. If you have a whole lot of pictures on your computer system, arranging them all with an excellent take care of images devices can be a daunting task.. The ideal manage photos software will certainly make it easy for you to arrange and organize your photos simultaneously.. Photo manager software makes it simpler to handle digital images by permitting you to handle picture files very rapidly as well as efficiently. Managing them manually can be a time consuming task that takes up a lot even more time than it should if you have images on your computer system.. When handle photos tools can do it all in a few clicks, there's no requirement to waste hrs arranging as well as labeling files.. Photo manager software is Windows based software that helps you handle your photos as well as their metadata (the information connected to the picture such as: place, camera used). Digital possession monitoring is the process of arranging as well as saving digital data.
A photo organizer software download is right here to help you manage your photo collection. When done, you will certainly have an absolutely arranged collection that is very easy to handle as well as share. Arrange digital pictures into albums or folders. Create slide shows for seeing on television or computer screen. A photo organizer, photo file manager, take care of pictures software application, manage picture files cost-free download are here to aid you handle your image collection. Photo administration device that allows you handle pictures in folders and also subfolders, relabel photos, include picture rankings or tags, produce automated slide program with music.
There are several methods you can arrange your photos on your computer. Images, by nature, are composed of data which is saved using different algorithms than papers or other kinds of files that utilize words and symbols. It enables you to handle them in one main area; it makes it very easy to look for particular images; it makes sharing images on the internet with friends and also family a breeze; as well as you can utilize it to manage picture collections.
You can even manage the order of your pictures in each folder. You can sort them by date (oldest at the top) which will organize your photo collection in chronological order if you like to handle your own pictures without software.. You can likewise produce personalized folders to handle details photos or teams of pictures, whether they are family photos, vacation shots or such. It can be used as a photo visitor, or as an extension to handle other programs.
Brand-new photo organizer software with several ideal gadgets for sort photos for image organization
Nevertheless, if you have hundreds or countless digital images on your computer, it can end up being a huge task to manage them all manually..

Therefore you can take care of picture collections as well as family photo collections. This program is a full remedy for arranging your digital pictures on your PC. Duplicate photo finder is the very best device for managing pictures on your PC. It is the best tool for image organization and also handling these significant image collections. Photos can be organized by date, period, event or time. Photo management software can be made use of to arrange, edit and share images online. Some of the ideal photo organizer software: SortPix XL and also Picasa. You may likewise locate that several of the images are matches of each other, that makes also extra benefit you. Duplicate photo finder software that helps to manage, find and remove duplicate photos on computer.
This energy allows you to manage, remove and also find duplicate photos on your computer. Exactly how do I organize images can automatically discovering as well as removing duplicate photos on your computer. The program can be used to handle personal images, in addition to those that moms and dads show to their children. This is specifically efficient for those with big number of photo collection.
1 note
·
View note
Text
Gemini App For Mac

Gemini 2 Mac
Gemini App For Mac Windows 10
What Is Gemini 2 App
Gemini Pro 2 Crack 2.6 keygen Full Serial 2021 Activation Key
CleanMyMac X is the 10th anniversary edition of CleanMyMac, a native macOS tool that daily cleans one million Macs worldwide. The app does all the essential housekeeping on a Mac: deletes tons of junk and malware, and makes a computer faster and more organized. You can use CleanMyMac X to manage storage, apps, and monitor the health of your Mac. Gemini for mac free download - Gemini for Mac OS X, Gemini 2, Gemini, and many more programs. The Gemiini Mobile app is designed as a supplement to the full Gemiini site at learn.gemiini.org. The app gives you the ability to view and archive your student's assignments on-the-go. However, it is NOT a stand-alone app, has no direct influence on the main site. Download Gemini 2.6.9 for Mac full version program setup free. Gemini 2 macOS is an impressive app that helps you find duplicate files and wipe them away to recovers tons of space on your Mac. Gemini 2.6.9 for Mac Review. Make your device go lighter with Gemini that finds out identical files in the system and clears them out.
Gemini Pro 2 Cracked is the most downloadable app that assists you to find duplicate files or wipe them away completely. Moreover, it is laser-accurate and recovers the tonnes of space on your MAC. Thus, it works well to find the duplicate file as you desire. Also, its performance is excellent. Many people like it to have on their device. The process of this software to find and detect the required file is very easy. However, it works on all Mac versions. It`s a user’s choice. Just click once, it will find or remove the duplicate files on your mac on the fly. The user can change the boring removing copies in entertainment. The operational apps came over quickly which is the final result that did not take a long time to offer. At the end of the band joyously becomes green, constantly.
Gemini Pro Full Cracked + License Key Free Download AIO Tool
Just, the user has to go to the finalization or end of the scan process. In addition, the Mac paw Gemini 2 activation code has many errors of data types like music, images. The results are designated as a general and each of the levels alone. As well as, Gemini 2 cracked version is a superb duplicate file finder app for the MAC which is prepared for a big update nowadays. Hence, the Gemini 2 Activation key includes an attractive interface and also changes the file scanning algorithm. So, it becomes more duplicate files alike when they are not named the similar thing. Additionally, it contains a GUI with powerful features. Above all, a smart app to free space on the storage.
Gemini 2 Keygen Important Features:
Locate and remove duplicate files, no matter what they are in which corners of your machine
Deeply, scan the results and hand-pick the files to wipe, or best – offering smart select to do all the work
Just like as duplicates, the same file also takes big space results space wastage. Nowadays, this app is after them. Spot the files that look alike, see how they differ and delete those you do not want.
Do not leave copies always create the big hurdle to locate those five copies of Space Oddity, you have added up.
Really, this software mac full version is very smart. It easily tells copies from the originals. Also, it knows which files will remain in your device. Which files not? Moreover, it learns to choose the copies the way you do.
Just with a few clicks, this program view duplicates in full detail or faster destroy them
As well as, it makes things very easy and so simple.
If you have lost something by mistake. Do worry, it moves duplicates to the trash and allows you to bring them back in the single-click
What`s New in this version 2.6 Gemini 2 Mac Cracked

Added- Provides full support of macOS High Sierra
Fix minor issues
Nitro PDF PRO Crack
How to use Keygen for Gemini Pro?
First of all, hit the download button at the end
Before going to the next steps, decide the right path
After completion of the installation, the user will get a shortcut on the desktop of your machine
Run it from your desktop icon
Now, it is working
Finally, all is done
Do not forget to share with your friends and family members
Make your own programs and macros as you desire- no programming skills required
Shadha
Gemini 2 Mac
Gemini pro
4
Gemini App For Mac Windows 10
Gemini Pro Crack
Windows, MAC
What Is Gemini 2 App
Software
1 note
·
View note
Text
Easy photo organizer software
An essential element of any type of photo organizer photo organizer software software download is definitely the potential to really help people keep on best of each one of our photo documents titles. In short this particular photo manager software is normally the only photo organizer software PC you may actually require considering that it covers all of our roots. Hence the powerful photo organizer software Computer can save people quality time and help a person to perform way more productively. Which suggests that we would not eliminate duplicate pictures out of folders or else that one that you choose within many different profiles. Windows photo organizer software furthermore supplies extensive screening and also arranging functionalities consumers enjoy. Ever since this development of experienced photographers has been actually confronted with this issue of growing several pictures in that collection. As earlier mentioned picture management program is actually a major Computer photo organizer software given that it lets people to speed up their method that they will find duplicate images.
Regardless if they need to find images or even sort images, similar photo finder offers the necessary functionality to finish the project. Assuming that we choose to search images on that laptop to set up a selection or even prefer manage images thus people start sort it, then the odds are generally it will certainly take anyone time to locate it upon that computer hardware. Keep reading to figure out further about duplicate picture finder also just why it really is certainly so much more than an average photo organizer software for Windows. That designer of image management program recognize that just not all clients intend to go on with this way. Capturing your disk to find duplicate pictures is a major component of this concept of this professional Windows photo organizer software. Assuming that they chose to rename any single report from a picture shoot you took for a client that each title included our private particulars, all people should do so. Photo organizer software may additionally be chosen being similar image remover through freelance photographers and even users in which may need to sort images.
It is actually a massive trouble for plenty of freelance photographers they simply get too much photos at their hard disk that locating specific images turns out nearly tough. That PC photo organizer software can be opened up exactly such as another tool, either directly from the beginning selection at that personal computer or even laptop or even via a computer desktop button. With this that Computer photo organizer software package provides people an extraordinary supply of control. Of course there certainly are normally plenty of programs that are advertised being photo organizer software Windows 10 however not each of them can perform all of their typical activities we could need to keep best of our picture collection. It is generally also feasible to set date layouts the minute people develop brand-new folders just because this allows anyone to stay on top of the same directories which have unique web content. Photo organizer software can certainly eliminate duplicate pictures to them but help people to analyze extremely comparable ones free from creating this problem of presuming that they are definitely the same. That way people will sort pictures along with photo organizer software what is totally supporting everyone to make knowledgeable choices relating to your picture creation. As a result our photo management software is actually an amazingly adjustable Windows 10 photo organizer software and also it is generally used to structure images.
#photo organizer software#photo organizer#PC photo organizer software#photo organizer software for Windows#photo organizer software Windows#photo organizer software Windows 10
1 note
·
View note