#CleanUI
Explore tagged Tumblr posts
Visit Tumblr Blog
Explore Tumblr blogs with no restrictions, modern design and the best experience.
Last Seen Tumblr Blogs


Fun Fact
130K people were victims of a chain letter scam that affected Tumblr in May 2011.
Text
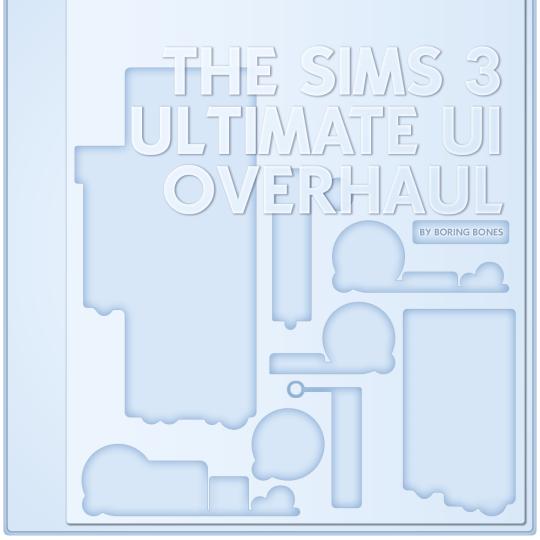
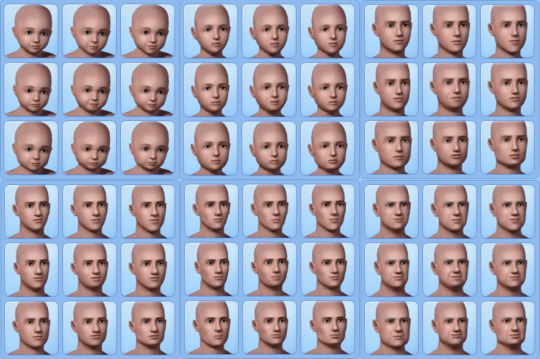
My new mod ULTIMATE UI OVERHAUL is available for everyone from now on <3 Hope you like it!! It's time to revamp your TheSims3 CAS experience!

DOWNLOAD NOW
686 notes
·
View notes
Text
#MinimalistDesign#WebDesignTrends#MinimalWeb#UIUXDesign#ModernWebDesign#CleanUI#SimpleDesign#MinimalUX#WebsiteInspiration#DigitalDesignTrends
0 notes
Text
“Do I Really Need a Mobile-Friendly Website in 2025?”

Absolutely yes.
Over 75% of internet users are on mobile. If your website isn’t mobile-optimized, you're losing visitors and leads — fast.
At Apex Digitech, every site we build is mobile-responsive, fast-loading, and Google-approved.
📱 Looks great on all screen sizes ⚡ Loads in under 2 seconds 🎯 Built to convert, not just exist
Let’s upgrade your digital first impression — because mobile users aren’t waiting around.
#NextGenWebDesign#WebsiteInspo#ModernWebDesign#CleanUI#WebSolutions#ResponsiveWeb#CodeAndDesign#CustomWebsiteDesign#DevLife#WebsiteGoals#UIThatWorks#DigitalMarketingExperts#OnlineMarketingTips#GrowthHacks#DigitalStrategies#FullStackMarketing#ContentIsKing#MarketingDoneRight#LeadMagnet#SocialReach#MarketingThatWorks
1 note
·
View note
Text
Removing Underlines from Buttons with CSS: Clean Styling
Introduction
Welcome to a journey into the world of clean and stylish button styling with CSS. In this blog post, we'll explore the significance of removing underlines from buttons and delve into the various techniques and best practices to achieve a polished and modern look for your web elements. Whether you're a seasoned developer or just starting with CSS, this guide will provide insights into creating buttons that not only catch the eye but also contribute to an enhanced user experience. Join us as we uncover the art of removing underlines from buttons, adding a touch of sophistication to your web design.
Why Remove Underlines?
Understanding the rationale behind the decision to remove underlines from buttons is crucial for crafting a visually appealing and user-friendly web interface. Let's explore the reasons driving this design choice: - Enhanced Aesthetics: Removing underlines from buttons contributes to a cleaner and more modern visual appearance. This aesthetic refinement aligns with contemporary design trends, providing a sleek and professional look to your website. - Reduced Visual Clutter: Underlines, though conventionally associated with links, can introduce unnecessary visual noise to buttons. By eliminating underlines, you declutter the visual space, allowing users to focus on the essential elements of your interface. - Consistency Across Elements: Achieving a consistent design language is essential for a harmonious user experience. Removing underlines from buttons aligns them visually with other non-link elements, promoting a cohesive and unified design language throughout your website. - Improved User Experience: Buttons without underlines present a more intuitive and user-friendly interface. Users can quickly identify actionable elements without the distraction of underlines, streamlining the navigation and interaction process. - Modern Design Trends: Following current design trends often involves breaking away from traditional styling conventions. Many contemporary websites opt for a minimalist and sleek appearance, and removing underlines from buttons aligns with this evolving design ethos. Beyond these key considerations, it's essential to recognize that the decision to remove underlines should be made thoughtfully, taking into account the overall design goals and user expectations. By doing so, you can create a visually appealing and user-friendly web environment that resonates with modern design principles.
CSS Basics
Before diving into the techniques for removing underlines from buttons, it's essential to revisit some fundamental CSS concepts. Familiarizing yourself with these basics will lay a solid foundation for effective button styling: - Selectors: Understanding CSS selectors is crucial for targeting specific HTML elements. Whether using class, ID, or tag selectors, choosing the right selector is the first step in styling buttons. - Properties and Values: CSS properties dictate the visual aspects of an element, such as color, size, and font. Familiarize yourself with common properties related to button styling, including background-color, border, and padding. - Box Model: The box model describes how elements are structured in terms of content, padding, border, and margin. Understanding this model is crucial for precise control over the sizing and spacing of buttons. - CSS Resets: Dealing with browser-specific styles can be challenging. CSS resets help standardize default styles across different browsers, providing a consistent starting point for your button styling. Once these basics are clear, you can proceed to explore more advanced techniques for removing underlines. One effective approach involves using the text-decoration property and setting it to none for buttons. Additionally, understanding the :hover and :active pseudo-classes allows you to create interactive and responsive button styles. Concept Description Selectors Identifiers used to target HTML elements for styling purposes. Properties and Values Attributes that define the appearance and behavior of CSS elements. Box Model Framework for understanding the layout of elements, including content, padding, border, and margin. CSS Resets Techniques to standardize default styles across different browsers. By mastering these CSS basics and exploring their application in button styling, you'll be well-equipped to implement underlines removal with precision and style.
Methods for Removing Underlines
When it comes to achieving a clean and stylish appearance by removing underlines from buttons, several methods are at your disposal. Each method offers its own set of advantages and considerations, allowing you to choose the approach that best aligns with your design goals. Let's explore these methods in detail: - Using the text-decoration Property: One of the most straightforward methods involves utilizing the text-decoration property in CSS. Setting this property to none effectively removes underlines from buttons. This method provides simplicity and ease of implementation. - Utilizing Class or ID Selectors: Applying the text-decoration property selectively through class or ID selectors allows for a more targeted approach. This method is advantageous when you want to remove underlines from specific buttons while leaving others unaffected. - Creating Custom Styles: Going beyond the basics, you can create custom styles for your buttons using advanced CSS techniques. This involves specifying properties such as border, background-color, and padding to achieve a tailored appearance without underlines. - Using Pseudo-classes: Employing pseudo-classes like :hover and :focus allows you to add interactivity to your buttons. These classes can be utilized to change the appearance of buttons when users hover over or focus on them, enhancing the user experience. Consider the nature of your website and the desired user interaction when selecting a method for removing underlines. Additionally, it's crucial to test your chosen method across various browsers to ensure consistent and reliable results. Method Description text-decoration Property Directly removes underlines by setting the text-decoration property to none. Class or ID Selectors Applies the text-decoration property selectively to specific buttons through class or ID selectors. Custom Styles Allows for the creation of unique button styles using a combination of CSS properties. Pseudo-classes Enhances interactivity by modifying button styles on user interaction, such as hovering or focusing. Experimenting with these methods will empower you to find the most suitable approach for achieving a polished and underline-free button styling on your website.
Best Practices
As you embark on the journey of removing underlines from buttons in CSS, adhering to best practices ensures a seamless and effective implementation. Consider the following guidelines to achieve clean and polished button styling: - Consistency is Key: Maintain a consistent design language across your website. Whether removing underlines from all buttons or specific ones, consistency enhances the overall user experience and fosters a cohesive visual identity. - Responsive Design: Ensure that your chosen method for removing underlines accommodates various screen sizes and devices. Responsive design principles help create a user-friendly experience on desktops, tablets, and smartphones. - Accessibility Matters: Prioritize accessibility by considering users with different abilities. Ensure that buttons remain distinguishable and interactive for users who rely on assistive technologies such as screen readers. - Test Across Browsers: Perform thorough testing across different web browsers to confirm the consistent application of your chosen styling method. This helps prevent unexpected visual discrepancies. - Optimize Performance: While focusing on aesthetics, be mindful of performance. Streamline your CSS code and consider the impact of your styling choices on page load times to create a smooth user experience. Additionally, incorporating user feedback and conducting usability testing can provide valuable insights into the effectiveness of your button styling. Remember that the ultimate goal is to create an intuitive and visually appealing interface that resonates with your target audience. Practice Description Consistency is Key Maintain a uniform design language throughout the website for a cohesive visual identity. Responsive Design Ensure that button styling remains effective across various screen sizes and devices. Accessibility Matters Prioritize the accessibility of buttons for users with different abilities, considering assistive technologies. Test Across Browsers Conduct thorough testing to ensure consistent styling across different web browsers. Optimize Performance Streamline CSS code and consider the performance implications of styling choices for improved page load times. By incorporating these best practices, you'll not only achieve a visually appealing design but also contribute to a positive user experience on your website.
Case Studies
Examining real-world examples of buttons without underlines provides valuable insights into the impact of this styling choice on different websites. Let's delve into a few case studies that showcase the effectiveness of removing underlines: - E-commerce Checkout Buttons: In the e-commerce sector, streamlined and clean checkout buttons play a pivotal role in guiding users through the purchase process. Removing underlines from these buttons creates a visually uncluttered interface, reducing distractions and enhancing the focus on completing the transaction. - Social Media Sharing Buttons: On social media platforms, the design of sharing buttons is crucial for encouraging user engagement. Many platforms opt for underlines-free buttons to maintain a sleek and modern appearance, aligning with the visual trends of contemporary web design. - Call-to-Action Buttons on Landing Pages: Landing pages often feature prominent call-to-action buttons to encourage user interaction. By removing underlines from these buttons, designers can draw attention to the action they want users to take, creating a visually compelling and persuasive design. - Mobile App Navigation Buttons: Mobile app interfaces prioritize simplicity and ease of use. Navigation buttons without underlines contribute to a clean and intuitive mobile experience, facilitating smooth navigation for users on various devices. Examining these case studies highlights that the decision to remove underlines is context-dependent and should align with the specific goals and design principles of each website. It's essential to consider the user journey, the nature of the content, and the overall aesthetic when implementing underlines removal. Case Study Observations E-commerce Checkout Buttons Streamlined checkout buttons without underlines enhance the focus on completing transactions in e-commerce scenarios. Social Media Sharing Buttons Underlines-free buttons on social media platforms contribute to a sleek and modern appearance, encouraging user engagement. Call-to-Action Buttons on Landing Pages Removing underlines from call-to-action buttons on landing pages draws attention to desired user actions, fostering interaction. Mobile App Navigation Buttons Navigation buttons without underlines contribute to a clean and intuitive mobile app interface, prioritizing simplicity. These case studies demonstrate the versatility of underlines removal and emphasize the impact it can have on user engagement and visual appeal across different website contexts.
Common Challenges
While the decision to remove underlines from buttons can enhance the visual appeal and user experience, it's essential to be aware of common challenges that may arise during the implementation. Understanding and addressing these challenges will help you navigate potential issues seamlessly: - Loss of Visual Cues: Removing underlines can result in a loss of traditional visual cues that indicate a clickable element. It's crucial to compensate for this by incorporating alternative design elements such as color changes, hover effects, or iconography to maintain interactivity. - Accessibility Concerns: Users with visual impairments may rely on underlines to identify links and interactive elements. Ensuring that your styling choices are accessible and considering alternative methods, such as using contrasting colors, helps address accessibility concerns. - Browser Compatibility: Different browsers may interpret CSS styles differently. Testing your underlines removal method across various browsers is essential to ensure a consistent and reliable user experience. - Impact on User Expectations: Users may have established expectations regarding the appearance of clickable elements. Deviating too far from these expectations can lead to confusion. Carefully balancing innovation with adherence to user expectations is key. Addressing these challenges requires a thoughtful approach to button styling. Consider incorporating subtle visual cues, leveraging ARIA roles for accessibility, and conducting thorough testing to mitigate potential issues. Challenge Considerations Loss of Visual Cues Compensate for the absence of underlines with alternative design elements like color changes, hover effects, or icons. Accessibility Concerns Ensure accessibility by considering the needs of users with visual impairments and using alternative methods such as color contrast. Browser Compatibility Test your underlines removal method across various browsers to ensure a consistent user experience. Impact on User Expectations Balance innovative design choices with adherence to established user expectations for clickable elements. By proactively addressing these common challenges, you can confidently implement underlines removal, creating a visually appealing and user-friendly button styling while mitigating potential issues that may arise. Backend developers after writing CSS for 20 minutes: pic.twitter.com/CzIvYuSQNK — Marko Denic (@denicmarko) November 13, 2023
FAQ
Explore answers to frequently asked questions about removing underlines from buttons in CSS to enhance your understanding of this styling choice: Q: Why should I remove underlines from buttons? Removing underlines from buttons offers a cleaner and more modern visual appearance, contributing to a polished design. It reduces visual clutter, enhances aesthetics, and aligns with contemporary design trends. Q: Will removing underlines affect accessibility? It can impact users with visual impairments who rely on underlines to identify clickable elements. To address accessibility concerns, consider alternative design cues, maintain color contrast, and test with assistive technologies. Q: What is the impact on user expectations? Users may have established expectations regarding the appearance of clickable elements. While removing underlines can offer a modern look, it's important to balance innovation with adherence to user expectations to avoid confusion. Q: How can I ensure a consistent experience across browsers? Testing your underlines removal method across various browsers is crucial to ensure a consistent user experience. Different browsers may interpret CSS styles differently, and thorough testing helps identify and address compatibility issues. Q: Are there alternative visual cues for clickable buttons? Yes, alternative visual cues such as color changes, hover effects, or iconography can compensate for the absence of underlines. Experiment with these elements to maintain interactivity and guide users to clickable buttons. These frequently asked questions provide valuable insights into the considerations and implications of removing underlines from buttons. Consider these answers as you navigate the process of implementing this styling choice on your website.
Conclusion
In conclusion, the decision to remove underlines from buttons in CSS is a design choice that can significantly impact the visual appeal and user experience of your website. By following the outlined methods, best practices, and considering real-world case studies, you can create a polished and modern interface that aligns with contemporary design trends. However, it's crucial to navigate the challenges associated with underlines removal, such as potential accessibility concerns, browser compatibility, and user expectations. Addressing these challenges with thoughtful solutions ensures that your design choices contribute positively to both aesthetics and usability. As you embark on the journey of styling buttons without underlines, keep in mind the importance of consistency, responsiveness, and accessibility. Test your chosen methods across various browsers and devices to guarantee a seamless user experience for all visitors to your website. By incorporating the insights from this blog post, you can confidently implement underlines removal, enhancing the overall look and feel of your website's buttons while maintaining a user-friendly and accessible design. Read the full article
0 notes
Text
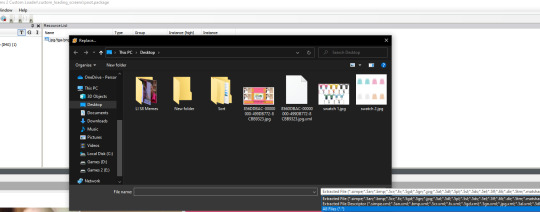
I'm making a default replacement for the in-game textures/icons when you build a wall, fence etc to match clean-ui, and when looking for them in SimPE I stumbled upon these:


I think they are leftovers from beta ts2 perhaps?
I also found these, called "glasswalls" and "glassroof":


Were we supposed to be able to have fucking glass walls and roofs???
Edit 2025-01-29: they are from the seasons ep, hahahah I am so sorry 🤡🤡
#adventures in simpe#just me rambling#ive been using cleanui since its release (love it)#but i think im going to change back to maxis original tbh#i miss it
76 notes
·
View notes
Text
Updated Resource List: UI Edition (Updated 11/10/24)
This is all the mods in my downloads folder that changes the game UI and makes it look better on modern display, removes annoyances etc. My old resource list only listed 3 which have since been replaced.
I play on a 2k monitor with the game set to 1080p with the default UI because I like the nostalgic look.
If you use cleanUI by @greatcheesecakepersona, then many of the widescreen fixes are already included! Many of these also have an alternative version made for cleanUI.
Loading screen replacement:
UC loading screen by @eddysims replace the Fun With Pets logo and removes idle M&G sims on select menu (I use an older version to match the Super Collection for mac, but have combined with this to remove the idle sims).
UC startup strings by @simsllama replace the M&G text strings while loading to fit Ultimate Collection.
M&G to UC program name replacement (MTS) changes the program name to say Ultimate Collection on taskbar, when closing the game and in credits. I use the old original Sims 2 icon in start menu.
More UI mods below my loading screen.
Removed or disabled buttons:
No delete button in Sim Bin by Chris Hatch avoid accidentially deleting a family in the neighborhood.
No delete button in Buy/Build mode by Chris Hatch. I prefer to delete cc in the downloads folder instead.
Edited No useless town buttons by ePSYlord. Removes the AL, FT and Pets buttons from upper select menu in hood view. It also disables Custom Content Browser button to the old sims2 webpage, the camera and video buttons which I never use but always accidentially click.
Removed Auto Login button by ePSYlord. Removes the redundant option in settings.
No delete button in CAS, edited More Columns in CAS by ePSYlord. This is an edit of Chris Hatch's ui mod (cas300Extra) that adds the columns while also removing delete button from all categories. I had difficulty getting it to work for me, but managed after changing load order and removing specific cc hairs.
Remove hood popup dialog box reoploaded on MATY. No more nagging to add subhoods when entering a neighborhood.
Visual annoyances begone:
No CC icon in CAS (MTS) hides the star on custom content.
No pause frame by @simnopke removes the red frame from live, buy and build mode.
Add store icon to CAS by @jawusa. Restore the TS2 Store Edition icon on store content which can all be found here.
Widescreen fixes:
Wider change appearance by Chris Hatch.
Wider buy/plan outfits by Chris Hatch.
Wider family tree by SixAM!
Wider design tool by @lamare-sims.
Wider collections by Chris Hatch.
Menu fixes or addons:
Subhood selection by Mootilda changes menu from big button to list of selections instead. Useful if playing with multiple subhoods.
Select your cemetery (MTS) adds dialog box to move tombstones if all sims on a lot die.
Baby Last Name Chooser by @midgethetree adds dialog box to choose a baby's last name when born.
Marriage Last Name Chooser (MTS) adds dialog box to choose last name after sims gets married.
Misc. UI changes:
Clearer need bars by simnopke. It just looks nicer.
Season icons in color (MTS). Replace the blue with colorful icons.
LTW icons fixed by Lamare. Resizes the Life Time Wants icons to be consistent.
I think that was everything concerning the user interface in my game. A lot more than anticipated and most added in the last year or so. My game looks so nice now!
If you have other UI mods or dialog box addons that isn't on the list, then please leave a suggestion for me 🥰
317 notes
·
View notes
Text
21 Sims 2 Custom Loading Screens
Happy New Year Everyone!
I bring you 21 custom loading screens for the sims 2 based on the Clean UI layout.
The photos from the custom loading screens are mainly from Sims 3 screenshots I got via Google (since Sims 3 has the best worlds ngl). Most of it is Maxis pictures, but some are player screenshots. There are also a couple that are from Skyrim and GTA San Andreas.
For players who use custom loading screens you either do one of three: 1. Use a UI replacement mod and only replace the loading screen file in your program files folder (i.e. CleanUi) 2. Use LoadingRandomizer 3. Use LoadingRandomizer for Sims2RPC - This is what I use
If you are 1 and don't have a loading randomizer, only install one loading screen in your game. If else, you can install as much loading screens as you can, but you don't have to install all. You can remove any loading screen that you don't prefer since I had a little fun with the photoshop effects with some.
P.S. The grey borders on the side in the video is not what it looks like in game, it's just a problem with the video. Plus, the actual picture files are actually larger, i cropped it to show how it looks like in my game (1920x1080)
proof (with reshade):
DOWNLOAD HERE (MODTHESIMS) 👈 the mediafire link is a zip file download containing all 21 custom loading screens, you can pick and choose which to download or not.
Huge credit to greatcheesecakepersona for their clean UI loading screen layout, which I referenced for this.
Disclaimer: If the resolution of your game is less than 1920x1080, some of these loading screens might look a mess in your game, so just test it out, some could still work, though some not.
If I'm asked to take the download down I will gladly do so. I'm just here to share what I already use in my game.
#s2cc#ts2#ts2cc#ts2 download#sims2cc#download#the sims 2#thesims2#sims 2#dl: loading screens#sims 2 loading screens
57 notes
·
View notes
Note
Hey, I love your ts3 gameplay, but I'm curious, how do you do these windows with emotions and so on?

Hello!! Thank you so much 🥰🥰
With the moodlet / wish overlays, I actually created my own PSD template for them a while ago, which is up for download here - it's based on JustMiha's CleanUI design :)
I personally use photopea to edit my screenshots (it's a free very similar version of Photoshop), so all I do is open the template in there, and then edit the text to match the in-game moodlets & wishes my sims get!
(they're psd files though so you can also open them in other editing apps such as gimp if you prefer)
I heavily use this icon collection from MTS and these pages (moodlets / wishes) from the sims wiki to add the icons onto the moodlets
Once I'm done editing, I save the image as a png and then just place it onto my gameplay screenshots
I've also recently been using the Layer Style -> Dropshadow function and playing around with the settings of that to make them look a little nicer!
For the notifications, interactions, and any other in-game overlay type thing, I followed this tutorial by erasabledinosaur, but basically in summary, I screenshot the overlay when it pops up using reshade's screenshot function, and then bring the screenshot up into photopea
I then draw a box around the thing I want to select using the object selection tool and copy -> paste it onto my gameplay screenshot
Sometimes they require a little bit of erasing the background as well, it depends on how clear the background of the screenshot is, I also use the Layer Style -> Dropshadow function for these to make them look a bit nicer :)
I hope that's helpful!
Let me know if you have any more questions I'm happy to help 🫶
60 notes
·
View notes
Text
Question...what's happened here? 🤔
I am playing around with my game, replacing mods ect and I use CleanUI. Fairly certain I've got it still in my Downloads, and I have just merged my CC. Got the original folders to roll back if needed, but never had this before!
When I click on Sort by Room, they appear, same with Collections. edIT: I reloaded the lot and now it's working...huh.
3 notes
·
View notes
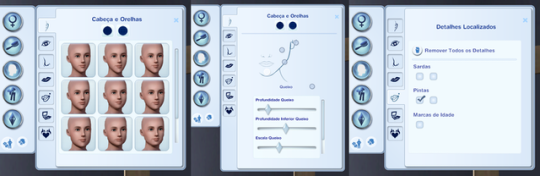
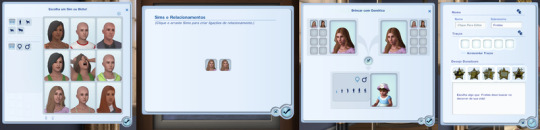
Text
My CAS REVAMP mod is officially available for everyone!! Update, modernize and make Create a Sim even more beautiful with this mod!: Cas Revamp - Thumbnails Naturais - BoringBones
193 notes
·
View notes
Text

Fashion Website Design – Bold, Clean & Trend-Driven UI 🖤✨
Just finished a sleek web design concept for a fashion brand that’s all about modern style and visual storytelling. This layout mixes minimal elegance with a smooth shopping flow — made to inspire confidence and conversions.
🖥️ Design Elements: • Full-screen hero section for featured collections • Grid-based product layout with subtle interactions • Lookbook-style gallery for styling inspo • Mobile-first responsive design • Neutral tones + bold accents for a fashion-forward feel
Built in Figma with attention to both beauty and usability. Perfect for streetwear, luxury lines, or boutique labels. 💅
🖤 Reblog if you're into clean fashion design. 📩 Open for collaborations & freelance projects!
#FashionWebsite #UIUX #WebDesign #MinimalDesign #Figma #Lookbook #OnlineStore #StyleInspo #TumblrDesign #CreativeWebDesign #FashionBranding #CleanUI #DesignerLife
0 notes
Text
Update about my cc's and some others news
Hello you guys, hope you're all doing well, sorry it's been quite a while since i didn't post cause i was quit busy with rl stuff.
About my cc's, i will soon post a cc that i did finish but sadly it will take a moment because my dumb self messed with my bodyshop folders trying to fix the resolution and it's broken now lmao.
Never install cleanui for bodyshop if you choose to not have all the packs like me....
About my console game review it's still in work as well , i'm just a huge procrastinater, one day i'm 100% in my project and the next day my brain is in the stars.
i'm playing ts2 and bustin out on gba both at the same time so things can go faster.
See ya very soon <3
1 note
·
View note
Text
Tutorial PSA: Creating Custom Loading Screens
Huge thanks to @adinc-sims for creating a template, which you can grab over here.
Apparently it’s very easy to create one of these. Here’s my very basic (and hopefully helpful) guide:
1) Download a custom loading screen. This will be your base.
2) Open up the file with SimPE.
3) Once the file is open, right click on it and choose export. Place it somewhere you’ll remember.

4) Open up A. D.’s template and go ham with your design. Once it is ready, SAVE as a .png. This is because the transparency is needed to show the tile screens loading. Otherwise it will just be flat white tiles.

5) Once you are happy with the results, go back to your open file in SimPE. Right click and choose replace.
You’ll notice that when you open the folder with your new image it does not show in SimPE. Make sure to select “all files” in the file type.
You’ll briefly get a pop-up from SimPE saying they need to refresh the file, so go ahead and say yes. Once that’s done your new image will load up in SimPE.
6) Save it as a new file entirely, and place it wherever you have your backgrounds (this will depend on whether you use @greatcheesecakepersona‘s amazing random screen generator or prefer to stick with one option).
7) Fire up your game and enjoy your monstrosity creation.

If you’re sharing your file please use this as tag #ts2:loadingscreen so we can find each other’s new screens and grab them! Unless someone can think of a shorter and easier hashtag to find custom screens?
30 notes
·
View notes
Text
Expect some updates & localization fixes for chromatica sims loading screen
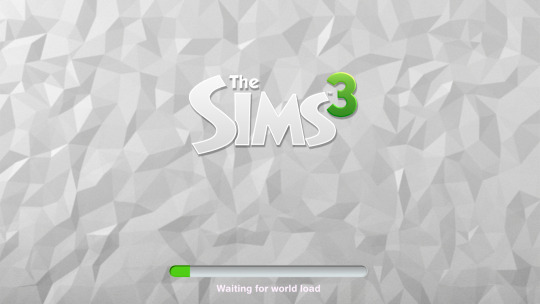

Within next post expect a discord server link for this project. Have fun simmers :D !!! EDIT: And now, while I’m still here, here’s the localization update of wonderful loading screen that chromatica sims made. Some languages did not have the updated logo. You will need both the original mod and my update, placed in Electronic Arts > The Sims 3 > Mods > Packages folder for this to work. Mod: https://modthesims.info/d/646181/the-sims-3-modern-loading-screen.html Update:https://drive.google.com/file/d/1pd1dOIH7dRvnubPY8rhwJFJX1I4xGImz/view?usp=sharing
64 notes
·
View notes
Text
Clean UI by GreatCheescakepersona

---------------------------------------------------------------------


Amazing! Love this new UI!!
#thesims2#thesims2ultimatecollection#cleanui#ts2cleanui#thesims2cleanui#greatcheesecakepersona#downloadsuggeriti
13 notes
·
View notes
Text
Find Out About Cleaning Services

The first and the essential thing that you need to know about commercial cleaning services is that they usually offer the necessary cleaning equipment and all the cleaning products required by their clients. This saves you money and time as a business owner. It is the best way to ensure that your business is kept in tip-top shape and that you can take care of it all by yourself.
If you are looking for commercial cleaning services for your home, make sure that the company you are dealing with offers various services. You need to know whether they can handle your cleaning as well as your cooking needs. If you have a restaurant or an office, you are probably not cleaning the rooms and the kitchen. The same applies to other areas like the garage and the back rooms. It is a good idea to find out if you can call in the cleaners at any time of the day if they do not come at night then they could be too busy to clean up after themselves, you may not be able to get a good night sleep, or the house might smell funny.
You will also want to find out what sort of cleaning the company will perform. Will they just come in to do the necessary cleaning of your home? Or will they be doing all the heavy cleaning in your house, such as upholstery cleaning? You can find out about what kind of cleaning service the company offers on its website.
The next thing you need to know is about the commercial cleaning services that are available for you. You will need to think about the company's size, how big the premises are, and how many people can safely fit inside a building. Some people find it difficult to fit so many people into a building. It will need to be based on your needs, so you need to think about the number of people visiting your premises.
Some commercial cleaners will be able to take care of all your cleaning needs. This means that they will clean your floors, walls, bathrooms, and even the kitchen. It is a good idea to determine what services they offer before you commit to one particular company. Ensure that the company has the experience and have enough knowledge about all areas that need cleaning.
When choosing commercial cleaners, you will need to consider whether they use a high-powered vacuum cleaner as this is something that you do not often see in your local area. Some of the best cleaners will use high powered vacuums as these are very effective in removing all sorts of dirt and grime from carpets and other surfaces.
Commercial cleaning services are essential if you have an office because you need to maintain your office's cleanliness. You will need to ensure that all the surfaces are free from dust and dirt. A good cleaning company can handle this job very effectively and ensure that your office remains professional.
There are many cleaning companies to choose from, and you can find out more information about them on the internet. You can also find a lot of information on the websites for the companies around your town and your local newspaper. Just by reading the small print on the websites, you will get some useful tips and information.
Once you have found the company you want to work with, it is time to choose which commercial cleaners to use. You will need to check out their experience and whether they have the right equipment for the job they have for you. If they are not able to handle specific cleaning jobs, you might have to look elsewhere.
Another consideration when you are looking for commercial cleaners is the price that they charge for their services. You will have to compare different companies and what they charge to ensure that you are getting value for money.
One last point to remember is to find out about their rates for cleaning after the first few weeks or months of the project. It is only after this that you can start to pay for them. You might find that they charge more in the beginning than they did when you started, but if you are using the company for a long time, it could make sense to pay the same amount over a more extended period. It is worth the cost in the long run.
0 notes